

Page 1

brighthouse.com/business
Hosted Voice
Quick Reference Guide
Page 2
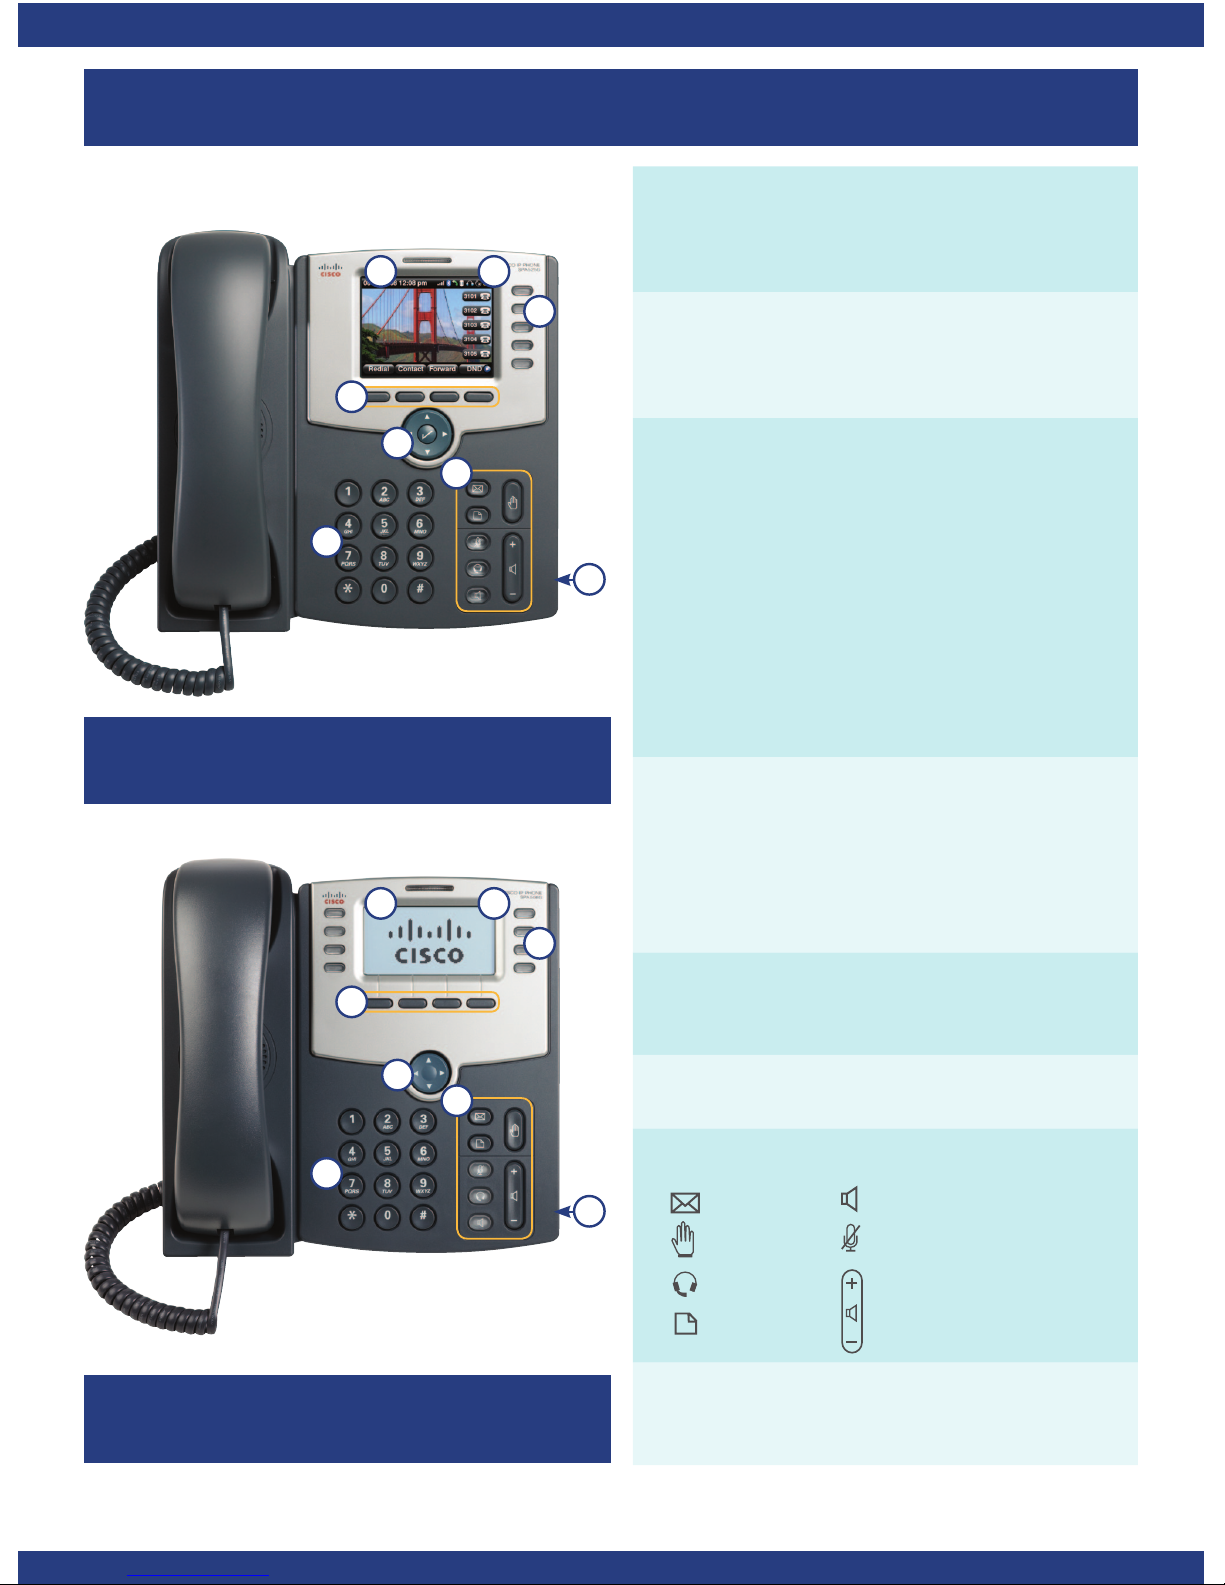
Your Desktop Device
1. Voice Mail Message Indicator
The light indicates Voice Mail Messages
(Solid) and Incoming Calls (Flashing)
2. LCD Screen
Provides useful information and access to
advanced features
3. Line Indicators
The programmable keys indicate phone line
status.
Green (Solid) – Line is idle
Red (Solid) – Line is active/in use
Red (Flashing) – Line is on hold
Orange (Solid) – Line is unregistered
(cannot be used)
Orange (Flashing) – Handset has a network
communication error
NOTE: The SPA502G does not utilize line
indicators.
4. Softkey Buttons
The keys perform the function displayed
directly above them on the LCD screen.
The functions are context-sensitive and
may change depending on the state of the
phone.
5. Navigation Keys
(Left, Right, Up, Down, Select)
6. Key Pad
7. Function Buttons:
Message Speaker Phone
Hold Mute
Headset
Volume
Menu
8. AUX port for Cisco SPA500DS
Attendant Console
2
2 1
1
3
3
5
5
6
6
8
Cisco SPA525G
Cisco SPA502G/SPA508G
8
You can manage many of these features and functions utilizing the Hosted Voice User Portal.
4
4
7
7
Page 3

Placing a Call
First, dial number. Then pick up handset.
For hands-free speakerphone – Dial number, then press
SPEAKER or press DIAL softkey.
Answer a Call
Pick up handset and press the ANSWER softkey or
press the SPEAKER button.
Dial a Number from Your Directories
Press SET UP. Select Call History.
Select Redial List, Answered Calls or Missed Calls.
Select the number and press DIAL.
The LCD screen shows missed calls. Press the LCR
softkey to dial the last missed call. Press the MISS softkey
to view a list of missed calls. Select a call and press DIAL.
Receiving a Call
Lift handset.
For hands-free speaker mode press SPEAKER or press
the ANSWER softkey.
Placing a Call on Hold
During a call, press the HOLD function button.
To retrieve the call, press the ashing red line button
for the call or the RESUME softkey.
Call Park/Call Park Retrieve
(NOTE: Call Park places a call on hold so that other users
assigned to Call Park service can retrieve that call.)
Press HOLD and then *68, or press PARK softkey. (The
PARK softkey does the same thing as HOLD and *68)
Enter the extension where the call will be parked, then #.
To retrieve parked call press *88 or the PICKUP softkey,
then the parked extension and #.
Transferring a Call
Announced Transfer
Press the XFER softkey to place active call on hold.
Dial the number where you want to transfer the call and
press DIAL.
Once the third party answers, announce the call and
press XFER.
Blind Transfer
Press the BXFER softkey to place active call on hold.
Press right arrow on Navigation key to view options.
Dial the number where you want to transfer the call and
press DIAL.
Transfer to Voicemail
Press the XFER softkey. Next enter *55 and dial the
party’s extension, then #.
Intercom
Pick up the receiver and press the INTERCOM softkey.
Make your announcement (this will broadcast to all
phones). Hang up when you are done.
To Mute a Call
Press MUTE to silence your phone’s mouthpiece/speaker.
To turn Mute off, press the line indicator that is blinking red.
Listening to Voice Mail
Press MESSAGES. Your phone will ring your Voice Portal.
Enter your passcode, then #. Follow voice prompts to
listen to/delete/save messages.
3-Way Conferencing
Place the rst call.
Press the CONF softkey to place the next call and dial
the number. The active call will be on hold.
After the second call answers, press the CONF softkey
again to join all parties in the conference.
All parties will be disconnected when you exit the call.
Forwarding Calls
Press the CFWD softkey.
Enter the number where you want your calls forwarded
and press DIAL.
CALLS FORWARDED will be displayed on LCD screen.
To turn off Call Forwarding, press CFWD.
Record Name
1. Press MESSAGE. Enter your PIN provided on your
“User List and Login Credentials.”
(NOTE: If you are trying to access a voice mail box other
than the phone you are dialing from, press *.)
2. Press #. Follow prompts to set a new PIN, then press #.
3. Follow prompts to verify the new PIN, then press #.
4. Follow prompts to record a name announcement,
then press #. At the tone, say the name of the
group or a brief two or three word description and
press #.
(NOTE: this is a name announcement and not one of the
two main voice mail greetings supplied with the service.)
5. You will be asked if you are satised with your name
recording. If yes, press *. If no, follow prompts to
re-record.
6. Press 1 to access your Voice Mail box.
Record Busy Greeting
A busy greeting plays when your phone is in Do Not
Disturb mode or unplugged.
1. Press 2. Then, press 1. Wait for the tone, and then
record your “busy greeting.”
2. Press # immediately after nishing.
3. Press 2 to listen to your greeting or press * to get
back to the previous menu.
Record No Answer Greeting
1. Press 3. Then, press 1. Wait for the tone, and then
record your “no answer greeting.”
2. Press # immediately after nishing.
3. Press 2 to listen to your greeting or press * to get
back to the previous menu.
Using the Cisco SPA 500 Series IP Phone
Voice Mail Set Up
Page 4

brighthouse.com/business
Visit brighthouse.com/HostedVoiceSupport
for training and support resources,
including a comprehensive look at the
features of your Hosted Voice service
Technical Support 1-877-824-6249
©2013 Bright Hous e Networks. Some restrictions apply. Serviceable areas only. Ser vice provided at the discretion of Bright House Networks.
The following tutorials are available online:
• Cisco IP Phone – Tutorials, Quick Start & Reference Guides
• Customer User Portal – Tutorial
• Receptionist Console – Tutorial
• Feature Pack – User Guides
 Loading...