

Page 1

Cisco Cius User Guide, Release 9.2(3)
First Published: March 15, 2012
Americas Headquarters
Cisco Systems, Inc.
170 West Tasman Drive
San Jose, CA 95134-1706
USA
http://www.cisco.com
Tel: 408 526-4000
800 553-NETS (6387)
Fax: 408 527-0883
Text Part Number: OL-26946-01
Page 2

THE SPECIFICATIONS AND INFORMATION REGARDING THE PRODUCTS IN THIS MANUAL ARE SUBJECT TO CHANGE WITHOUT NOTICE. ALL STATEMENTS,
INFORMATION, AND RECOMMENDATIONS IN THIS MANUAL ARE BELIEVED TO BE ACCURATE BUT ARE PRESENTED WITHOUT WARRANTY OF ANY KIND,
EXPRESS OR IMPLIED. USERS MUST TAKE FULL RESPONSIBILITY FOR THEIR APPLICATION OF ANY PRODUCTS.
THE SOFTWARE LICENSE AND LIMITED WARRANTY FOR THE ACCOMPANYING PRODUCT ARE SET FORTH IN THE INFORMATION PACKET THAT SHIPPED WITH
THE PRODUCT AND ARE INCORPORATED HEREIN BY THIS REFERENCE. IF YOU ARE UNABLE TO LOCATE THE SOFTWARE LICENSE OR LIMITED WARRANTY,
CONTACT YOUR CISCO REPRESENTATIVE FOR A COPY.
The following information is for FCC compliance of Class A devices: This equipment has been tested and found to comply with the limits for a Class A digital device, pursuant to part 15
of the FCC rules. These limits are designed to provide reasonable protection against harmful interference when the equipment is operated in a commercial environment. This equipment
generates, uses, and can radiate radio-frequency energy and, if not installed and used in accordance with the instruction manual, may cause harmful interference to radio communications.
Operation of this equipment in a residential area is likely to cause harmful interference, in which case users will be required to correct the interference at their own expense.
The following information is for FCC compliance of Class B devices: This equipment has been tested and found to comply with the limits for a Class B digital device, pursuant to part 15
of the FCC rules. These limits are designed to provide reasonable protection against harmful interference in a residential installation. This equipment generates, uses and can radiate radio
frequency energy and, if not installed and used in accordance with the instructions, may cause harmful interference to radio communications. However, there is no guarantee that interference
will not occur in a particular installation. If the equipment causes interference to radio or television reception, which can be determined by turning the equipment off and on, users are
encouraged to try to correct the interference by using one or more of the following measures:
Reorient or relocate the receiving antenna.
•
Increase the separation between the equipment and receiver.
•
Connect the equipment into an outlet on a circuit different from that to which the receiver is connected.
•
Consult the dealer or an experienced radio/TV technician for help.
•
Modifications to this product not authorized by Cisco could void the FCC approval and negate your authority to operate the product
The Cisco implementation of TCP header compression is an adaptation of a program developed by the University of California, Berkeley (UCB) as part of UCB’s public domain version
of the UNIX operating system. All rights reserved. Copyright©1981, Regents of the University of California.
NOTWITHSTANDING ANY OTHER WARRANTY HEREIN, ALL DOCUMENT FILES AND SOFTWARE OF THESE SUPPLIERS ARE PROVIDED "AS IS" WITH ALL FAULTS.
CISCO AND THE ABOVE-NAMED SUPPLIERS DISCLAIM ALL WARRANTIES, EXPRESSED OR IMPLIED, INCLUDING, WITHOUT LIMITATION, THOSE OF
MERCHANTABILITY, FITNESS FOR A PARTICULAR PURPOSE AND NONINFRINGEMENT OR ARISING FROM A COURSE OF DEALING, USAGE, OR TRADE PRACTICE.
IN NO EVENT SHALL CISCO OR ITS SUPPLIERS BE LIABLE FOR ANY INDIRECT, SPECIAL, CONSEQUENTIAL, OR INCIDENTAL DAMAGES, INCLUDING, WITHOUT
LIMITATION, LOST PROFITS OR LOSS OR DAMAGE TO DATA ARISING OUT OF THE USE OR INABILITY TO USE THIS MANUAL, EVEN IF CISCO OR ITS SUPPLIERS
HAVE BEEN ADVISED OF THE POSSIBILITY OF SUCH DAMAGES.
Cisco and the Cisco logo are trademarks or registered trademarks of Cisco and/or its affiliates in the U.S. and other countries. To view a list of Cisco trademarks, go to this URL: http://
www.cisco.com/go/trademarks. Third-party trademarks mentioned are the property of their respective owners. The use of the word partner does not imply a partnership
relationship between Cisco and any other company. (1110R)
Any Internet Protocol (IP) addresses used in this document are not intended to be actual addresses. Any examples, command display output, and figures included in the document are shown
for illustrative purposes only. Any use of actual IP addresses in illustrative content is unintentional and coincidental.
©
2012 Cisco Systems, Inc. All rights reserved.
Page 3

CONTENTS
CHAPTER 1
CHAPTER 2
Preface 1
Guide Organization 1
Related Documentation 1
Additional Information 2
Obtaining Documentation and Submitting a Service Request 2
Overview 3
Hardware 3
Power Button 7
Turn Cisco Cius On 7
Turn Cisco Cius Off 7
Turn On Silent Mode 8
Turn Off Silent Mode 8
Airplane Mode 8
Turn On Airplane Mode 8
Turn Off Airplane Mode 8
Turn Off the Screen 9
Home Key 9
View the Home Screen 9
Multitasking 9
Menu Key 9
View a Menu 9
Back Key 9
Go to the Previous Page or Application 9
Battery 9
Insert the Battery 10
Charge the Battery 10
Remove the Battery 10
Cisco Cius User Guide, Release 9.2(3)
OL-26946-01 iii
Page 4

Contents
SIM Card 10
Insert a SIM Card 10
SIM Card Activation 11
Camera LED 11
Features 11
Lock Screen 11
Unlock the Screen 12
Add a PIN 12
Add a Password 13
Reset a Lost PIN or Password 13
Place an Emergency Call from the Unlock Screen 13
Set Screen Timeout 13
Setup Assistant 14
Run the Setup Assistant 14
Home Screen 14
Notification Bar 15
Data Connection Icon 15
Quick Launch Bar 16
Applications Menu 16
Phone Application 16
Add to Cius Home Screen 16
Search 16
Customize the Home Screen 17
Add an Application to the Home Screen 17
Add a Widget to the Home Screen 17
Add a Folder to the Home Screen 17
Move a Widget or an Icon 18
Remove a Widget or an Icon from the Home Screen 18
Change Your Wallpaper 18
Work Spaces 18
Navigate Between Work Spaces 18
On-Screen Keyboard 19
Switch Keyboard Modes 19
CHAPTER 3
Cisco Cius User Guide, Release 9.2(3)
iv OL-26946-01
Quick Reference 21
Page 5

Contents
CHAPTER 4
Applications 23
Wireless & Networks 24
Connect to a Wireless Network 24
Connect to a Hidden Wireless Network 24
Edit a Wireless Network 25
Delete a Wireless Network 25
Wireless Network Security Certificates 25
Install a Certificate 26
Connect to a Wireless Network with an EAP-TLS Certificate 26
Connect to a Wireless Network with a PEAP Certificate 27
Web Proxy 27
Add a Web Proxy 27
Edit a Web Proxy 28
Delete a Web Proxy 28
TFTP 28
Connect to a TFTP Server 29
AnyConnect VPN 29
AutoNetDetect 29
Password Persistence 29
Enable VPN 30
Add a VPN Connection Profile 30
Edit a VPN Connection Profile 30
Connect to a VPN 31
Disconnect from a VPN 31
Delete a VPN Connection Profile 32
VPN Transitioning 32
Mobile Network 32
Enable Data Access 33
Enable Data Roaming 33
View Access Point Names 33
Use Only 2G Networks 34
Select a Network Operator 34
AT&T Communication Manager 34
AT&T Communication Manager Widget 34
Cisco Cius User Guide, Release 9.2(3)
OL-26946-01 v
Page 6

Contents
Phone 35
Your Phone Number 35
Place a Call 36
Place an Emergency Call from the Unlock Screen 36
Incoming Calls 36
Answer a Call 37
Ignore a Call 37
Divert a Call 38
Call Control Bar 38
View More Call Control Bar Options 38
End a Call 38
Video Calls 38
View a Video Call in Full Screen Mode 38
Video Call Control Bar 39
Mute Your Video Transmission 39
Automatic Video Transmission 39
Stop Automatically Transmitting Video 40
Adjust Video Call Settings 40
Turn Off Video Calls 40
Self-View 40
Show Self-View 41
Barge 41
Call Forward All 41
Forward Your Calls 42
Stop Forwarding Your Calls 42
Conference 42
Add Another Party to Your Call to Create a Conference 42
Swap Between Active Calls from the Conference Dialog Box 43
View Conference Participants 43
Contacts 43
View Call Details 43
Display the Keypad 43
Do Not Disturb 44
Turn DND On and Off 44
Favorites 44
Cisco Cius User Guide, Release 9.2(3)
vi OL-26946-01
Page 7

Contents
HD Media Station 44
Call History 44
Hold 45
Put a Call on Hold 45
Put a Call on Hold by Answering a New Call 45
Line Status 45
Message Indicator 46
Missed Calls 46
Mobile Connect 46
Mute 47
Mute Your Phone 47
On-hook Dialing 47
Plus Dialing 47
Dialing an International Number 47
Privacy 47
Recent Call List 48
Set Your Ringtone 48
Secure and Nonsecure Indication Tone 48
Shared Lines 49
Speed Dial 49
Transfer 49
Transfer a Call to Another Number 50
Swap Between Active Calls from the Transfer Dialog Box 50
Visual Voicemail 50
Set Up Visual Voicemail 50
Sign In to Visual Voicemail 51
Listen to a Voice Message 51
View Voice Message Details 51
Reply to a Voice Message 52
Forward a Voice Message 52
Delete a Voice Message 52
Call Waiting 52
Cisco Unified CM User Options 52
Sign In and Out of User Options Web Pages 53
Device 53
Cisco Cius User Guide, Release 9.2(3)
OL-26946-01 vii
Page 8

Contents
Select a Device From the User Options Web Pages 53
Customize Do Not Disturb Options 54
Line Settings 54
Set Up Call Forwarding for a Line 54
Change the Audible Voice Message Indicator Setting for a Line 55
Speed Dial on the Web 55
Set Up Speed-Dial Buttons 55
User Settings 55
Change Your Browser Password 56
Change Your PIN 56
Change the Language for Your User Options Web Pages 56
Directory 56
Mobility Settings 56
Add a New Remote Destination 57
Create an Access List 58
Contacts 58
Contact Details 59
Add a Contact 59
Edit a Contact 60
Remove a Contact 60
Mark a Contact as a Favorite 60
Add a Group 61
Delete a Group 61
Add a Contact to a Group 61
Contact Icons 61
Call a Contact 62
View Contact Details 62
Send an Email Message 62
Start a Conversation 62
Start a WebEx Meeting 63
Search 63
Search Your Contacts 63
Import Contacts 64
Export Contacts 64
Availability 64
Cisco Cius User Guide, Release 9.2(3)
viii OL-26946-01
Page 9

Contents
Email 64
Settings 64
Add an Email Account 65
Inbox 65
Refresh Your Inbox 66
Sort Mailbox 66
Navigate Between Email Messages 66
Search Your Email Messages 66
Send an Email Message 67
Save an Email Message Draft 67
Reply to an Email Message 68
Forward an Email Message 68
Add an Attachment to an Email Message 68
Add a CC or BCC Recipient 68
Delete an Email Message 69
Delete Multiple Email Messages 69
Delete a Folder 69
Move an Email Message 69
Mark an Email Message as a Favorite 69
Mark Multiple Email Messages as Favorites 70
Mark an Email Message as a New Message 70
Mark Multiple Email Messages as New Messages 70
Add a Signature to Your Email Messages 70
Quick Contact Badge 71
Digitally Signed Email Messages 71
Set Your Email Check Frequency 71
Reset Your Email Password 71
Select Your Ringtone 72
Edit Your Vibrate Settings 72
Chat 72
Set Up an Account 72
Add a Chat Account 73
Signing In 73
Contacts 73
Add a Chat Contact 74
Cisco Cius User Guide, Release 9.2(3)
OL-26946-01 ix
Page 10

Contents
Remove a Chat Contact 74
Show Offline Contacts 74
View Chat Contact Details 74
Start a Conversation with a Chat Contact 74
Call a Chat Contact 75
Start a WebEx Meeting with a Chat Contact 75
Send an Email Message to a Chat Contact 75
Unsynced Contacts 75
Add an Unsynced Contact to Your Chat Contacts 76
Start a Conversation with an Unsynced Contact 76
Call an Unsynced Contact 76
Start a WebEx Meeting with an Unsynced Contact 76
Send an Email Message to an Unsynced Contact 76
Contact Requests 77
View Your Contact Requests 77
Conversations 77
Start a Conversation 78
End a Conversation 78
Availability 78
Add a Custom Status 78
Delete a Custom Status 79
Emoticons 79
Insert an Emoticon into a Conversation 79
Links 79
Open a URL 79
Email Address 79
Phone Number 79
WebEx 79
Search 80
Add a Search Result to Your Chat Contacts 80
Start a Conversation with a Search Result 80
Settings 80
Set Your Profile Picture 80
Remove a Profile Picture 81
Enable Status Bar Notifications 81
Cisco Cius User Guide, Release 9.2(3)
x OL-26946-01
Page 11

Contents
Enable Audio Notifications 81
Enable In-Chat Audio Notifications 81
Set Your Ringtone 82
Sign Out of Chat 82
Calendar 82
Set Up an Account 83
Add a Calendar Account 84
Add a Calendar Event 84
Edit an Event 85
Delete an Event 85
Start a Scheduled WebEx Meeting 85
Join a Scheduled WebEx Meeting 85
Settings 85
Hide Declined Events 86
Set Alerts and Notifications 86
Select Your Ringtone 86
Edit Your Vibrate Settings 86
Set Your Default Reminder Time 87
Calendar Widget 87
Unified Inbox 87
Contacts View 87
View Communications with a Contact 87
Search the Contact List 88
View an Email Message 88
View a Visual Voice Message 88
Play a Visual Voice Message 88
Reply to a Visual Voice Message 88
View Event Details 88
Join a WebEx Meeting 89
Reorder the Panels 89
Refresh Application Data 89
Events View 89
View Event Details 89
View an Email Message 90
Reorder the Panels 90
Cisco Cius User Guide, Release 9.2(3)
OL-26946-01 xi
Page 12

Contents
Refresh Application Data 90
View Communications with a Contact 90
Search the Contact List 90
Contact Icons 91
Start a Conversation 91
Call a Contact 91
Start a WebEx Meeting 91
Send an Email Message 91
Unified Inbox Widget 92
Cisco WebEx Meetings 92
Start an Instant WebEx Meeting 92
Schedule a New WebEx Meeting 92
Start a Scheduled WebEx Meeting 93
Join a Scheduled WebEx Meeting 93
Join a WebEx Meeting by Meeting Number 93
Start an Unscheduled WebEx Meeting 94
Invite More Participants to a WebEx Meeting 94
Invite More Participants During a WebEx Meeting 94
Invite Participants on a Phone Call into a WebEx Meeting 95
Invite Participants in a Chat into a WebEx Meeting 95
Cisco WebEx Meetings Widget 95
Google Search 95
Search the Internet 96
Search for Applications 96
Search Your Contacts 96
Add More Search Options 97
Search Widget 97
Browser 97
View a Website 97
Open a New Window 98
View Open Windows 98
View Your Bookmarks 98
Bookmark a Website 98
Open a Bookmark 99
Open a Bookmark in a New Window 99
Cisco Cius User Guide, Release 9.2(3)
xii OL-26946-01
Page 13

Contents
Edit a Bookmark 99
Delete a Bookmark 100
Add a Shortcut to the Home Screen 100
Share a Link 100
Copy a Link URL 101
Set a Link as Your Homepage 101
View Your Most Visited Websites 101
View Your Browser History 102
Refresh a Page 102
Search a Page 102
View Download History 103
Edit Browser Settings 103
Quickoffice 103
Open a Word Document 103
Open a Spreadsheet 104
Open a Presentation 104
Open a PDF Document 104
Save a File 104
Camera 105
Switch Between Picture and Video 105
Switch Cameras 105
Pictures 105
Take a Picture 105
Adjust the Picture Size 105
Change the Exposure 106
Change Color Effects 106
Restore Default Camera Settings 106
Enable Location Data 106
Disable Location Data 107
Videos 107
Record a Video 107
Change the Exposure 107
Change Color Effects 107
Restore Default Camera Settings 108
Adjust the Video Quality 108
Cisco Cius User Guide, Release 9.2(3)
OL-26946-01 xiii
Page 14

Contents
Gallery 108
Albums 109
View an Album 109
Switch Album Views 109
Select All Items in an Album 109
Pictures 109
View a Picture 109
View a Slideshow 109
Share a Picture 110
Delete a Picture 110
Rotate a Picture 110
Set a Picture as Wallpaper 111
Set a Picture as a Contact Icon 111
Crop a Picture 111
View Picture Details 112
Picture Frame Widget 112
Videos 112
View a Video 112
Delete a Video 112
Share a Video 113
View Video Details 113
Music 113
Songs 114
Play a Song 114
Delete a Song 115
Use a Song as a Ringtone 115
Playlists 115
Add a Song to a Playlist 115
Remove a Song from a Playlist 115
Play a Playlist 116
Rename a Playlist 116
Delete a Playlist 116
Edit the Recently Added Playlist 116
Music Widget 116
Clock 117
Cisco Cius User Guide, Release 9.2(3)
xiv OL-26946-01
Page 15

Contents
Set an Alarm 117
Edit an Alarm 117
Delete an Alarm 117
View a Slideshow 118
Open the Music Player Application 118
Analog Clock Widget 118
Sound Recorder 118
Record 118
Play Back a Recording 118
Desktop Virtualization 118
Google Mobile Services 119
Add a Google Account 120
Gmail 120
Google Search 120
Latitude 120
Maps 120
Market 120
Navigation 121
News & Weather 121
Places 121
Talk 121
YouTube 121
More Applications 121
Cisco AppHQ 121
Sign In 121
View Featured Applications 122
View a Category 122
Search Applications 122
View Application Downloads 122
View Application Details 123
Download an Application 123
Remove an Application 123
Exit 123
Android Market 124
Market Widget 124
Cisco Cius User Guide, Release 9.2(3)
OL-26946-01 xv
Page 16

Contents
UCM App 124
Remove an Application 124
CHAPTER 5
Accessories 125
HD Media Station 125
Connect Cisco Cius to an HD Media Station 127
Power Cisco Cius Through Power Port 128
Power Cisco Cius Through PoE+ 128
Wired Network Connection 128
Connect Cisco Cius to a Wired Network 128
Share a Wired Network Connection with a Computer 128
Launch the Phone Application 129
Answer a Call 129
Docking and Undocking During a Call 129
Start a Speakerphone Call 129
Switch to a Speakerphone Call 129
End a Speakerphone Call 129
Adjust the Ringer Volume 129
Updating Media Station Firmware 130
USB Accessories 130
USB Keyboard and Mouse 130
Cisco Cius Key Shortcuts 130
Typing Shortcuts 130
Browser Shortcuts 131
Gmail Shortcuts 131
Mouse Actions 131
VDI Shortcuts 132
Keyboard Shortcuts 132
Mouse Shortcuts 132
USB Memory Stick 132
USB-Powered Hub 132
USB Console Cable 132
Micro-USB Port 133
Turn On USB Storage 133
Turn Off USB Storage 133
Cisco Cius User Guide, Release 9.2(3)
xvi OL-26946-01
Page 17

Contents
MicroSD Card Slot 133
Mount a MicroSD Card 134
Format a MicroSD Card 134
Connecting to a Monitor 134
Edit HDMI Settings 135
Virtual Desktop Infrastructure 135
Bluetooth 135
Enable Bluetooth 136
Edit Bluetooth Settings 136
Scan for Bluetooth Devices 136
Pair a Bluetooth Device 136
Unpair a Bluetooth Device 137
CHAPTER 6
Make the Cius Discoverable 137
Set Your Bluetooth Device Name 137
Sharing Files 137
Disconnect a Bluetooth Device 138
Disconnect and Unpair a Bluetooth Device 138
3.5 mm Headsets 138
Product Safety Security Accessibility and Related Information 139
Safety and Performance Information 139
Power Outage 139
Emergency Response Notification 139
Emergency Response Notification for Phone Application 140
Emergency Response Notification for VPN Networks 140
External Devices 140
Headset Safety 141
Bluetooth Wireless Headset Performance 141
FCC Compliance Statements 141
FCC Part 15.21 Statement 141
FCC Receivers and Class B Digital Statement 141
CE Marking 142
Cryptographic Information 142
Data Backup 143
Accessibility Features 143
Cisco Cius User Guide, Release 9.2(3)
OL-26946-01 xvii
Page 18

Contents
Accessibility Settings 143
Install the Screen Reader 143
Enable Haptic Feedback 144
Screen Brightness 144
Text-to-Speech 144
Zoom In or Out 145
Zoom In 145
Zoom Out 145
Additional Information 145
CHAPTER 7
CHAPTER 8
FAQs and Troubleshooting 147
Frequently Asked Questions 147
Troubleshooting Tips 148
The phone is not registered 148
The chat application will not sign in 149
The Presence service is unavailable 149
Meetings do not appear in the WebEx application 149
Cannot connect to a wireless network 149
Warranty 151
Cisco 90-Day Limited Hardware Warranty Terms 151
Cisco Cius User Guide, Release 9.2(3)
xviii OL-26946-01
Page 19

Preface
This guide describes the Cisco Cius and how to use it. The guide is written for system administrators and
users.
• Guide Organization, page 1
• Related Documentation, page 1
• Additional Information, page 2
• Obtaining Documentation and Submitting a Service Request, page 2
Guide Organization
This guide is organized into these topics:
• Hardware, on page 3
CHAPTER 1
• Quick Reference, on page 21
• Gallery, on page 108
• HD Media Station, on page 125
• Product Safety Security Accessibility and Related Information, on page 139
• FAQs and Troubleshooting, on page 147
• Warranty, on page 151
Related Documentation
See these documents for additional information about Cisco Cius:
•
Cisco Cius Administration Guide
•
Cisco Cius Quick Start
•
Regulatory Compliance and Safety Information for Cisco Cius
Cisco Cius User Guide, Release 9.2(3)
OL-26946-01 1
Page 20

Additional Information
•
Cisco Cius Release Notes
•
Cisco Cius Wireless LAN Deployment Guide
Additional Information
You can access the Cisco website at this URL:
http://www.cisco.com
Cisco Cius Quick Start, Administration, Deployment, and User Guides:
http://www.cisco.com/en/US/products/ps11156/tsd_products_support_series_home.html
Licensing information:
http://www.cisco.com/en/US/docs/general/warranty/English/EU1KEN_.html
Cisco international websites:
Access international Cisco websites from www.cisco.com by clicking the Worldwide link at the top of the
web page.
Preface
Obtaining Documentation and Submitting a Service Request
For information about obtaining documentation, submitting a service request, and gathering additional
information, see the monthly What’s New in Cisco Product Documentation, which also lists all new and
revised Cisco technical documentation, at this URL:
http://www.cisco.com/en/US/docs/general/whatsnew/whatsnew.html
Subscribe to the What’s New in Cisco Product Documentation as a Really Simple Syndication (RSS) feed
and set content to be delivered directly to your desktop using a reader application. The RSS feeds are a free
service and Cisco currently supports RSS Version 2.0.
Cisco Cius User Guide, Release 9.2(3)
2 OL-26946-01
Page 21
Overview
This chapter outlines the features of Cisco Cius.
The following illustration shows the Cisco Cius.
Figure 1: Cisco Cius
CHAPTER 2
The chapter covers these topics:
• Hardware, page 3
• Features, page 11
Hardware
This section provides an overview of Cisco Cius hardware.
Cisco Cius User Guide, Release 9.2(3)
OL-26946-01 3
Page 22
Hardware
Overview
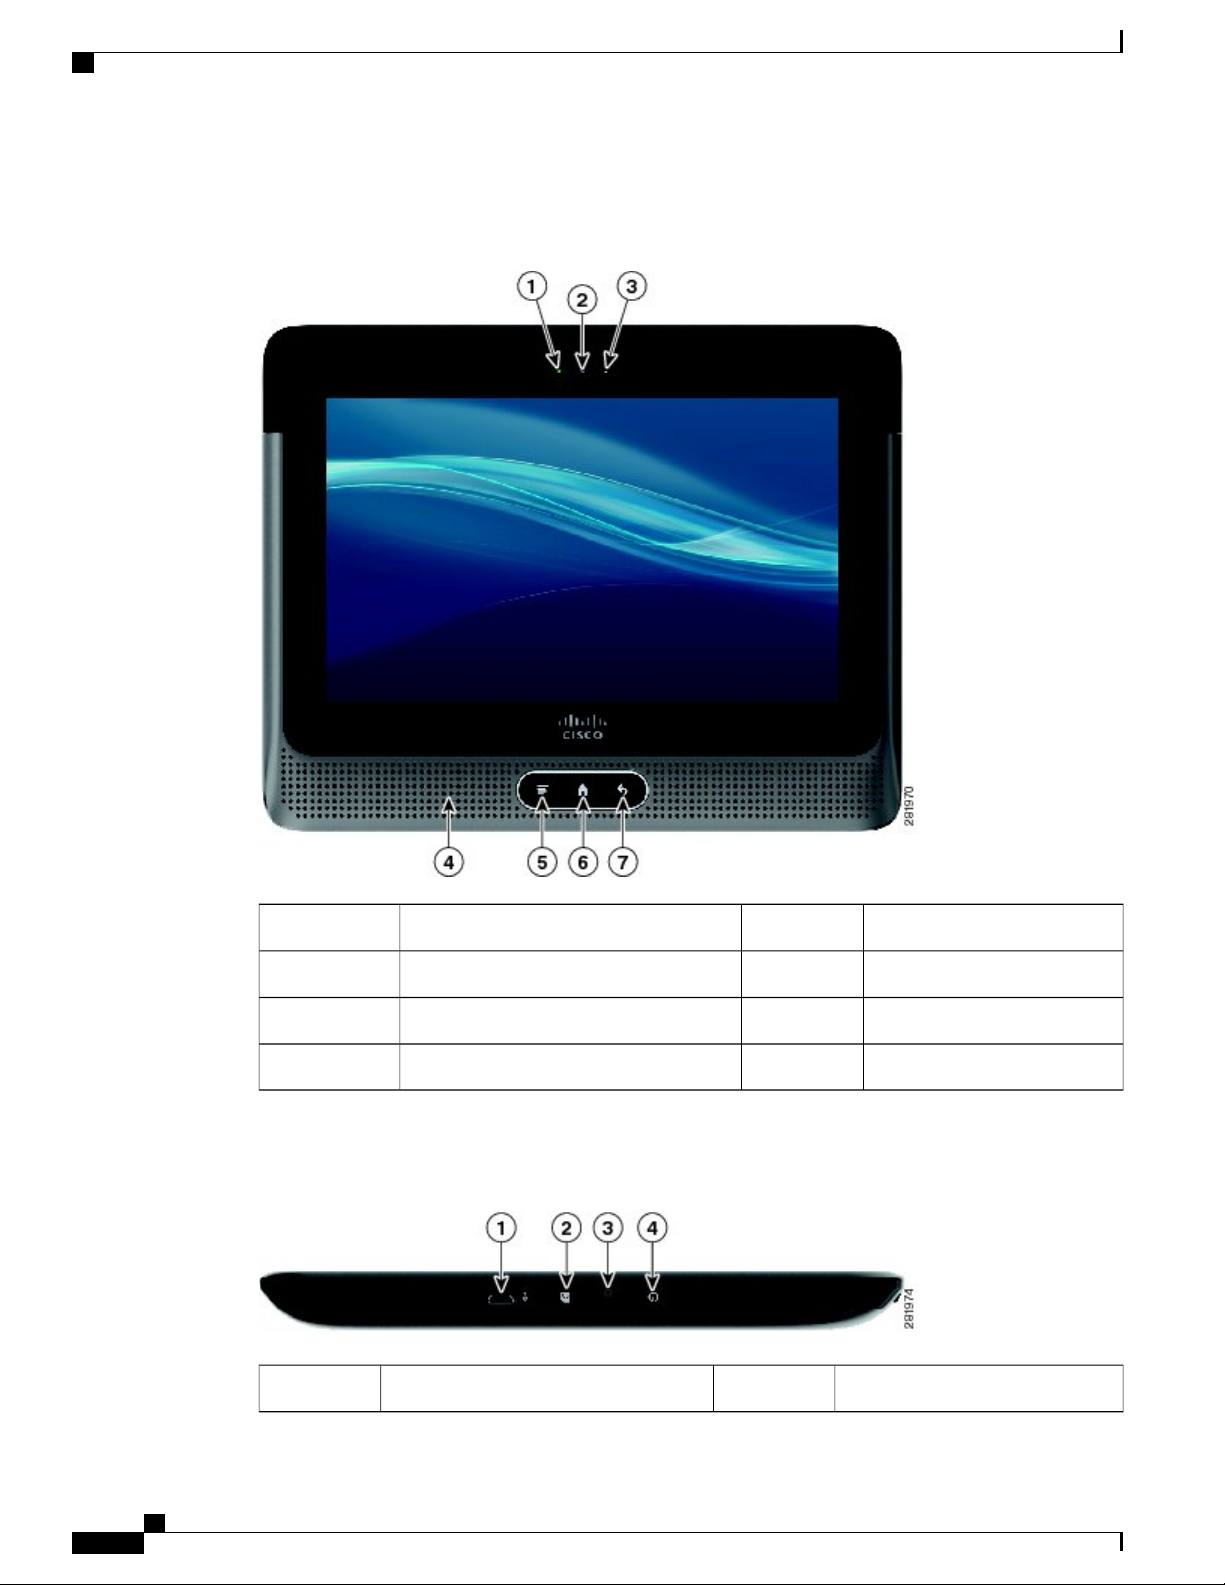
The following image shows the front view of Cisco Cius.
Figure 2: Cisco Cius Front View
Speaker4
The following image shows the top view of Cisco Cius.
Figure 3: Cisco Cius Top View
Menu key5Camera LED1
Home key6Front-facing camera2
Back key7Light sensor3
Microphone3Micro-USB port1
Cisco Cius User Guide, Release 9.2(3)
4 OL-26946-01
Page 23
Overview
Hardware
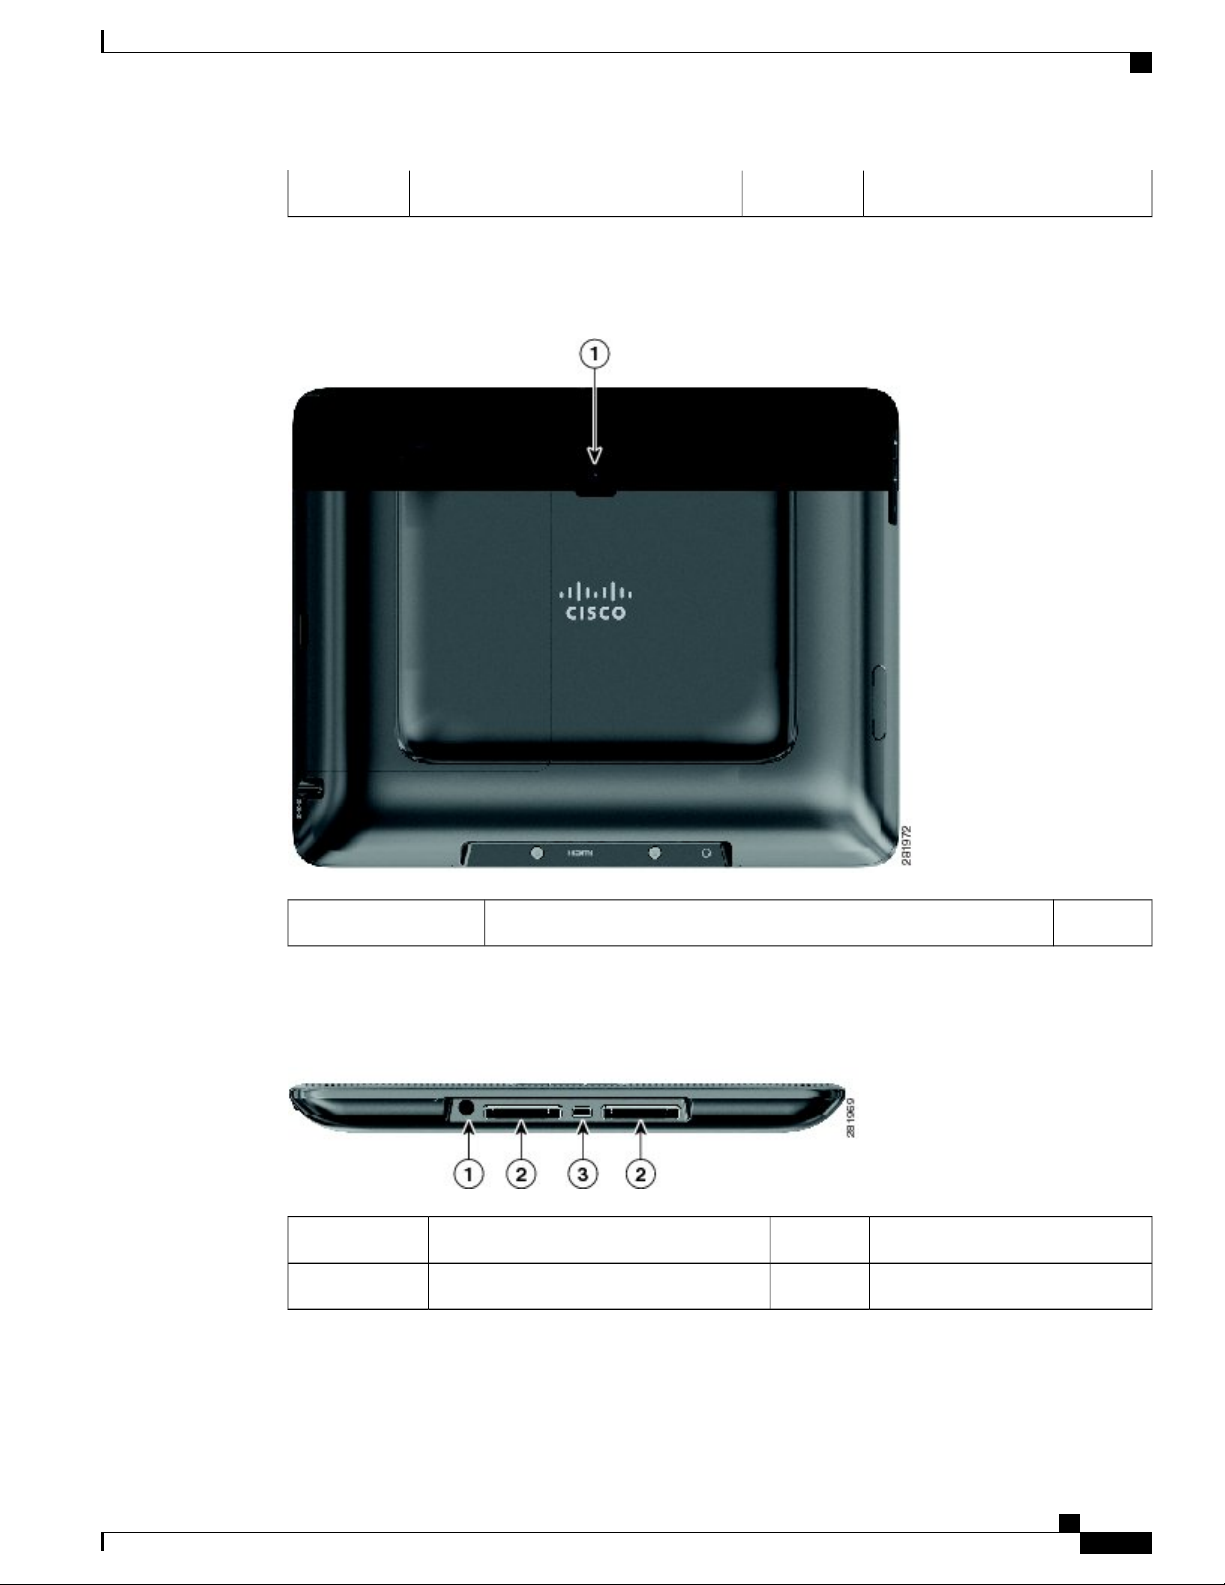
Power button4MicroSD card slot2
The following image shows the back view of Cisco Cius.
Figure 4: Cisco Cius Back View
Rear-facing camera1
The following image shows the bottom view of Cisco Cius.
Figure 5: Cisco Cius Bottom View
Docking ports2
Micro-HDMI port3Headset port1
Cisco Cius User Guide, Release 9.2(3)
OL-26946-01 5
Page 24
Hardware
Overview
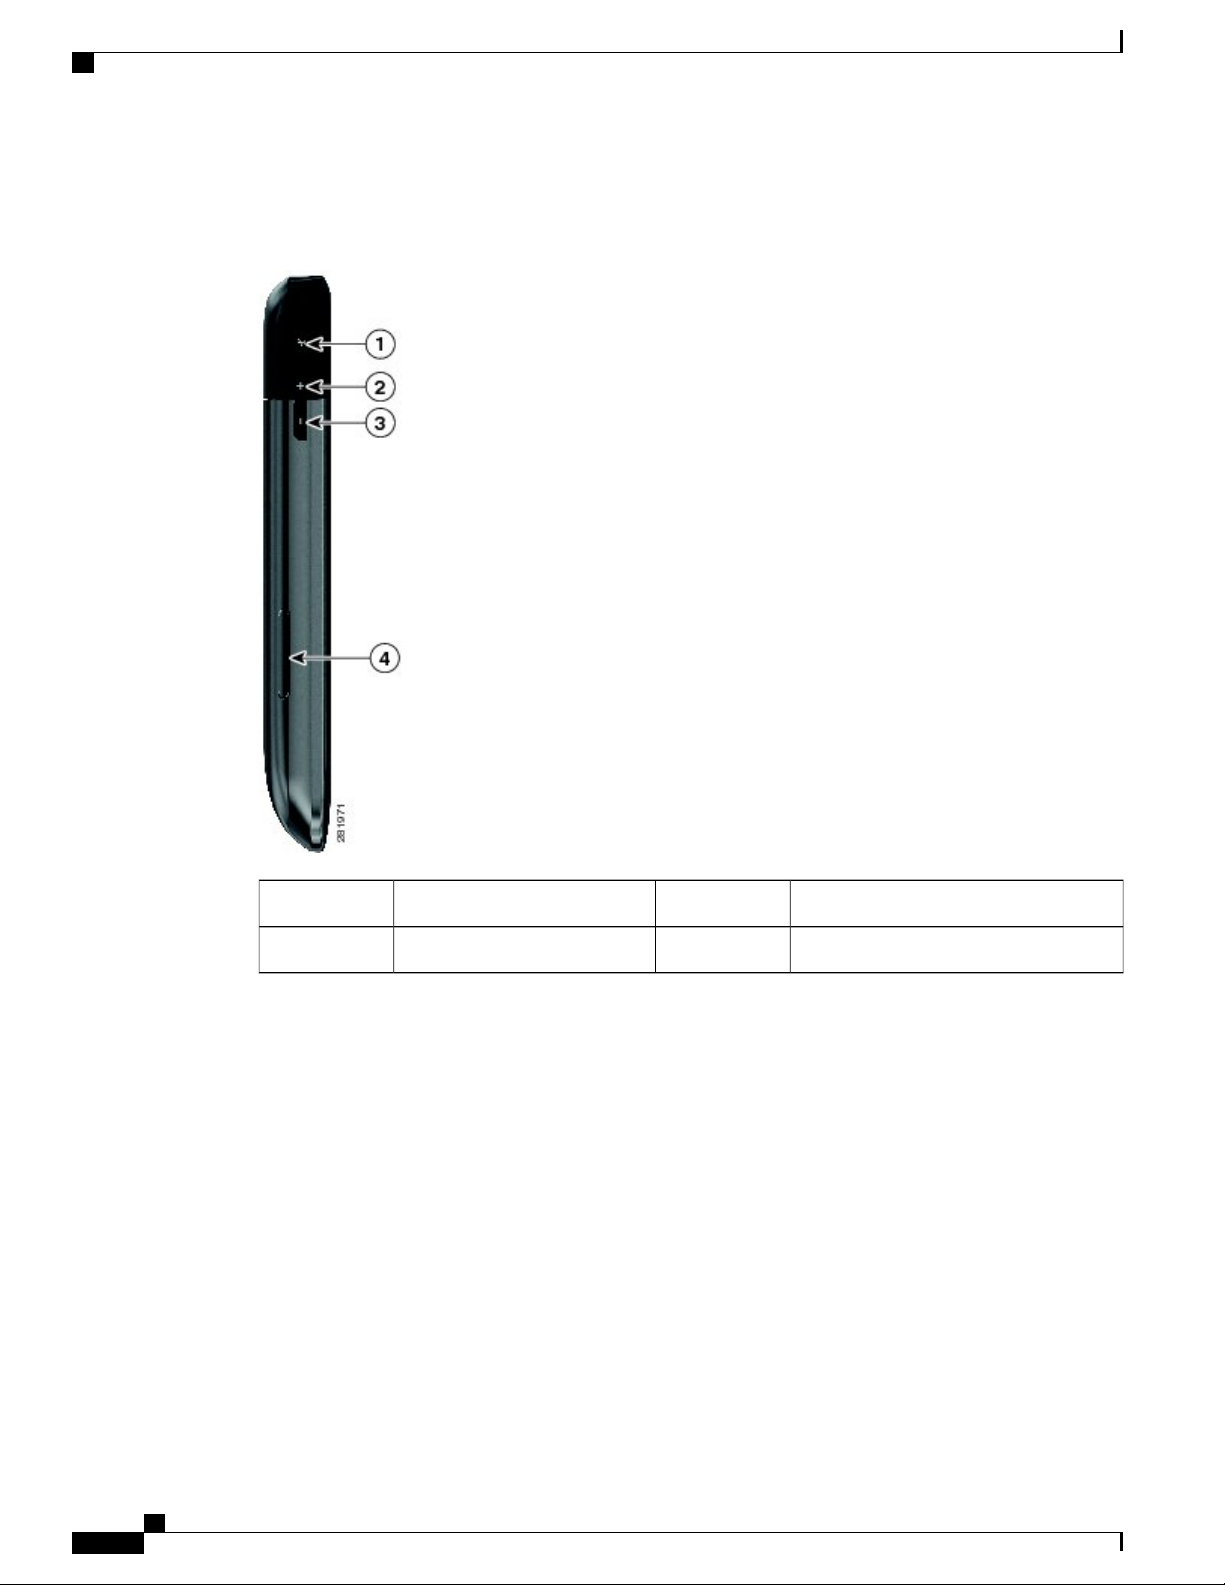
The following image shows the left side of Cisco Cius.
Figure 6: Cisco Cius Left Side
Volume down3Mute1
SIM card tray4Volume up2
Cisco Cius User Guide, Release 9.2(3)
6 OL-26946-01
Page 25
Overview
Power Button
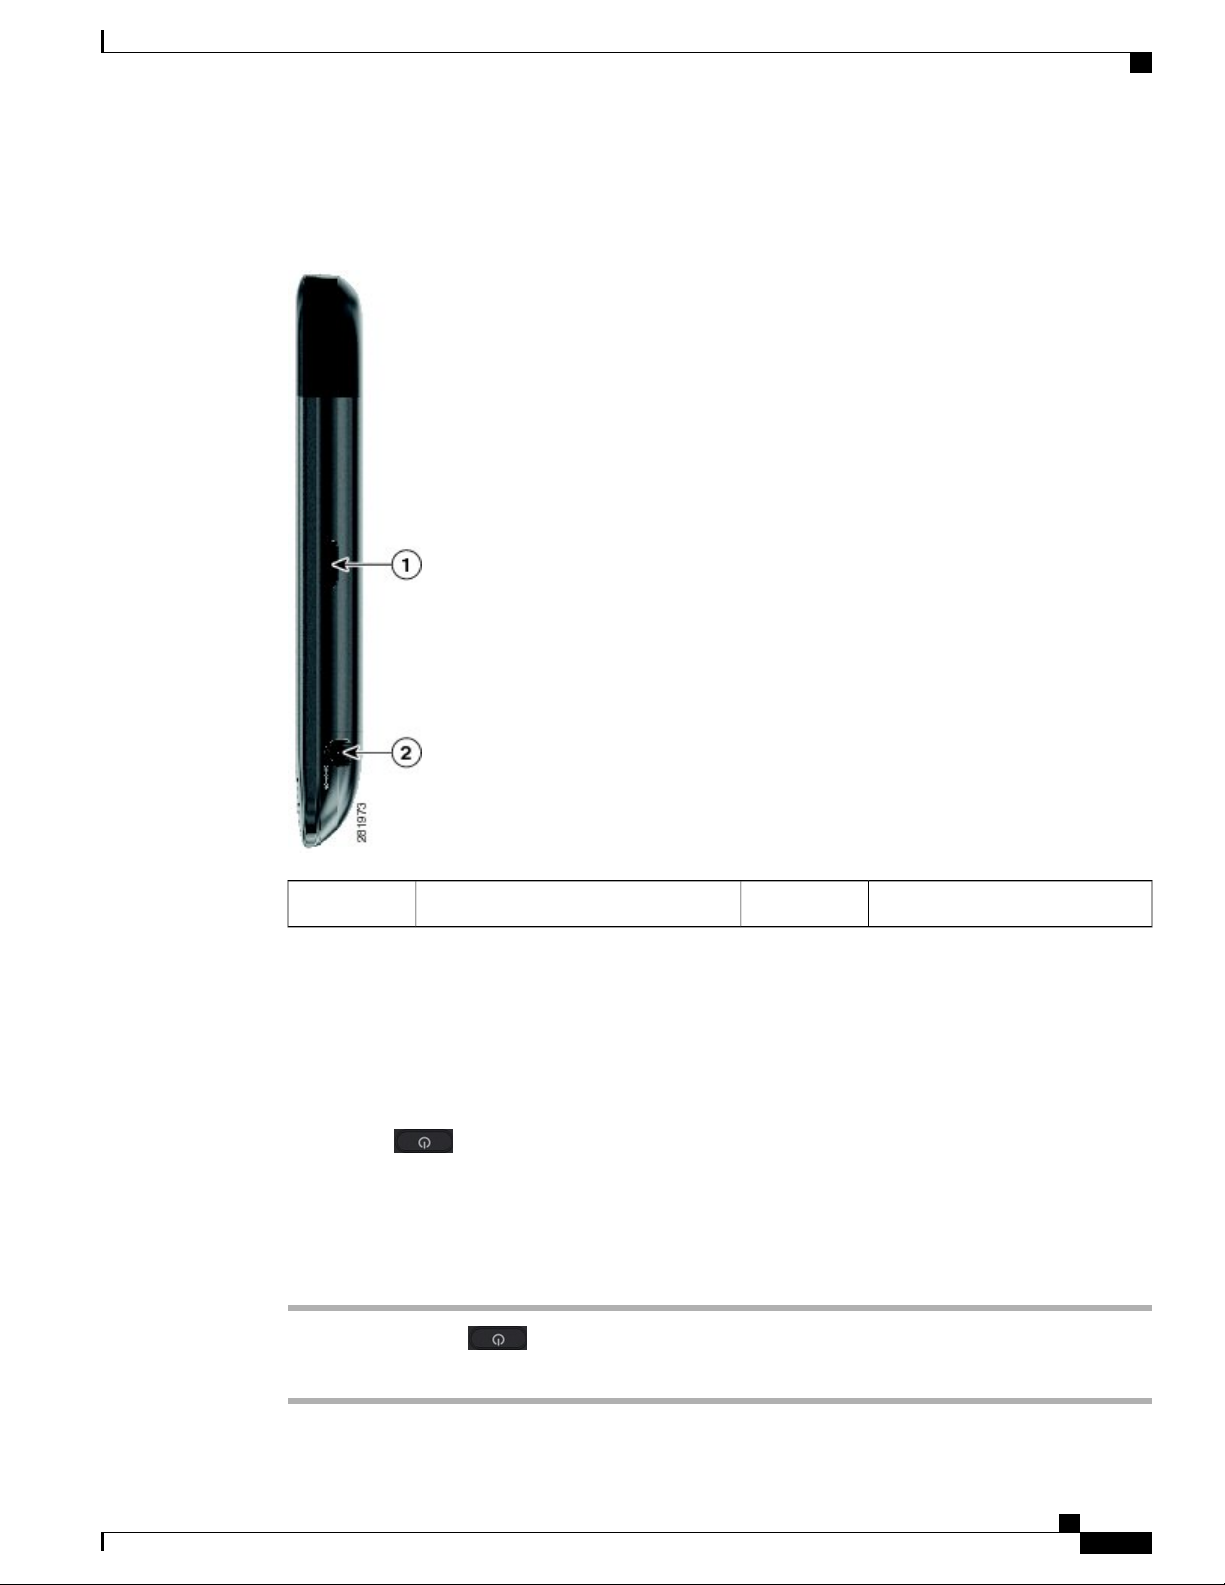
The following image shows the right side of Cisco Cius.
Figure 7: Cisco Cius Right Side
Power Button
Turn Cisco Cius On
Turn Cisco Cius Off
Step 1
Step 2
Power port2Battery release1
Use the Power button to turn Cisco Cius on or off, to activate Silent mode, or to activate Airplane mode.
Press Power at the top of the unit for two or three seconds.
Procedure
Press and hold Power .
Tap Power Off in the dialog box that appears.
Cisco Cius User Guide, Release 9.2(3)
OL-26946-01 7
Page 26

Power Button
Turn On Silent Mode
Procedure
Overview
Step 1
Step 2
Press and hold Power .
Tap Silent Mode in the dialog box that appears.
Turn Off Silent Mode
Procedure
Step 1
Step 2
Press and hold Power .
Tap Silent Mode in the dialog box that appears.
Airplane Mode
Use Airplane Mode to quickly enable or disable your Wi-Fi, 4G, and Bluetooth connections.
Turn On Airplane Mode
Procedure
Step 1
Step 2
Press and hold Power .
Tap Airplane Mode in the dialog box that appears.
Turn Off Airplane Mode
Procedure
Step 1
Step 2
Step 3
Step 4
Cisco Cius User Guide, Release 9.2(3)
8 OL-26946-01
Tap the Applications Menu icon on the home screen.
Tap Settings .
Tap Wireless & Networks.
Tap Airplane Mode.
Page 27

Overview
Turn Off the Screen
Home Key
View the Home Screen
Multitasking
Home Key
Press Power at the top of the unit.
Use the Home key to view the home screen, or for multitasking.
Press the Home key to view the home screen.
Press and hold the Home key to view a list of open and recently used applications.
Menu Key
Some applications include options that you access through the Menu key.
View a Menu
Press Menu to view a menu for the current application.
Back Key
Some applications allow you to use the Back key to go to a previous page or application.
Go to the Previous Page or Application
Press Back to go to the previous page or application.
Battery
Cisco Cius uses a removable battery. The first time that you use Cisco Cius, you must charge the battery for
a minimum of 5 hours to ensure battery longevity. You can use Cisco Cius while it is charging.
When your Cius is powered down and connected to a charging device, the Home key LED indicates whether
the Cius has enough charge to boot. If the LED is white, the battery is charging but does not have sufficient
charge to boot. If the LED is red, the battery is charging and there is sufficient charge to boot. After the Cius
has booted, battery charge status is indicated only on the notification bar.
Related Topics
Notification Bar, on page 15
Cisco Cius User Guide, Release 9.2(3)
OL-26946-01 9
Page 28

SIM Card
Insert the Battery
Procedure
Overview
Step 1
Step 2
Charge the Battery
Remove the Battery
Step 1
Step 2
SIM Card
Align the metal contacts on the battery with the metal contacts on your Cisco Cius.
Slide the battery into place. There is an audible click when the battery is secure.
Insert the power cable into the power port on the right side of the unit.
Do not confuse the power port with the headset port on the bottom of the unit.
Procedure
Slide the battery release down. You may need to use a pen or a small screwdriver to slide the release.
While holding the battery release down, slide the battery out.
Cisco Cius SP is a High Speed Packet Access Evolved (HSPA+) 4G wireless version of the Cisco Cius mobile
collaboration endpoint.
Insert a SIM card to connect your Cisco Cius SP to a 4G network.
Insert a SIM Card
Procedure
Step 1
Step 2
Cisco Cius User Guide, Release 9.2(3)
10 OL-26946-01
Turn your Cisco Cius off.
Completely remove the SIM card tray.
Page 29
Overview
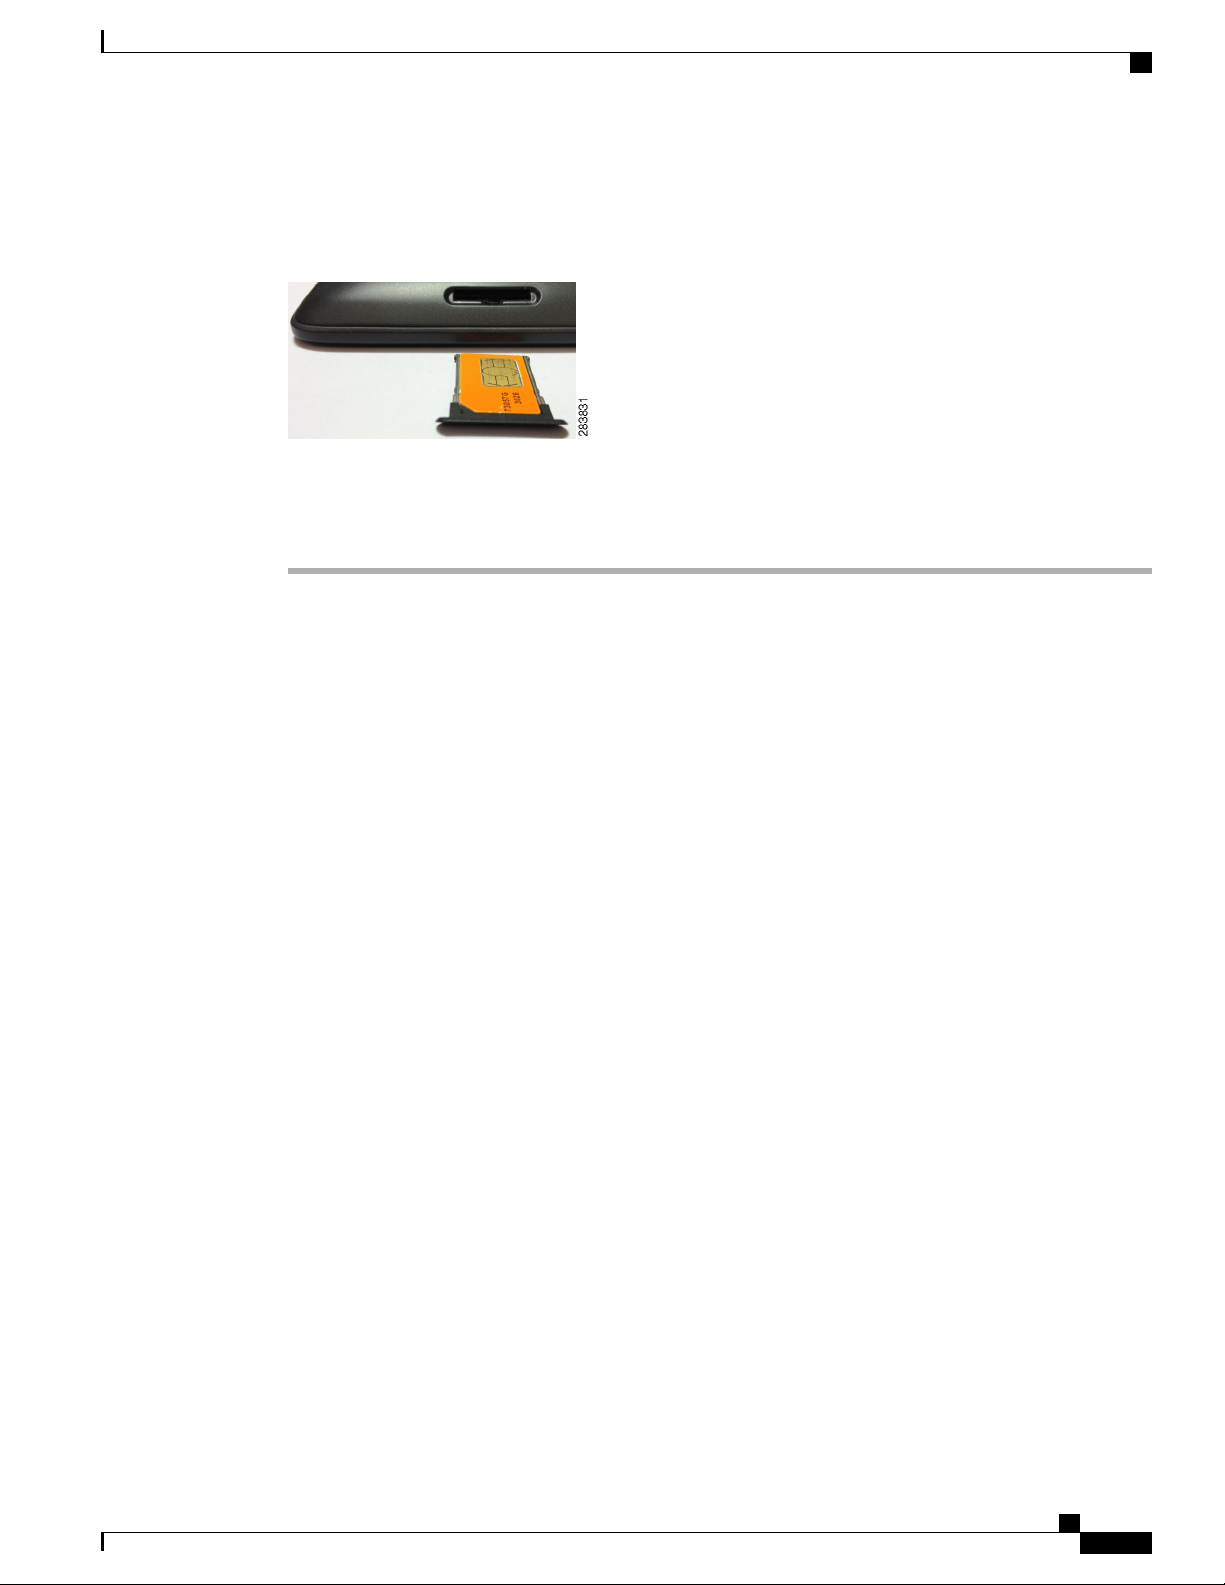
Camera LED
The following image shows a SIM card tray.
Figure 8: SIM Card Tray
Step 3
Step 4
Step 5
SIM Card Activation
Camera LED
Features
Lock Screen
Place the SIM card into the tray.
Reinsert the tray.
Turn your Cius back on.
SIM cards must be activated before use. If your SIM card has not been activated, contact your system
administrator for more information.
The Camera LED is green when the front-facing camera captures video.
This section describes the basic features of Cisco Cius.
The Lock screen is displayed when Cisco Cius is locked (inactive). The Lock screen displays the date and
time, number of recently missed calls, the number of new voice messages, and the number of upcoming events
for the next 24 hours.
Cisco Cius User Guide, Release 9.2(3)
OL-26946-01 11
Page 30
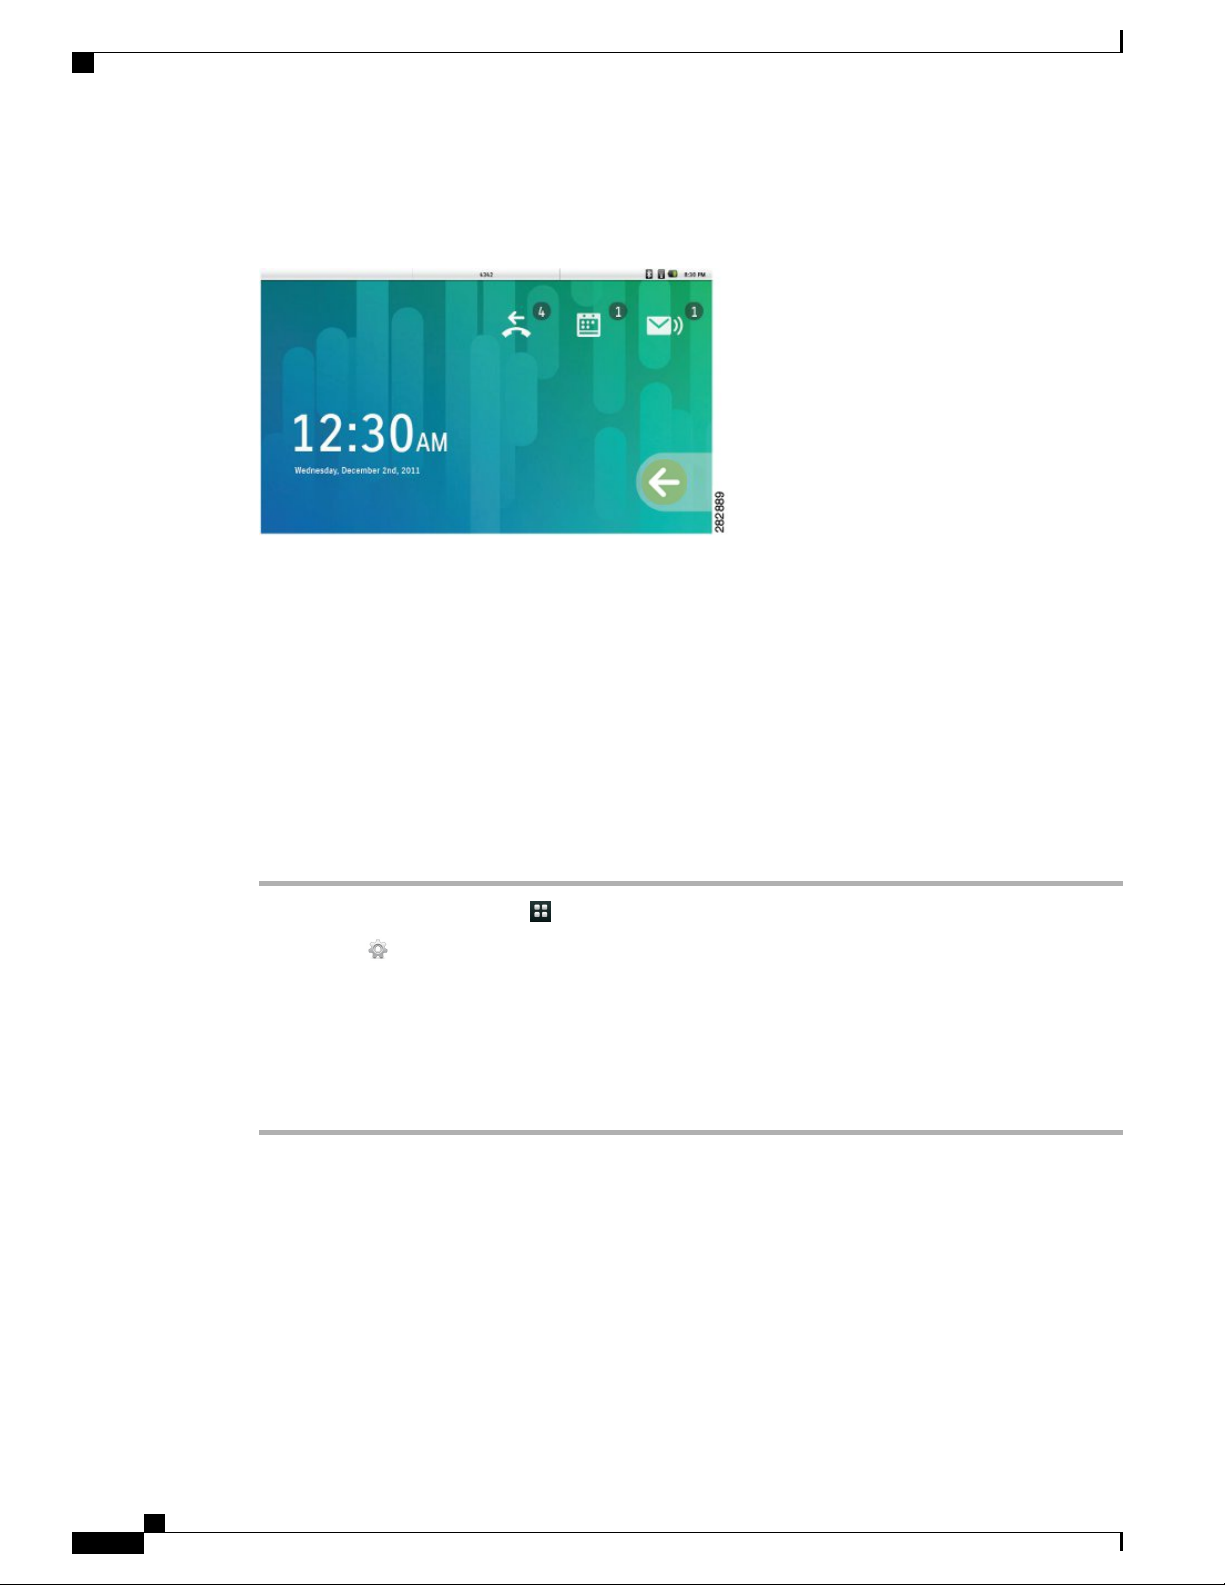
Lock Screen
The following image shows the Lock screen.
Figure 9: Lock Screen
Unlock the Screen
Overview
Add a PIN
Step 1
Step 2
Step 3
Step 4
Step 5
Step 6
Step 7
To unlock the screen, slide the arrow at the bottom right corner across to the left side.
Depending on your security settings, Cisco Cius may require you to enter a personal identification number
(PIN) or a password to unlock the screen. Note that until the PIN or password is entered on the Unlock screen,
you cannot place calls other than emergency calls.
Procedure
Tap the Applications Menu icon on the home screen.
Tap Settings .
Tap Location & Security.
Tap Set Up Screen Lock.
Tap PIN.
Enter a PIN and tap OK. Your PIN must be at least four digits.
Enter your PIN again and tap OK to confirm your PIN.
Cisco Cius User Guide, Release 9.2(3)
12 OL-26946-01
Page 31

Overview
Add a Password
Lock Screen
Procedure
Step 1
Step 2
Step 3
Step 4
Step 5
Step 6
Step 7
Tap the Applications Menu icon on the home screen.
Tap Settings .
Tap Location & Security.
Tap Set Up Screen Lock.
Tap Password.
Enter a password and tap OK. Your password must be at least four characters.
Enter your password again and tap OK to confirm your password.
Reset a Lost PIN or Password
Procedure
Step 1
Step 2
Step 3
Tap the Forgot PIN? or Forgot Password? button on the Unlock screen.
Select an account on the left side of the screen and enter your account credentials on the right side of the
screen.
Reset your PIN or password. Your Cisco Cius is now unlocked and your new PIN or password is ready to
use.
Place an Emergency Call from the Unlock Screen
Tap the Emergency Call button.
Set Screen Timeout
Procedure
Step 1
Step 2
Step 3
Step 4
Step 5
OL-26946-01 13
Tap the Applications Menu icon on the home screen.
Tap Settings .
Tap Display.
Tap Screen Timeout.
Select the length of time that your Cisco Cius can be inactive before the screen locks. Note that your security
settings may limit your screen timeout choices.
Cisco Cius User Guide, Release 9.2(3)
Page 32

Setup Assistant
Setup Assistant
Use the Setup Assistant to set up the following applications:
The Setup Assistant runs automatically the first time that you use your Cisco Cius. If you choose not to use
the Setup Assistant, you can set up these applications through the Settings application. Launch the Settings
application from the Applications menu.
Run the Setup Assistant
Overview
• Wi-Fi
• Email application
• Chat application
• Cisco WebEx Meeting Center
• Visual Voicemail
Step 1
Step 2
Step 3
Step 4
Step 5
Step 6
Step 7
Procedure
Tap Start Setup.
Tap Setup Wi-Fi.
Tap Wi-Fi and connect to a wireless network.
Depending on your security settings, Cisco Cius may require you to enter a PIN or a password after connecting
to a wireless network.
Tap Email and follow the on-screen instructions.
Tap Chat and follow the on-screen instructions.
Tap WebEx and follow the on-screen instructions.
Tap Voice Messages and follow the on-screen instructions.
Related Topics
Wireless & Networks, on page 24
Email, on page 64
Chat, on page 72
Cisco WebEx Meetings, on page 92
Visual Voicemail, on page 50
Home Screen
The Cisco Cius home screen uses a landscape orientation, with a 5 x 9 grid for widgets and shortcuts. Widgets
and shortcuts can be placed anywhere on the grid. The home screen displays widgets of different shapes and
sizes.
Cisco Cius User Guide, Release 9.2(3)
14 OL-26946-01
Page 33

Overview
Notification Bar
Home Screen
The notification bar is at the top of the screen. The notification bar includes notifications for applications such
as the Phone application, email, and chat, as well as status icons for network connections and battery power.
The following image shows the notification bar.
Figure 10: Notification Bar
Tap the notification bar and drag down to see more detailed information about your notifications.
The following common status icons can appear on the notification bar:
The Data Connection and Signal Strength icons are available only on the Cisco Cius SP.Note
Data Connection Icon
•
Battery Charging
• Battery Discharging
•
Battery Full
•
Battery Low
•
Bluetooth
•
Data Connection
•
Signal Strength
•
Wi-Fi
The data connection icon displays the type of data connection that is active. The up and down arrows on the
data connection icon light up to indicate that you are uploading or downloading data.
Cisco Cius User Guide, Release 9.2(3)
OL-26946-01 15
Page 34

Home Screen
Quick Launch Bar
The quick launch bar on the home screen provides links to the Applications menu, the Phone application, the
Add to Cius Home Screen menu, and the Google Search application. The green status bar at the bottom of
the quick launch bar indicates which work space is active.
The following image shows the quick launch bar.
Figure 11: Quick Launch Bar
Related Topics
Work Spaces, on page 18
Overview
Applications Menu
Tap the Applications Menu icon to display the full collection of available applications in a separate
applications tray dialog box.
Related Topics
Applications, on page 23
Phone Application
Tap the Phone Application icon to launch the Phone application.
Related Topics
Phone, on page 35
Add to Cius Home Screen
Tap the Add to Cius Home Screen icon , or tap and hold an open space on the home screen to add shortcuts
to applications, widgets, or folders to the current work space or to change the wallpaper on the current work
space.
Cisco Cius supports customized Cisco wallpapers, as well as wallpapers that you add.
Cisco Cius also supports live wallpapers. Live wallpapers are animated, interactive wallpapers.
Search
Tap the Search icon to search the web, applications, your contacts, or all three.
You must have an active network connection to search the web.
Cisco Cius User Guide, Release 9.2(3)
16 OL-26946-01
Page 35

Overview
Related Topics
Google Search, on page 95
Customize the Home Screen
Add applications, widgets, and folders, or change your wallpaper to customize your home screen.
Add an Application to the Home Screen
Procedure
Home Screen
Step 1
Step 2
Tap the Applications Menu icon .
Tap and hold an application from the Applications menu.
Add a Widget to the Home Screen
Procedure
Step 1
Step 2
Step 3
Tap the Add to Cius Home Screen icon .
Tap Widgets.
Select a widget.
Add a Folder to the Home Screen
Procedure
Step 1
Step 2
Step 3
Tap the Add to Cius Home Screen icon .
Tap Folders.
Select a folder.
Cisco Cius User Guide, Release 9.2(3)
OL-26946-01 17
Page 36

Home Screen
Move a Widget or an Icon
Procedure
Overview
Step 1
Step 2
Tap and hold the widget or icon.
Drag and drop the widget or icon to where you want to place it.
Remove a Widget or an Icon from the Home Screen
Procedure
Step 1
Step 2
Tap and hold the widget or icon to expose the trash can .
Drag and drop the widget or icon into the trash can. The widget or icon is deleted and the trash can disappears.
Change Your Wallpaper
Procedure
Step 1
Step 2
Step 3
Tap the Add to Cius Home Screen icon .
Tap Wallpapers. A horizontal menu appears with the available wallpapers.
Select a wallpaper from the horizontal menu to use that wallpaper.
Work Spaces
Five work spaces are available for you to customize. Each work space holds a variety of widgets and shortcuts
in any configuration.
The green status bar at the bottom of the quick launch bar indicates which work space is active.
Navigate Between Work Spaces
Procedure
Step 1
Step 2
Cisco Cius User Guide, Release 9.2(3)
18 OL-26946-01
Tap and hold the Applications Menu icon on the quick launch bar.
Tap a work space in the menu to display that work space.
Or, tap on one of the bottom corners of the current work space to go to the work space to the left or to the
right.
Page 37

Overview
Or, swipe left or right on an open space on the home screen to go to the work space to the left or to the right.
On-Screen Keyboard
An on-screen keyboard pops up automatically when you select a text input field.
Switch Keyboard Modes
Procedure
On-Screen Keyboard
Step 1
Step 2
Step 3
Step 4
To switch between uppercase and lowercase letters, tap the Shift button .
To switch to numbers and symbols, tap the ?123 button.
To switch to more symbols, tap the ALT button.
To switch back to letters, tap the ABC button.
Cisco Cius User Guide, Release 9.2(3)
OL-26946-01 19
Page 38

On-Screen Keyboard
Overview
Cisco Cius User Guide, Release 9.2(3)
20 OL-26946-01
Page 39

Quick Reference
CHAPTER 3
Quick Launch BarTips and TricksKeys
•
Cius, press Power.
•
for the current
application, press Menu.
•
screen, press Home.
•
page, make the
on-screen keyboard
disappear, or exit an
application, press Back.
•
volume, press Volume
Up.
•
volume, press Volume
Down.
To turn on your
To view a menu
To view the home
To go to a previous
To increase the
To decrease the
Here are some tips to help you
familiarize yourself with your Cisco
Cius.
Battery
To charge the battery, insert the
power cable into the power port on
the right side.
The Battery Charging icon is
displayed on the notification bar
while the battery is charging.
Lock Screen
The Lock screen displays the
number of missed phone calls,
upcoming appointments, and new
voice messages that you have.
•
Launch the Applications menu
•
Launch the Phone application
•
Launch the Add to Cius Home
Screen menu
•
Launch the Google Search
application
Notification Bar
The notification bar is at the top of the
screen.
Slide the notification bar down to see
your notifications.
The notification bar can include
notifications for applications, as well
as status icons for network connections
and battery power.
You can tap a notification for an
application such as Phone, Email, or
Chat, to open that application.
•
To mute the
volume, press Mute.
Cisco Cius User Guide, Release 9.2(3)
OL-26946-01 21
Page 40

Quick Reference
Direct Dial ShortcutQuick Contact BadgeHome Screen
Cisco Cius home screen has five
work spaces that you can customize
with widgets and shortcuts.
Navigate Between Work Spaces
• Tap the bottom left or bottom
right corner to navigate
between work spaces.
• Tap and hold the Applications
menu icon to view a menu
of all five work spaces. Tap a
work space on the menu to go
to that work space.
Customize the Home Screen
• To add widgets, shortcuts to
applications, or folders to the
home screen, or to change the
wallpaper on the home screen,
tap the Add to Cius Home
Screen icon , or tap and hold
an open space on the home
screen.
• To add an application to the
home screen, tap the
Applications menu icon ,
and then tap and hold an
application icon.
• To remove an icon or widget
from the home screen, tap and
hold an icon or widget on the
home screen, and drag it to the
trash can at the bottom of
the screen.
Tap the contact picture of one of
your contacts to display the
Quick Contact Badge.
From the Quick Contact Badge,
you can:
•
Place a call
•
View contact details
•
Send an email message
•
Start a chat
•
Start a Cisco WebEx
meeting
Contact Pictures
Contact pictures appear only for
contacts that you have added
manually, or that you have
synced from your Chat
application contact list.
To download contact pictures for
your email contacts:
1
From the Settings application
, tap Accounts & Sync.
2
Tap Manage Accounts.
3
Select your email account.
4
Tap Account Settings.
5
Check Download Pictures.
Add a direct dial shortcut to a home
screen to use as a speed dial for that
contact.
1
Tap the Add to Cius Home
Screen icon , or tap and hold
an open space on the home
screen.
2
Tap Shortcuts.
3
Tap Direct Dial.
4
Select a contact.
Enable Auto-Rotation
You can enable auto-rotation so
that your Cius displays applications
properly whether you are holding
your Cius horizontally or vertically.
1
From the Settings application
, select Display.
2
Select Auto-Rotate Screen.
Keyboard Shortcuts
When you are using your Cisco
Cius with a media station and USB
keyboard, you can use these
keyboard shortcuts:
•
Menu: Shift-Ctrl-[
•
Home: Shift-Ctrl-]
•
Back: Shift-Ctrl-\
When you are using a USB mouse,
right-click to make the Menu,
Home, and Back keys appear on
screen.
Cisco Cius User Guide, Release 9.2(3)
22 OL-26946-01
Page 41

Applications
This chapter outlines the Cisco Cius applications.
• Wireless & Networks, page 24
• AnyConnect VPN, page 29
• Mobile Network, page 32
• AT&T Communication Manager, page 34
• Phone, page 35
• Contacts, page 58
• Email, page 64
• Chat, page 72
• Calendar, page 82
• Unified Inbox, page 87
CHAPTER 4
• Cisco WebEx Meetings, page 92
• Google Search, page 95
• Browser, page 97
• Quickoffice, page 103
• Camera, page 105
• Gallery, page 108
• Music, page 113
• Clock, page 117
• Sound Recorder, page 118
• Desktop Virtualization, page 118
• Google Mobile Services, page 119
• More Applications, page 121
Cisco Cius User Guide, Release 9.2(3)
OL-26946-01 23
Page 42

Wireless & Networks
Wireless & Networks
Connect Cisco Cius to a wireless network before launching an Internet application such as the e-mail or
browser application.
To connect to a wireless network, use the Setup Assistant that runs automatically the first time that you use
your Cisco Cius. If you choose not to connect to a wireless network with the Setup Assistant, you can use the
Settings application to connect to a wireless network. You can add a total of four wireless network profiles.
Related Topics
Setup Assistant, on page 14
Connect to a Wireless Network
Procedure
Applications
Step 1
Step 2
Step 3
Step 4
Step 5
Step 6
Step 7
Tap the Applications Menu icon on the home screen.
Tap Settings .
Tap Wireless & Networks.
Tap Wi-Fi Settings.
Tap Wi-Fi.
Select a wireless network from the list of available networks.
Enter your credentials and tap Connect.
Connect to a Hidden Wireless Network
Procedure
Step 1
Step 2
Step 3
Step 4
Step 5
Step 6
Step 7
Step 8
Tap the Applications Menu icon on the home screen.
Tap Settings .
Tap Wireless & Networks.
Tap Wi-Fi Settings.
Tap Wi-Fi.
Tap Add Wi-Fi Network.
Enter the Network SSID, select the Security and Frequency Band settings and tap Save.
Enter your credentials and tap Connect.
Cisco Cius User Guide, Release 9.2(3)
24 OL-26946-01
Page 43

Applications
Edit a Wireless Network
Procedure
Edit a Wireless Network
Step 1
Step 2
Step 3
Step 4
Step 5
Step 6
Step 7
Tap the Applications Menu icon on the home screen.
Tap Settings .
Tap Wireless & Networks.
Tap Wi-Fi Settings.
Tap Wi-Fi.
Tap and hold a wireless network from the list of available networks.
Tap Modify Network.
Delete a Wireless Network
Procedure
Step 1
Step 2
Step 3
Step 4
Step 5
Step 6
Step 7
Tap the Applications Menu icon on the home screen.
Tap Settings .
Tap Wireless & Networks.
Tap Wi-Fi Settings.
Tap Wi-Fi.
Tap and hold a wireless network from the list of available networks.
Tap Forget Network.
Wireless Network Security Certificates
Cisco Cius supports Extensible Authentication Protocol Transport Layer Security (EAP-TLS) and Protected
Extensible Authentication Protocol Generic Token Card (PEAP-GTC) security certificates for wireless
networks. Contact your system administrator for more information.
Cisco Cius User Guide, Release 9.2(3)
OL-26946-01 25
Page 44

Wireless Network Security Certificates
Install a Certificate
Procedure
Applications
Step 1
Step 2
Step 3
Step 4
Step 5
Step 6
Step 7
Step 8
Tap the Applications Menu icon on the home screen.
Tap Settings .
Tap Location & Security.
Tap Install from SD Card.
Select a certificate.
Choose or enter your credential storage password and tap OK.
Enter the certificate password.
Choose a name for the certificate and tap OK.
Connect to a Wireless Network with an EAP-TLS Certificate
Procedure
Step 1
Step 2
Step 3
Step 4
Step 5
Step 6
Step 7
Step 8
Step 9
Tap the Applications Menu icon on the home screen.
Tap Settings .
Tap Wireless & Networks.
Tap Wi-Fi Settings.
Tap Wi-Fi.
Select a wireless network from the list of available networks.
Select TLS from the list of available EAP methods.
Select your CA certificate and user certificate.
Enter your credential storage password and tap OK.
Cisco Cius User Guide, Release 9.2(3)
26 OL-26946-01
Page 45

Applications
Connect to a Wireless Network with a PEAP Certificate
Procedure
Web Proxy
Step 1
Step 2
Step 3
Step 4
Step 5
Step 6
Step 7
Step 8
Step 9
Web Proxy
Add a Web Proxy
Tap the Applications Menu icon on the home screen.
Tap Settings .
Tap Wireless & Networks.
Tap Wi-Fi Settings.
Tap Wi-Fi.
Select a wireless network from the list of available networks.
Select PEAP from the list of available EAP methods.
Select a Phase 2 authentication method.
Enter your credentials and tap Connect.
Depending on your security settings, you may need to connect to a web proxy to access the Internet. If a VPN
is enabled, you cannot use a web proxy with that VPN. Contact your system administrator for more information.
Procedure
Step 1
Step 2
Step 3
Step 4
Step 5
Step 6
Step 7
OL-26946-01 27
Tap the Applications Menu icon on the home screen.
Tap Settings .
Tap Wireless & Networks.
Tap Proxy Settings.
Tap Proxy.
Tap Add Proxy.
Enter the Web Proxy settings and tap Save.
Cisco Cius User Guide, Release 9.2(3)
Page 46

TFTP
Edit a Web Proxy
Procedure
Applications
Step 1
Step 2
Step 3
Step 4
Step 5
Step 6
Step 7
Tap the Applications Menu icon on the home screen.
Tap Settings .
Tap Wireless & Networks.
Tap Proxy Settings.
Tap and hold a proxy from the list of available proxies.
Tap Modify.
Edit the Web Proxy settings and tap Save.
Delete a Web Proxy
Procedure
Step 1
Step 2
Step 3
Step 4
Step 5
Step 6
Step 7
Tap the Applications Menu icon on the home screen.
Tap Settings .
Tap Wireless & Networks.
Tap Proxy Settings.
Tap and hold a proxy from the list of available proxies.
Tap Delete.
Tap Yes.
TFTP
Connect to a TFTP server to receive updates to Cisco Cius firmware, and for phone application configuration
and connectivity. Contact your system administrator for a TFTP server address.
Cisco Cius User Guide, Release 9.2(3)
28 OL-26946-01
Page 47

Applications
Connect to a TFTP Server
Procedure
AnyConnect VPN
Step 1
Step 2
Step 3
Step 4
Step 5
Step 6
Step 7
Tap the Applications Menu icon on the home screen.
Tap Settings .
Tap Wireless & Networks.
Tap TFTP Server Settings.
Tap Use Alternate TFTP Server.
Tap TFTP Server1.
Enter the TFTP server address and tap OK.
AnyConnect VPN
Your system administrator sets up the AnyConnect VPN application. After the application is set up, connect
the Cisco Cius to a secure gateway to access a VPN.
AnyConnect VPN allows you to have secure remote access to corporate resources on your Cisco Cius. For
security reasons, it is usually recommended that you connect to a VPN through a wired network connection.
A media station is required for a wired network connection.
If your system administrator has set up a VPN connection profile for you with Cisco Unified Communications
Manager, it will appear in the VPN Connection list. You cannot edit or delete these VPN connections.
Your system administrator can enable you to create and edit your own VPN connections.
Related Topics
Connect Cisco Cius to an HD Media Station, on page 127
AutoNetDetect
If your system administrator enables the AutoNetDetect feature for a VPN connection profile set up with
Cisco Unified CM, the Phone application will automatically attempt to establish a VPN connection.
Password Persistence
If your system administrator enables the Password Persistence feature for a VPN connection profile set up
with Cisco Unified CM, the AnyConnect VPN application will store a previously successful password. You
cannot change a working password.
Cisco Cius User Guide, Release 9.2(3)
OL-26946-01 29
Page 48

Enable VPN
Enable VPN
Applications
Procedure
Step 1
Step 2
Step 3
Step 4
Step 5
Tap the Applications Menu icon on the home screen.
Tap Settings .
Tap Wireless & Networks.
Tap VPN Settings.
Tap Cisco AnyConnect Secure Mobility Client.
Add a VPN Connection Profile
Procedure
Step 1
Step 2
Step 3
Step 4
Step 5
Step 6
Step 7
Tap the Applications Menu icon on the home screen.
Tap Settings .
Tap Wireless & Networks.
Tap VPN Settings.
Tap Add New VPN Connection.
Enter a description of the VPN connection and the server address.
Tap Save.
Edit a VPN Connection Profile
Procedure
Step 1
Step 2
Step 3
Step 4
Step 5
Step 6
Step 7
Step 8
Cisco Cius User Guide, Release 9.2(3)
30 OL-26946-01
Tap the Applications Menu icon on the home screen.
Tap Settings .
Tap Wireless & Networks.
Tap VPN Settings.
Tap and hold a VPN connection.
Tap Edit Connection.
Edit the connection description or server address.
Tap Save.
Page 49

Applications
Connect to a VPN
Procedure
Connect to a VPN
Step 1
Step 2
Step 3
Step 4
Step 5
Step 6
Step 7
Tap the Applications Menu icon on the home screen.
Tap Settings .
Tap Wireless & Networks.
Tap VPN Settings.
Select a VPN connection.
If necessary, do either of the following in response to the appropriate prompts:
• Enter your credentials. If prompted to do so, also enter your secondary credentials to support double
authentication.
• Tap Get Certificate, then enter the certificate enrollment credentials supplied by your system
administrator. AnyConnect saves the certificate and reconnects to the VPN secure gateway to use the
certificate for authentication.
Tap Connect.
Disconnect from a VPN
Procedure
Step 1
Step 2
Step 3
Step 4
Step 5
Step 6
OL-26946-01 31
Tap the Applications Menu icon on the home screen.
Tap Settings .
Tap Wireless & Networks.
Tap VPN Settings.
Tap and hold a VPN connection.
Tap Disconnect.
Cisco Cius User Guide, Release 9.2(3)
Page 50

Delete a VPN Connection Profile
Delete a VPN Connection Profile
Procedure
Applications
Step 1
Step 2
Step 3
Step 4
Step 5
Step 6
Tap the Applications Menu icon on the home screen.
Tap Settings .
Tap Wireless & Networks.
Tap VPN Settings.
Tap and hold a VPN connection.
Tap Delete Connection.
VPN Transitioning
When your Cisco Cius SP transitions from a 4G to Wi-Fi network during a call over VPN, the 4G connection
is maintained until the call ends.
When your Cisco Cius SP transitions from a Wi-Fi network to a 4G network, the call drops.
Mobile Network
Use a Cisco Cius SP with a SIM card to connect to a mobile network. When you connect your Cius to a Wi-Fi
network, or when you connect your Cius to an HD media station and an Ethernet connection, your Cius will
immediately disconnect from the mobile network. If you are on a call when you connect your Cius to a Wi-Fi
network or an Ethernet connection, your Cius will disconnect from the mobile network when the call is
completed.
Related Topics
SIM Card, on page 10
HD Media Station, on page 125
Cisco Cius User Guide, Release 9.2(3)
32 OL-26946-01
Page 51

Applications
Enable Data Access
Procedure
Enable Data Access
Step 1
Step 2
Step 3
Step 4
Step 5
Tap the Applications Menu icon on the home screen.
Tap Settings .
Tap Wireless & Networks.
Tap Mobile Network Settings.
Tap Data Enabled.
Enable Data Roaming
Procedure
Step 1
Step 2
Step 3
Step 4
Step 5
Tap the Applications Menu icon on the home screen.
Tap Settings .
Tap Wireless & Networks.
Tap Mobile Network Settings.
Tap Data Roaming.
View Access Point Names
Procedure
Step 1
Step 2
Step 3
Step 4
Step 5
OL-26946-01 33
Tap the Applications Menu icon on the home screen.
Tap Settings .
Tap Wireless & Networks.
Tap Mobile Network Settings.
Tap Access Point Names.
Cisco Cius User Guide, Release 9.2(3)
Page 52

Use Only 2G Networks
Use Only 2G Networks
Procedure
Applications
Step 1
Step 2
Step 3
Step 4
Step 5
Tap the Applications Menu icon on the home screen.
Tap Settings .
Tap Wireless & Networks.
Tap Mobile Network Settings.
Tap Use Only 2G Networks.
Select a Network Operator
Procedure
Step 1
Step 2
Step 3
Step 4
Step 5
Step 6
Tap the Applications Menu icon on the home screen.
Tap Settings .
Tap Wireless & Networks.
Tap Mobile Network Settings.
Tap Network Operators.
Select a network operator.
AT&T Communication Manager
Use the AT&T Communication Manager application to monitor the data usage on your Cisco Cius SP with
either prepaid or postpaid SIM cards.
AT&T Communication Manager Widget
Use the AT&T Communication Manager widget to display your data usage on the home screen. This widget
is installed on the home screen by default.
The following image shows the AT&T Communication Manager widget for a post-paid SIM card.
Figure 12: AT&T Communication Manager Widget for a Postpaid SIM Card
Cisco Cius User Guide, Release 9.2(3)
34 OL-26946-01
Page 53

Applications
Phone
Phone
The following image shows the AT&T Communication Manager widget for a pre-paid SIM card.
Figure 13: AT&T Communication Manager Widget for a Prepaid SIM Card
Related Topics
SIM Card, on page 10
Add a Widget to the Home Screen, on page 17
The Cisco Cius Phone application is an enterprise phone application. Depending on how your system
administrator set up your phone application, some features included in this guide may not be available to you.
Contact your system administrator for more information.
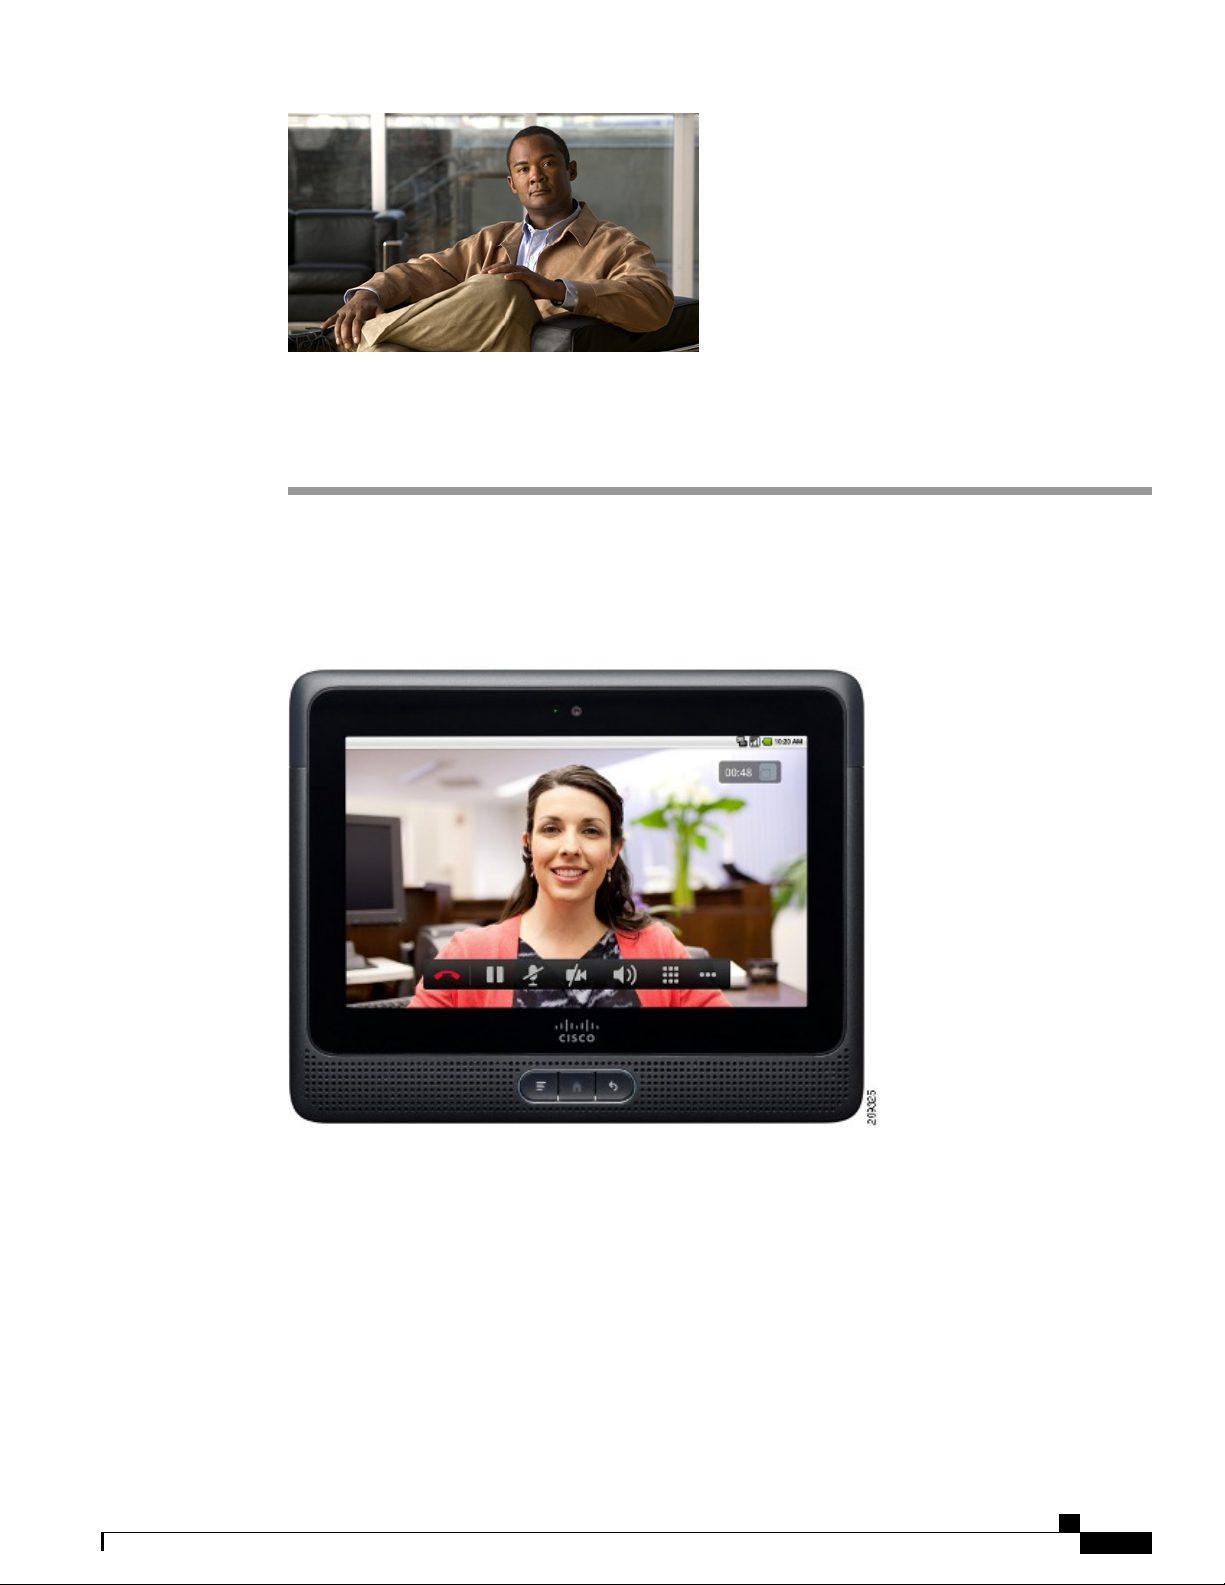
The following image shows the Phone application.
Figure 14: Phone Application
Launch the Phone application from the quick launch bar on the home screen or from the Applications Menu
.
Related Topics
Cisco Unified CM User Options, on page 52
Your Phone Number
When you open the Phone application, your phone number appears on the notification bar.
To find your phone number when the Phone application is not open:
Cisco Cius User Guide, Release 9.2(3)
OL-26946-01 35
Page 54

Place a Call
Applications
Procedure
Step 1
Step 2
Step 3
Step 4
Place a Call
Step 1
Step 2
Tap the Applications Menu icon on the home screen.
Tap Settings .
Tap About Cius.
Tap Status. Your phone number is listed under My Phone Number.
Procedure
Enter a phone number.
Tap the Call button.
Or, tap an entry on the Recent Call list.
Or, tap the Phone icon next to a Call History entry.
Or, tap the Phone icon next to a Contact or a Favorite.
Place an Emergency Call from the Unlock Screen
Tap the Emergency Call button.
Incoming Calls
Incoming calls appear in a dialog box.
The following image shows an incoming call notification window.
Figure 15: Incoming Call Notification Window
If you are viewing the recent call list when a call comes in, the incoming call is added to the list instead of
appearing in a notification window.
Cisco Cius User Guide, Release 9.2(3)
36 OL-26946-01
Page 55

Applications
Incoming Calls
The following image shows an incoming call on the recent call list.
Figure 16: Incoming Call on the Recent Call List
If your Cius screen is locked, the incoming call will appear in an incoming call notification window. Note
that while the Cius screen is locked, during a call you will not be able to transfer a call, start a conference call,
or navigate to your contacts or Favorites.
The following image shows an incoming call on a locked Cius.
Figure 17: Incoming Call Window for a Locked Cius
Answer a Call
From the incoming call notification window, slide the green Answer icon across from the bottom right corner
to the left side of the screen.
Or, from the recent call list or incoming call dialog box, tap the Answer button.
Ignore a Call
From the incoming call notification window, slide the Ignore icon across from the bottom left corner to the
right side of the screen.
Or, from the recent call list or incoming call dialog box, tap the Ignore button.
Cisco Cius User Guide, Release 9.2(3)
OL-26946-01 37
Page 56

Call Control Bar
Divert a Call
From the recent call list or incoming call dialog box, tap the Divert button.
Call Control Bar
A call control bar displays at the bottom of an active audio call in the recent call list.
The following image shows the audio call control bar.
Figure 18: Audio Call Control Bar
Applications
View More Call Control Bar Options
Tap the View More Right icon or the View More Left icon on the call control bar.
End a Call
Tap the End Call icon on the call control bar.
Video Calls
The Phone application allows you to send and receive video calls.
The following image shows a video call.
Figure 19: Video Call Screen
View a Video Call in Full Screen Mode
Tap the Full Screen icon at the top right of the video to turn on full screen mode.
Cisco Cius User Guide, Release 9.2(3)
38 OL-26946-01
Page 57

Applications
The following image shows a full screen video call.
Figure 20: Full Screen Video Call
Video Call Control Bar
Video Calls
A call control bar appears at the bottom of an active video call. The video call control bar disappears after a
few seconds. Tap the screen to make the call control bar reappear.
The following image shows the video call control bar.
Figure 21: Video Call Control Bar
Mute Your Video Transmission
Procedure
Step 1
Step 2
Tap the Video Mute icon on the video call control bar to mute your video.
Tap the Video Mute icon again to turn the Video Mute off.
Automatic Video Transmission
By default, the Phone application automatically transmits video during a video call.
Cisco Cius User Guide, Release 9.2(3)
OL-26946-01 39
Page 58

Video Calls
Stop Automatically Transmitting Video
Procedure
Applications
Step 1
Step 2
Step 3
Step 4
Tap the Applications Menu icon on the home screen.
Tap Settings .
Tap Call Settings.
Uncheck Auto Transmit Video. Depending on your system settings, this option may not be available. Contact
your system administrator for more information.
Adjust Video Call Settings
You can adjust your video quality for video calls or turn off video calls.
Procedure
Step 1
Step 2
Step 3
Step 4
Step 5
Tap the Applications Menu icon on the home screen.
Tap Settings .
Tap Call Settings.
Tap Video Calls.
Select a video call setting. Depending on how your system administrator set up your phone application, some
video call settings may not be available to you. Contact your system administrator for more information.
Turn Off Video Calls
Procedure
Step 1
Step 2
Step 3
Step 4
Step 5
Tap the Applications Menu icon on the home screen.
Tap Settings .
Tap Call Settings.
Tap Video Calls.
Tap Off.
Self-View
Use self-view to preview the video of yourself that you display during video calls.
Cisco Cius User Guide, Release 9.2(3)
40 OL-26946-01
Page 59

Applications
Show Self-View
Barge
Procedure
Step 1
Step 2
Step 3
Press the Menu key .
Tap Show Self-View.
Tap OK or press the Back key to stop showing self-view. During a video call, self-view will disappear
after a few seconds.
Barge
The barge feature allows you to add yourself to nonprivate calls on a shared line. You can convert the call
into a conference and add new participants. A call that can be barged will have a red dot to the right of the
call line status.
Tap the Remote Active Call icon next to the call line status to barge.
Related Topics
Call Forward All
Call Forward All allows you to forward calls from any line on your phone to another number, or to your
Voicemail.
When forwarding calls from your phone, enter the call forward target number exactly as you would dial it
from your phone. For example, enter an access code or the area code, if necessary.
Call forwarding is phone-line specific. If a call reaches you on a line on which call forwarding is not enabled,
the call will ring as usual.
Your system administrator can set up other call-forward options that do the following:
Shared Lines, on page 49
• Allow calls placed from the call forward target number to your phone to ring through, rather than be
forwarded
• Prevent you from creating a call-forward loop or exceeding the maximum number of links in a call
forwarding chain
Cisco Cius User Guide, Release 9.2(3)
OL-26946-01 41
Page 60

Conference
Forward Your Calls
Procedure
Applications
Step 1
Step 2
Step 3
Press the Menu key .
Tap Forward All.
Select a number to forward calls to. Or, tap the Voicemail entry in your Recent Call list or call history to
forward all calls to Voicemail.
Stop Forwarding Your Calls
Tap Cancel.
Conference
Conference allows you to talk simultaneously with multiple parties.
When you are talking on a call, use Conference to dial another party and add them to the call.
Add Another Party to Your Call to Create a Conference
Procedure
Step 1
Step 2
Step 3
Step 4
Tap the Conference icon on the call control bar.
From the Conference screen, select a contact from the Recent Call list on the left side of the screen, select a
contact from your call history, select a contact from your contact list or Favorite list, or dial a number using
the keypad on the right side of the screen.
Tap the Conference button in the dialog box that appears.
Repeat these steps to add more participants.
Cisco Cius User Guide, Release 9.2(3)
42 OL-26946-01
Page 61

Applications
Contacts
The following image shows the conference call dialog box.
Figure 22: Conference Dialog Box
Swap Between Active Calls from the Conference Dialog Box
Tap the Swap icon .
View Conference Participants
Procedure
While in a conference, tap the Call Details icon to view a list of participants.
Contacts
Tap the Contacts tab to open the Contacts application.
Related Topics
Calendar, on page 82
View Call Details
During a call, tap the Call Details icon on the call control bar.
Display the Keypad
Tap the Keypad icon on the call control bar.
Cisco Cius User Guide, Release 9.2(3)
OL-26946-01 43
Page 62

Do Not Disturb
Do Not Disturb
Turn DND On and Off
Applications
Do Not Disturb (DND) allows you to turn off either of the following:
• The ringer on your phone
• The ringer and any visual notification that you have an incoming call
When DND is enabled, your incoming calls are forwarded to another number, such as your voicemail if your
voicemail is set up. The forwarded call is not saved or listed in your call history.
The DND feature affects all the lines on a phone. However, it does not affect 911 calls.
Your system administrator sets up a line button on your phone for DND with the ringer and visual notifications
off by default. However, you can change your DND options from your User Options web pages.
Procedure
Step 1
Step 2
Tap the Do Not Disturb button to turn on DND.
Tap the Do Not Disturb button again to turn off DND.
Favorites
Tap the Favorites tab to view your favorite contacts.
Related Topics
Mark a Contact as a Favorite, on page 60
HD Media Station
The Phone application preserves your calls when you dock or undock your Cius with an HD media station.
There is a slight delay before the call audio is reestablished.
Related Topics
Connect Cisco Cius to an HD Media Station, on page 127
Call History
Tap the History tab to view your call history.
Cisco Cius User Guide, Release 9.2(3)
44 OL-26946-01
Page 63

Applications
Hold
Put a Call on Hold
Hold
Hold allows you to put an active call into a held state. Your phone allows one active call at a time; other calls
are put on hold.
Procedure
Step 1
Step 2
Tap the Hold icon on the call control bar.
Tap the Hold icon on the call history to resume the call.
Put a Call on Hold by Answering a New Call
If you are already on a call and receive a new call, answering the new call puts the first call on
hold automatically.
Line Status
The following image shows a line status icon.
Figure 23: Line Status
Line status is displayed to the left of your name at the top left of the phone application.
•
Call connected
•
Outgoing call ringing
•
Call on hold
•
Call on hold remotely
•
Call forward on
•
On hook
•
Incoming call
Cisco Cius User Guide, Release 9.2(3)
OL-26946-01 45
Page 64

Message Indicator
Message Indicator
The following image shows a message indicator icon.
Figure 24: Message Indicator
The message indicator displays to the right of your name at the top left of the phone application.
•
•
Applications
Missed calls
Missed voice messages
Missed Calls
Missed call notifications appear on the notification bar.
Tap a missed call notification to open the phone application.
Related Topics
Mobile Connect
Mobile Connect allows you to use your mobile phone to handle calls associated with your Cius Phone
application phone number.
When you enable Mobile Connect:
Notification Bar, on page 15
• Your Phone application and remote destinations (your mobile phones) receive calls simultaneously.
• When you answer the call with the Phone application, the remote destinations stop ringing, are
disconnected, and display a missed call message.
• When you answer the call on one remote destination, the other remote destinations and Phone application
stop ringing and are disconnected, and a missed call message is shown on the other remote destinations.
• When you answer the call on one remote destination and then switch the call to a Cisco Unified device
that shares lines, the Cisco Unified devices that share the same line display a Remote In Use message.
To set up Mobile Connect, use the User Options web pages to set up remote destinations and create access
lists to allow or block calls from specific phone numbers from being passed to the remote destinations.
Related Topics
Visual Voicemail, on page 50
Cisco Cius User Guide, Release 9.2(3)
46 OL-26946-01
Page 65

Applications
Mute
Mute Your Phone
Mute
Mute allows you to block audio input for your handset, headset, and speakerphone, so that you can hear other
parties on the call but they cannot hear you.
Procedure
Step 1
Step 2
Tap the Mute icon to turn Mute on.
Tap the Mute icon again to turn Mute off.
On-hook Dialing
On-hook dialing allows you to enter a phone number before getting a dial tone and press the Call button to
complete the call.
Plus Dialing
Plus dialing allows you to tap and hold the * button for at least 1 second to add a plus “+” sign as the first
digit in a phone number for international dialing.
Dialing an International Number
Procedure
Step 1
Step 2
Tap and hold the “*” button for at least 1 second. The + sign is entered as the first digit in the phone number.
(The corresponding tone stops to indicate that the * has changed to a + sign.)
Dial the international number.
Privacy
Privacy allows you to prevent others who share your line from seeing information about your calls.
It applies to all shared lines on your Phone application. If you have multiple shared lines and Privacy is enabled,
others cannot view any of your shared lines.
If the phone that shares your line has Privacy enabled, you can make and receive calls using the shared line
as usual.
Cisco Cius User Guide, Release 9.2(3)
OL-26946-01 47
Page 66

Recent Call List
Related Topics
Shared Lines, on page 49
Recent Call List
The recent call list displays your active, held, incoming, and recent calls.
Tap the Recent Calls tab to view your recent call list.
Set Your Ringtone
Procedure
Applications
Step 1
Step 2
Step 3
Step 4
Step 5
Tap the Applications Menu icon on the home screen.
Tap Settings .
Tap Sound.
Tap Phone Ringtone.
Select a ringtone and tap OK.
Secure and Nonsecure Indication Tone
When a phone is set up as secure (encrypted and trusted), it can be given a “protected” status. After that, if
desired, the protected phone can be configured to play an indication tone at the beginning of a call.
Only protected phones hear these secure or nonsecure indication tones. (Nonprotected phones never hear
tones.) If the overall call status changes during the call, the indication tone changes accordingly. The protected
phone plays the appropriate tone.
A protected phone plays a tone or not under these circumstances:
• When the option to play a tone, “Play Secure Indication Tone option,” is enabled (True):
◦ When end-to-end secure media is established and the call status is secure, the Phone application
plays the secure indication tone (three long beeps with pauses).
◦ When end-to-end nonsecure media is established and the call status is nonsecure, the Phone
application plays the nonsecure indication tone (six short beeps with brief pauses). (This capability
is a change with this release.)
• When the Play Secure Indication Tone option is disabled, no tone is played.
For more information, contact your system administrator.
Cisco Cius User Guide, Release 9.2(3)
48 OL-26946-01
Page 67

Applications
Shared Lines
Shared Lines
Shared lines allow you to use one phone number for multiple phones.
If you share a line with a coworker, the following options are available:
• When a call comes in on the shared line:
◦ Your phone rings.
◦ Your coworker’s phone rings and either you or your coworker can answer the call.
• When your coworker has a call on the shared line, the coworker’s call is displayed on your screen (unless
your coworker has Privacy enabled).
• If you put a call on hold, your coworker can pick up the call.
• You or the coworker can join a call on the shared line using the Barge feature. Barge converts the call into
a conference.
Speed Dial
Transfer
Related Topics
Barge, on page 41
Privacy, on page 47
The speed dial feature allows you to press a button to place a call. Before you can use the speed dial feature,
you must set up speed dial on your User Options web pages.
If your system administrator has set up the Line Status feature, you can monitor the status of a speed dial line
by using the line status indicators.
Related Topics
Cisco Unified CM User Options, on page 52
Transfer allows you to redirect a connected call from your phone to another number.
Cisco Cius User Guide, Release 9.2(3)
OL-26946-01 49
Page 68

Visual Voicemail
Transfer a Call to Another Number
Procedure
Applications
Step 1
Step 2
Step 3
Tap the Transfer icon on the call control bar.
From the Transfer screen, select a contact from the Recent/Held list on the left side of the screen, select a
contact from your Call History, or select a contact from your contact list or Favorite list, or dial a number
using the keypad on the right side of the screen.
Tap the Transfer button in the dialog box that appears.
The following image shows a call transfer dialog box.
Figure 25: Transfer Dialog Box
Swap Between Active Calls from the Transfer Dialog Box
Tap the Swap icon .
Visual Voicemail
Visual Voicemail allows you to manage your voice messages on a tab in the Phone application. You can also
access your voice messages in the Unified Inbox application.
Set Up Visual Voicemail
Before you can use Visual Voicemail, you must set up an account. If you have not already entered your Visual
Voicemail credentials using the Setup Assistant, you can set up your account on the Voice Messages tab.
Cisco Cius User Guide, Release 9.2(3)
50 OL-26946-01
Page 69

Applications
Visual Voicemail
Procedure
Step 1
Step 2
Step 3
Tap the Voice Messages icon .
Tap Sign-In.
Enter your account credentials and tap Save.
Related Topics
Setup Assistant, on page 14
Sign In to Visual Voicemail
Procedure
Step 1
Step 2
Step 3
Step 4
Tap the Voice Messages icon .
Tap Sign-In.
Enter your account credentials.
Tap Save.
Listen to a Voice Message
Procedure
Step 1
Step 2
Tap the Voice Messages icon .
Tap the Play icon in a voice message to listen to that voice message.
View Voice Message Details
Procedure
Step 1
Step 2
Tap the Voice Messages icon .
Tap a voice message to view details.
Cisco Cius User Guide, Release 9.2(3)
OL-26946-01 51
Page 70

Call Waiting
Reply to a Voice Message
Procedure
Applications
Step 1
Step 2
Step 3
Tap the Voice Messages icon .
Tap a voice message to view details.
Tap the Reply icon or the Reply All icon .
Forward a Voice Message
Procedure
Step 1
Step 2
Step 3
Tap the Voice Messages icon .
Tap a voice message to view details.
Tap the Forward icon and select the recipients.
Delete a Voice Message
Procedure
Step 1
Step 2
Step 3
Tap the Voice Messages icon .
Tap a voice message to view details.
Tap the Delete icon .
Call Waiting
Call Waiting provides a call waiting tone (single beep) to notify you that a new call is ringing on your phone
when you are talking on another call.
Cisco Unified CM User Options
You can use a web browser to sign in to your Cisco Unified CM User Options web pages, where you can
control features, settings, and services for the Cisco Cius Phone application.
After you have signed in to your User Options web pages, select User Options to access the following:
Cisco Cius User Guide, Release 9.2(3)
52 OL-26946-01
Page 71

Applications
• Device
• User Settings
• Directory
• Mobility Settings
Sign In and Out of User Options Web Pages
Before you can access any of your user options, you must sign in. When you are finished using the User
Options web pages, you must sign out.
In some cases, you can access your user options without having to sign in. For more information, contact your
system administrator.
Procedure
Cisco Unified CM User Options
Device
Step 1
Step 2
Step 3
Step 4
Step 5
Step 6
Step 7
Obtain the User Options URL, user ID, and default password (provided by your system administrator).
Open a web browser and enter the URL.
If prompted to accept security settings, select Yes or Install Certificate.
Enter your user ID in the Username field.
Enter your password in the Password field.
Select Login.
The Cisco Unified CM User Options home page is displayed. From this page you can select User Options to
select a device, access user settings and Directory features.
To sign out of User Options, select Logout.
You can make changes to your Phone application settings from the User Options web pages:
• Lines
• Speed-dial settings
Related Topics
Speed Dial, on page 49
Select a Device From the User Options Web Pages
Procedure
Step 1
OL-26946-01 53
On your User Options web pages, select User Options > Device.
The Device Configuration page displays. Toolbar buttons located at the top of the Device Configuration page
are specific to the selected device type.
Cisco Cius User Guide, Release 9.2(3)
Page 72

Cisco Unified CM User Options
Applications
Step 2
If you have multiple devices assigned to you, select the appropriate device (phone model, Extension Mobility
profile, or Remote Destination profile) from the Name drop-down menu.
Customize Do Not Disturb Options
Procedure
Step 1
Step 2
On your User Options web pages, select User Options > Device.
Set the following options:
• Do Not Disturb - Check the check box to enable or disable DND.
• DND Option - Select either None or Ringer Off (to turn off only the ringer).
• DND Incoming Call Alert (applies to either DND option set) - Set the alert to Beep Only, Flash Only,
Disable, or select None (to use the Alert setting set up by your system administrator).
Related Topics
Do Not Disturb, on page 44
Line Settings
Line settings affect a specific phone line (directory number) for your Phone application. Line settings can
include call forwarding, audio message indicators, voice-message indicators, and other line-specific settings.
Set Up Call Forwarding for a Line
Procedure
Step 1
Step 2
Step 3
Step 4
Step 5
Step 6
On your User Options web page, select User Options > Device.
Select a phone from the Name drop-down menu.
Select Line Settings.
If you have more than one directory number (line) assigned to your Phone application, select a line from the
Line drop-down menu.
In the Incoming Call Forwarding area, select call forwarding settings for various conditions.
Select Save.
Related Topics
Call Forward All, on page 41
Cisco Cius User Guide, Release 9.2(3)
54 OL-26946-01
Page 73

Applications
Change the Audible Voice Message Indicator Setting for a Line
Procedure
Cisco Unified CM User Options
Step 1
Step 2
Step 3
Step 4
Step 5
Step 6
On your User Options web page, select User Options > Device.
Select a phone from the Name drop-down menu.
Select Line Settings.
If you have more than one directory number (line) assigned to your Phone application, select a line from the
Line drop-down menu.
In the Audible Message Waiting Lamp area, choose from various settings.
Select Save.
Speed Dial on the Web
Depending on how your Phone application has been set up, you can use speed-dial buttons, which you can
set up on your User Options web pages.
Set Up Speed-Dial Buttons
Procedure
Step 1
Step 2
Step 3
Step 4
Step 5
On your User Options web page, select User Options > Device.
Select a phone from the Name drop-down menu.
Select Speed Dials.
In the Speed Dial Settings area, enter a number and label for a speed-dial button for your Phone application.
Select Save.
User Settings
Your PIN and password allow you to access different features and services. For example, use your PIN to
sign in to Cisco Extension Mobility. Use your password to sign in to your User Options web pages and Cisco
Web Dialer on your personal computer. For more information, contact your system administrator.
User settings include your browser password, PIN, and language (locale) settings.
Cisco Cius User Guide, Release 9.2(3)
OL-26946-01 55
Page 74

Cisco Unified CM User Options
Change Your Browser Password
Procedure
Applications
Step 1
Step 2
Step 3
Step 4
Step 5
On your User Options web page, select User Options > User Settings.
Enter your Current Password.
Enter your New Password.
Reenter your new password in the Confirm Password field.
Select Save.
Change Your PIN
Procedure
Step 1
Step 2
Step 3
Step 4
Step 5
On your User Options web page, select User Options > User Settings.
Enter your Current PIN.
Enter your New PIN.
Reenter your new PIN in the Confirm PIN field.
Select Save.
Change the Language for Your User Options Web Pages
Procedure
Step 1
Step 2
Step 3
On your User Options web page, select User Options > User Settings.
In the User Locale area, select an item from the Locale drop-down list.
Select Save.
Directory
To get a list of coworkers in your corporate directory, select User Options > Directory.
You can access the Cisco Unified Communications Manager Address Book Synchronizer in your web browser.
Mobility Settings
When using Cisco Mobile Connect, you must add your mobile and other phones that you want to use to make
and receive calls using the same directory numbers as your Phone application. These phones are called remote
Cisco Cius User Guide, Release 9.2(3)
56 OL-26946-01
Page 75

Applications
destinations. You can also define access lists to restrict or allow calls from certain numbers to be sent to your
mobile phone.
Related Topics
Mobile Connect, on page 46
Add a New Remote Destination
Procedure
Cisco Unified CM User Options
Step 1
Step 2
Step 3
Step 4
Step 5
Step 6
Step 7
On your User Options web page, select User Options > Mobility Settings > Remote Destinations.
Select Add New.
Enter the following information:
• Name - Enter a name for the mobile (or other) phone.
• Destination Number - Enter your mobile phone number.
Select your remote destination profile from the drop-down list box. Your remote destination profile contains
the settings that apply to remote destinations that you create.
Check the Mobile Phone check box to allow your remote destination to accept a call sent from your Phone
application.
Check the Enable Mobile Connect check box to allow your remote destination to ring simultaneously with
your Phone application.
Select one of the following options in the Ring Schedule area (the ring schedule drop-down list boxes include
only the access lists that you have created):
• All the time - Select this option if you do not want to impose day and time restrictions on ringing the
remote destination.
• As specified below - Select this option and select from the following items to set up a ring schedule
based on day and time:
1
Check a check box for each day of the week you want to allow calls to ring the remote destination.
2
For each day, select All Day or select the beginning and ending times from the drop-down lists.
3
Select the time zone from the drop-down list box.
Step 8
Select one of these ringing options:
• Always ring this destination.
• Ring this destination only if the caller is in the allowed access list that you select.
• Do not ring this destination if the caller is in the blocked access list that you select.
Step 9
OL-26946-01 57
Select Save.
Cisco Cius User Guide, Release 9.2(3)
Page 76

Contacts
Create an Access List
Procedure
Applications
Step 1
Step 2
Step 3
Step 4
Step 5
Step 6
Step 7
Step 8
Step 9
Step 10
On your User Options web page, select User Options > Mobility Settings > Access Lists.
Select Add New.
(Optional) Enter a name to identify the access list and a description.
Select whether the access list will allow or block specified calls.
Select Save.
Select Add Member to add phone numbers or filters to the list.
Select an option from the Filter Mask drop-down list box.
You can filter a directory number, calls with restricted caller ID (Not Available), or calls with anonymous
caller ID (Private).
If you select a directory number from the Filter Mask drop-down list box, enter a phone number or filter in
the DN Mask field.
You can use the following wild cards to define a filter:
• X (upper or lower case) - Matches a single digit. For example, 408555123X matches any number between
4085551230 and 4085551239.
• ! - Matches any number of digits. For example, 408! matches any number that starts with 408.
• # - Used as a single digit for exact match.
To add this member to the access list, select Save.
To save the access list, select Save.
Contacts
Use the Cisco Cius Contacts application to store, sort, and search your contacts. The Contacts application is
a standalone application but is also integrated into other applications, such as the Phone application and Email
application.
Launch the Contacts application from the Applications menu .
Cisco Cius User Guide, Release 9.2(3)
58 OL-26946-01
Page 77

Applications
The following image shows the Contacts application.
Figure 26: Contacts Application
Contact Details
Contact Details
Add a Contact
Tap an entry in your contact list to view details for that contact. From the contact details screen, place a call,
start a chat, start a WebEx meeting, or send an email message to that contact.
The following image shows a contact card.
Figure 27: Contact Card
Procedure
Step 1
Step 2
Step 3
Step 4
OL-26946-01 59
Press the Menu key .
Tap New Contact.
Enter the contact name.
Enter the contact information.
Cisco Cius User Guide, Release 9.2(3)
Page 78

Edit a Contact
Edit a Contact
Applications
Procedure
Step 1
Step 2
Step 3
Step 4
Step 5
Select a contact.
Press the Menu key .
Tap Edit Contact.
Edit the contact information.
Tap Done.
Remove a Contact
Procedure
Step 1
Step 2
Step 3
Step 4
Select a contact.
Press the Menu key .
Tap Remove Contact.
Tap OK.
Mark a Contact as a Favorite
Procedure
Step 1
Step 2
Step 3
Cisco Cius User Guide, Release 9.2(3)
60 OL-26946-01
Select a contact.
Tap the Favorite icon .
Tap the Favorite icon again to unmark the contact as a favorite.
Page 79

Applications
Add a Group
Add a Group
Procedure
Step 1
Step 2
Step 3
Tap + Group.
Enter the name of the group.
Tap OK.
Delete a Group
Procedure
Step 1
Step 2
Step 3
Select a group.
Tap Delete Group.
Tap Delete.
Add a Contact to a Group
Procedure
Step 1
Step 2
Step 3
Step 4
Contact Icons
Select a group.
Tap New Contact.
Select a contact.
Tap OK.
Use a contact icon to open the Quick Contact Badge to communicate with your contacts. Note that other
options may be available on the Quick Contact Badge, depending upon which applications you have installed.
The following image shows a Quick Contact Badge.
Figure 28: Quick Contact Badge
Cisco Cius User Guide, Release 9.2(3)
OL-26946-01 61
Page 80

Contact Icons
Call a Contact
Applications
Procedure
Step 1
Step 2
Tap and hold the contact icon to open the Quick Contact Badge.
Tap the Phone icon .
View Contact Details
Procedure
Step 1
Step 2
Tap and hold the contact icon to open the Quick Contact Badge.
Tap the Contact Details icon .
Send an Email Message
Procedure
Step 1
Step 2
Tap and hold the contact icon to open the Quick Contact Badge.
Tap the Email icon .
Start a Conversation
Procedure
Step 1
Step 2
Cisco Cius User Guide, Release 9.2(3)
62 OL-26946-01
Tap and hold the contact icon to open the Quick Contact Badge.
Tap the Chat icon .
Page 81

Applications
Start a WebEx Meeting
Procedure
Search
Search
Step 1
Step 2
Tap and hold the contact icon to open the Quick Contact Badge.
Tap the WebEx icon .
While your Cisco Cius is connected to a network, use the Contacts application to search for contacts in three
places:
• Your local Android contacts
• A Microsoft Exchange Global Address List (GAL)
• Cisco Unified Communications Manager database
By default, the Contacts application searches your local contacts. If the minimum number of contacts is not
found, the search queries the Cisco Unified CM database. Contacts that appear in both your local contacts
and Cisco Unified CM database are merged, and your local contact details show the merged information.
Cisco Unified CM database search results that are not in your local contacts are displayed in their own block
under the list of local contacts.
The Cisco Unified CM database is searched for first and last names only.
The Exchange Global Address List is searched only if an ActiveSync account is set up and you enter at least
three characters in the search field.
Use the Contacts application to sync your local Android contacts with other services, such as a Google account
or a Facebook account.
Search Your Contacts
Procedure
Step 1
Step 2
OL-26946-01 63
Press the Menu key .
Tap Search.
Cisco Cius User Guide, Release 9.2(3)
Page 82

Import Contacts
Import Contacts
Procedure
Applications
Step 1
Step 2
Step 3
Press the Menu key .
Tap Import/Export.
Tap Import from SD card.
Export Contacts
Procedure
Step 1
Step 2
Step 3
Press the Menu key .
Tap Import/Export.
Tap Export to SD card.
Availability
Availability is displayed when you are signed in to the Cisco Unified Presence application through the Chat
application or the Cisco WebEx Meetings application. Availability shows the status of local contacts.
The Email application allows you to manage multiple email accounts. Use the Email application to view
individual email account inboxes or a combined inbox. The Email application supports POP3, IMAP and
Exchange email accounts.
Use the Email application to add and manage multiple email accounts, including multiple Exchange accounts
on different servers.
Email accounts can use ActiveSync for the Calendar and Contacts applications.
Launch the Email application from the Applications menu .
Settings
The first time that you open the Email application, you are taken to the Settings page to configure the account
credentials (server and username, password, incoming server address, check box for Secure Connections and
Accept all SSL certificates), unless you already entered the credentials using the Setup Assistant or the Settings
application.
Cisco Cius User Guide, Release 9.2(3)
64 OL-26946-01
Page 83

Applications
If you choose not to set up the account credentials right away, use the Settings application to enter the credentials
later.
Related Topics
Setup Assistant, on page 14
Add an Email Account
Procedure
Inbox
Inbox
Step 1
Step 2
Step 3
Step 4
Step 5
Step 6
Tap the Applications Menu icon on the home screen.
Tap Settings .
Tap Accounts & Sync.
Tap Add Account.
Tap Corporate.
Enter the email account credentials.
Enter all credentials before you save account settings. The application tries to authenticate credentials before
saving and prompts you to try again when you enter incorrect information.
The Email shares account settings with the Calendar application; either application initiates the account setup.
Accounts are listed in the tab on the left side, followed by a summary of folders with new messages.
Folders are listed in the right side tab.
The following image shows a combined inbox.
Figure 29: Combined Inbox Screen
View email messages from an individual or a combined inbox. While an email message is open, the inbox is
displayed in the left tab.
Cisco Cius User Guide, Release 9.2(3)
OL-26946-01 65
Page 84

Inbox
Tap the Mailbox button at top left of the email message screen to return to the mailbox.
Refresh Your Inbox
Procedure
Applications
Step 1
Step 2
Press the Menu key .
Tap Refresh.
Sort Mailbox
Procedure
Step 1
Step 2
Step 3
Press the Menu key .
Tap Sort By.
Select a sorting method.
Navigate Between Email Messages
Procedure
Tap Previous or Next to navigate between messages.
Search Your Email Messages
Procedure
Step 1
Step 2
Step 3
Cisco Cius User Guide, Release 9.2(3)
66 OL-26946-01
Tap the Search icon.
Select the type of search.
Enter your search query into the search bar.
Page 85

Applications
Send an Email Message
Procedure
Send an Email Message
Step 1
Step 2
Step 3
Tap the Compose icon.
Use the on-screen keyboard to enter the email address, enter the subject, and compose the message.
Tap the Send button.
The following image shows an email message being composed.
Figure 30: Composing an Email Message
Save an Email Message Draft
Procedure
Step 1
Step 2
Step 3
OL-26946-01 67
Tap the Compose icon.
Use the on-screen keyboard to enter the email address, enter the subject, and compose the message.
Tap the Save as draft button.
Cisco Cius User Guide, Release 9.2(3)
Page 86

Reply to an Email Message
Reply to an Email Message
Procedure
Applications
Step 1
Step 2
Step 3
Tap the Reply button or the Reply all button.
Use the on-screen keyboard to compose the message.
Tap the Send button.
Forward an Email Message
Procedure
Step 1
Step 2
Step 3
Tap the Forward button.
Use the on-screen keyboard to enter the email address.
Tap the Send button.
Add an Attachment to an Email Message
Procedure
Step 1
Step 2
Tap the Attach button.
Select a file.
Note
The total size of attachments cannot exceed 5 MB. A warning is displayed when the total size of
attachments reaches 3 MB.
Add a CC or BCC Recipient
Procedure
Step 1
Step 2
Step 3
Press the Menu key .
Tap Add Cc/Bcc.
Use the on-screen keyboard to enter the email address in the Cc or Bcc field.
Cisco Cius User Guide, Release 9.2(3)
68 OL-26946-01
Page 87

Applications
Delete an Email Message
Tap the Delete button.
Delete Multiple Email Messages
Procedure
Delete an Email Message
Step 1
Step 2
Check the email messages.
Tap the Delete button.
Delete a Folder
Procedure
Step 1
Step 2
Tap and hold a folder.
Select Delete.
Move an Email Message
Procedure
Step 1
Step 2
Step 3
Tap and hold a message.
Tap Move.
Select a folder.
Mark an Email Message as a Favorite
Tap the Favorite icon .
Cisco Cius User Guide, Release 9.2(3)
OL-26946-01 69
Page 88

Mark Multiple Email Messages as Favorites
Mark Multiple Email Messages as Favorites
Procedure
Applications
Step 1
Step 2
Check the email messages.
Tap the Star button.
Mark an Email Message as a New Message
Procedure
Step 1
Step 2
Check the email message.
Tap Mark Unread.
Mark Multiple Email Messages as New Messages
Procedure
Step 1
Step 2
Check the email messages.
Tap Mark Unread.
Add a Signature to Your Email Messages
Procedure
Step 1
Step 2
Step 3
Step 4
Cisco Cius User Guide, Release 9.2(3)
70 OL-26946-01
Press the Menu key .
Tap Account Settings.
Tap Signature.
Enter your signature and tap OK. Your signature appears on any new email message that you compose. Your
signature does not appear when you reply to a message.
Page 89

Applications
Quick Contact Badge
To open the Quick Contact Badge to communicate with your contacts, tap a contact icon or an email address
in the To or CC field. Note that other options may be available on the Quick Contact Badge, depending on
which applications you have installed.
Related Topics
Contact Icons, on page 61
Digitally Signed Email Messages
A digitally signed email message that is sent from an Exchange 2003 server will appear as a downloadable
attachment of unknown size.
Set Your Email Check Frequency
Quick Contact Badge
Procedure
Step 1
Step 2
Step 3
Step 4
Press the Menu key .
Tap Account Settings.
Tap Email Check Frequency.
Select a frequency.
Reset Your Email Password
Procedure
Step 1
Step 2
Step 3
Step 4
Press the Menu key .
Tap Account Settings.
Tap Incoming Settings.
Enter your new password in the Password field.
Cisco Cius User Guide, Release 9.2(3)
OL-26946-01 71
Page 90

Select Your Ringtone
Select Your Ringtone
Procedure
Applications
Step 1
Step 2
Step 3
Step 4
Press the Menu key .
Tap Account Settings.
Tap Select Ringtone.
Select a ringtone and tap OK.
Edit Your Vibrate Settings
Procedure
Step 1
Step 2
Step 3
Press the Menu key .
Tap Account Settings.
Tap Vibrate.
Chat
Use the Chat application to send and receive instant messages, to update your availability, and to add and
remove contacts. You receive chat messages and presence updates while the Chat application is minimized
or out of focus.
Launch the Chat application from the Applications menu .
Set Up an Account
The first time that you open the Chat application, you are taken to the Settings page to configure your account
credentials, unless you already entered the credentials using the Setup Assistant or the Settings application.
If you choose not to set up the account credentials in the Setup Assistant, you will be prompted to do so when
you first launch the Chat application.
Related Topics
Setup Assistant, on page 14
Cisco Cius User Guide, Release 9.2(3)
72 OL-26946-01
Page 91

Applications
Add a Chat Account
Enter all credentials before you save account settings. The application tries to authenticate credentials before
saving and prompts you to try again when you enter incorrect information.
Procedure
Signing In
Step 1
Step 2
Step 3
Step 4
Step 5
Step 6
Signing In
Contacts
Tap the Applications Menu icon on the home screen.
Tap Settings .
Tap Accounts & Sync.
Tap Add Account.
Tap Cisco Jabber IM.
Enter the chat account credentials.
An automatic sign-in option for the Chat application is enabled by default. The Chat application starts
automatically when Cisco Cius is turned on, unless you sign out of the Chat application.
If you are not signed in to the Chat application, the application will try to sign you in automatically when the
application is launched. If the sign-in succeeds, the Chat Contacts screen is displayed. If the sign-in does not
succeed, you will be prompted to reenter your account credentials.
The Contacts application is integrated with the Chat application.
The following image shows the Chat contacts screen.
Figure 31: Chat Contacts
Related Topics
Contacts, on page 58
Cisco Cius User Guide, Release 9.2(3)
OL-26946-01 73
Page 92

Contacts
Add a Chat Contact
Procedure
Applications
Step 1
Step 2
Press the Menu key .
Tap Add Contact.
Remove a Chat Contact
Procedure
Step 1
Step 2
Tap and hold a contact on the Contacts screen, or in an active conversation.
Tap Remove Contact from Chat.
Show Offline Contacts
Procedure
Step 1
Step 2
Press the Menu key .
Tap Show Offline Contacts.
View Chat Contact Details
1
Tap the contact icon to open the Quick Contact Badge.
2
Tap the Contact Details icon .
Or:
1
Tap and hold a contact on the Contacts screen, or in an active conversation
2
Tap View Chat Contact.
Start a Conversation with a Chat Contact
1
Tap and hold the contact icon to open the Quick Contact Badge.
2
Tap the Chat icon .
Cisco Cius User Guide, Release 9.2(3)
74 OL-26946-01
Page 93

Applications
Or:
1
2
Call a Chat Contact
1
2
Or:
1
2
Unsynced Contacts
Tap and hold a contact on the Contacts screen, or in an active conversation.
Tap Chat.
Tap and hold the contact icon to open the Quick Contact Badge.
Tap the Phone icon .
Tap and hold a contact on the Contacts screen, or in an active conversation.
Tap Call.
Start a WebEx Meeting with a Chat Contact
1
Tap and hold the contact icon to open the Quick Contact Badge.
2
Tap the WebEx icon .
Or:
1
Tap and hold a contact on the Contacts screen, or in an active conversation.
2
Tap Start WebEx Meeting.
Send an Email Message to a Chat Contact
1
Tap and hold the contact icon to open the Quick Contact Badge.
2
Tap the Email icon .
Or:
1
Tap and hold a contact on the Contacts screen, or in an active conversation.
2
Tap Send Email.
Unsynced Contacts
You can use the Chat application to communicate with unsynced contacts. Unsynced contacts are contacts
that you have not added to your chat contacts.
Cisco Cius User Guide, Release 9.2(3)
OL-26946-01 75
Page 94

Unsynced Contacts
Add an Unsynced Contact to Your Chat Contacts
Procedure
Applications
Step 1
Step 2
Tap and hold the contact icon.
Tap Add in the Contact Details dialog box.
Start a Conversation with an Unsynced Contact
1
Tap and hold the contact icon.
2
Tap the Chat icon on the Contact Details dialog box.
Or:
1
Tap and hold a contact on the Contacts screen, or in an active conversation.
2
Tap Chat.
Call an Unsynced Contact
1
Tap and hold the contact icon.
2
Tap a Phone icon on the Contact Details dialog box.
Or:
1
Tap and hold a contact on the Contacts screen, or in an active conversation.
2
Tap Call.
Start a WebEx Meeting with an Unsynced Contact
1
Tap and hold the contact icon.
2
Tap the WebEx icon on the Contact Details dialog box.
Or:
1
Tap and hold a contact on the Contacts screen, or in an active conversation.
2
Tap Start WebEx Meeting.
Send an Email Message to an Unsynced Contact
1
Tap and hold the contact icon.
2
Tap an Email icon on the Contact Details dialog box.
Cisco Cius User Guide, Release 9.2(3)
76 OL-26946-01
Page 95

Applications
Or:
1
Tap and hold a contact on the Contacts screen, or in an active conversation.
2
Tap View Chat Contact.
Contact Requests
While you are signed in to the Chat application, you will receive a notification in the notification bar if you
receive a new contact request.
View Your Contact Requests
Procedure
Contact Requests
Step 1
Step 2
Step 3
Step 4
Conversations
Press the Menu key .
Tap Contact Requests.
Tap Allow or Deny.
Tap Confirm.
The following image shows an active conversation.
Figure 32: Active Conversation
The chat opens in the Active Conversations tab on the right side of the screen. Use the on-screen keyboard
to type your messages.
While you are viewing an active conversation, a scrollable list of your active conversations displays on the
left side of the screen. Select a conversation to view it.
Cisco Cius User Guide, Release 9.2(3)
OL-26946-01 77
Page 96

Availability
Start a Conversation
End a Conversation
Availability
Applications
Tap a contact from your contact list.
Tap the Close icon at the top right of the conversation.
Tap the top left of the screen to set your status to one of the following:
• Available
• Away
• Do Not Disturb
• Custom
The following image shows the status options.
Figure 33: Status Options
Add a Custom Status
Procedure
Step 1
Step 2
Step 3
Step 4
Step 5
Cisco Cius User Guide, Release 9.2(3)
78 OL-26946-01
Tap your status at the top left of the screen.
Tap Custom.
Select an availability for the status.
Enter the text for your status.
Tap OK.
Page 97

Applications
Delete a Custom Status
Procedure
Emoticons
Step 1
Step 2
Step 3
Tap your status at the top left of the screen.
Tap and hold a custom status.
Tap Delete.
Emoticons
The Chat application includes emoticons that you can use in conversation.
Insert an Emoticon into a Conversation
Procedure
Step 1
Step 2
Tap the Emoticon icon at the right side of the text entry box.
Tap an emoticon to insert it into the conversation.
Links
The Chat application supports links in conversations.
Open a URL
Tap a URL in a conversation to open that website in the Browser application.
Email Address
Tap an email address in a conversation to open a new message in the Email application, with that email address
in the To field.
Phone Number
Tap a phone number in a conversation to launch the Phone application with that phone number on the call
line.
WebEx
Tap a WebEx link in a conversation to join a WebEx meeting.
Cisco Cius User Guide, Release 9.2(3)
OL-26946-01 79
Page 98

Search
Search
Use the search function to search your chat contacts and your corporate directory.
Add a Search Result to Your Chat Contacts
Procedure
Applications
Step 1
Step 2
Step 3
Step 4
Tap a contact icon from the search results.
Tap Add.
Select a group for the contact.
Tap Close.
Start a Conversation with a Search Result
Tap on a search result to start a conversation with that contact.
Settings
The Chat application settings allow you to set up your auto-sign-in option and to edit your chat account
information.
Set Your Profile Picture
Procedure
Step 1
Step 2
Step 3
Step 4
Press the Menu key .
Tap Account Settings.
Tap Select Profile Picture.
Tap Take Photo to launch the Camera application and take a picture. Or, tap Select Photo from Gallery to
launch the Gallery application and select a picture.
Cisco Cius User Guide, Release 9.2(3)
80 OL-26946-01
Page 99

Applications
Remove a Profile Picture
Procedure
Settings
Step 1
Step 2
Step 3
Step 4
Press the Menu key .
Tap Account Settings.
Tap Select Profile Picture.
Tap Remove Profile Picture.
Enable Status Bar Notifications
Procedure
Step 1
Step 2
Step 3
Press the Menu key .
Tap Account Settings.
Tap Status Bar Notifications.
Enable Audio Notifications
Procedure
Step 1
Step 2
Step 3
Press the Menu key .
Tap Account Settings.
Tap Audio Notifications.
Enable In-Chat Audio Notifications
Procedure
Step 1
Step 2
Step 3
OL-26946-01 81
Press the Menu key .
Tap Account Settings.
Tap In Chat Audio Notifications.
Cisco Cius User Guide, Release 9.2(3)
Page 100

Sign Out of Chat
Set Your Ringtone
Procedure
Applications
Step 1
Step 2
Step 3
Step 4
Press the Menu key .
Tap Account Settings.
Tap Select Ringtone.
Select a ringtone.
Sign Out of Chat
Procedure
Step 1
Step 2
Press the Menu key .
Tap Sign Out.
Calendar
The Cisco Cius Calendar application includes an integrated Cisco WebEx Meeting Center application.
Calendar reminders appear on the notification bar.
Launch the Calendar application from the Applications menu .
Tap the 1 (day), 7 (week), or 31 (month) tab to change your calendar view. Tap the Today button to return
to the Day view of the current day.
Upcoming appointments are listed on the right side of the screen.
Cisco Cius User Guide, Release 9.2(3)
82 OL-26946-01
 Loading...