

Page 1
Cisco ASA Firepower Module
Easy Setup Guide
1
Preconfiguring
2
Configuring Security Policy
3
Updating Database
4
Reporting & Monitoring
You can easily set up your ASA Firepower Module
in this step-by-step guide
Page 2

This guide provides information about basic configuration of security policies (ac-
cess control policies) on the Cisco ASA Firepower module, using the Cisco Adap-
tive Security Device Manager (ASDM). Before proceeding, make sure that you have
completed the initial configuration of the Cisco ASA with Firepower Services, refer
to the separate "Cisco ASA with Firepower Services Easy Setup Guide" and so on.
Some configurations in this guide require having optional licenses installed. In those
cases, "MEMO" or "Caution" columns specify the necessary licenses.
The Cisco ASA with Firepower Services ship with a base license for Application
Visibility and Control (AVC). Optional subscriptions for Next-Generation IPS
(
N-
GIPS), Cisco Advanced Malware Protection(AMP), and URL Filtering (URL) can
be added to the base configuration for advanced functionality.
●
AVC:Supports more than 3,000 application-layer and risk-based controls that
can launch tailored intrusion prevention system (IPS) threat detection policies to
optimize security effectiveness.
●
NGIPS:Provides highly effective threat prevention and full contextual awareness
of users, infrastructure, applications, and content to detect multivector threats
and automate defense response.
●
AMP:Delivers inline network protection against sophisticated malware and Cisco
Threat Grid sandboxing.
●
URL:Adds the capability to filter more than 280 million top-level domains by risk
level and more than 82 categories.
Redirect traffic to the ASA Firepower module by creating a service policy on the
ASA that identifies specific traffic that you want to send.
Preconfiguring
1
1-1 Before You Begin
1-2 Configuring Service Policy
1
1
Click [Configuration].
2
2
Click [Firewall].
Optional Licenses
Characters
Included
in SKU
NGIPS AMP URL
NGIPS License TA
●
- -
AMP License AMP -
●
-
URL License URL - -
●
NGIPS & AMP License TAM
● ●
-
NGIPS & URL License TAC
●
-
●
NGIPS & AMP & URL License TAMC
● ● ●
Cisco ASA Firepower Module Easy Setup Guide
1
Preconfiguring
Page 3

8
8
Click [ASA FirePOWER
Inspection].
5
5
Click [Next].
Use the default [Global - applies
to all interfaces]. This option applies the service policy globally
to all interfaces.
3
4
3
Click [Service Policy
Rules].
4
Click [Add Service Policy
Rule] from the [Add] menu
bar.
6
6
Click [Use class-default as
the traffic class].
7
Click [Next].
7
9
10
9
Click [Enable ASA Fire-
POWER for this traffic
flow].
10
Click [Permit traffic] or
[Close traffic].
The [Permit traffic] sets the
ASA to allow all traffic through,
uninspected, if the module is
unavailable. The [Close traffic]
sets the ASA to block all traffic if
the module is unavailable.
11
Click [Finish].
11
Cisco ASA Firepower Module Easy Setup Guide
1
Preconfiguring
Page 4
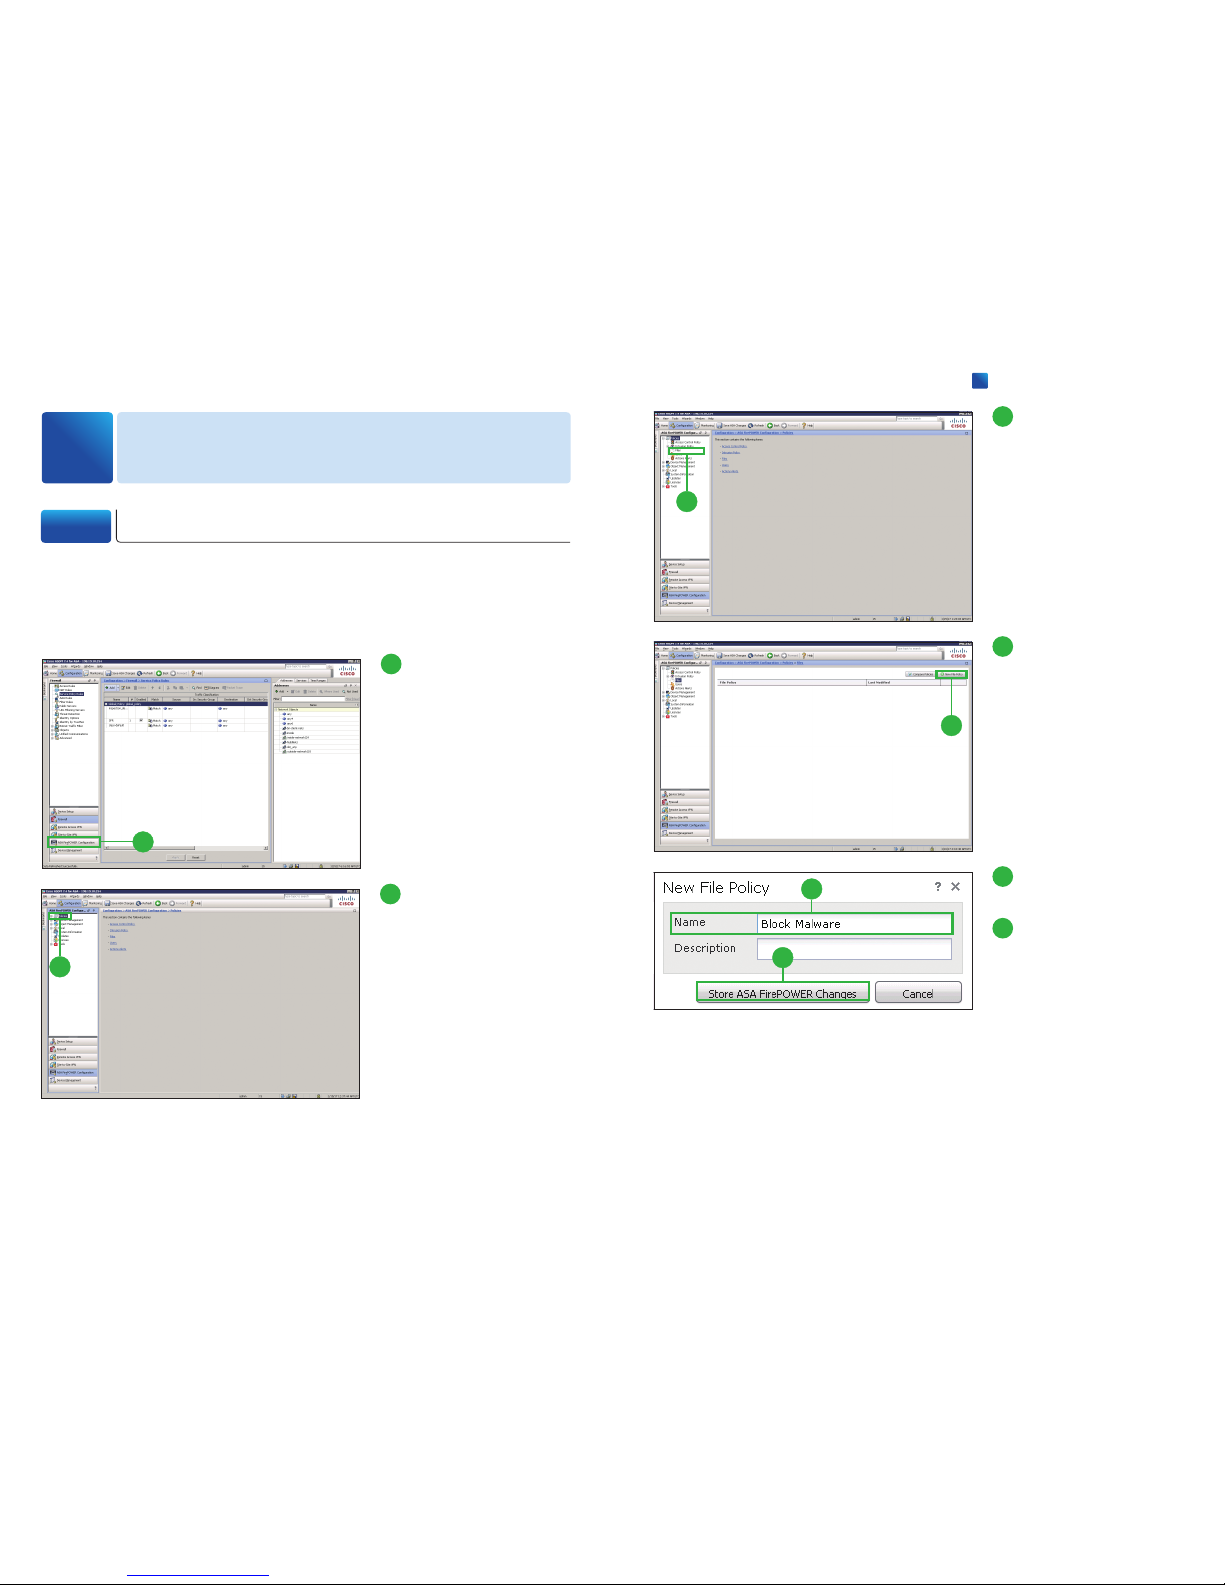
Create file policies to configure the system to perform malware protection and file
control as part of your overall access control configuration. The file policies that
you create here will be used in
”
2-2 Configuring Access Control Policy: Visual-
ization”.
Configuring Security Policy
2
2-1 Configuring File Policy: Blocking Malware
1
1
Click [ASA FirePOWER
Configuration].
2
2
Click [Policies].
3
3
Click [Files].
4
4
Click [New File Policy].
The [New File Policy] pop-up
window appears.
5
Enter a name for your new
policy in the [Name] field.
6
Click [Store ASA Fire-
POWER Changes].
6
5
Cisco ASA Firepower Module Easy Setup Guide
2
Configuring Security Policy
Page 5

7
7
Click [Add File Rule].
The [Add File Rule] pop-up window appears.
8
10
11
9
8
Click [Block Malware]
from the [Action] dropdown list.
9
Select one or more [File
Types].
10
Click [Add].
You can select one or more [File
Type Categories] and search for
a file type by its name or description.
11
Click [Store ASA Fire-
POWER Changes].
12
Click [Store ASA Fire-
POWER Changes].
The [Apply Access Control Policy] pop-up window appears.
12
Caution
At step
❽
, the rule actions [Malware Cloud Lookup].and
[Block Malware] require the NGIPS License or the AMP
License. If you don
ʼ
t have these licenses, select the rule
actions [Detect Files].or [Block Files].
●
Detect Files rules allow you to log the detection of
specific file types while still allowing their transmis
-
sion.
●
Block File rules allow you to block specific file types.
●
Malware Cloud Lookup rules allow you to log the
malware disposition of files traversing your network
based on a cloud lookup, while still allowing their
transmission.
●
Block Malware rules allow you to calculate the SHA256 hash value of specific file types, then use a cloud
lookup process to first determine if files traversing
your network contain malware, then block files that
represent threats.
MEMO
You can set separate rules within a file policy to take different actions for different file types,
application protocols, or directions of transfer. If you want to do so, repeat the steps
❼
to ⓫.
By editing the [Default Allow All Traffic] policy that the system provides by default,
configure access control rules to exert granular control over network traffic logging
and handling (visualization).
2-2 Configuring Access Control Policy: Visualization
1
1
Click [Access Control
Policy].
Cisco ASA Firepower Module Easy Setup Guide
2
Configuring Security Policy
Page 6

2
2
Click the edit icon ( )
next to the [Default Allow
All Traffic] policy.
3
3
Click [Add Rule].
The [Add Rule] pop-up window
appears.
4
5
4
Enter a name for your new
rule in the [Name] field.
5
Click [Inspection].
9
10
9
Click [Log at End of Con-
nection].
10
Click [Add].
11
Click [Apply ASA Fire-
POWER Changes].
The [Apply Access Control Policy] pop-up window appears.
11
12
Click [Apply All].
12
6
7
6
Select [Connectivity Over
Security] from the [Intrusion Policy] drop-down
list.
7
Select the policy name of
the step 2-1
❺
from the
[File Policy] drop-down
list.
8
Click [Logging].
8
Caution
At step
❻
, the intrusion policies [Connectivity Over Security] and so on require the NGIPS Li-
cense. If you donʼt have this license, select the [None].
Cisco ASA Firepower Module Easy Setup Guide
2
Configuring Security Policy
Page 7

5
2
3
4
2
Enter a name for your new
rule in the [Name] field.
3
Select [Block] from the
[Action] drop-down list.
4
Select [above rule] from
the [Insert] drop-down
list.
5
Click [Applications].
8
7
6
6
Select one or more [Avail-
able Applications].
7
Click [Add to Rule].
You can select one or more
[Application Filters] and search
for a application by its name or
description.
8
Click [URL].
12
11
9 10
9
Select one or more
[Categories and URLs].
10
Select one [Reputations].
11
Click [Add to Rule].
If you do not specify a reputation level, the system defaults to
[Any], meaning all levels.
12
Click [Logging].
1
1
Click [Add Rule].
The [Add Rule] pop-up window
appears.
Because the [Default Allow All Traffic] allows all traffic through, configure access
control rules to block specific traffic, for example, application or web traffic that is
high risk or has low business relevance.
2-3 Configuring Access Control Policy: Blocking
13
14
13
Click [Log at Beginning
and End of Connection].
14
Click [Add].
Caution
At step
❿
, the URL reputation requires the URL License. And you can only select one reputation level. Selecting a reputation level also selects all reputations more severe than that level.
For example, if you configure a rule to block [Suspicious sites] (level 2), it also automatically
blocks [High Risk] (level 1) sites.
Cisco ASA Firepower Module Easy Setup Guide
2
Configuring Security Policy
Page 8

15
Click [Apply ASA Fire-
POWER Changes].
The [Apply Access Control Policy] pop-up window appears.
15
16
Click [Apply All].
16
As new vulnerabilities become known, Cisco releases rule updates that you can
first import onto your ASA Firepower module, then implement by applying affected
access control, network analysis, and intrusion policies.
Rule updates are cumulative, and Cisco recommends you always import the latest
update.
1
Click [Updates].
1
2
Click [Rule Updates].
2
Updating Database
3
Cisco ASA Firepower Module Easy Setup Guide
3
Configuring Security Policy
Page 9
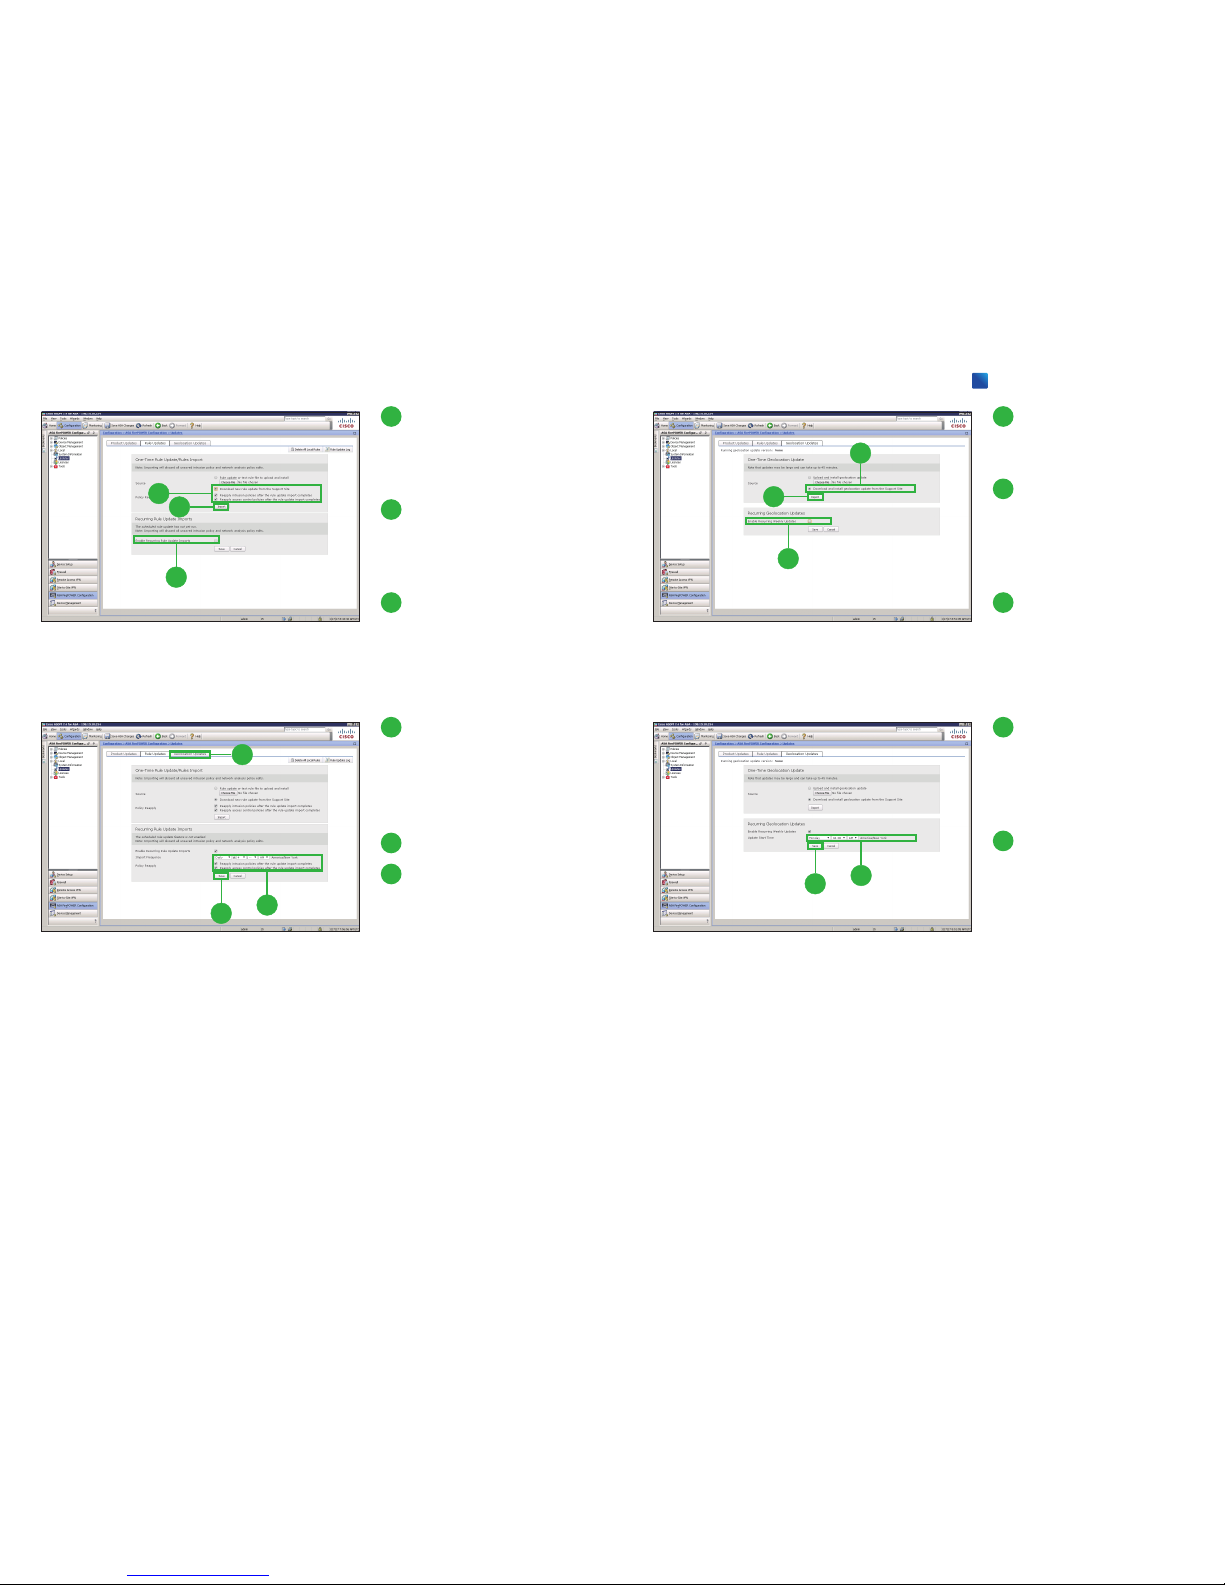
3
Select [Download new
Rule Update from the
Support Site] and click
two options below.
4
Click [Import].
The system installs the rule update.
5
Click [Enable Recurring
Rule Update Imports].
The page expands to display
options for configuring recurring
imports.
3
4
5
6
Select import frequency
and click two options below.
We recommend
[Daily].
7
Click [Save].
8
Click [Geolocation Up-
dates].
7
6
8
9
10
11
9
Click [Download and install
geolocation update from
the Support Site].
10
Click [Import].
The update process begins.
The average duration of update
installation is 30 to 40 minutes.
11
Click [Enable Recurring
Weekly Updates].
The page expands to display
options for configuring recurring
imports.
12
Specify the time and day of
the week when you want
weekly GeoDB updates to
occur.
13
Click [Save].
13
12
Cisco ASA Firepower Module Easy Setup Guide
3
Configuring Security Policy
Page 10
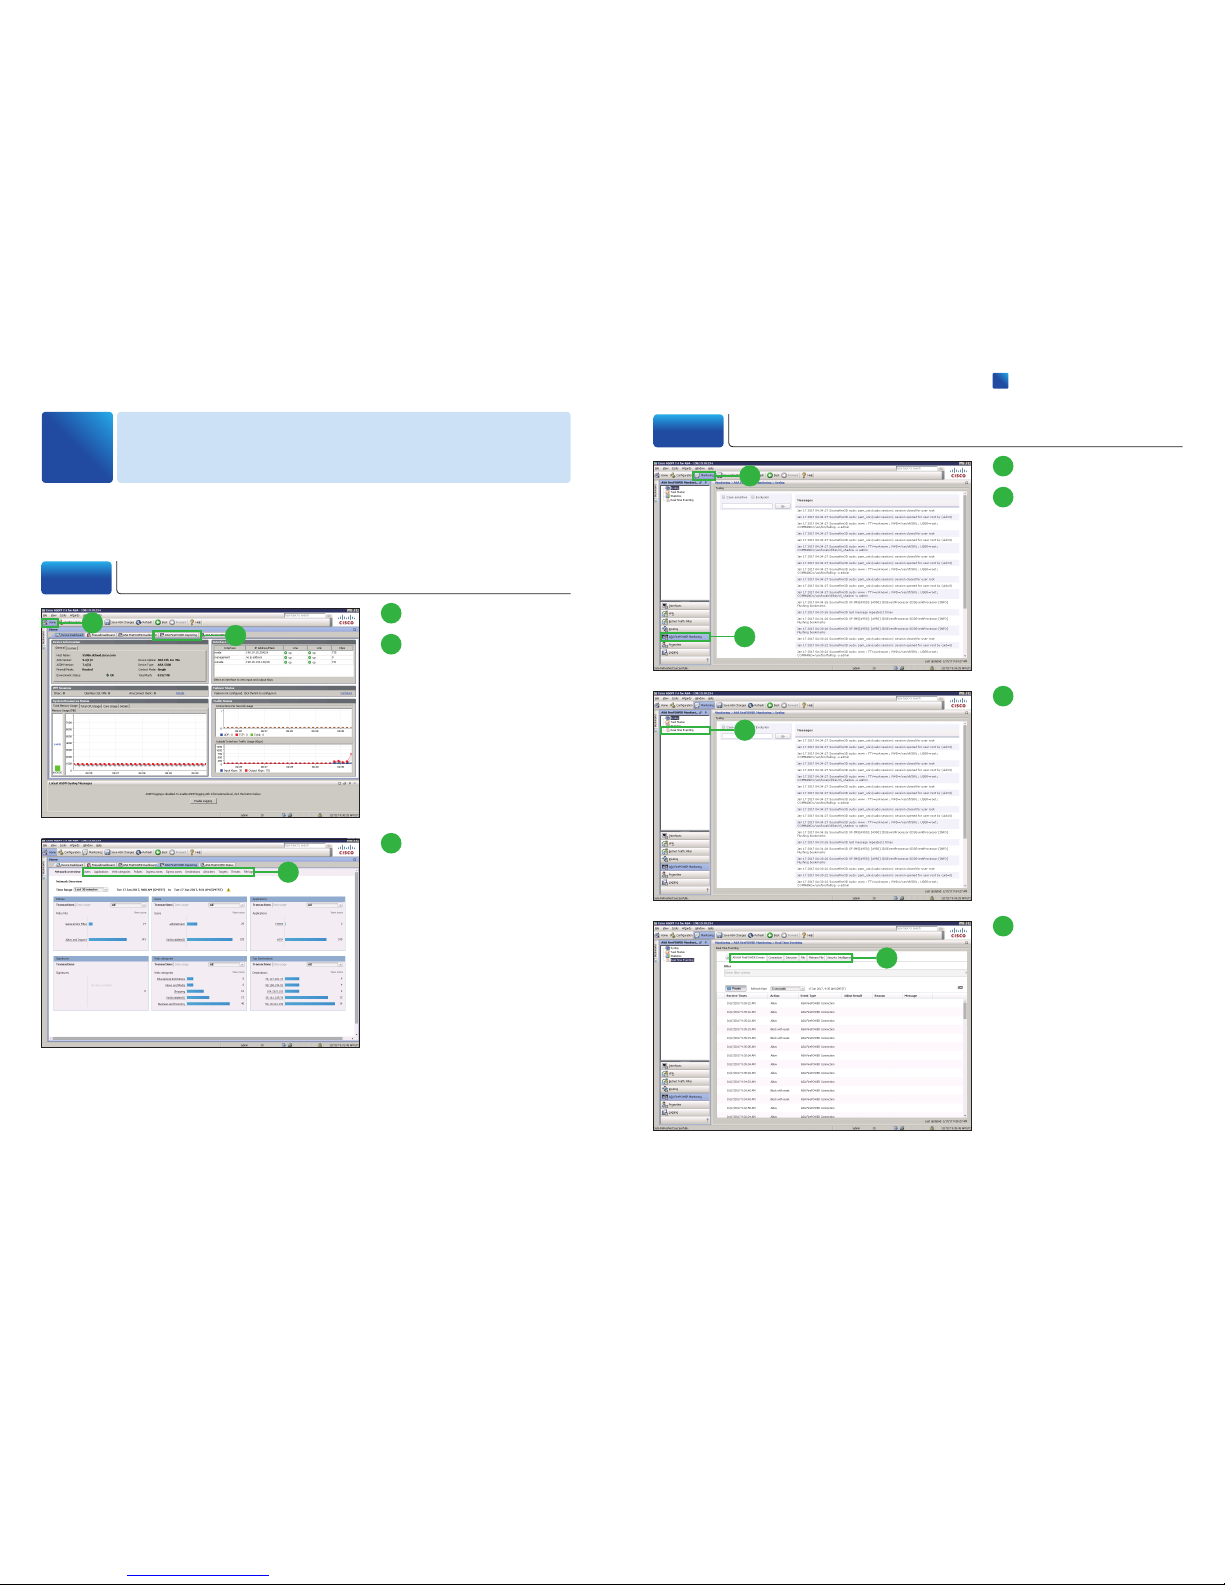
The Cisco Adaptive Security Device Manager (ASDM) provides many useful report-
ing and monitoring features to assist you in the daily administration of your system.
Reporting & Monitoring
4
4-2 Monitoring the System
1
Click [Monitoring].
2
Click [ASA FirePOWER
Monitoring].
1
2
4-1 Viewing Reports
1
Click [Home].
2
Click [ASA FirePOWER
Reporting].
1
2
3
Click individual items to get
more detailed information.
3
4
Click individual items to get
more detailed information.
4
3
Click [Real Time Eventing].
3
Cisco ASA Firepower Module Easy Setup Guide
4
Reporting & Monitoring
Page 11

© 2017 Cisco and/or its affiliates. All rights reserved. Cisco and the Cisco logo are trademarks or registered trademarks of Cisco and/or its affiliates in the U.S. and other countries.
To view a list of Cisco trademarks, go to this URL: www.cisco.com/go/trademarks. Third-party trademarks mentioned are the property of their respective owners. The use of the
word partner does not imply a partnership relationship between Cisco and any other company. (1110R)
 Loading...