

Page 1
High-Definition
Personal Video Recorder
met Video-On-Demand
Cisco 8455DVB HD PVR
Goedgekeurd voor gebruik op het Ziggo-kabelnetwerk
Page 2

Page 3

Inhoud
Belangrijke symbolen ........................................................................................................................................2
Accessoirepakket ..............................................................................................................................................2
Introductie van de PVR .....................................................................................................................................3
Welkom ............................................................................................................................................................3
Het belang van veiligheid ..................................................................................................................................3
Klantenservice en technische ondersteuning ................................................................................................3
PVR-overzicht .....................................................................................................................................................4
Kenmerken van frontpaneel ............................................................................................................................4
Verbindingen aan achterkant ...........................................................................................................................5
Mogelijkheden van de afstandsbediening ......................................................................................................6
Maak de PVR gereed voor Interactieve Televisie ...........................................................................................7
Voordat u begint ..............................................................................................................................................7
Overzicht ..........................................................................................................................................................7
Voer de smartcard in ........................................................................................................................................7
Sluit de PVR aan op uw tv ............................................................................................................................... 8
PVR naar HDTV en DVD (HDMI-verbinding)..............................................................................................8
PVR naar standaard-tv en DVD ..................................................................................................................9
PVR naar standaard-tv, DVD en videorecorder ........................................................................................10
Afstandsbediening instellen om tv te bedienen (naar keuze) ....................................................................11
Directe programmamethode .......................................................................................................................... 11
All Code Scan-methode .................................................................................................................................12
Onthoud de code die functioneerde ..............................................................................................................12
Hoofdstuk Engels ............................................................................................................................................13
Appendix ...........................................................................................................................................................25
TV Codes ....................................................................................................................................................... 26
Informatie over technische ondersteuning ...................................................................................................36
Reparatie Service Informatie .........................................................................................................................36
Handelsmerken en kennisgevingen ..............................................................................................................37
Informatie en ondersteuning ....................................................................................... Zie achterkant omslag
1
Page 4
Belangrijke symbolen
Belangrijk: Het is belangrijk dat u de volgende informatie goed leest en begrijpt.
Apparatuur correct verwijderen
Dit merkteken, dat ook op uw apparaat staat, duidt erop dat het apparaat aan het einde van zijn
gebruiksduur niet met ander huishoudelijk afval verwijderd moet worden. Om mogelijke schade
aan het milieu of de menselijke gezondheid door ongecontroleerde afvalverwijdering te voorkomen,
moet u dit product van andere soorten afval scheiden en op een verantwoorde manier recyclen.
Daarmee wordt duurzaam hergebruik van materiaalbronnen bevorderd. Als u de apparatuur wilt
verwijderen, neem dan contact op met het verkooppunt waar u dit product hebt gekocht of met
de gemeente waar u woont om te vernemen waar en hoe u dit product milieuvriendelijk kunt laten
recyclen. Zakelijke gebruikers moeten contact opnemen met hun leverancier en de algemene
voorwaarden van de koopovereenkomsten nalezen. Dit product moet niet worden gemengd met
ander bedrijfsafval voor verwijdering.
Dit symbool “Herbruikbaar materiaal” op de transportverpakking, of in de gebruikershandleiding,
geeft aan dat de artikelen kunnen worden hergebruikt.
Het symbool “Herbruikbaar materiaal” op plastic onderdelen geeft aan dat de onderdelen
opnieuw te gebruiken zijn.
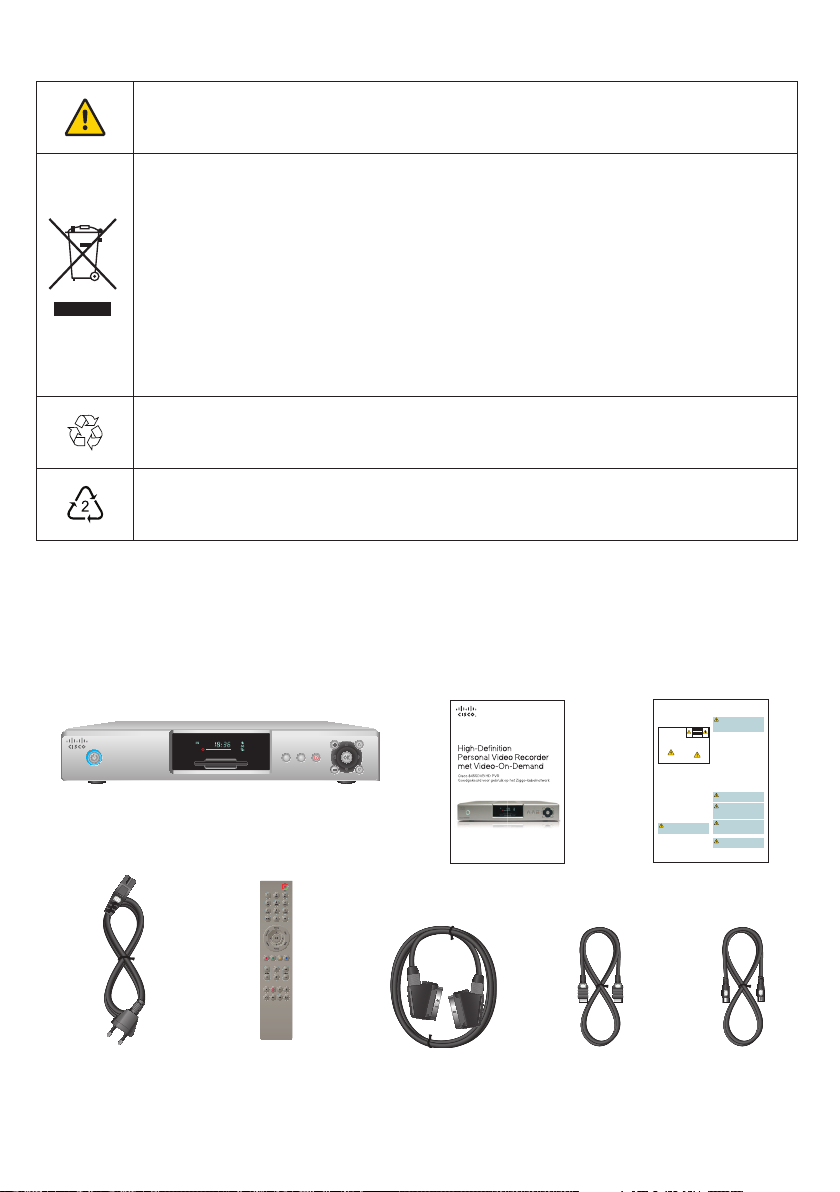
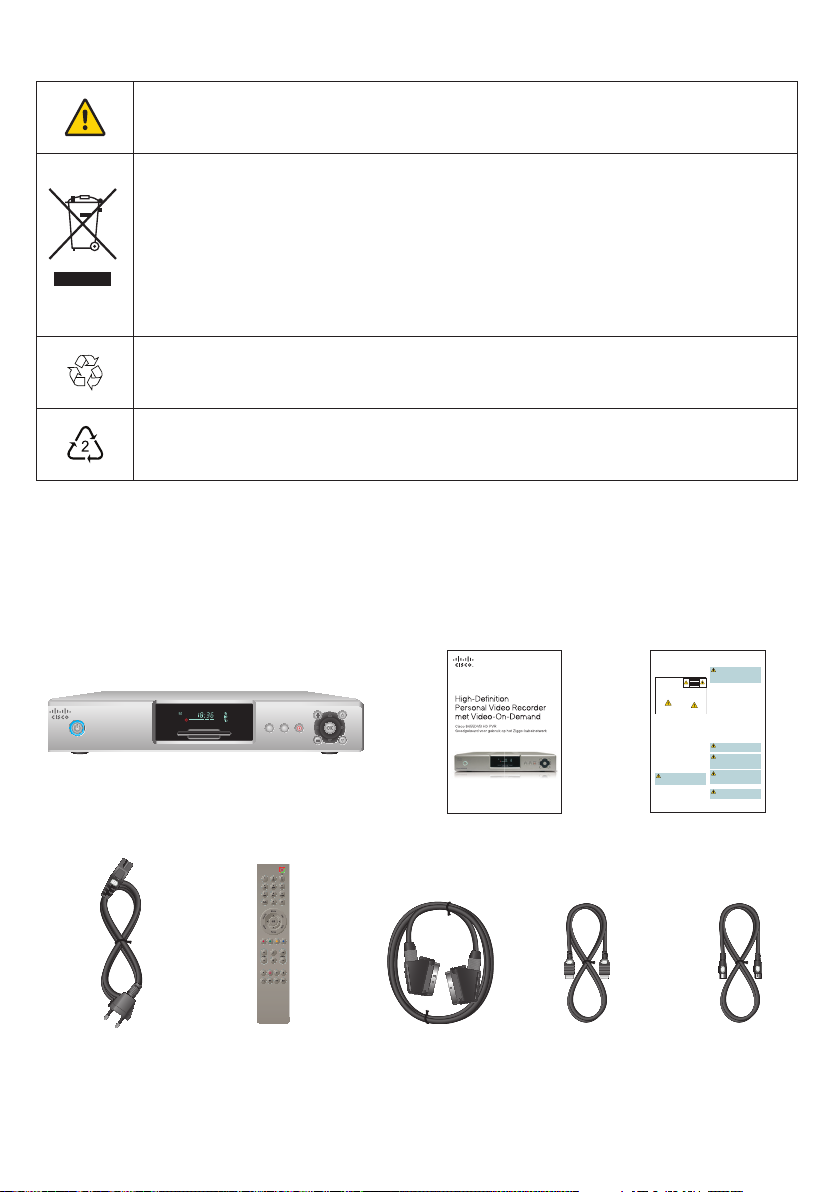
Accessoirepakket
Het accessoirepakket bevat: Personal Video Recorder (PVR), PVR-voedingskabel, afstandsbediening en
batterijen, PVR-installatiehandleiding, SCART-kabel, HDMI™-kabel, RF-coaxkabel en veiligheidsinstructies.
BELANGRIJKE VEILIGHEIDSINSTRUCTIES
Mededeling voor installateurs
Vermijd overbelasting van het lichtnet
De onderhoudsinstructies in deze mededeling zijn uitsluitend bedoeld voor
CISCO 8455DVB
Personal Video Recorder (PVR)
tv menu opnemen
gebruik door bevoegd onderhoudspersoneel. Om het risico op een elektrische
schok te beperken, mag geen ander onderhoud worden uitgevoerd dan wat in
de gebruiksinstructies vermeld staat, tenzij u bevoegd bent dat te doen.
Mededeling aan de systeeminstallateur
Voor dit apparaat, zal het coaxiale kabelschild/het
scherm zo dicht praktisch aan het punt van ingang
worden aan de grond gezet van de kabel in het
gebouw. Voor producten die in de V.S. en Canada
worden verkocht, wordt deze herinnering verstrekt om
de aandacht van de systeeminstallateur aan Artikel
820-93 en Artikel 820-100 van NEC (of Canadees
Elektrodeel van de Code 1) te roepen, dat richtlijnen
voor het juiste aan de grond zetten van het coaxiale
Z
E
E
N
M
D
U
E
L
R
O
V
kabelschild verstrekt.
Dit symbool is bedoeld om u te waarschuwen dat
nietgeïsoleerde spanning op dit product voldoende
sterkte kan bezitten om een elektrische schok te
veroorzaken. Het is daarom gevaarlijk contact van
enigerlei aard met aan de binnenkant van dit product
aanwezige onderdelen te maken.
Lees deze instructies
Bewaar deze instructies
Neem alle waarschuwingen in acht
Volg alle instructies
Waarschuwing stroombron
Een etiket op dit product geeft de juiste stroombron ervoor aan. Gebruik dit
product uitsluitend op een stopcontact met de op het productetiket aangegeven
spanning en netfrequentie. Als u niet zeker weet welk type stroombron uw
huis of bedrijf heeft, raadpleeg dan uw serviceverlener of uw plaatselijke
elektriciteitsbedrijf.
Het wisselstroomaansluitpunt op het apparaat moet altijd toegankelijk en
bruikbaar blijven.
Het product aarden
Als dit product op een buitenantenne of coaxkabelbedrading aansluit, moet u
ervoor zorgen dat de antenne of het kabelsysteem van een aardleiding is voorzien
(geaard is). Aarding biedt enige bescherming tegen spanningsverschillen en
opgehoopte statische ladingen.
Dit product kan een ontvanger bevatten waarmee uitzendingen kunnen worden
opgevangen die niet bestemd zijn voor uitzending.
Bescherm het product tegen blikseminslag
Tijdens onweer of wanneer het apparaat lange tijd niet gebruikt wordt, moet
als extra bescherming de stekker van dit apparaat uit het stopcontact worden
getrokken. Koppel de wisselstroomtoevoer van het stopcontact los, evenals
de signaalingangen.
De stroombron controleren met het Aan/Uit-lichtje
Wanneer het Stroom Aan/Uit-lichtje niet brandt, is het desondanks mogelijk
dat het apparaat nog steeds op de stroombron aangesloten is. Het lichtje
gaat uit wanneer het apparaat uitgeschakeld wordt, ongeacht of het al dan
niet op het lichtnet aangesloten is.
PVR-installatie-
handleiding
CAUTION
RISK OF ELECTRIC SHOCK
DO NOT OPEN
VOORZICHTIG
GEVAAR VOOR ELEKTRISCHE
SCHOK. NIET OPENEN.
VOORZICHTIG: Om het risico van een elektrische
schok te beperken, mag de afscherming (of de
achter kant) niet verwijderd worden. Er bevinden
zich geen onderdelen binnenin waaraan de
gebruiker onderhoud kan uitvoeren. Onderhoud
moet door bevoegd onder houdspersoneel
worden uitgevoerd.
WAARSCHUWING
OM BRAND OF ELEKTRISCHE SCHOK TE
VOORKOMEN MAG DIT APPARAAT NIET AAN
REGEN OF VOCHT WORDEN BLOOTGESTELD.
Dit symbool is bedoeld om u attent te maken op
belangri jke gebruiksen onderhoudsinstructies
in het informatie materiaal dat bij dit product
wordt geleverd.
SysInstaller_Article820_Dutch
WAARSCHUWING: Om elektrische schok te voorkomen,
mag een buitenantennesysteem niet in de nabijheid van
elektriciteitsleidingen of stroomcircuits worden geplaatst.
Elektriciteitsleidingen of -circuits aanraken kan fataal zijn.
Veiligheids -
instructies
WAARSCHUWING: Vermijd het gevaar van elektrische schok
en brand! Het lichtnet, de stopcontacten, inwendige stopcontacten
of verlengsnoeren mogen niet overbelast worden. Van producten
die batterijstroom of andere krachtbronnen nodig hebben om te
werken, moeten de toepasselijke gebruiksaanwijzingen worden
geraadpleegd.
Vermijd beschadiging van het netsnoer
Zorg ervoor dat er niet op het netsnoer wordt gelopen of het niet bekneld
raakt, vooral bij stekkers, inwendige stopcontacten en op het punt waar het
netsnoer uit het apparaat komt.
Zorg voor ventilatie en kies een plek
• Verwijder alle verpakkingsmateriaal voordat het apparaat wordt
aangesloten op het net.
• Blokkeer de ventilatieopeningen niet. Installeer het apparaat volgens de
instructies van de fabrikant.
• Dit apparaat niet op een bed, sofa, vloerkleed of dergelijk oppervlak
plaatsen.
• Dit apparaat niet op een onstabiel oppervlak plaatsen.
• Niet installeren in de nabijheid van warmtebronnen zoals radiators,
verwarmingsroosters, kachels of andere apparaten (inclusief versterkers)
die warmte afgeven.
• Dit apparaat niet in een besloten ruimte zoals een boekenkast of
boekenplank installeren, tenzij de installatie de juiste ventilatie
verschaft.
• Geen entertainmentapparaten (zoals videorecorders of dvd’s), lampen,
boeken, of vazen die vloeistof bevatten boven op dit product plaatsen.
Beschermen tegen blootstelling aan vocht en
vreemde voorwerpen
Dit apparaat niet in de nabijheid van water gebruiken.
WAARSCHUWING: Vermijd het gevaar van elektrische
schok en brand! Dit product niet aan vloeistoffen, regen of vocht
blootstellen.
WAARSCHUWING: Vermijd het gevaar van elektrische
schok! Trek vóór het schoonmaken van dit product de stekker
uit het stopcontact. Alleen met een droge doek schoonmaken.
Geen vloeibaar of aerosolschoonmaakmiddel gebruiken. Geen
magnetisch/statisch schoonmaakapparaat (stofafnemer) voor het
schoonmaken van dit product gebruiken.
WAARSCHUWING: Vermijd het gevaar van elektrische
schok en brand! Nooit voorwerpen door de openingen in
dit product duwen. Vreemde voorwerpen kunnen kortsluiting
veroorzaken, die elektrische schok of brand tot gevolg
kan hebben.
Waarschuwing m.b.t. accessoires
WAARSCHUWING: Vermijd de mogelijkheid van elektrische
schok of brand. Gebruik uitsluitend hulpstukken/accessoires die
door uw serviceverlener of de fabrikant gespecificeerd worden.
Afstandsbediening
en batterijen HDMI-KabelPVR-voedingskabel
SCART-kabel RF-coaxkabel
2
Page 5

Introductie van de PVR
Welkom
U staat op het punt een programma van hoge kwaliteit te bekijken met de Cisco® 8455DVB High-Defi nition
Personal Video Recorder (PVR). Deze PVR geeft u controle, gemak en keuze wanneer u tv-kijkt.
Bediening
• Regel zelf uw live-tv en opnames.
– Als de telefoon gaat of de baby huilt, druk dan op de pauzeknop; kijk verder wanneer het u uitkomt.
– Als u nét het doelpunt hebt gemist, of u wilt het nogmaals zien, druk dan op Instant Replay
(onmiddellijk terugspoelen).
• Kijk tv en fi lms wanneer het u uitkomt.
Gemak
• Gebruik de elektronische programmagids (EPG) om het programma-aanbod te vinden.
• Gebruik EPG om opnames in te plannen van uw favoriete programma, acteur of regisseur.
• U kunt tot 80 uur programma’s opnemen en bewaren op de PVR.
• Neem een abonnement op Video-on-Demand (VOD) en geniet thuis van de fi lms, tv-series en
documentaires.
• Gebruik Net Gemist om programma’s te bekijken die in de afgelopen 10 dagen zijn uitgezonden.
Keuze
• Kijk naar uw favoriete programma terwijl u tegelijkertijd een ander programma opneemt.
• Kies uw verbinding met HDMI of SCART.
Diensten
• Video-on-Demand (VOD) geeft u toegang tot een grote bibliotheek met fi lms, series en documentaires.
• High-Defi nition (HD) video biedt een beter geluid en beeld dan de standaarddefi nitie.
U zult nooit meer op een andere manier tv willen kijken nadat u HD-video hebt gekeken.
Het belang van veiligheid
Voordat u de PVR installeert en gebruikt, dient u eerst de bij uw PVR meegeleverde belangrijke
veiligheidsinstructies te lezen.
Klantenservice en technische ondersteuning
De Cisco 8455DVB HD PVR is goedgekeurd voor gebruik op uitsluitend het Ziggo kabelnetwerk.
Voor klanten-service en technische ondersteuning kunt u ons online bezoeken op www.ziggo.nl
of de “Installatie Hoofdaansluiting Interactieve Televisie” raadplegen.
3
Page 6

PVR-overzicht
Kenmerken van frontpaneel
Z
E
N
D
E
R
CISCO 8455DVB
tv
menu opnemen
E
M
U
L
O
V
1 32 4 5 6 78 9 10 11
T13628
1 Schakelt de PVR aan en uit
2 Geeft de tijd en andere PVR-informatie weer
3 Ingang voor de smartcard
4 Ontvangt het infraroodsignaal van de afstandsbediening. De sensor bevindt zich achter het frontpaneel
5 Keert terug naar het tv-programma
6 Geeft het menu weer
7 Neemt een tv-programma op
8 Past volume aan
9 Geeft on-screenmogelijkheden en navigatiemenu’s weer
10 Bevestigt on-screenmenukeuzes
11 Navigeert door de zenders
4
Page 7

Verbindingen aan achterkant
SABKJNXPJ N0023447426
CATV CONVERTER
MADE IN MEXICO
0011E611A756
VIDEO OUT
Pr
AUDIO
MULTI TV
CABLE INRF BYPASS
ETHERNET
OUT
L
USB
R
TV
Pb
Y
VCR
CAUTION
RISK OF ELECTRIC SHOCK
DO NOT OPEN
VOORZICHTIG
GEVAAR VOOR ELEKTRISCHE
SCHOK. NIET OPENEN.
TEST
OPTICAL
AUDIO OUT
220-240V~
50-60Hz 40W
1 2 43 5 6 7 9 10 11 128
1 Geeft een RF BYPASS. Sluit aan op een tv of een videorecorder
2 Sluit aan op de RF-coaxkabel die het signaal levert van uw serviceprovider
3 Gereserveerd voor toekomstig gebruik
4 Gereserveerd voor toekomstig gebruik
5 Gereserveerd voor toekomstig gebruik
6 Sluit aan op RCA-kabels om analoge audiosignalen (Links/Rechts) te zenden naar een stereo-
ontvanger of tv met stereoaansluitingen
7 Sluit de PVR aan op de component video-input (YPbPr) op de tv
NB: Geeft alleen standaarddefi nitiesignalen, ongeacht het type uitzendsignaal.
8 Sluit aan op een tv voorzien van een SCART
9 Sluit aan op een apparaat voorzien van een SCART (videorecorder, DVD, et cetera)
10 Sluit een HDMI-kabel aan die HDMI-signalen stuurt naar een HDTV
NB: Levert high-defi nition of standaarddefi nitiesignalen, afhankelijk van het type uitzendsignaal.
11 Sluit een optische kabel aan om het digitale audiosignaal te zenden naar een surround sound-
ontvanger of andere digitale audioapparatuur
12 Sluit de voedingskabel aan om de PVR te voorzien van stroom
T13629
5
Page 8
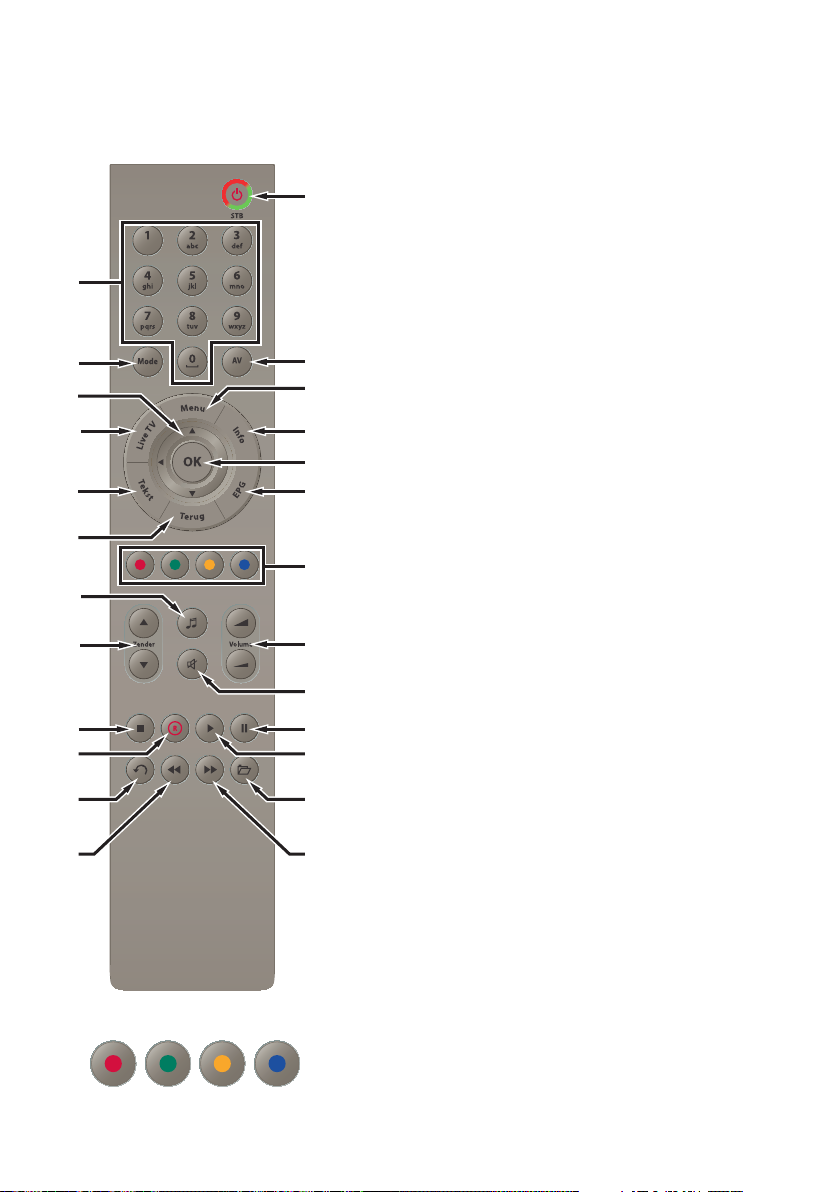
Mogelijkheden van de afstandsbediening
Druk op de knoppen van de afstandsbediening om alle menu’s te doorlopen, om toegang tot programma’s te
krijgen en om programma’s op te nemen.
Tip: Plaats twee nieuwe CR 2025-type knoopcelbatterijen in de afstandsbediening.
1 Nummers wijzigt zenders of zoekt een deel van een
opname op
2 Mode neemt de tv-afstandsbedieningsfunctionaliteit over
3 Pijlen gaan door de menu’s
4 Live TV geeft live-tv op volledig scherm weer
5 Tekst STB Teletekst
6 Terug gaat terug naar de vorige stap
7 Radio/tv schakelt tussen radio en tv
8 Zender wijzigt zender
9 Stop een opname of herhaling
10 Opnemen direct, van EPG of minigids
11 Instant Replay gaat 7 seconden terug in het programma
12 Terugspoelen op verschillende snelheden
13 Power (aan/uit) schakelt PVR of tv aan en uit
14 AV bedient de SCART/HDMI interface
15 Menu toont of verbergt het menu
16 Info opent de minigids en geeft aanvullende informatie weer
17 OK opent de tv-zenderlijst, kiest of activeert het gekozen
item
18 EPG geeft tv-gids weer
19 Gekleurde navigatie knoppen komen overeen met de
gekleurde knoppen onder aan sommige schermen
20 Volume wijzigt het volume van de tv of PVR
21 Geluidloos zet geluid aan en uit
22 Pauze van het programma
23 Speel (afspelen) start afspelen of gaat verder met afspelen
24 Bibliotheek voor weergave van uw overzicht van
opgenomen video- en radiobestanden.
25 Vooruitspoelen op verschillende snelheden
Tips:
• De keuzemogelijkheden onder aan de schermen zijn in
dezelfde kleuren weergegeven als de vier knoppen op de
afstandsbediening. Druk op een gekleurde knop op de
afstandsbediening om de mogelijkheid te bekijken.
• Druk op de pijlknoppen (WXTS) om door de
mogelijkheden van de schermen te lopen.
1
2
3
4
5
6
7
8
9
10
11
12
T13630
13
14
15
16
17
18
19
20
21
22
23
24
25
T13631
6
Page 9
Maak de PVR gereed voor Interactieve Televisie
Voordat u begint
Let op: Voordat u de Cisco 8455DVB PVR installeert, dient u eerst de stappen in de
“Installatie Hoofdaansluiting Interactieve Televisie” te doorlopen.
Waarschuwing: Gevaar voor elektrische schok. Trek de stekkers van alle elektronische
apparatuur uit het stopcontact voordat u kabels van die apparatuur aansluit op de PVR of uit
de PVR haalt.
Overzicht
Voer de volgende stappen uit om de PVR gereed te maken voor Interactieve Televisie en al snel zult u
kunnen genieten van de kwaliteit van de programmaweergave met de Cisco 8455DVB HD PVR.
1. Voer de smartcard aan de voorzijde van de PVR in.
2. Sluit uw PVR aan op uw tv.
3. Activeer de PVR voor door uw accountgegevens in te voeren.
4. Pas de taalinstellingen aan.
5. Pas de PVR-instellingen aan.
6. Pas de audio- en video-instellingen aan.
7. Stel pincode voor kindervergrendeling in.
8. Programmeer de afstandsbediening voor gebruik op uw tv (naar keuze).
9. Veel plezier met het gebruik van de PVR voor het bekijken en opnemen van uw favoriete programma’s.
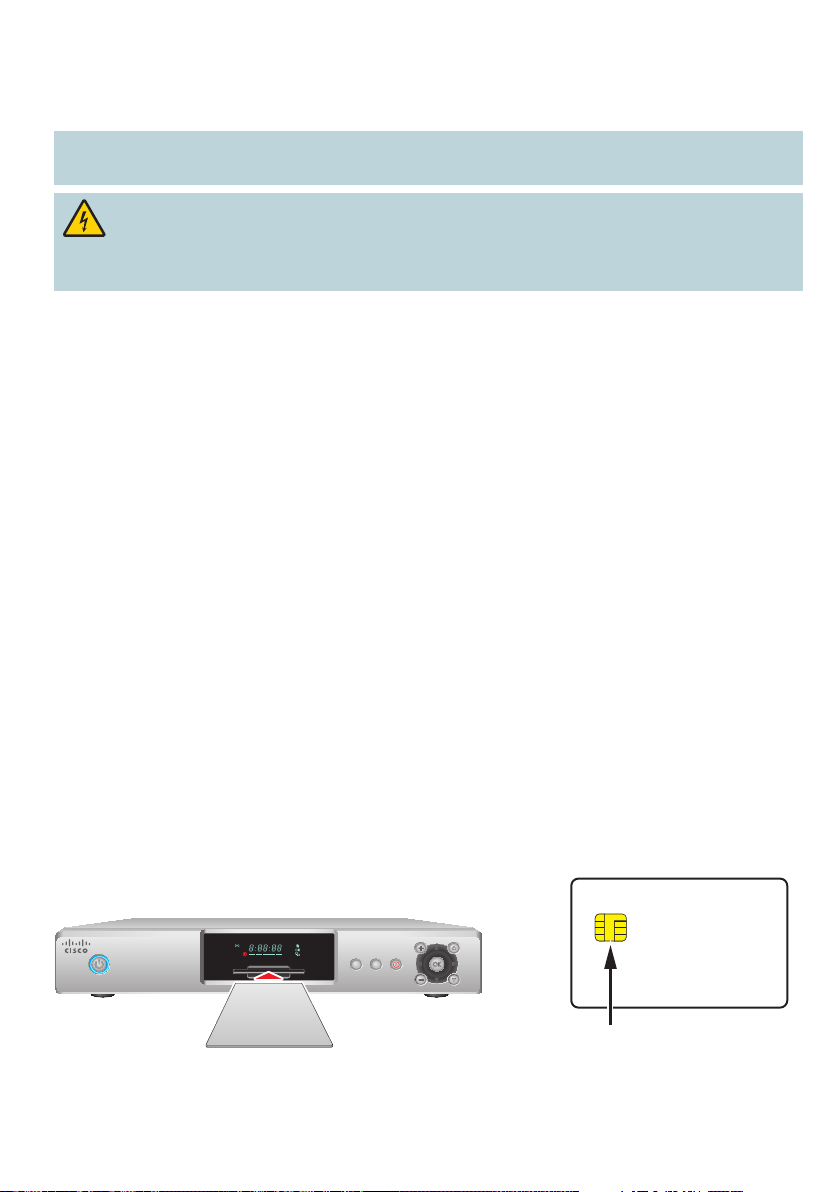
Voer de smartcard in
Wanneer u de PVR aanschaft, dient u ook een smartcard aangeschaft te hebben. De smartcard is nodig voor
het gebruik van de PVR.
1. Voer de smartcard in aan de voorzijde van de PVR met de chipkant naar beneden.
2. Haal de smartcard er niet meer uit, wanneer hij eenmaal is ingevoerd.
Tip: De PVR functioneert niet zonder de smartcard.
Z
E
E
N
M
D
U
E
L
R
O
V
T13632
Chip
(Insteken met deze
zijde naar onder)
CISCO 8455DVB
menu opnemen
tv
T13634
7
Page 10
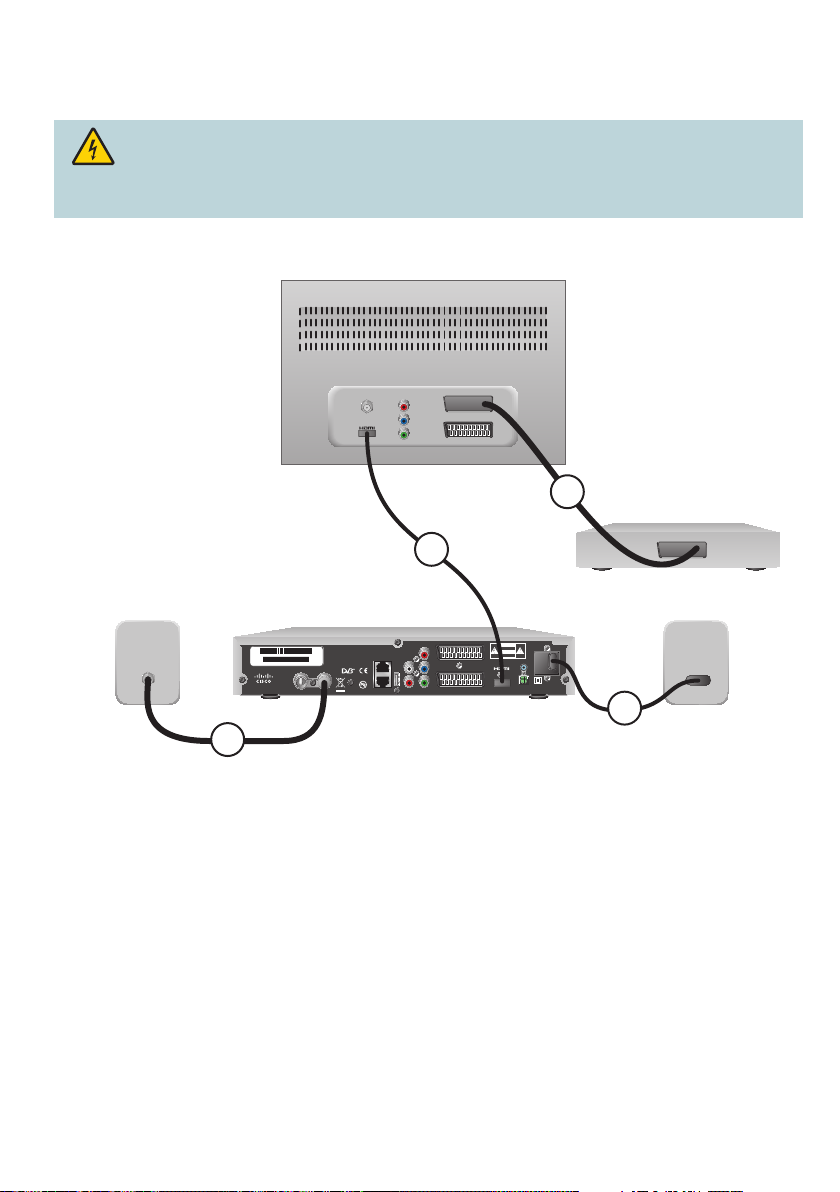
Sluit de PVR aan op uw tv
PVR naar HDTV en DVD (HDMI-verbinding)
Waarschuwing: Gevaar voor elektrische schok. Trek de stekkers van alle elektronische
apparatuur uit het stopcontact voordat u kabels van die apparatuur aansluit op de PVR of uit
de PVR haalt.
High-Definition tv
DVD-recorder/
3
2
DVD-speler
Kabelaansluiting
CATV CONVERTER
MADE IN MEXICO
0011E611A756
SABKJNXPJ N0023447426
PVR
VIDEO OUT
Pr
AUDIO
OUT
MULTI TV
L
CABLE INRF BYPASS
Pb
USB
Y
R
ETHERNET
CAUTION
RISK OF ELECTRIC SHOCK
DO NOT OPEN
VOORZICHTIG
GEVAAR VOOR ELEKTRISCHE
SCHOK. NIET OPENEN.
TV
VCR
TEST
220-240V~
OPTICAL
50-60Hz 40W
AUDIO OUT
4
1
1. Sluit de RF-coaxkabel aan op de PVR en op de kabeluitgang.
2. Sluit de HDMI-kabel aan op de PVR en op de HDTV HDMI-ingang.
3. Sluit de SCART-kabel aan op de HDTV en op de DVD-recorder/DVD-speler.
4. Sluit de stroomtoevoerkabel aan op de PVR en op de stroomuitgang.
Tips:
• Deze verbinding geeft u de beste beeldkwaliteit.
• Om analoge zenders te ontvangen, dient u een extra RF-coaxkabel aan te sluiten op de
RF BYPASS-ingang op de PVR met de RF INPUT-ingang op de tv.
8
Stopcontact
T13635
Page 11
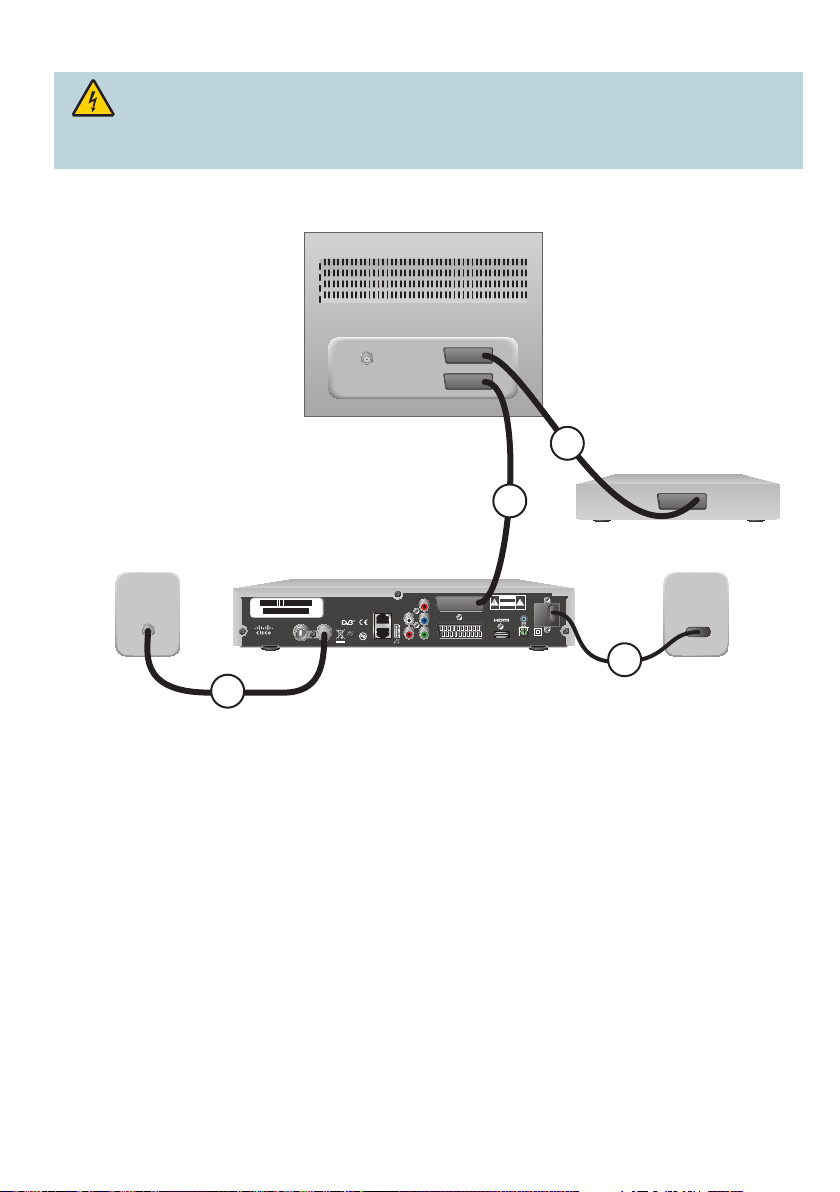
PVR naar standaard-tv en DVD
Waarschuwing: Gevaar voor elektrische schok. Trek de stekkers van alle elektronische
apparatuur uit het stopcontact voordat u kabels van die apparatuur aansluit op de PVR of uit
de PVR haalt.
Standaarddefinitie tv
DVD-recorder/
3
DVD-speler
2
Kabelaansluiting
CATV CONVERTER
MADE IN MEXICO
0011E611A756
SABKJNXPJ N0023447426
PVR
VIDEO OUT
Pr
AUDIO
OUT
MULTI TV
Pb
CABLE INRF BYPASS
L
USB
R
Y
ETHERNET
CAUTION
RISK OF ELECTRIC SHOCK
DO NOT OPEN
VOORZICHTIG
GEVAAR VOOR ELEKTRISCHE
SCHOK. NIET OPENEN.
TV
VCR
TEST
220-240V~
OPTICAL
50-60Hz 40W
AUDIO OUT
Stopcontact
4
1
1. Sluit de RF-coaxkabel aan op de PVR en op de kabeluitgang.
2. Sluit een SCART-kabel aan op de PVR en op de tv.
3. Sluit de SCART-kabel aan op de HDTV en op de DVD-recorder/DVD-speler.
4. Sluit de stroomtoevoerkabel aan op de PVR en op de stroomuitgang.
Tip: Om analoge zenders te ontvangen, dient u een extra RF-coaxkabel aan te sluiten op de
RF BYPASS-ingang op de PVR met de RF INPUT-ingang op de tv.
T13637
9
Page 12
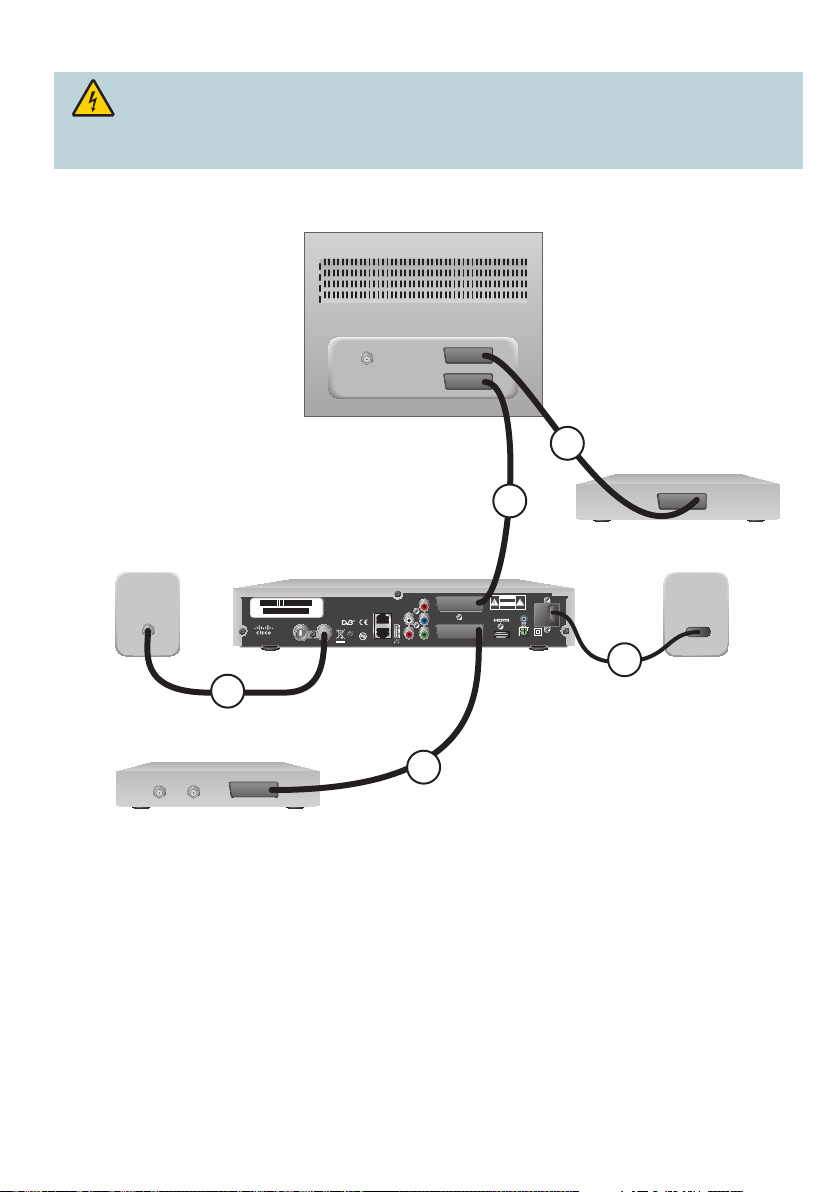
PVR naar standaard-TV, DVD en videorecorder
Waarschuwing: Gevaar voor elektrische schok. Trek de stekkers van alle elektronische
apparatuur uit het stopcontact voordat u kabels van die apparatuur aansluit op de PVR of uit
de PVR haalt.
Standaarddefinitie tv
DVD-recorder/
3
DVD-speler
2
Kabelaansluiting
CATV CONVERTER
MADE IN MEXICO
0011E611A756
SABKJNXPJ N0023447426
PVR
VIDEO OUT
Pr
AUDIO
OUT
MULTI TV
Pb
CABLE INRF BYPASS
L
USB
R
Y
ETHERNET
CAUTION
RISK OF ELECTRIC SHOCK
DO NOT OPEN
VOORZICHTIG
GEVAAR VOOR ELEKTRISCHE
SCHOK. NIET OPENEN.
TV
VCR
TEST
220-240V~
OPTICAL
50-60Hz 40W
AUDIO OUT
Stopcontact
5
1
Videorecorder
4
1. Sluit de RF-coaxkabel aan op de PVR en op de kabeluitgang.
2. Sluit een SCART-kabel aan op de PVR en op de tv.
3. Sluit een SCART-kabel aan op de HDTV en op de DVD-recorder/DVD-speler.
4. Sluit een SCART-kabel aan op de PVR en op de VCR.
5. Sluit de stroomtoevoerkabel aan op de PVR en op de stroomuitgang.
Tip: Om analoge zenders te ontvangen, dient u een extra RF-coaxkabel aan te sluiten op de
RF BYPASS-ingang op de PVR met de RF INPUT-ingang op de tv.
T13639
10
Page 13

Afstandsbediening instellen om tv te bedienen
(naar keuze)
De afstandsbediening is voorgeprogrammeerd om de PVR te bedienen. Indien u wilt dat de PVRafstandsbediening ook uw tv bedient, kunt u de PVR-afstandsbediening programmeren. Zoek in het
hoofdstuk TV-codes van deze handleiding uw tv-merk en de bijbehorende code. Indien meerdere codes
worden gegeven, begin dan met het eerste nummer en volg deze instructies.
Tips:
• Zoek de code (3 nummers) voor uw tv-merk aan het einde van deze handleiding.
• Druk op de Mode-toets op de afstandsbediening om te wisselen tussen het bedienen van de PVR en de tv.
• Wanneer de afstandsbediening in de TV mode is, kan deze het volume en het aan- en uitzetten van de
TV bedienen.
Directe programmamethode
1. Schakel uw tv aan.
2. Druk op de Mode-toets op de afstandsbediening
totdat het rode lichtje (LED) op de Power (aan/
uit)-toets tweemaal knippert.
3. Voer binnen 5 seconden de 3-cijferige tv-code in.
Het rode lichtje (LED) knippert tweemaal om aan
te geven dat de code geaccepteerd is.
• Indien het lichtje (LED) twee seconden lang
aanblijft nadat u de tv-code hebt ingegeven,
hebt u een verkeerde code ingegeven.
4. Richt de afstandsbediening op de tv en druk op
de Power-toets.
• De tv gaat nu in Stand-By-modus.
• Indien de tv niet in Stand-By-modus gaat,
selecteer dan een andere code en herhaal
de stappen 1 en 2.
5. Druk op de Mode-toets op de afstandsbediening
totdat het rode lichtje (LED) op de Power (aan/
uit)-toets tweemaal knippert.
6. Druk op 000 op de afstandsbediening om uw
tv-code te deblokkeren.
7. Test de toetsen voor alle functies op de
afstandsbediening.
• Indien de functietoetsen niet correct werken,
herhaal het proces met een andere tv-code.
Tip: Indien deze methode niet werkt, gebruik de
All Code Scan-methode om uit te zoeken welke
code uw afstandsbediening gebruikt om uw tv te
bedienen.
T13735
LED
11
Page 14

All Code Scan-methode
1. Schakel uw tv aan.
2. Druk op de Mode-toets op de afstandsbediening totdat het rode lichtje (LED) op de Power (aan/uit)-toets
tweemaal knippert.
3. Druk binnen 5 seconden op 001. Het rode lichtje (LED) knippert tweemaal om de ingevoerde code te
bevestigen.
4. Richt de afstandsbediening op de tv en druk op de
5. Terwijl de afstandsbediening de codes aan het scannen is, kunt u de Power-toets loslaten en de
functietoetsen testen.
• Indien binnen 10 seconden geen toets wordt ingedrukt, stopt het zoeken naar het merk en keert de
afstandsbediening terug naar de gewone toestand.
• Indien de tv in Stand-By-modus gaat tijdens het scannen, laat onmiddellijk de Power-toets los en druk
OK. Het rode lichtje (LED) knippert tweemaal om aan te geven dat de code opgeslagen is.
op
Tips:
• Dit proces kan tot 10 minuten duren.
• De afstandsbediening kan verschillende codes vinden die uw tv bedienen. Indien echter enige
functietoetsen niet naar behoren werken, herhaal stappen 1 tot en met 5 totdat een code wordt gevonden
die alle functietoetsen doet werken.
• Tijdens het scannen kunt u de W toets tot 5 keer indrukken om eerdere codes te selecteren of de X toets
om weer vooruit te zoeken.
Power-toets totdat uw tv wordt uitgeschakeld.
Onthoud de code die functioneerde
Om de code te zoeken die uw afstandsbediening gebruikt om uw tv te bedienen:
1. Druk op de
2. Druk op 002. Het rode lichtje (LED) knippert tweemaal om de ingevoerde code te bevestigen.
3. Druk op 1; tel vervolgens het aantal keren dat het lichtje (LED) knippert. Het aantal fl itsen geeft het eerste
nummer van de code weer.
4. Druk op 2; tel vervolgens het aantal keren dat het lichtje (LED) knippert. Het aantal fl itsen geeft het tweede
nummer van de code weer.
5. Druk op
nummer van de code weer.
Tips:
• Noteer de code hier: ___________________________________________________________________ .
• Indien het lichtje (LED) niet knippert nadat u de toetsen hebt ingedrukt, is het cijfer voor de code 0.
Mode-toets op de afstandsbediening totdat het rode lichtje (LED) tweemaal knippert.
3; tel vervolgens het aantal keren dat het lichtje (LED) knippert. Het aantal fl itsen geeft het derde
12
Page 15

English Language Contents
Signifi cant Symbols.........................................................................................................................................14
Accessory Pack ...............................................................................................................................................14
Introducing the PVR ........................................................................................................................................15
Welcome ........................................................................................................................................................ 15
Safety First ........................................................................................................................................................ 15
Customer Service and Technical Assistance ...............................................................................................15
PVR Overview ...................................................................................................................................................16
Front Panel Features ..................................................................................................................................... 16
Back Panel Connectors .................................................................................................................................17
Remote Control Features ................................................................................................................................18
Prepare the PVR for Interactive TV ................................................................................................................19
Before You Begin ..........................................................................................................................................19
Overview ........................................................................................................................................................19
Insert the Smartcard ......................................................................................................................................19
Connect the PVR to Your TV ......................................................................................................................... 20
PVR to HDTV and DVD (HDMI Connection) ............................................................................................20
PVR to Standard TV and DVD ..................................................................................................................21
PVR to Standard TV, DVD, and VCR ........................................................................................................22
Prepare the Remote Control to Operate Your TV (Optional) .......................................................................23
Direct Programme Method ................................................................................................................................. 23
All Code Scan Method ................................................................................................................................... 24
Remember the Code That Worked ...............................................................................................................24
Appendix ...........................................................................................................................................................25
TV Codes ....................................................................................................................................................... 26
Technical Assistance Contact Information .....................................................................................................38
Repair Service Information ............................................................................................................................38
Trademarks and Notices ................................................................................................................................39
Information and Assistance ............................................................................................................Back Cover
13
Page 16
Signifi cant Symbols
Important: It is important that you read and understand the following information.
This device must be disposed of correctly.
The symbol found here and on the set-top means that the device should not to be thrown away
with household waste when it reaches end of life (EOL). To protect the environment and human
health, owners must separate the device from other waste and recycle it responsibly. This practice
is intended to increase the use of recyclable materials. When the set-top reaches EOL, end users
should contact the retailer to learn the correct disposal process. Retailers should dispose of the
device according to contractual obligations. The device should not be thrown away with ordinary
business waste.
The presence of this symbol “recyclable material” on the shipping carton or in the user manual
indicates that the articles are recyclable.
The presence of this symbol “recyclable material” on the pieces of plastic indicates that the
pieces are recyclable.
Accessory Pack
The accessory pack contains: Personal Video Recorder (PVR), PVR power supply cable, remote control and
batteries, PVR Install Guide, SCART cable, HDMI™ cable, RF coaxial cable, and Safety Instructions.
BELANGRIJKE VEILIGHEIDSINSTRUCTIES
Mededeling voor installateurs
Vermijd overbelasting van het lichtnet
De onderhoudsinstructies in deze mededeling zijn uitsluitend bedoeld voor
CISCO 8455DVB
Personal Video Recorder (PVR)
tv menu opnemen
gebruik door bevoegd onderhoudspersoneel. Om het risico op een elektrische
schok te beperken, mag geen ander onderhoud worden uitgevoerd dan wat in
de gebruiksinstructies vermeld staat, tenzij u bevoegd bent dat te doen.
Mededeling aan de systeeminstallateur
Voor dit apparaat, zal het coaxiale kabelschild/het
scherm zo dicht praktisch aan het punt van ingang
worden aan de grond gezet van de kabel in het
gebouw. Voor producten die in de V.S. en Canada
worden verkocht, wordt deze herinnering verstrekt om
de aandacht van de systeeminstallateur aan Artikel
820-93 en Artikel 820-100 van NEC (of Canadees
Elektrodeel van de Code 1) te roepen, dat richtlijnen
voor het juiste aan de grond zetten van het coaxiale
kabelschild verstrekt.
Dit symbool is bedoeld om u te waarschuwen dat
nietgeïsoleerde spanning op dit product voldoende
sterkte kan bezitten om een elektrische schok te
veroorzaken. Het is daarom gevaarlijk contact van
enigerlei aard met aan de binnenkant van dit product
Z
E
E
N
M
D
U
E
L
R
O
V
aanwezige onderdelen te maken.
Lees deze instructies
Bewaar deze instructies
Neem alle waarschuwingen in acht
Volg alle instructies
Waarschuwing stroombron
Een etiket op dit product geeft de juiste stroombron ervoor aan. Gebruik dit
product uitsluitend op een stopcontact met de op het productetiket aangegeven
spanning en netfrequentie. Als u niet zeker weet welk type stroombron uw
huis of bedrijf heeft, raadpleeg dan uw serviceverlener of uw plaatselijke
elektriciteitsbedrijf.
Het wisselstroomaansluitpunt op het apparaat moet altijd toegankelijk en
bruikbaar blijven.
Het product aarden
Als dit product op een buitenantenne of coaxkabelbedrading aansluit, moet u
ervoor zorgen dat de antenne of het kabelsysteem van een aardleiding is voorzien
(geaard is). Aarding biedt enige bescherming tegen spanningsverschillen en
opgehoopte statische ladingen.
Dit product kan een ontvanger bevatten waarmee uitzendingen kunnen worden
opgevangen die niet bestemd zijn voor uitzending.
Bescherm het product tegen blikseminslag
Tijdens onweer of wanneer het apparaat lange tijd niet gebruikt wordt, moet
als extra bescherming de stekker van dit apparaat uit het stopcontact worden
getrokken. Koppel de wisselstroomtoevoer van het stopcontact los, evenals
de signaalingangen.
De stroombron controleren met het Aan/Uit-lichtje
Wanneer het Stroom Aan/Uit-lichtje niet brandt, is het desondanks mogelijk
dat het apparaat nog steeds op de stroombron aangesloten is. Het lichtje
gaat uit wanneer het apparaat uitgeschakeld wordt, ongeacht of het al dan
niet op het lichtnet aangesloten is.
PVR Install Guide
CAUTION
RISK OF ELECTRIC SHOCK
DO NOT OPEN
VOORZICHTIG
GEVAAR VOOR ELEKTRISCHE
SCHOK. NIET OPENEN.
VOORZICHTIG: Om het risico van een elektrische
schok te beperken, mag de afscherming (of de
achter kant) niet verwijderd worden. Er bevinden
zich geen onderdelen binnenin waaraan de
gebruiker onderhoud kan uitvoeren. Onderhoud
moet door bevoegd onder houdspersoneel
worden uitgevoerd.
WAARSCHUWING
OM BRAND OF ELEKTRISCHE SCHOK TE
VOORKOMEN MAG DIT APPARAAT NIET AAN
REGEN OF VOCHT WORDEN BLOOTGESTELD.
Dit symbool is bedoeld om u attent te maken op
belangri jke gebruiksen onderhoudsinstructies
in het informatie materiaal dat bij dit product
wordt geleverd.
SysInstaller_Article820_Dutch
WAARSCHUWING: Om elektrische schok te voorkomen,
mag een buitenantennesysteem niet in de nabijheid van
elektriciteitsleidingen of stroomcircuits worden geplaatst.
Elektriciteitsleidingen of -circuits aanraken kan fataal zijn.
Safety
Instructions
WAARSCHUWING: Vermijd het gevaar van elektrische schok
en brand! Het lichtnet, de stopcontacten, inwendige stopcontacten
of verlengsnoeren mogen niet overbelast worden. Van producten
die batterijstroom of andere krachtbronnen nodig hebben om te
werken, moeten de toepasselijke gebruiksaanwijzingen worden
geraadpleegd.
Vermijd beschadiging van het netsnoer
Zorg ervoor dat er niet op het netsnoer wordt gelopen of het niet bekneld
raakt, vooral bij stekkers, inwendige stopcontacten en op het punt waar het
netsnoer uit het apparaat komt.
Zorg voor ventilatie en kies een plek
• Verwijder alle verpakkingsmateriaal voordat het apparaat wordt
aangesloten op het net.
• Blokkeer de ventilatieopeningen niet. Installeer het apparaat volgens de
instructies van de fabrikant.
• Dit apparaat niet op een bed, sofa, vloerkleed of dergelijk oppervlak
plaatsen.
• Dit apparaat niet op een onstabiel oppervlak plaatsen.
• Niet installeren in de nabijheid van warmtebronnen zoals radiators,
verwarmingsroosters, kachels of andere apparaten (inclusief versterkers)
die warmte afgeven.
• Dit apparaat niet in een besloten ruimte zoals een boekenkast of
boekenplank installeren, tenzij de installatie de juiste ventilatie
verschaft.
• Geen entertainmentapparaten (zoals videorecorders of dvd’s), lampen,
boeken, of vazen die vloeistof bevatten boven op dit product plaatsen.
Beschermen tegen blootstelling aan vocht en
vreemde voorwerpen
Dit apparaat niet in de nabijheid van water gebruiken.
WAARSCHUWING: Vermijd het gevaar van elektrische
schok en brand! Dit product niet aan vloeistoffen, regen of vocht
blootstellen.
WAARSCHUWING: Vermijd het gevaar van elektrische
schok! Trek vóór het schoonmaken van dit product de stekker
uit het stopcontact. Alleen met een droge doek schoonmaken.
Geen vloeibaar of aerosolschoonmaakmiddel gebruiken. Geen
magnetisch/statisch schoonmaakapparaat (stofafnemer) voor het
schoonmaken van dit product gebruiken.
WAARSCHUWING: Vermijd het gevaar van elektrische
schok en brand! Nooit voorwerpen door de openingen in
dit product duwen. Vreemde voorwerpen kunnen kortsluiting
veroorzaken, die elektrische schok of brand tot gevolg
kan hebben.
Waarschuwing m.b.t. accessoires
WAARSCHUWING: Vermijd de mogelijkheid van elektrische
schok of brand. Gebruik uitsluitend hulpstukken/accessoires die
door uw serviceverlener of de fabrikant gespecificeerd worden.
14
PVR Power
Supply Cable
Remote Control
and Batteries
SCART Cable RF Coaxial Cable
HDMI Cable
Page 17

Introducing the PVR
Welcome
You are about to experience high quality programme viewing using the Cisco® 8455DVB High-Defi nition
Personal Video Recorder (PVR). This PVR gives you control, convenience, and choice when watching TV.
Control
• Control live TV and recordings.
– If the phone rings or the baby cries, press Pause; then, continue watching TV when you are ready.
– If you miss the big goal or you want to see it again, press Instant Replay.
• Watch TV and movies on your schedule.
Convenience
• Use the Electronic Programme Guide (EPG) to fi nd programme schedules.
• Use the EPG to schedule recordings of your favourite programme, actor, or director.
• Record and store up to 80 hours of your favourite programmes on the PVR.
• Subscribe to Video-on-Demand (VOD) and enjoy movies, TV series, and documentaries in the comfort
of your home.
• Use the Net Gemist feature to catch up on programmes from the previous ten days.
Choice
• Watch your favourite programme and record another at the same time.
• Choose your connection with HDMI or SCART.
Services
• Video-on-Demand (VOD) gives you access to a large library of movies, series, and documentaries.
• High-Defi nition (HD) video provides better pictures and sound when compared to standard-defi nition.
You will not want to watch TV any other way once you have experienced HD video.
Safety First
Before you install or operate the PVR, read the Important Safety Instructions that came with the PVR.
Customer Service and Technical Assistance
The Cisco 8455DVB HD PVR is approved for use only on the Ziggo cable network. For customer
service and technical assistance, please visit Ziggo online at
“Installatie Hoofdaansluiting Interactieve Televisie.”
www.ziggo.nl or refer to the
15
Page 18

PVR Overview
Front Panel Features
menu opnemen
tv
CISCO 8455DVB
E
M
U
L
O
V
1 32 4 5 6 78 9 10 11
1 Turns the PVR on and off
2 Displays the time of day and other PVR information
3 Accepts the smartcard
4 Receives the infrared signal from the remote control. The sensor is behind the front panel
5 Returns to TV programme
6 Displays the Menu
7 Records a TV programme
8 Adjusts volume
9 Displays on-screen services and navigates menus
10 Confi rms on-screen menu choices
11 Navigates through the channels
Z
E
N
D
E
R
T13628
16
Page 19

Back Panel Connectors
SABKJNXPJ N0023447426
CATV CONVERTER
MADE IN MEXICO
0011E611A756
VIDEO OUT
Pr
AUDIO
MULTI TV
CABLE INRF BYPASS
ETHERNET
OUT
L
USB
R
TV
Pb
Y
VCR
CAUTION
RISK OF ELECTRIC SHOCK
DO NOT OPEN
VOORZICHTIG
GEVAAR VOOR ELEKTRISCHE
SCHOK. NIET OPENEN.
TEST
OPTICAL
AUDIO OUT
220-240V~
50-60Hz 40W
1 2 43 5 6 7 9 10 11 128
T13629
1 Provides an RF BYPASS. Connects to a TV or VCR
2 Connects to the RF coaxial cable that delivers the signal from your service provider
3 Reserved for future use
4 Reserved for future use
5 USB connector (Reserved for future use)
6 Connects to RCA cables to send analog audio signals (Left/Right) to a stereo receiver or TV with
stereo inputs
7 Connects the PVR to the component video input (YPbPr) on the TV
Note: Delivers only standard-defi nition signals regardless of the broadcast signal format
8 Connects to a SCART-equipped TV
9 Connects to a SCART-equipped device (VCR, DVD, etc.)
10 Connects an HDMI cable that sends HDMI signals to an HDTV
Note: Delivers high-defi nition or standard-defi nition signals depending on the broadcast signal format
11 Connects an optical cable to send a digital audio signal to a surround-sound receiver or other digital
audio device
12 Connects the power cord to deliver power to the PVR
17
Page 20

Remote Control Features
Press the keys on the remote control to navigate through the menus, to access programmes, and to record
programmes.
Tip: Insert 2 new CR 2025-type cell batteries into the remote control.
1 Numbers change channels or fi nd a percentage of a
recording
2 Mode takes over TV remote control functionality
3 Arrows navigate through menus
4 Live TV displays full-screen live TV
5 Tekst STB Teletext
6 Terug goes back to previous logical point
7 Radio/TV switches between Radio and TV
8 Zender changes channel
9 Stop a recording or playback
10 Record instantly or from EPG or Mini Guide
11 Instant Replay jumps back 7 seconds in the programme
12 Rewind at variable speeds
13 Power turns PVR or TV on and off
14 AV controls the SCART/HDMI interface
15 Menu displays or hides the menu
16 Info opens the Mini Guide and displays additional
information
17 OK opens the TV channel list, selects or activates the
selected item
18 EPG displays the TV Guide
19 Coloured Navigation keys match colour-coded buttons on
the bottom of some screens
20 Volume changes the TV or PVR volume
21 Mute turns sound on or off
22 Pause the programme
23 Play begins or resumes playing
24 Library displays your library of recorded video and radio fi les
25 Forward at variable speeds
10
11
12
13
1
2
3
4
14
15
16
17
5
18
6
19
7
8
20
21
9
22
23
24
25
T13630
18
Tips:
• The selection options at the bottom of the screens are colourcoded to match these four keys on the remote control. Press
the colour-coded key on the remote control to see the option.
• Press the arrow keys (WXTS) to navigate through the
options on the screens.
T13631
Page 21

Prepare the PVR for Interactive TV
Before You Begin
Attention: Before you start the installation of the Cisco 8455DVB PVR, you must fi rst complete the
steps in the “Installatie Hoofdaansluiting Interactieve Televisie.”
Warning: Electric shock hazard. Unplug all electronic devices before connecting or
disconnecting any device cables to the PVR.
Overview
Complete the following steps to prepare and activate the PVR for Interactive TV and you will soon be
enjoying high-quality programming using the Cisco 8455DVB HD PVR.
1. Insert the smartcard into the front of the PVR.
2. Connect the PVR to your TV.
3. Prepare the PVR by entering your account information.
4. Customize the language settings.
5. Customize the PVR settings.
6. Set the audio and video formats.
7. Set the Parental Control PIN.
8. Programme the remote control to operate your TV (optional).
9. Enjoy using the PVR to watch and record your favourite shows.
Insert the Smartcard
When you purchased the PVR you should also have purchased a smartcard. The smartcard is necessary
to operate the PVR.
1. Insert the smartcard into the front of the PVR with the chip side down.
2. Once inserted, do not remove the smartcard.
Tip: The PVR will not operate without the smartcard.
Z
E
E
N
M
D
U
E
L
R
O
V
T13632
Chip
(Insert this side down)
CISCO 8455DVB
menu opnemen
tv
T13633
19
Page 22

Connect the PVR to Your TV
PVR to HDTV and DVD (HDMI Connection)
Warning: Electric shock hazard. Unplug all electronic devices before connecting or
disconnecting any device cables to the PVR.
High-Definition TV
3
DVD
Recorder/Player
2
Cable Outlet
CATV CONVERTER
MADE IN MEXICO
0011E611A7 56
SABKJNXPJ N0023447426
PVR
VIDEO OUT
Pr
AUDIO
OUT
MULTI TV
Pb
CABLE INRF BYPASS
L
USB
R
Y
ETHERNET
CAUTION
RISK OF ELECTRIC SHOCK
DO NOT OPEN
VOORZICHTIG
GEVAAR VOOR ELEKTRISCHE
SCHOK. NIET OPENEN.
TV
VCR
TEST
220-240V~
OPTICAL
50-60Hz 40W
AUDIO OUT
Power Outlet
4
1
1. Connect the RF coaxial cable to the PVR and to the cable outlet.
2. Connect the HDMI cable to the PVR and to the HDTV HDMI port.
3. Connect a SCART cable to the HDTV and to the DVD recorder/player.
4. Connect the power supply cable to the PVR and to the power outlet.
Tips:
• This connection gives you the best picture quality.
• To receive all the analogue channels, connect an additional RF coaxial cable to the RF BYPASS
port on the PVR with the RF INPUT port on the TV.
T13636
20
Page 23

PVR to Standard TV and DVD
Warning: Electric shock hazard. Unplug all electronic devices before connecting or
disconnecting any device cables to the PVR.
Standard-Definition TV
3
DVD
Recorder/Player
2
Cable Outlet
CATV CONVERTER
MADE IN MEXICO
0011E611A7 56
SABKJNXPJ N0023447426
PVR
VIDEO OUT
Pr
AUDIO
OUT
MULTI TV
Pb
CABLE INRF BYPASS
L
USB
R
Y
ETHERNET
CAUTION
RISK OF ELECTRIC SHOCK
DO NOT OPEN
VOORZICHTIG
GEVAAR VOOR ELEKTRISCHE
SCHOK. NIET OPENEN.
TV
VCR
TEST
220-240V~
OPTICAL
50-60Hz 40W
AUDIO OUT
Power Outlet
4
1
1. Connect the RF coaxial cable to the PVR and to the cable outlet.
2. Connect a SCART cable to the PVR and to the TV.
3. Connect a SCART cable to the TV and to the DVD recorder/player.
4. Connect the power supply cable to the PVR and to the power outlet.
Tip: To receive all the analogue channels, connect an additional RF coaxial cable to the RF BYPASS port on
the PVR with the RF INPUT port on the TV.
T13638
21
Page 24

PVR to Standard TV, DVD, and VCR
Warning: Electric shock hazard. Unplug all electronic devices before connecting or
disconnecting any device cables to the PVR.
Standard-Definition TV
3
DVD
Recorder/Player
2
Cable Outlet
CATV CONVERTER
MADE IN MEXICO
0011E611A7 56
SABKJNXPJ N0023447426
PVR
VIDEO OUT
Pr
AUDIO
OUT
MULTI TV
Pb
CABLE INRF BYPASS
L
USB
R
Y
ETHERNET
CAUTION
RISK OF ELECTRIC SHOCK
DO NOT OPEN
VOORZICHTIG
GEVAAR VOOR ELEKTRISCHE
SCHOK. NIET OPENEN.
TV
VCR
TEST
220-240V~
OPTICAL
50-60Hz 40W
AUDIO OUT
Power Outlet
5
1
VCR
4
T13640
1. Connect the RF coaxial cable to the PVR and to the cable outlet.
2. Connect a SCART cable to the PVR and to the TV.
3. Connect a SCART cable to the TV and to the DVD recorder/player.
4. Connect a SCART cable to the PVR and to the VCR.
5. Connect the power supply cable to the PVR and to the power outlet.
Tip: To receive all the analogue channels, connect an additional RF coaxial cable to the RF BYPASS port on
the PVR with the RF INPUT port on the TV.
22
Page 25

Prepare the Remote Control to Operate Your TV (Optional)
The remote control is preprogrammed to operate the PVR. If you want the PVR remote control to operate
your TV also, you can programme the PVR remote control. In the TV Codes section of this guide, locate your
TV brand and the associated code number. If there are several codes listed, begin with the fi rst number and
follow these instructions.
Tips:
• Find the 3-digit code for your TV brand at the end of this guide.
• Press the Mode key on the remote control to switch between operating the PVR and the TV.
• In TV mode, the remote can control TV volume and TV on/off.
Direct Programme Method
1. Turn on the TV.
2. Press the Mode key on the remote control until
the red LED on the Power key fl ashes twice.
3. Within 5 seconds, enter the 3-digit TV code.
The red LED will fl ash twice to indicate that the
code is accepted.
• If the LED lights steadily for 2 seconds after
you enter the TV code, there is a typing error.
4. Point the remote control toward the TV and press
the Power key.
• The TV will go into Stand-By mode.
• If the TV does not go into Stand-By mode,
select a different code from the TV code list
and repeat steps 1 and 2.
5. Press the
the red LED on the Power key fl ashes twice.
6. Press 000 on the remote control to unlock your
TV code.
7. Test all the function keys on the remote control.
• If the function keys do not work correctly,
repeat the process using a different TV code.
Tip: If this method does not work, use the All
Code Scan Method to fi nd out which code your
remote control uses to operate your TV.
Mode key on the remote control until
T13735
LED
23
Page 26

All Code Scan Method
1. Turn on the TV.
2. Press the Mode key on the remote control until the red LED on the Power key fl ashes twice.
3. Within 5 seconds, press 001. The red LED will fl ash twice to confi rm the entered code.
4. Point the remote control toward the TV and press and hold the Power key until your TV turns off.
5. While the remote control is scanning the codes, you can release the
• If a key is not pressed within 10 seconds, the brand search is stopped and the remote control returns to
normal mode.
• If the TV goes into Stand-By mode during the scan process, immediately release the Power key and
press OK. The red LED will fl ash twice to indicate that the code is stored.
Tips:
• This process may take as long as 10 minutes.
• The remote control may fi nd several codes that operate your TV. However, if some function keys do not
work properly, repeat steps 1 through 5 until a code is found that operates all function keys.
• During the scan process you can press the W key as many as fi ve times to select previous codes or
the X key to search forward again.
Power key and test the function keys.
Remember the Code That Worked
To fi nd out which code your remote control uses to operate your TV:
1. Press the
2. Press 002. The red LED will fl ash twice to confi rm the entered code.
3. Press 1; then, count the number of times the LED fl ashes. The number of fl ashes indicates the fi rst number
of the code.
4. Press 2; then, count the number of fl ashes. The number of fl ashes indicates the second number of the code.
5. Press 3; then, count the number of fl ashes. The number of fl ashes indicates the third number of the code.
Tips:
• Write the code here: ___________________________________________________________________ .
• If the LED does not fl ash after you press the keys, the code digit is 0.
Mode key on the remote control until the red LED fl ashes twice.
24
Page 27

Appendix
25
Page 28

TV Codes
TV Brand Code
0-9
2M Electronics 257
A
A.R.Systems 219, 285, 290, 408, 416, 489, 500, 702
Accent 150, 446, 447
Action 150, 286, 416, 617, 694
Admiral 101, 107, 109, 132, 150, 199, 290, 416,
530, 679
Advent 657
Adyson 295, 416
Agazi 290
Agb 213
Aiko 150
Aim 416, 446, 447
Aiostay 219, 530
Aiwa 161, 245, 416
Akai 101, 106, 109, 110, 113, 118,142, 145, 150, 220,
241, 252, 282, 371, 372, 385, 403, 409, 410, 411,
416, 473, 478, 585, 618, 658, 694, 704, 711
Akiba 142
Akira 446, 447
Akura 142, 150, 266, 290, 416
Alba 113, 128, 139, 142, 150, 154, 220, 266, 282, 290,
332, 334, 403, 410, 416, 452, 636, 655, 670, 679
Albiral 416, 680, 687
Alcyon 355
Alfa 419
Allorgan 123, 637, 704
Allstar 416, 489
Alphatronik 555
Altus 473, 478
American High 286
Amstrad 107, 143, 150, 366, 543, 697
Andersson 465
Anglo 139, 150, 290
Anitech 141, 150, 290, 295, 352, 355, 416, 489, 687
Ansonic 150, 224, 262, 266, 290, 403, 410, 472, 475, 489,
503, 670, 687
Antecno 142
Aoc 416
Arc En Ciel 708, 713
Arcon 688
Arctic 473, 478
Aristona 250, 408, 409, 416, 448
Art Tech 416
Asa 269, 280, 355, 357, 536,
Asberg 352, 355, 416, 687, 690
Asora 150
Astra 416
TV Brand Code
Asuka 142, 290
Atlantic 268, 416, 704
Atlas 408
Atori 150
Audio Technica 210
Audiosonic 142, 150, 262, 266, 290, 416
Audioton 150
Audiovox 416
Ausind 355
Autovox 123, 223, 355, 704
AWA 150, 416
Axxion 141, 150, 282
B
Bang 241
Bang & Olufsen 416, 520, 533
Basic Line 123, 141, 142, 145, 150, 153, 403, 410, 416, 473,
478, 565, 670
Baur 101, 106, 109, 115, 123, 150, 172, 175, 176, 241,
244, 250, 252, 351, 366, 408, 409, 416, 432, 446,
447, 476, 514, 568, 573, 577
Baysonic 290
Bazin 120
Bec 101, 213, 416, 617, 694
Becrese 101, 109, 351, 416, 568, 577, 617, 618, 624
Beko 262, 266, 271, 400, 403, 422, 473, 474, 478, 479,
623, 624, 670, 671, 711
Bell & Howell 199, 416, 561
Benchmark-Beaumark 150, 286, 416
Benq 626
Beon 416, 690
Best 262, 266
Bestar 113, 266, 416
Bigston 150
Black Panther 687
Black Star 224
Blackstripe 286, 561, 568, 577
Blaupunkt 116, 145, 154, 229, 239, 241, 242, 244, 245, 246,
250, 252, 253, 260, 275, 276, 278, 408
Blue Sky 142, 154, 403, 410, 416, 472, 473, 475, 478, 489,
503, 670
Bondstec 223
Bosch-Bauer 122
Boxford 483, 488, 643
Brandt 109, 305, 708, 711, 713, 721
Brandt Electronique 708, 713, 719, 721
Braun 432, 723
Brendstar 150
Brinkmann 679
Brionvega 107, 409, 416, 530, 682
Brockwood 109
26
Page 29

TV Codes, continued
TV Brand Code
Brother 290
Bruns 106, 262, 530, 687, 689
BSR 120, 139, 637
BTC 142
Bush 101, 113, 128, 139, 142, 154, 220, 282, 287, 290,
334, 403, 410, 416, 452, 636, 670
C
Cample 109
Canal+ Canalsatellite 412
Capehart 416, 694
Capsonic 290, 416
Carrefour 355, 416
Casio 419
Cathay 416
CCI 546
Centurion 416
Century 224, 530
CGE 113, 120, 150, 224, 276, 277, 352, 355, 679, 690
CGM 141, 150
Ciate 530
Cie 150, 153, 223, 543
Cihan 419
Cimline 150, 636
Cinex 489, 503
Circuit City 109
Citizen 286, 416, 577
City 150
Clarivox 213, 217, 219, 224, 350, 416, 683, 701
Claton 403, 410
Clatronic 122, 139, 142, 150, 224, 266, 282, 352, 416, 473,
478, 687, 690
Claud 409
Clubinternet 581
CMX/Commax 632
Colortyme 286, 416
Computec 497
Computron 150, 416
Concorde 150
Condor 122, 141, 150, 224, 266, 416, 489, 687, 690
Conic 416, 617
Conrac 675
Constructa 408
Contec 141, 150, 304
Continental 154
Continental Edison 708, 713, 721
Corfung 290
Cosmel 150
Craig 416
TV Brand Code
Crosley 135, 224, 266, 276, 352, 355, 416, 530, 617
Crosswood 403, 410
Crown 109, 139, 150, 199, 262, 263, 266, 352, 355, 416,
684, 687
Crystal 409
CS Electronics 142, 223, 224
CTC Clatronic 122, 224, 687, 690
Curtis 416, 492, 690
Curtis Mathes 286, 416, 561, 577
D
Daewoo 150, 153, 157, 159, 160, 161, 162, 225, 416, 436,
452, 490
Daichi 150
Daimond 446, 447
Dainichi 142
Dantax 262, 420, 473, 478
Davis 409, 438
Dawa 416
Daytron 150, 568
DCE 403, 410, 428
De Graaf 101, 109
Deca 489, 503
Decca 214, 416, 489, 503, 531, 677, 696
Denver 150
Desmet 416
Diamond 150
Digiline 670
Digital Sat 409, 412
Digitech 366
Dixi 150, 416, 689
Dmtech 403, 410, 464, 540
Doric 127
DTS 150
Dual 106, 107, 123, 142, 150, 264, 268, 351, 366, 416,
425, 441, 446, 447, 449, 452, 456
Dumont 109, 269, 355, 530, 687, 690
Dynamic 150
Dynatech 109
E
Eaton 286
Ecrom 403, 410
Ecron 434
Edison 154
Eksperten Vest 258
Elbe 105, 107,139, 219, 264, 403, 408, 410, 416, 472,
475, 539, 642, 644, 691
Elbit 409, 419, 423
Elbit Fraba 429
27
Page 30

TV Codes, continued
TV Brand Code
Elcit 224, 687
Elecs 419
Electro Tech 150
Electrohome 109, 561, 617
Electronika 263, 416, 440
Elekta 141, 150, 290
Elektronika 263, 419, 440
Elemis 262, 266
Elin 106, 150, 269, 416, 489
Elite 122, 142, 278, 286, 416, 561, 577
Elmak 395, 424, 426, 669
Elman 139, 687, 711
Elta 113, 150, 416
E Max 627, 659
Emerson 109, 113, 122, 142, 262, 266, 282, 403, 410, 416,
473, 478, 530, 670, 687, 701
Eon 286
Epson 307, 340, 640
Erres 241, 408, 409, 416, 448
Eternity 659
Etron 106, 150, 416
Euro-Feel 290
Euroline 419, 473, 478
Euroman 416
Euromann 262, 290, 416
Europhon 113, 139, 213, 220, 221, 224, 416, 687, 691
Excelsior 401
Expert 117, 268, 376, 704
F
Fenner 150, 416, 670
Ferguson 106, 107, 109, 117, 120, 132, 135, 172, 175, 176,
177, 185, 219, 241, 242, 252, 269, 276, 304, 305,
350, 364, 392, 394, 408, 409, 416, 445, 446, 447,
448, 450, 501, 514, 568, 573, 577, 584, 614, 615,
617, 623, 624, 634, 677, 693, 696, 711, 713, 718,
719, 720, 721, 725
Fidelis 150, 416
Fidelity 123, 136
Filsai 150
Finlandia 101, 120, 280, 564, 565, 719
Finlux 139, 150, 214, 224, 269, 280, 281, 355, 357, 371,
372, 373, 374, 376, 379, 382, 385, 388, 408, 416,
446, 447, 489, 503, 530, 662, 672, 677, 687, 690
First Line 105, 113, 122, 123, 139, 150, 153, 219, 224, 403,
408, 410, 416, 464, 473, 478, 489, 565, 637, 670
Fisher 123, 135, 156, 175, 266, 269, 351, 530, 560, 561,
562, 563, 568, 686, 689
Flint 416
Force 549, 659
Formenti 122, 220, 355, 409, 416, 419, 425
Fortress 199
TV Brand Code
Fraba 266
Frontech 101, 128, 139, 150, 216, 224, 290
Fuji 704
Fujitsu 107, 109, 268, 694, 704
Fujitsu General 107, 268, 704
Funai 109, 150, 290, 411, 637
G
Galaxis 266, 679, 687
Galaxy 266, 687, 690
Galeria 150
GBC 101, 132, 135, 139, 150, 217, 225, 416
GE 719
Geber 123
GEC 109, 116, 117, 120, 127, 214, 416, 617, 677
Geloso 101, 132, 135, 139, 142, 150, 225
Gemsound 150
Genexxa 142, 416
Gericom 341
Giant 416
Gitem 250, 409, 416, 713, 719
GM 150
GMG 690
Goldbox 412
Goldhand 150
Goldi 409
Goldstar 128, 139, 150, 154, 216, 223, 242, 266, 268, 286,
290, 354, 409, 416, 419, 421, 473, 478, 489, 490,
556, 617, 681, 694
Goldy 666
Goodmans 142, 150, 153, 159, 161, 166, 282, 334, 364, 403,
408, 409, 410, 416, 428, 436, 441, 464, 489, 585,
658, 670
Gorenje 262, 266
GPM 142, 150
Gradin 142, 150, 416
Graetz 101, 106, 116, 117, 118, 120, 127, 135,
403, 410
Gran Prix 489, 503
Granada 101, 109, 119, 120, 127, 131, 145, 184, 195, 197,
214, 229, 262, 266, 280, 350, 363, 376, 378, 385,
398, 408, 409, 416, 435, 439, 560, 561, 563, 564,
565, 573, 577, 608, 609, 611, 618, 677, 694, 696,
719
Grandin 117, 403, 410, 670
Grenadier 150, 416
Gronic 113, 416
Grundig 109, 151, 154, 238, 239, 240, 241, 242, 244, 245,
246, 247, 250, 252, 253, 254, 259, 261, 263, 265,
267, 332, 350, 352, 353, 355, 359, 360, 400, 408,
409, 416, 419, 434, 435, 445, 449, 519, 636, 659
Grunkel 403, 410
28
Page 31

TV Codes, continued
TV Brand Code
GTT 150, 690
Guttronic 135
Gze Unimor 266
H
Haier 189, 288, 291, 294, 453, 560, 563
Halifax 290
Hallmark 109
Hanseatic 101, 106, 123, 128, 135, 139, 150, 161, 250, 262,
264, 351, 409, 416, 425, 446, 447, 452, 460, 489,
637, 681, 682
Hantarex 150, 217, 416
Harley Davidson 109, 286
Harrad 109
Hb Ingelen 403, 410
HCM 141, 142, 150, 262, 290
Heathkit 416
Hemmermann 123
Hifi vox 708, 713
Hiline 150
Hinari 106, 142, 150, 304, 416, 489
Hisawa 142
Hisense 632
Hit 530
Hitachi 101, 109, 110, 115, 116, 117, 120, 123, 125, 127,
132, 159, 161, 199, 214, 250, 305, 324, 351, 371,
376, 403, 410, 416, 421, 428, 433, 435, 436, 437,
452, 457, 464, 465, 545, 568, 577, 589, 590, 591,
592, 593, 594, 595, 596, 597, 598, 599, 600, 601,
602, 603, 604, 605, 606, 607, 608, 609, 610, 611,
612, 613, 614, 615, 616, 617, 618, 619, 620, 621,
622, 623, 624, 625, 664, 677, 682, 694, 708, 721
Hoher 403, 410, 473, 478
Höher 400, 403, 410, 434, 465
Home Electronics 643, 674
Horizont 419
Hornyphon 409, 416
Hoshai 142
HQ 416
Humax 628, 629, 630, 631, 646, 652
Huspi Elektronik 679
Hyper 120, 150, 220, 223, 282, 419
Hypervision 467
Hypson 150, 290, 416
Hyundai 158, 288, 657, 660, 661
I
I.V. 416
Ibervisao 123, 139
Ice 142, 150, 216, 220, 282, 290, 416
Iekei 550
TV Brand Code
IMA 109
Imperial 101, 113, 120, 133, 139, 224, 266, 276, 352, 355,
416, 690
Indesit 718
Indiana 416
Infratex 289, 335, 419, 452, 665, 669, 670, 673, 700, 702
Ingelen 106, 116, 117, 118, 127, 135, 642, 671
Ingersoll 150
Inno Hit 135, 142, 150, 213, 216, 282, 354, 416, 677, 694
Innohit 135, 142, 150, 213, 216, 282, 354, 416, 677, 694
Interbuy 150, 224, 290, 295
Intercord 351
Interdiscount 175, 305, 409, 713, 719, 721
Interfunk 101, 106, 109, 116, 117, 118, 123, 127, 132, 135,
137, 224, 266, 275, 358, 408, 409, 416, 446, 447,
532, 536, 568, 690, 713
Intervision 101, 113, 139, 142, 223, 224, 262, 266, 290, 295,
408, 663, 681, 687
Irradio 142, 150, 223, 350, 354, 355, 416, 489
Iskra 139, 687
IST 142, 220, 416
Isukai 142, 416
ITC 139
ITL 150
ITS 142, 150, 216, 282
ITT 101, 102, 106, 109, 113, 117, 132, 197, 199, 245,
304, 350, 371, 376, 385, 560, 561, 568, 636, 672,
682, 708
ITV 290, 489
J
Jacson 215, 677
Jamo 651
JBL 416
JDB 643
JEC 577
Jetpoint 286, 409
Jinlipu 150
JRC 113, 282
Jumbotronic 419
JVC 203, 204, 205, 206, 207, 208, 209, 210, 211, 212,
282, 416, 560, 561
K
Kaido 128
Kaiser 416
Kaisui 142, 150, 416
Kambrook 305, 721
Kapsch 101, 109, 116, 127, 135, 268, 704
Karcher 150, 262, 263, 416, 489, 503, 691
Kathrein 241
29
Page 32

TV Codes, continued
TV Brand Code
Kawa 282
KDS 229, 408
Kendo 101, 105, 107, 132, 150, 403, 410, 416, 454, 474,
489, 636, 642, 682, 687, 688, 704, 706
Kennedy 107, 135, 142, 268, 704
Kennex 436
Kenwood 239, 412
Kerion 416
Keymat 342, 548, 580, 587, 588
Kimay 290
Kiota 150
Kiton 403, 410
KLH 109, 694
Kloss 286
Kneissel 105, 107, 153, 219, 264, 416, 436, 539, 642, 670,
683
Kobic 150
Kolster 109, 142, 223, 416, 687
Konichi 150
Konka 142, 165, 282, 293, 538
Korpel 416
Körting 262, 263, 266, 530
KTV 109
Kuasho 416
Kuba 109, 123, 351
Kuba Electronic 123, 351
L
Lavis 113, 153, 416, 434, 440, 683
Leader 150
Legend 416
Lenco 106, 150, 152, 153, 164, 290, 416, 462, 687
Lenoir 123, 150, 416
Lesa 224
Lexus 290
Leyco 416, 637, 694
LG 434, 464, 473, 478, 490, 491, 542, 551, 552, 553,
554
Liesenkötter 409
Life 150
Lifetec 142, 150, 153, 290, 403, 410, 416, 427, 452, 670
Linitron 199
Lloyd’s 109, 127, 150, 350
Locatel 237
Loewe 213, 229, 305, 409, 416, 430, 432, 446, 447, 459,
484, 530, 535
Logik 304, 634
Lögik 304, 416
Love 219
Luma 101, 107, 132, 150, 268, 416, 704
TV Brand Code
Lumatron 107, 268, 403, 410, 411, 670, 704
Lux¬May 282, 416, 701
Luxor 101, 102, 106, 109, 110, 115, 116, 118, 120, 125,
127, 150, 280, 354, 358, 371, 372, 376, 379, 382,
383, 388, 403, 410, 433, 487, 498, 672, 694
LXI 199, 416, 561
M
M Electronics 123, 150, 225, 269, 280, 351, 376, 379, 382, 385,
388, 416, 711
Magasin 552, 554
Magnadyne 123, 135, 150, 213, 223, 224, 225, 416, 419, 489,
530, 687, 690
Magnafon 135, 213, 220, 355, 419, 687, 691
Magnasonic 150, 199, 416, 489, 561
Magnavox 408, 416, 431, 617
Magnex 416
Magnum 502
Mandor 290
Manesth 416, 636
Marantz 351, 404, 409, 416
Mark 153, 262, 403, 410, 416, 447, 473, 478
Marshal 142
Mascom 489, 503
Mascot 224
Match Italia 416
Matsui 123, 127, 128, 133, 139, 150, 154, 179, 220, 241,
242, 244, 282, 304, 334, 336, 337, 338, 339, 403,
410, 489, 543, 560, 563, 584, 634, 636, 639
Maxam 150
Maxwell 687
Mc Michael 617
MCE 150
Mcoerson 496
Media Tv 448
Mediator 416
Medion 371, 373, 403, 409, 410, 452, 472, 473, 475, 478,
585, 658, 670, 675, 685
Megas 642
Megatron 618
Melectronic 376, 379, 381, 385
Memorex 150, 290, 561
Memory 464
Memphis 150, 694
Mercury 150, 416
Merrit 101, 106
Meteor 691
Metz 241, 242, 243, 245, 248, 249, 250, 251, 252, 255,
256, 389, 390, 391, 403, 410, 465, 489, 529, 530,
532, 534, 536, 537, 685
MGA 446, 447
30
Page 33

TV Codes, continued
TV Brand Code
Micromaxx 403, 410
Minerva 154, 241, 242, 250, 252, 350, 355
Minoka 416
Mitsubishi 150, 182, 183, 184, 185, 186, 241, 252, 304, 416,
435, 436, 446, 447, 530
Mitsubushi 403, 410
Mivar 217, 220, 222, 264, 354, 356, 692
Monitor 286
Motion 355
Motorola 199, 416
MTC 109, 266, 286, 447
Multichoice 468, 641, 668, 724
Multimedia 149
Multistandard 687
Multitec 403, 410
Multitech 101, 109, 128, 150, 224, 304, 352, 416, 687
Murphy 127, 269
N
Nagoya 120
Namsunc 150
Naonis 101, 132
Nap 409
National 416
NEC 150, 286, 304, 547, 648, 649, 650, 652
Neckermann 101, 107, 109, 115, 128, 132, 150, 175,176, 206,
213, 224, 241, 242, 245, 250, 254, 263, 266, 275,
351, 408, 409, 416, 419, 420, 446, 447, 452, 489,
514, 530, 636, 637
NEI 142, 416, 701
Neovia 330, 653
Nesco 225
New World 142
Newtech 150, 416
Nikkai 142, 290, 416, 577, 694
Nikkei 416
Nikko 489, 703
Nissan 286
Noblex 150, 156
Nobliko 220, 350, 352, 687
Nogamatic 708, 713
Nokia 100, 101, 102, 103, 106, 109, 110, 111, 116, 117,
118, 120, 123, 127, 129, 130, 131, 132, 135, 137,
138, 141, 150, 280, 281, 282, 286, 290, 358, 371,
372, 375, 376, 377, 378, 379, 380, 381, 382, 383,
385, 386, 387, 388, 416, 419, 530, 560, 561, 568,
672, 690
Noname 109, 113, 128, 141, 284, 409, 416, 443, 461, 501,
637
Nordmende 135, 139, 197, 305, 306, 338, 409, 419, 708, 710,
711, 713, 714, 717, 719, 721
Nordway 219
TV Brand Code
Nortek 416
Northern Star 654
Nova 106, 269, 416
Novatronic 150, 416
Nucleonic 113
O
O General 150
Oceanic 101, 102, 106, 109, 111, 117, 120, 127, 200, 376,
379, 382, 385, 388, 560, 561, 637, 704
Okano 150, 266, 678
Olympic 150
Onceas 225
Onida 416
Onwa 142, 220, 282
Opera 416
Optanka 199
Orava 419, 431
Orbit 416
Orbitech 409, 412
Orbiter 266
Orient 150
Orion 109, 120, 123, 124, 126, 139, 142, 150, 176, 187,
188, 290, 304, 334, 335, 337, 338, 339, 403, 408,
409, 410, 416, 418, 419, 420, 445, 543, 636, 637,
639, 659, 707
Osaki 142, 416, 694
Oso 142
Osume 694
Otake 636
Otava 443, 500
OTF 150
Others 106, 109, 113, 128, 140, 141, 150, 218, 242, 284,
304, 305, 403, 409, 416, 421, 479, 489, 493, 501,
561, 677, 716
Otto Versand 101, 106, 109, 113, 115, 122, 123, 128, 139, 141,
145, 150, 172, 174, 175, 176, 177, 195, 197, 199,
200, 221, 223, 224, 229, 241, 242, 245, 250, 252,
254, 262, 282, 351, 366, 408, 409, 416, 419, 420,
432, 446, 447, 448, 452, 489, 514, 568, 573, 577,
636, 637, 681, 682, 707, 711, 719
OVP 485, 486
P
Pacifi c 338
Pael 220, 350, 489
Palladium 101, 245, 250, 266, 403, 410, 416
Panama 150, 224, 290, 416
Panashiba 150
31
Page 34

TV Codes, continued
TV Brand Code
Panasonic 101, 127, 135, 144, 145, 146, 147, 228, 229, 230,
231, 232, 233, 234, 235, 236, 241, 249, 250, 252,
409, 416, 677
Panavision 667
Panavox 150
Panoramic 713
Pathe 139, 264, 708, 713
Pathe Cinema 139
Pathe Marconi 708, 713
Pausa 150
Pce/Pec 286, 561, 568, 577
Penney 286, 351, 577
Perfekt 416
Performance 304
Pershin 350
Philco 113, 120, 135, 139, 150, 224, 266, 276, 352, 355,
416, 530, 617, 679, 683, 690
Philex 446, 447
Philips 116, 175, 241, 250, 268, 305, 395, 398, 399, 401,
402, 404, 405, 408, 409, 412, 413, 414, 415, 416,
417, 418, 419, 429, 435, 438, 440, 445, 448, 450,
453, 463, 472, 490, 505, 506, 573, 617, 694, 708,
721
Phocus 400
Phoenix 416, 419, 420
Phonola 416
Pioneer 106, 305, 343, 344, 409, 412, 416, 419, 525, 526,
527, 528, 721
Plantron 150, 290, 416
Playsonic 403, 410, 473, 478
Policom 687, 713
Poppy 150
Portland 419
Prandoni Prince 101, 132, 135, 139, 213, 224, 282, 355, 489, 687
Prima 150, 286, 290, 416, 561, 577
Princess 150
Pringston 473, 478
Prinz 351, 694
Pro Basic 638
Proelco 262, 419
Profex 106, 113, 128, 150, 352, 687
Profi lo 472, 475, 480, 489, 503
Profi tronic 416, 489, 687
Proline 161, 436, 489, 504, 682
Proscan 286
Prosonic 473, 478, 500
Protec 101, 150, 224, 290, 416, 687
Protech 408, 416, 670
Proton 150
Provision 408, 473, 478, 489
Pulser 150, 286, 416, 617, 694
TV Brand Code
Pye 409, 416
Pymi 150
Q
Qty1 419
Quadro 396, 403, 410, 411, 428, 442, 458, 464, 465, 627,
635, 676
Quasar 150, 224, 687
Quelle 101, 106, 107, 113, 117, 123, 128, 139, 145, 150,
172, 175, 176, 177, 181, 206, 223, 229, 241, 242,
245, 250, 252, 263, 266, 268, 269, 275, 276, 277,
278, 280, 304, 350, 354, 355, 357, 366, 376, 379,
382, 385, 388, 403, 404, 408, 409, 410, 411, 416,
419, 420, 432, 446, 447, 448, 489, 514, 543, 568,
573, 577, 636, 637, 670, 678, 686, 704, 719, 725
R
R Line 416
Radio Shack 199, 561
Radiola 408, 409, 416, 435, 448
Radiomarelli 213, 224, 225, 419
Radionette 117, 127
Radiotone 150, 262, 290, 403, 410, 416, 489, 670
Radix 568
Rank 127, 355
RCA 286, 521, 522
Realcolor 216
Realistic 561
Recor 416, 419, 446, 447
Record 148, 262, 416, 419
Red Star 489, 503
Rediffusion 106, 127
Regente 150
Relisys 586
Revox 355, 409, 416, 447
Rex 101, 105, 107, 132, 264, 268, 704
RFT 106, 142, 262, 264, 270, 409, 530, 689
Rice Club 286
Roadstar 142, 150, 262, 290, 334, 403, 408, 410, 411, 416,
419, 420, 434, 473, 478
Robotron 241
Roombase 541
Rosita 150
Rosner 216
Rowa 150
Royal 141, 142, 150, 242, 262, 289, 290, 416
Royal NEC 473, 478
Runco 286
32
Page 35

TV Codes, continued
TV Brand Code
S
Saba 101, 109, 116, 127, 134, 135, 137, 213, 241, 305,
306, 363, 394, 687, 705, 708, 710, 711, 713, 719,
720, 721, 722
Sagem 642
Saisho 123, 128, 216, 304, 409, 543, 636
Saivod 403, 410, 464, 472, 475, 489
503, 670
Sakio 150, 290
Sakura 150
Salora 101, 102, 106, 109, 115, 118, 119, 120, 132, 135,
280, 354, 371, 373, 376, 379, 381, 382, 384, 385,
388, 432, 560, 561, 672, 694
Sambers 213, 350, 352, 354, 355, 489, 687, 691
Samsung 117, 150, 152, 155, 156, 216, 266, 286, 290, 292,
309, 310, 311, 312, 313, 314, 315, 316 , 317, 318,
319, 320, 321, 322, 323, 324, 325, 326, 327, 328,
329, 354, 398, 407, 409, 416, 435, 444, 476, 477,
481, 489, 490, 493, 495, 501, 677, 678, 694
Sansui 150, 286, 290, 304, 409, 416, 446, 447
Sany 305, 721
Sanyo 123, 135, 150, 216, 264, 266, 269, 304, 351, 489,
503, 530, 557, 558, 559, 560, 561, 562, 563, 564,
565, 566, 567, 568, 569, 584, 677, 686, 689, 694
SBR 416
Schaub Lorenz 101, 106, 116, 117, 118, 127, 403, 410
Schneider 106, 107, 117, 123, 130, 135, 142, 150, 223, 264,
268, 282, 290, 351, 352, 366, 397, 403, 408, 409,
410, 416, 419, 428, 434, 440, 444, 445, 446, 451,
452, 455, 469, 472, 473, 475, 478, 480, 489, 490,
493, 494, 497, 502, 503, 670
Schwaiger 467
Scotland 113
Scott 109, 633
Screenlant Tft 455
Sea 464
Sears 561
Seg 139, 142, 150, 181, 216, 224, 290, 352, 396, 403,
406, 410, 464, 670, 687, 689
Seleco 101, 105, 107, 114, 132, 264, 268, 408, 416, 682,
688, 698, 704, 706, 708, 719, 724
Sencora 150
Sentra 106, 142, 577
Serino 642
Sharp 190, 191, 192, 193, 194, 195, 196, 197, 198, 199,
200, 201, 202, 409, 416, 577, 607, 682
Shintom 489
Shivaki 148, 409, 489
Shorai 637
Show 150
Siarem 135, 213, 217, 530, 687
Sicatel 266, 695
Sice 241, 252
TV Brand Code
Siemens 241, 242, 244, 245, 250, 252, 254, 265, 275, 278,
409, 416, 420, 435, 461, 701
Siena 434
Sierra 409, 416
Siesta 262, 266
Sigmax 286
Signature 577
Silma 416
Silva Schneider 139, 150, 403, 428, 455, 464, 472, 475, 480, 489,
491, 503
Silver 142
Singer 130, 150, 224, 416, 530, 687
Sinotec 489
Sinudyne 101, 107, 123, 130, 132, 135, 175, 338, 409, 418,
419, 420, 434, 454, 530, 543, 636, 637, 687, 691,
707
Skantic 101
Sky 544, 645, 659
Smaragd 154
Snyder 416
Solavox 106, 117
Sonitron 266, 560, 561, 562, 565, 568
Sonix 574, 659
Sonoko 150, 290, 416
Sonolor 101, 102, 127
Sontec 266, 416
Sony 167, 168, 169, 170, 171, 172, 173, 174,175, 176,
177, 178, 180, 181, 249, 275, 304, 408, 409, 416,
507, 508, 509, 510, 511, 512, 513, 514, 515, 516,
517, 518
Sound & Vision 142, 687
Soundcolor 489, 503
Soundesign 109, 286
Soundmaster 150
Spectra 153
Spectrician 416
Sr2000 561
Standard 142, 150, 225
Star 288, 416
Starlite 150, 489
Starlux 150
Staßfurt 689
Stern 101, 105, 107, 132, 264, 268, 704
Strato 290
Sunkai 142, 636, 637
Sunrise 155
Sunstar 150
Sunwatt 416
Sunwood 150, 416
Supersonic 446, 447
Supertec 150, 416, 419
33
Page 36

TV Codes, continued
TV Brand Code
Supertech 113, 123, 150, 419
Supra 150
Swisstec 659
Syc Line 150
Sylvania 416
Symphonic 109
T
Tadistar 489
Talent 241, 252
Tandberg 107, 249, 713
Tandy 120, 142, 199, 224, 694
Targa 324
Tashiko 101, 617
Tatung 214, 304, 401, 409, 416, 420, 433, 482, 488, 489,
498, 500, 503, 531, 624, 677, 694, 696
Teak 123, 150, 416, 446, 447
Tec 107, 113, 139, 150, 153, 223, 224, 268, 701
Techline 411, 687
Technica 286, 403, 410, 464, 472, 475, 669
Technics 229, 416
Technisat 409, 412, 699
Technol 150, 416, 446, 447
Techwood 190, 286, 403, 410
Tecnimagen 404, 409, 434, 473
Tecnison 150, 489
Tedelex 150, 416
Teknant 150, 416
Tekon 150, 286
Teleavia 305, 708, 711, 713
Teleco 470
Telefac 150
Telefunken 109, 224, 276, 277, 305, 306, 364, 385, 393, 394,
416, 685, 704, 705, 708, 711, 712, 713, 715, 717,
718, 719, 721, 725
Teleopta 150
Telerent 117, 447
Teleservice 241, 252
Telestar 150, 409, 412, 489, 503
Teletech 150, 224, 403, 410, 504, 670
Teleton 101, 109, 268, 704
Televideon 135
Teleview 489, 503
Telra 489, 503
Tempest 150
Tensai 122, 139, 142, 150, 216, 220, 225, 269, 409, 416,
489, 637, 681, 687
Tenson 150
Tesla 409, 416, 471, 530, 669
TV Brand Code
Tevion 403, 410, 452, 473, 478, 489, 503, 585, 652, 658,
670
Thomas 150, 286, 416, 617, 694
Thomson 109, 163, 219, 242, 269, 276, 305, 350, 362, 363,
364, 365, 394, 444, 693, 708, 711, 713, 715, 718,
719, 721, 725
Thorn 106, 107, 117, 120, 132, 135, 137, 138,175, 185,
219, 241, 252, 269, 281, 283, 304, 350, 409, 416,
446, 447, 448, 450, 501, 566, 568, 577, 583, 584,
614, 617, 677, 693, 711, 713, 718, 719, 720, 721
Thorn Ferguson 106, 107, 117, 123, 127, 175, 176, 219, 241, 242,
250, 252, 276, 305, 350, 416, 446, 447, 693, 711,
713, 718, 721, 725
TMK 286
Tobo 150
Tokai 404, 416, 694
Tokyo 155, 286
Toshiba 161, 241, 244, 247, 286, 310, 331, 333, 334, 355,
403, 410, 416, 446, 447, 473, 478, 561, 568, 570,
571, 572, 573, 575, 576, 577, 578, 579, 582, 583,
584, 647, 656
Tosonic, 286
Towada 101, 139, 687
Transonic 416
TRC 141, 150, 489
Trevi 150
Triad 409, 416
Triax 489
Trilux 262, 401, 419, 436, 670
Tristar 142
Triumph 355, 543
Trivision 150
U
Uher 122, 176, 268, 351, 355, 416, 447, 687, 704
Ultra 694
Ultravox 135, 220, 224, 416, 530, 687
Uma 101, 106, 117, 123, 127, 132, 142, 241, 252, 266,
276, 277, 278, 305, 350, 409, 446, 447, 708, 713,
721
Unic 266
Unic Radio 106
Unimor 262, 409
United 334, 416, 473, 478
Universum 106, 123, 150, 175, 224, 241, 245, 250, 252, 262,
265, 266, 269, 276, 280, 290, 304, 350, 373, 385,
403, 406, 408, 409, 410, 411, 416, 419, 440, 446,
447, 466, 489, 670, 704
Univox 117, 225, 416, 530
Uranya 150, 687
34
Page 37

TV Codes, continued
TV Brand Code
V
Vanguard 109, 150
Veco 416
Vega 530
Vestel 113, 401, 403, 406, 410, 411, 416, 419, 427, 428,
465, 670
Vexa 150, 416
Victor 210
Videcon 416
Videologique 142
Videosat 224
Videoseven 179
Videoton 108, 120, 124, 126, 305, 690, 709, 721
Vidion 150
Viditel 290
Vision 122, 150
Vison 416
Voxson 101, 132, 355, 416, 489, 530
VTQ 689
W
Walkie 268
Waltham 101, 124, 126, 305
Wards 210, 416
Watson 122, 142, 150, 278, 403, 410, 411, 416, 419, 670
Wattradio 123, 135, 220, 489, 687, 690, 691
Wega 530
Wegavox 150, 224, 416, 690
Welltech 473, 478
Welstar 403, 410, 464
Weltblick 416
Whirlpool 363, 364, 435
White Westinghouse 122, 220, 403, 409, 410, 416, 446, 447, 561, 687,
690
Windsor 403, 410
Winston 150, 416
Winternitz 150
Wizja 401
World Of Vision 308, 341
World Tech 153
Worldview 150, 409, 416
TV Brand Code
Y
Yamaha 399, 573, 576
Yamo 142
Yevici 150
Yokan 416
Yoko 128, 139, 142, 150, 153, 263, 290, 416, 419, 560,
561, 713
York 416, 568
Yorx 142
Yoshita 416
Z
Zanela 113
Zanussi 101, 132, 704
Zenith 416
35
Page 38

Informatie over technische ondersteuning
Hulp nodig? Breng dit apparaat
niet terug naar uw winkelier.
Voordat u uw nieuwe PVR naar uw winkelier terugbrengt, neem contact op met
Ziggo voor klanten-service en technische ondersteuning via de Ziggo-helpdesk
op 0900-1884 (€ 0,10 p/min) of bezoek Ziggo online op www.ziggo.nl.
Ziggo zal allereerst verzekeren dat de PVR correct geinstalleerd en aangesloten
is op het kabelnetwerk.
Reparatie Service Informatie
Indien u uw PVR voor reparatie dient terug te sturen, bekijkt u dan onderstaande link voor meer informatie:
www.cisco.com/web/NL/consumer/products/settop-8455dvb.html.
36
Page 39

Handelsmerken
Cisco, Cisco Systems, het Cisco-logo, en het Cisco Systems-logo zijn gedeponeerde handelsmerken of
handelsmerken van Cisco Systems, Inc. en/of haar fi llialen in de V.S. en verschillende andere landen.
Vervaardigd onder licentie van Dolby Laboratories.
“Dolby” en het dubbele-D-symbool zijn handelsmerken van Dolby Laboratories.
is een handelsmerk van het DVB Project.
HDMI, het HDMI-logo, en High-Defi nition Multimedia Interface zijn handelsmerken of gedeponeerde
handelsmerken van HDMI Licensing LLC.
Alle andere handelsmerken die in dit document vermeld zijn, zijn eigendom van hun respectievelijke
eigenaren.
Disclaimer
Cisco Systems, Inc. neemt geen verantwoordelijkheid voor eventuele fouten of weglatingen in deze handleiding.
Wij behouden het recht voor om deze handleiding op gelijk welk moment te wijzigen zonder voorafgaande
kennisgeving.
Verklaring van software- en fi rmwaregebruik
De software beschreven in dit document is auteursrechtelijk beschermd en aan u verstrekt onder een
licentieovereenkomst. U mag deze software uitsluitend gebruiken of kopiëren in overeenstemming met de
licentieovereenkomst.
De fi rmware in dit apparaat is auteursrechtelijk beschermd. U mag de fi rmware uitsluitend gebruiken in het
apparaat waarin het is geleverd. Elke reproductie of distributie van deze fi rmware, of een gedeelte ervan,
zonder onze expliciete schriftelijke toestemming, is verboden.
Amerikaanse octrooien
Een octrooibewijs is aan dit product toegevoegd. Verder kan dit product ook gedekt zijn door een of meerdere
van de volgende octrooien:
4,498,169, 4,692,919, 4.748.667; 4.829.569; 4.866.770; 4.885.775; 4.888.799; 4.890.319; 4.922.456; 4.922.532; 4.924.498; 4.965.534;
4.991.011; 5.003.384; 5.012.510; 5.029.207; 5.045.816; 5.053.883; 5.054.071; 5.058.160; 5.142.575; 5.142.690; 5.146.526; 5.155.590;
5.214.390; 5.225.902; 5.225.925; 5.235.619; 5.237.610; 5.239.540; 5.241.610; 5.247.364; 5.255.086; 5.257.403; 5.267.071; 5.270.809;
5.271.041; 5.272.752; 5.282.028; 5.285.497; 5.287.351; 5.301.028; 5.309.514; 5.317.391; 5.319.709; 5.341.425; 5.347.388; 5.347.389;
5.357.276; 5.359.601; 5.361.156; 5.367.571; 5.379.141; 5.379.145; 5.381.481; 5.390.337; 5.400.401; 5.406.558; 5.418.782; 5.420.866;
5.420.923; 5.425.101; 5.428.404; 5.430.568; 5.434.610; 5.436.749; 5.438.370; 5.440.632; 5.442.472; 5.455.570; 5.457.701; 5.471.492;
5.477.199; 5.477.262; 5.477.282 5.477.370; 5.481.389; 5.481.542; 5.485.221; 5.493.339; 5.497.187; 5.500.758; 5.502.499; 5.506.904;
5.519.780; 5.539.822; 5.550.825; 5.579.055; 5.579.057; 5.583.562; 5.592.551; 5.596.606; 5.600.378; 5.602.933; 5.640.388; 5.657.414;
5.675.575; 5.684.876; 5.715.515; 5.724.525; 5.734.822; 5.740.300; 5.742.677; 5.754.940; 5.757.416; 5.771.064; 5.774.859; 5.825.829;
5.826.167; 5.850.305; 5.854.703; 5.870.474; 5.892.607; 5.920.626; 5.923.755; 5.930.024; 5.930.515; 5.937.067; 5.963.352; 5.966.163;
5.982.424; 5.991.139; 5.999.207; 6.005.631; 6.005.938; 6.016.163; 6.028.941; 6.029.046; 6.052.384; 6.055.244; 6.072.532; 6.105.134;
6.148.039; 6.157.719; 6.188.729; 6.195.389; 6.212.278; 6.215.530; 6.219.358; 6.240.103; 6.243.145; 6.246.767; 6.252.964; 6.272.226;
6.292.081; 6.292.568; 6.320.131; 6.374.275; 6.405.239; 6.411.602; 6.417.949; 6.424.714; 6.424.717; 6.433.906; 6.438.139; 6.463.586;
6.467.091; 6.476.878; 6.493.876; 6.510.519; 6.516.002; 6.516.412; 6.526.508; 6.538.595; 6.546.013; 6.560.340; 6.567.118; 6.570.888;
6.622.308; 6.629.227; 6.664.984; 6.667.994; 6.671.879; 6.674.967; 6.678.891; 6.714.598; 6.721.352; 6.721.956; 6.725.459; 6.738.982;
6.744.892; 6.744.967; 6.751.271; 6.760.918; 6.795.972; 6.802.077; 6.804.708; 6.811.447; 6.817.028; 6.822.972; 6.823.385; 6.832.386;
6.845.106; 6.868.473; 6.874.075; 6.889.191; 6.909.471; 6.917.622; 6.917.628; 6.922.412; 6.927.806; 6.928.656; 6.931.058; 6.937.729;
6.969.279; 6.971.008; 6.971.121; 6.978.310; 6.986.156; 6.988.900; 6.996.838; 7.010.801; 7.053.960; 7.065.213; 7.069.578; 7,069572;
D348065; D354959; D359737; D363932; D390217; D434753; D507240; D507535; D513407; D516518; RE36368; RE36988
Dit product is in overeenstemming met de volgende Europese richtlijnen:
-73/23/EEG
-93/68/EEG
-89/336/EEG
-2002/95/EC RoHS
-2002/96/EC WEEE
20070417 Octrooien
37
Page 40

Technical Assistance Information
Need Help? Do Not Return This
Device to the Retailer.
Before returning your new PVR back to the retailer or to Cisco for repair, contact
Ziggo for customer service and technical assistance at 0900-1884 (€ 0,10 p/min)
or visit online at www.ziggo.nl.
Ziggo must fi rst ensure the PVR is correctly confi gured and connected to the
cable network.
Repair Service Information
If your PVR needs to be returned for service, please open a web browser on your computer and go to the following link for further information: www.cisco.com/web/consumer/products/settop-8455dvb.html.
38
Page 41

Trademarks
Cisco, Cisco Systems, the Cisco logo, and the Cisco Systems logo are registered trademarks or trademarks of
Cisco Systems, Inc. and/or its affi liates in the U.S. and certain other countries.
Manufactured under license from Dolby Laboratories.
“Dolby” and the double-D symbol are trademarks of Dolby Laboratories.
is a trademark of the DVB Project.
HDMI, the HDMI logo, and High-Defi nition Multimedia Interface are trademarks or registered trademarks of
HDMI Licensing LLC.
All other trademarks mentioned in this document are the property of their respective owners.
Disclaimer
Cisco Systems, Inc. assumes no responsibility for errors or omissions that may appear in this guide. We
reserve the right to change this guide at any time without notice.
Software and Firmware Use Notice
The software described in this document is protected by copyright law and furnished to you under a license
agreement. You may only use or copy this software in accordance with the terms of your license agreement.
The fi rmware in this equipment is protected by copyright law. You may only use the fi rmware in the equipment
in which it is provided. Any reproduction or distribution of this fi rmware, or any portion of it, without our express
written consent is prohibited.
U.S. Patents
A patent notice is affi xed to this product. In addition, the product may also be covered by one or more of the
following patents:
4,498,169, 4,692,919, 4,748,667; 4,829,569; 4,866,770; 4,885,775; 4,888,799; 4,890,319; 4,922,456; 4,922,532; 4,924,498; 4,965,534;
4,991,011; 5,003,384; 5,012,510; 5,029,207; 5,045,816; 5,053,883; 5,054,071; 5,058,160; 5,142,575; 5,142,690; 5,146,526; 5,155,590;
5,214,390; 5,225,902; 5,225,925; 5,235,619; 5,237,610; 5,239,540; 5,241,610; 5,247,364; 5,255,086; 5,257,403; 5,267,071; 5,270,809;
5,271,041; 5,272,752; 5,282,028; 5,285,497; 5,287,351; 5,301,028; 5,309,514; 5,317,391; 5,319,709; 5,341,425; 5,347,388; 5,347,389;
5,357,276; 5,359,601; 5,361,156; 5,367,571; 5,379,141; 5,379,145; 5,381,481; 5,390,337; 5,400,401; 5,406,558; 5,418,782; 5,420,866;
5,420,923; 5,425,101; 5,428,404; 5,430,568; 5,434,610; 5,436,749; 5,438,370; 5,440,632; 5,442,472; 5,455,570; 5,457,701; 5,471,492;
5,477,199; 5,477,262; 5,477,282 5,477,370; 5,481,389; 5,481,542; 5,485,221; 5,493,339; 5,497,187; 5,500,758; 5,502,499; 5,506,904;
5,519,780; 5,539,822; 5,550,825; 5,579,055; 5,579,057; 5,583,562; 5,592,551; 5,596,606; 5,600,378; 5,602,933; 5,640,388; 5,657,414;
5,675,575; 5,684,876; 5,715,515; 5,724,525; 5,734,822; 5,740,300; 5,742,677; 5,754,940; 5,757,416; 5,771,064; 5,774,859; 5,825,829;
5,826,167; 5,850,305; 5,854,703; 5,870,474; 5,892,607; 5,920,626; 5,923,755; 5,930,024; 5,930,515; 5,937,067; 5,963,352; 5,966,163;
5,982,424; 5,991,139; 5,999,207; 6,005,631; 6,005,938; 6,016,163; 6,028,941; 6,029,046; 6,052,384; 6,055,244; 6,072,532; 6,105,134;
6,148,039; 6,157,719; 6,188,729; 6,195,389; 6,212,278; 6,215,530; 6,219,358; 6,240,103; 6,243,145; 6,246,767; 6,252,964; 6,272,226;
6,292,081; 6,292,568; 6,320,131; 6,374,275; 6,405,239; 6,411,602; 6,417,949; 6,424,714; 6,424,717; 6,433,906; 6,438,139; 6,463,586;
6,467,091; 6,476,878; 6,493,876; 6,510,519; 6,516,002; 6,516,412; 6,526,508; 6,538,595; 6,546,013; 6,560,340; 6,567,118; 6,570,888;
6,622,308; 6,629,227; 6,664,984; 6,667,994; 6,671,879; 6,674,967; 6,678,891; 6,714,598; 6,721,352; 6,721,956; 6,725,459; 6,738,982;
6,744,892; 6,744,967; 6,751,271; 6,760,918; 6,795,972; 6,802,077; 6,804,708; 6,811,447; 6,817,028; 6,822,972; 6,823,385; 6,832,386;
6,845,106; 6,868,473; 6,874,075; 6,889,191; 6,909,471; 6,917,622; 6,917,628; 6,922,412; 6,927,806; 6,928,656; 6,931,058; 6,937,729;
6,969,279; 6,971,008; 6,971,121; 6,978,310; 6,986,156; 6,988,900; 6,996,838; 7,010,801; 7,053,960; 7,065,213; 7,069,578; 7,069572;
D348065; D354959; D359737; D363932; D390217; D434753; D507240; D507535; D513407; D516518; RE36368; RE36988
This product conforms to the following European directives:
-73/23/EEC
-93/68/EEC
-89/336/EEC
-2002/95/EC RoHS
-2002/96/EC WEEE
20070417 Patents
39
Page 42

40
Page 43

41
Page 44

Ziggo
Postbus 16192
2500 BD Den Haag
Helpdesk 0900-1884
(€ 0,10 p/min)
www.ziggo.nl
Aanvullende Productinformatie kunt u vinden op:
www.cisco.com/web/NL/consumer/products/settop-8455dvb.html
Additional Product Information in English can be found at:
www.cisco.com/web/consumer/products/settop-8455dvb.html
Dit doc ument bevat verscheidene handelsm erken van C isco Systems, Inc.
Raadpl eeg het ho ofdstuk over handelsmerke n van dit doc ument voor een lij st van de in di t docume nt gebruikte handelsm erken van Cisco Systems, Inc.
Alle and ere hande lsmerken die in dit d ocumen t vermeld z ijn, zij n eigendo m van hun res pectieve lijke eig enaren.
Beschikbaarheid van dit produc t en deze ser vice is onderhevig aan verander ing zonde r voorafgaande ken nisgevi ng.
©200 8-20 09 Cisco Syste ms, Inc. A lle rech ten voor behoud en.
This doc ument in cludes various t radema rks of Cisco Systems, Inc.
Please see the Tradema rks section of this docum ent for a lis t of the Cisco Systems, Inc. tr ademar ks used in t his document.
All othe r tradema rks menti oned in thi s docume nt are the pr oper ty of thei r respec tive owner s.
Produc t and ser vice avai labilit y is subject to change without notic e.
©200 8-20 09 Cisco Syste ms, Inc. A ll right s reser ved.
January 2009 4024735 Rev B
 Loading...