

Page 1

USER GUIDE
Cisco Unified IP Phone 7921 (SCCP) for Cisco Unified
Communications Manager Express 4.3
1 Overview
2 Operating Your Phone
3 Phone Features and Functions
Page 2
1 Overview
180258
0
1
@
2
ABC
3
DEF
4
5
JKL
6
MNO
GHI
7
8
TUV
9
PQRS
#
*
10
13
12
14
15
16
11
17
1
4
8
9
7
6
5
2
3
7921
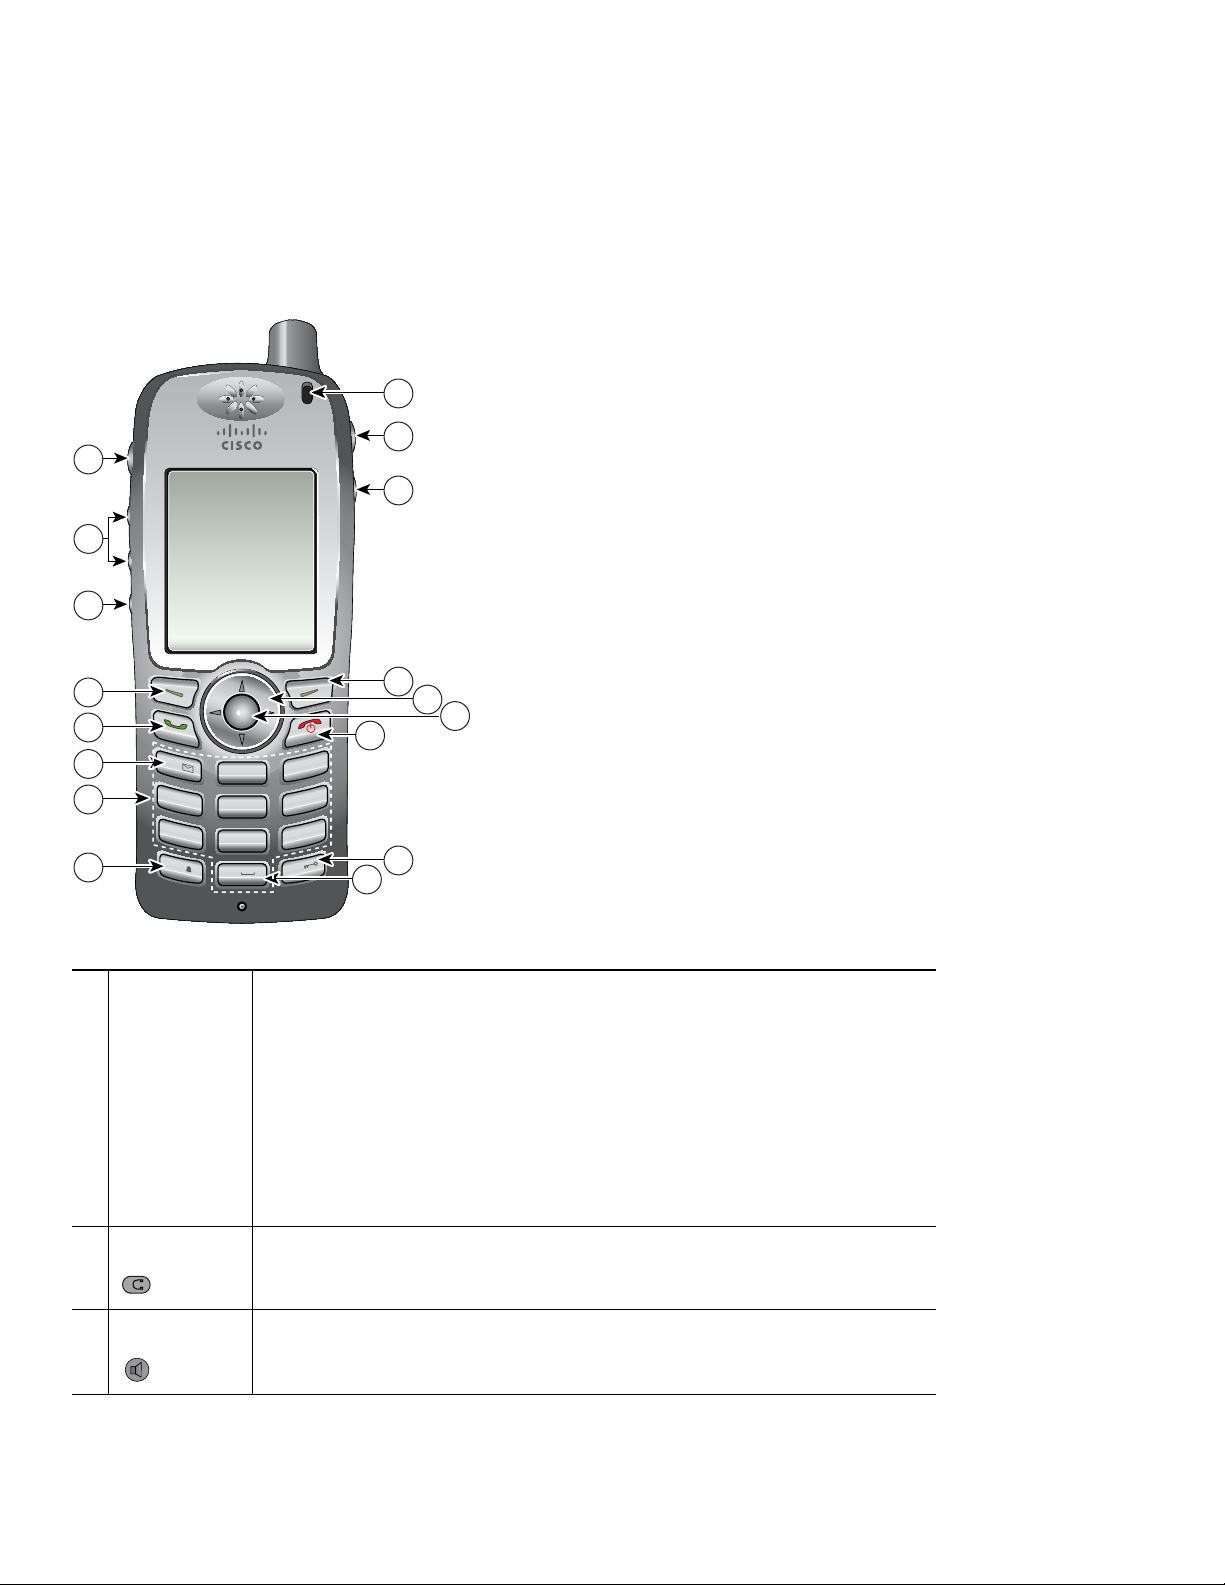
This guide provides phone, soft key, and features descriptions for the Cisco Unified IP Phone models 7921.
Physical Layout
The Cisco Unified IP phone 7921 is a single-line phones.
WXYZ
Indicator light
1
(LED)
Provides these indications:
• Solid red—Phone is connected to AC power source, and battery is charging.
• Solid green—Phone is connected to AC power source, and battery is fully
charged.
• Fast blinking red—Incoming call. (Phone can be charging or fully charged.)
• Slow blinking red—Voice message. (When phone is connected to AC power
source, red light displays longer than when using only the battery.)
• Slow blinking green—Phone is using only battery power. Phone is
registered with the wireless network and is within service coverage area.
Headset port Port for plugging in a headset or ear bud.
2
Speaker button Toggles the speaker mode on or off for the phone.
3
2
Page 3
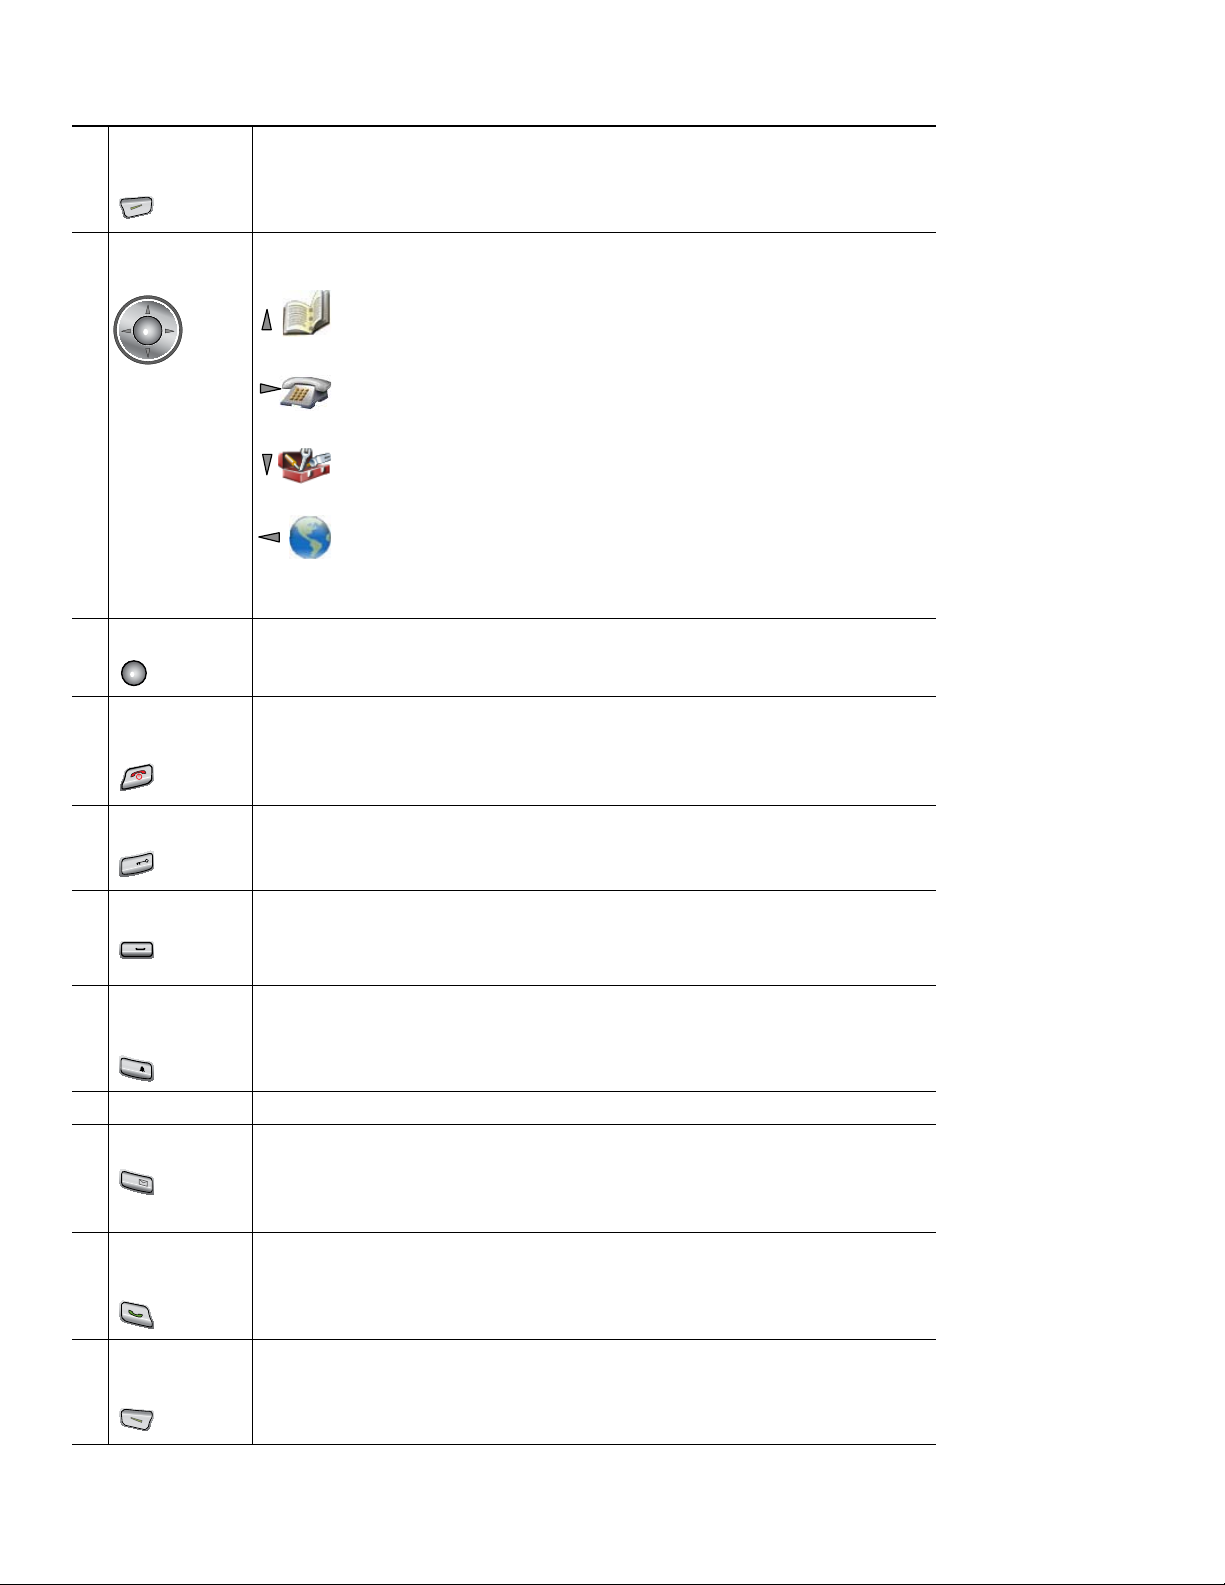
Right softkey
#
0
*
1
@
4
button
Activates the Options menu for access to the list of softkeys. Sometimes
displays a softkey label.
Navigation
5
button
Accesses these menus and lists from the main screen.
Directory
Line View
Settings
Services
Allows you to scroll up and down menus to highlight options and to move left
and right through phone numbers and text entries.
Select button Activates the Help menu from the main screen.
6
Allows you to select a menu item, a softkey, a call, or an action.
Power/End
7
button (red)
Turns the phone on or off, diverts a ringing call to your voice messaging system,
or ends a connected call. If there is no voice messaging system, then silences the
ring.
When using menus, acts as a shortcut to return to the main screen.
Pound (#) key Toggles between locking and unlocking the key pad.
8
Allows you to enter these special characters when you are entering text:
# ? ( ) [ ] { }
Zero (0) key Enters “0” when dialing a number. Allows you to enter a space or these special
9
characters when you are entering text:
, . ‘ “ | _ ~ ’
Asterisk (*)
10
key
Toggles between Ring and Vibrate mode.
Allows you to enter these special characters when you are entering text:
* + - / = \ : ;
Keypad Allows you to dial numbers, enter letters, and choose menu items by number.
11
One (1) key Enters “1” when dialing a number. Allows you to access the voice messaging
12
system.
Allows you to enter these special characters when you are entering text:
! @ < > $ % ^ &
Answer/Send
13
Allows you to answer a ringing call or, after dialing a number, to place the call.
button (green)
Left softkey
14
Activates the softkey option displayed on the screen.
button
3
Page 4
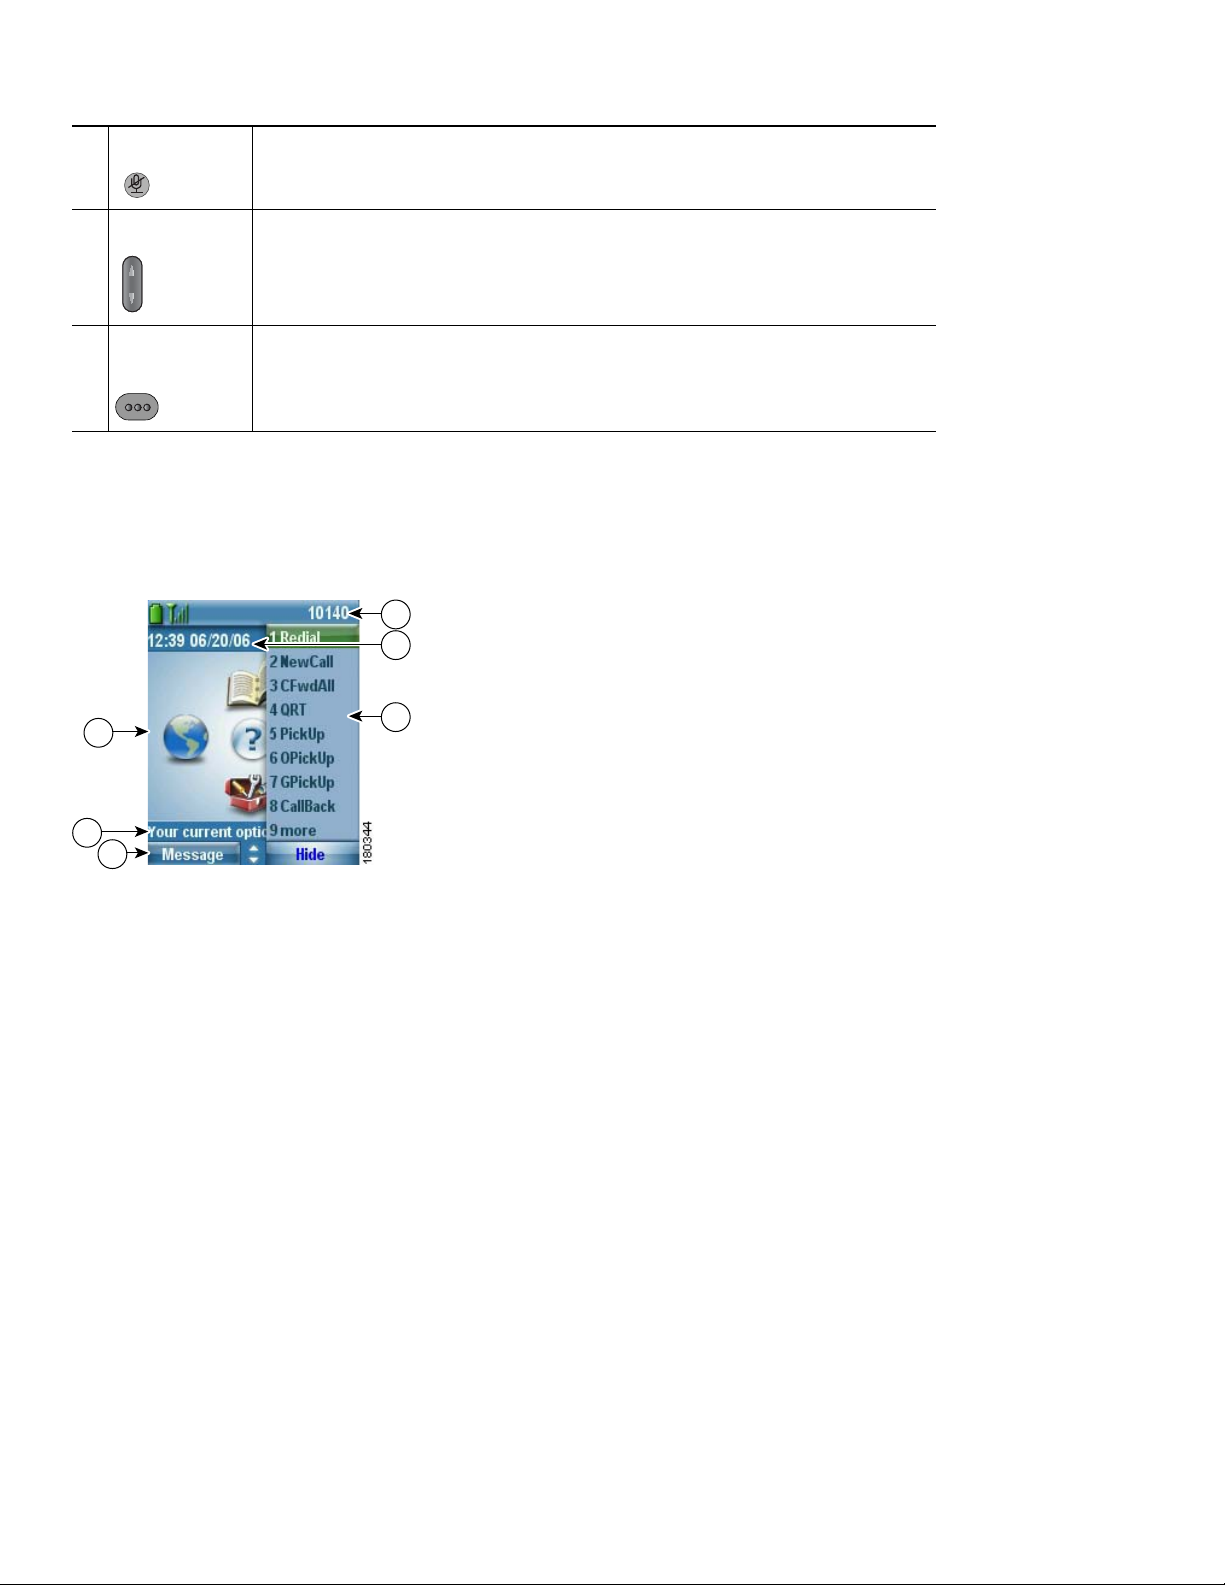
Mute button Toggles the mute feature on or off.
6
5
4
1
3
2
15
Volume button When the phone is idle, controls the ring volume, vibrate option, or turns off
16
the ring.
During a call, controls the speaker volume for the handset, headset, and speaker
mode.
Applications
17
button
Used with XML applications, such as Push to Talk or directory services.
Phone Screen Features
Because the Cisco Unified Wireless IP Phone 7921G has only two soft keys, the Options softkey displays the list of available
feature options for the phone. The features in the Options list change depending on whether the phone is idle or in an active
call. This is what your main phone screen looks like with the Options list open.
4
Page 5
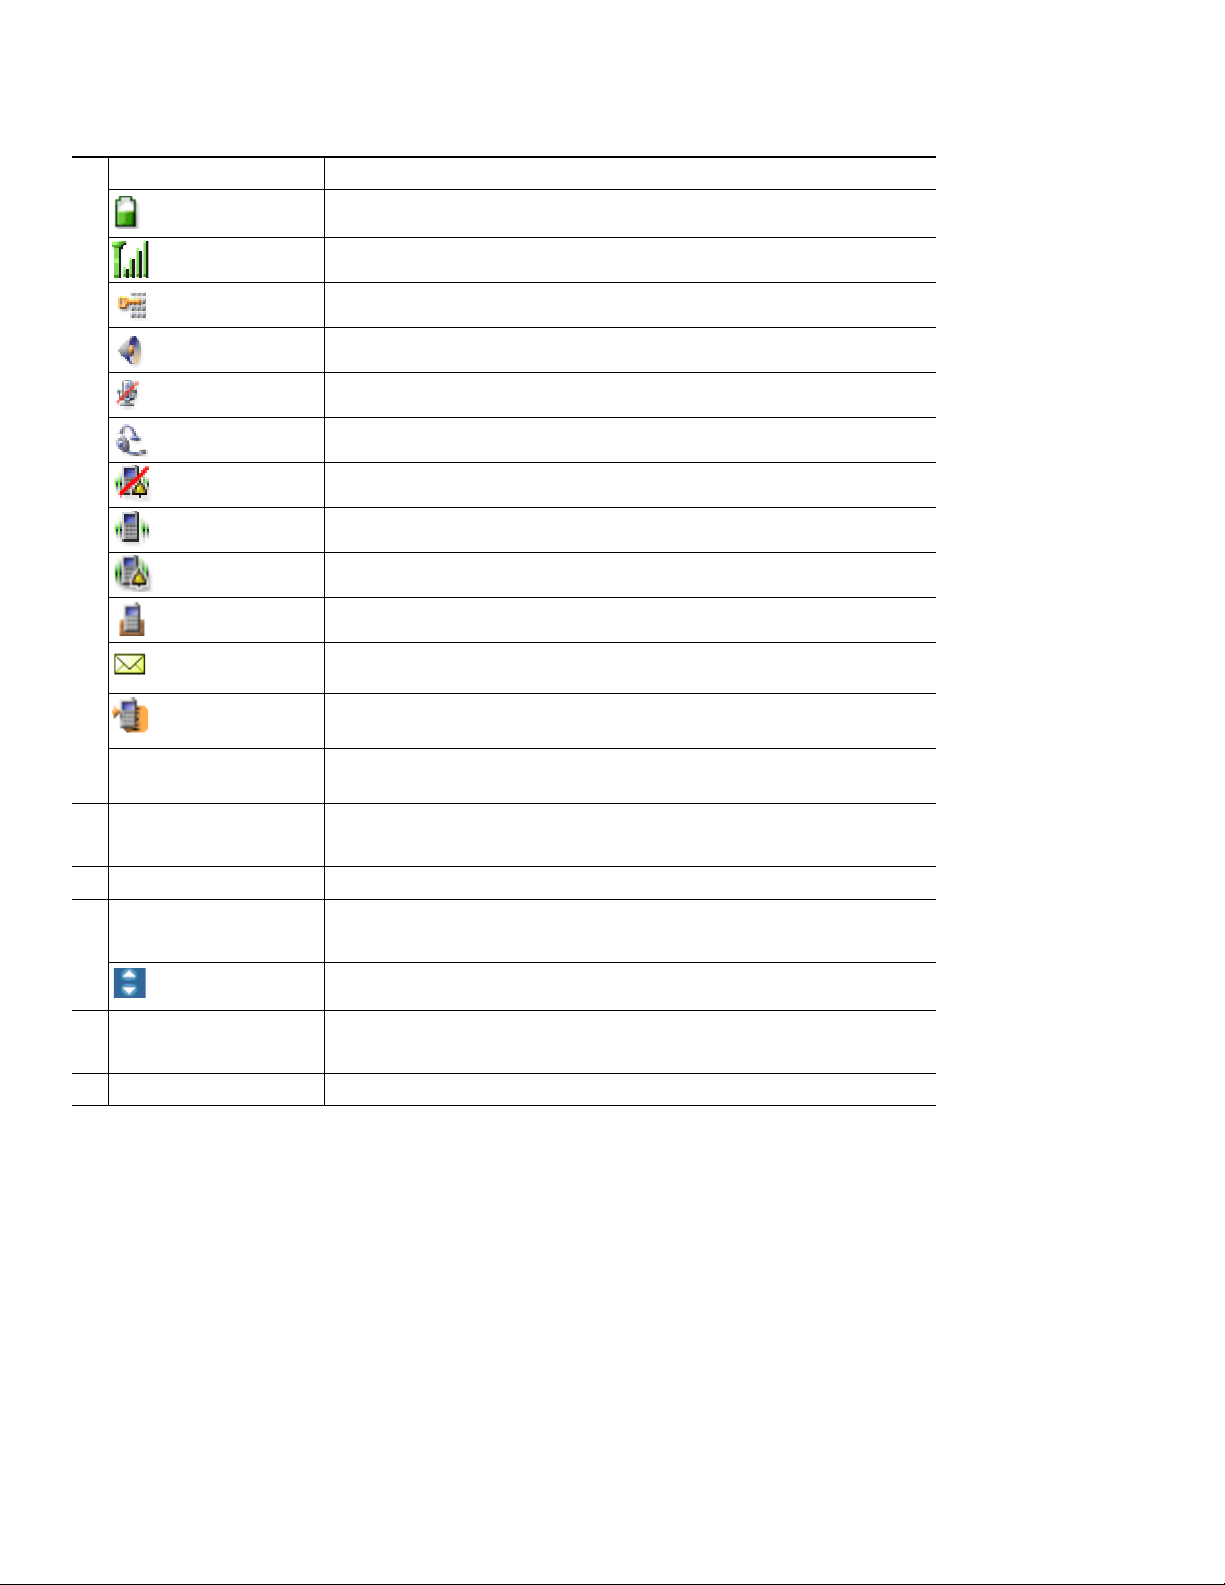
Phone Status line Displays these icons (if active) and your directory number:
1
Battery icon—Shows the level of charge in battery
Signal icon—Shows the degree of signal strength
Key lock icon—Indicates the keypad is locked
Speaker icon—Indicates speaker mode is active
Mute icon—Indicates mute is active
Headset icon—Indicates headset is plugged in to phone
Ringer Off icon—Indicates the phone alert is silent
Vibrate icon—Indicates the phone alert is vibrate only
Vibrate and ring icon—Indicates the phone alert is ring and vibrate
Desk Top Charger icon—Indicates the phone is docked in the charger
Voice Message icon—Indicates you have a voice message
Application icon—Indicates the application (such as Push to Talk) is
active
Date and Time line
2
Options Menu Displays softkey features for the current call state
3
Softkey labels area
4
0HVVDJH+LGH
Primary phone line—Displays the phone number (directory number)
for your primary phone line
Displays time and date information
Displays softkey options and provides access to the Options list of
softkey features
Displays the active navigation arrows for the menu or screen
Status and information
5
<RXUFXUUHQWRSWLRQV
Main phone screen Displays four menu icons and Help
6
Provides phone status or instructions
Connecting Your Phone
This section shows how to use the connectors on your Cisco IP phone.
Your system administrator will configure your new Cisco Unified Wireless IP Phone to connect to the corporate wireless
network and the IP telephony network.
A rechargeable Lithium ion battery powers the Cisco Unified Wireless IP Phone 7921G. Before you can use your phone, you
must install the battery in the phone and then charge the battery. Depending on the type of battery you have, the fully charged
battery provides these hours of service:
• The standard battery provides up to 10 hours of talk time or up to 80 hours of standby time.
• The extended battery provides up to 12 hours of talk time or up to 100 hours of standby time.
5
Page 6
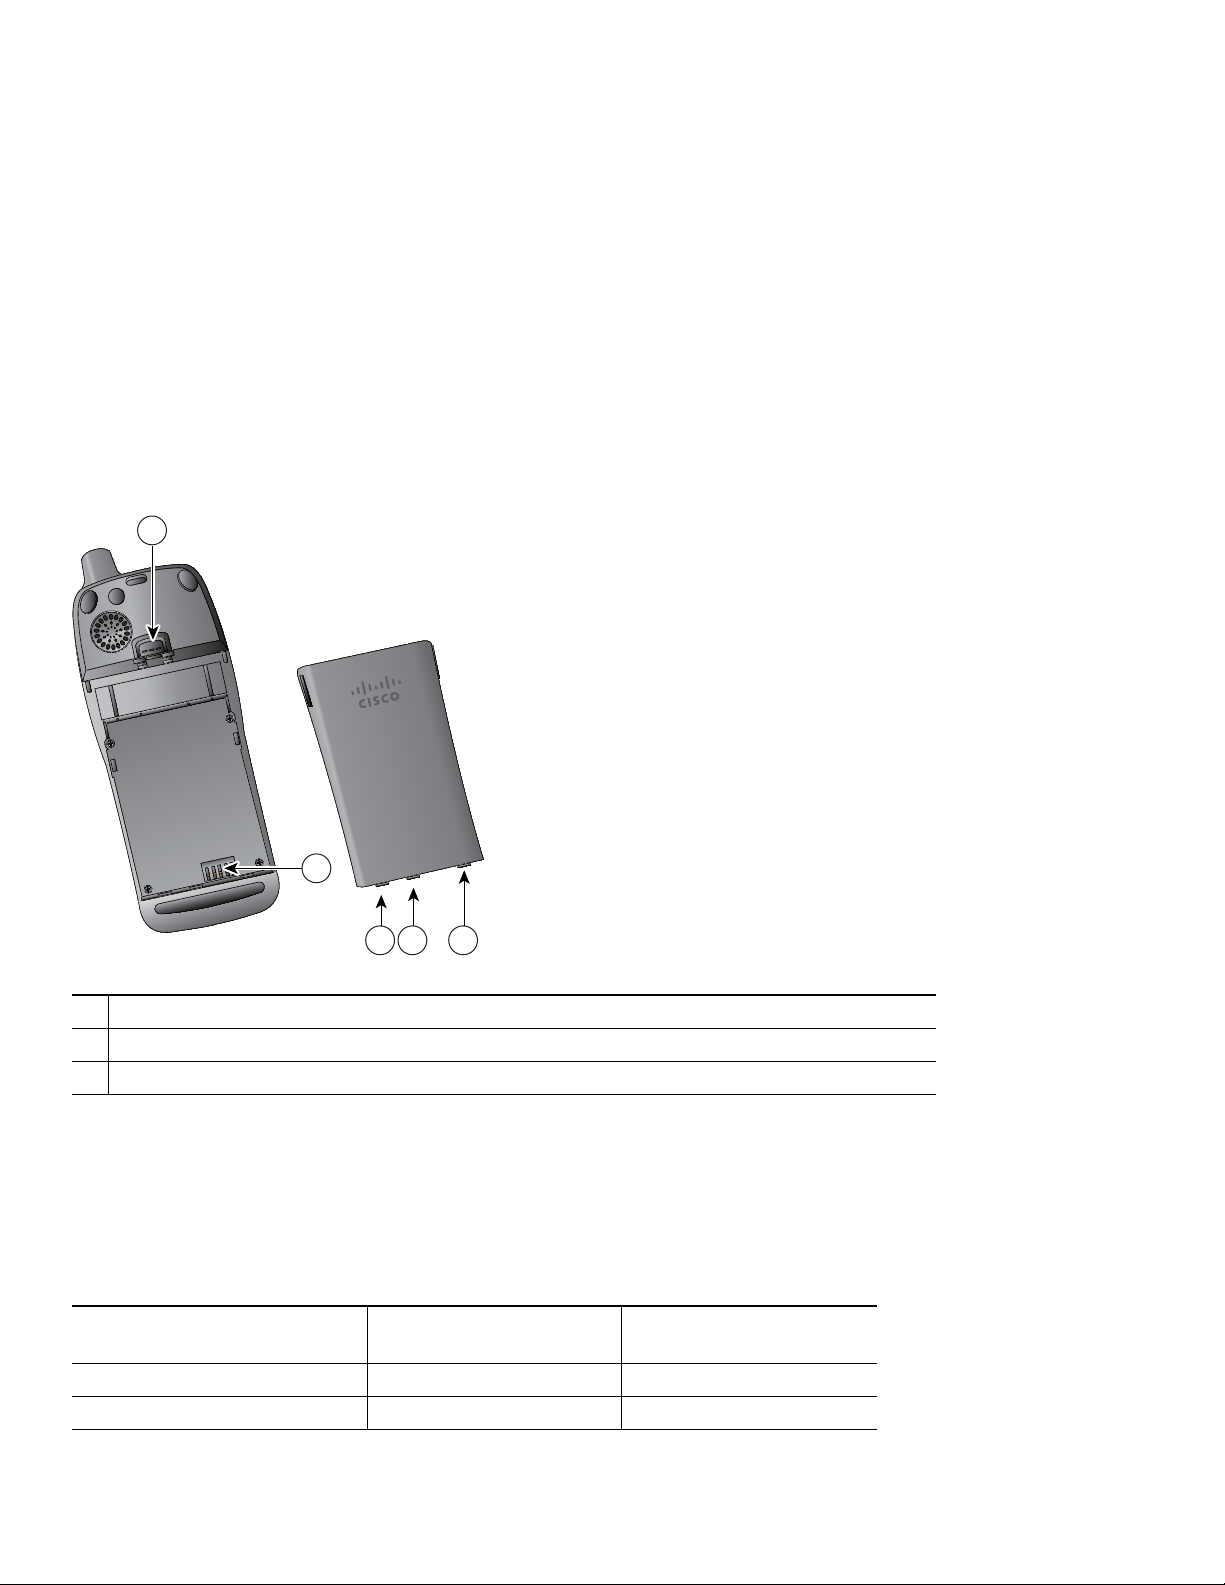
Installing or Removing the Phone Battery
222
1
3
180349
To install or remove the battery, follow these steps
Install the battery
1. Insert the battery catches in the slots at the bottom of the phone. Ensure metal contacts on the battery and the phone face
each other.
2. Press the battery to the phone until it locks into place.
Remove the battery
1. Press up on the locking catch with one hand.
2. With the other hand, hold the battery at the edges and pull out to remove the battery.
:
Locking catch—Push up to release the battery.
1
Battery catches—Insert these into the slots near the bottom of the phone at battery installation.
2
Metal contacts—Match the contacts on the battery to the contacts on the phone.
3
Charging the Phone Battery
You can charge the battery in your wireless IP phone by connecting the AC power supply or the USB cable to your phone. For
more information, see these sections:
•
Using the AC Power Supply to Charge the Battery, page 7
• Using the USB Cable and PC Port to Charge the Batt ery, p age 7
Charging Times
Battery Type
AC Power Supply
Connected to Phone
Standard 2 hours 5 hours
Extended 3 hours 7 hours
6
Phone Connected to
PC with USB Cable
Page 7
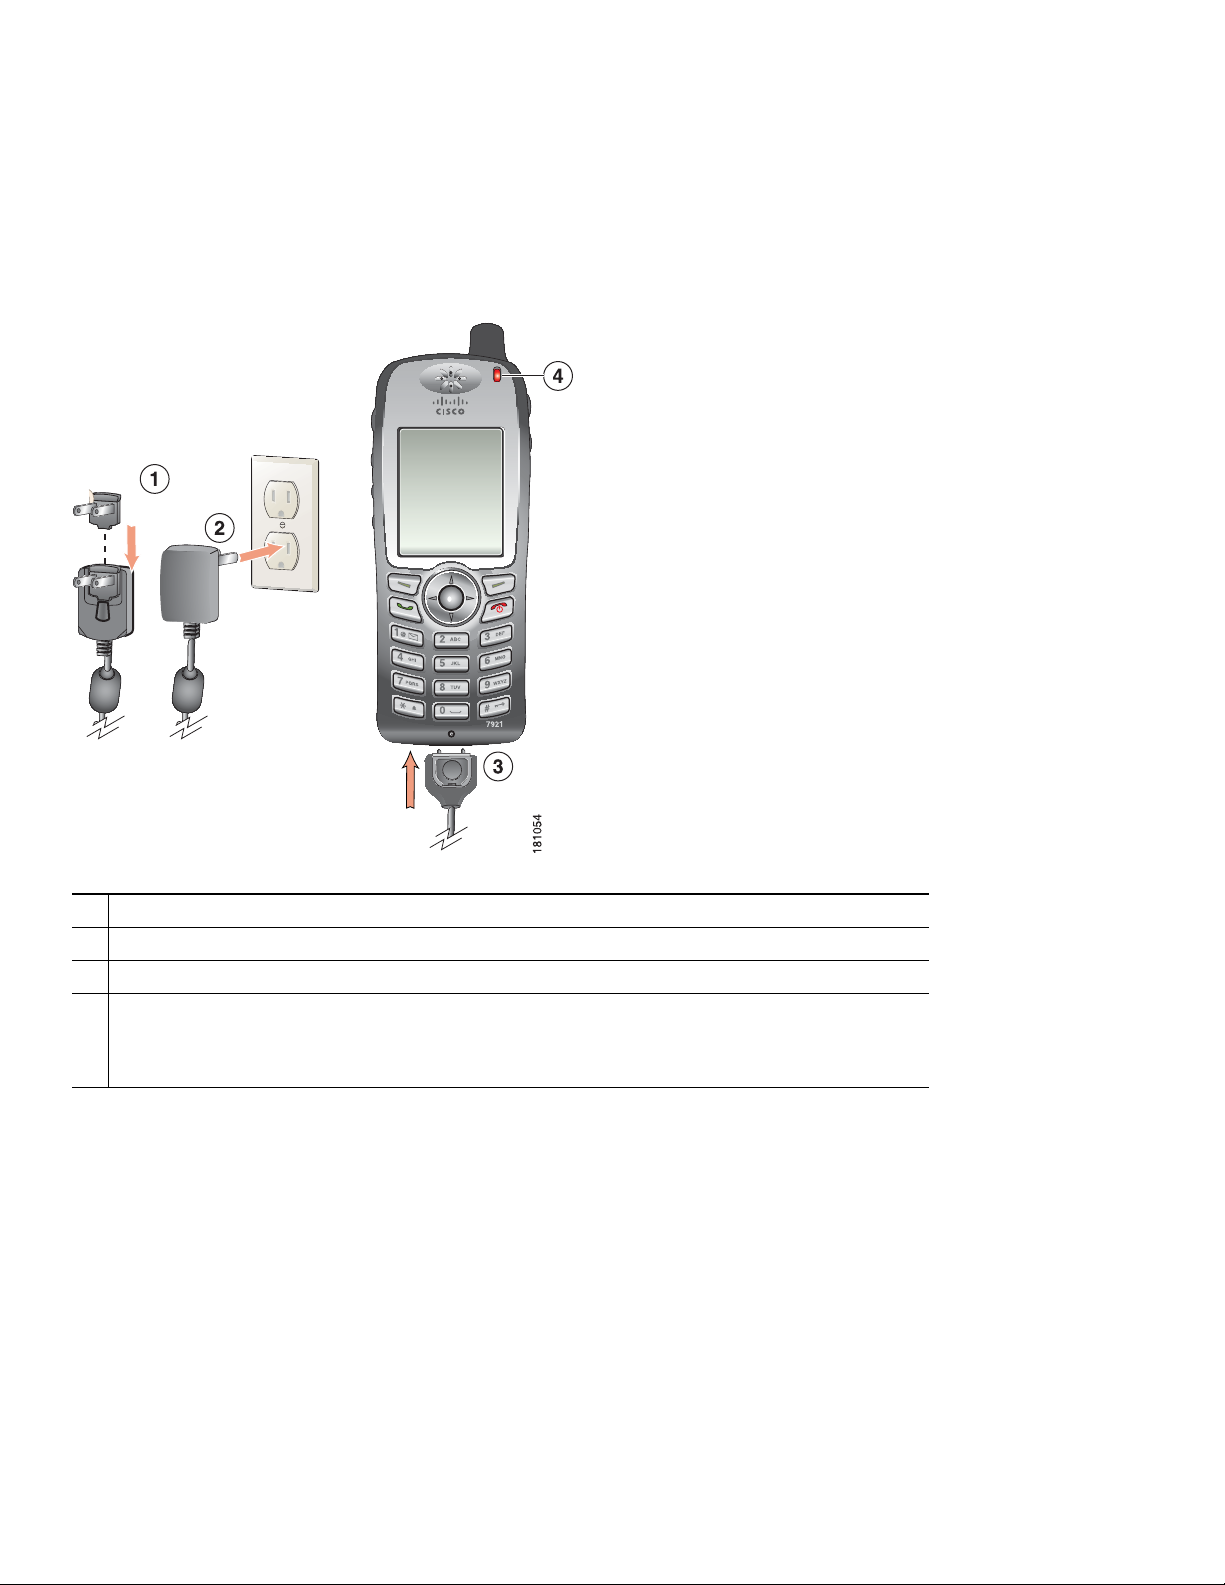
Using the AC Power Supply to Charge the Battery
You can charge your battery quickly by connecting the AC power supply to the phone. To accommodate different AC power
receptacles, you must insert the appropriate AC plug adapter on the AC power supply.
You can use the phone while the battery is being charged. After the battery is charged, you can unplug the power supply cord,
or you can leave the phone plugged into the power cord.
To charge the battery in the phone using the AC power supply, use this diagram:
AC plug adapter—Insert the AC plug adapter into the slot on the power supply.
1
AC Power supply—Insert into an AC outlet.
2
Phone connector on AC power supply cable—Insert into the connector slot at bottom of phone.
3
Indicator light—Indicates the charging status:
4
• Red—Battery charging in process
• Green—Battery charging is completed
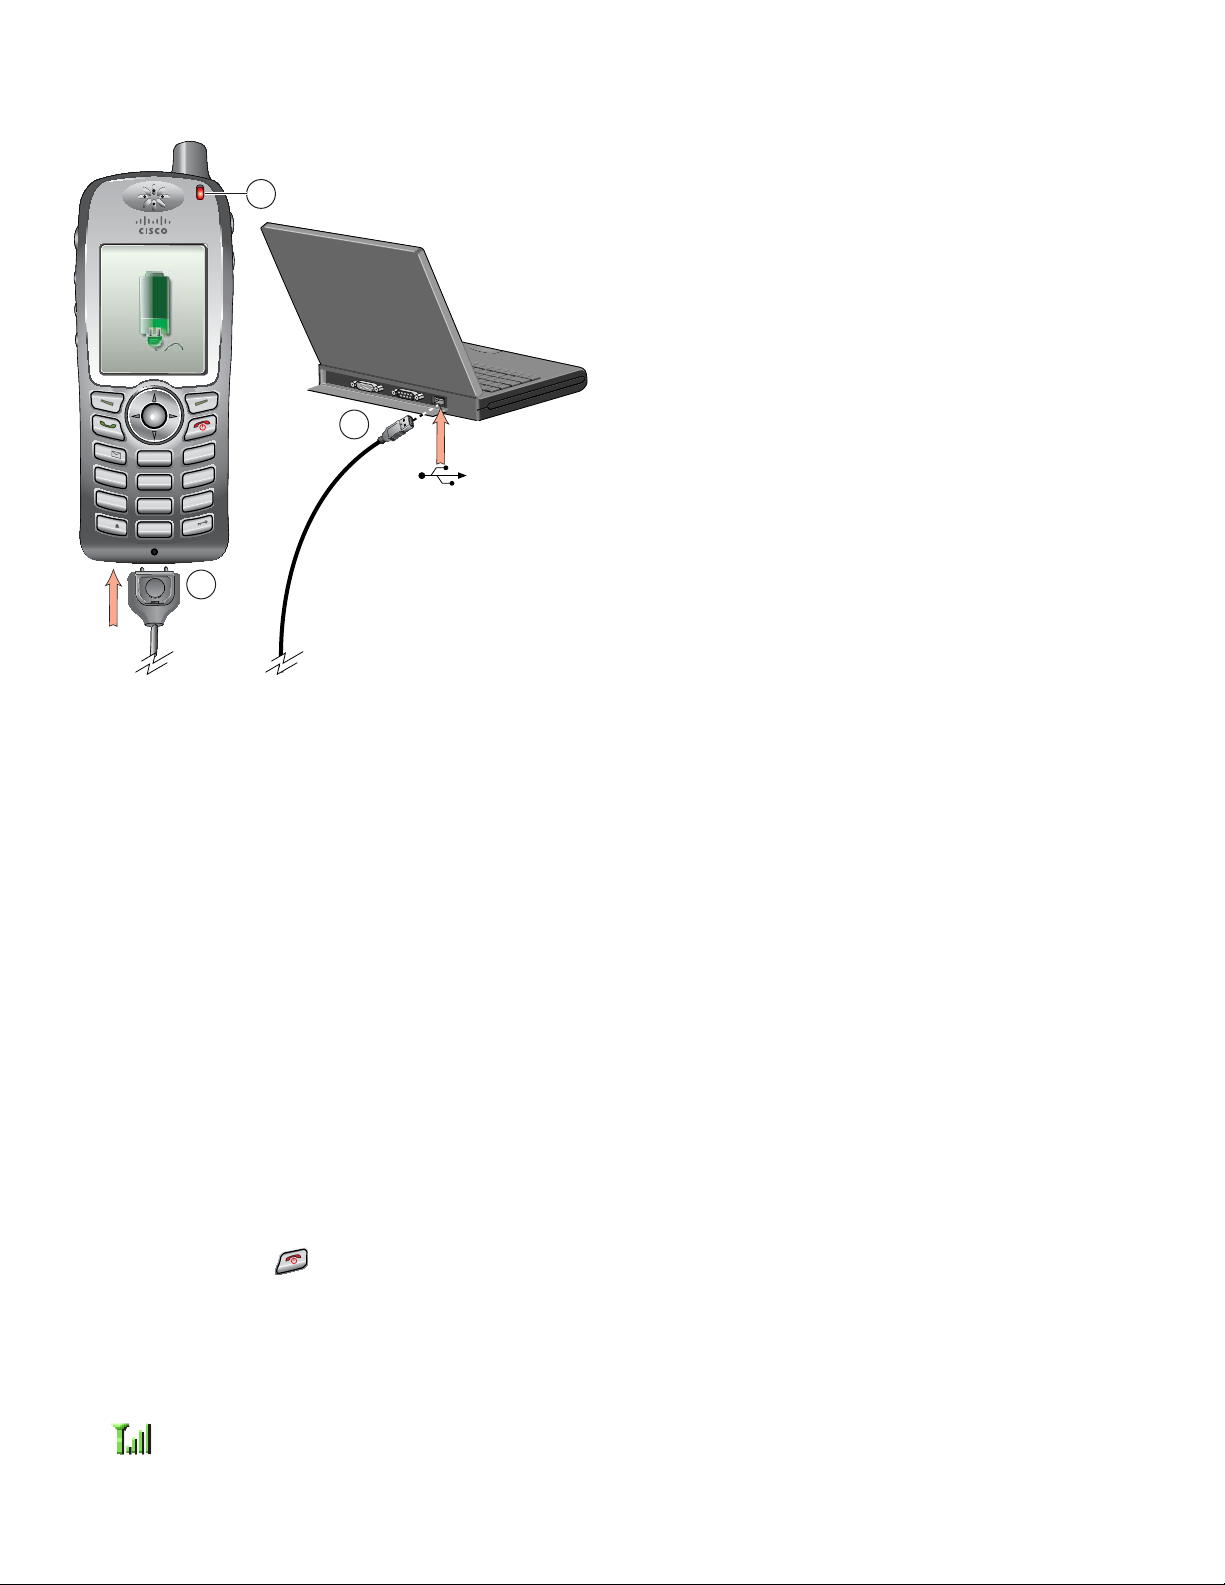
Using the USB Cable and PC Port to Charge the Battery
You can charge the battery in the phone by connecting your phone with a USB cable to a USB port on you PC. Charging takes
longer when you use the USB port on the PC to charge the battery.
To use the USB cable and USB port to charge the battery, use this diagram and follow the steps:
7
Page 8
180350
WXYZ
0
1
@
2
ABC
3
DEF
4
5
JKL
6
MNO
GHI
7
8
TUV
9
PQRS
#
*
1
2
3
7921
Charge the battery using the USB cable
1. Insert the phone connector on the USB cable into the phone.
2. Insert the USB A-type connector into the USB port on your PC.
Note
If the Found New Hardware Wizard opens, use the following procedure to stop it.
3. Monitor the indicator light after the phone briefly displays “USB Connected” on the status line.
While the battery is charging, the indicator light is red. When the battery is fully charged, the indicator light turns green.
Stop Found New Hardware Wizard from opening when connecting to USB port
1. Click Next to use the wizard dialog box.
2. In the Update New Software dialog, click No, not this time, and click Next.
3. Click Install the Software automatically (Recommended) and click Next.
4. After a few moments, the Cannot Install This Hardware dialog displays. Click Don't prompt me again to install this
software.
5. Click Finish to close the dialog box.
Powering On the Phone
After charging the battery, you must power on the phone to make and receive calls.
1. Press and hold the (red button) until the phone powers on.
2. You might need to enter a username and password to access the wireless network.
3. After completing authentication and registration with Cisco Unified CallManager, the phone displays the main screen and
is ready to place or receive calls.
Check signal strength
The icon indicates the strength of the signal between the wireless access point and your phone. Your phone must have at
least one bar to place or receive calls.
8
Page 9

When you move the phone out of signal range, you lose connection with the wireless LAN. The icon appears, and the status
line displays, “Leaving service area.”
Tip
Your idle phone screen can turn off after a time interval. To alert you that the phone is still powered on and connected to the
wireless network when using battery power, the indicator light blinks green every 2 seconds.
Accessories for the Cisco Unified Wireless IP Phone 7921G
The following phone accessories are available for your phone:
• Standard and extended batteries
• AC power supplies for different geographical areas
• Desktop charger with speakerphone
• Carrying cases
• Lock sets
For a complete list and description of accessories, refer to this guide:
Cisco Unified Wireless IP Phone 7921G Accessory Guide.
Headset Information
Although Cisco Systems performs some internal testing of third-party headsets for use with the Cisco Unified IP Phones, Cisco
does not certify or support products from headset or handset vendors. Because of the inherent environmental and hardware
inconsistencies in the locations where Cisco Unified
for all environments. Cisco recommends that customers test the headsets that work best in their environment before deploying
a large number of units in their network.
In some instances, the mechanics or electronics of various headsets can cause remote parties to hear an echo of their own voice
when they speak to Cisco Unified IP Phone users.
Cisco Systems recommends the use of good quality external devices, like headsets that are screened against unwanted radio
frequency (RF) and audio frequency (AF) signals. Depending on the quality of these devices and their proximity to other devices
such as cell phones and two-way radios, some audio noise may still occur.
The primary reason that a particular headset would be inappropriate for the Cisco Unified IP Phone is the potential for an
audible hum. This hum can be heard by either the remote party or by both the remote party and you, the Cisco Unified IP Phone
user. Some potential humming or buzzing sounds can be caused by a range of outside sources, for example, electric lights, being
near electric motors, large PC monitors.
IP Phones are deployed, there is not a single “best” solution that is optimal
Audio Quality Subjective to the User
Beyond the physical, mechanical and technical performance, the audio portion of a headset must sound good to you (the user)
and to the party on the far end. Sound is subjective and Cisco cannot guarantee the performance of any headsets, but some of
the headsets on the sites listed below have been reported to perform well on Cisco Unified IP Phones.
Nevertheless, it is ultimately the customer's responsibility to test this equipment in their own environment to determine suitable
performance.
For information about headsets for your phone, refer to the
sites:
http://www.plantronics.com
•
• http://www.jabra.com
Cisco Unified Wireless IP Phone 7921G Accessory Guide and these web
Securing the Phone with a Lock Set and Cable Lock
You can secure the Cisco Unified Wireless IP Phone 7921G to a desk top by ordering the lock set from Cisco. For more
information, refer to the
To install the lock set, use the diagram and follow these steps:
Cisco Unified Wireless IP Phone 7921G Accessory Guide.
9
Page 10

Install the lock set on the phone
181319
1
2
3
1. Put the security cable around a post or through a hole in the desktop. Insert the loops at the ends of the security cable
through the C-ring.
2. Insert the C-ring with cable loops through the slot on back of phone.
3. Use the combination lock to secure the ends of the C-ring around cable loops and phone.
The phone is secured to the desktop area.
4. To secure the desktop charger, use a laptop cable lock.
4
You can secure your Cisco Unified Wireless IP Phone 7921G Desktop Charger by using a laptop cable lock. The lock connects
to the security slot on the side of the desktop charger, and the cable can be secured to a desktop. The diagram shows where to
insert the lock.
Note The lock set does not include the cable lock.
10
Page 11

2 Operating Your Phone
0
*
Physical Layout 2
Phone Screen Features 4
Connecting Your Phone 5
Installing or Removing the Phone Battery 6
Charging the Phone Battery 6
Powering On the Phone 8
Accessories for the Cisco Unified Wireless IP Phone 7921G 9
Headset Information 9
Securing the Phone with a Lock Set and Cable Lock 9
Entering and Editing Text 11
Feature Buttons and Menus 12
Help System 13
Phone Buttons 13
Choosing a Network Profile 13
Accessing Voice Messages 14
Call Logs 14
Directory Dialing 15
Personal Directory 16
Handset, Headset, and Speakerphone 18
AutoAnswer 19
Speed Dialing 19
Call Pickup 19
Parked Calls 20
Logging Out of Hunt Groups 20
Remote-in-Use 21
Secure Calls 21
Prioritizing Critical Calls 21
Transferring Calls 22
Cisco Extension Mobility 22
Push to Talk Service 23
Entering and Editing Text
You can enter characters, numbers, and special characters for passwords. When you press a numeric key on the keypad, a text
bubble shows all the characters and symbols that this key controls. Each press moves to another character option.
Enter characters
Press the number key until you highlight the character (lower or upper case) that you want to enter.
Enter numbers
Press the number key and locate the number that you want to enter.
Delete the last character
Press << once to delete the last character or number or to delete the whole character string, press and hold <<.
Enter a space
Press to enter a space between characters.
Enter special characters and symbols
Press to display and enter these symbols * + - / = \ : ;
11
Page 12

Press to display and enter these symbols space , . ‘ “ | _ ~ ’
0
#
1
@
Press to display and enter these symbols # ? ( ) [ ] { }
Press
to display and enter these symbols ! @ < > $ % ^ &
Cancel editing mode
Choose Options > Cancel to return to the menu option or main screen.
Feature Buttons and Menus
From the main phone screen, you can use the Navigation button to access feature menus.
Open a feature menu
Use the Navigation button to press one of these arrows that open a menu:
Accesses these menus and lists from the main screen:
Directory
Line View
Settings
Services
Scroll through a menu or list
Press the Navigation button up or down.
Select a menu option
Do one of these actions:
• Press the keypad number key for the item.
• Scroll to highlight the item, and then press the button (center of the navigation button).
Go back one level in a feature menu
Press Back.
Note
Pressing (red button) from any level of a menu closes the menu and returns you to the main screen.
Reposition the cursor to edit a phone number or name
Press the Navigation button left or right.
12
Page 13

Select a highligh te d call or op ti on
#
*
*
1
@
Press .
Access Help
From the main screen, press .
Help System
Your phone provides an online help system. Help topics display on the screen.
View the main menu
Press and wait a few seconds for the menu to display. Main menu topics include:
• About Your Cisco Unified IP Phone—Details about your phone
• How do I...?—Procedures for common phone tasks
• Calling Features—Descriptions and procedures for calling features
• Help—Tips on using and accessing Help
Get help using Help
Press , wait for the online help main menu to display, and then choose Help.
Phone Buttons
The phone keypad and buttons provide these shortcuts to frequently used functions.
Lock or unlock the phone keypad
Press and hold the key (3 seconds). The screen displays “Keypad Locked!”, and the icon displays at the top of the
Main screen.
Press any key, and the screen displays “Unlock Keypad?” Press Yes , the icon disappears and the screen displays “Keypad
Unlocked!” or press No to retain the keypad lock.
Note
Toggle between ringing and vibrating mode
Press and hold the key. The screen displays “Vibrate On!” and the icon displays at the top.
To switch back to the ring mode, press and hold the key. The screen displays “Vibrate Off!”, and the icon disappears.
Note
Listen to voice messages
Press and hold the key. The phone connects to your voice messaging system.
Adjust the volume during a call
The keypad lock is temporarily disabled when you have an incoming call.
You can use the Volume button to set vibrate also.
Press for a call on the handset, speaker, or headset.
13
Page 14

Change the ring pattern for your calls
1
@
When the phone is idle, press to set the ring volume, vibrate, or silent mode.
Choosing a Network Profile
Network profiles provide predefined settings for access to the wireless local area network (WLAN) and for authentication and
encryption in your system. Your system administrator defines network profiles. You might have more than one network profile
available to you so you can access WLAN configurations at locations that use different SSIDs or authentication types.
Your Cisco Unified Wireless IP Phone 7921G can have up to four enabled network profiles. Your phone automatically scans the
profiles and selects the network profile with the matching SSID and settings for a specific WLAN.
Note Consult with your system administrator if you need to have additional network profiles or change settings in a profile.
View an enabled Networ k Prof i le
1. Choose (Settings) > Network Profiles.
2. Press . The enabled profile has a next to it.
Choose a different pr ofil e
1. Choose (Settings) > Network Profiles.
2. Press . The locked icon displays by Network Profiles; you must unlock the options.
3. Scroll to a different profile.
4. Press . The appears next to the enabled profile.
5. Press Save.
Tips
• When the locked icon appears next to a menu, see your system administrator for this information.
• Do not make changes to settings in your network profiles without consulting your system administrator first.
Accessing Voice Messages
When the phone displays “You Have VoiceMail” or has a red blinking light, you can access your messages from your phone.
Note Your company determines the voice message service that your phone system uses. For the most accurate and detailed
information, refer to the documentation that came with your voice message service.
Set up and personalize your voi ce messa ge servi ce
1. Press Message or press and hold .
2. Follow the voice instructions.
See if you have a new voice message
Look at your phone for these indicators:
–
A red blinking light
–
A text message, “You Have VoiceMail”
–
A flashing message waiting icon next to your directory number in (Line View)
14
Page 15

Listen to your voice messages or access the voice message system menu
1
@
1. Press Message or press and hold .
2. Enter your voice message password.
3. Follow the voice instructions to listen to your messages.
Call Logs
Your phone maintains records of your missed, placed, and received calls. Each call log holds up to 30 entries.
View your call logs
1. Press (Directory).
2. Choose Missed Calls, or Received Calls, or Placed Calls.
Dial from a call log
1. Press (Directory).
2. Choose Missed Calls, or Received Calls, or Placed Calls.
3. Scroll to a phone number.
Note
4. Press Dial or .
To edit the displayed number (to add or to remove a prefix), press Options > EditDial followed by or to reposition the
cursor. Use the keypad to enter digits, or press << to delete numbers.
Delete a call record
1. Press (Directory).
2. Choose Missed Calls, or Received Calls, or Placed Calls.
3. Scroll to a call record.
4. Choose Options > Delete, or choose Options > Exit.
Delete a call log
1. Press (Directory).
2. Choose Missed Calls, or Received Calls, or Placed Calls.
3. Choose Options > Delete, or choose Options > Exit.
Erase your call logs
1. Press (Directory) to display call logs.
2. Press Clear. Doing so erases all call logs, or choose Options > Exit.
15
Page 16

Directory Dialing
Depending on configuration, your phone can provide access to a corporate directory and personal directory features:
• Corporate Directory—Corporate contacts that you can access on your phone. Your system administrator sets up and
maintains Corporate Directory.
• Personal Directory—If available, personal contacts and associated speed-dial codes that you can configure and access from
your phone and User Options web pages. Personal Directory is comprised of Personal Address Book (PAB) and Fast Dials.
–
PAB is a directory of your personal contacts.
–
Fast Dial allows you to assign codes to PAB entries for quick dialing.
Dial from a corporate directory (while not on another call)
1. Choose (Directory) > Directory Services > Corporate Directory (name can vary).
2. Use your keypad to enter a search criteria such as a name.
3. Choose or Options > Submit.
4. Scroll to a listing.
Note
5. Press Dial or .
Tips
To edit the displayed number (to add or to remove a prefix), choose Options > EditDial followed by or to reposition
the cursor. Use the keypad to enter digits, or press << to delete numbers.
• Use the numbers on your keypad to enter characters on your phone screen. See Entering and Editing Text, page 11.
• Use the Navigation button on your phone to move between input fields.
Personal Directory
The Personal Directory feature set contains your Personal Address Book (PAB) and Fast Dials.
Access Personal Director y (for PAB an d Fast Dial codes)
1. Choose (Services) > Personal Address Book (PAB) Service (exact name may vary).
2. Enter your Cisco Unified CallManager user ID and PIN, then press Options > Submit.
Search for a PAB entry
1. Access Personal Address Book.
2. Enter search criteria and choose Options > Submit.
Note
3. You can choose Options > Previous or Next to move through listings.
4. Scroll to the PAB listing that you want and press Select or .
Dial from PAB entry
1. Search for a PAB entry.
2. Scroll to the listing and press Select or .
3. Press Dial.
4. Scroll to the number that you want to dial and press OK.
5. Press OK again to dial the number.
To get a complete list of your PAB entries, do not enter any search criteria, and choose Options > Submit.
16
Page 17

Delete a PAB entry
1. Search for a PAB entry.
2. Scroll to the listing and press Select or .
3. Choose Options >Delete.
4. Press OK to confirm the deletion or Cancel.
Edit a PAB entry
1. Search for a PAB entry.
2. Scroll to the listing and press Select or .
3. Choose Options > Edit to modify a name or mail address.
4. If necessary, choose Options > Phones to modify a phone number.
5. Press Update.
Add a new PAB entry
1. Access Personal Address Book.
2. Access the Search page and choose Options > Submit. (You do not need to input search information first.)
3. Choose Options > New.
4. Use the keypad to enter a name or nickname.
5. Press Phones and use the keypad to enter phone numbers. Be sure to include any necessary access codes such as a 9 or 1.
6. Press Submit to add the entry to the database.
Assign a Fast Dial code to a PAB entry
1. Search for a PAB entry.
2. Scroll to the listing and press Select or .
3. Choose Options > Fast Dial.
4. Scroll to the Fast Dial code that you want to assign to the number and press Select or .
Add a new Fast Dial code (not using a PAB entry)
1. Choose (Services)> Personal Address Book.
2. Select Personal Fast Dials.
3. Scroll to a Fast Dial code that is unassigned and press Select or .
4. Press Assign.
5. Enter a phone number.
6. Press Update.
Search for Fast Dial codes
1. Choose (Services) > Personal Address Book.
2. Select Personal Fast Dials.
3. Scroll to the listing you want and press Select or .
Note
You can choose Options > Previous or Next to move through listings.
Place a call using a Fast Dial code
1. Search for a Fast Dial code.
17
Page 18

2. Scroll to the listing you want and press Select or .
3. Press Dial.
4. Choose OK to complete the action.
Delete a Fast Dial code
1. Search for a Fast Dial code.
2. Scroll to the listing you want and press Select or .
3. Choose Options > Remove.
Log out of Personal Di rect ory
1. Choose (Services) > Personal Address Book (exact name may vary).
2. Choose Logout.
Tips
• Your system administrator can provide the user ID and PIN that you need to log in to Personal Directory.
• Personal Directory automatically logs you out after a certain amount of time. This time limit can vary. Ask your system
administrator for more information.
• Use the numbers on your keypad to enter characters on your phone screen. Use the Navigation button on your phone to
move between input fields.
Handset, Headset, and Speaker phone
You can use your phone as a mobile handset, a speakerphone, with a headset, or with the speakerphone in the desktop charger.
Use the handset
Press the (green button); press (red button) to hang up.
Use a headset
Plug the headset connector into the headset port . The icon displays on the phone status line. Place and answer calls as
usual.
You can use the headset with all the controls on your phone, including and .
The headset audio remains active when the headset is connected to the phone
Use the speaker mode
Press before placing a call or during a call to activate speaker mode. The icon displays when the speaker is active.
Note
Switch to the speaker (from the handset) during a call
Press and displays.
Press to toggle back to the handset.
Speaker mode remains active for future calls until toggled off.
Switch to the desktop charger speakerpho ne
1. Place the wireless IP phone in the desktop charger cradle. “AC connected!” displays on the screen.
2. Press down on the top of the phone. “Docking connected!” displays on the screen and the icon displays on the phone
status line. The desktop charger speaker and microphone are connected.
3. Place and receive calls.
18
Page 19

Use all the buttons on your phone, including and .
You can use the headset to answer calls when the phone is in the desktop charger.
Note
The internal, single-direction microphone is located on the lower left side of the phone (two small holes). For best results, place
the desktop charger in front of you when using the speakerphone.
Switch to the handset from the desktop charger speakerphone
1. Hold the top of the phone and move it forward before lifting it off the desktop charger.
2. Use the handset to continue with the call. The desktop charger speaker and microphone disconnect.
Note
You cannot turn off the desktop speaker by using the button.
Adjust the volume level for a call
During a call, press to adjust the volume for the handset, speaker, headset or desktop charger.
Note
The new volume level is preserved for future calls after the phone is powered off.
Obtaining a Headset
Your phone supports headset jack types with a 2.5 mm, 3-band/ 4 connector. For information about purchasing headsets, see
Headset Information, page 9.
AutoAnswer
You might use AutoAnswer if you receive a high volume of incoming calls or handle calls on behalf of others. Your system
administrator configures AutoAnswer to work with either your speaker mode or headset.
Use AutoAnswer with a headset
Keep headset mode active by ensuring the headset is plugged into the phone, even when not on a call.
If your phone is set up to use AutoAnswer in headset mode, calls are answered automatically only if the icon is in the phone
status line. Otherwise, calls ring normally and you must manually answer them.
Use AutoAnswer with the desktop char ger spe aker
Keep the handset in the desktop charger cradle, so the speaker is active.
If your phone is set up to use AutoAnswer in speaker mode, calls are answered automatically using the desktop charger speaker.
Note
You cannot turn off the desktop charger speaker. You must remove the phone from the cradle to disable the desktop charger
speaker.
Speed Dialing
Speed dialing allows you to press a key, select a Line View item, or use an index number to place a call. Depending on
configuration, your phone can support several speed-dial features:
• Speed-dial numbers (identified with icons) in your Line View
• Speed Dialing and Abbreviated Dialing
• Fast Dials
Use speed-dial numbers
1. Set up speed-dial numbers from your User Options web pages.
2. To place a call, press (Line View).
3. Scroll to a speed-dial number with its label.
19
Page 20

4. Press .
Note
The Line View displays your directory numbers, followed by your speed-dial numbers identified with . Six items (lines plus
speed dials) can display.
Use Abbreviated Dial
1. Set up Abbreviated Dialing codes from your User Options web pages.
2. To place a call, enter the Abbreviated Dialing code.
3. Choose Options > AbbrDial.
Call Pickup
Call PickUp allows you to answer a call that is ringing on a coworker’s phone by redirecting the call to your phone. You might
use Call PickUp if you share call-handling with coworkers.
Answer a call that is ringi ng on anot her ext ensio n wit hin your call pi ckup group
1. Choose Options > PickUp. If your phone supports auto-pickup, you are now connected to the call.
2. If the call rings on your phone, press Answer to connect to the call.
Answer a call that is ringi ng on anot her ext ensio n in your gr ou p or in an associ ated group
1. Choose Options > OPickUp (if available). If your phone supports auto-pickup, you are now connected to the call.
2. If the call rings on your phone, press Answer to connect to the call.
Tips
• Depending on how your phone is configured, you might receive an audio and/or visual alert about a call to your pickup
group.
• Pressing PickUp and GPickUp connects you to the call that has been ringing for the longest time.
• Pressing OPickUp connects you to the call in the pickup group with the highest priority.
• If you have multiple lines and want to pick up the call on a non-primary line, first press (Line View) to switch to
the desired line, then choose Options and a Call PickUp softkey.
Parked Calls
You can park a call when you want to store the call so that you or someone else can retrieve it from another phone in the Cisco
Unified CallManager system (for example, a phone in a conference room).
You can park a call by using the Park softkey to store the call. Your phone displays the call park number where the system stored
your call. You must record this number and then use the same number to retrieve the call.
Store an active call using Call Par k
1. During a call, choose Options > Park.
2. Note the call park number that displays on your phone screen.
3. Press the .
Retrieve a parked call
Enter the call park number from any Cisco Unified IP Phone in your network to connect to the call.
Tip
You have a limited time to retrieve a parked call before it reverts to ringing at the original number. See your system administrator
for details.
20
Page 21

Logging Out of Hunt Groups
If your organization receives a large number of incoming calls, you might be a member of a hunt group. A hunt group includes
a series of directory numbers that share the incoming call load. When the first directory number in the hunt group is busy, the
system hunts for the next available directory number in the group and directs the call to that phone. When you are away from
your phone, you can prevent hunt group calls from ringing your phone by logging out of hunt groups.
Log out of hunt groups to temporarily block hunt group calls
Choose Options > HLog. Your phone screen displays, “Logged out of Hunt Group.”
Log in to receive hunt group calls
Choose Options > HLog.
Tip
Logging out of hunt groups does not prevent non-hunt group calls from ringing your phone.
Remote-in-Use
The “In Use Remote” message and icon display on a Cisco Unified Wireless IP Phone 7921G when another phone that
shares your line has a connected call and Privacy is disabled. You can place and receive calls as usual on the shared line, even
when the “In Use Remote” message or icon displays.
Secure Calls
Depending on how your system administrator has configured your phone system, your phone might support making and
receiving secure calls.
Your phone can support these types of calls:
• Authenticated call—The identities of all phones participating in the call have been verified.
• Encrypted call—The phone is receiving and transmitting encrypted audio (your conversation) within the Cisco IP network.
Encrypted calls are also authenticated.
• Non-secure call—At least one of the participating phones or the connection does not support these security features, or the
phones cannot be verified.
Check the security level of a call
Look for a security icon in the top right corner of the call activity area, next to the call duration timer:
Authenticated call
Encrypted call
Neither security icon appears if the call is non-secure.
Determine if secure calls can be made in your compan y
Contact your system administrator.
Note There are interactions, restrictions, and limitations that affect how security features work on your phone. For more
information, ask your system administrator.
21
Page 22

Prioritizing Critical Calls
In some specialized environments, such as military or government offices, you might need to make and receive urgent or critical
calls. If you have the need for this specialized call handling, your system administrator can add Multilevel Precedence and
Preemption (MLPP) to your phone.
Keep these terms in mind:
• Precedence indicates the priority associated with a call.
• Preemption is the process of ending an existing, lower priority call while accepting a higher priority call that is sent to your
phone.
Want to choose a priority ( preced en ce) level fo r an outgo in g call
Contact your system administrator for a list of corresponding precedence numbers for calls.
Want to make a priority (prece den ce) c all
Enter the MLPP access number (provided by your system administrator) followed by the phone number.
Hear a special ring (faster than usual) or special call waiting tone
You are receiving a priority (precedence) call. An MLPP icon on your phone screen indicates the priority level of the call.
Want to view priority level of a call
Look for an MLPP icon on your phone screen:
Priority Call
Medium priority (immediate) call
High priority (flash) call
Highest priority (flash override) or Executive Override call
Higher priority calls are displayed at the top of your call list. If you do not see an MLPP icon, the priority level of the call is
normal (routine).
Want to accept a higher -pr io rit y call
Answer the call as usual. If necessary, end an active call first.
Hear a continuous tone interrupting your call
You or the other party are receiving a call that must preempt the current call. Disconnect immediately to allow the higher
priority call to ring through.
Tips
• When you make or receive an MLPP-enabled call, you will hear special ring tones and call-waiting tones that differ from
the standard tones.
• If you enter an invalid MLPP access number, a verbal announcement will alert you of the error.
Transferring Calls
Transfer or redirects a connected call. The target is the number to which you want to transfer the call.
Transfer a call without talking to the transfer recipient
1. From an active call, choose Options >Trn sf er.
2. Dial the target number.
22
Page 23

3. Choose Options > Trn s fe r again to complete the transfer or EndCall to cancel.
Note If your phone supports on-hook transfer, you can alternately complete the transfer by disconnecting.
Talk to the transfer recipient before transferring a call (consult transfer)
1. From an active call, choose Options > Trnsfer.
2. Dial the target number.
3. Wait for the transfer recipient to answer.
4. Choose Options > Trn s fe r again to complete the transfer or EndCall to cancel.
Cisco Extension Mobility
Cisco Extension Mobility (EM) allows you to temporarily configure a Cisco Unified IP Phone as your own. Once you log in to
EM, the phone adopts your user profile, including your phone lines, features, established services, and web-based settings. Your
system administrator must configure EM for you.
Log in to EM
1. Choose (Services) > EM Service (name can vary).
2. Enter your user ID and PIN (provided by your system administrator).
3. If prompted, select a device profile.
Log out of EM
1. Choose (Services) > EM Service (name can vary).
2. When prompted to log out, press Ye s.
Tips
• EM automatically logs you out after a certain amount of time. You system administrator establishes this time limit.
• Changes that you make to your EM profile (from the User Options web pages) take effect the next time that you log in to
EM on a phone.
• Settings that are controlled on the phone only are not maintained in your EM profile.
Push to Talk Service
The Push to Talk service provides immediate communication (similar to a two-way radio) with members of your organization.
Your system administrator must set up the Push to Talk service by using an XML application, and then you must subscribe to
this service.
Use Push to Talk service
1. Choose (Services) > Push to Talk (name can vary).
Push to Talk service is active when the icon displays.
2. Use the button to start and end a transmission depending on how your service is configured. You can also use the
Talk and Stop softkeys to toggle between transmitting and listening.
Note
Your system administrator will provide detailed information about how to use your Push to Talk service.
Soft Key Descriptions
Your Cisco Unified IP phone is equipped with soft keys for call features and options. soft keys are displayed along the bottom
of the LCD screen and are engaged using the corresponding buttons. Soft keys can change according to the state of the phone.
23
Page 24

Following is a comprehensive list of soft keys offered on these Cisco Unified IP Phones. Functions depend on your system
configuration.
Soft Key Description
<< or >> Navigates to edit characters. Use the backspace soft key to erase digits that were entered incorrectly.
Accept Accepts the current edits. For instance, adding an entry to your personal directory.
Acct Consult your administrator on the use of this soft key.
Add Adds an entry to the personal directory.
Alpha Toggles character input mode from numeric to alphanumeric.
Answer Answers an incoming call.
BlndXfr Redirects the call without allowing you to speak to the transfer recipient (known as a blind transfer).
Callback Notifies callers that the called line is free.
Cancel Cancels the last selection.
CFwdALL Forwards all calls.
Clear Clears directory history.
Confrn Connects callers to a conference call.
DelAll Deletes all entries in the personal directory.
Delete Deletes selected item.
Dial Dials the displayed number.
Directories Provides access to phone directories.
DND Enables and disables the Do-Not-Disturb feature.
Down Decreases the LCD screen contrast.
Edit Selects a number and activates the cursor for editing.
EditDial Selects a number and activates the cursor for editing.
EndCall Ends the current call.
Exit Exits from the current selection or screen.
Flash Provides hookflash functionality for three-way calling and call waiting services provided by the PSTN or
Centrex service.
GPickUp Selectively picks up calls to a phone number that is a member of a pickup group.
Hold Places an active call on hold. Resumes a held call.
Login Provides PIN-controlled access to restricted phone features. Contact your system administrator for additional
instructions.
Message Dials the local voice-mail system.
Monitor Enables the user to switch from the handset to the speaker to listen to a call hands-free.
Monoff Enables the user to switch from the speaker to the handset and continue talking on the call.
more Scrolls through additional soft key options (for example, use the more soft key to locate the Number soft key).
Mute Toggles muting on and off.
NewCall Opens a new line on the speakerphone to place a call.
Number Toggles character input mode from alphanumeric to numeric.
Ok Confirms the selection.
Park Forwards calls to a location from which the call can be retrieved by anyone in the system.
PickUp Selectively picks up calls to another extension.
Play Plays the ring sound sample.
Redial Redials the last number dialed.
24
Page 25

Soft Key Description (continued)
Reorder Reorder the entries in the Personal Directory.
Restore Consult your system administrator on the use of this soft key.
Resume Returns to an active call.
Save Saves the last change.
Search Initiates a search in the local directory.
Select Selects the highlighted option.
Settings Provides access to phone settings such as display contrast, ring volume, and ring type.
Trnsfer Transfers selected calls to an alternate number.
TrnsfrVM Transfers the call to voicemail.
Up Increases the LCD screen contrast.
URL Enter alphanumeric characters for call forwarding.
25
Page 26

3 Phone Features and Functions
This section provides an alphabetized list of phone features and functions.
Accessing Voice Messages 14
Accessories for the Cisco Unified Wireless IP Phone 7921G 9
AutoAnswer 19
Call Logs 15
Call Pickup 20
Charging the Phone Battery 6
Choosing a Network Profile 14
Cisco Extension Mobility 23
Connecting Your Phone 5
Directory Dialing 16
Entering and Editing Text 11
Feature Buttons and Menus 12
Handset, Headset, and Speakerphone 18
Headset Information 9
Help System 13
Installing or Removing the Phone Battery 6
Logging Out of Hunt Groups 21
Parked Calls 20
Personal Directory 16
Phone Buttons 13
Phone Screen Features 4
Physical Layout 2
Powering On the Phone 8
Prioritizing Critical Calls 22
Push to Talk Service 23
Remote-in-Use 21
Secure Calls 21
Securing the Phone with a Lock Set and Cable Lock 9
Speed Dialing 19
Transferring Calls 22
26
Page 27

Americas Headquarters
CCVP, the Cisco logo, and Welcome to the Human Network are trademarks of Cisco Systems, Inc.; Changing the Way We Work, Live, Play, and Learn is a service mark of Cisco Systems, Inc.; and Access Registrar,
Aironet, Catalyst, CCDA, CCDP, CCIE, CCIP, CCNA, CCNP, CCSP, Cisco, the Cisco Certified Internetwork Expert logo, Cisco IOS, Cisco Press, Cisco Systems, Cisco Systems Capital, the Cisco Systems logo,
Cisco Unity, Enterprise/Solver, EtherChannel, EtherFast, EtherSwitch, Fast Step, Follow Me Browsing, FormShare, GigaDrive, HomeLink, Internet Quotient, IOS, iPhone, IP/TV, iQ Expertise, the iQ logo, iQ Net
Readiness Scorecard, iQuick Study, LightStream, Linksys, MeetingPlace, MGX, Networkers, Networking Academy, Network Registrar, PIX, ProConnect, ScriptShare, SMARTnet, StackWise, The Fastest Way to
Increase Your Internet Quotient, and TransPath are registered trademarks of Cisco Systems, Inc. and/or its affiliates in the United States and certain other countries.
All other trademarks mentioned in this document or Website are the property of their respective owners. The use of the word partner does not imply a partnership relationship between Cisco and any other company.
(0711R)
Cisco Systems, Inc.
170 West Tasman Drive
San Jose, CA 95134-1706
USA
www.cisco.com
Tel: 408 526-4000
800 553-NETS (6387)
Fax: 408 527-0883
Asia Pacific Headquarters
Cisco Systems, Inc.
168 Robinson Road
#28-01 Capital Tower
Singapore 068912
www.cisco.com
Tel: +65 6317 7777
Fax: +65 6317 7799
Europe Headquarters
Cisco Systems International BV
Haarlerbergpark
Haarlerbergweg 13-19
1101 CH Amsterdam
The Netherlands
www-europe.cisco.com
Tel: 31 0 800 020 0791
Fax: 31 0 20 357 1100
Cisco has more than 200 offices worldwide. Addresses, phone numbers, and fax numbers are listed on the
Cisco Website at www.cisco.com/go/offices.
© 2008 Cisco Systems, Inc. All rights reserved.
OL-16476-01
Page 28

28
 Loading...