

Page 1
Cisco 7912 IP Phone - User Documentation
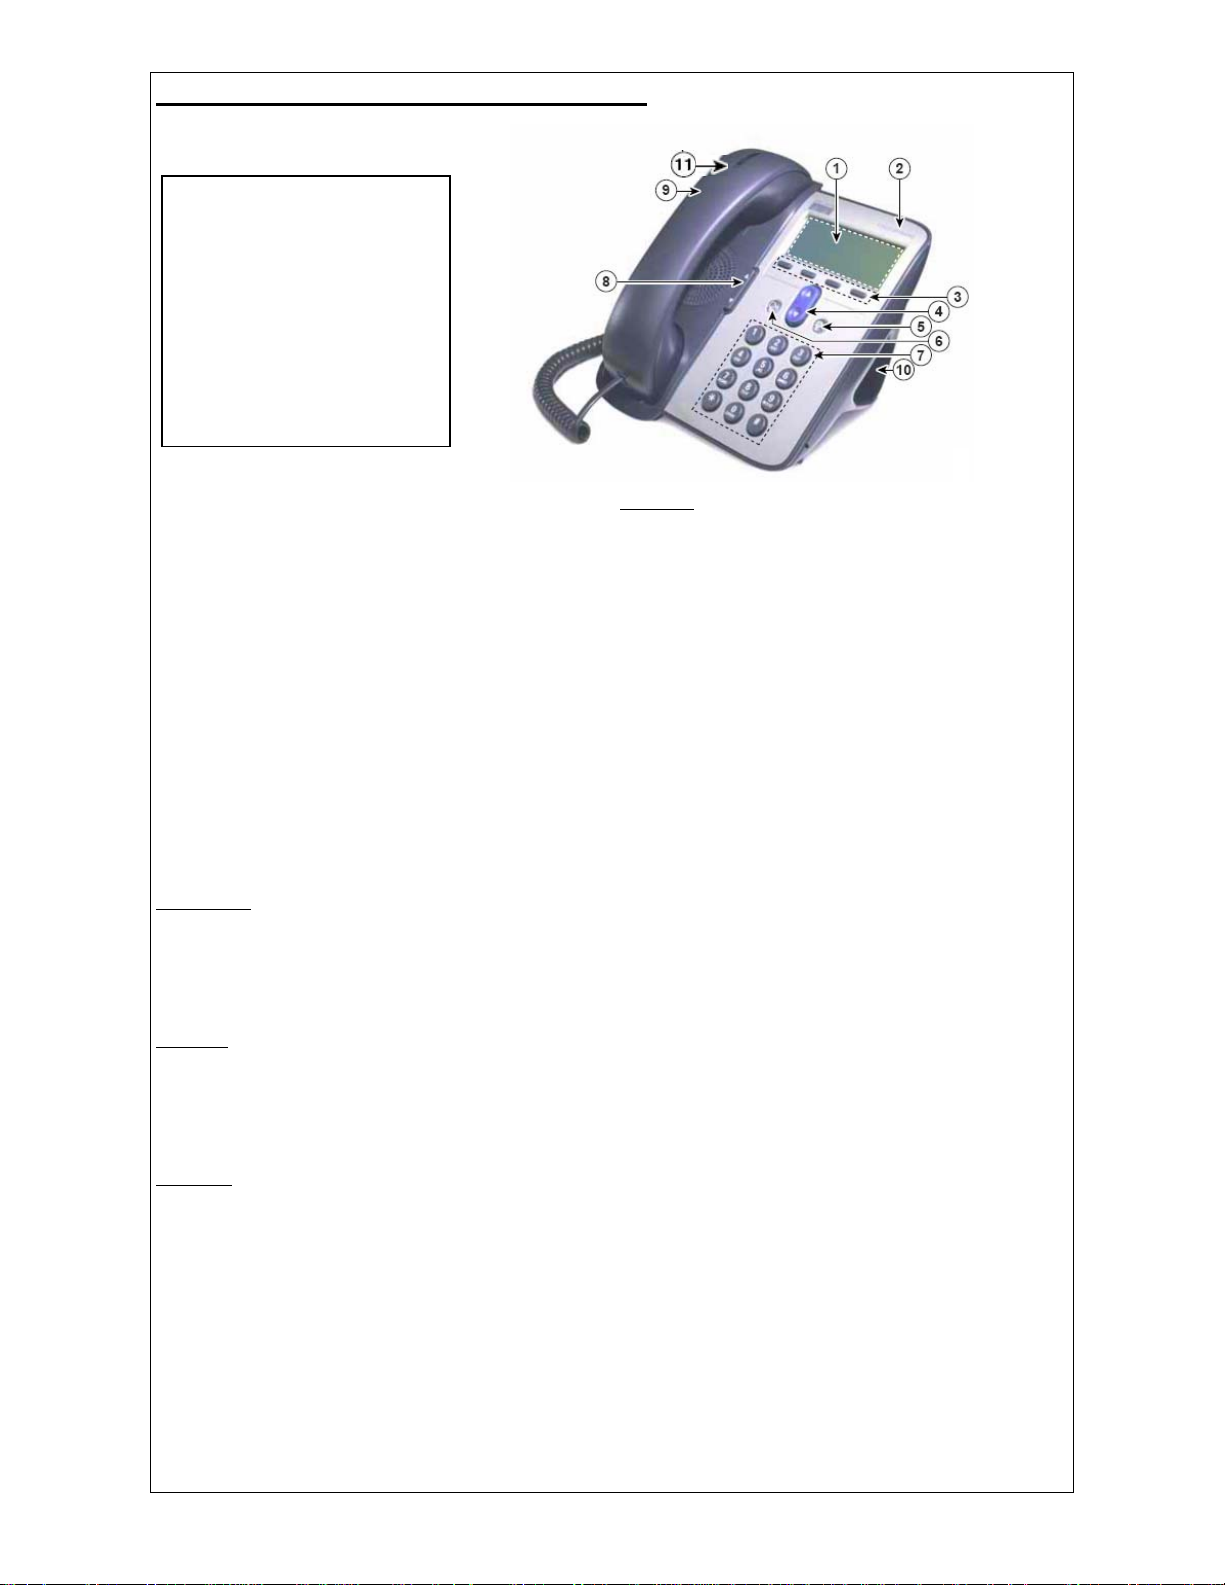
1. LCD screen
2. Model type
3. Soft key buttons
4. Navigation button
5. Menu button
6. Hold button
7. Keypad
8. Volume Control button
9. Handset
10. Footstand
11. Ring/Message indicator
Dialing Instructions
Placing A Call
Answering A Call
Ending A Call
Placing A Call On Hold
Last Number Redial
Voice Mail
Call Forwarding (to an extension)
Call Forwarding (to voice mail)
Call Parking
Transferring A Call (cold transfer)
Transferring A Call (warm transfer)
Conference
Activating Monitor
Menu Button
Directories
View Call Records
Dial From A Call Record
Delete Call Records
Name or Phone Number Search
Settings
Display Contrast
Ring Type
Volume Adjustment - Ringer
Volume Adjustment - Handset/Speaker
Services
Currently unavailable until further notice
: Missed Calls/Received Calls/Placed Calls
: Customizing Your Telephone
:
Figure 1
: Cisco 7912 IP Phone
Page 1 of 5
Page 2
Dialing Instructions
Placing A Call
• Lift handset OR
• Press NewCall soft key
• Dial number using keypad (9 must be
dialed prior to placing an external
call. Internal extensions can be
dialed directly)
Answering A Call
• Lift handset
Ending A Call
• Hang up OR
• Press EndCall soft key
When placing a call your telephone will be in "listen"
mode until the receiver is lifted. In "listen" mode you
will be able to hear the call but the other party will not
hear you. When the call is answered lift the receiver to
talk.
: When placing a call, dial number with the handset
Tip
down, press the Dial soft key, and then lift the handset.
Dialing in this manner provides more time to place call
before it times out.
Called line is automatically selected.
Please Note
: While on a call, another call can be
answered by pressing the Answer soft key. The
original call will be placed on hold.
Placing A Call On Hold
• Press the Hold button
Last Number Redial
• Lift the handset and press the Redial
soft key OR
• Press the Redial soft key and lift
handset when party answers
Voice Mail
• Lift the handset and press the
Message soft key to access your
voice mail
Call Forwarding (to an extension)
• With the handset down press
CFwdAll soft key and wait for two
beeps
• Enter the extension number
The call placed on hold will flash on phone’s LCD
screen. To return to a held call press the Hold button
again.
Please Note
: If multiple calls are placed on hold, use
the Navigation button (4) to select the call you wish to
take off hold and then press the Hold button.
If using the redial feature before lifting the handset your
telephone will be in “listen” mode. You will not be able
to speak with the other party until the handset is lifted.
Follow voice mail instructions to retrieve messages or
change user options.
Indicator light (11) on handset is lit when new
messages are received. Light will remain lit until all
new messages have been accessed.
While call forwarding is in effect you can call out from
your telephone but can not receive incoming calls. To
cancel call forwarding press the CFwdAll soft key
again.
Page 2 of 5
Page 3

Call Forwarding (to voice mail)
• With the handset down press
CFwdAll soft key and wait for two
beeps
• Press the Message soft key
Call Parking
• Press the more soft key
• Press the Park soft key (call is
placed on hold)
• Hang up phone
• “Call park At XXXX”, where XXXX is
the extension used to store the call,
will display on the phone’s LCD
screen for 10 seconds
• Note the “call park” extension and
dial it at the phone that wishes to
retrieve the call
Transferring A Call (cold transfer)
• Press the Trnsfer soft key and wait
for a tone (the caller is placed on
hold)
• Dial the extension you wish to
transfer the call to
• When you hear ringing press the
Trnsfer soft key to transfer the call
While call forwarding is in effect you can call out from
your telephone but can not receive incoming calls. To
cancel call forwarding press the CFwdAll soft key
again.
Call parking allows a call to be placed on hold so that it
can be retrieved from another phone on the Cisco
system.
If the parked call is not retrieved within 60 seconds, it
will ring the phone or extension that originally parked
the call, and “CallPark Reversion (XXXX)”, where
XXXX is the extension used to store the call, will
display.
If you make a dialing error while attempting to transfer
a call press the EndCall soft key and then the Hold
button to return to the original caller.
Transferring A Call (warm transfer)
• Press the Trnsfer soft key and wait
for a tone (the caller is placed on
hold)
• Dial the extension you wish to
transfer the call to
• Wait for an answer and announce the
call
• Press the Trnsfer soft key to transfer
the call
Conference
• While on a call press the more and
then the Confrn soft keys - you will
hear a tone and the caller is placed
on hold
• Dial the telephone number you wish
to add to the call
• When the called party answers you
can talk privately
• To complete the conference call
press the Confrn soft key
• Repeat the procedure to add up to 5
additional parties to the conference
call, including yourself
If you make a dialing error, or the called party does not
answer or want to accept the transferred call, press the
EndCall soft key and then the Hold button to return to
the original caller.
If you make a dialing error, or the called party does not
answer or want to participate in the conference call,
press the EndCall soft key and then the Hold button to
return to the original caller(s).
Page 3 of 5
Page 4
Activating Monitor
• While on a call, press the Monitor
soft key
While monitoring a call you will be able to hear the
other party but they will not be able to hear you.
To resume the call, press the MonOff soft key. If you
hung up the handset after pressing the “Monitor” soft
key, simply lift the handset to resume the call.
Menu Button
Directories: Missed Calls/Received Calls/Placed Calls
View Call Records
• Press the Menu button
• Select Directories
• Select a particular directory (Missed
Calls/Received Calls/Placed Calls)
Dial From A Call Record
• Follow the steps above to access the
desired directory
• Select a record using the Navigation
button
• If necessary, use the EditDial soft
key to add digits to the number (e.g.,
"9" for external calls)
• Press the Dial soft key to dial the
number
• To exit directory press the Exit soft
key until all menus are closed
Please Note
handset, the number will be dialed.
: If a call record is selected and you lift the
Delete Call Records
• Press the Menu button
• Select Directories
• Press the Clear soft key to delete all
of the records in all
the directories
(Missed Calls/Received Calls/Placed
Calls) OR
• To delete a particular call record,
select the directory where the record
resides, highlight it using the
Navigation button, and then press
the Delete soft key
Name or Phone Number Search
• Press the Menu button
• Select Directories
• Select Directory Services
• Select Corporate Directory
• Use the keypad to enter search
criteria (name or phone number)
• Press Search soft key to perform
search
• To exit directory press the Exit soft
key until all menus are closed
When using the “Corporate Directory” you can search
Trent University’s Phone Directory by name or phone
number.
If the search returns a number it can be dialed by
pressing the Dial soft key. If necessary, use the
EditDial soft key to add digits to the number (e.g., "9"
for external calls).
Please Note
: If a searched entry is selected and you lift
the handset, its number will be dialed.
Page 4 of 5
Page 5

Settings: Customizing Your Telephone
Display Contrast
• Press the Menu button
• Select Settings
• Select Contrast
• Press the Up and Down soft keys to
adjust contrast
• Press the Ok soft key to save the
changes and exit
Ring Type
• Press the Menu button
• Select Settings
• Select Ring Type
• Use the Navigation button to
highlight a ring type
• Press Play soft key to listen to ring
type
• With the ring type of choice
highlighted, press Select and then
Ok soft keys to save selection
Volume Adjustment – Ringer
• While not on a call and with the
handset down, press the Volume
control button (8) to adjust the
volume
Volume Adjustment - Handset/Speaker
• While on a call, press the Volume
control button (8) to adjust the
volume
• Press the Save soft key
Services:
• Press the Menu button
• Select Services
Services are currently unavailable until further notice.
If “Services” is selected, please lift and replace handset
until “Menu” button is no longer illuminated. Otherwise,
phone will be locked up.
Page 5 of 5
 Loading...