

Razorline
Cisco 7911
User Manual
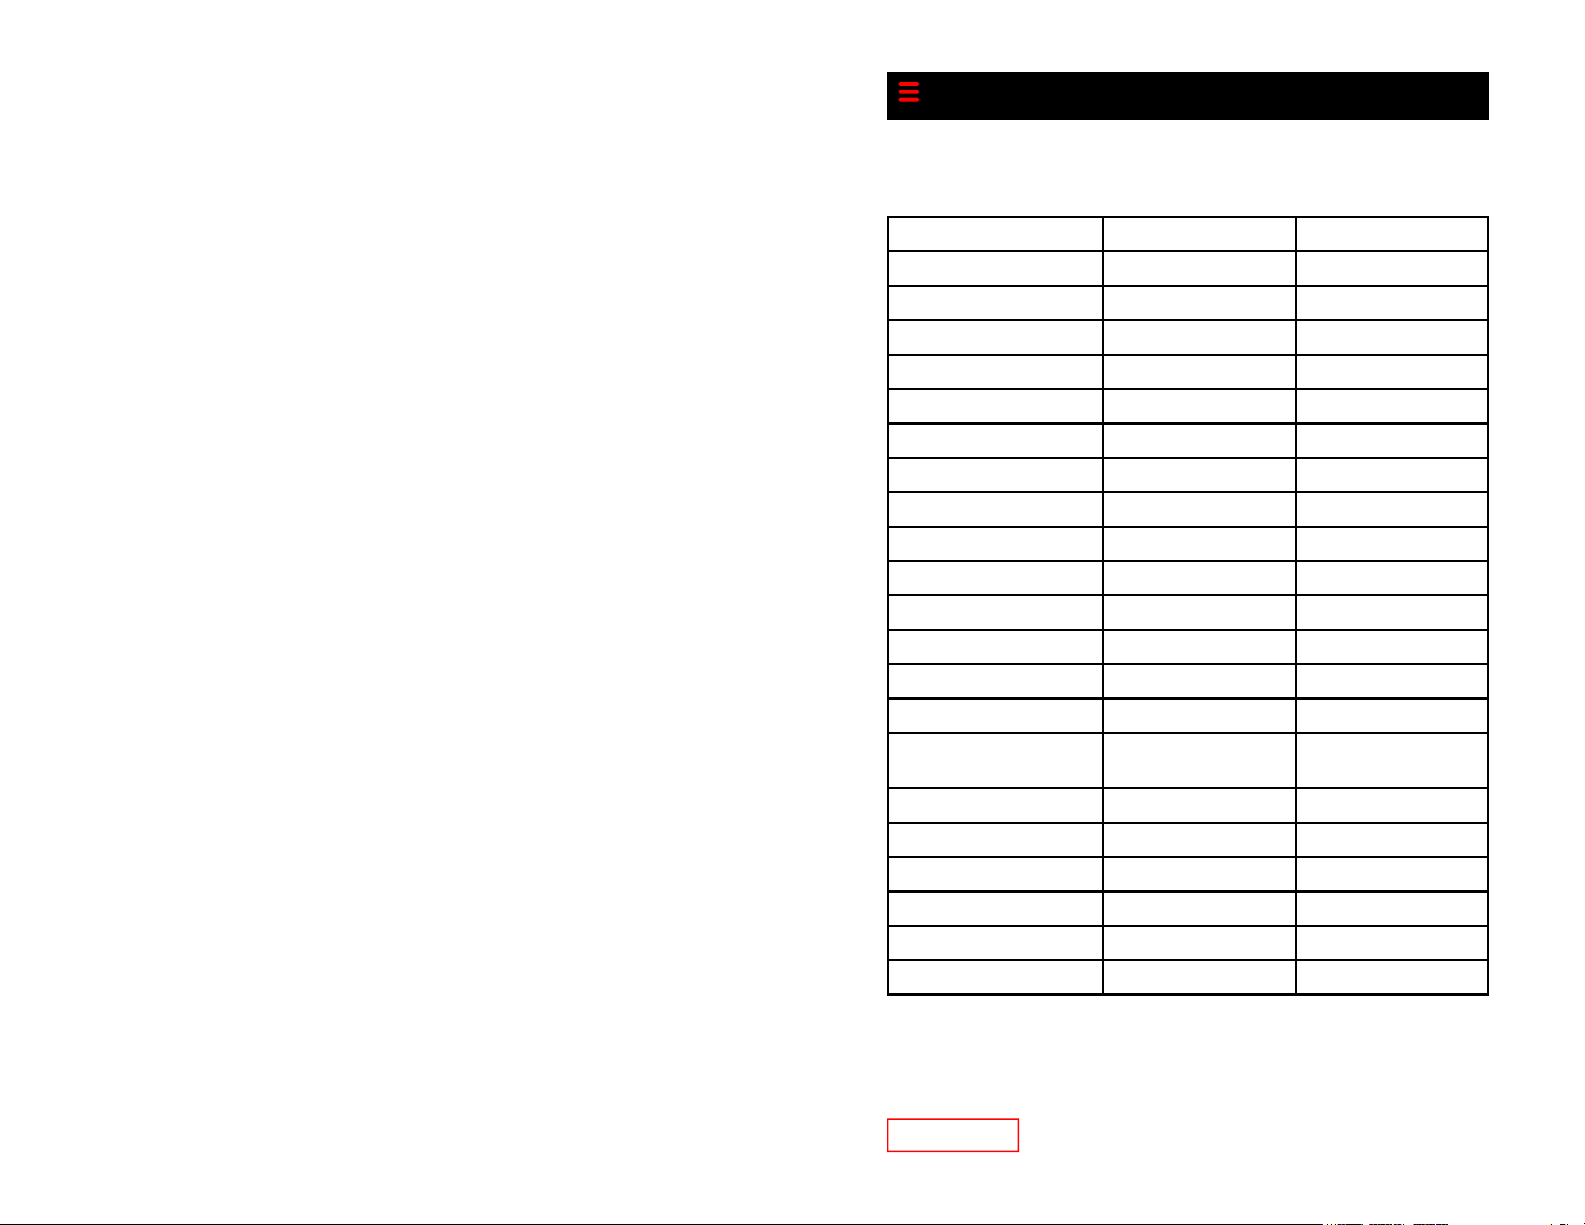
Feature Set Cancel
Abbreviated Dial 75* + Menu 75* + Menu
Anonymous Call Rejection *77 *87
Call Forward—All Calls 72* + no. + # 73*
Call Forward—Busy 76* no. + # 77*
Call Forward—No Answer 78* + no. + # 79*
Call Forward—Out of Svc. 70* + Menu 71*
Call Forward—Selective *63 + Menu *83 + Menu
Call Return *69 N/A
Call Trace *57 N/A
Call Waiting N/A *70 + no.
Caller ID Block *67 N/A
Directed Call Pickup *12 + extension N/A
Star Code Summary
Do Not Disturb *04 *04
Group Call Pickup *06 N/A
Perm. Caller ID Block
Release
Priority Call *61 + Menu *61 + Menu
Privacy Guard *88 + Menu *88 + Menu
Redial *07 N/A
Selective Call Block *60 + Menu *60 + Menu
Speed Dial 74* + Menu 74 + Menu
Voicemail *09 N/A
Page 23
N/A *82 + no.
Configuring Cisco 7911 for Off-
Network Access
Important—Make sure you have a power brick for the telephone.
Erasing Existing Configuration:
Press the Globe Button (to the right of the toggle button)
Use the arrow keys to select Settings
Use the select soft key
Use the arrow keys to select Network Configuration
Use the select soft key
Using the keypad, dial the following keys:
**#
Make sure the lock in the upper right hand corner of the LCD
screen is open
Use arrow keys to navigate to line 29 (erase configuration)
Use the yes soft key
Use the save soft key, the phone will reboot.
Setting New Configuration:
Press the Globe Button.
Use the arrow keys to select Settings.
Use the select soft key
Use the arrow keys to select Network Configuration
Use the select soft key, using the keypad, dial the following keys:
**#
Make sure that the lock is the upper right hand corner of the LCD
screen is open.
Use the arrow keys to navigate to line 26 (Alternate TFTP)
Use the Yes soft key
DO NOT HIT SAVE AFTER THIS
Use arrow keys to navigate to line 8 (TFTP Server 1)
Use the Edit soft key
Using the keypad, dial the following keys:
204*11*8*140
Use the Validate soft key
Use the Save soft key
Page 22
Table of Contents
Connecting Your Phone 4
Buttons and Hardware 5
Adjusting the Phone 7
Placing a Call 9
Answering a Call 10
Using Call Directories 12
Using Call Forwarding 13
Do Not Disturb 14
Conference Calls 14
Hold 15
Parked Calls 15
Directed Call Pickup 16
Transfer 16
Billing Codes 17
Long Distance Codes 18
Voice Mail 18
Configuring phone for off-net use 22
Star Code Summary 23
Customer Service/Technical Support
Please call 877-733-1700 or e-mail us at support@razorline.com Customers have the ability to report trouble 24 hours a day 7 days a week.
Important Razorline Numbers and Web Addresses
New Orleans Main Number: 504-274-1700
Razorline Website: http://www.razorline.com
Web Portal Address: http://webportal.razorline.com
Web Mail Address: http://webmail.razorline.com
Technical Support Email: support@razorline.com
Page 3
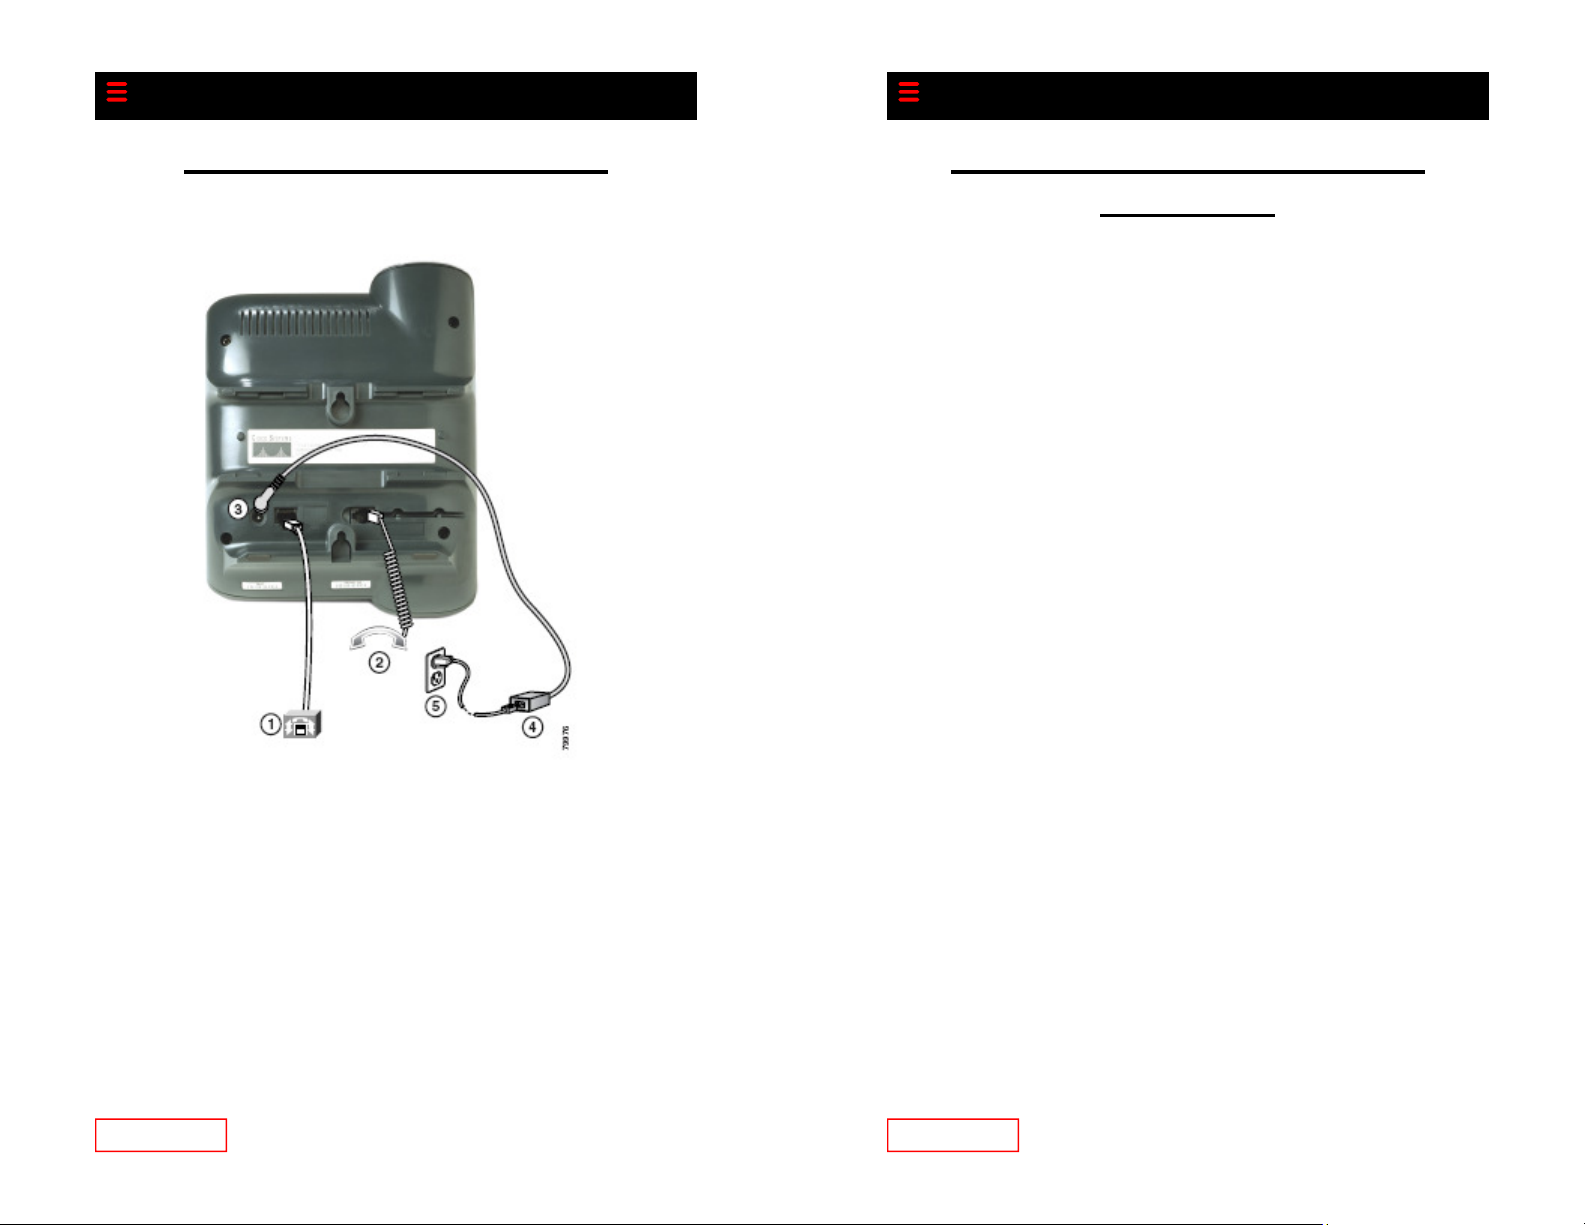
Connecting Your Phone
1. Network port (10/100 SW)
2. Access port (10/100 PC)
3. Handset port
4. DC Adapter port (DC48V)
5. AC to DC power supply
6. AC power cord
Recording Your Voice Mail
Greetings
You can record a different voice mail greeting for each of
the conditions that transfers a call to your voice mailbox.
1. When your phone rings and you don’t answer it.
(No Answer Greeting)
2. When you have activated the Do Not Disturb feature
3. When you are talking on the phone (Busy Greeting)
Greeting examples:
No Answer:
You have reached the desk of (User). I am not available to
answer your call at this time….
Busy Greeting:
You have reached the desk of (User). I am currently on another call…..
Do Not Disturb Greeting:
You have reached the desk of (User). I am in the office, but
am not available to take your call…..
Also, used for, I am on vacation from Jan 1st through Jan
6th…...
Page 4
Page 21

Voice Mail Menu
1—Listen to Inbox messages
2—Listen to Saved messages
3—Change your password
4—Listen to your voice mail greetings
5—Record your voicemail greetings
6—Access your personal distribution groups
7—To compose a message
8—To hear or change your customized operator assistance
While Listening to Your Messages
#—Skip Time/Date stamp prior to message
7—Rewind in 5 second increments
9—Forward in 5 second increments
99—Skip to the end of the message
77—Rewind to the beginning of the message
8—Pause the play of the message
5—Save the message
4—Delete the message
Buttons and Hardware
1. Phone Screen
2. Cisco Unified IP Phone Series
3. Soft key buttons
4. Navigation button
5. Applications Menu button
6. Hold
7. Keypad
8. Volume button
9. Handset with light strip
Page 20
Page 5

Buttons and Hardware
From your phone:
1. Press the Messages soft key to access voice mail
2. Enter your password
3. If you have a new voice mail, the messages are identified
and played. Otherwise, you will be prompted with
choices to play your inbox messages, play your saved
messages, change your password, playback your greetings, record new greetings, or exit the voice mail system.
4. Press the corresponding digit on your phone to select
the desired voice mail function.
From any other internal phone:
1. Dial 555 (or the code provided by your system administrator) You hear a welcome greeting and are prompted
to enter your extension number.
2. Enter your extension number, and you are prompted to
enter your password.
3. Enter your password, followed by the # key.
4. Follow the prompts to use the voice mail system.
From any touchtone phone outside your office:
1. Dial the phone number of your office phone.
2. When the voicemail greeting plays, press the * key.
3. You will be prompted to enter your password.
4. Enter your numeric password, followed by the # key.
Page 6
Page 19

Note: The other party will not hear key tones as you make
entries. If you enter multiple billing codes during a call, only
the last billing code will be recorded.
Long Distance Authorization
Codes
Authorization codes enable you to override any call restrictions on the phone when you place a call.
To make a call with an authorization code:
• Lift the handset
• Dial your outside access digit
• Press #
• Enter your authorization code
• When you enter the correct code, you will hear a
dial tone
• Dial the phone number
Voice Mail
You can access your voice mailbox from several different
sources:
Your phone
Any other internal phone
Any touchtone phone outside your office
Adjusting the Phone
To Adjust the Display Contrast
Press the Menu button.
Use the Navigation button to scroll to Settings.
Press Select.
Use the Navigation button to scroll to Contrast.
Press Select.
Press and release the Up and Down soft keys to reach the
desired contrast level.
If you want the contrast to be saved, press Save.
Press Exit to exit the Setting menu.
To Adjust the Ringer Volume
To adjust the ringer volume, press and release the up or
down VOLUME button while the phone is on hook to adjust the ringer volume. The ringer sounds and a horizontal
scale displays on the phone to indicate the volume level.
The new setting is saved automatically.
To Adjust the Handset Volume
Pick up the handset or answer a call.
Press and release the up or down VOLUME button to adjust the volume as desired.
To save the volume setting for future calls, press Save.
Page 18
Page 7

To Adjust the Speakerphone Volume
Press and release the up or down VOLUME button while
the speaker is in use.
Selecting a Ringer Sound
To change the sound of your telephone’s ringer, follow
these steps:
Press the Menu button.
Use the Navigation button to scroll to Settings.
Press Select.
Use the Navigation button to scroll to Ring Type.
Press Select and a list of ringer options appear.
Use the Navigation button to scroll up and down the ringer
options.
Press play to hear the highlighted ringer option.
Press Select to check the checkbox for your choice of
ringer.
Press OK to accept and save your ringer choice.
To retain the ringer, press Save.
Press Exit to exit the Setting menu.
Hang up or press the End Call soft key and let the call
transfer to the called party’s voice mail.
Transfer directly to voice mail
1. Press the more soft key.
2. Press the transfer soft key.
3. Dial 577 (or the code provided by your system administrator), then dial the extension to which you want to
transfer.
4. Hang up or press the End Call to complete the transfer
to voicemail.
Billing Codes
Billing codes enable you to track calls by associating a
billing code with each call.
To enter a billing code for a all using star codes:
• During a call, press *02
• Enter the billing code and then press #
To enter a billing code for a call using the menu:
• Press the More soft key until you see the Billing soft
key
• Press the Billing soft key
• Enter the billing code
• Press the More soft key again until you see the Bill-
ing soft key
• Press the Billing soft key
Page 8
Page 17

Call Forwarding
Directed Call Pickup
Directed Call Pickup lets you answer another phone from
your phone when you hear the other phone ringing. Both
phones must be members of the same Directed Call Pickup
Group. Your system administrator should tell you if you
are in a pickup group and who the members are.
1. Pick up the handset
2. Press the more soft key until you see the Pickup soft
key
3. Dial the ringing extension number to answer the phone
and begin speaking with the caller
Transfer
Use this feature to transfer a call to another number.
1. Tell the calling party you will transfer the call, and then
press the more soft key.
2. Press the transfer soft key. The call is placed on hold
and you hear a dial tone.
3. Dial the number to which you want to transfer the call.
4. If the called party answers, you can inform them of the
transfer and do one of the following:
Hang up or press the End Call soft key and let the call
transfer, or
Use the navigation button to scroll to the holding party,
press the Hold button to cancel the transfer.
5. If the called party does not answer, you can do one of
the following:
Use the navigation button to scroll to the holding party.
Press the Hold button to cancel the transfer.
Placing a Call—Basic Options
Here are some easy ways to place a call on your Cisco Unified IP Phone.
To dial:
An internal extension-dial the extension
A local call—dial the outside access digit & the number
Long distance– dial the outside access digit & 1 & the number
International-dial the outside access digit & 011 & country
code & city code & the number
To redial the last number called-press the redial key
Making a Call
Using the handset
1. Lift the handset
2. If this is an outside call, press your outside access digit
3. Dial the desired number, including “1” and the area
code, if calling long distance.
Using the Speaker
1. Press New Call
2. If this is an outside call, press your outside access digit
3. Dial the desired number, including “1” and the area
code, if calling long distance
4. When the call is answered, pick up the handset
Page 16
Page 9

Using the Keypad
1. If this is an outside call, press your outside access digit
2. Dial the desired number, including “1” and the area
code, if calling long distance
3. Press dial (activates the speaker)
4. When the call is answered, pick up the handset
While on a call
1. Press New Call (the original call is automatically placed
on hold)
2. If this is an outside call, press your outside access digit
3. Dial the desired number, including “1” and the area
code, if calling long distance
4. When the second call answers, switch between the calls
by using the Navigation button & pressing Hold
Answering a Call
Answer a call
When you hear your phone ring and see the red light flash
on your handset, pick up the handset. You will be connected to the calling party.
Answering a Second Call
When a call arrives while you are on the phone you can disconnect from the first call to answer the second or you can
answer the second call and keep the first call connected, but
on hold.
Page 10
Hold
This feature allows you to place a call on hold. While a call
is holding, the holding party occupies the associated line.
1. During a conversation, press the HOLD button. Depending on your system configuration, the party may
hear music, a recorded announcement, or silence while
holding.
2. To resume the conversation, press the HOLD button.
Storing and Retrieving Parked
Calls
You can park a call when you want to store the call so that
you or someone else can retrieve it from another phone in
the Razorline system. (for example, a co-worker’s desk or
a conference room)
If you want to:
Store an active call using Call Park:
During a call, press park. You may need to press the more
soft key to see park.
Record the call park number displayed on your phone.
To retrieve a parked call:
Enter the call park number from any Razorline phone
in your system to access the call.
After 1 minute, if no one in the office retrieves the parked
call, it will ring back to the phone of the user who originally
parked the call.
Page 15

Do Not Disturb instantly routes all your incoming calls to
another destination (your voice mailbox, the operator, a coworker, etc), but still lets you make calls and use other telephone features. With Do Not Disturb enabled, the phone
will not ring when a call comes in.
You can record a special voicemail greeting that callers will
hear when you have DND active and they are routed to
voice mail.
1. To activate & de-activate DND, press *04 on the keypad.
2. Press the Dial soft key or pickup the handset.
3. Hang up the handset or press End Call.
Using Do Not Disturb
Making conference calls
Your phone allows you to talk simultaneously with multiple
parties in a conference call.
If you want to create a conference call by calling participants:
From a connected call, press Confrn
Enter the participant’s phone number
Wait for the call to connect
Press Confrn again to add the participant to your call
Repeat to add additional participants
Putting the first call on hold
To answer a second call you do not need to end the current call. When you see the second call, press the Answer
soft key. The first call is automatically placed on hold and
you are connected to the second call.
NOTE: If you do not answer the second call, it is sent to
the programmed destination for unanswered calls, which is
usually your voice mailbox.
Disconnecting the first call
If you are through with the conversation with the current
party, hang up the handset and the new call will ring.
Switching between calls on hold
To switch between calls, press the Hold button. The current call is held and the first call resumes. When you hang
up the handset, the current call is disconnected, but the
other call is still on hold. Press the hold button and pick up
the handset to resume the other call.
Reconnecting to the First Call
Pressing Hold will switch you between the two calls. To
end either call, press End Call while connected to the party
you no longer wish to speak to.
Hanging up
To hang-up or disconnect from a call, either replace the
handset in its cradle or press the End Call soft key.
Page 14
Page 11

Using the Call Directory
The Cisco IP Phone maintains a directory of calls you miss,
receive, or make. You can use this directory to located
numbers you want to redial. This section describes what
you can do with the directory.
Viewing or Dialing from the Directories
You can view the calls you have made, received, or missed
using the Directories menu to view the call logs and, if desired, dial from the call log.
1. Press the Menu button.
2. Use the Navigation button to scroll to Directories.
3. Press Select.
4. Use the Navigation button to scroll to the desired directory (Missed Calls, Received Calls, or Placed Calls)
5. Press Select when you have selected a directory.
6. Use the Navigation button to scroll through the calls.
7. To place a call from the directory, press Dial to dial the
number.
NOTE: You might need to use the Edit Dial soft key to add
digits in front of the number. For example, if the call was
from an outside, long-distance caller, you need to add the
digit “1” to the front of the number.
8. Press Exit twice or press the Menu button to exit the Di-
rectories
Call Forward (All Calls)
Call Forward (All Calls) allows you to forward all calls for
your phone to the number you enter. Calls will not ring at
your phone and will be sent to the number you enter as the
forward destination. Your telephone display will show that
your phone has been forwarded. You can forward calls to
an IP or non-IP phone. Calls forwarded to an external number that are unanswered will roll over to voice mail (if available) at that number.
Enabling Call Forward (All)
1. Press the CFwdAll button
2. Enter the number to which you want to forward all your
calls. Be sure to enter the number exactly as you would
if you were to call that number. Include the area code if
necessary. You do not have to include the outside access digit. The display shows the number as it is entered
3. To forward your calls, do one of the following to hang
up the phone:
Press the End Call soft key
Pickup and replace the handset
Disabling Call Forward (All)
1. Press the CFwdAll button
2. Do one of the following to hang up the phone:
Press the End Call soft key
Pick up and replace the handset
Page 12
Page 13
 Loading...