

Page 1

Introduction
CHAPTER
6
Java Event List Configuration
This chapter covers how configure the Cisco Info Center Java Event List. You need only read this section
if you have installed Java support for the Java Event List.
This chapter includes the following sections:
• “Introduction”
• “Configuration Procedure”
• “License File”
• “Creating HTML Pages”
• “Running the JELD Process in Background”
The Java Event List is used to distribute and manage Cisco Info Center events through the World Wide
Web (WWW). The Java Event List uses a background server process, which obtains information from
the Cisco Info Server.
The background process, called jeld, and a Web server should be installed on the same machine to
overcome Java browser security issues.
When a Web browser makes a connection to the Web server, the server can send back an HTML page
containing the Java applet to the browser. The applet then connects to the jeld and requests a
configuration. The jeld
the Event List information in the Web browser.
The configuration information is stored in an Cisco Info Server database table and is configured using
the JEL Advanced Configuration Editor (JACE).
retrieves the configuration from the Cisco Info Server, and this is used to display
78-5664-05
Cisco Info Center Administrator Reference
6-1
Page 2
Configuration Procedure
Chapter 6 Java Event List Configuration
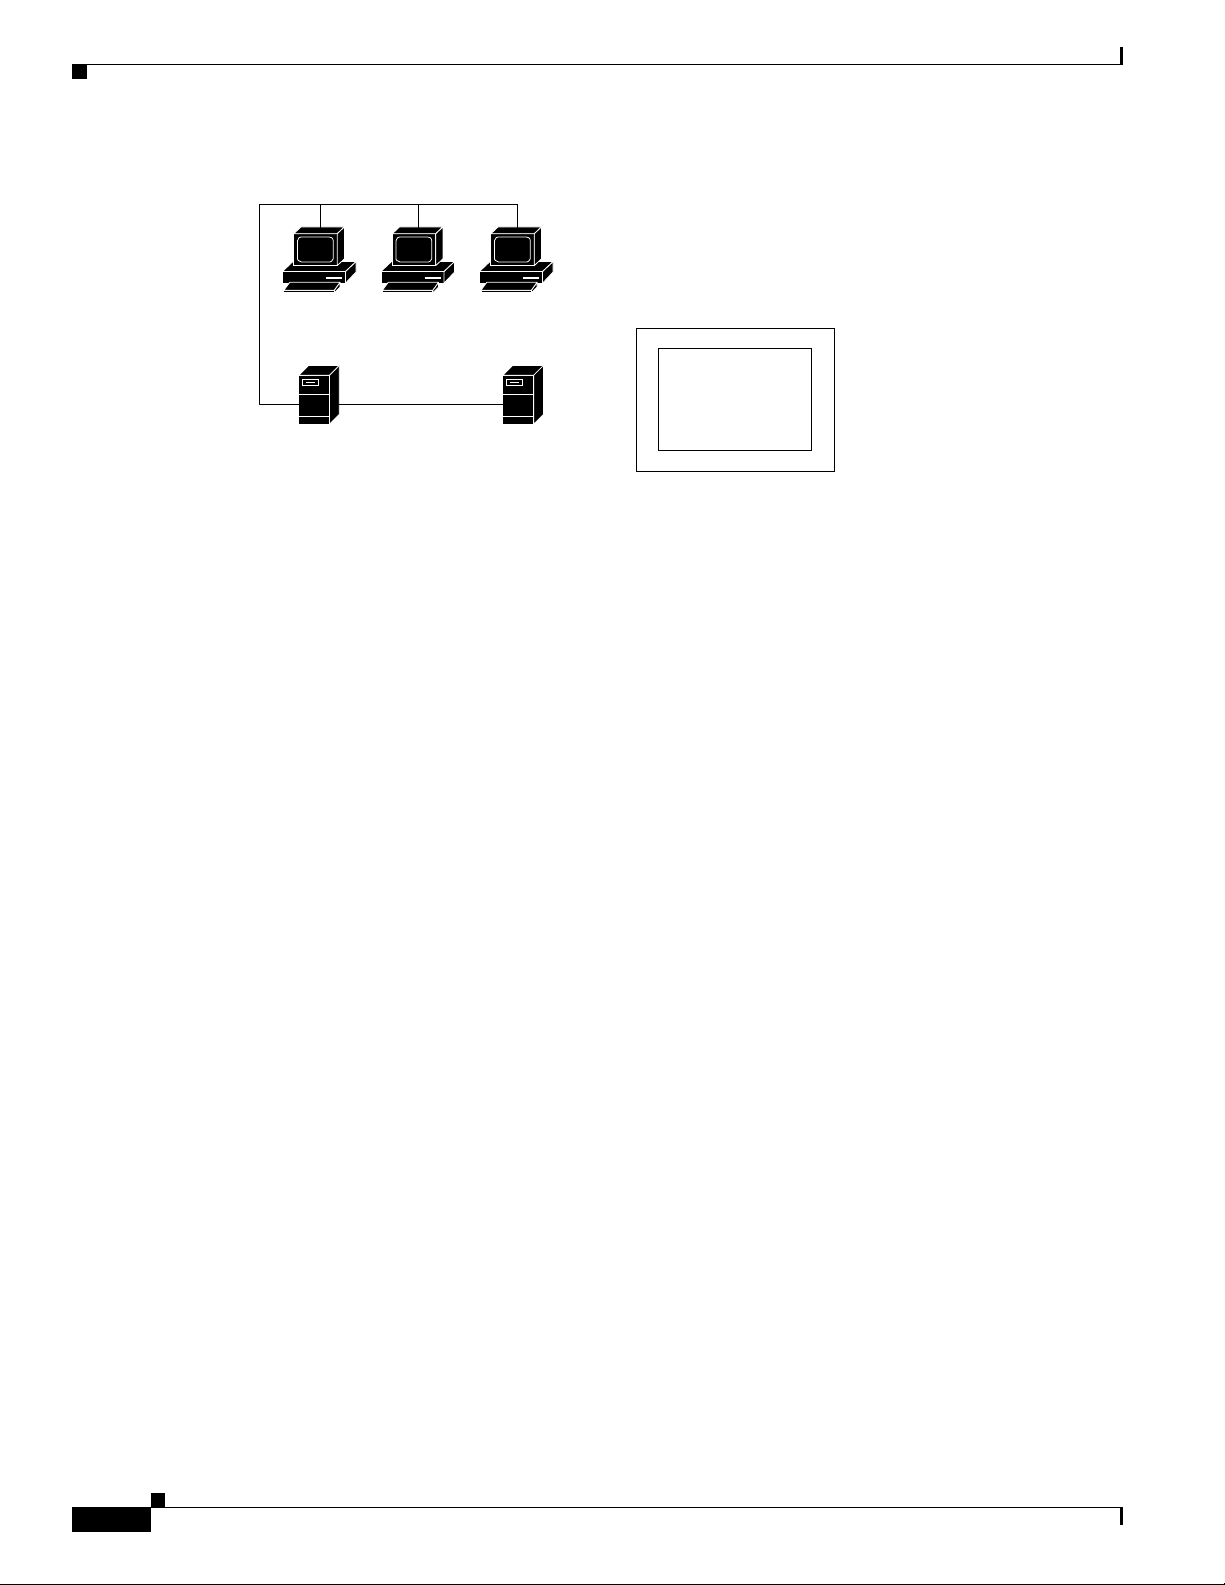
Figure 6-1 Java Component
Web browsers display the HTML
page containing the Java applet
Configuration
with JACE
Web server
jeld
Cisco Info Server
Configuration Procedure
The Java support components are, by default, installed in the $OMNIHOME/java directory. The
configuration procedure for Java support covers the following steps:
1. Install a Web server and set up the communications to Cisco Info Center.
2. Copy the class files to the publication home directory of the Web server.
3. Set the jeld properties files.
4. Create configurations with JACE.
5. Create the HTML pages.
6. Run the background process, jeld.
These steps are described in detail in the following sections.
Web Servers
In order to use the Java Event List, you must have a Web server installed and configured to support Java
applets. The Web server must be installed on the same machine as the Java support components. You can
obtain free Web servers from the WWW.
14913
6-2
For information about how to configure the Web server to support Java applets, for example,
initialization of class files, see your Web server documentation.
You should configure the system that runs the Web server to connect to Cisco Info Center. To do this,
you install a Cisco Info Admin Desktop on the machine that runs the Web server to check the
connectivity requirements. See the Cisco Info Center Installation and Configuration guide for more
information.
You also need to generate an interfaces file. This file contains information about which machines run
the Cisco Info Servers and also the communications between those machines. See the Cisco Info Center
Installation and Configuration guide for more information.
Cisco Info Center Administrator Reference
78-5664-05
Page 3

Chapter 6 Java Event List Configuration
Publishing Class and Zip Files
Before you can create HTML pages for the WWW, you must publish the class and zip files on the Web
server. The class files are in the $OMNIHOME/java/jel directory. This directory contains the following
subdirectories:
• classes containing the Java class files
• html containing an example configuration of the applet.
Copy these directories to the publication home directory of your Web server. To test the applets, load the
pages from the Web server.
For example, specify your server name with the following URL:
http://<your-server-name>/html/index.html
Setting the Properties File
The jeld.props properties file is located in the $OMNIHOME/java/props directory. You must modify
this file to match your system configuration. An example properties file is shown below.
jeld.Cisco Info Server.host: omnihost
jeld.Cisco Info Server.port: 4100
jeld.Cisco Info Server.user: root
jeld.objectserver.password
jeld.objectserver.1.host: host
jeld.objectserver.1.port: 4100
jeld.objectserver.1.user: user
jeld.objectserver.1.password: encrypted_password
#jeld.objectserver.1.url
#
#JDBC driver properties
#
jeld.jdbc: com.sybase.jdbc.SybDriver
#
#Jeld server properties
#
jeld.listenport: 7575
jeld.maxconns: 3
#
#Jeld global security properties
#
jeld.isp: +*
jeld.hosts: +*
#
#Log file properties
#
jeld.logdir: /opt/Omnibus
jeld.logfile: jeld.log
Configuration Procedure
78-5664-05
The following sections explain the items in the properties file and how to set the values.
Cisco Info Center Administrator Reference
6-3
Page 4

Configuration Procedure
Info Server Connection Properties
The properties file provides three methods of connecting to an Info Server. These are:
1. Connection to a list of Info Servers. JELD tries each Info Server in the list until a connection is
made. This is the preferred method.
2. Single connection to an Info Server. This method is provided for backward compatibility with
previous versions.
3. Connection to a list of URLs. Each URL specifies fully an Info Server connection. JELD tries each
URL in the list until it connects to an Info Server. This option is only for use by experienced
integrators. It should not be used in normal implementations.
Connection to List of Info Servers
The preferred method for the JELD to connect to an Info Server is for it to try to connect to each Info
Server in a list until it makes a connection. This means that you can specify a fallback Info Server, or
have the JELD retry the same one several times.
Chapter 6 Java Event List Configuration
Host Name
Port
Each Info Server is specified in the properties file by a set of properties. Each property includes a number
which identifies the position of the Info Server in the list. The property names for the first Info Server
are:
jeld.objectserver.1.host:
jeld.objectserver.1.port:
jeld.objectserver.1.user:
jeld.objectserver.1.password:
The second Info Server has 2 instead of 1, and so on for subsequent Info Servers.
You can override the entries in the properties file from the command line. For more information, see the
“JELD Command Line Utility” section on page B-2
This entry contains the host name where the Cisco Info Server is located. For example, specify:
jeld.objectserver.host: <omnihost>
Where <omnihost> is the name of the host.
You can override this entry with the jeld command line option -host.
This entry contains the port setting for the Cisco Info Server. For example, specify:
jeld.objectserver.port: 4100
You can override this entry with the jeld command line option -port.
User Name
6-4
This entry contains a user name (the suggested user name is jeld) for the Cisco Info Server. For example,
specify:
jeld.objectserver.user: jeld
Cisco Info Center Administrator Reference
78-5664-05
Page 5

Chapter 6 Java Event List Configuration
Password
This entry contains the jeld password for the Cisco Info Server. The password should be encrypted using
the nco_crypt command. For example, specify:
jeld.Cisco Info Server.password: <string>
Where <string> is the encrypted password. To create an encrypted password, specify:
nco_crypt <password>
Where <password> is the unencrypted form of the password. The nco_crypt command displays an
encrypted version of the password.
Single Connection to an Info Server
This option is provided for backward compatibility only. These lines are commented out in the example
configuration file.
Use the following fields to specify a connection to a single Info Server.
jeld.objectserver.host:
jeld.objectserver.port:
jeld.objectserver.user:
jeld.objectserver.password:
Configuration Procedure
Enter the Info Server details against these properties. The JELD tries to connect to the specified Info
Server. If it cannot connect the first time, it tries a second time. If it cannot connect then, it returns a
failure.
Info Server URL List
Note Only experienced integrators should use this connection method.
When you specify an Info Server URL list, the data from each URL is used to establish a connection to
the Info Server. You can use this option you need to specify fully the connection to an Info Server. The
property name is:
jeld.objectserver.1.url
In this property name, url is the address of the machine running the Info Server. It is not a web reference
and does not include the
This property is commented out in the example configuration file. Replace the number 1 with the number
2 for the second Info Server, 3 for the third Info Server and so on.
JDBC Driver Properties
http: prefix.
78-5664-05
This option defines the way in which the connection to the Info Server is established:
jeld.jdbc: com.sybase.jdbc.SybDriver
It should not be changed or removed except under instruction from technical support.
Cisco Info Center Administrator Reference
6-5
Page 6

Configuration Procedure
JELD Server Properties
There are two JELD server properties: listenport and maxconns.
Listen Port
This entry contains the listen port number. For example, specify:
jeld.listenport: 7575
You can override this entry with the jeld command line option -listenport.
Maximum Connections
This entry contains the maximum number of connections supported by the nco_jeld process. For
example, specify:
jeld.maxconns: 3
You can control the number of connections a single jeld process can handle, however, this does not
override the number of available licences.
Chapter 6 Java Event List Configuration
JELD Global Security Properties
There are two JELD global security properties: ips and hosts.
IPS
This entry is a list of the domains allowed to connect to the applet. For example, to allow only 10.0.0.1,
10.0.0.5, and 10.0.0.10 to connect to the applet, specify:
ips:+10.0.0.1 +10.0.0.5 +10.0.0.10 -*
To allow only machines in the domain 10.n.n.n to connect, specify:
ips:+10.* -*
To allow any domain to connect, specify:
ips: +*
Hosts
This entry is a list of hosts allowed to connect to the applet. For example, to allow only machine1,
machine2, and machine3 to connect to the applet, specify:
hosts:+machine1 +machine2 +machine3 -*
To allow only machine1 to connect, specify:
hosts:+*machine1 -*
To allow any machine to connect, specify:
hosts:+*
6-6
Cisco Info Center Administrator Reference
78-5664-05
Page 7

Chapter 6 Java Event List Configuration
Log File Properties
There are two log file properties: logdir and logfile.
Log Directory
This entry contains the name of the directory in which the log file is located. For example, to ensure the
log file is located in the /opt/Omnibus directory, specify:
jeld.logdir: /opt/Omnibus
Log File
This entry contain the name of a log file. The log file contains diagnostic information about the
background process, jeld. For example, to use a log file called jeld.log
jeld.logfile: jeld.log
License File
Configuration Procedure
,specify:
The JELD license file is $OMNIHOME/java/props/jeld.lic.
The license file contains information about the IP address of the host on which the JELD is licensed to
run, the license key, the number of licenses, and the expiry date of the JELD license. For example, a
license file could look like the following:
jeld.license.key:string
jeld.license.address:IP_address
jeld.license.count: 3
jeld.license.expire:01/Feb/2000
To obtain a license file, email Micromuse Technical Support (support@micromuse.com). After they
send you the information for a license, use the text editor of your choice to create a jeld.lic file and paste
the information that they send you into the file. Then save the file in the
directory.
Info Server Connection and Reconnection
This section describes how JELD makes a connection when it is configured to connect to a list of Info
Servers, and how it reconnects if necessary. For more information about the Info Server connection see
the “Info Server Connection Properties” section on page 6-4.
Initial Info Server Connection
When JELD is started, it tries to establish a connection to the first Info Server in the properties file. If it
cannot, it tries to establish a connection to the second Info Server.
If you wish to try to connect to the same Info Server twice, enter the same details in the first and second
Info Server properties.
opt/Omnibus/java/props
78-5664-05
Cisco Info Center Administrator Reference
6-7
Page 8

Configuration with the JACE Editor
There is no limit to the number of Info Servers that you can specify in the properties file or the number
of times you can enter the details of the same Info Server.
Once a connection has been established, the JELD can respond to requests from the Java applet in the
JEL.
Info Server Connection Failure
If the connection to the Info Server is broken, the JELD shuts down automatically. The JEL detects the
shutdown of the JELD, report an error on the desktop and offers the user the option of reconnecting.
If the JELD is running under process control it can be restarted automatically. As a new process the JELD
tries to establish a connection with an Info Server as described in the “Initial Info Server Connection”
section on page 6-7.
A dialog box appears on the JEL to reconnect to the JELD. If the JELD has established a new Info Server
connection, the JEL resynchronizes the data from the Info Server.
Fail Over Support
Chapter 6 Java Event List Configuration
When you enter a list of Info Servers in the jeld.props file, the JELD attempts to connect to each Info
Server in turn until a successful connection is made.
For the JELD to continue to operate after a failure, every Info Server listed in the
contain the same JELD configuration table, and the JELD must be restarted automatically under process
control.
Configuration with the JACE Editor
For Java configuration, use the JEL Advanced Configuration Editor (JACE). JACE is a table-orientated
editor that allows you to manage configurations. These configurations are stored in the jel.jel_props
Cisco Info Server table, to which the jeld is connected. You must have super user privilege to use JACE.
For maximum flexibility, the configuration files include options to take particular settings from the
HTML parameters. These parameters include, view name, fields, order, and filter.
Starting JACE
Before starting JACE, set OMNIHOME:
host# setenv OMNIHOME=/opt/Omnibus
To start JACE, specify the following command:
host# $OMNIHOME/java/bin/jace
Figure 6-2 shows the JACE display.
jeld.props file must
6-8
Cisco Info Center Administrator Reference
78-5664-05
Page 9

Chapter 6 Java Event List Configuration
Figure 6-2 JEL Advanced Configuration Editor (JACE)
Configuration with the JACE Editor
When you first start JACE, you should import the default configuration file
$OMNIHOME/java/misc/jel1.jace.
The JACE display is in a tree format, made up of sets. A set is a group of property and name value pairs.
The display shows a configuration, named
configuration is used by default in the applet parameters in the HTML page, and is specified using the
config parameter. For more information on the config parameter, see the “Configuration Parameter”
section on page 6-21.
You can edit the jel1 configuration or use it as the basis for new configurations.
Renaming a Configuration
To rename a configuration:
1. Click on the configuration you want to rename. For example, click on jel1.
2. Click on the Rename button. The Rename Configuration window is displayed, as shown in
Figure 6-3.
Figure 6-3 Rename a Configuration in JACE
jel1, which contains the default values for the sets. This
78-5664-05
Specify the new name for the configuration.
3.
Cisco Info Center Administrator Reference
6-9
Page 10

Configuration with the JACE Editor
Copying a Configuration
An entire configuration can be copied, including all sets and properties, or just one part of a
configuration.
To copy a configuration:
1. Click on the configuration you want to copy. For example, click on jel1.
2. Click on the Copy button. The Copy Configuration window is displayed, as shown in Figure 6-4.
Figure 6-4 Copy a Configuration in JACE
3. Specify a name for the configuration. The copied configuration is displayed in the JACE display.
Chapter 6 Java Event List Configuration
Deleting a Configuration
To delete a configuration:
1. Select the configuration from the JACE display.
2. Click on the Delete button. The configuration is removed from the JACE display.
Adding a Set to the Configuration
You can create additional sets in the configuration. To add a set:
1. Select the configuration from the JACE display.
2. Click on the Add button. The Add Set to Configuration window is displayed, as shown in Figure 6-5.
Figure 6-5 Add Set to Configuration in JACE
Specify the name of the set. The set is displayed in the configuration in alphabetical order.
3.
Deleting a Set
Cisco Info Center Administrator Reference
6-10
To delete a selected set and all the properties in it, do one of the following:
• Click the Delete button (shown in the left margin).
• Right click on the list to display the popup menu, then select Delete Set.
The set no longer appears in the JACE display.
78-5664-05
Page 11

Chapter 6 Java Event List Configuration
Importing and Exporting Configurations
JACE allows you to import and export configurations for use on other machines. Configurations may be
exported to ASCII readable files and those files can be imported, allowing for the backup of master
configurations.
To import a configuration:
1. Select the File menu’s Import option.
2. Select the configuration file to import, then click on the OK button. The configuration is displayed
in the JACE display.
To export a configuration:
1. Select the configuration from the JACE display.
2. Select the File menu’s Export option.
3. Specify a file name for the configuration. It is recommended you give the file name a .jace
extension.
Configuration with the JACE Editor
Using Multiple Configurations
The configuration mechanism allows multiple-named configurations to be stored for use by the applets.
To use a configuration, the configuration name is specified as an attribute of the
in the HTML page. For more information on the config parameter, see the “Configuration Parameter”
section on page 6-21.
Set and Property Management
The following sections describe how to use the JACE editor to manage sets and properties.
Copying a Set
You can copy a set, including all its properties, within the same configuration. To copy a selected set, do
one of the following:
• Click the Copy button.
• Right click on the list to display the popup menu, then select Copy Set.
The Copy Set window opens. Enter a name for the new set and select OK. The copied set now appears
in its alphabetical position in the configuration.
config applet parameter
Renaming a Set
78-5664-05
To rename a selected set, do one of the following:
• Click the Rename button (shown in the left margin).
• Right click on the list to display the popup menu, then select Rename Set.
The Rename Set window opens. Enter a name for the new set and select OK. The renamed set now
appears in its alphabetical position in the configuration.
Cisco Info Center Administrator Reference
6-11
Page 12

Configuration with the JACE Editor
Adding a Property to a Set
To add a new property to a selected set, do one of the following:
• Click the Add button (shown in the left margin).
• Right click on the list to display the popup menu, then select Add Property to Set.
The Add Property window opens. Enter a name for the new property and select OK. The property now
appears in its alphabetical position in the set.
Deleting a Property
To delete a property, do one of the following:
• Select the property then click the Delete button (shown in the left margin).
• Right click on the list to display the popup menu, then select Delete Property.
The property is deleted from the JACE display.
Renaming a Property
Chapter 6 Java Event List Configuration
To rename a property in a set:
Step 1 Right click on a property and select Rename Property from the popup menu.
The Rename Property window opens.
Step 2 Enter the new property name in the Rename Property window and select OK.
The property appears in the set in alphabetical order.
Saving and Restoring Modifications
When you create or modify a configuration, set or a property, its icon in the JACE display indicates that
it has unsaved changes. The modified icon appears against the property, the set and the configuration.
To save every modification in every configuration select the Save All button at the bottom of the JACE
window.
To save the modification made to a single set, right click on the set to display the popup menu, then select
Save Set setname, where setname is the set or option to be saved.
To restore every option in every configuration to its currently saved state select the button Restore All
at the bottom of the JACE window.
To restore the modification made to a single set right click on the set to display the popup menu, then
select Restore Set setname, where setname is the set or option to be restored.
Once a configuration, set or property is saved or restored, the modified icon is removed.
6-12
Cisco Info Center Administrator Reference
78-5664-05
Page 13

Chapter 6 Java Event List Configuration
Configuration Options
In this section, there is a table of properties for each setname.
Configuration with the JACE Editor
Field Extension
The type of each property can be
String, Integer or Boolean. All configuration options are included in
the JEL template.
The Basic Field and Basic Tool sets are provided as models that you can copy and use as the basis of
custom fields and tools.
A set exists for each field plus its extension. Example set names include:
• Field1
• Field2
• FieldAlerts
The names must correspond to the entries in the property
Each set must contain a minimum group of properties. For example, the
fields in the view set.
basic field set from the default
configuration, contains the properties described in Table 6-1.
Table 6-1 Field Set Properties
Property Type Description
field
title
width
String Sets the name of the field in the database table.
String Sets the column title.
String Sets the column width.
.
View
These three properties, when copied to a field set and completed, provide the minimum requirements for
that set.
The two additional properties described in Table 6-2 can be added to the field set
Table 6-2 Additional Field Set Properties
Property Type Description
justify
String Set this property to L, R or C to left, right or center justify the
column text.
justifytitle
String Set this property to L, R or C to left, right, or center justify the
title text. If these properties are not set, the justification
defaults to left.
The properties for the view set are described inTable 6-3.
78-5664-05
Cisco Info Center Administrator Reference
6-13
Page 14

Configuration with the JACE Editor
Chapter 6 Java Event List Configuration
.
Table 6-3 View Set Properties
Property Type Description
fieldsfromhtml
fields
Boolean If set to true the field information for the JEL is taken from
the HTML page applet parameter
as JEL 1.x. If set to
the property
false the field information is taken from
filter in the view set.
fields in the same format
String The field information is taken from the field data in the
configuration (see the “Field Extension” section on
page 6-13). For example enter values
1,2,Alerts to
represents these field sets.
namefromhtml
name
Boolean If this field is set to true, the view name is taken from the
HTML page applet parameter
JEL 1.x. If this field is set to
from the property
name in the view set.
viewname in the same format as
false, the view name is taken
String Enter a string to specify the name of the view. This appears
on the monitor box button, the inline-view message area and
the float-view title bar.
orderfromhtml
order
toolsfromhtml
Boolean If this field is set to true, the order is taken from the HTML
page applet parameter
If this field is set to
property
order in the view set.
order in the same format as JEL 1.x.
false, the view name is taken from the
String Specifies the ordering to be used for the view. For example,
Severity asc for an ascending order by Severity.
Boolean If this field is set to true, the tools information is taken from
the HTML page applet parameter
JEL 1.x. If this field is set to
tools in the same format as
false, the tools information is
taken from the tool data in the configuration (See the “Tool
Number” section on page 6-16).
filterfromhtml
filter
filterrestriction
Boolean If this field is set to true, the filter is taken from the HTML
page applet parameter
If this field is set to
property
filter in the view set.
order in the same format as JEL 1.x.
false, the view name is taken from the
String Specifies the filter to be used for the view. For example,
Serial>0.
String If not null, the filter is prefixed and an AND clause is added
with the specified restriction. This applies to HTML and
configuration filters.
Access
6-14
The two properties required for JELD global security are defined in the access set, as described in
Table 6-4.
Cisco Info Center Administrator Reference
78-5664-05
Page 15

Chapter 6 Java Event List Configuration
Table 6-4 Access Set Properties
Property Type Description
host
ips
Audio
The properties for the audio set are described in Table 6-5
.
Table 6-5 Audio Set Properties
Property Type Description
enabled
alertsample
Configuration with the JACE Editor
String Sets the host name to be used for validation. The default is
“+*”.
String Sets the IP address to be used for validation. The default is
“+*”.
Boolean If this field is set to true, the alerts sample is played when
new alerts appear in the event list. If this field is set to
the alerts sample is not played.
String This sets the sample to be played for audio alerts. It must be
the URL for an audio file. The default is
crash.au.
false,
Basic Tool
The Basic Tool set is a template that you can copy and use as the basis of custom tools. The properties
for the basic tools set are described in Table 6-6.
Table 6-6 Basic Tools Set Properties
Property Type Description
name
params
type
String Set the name of the tool.
String Set the parameters to be parsed to the URL.
String Set one of the following four options:
go - Opens a new browser window with the selected URL.
one - Opens a new browser window for the first row in a
selection and parses the parameters to the URL.
curl- Opens a new browser window for the first row in a
selection and parse the parameters to create the URL. If the
parameter is within quotes the string is parsed. If the
parameter is not enclosed within quotes the value of the
parameter in the selected alert is parsed.
all - Opens a new browser window for every selected alert
and passes the parameters in the URL as arguments.
url
String Set the URL of the page or Common Gateway Interface
(CGI) script to display.
78-5664-05
Cisco Info Center Administrator Reference
6-15
Page 16

Configuration with the JACE Editor
Tool Number
Chapter 6 Java Event List Configuration
These four properties, when copied to a tool set and completed, provide the minimum requirements for
that set. See “Configuring Tools” on page 23 for details of the possible values of the fields.
A set exists for each tool plus its number. Example set names include:
• Tool 1
• Tool 2
• Tool 3
The numbers must form a continuous numeric sequence. If a break occurs in the sequence only tools
with numbers up to the break are used.
The properties within each set are the same as those in the basic tool set. Table 6-7 describes the
properties for the tool number set.
Ta b le 6 - 7 To o l N u m be r S et P r o p er t ie s
Property Type Description
name
params
type
String Set the name of the tool.
String Set the parameters to be parsed to the URL.
String Set one of the following four options:
Help
go - Opens a new browser window with the selected URL.
one - Opens a new browser window for the first row in a
selection and parse the parameters to the URL.
curl- Opens a new browser window for the first row in a
selection and parse the parameters to create the URL. If the
parameter is within quotes the string is parsed. If the
parameter is not enclosed within quotes the value of the
parameter in the selected alert is parsed.
all - Opens a new browser window for every selected alert
and pass the parameters in the URL as arguments.
See “Tools Parameter” on page 23 for examples.
url
String Set the URL of the page or Common Gateway Interface
(CGI) script to display.
Table 6-8 describes the property for the help set.
Table 6-8 Help Set Property
Property Type Description
url
String Set the URL of the help page. This defines the URL to browse
when the help option is selected from the menu.
6-16
Cisco Info Center Administrator Reference
78-5664-05
Page 17

Chapter 6 Java Event List Configuration
Look
The properties for the look set are described in Table 6-9.
Table 6-9 Look Set Properties
Property Type Description
authenticate
authenticatefirst
autorefresh
background
fixedfont
fixedfontsize
font
fontsize
foreground
frameheight
framewidth
inline
look3d
manualrefresh
menufont
menufontsize
monitorbox
Configuration with the JACE Editor
Boolean If set to true the user must authenticate before each operation
that modifies an alert. This property also adds the menu items
Authenticate and Deauthenticate to the File menu in the
JEL.
Boolean If set to true the user must authenticate themselves before the
JEL displays any data.
Boolean If set to true the JEL is automatically refreshed at time
intervals set by the
When this property is set to
is implicitly set to
String Sets the background color of the JEL for all widgets where a
background color is meaningful. All colors are specified in
hexadecimal. The default is
String Sets the font for the JEL dialogs. The default is Courier.
Integer Sets the font size for the JEL dialogs. The default is 12.
String Sets the font for the JEL. The default is Helvetica.
Integer Sets the font size for the JEL. The default is 12.
String Sets the foreground color for windows. The default is ffffff.
Integer Sets the pixel height of the frame opened when JEL opens in
float mode. The default is
Integer Sets the pixel width of the frame opened when JEL opens in
float mode. The default is
Boolean If this field is set to true, the JEL operates in inline mode. If
set to
false JEL operates in float mode.
Boolean If this field is set to true, the alert list grid has a 3-dimensional
raised edge look. If set to
2-dimensional look.
Boolean If this field is set to true, the menu item Refresh is added to
the JEL File menu. The data is only refreshed when this menu
item is selected. When this property is set to
autorefresh is implicitly set to False.
String Sets the font for menus (where the platform allows menu fonts
to be set). The default is
Integer Sets the menu font size (where the platform allows menu fonts
to be set). The default is
Boolean If this field is set to true, a monitor box is displayed in float
mode. If set to
displayed in float mode.
refreshrate property of the look set.
true the property manualrefresh
False.
708090.
256.
512.
false the grid has a flat
true the property
SansSerif.
12.
false, only a button with the view name is
78-5664-05
Cisco Info Center Administrator Reference
6-17
Page 18

Configuration with the JACE Editor
Monitor Box
Chapter 6 Java Event List Configuration
Table 6-9 Look Set Properties (continued)
Property Type Description
refreshrate
refreshtoggle=
The following options are only relevant in float mode to control the appearance of the monitor box. The
properties for the monitor box set are described in Table 6-10.
Table 6-10 Monitor Box Set Properties
Integer Sets the refresh rate for the alert list in automatic refresh
mode. The default is
10. This set is associated with the refresh
utility.
Boolean If this field is set to true, the menu item Refresh Mode is
added to the File menu and the Refresh button is always
available. This item contains the buttons Automatic Refresh
and Manual Refresh. Using these buttons the user can
override the property settings
autorefresh and manualrefresh
in the look set.
Property Type Description
font
fontsize
height
String Sets the font used in the monitor box. The default is
Helvetica.
Integer Sets the font size used in the monitor box. The default is 12.
Integer Sets the height of the distribution meter in the monitor box.
The default is
highest
Boolean If this field is set to true, the monitor box displays the
highest severity in the current view.
lowest
Boolean If this field is set to true, the monitor box displays the
lowest severity in the current view.
metric
Boolean If this field is set to true, the monitor box displays the
metric in the JEL.
metricfield
String Set the field name from the JEL which is to be used to
calculate the metrics. The selected field must be an integer
and exist in the JEL view.
metrictype
String Sets the type of calculation which is to be performed on the
data from the field selected in
metrics types available are:
sum
average
max
min
40.
metricfield property. The
6-18
Cisco Info Center Administrator Reference
78-5664-05
Page 19

Chapter 6 Java Event List Configuration
Table 6-10 Monitor Box Set Properties (continued)
Property Type Description
style
total
Update Permissions
The update permissions set controls the way in which alerts can be modified. Authentication is required
before you can change any of the options in this set.
The properties for the update permissions set are described in Table 6-11.
Table 6-11 Update Permissions Set Properties
Configuration with the JACE Editor
String This property sets the way in which the current status on
severity is shown. If it is set to
lava lamp. If it is set to
h, the monitor box shows a
histogram. When a histogram is selected, the
must be increased.
Boolean If this field is set to true, the monitor box displays the total
number of alerts in the current view.
l, the monitor box shows a
height value
View Permissions
Property Type Description
acknowledge
Boolean If this field is set to true, the menu items Acknowledge and
Deacknowledge are added to the Alerts menu.
assign
Boolean If this field is set to true, the menu item Assign is added to
the Alerts menu. The user can assign an alert to another user.
assigngroup
Boolean If this field is set to true, the menu item GroupAssign is
added to the Alerts menu. The user can assign an alert to
another group.
delete
Boolean If this field is set to true, the menu item Delete is added to
the Alerts menu. The user can delete an alert.
journal
Boolean If this field is set to true, the menu item Add to Journal is
added to the Alerts menu. The user can make an addition to
the journal.
severity
Boolean If this field is set to true, the menu item Prioritize is added
to the Alerts menu. The user can change the severity of an
alert.
takeownership
Boolean If this field is set to true, the menu item Take Ownership is
added to the Alerts menu. The user can take ownership of an
alert.
78-5664-05
The view permissions set controls way alerts are viewed. The properties for the update permissions set
are described in Table 6-12.
Cisco Info Center Administrator Reference
6-19
Page 20

Configuration with the JACE Editor
Table 6-12 View Permissions Set Properties
Property Type Description
details
fullreport
info
journal
select
Chapter 6 Java Event List Configuration
Boolean If this field is set to true, a user can view the alert and its
details in information or reports. The details for the alert is
also shown.
Boolean If this field is set to true, the user can view the full report
information. The menu item Report is added to the Alerts
menu.
Boolean If this field is set to true, the user can view the alert
information for the selected events. The menu item
Information is added to the Alerts menu.
Boolean If this field is set to true, the user can display the journal
details for the selected events. The menu item Journal is
added to the Alerts menu.
Boolean If this field is set to true, the Edit menu is added to the
JEL. The items Select All and Deselect All are added to the
Edit menu.
Admin
Fail Over Support
The property for the admin set is described in Table 6-13.
Table 6-13 Admin Set Property
Property Type Description
include String Specifies a configuration, string, to
include.
include option allows you to include all the values from another configuration into the current
The
configuration.
Sets and properties can be added to the current configuration. The value of a property in the current
configuration overrides the same property in the included configuration.
If a configuration includes another configuration that contains the admin set, the included configuration
can point to the including configuration. This creates an loop that never ends. JACE cannot validate the
included configuration when this occurs. It should be avoided.
For the JELD to continue to operate after a failover, every Info Server listed in the jeld.props file must
contain the same JELD configuration table. You must copy any changes that you make to the JELD
configuration table in JACE to all of the Info Servers in the
jeld.props file.
For more information on this topic, see the “Connection to List of Info Servers” section on page 6-4.
6-20
Cisco Info Center Administrator Reference
78-5664-05
Page 21

Chapter 6 Java Event List Configuration
Creating HTML Pages
To configure the JEL, you add applet pa rameters t o t h e HTML pag e s . An example HT M L fi l e i s provided
in the following file:
$OMNIHOME/java/html/jel1.htm.
The following sections describe the available parameters and how to set their values.
The APPLET Tag
The applet tag defines where the code for the JEL is located and the class that should be run. It also
defines the width and height of the applet in the HTML page. For example:
<APPLET CODEBASE=”../classes” archive=”jel.zip”
CODE=”COM.micromuse.jel.Jel.class” WIDTH=200 HEIGHT=64>
For Netscape Communicator and other Java 1.1 compliant browser users, change the archive entry to
jel.jar. For example:
<APPLET CODEBASE=”../classes” archive=”jel.jar”
CODE=”COM.micromuse.jel.Jel.class” WIDTH=200 HEIGHT=64>
Creating HTML Pages
There must be a corresponding </APPLET> tag at the end of the applet.
Host Parameter
The host parameter allows you to specify a host to which the applet connects directly. The applet can
connect only if the host has no access control. Use this tag with caution. For example:
<param name=”host” value=”host”>
Configuration Parameter
The config parameter allows you to specify the configuration to use. The configuration is defined with
JACE, as described in the “Configuration with the JACE Editor” section on page 6-8. For example
<param name=”config” value=”jel1”>
Port Parameter
The port parameter allows you to specify the port number. For example, enter:
<param name=”port” value=”7575”>
78-5664-05
This parameter defaults to 7575.
Cisco Info Center Administrator Reference
6-21
Page 22

Creating HTML Pages
ViewName Parameter
The ViewName parameter is a string that labels the button and window that appear in float mode. For
example:
<param name=”ViewName” value=”High Severity”>
This parameter is used when the configuration namefromhtml is set to true.
Order Parameter
The Order parameter is the SQL text of an ordered by clause. For example:
• Severity desc orders by descending severity
• Severity asc orders by ascending severity
You can specify multiple orders, with precedence going from left to right, by separating entries with a
comma. For example, enter:
<param name=”Order” value=”Severity desc, Serial asc”>
Chapter 6 Java Event List Configuration
This parameter is used when the configuration orderfromhtml is set to true.
ViewFields Parameter
The ViewFields parameter controls the display of fields. For example, enter:
<param name=”ViewFields” value=”Serial,,Serial,R,10|Node,,Node,,16|
Summary,,Summary,,64|Severity,,Sev,,10|Acknowledged,,Ack,,3|FirstOccurence,,First,,16|Owne
rID,,Owner,,16”>
The fields are listed in the following format:
FieldName,Justify,Title,JustifyTitle,Width [| FieldName,Justify,Title, JustifyTitle,Width
]...
The fields are as follows:
• FieldName is the field from the Info Server
• Justify is the justification of the field name. If omitted the default is left.
• Title is the text to appear above the column when it is displayed,
• JustifyTitle is the justification of the column title. If omitted the default is left.
• Width is the number of characters.
The vertical bar character (|) is used to separate the entries.
If you do not include the
Acknowledged field, no acknowledgment shading appears. This feature allows you to prevent severity
and acknowledgment information appearing in the event list. This parameter is used when the
configuration
Severity field, no severity coloring appears. If you do not include the
fieldsfromhtml is set to true.
6-22
Cisco Info Center Administrator Reference
78-5664-05
Page 23

Chapter 6 Java Event List Configuration
Filter Parameter
The Filter parameter allows you to define the filter. This is the value of an SQL where clause and can
contain any valid filter text. For example, enter:
<param name=”Filter” value=”Severity>3”>
This parameter is used when the configuration filterfromhtml is set to true.
Tools Parameter
The Tools parameter defines tools that call CGI scripts (or other web-based tools) according to the value
of fields in selected alerts. The parameter’s value consists of a list of tool definitions:
<param name=”Tools” value=”
Tool1(type)(BaseURL)([CGIParam,Value,CGIParam,Value...)
Tool2(type)(BaseURL)([CGIParam,Value,CGIParam,Value...)
.
.
”>
Configuring Tools
Each tool is defined on a single line in the following format:
NameforMenu(type)(BaseURL)(CGIParam,Value,CGIParam,Value...)
For example:
Ping multiple hosts (all)(http://armagnac/cgi-bin/ncping)(Node,Node,Serial,Serial)
This parameter is used when the configuration toolsfromhtml is set to true.
See the “Configuring Tools” section on page 6-23 for details of the parameters.
Configuring Tools
You can specify tools for use with alerts displayed in a Java event list. Each tool consists of a URL that
points to a web based application, for example a CGI script or page relevant to the alert. You can
configure tools either in the JACE, as part of the JEL configuration, or in the HTML for a Java event list
web page. If you define tools in the web page, the JEL configuration must have the
to true for a Java event list to use them.
Each tool consists of the following:
• A name
• A base URL
• A type
• Parameters derived from the alert
toolsfromhtml set
Tool Name
78-5664-05
The name of the tool is displayed in the Too ls menu title bar. In a tool defined in JACE, it is defined in
the
name property of the tool. In a tool defined in an applet, it is defined in the first (NameForMenu tag)
parameter of the tool definition.
Cisco Info Center Administrator Reference
6-23
Page 24

Configuring Tools
Base URL
Chapter 6 Java Event List Configuration
You must specify a base URL that forms the stem of the URL for each tool. The rest of the tool’s URL
is derived from the parameters in a way that depends on the tool’s type. See the “Tool Type” section on
page 6-24 and the “Tools Parameters” section on page 6-24 for details.
In a tool defined in JACE, the base URL is defined in the second (
defined in an applet, it is defined in the second (
Tool Type
The tool can be one of the following types:
• go to pass no parameters and open a browser window with the BaseURL page
• one to work on only one selected alert, open a browser window and call the BaseURL page with the
• curl to construct a URL and open a browser window with the constructed URL
• all to work on one or more selected alerts. A browser window opens for each alert, calling the
In a tool defined in JACE, the tool type is defined in the
applet, it is defined in the third (
Tools Parameters
A tool can have no parameters, or any number. In a tool defined in JACE, the parameters are defined as
a single string in the
fourth tag.
url) property of the tool. In a tool
BaseURL) tag.
appropriate expanded parameters
BaseURL and appropriate expanded parameters.
url property of the tool. In a tool defined in an
type) tag.
params property of the tool. In a tool defined in an applet, they are defined in the
Tools of Type Go
Tools of Type One
Cisco Info Center Administrator Reference
6-24
Tools of type go have no parameters. In a tool defined in JACE, the params property should be empty. In
a tool defined in an applet, the fourth parameter should be null:
Show Home Page(go)(http://armagnac/)()
Tools of type one have one or more parameters, each of which that consists of the name of a parameter
used by the tool, and its value. The list of parameters is itself a single parameter in the tool definition:
Ping a single host(one)(http://armagnac/cgi-bin/ncping)(Node,Node,Serial,Serial)
The contents of the final parentheses in these examples are the same as the value of the params parameter
in a tool defined in JACE.
The name/value pair is passed to the script at the URL. The value of each named parameter is taken from
the specified field in the alert. In this example, the script expects a
value of the
the script as the value of a
Node field in the first alert. The value of the Serial field in each alert is similarly passed to
Serial parameter. The name of the parameter does not have to be the same as
Node parameter, and runs with the
the name of the field from which it takes its value, although this helps in tracking values.
78-5664-05
Page 25

Chapter 6 Java Event List Configuration
Tools of Type All
Tools of type all have one or more parameters, defined in the same way as for tools of type one:
Ping multiple hosts(all)(http://armagnac/cgi-bin/ncping)(Node,Node,Serial,Serial)
In this example, the script expects a Node parameter, and runs with the value of the Node field in the each
selected alert. The value of the
a
Serial parameter.
Tools of Type Curl
A tool of type curl accesses a URL constructed from the values of the third and forth parameters. The
third parameter is a base URL, for example,
values which can be either taken from fields in the alert or passed as strings, included in quotes.
For example, if you have a directory structure that contains appropriate HTML pages for each type of
alert, the following file could contain instructions for dealing with a critical (severity 5) alert involving
a disk failure on the node
http://armagnac/info/demo5/Disk/help.html
Running the JELD Process in Background
Serial field in each alert is similarly passed to the script as the value of
http://armagnac/info. The fourth parameter is a list of
demo:
To access this URL when the relevant alert occurs, the tool definition is:
Help(curl)(http://armagnac/info/) (Node,Severity,”/help.html”)
Running the JELD Process in Background
To run t h e jeld process in background, enter the following:
$OMNIHOME/java/bin/jeld&
The JELD process can also be run under process control. For information on process control, see
Chapter 2, “Process Control.”
You can then open the HTML page in a web browser. The page displays the configuration settings.
Figure 6-6 shows the web browser with a configuration modified to show the metric and a histogram in
the monitor box.
78-5664-05
Cisco Info Center Administrator Reference
6-25
Page 26

Running the JELD Process in Background
Figure 6-6 Example HTML Page
Chapter 6 Java Event List Configuration
6-26
Cisco Info Center Administrator Reference
78-5664-05
 Loading...