

1
MV22-HW Installation Guide
MV22-HW Overview
The Cisco Meraki MV22-HW is an indoor wireless networked camera that is exceptionally simple to deploy
and configure due to its integration into the Meraki dashboard and the use of cloud augmented edge
storage. The MV family eliminates the complex and costly servers and video recorders required by
traditional solutions which removes the limitations typically placed on video surveillance deployments.
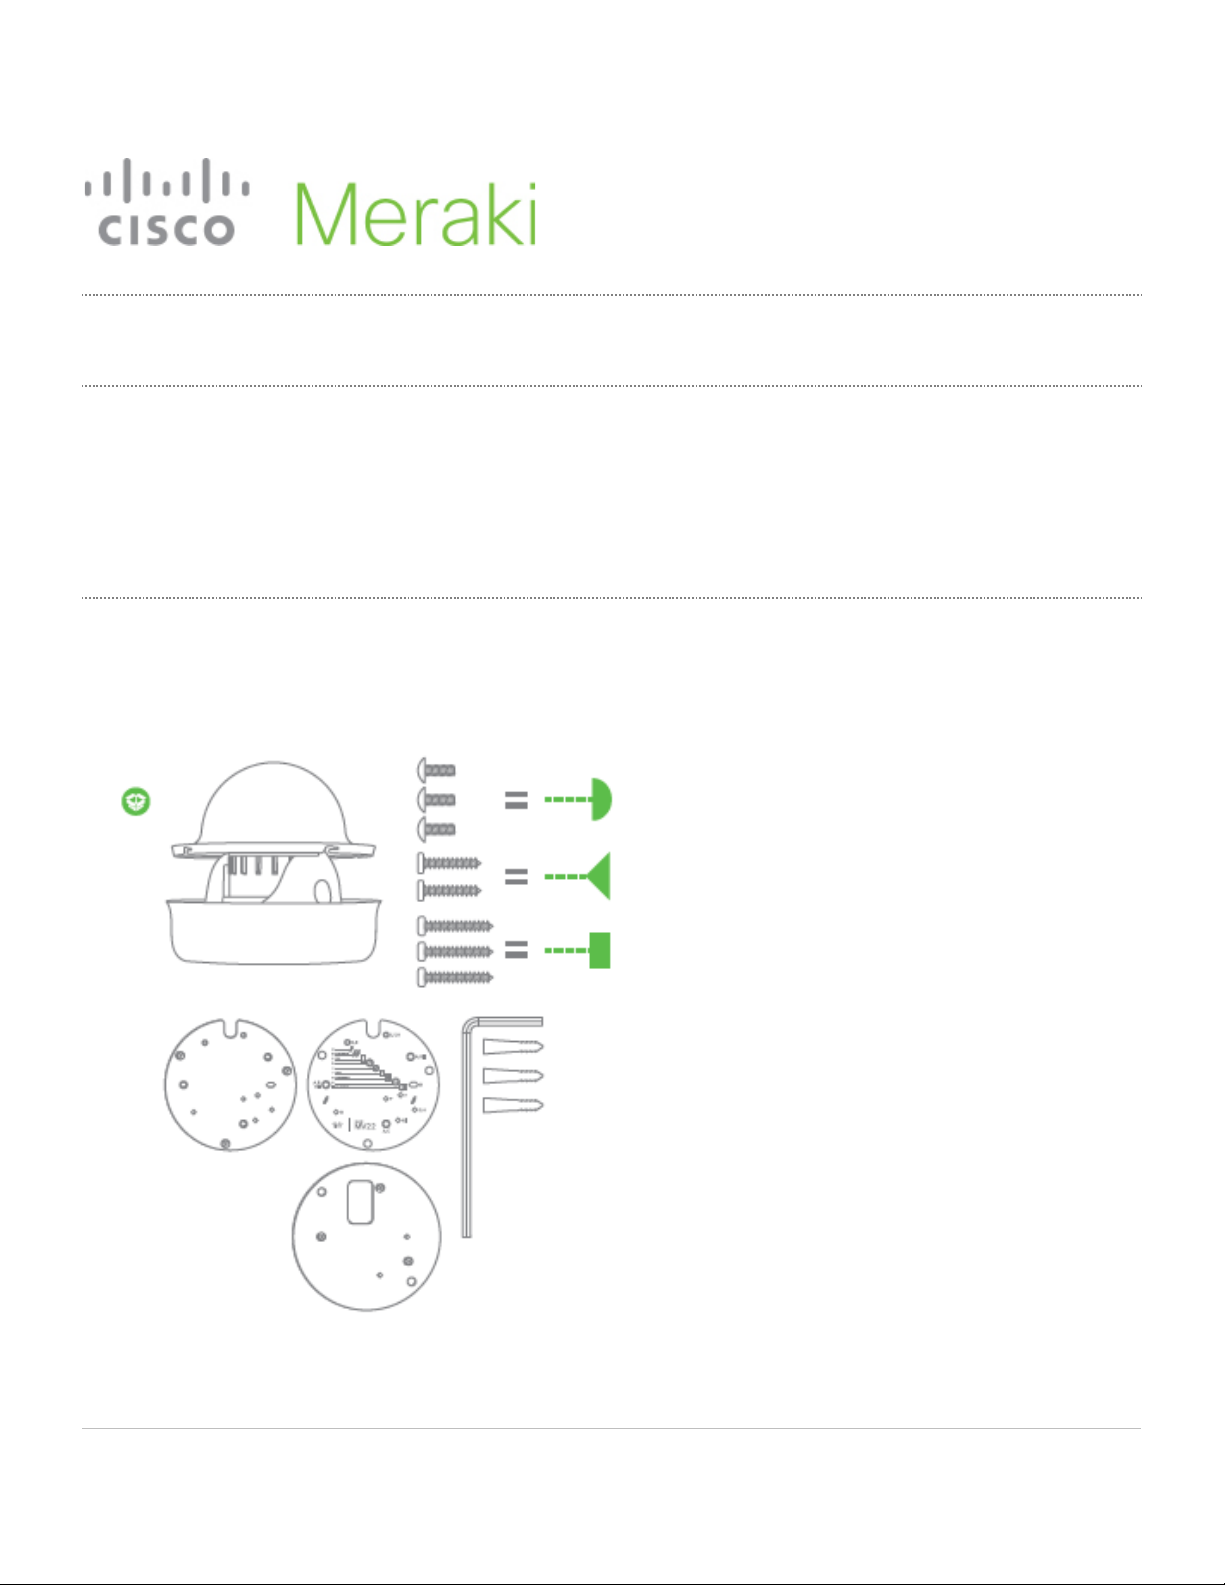
Package Contents and Wall Mount Hardware
In addition to the MV camera, the following are provided:
2
Ethernet Ports
The MV22-HW features one LAN RJ45 port. This port is used for two purposes. One function is to be an
uplink to access Meraki’s Dashboard. The secondary function is to accept 802.3af power over Ethernet
(PoE) via an injector or Switch.
Power Options
The MV22-HW can be powered using a Meraki MA-INJ-4 PoE injector (optional accessory) or using a PoE
switch.
Pre-Install Preparation
You should complete the following steps before installing the MV22-HW in its final location.
Configure your MV22-HW in the Networking using Dashboard
You should complete the following steps before installing the MV22-HW in its final location.
The following is a brief overview only of the steps required to add a MV12 to your network. For detailed
instructions about creating, configuring, and managing Meraki Camera networks, refer to the online
documentation (https://documentation.meraki.com/MV).
1. Login to http://dashboard.meraki.com. If this is your first time, create a new account.
2. Find the network to which you plan to add your camera(s) or create a new network.
3. Add your camera(s) to your new network. You will need your Meraki order number (found on your
invoice) or the serial number of each camera, which looks like Qxxx-xxxx-xxxx, and is found on the
bottom of the unit.
3
4. Verify that the camera is now listed under Cameras > Monitor > Cameras.
Check and Configure Firewall Settings
If a firewall is in place, it must allow outgoing connections to particular ports using given IP addresses. The
most current list of outbound ports and IP addresses for your particular organization can be found here.
DNS Configuration
Each MV22-HW will generate a unique domain name to allow for secured direct streaming functionality.
These domain names resolve an A record for the private IP address of the camera. Any public recursive
DNS server will resolve this domain.
If utilizing an onsite DNS server, please whitelist *.devices.meraki.direct or configure a conditional forwarder
so that the local domains are not appended to *.devices.meraki.direct and that these domain requests are
forwarded to Google public DNS.
Assigning IP Addresses
At this time, the MV22-HW does not support static IP assignment. MV12 units must be added to a subnet
that uses DHCP and has available DHCP addresses to operate correctly.
Installation Instructions
Note: Each MV22-HW-HW comes with an instruction insert within the box. This insert contains detailed
step-by-step guides and images to assist in the physical installation of the camera. A pdf can be found
here. (Note—this is a draft hyperlink not active yet.)
Note: During first time setup, the MV22-HW-HW will automatically update to the latest stable firmware.
Some features may be unavailable until this automatic update is completed. This process may take up
to 10 minutes due to enabling of whole disk encryption.
4
Wall Mounting and Installation Instructions
For most mounting scenarios, the MV22-HW wall mount provides a quick, simple, and flexible means of
mounting your device. The installation should be done in a few simple steps—
1. Do not remove the protective bubble cover.
2. Use mount plate adhesive flyer to position the mount plate at the desired location prior to positioning
mount plate.

5
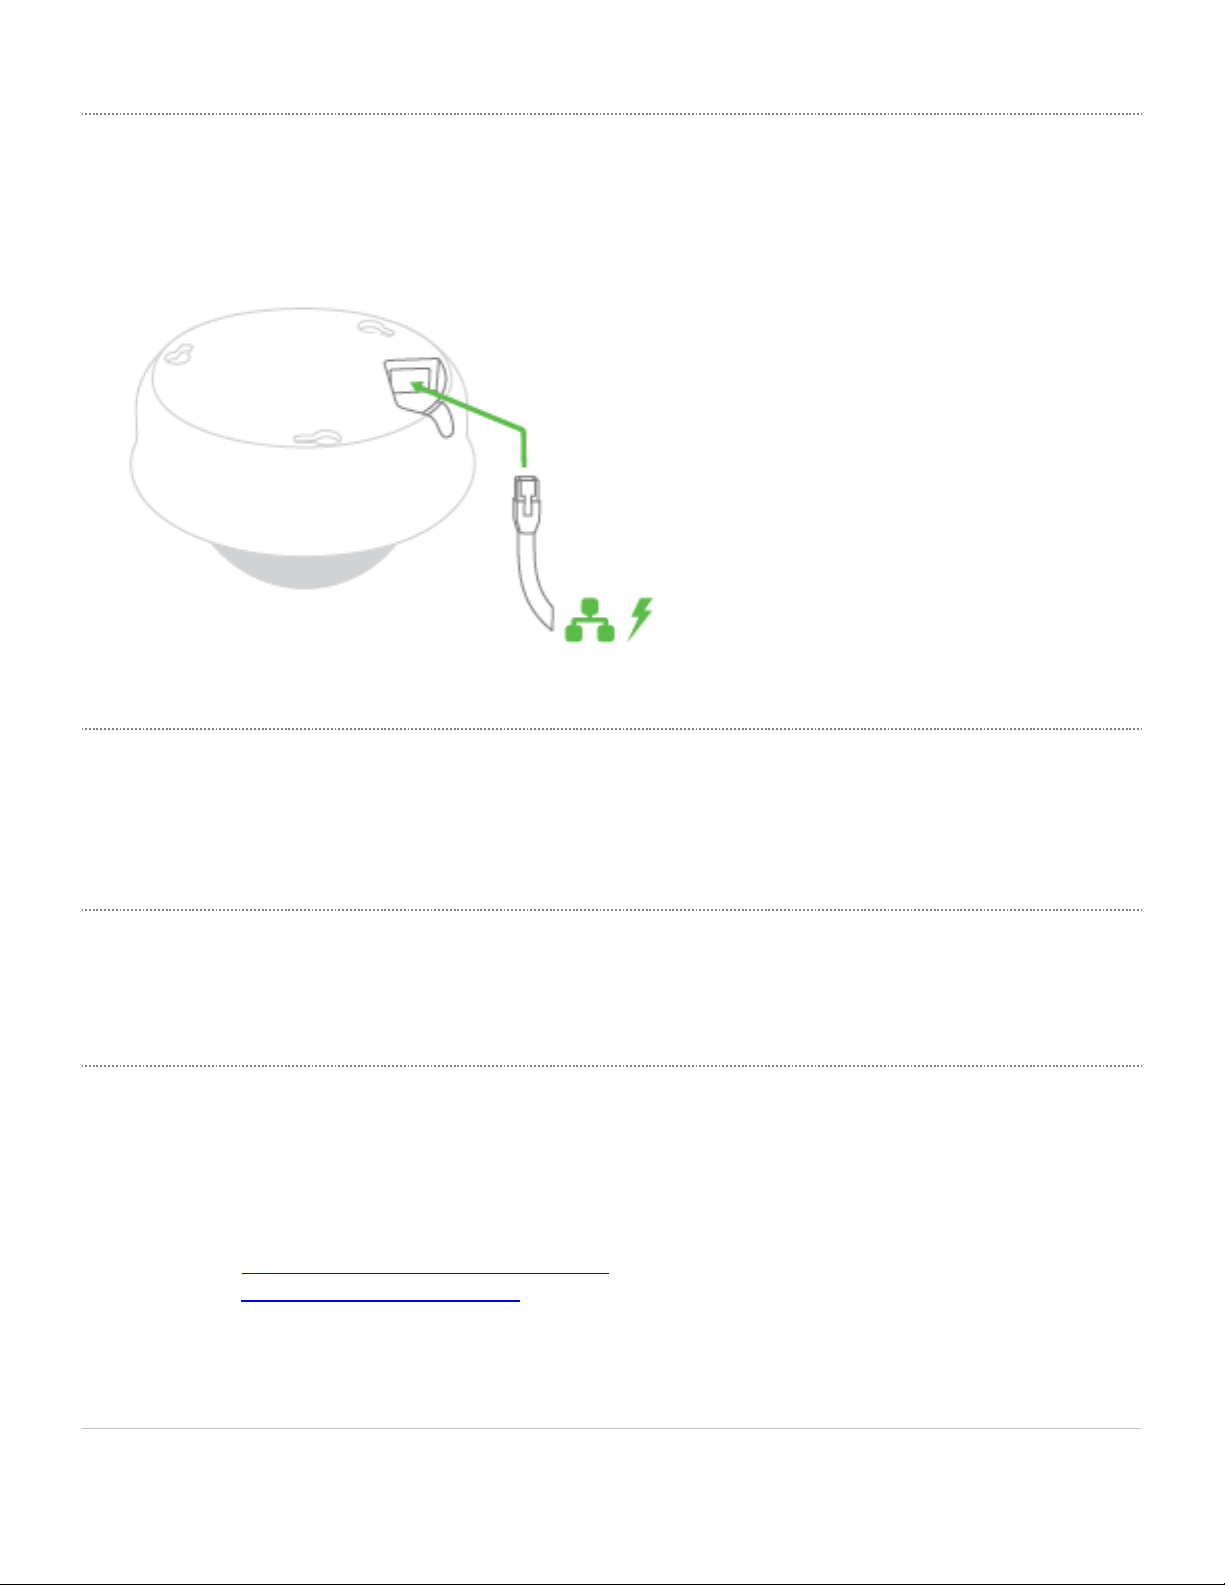
3. Connect PoE RJ45 Cable to underside of the camera as shown in the image below.
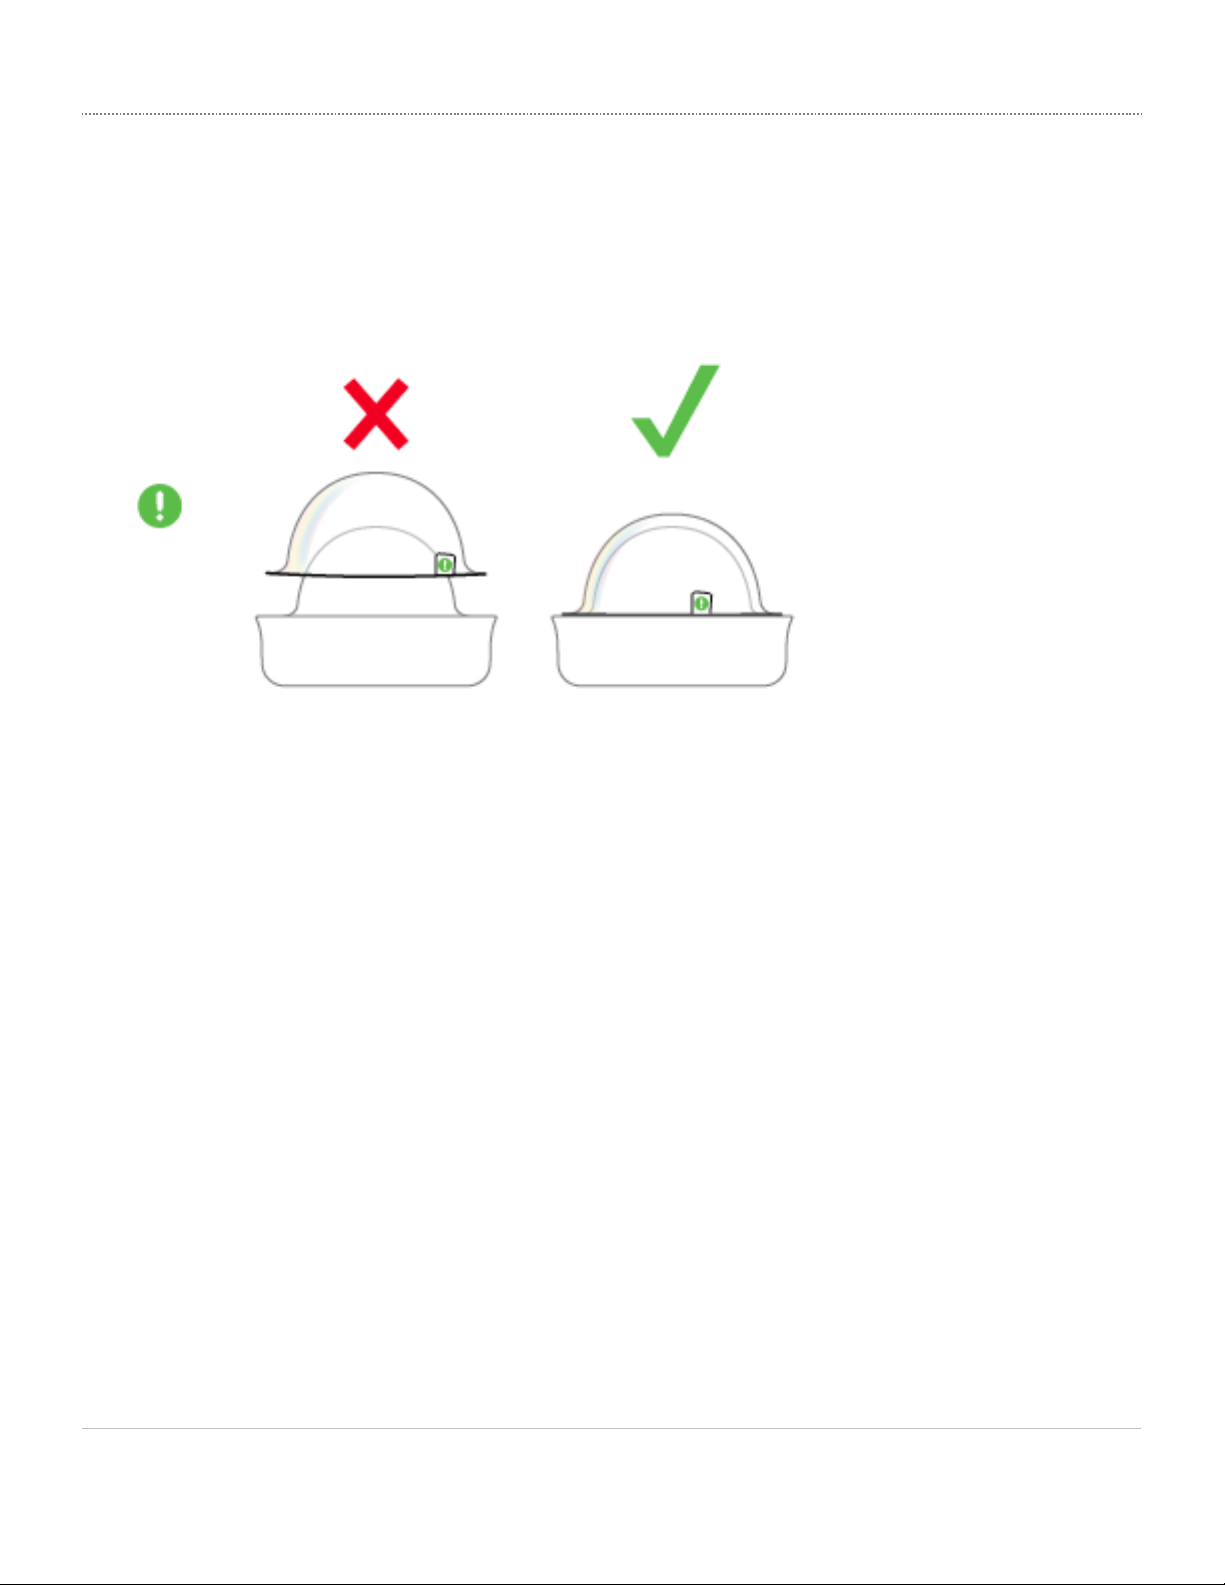
4. Before mounting the camera, remove the lens cover with the plastic bubble still attached. Align the
camera to the mount plate guide pins and tighten screws to secure.

6

7
5. Adjust the lens as desired.
6. Once the lens is adjusted and focused on the right position, remove the protective plastic lens cover
as shown in the image below.

8
7. The camera has a LED light that provides functionality status. Shown below are the LED status
color definition.
8. Login to dashboard.meraki.com

9
Regulatory Statements
EU Radiation Exposure Statement
Installing or mounting of this device shall be done as such that a minimum separation distance (distance
between a person and the device, or the device’s antennas) of 20 cm is always ensured.
FCC Compliance Statement
This device complies with part 15 of the FCC rules. Operation is subject to the following two conditions: (1)
This device may not cause harmful interference, and (2) this device must accept any interference received,
including interference that may cause undesired operation.
FCC Interference Statement
This equipment has been tested and found to comply with the limits for a Class B digital device, pursuant to
part 15 of the FCC Rules. These limits are designed to provide reasonable protection against harmful
interference in a residential installation. This equipment generates, uses and can radiate radio frequency
energy and, if not installed and used in accordance with the instructions, may cause harmful interference to
radio communications. However, there is no guarantee that interference will not occur in a particular
installation. If this equipment does cause harmful interference to radio or television reception, which can be
determined by turning the equipment off and on, the user is encouraged to correct the interference by one of
the following measures:
• Reorient or relocate the receiving antenna.
• Increase the separation between the equipment and receiver.
• Connect the equipment into an outlet on a circuit different from which the receiver is connected.
• Consult the dealer or an experienced radio/TV technician for help.
FCC Caution
Any changes or modifications not expressly approved by Cisco Systems, Inc. could void the user’s authority
to operate this equipment. This Transmitter must not be co-located or operation in conjunction with any
other antenna or transmitter.
FCC Radiation Exposure Statement
This equipment complies with FCC radiation exposure limits set forth for an uncontrolled environment. This
equipment should be installed and operated with minimum distance 20 cm between the radiator and your
body. This transmitter must not be co-located or operating in conjunction with any other antenna or
transmitter.
IEEE 802.11b or 802.11g operation of this product in the USA is firmware-limited to channels 1 through 11.
Industry Canada Statement
This device contains licence-exempt transmitter(s)/receiver(s) that comply with Innovation, Science and
Economic Development Canada’s licence-exempt RSS(s). Operation is subject to the following two
conditions:
1. This device may not cause interference.!
2. This device must accept any interference, including interference that may cause undesired operation of
the device.!

10
L’émetteur/récepteur exempt de licence contenu dans le présent appareil est conforme aux CNR
d’Innovation, Sciences et Développement économique Canada applicables aux appareils radio exempts de
licence. L’exploitation est autorisée aux deux conditions suivantes:
1. L’appareil ne doit pas produire de brouillage;!
2. L’appareil doit accepter tout brouillage radioélectrique subi, même si le brouillage est susceptible d’en
compromettre le fonctionnement.!
For product available in the USA/Canada market, only channel 1~11 can be operated. Selection of other
channels is not possible.
Pour les produits disponibles aux États-Unis / Canada du marché, seul le canal 1 à 11 peuvent être
exploités. Sélection d’autres canaux n’est pas possible.
This device and it’s antenna(s) must not be co-located or operating in conjunction with any other antenna or
transmitter except in accordance with IC multi-transmitter product procedures.
Cet appareil et son antenne (s) ne doit pas être co-localisés ou fonctionnement en association avec une
autre antenne ou transmetteur.
Dynamic Frequency Selection (DFS) for devices operating in the bands 5250- 5350 MHz, 5470-5600 MHz
and 5650-5725 MHz.
Sélection dynamique de fréquences (DFS) pour les dispositifs fonctionnant dans les bandes 5250-5350
MHz, 5470-5600 MHz et 5650-5725 MHz.
Industry Canada Caution
(i) the device for operation in the band 5150-5250 MHz is only for indoor use to reduce the potential for
harmful interference to co-channel mobile satellite systems;
(ii) high-power radars are allocated as primary users (i.e. priority users) of the bands 5250-5350 MHz and
5650-5850 MHz and that these radars could cause interference and/or damage to LE-LAN devices.
Avertissement:
(i) les dispositifs fonctionnant dans la bande 5 150-5 250 MHz sont réservés uniquement pour une utilisation
à l’intérieur afin de réduire les risques de brouillage préjudiciable aux systèmes de satellites mobiles utilisant
les mêmes canaux;
(ii) De plus, les utilisateurs devraient aussi être avisés que les utilisateurs de radars de haute puissance
sont désignés utilisateurs principaux (c.-à-d., qu’ils ont la priorité) pour les bandes 5 250-5 350 MHz et 5
650-5 850 MHz et que ces radars pourraient causer du brouillage et/ou des dommages aux dispositifs LANEL.
Industry Canada Radiation Exposure Statement
This equipment complies with IC radiation exposure limits set forth for an uncontrolled environment. This
equipment should be installed and operated with minimum distance 20 cm between the radiator & your
body.
D_éc_l_a_r_a_t_i_o_n_ _d_’e_x_p_o_s_i_t_i_o_n_ _a_u_x_ _r_a_d_i_a_t_i_o_n_s_:
Cet équipement est conforme aux limites d’exposition aux rayonnements IC établies pour un environnement

11
non contrôlé. Cet équipement doit être installé et utilisé avec un minimum de 20 cm de distance entre la
source de rayonnement et votre corps.
Taiwan Wireless Statements
低功率射頻設備的管理辦法
第12條 經型式認證合格之低功率射頻電機,非經許可,公司、商號或使用者均 不得 擅自變更頻率、加大功率 變
更原設計之特性及功能。
第14條 低功率射頻電機之使用不得影響飛航安全及干擾合 法通信;經發現有干 擾現象時,應立即停用,並改善
至無干擾時方得繼續使用。
前項合法通信,指依電信法規定作業之無線電通信。
低功率射頻電機須忍受合法通信或工業、科學及醫 療用電波輻射性電機 設備之干擾。
低功率射頻電機技術規範
4.7 無線資訊傳輸設備
4.7.6 無線資訊傳輸設備須忍受合法通信之干擾且不得 干擾合法通信;如造成
干擾,應立即停用,俟無干擾之 虞,始得 繼續使用。
4.7.7 無線資訊傳輸設備的製造廠商應確保頻率穩定性, 如依製造廠商使用手
冊上所述正常操作,發射的信號 應維持於操作帶中。
在5.25-5.35 秭赫頻帶內操作之無線資訊傳輸設備, 限於室內使用。
電磁波曝露量MPE標準值1mW/cm2,本產品使用時建議應距離人體20 cm。
Statement CS-0438 - 台灣 RoHS
台灣RoHS“限用物質含有情況標示聲明書”網址 www.cisco.com/go/taiwanrohs
Statement CS-0438 - Taiwan RoHS
Taiwan RoHS “Restricted Substances Content Disclosure Table” web address
www.cisco.com/go/taiwanrohs
 Loading...