


CRD7410-HE User’s Guide
http://www.cirrus.com
Release 1.2
Copyright © Cirrus Logic, Inc. 2004
(All Rights Reserved)
Feb ‘04
DS621UMC2

Contacting Cirrus Logic Support
r
A
A
A
r
For all product questions and inquiries contact a Cirrus Logic Sales Representative.
To find the one nearest to you go to www.cirrus.com
IMPORTANT NOTICE
Cirrus Logic, Inc. and its subsidiaries ("Cirrus") believe that the information contained in this document is accurate and reliable.
However, the information is subject to change without notice and is provided "AS IS" without warranty of any kind (express or
implied). Customers are advised to obtain the latest version of relevant information to verify, before placing orders, that
information being relied on is current and complete. All products are sold subject to the terms and conditions of sale supplied at
the time of order acknowled gm ent, including those pe rtaining to warranty, patent infringem ent, and lim itation of liab ility. No
responsibility is assumed by Cirrus for the use of this information, including use of this inform ation as th e basis for man ufacture o
sale of any items, or for infringement of patents or other rights of third parties. This document is the property of Cirrus and by
furnishing this information, Cirrus grants no license, express or implied under any patents, mask work rights, copyrights,
trademarks, trade secrets or other intellectual property rights. Cirrus owns the copyrights associated with the information
contained herein and gives consent for copies to be made of the information only for use within your organization with respect to
Cirrus integrated circuits or other products of Cirrus. This consent does not extend to other copying such as copying for general
distribution, advertising or promotional purposes, or for creating any work for resale.
CERTAIN APPLICATIONS USING SEMICONDUCTOR PRODUCTS MAY INVOLVE POTENTIAL RISKS OF DEATH,
PERSONAL INJURY, OR SEVERE PROPERTY OR ENVIRONMENTAL DAMAGE (“CRITICAL APPLICATIONS”). CIRRUS
PRODUCTS ARE NOT DESIGNED, AUTHORIZED OR WARRANTED FOR USE IN AIRCRAFT SYSTEMS, MILITARY
PPLICATIONS, PRODUCTS SURGICALLY IMPLANTED INTO THE BODY, LIFE SUPPORT PRODUCTS OR OTHER
CRITICAL APPLICATIONS (INCLUDING MEDICAL DEVICES, AIRCRAFT SYSTEMS OR COMPONENTS AND PERSONAL OR
UTOMOTIVE SAFETY OR SECURITY DEVICES). INCLUSION OF CIRRUS PRODUCTS IN SUCH APPLICATIONS IS
UNDERSTOOD TO BE FULLY AT THE CUSTOMER’S RISK AND CIRRUS DISCLAIMS AND MAKES NO WARRANTY,
EXPRESS, STATUTORY OR IMPLIED, INCLUDING THE IMPLIED WARRANTIES OF MERCHANTABILITY AND FITNESS FOR
PARTICULAR PURPOSE, WITH REGARD TO ANY CIRRUS PRODUCT THAT IS USED IN SUCH A MANNER. IF THE
CUSTOMER OR CUSTOMER’S CUSTOMER USES OR PERMITS THE USE OF CIRRUS PRODUCTS IN CRITICAL
PPLICATIONS, CUSTOMER AGREES, BY SUCH USE, TO FULLY INDEMNIFY CIRRUS, ITS OFFICERS, DIRECTORS,
EMPLOYEES, DISTRIBUTORS AND OTHER AGENTS FROM ANY AND ALL LIABILITY, INCLUDING ATTORNEYS’ FEES AND
COSTS, THAT MAY RESULT FROM OR ARISE IN CONNECTION WITH THESE USES.
Cirrus Logic, Cirrus, and the Cirrus Logic logo designs are trademarks of Cirrus Logic, Inc. All other brand and product names in
this document may be trademarks or service marks of their respective owners.
Supply of this product does not convey a license under the relevant intellectual property of Thomson multimedia and/o
Fraunhofer Gesellschaft nor imply any right to use this product in any finished end user or ready-to-use final product. An
inde pendent license for such us e is required. For details, please visit http://www.mp3licensing.com
Windows Media is a registered trademark of Microsoft Corporation. The product includes technology owned by Microsoft
Corporation and cannot be used or distributed without a license from Microsoft Licensing, Inc.
.
2 CRD7410-HE User’s Guide - DS621UMC2
Copyright 2004 Cirrus Logic

Table of Contents
0Table of Contents
1.1. Overview . . . . . . . . . . . . . . . . . . . . . . . . . . . . . . . . . . . . . . . . . . . . . . . . . . . . . . . . . . . . . . . . . . . . 9
1.2. Main Subsystems. . . . . . . . . . . . . . . . . . . . . . . . . . . . . . . . . . . . . . . . . . . . . . . . . . . . . . . . . . . . . 11
1.2.1. Decoder Subsystem . . . . . . . . . . . . . . . . . . . . . . . . . . . . . . . . . . . . . . . . . . . . . . . . . . . . . 11
1.2.2. Audio Subsystem . . . . . . . . . . . . . . . . . . . . . . . . . . . . . . . . . . . . . . . . . . . . . . . . . . . . . . . 12
1.2.2.1. On-board DAC . . . . . . . . . . . . . . . . . . . . . . . . . . . . . . . . . . . . . . . . . . . . . . . . . . 12
1.2.2.2. SPDIF Digital Audio Output . . . . . . . . . . . . . . . . . . . . . . . . . . . . . . . . . . . . . . . . 13
1.2.2.3. Subsystem Design Details . . . . . . . . . . . . . . . . . . . . . . . . . . . . . . . . . . . . . . . . . 13
1.2.3. Tuner Subsystem . . . . . . . . . . . . . . . . . . . . . . . . . . . . . . . . . . . . . . . . . . . . . . . . . . . . . . . 14
1.2.4. User Interface Subsystem . . . . . . . . . . . . . . . . . . . . . . . . . . . . . . . . . . . . . . . . . . . . . . . . 15
1.2.4.1. LCD Display . . . . . . . . . . . . . . . . . . . . . . . . . . . . . . . . . . . . . . . . . . . . . . . . . . . . 15
1.2.4.2. System Control Buttons . . . . . . . . . . . . . . . . . . . . . . . . . . . . . . . . . . . . . . . . . . . 16
1.2.4.3. Remote Controller . . . . . . . . . . . . . . . . . . . . . . . . . . . . . . . . . . . . . . . . . . . . . . . . 17
1.2.4.4. CD Loader Subsystem . . . . . . . . . . . . . . . . . . . . . . . . . . . . . . . . . . . . . . . . . . . . 18
1.2.4.5. Power Subsystem . . . . . . . . . . . . . . . . . . . . . . . . . . . . . . . . . . . . . . . . . . . . . . . . 19
1.2.4.6. Debug Interface . . . . . . . . . . . . . . . . . . . . . . . . . . . . . . . . . . . . . . . . . . . . . . . . . 19
1.2.4.7. Jumpers and Switches . . . . . . . . . . . . . . . . . . . . . . . . . . . . . . . . . . . . . . . . . . . . 20
2.1. User Interface. . . . . . . . . . . . . . . . . . . . . . . . . . . . . . . . . . . . . . . . . . . . . . . . . . . . . . . . . . . . . . . . 21
2.1.1. System Start-up . . . . . . . . . . . . . . . . . . . . . . . . . . . . . . . . . . . . . . . . . . . . . . . . . . . . . . . . 23
2.1.2. Normal (Default) Start-up Mode . . . . . . . . . . . . . . . . . . . . . . . . . . . . . . . . . . . . . . . . . . . . 25
2.2. Main Menu . . . . . . . . . . . . . . . . . . . . . . . . . . . . . . . . . . . . . . . . . . . . . . . . . . . . . . . . . . . . . . . . . . 30
2.2.1. ESP Mode . . . . . . . . . . . . . . . . . . . . . . . . . . . . . . . . . . . . . . . . . . . . . . . . . . . . . . . . . . . . 33
2.2.2. Backlight Mode . . . . . . . . . . . . . . . . . . . . . . . . . . . . . . . . . . . . . . . . . . . . . . . . . . . . . . . . . 33
2.2.3. Lyrics . . . . . . . . . . . . . . . . . . . . . . . . . . . . . . . . . . . . . . . . . . . . . . . . . . . . . . . . . . . . . . . . 34
2.2.4. Resume . . . . . . . . . . . . . . . . . . . . . . . . . . . . . . . . . . . . . . . . . . . . . . . . . . . . . . . . . . . . . . 34
2.2.5. Scrolling . . . . . . . . . . . . . . . . . . . . . . . . . . . . . . . . . . . . . . . . . . . . . . . . . . . . . . . . . . . . . . 35
2.2.6. Power Off Time Menu. . . . . . . . . . . . . . . . . . . . . . . . . . . . . . . . . . . . . . . . . . . . . . . . . . . . 36
2.2.7. Audio Source Menu . . . . . . . . . . . . . . . . . . . . . . . . . . . . . . . . . . . . . . . . . . . . . . . . . . . . . 36
2.2.8. Playback Mode Menu . . . . . . . . . . . . . . . . . . . . . . . . . . . . . . . . . . . . . . . . . . . . . . . . . . . . 37
2.2.9. EQ (Preset) Menu. . . . . . . . . . . . . . . . . . . . . . . . . . . . . . . . . . . . . . . . . . . . . . . . . . . . . . . 38
2.2.10. User EQ Menus . . . . . . . . . . . . . . . . . . . . . . . . . . . . . . . . . . . . . . . . . . . . . . . . . . . . . . . 39
2.2.10.1. 60Hz EQ Menu . . . . . . . . . . . . . . . . . . . . . . . . . . . . . . . . . . . . . . . . . . . . . . . . . 40
2.2.10.2. 150Hz EQ Menu . . . . . . . . . . . . . . . . . . . . . . . . . . . . . . . . . . . . . . . . . . . . . . . . 40
2.2.10.3. 400Hz EQ Menu . . . . . . . . . . . . . . . . . . . . . . . . . . . . . . . . . . . . . . . . . . . . . . . . 41
2.2.10.4. 1kHz EQ Menu . . . . . . . . . . . . . . . . . . . . . . . . . . . . . . . . . . . . . . . . . . . . . . . . . 41
2.2.10.5. 2kHz EQ Menu . . . . . . . . . . . . . . . . . . . . . . . . . . . . . . . . . . . . . . . . . . . . . . . . . 41
2.2.10.6. 6kHz EQ Menu . . . . . . . . . . . . . . . . . . . . . . . . . . . . . . . . . . . . . . . . . . . . . . . . . 42
2.2.10.7. 15kHz EQ Menu . . . . . . . . . . . . . . . . . . . . . . . . . . . . . . . . . . . . . . . . . . . . . . . . 42
2.2.11. 3D Enhancement Menu . . . . . . . . . . . . . . . . . . . . . . . . . . . . . . . . . . . . . . . . . . . . . . . . . 43
2.2.12. Sleep Timer Menu . . . . . . . . . . . . . . . . . . . . . . . . . . . . . . . . . . . . . . . . . . . . . . . . . . . . . 43
2.2.13. Order Tracks Menu. . . . . . . . . . . . . . . . . . . . . . . . . . . . . . . . . . . . . . . . . . . . . . . . . . . . . 44
2.2.14. Firmware Version . . . . . . . . . . . . . . . . . . . . . . . . . . . . . . . . . . . . . . . . . . . . . . . . . . . . . . 45
2.3. Menu Options. . . . . . . . . . . . . . . . . . . . . . . . . . . . . . . . . . . . . . . . . . . . . . . . . . . . . . . . . . . . . . . . 45
2.3.1. Power Off Mode . . . . . . . . . . . . . . . . . . . . . . . . . . . . . . . . . . . . . . . . . . . . . . . . . . . . . . . . 45
CRD7410-HE User’s Guide - DS621UMC2 3
Copyright 2004 Cirrus Logic

Table of Contents
2.3.2. Normal Mode . . . . . . . . . . . . . . . . . . . . . . . . . . . . . . . . . . . . . . . . . . . . . . . . . . . . . . . . . . 46
2.3.3. Navigator/Menu Mode . . . . . . . . . . . . . . . . . . . . . . . . . . . . . . . . . . . . . . . . . . . . . . . . . . . 48
2.3.4. Playlist Selection Mode . . . . . . . . . . . . . . . . . . . . . . . . . . . . . . . . . . . . . . . . . . . . . . . . . . 49
2.3.5. Playlist Creation Mode . . . . . . . . . . . . . . . . . . . . . . . . . . . . . . . . . . . . . . . . . . . . . . . . . . . 50
2.3.6. Menu Mode, in a Menu List . . . . . . . . . . . . . . . . . . . . . . . . . . . . . . . . . . . . . . . . . . . . . . . 51
2.3.7. Menu Mode, in a Settings Screen . . . . . . . . . . . . . . . . . . . . . . . . . . . . . . . . . . . . . . . . . . 51
2.3.8. Menu Mode, in the User EQ Setting Screen . . . . . . . . . . . . . . . . . . . . . . . . . . . . . . . . . . 52
3.1. Tuner Subsystem . . . . . . . . . . . . . . . . . . . . . . . . . . . . . . . . . . . . . . . . . . . . . . . . . . . . . . . . . . . . 55
3.1.1. Integrated Stereo FM Tuner. . . . . . . . . . . . . . . . . . . . . . . . . . . . . . . . . . . . . . . . . . . . . . . 55
3.1.2. CS5333 ADC . . . . . . . . . . . . . . . . . . . . . . . . . . . . . . . . . . . . . . . . . . . . . . . . . . . . . . . . . . 55
3.1.3. CS43L42 DAC . . . . . . . . . . . . . . . . . . . . . . . . . . . . . . . . . . . . . . . . . . . . . . . . . . . . . . . . . 55
3.1.4. Tuner Mode Main Menu . . . . . . . . . . . . . . . . . . . . . . . . . . . . . . . . . . . . . . . . . . . . . . . . . . 55
3.1.5. Tuner Mode Button Functions . . . . . . . . . . . . . . . . . . . . . . . . . . . . . . . . . . . . . . . . . . . . . 58
4 CRD7410-HE User’s Guide - DS621UMC2
Copyright 2004 Cirrus Logic

List of Figures
0List of Figures
Figure 1-1.. CRD7410-HE System. . . . . . . . . . . . . . . . . . . . . . . . . . . . . . . . . . . . . . . . . . . . . . . . . . . 10
Figure 1-2.. CS7410 (U6) and SDRAM (U8) . . . . . . . . . . . . . . . . . . . . . . . . . . . . . . . . . . . . . . . . . . . 11
Figure 1-3.. Flash EEPROM (U3) . . . . . . . . . . . . . . . . . . . . . . . . . . . . . . . . . . . . . . . . . . . . . . . . . . . 12
Figure 1-4.. CS43L42 DAC . . . . . . . . . . . . . . . . . . . . . . . . . . . . . . . . . . . . . . . . . . . . . . . . . . . . . . . . 13
Figure 1-5.. CS5333 ADC . . . . . . . . . . . . . . . . . . . . . . . . . . . . . . . . . . . . . . . . . . . . . . . . . . . . . . . . . 13
Figure 1-6.. Headphones and Line Out Jacks . . . . . . . . . . . . . . . . . . . . . . . . . . . . . . . . . . . . . . . . . . 14
Figure 1-7.. FM Tuner . . . . . . . . . . . . . . . . . . . . . . . . . . . . . . . . . . . . . . . . . . . . . . . . . . . . . . . . . . . . 14
Figure 1-8.. LCD. . . . . . . . . . . . . . . . . . . . . . . . . . . . . . . . . . . . . . . . . . . . . . . . . . . . . . . . . . . . . . . . . 15
Figure 1-9.. Detail View of the Control Buttons . . . . . . . . . . . . . . . . . . . . . . . . . . . . . . . . . . . . . . . . . 16
Figure 1-10.. Remote Control Buttons . . . . . . . . . . . . . . . . . . . . . . . . . . . . . . . . . . . . . . . . . . . . . . . . 17
Figure 1-11.. Servo Subsystem . . . . . . . . . . . . . . . . . . . . . . . . . . . . . . . . . . . . . . . . . . . . . . . . . . . . . 18
Figure 1-12.. CD Loader . . . . . . . . . . . . . . . . . . . . . . . . . . . . . . . . . . . . . . . . . . . . . . . . . . . . . . . . . . 18
Figure 1-13.. Power Subsystem. . . . . . . . . . . . . . . . . . . . . . . . . . . . . . . . . . . . . . . . . . . . . . . . . . . . . 19
Figure 1-14.. Debug Subsystem . . . . . . . . . . . . . . . . . . . . . . . . . . . . . . . . . . . . . . . . . . . . . . . . . . . . 20
Figure 2-1.. Power On Screen . . . . . . . . . . . . . . . . . . . . . . . . . . . . . . . . . . . . . . . . . . . . . . . . . . . . . . 23
Figure 2-2.. Checking for Update Files Screen . . . . . . . . . . . . . . . . . . . . . . . . . . . . . . . . . . . . . . . . . 23
Figure 2-3.. Loading Updated Firmware Screen . . . . . . . . . . . . . . . . . . . . . . . . . . . . . . . . . . . . . . . . 24
Figure 2-4.. Bad Disc Screen . . . . . . . . . . . . . . . . . . . . . . . . . . . . . . . . . . . . . . . . . . . . . . . . . . . . . . . 24
Figure 2-5.. Normal Operation Screen (Play). . . . . . . . . . . . . . . . . . . . . . . . . . . . . . . . . . . . . . . . . . . 24
Figure 2-6.. Normal Operation Screen (Pause) . . . . . . . . . . . . . . . . . . . . . . . . . . . . . . . . . . . . . . . . . 25
Figure 2-7.. Volume Adjust Screen . . . . . . . . . . . . . . . . . . . . . . . . . . . . . . . . . . . . . . . . . . . . . . . . . . 27
Figure 2-8.. Navigator Mode Screen . . . . . . . . . . . . . . . . . . . . . . . . . . . . . . . . . . . . . . . . . . . . . . . . . 28
Figure 2-9.. Playlist Select Menu . . . . . . . . . . . . . . . . . . . . . . . . . . . . . . . . . . . . . . . . . . . . . . . . . . . . 28
Figure 2-10.. Loading Playlist Screen . . . . . . . . . . . . . . . . . . . . . . . . . . . . . . . . . . . . . . . . . . . . . . . . 29
Figure 2-11.. Create Playlist Screen . . . . . . . . . . . . . . . . . . . . . . . . . . . . . . . . . . . . . . . . . . . . . . . . . 29
Figure 2-12.. CRD7410-HE Menu Map . . . . . . . . . . . . . . . . . . . . . . . . . . . . . . . . . . . . . . . . . . . . . . . 30
Figure 2-13.. Main Menu Screen . . . . . . . . . . . . . . . . . . . . . . . . . . . . . . . . . . . . . . . . . . . . . . . . . . . . 31
Figure 2-14.. Electronic Shock Protection (ESP) Screen . . . . . . . . . . . . . . . . . . . . . . . . . . . . . . . . . . 33
Figure 2-15.. Backlight Screen. . . . . . . . . . . . . . . . . . . . . . . . . . . . . . . . . . . . . . . . . . . . . . . . . . . . . . 33
Figure 2-16.. Lyrics Screen . . . . . . . . . . . . . . . . . . . . . . . . . . . . . . . . . . . . . . . . . . . . . . . . . . . . . . . . 34
Figure 2-17.. Resume Screen . . . . . . . . . . . . . . . . . . . . . . . . . . . . . . . . . . . . . . . . . . . . . . . . . . . . . . 34
Figure 2-18.. Scrolling Screen . . . . . . . . . . . . . . . . . . . . . . . . . . . . . . . . . . . . . . . . . . . . . . . . . . . . . . 35
Figure 2-19.. Power Off Time Screen . . . . . . . . . . . . . . . . . . . . . . . . . . . . . . . . . . . . . . . . . . . . . . . . 36
Figure 2-20..
Figure 2-21.. Playback Mode Screen. . . . . . . . . . . . . . . . . . . . . . . . . . . . . . . . . . . . . . . . . . . . . . . . . 37
Figure 2-22.. EQ (Preset) Screen . . . . . . . . . . . . . . . . . . . . . . . . . . . . . . . . . . . . . . . . . . . . . . . . . . . 39
Figure 2-23.. User EQ Select . . . . . . . . . . . . . . . . . . . . . . . . . . . . . . . . . . . . . . . . . . . . . . . . . . . . . . . 39
Figure 2-24.. User EQ 60 Hz Submenu Screen. . . . . . . . . . . . . . . . . . . . . . . . . . . . . . . . . . . . . . . . . 40
Figure 2-25.. User EQ 150 Hz Submenu Screen. . . . . . . . . . . . . . . . . . . . . . . . . . . . . . . . . . . . . . . . 40
Figure 2-26.. User EQ 400 Hz Submenu Screen. . . . . . . . . . . . . . . . . . . . . . . . . . . . . . . . . . . . . . . . 41
Figure 2-27.. User EQ 1 kHz Submenu Screen . . . . . . . . . . . . . . . . . . . . . . . . . . . . . . . . . . . . . . . . . 41
Figure 2-28.. User EQ 2 kHz Submenu Screen . . . . . . . . . . . . . . . . . . . . . . . . . . . . . . . . . . . . . . . . . 41
Audio Source Screen . . . . . . . . . . . . . . . . . . . . . . . . . . . . . . . . . . . . . . . . . . . . . . . . . . 36
CRD7410-HE User’s Guide - DS621UMC2 5
Copyright 2004 Cirrus Logic

List of Figures
Figure 2-29.. User EQ 6 kHz Submenu Screen . . . . . . . . . . . . . . . . . . . . . . . . . . . . . . . . . . . . . . . . 42
Figure 2-30.. User EQ 15 kHz Submenu Screen . . . . . . . . . . . . . . . . . . . . . . . . . . . . . . . . . . . . . . . 42
Figure 2-31.. 3D Enhancement Screen . . . . . . . . . . . . . . . . . . . . . . . . . . . . . . . . . . . . . . . . . . . . . . . 43
Figure 2-32.. Sleep Timer Screen . . . . . . . . . . . . . . . . . . . . . . . . . . . . . . . . . . . . . . . . . . . . . . . . . . . 43
Figure 2-33.. Order Tracks Screen 1 . . . . . . . . . . . . . . . . . . . . . . . . . . . . . . . . . . . . . . . . . . . . . . . . . 44
Figure 2-34.. Order Tracks Screen 2 . . . . . . . . . . . . . . . . . . . . . . . . . . . . . . . . . . . . . . . . . . . . . . . . . 44
Figure 2-35.. Firmware Version Screen. . . . . . . . . . . . . . . . . . . . . . . . . . . . . . . . . . . . . . . . . . . . . . . 45
Figure 3-1.. Audio Source Menu . . . . . . . . . . . . . . . . . . . . . . . . . . . . . . . . . . . . . . . . . . . . . . . . . . . . 56
Figure 3-2.. Navigator Mode Screen (Tuner Mode). . . . . . . . . . . . . . . . . . . . . . . . . . . . . . . . . . . . . . 56
Figure 3-3.. Tuner Playback Screen . . . . . . . . . . . . . . . . . . . . . . . . . . . . . . . . . . . . . . . . . . . . . . . . . 57
Figure 3-4.. Tuner Tuning Screen . . . . . . . . . . . . . . . . . . . . . . . . . . . . . . . . . . . . . . . . . . . . . . . . . . . 57
Figure 3-5.. Tuner Edit Screen . . . . . . . . . . . . . . . . . . . . . . . . . . . . . . . . . . . . . . . . . . . . . . . . . . . . . 58
6 CRD7410-HE User’s Guide - DS621UMC2
Copyright 2004 Cirrus Logic

List of Tables
0List of Tables
Table 1-1:. Main Board Buttons . . . . . . . . . . . . . . . . . . . . . . . . . . . . . . . . . . . . . . . . . . . . . . . . . . . . . 16
Table 1-2:. Remote Controller Buttons . . . . . . . . . . . . . . . . . . . . . . . . . . . . . . . . . . . . . . . . . . . . . . . 17
CRD7410-HE User’s Guide - DS621UMC2 7
Copyright 2004 Cirrus Logic

List of Tables
This page intentionally blank.
8 CRD7410-HE User’s Guide - DS621UMC2
Copyright 2004 Cirrus Logic

Chapter 1
1.1 Overview
1Board Architecture
This document describes a reference design platform for the Cirrus Logic
CS7410, known as the CRD7410-HE. It is an evaluation platform for a
high-end portable CD player. The CRD7410-HE platform provides a low-cost
yet powerful solution for today’s popular digital music formats (CDDA, MP3,
WMA, VCD, AVCD, and SVCD). The platform also provides support for
today’s popular music playlist formats such as MP3, M4U, PLS, B4S, and
RMP. An integrated single-chip stereo FM tuner provides yet another attractive
feature for the portable audio market. The system’s small size, light weight,
and low power consumption allow designers to integrate powerful features into
a portable device. The design is also easily adapted to small bookshelf
systems.
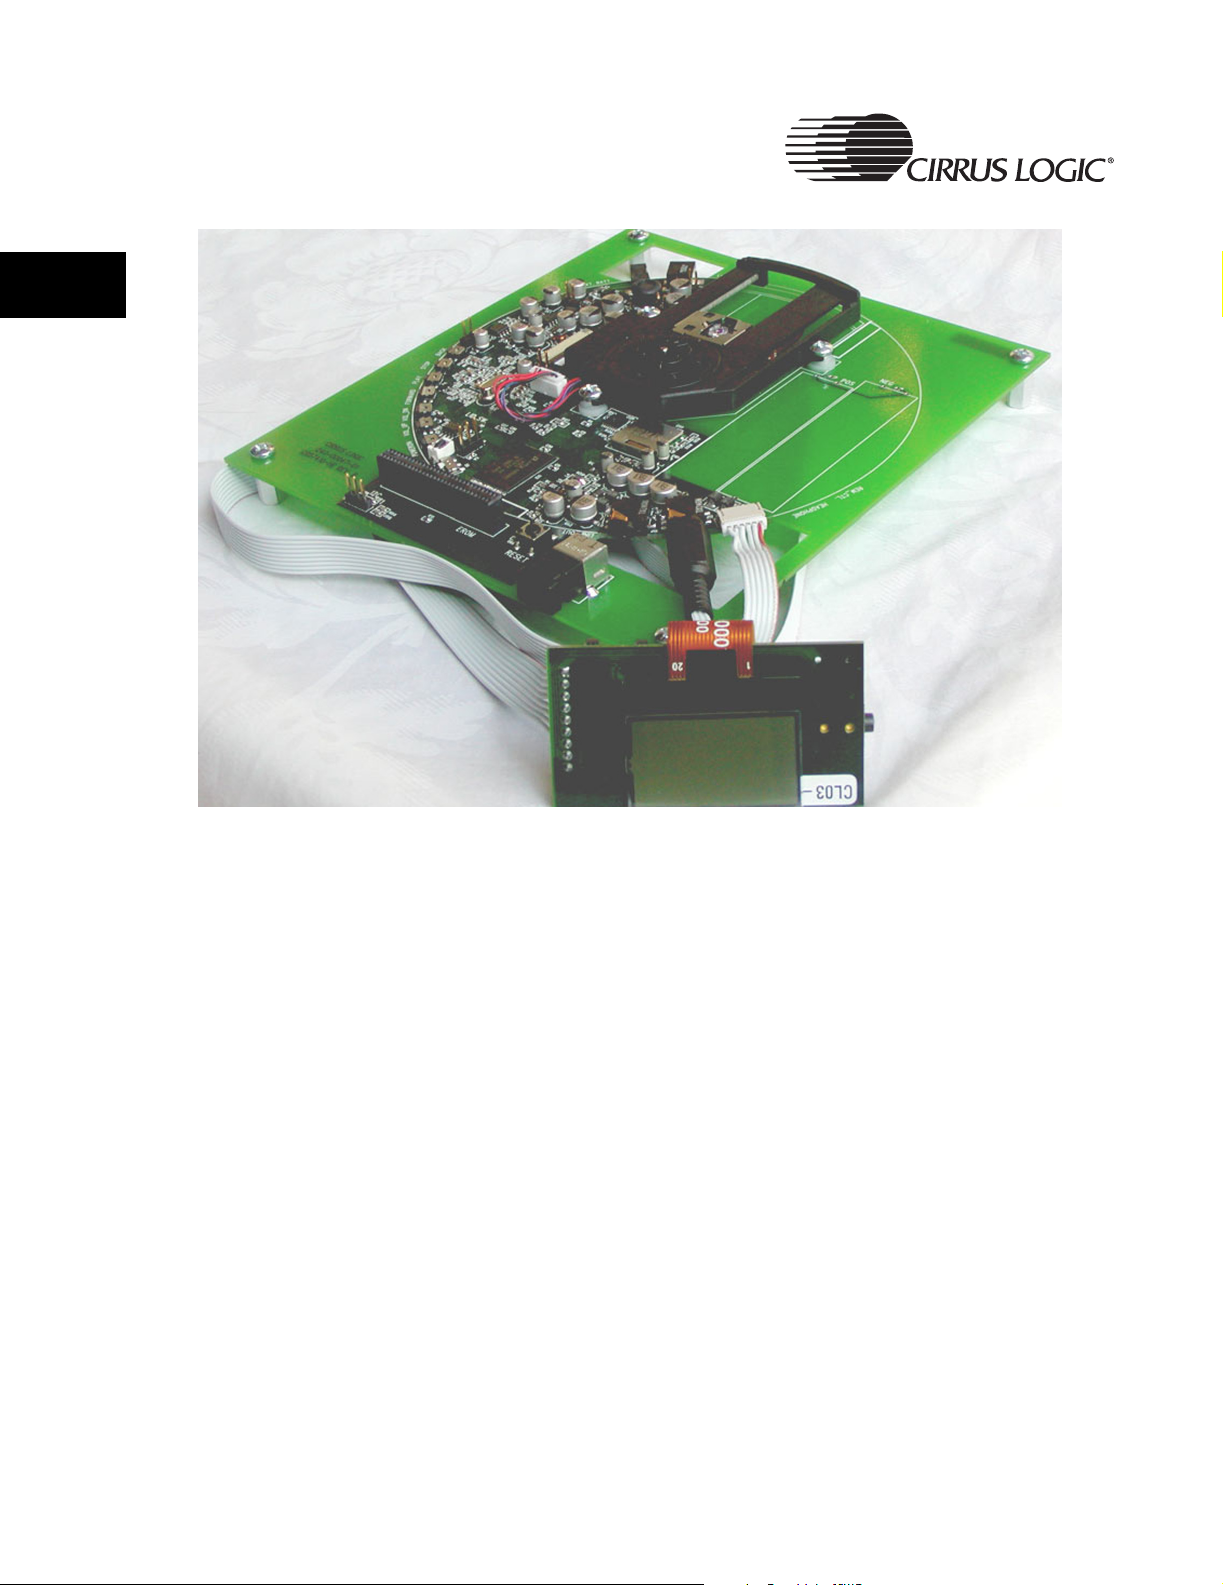
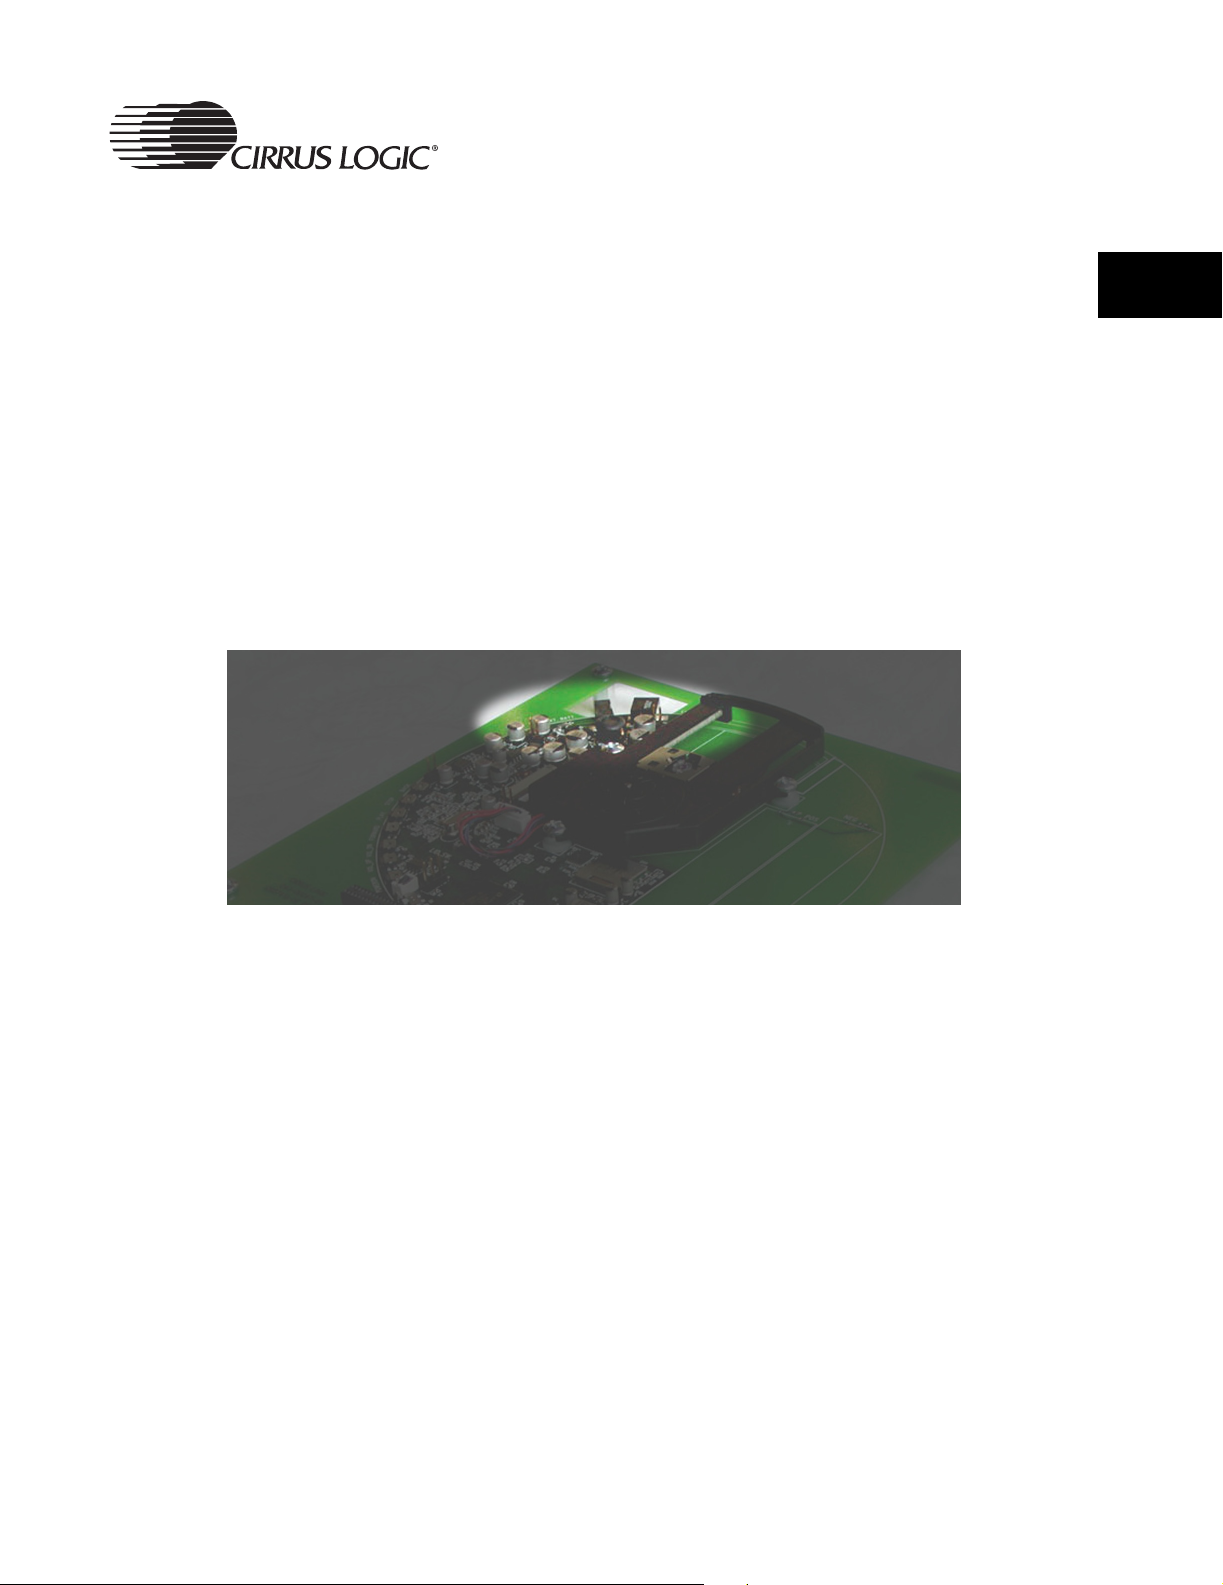
The CRD7410-HE is composed of the main board and the remote control unit.
All components necessary for a portable
CD/MP3/WMA/VCD/AVCD/SVCD/FM application except the LCD display are
incorporated into the main board. The remote control unit contains an LCD
display and all switches necessary to control the player. Refer to Figure 1-1.
1
Debug capability is provided adjacent to the main circuitry. In a final design,
the I2C debug and Romulator ports could easily be eliminated, leaving only
the circuitry required for the application.
In addition, the LCD display and control buttons on the remote control are laid
out in a manner which allows that circuitry to be moved easily to a separate
front panel PCB. Refer to Figure 1-1.
Cirrus Logic provides the system as a complete solution. Schematics and
Gerber data files for the PCB are available.
CRD7410-HE User’s Guide - DS621UMC2 9
Copyright 2004 Cirrus Logic
1
Board Architecture
Figure 1-1. CRD7410-HE System
The CRD7410-HE system contains three Cirrus Logic devices:
• CS7410 Compressed Audio Decoder
• CS43L42 Low-voltage Stereo D/A Converter with Headphone Amp
• CS5333 24-Bit, 96 kHz, Stereo A/D Converter
User interface control and digital audio decoding are provided by the CS7410.
The CS7410 receives data from the CD loader subsystem, decodes the
CDDA/MP3/WMA/VCD/AVCD/SVCD data, processes it for EQ and 3D sound
effects and delivers digital audio outputs to the on-board CS43L42
digital-to-analog converter (DAC).
The CS43L42 DAC can deliver the analog audio to an external amplifier via a
line-level output jack or, using its integrated headphones amplifier, power a set
of headphones.
The CS5333 ADC converts analog input from the on-board
world-wide-capable FM tuner or the auxiliary line-level input jack. The analog
data is converted and delivered to the CS7410 for EQ and 3D sound effects
processing. The processed digital data is then passed to theCS43L42 stereo
DAC and output to both the integrated headphones amplifier and the auxiliary
line-out jack.
10 CRD7410-HE User’s Guide - DS621UMC2
Copyright 2004 Cirrus Logic
1.2 Main Subsystems
The CRD7410-HE has seven main subsystems. They are:
• Decoder
• Audio
• User Interface Subsystem
• CD Loader
• Power
• Debug Interface
• Jumpers and Switches
The subsystems are detailed in the following sections.
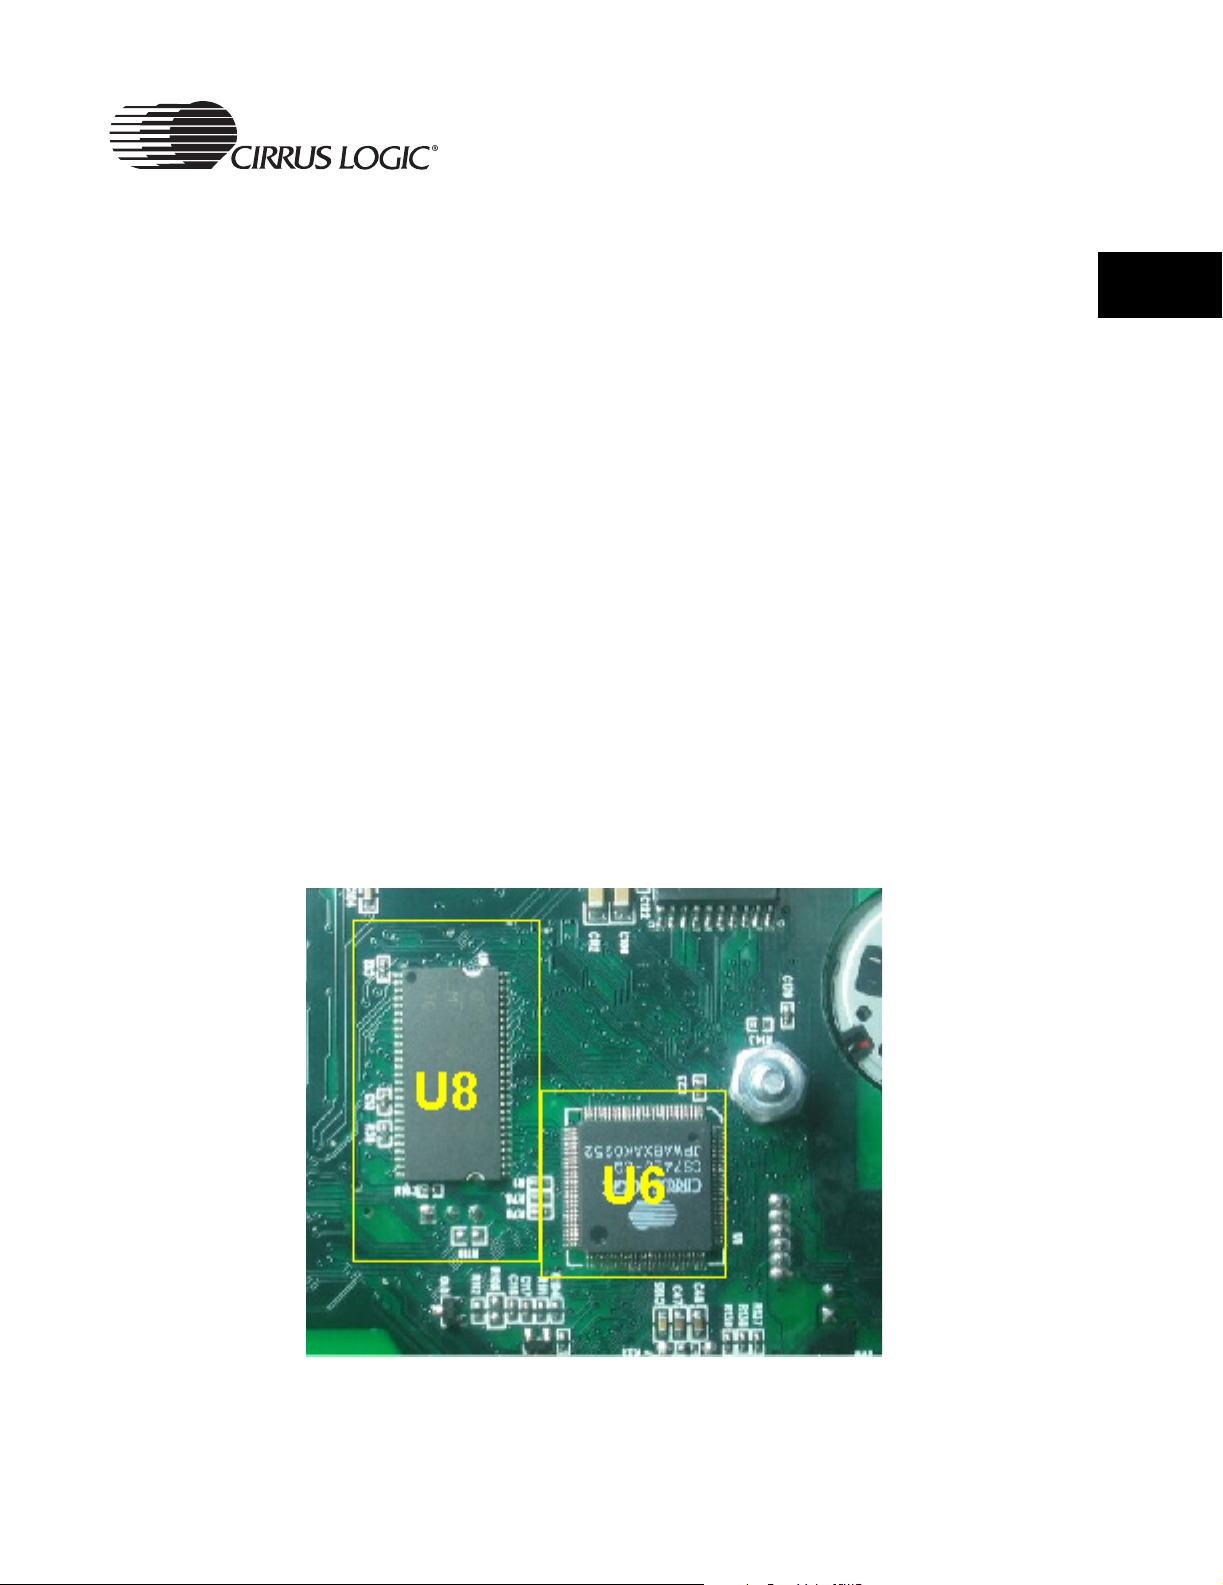
1.2.1 Decoder Subsystem
Board Architecture
1
This system uses the Cirrus Logic CS7410 for main control and audio decode.
See U6 in Figure 1-2.
A Flash EEPROM is used for application code. See U3 in Figure 1-3.
An SDRAM is provided for Electronic Shock Protection (ESP). See U8 in
Figure 1-2.
Figure 1-2. CS7410 (U6) and SDRAM (U8)
CRD7410-HE User’s Guide - DS621UMC2 11
Copyright 2004 Cirrus Logic
1
Board Architecture
U3
1.2.2 Audio Subsystem
The CS7410 receives data from the CD loader subsystem, decodes the
CDDA/MP3/WMA/VCD/AVCD/SVCD data (supporting
M3U/M4U/PLS/B4S/RMP playlist formats), processes it for EQ and 3D sound
effects and delivers digital audio outputs to the on-board CS43L42
digital-to-analog converter (DAC).
The CS43L42 DAC can deliver the analog audio to an external amplifier via a
line-level output jack or, using its integrated headphones amplifier, power a set
of headphones.
The CS5333 ADC converts analog input from the on-board
world-wide-capable FM tuner or the auxiliary line-level input jack. The analog
data is converted and delivered to the CS7410 for EQ and 3D sound effects
processing. The processed digital data is then passed to the CS43L42 stereo
DAC and output to both the integrated headphones amplifier and the auxiliary
line-out jack.
1.2.2.1 On-board DAC
The CS43L42 is an integrated Sigma-Delta-based Digital-to-Analog
Converter. This allows the designer to build a low-cost DAC with a simple RC
integration circuit. In such a design, proper layout permits greater than 80 dB
SNR.
Figure 1-3. Flash EEPROM (U3)
12 CRD7410-HE User’s Guide - DS621UMC2
Copyright 2004 Cirrus Logic
1.2.2.2 SPDIF Digital Audio Output
This system also provides audio data in serial format, to support the use of an
external DAC. An optical SPDIF connector is available adjacent to the
Romulator and I2C debug ports.
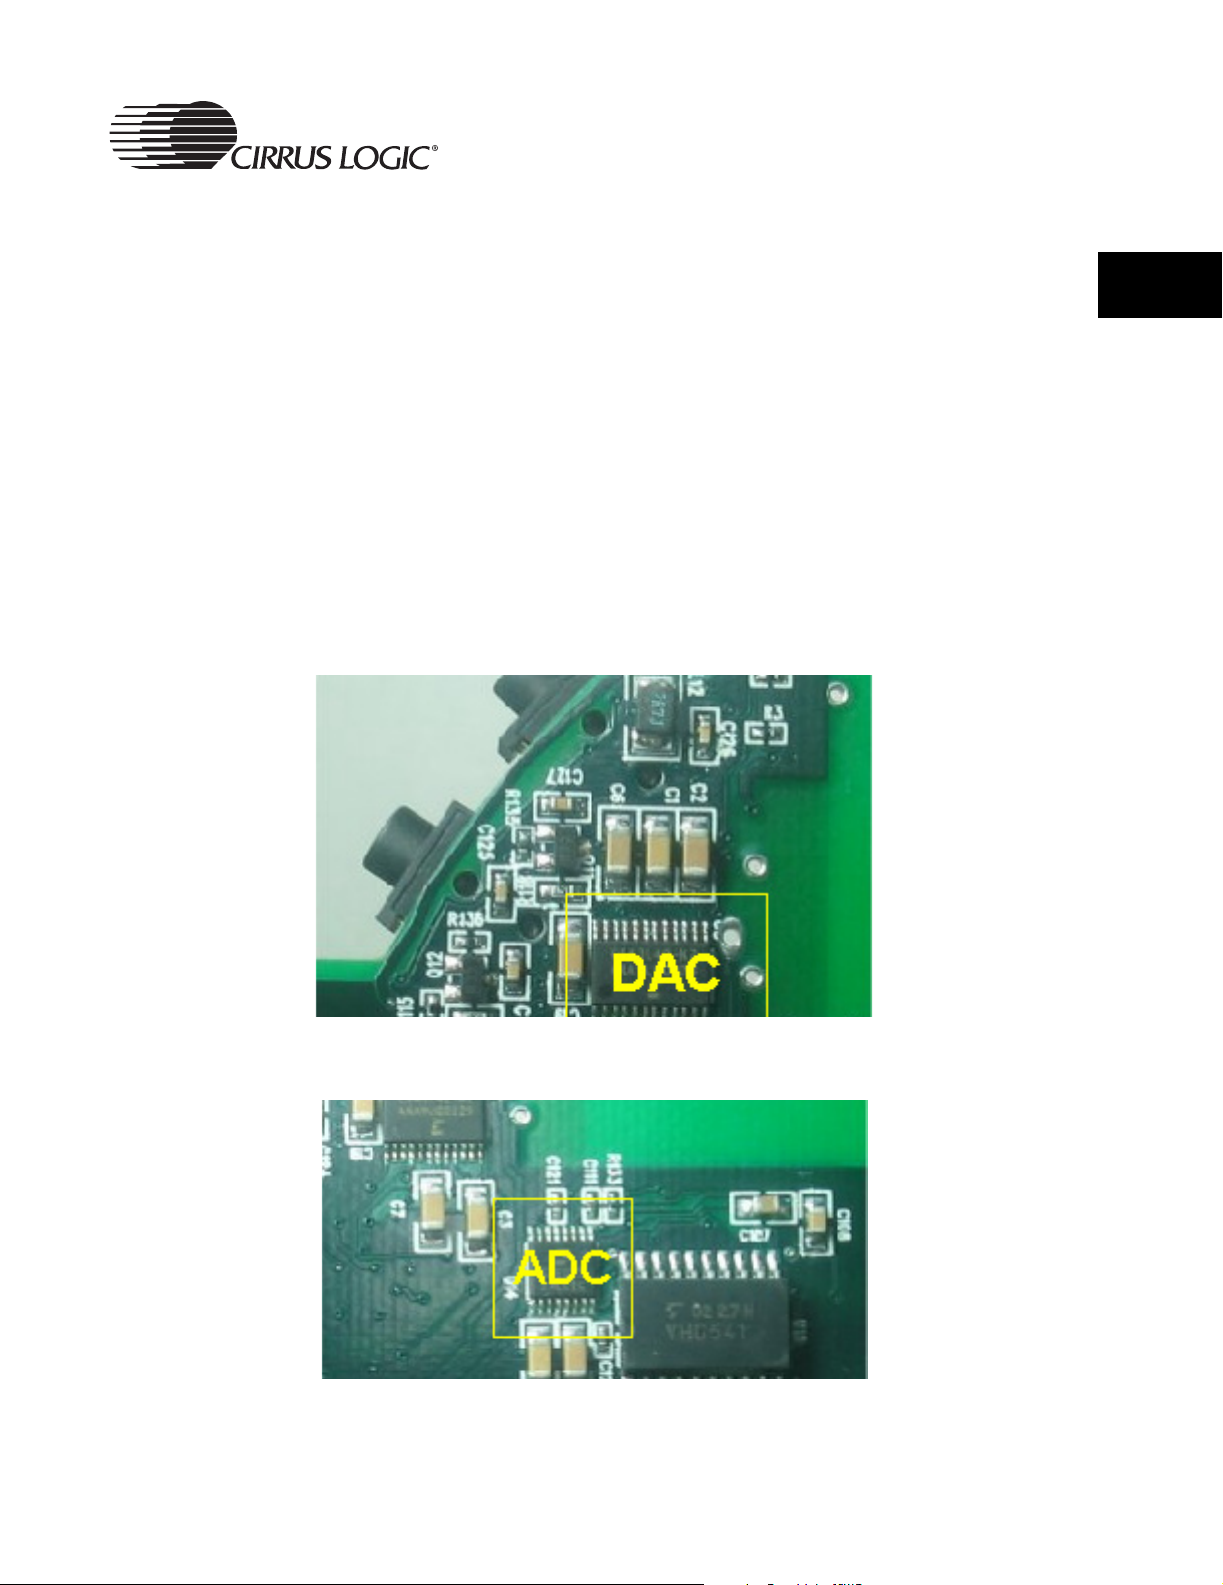
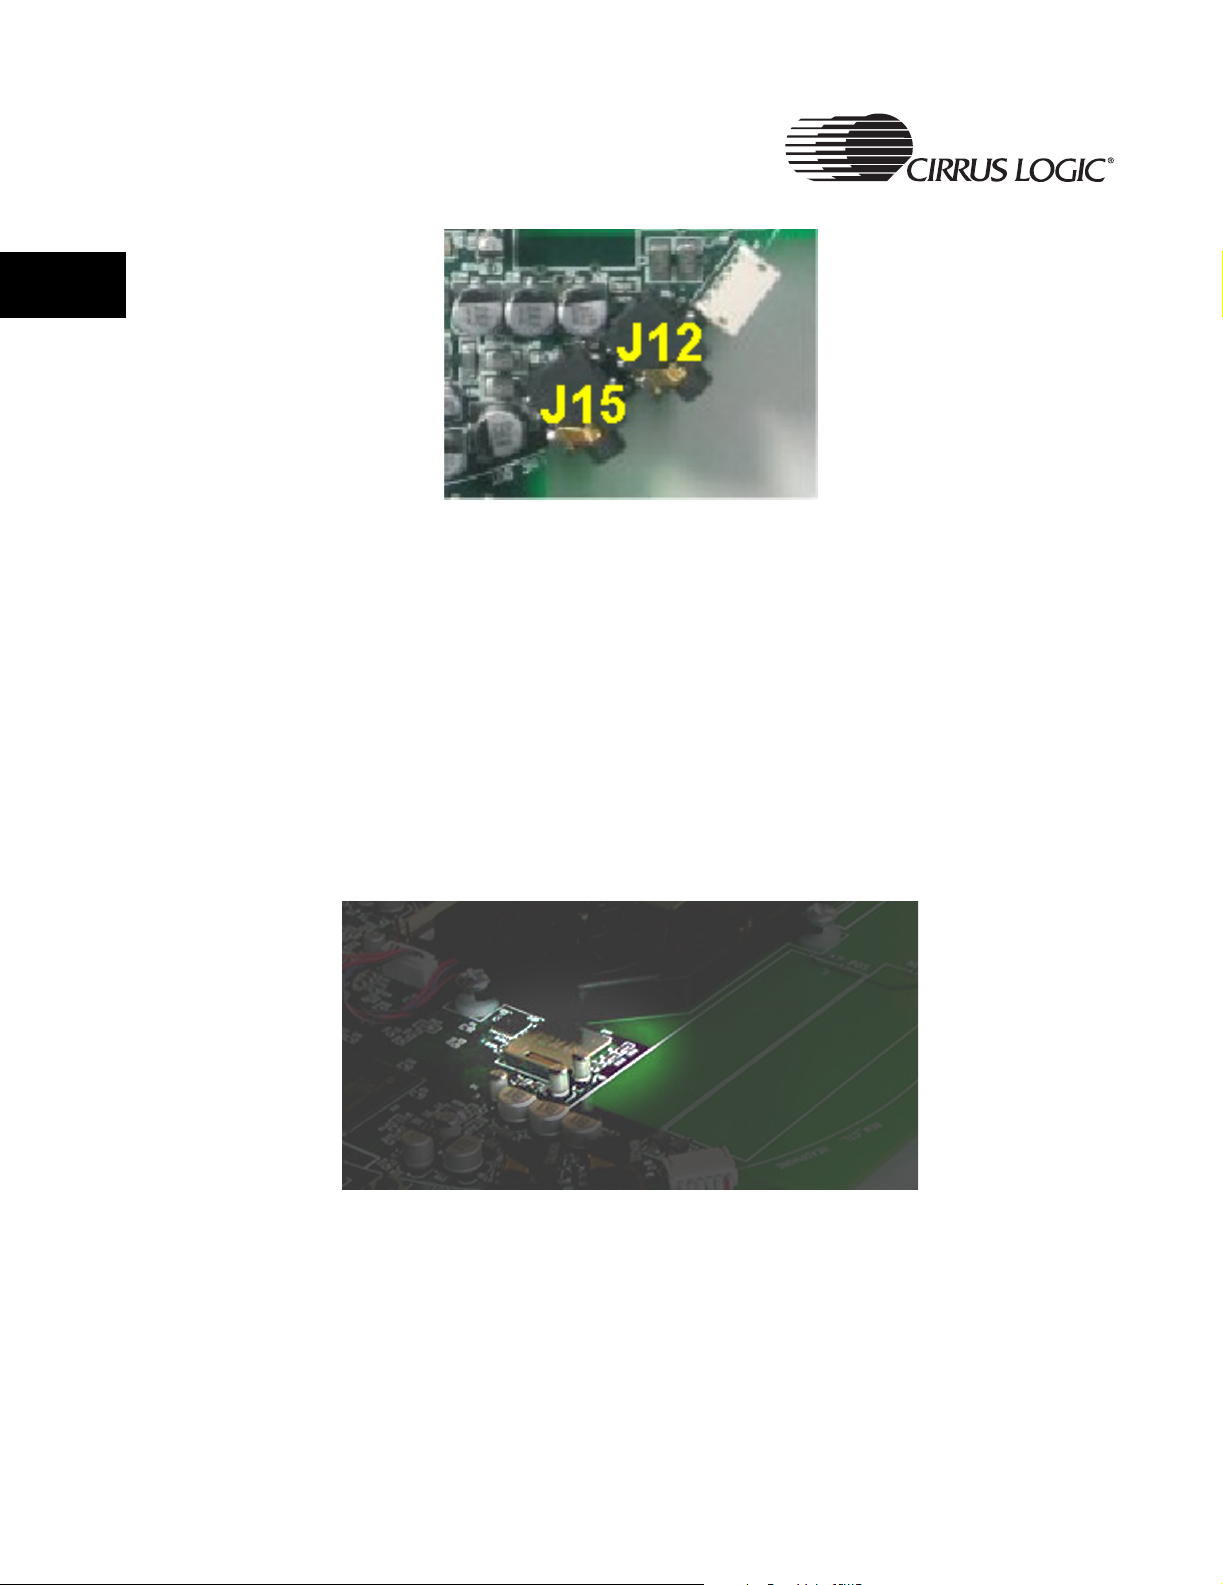
1.2.2.3 Subsystem Design Details
The flowering three figures show the details of the implementation of this
subsystem design. This list below defines the semiconductor devices and
connectors used in this subsystem, and the function of each.
• D-to-A Converter - CS43L42
• A-to-D Converter - CS5333
• J12 - Headphones Out and Line Controller Headphones Jack
• J15 - Line Out Jack
Board Architecture
1
Figure 1-4. CS43L42 DAC
Figure 1-5. CS5333 ADC
CRD7410-HE User’s Guide - DS621UMC2 13
Copyright 2004 Cirrus Logic
1
Board Architecture
Remote
Connector
Figure 1-6. Headphones and Line Out Jacks
1.2.3 Tuner Subsystem
The tuner subsystem incorporates an single-chip electronically-tuned FM
stereo radio with fully integrated IF selectivity and demodulation.
The radio can be tuned to the European, US, and Japanese FM bands.
The tuner’s analog outputs are sampled and converted to digital data by the
CS5333 and delivered to the CS7410 for EQ and 3D sound effects
processing. The data is then passed to the optical SPDIF connector and the
CS43L42 DAC. The CS43L42 integrates both a headphones amplifier and
line-level amplifier.
Figure 1-7. FM Tuner
14 CRD7410-HE User’s Guide - DS621UMC2
Copyright 2004 Cirrus Logic
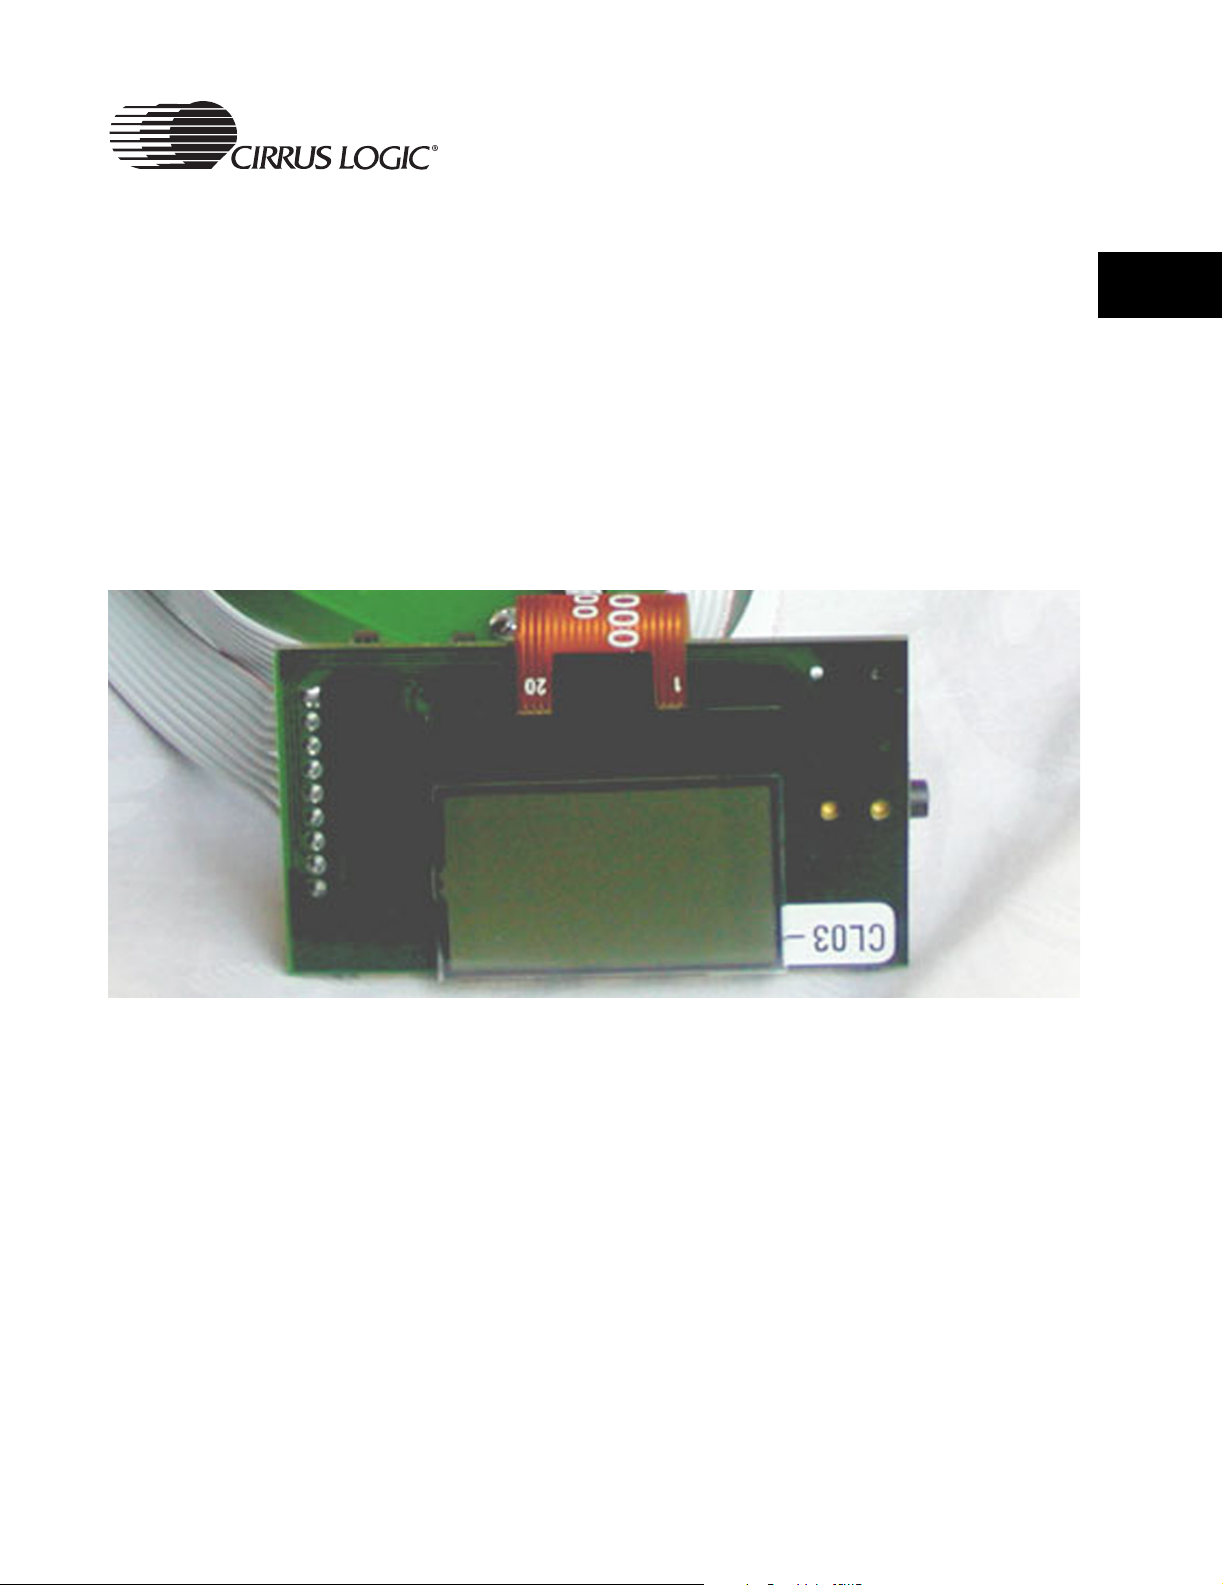
1.2.4 User Interface Subsystem
The User Interface Subsystem has three sections: the LCD (Liquid Crystal
Display), the Button Matrix, and the wired remote controller. The LCD is
integrated into the remote controller.
1.2.4.1 LCD Display
Figure 1-8 shows a close-up view of the LCD, which is part of the User
Interface Subsystem.
The LCD display (reference designator - DSP1) is a 128 x 64 pixel display. For
a dot matrix character size of 8 x 6, this gives 21 characters per line, by 8 lines
per display.
Board Architecture
1
Figure 1-8. LCD
CRD7410-HE User’s Guide - DS621UMC2 15
Copyright 2004 Cirrus Logic
1
Board Architecture
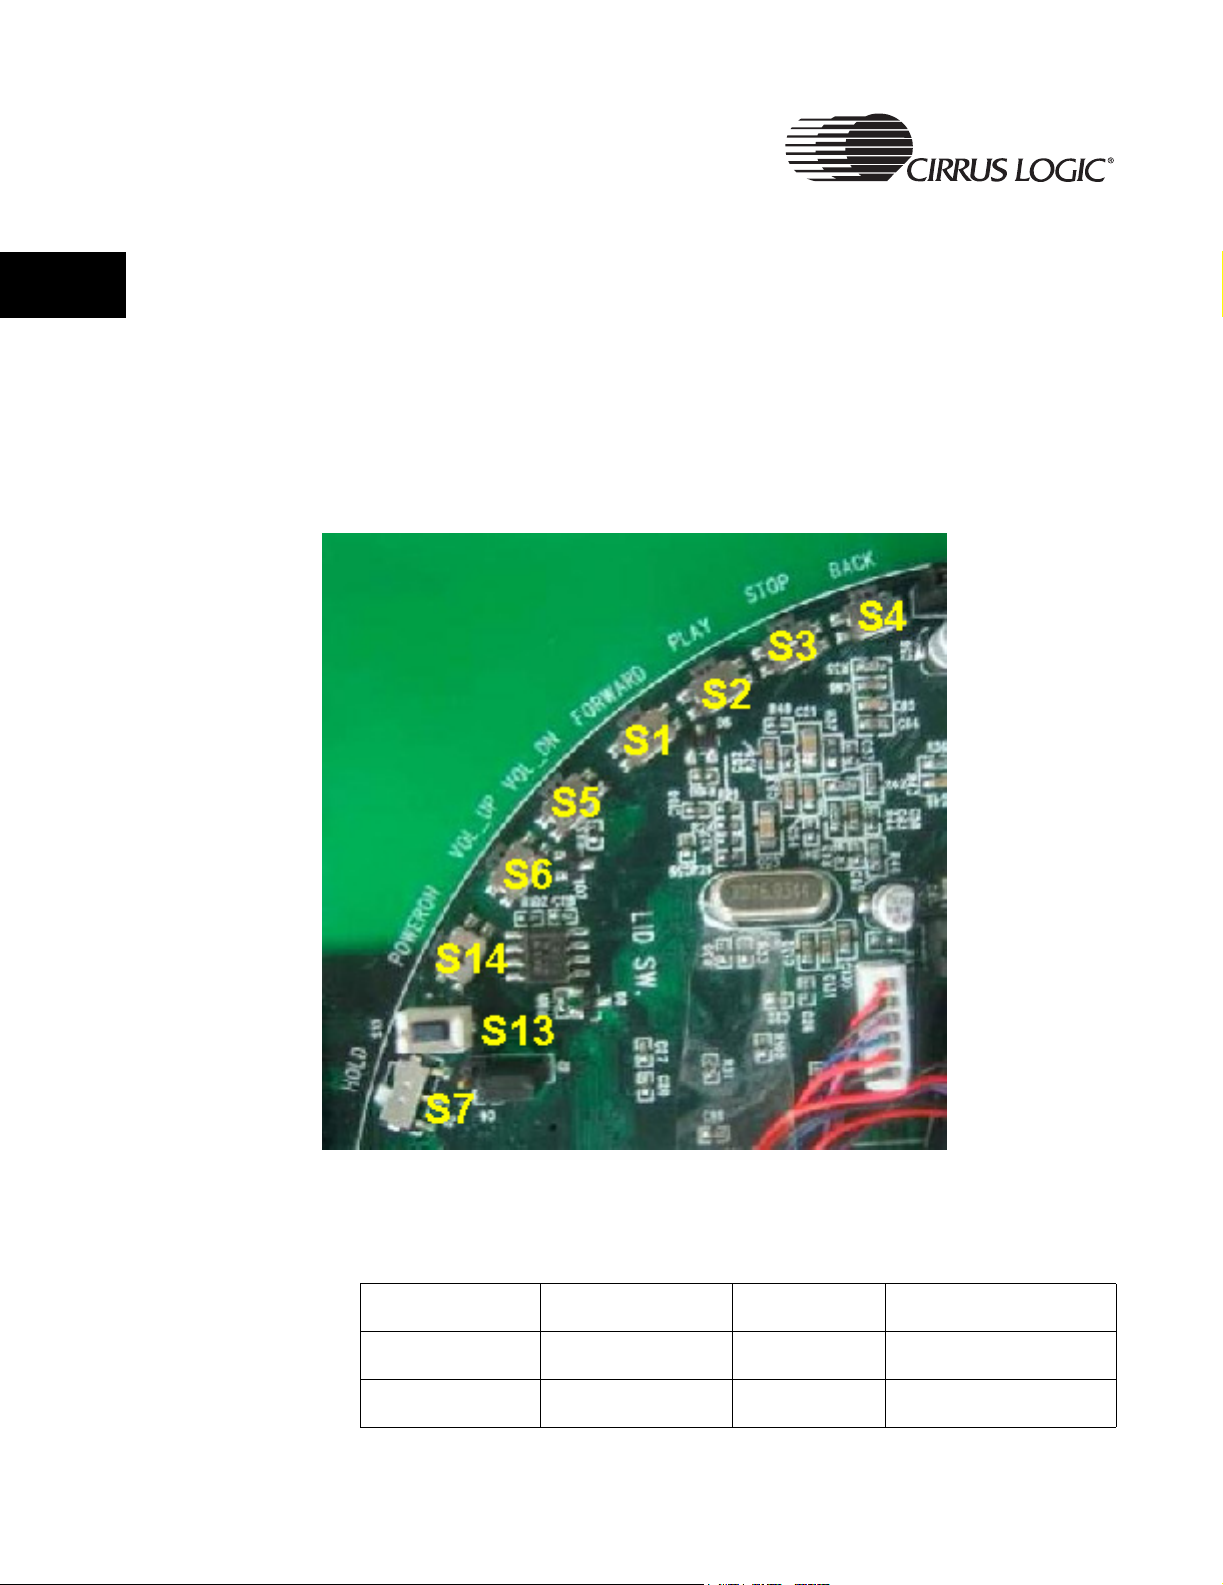
1.2.4.2 System Control Buttons
Figure 1-9 shows a close-up view of the control buttons located on the main
board, which are part of the User Interface Subsystem. The Lid Open switch
works as an interlock preventing the unit from being powered on while the
lid/door is open. If the lid/door is opened while the unit is playing, the power
will be switched off.
User inputs are implemented with 8 push buttons on the main board and 12
buttons on the remote control.
Table 1-1 shows the functions of the push buttons shown in Figure 1-9.
Figure 1-9. Detail View of the Control Buttons
Note: When the power is on, push button S2 must be pressed to activate the system.
Table 1-1: Main Board Buttons
S1:
Next/Right/Select
S5:
Vol-
S13:
Lid Open
16 CRD7410-HE User’s Guide - DS621UMC2
S2:
Play/Pause/Up
S6:
Vol+
S3:
Stop/Down
S7:
Hold
S4:
Previous/Left/Delete
S14:
Power On
Copyright 2004 Cirrus Logic
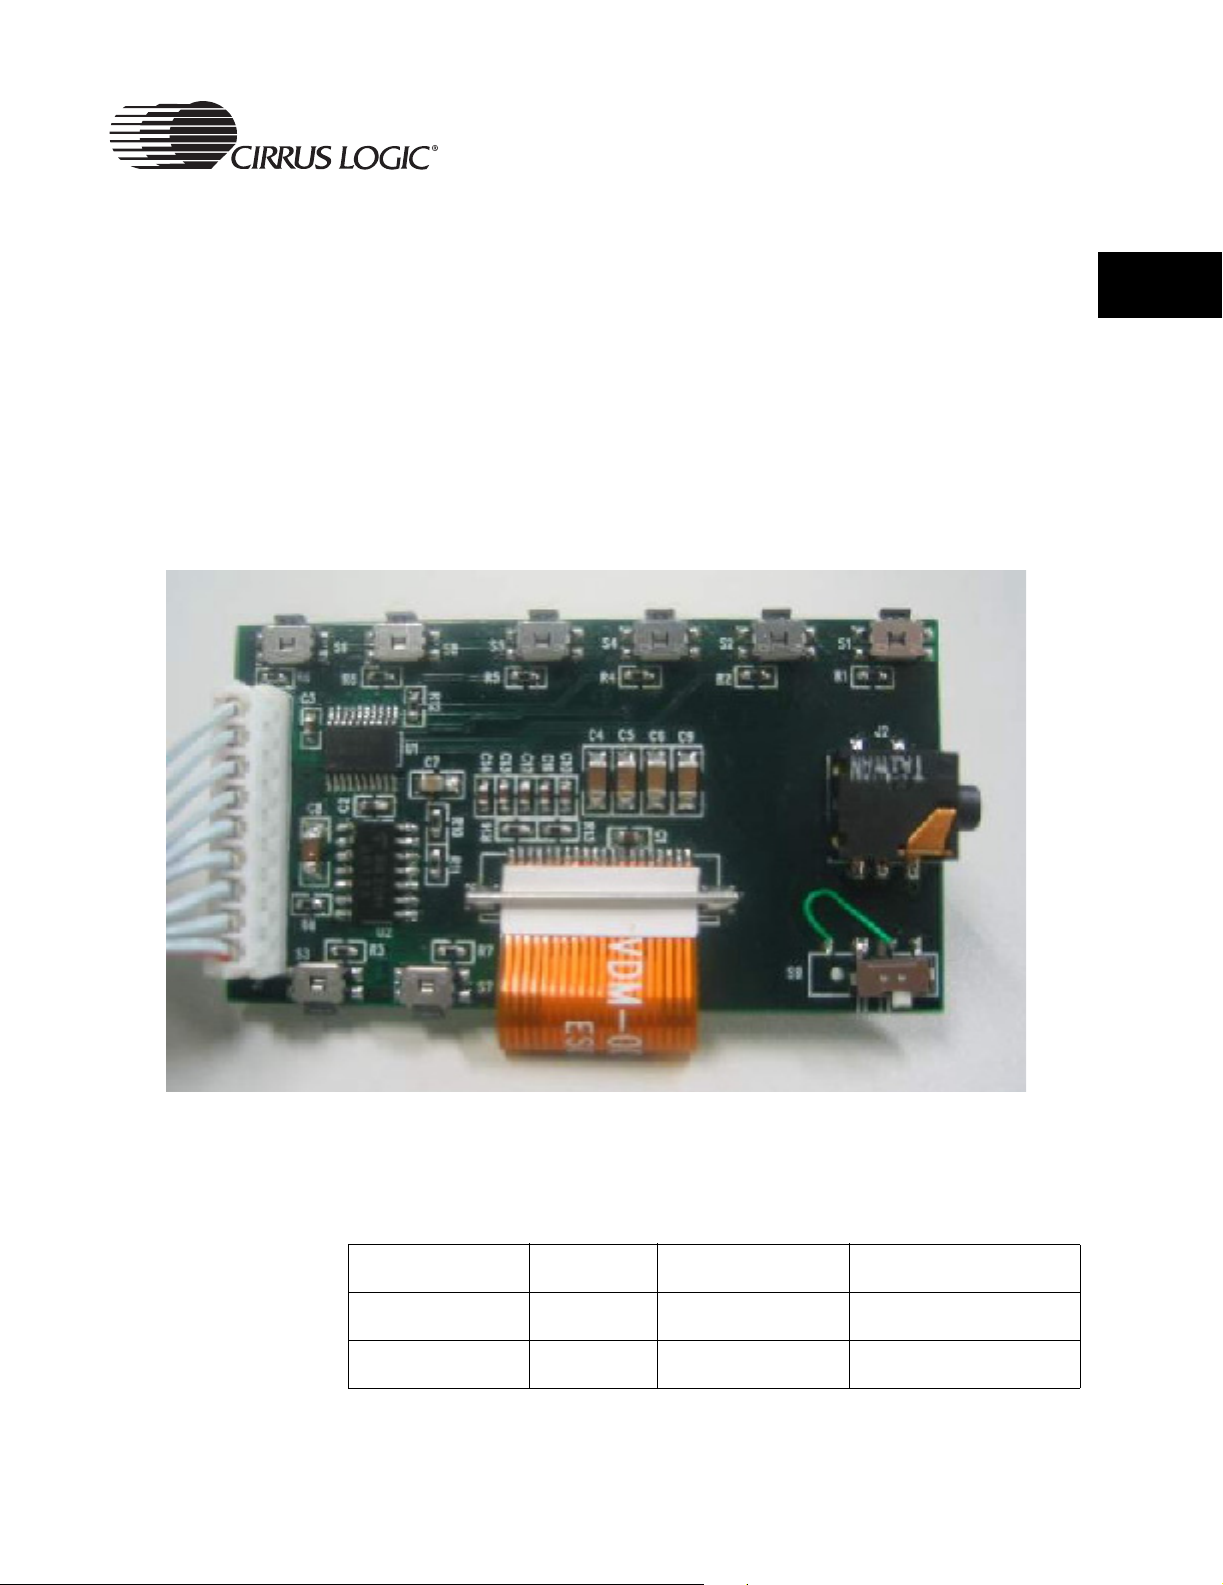
1.2.4.3 Remote Controller
Figure 1-10 shows a close-up view of the remote controller, which is part of
the User Interface Subsystem.
User inputs are implemented with 8 push buttons, one switch (Hold) and one
headphone output.
The Hold button prevents inadvertent button presses while it is engaged. This
allows the unit for instance, to be worn while jogging or other activity without
unwanted button activity.
Table 1-2 shows the functions of the push buttons and switch shown in
Figure 1-10.
S1 S2 S3 S4 S5 S6
Board Architecture
1
S7
Table 1-2: Remote Controller Buttons
S8
Note: When the power is on, push button S5 must be pressed to activate the system.
S1:
Next/Right
S5:
Play/Pause/Up
S9:
Hold Switch
Figure 1-10. Remote Control Buttons
S2:
Vol-
S6:
Vol+
Stop/Down
Previous/Left/Delete
Headphones
Jack
S9
S3:
Select/AB Repeat/Program
S7:
Navigator/Menu
S4:
S8:
CRD7410-HE User’s Guide - DS621UMC2 17
Copyright 2004 Cirrus Logic
1
Board Architecture
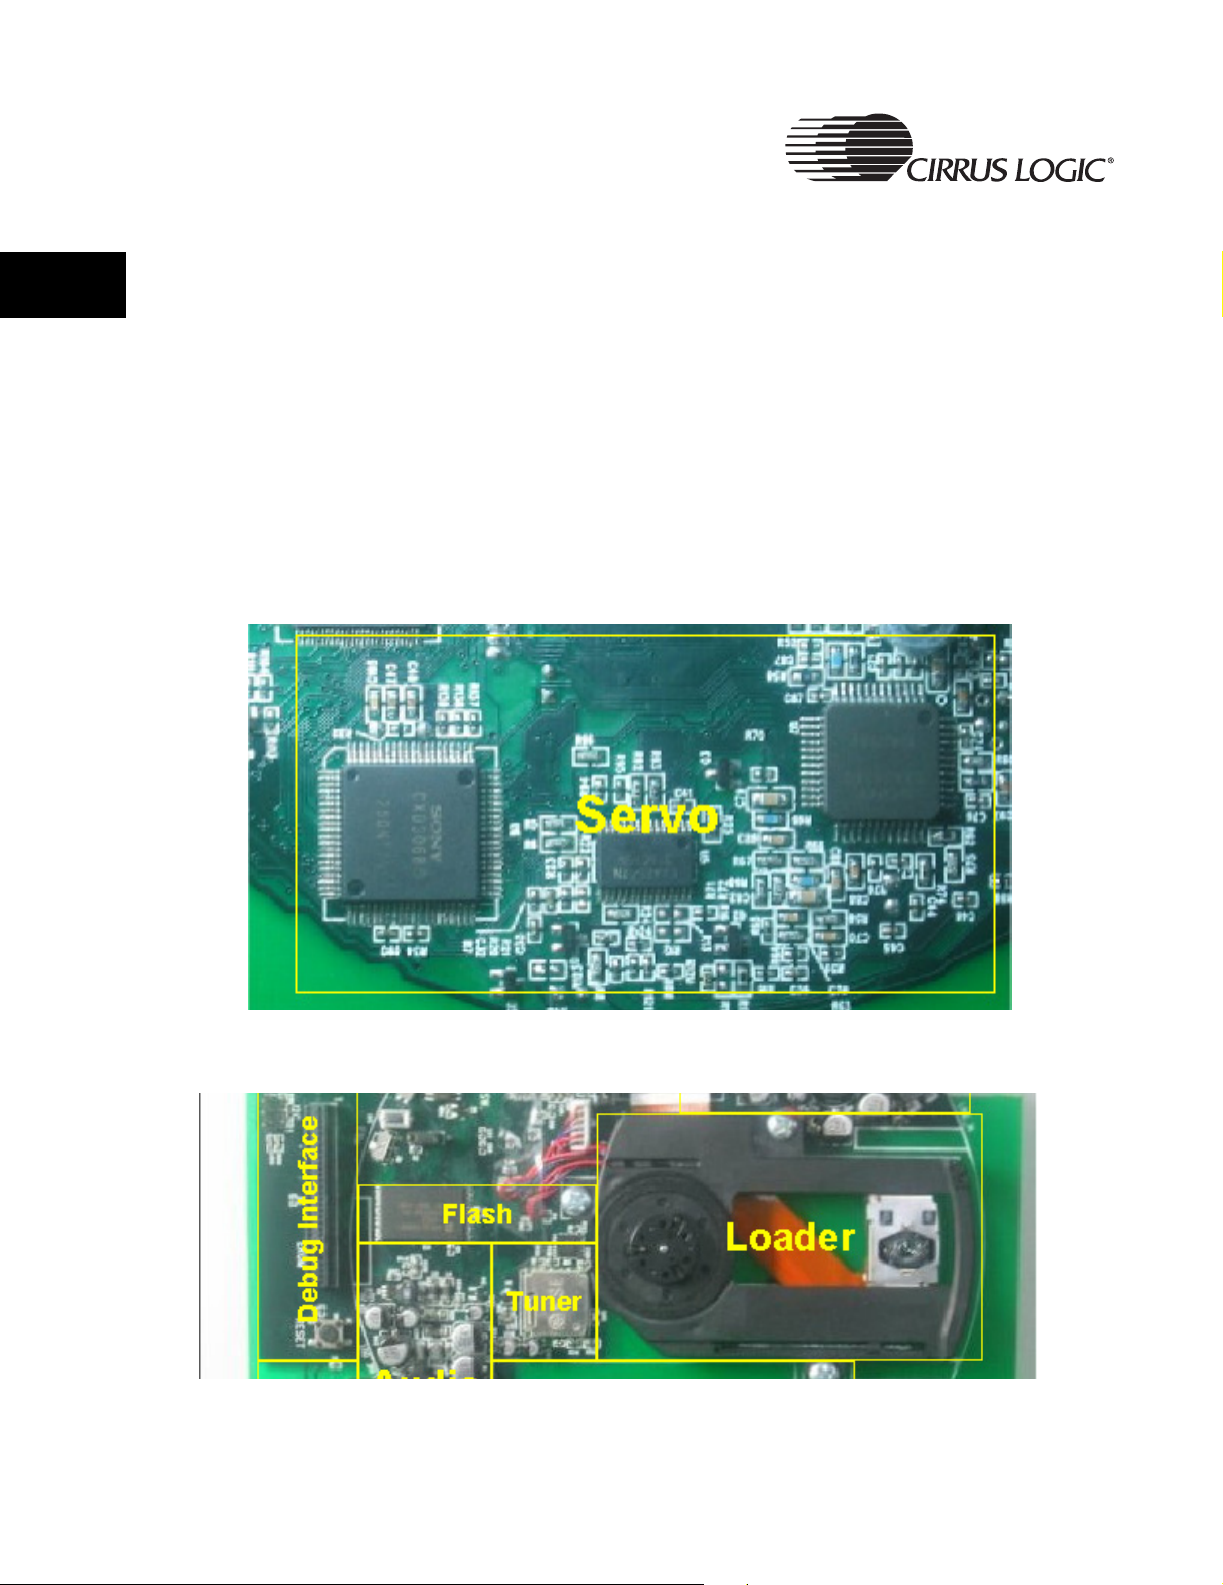
1.2.4.4 CD Loader Subsystem
The CRD7410-HE provides direct support for common servo chipsets. The
devices incorporated into the CRD7410-HE servo system are:
• SAA7824HL - (U301) CD audio decoder, digital servo and filterless DAC
with integrated pre-amp and laser control. Refer to Figure 1-11.
• MM1538XQ - (U201) 4-channel Motor Driver and DC-DC control. Refer to
Figure 1-12.
• TPP381 - CD Loader Mechanism. Refer to Figure 1-12.
This design implements a power-save-mode circuit to maximize battery life.
Because of the capabilities built into the CS7410, no separate microcontroller
is needed.
Figure 1-11. Servo Subsystem
Figure 1-12. CD Loader
18 CRD7410-HE User’s Guide - DS621UMC2
Copyright 2004 Cirrus Logic
1.2.4.5 Power Subsystem
The Power Subsystem provides power to all system components. It consists
of:
• The 5 Volt power input connector (J2).
• The AA battery supply mounts (J1) and Battery Supply On/Off switch
(SW3).
• A MM1538XQ DC-to-DC converter, to generate the main system voltage
(3.0 V).
• The potentiometer and a comparator circuit for Power Subsystem battery
monitoring (U1 - Dual Comparator - BA4510).
• Voltage regulators to generate the 1.8 V levels needed for the CS7410
core (U10 - Voltage Regulator - LM393M).
Board Architecture
1
Figure 1-13. Power Subsystem
1.2.4.6 Debug Interface
There is a debug interface and Romulator connector to provide test and debug
facilities.
The following connectors are provided (see Figure 1-14, below):
• J11 - I2C debug (be sure to match pin 1 to pin 1 when connecting the I2C
debug cable from the Romulator to J12).
• J401 - Romulator connector (be sure to match pin 1 to pin 1 (as marked
on the connectors) when connecting the buffer card connector from the
Romulator to J401).
• J402 - Romulator select (install a jumper between pin 1 and pin 2 to
select Flash mode, or install a jumper between pin 2 and pin 3 to select
Romulator mode)
CRD7410-HE User’s Guide - DS621UMC2 19
Copyright 2004 Cirrus Logic

1
Board Architecture
Figure 1-14. Debug Subsystem
1.2.4.7 Jumpers and Switches
Switches
• S13 - Button Hold
• S14 - Lid Open
• S15 - Not Used
• S16 - Reset
Jumpers
• JP1 – When closed, the power supply will be enabled.
• JP2:JP3 – When closed, the system power will be 3.1v;when open the
system power will be 2.6-2.8v.
• JP4 – When closed, the system does not check the status of the Lid Open
switch (S13).
• JP5, – when closed, S13 will be disabled.
• JP6, – when closed, S14 will be disabled.
• JP7, – when closed, S15 will be disabled.
• JP8, – when closed, S16 will be disabled.
20 CRD7410-HE User’s Guide - DS621UMC2
Copyright 2004 Cirrus Logic

Chapter 2
2.1 User Interface
This document describes the reference user interface for the CS7410-HE
firmware. The user interface supplies the required UI APIs as specified in the
“CS7410HE Firmware Architecture Specification” and relies upon the services
provided by that architecture. It is easy to understand, easy to customize, and
easy to expand.
The hardware available for use by the user interface consists of six push
buttons (Play/Pause/Up, Stop/Down, Previous/Left, Next/Right, Vol+, Vol-)
and two switches (Lid Open, Hold) on the HE board, and eight push buttons
(Play/Pause/Up, Stop/Down, Previous/Left, Next/Right, Navigator/Menu,
Select, Vol+, Vol-), one switch (Hold) on the remote control, an LCD (which is
twenty columns by four rows of text, 8X6 characters) in Remote CTL. These
buttons and switches on the HE board and remote control are independent.
The CS7410 version 6.0 firmware assumes availability of eight push buttons,
two switches, and an LCD (which is twenty columns by eight rows of text). The
eight push buttons are used for the following functions:
2User Menu Selections
2
Play/Pause/Up:
• This button is used to start or pause playback of the current track.
When displaying a menu, this button is used to move up. When the
player is in Soft Power Down mode, pressing this button will power on
the player and commence playback.
Stop/Down:
• This button is used to stop playback of the current track. When
displaying a menu, this button is used to move down. When held, this
button will put the player into Soft Power Down mode.
Previous/Left/Delete:
• This button is used to skip to the beginning of the current track, or to
the beginning of the previous track if already at the beginning of the
current track. Holding this button while playing will seek backwards
within the track. Holding this button while stopped will repeatedly skip
to the previous track. When displaying a menu, this button is used to
move left.
• In radio mode, this button deletes previously created pre-sets.
CRD7410-HE User’s Guide - DS621UMC2 21
Copyright 2004 Cirrus Logic

2
User Menu Selections
Next/Right:
• This button is used to skip to the beginning of the next track. Holding
this button while playing will seek forward within the track. Holding this
button while stopped will repeatedly skip to the next track. When
displaying a menu, this button is used to move right.
Select/ A
• This button is used to select items when displaying a menu.
• Pressing this button while playing sets the A point for the A
mode. Pressing it again will set the B point and enable the A
Repeat mode. Pressing it a third time will cancel the A
mode.
• Pressing this button while stopped will enter the playlist menu.
Navigator/Menu:
• Pressing this button will enter/leave the file system Navigator menu.
• Holding this button will enter/leave the Main menu.
• Pressing this button while stopped will leave the Playlist menu.
Vol+:
• Pressing this button will turn the volume up by one. Holding this button
will repeatedly turn the volume up.
Vol-:
• Pressing this button will turn the volume down by one. Holding this
button will repeatedly turn the volume down.
→B Repeat/Program:
→B Repeat
→B
→B Repeat
The two switches are used for the following functions:
Lid Open:
• This switch is used to detect whether the lid of the CD player is opened
or closed.
Hold:
• This switch is used to disable the buttons. When enabled, the player
will ignore all buttons except the Hold button.
The LCD is used to provide status information to the user. Normally, the LCD
will display information about the track currently being played. Various menu
modes exist which will overlay the status information with a menu, allowing
settings to be changed, playlists to be loaded, etc. Additionally, these menu
modes change the functions of some of the buttons.
22 CRD7410-HE User’s Guide - DS621UMC2
Copyright 2004 Cirrus Logic
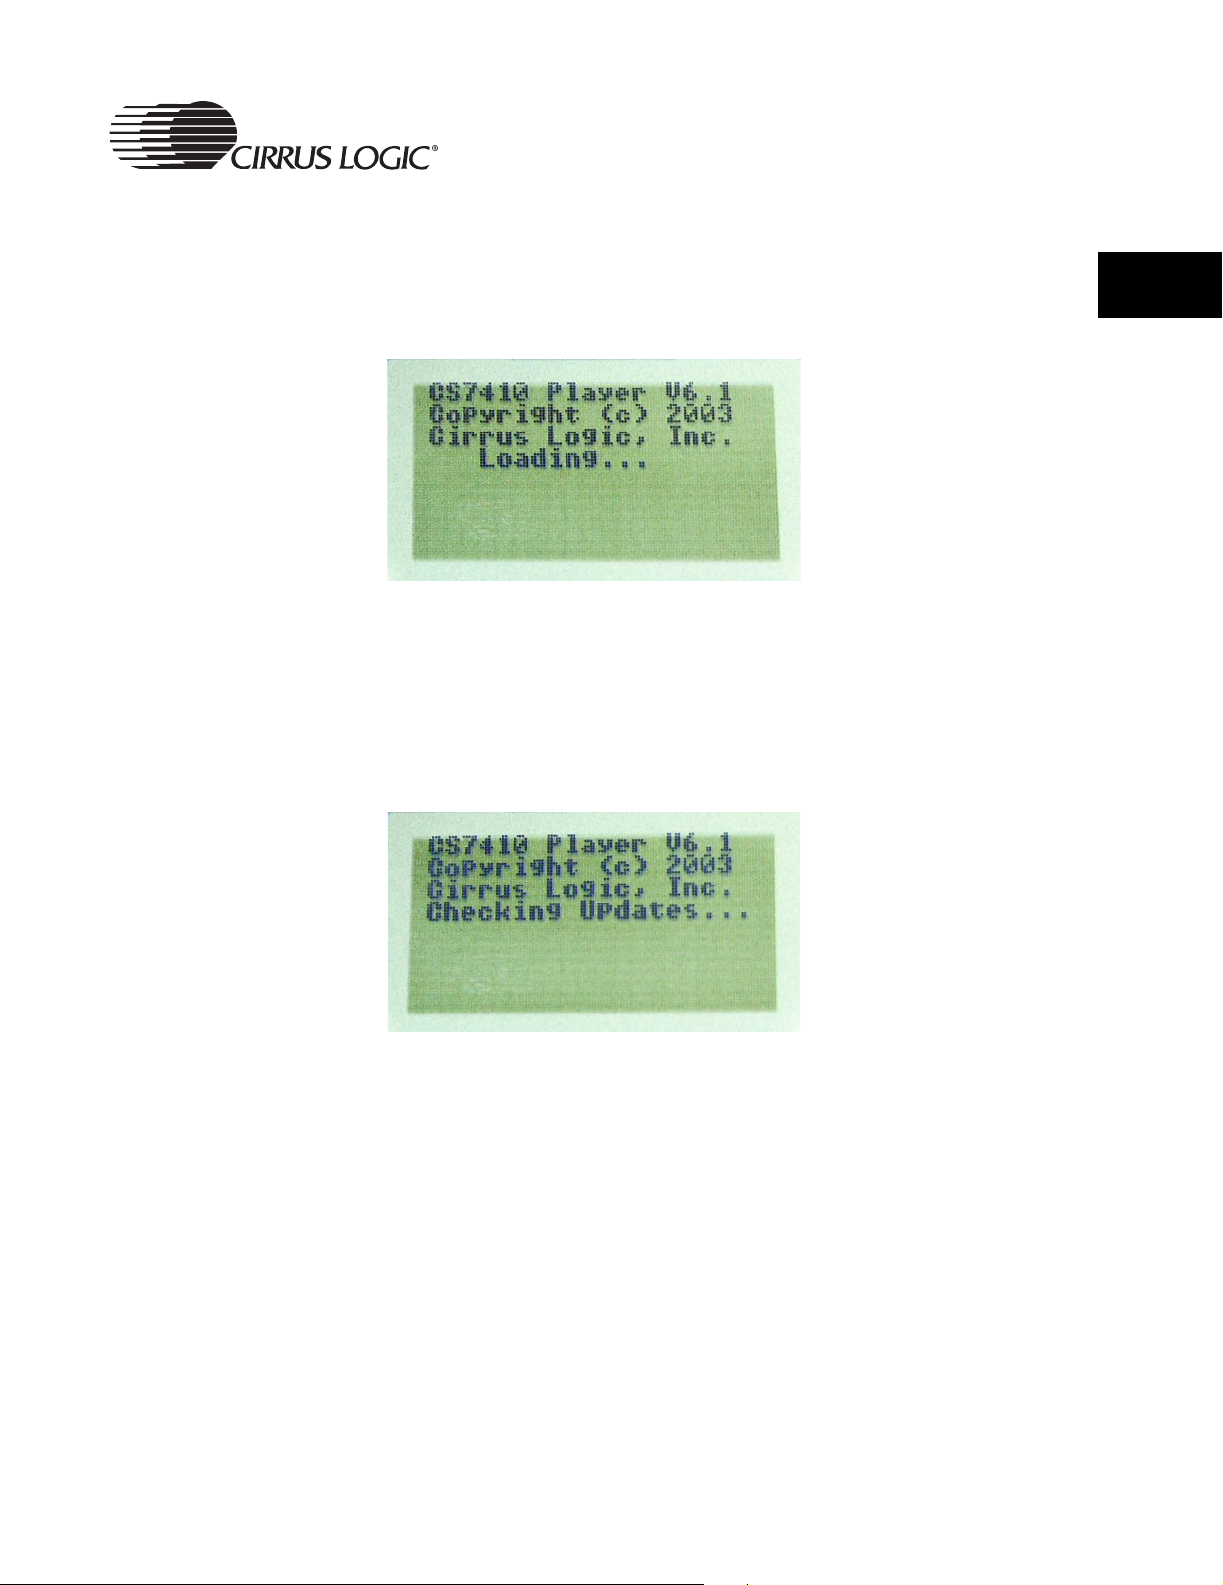
2.1.1 System Start-up
When the player is first powered on, it will initialize the LCD and display the
following screen.
The number at the end of the last line is the number of tracks currently read
from the disc. Every 0.5 seconds, the number of tracks is updated.
User Menu Selections
2
Figure 2-1. Power On Screen
Once the disc scan has completed, the player will check for update files. If any
are found, it will display the following screen:
Figure 2-2. Checking for Update Files Screen
If an update file is found that is newer than the current firmware, the player will
display the following screen:
CRD7410-HE User’s Guide - DS621UMC2 23
Copyright 2004 Cirrus Logic

2
User Menu Selections
Figure 2-3. Loading Updated Firmware Screen
When the firmware has been updated, the player will restart and the new
firmware will be run.
If there is a problem with the disc, the player will report that fact to the user
interface. In this case, an appropriate message will be displayed on the LCD
for five seconds, after which the player is powered off. The following is an
example screen for the case where a bad disc is found:
Figure 2-4. Bad Disc Screen
If the disc has been recognized and scanning has been completed, the
Normal screen will then be displayed. The user interface will automatically
start playback after the player finds a good disc.
Figure 2-5. Normal Operation Screen (Play)
24 CRD7410-HE User’s Guide - DS621UMC2
Copyright 2004 Cirrus Logic
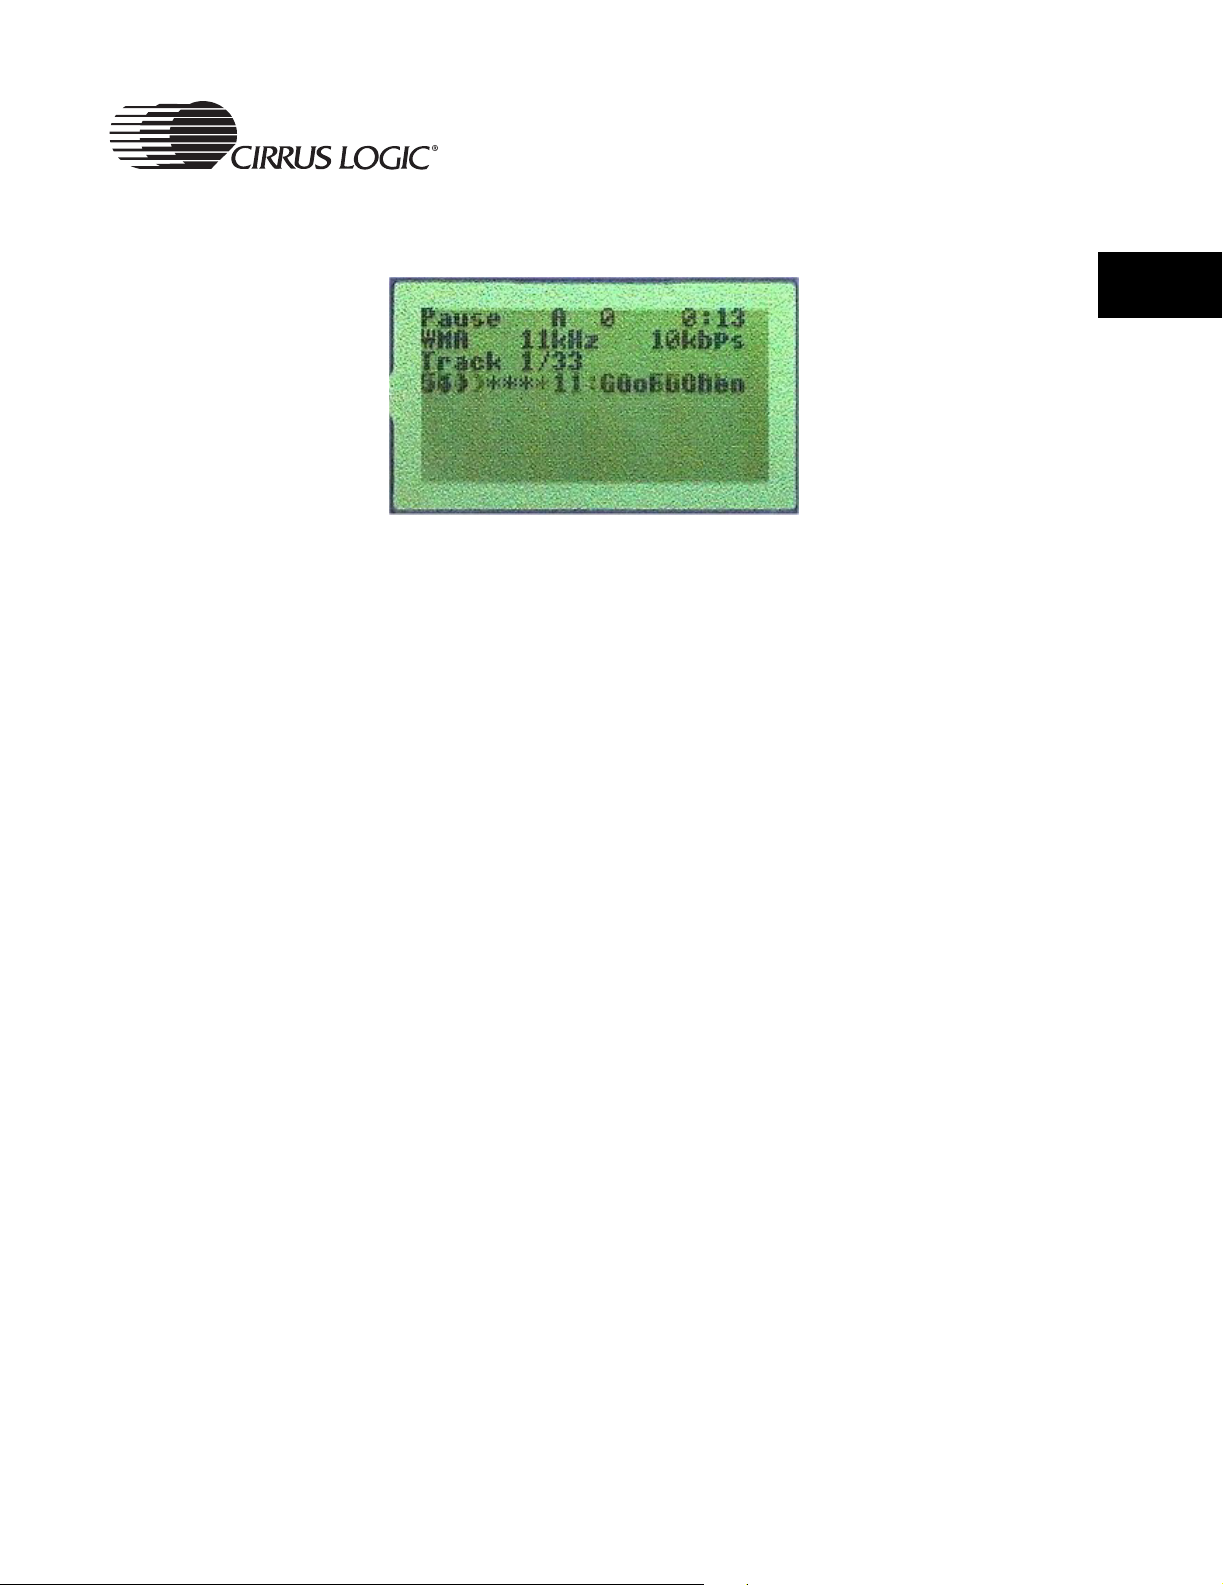
When paused, the following screen will be displayed.
Figure 2-6. Normal Operation Screen (Pause)
2.1.2 Normal (Default) Start-up Mode
The default mode of the player at power on is Play. Refer to Figure 2-5 and
Figure 2-6.
User Menu Selections
2
The MMM field corresponds to the current playback mode, which can be one
of the following values:
Value Meaning
A All tracks on the disc are played in the order encountered.
When the last track has been played, the player stops.
This is the default playback mode.
1 Only the current track is played. When the track has been
played, the player stops.
D Only the tracks in the same directory as the current track
are played. When the last track in the directory has been
played, the player stops.
RA All tracks on the disc are played in the order encountered.
When the last track has been played, the player continues
by playing the first track.
R1 Only the current track is played. When the track has been
played, the player replays the current track.
RD Only the tracks in the same directory as the current track
are played. When the last track in the directory has been
played, the player continues by playing the first track in the
directory.
SA All tracks on the disc are played in a random order. When
all tracks have been played, the player stops.
CRD7410-HE User’s Guide - DS621UMC2 25
Copyright 2004 Cirrus Logic

2
User Menu Selections
S1 Only the current track is played. When the track has been
played, the player stops. Skipping to the next or previous
track will go to a random track.
SD Only the tracks in the same directory as the current track
are played, but in a random order. When all tracks in the
directory have been played, the player stops.
RSA All tracks on the disc are played in a random order. When
all tracks have been played, they will all be played again in
a different random order.
RS1 Only the current track is played. When the track has been
played, the player replays the current track. Skipping to
the next or previous track will go to a random track.
RSD Only the tracks in the same directory as the current track
are played, but in a random order. When all tracks in the
directory have been played, they will all be played again in
a different random order.
IA The first portion of all tracks on the disc are played. When
all tracks have been played, the player stops.
IS The first portion of all tracks in the specified directory, and
all its subdirectories, are played. When all tracks in the list
have been played, the player stops.
HA A portion from the middle of all tracks on the disc are
played. When all tracks have been sampled, the player
stops.
a A
ab The B point is selected and the player seeks back to the A
The L field is an indicator that is set to L when the player is using a custom
playlist. The custom playlist can either be one loaded from a playlist file on the
disc or one created by the user. When playing from the default playlist, this
indicator will be blank.
The K field is an indicator that is set to L when the Hold switch is on, causing
the buttons to be ignored by the user interface. When the Hold switch is off,
this indicator will be blank.
→B Repeat mode is enabled, but only the A point is
selected. During this time, the player is set to play all
tracks on the disc in non-shuffled mode.
point whenever the B point is encountered.
The time in the upper right corner of the screen is the current playback time.
The second line contains the following items:
26 CRD7410-HE User’s Guide - DS621UMC2
Copyright 2004 Cirrus Logic

User Menu Selections
Format
• This indicates the format of the audio on the disc. It will be CDDA,
MP1, MP2, MP3, WMA, VCD, AVCD, or SVCD.
Sample Rate
• This indicates the sample rate of the PCM audio.
• It will be one of these ranges: 8kHz, 11kHz, 12kHz, 16kHz, 22kHz,
24kHz, 32kHz, 44kHz or 48kHz.
Bit Rate
• This indicates the bit rate of the audio on the disc. It will be specified as
XXXX kbps, where XXXX is the bit rate specified in kilobits per
second (kbps).
The third line displays the current track number and the total number of tracks
available.
The fourth line contains a scrolling string providing track information. The
complete format of this string is TrackNum: Artist - Song (Length), where
TrackNum is the number of the track on the disc, Artist is the name of the
artist, Song is the name of the song, and Length is the length of the track in
minutes and seconds (i.e. xx:xx). If the artist name is not known, just the song
name will be used. If the song name is not known, the file name will be
substituted for the song name. If neither is known, the file name will be used in
place of the artist name and song name (i.e. TrackNum: Filename (Length)).
This string will not be scrolled if it is short enough to fit on the display without
scrolling.
2
During normal operation, these two variants of the screen (Figure 2-5 and
Figure 2-6) are all that will be seen. When settings are changed though, the
screen will be modified (or replaced) to provide feedback of that change.
When the volume is changed via the Vol+ and Vol- buttons, the bottom line will
be replaced with the volume indicator.
Figure 2-7. Volume Adjust Screen
CRD7410-HE User’s Guide - DS621UMC2 27
Copyright 2004 Cirrus Logic

2
User Menu Selections
The top three lines will continue to operate as before, with the bottom line
indicating the current volume setting. Once the volume has remained
unchanged for a period of time, the volume indicator goes away and the
Normal display returns.
Pressing the Navigator/Menu button will enter navigator mode and the
following screen is displayed.
Figure 2-8. Navigator Mode Screen
The arrow buttons can be used to highlight a file, which is then selected by
pressing the Select button. Selecting a file will cause it to be played back, and
the playback mode set to A. Similarly, a directory can be highlighted and
selected by pressing the Select button. Selecting a directory will cause its
contents to be played back and the playback mode set to S. If in navigator
mode with no button activity for a period of time, the screen reverts to Normal
mode.
If the Select/A
stopped, the playlist selection mode will be entered and the following screen
displayed:
→B Repeat/Program button is pressed while the player is
Figure 2-9. Playlist Select Menu
The arrow buttons can be used to highlight a playlist, which is then selected by
pressing the Select/A
cause the contents of that playlist to be loaded as a custom playlist, playback
28 CRD7410-HE User’s Guide - DS621UMC2
→B Repeat/Program button. Selecting a playlist will
Copyright 2004 Cirrus Logic

User Menu Selections
started, and the playback mode set to A. If in playlist selection mode with no
button activity for a period of time, the screen reverts to normal mode.
When a playlist file is selected, the following screen is displayed while the
contents of that file are being read and inserted into the custom playlist (with
<name> replaced with the name of the playlist file).
Figure 2-10. Loading Playlist Screen
After the playlist has been read from the playlist file, the playback mode is set
to A, playback commenced, and the screen reverted to normal mode.
Selecting the {new} item enters the playlist creation mode, and the following
screen is displayed.
2
Figure 2-11. Create Playlist Screen
The number on the first line is the playlist index of the track currently being
programmed. Like in navigator mode, files are selected with the arrow buttons.
Pressing the Select/A
custom playlist. Pressing the Navigator/Menu button will complete the custom
playlist, return the screen to normal mode, set the playback mode to A, and
start playback of the custom playlist.
CRD7410-HE User’s Guide - DS621UMC2 29
Copyright 2004 Cirrus Logic
→B Repeat/Program button will add the file to the
2
User Menu Selections
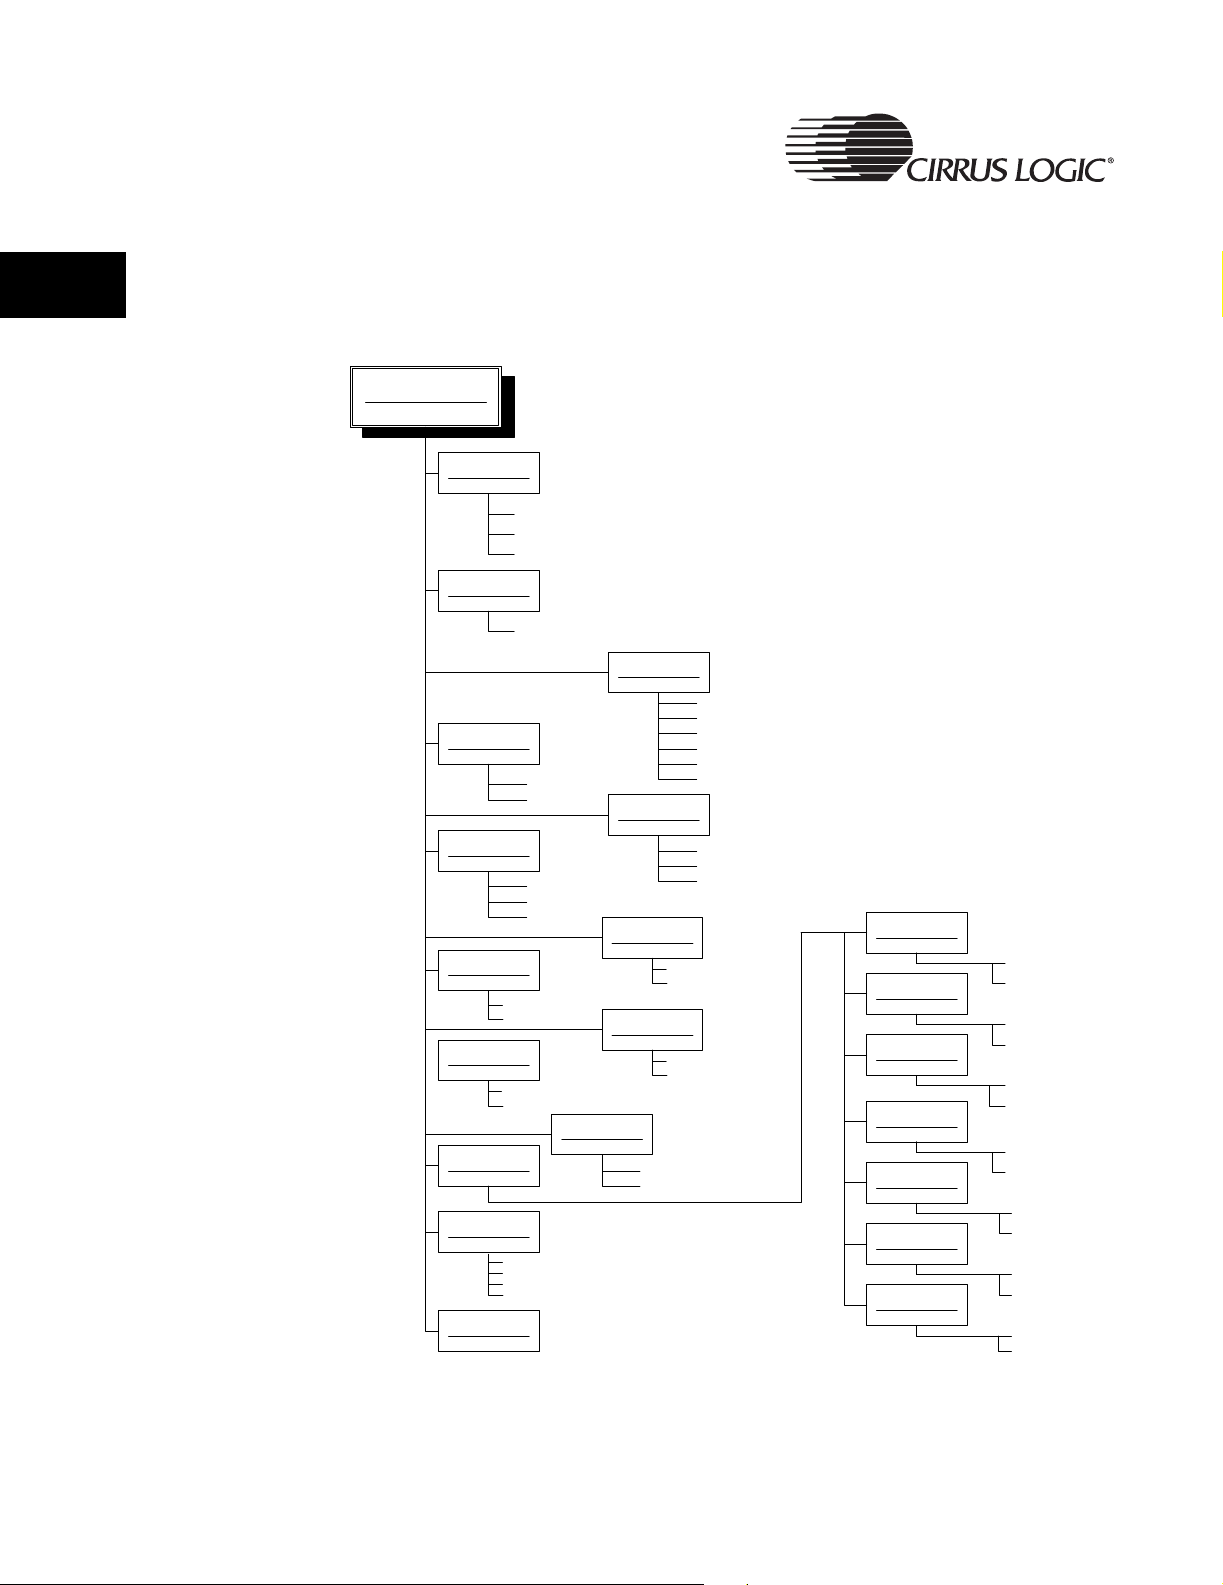
2.2 Main Menu
Control of the CRD7410-HE ia accomplished through a series of menus
originating with the Main Menu. Refer to Figure 2-12.
Main menu
Audio Source
Playmode
3D Enhancement
Backlight Mode
Resume
Power Off Time
Increase (Play/Pause/Up)
Decrease (Stop/Down)
User EQ
Order Track
By dir
By a rt-trk
By a lb-trk
By a rt-alb-trk
Firm ware Versio n
[CD ]
[AM ]
[FM ]
A, 1, D, RA, R1, RD, SA, S1, SD,
RSA, RS1, RSD, IA, IS, HA, a, ab
EQ
Off
On
Always Off
Automatic
Always On
Off
On
Sleep Timer
ESP
Lyrics
Sc rolling
Increase (Play/Pause/Up)
Decrease (Stop/Down)
Normal
Rock
Jazz
Classical
Bass
Custom
None
Uncompressed
Compressed
Off
On
On
Off
CRD7410-HE Menu Map
60Hz
+ Play/Pause/Up
150Hz
400Hz
1kHz
2kHz
6kHz
15kHz
- Stop /Dow n
+ Play/Pause/Up
- Stop /Dow n
+ Play/Pause/Up
- Stop /Dow n
+ Play/Pause/Up
- Stop /Dow n
+ Play/Pause/Up
- Stop/Down
+ Play/Pause/Up
- Stop/Down
+ Play/Pause/Up
- Stop/Down
Figure 2-12. CRD7410-HE Menu Map
30 CRD7410-HE User’s Guide - DS621UMC2
Copyright 2004 Cirrus Logic

User Menu Selections
Holding the Navigator/Menu button will enter Menu mode and display the
following screen.
Figure 2-13. Main Menu Screen
The Up and Down buttons will highlight a menu item. Pressing the Select
button will enter the setting screen for that item. The asterisk (*) denotes the
cursor position.
2
The following is a list of the items in the main menu:
Audio Source
•CD
• AM (Disabled in CRD7410-HE)
•FM
Play Mode
• A, 1, D, RA, R1, RD, SA, S1, SD, RSA, RS1, RSD, IA, IS, HA, a, ab
EQ (Preset)
• Normal, Rock, Jazz, Classical, Bass, Custom
3D Enhancement
•Off
•On
Electronic Shock Protection (ESP)
• None
• Uncompressed (No ADPCM + ESP)
• Compressed (ADPCM + ESP)
CRD7410-HE User’s Guide - DS621UMC2 31
Copyright 2004 Cirrus Logic

User Menu Selections
Backlight Mode
•Always Off
2
• Automatic
•Always On
Power off Time
• 0-15 minutes
Lyrics
• Off
• On
Resume
• Off
• On
Scrolling
• On
• Off
Sleep Timer
• 0-120 Minutes in 15-minute increments
User EQ
• Displays the User EQ (user-defined EQ) menu screen
Order Tracks
• Normal
• By dir
• By art-trk
• By alb-trk
• By art-alb-trk
Firmware Version
• Displays the Firmware version
The order of the menu items can be changed, and items can be added or
removed.
32 CRD7410-HE User’s Guide - DS621UMC2
Copyright 2004 Cirrus Logic

2.2.1 ESP Mode
User Menu Selections
Selecting the ESP item from the Main menu will display the following screen.
2
Figure 2-14. Electronic Shock Protection (ESP) Screen
The X in the box indicates the current setting of the ESP item, the asterisk (*)
denotes the cursor position. Highlighting a different setting and pressing the
Right button will change the setting. Pressing the Select button will go back to
the parent menu. The actual values for the Uncompressed and Compressed
settings are based on the size of the ESP buffer. It will be ~45 and
~180 seconds if a 8 MB DRAM is used and ~11 and ~45 seconds if a 2 MB
DRAM is used.
2.2.2 Backlight Mode
Selecting the Backlight menu item displays this screen.
When the backlight setting is set to Always Off, the backlight is kept off at all
times. If it is set to Always On, it is kept on at all times. If it is set to Automatic,
it is turned on whenever a button is pressed. If no buttons are pressed for
5 seconds, the backlight is turned off. The asterisk (
position.
Figure 2-15. Backlight Screen
*) denotes the cursor
CRD7410-HE User’s Guide - DS621UMC2 33
Copyright 2004 Cirrus Logic

2
User Menu Selections
2.2.3 Lyrics
Selecting the Lyrics menu item displays this screen.
Figure 2-16. Lyrics Screen
The X in the box indicates the current setting of the Lyrics item. The asterisk
(*) denotes the cursor position. Highlighting a different setting and pressing
the Right button will change the setting. Pressing the Select button will go
back to the parent menu.
2.2.4 Resume
When the Lyrics setting is set to On, if the track which is playing has lyrics on
disc, the 4
When the Lyrics setting is set to Off, if the track which is playing has lyrics on
disc, the 4
lyrics.
Selecting the Resume menu item displays this screen.
th
line of LCD will display the lyrics of the track.
th
line of LCD will only display the name of the track, not display the
Figure 2-17. Resume Screen
The X in the box indicates the current setting of the Resume item. The asterisk
(*) denotes the cursor position. Highlighting a different setting and pressing
34 CRD7410-HE User’s Guide - DS621UMC2
Copyright 2004 Cirrus Logic

User Menu Selections
the Right button will change the setting. Pressing the Select button will go
back to the parent menu.
2.2.5 Scrolling
When the Resume setting is set to On and the user opens the Lid, the
CRD7410-HE will remember the current time of the current track on that disc.
When the user replays that disc, the system will begin playing from the point
on the disc when the lid was opened (for that disc). However the function only
remembers the last five (5) discs that have been played. When the 6
inserted, the information for the 1
When the Resume setting is set to Off, the CRD7410-HE will not have the
Resume function.
Selecting the Scrolling menu item displays this screen.
st
disc is overwritten.
th
disc is
2
Figure 2-18. Scrolling Screen
The X in the box indicates the current setting of the Scrolling item. The
asterisk (*) denotes the cursor position. Highlighting a different setting and
pressing the Right button will change the setting. Pressing the Select button
will go back to the parent menu.
When the Scrolling setting is set to On and the information that displays on 4
line of LCD (artist, album, or track name) is significantly longer than the length
of the LCD's line, the information will scroll accross the 4
Therefore, It will display the entire contents.
When the Scrolling setting is set to Off and the information that displays on 4
line of LCD (artist, album, or track name) is significantly longer than the length
of the LCD's line, the 4
of the information.
CRD7410-HE User’s Guide - DS621UMC2 35
Copyright 2004 Cirrus Logic
th
line of the LCD will only display the first 20 characters
th
line of the LCD.
th
th
2
User Menu Selections
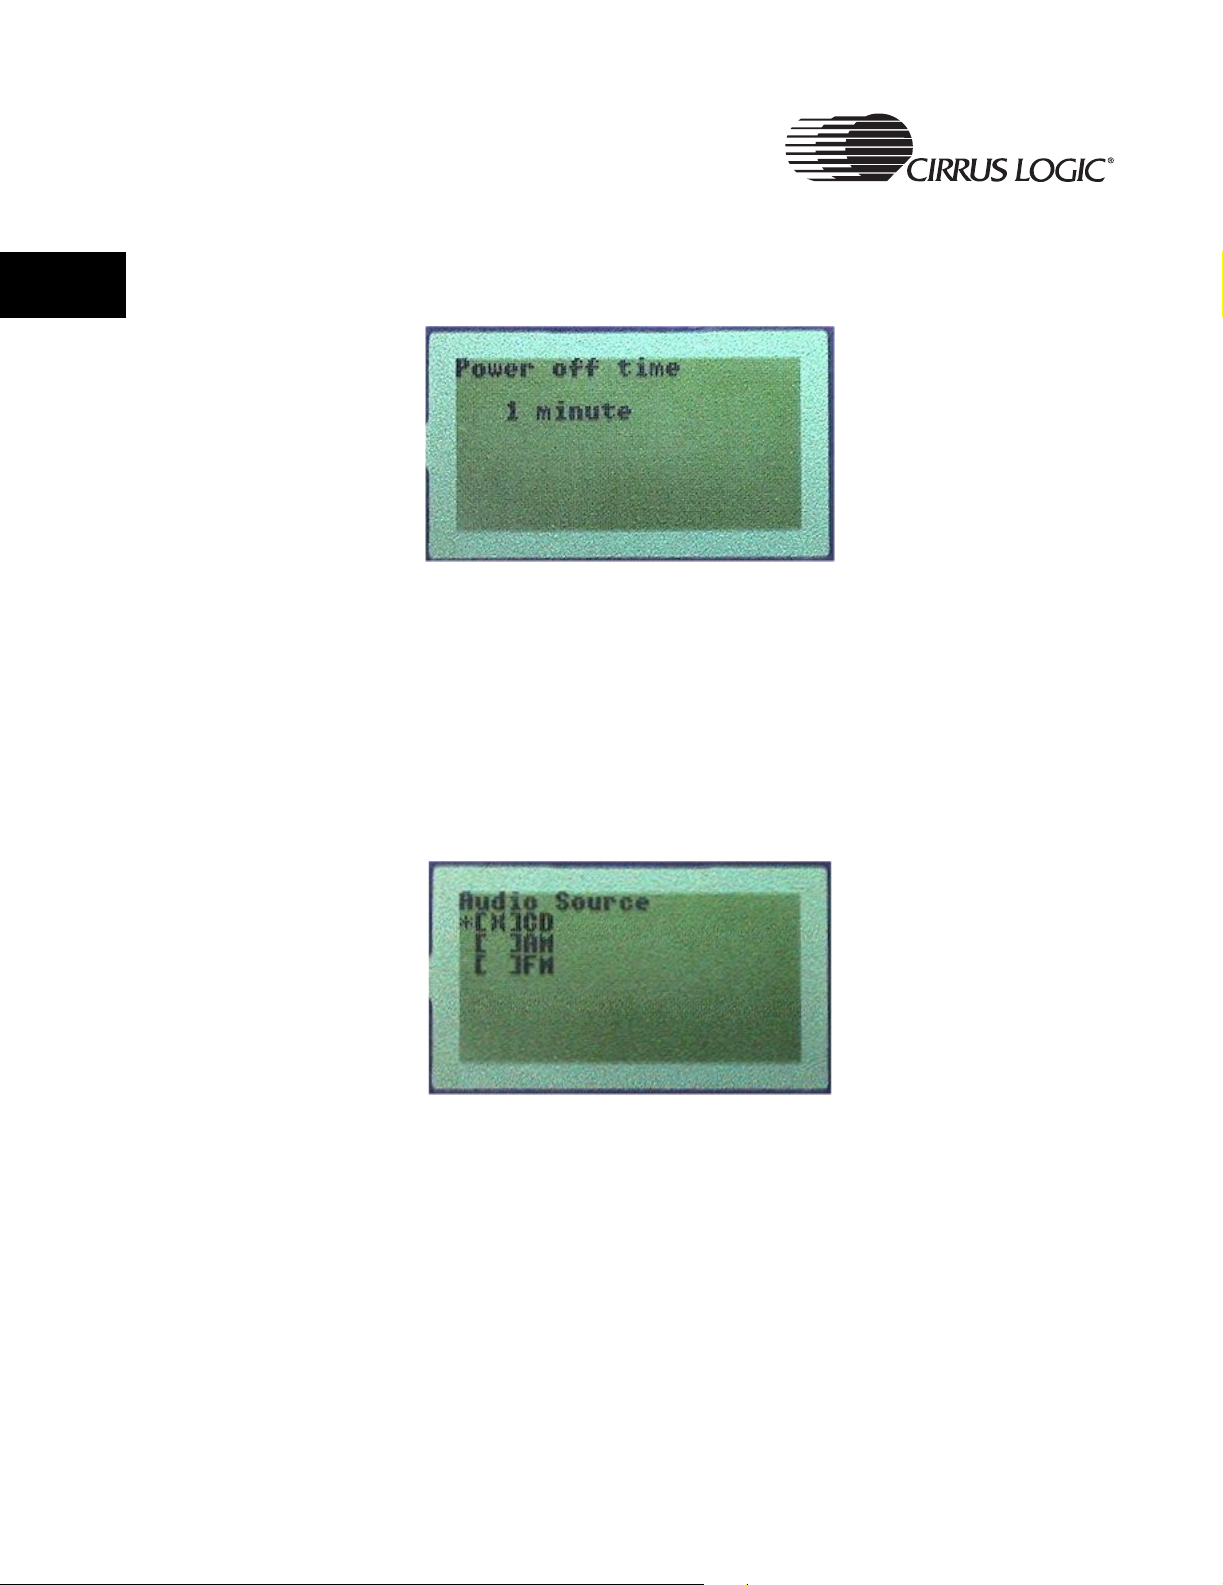
2.2.6 Power Off Time Menu
Selecting the Power Off Time menu item displays the following screen.
Figure 2-19. Power Off Time Screen
If the Power Off Time is not zero, the player will be put into Soft Power Off
mode after the specified number of minutes of inactivity (i.e. no button presses
while the player is in Stop mode).
2.2.7 Audio Source Menu
Selecting the Audio Source menu item displays the following screen.
The X in the box indicates the current setting of the Audio Source item. The
asterisk (
pressing the Right button will change the setting. Pressing the Select button
will go back to the parent menu. When the audio source setting is set to CD,
the tuner will be disabled and the data from disc will be played MP3/WMA/CDDA/VCD/AVCD/SVCD. If it is set to AM or FM, the tuner will be
enabled. This selection can only be made when player is in Stop mode. The
default setting of the Audio Source item is CD.
*) denotes the cursor position. Highlighting a different setting and
Figure 2-20. Audio Source Screen
Note: While the CRD7410-HE firmware supports an AM/FM tuner, the
36 CRD7410-HE User’s Guide - DS621UMC2
Copyright 2004 Cirrus Logic

current hardware only supports FM mode. This menu item
appears in the Audio Source menu but is inactive. Selecting it will
do nothing.
2.2.8 Playback Mode Menu
Selecting the Playback Mode menu item displays the following screen.
User Menu Selections
2
Figure 2-21. Playback Mode Screen
The MMM field corresponds to the current playback mode, which can be one
of the following values:
Value Meaning
A All tracks on the disc are played in the order encountered.
When the last track has been played, the player stops.
This is the default playback mode.
1 Only the current track is played. When the track has been
played, the player stops.
D Only the tracks in the same directory as the current track
are played. When the last track in the directory has been
played, the player stops.
RA All tracks on the disc are played in the order encountered.
When the last track has been played, the player continues
by playing the first track.
R1 Only the current track is played. When the track has been
played, the player replays the current track.
RD Only the tracks in the same directory as the current track
are played. When the last track in the directory has been
played, the player continues by playing the first track in the
directory.
SA All tracks on the disc are played in a random order. When
all tracks have been played, the player stops.
CRD7410-HE User’s Guide - DS621UMC2 37
Copyright 2004 Cirrus Logic

2
User Menu Selections
S1 Only the current track is played. When the track has been
played, the player stops. Skipping to the next or previous
track will go to a random track.
SD Only the tracks in the same directory as the current track
are played, but in a random order. When all tracks in the
directory have been played, the player stops.
RSA All tracks on the disc are played in a random order. When
all tracks have been played, they will all be played again in
a different random order.
RS1 Only the current track is played. When the track has been
played, the player replays the current track. Skipping to
the next or previous track will go to a random track.
RSD Only the tracks in the same directory as the current track
are played, but in a random order. When all tracks in the
directory have been played, they will all be played again in
a different random order.
IA The first portion of all tracks on the disc are played. When
IS The first portion of all tracks in the specified directory, and
HA A portion from the middle of all tracks on the disc are
a A
ab The B point is selected and the player seeks back to the A
2.2.9 EQ (Preset) Menu
Selecting the EQ item will display the following screen. The asterisk (*)
denotes the cursor position. Note that if Vol- is pressed, the asterisk will move
down and cause the screen to scroll, showing more selections (Classical,
Bass).
all tracks have been played, the player stops.
all its subdirectories, are played. When all tracks in the list
have been played, the player stops.
played. When all tracks have been sampled, the player
stops.
→B Repeat mode is enabled, but only the A point is
selected. During this time, the player is set to play all
tracks on the disc in non-shuffled mode.
point whenever the B point is encountered.
38 CRD7410-HE User’s Guide - DS621UMC2
Copyright 2004 Cirrus Logic

2.2.10 User EQ Menus
The User EQ is selected from the scrolling list in the Main menu. Refer to
Figure 2-23. When User EQ is selected, the bottom three lines will be replaced
with the current equalizer setting indicator. Refer to Figure 2-24.
User Menu Selections
2
Figure 2-22. EQ (Preset) Screen
Figure 2-23. User EQ Select
The first time the User EQ is selected, the current equalizer setting will be
displayed. Subsequent presses of the Select/A
while the equalizer is displayed will cycle through the various equalizer
settings.
The first line indicates the frequency band of the equalizer setting. The bottom
two lines provide a graphical representation of the equalizer setting.
A setting of 0dB for a band is displayed with the top character being blank and
the bottom character being solid (i.e. like the first column in Figure 2-24). A
setting of +12dB for a band is displayed as both the top and bottom characters
being solid, and -12dB as both characters being blank.
→B Repeat/Program button
Once the equalizer has remained unchanged for a period of time, the EQ
indicator goes away and the Normal display returns.
The equalizer is automatically set to User Defined when the Main menu User
EQ item is selected. The frequency band is displayed, as well as the current
decibel setting of that band. The three asterisks (***) denote the currently
CRD7410-HE User’s Guide - DS621UMC2 39
Copyright 2004 Cirrus Logic

2
User Menu Selections
selected band. The Left and Right buttons select the band and the Up and
Down buttons change the decibel setting of that band. Pressing Select saves
the settings for the equalizer and returns to Normal mode.
2.2.10.1 60Hz EQ Menu
The User EQ menu for the 60Hz band displays the following screen.
Figure 2-24. User EQ 60 Hz Submenu Screen
2.2.10.2 150Hz EQ Menu
The User EQ menu for the 150Hz band displays the following screen.
Figure 2-25. User EQ 150 Hz Submenu Screen
40 CRD7410-HE User’s Guide - DS621UMC2
Copyright 2004 Cirrus Logic

2.2.10.3 400Hz EQ Menu
The User EQ menu for the 400Hz band displays the following screen.
Figure 2-26. User EQ 400 Hz Submenu Screen
2.2.10.4 1kHz EQ Menu
The User EQ menu for the 1kHz band displays the following screen.
User Menu Selections
2
Figure 2-27. User EQ 1 kHz Submenu Screen
2.2.10.5 2kHz EQ Menu
The User EQ menu for the 2kHz band displays the following screen.
Figure 2-28. User EQ 2 kHz Submenu Screen
CRD7410-HE User’s Guide - DS621UMC2 41
Copyright 2004 Cirrus Logic
2
User Menu Selections
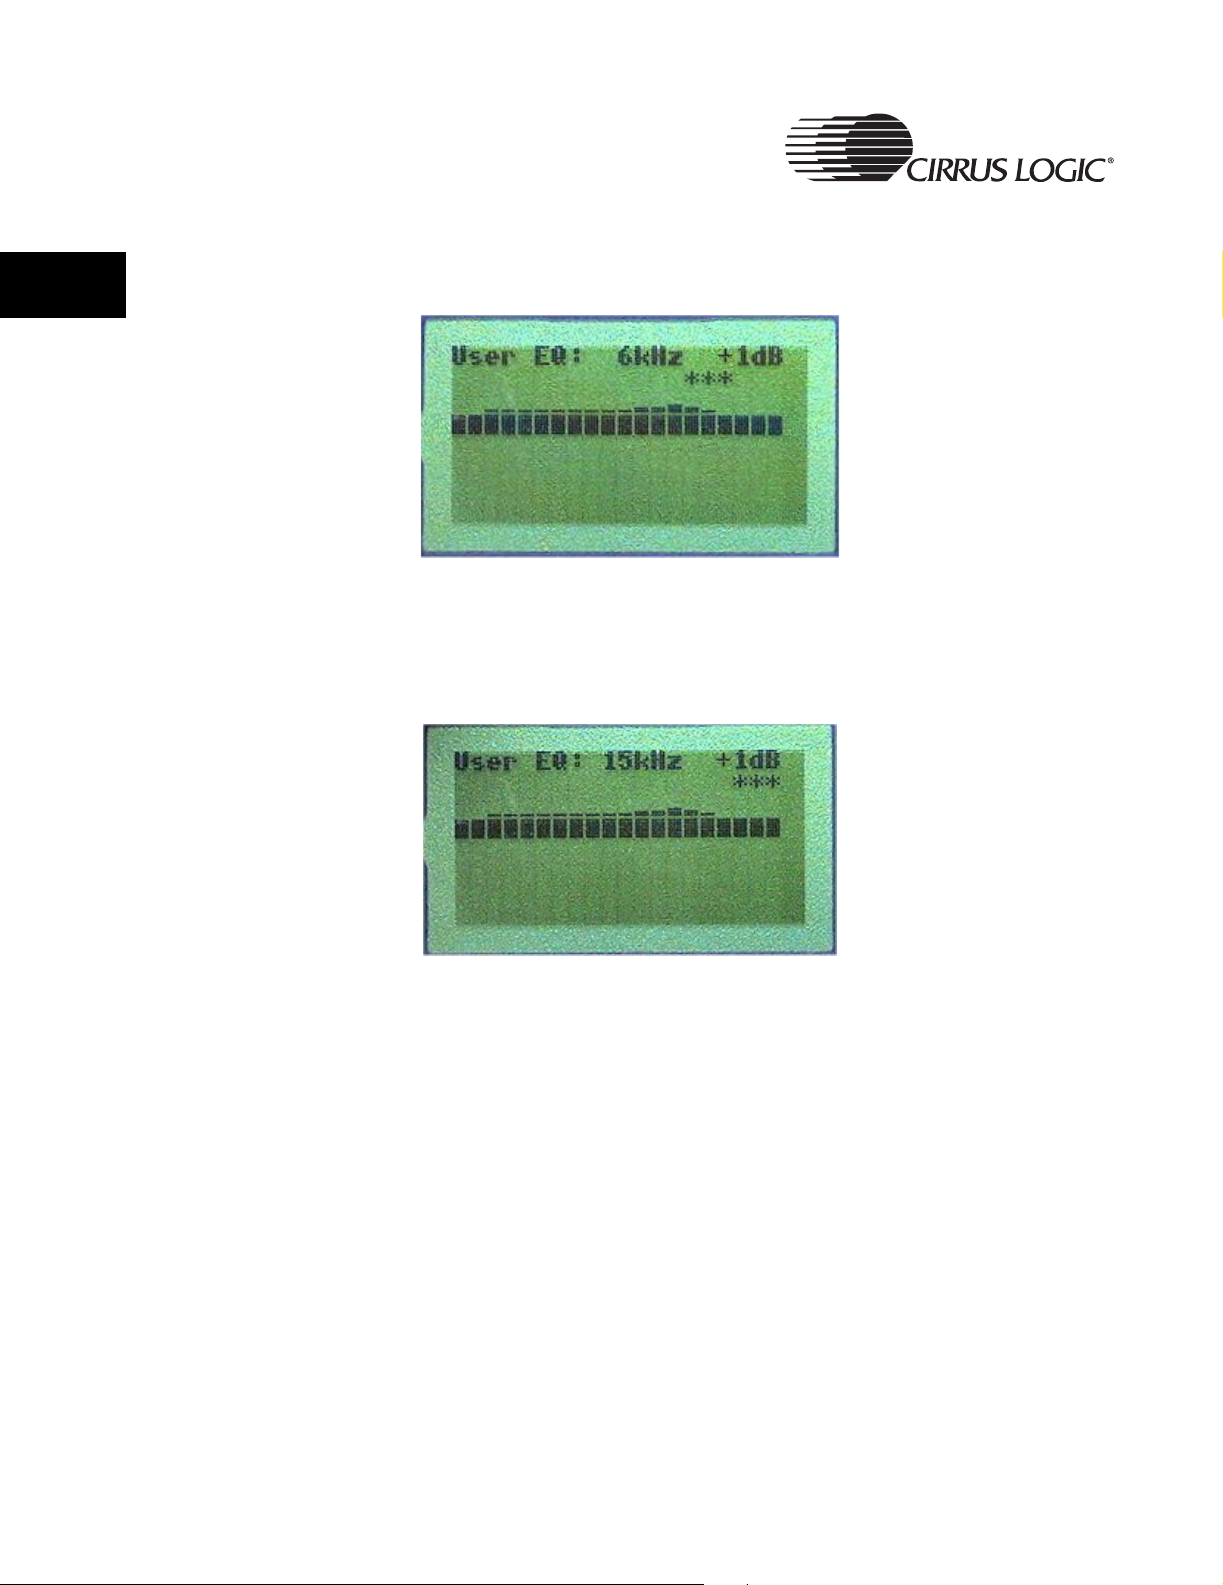
2.2.10.6 6kHz EQ Menu
The User EQ menu for the 6kHz band displays the following screen.
Figure 2-29. User EQ 6 kHz Submenu Screen
2.2.10.7 15kHz EQ Menu
The User EQ menu for the 15kHz band displays the following screen.
Figure 2-30. User EQ 15 kHz Submenu Screen
42 CRD7410-HE User’s Guide - DS621UMC2
Copyright 2004 Cirrus Logic

2.2.11 3D Enhancement Menu
Selecting the 3D Enhancement menu item will display the following screen.
Figure 2-31. 3D Enhancement Screen
If 3D Enhancement is set to Off, the 3D effect will be disabled. If
3D Enhancement is set to On, the 3D effect will be enabled.
User Menu Selections
2
2.2.12 Sleep Timer Menu
Selecting the Sleep Timer menu item displays the following screen.
If the Sleep Timer setting is not zero, the player will be put into Soft Power Off
mode after the specified number of minutes, regardless of activity.
Figure 2-32. Sleep Timer Screen
CRD7410-HE User’s Guide - DS621UMC2 43
Copyright 2004 Cirrus Logic
2
User Menu Selections
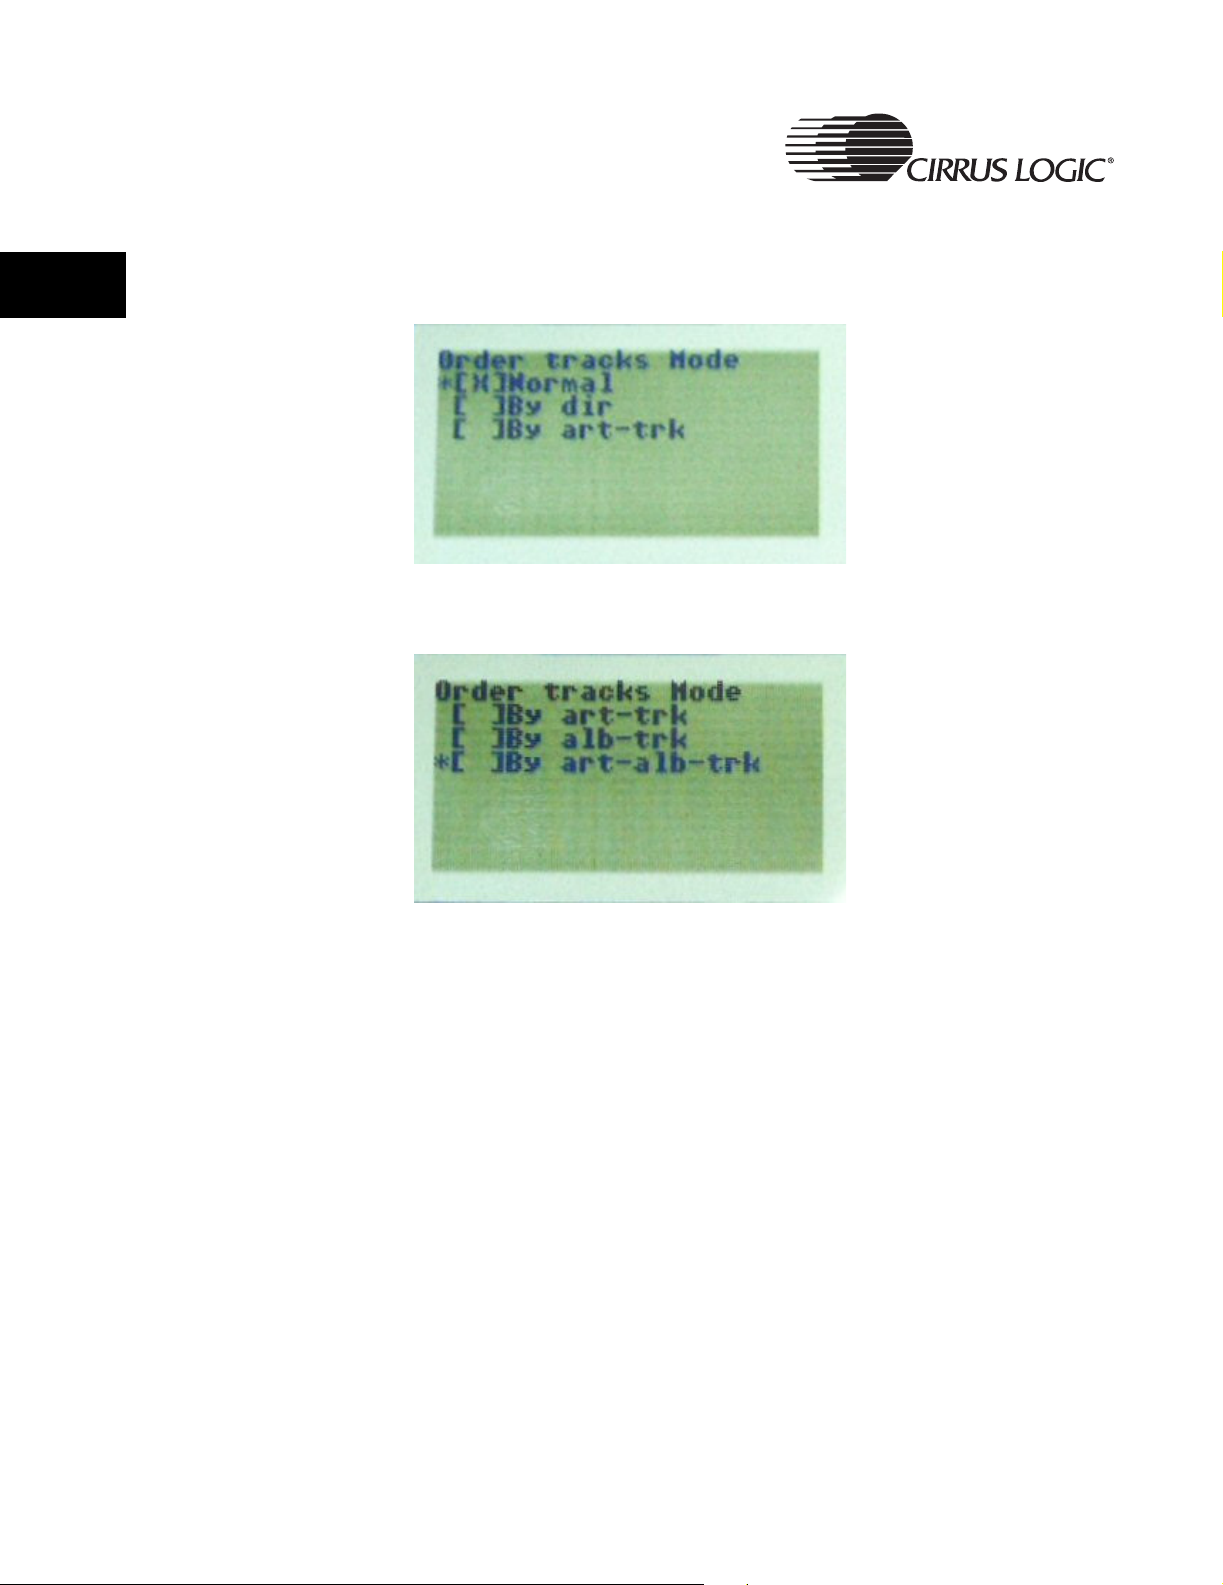
2.2.13 Order Tracks Menu
Selecting the Order Tracks menu item displays the following screen.
Figure 2-33. Order Tracks Screen 1
Figure 2-34. Order Tracks Screen 2
The Order Tracks option is selected from the scrolling list in the Main menu.
Selecting the Audio Source menu item displays the screens shown in
Figure 2-33 and Figure 2-34. The X in the box indicates the current setting of
the Order Tracks item. The asterisk (*) denotes the cursor position.
Highlighting a different setting and pressing the Right button will change the
setting. Pressing the Select button will go back to the parent menu.
• By Dir: This mode is similar to the original mode when the system boots.
Files are kept in directory and sorted by filename.
• By Artist and Track: This mode is Sort by Artist, if the Artist fields are the
same for several songs, they will be sorted by filename. All files listed
appear as Artist.Filename.
• By Album and Track: This mode is Sort by Album, if the Album fields are
the same for several songs, they will be sorted by filename. All files listed
appear as Album.Filename.
• By Artist, Album and Track: This mode is Sort by Artist, if the Artist fields
are the same for several songs, they will be sorted by Album, if the Album
44 CRD7410-HE User’s Guide - DS621UMC2
Copyright 2004 Cirrus Logic
User Menu Selections
fields are the same for several songs, they will be sorted by filename. All
files here appear as Artist.Album.Filename.
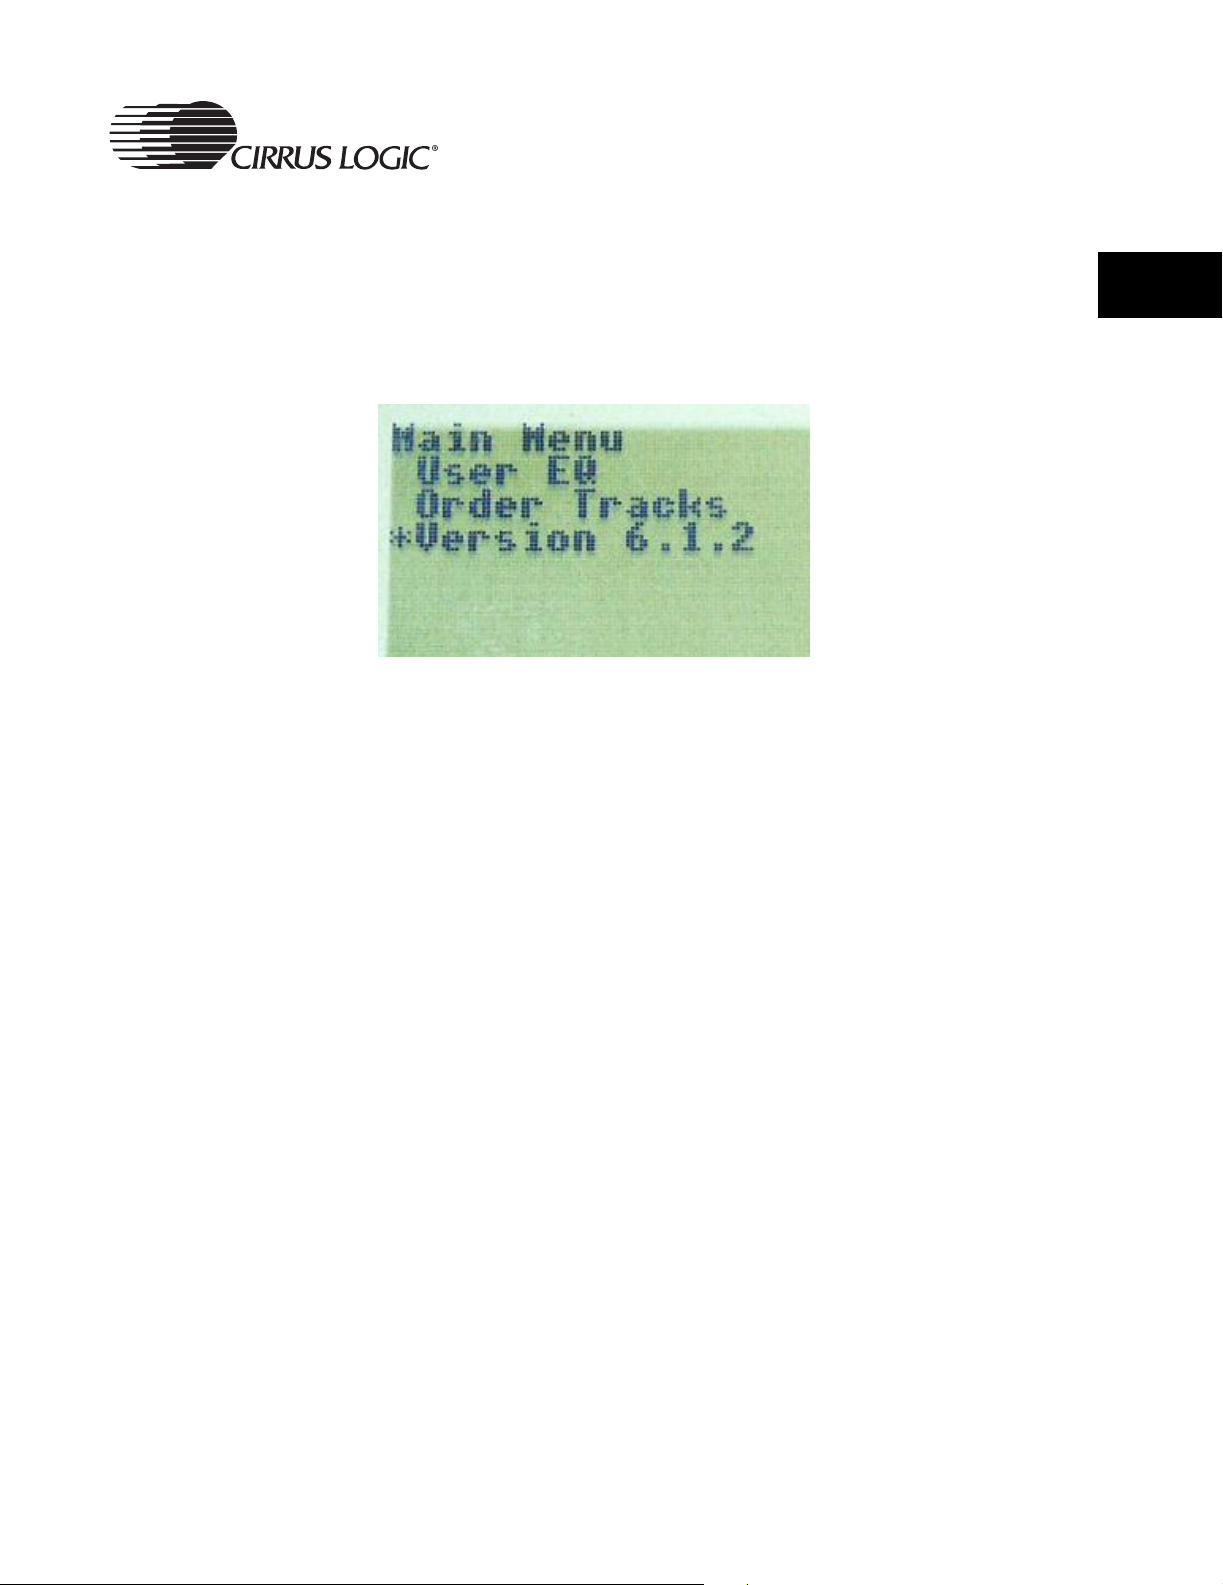
2.2.14 Firmware Version
The following screen shows the version of firmware loaded.
Figure 2-35. Firmware Version Screen
Ver x.x.x represents the version of the firmware.
2.3 Menu Options
Many of the buttons in the user interface have modified/different functions if
they are pressed and released or if they are pressed and held. Some buttons
continue to perform their function so long as the button is held.
2
The following is a complete list of the functions of the buttons by player mode.
2.3.1 Power Off Mode
Play/Pause/Up
• Pressing this button when the lid is closed will power on the player and
start playback of the first track. The player will then be in Normal mode.
• All other buttons are ignored in this mode.
CRD7410-HE User’s Guide - DS621UMC2 45
Copyright 2004 Cirrus Logic

2
User Menu Selections
2.3.2 Normal Mode
Play/Pause/Up
• If the player is stopped, pressing this button will commence playback
of the current track.
• If the player is playing, pressing this button will pause playback of the
current track.
• If the player is paused, pressing this button will resume playback of the
current track.
Stop/Down
• If the player is not stopped, pressing this button will stop playback of
the current track and set the playback position to the beginning of the
track.
• If the player is stopped and a custom playlist is loaded, pressing this
button will cancel the custom playlist and revert to the default playlist.
• Holding this button for 1 second will put the player into power off mode,
stopping playback and reducing power consumption as much as
possible.
Previous/Left/Delete
• Pressing this button when the player is not stopped and the playback
position is less than 3 seconds into the current track will skip to the
previous track, maintaining the current playback mode.
• Pressing this button when the player is not stopped and the playback
position is greater than or equal to 3000 ms into the current track will
seek back to the beginning of the current track, maintaining the current
playback mode.
• Holding this button for 500 ms when the player is not stopped will start
seeking backward within the track. Every 250 ms afterwards, another
backward seek will occur.
• Holding the button for 500 ms when the player is stopped will skip to
the previous track when the button is first pressed, at the 500 ms point,
and then every 250 ms afterwards until the button is released.
46 CRD7410-HE User’s Guide - DS621UMC2
Copyright 2004 Cirrus Logic

User Menu Selections
Next/Right
• Pressing this button when the player is not stopped will skip to the next
track, maintaining the current playback mode.
• Holding this button for 500 ms when the player is not stopped will start
seeking forward within the track. Every 250 ms afterwards, another
forward seek will occur.
• Holding this button for 500 ms when the player is stopped will skip to
the next track when the button is first pressed, at the 500 ms point, and
then every 250 ms afterwards until the button is released.
2
Select/A
• If playing, pressing this button will set the A point for the A
• If the player is stopped, pressing this button will enter the Playlist
Navigator/Menu
• Pressing this button will enter Menu mode.
• Holding this button for 500 ms will enter Navigator mode.
• If the player is stopped and a playlist is created, pressing this button
Vol+
• Pressing this button will turn the volume up by one setting.
• Holding this button for 500 ms will turn up the volume by one setting
• The behavior of this button is not affected by the other modes, other
→B Repeat/Program
→B Repeat.
Pressing it again will set the B point and restart playback from the A
point. Pressing it again will cancel A
Selection mode.
will leave the Playlist Selection mode.
when the button is first pressed, at the 500 ms point, and then every
100 ms afterwards until the button is released.
than the fact that the volume indicator is only displayed when in
Normal mode.
→B Repeat mode.
Vol-
• Pressing this button will turn the volume down by one setting.
• Holding this button for 500 ms will turn down the volume by one setting
when the button is first pressed, at the 500 ms point, and then every
100 ms afterwards until the button is released.
• The behavior of this button is not affected by the other modes, other
than the fact that the volume indicator is only displayed when in
Normal mode.
CRD7410-HE User’s Guide - DS621UMC2 47
Copyright 2004 Cirrus Logic

2
User Menu Selections
2.3.3 Navigator/Menu Mode
Play/Pause/Up
• Pressing this button will move the cursor up the current directory list by
one entry. If already at the top of the directory list, pressing this button
does nothing.
• Holding this button for 500 ms will move the cursor up the current
directory list by one entry when the button is first pressed, at the
500 ms point, and then every 125 ms afterwards until the button is
released or the top of the directory list is reached.
Stop/Down
• Pressing this button will move the cursor down the current directory list
by one entry. If already at the bottom of the directory list, pressing this
button does nothing.
• Holding this button for 500 ms will move the cursor down the current
directory list by one entry when the button is first pressed, at the
500 ms point, and then every 125 ms afterwards until the button is
released or the bottom of the directory list is reached.
Previous/Left/Delete
• Pressing this button will move up one level in the directory hierarchy. If
already at the root directory, pressing this button does nothing.
• Holding this button for 500 ms will move up one level in the directory
hierarchy when the button is first pressed, at the 500 ms point, and
then every 250 ms afterwards until the button is released or the root
directory is reached.
Next/Right
• If the cursor is currently on a directory in the list, pressing this button
will move into the specified directory.
• While the cursor is on a directory in the list, holding this button for
500 ms will move down the directory hierarchy when the button is first
pressed, at the 500 ms point, and then every 125 ms afterwards until
the button is released or the current entry is no longer a directory.
• If the cursor is currently on a file in the list, pressing this button will do
nothing.
Navigator/Menu
• Pressing this button will exit Navigator mode and return to the Normal
mode.
48 CRD7410-HE User’s Guide - DS621UMC2
Copyright 2004 Cirrus Logic

Select/A→B Repeat/Program
• If the cursor is currently on a file in the list, pressing this button will
commence playback of the currently selected file and return to Normal
mode.
• If the cursor is currently on a directory in the list, pressing this button
will commence playback of the directory in subdirs mode and return to
Normal mode.
2.3.4 Playlist Selection Mode
Play/Pause/Up
• Pressing this button will move the cursor up the list of playlists by one
entry. If already at the top of the list, pressing this button does nothing.
• Holding this button for 500 ms will move the cursor up the list of
playlists by one entry when the button is first pressed, at the 500 ms
point, and then every 125 ms afterwards until the button is released or
the top of the list is reached.
User Menu Selections
2
Stop/Down
• Pressing this button will move the cursor up the list of playlists by one
entry. If already at the bottom of the list, pressing this button does
nothing.
• Holding this button for 500 ms will move the cursor down the list of
playlists by one entry when the button is first pressed, at the 500 ms
point, and then every 125 ms afterwards until the button is released or
the bottom of the list is reached.
Previous/Left/Delete
• This button is ignored.
Next/Right
• This button is ignored.
Select
• If the cursor is on the {new} entry, pressing this button will enter Playlist
Creation mode.
• If the cursor is on one of the playlist entries, pressing this button will
load the selected playlist, commence playback of the first track, and
return to Normal mode.
Navigator/Menu
• Pressing this button will exit Playlist Selection mode and return to
Normal mode.
CRD7410-HE User’s Guide - DS621UMC2 49
Copyright 2004 Cirrus Logic

2
User Menu Selections
2.3.5 Playlist Creation Mode
Play/Pause/Up
• Pressing this button will move the cursor up the current directory list by
one entry. If already at the top of the directory list, pressing this button
does nothing.
• Holding this button for 500 ms will move the cursor up the current
directory list by one entry when the button is first pressed, at the
500 ms point, and then every 125 ms afterwards until the button is
released or the top of the directory list is reached.
Stop/Down
• Pressing this button will move the cursor down the current directory list
by one entry. If already at the bottom of the directory list, pressing this
button does nothing.
• Holding this button for 500 ms will move the cursor down the current
directory list by one entry when the button is first pressed, at the
500 ms point, and then every 125 ms afterwards until the button is
released or the bottom of the directory list is reached.
Previous/Left/Delete
• Pressing this button will move up one level in the directory hierarchy. If
already at the root directory, pressing this button does nothing.
• Holding this button for 500 ms will move up one level in the directory
hierarchy when the button is first pressed, at the 500 ms point, and
then every 125 ms afterwards until the button is released or the root
directory is reached.
Next/Right
• If the cursor is currently on a directory in the list, pressing this button
will move into the specified directory.
• While the cursor is on a directory in the list, holding this button for
500 ms will move down the directory hierarchy when the button is first
pressed, at the 500 ms point, and then every 125 ms afterwards until
the button is released or the current entry is no longer a directory.
• If the cursor is currently on a file in the list, pressing this button will do
nothing.
Select/A
• If the cursor is currently on a file in the list, pressing this button will add
→B Repeat/Program
the selected file to the playlist.
• If the cursor is currently on a directory in the list, this button is ignored.
50 CRD7410-HE User’s Guide - DS621UMC2
Copyright 2004 Cirrus Logic

Navigator/Menu
• Pressing this button will commence playback of the created playlist
and return to Normal mode.
2.3.6 Menu Mode, in a Menu List
Play/Pause/Up
• Pressing this button will move the cursor up the current menu by one
entry. If already at the top of the menu, pressing this button does
nothing.
• Holding this button for 500 ms will move the cursor up the current
menu by one entry when the button is first pressed, at the 500 ms
point, and then every 125 ms afterwards until the button is released or
the top of the menu is reached.
Stop/Down
User Menu Selections
2
• Pressing this button will move the cursor down the current menu by
one entry. If already at the bottom of the menu, pressing this button
does nothing.
• Holding this button for 500 ms will move the cursor down the current
menu by one entry when the button is first pressed, at the 500 ms
point, and then every 125 ms afterwards until the button is released or
the bottom of the menu is reached.
Previous/Left/Delete
• This button is ignored.
Next/Right
• This button is ignored.
Select/A
• Pressing this button will display the selected setting screen.
Navigator/Menu
• Pressing this button will return to Normal mode.
→B Repeat/Program
2.3.7 Menu Mode, in a Settings Screen
Play/Pause/Up
• Pressing this button will move the cursor up the list of settings. If
already at the first setting, pressing this button does nothing.
• Holding this button for 500 ms will move the cursor up the list of
settings when the button is first pressed, at the 500 ms point, and then
CRD7410-HE User’s Guide - DS621UMC2 51
Copyright 2004 Cirrus Logic

User Menu Selections
every 125 ms afterwards until the button is released or the first setting
is reached.
2
Stop/Down
• Pressing this button will move the cursor down the list of settings. If
already at the last setting, pressing this button does nothing.
• Holding this button for 500 ms will move the cursor down the list of
settings when the button is first pressed, at the 500 ms point, and then
every 125 ms afterwards until the button is released or the last setting
is reached.
Previous/Left/Delete
• This button is ignored.
Next/Right
• Pressing this button will change the setting to the currently selected
value.
Select/A
• Pressing this button will return to the menu containing the current
Navigator/Menu
• Pressing this button will return to Normal mode.
→B Repeat/Program
setting.
2.3.8 Menu Mode, in the User EQ Setting Screen
play/Pause/Up
• Pressing this button will increase the gain for the currently selected
band by 1dB.
• Holding this button for 500 ms will increase the gain for the currently
selected band by 1dB when the button is first pressed, at the 500 ms
point, and then every 125 ms afterwards until the button is released or
+12dB is reached.
Stop/Down
• Pressing this button will decrease the gain for the currently selected
band by 1dB.
• Holding this button for 500 ms will decrease the gain for the currently
selected band by 1dB when the button is first pressed, at the 500 ms
point, and then every 125 ms afterwards until the button is released or
-12dB is reached.
52 CRD7410-HE User’s Guide - DS621UMC2
Copyright 2004 Cirrus Logic

Previous/Left/Delete
• Pressing this button will select the next lower band.
User Menu Selections
• Holding this button for 500 ms will select the next lower band when the
button is first pressed, at the 500 ms point, and then every 250 ms
afterwards until the button is released or the first band is selected.
Next/Right
• Pressing this button will select the next higher band.
• Holding this button for 500 ms will select the next higher band when
the button is first pressed, at the 500 ms point, and then every 250 ms
afterwards until the button is released or the last band is selected.
Select/A
• Pressing this button will return to the menu containing the user EQ
Navigator/Menu
• Pressing this button will return to Normal mode.
The following playback modes are available when playing from the default
playlist:
A, 1, D, RA, R1, RD, SA, S1, SD, RSA, RS1, RSD, IA, IS, HA - in that order.
If a custom playlist has been loaded, the playback modes available are:
A, 1, RA, R1, SA, S1, RSA, RS1, IA, HA - in that order.
→B Repeat/Program
setting.
2
If subdirectory playback mode has been selected from the navigator, these
playback modes are available:
S, RS, SS, RSS, IS, HS - in that order.
CRD7410-HE User’s Guide - DS621UMC2 53
Copyright 2004 Cirrus Logic

2
User Menu Selections
54 CRD7410-HE User’s Guide - DS621UMC2
Copyright 2004 Cirrus Logic

FM Tuner
Chapter 3
3.1 Tuner Subsystem
3.1.1 Integrated Stereo FM Tuner
The CRD7410-HE system incorporates a single-chip, electronically tuned FM
stereo radio with fully integrated IF selectivity and demodulation.
The radio can be tuned to the European, US, and Japanese FM bands.
3.1.2 CS5333 ADC
This system provides support for the tuner’s analog audio output through an
ADC (Analog-to-Digital Converter). A multiplexer on the CRD7410-HE main
board switches between sources, selecting analog input from the CD or the
tuner.
The tuner’s analog outputs are sampled and converted to digital data by the
CS5333 and delivered to the CS7410 for EQ and 3D sound effects
processing.
3FM Tuner
3
3.1.3 CS43L42 DAC
The digital signal from the CDS7410 is sent to the CS43L42 DAC. The digital
data is converted to an analog signal and delivered the headphones amplifier
and line-level amplifier on board the CS43L42.
The CS43L42 headphones amplifier output is sent to the headphones jack.
The CS43L42 line-level analog output is sent to the line out jack.
3.1.4 Tuner Mode Main Menu
The X in the box indicates the current setting of the Audio Source item.
Highlighting a different item and pressing the Right button will change the
setting.
Pressing the Select button will go back to the parent menu. Refer to
Figure 3-1.
CRD7410-HE User’s Guide - DS621UMC2 55
Copyright 2004 Cirrus Logic

3
FM Tuner
Figure 3-1. Audio Source Menu
When the audio source setting is set to CD, the tuner will be disabled and the
data from disc will be played - MP3/WMA/CDDA etc. If it is set to FM, the tuner
will be enabled. This selection can only be made when the player is in Stop
mode. The default setting of the Audio Source item is CD.
Figure 3-2. Navigator Mode Screen (Tuner Mode)
The arrow buttons can be used to highlight a preset slot, which is then
selected by pressing the Select button. Selecting a preset while listening to the
tuner will cause that preset to be tuned. Selecting a preset while in preset edit
mode will cause that preset slot to be loaded with the current tuner frequency.
56 CRD7410-HE User’s Guide - DS621UMC2
Copyright 2004 Cirrus Logic
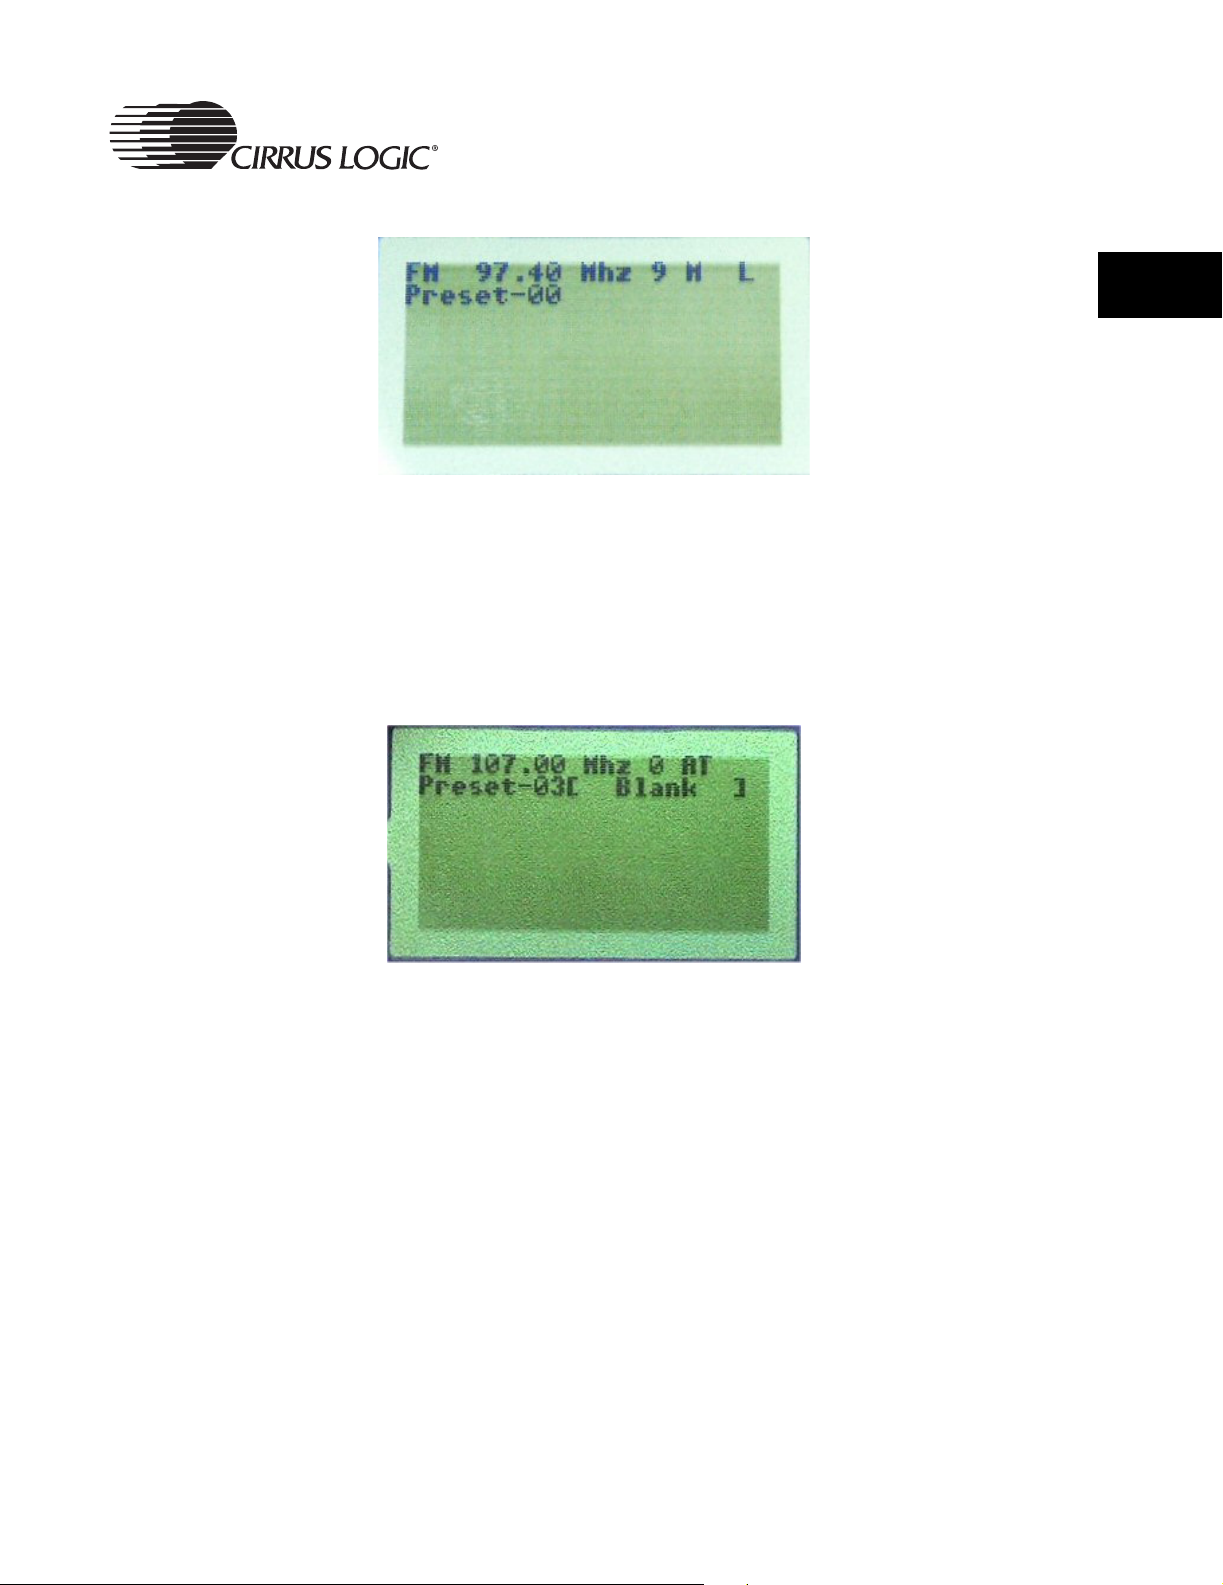
FM Tuner
Figure 3-3. Tuner Playback Screen
In this example, the current band (FM), frequency (99.90 MHz), battery life (0),
and tuning mode (Automatic - A) are displayed in the first line of the LCD
display. The preset slots and their frequency settings (if any) are displayed in
the second, third, and fourth lines of the LCD display. This list will scroll if there
are too many presets to display at once (more than three).
3
Figure 3-4. Tuner Tuning Screen
When the system is in FM mode, pressing the Select button toggles between
Automatic (A) or Manual (M) tuning mode.
Pressing the Up or Down buttons will begin either and upward or downward
search for an FM station.
The Next and Previous buttons select an FM preset slot (location). Pressing
the Select button will load the current preset slot with the current tuner
frequency.
When in manual or automatic tuning mode, and tuning is in progress, the
tuning indicator, T will be displayed after the tuning mode (in this example, A
for automatic tuning mode). Refer to Figure 3-4. All tuning commands will be
ignored until the current tuning is complete.
CRD7410-HE User’s Guide - DS621UMC2 57
Copyright 2004 Cirrus Logic

3
FM Tuner
Figure 3-5. Tuner Edit Screen
In this example, the current band (FM), frequency (97.4 MHz), battery life (0),
and tuning mode (Automatic - A) are displayed in the first line of the LCD
display. The preset slot to save the current frequency and its contents (if any)
are displayed in the second line of the LCD display.
3.1.5 Tuner Mode Button Functions
The following is a complete list of the functions of the buttons based on the
tuner mode.
play/pause/up
• If the tuning mode is set to manual, pressing this button will increase
the current frequency by one step and the system enters preset edit
mode. The step grid is 100kHz.
• Holding this button for 500 ms will increase the current frequency by
one step when the button is first pressed, at the 500 ms point, and then
every 125 ms afterwards until the button is released or the maximum
frequency is reached.
• If the tuning mode is set to automatic, pressing this button will search
the for the next higher-frequency station, and enter preset edit mode.
stop/down
• If the tuning mode is set to manual, pressing this button will decrease
the current frequency by one step and the system enters preset edit
mode. The step grid is 100kHz.
• Holding this button for 500 ms will decrease the current frequency by
one step when the button is first pressed, at the 500 ms point, and then
every 125 ms afterwards until the button is released or the minimum
frequency is reached.
• If the tuning mode is set to automatic, pressing this button will search
the for the next lower-frequency station, and enter preset edit mode.
58 CRD7410-HE User’s Guide - DS621UMC2
Copyright 2004 Cirrus Logic

FM Tuner
previous/left
• When listening to the FM source, pressing this button will switch to the
next lower-numbered preset slot, the frequency in that slot will be
tuned.
• When editing presets, pressing this button will switch to the next
lower-numbered preset slot.
• When in Tuner Navigator mode, pressing this button will erase the
currently selected preset slot contents.
next/right
• When listening to the FM source, pressing this button will select the
next higher-numbered preset slot, the frequency in that slot will be
tuned.
• When editing presets, pressing this button will switch to the next
higher-numbered preset slot.
select
3
• When listening to the FM source, pressing this button will switch the
tuning mode between automatic and manual.
• When editing presets, pressing this button will save the current tuner
frequency into the current slot, and the system returns to listening
mode.
navigator/menu
• Pressing this button will enter menu mode.
• Holding this button for 500 ms will enter navigator mode.
vol+
• Pressing this button will turn the volume up by one setting.
• Holding this button for 500 ms will turn up the volume by one setting
when the button is first pressed, at the 500 ms point, and then every
100 ms afterwards until the button is released, or the highest volume
setting is reached.
• The behavior of this button is not affected by the other modes, other
than the fact that the volume indicator is only displayed when in tuner
mode.
vol-
• Pressing this button will turn the volume down by one setting.
• Holding this button for 500 ms will turn up the volume by one setting
when the button is first pressed, at the 500 ms point, and then every
CRD7410-HE User’s Guide - DS621UMC2 59
Copyright 2004 Cirrus Logic

FM Tuner
100 ms afterwards until the button is released, or the lowest volume
setting is reached.
3
• The behavior of this button is not affected by the other modes, other
than the fact that the volume indicator is only displayed when in tuner
mode.
60 CRD7410-HE User’s Guide - DS621UMC2
Copyright 2004 Cirrus Logic
 Loading...