

Page 1

FORGE Application Generator - Batch
9300 / 9400 / 9500CE / 9600 Series
Mobile Computers
DOC Version 1.33
Page 2

Copyright © 2007~2010 CIPHERLAB CO., LTD.
All rights reserved
The software contains proprietary information of CIPHERLAB CO., LTD.; it is provided
under a license agreement containing restrictions on use and disclosure and is also
protected by copyright law. Reverse engineering of the software is prohibited.
Due to continued product development this information may change without notice. The
information and intellectual property contained herein is confidential between CIPHERLAB
and the client and remains the exclusive property of CIPHERLAB CO., LTD. If you find
any problems in the documentation, please report them to us in writing. CIPHERLAB
does not warrant that this document is error-free.
No part of this publication may be reproduced, stored in a retrieval system, or
transmitted in any form or by any means, electronic, mechanical, photocopying,
recording or otherwise without the prior written permission of CIPHERLAB CO., LTD.
For product consultancy and technical support, please contact your local sales
representative. Also, you may visit our web site for more information.
The CipherLab logo is a registered trademark of CIPHERLAB CO., LTD.
Microsoft, Windows, and the Windows logo are registered trademarks of Microsoft
Corporation in the United States and/or other countries.
Bluetooth is a trademark of Bluetooth SIG, Inc., U.S.A.
Other product names mentioned in this manual may be trademarks or registered
trademarks of their respective companies and are hereby acknowledged.
The editorial use of these names is for identification as well as to the benefit of the
owners, with no intention of infringement.
CIPHERLAB CO., LTD.
Website:
http://www.cipherlab.com
Page 3

RELEASE NOTES
Version Date Notes
1.33 Jan. 11, 2010
1.32 Dec. 29, 2009
1.31 Dec. 21, 2009
1.30 Oct. 21, 2009
1.24 May. 06, 2009
1.23 Aug. 25, 2008
1.22 Jan. 31, 2008
1.21 Nov. 20, 2007
Modified: 4.1.1 Barcode Reader — Add “None” to Barcode Reader
Modified: Appendix II, III, V — Good Read Notifications setting
Modified: Appendix III — Add “UPC/EAN Security Level” for SE955
Modified: Appendix III — Redundancy Level default setting
Modified: Appendix V — Remove “Send Control Header” from 2D
Support ISBT 128 for CCD/Laser
Use same filename: ReaderDll_CE.dll
Modified: 4.1.2 RFID Reader — update screenshot and
Support 9300 and 9600
Modified: 1.8 Advanced — Add “Enable MSQI Function”
Modified: 4.1 Reader Type — Tables updated
Modified: Appendix III — Add “Timeout between Same Barcode”
Modified: Appendix V — Add “Intercharacter Gap Size” for 4507
Modified: Appendix V —
Modified: Appendix V — Remove Mirror Image (for Data Matrix)
Add new function descriptions and remove 9500PPC
New: Installing from the Power Suite CD-ROM – Provide setup file
New: Getting Started with AG9500
Modified: section 1.9.16 Image – Properties
Modified: section 3 Lookup – Add “Data Type” for field checking
Modified: section 4 Barcode – Add Good Read LED and Beep for
Modified: section 5 Settings – Camera initial settings
Modified: section 5 Settings – System initial settings – Auto run
Modified: Appendix II~IV – Update default values
Modified: Appendix II~III – Support replacement of EAN-128 field
Modified: Appendix IV – Add “Image Capture” feature
Modified: section 1.10 Prompt – Max. 30 characters allowed
Modified: sections 5.3 and 5.4 – Remove [Warning Beep]
Modified: section 1.9.16 Image – file format .TIFF not supported
selections and update screenshot
Symbologies - Macro PDF settings
ID_MOD_MP_RFID table
for SE955
Remove “Gain Time” from Image Capture
settings
to install files to mobile computer
9400
after pre-loading the last .A94 or .A95 file
separator for all scan engines
Page 4

1.20 Oct. 18, 2007
Modified: section 1.2 Index Field
Modified: section 1.8 Advanced – Only Read Data Once
New: section 1.9.16 Image (data type supported by 9400
Application Generator)
Modified: section 2.4 Item Name
1.12 Oct. 05, 2007
Modified: sections 1.9.5 and 1.9.7 –
data when selecting “-field”
Modified: section 4.4 Code ID – removed
New: Appendix I – Utilities Menu > Browse: example provided
1.11 Sep. 20, 2007
New: section 4.4 Code ID
Modified: minor changes
1.10 Aug. 31, 2007 New Word template applied
Removed: section 4.2 Reader Settings – Code ID
1.01 Oct. 24, 2006
Modified: Add “Run” to the main menu of 9500_PPC
Removed: File > Run
New: section 7.1 Sample screenshot of 9500_CE
1.00 Oct. 17, 2006 Initial release
Minus sign prefixed to saved
Page 5

CONTENTS
RELEASE NOTES.............................................................................................................................. - 3 -
INTRODUCTION.................................................................................................................................... 1
Features............................................................................................................................................. 2
Installing from the CD-ROM .............................................................................................................. 3
How It Works...................................................................................................................................... 4
Getting Started .................................................................................................................................. 5
Command Menu........................................................................................................................... 6
Application Template ................................................................................................................... 8
FORM .................................................................................................................................................11
1.1 ID ...............................................................................................................................................12
1.2 Index Field................................................................................................................................. 12
1.3 Esc .............................................................................................................................................13
1.4 Next ...........................................................................................................................................13
1.5 Lookup (File) .............................................................................................................................13
1.6 Record .......................................................................................................................................14
1.6.1 Export files ........................................................................................................................ 14
1.6.2 Manipulate data ...............................................................................................................14
1.7 Time Stamp............................................................................................................................... 15
1.7.1 Stamp Position ................................................................................................................. 15
1.7.2 Date/Time Format............................................................................................................ 15
1.8 Advanced...................................................................................................................................16
1.8.1 Only Read Data Once....................................................................................................... 16
1.8.2 Change Export Name ....................................................................................................... 16
1.8.3 Auto Export… ....................................................................................................................16
1.8.4 Enable MSQI Function .....................................................................................................17
1.9 Data Type .................................................................................................................................. 23
1.9.1 Nil ...................................................................................................................................... 24
1.9.2 Text.................................................................................................................................... 24
1.9.3 Letter................................................................................................................................. 24
1.9.4 Alphameric........................................................................................................................ 25
1.9.5 Integer............................................................................................................................... 25
1.9.6 Real ................................................................................................................................... 26
1.9.7 Auto (+/-) ..........................................................................................................................26
1.9.8 Extension .......................................................................................................................... 27
1.9.9 Pass down ........................................................................................................................28
1.9.10 Boolean ..........................................................................................................................28
1.9.11 Lookup............................................................................................................................28
1.9.12 Fixed data.......................................................................................................................29
1.9.13 Prompt............................................................................................................................ 29
1.9.14 Pause..............................................................................................................................29
1.9.15 Counter........................................................................................................................... 29
1.9.16 Image..............................................................................................................................30
Page 6

FORGE 9 Series Application Generator User Guide
1.10 Prompt ....................................................................................................................................
32
1.11 Input Source ...........................................................................................................................32
1.12 Minimum Length ....................................................................................................................32
1.13 Maximum Length....................................................................................................................32
1.14 Lookup (Field) / Variables .....................................................................................................33
1.14.1 Lookup (Field) ................................................................................................................33
1.14.2 Variables......................................................................................................................... 34
1.15 Properties ...............................................................................................................................35
1.15.1 Field Data ....................................................................................................................... 35
1.15.2 Barcode Input.................................................................................................................37
1.16 Reset ....................................................................................................................................... 38
MENU ................................................................................................................................................. 39
2.1 ID ...............................................................................................................................................40
2.2 ESC ............................................................................................................................................40
2.3 Menu Caption ...........................................................................................................................40
2.4 Item Name ................................................................................................................................40
2.5 Next ...........................................................................................................................................41
2.6 Data ...........................................................................................................................................41
2.7 Reset .........................................................................................................................................42
LOOKUP..............................................................................................................................................43
3.1 Name......................................................................................................................................... 44
3.2 Field Property............................................................................................................................ 44
3.2.1 Fixed Length ..................................................................................................................... 44
3.2.2 Delimiter ...........................................................................................................................44
3.3 Number of Fields ......................................................................................................................44
3.4 Data Type .................................................................................................................................. 45
3.5 Field Name................................................................................................................................ 46
3.6 (Max) Length ............................................................................................................................. 46
3.7 Key Field.................................................................................................................................... 46
3.8 Change Export Name................................................................................................................ 47
3.9 Auto Export Lookup Table When Close Application................................................................ 47
3.10 Action When the Format of Record Is Wrong .......................................................................47
3.10.1 Stop the Import Process................................................................................................ 47
3.10.2 Truncate/Reformat the Record..................................................................................... 47
3.10.3 Skip the Record..............................................................................................................47
3.11 Action When the Input Data Has No Match..........................................................................48
3.11.1 Continue ......................................................................................................................... 48
3.11.2 Show Warning Message ................................................................................................ 48
3.11.3 Insert to Lookup file.......................................................................................................48
3.11.4 Show Warning Message & Insert..................................................................................48
3.11.5 Clear the Screen ............................................................................................................49
3.11.6 Show Warning & Clear Screen ...................................................................................... 49
3.12 Reset ....................................................................................................................................... 49
Page 7

FORGE 9 Series Application Generator User Guide
BARCODE ........................................................................................................................................... 51
4.1 Reader Type ..............................................................................................................................52
4.1.1 Barcode Reader ...............................................................................................................52
4.1.2 RFID Reader .....................................................................................................................54
4.1.3 Reset................................................................................................................................. 57
4.2 Reader Settings ........................................................................................................................ 58
4.3 Barcode & Parameters.............................................................................................................58
SETTINGS........................................................................................................................................... 59
5.1 Program Start From ..................................................................................................................60
5.2 Data Field Delimiter.................................................................................................................. 60
5.3 Camera Initial Settings............................................................................................................. 60
5.4 System Initial Settings..............................................................................................................61
5.4.1 Auto-preload the Last Template File ............................................................................... 61
5.4.2 Data Deletion....................................................................................................................62
5.4.3 Entry Options .................................................................................................................... 62
5.4.4 Vibrator Duration..............................................................................................................62
5.4.5 Default Export Store......................................................................................................... 62
5.4.6 Always Delete All Database … ......................................................................................... 62
5.5 Security......................................................................................................................................63
5.6 Reset .........................................................................................................................................65
DEMONSTRATION ON MOBILE COMPUTERS.................................................................................... 67
Main Menu (Reader Test) ...............................................................................................................68
File Menu ......................................................................................................................................... 69
Open .A94 file.............................................................................................................................69
Import lookup files .....................................................................................................................69
Export files .................................................................................................................................. 70
Exit the application.....................................................................................................................71
Run the Application......................................................................................................................... 72
Utilities Menu...................................................................................................................................73
Browse ........................................................................................................................................ 73
Delete..........................................................................................................................................77
Settings....................................................................................................................................... 77
About................................................................................................................................................ 78
LINEAR IMAGER (CCD), LASER (SE950) ........................................................................................... 79
Reader Settings Table..................................................................................................................... 79
Symbology Settings Table...............................................................................................................80
LASER (SE955).................................................................................................................................. 85
Reader Settings Table..................................................................................................................... 85
Symbology Settings Table...............................................................................................................86
LR, ELR LASER................................................................................................................................... 91
Reader Settings Table..................................................................................................................... 91
Symbology Settings Table...............................................................................................................91
Page 8

FORGE 9 Series Application Generator User Guide
2D IMAGER ........................................................................................................................................
Reader Settings Table..................................................................................................................... 97
Symbology Settings Table...............................................................................................................99
97
Page 9

INTRODUCTION
FORGE Batch Application Generator for 9 Series Mobile Computers, featuring easy-to-use
and quick-to-apply, is designed for the users of Windows mobile computers to develop
custom templates for the use with AG application on the mobile computers. Users are
then able to define their own data collection templates on any desktop computer without
spending time writing any program code.
FORGE Application Generator is used to develop applications for many purposes, such
as –
Receiving in Retail
Price Check
Product labeling & Tracking
Shelf Product Replenishment
Mobile Point of Sale (POS)
Mobile Inventory Management
Order Picking & Staging
Work-In-Process Tracking
Material Flow Control
Transportation & Distribution
Warehousing
Asset Management
After having configured and saved your template, copy or move the template file to the
mobile computer. When running the AG application on the mobile computer, data
collection can commence immediately by making use of the template specified.
This manual serves to provide comprehensive understanding of FORGE Batch Application
Generator for 9 Series Mobile Computers, and helps define custom template for a specific
application. We recommend that you read the document thoroughly before use and keep
it at hand for quick reference.
Thank you for choosing CipherLab products!
1
Page 10

FORGE 9 Series Application Generator User Guide
FEATURES
Supports CipherLab Windows CE 5.0 mobile computers —9400 / 9500CE Series
Supports CipherLab Windows CE 6.0 mobile computers — 9300 / 9600 Series
Definition of program flow
Editing of screens and data
Managing barcode reader and RFID reader
Font size options and program localization
Password-protected user settings to prevent unauthorized user intervention
Definition of system initial settings for a quick start
Easy cloning by delivering the template file
2
Page 11

Introduction
INSTALLING FROM THE CD-ROM
The program files are provided on the product CD:
9300 Application Generator
AG9300.exe Application Generator for 9300
AG9300-xxxxxxx.lng This language file for AG9300.exe
AG9300CE.exe The setup file for installing the applet to “\DiskOnChip\FORGE\” on the
mobile computer.
The FORGE folder contains two files: 9300_CE.exe and ReaderDll_CE.dll
A shortcut to the AG applet is created and placed in: Start | Programs.
9400 Application Generator
AG9400.exe Application Generator for 9400
AG9400-xxxxxxx.lng This language file for AG9400.exe
AG9400CE.exe The setup file for installing the applet to “\DiskOnChip\FORGE\” on the
mobile computer.
The FORGE folder contains two files: 9400_CE.exe and ReaderDll_CE.dll
A shortcut to the AG applet is created and placed in: Start | Programs.
9500 Application Generator
AG9500.exe Application Generator for 9500CE
AG9500-xxxxxxx.lng This language file for AG9500.exe
AG9500CE.exe The setup file for installing the applet to “\DiskOnChip\FORGE\” on the
mobile computer.
The FORGE folder contains two files: 9500_CE.exe and ReaderDll_CE.dll
A shortcut to the AG applet is created and placed in: Start | Programs.
9600 Application Generator
AG9600.exe Application Generator for 9600
AG9600-xxxxxxx.lng This language file for AG9600.exe
AG9600CE.exe The setup file for installing the applet to “\DiskOnChip\FORGE\” on the
mobile computer.
The FORGE folder contains two files: 9600_CE.exe and ReaderDll_CE.dll
3
A shortcut to the AG applet is created and placed in: Start | Programs.
Page 12
FORGE 9 Series Application Generator User Guide
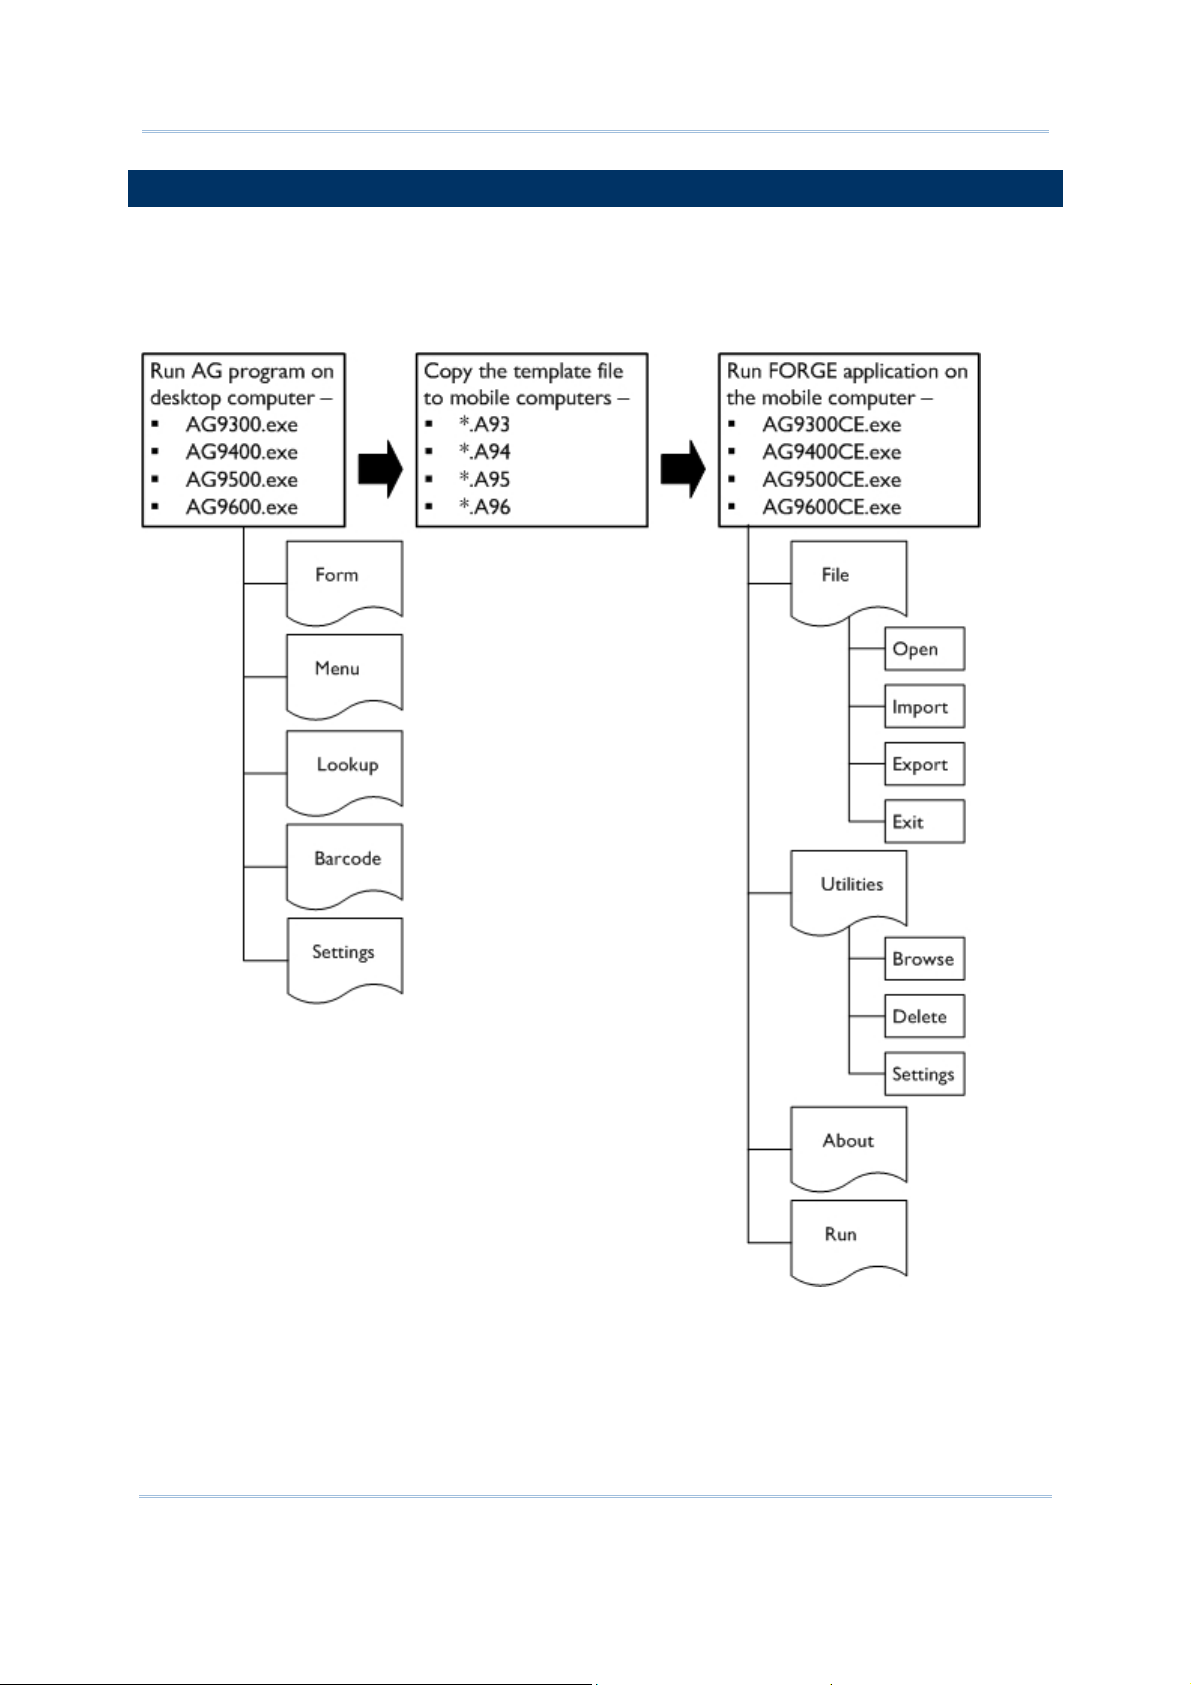
HOW IT WORKS
Data collection mainly consists of three elements: input (scanning or key-in), data
processing, and output (updating database). FORGE Application Generator for 9 Series
Mobile Computers is specifically designed to deal with the sequences of data processing
inside the mobile computers.
4
Page 13
Introduction
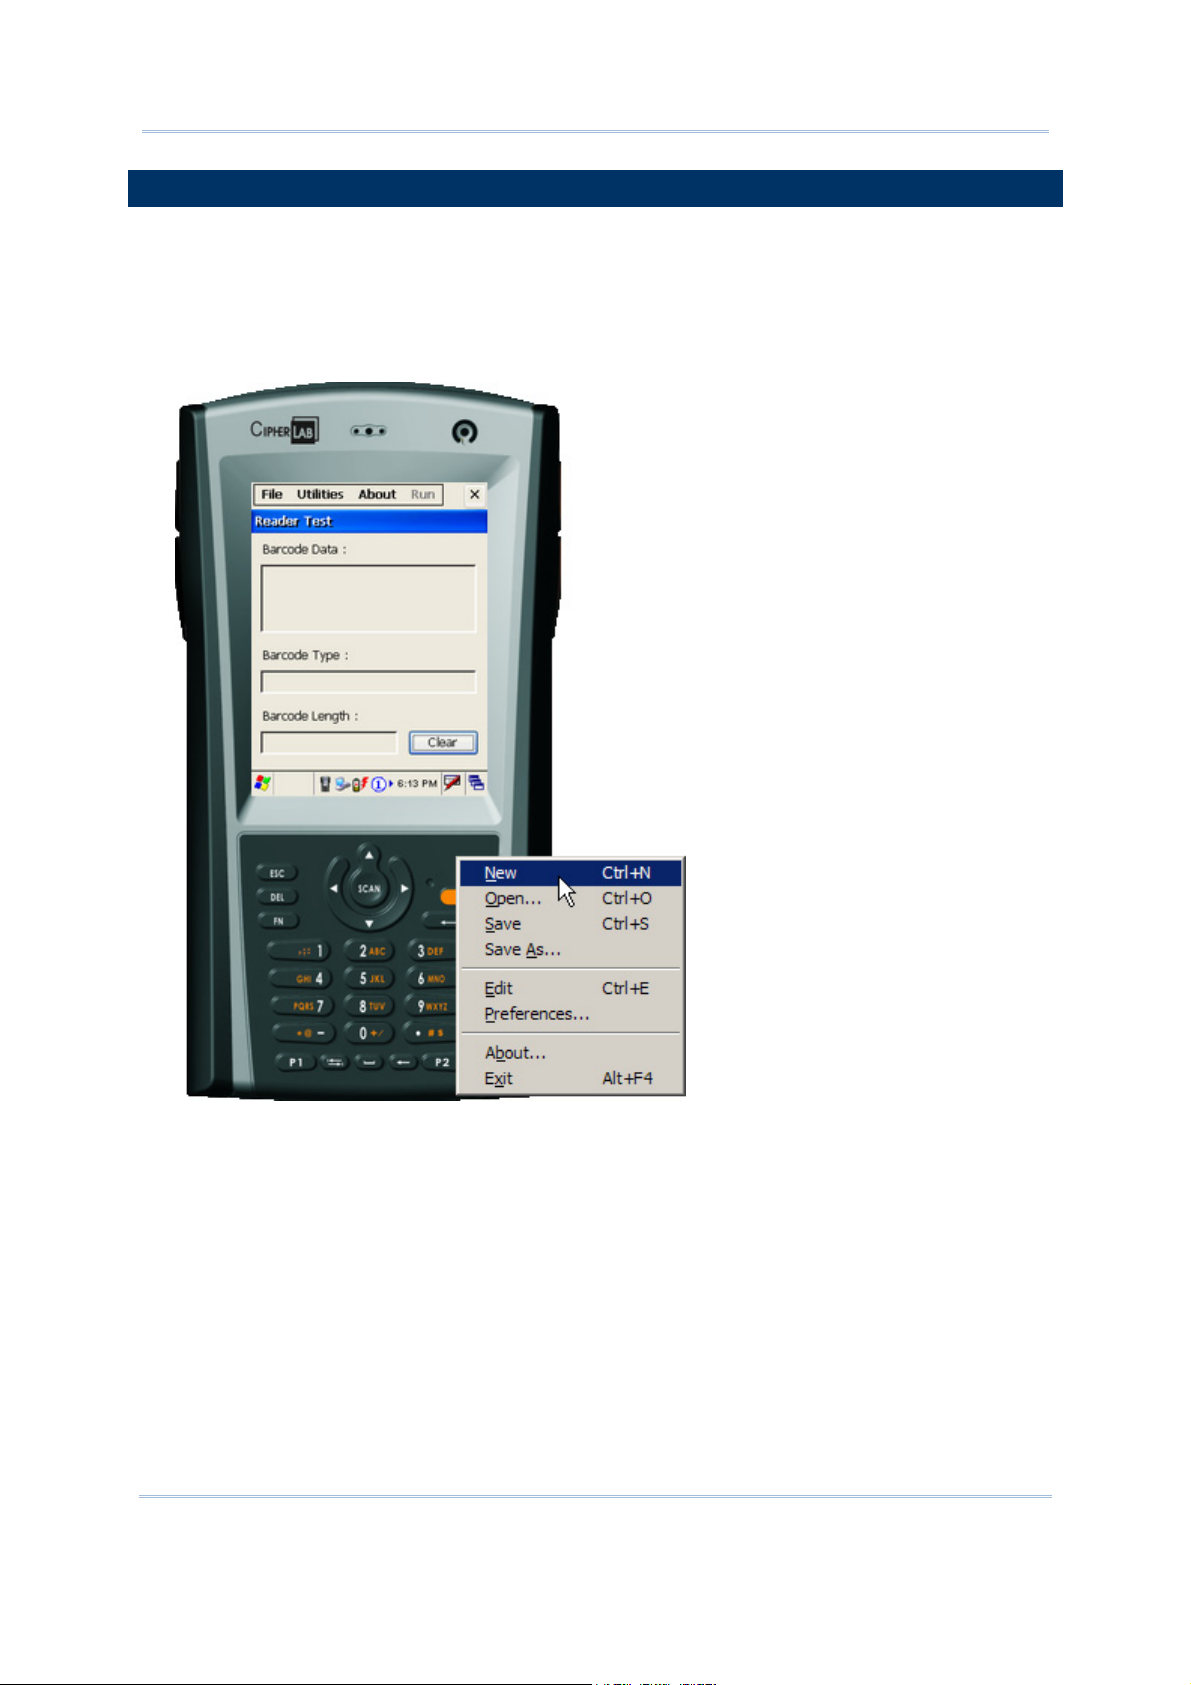
GETTING STARTED
Let’s take the example of 9400 Application Generator.
1) Run AG9400.exe on your computer. The miniature image of 9400 pops up.
2) Right-click freely on the image or click the [Power] key on it.
The Command Menu appears as shown below.
3) Click [Edit] to start with a new or the latest application template.
4) Click [OK] to close the editing window upon completion.
5) Click [Save] or [Save As] to save the current editing template to file (*.A94).
6) Copy the template file (*.A94) to the mobile computer via ActiveSync.
7) Run the program 9400_CE.exe on the mobile computer.
8) Tap [File | Open] to use the application template (*.A94).
9) Tap [File | Import] to import lookup file(s) if necessary.
10) Tap [Run] to start with your data collection task.
5
Page 14
FORGE 9 Series Application Generator User Guide
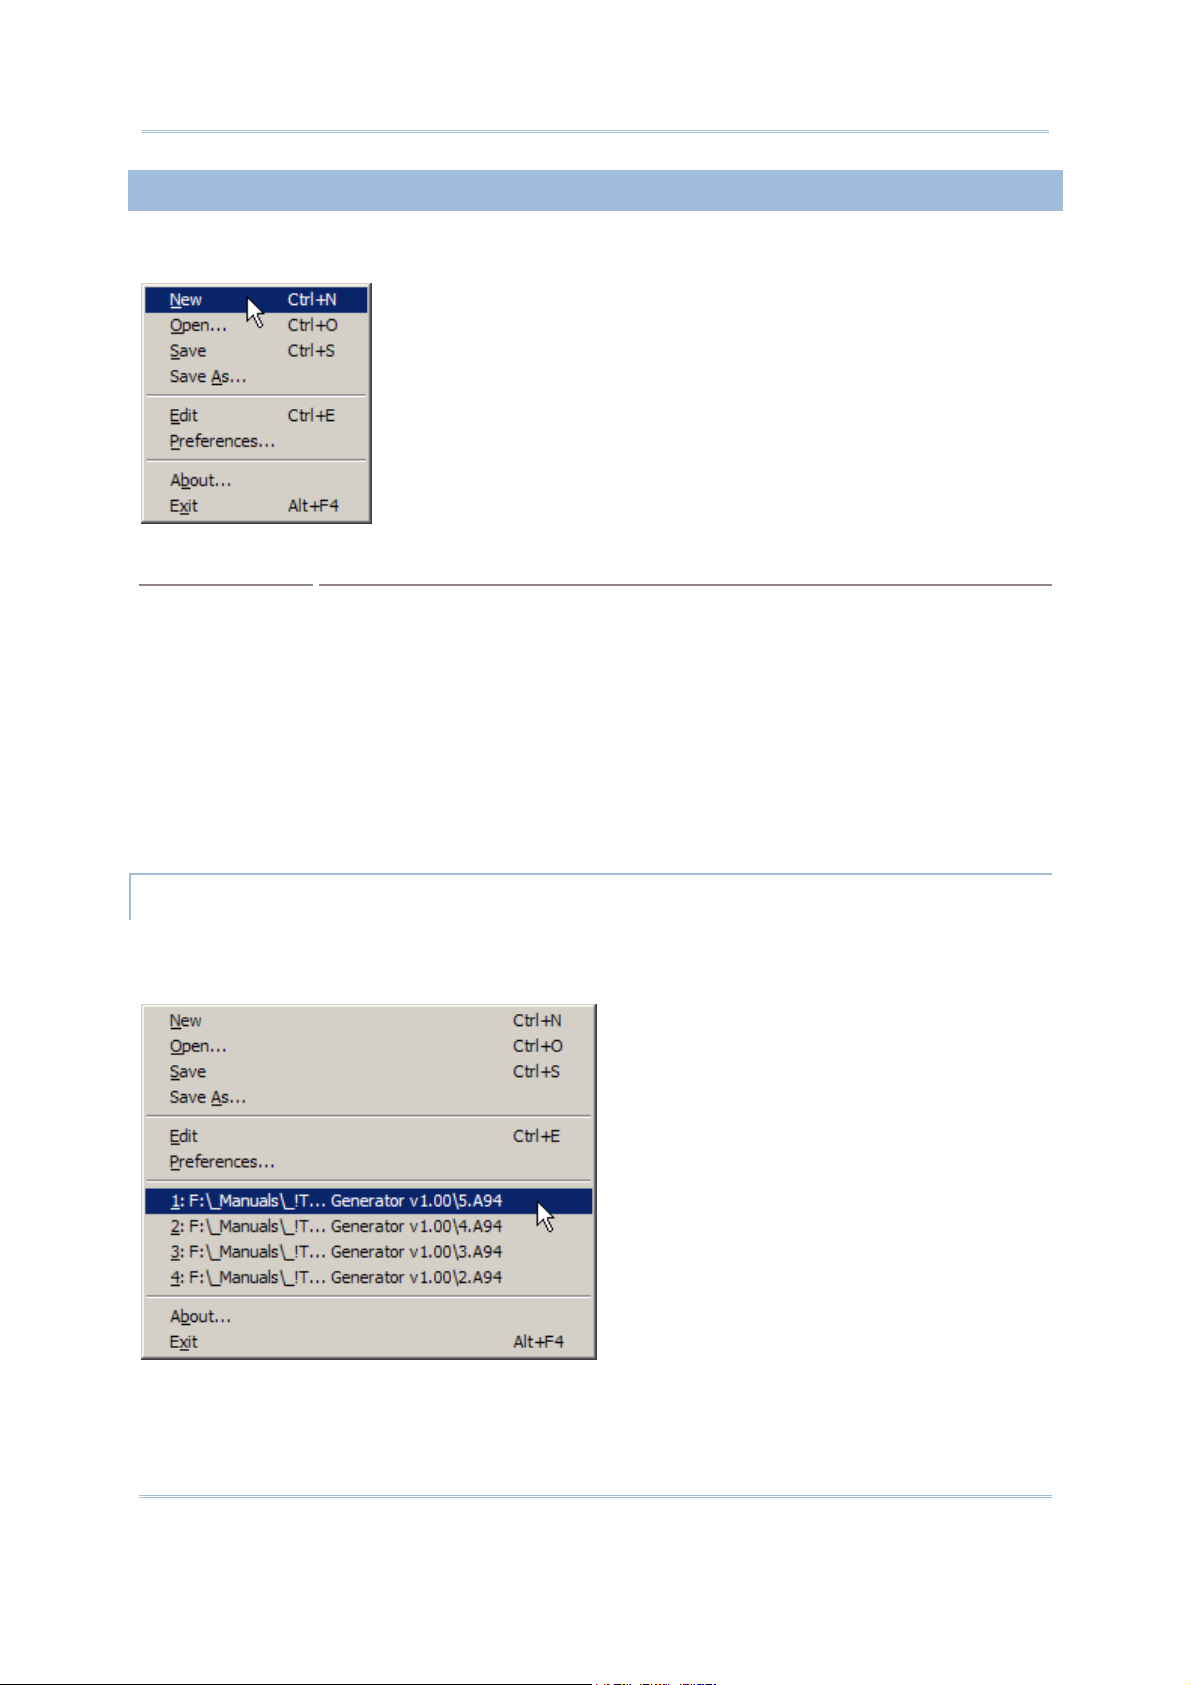
COMMAND MENU
When the Command Menu first appears, it displays the following commands.
Command
New To create a new application template.
Open To open an existing application template. File path needs to be specified.
Save To save the current editing template.
Save As To save the current editing template to a new file.
Edit To edit a new or the latest application template.
Preferences To configure the language settings, application property and load action.
About... To show information about the Application Generator.
Exit To close the Application Generator.
Action...
RECENT FILE LIST
If you ever saved a template, it will be displayed in the Command Menu as well. Up to 4
recent template files are listed for quick access.
6
Page 15
Introduction
The first file on the recent file list is the latest template you work on. If you
accidentally clicked the Close button or [OK] of the template, simply click the Edit
command to re-open it.
You may click any of the four files to open the template for editing. It will then be
placed on top of the list.
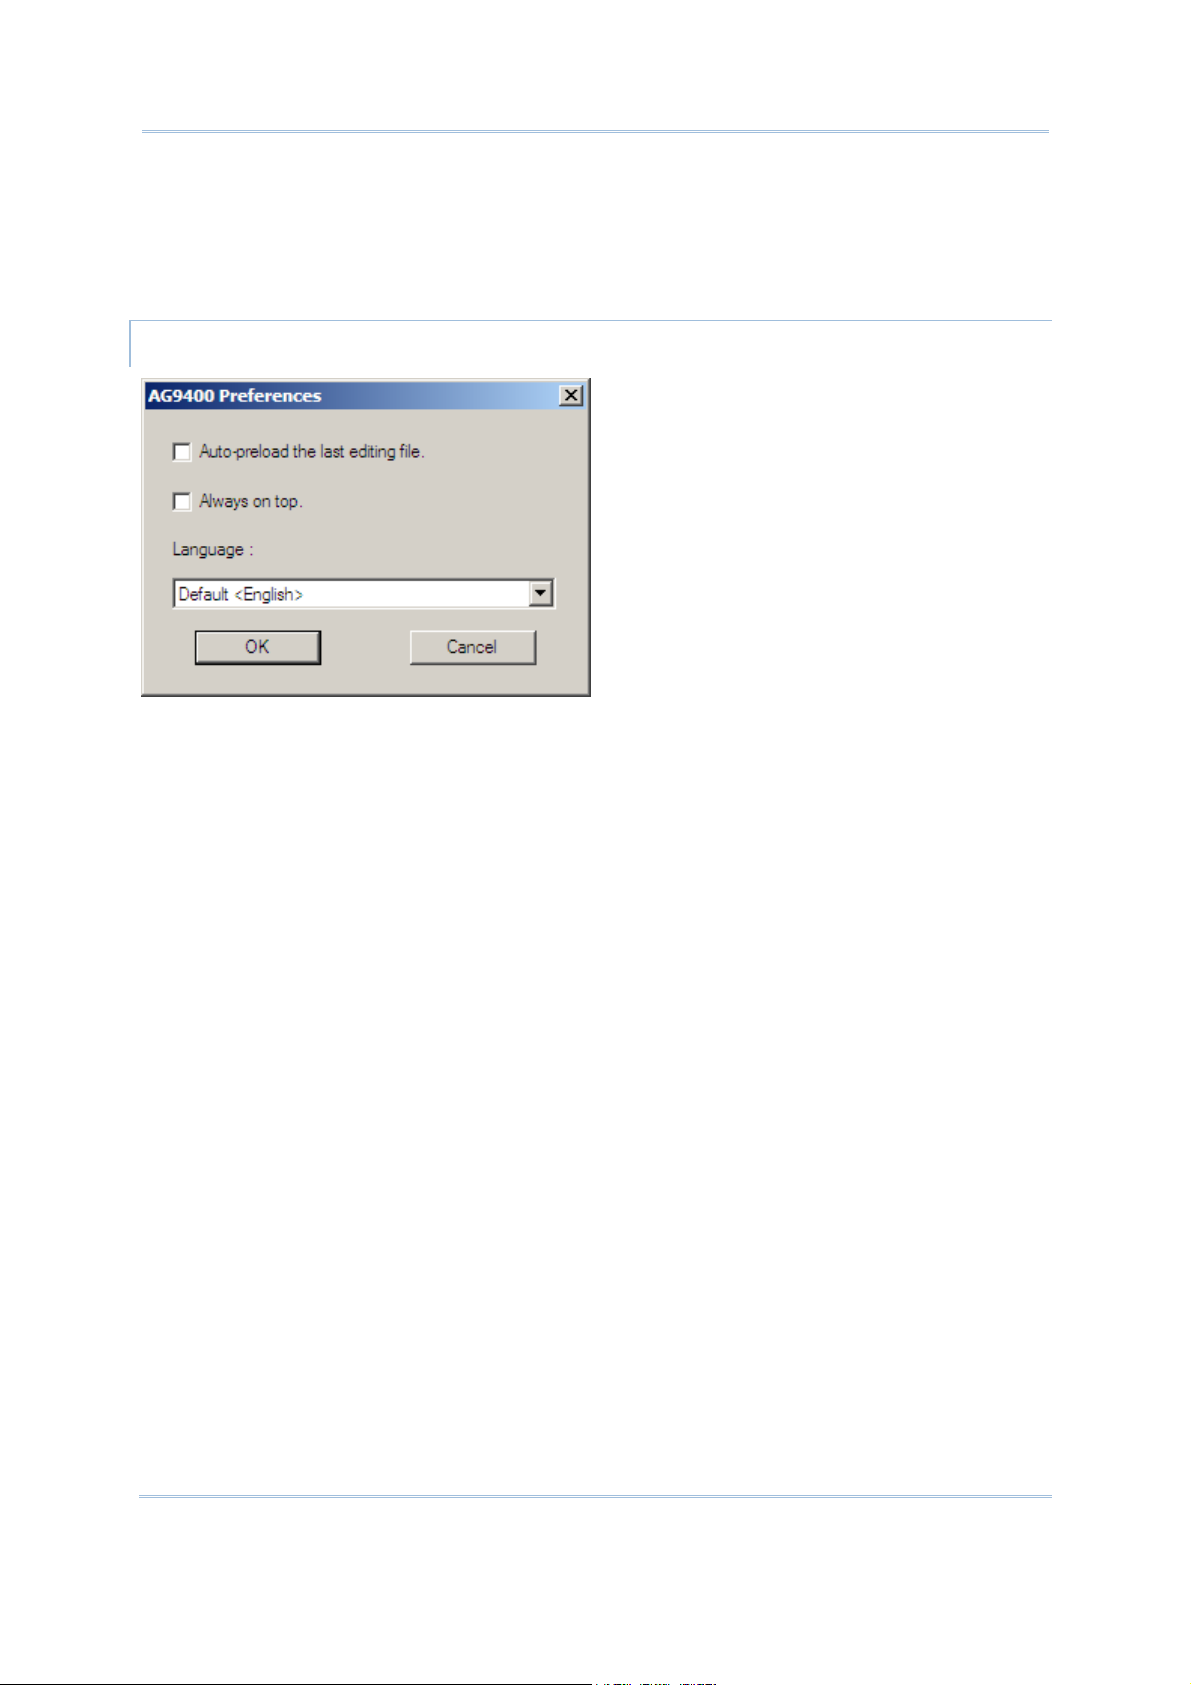
PREFERENCES
Auto-preload the last editing file.
You may select the check box so that the last editing file will be loaded upon running
the AG program on the desktop computer.
Always on top.
You may select the check box so that the AG program always remains on top of all
other windows on the desktop.
Language
If there is any language file (*.lng) saved in the same folder where the AG program is,
a drop-down menu will be available. Then you will be able to select a preferred
language for the GUI of your program.
7
Page 16
FORGE 9 Series Application Generator User Guide
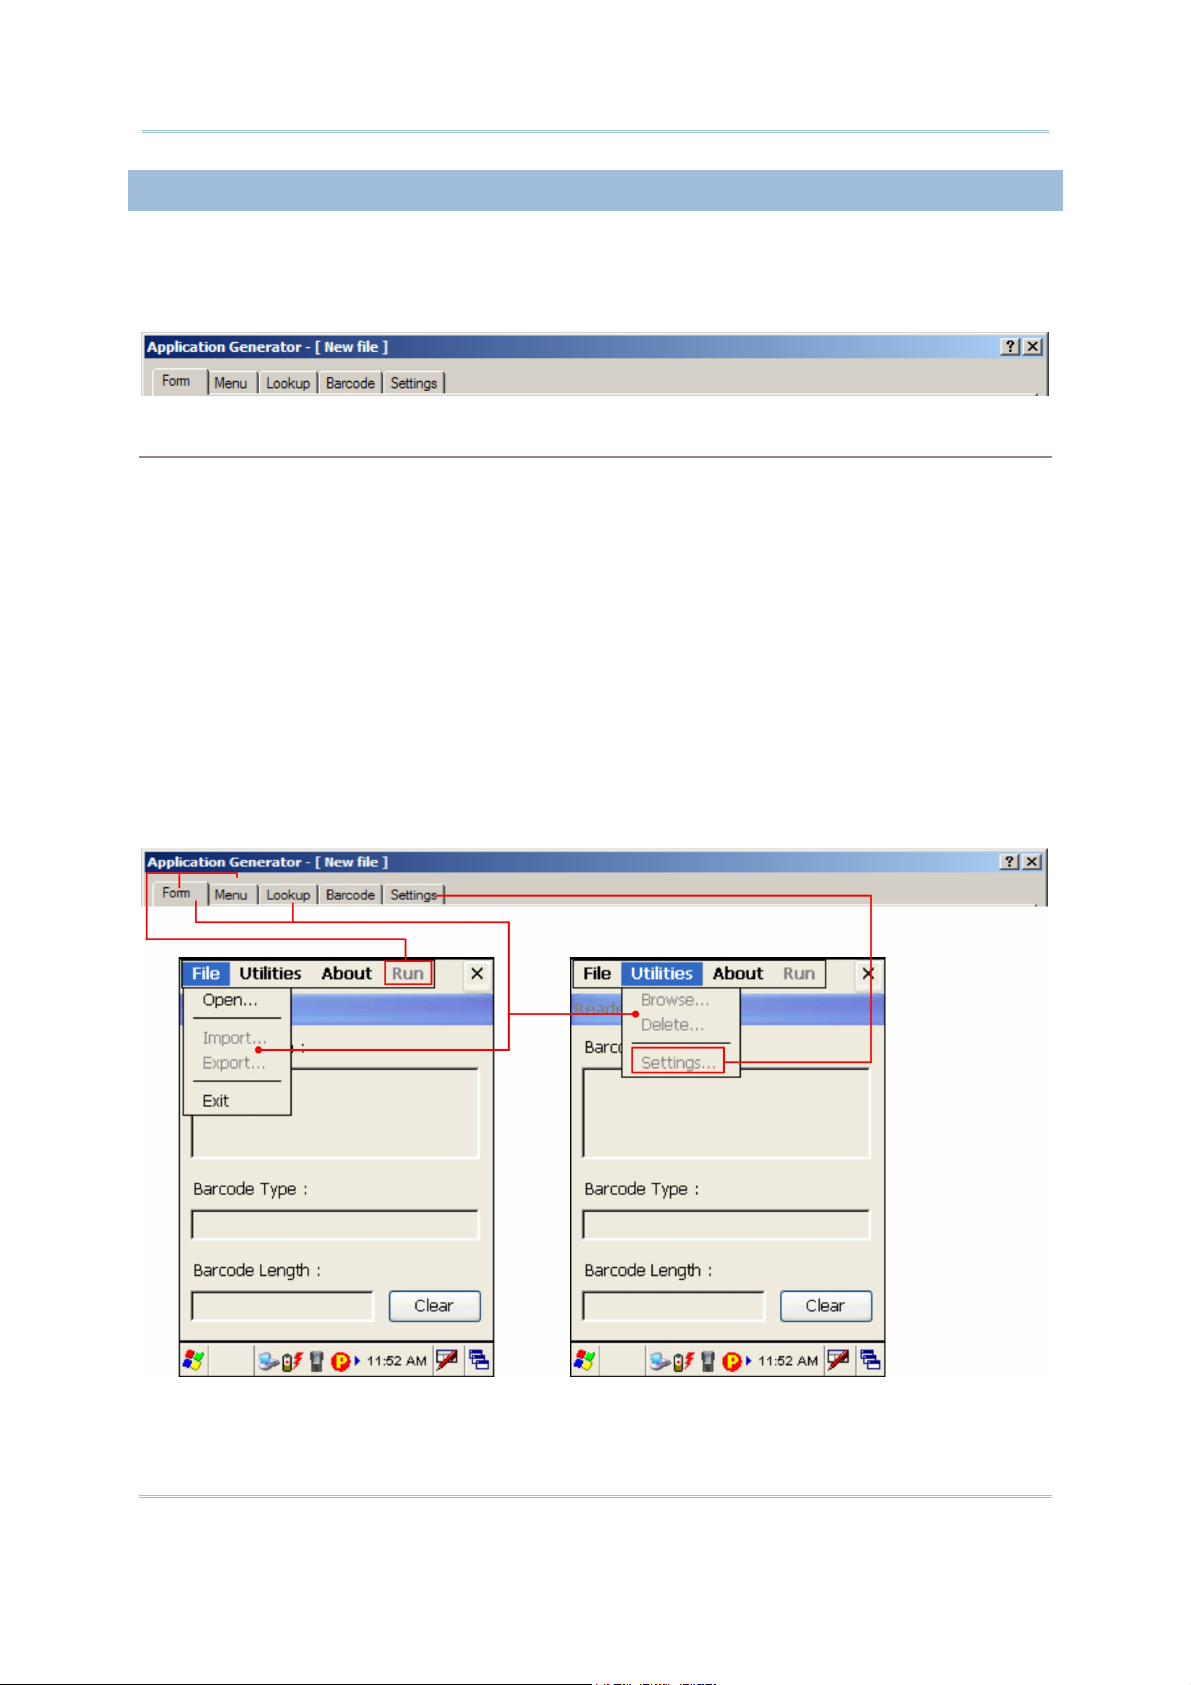
APPLICATION TEMPLATE
To work on a new or existing application template, click the New, Open, or Edit command.
An application template is composed of five tabs; each is a property page for custom
configurations.
Property Pages
Form Forms are used to show information and allow for data input, which may be placed
under a user menu, e.g. Main Menu > (Menu 1) > Form 1.
Menu Menus are used to provide multi-level options, which may be placed under the
main menu, e.g. Main Menu > Menu 1 > (Menu 2) > Form 1.
Lookup Data of forms may make reference to one or up to 5 lookup files. You need to
specify the data format of a lookup file.
Barcode You may configure symbologies and barcode parameters.
Settings You may configure program sequences and system settings so that they will take
effect when initialization is done on the mobile computer.
When you have completed all the configuration, copy the application template file (*.A93,
*.A94, *.A95 or *.A96) to the mobile computer and open it. The submenus will become
available now. If no lookup files are defined in both the Form and Lookup tabs, the
associated options will become unavailable, as shown below.
8
Page 17

Introduction
Warning: (1) On the Barcode tab of the AG program, you must select the correct
barcode reader even though no modification is made to its settings.
Otherwise, a warning dialog box is displayed to remind you of "wrong
reader type" after opening the template file on the mobile computer. Then,
you may choose to close the application directly or use the default setting
to initialize the barcode reader.
(2) AG9400 or AG9600 program allows the configuration of camera
settings on the Settings tab, as well as the Image Capture setting on the
Barcode tab when the barcode reader selected is 2D reader. If 9400/9600
mobile computer is equipped with both a camera and 2D reader, it only
allows using the camera for image capture.
9
Page 18

FORGE 9 Series Application Generator User Guide
10
Page 19
3
5
6
11121
3
1
5
1
6
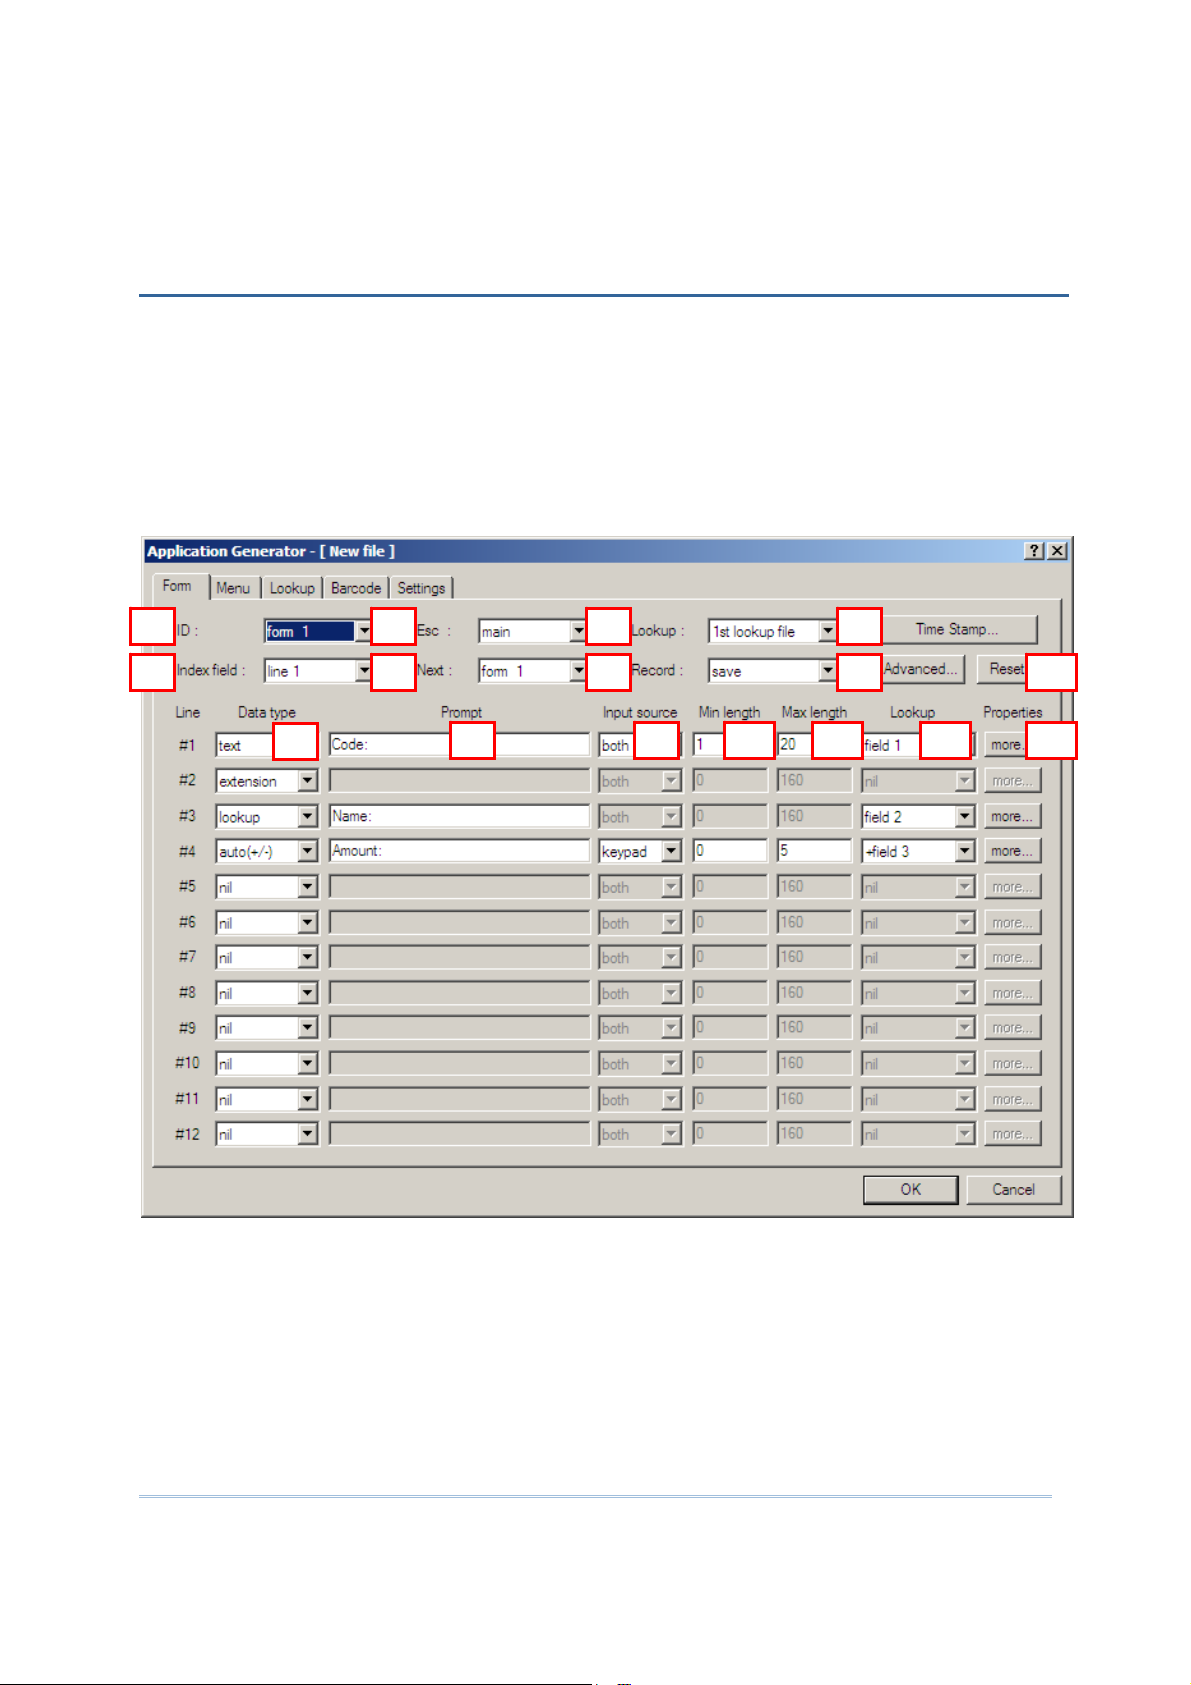
Chapter 1
FORM
A form is a data collection template with input prompts. Data will be kept as a
transaction record after the user completes all the input fields (lines) of a form. Then, it
can be saved in a data file, added to its lookup database, etc.
Each form allows at most twelve input fields (12 lines).
Twenty different forms can be defined.
The attributes on this property page are explained in detail as follows.
1
2
9
4
10
7
8
14
11
Page 20

FORGE 9 Series Application Generator User Guide
IN THIS CHAPTER
1.1 ID ........................................................................... 12
1.2 Index Field................................................................ 12
1.3 Esc .......................................................................... 13
1.4 Next ........................................................................ 13
1.5 Lookup (File) ........................................................... 13
1.6 Record ..................................................................... 14
1.7 Time Stamp .............................................................. 15
1.8 Advanced ................................................................. 16
1.9 Data Type................................................................. 17
1.10 Prompt ................................................................... 32
1.11 Input Source ........................................................... 32
1.12 Minimum Length ...................................................... 32
1.13 Maximum Length ..................................................... 32
1.14 Lookup (Field) / Variables ......................................... 33
1.15 Properties ............................................................... 35
1.16 Reset ..................................................................... 38
1.1 ID
Select an ID for the current form you work on. Usually start with “form 1”.
form 1 ~ 20
1.2 INDEX FIELD
By default, data is to be saved to a sequential data file (by “form”). However, you may
select an input field as the index so that data will be saved by index and a quick search is
allowed when browsing data. Refer to
Utilities Menu > Browse in Appendix I –
Demonstration on Mobile Computers.
Select Save or Save & update in 1.6 Record.
This feature can be used together with the "Only read data once" feature, which is
normally applied to prevent any repeated reading of the same barcode.
Record
Save
Save &
update
Index Field Advanced > "Only read data once"
None Regardless of this setting, data will be saved to a sequential
file.
Any (line
1~12)
If "Only read data once" is enabled, any reading of the
same barcode will be rejected. A warning message will be
displayed on the mobile computer to indicate "Data
duplicated!"
If "Only read data once" is disabled, the reading of the
same barcode will be accepted but only the last one is
saved. A message will be displayed on the mobile
computer to indicate "Data updated!"
12
Page 21

Chapter 1 Form
1.3 ESC
Select a form or menu that will be displayed when you press the [ESC] key on the mobile
computer.
main
form 1 ~ 20
menu 1 ~ 10
Note: Normally, the [ESC] key is used to return to a previous form or menu.
1.4 NEXT
Select a form or menu that will be displayed when the last input field of the current form
has been completed.
main
form 1 ~ 20
menu 1 ~ 10
This function is invoked by sending the key value of [Enter] when you finish with the last
input field. And, the setting of
[Enter].
Input Source of the last line
Reader In 1.15 Properties, Auto ENTER for barcode input must be
Keypad Press the [Enter] key on the mobile computer.
Both See the two options above.
RFID Press the [Enter] key on the mobile computer.
All See all the options above.
Input Source decides the way to produce the key value of
Operation
configured as "Scan + ENTER".
1.5 LOOKUP (FILE)
A lookup file is a database. Select whether or not a lookup file is associated with the
form.
If a lookup file is used, its data format must be defined on the
especially the number of fields and length of each field.
On this property page, related settings must be configured.
Lookup property page,
1.9 Data Type
1.14 Lookup (Field) / Variables
Note: The associated lookup file(s) must be imported to the mobile computer.
13
Page 22

FORGE 9 Series Application Generator User Guide
1.6 RECORD
Select which action to take as soon as the input fields of a form have been completed.
Options
save To save the record to a data file.
Action...
Refer to the "Index Field" and "Advanced" settings.
update lookup To update the lookup file associated with the form.
save & update To save the record to a data file and update the lookup file.
Refer to the "Index Field" and "Advanced" settings.
pass down To pass down data to the next form or menu without saving.
Note: If data is to be saved in a data file, the default export file name can be changed in
the "Advanced" setting.
1.6.1 EXPORT FILES
Refer to File Menu > Export Files in Appendix I – Demonstration on Mobile Computers.
Based on the selected option of Record, you can export a data file (by “form”) or lookup
file, or even merge them to a new file.
Data file:
This is available only when you have selected "Save" or "Save & update" for Record.
Refer to
Form 01".
"
1.2 Index Field about how to make use of an index. The default file name is
Lookup file:
This is available only when you have specified a lookup file in use. The default file
name is "
1st lookup file".
1.6.2 MANIPULATE DATA
Refer to Utilities Menu in Appendix I – Demonstration on Mobile Computers.
14
Page 23
Chapter 1 Form
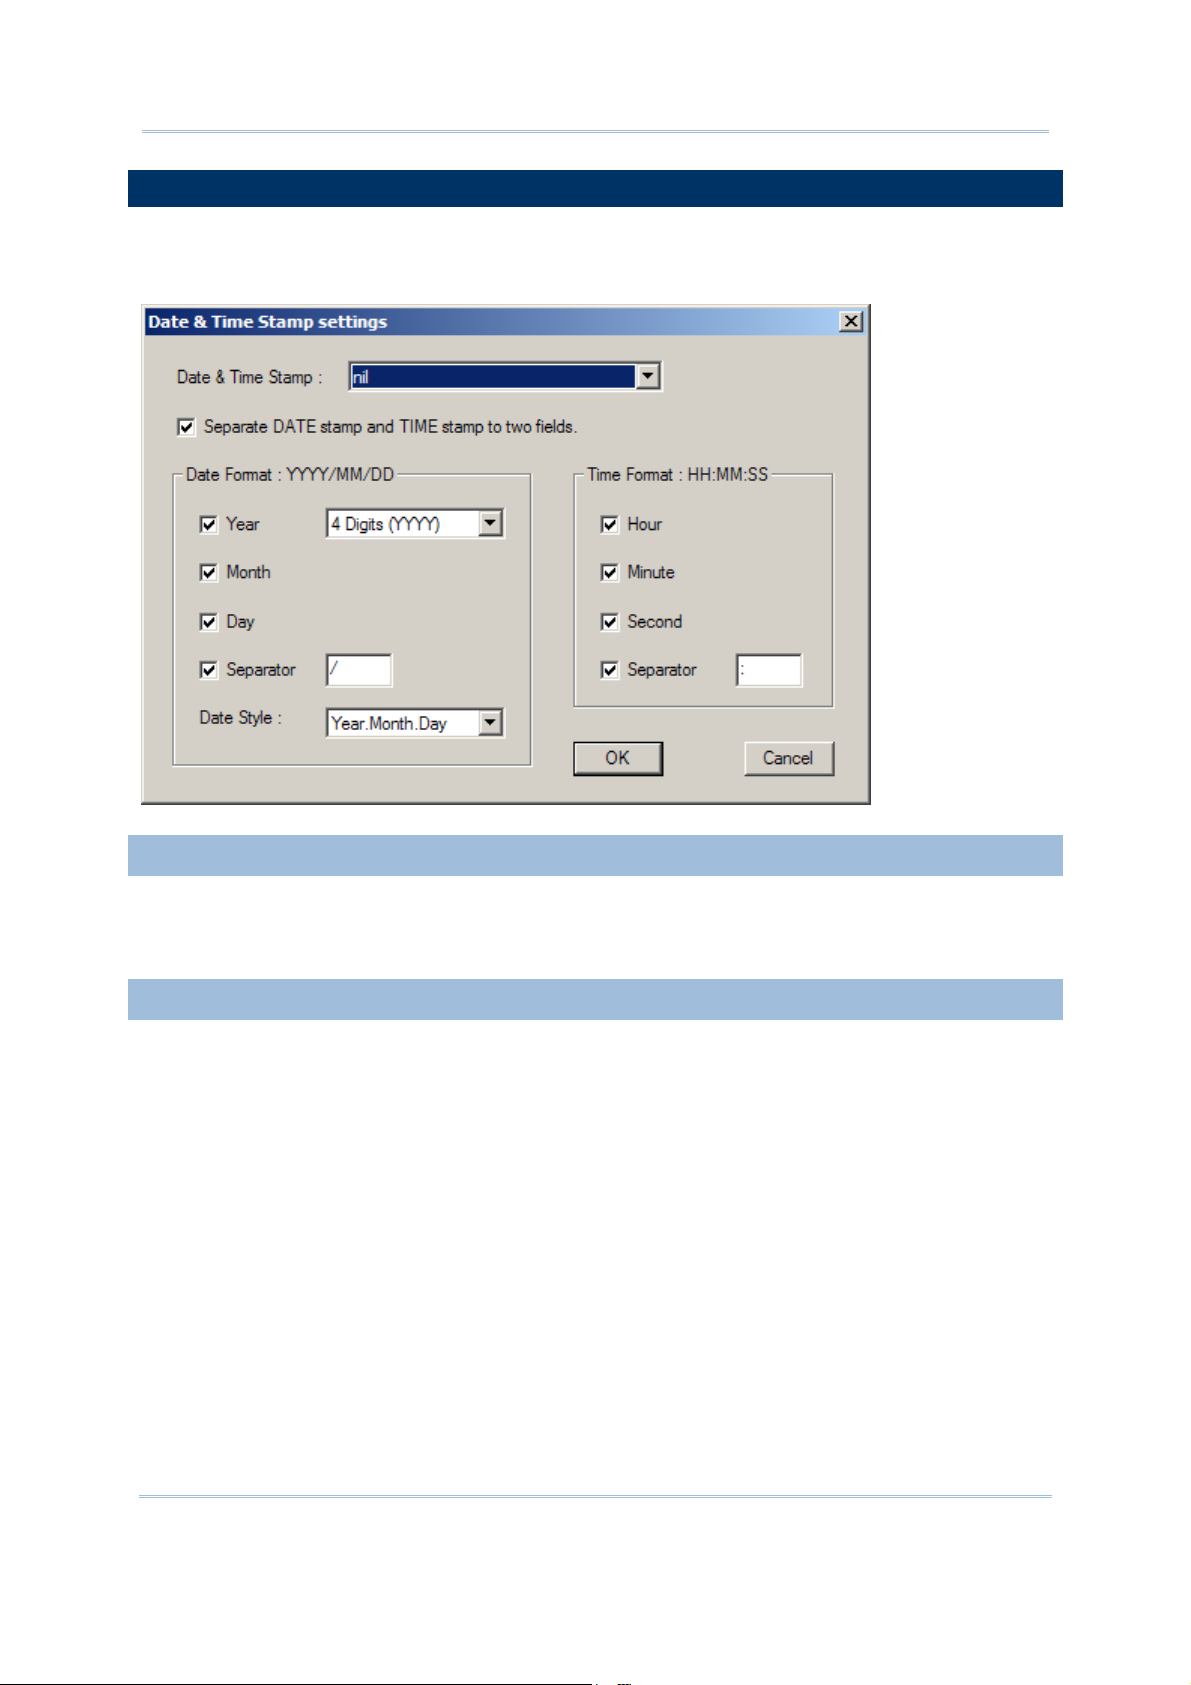
1.7 TIME STAMP
This feature actually includes Date and Time stamp. It may be helpful in analyzing data
when the date and time information is joined in each record.
1.7.1 STAMP POSITION
Decide whether or not to enable the stamp function and include the date/time
information, either to the beginning or to the end of a record.
1.7.2 DATE/TIME FORMAT
Select the format of the Date and Time stamp. To stop the use of either stamp, clear all
the associated settings.
15
Page 24
FORGE 9 Series Application Generator User Guide
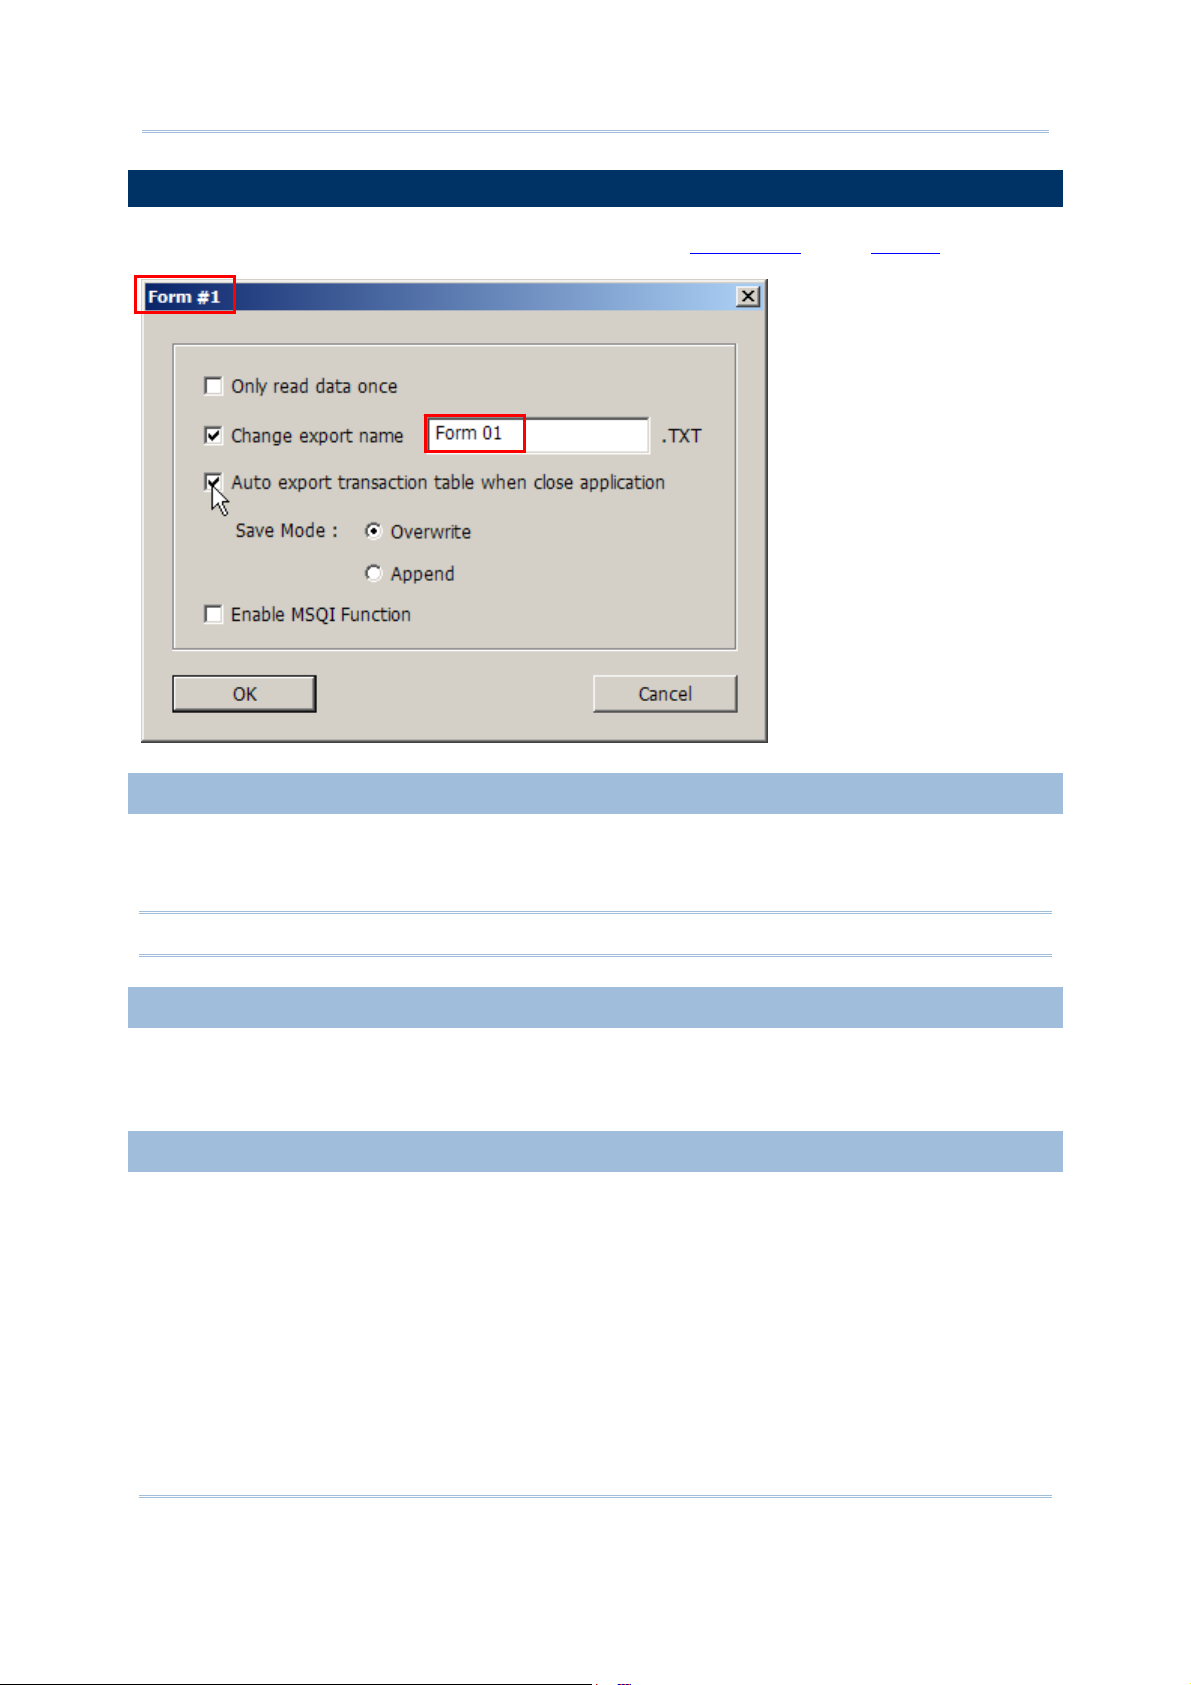
1.8 ADVANCED
Here provides additional settings associated with the "Index Field" and "Record" features.
1.8.1 ONLY READ DATA ONCE
When the “Only read data once” feature is enabled, a warning message “Data
duplicated!” is displayed on the mobile computer if the entry of input data already exists.
Note: To enable the “Only read data once” functionality, you must specify the index field.
1.8.2 CHANGE EXPORT NAME
By default, data is to be saved to a sequential data file (by “form”). Change the file name
if necessary.
1.8.3 AUTO EXPORT…
If “Auto export transaction table when close application” is enabled, the data file will be
exported automatically upon closing the application. Choose the save mode to decide
whether the data file will overwrite or append to the existing file.
16
Page 25
Chapter 1 Form
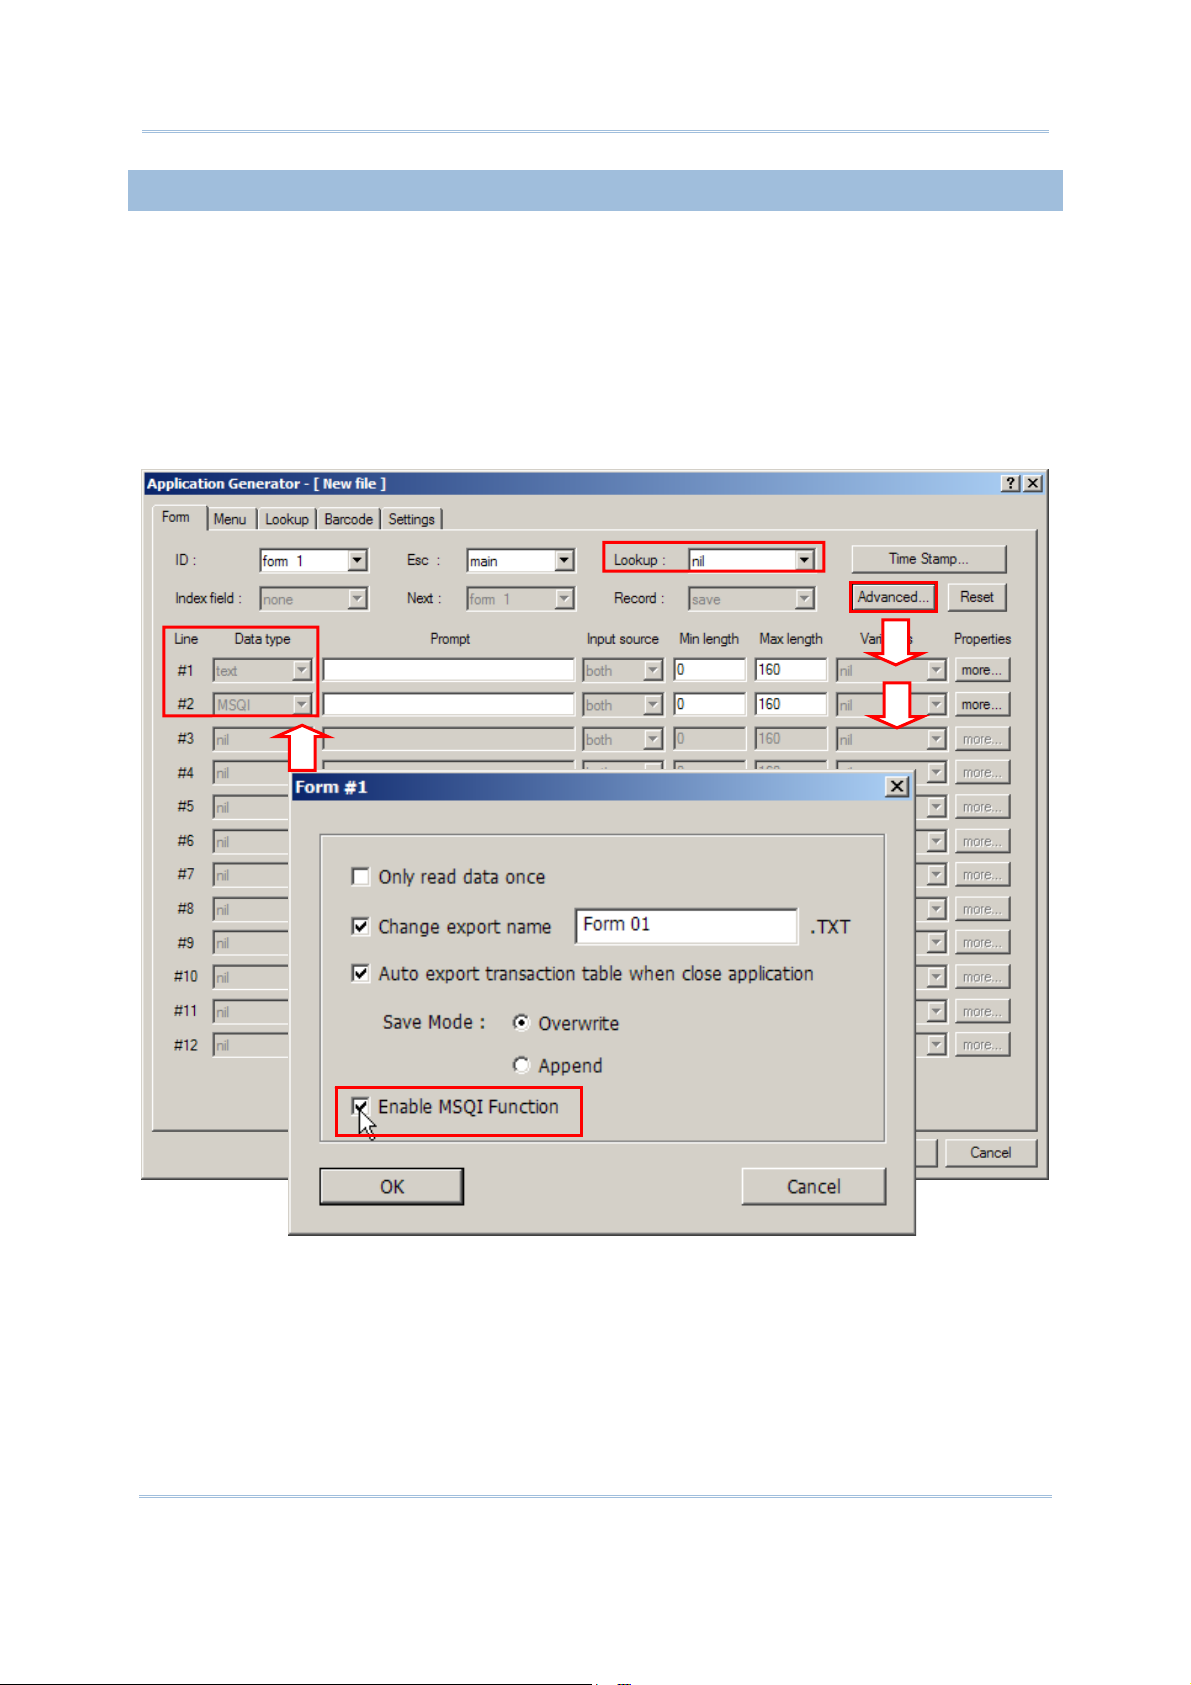
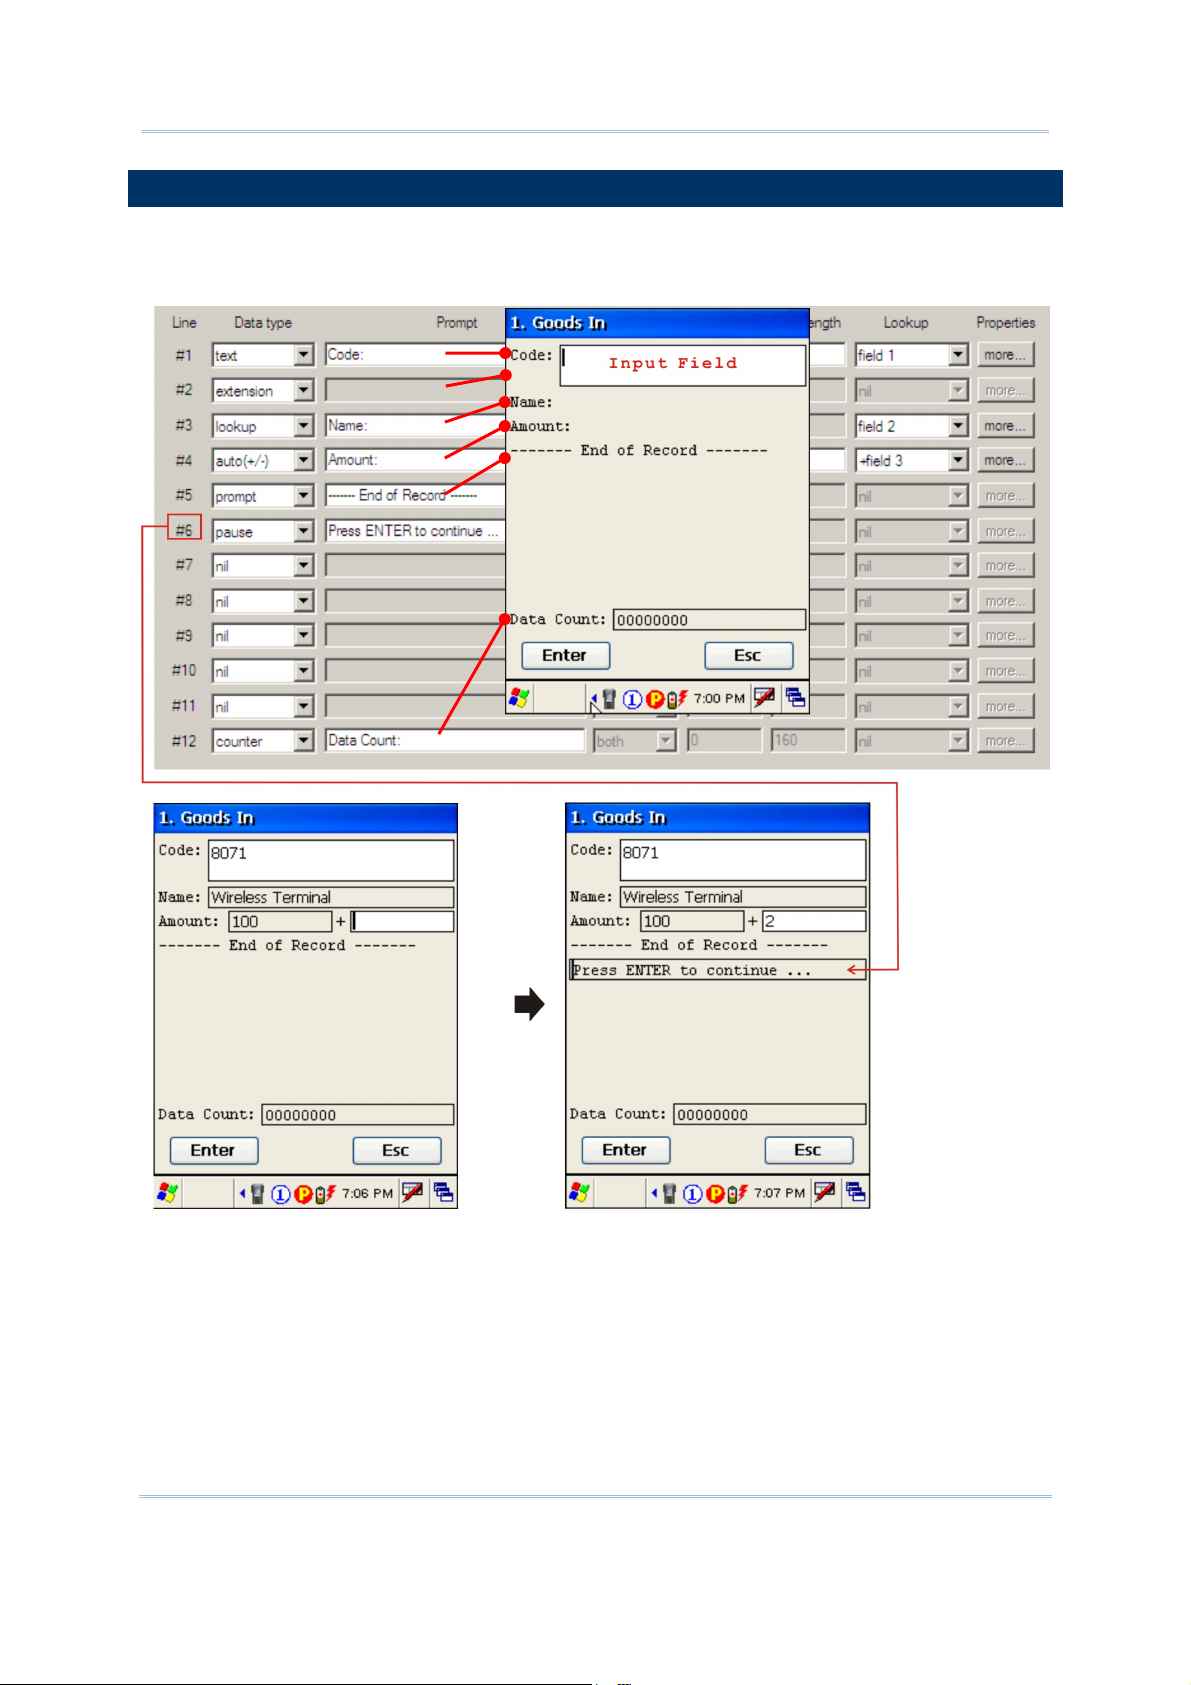
1.8.4 ENABLE MSQI FUNCTION
When the Multiple Scan Quantity Incrementing (MSQI) function is enabled, the form is
set to be processed again and again until you press the [ESC] key on the mobile
computer. Data will be saved to a data file.
Line 1 is set to “text” for data type. If a lookup file is specified in use, the lookup field
will be automatically set to the key field.
Line 2 is set to “MSQI” for data type. By default, the initial value is “0”; you may
specify a value instead. If a lookup file is specified in use, the initial value depends on
the lookup field you select.
17
Page 26
FORGE 9 Series Application Generator User Guide
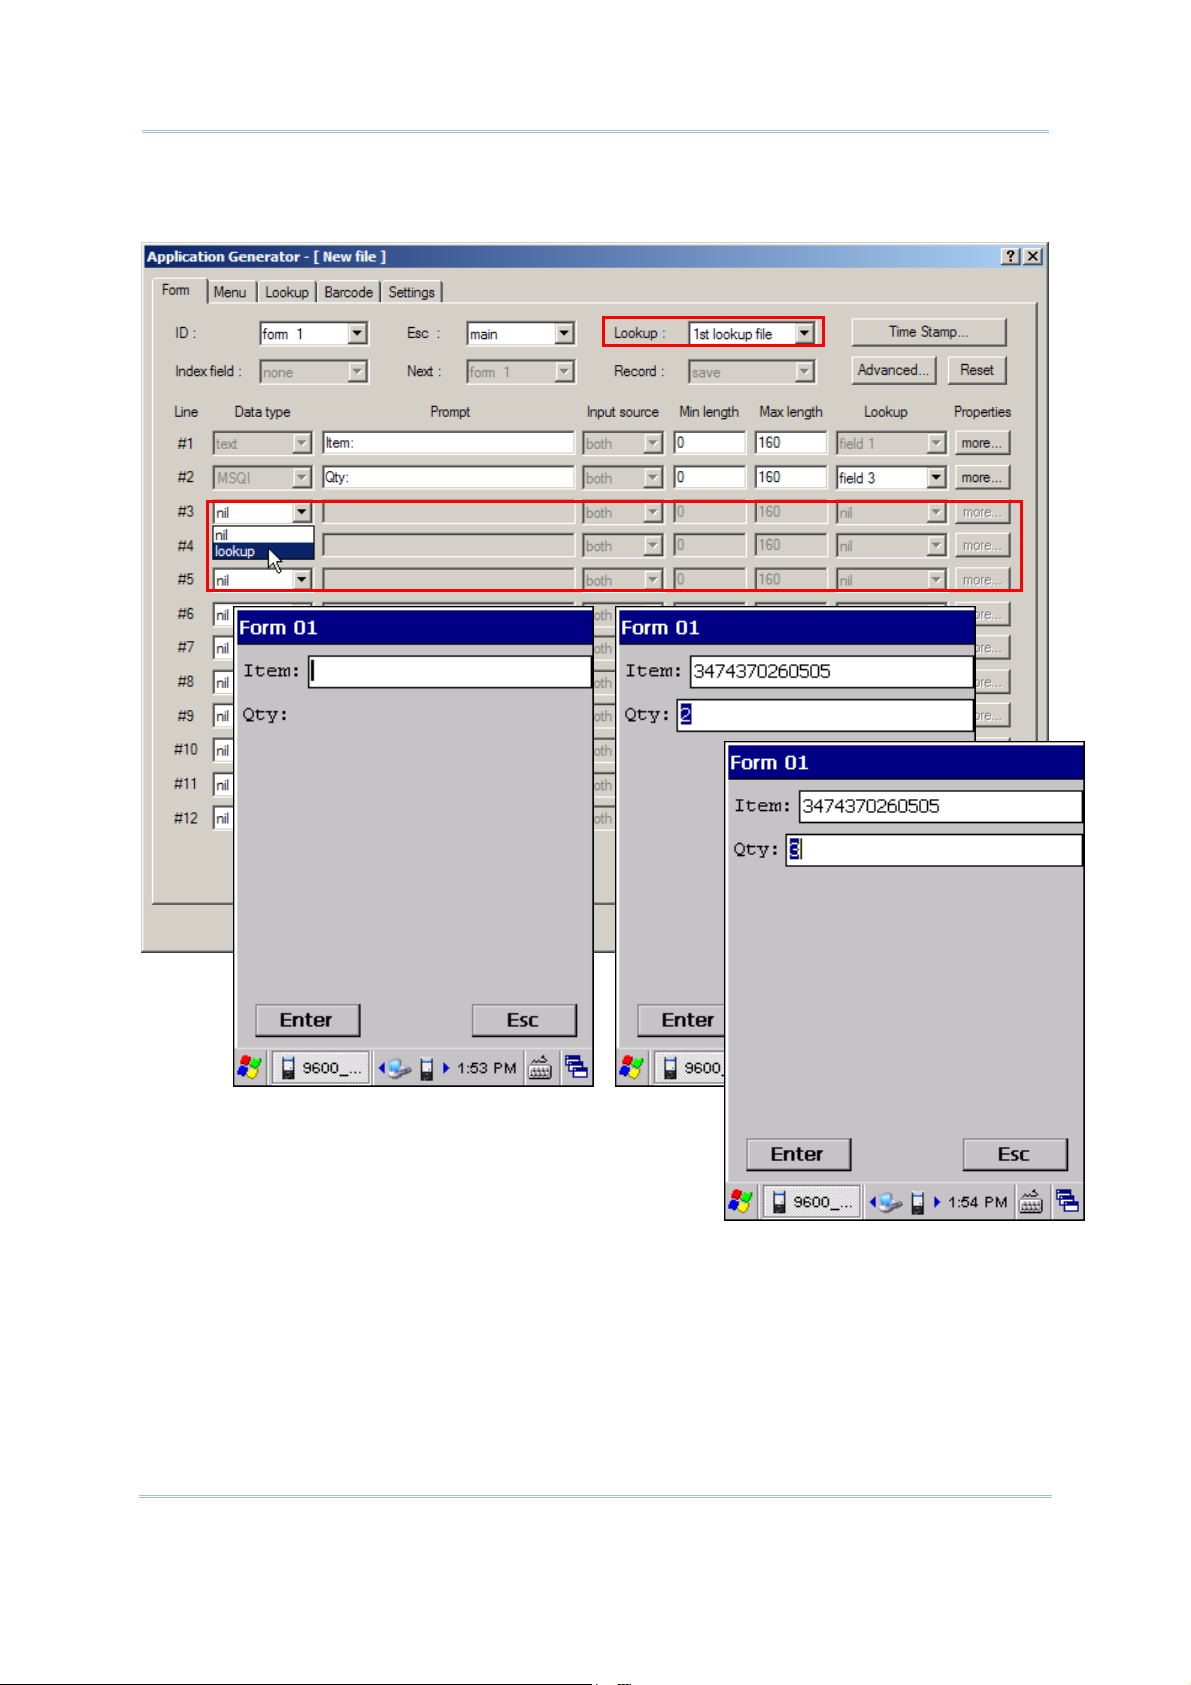
If a lookup file is specified in use, you may specify to import more information (line #3~)
from the lookup file and display it on the mobile computer.
The process designed in Form 01, as shown above, will repeat as long as you are
scanning barcodes.
When you keep scanning the same barcode, it will accumulate the value for “Qty”
field by one for each scanning.
When you scan a different barcode, it starts all over again with accumulating the
quantity of this new item. Data for the previous item will be saved as a transaction
record!
18
Page 27
Chapter 1 Form
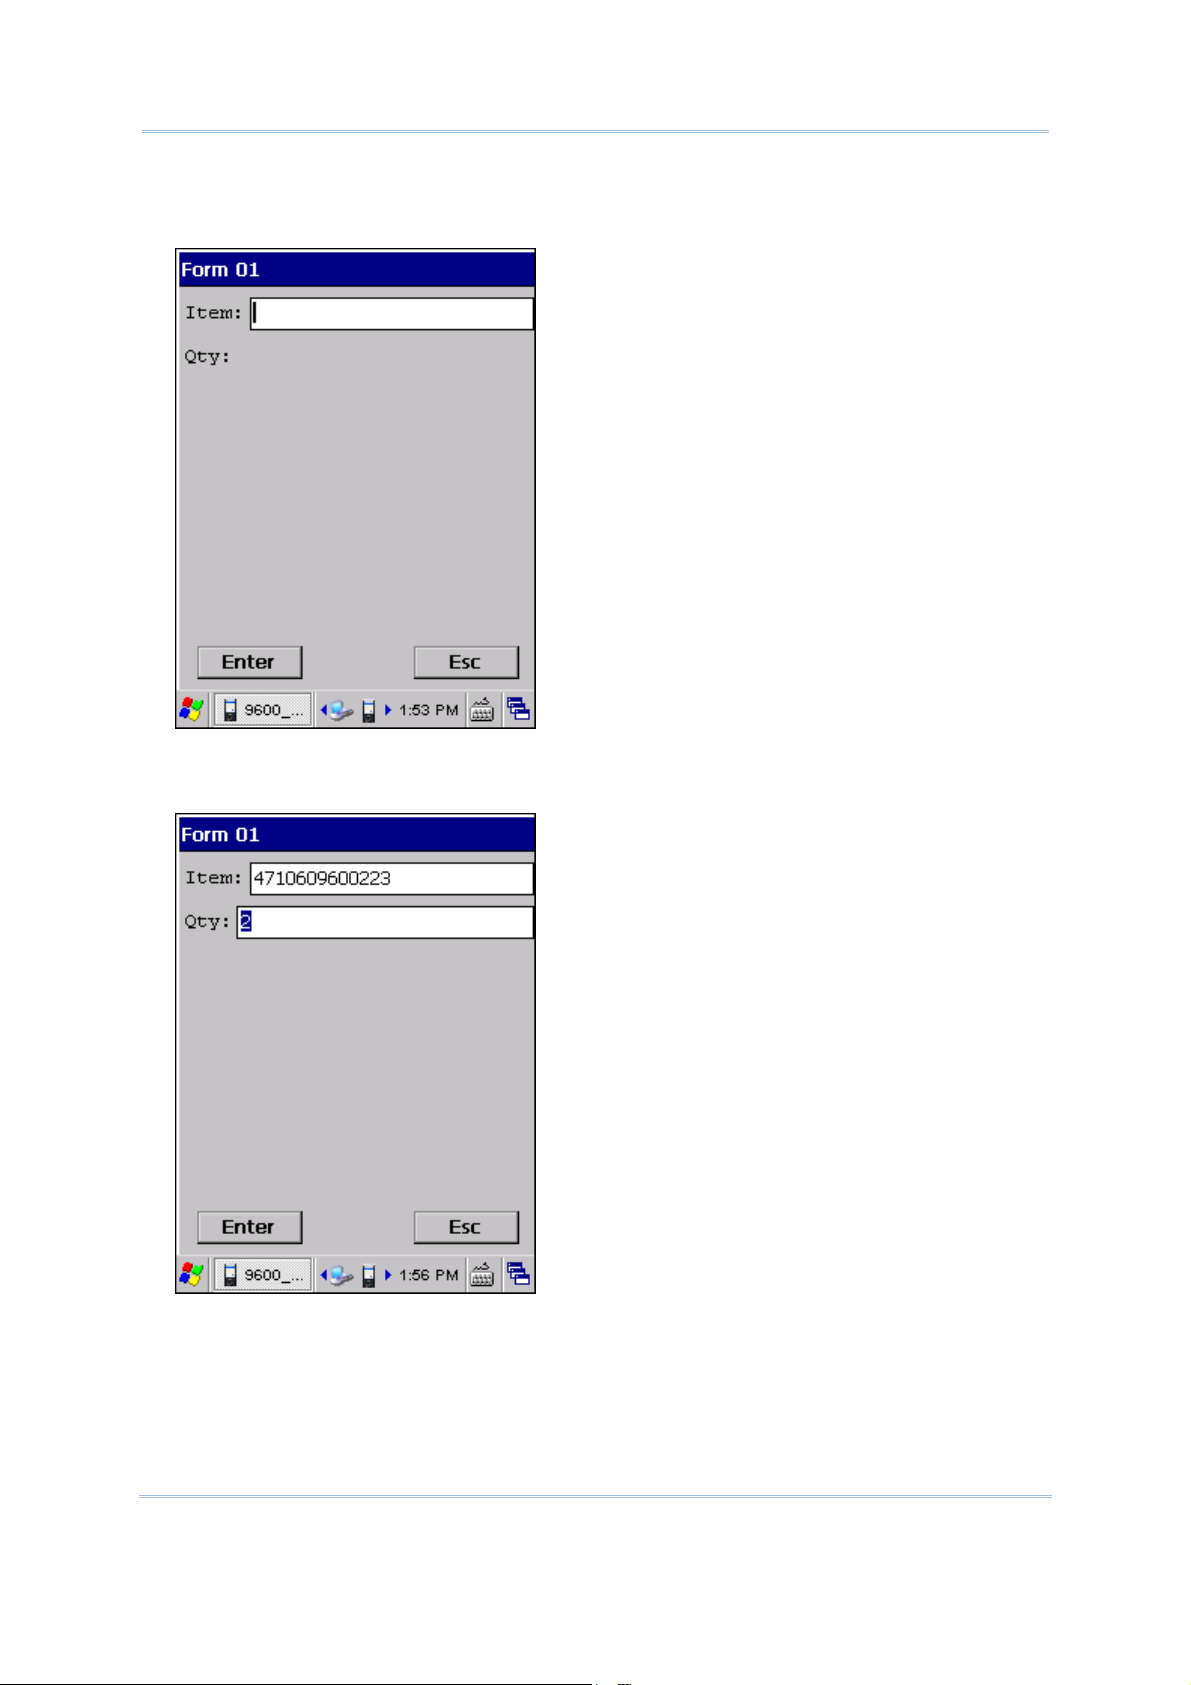
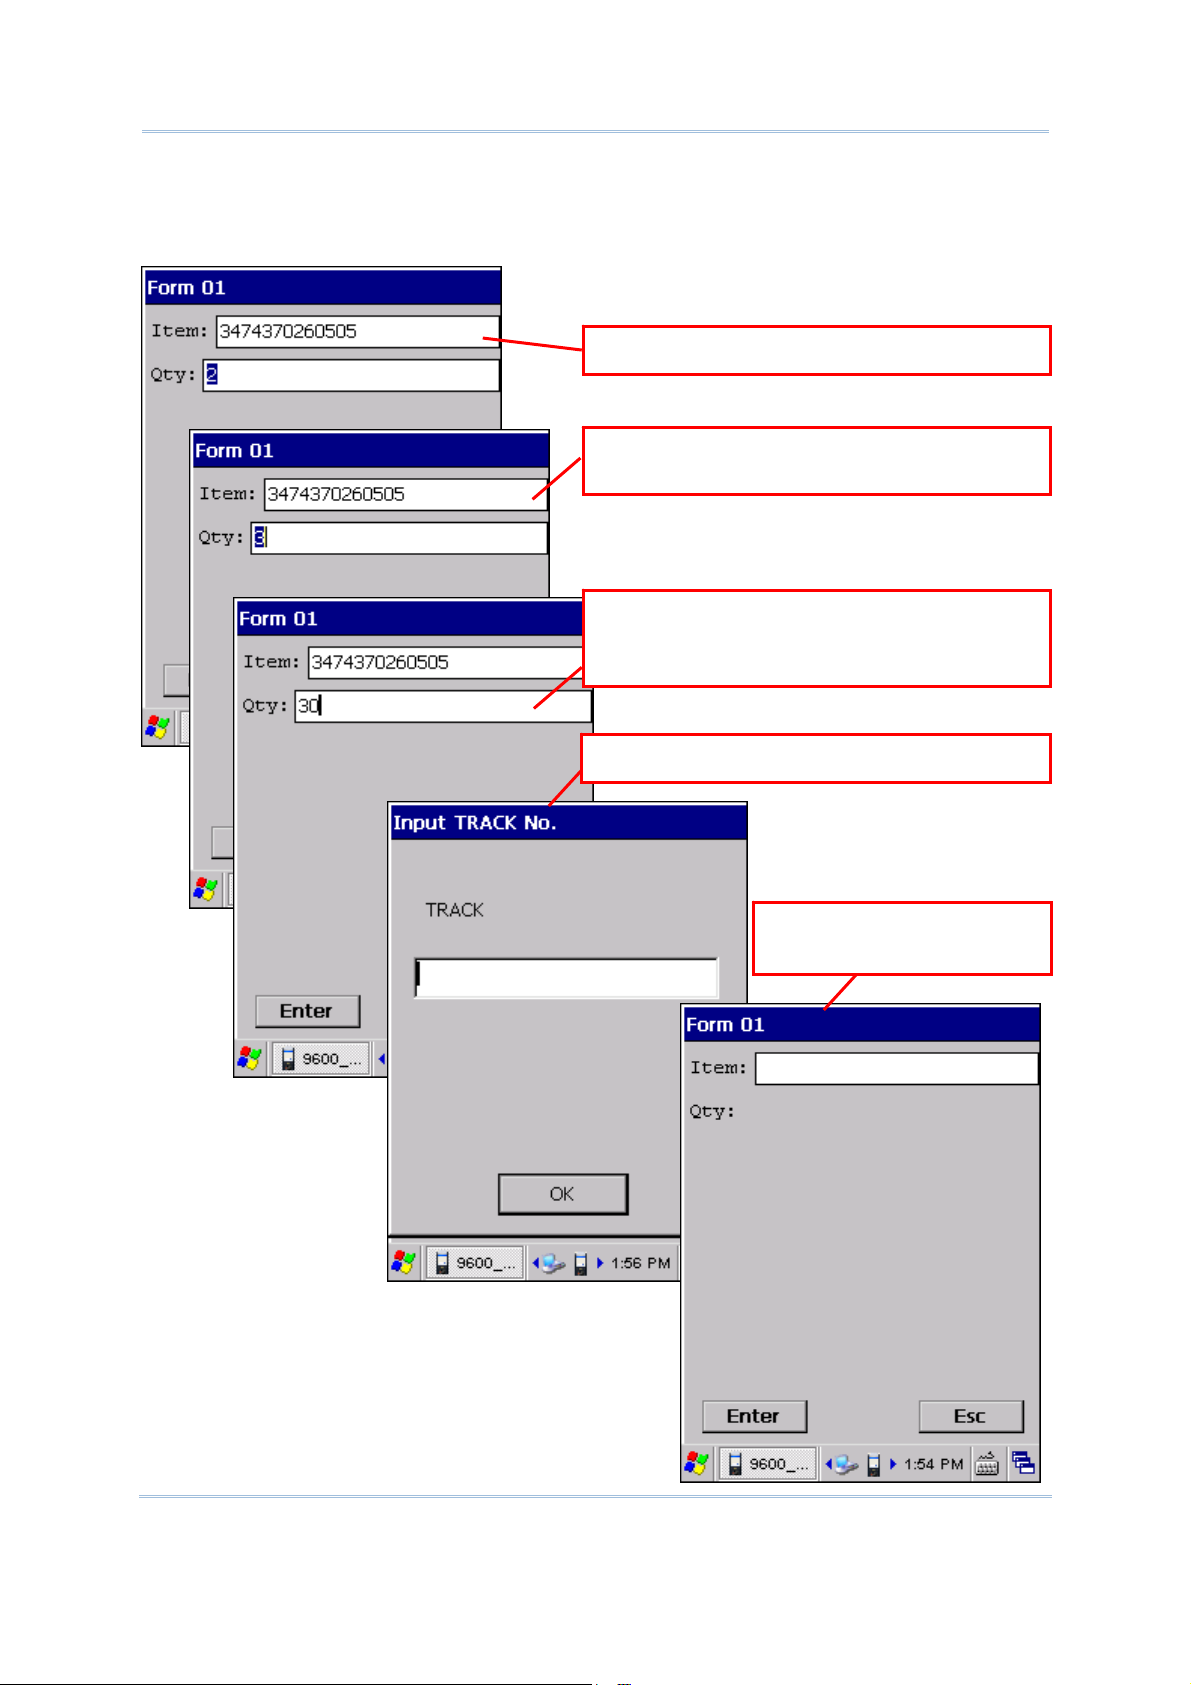
Below is the process flow explaining how MSQI function works.
1) Scan a barcode for an item. (line #1)
2) The lookup value will be displayed as the initial value. (line #2)
(If no lookup file is specified in use, the pre-defined initial value will be displayed.)
19
Page 28
FORGE 9 Series Application Generator User Guide
3) Scan the barcode again, and it will accumulate the value by 1.
4) You may keep scanning barcodes for different items. Repeat step 2 and step 3.
Data for the previous item will be saved automatically. Take the scanning in step 3 for
example, data for the quantity field saved with this transaction record is the value
displayed on the screen, say “3” for this case.
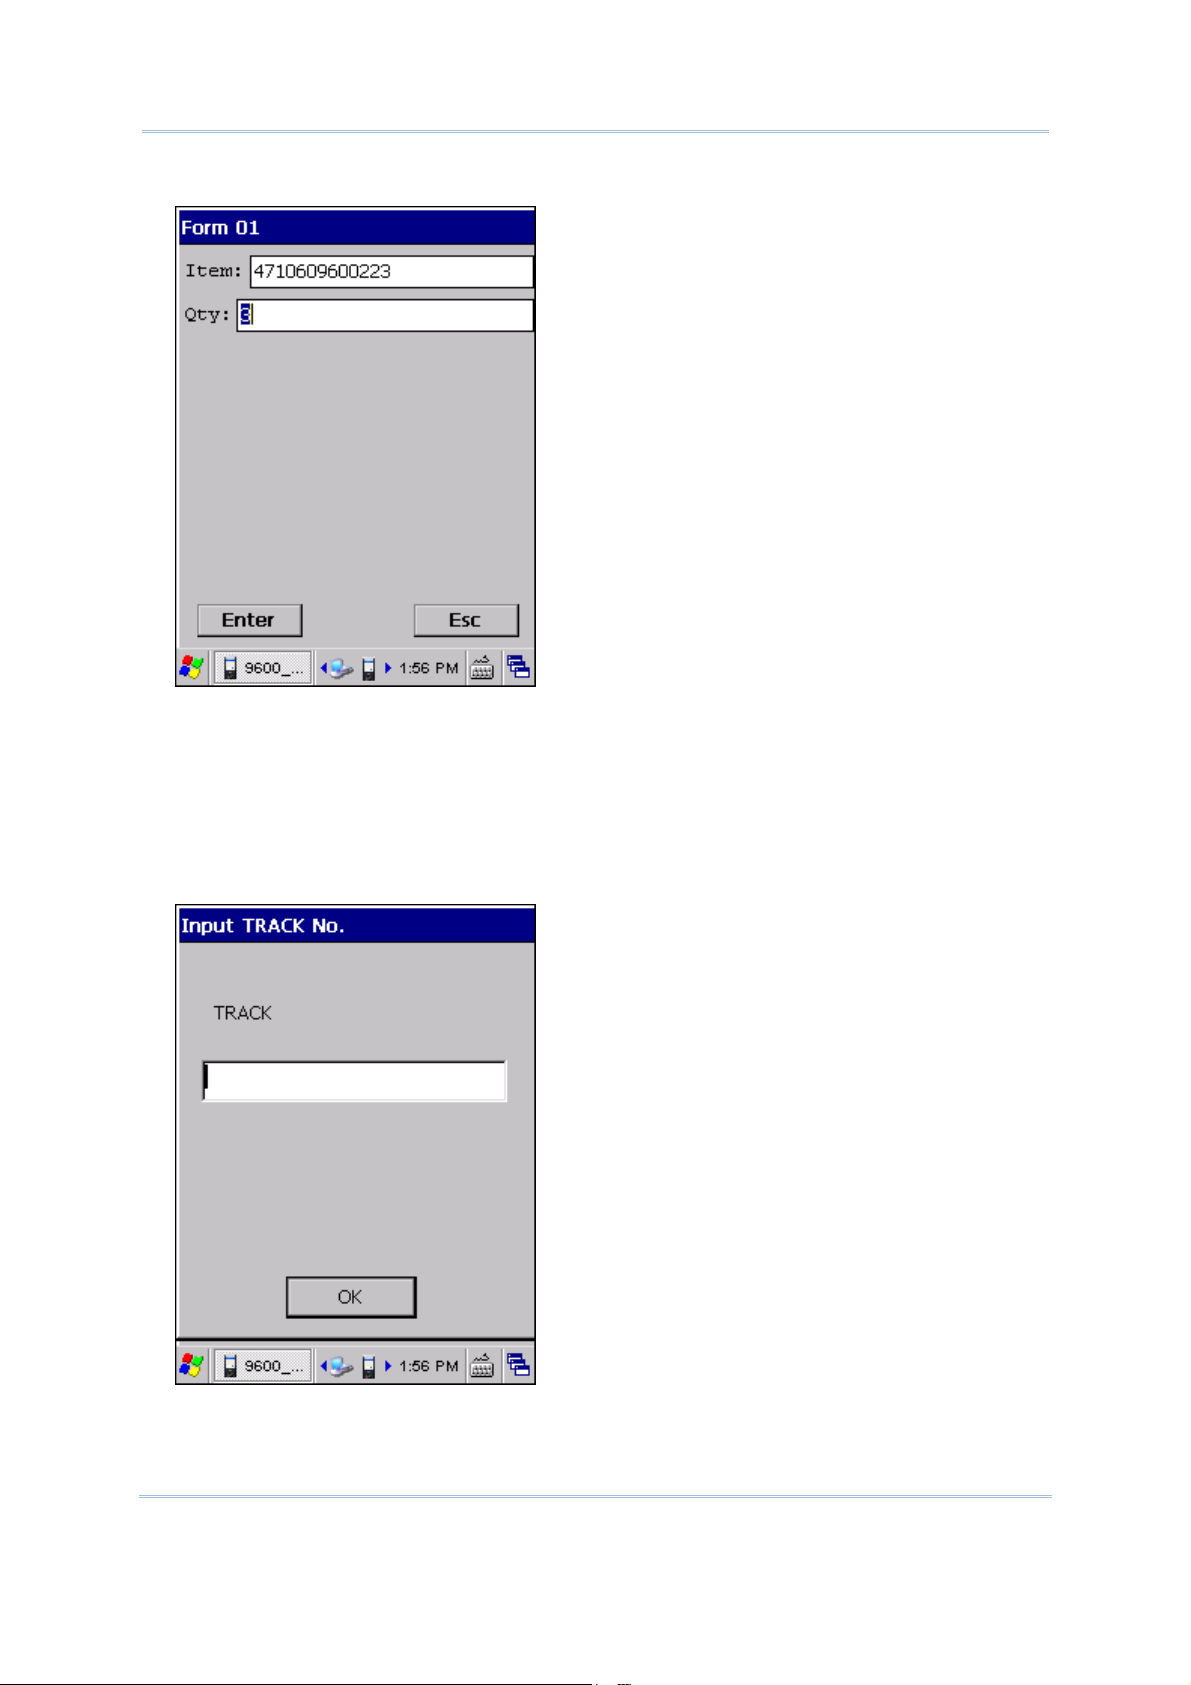
5) Press [Enter] to end the scanning task. A dialog box appears requesting you to input
a track number. Enter a number if necessary; otherwise, tap [OK] to skip and close
the dialog box.
20
Page 29
Chapter 1 Form
S
I
Alternatively, if you have a large number of the same item, you may manually input the
quantity, say “30”. It will override the previous scanning of this item. Press [Enter]. Data
for the quantity field saved with this transaction record is “30”.
tart with initial scanning.
Scan the same barcode to accumulate
the quantity.
Manually input a value to override
the previous scanning.
Press [Enter] to save data.
nput track no. if necessary.
Back to the beginning
of Form 01.
21
Page 30
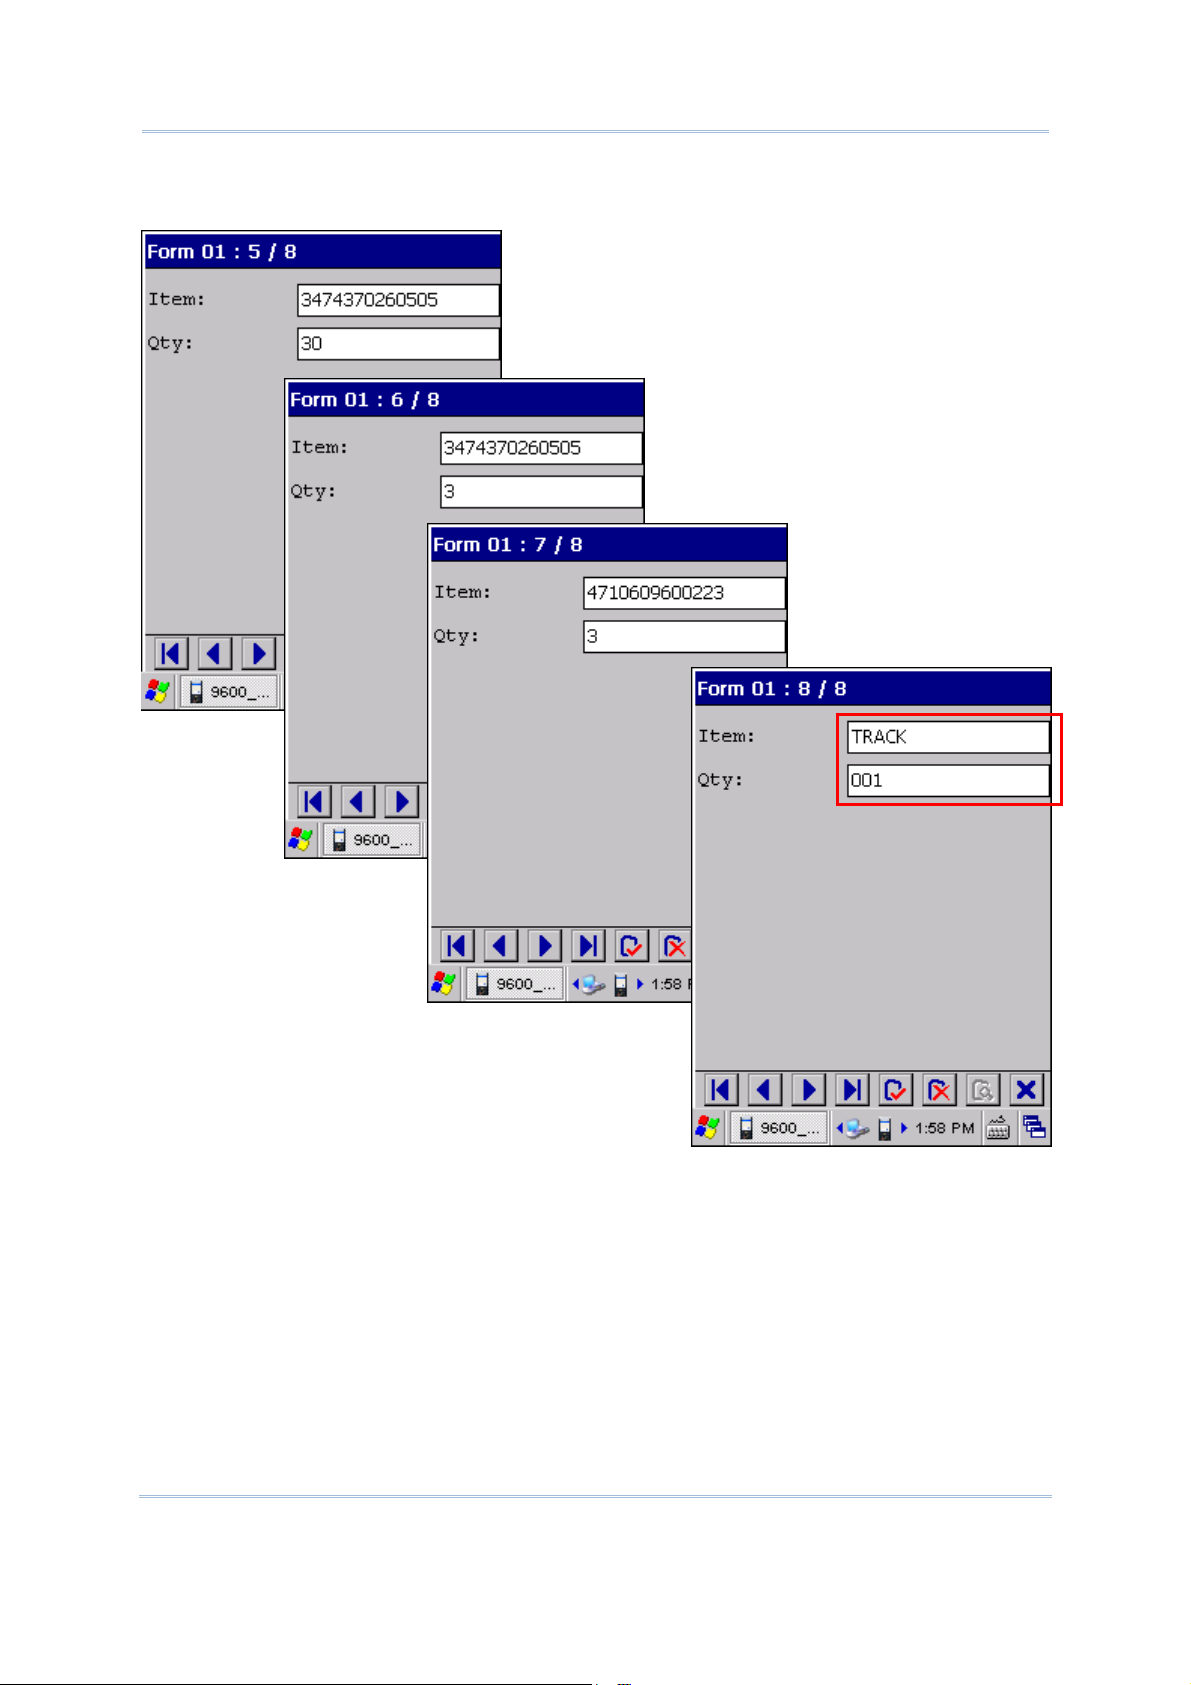
FORGE 9 Series Application Generator User Guide
When browsing data, you will see records as shown below. The last one is for the track
number.
22
Page 31
Chapter 1 Form
1.9 DATA TYPE
Specify the data type line by line to address your application requirements. Take the
following for example.
The associated settings for each data type are marked in the table below.
23
Page 32

FORGE 9 Series Application Generator User Guide
Data Type Prompt Input Source Length Lookup Properties
on-screen saved in record Min / Max Field More...
nil
text
letter
alphanumeric
integer
real
auto (+/-)
extension
pass down
boolean
lookup
fixed data
prompt
pause
counter
image
User-definable
1.9.1 NIL
No data input is allowed.
This is the default setting. There will be single line spacing on the mobile computer
screen.
When the data type of the previous line is “image”, you may need to reserve enough
space for displaying the image.
1.9.2 TEXT
ASCII character – any character is acceptable. For example, $1a2b3c=-*/…
1.9.3 LETTER
Alphabetic character – any letter is acceptable, capital or small (Aa ~ Zz).
24
Page 33

Chapter 1 Form
I
1.9.4 ALPHAMERIC
A combination choice of alphabetic (1.9.3) and numeric (1.9.5); any alphabet or
number is acceptable. For example, ABC123xyz
1.9.5 INTEGER
Whole number - any number is acceptable, such as … -2, -1, 0, 1, 2 …
When integer or real is selected along with lookup field specified, the lookup value
will be first displayed in the input field on the mobile computer screen. Then, data
input is allowed.
Lookup Value
→
nput Value
LOOKUP (FIELD) – NO ARITHMETIC SIGN
For example, if you select “Save & Update” for Record, the input value will overwrite the
lookup value. No arithmetic operations are performed
Utilities > Browse (Data) > select "Form 01": the value of the entry is 103
Utilities > Browse (Data) > select "1st lookup file": the value of the entry is 103
LOOKUP (FIELD) – ARITHMETIC SIGN “+”
For example, if you select “Save & Update” for Record, it will automatically add the input
value to the lookup value.
Utilities > Browse (Data) > select "Form 01": the value of the entry is 103
Utilities > Browse (Data) > select "1st lookup file": the value of the entry is 203
25
Page 34

FORGE 9 Series Application Generator User Guide
I
LOOKUP (FIELD) – ARITHMETIC SIGN “−”
For example, if you select “Save & Update” for Record, it will automatically subtract the
input value to the lookup value.
Utilities > Browse (Data) > select "Form 01": the value of the entry is -103
Utilities > Browse (Data) > select "1st lookup file": the value of the entry is -3
1.9.6 REAL
Real number – any number with a decimal representation is acceptable, rational or
irrational. For example, 4.56
1.9.7 AUTO (+/-)
Any Integer number is acceptable. For example, 123
This is similar to data type integer, except that the lookup value is displayed before
the input field. There may be an arithmetic sign (+, -) in front of the input field,
which depends on the setting of the lookup field.
LOOKUP (FIELD) – NO ARITHMETIC SIGN
For example, if you select “Save & Update” for Record, the input value will simply
overwrite the lookup value. No arithmetic operations are performed.
Utilities > Browse (Data) > select "Form 01": the value of the entry is 8
Utilities > Browse (Data) > select "1st lookup file": the value of the entry is 8
Lookup Value
nput Value
26
Page 35

Chapter 1 Form
L
LOOKUP (FIELD) – ARITHMETIC SIGN “+”
For example, if you select “Save & Update” for Record, it will automatically add the input
value to the lookup value (left below).
Utilities > Browse (Data) > select "Form 01": the value of the entry is 5
Utilities > Browse (Data) > select "1st lookup file": the value of the entry is 105
Lookup Value
Input Value
ookup Value
Input Value
LOOKUP (FIELD) – ARITHMETIC SIGN “−”
For example, if you select “Save & Update” for Record, it will automatically subtract the
input value to the lookup value (right above).
Utilities > Browse (Data) > select "Form 01": the value of the entry is -7
Utilities > Browse (Data) > select "1st lookup file": the value of the entry is 93
1.9.8 EXTENSION
No data input is allowed.
The line will be reserved as an "extension" of the previous line so that the whole input
data can be displayed on the mobile computer screen.
Note: The number of extension lines depends on the maximum length of your data and
how many characters can be displayed per line of an input field.
27
Page 36

FORGE 9 Series Application Generator User Guide
1.9.9 PASS DOWN
No data input is allowed.
Data of this line may be imported from a previous form, of which the setting of
Record is specified as “pass down”. When one line is not enough for displaying the
inherited contents, set its following line(s) to be an "extension". Or, it may be
imported from a menu, of which at least one of the options of Data on the Menu tab
is selected for “pass down”.
Note: This data type is used to combine a number of forms so that they can be saved as
one record.
1.9.10 BOOLEAN
Only one of these sets of values are acceptable – “0 or 1”, “Y or N” and “T or F”.
If you input a value other than the above ones, a message will be displayed on the
mobile computer to indicate "Data type is wrong!"
1.9.11 LOOKUP
No data input is allowed.
When data of a previous input field is found matching with the "key field" of a lookup
file, data of this input field will be imported from its associated lookup field. This field
will be displayed in grey on the mobile computer.
By default, the imported data will not be saved in the transaction record. Click the
[more] button and select Save field data in its associated
below.
Properties as shown
28
Page 37

Chapter 1 Form
Note: The lookup value is imported for reference. No change is allowed.
1.9.12 FIXED DATA
No data input is allowed.
The prompt string will be saved as part of the transaction record.
1.9.13 PROMPT
No data input is allowed.
The prompt string will not be saved.
1.9.14 PAUSE
No data input is allowed.
The prompt string will not be saved. However, it will be displayed on the mobile
computer as a message to catch your attention.
1.9.15 COUNTER
No data input is allowed.
The current record count will be displayed in eight digits, starting from 00000000.
Refer to
29
5.4.3 Entry Options.
Page 38

FORGE 9 Series Application Generator User Guide
1.9.16 IMAGE
Only image data is allowed. The supported image file formats include BMP, JPEG, PNG,
and GIF.
The prompt string and the file path to an image will both be saved in the transaction
record. Click the [more] button and select Edit file path to give a full path to an
image file in the associated Properties dialog box as shown below. You may specify a
default file path to an image file and change it later while collecting data.
Note: (1) For 9400/9600 mobile computer to capture an image, you must make sure
that it is equipped with either a camera or 2D reader. For the latter, the Image
Capture setting on the Barcode tab must be enabled. If both camera and 2D
reader exist, it only allows using the camera for image capture.
(2) For 9300/9500CE mobile computer to capture an image, you must make sure
that it is equipped with 2D reader. Also, the Image Capture setting on the Barcode
tab is enabled.
Select the check box to display
for the form.
30
Page 39

Chapter 1 Form
Leave a number of lines (“nil” by default as shown below) to display the image.
Tap this button to select
another image file or capture
a new image.
→
Tap
Warning: When “Check file path” is enabled, the file path to an image must be
31
to select another image or capture a new image.
specified!
Page 40

FORGE 9 Series Application Generator User Guide
1.10 PROMPT
Specify a prompt string for a specific input field, if necessary. Maximum 30 characters
are allowed. Due to the screen size, the length of the prompt string will affect how the
input field looks on the screen – it may be a very narrow input box if the prompt string is
too long, and therefore, it will not display the whole input data on the screen, even
though a number of its following lines are set to “extension”. It looks better when
browsing data because the prompt string to be displayed is limited to 12 characters.
Note: Unless the data type of a line is “fixed data”, a prompt string will not be saved in a
transaction record.
1.11 INPUT SOURCE
Specify from which source data can be collected.
Reader
Keypad
Both
RFID
All
Upon completion of one input field, it is necessary to press the [Enter] key on the mobile
computer. Then it will move either to the next input field, or to the next form or menu.
When the input source is specified to “reader” only, you need to enable "Auto ENTER" for
barcode input settings in
1.15 Properties.
Note: “RFID” and “All” are available only when the RFID reader is selected on the
Barcode property page. When “RFID” is selected, you may still press the [ESC] or
[Enter] key to cancel or confirm a task. The rest keys on the keypad are disabled.
1.12 MINIMUM LENGTH
Specify the minimum length of an input field.
If the input data is shorter than specified, it will be considered unacceptable. A
warning message will be displayed to indicate "Data is too short!"
1.13 MAXIMUM LENGTH
Specify the maximum length of an input field. The value can be 160 at most.
You can facilitate data input by showing input marks on the screen. In
select Show input mark. The number of input marks equals to the maximum length
specified here.
1.15 Properties,
32
Page 41

Chapter 1 Form
If the input data is longer than specified, it will be considered unacceptable.
Input via Barcode/RFID Reader
A warning message will be displayed to indicate "Data is too long!"
Input via Keypad
No warning message, however, you cannot input any more characters beyond the maximum
length.
1.14 LOOKUP (FIELD) / VARIABLES
If there is no lookup file in use, this feature will be Variables.
1.14.1 LOOKUP (FIELD)
Refer to 1.5 Lookup (File). If a lookup file is in use, you need to specify the
corresponding lookup field line by line. For each lookup file, there will be a key field. By
default, the "
and its input data is found matching, data for its following input fields will be imported
from each corresponding lookup fields.
key field" is Field #1. When an input field makes reference to the key field
For those data types other than integer, real, and auto (+/-), see the options left
below.
For data types integer, real, and auto (+/-), see the options right below.
When an arithmetic sign (+, -) is prefixed to the lookup field, the input data will be
added or subtracted from the lookup value.
Lookup Field
Lookup Field for data type:
integer,
real,
auto (+/-)
33
Page 42

FORGE 9 Series Application Generator User Guide
V
1.14.2 VARIABLES
Refer to 1.5 Lookup (File). If there is no lookup file in use, it will provide variables as
shown below, which can be accessed by different forms.
For example, you may specify set v1 for input field #1 of form 1, and its input data will
be saved in the first character array. Specify get v1 for input field #3 of form 2, and the
previous input data will be imported. If you specify get&set v1 for input field #3 of form
2, the previous input data will be imported and then updated.
ariables
34
Page 43

Chapter 1 Form
1.15 PROPERTIES
Specify field properties if necessary.
1.15.1 FIELD DATA
FIXED DATA LENGTH
Select the check box. The data length will be fixed to the value specified here.
If the input data is longer, it will be truncated and saved to transaction record for the
exported file only. When browsing data, it will remain intact on the screen.
If the input data is shorter, "Space" or "0" will be added in front of or to the end of
the data based on either "Left" or "Right" alignment.
Below are some examples.
Fixed data length
4 Left aligned / space 123456789 1234
4 Right aligned / space 123456789 6789
10 Left aligned / 0 7654321 7654321000
10 Right aligned / 0 7654321 0007654321
Alignment Input data Transaction record
35
Page 44

FORGE 9 Series Application Generator User Guide
INITIAL VALUE OR TEXT
Select the check box. An initial value or text, up to 10 characters, specified here will be
shown in the input field. It is to be replaced by input data.
For example, it can be used to prompt an initial value for quantity.
ADD PREFIX CODE
Select the check box to prefix a code to the input data. Click the editing box next to it,
and select one or more codes from the Grid Control (ASCII codes). For example, a dollar
sign ("$") can be added to the front of the data input for price.
ADD SUFFIX CODE
Select the check box to suffix a code to the input data. Click the editing box next to it,
and select one or more codes from the Grid Control (ASCII codes).
Instead of using delimiters in
codes to separate each entry of input data.
Note: You may use prefix/suffix code to wrap the input data. The prefix/suffix code will
be added to the exported file only.
5.2 Data Field Delimiter, you may use prefix and/or suffix
SHOW INPUT MARK
Select the check box to show input marks, such as underline (_) or asterisk (*), which is
to be replaced by input data.
The number of input marks shown on the screen equals to the maximum length of data
specified in
1.13 Maximum Length.
DECIMAL PLACES
A decimal place is the position of a digit to the right of a decimal point. When the data
type is real, you may need to specify its decimal places.
By default, it is set variable to accept all real numbers.
For example, 4 is selected for decimal places, however, there are only 2 decimal places
in the input number, say "8.12". To follow this rule, the system will save the input data
as "8.1200". If you try to input a number "8.12345" via the keypad, it will not allow the
input of the fifth decimal digit. Only "8.1234" is acceptable and saved to file.
If the barcode "8.12345" is scanned via the barcode reader, a warning message
“Incorrect decimal input” will be displayed on the mobile computer, and the system will
automatically clear the input data and wait for new entry.
36
Page 45

Chapter 1 Form
1.15.2 BARCODE INPUT
READ PARTIAL BARCODE
By default, it will return the whole barcode that has been decoded. When the check box
is selected, it will return partial barcode according to the settings of the start position and
maximum length.
Below are some examples.
Start position
2 10 9876543210 876543210
2 3 9876543210 876
Max. length Barcode scanned Transaction record
CHECK LEADING CODE
The leading code refers to the digit in the start position of a barcode.
Select the check box to verify the barcode input. When the leading code is not matching,
the barcode will be rejected.
Below are some examples.
Leading code
9 9876543210 9876543210
2 9876543210 (Discarded: code not matching)
Read partial code + Check leading code:
Start position
2 7 8 9876543210 8765432
Max. length Leading Code Barcode scanned Transaction record
Barcode scanned Transaction record
2 7 9 987654321 (Discarded)
CHECK DIGIT VERIFICATION
The check digit refers to the digit in the end of a barcode, as a one-digit derived
checksum digit. Select the check box to verify the barcode input. You may apply different
modulus 10 or 11 check digit as provided in the drop-down menu. When the check digit
is not matching, the barcode will be rejected.
AUTO ENTER
Normally, it is necessary to press the [Enter] key on the mobile computer upon
completion of one input field. Then, it will move either to the next input field, or to the
next form/menu specified.
37
Page 46

FORGE 9 Series Application Generator User Guide
This function will automatically add a carriage return in front of or to the end of the
barcode input.
For barcode scanning, it proves to be timesaving when Scan+ENTER is enabled.
For a typical application of continuous scanning, it is efficient by making use of
ENTER+Scan.
1.16 RESET
Click this button to load the default settings.
Note: The settings for the current form will be cleared.
38
Page 47

4
3 6
Chapter 2
MENU
A menu is a list of selection items. Up to ten different menus can be defined.
Below are the settings for each field of a menu.
1
2
5
7
IN THIS CHAPTER
2.1 ID ........................................................................... 40
2.2 ESC ......................................................................... 40
2.3 Menu Caption............................................................ 40
2.4 Item Name ............................................................... 40
2.5 Next ........................................................................ 41
2.6 Data ........................................................................ 41
2.7 Reset ....................................................................... 42
39
Page 48

FORGE 9 Series Application Generator User Guide
e
2.1 ID
Select a name for the current menu you work on. Usually start with “menu 1”.
menu 1 ~ 10
2.2 ESC
Select a form or menu that will be displayed when you press the [ESC] key on the mobile
computer.
main
form 1 ~ 20
menu 1 ~ 10
Note: Normally, the [ESC] key is used to return to a previous form or menu.
2.3 MENU CAPTION
Select the check box and specify a caption for the current menu if necessary.
2.4 ITEM NAME
Specify a name for each menu item. For example, you may specify "1. Goods In" (see
left below) or "Goods In" (see right below) in the first field of Item Name. The only
difference is the Item No. will not be displayed on the screen in the latter.
Caption
Item Name
Item Nam
40
Page 49

Chapter 2 Menu
2.5 NEXT
Select a form or menu that will be displayed when a menu item has been selected.
main
form 1 ~ 20
menu 1 ~ 10
This function can be invoked by performing one of the following actions on the mobile
computer –
Double-tap the desired menu item.
Press the [Up/Down] arrow keys to select a menu item, and then press [Enter].
2.6 DATA
Specify how to proceed when a menu item has been selected.
Save caption – Save the menu caption to the transaction record as “Pass Down” data
if this menu is running.
Save selected item – Save the selected menu item to the transaction record as “Pass
Down” data if this menu applies.
Save selected item Save caption
41
Page 50

FORGE 9 Series Application Generator User Guide
Save caption and selected item – Save both to the transaction record as “Pass Down”
data. If the data is too long to be displayed in full, press the [Right Arrow] key on the
keypad to view the rest of it if necessary.
Save caption & selected item
→
Note: The selected option(s) will be passed down to an associated form or menu.
2.7 RESET
Click this button to load the default settings.
Note: The settings for the current menu will be cleared.
42
Page 51

8
3 5
6
410
Chapter 3
LOOKUP
A lookup file is a database file created for information reference. Up to five lookup files
can be defined. If settings on this property page are specified improperly, it may go
wrong when an input field makes reference to its corresponding lookup field.
If the default settings remain unchanged for the following items in the AG template file
that has been copied to your mobile computer, [File > Import] and [File > Export]
will be unavailable on the mobile computer.
Besides this chapter, you may refer to the following sections for a whole understanding
of all related settings:
1.5 Lookup (File)
1.9.11 Lookup (Data Type)
1.14 Lookup (Field)
1
2
9
11
12
7
43
Page 52

FORGE 9 Series Application Generator User Guide
IN THIS CHAPTER
3.1 Name....................................................................... 44
3.2 Field Property............................................................ 44
3.3 Number of Fields ....................................................... 44
3.4 Data Type................................................................. 45
3.5 Field Name ............................................................... 46
3.6 (Max) Length ............................................................ 46
3.7 Key Field .................................................................. 46
3.8 Change Export Name.................................................. 47
3.9 Auto Export Lookup Table When Close Application .......... 47
3.10 Action When the Format of Record Is Wrong ................ 47
3.11 Action When the Input Data Has No Match................... 48
3.12 Reset ..................................................................... 49
3.1 NAME
Select a lookup file you want to define its settings. Up to 5 different lookup files can be
specified. Usually start with the “1st lookup file”.
3.2 FIELD PROPERTY
Specify the settings of data field of the database (lookup file).
3.2.1 FIXED LENGTH
This is the default setting. Proceed to define related settings –
3.3 Number of fields
3.6 Length
3.2.2 DELIMITER
You may use a delimiter (ASCII code) to separate the data fields. Proceed to define
related settings –
3.3 Number of fields
3.6 Max. Length
If the maximum length of each field is set improperly, you will receive a warning
message in the import process. You may fail to import the lookup file, which depends on
the action specified when the data format is wrong. Refer to the settings of
When the Format of Record Is Wrong
.
3.10 Action
3.3 NUMBER OF FIELDS
It must at least cover the referred fields of the database (lookup file). Refer to 1.14
Lookup (Field) / Variables
.
44
Page 53

Chapter 3 Lookup
imag
3.4 DATA TYPE
A newly-added feature to help you verify whether the lookup file you are importing is
correct or not. Be careful with the data type you set to each of the lookup field. If data in
the lookup file is not as described, it may fail to import the lookup file and display a
warning message. Refer to
When the Format of Record Is Wrong
1.9 Data Type for details on each data type and 3.10 Action
.
text
integer
real
letter
boolean
image — same as “text”, full file path is required, such as “\DiskOnChip\1000.jpg”.
While browsing data, tap
capturing a new image.
to view image. It allows selecting another image file or
text text integer
e
Select another image file,
or capture an image.
→
45
Page 54

FORGE 9 Series Application Generator User Guide
3.5 FIELD NAME
Specify a name for each lookup field, which will be displayed on the mobile computer to
facilitate data editing under [Utilities > Browse Data].
Field Name
3.6 (MAX) LENGTH
When the field property is set Fixed Length, specify the length for each referred
data field.
When the field property is set Delimiter, specify the maximum length for each
referred data field.
Note: If a delimiter is used to separate data fields, any improper value would cause
wrong data format.
3.7 KEY FIELD
The import of data depends on the key field. Select your key field so that an index file
can be created for the database (lookup file), and therefore enable searching by key field
when you browse the lookup file.
Refer to
Utilities Menu > Browse in Appendix I – Demonstration on Mobile Computers.
When a form makes reference to a lookup file, there must be one input field
associated with the key field of the database (lookup file). When its input data is
found matching with that of the key field, data of other input fields, if referring to a
lookup field, will be imported accordingly.
If no matching, refer to
3.11 Action When the Input Data Has No Match.
46
Page 55

Chapter 3 Lookup
3.8 CHANGE EXPORT NAME
If you have specified a lookup file in use, you can export it or even merge it with a data
file. The default file name is "1st lookup file".
Note: The new name of a lookup file cannot be identical to that of the original file;
otherwise, it will overwrite the original file!
3.9 AUTO EXPORT LOOKUP TABLE WHEN CLOSE APPLICATION
If a lookup file is in use and “Auto export lookup table when close application” is enabled,
the lookup table will be exported automatically upon closing the application. Choose the
save mode to decide whether the lookup table will overwrite or append to the existing
table.
3.10 ACTION WHEN THE FORMAT OF RECORD IS WRONG
This applies to Delimiter, when a delimiter is used to separate data fields of the lookup
file. It provides several options to handle wrong data format when you import the lookup
file.
3.10.1 STOP THE IMPORT PROCESS
When wrong data format is encountered, a warning message will be displayed on the
mobile computer. The import process is stopped then. You will need to correct the data
format, for example, remove an empty record (line) at the end of a file. Then, import the
lookup file again.
3.10.2 TRUNCATE/REFORMAT THE RECORD
When wrong data format is encountered, it will automatically truncate or reformat the
lookup file in the import process. For example, the additional fields of a record will be left
out.
3.10.3 SKIP THE RECORD
When wrong data format is encountered, it will automatically skip the record.
47
Page 56

FORGE 9 Series Application Generator User Guide
3.11 ACTION WHEN THE INPUT DATA HAS NO MATCH
Choose the appropriate action to take when the input data does not match that of the
key field.
3.11.1 CONTINUE
The program will allow data input to proceed without showing any message.
Data can only be saved in a data file if you have selected save or save & update in
1.6 Record.
3.11.2 SHOW WARNING MESSAGE
A warning message "Data is not found!" is displayed on the mobile computer.
Tap [OK] to close the message box. You will need to clear the input data manually.
3.11.3 INSERT TO LOOKUP FILE
The program will allow data input to proceed without showing any message.
Data will be inserted to the target lookup file if you have selected update lookup or
save & update in
1.6 Record.
3.11.4 SHOW WARNING MESSAGE & INSERT
A warning message "Data is not found!" is displayed on the mobile computer.
It will resume to data input. Data will be inserted to the target lookup file if you have
selected update lookup or save & update in
1.6 Record.
48
Page 57

Chapter 3 Lookup
3.11.5 CLEAR THE SCREEN
The program will automatically clear the input data and wait for new entry.
3.11.6 SHOW WARNING & CLEAR SCREEN
A warning message "Data is not found!" is displayed on the mobile computer.
It will automatically clear the input data and wait for new entry.
→
3.12 RESET
Click this button to load the default settings.
Note: The settings for the current lookup file will be cleared.
49
Page 58

FORGE 9 Series Application Generator User Guide
50
Page 59

3
Chapter 4
BARCODE
According to the requirements of a specific application, you may enable or disable any of
the barcode symbologies and configure the associated parameters.
Supported barcodes depend on the scan engine integrated on the mobile computer.
1
2
IN THIS CHAPTER
4.1 Reader Type ............................................................. 52
4.2 Reader Settings......................................................... 58
4.3 Barcode & Parameters ................................................ 58
51
Page 60

FORGE 9 Series Application Generator User Guide
4.1 READER TYPE
Depending on the module equipped on your mobile computer, the following reader types
are supported –
Scan Engine
1D Linear Imager CCD
1D Laser
1D Long Range Laser LR
1D Extra Long Range Laser ELR
2D 2D Imager
RFID
ID_MOD_RFID (ACG)
ID_MOD_TI_RFID
ID_MOD_MP_RFID
ID 9300 9400 9500CE 9600
SE950
SE955
PL4407
PL4507
Options of different reader combination are allowed, such as 1D+RFID and 2D+RFID. For
each combination, both readers can be initialized and ready for scanning at the same
time (dual mode operation). For example, if you press the [SCAN] button while running
the AG program on the mobile computer, it will read a barcode in position or an RFID tag
in proximity depending on which one comes first.
Note: You cannot have 1D+2D scan engines installed on the mobile computer because
they are both barcode readers!
4.1.1 BARCODE READER
Select a reader type that matches the hardware configuration of your mobile computer.
The associated barcode parameters will be displayed accordingly. If there is a More
button next to the barcode symbology listed, advanced settings are available.
Note: (1) In order to initialize the barcode reader, you must select the correct reader
type when you first configure a template file. Otherwise, a message "Wrong reader
type!" will be displayed on the mobile computer after you open the template file.
(2) For 9600 mobile computer integrated with a RFID reader only, select “None”
for barcode reader.
SYMBOLOGIES SUPPORTED
Varying by the scan engine installed, the supported symbologies or tag types are listed
below. For details on configuring associated settings, please refer to each Appendix
separately.
52
Page 61

Chapter 4 Barcode
Symbology CCD, SE950 SE955 LR, ELR 2D
Codabar
Code 11
Code 93
Composite Code
MSI
Plessey
Postal Codes
Telepen
Code 128
Code 2 of 5
Code 3 of 9
EAN/UPC
GS1 DataBar
(RSS)
2D
Symbologies
Code 128
GS1-128 (EAN-128)
ISBT 128
Industrial 25 (Discrete 25)
Interleaved 25
Matrix 25
Chinese 25
Code 39
Trioptic Code 39
Italian Pharmacode
(Code 32)
French Pharmacode
EAN-8
EAN-13
Bookland EAN (ISBN)
UPC-E0
UPC-E1
UPC-A
GS1 DataBar Omnidirectional
(RSS-14)
GS1 DataBar Limited
(RSS Limited)
GS1 DataBar Expanded
(RSS Expanded)
PDF417
MicroPDF417
Data Matrix
(PL4507
only)
53
Page 62

FORGE 9 Series Application Generator User Guide
Maxicode
QR Code
MicroQR
Aztec
(PL4507
only)
4.1.2 RFID READER
Select the check box to enable the RFID reader. Advanced settings are provided as
shown below. RFID tags in proximity will be read automatically by 9400/9500/9600 when
RFID reader is enabled. You may limit the
misreading RFID data.
Input Source options in Form to prevent from
Read UID
By default, the RFID reader is set to read UID (Unique Identification).
Read Data
Select the check box so that RFID data can be read.
If only partial data is required, specify the start position (or start page) and maximum length.
Some RFID tags support both read/write operations, on a page-by-page basis. You may find it
necessary to define your own read operation here. For reference only, the table below lists the
start page for read/write operation on a number of RFID tags.
Start Page Tag Type Standard
-1 Start from byte 0 of the default page (see below) for all
tags
3 Mifare Ultralight ISO 14443A
4 SR176 ISO 14443B
3 ICODE SLI ISO 15693
54
Page 63

Chapter 4 Barcode
0 LRI512 ISO 15693
3 SRF55VxxP ISO 15693
0 EM4135 ISO 15693
0 Tag-it HF-I ISO 15693
0 Others ISO 15693
5 ICODE ICODE® (Phillips)
0 Tag-it Tag-it® (TI)
Note: Please refer to the specifications of your RFID tags for memory organization.
User Delimiter
Select the check box and specify a delimiter to separate UID from data.
RFID TAGS SUPPORTED
The RFID reader supports read/write operations depending on the tags. The supported
labels include ISO 15693, Icode®, ISO 14443A, and ISO 14443B. Currently, the
performance of some tags has been confirmed, and the results are listed below for your
reference.
Note: You should study the specifications of RFID tags before use.
ID_MOD_RFID, (ACG) Module Version 1.0 UID Only Read Page Write Page
ISO 14443A Mifare Standard 1K
Mifare Standard 4K
Mifare Ultralight
Mifare DESFire
Mifare S50
SLE44R35
SLE66R35
ISO 14443B SRIX 4K
SR176
ISO 15693 ICODE SLI
SRF55V02P
SRF55V02S
SRF55V10P
TI Tag-it HF-I
ICODE®
(Phillips)
ICODE
--- ---
--- ---
--- ---
--- ---
--- ---
55
Page 64

FORGE 9 Series Application Generator User Guide
ID_MOD_TI_RFID, Module Version 1.0.A UID Only Read Page Write Page
ISO 14443A Mifare Standard 1K
Mifare Standard 4K
Mifare Ultralight
Mifare DESFire
Mifare S50
SLE44R35
SLE66R35
ISO 14443B SRIX 4K --- --- ---
SR176 --- --- ---
ISO 15693 ICODE SLI
SRF55V02P
SRF55V02S
SRF55V10P
TI Tag-it HF-I
ST LRI512
--- ---
--- ---
--- ---
--- ---
--- ---
--- ---
--- ---
--- ---
--- ---
ICODE®
(Phillips)
ICODE --- --- ---
56
Page 65

Chapter 4 Barcode
ID_MOD_MP_RFID UID Only Read Page Write Page
ISO 14443A Mifare Standard 1K
Mifare Standard 4K
Mifare Ultralight
Mifare DESFire
Mifare S50
SLE44R35
SLE66R35
ISO 14443B SRIX 4K --- --- ---
SR176
ISO 15693 ICODE SLI
SRF55V02P
SRF55V02S
SRF55V10P
TI Tag-it HF-I
ST LRI512
--- ---
4.1.3 RESET
Click [Reset] to load the default settings. This applies to the following –
4.1 Reader Type
4.2 Reader Settings
4.3 Barcode & Parameters
Note: The current settings will be cleared.
57
Page 66

FORGE 9 Series Application Generator User Guide
4.2 READER SETTINGS
Refer to the reader settings table in related appendixes.
4.3 BARCODE & PARAMETERS
Refer to the symbology settings table in related appendixes.
Scan Engine
Linear Imager (CCD) 9400, 9500, 9600 Appendix II — Linear Imager
Laser (SE950) 9400, 9500, 9600 Appendix II — Linear Imager
Laser (SE955) 9300 Appendix III — Laser (SE955)
Long Range/Extra Long Ranger Laser 9500 Appendix IV — LR, ELR Laser
2D Imager (PL4407) 9400, 9500 Appendix V — 2D Imager
2D Imager (PL4507) 9300, 9600 Appendix V — 2D Imager
Related Mobile Computers Reference
(CCD), Laser (SE950)
(CCD), Laser (SE950)
58
Page 67

3
4
5
6
Chapter 5
SETTINGS
On this property page, basic settings for the application program can be changed.
1
2
IN THIS CHAPTER
5.1 Program Start From ................................................... 60
5.2 Data Field Delimiter ................................................... 60
5.3 Camera Initial Settings ............................................... 60
5.4 System Initial Settings ............................................... 61
5.5 Security ................................................................... 63
5.6 Reset ....................................................................... 65
59
Page 68

FORGE 9 Series Application Generator User Guide
5.1 PROGRAM START FROM
Decide where the application program starts as soon as you tap [Run] from the toolbar
on the mobile computer.
form 1
menu 1
5.2 DATA FIELD DELIMITER
The input data will be saved as transaction records. Specify the delimiters used to
separate data fields, either in ASCII code or text. It allows using up to two different
delimiters.
Type the ASCII code for a delimiter and its corresponding character will be shown
automatically, and vice versa.
5.3 CAMERA INITIAL SETTINGS
The camera initial settings are only available for the AG9400 or AG9600 program. If a
camera and 2D reader both exist, it only allows using the camera for image capture.
Camera Settings
Resolution By default, 800 by 600 pixels resolution is in use.
Options
1600 by 1200 pixels resolution is supported.
Flash Light By default, the flash light is turned off.
If you need to add lighting when the ambient light is too dim, you
may turn it on.
Auto Flash is supported on 9600 only.
Color Effects By default, no color effect is applied.
Monochrome, Sepia, Negative, Solarize (with unmodified UV), and
Solarize 2 (with UV) are supported. Applying any color effect will
take in a few seconds to configure the camera.
Image Format By default, the captured image will be saved in JPEG format.
Bitmap format is supported.
Capture Settings Options
Default image store By default, the captured image is stored under the directory
“\DiskOnChip”. Specify a file name, and the full path name will be
saved to the transaction record.
Auto file name By default, the captured image is saved to a user-specified filename.
When enabled, the captured image will be saved to a filename
following the automatic naming rule explained below.
File Title Specify a string prefixed to the filename. It allows up to 5 characters.
60
Page 69

Chapter 5 Settings
Using default naming rule
When enabled, the format of automatic filename is
xxxxxyaabbccccc.jpg (or .bmp), where
“xxxxx” is the file title specified above.
“y” can be the capital letter F for Form, or L for Lookup.
“aa” indicates in which Form (or Lookup) the image data is
saved.
“bb” indicates in which “Field” of Form (or Lookup) the image
data is for.
“ccccc” stands for a 5-digit serial number starting from “00001”.
When disabled, the format of automatic filename is xxxxxccccc.jpg
(or .bmp), where
“xxxxx” is the file title specified above.
“ccccc” stands for a 5-digit serial number starting from “00001”.
Print time stamp on the
image
By default, there’s no time stamp. When enabled, it will add the
date/time information to the upper-left corner of the image.
The format of the Date and Time stamp is as follows:
YYYY/MM/DD HH:MM:SS
5.4 SYSTEM INITIAL SETTINGS
System Settings Default Value Remarks
1. Auto-preload the last template file
(.A93, .A94, .A95 or .A96)
2. Data Deletion Manual
3. Entry Options Show count Stay on the LCD for 600 ms
4. Vibrator Duration Off
5. Default export store \DiskOnChip
6. Always delete all database in the
device when open the template file
No Select the check box of “Auto run the
application (template)” if necessary.
Disabled
5.4.1 AUTO-PRELOAD THE LAST TEMPLATE FILE
You may select to automatically pre-load the last template file and the imported lookup
file(s) upon running the AG runtime on the mobile computer.
By default, you need to tap [File > Open] to open a template file.
Template File
*.A93 AG9300CE.exe
*.A94 AG9400CE.exe
*.A95 AG9500CE.exe
FORGE AG Runtime
*.A96 AG9600CE.exe
61
Page 70

FORGE 9 Series Application Generator User Guide
5.4.2 DATA DELETION
You may select to automatically delete a data file or a lookup file once it has been
exported. The file will be unavailable when you tap [File > Export], [Utilities >
Browse] or [Utilities > Delete] any more.
By default, you need to tap [Utilities > Delete] to manually delete a file.
5.4.3 ENTRY OPTIONS
You may specify whether or not to display more information, either the record count
(Show count) or the record preview (Show record), before proceeding to the next entry.
When selecting "Show count" or "Show record", you will need to specify how long it will
be displayed on the screen. Time-out is specified in the range of 1~99, in units of 100
milliseconds.
By default, the record count will be displayed on the mobile computer screen for 600
milliseconds as soon as an entry is completed. Refer to
1.9.15 Counter.
5.4.4 VIBRATOR DURATION
You may specify whether or not to turn on the vibrator to warn you of a specific event.
5.4.5 DEFAULT EXPORT STORE
You may specify the storage directory which the export file will be saved to.
By default, the default export storage directory is “\DiskOnChip”.
5.4.6 ALWAYS DELETE ALL DATABASE …
If this item is selected, then the database will be deleted every time you open the
template file. It means the database will be the new one and there will be no records in
the database every time you open this file.
62
Page 71

Chapter 5 Settings
5.5 SECURITY
For security concerns, you may specify a password and select the check box of one or
more tasks that need security checking.
By default, no password is required for the listed tasks.
A password can be up to 10 alphanumeric characters.
Note: The password is case-sensitive.
If any task is selected and provided with a password, you will not be allowed to enter a
submenu on the mobile computer without the password.
Security Options
Open File > Open
Import File > Import
Export File > Export
Password-protected Settings
63
Page 72

FORGE 9 Series Application Generator User Guide
Security Options Password-protected Settings
Edit Data Utilities > Browse
Delete Data Utilities > Delete
Settings Utilities > Settings
Auto-preload Utilities > Settings > Auto-preload
Data Deletion Utilities > Settings > Data Deletion
Entry Options Utilities > Settings > Entry Options
Vibrator Duration Utilities > Settings > Vibrator
Duration
Camera
Properties
Utilities > Settings > Camera
Properties
(hardware dependent)
64
Page 73

Chapter 5 Settings
Security Options Password-protected Settings
2D Image
Capture
Note: (1) 2D Image Capture option is only available when the Image Capture setting on
the Barcode tab is enabled for 2D reader.
(2) Camera Properties option is only available on 9400/9600 mobile computer
when equipped with a camera. If a camera and 2D reader both exist, it only allows
using the camera for image capture.
Properties dialog box for 2D Image
Capture
5.6 RESET
Click this button to load the default settings.
Note: The current settings will be cleared.
65
Page 74

FORGE 9 Series Application Generator User Guide
66
Page 75

Appendix I
DEMONSTRATION ON MOBILE COMPUTERS
Let’s take the example of 9400 Application Generator.
1) Run AG9400.exe on your computer to configure application templates.
2) Save the template file (*.A94) and copy it to the mobile computer via ActiveSync.
3) Run 9400_CE.exe on the mobile computer.
4) Tap [File > Open] to use the application template (*.A94).
5) Tap [File > Import] to import lookup file(s) if specified in the template file for use.
6) Tap [Run] to start with your application. It may start from a menu or form.
7) Tap [Utilities > Browse] to edit data collected.
Tap [Utilities > Delete] to manually delete a data file or lookup file.
Tap [Utilities > Settings] to change system settings directly.
8) Tap [File > Export] if you wish to export a data file or lookup file.
67
Page 76

FORGE 9 Series Application Generator User Guide
MAIN MENU (READER TEST)
As suggested, the 9400_CE.exe program is stored in (My Device >) DiskOnChip. Run the
program and the main menu is displayed as shown below.
Image Capture settings
if 2D reader exists
You can perform a reader test on sample barcodes if necessary. Refer to
Reader
for associated settings.
4.1.1 Barcode
Note: The correct reader type must be selected when configuring your application
template, even though you have not made any changes to it.
68
Page 77

Appendix I Demonstration on Mobile Computers
3
FILE MENU
Refer to 5.5 Security. You may apply password-protection to these tasks.
OPEN .A94 FILE
You will need to open a *.A94 file first. The rest depends on the configuration of this
template file.
IMPORT LOOKUP FILES
If you have associated a form to a lookup file, you will need to import the lookup file
after opening the *.A94 file. Finally, run your application.
1
2
4
69
Page 78

FORGE 9 Series Application Generator User Guide
EXPORT FILES
You can export a data file (by form) or lookup file, or even merge them to a new file.
Refer to
1.6.1 Export files.
Note: If the export file name is the same as of an existing file, the exported data will
overwrite the original one. Otherwise, you may select “Append to file”.
DATA FILES
This is available only when you have selected Save or Save & update for Record.
The default file name is "Form xx", start from Form 01.
The exported data file is a sequential file.
Select to save by index if
quick search is desired
for data browsing.
→
70
Page 79

Appendix I Demonstration on Mobile Computers
You may specify an automatic exporting function for a data file when closing the
application and the save mode of the exporting.
LOOKUP FILES
This is available only when you have specified a lookup file in use.
The default file name is “xxx lookup file”, starting from 1
st
lookup file.
If “Auto export lookup table when close application” is enabled, the lookup table will
be exported automatically upon closing the application. It either overwrites or
appends to the existing table.
EXIT THE APPLICATION
Choose [File > Exit] to end the application properly.
71
Page 80

FORGE 9 Series Application Generator User Guide
3
RUN THE APPLICATION
If no lookup files are associated with your forms, run your application after opening the
template file.
Here is an example of starting from "menu 1".
2
1
→ →
4
→
Note: If the template file requires image data by using the camera on 9400 or 9600, it
will turn on the camera upon running the application.
72
Page 81

Appendix I Demonstration on Mobile Computers
UTILITIES MENU
Unless a task is password-protected, you can edit data, delete files, and change the
system settings. Refer to
5.5 Security.
BROWSE
You can edit a data file or lookup file if necessary.
Tap the button to view
or change the image
73
→
Page 82

FORGE 9 Series Application Generator User Guide
1
Editing Toolbar
First Record Go to the first record.
Previous
Record
Next Record Go to the next record.
Last Record Go to the last record.
Update Update the current record if you have made changes to any field.
Delete Delete the current record.
Search Search in the saved data by form or lookup file. (only for full match;
Go to the previous record.
case-sensitive)
By “Form” – You must select the field that is the index field defined
on the Form property page.
By “lookup file” – You must select the field that is defined as the “key
field” on the Lookup property page.
See below for how to search in the lookup file.
Esc Exit data editing.
HOW TO SEARCH IN THE LOOKUP FILE?
1) Select the value of field 1, which is the key field defined on the Lookup property page
of the template file.
2) Replace the original value with the new value that you want to search for, say, 9400.
2
→
3) Tap
to start searching.
4) If successful, it will display a “Data found!” message. Tap [OK].
74
Page 83

Appendix I Demonstration on Mobile Computers
12 3 3 5
5) Based on the new value, the whole data is displayed.
4
→
HOW TO VIEW OR UPDATE THE IMAGE FILE?
1) Tap to view the image.
2) When the image is displayed, tap
to get ready for taking a new image.
on the screen to select another image, or tap
→
The icons on the toolbar, from left to right, are explained in the table below.
75
Page 84

FORGE 9 Series Application Generator User Guide
Button Description
Open an image. Any existing file in the following formats can be viewed —
JPEG
Bitmap
PNG
GIF
Save the opened image to a different file name or format.
Enter the Camera Preview Mode and display a camera preview image.
Take a picture.
Exit the Camera Preview Mode.
Configure camera settings if necessary.
3) Tap [OK].
A dialog box appears requesting you to confirm whether to update the image. Tap
[OK] to update the record with new image or [Cancel] to keep the original image.
76
Page 85

Appendix I Demonstration on Mobile Computers
DELETE
You can manually delete a data file or lookup file if it is not desired any more.
SETTINGS
You can change system settings directly on the mobile computer. Refer to 5.4 System
Initial Settings
.
Only available on 9400 or
9600 equipped with a camera.
77
Page 86

FORGE 9 Series Application Generator User Guide
ABOUT
View the version information.
78
Page 87

Appendix II
LINEAR IMAGER (CCD), LASER (SE950)
The tables below list reader settings as well as symbology settings for the Linear Imager
(CCD) or Laser (SE950) scan engine.
READER SETTINGS TABLE
CCD/Laser Description Default
Scan Mode Laser mode
Continuous Mode Non-stop scanning
To decode the same barcode repeatedly, move away the scan beam
and target it at the barcode for each scanning.
Test Mode Non-stop scanning
Capable of decoding the same barcode repeatedly
Alternate Mode Press the scan trigger to start with scanning.
The scanning won't stop until you press the trigger again.
Laser Mode Hold down the scan trigger to start with scanning.
The scanning won't stop until (a) a barcode is read, (b) the preset
timeout expires, or (c) you release the trigger.
Auto Off Mode Press the scan trigger to start with scanning.
The scanning won't stop until (a) a barcode is read or (b) the preset
timeout expires.
Redundancy Level None
None No redundancy means one successful decoding will make the reading valid
and induce the "READER Event".
One time, Two times,
or Three times
The higher the reading security is (that is, the more redundancy the user
selects), the slower the reading speed gets.
If "Three Times" is selected, it will take a total of four consecutive
successful decodings of the same barcode to make the reading valid.
Time-out 3 sec.
0~255 (second) It applies to the following scan modes only:
Laser mode
Auto Off mode
Good Read Notifications ---
Vibrate
Off
Off
1~9 (second)
Play a Sound via
Speaker
79
Mute
Sound 1~9
Sound 2 for
9300, 9400
and 9600
Page 88

FORGE 9 Series Application Generator User Guide
Sound 3 for
9500CE
Beep via Buzzer It is available on 9300/9400/9600 only:
Disable
0 = Disable
1~255 (0.1 second)
Frequency level 500~5000 Hz (+500 Hz per increment).
LED Indicator (green) It is available on 9300/9400/9600 only:
Disable
0 = Disable
1~255 (0.1 second)
Negative Barcode Disable
SYMBOLOGY SETTINGS TABLE
CCD/Laser Description Default
Codabar Enable
Transmit Start/Stop
Characters
Decide whether to include the start/stop characters in the
data being transmitted.
If "Transmit Start/Stop Characters" is desired, select one
set:
No
abcd / abcd
abcd / tn*e
ABCD / ABCD
ABCD / TN*E
Code 128 Enable
GS1-128 (EAN-128) Enable
Transmit Code ID (for
GS1-128)
Replace Field
Separator
ISBT 128 Enable
Industrial 25 (Discrete 25) Enable
Start/Stop Selection This decides the readability of all 2 of 5 symbology
Verify Check Digit Decide whether to verify the check digit. If the check digit
Transmit Check Digit Decide whether to include the check digit in the data being
Select Length
Decide whether to include Code ID (“]C1”) will be included
in the data being transmitted.
Decide whether to replace the field separator. No
variants. For example, flight tickets actually use an
Industrial 2 of 5 barcode but with Interleaved 2 of 5
start/stop pattern. In order to read this barcode, the
start/stop pattern selection parameter of Industrial 2 of 5
should set to "Interleaved 25".
is incorrect, the barcode will not be accepted.
transmitted.
One or two fixed lengths
No
Industrial 25
No
Yes
4~127
Range (1~127)
80
Page 89

Appendix II Linear Imager (CCD), Laser (SE950)
Interleaved 25 Enable
Start/Stop Selection Refer to Industrial 25. Interleaved
25
Verify Check Digit Decide whether to verify the check digit. If the check digit
is incorrect, the barcode will not be accepted.
Transmit Check Digit Decide whether to include the check digit in the data being
transmitted.
Select Length
One or two fixed lengths
No
Yes
4~127
Range (1~127)
Matrix 25 Enable
Start/Stop Selection Refer to Industrial 25. Matrix 25
Verify Check Digit Decide whether to verify the check digit. If the check digit
is incorrect, the barcode will not be accepted.
Transmit Check Digit Decide whether to include the check digit in the data being
transmitted.
Select Length
One or two fixed lengths
No
Yes
4~127
Range (1~127)
French Pharmacode Disable
Transmit Check Digit Decide whether to include the check digit in the data being
transmitted.
Italian Pharmacode (Code 32) Disable
Transmit Check Digit Decide whether to include the check digit in the data being
transmitted.
Yes
Yes
Note: For French/Italian Pharmacode, “Transmit Start/Stop Character” is not provided in
UI but it is controlled by the same setting of Code 39.
Code 39 Enable
Transmit Start/Stop
Character
Verify Check Digit Decide whether to verify the check digit. If the check digit
Transmit Check Digit Decide whether to include the check digit in the data being
Code 39 Full ASCII Code 39 Full ASCII includes all the alphanumeric and
Code 93 Enable
MSI Disable
Verify Check Digit Select one of the three calculation formulas to verify the
Decide whether to include the start/stop characters "*" in
the data being transmitted.
is incorrect, the barcode will not be accepted.
transmitted.
special characters.
check digit. If the check digit is incorrect, the barcode will
not be accepted.
No
No
Yes
Disable
Single Modulo
10
Single Modulo 10
Double Modulo 10
Modulo 11 & 10
81
Page 90

FORGE 9 Series Application Generator User Guide
Transmit Check Digit Decide whether to include the check digit in the data being
transmitted.
Both digits
transmitted
Last digit not transmitted
Both digits transmitted
Both digits not transmitted
Select Length
One or two fixed lengths
4~127
Range (1~127)
Plessey Disable
Convert to UK Plessey When applied, each occurrence of the character "A" in the
barcode data will be replaced by the character "X".
Transmit Check Digit Decide whether to include the two check digits in the data
being transmitted.
Telepen Disable
Original Telepen
(Numeric)
AIM Telepen (Full
ASCII)
GS1 DataBar Omnidirectional (GS1 DataBar-14, RSS-14) Disable
Transmit Code ID Decide whether to include Code ID (“]e0”) will be included
The original Telepen includes numeric characters. Yes
AIM Telepen (Full ASCII) includes all the alphanumeric and
special characters.
in the data being transmitted.
No
Yes
No
Yes
Transmit Application
ID
Transmit Check Digit Decide whether to include the check digit in the data being
GS1 DataBar Limited (RSS Limited) Disable
Transmit Code ID Refer to RSS-14. Yes
Transmit Application
ID
Transmit Check Digit Refer to RSS-14. Yes
GS1 DataBar Expanded (RSS Expanded) Disable
Transmit Code ID Refer to RSS-14. Yes
EAN-8 Enable
Convert to EAN-13 The EAN-8 barcode will be expanded into EAN-13, and the
Transmit Check Digit Decide whether to include the check digit in the data being
Addon 2 / Addon 5 Decide whether to decode EAN-8 with supplementals. No
EAN-13 / UPC-A Enable
Decide whether to include the Application ID (“01”) in the
data being transmitted.
transmitted.
Refer to RSS-14. Yes
next processing will follow the settings configured for
EAN-13.
transmitted.
Yes
Yes
No
Yes
ISBN Conversion The EAN-13 barcode starting with 978 and 979 will be
converted to ISBN.
ISSN Conversion The EAN-13 barcode starting with 977 will be converted to
ISSN.
No
No
82
Page 91

Appendix II Linear Imager (CCD), Laser (SE950)
GTIN for EAN-13 The EAN-13 barcode will be expanded into 14-digit Global
Trade Item Number (GTIN).
Transmit Check Digit Decide whether to include the check digit in the data being
transmitted.
Addon 2 / Addon 5 Decide whether to decode EAN-13/UPC-A with
supplementals.
(UPC-A) Convert to
EAN-13
(UPC-A) Transmit
Check Digit
(UPC-A) Transmit
System Number
UPC-E Enable
Convert to UPC-A The UPC-E barcode will be expanded into UPC-A, and the
Transmit Check Digit Decide whether to include the UPC-E check digit in the
Transmit System
Number
The UPC-A barcode will be expanded into EAN-13, and the
next processing will follow the settings configured for
EAN-13.
Decide whether to include the UPC-A check digit in the
data being transmitted.
Decide whether to include the UPC-A System Number in
the data being transmitted.
next processing will follow the settings configured for
UPC-A.
data being transmitted.
Decide whether to include the UPC-E System Number in
the data being transmitted.
No
Yes
No
Yes
Yes
Yes
No
Yes
No
Addon 2 / Addon 5 Decide whether to decode UPC-E with supplementals. No
*It cannot read UPC-E1 barcodes!
83
Page 92

FORGE 9 Series Application Generator User Guide
84
Page 93

Appendix III
LASER (SE955)
The tables below list reader settings as well as symbology settings for the Laser (SE955)
scan engine.
READER SETTINGS TABLE
Laser (SE955) Description Default
Decode Time-out Set the maximum time for decoding to continue during a
scan attempt.
3 sec.
5~99, in units of 0.1 second.
Redundancy Level Level 1
Level 1 The following barcodes must be successfully read twice before being
decoded:
Barcode Types Code Length
Codabar All
MSI 4 characters or less
Industrial 25 (Discrete 25) 8 characters or less
Interleaved 25 8 characters or less
Level 2 All barcodes must be successfully read twice before being decoded.
Level 3 All barcodes except for the following barcodes must be successfully read
twice before being decoded. The following barcodes must be read three
times:
Barcode Types “Excluded” Code Length
MSI 4 characters or less
Industrial 25 (Discrete 25) 8 characters or less
Interleaved 25 8 characters or less
Level 4 All barcodes must be successfully read three times before being decoded.
Scan Angle
“narrow” for 35°
Wide
“wide” for 47°
Scan Mode Laser mode
Continuous Mode Non-stop scanning
To decode the same barcode repeatedly, move away the scan beam
and target it at the barcode for each scanning.
Laser Mode Hold down the scan trigger to start with scanning.
The scanning won't stop until (a) a barcode is read, (b) the preset
85
timeout expires, or (c) you release the trigger.
Page 94

FORGE 9 Series Application Generator User Guide
Timeout between
Same Symbol
When in Continuous mode, set the minimum time that
must elapse before the scan engine decodes a second
barcode, which is identical to the one that has just been
decoded. This reduces the risk of accidently scanning the
same barcode twice.
1.0 sec.
0.0~9.9 (second)
Good Read Notifications ---
Vibrate
Off
Off
1~9 (second)
Play a Sound via
Speaker
Beep via Buzzer It is available on 9300/9400/9600 only:
Mute
Sound 1~9
Sound 2
Disable
0 = Disable
1~255 (0.1 second)
Frequency level 500~5000 Hz (+500 Hz per increment).
LED Indicator (green) It is available on 9300/9400/9600 only:
Disable
0 = Disable
1~255 (0.1 second)
SYMBOLOGY SETTINGS TABLE
Laser (SE955) Description Default
Code 11 Enable
Verify Check Digit Decide whether to verify the check digit. If the check digit
is incorrect, the barcode will not be accepted.
No
No verification
One Check Digit
Two Check Digits
Transmit Check Digit Decide whether to include the check digit in the data being
transmitted.
No
"Verify Check Digit" must be enabled.
Select Length
Any length
4~55
One or two fixed lengths
Range (1~55)
Codabar Enable
CLSI Editing When applied, the CLSI editing strips the start/stop
characters and inserts a space after the first, fifth, and
tenth characters of a 14-character Codabar barcode.
No
The 14-character barcode length does not include
start/stop characters.
86
Page 95

Appendix III Laser (SE955)
NOTIS Editing Decide whether to include the start/stop characters in the
data being transmitted.
No
NOTIS Editing is to strip the start/stop characters, i.e.
to disable "Transmit Start/Stop Characters".
Select Length
Any length
4~55
One or two fixed lengths
Range (1~55)
Code 128 Enable
GS1-128 (UCC/EAN-128) Enable
Replace Field
Separator
ISBT 128 Enable
Industrial 25 (Discrete 25) Enable
Select Length
Decide whether to replace the field separator. No
Any length
4~55
One or two fixed lengths
Range (1~55)
Interleaved 25 Enable
Convert to EAN-13 Convert a 14-character barcode into EAN-13 if the
following requirements are met:
No
The barcode must have a leading 0 and a valid EAN-13
check digit.
Verify Check Digit Decide whether to verify the check digit. If desired, select
one of the algorithms below. If the check digit is incorrect,
the barcode will not be accepted.
No
No
USS algorithm
OPCC algorithm
Transmit Check Digit Decide whether to include the check digit in the data being
transmitted.
No
Select Length
Any length
4~55
One or two fixed lengths
Range (1~55)
Chinese 25 Disable
Code 39 Enable
Convert to Code 32 Convert to Italian Pharmacode. No
Code 32 Prefix Prefix character "A" to Code 32 barcodes. No
Verify Check Digit Decide whether to verify the check digit. If the check digit
is incorrect, the barcode will not be accepted.
Transmit Check Digit Decide whether to include the check digit in the data being
transmitted.
No
No
"Verify Check Digit" must be enabled.
87
Page 96

FORGE 9 Series Application Generator User Guide
Code 39 Full ASCII Code 39 Full ASCII includes all the alphanumeric and
special characters.
Trioptic Code 39 Decide whether to decode Trioptic Code 39.
Disable
Disable
Trioptic Code 39 is a variant of Code 39 used in the
marking of computer tape cartridges. It always
contains six characters.
Select Length
Any length
4~55
One or two fixed lengths
Range (1~55)
Code 93 Enable
Select Length
Any length
4~55
One or two fixed lengths
Range (1~55)
MSI Enable
Verify Check Digit If Two Check Digits option is selected, an additional
verification is required to ensure integrity. Select one of
the algorithms below. If the check digit is incorrect, the
barcode will not be accepted.
Check Digit Algorithm
One Check Digit Single Modulo 10
Two Check Digits
Transmit Check Digit Decide whether to include the check digit in the data being
transmitted.
Mod 10/Mod 11
Mod 10/Mod 10
Single Modulo
10
No
Select Length
Any length
4~55
One or two fixed lengths
Range (1~55)
GS1 DataBar (RSS) ---
GS1 DataBar
Omnidirectional (GS1
DataBar-14, RSS-14)
GS1 DataBar Limited
(RSS Limited)
GS1 DataBar Expanded
(RSS Expanded)
Covnert GS1 Databar
to UPC/EAN
"Convert to UPC/EAN" only applies to RSS-14 and RSS
Limited barcodes not decoded as part of a Composite
barcode.
Convert to EAN-13
Strip the leading "010" from barcodes.
"01" is the Application ID and must be followed by a
single zero (the first digit encoded)
Convert to UPC-A
Strip the leading "0100" from barcodes.
Disable
Disable
Disable
No
"01" is the Application ID and must be followed by
two or more zeros (but not six zeros)
88
Page 97

Appendix III Laser (SE955)
EAN-8 Enable
Convert to EAN-13 The EAN-8 barcode will be expanded into EAN-13, and the
next processing will follow the settings configured for
EAN-13.
Addon 2 / Addon 5 Refer to UPC/EAN Addon setting.
EAN-13 Enable
Bookland EAN (ISBN) The EAN-13 barcode starting with 978 will be converted to
ISBN.
Addon 2 / Addon 5 Refer to UPC/EAN Addon setting.
UPC-A Enable
Transmit Check Digit Decide whether to include the UPC-A check digit in the
data being transmitted.
Transmit Preamble Decide whether to include the UPC-A preamble System
Number (and Country Code) in the data being transmitted.
Addon 2 / Addon 5 Refer to UPC/EAN Addon setting.
UPC-E0 Enable
Transmit Check Digit Decide whether to include the UPC-E0 check digit in the
data being transmitted.
Transmit Preamble Decide whether to include the UPC-E0 preamble System
Number (and Country Code) in the data being transmitted.
Addon 2 / Addon 5 Refer to UPC/EAN Addon setting.
No
Yes
Yes
System
Number
Yes
System
Number
Convert to UPC-A The UPC-E0 barcode will be expanded into UPC-A, and the
next processing will follow the settings configured for
UPC-A.
UPC-E1 Disable
Transmit Check Digit Decide whether to include the UPC-E1 check digit in the
data being transmitted.
Transmit Preamble Decide whether to include the UPC-E1 preamble System
Number (and Country Code) in the data being transmitted.
Addon 2 / Addon 5 Refer to UPC/EAN Addon setting.
Convert to UPC-A The UPC-E1 barcode will be expanded into UPC-A, and the
next processing will follow the settings configured for
UPC-A.
UCC Coupon Extended Code Disable
Read UPC-A barcodes starting with digit "5", EAN-13 barcodes starting with digits "99", and
UPC-A/GS1-128 Coupon Codes.
No
Yes
System
Number
No
UPC-A, EAN-13, and GS1-128 must be enabled first!
UPC/EAN Addon ---
Addon 2 / Addon 5 Decide whether to decode EAN-8, EAN-13, UPC-E0,
UPC-E1, UPC-A with supplementals.
Ignore...
Ignore Supplementals
Decode Only With Supplementals
Decode With Supplementals (= Auto-discriminate)
89
Page 98

FORGE 9 Series Application Generator User Guide
Addon Redundancy When “Decode with Supplementals” is applied, decide the
number of times (2~30) of supplementary decoding the
same barcode that makes a valid reading.
UPC/EAN Security Level Level 2
Decide the decode security for UPC/EAN barcodes. Higher security levels are selected for
decreasing levels of barcode quality. Note that increasing security level decreases the scan engine’s
aggressiveness; choose only that level of security necessary for the application.
7 times
Level 0 – Select this option for the scan engine to operate in its most aggressive state,
providing sufficient security in decoding most “in-spec” UPC/EAN barcodes.
Level 1 – As barcode quality level diminish, certain characters become prone to mis-decodes
before others (i.e. 1, 2, 7, 8). Select this option for the scan engine to eliminate mis-decodes,
which are limited to characters 1, 2, 7 and 8.
Level 2 – This default setting allows the scan engine to eliminate most mis-decodes when the
poorly printed barcodes occurrence not limited to characters 1, 2, 7 and 8.
Level 3 – Select this option if Level 2 still fails to eliminate mis-decodes. However, selecting
this option impairs the decoding ability of the scan engine. If this level of security is necessary,
try to improve the barcode quality.
90
Page 99

Appendix IV
LR, ELR LASER
The tables below list reader settings as well as symbology settings for the Long Range
Laser (LR) or Extra Long Range Laser (ELR) scan engine.
READER SETTINGS TABLE
LR/ELR Description Default
Aiming Duration
Decode Time-out Set the maximum time for decoding to continue during a
Good Read Notifications ---
0~99, in units of 1 second.
Enter 0 if aiming is not desired.
scan attempt.
5~99, in units of 0.1 second.
No aiming
3 sec.
Vibrate
0 = Disable
Disable
1~9 (second)
Play a Sound via
Speaker
0 = Disable
Sound 1~9
Sound 3 for
9500CE
SYMBOLOGY SETTINGS TABLE
LR/ELR/2D Description Default
Codabar Enable
CLSI Editing When applied, the CLSI editing strips the start/stop
characters and inserts a space after the first, fifth, and
tenth characters of a 14-character Codabar barcode.
No
The 14-character barcode length does not include
start/stop characters.
NOTIS Editing Decide whether to include the start/stop characters in the
data being transmitted.
No
NOTIS Editing is to strip the start/stop characters, i.e.
to disable “Transmit Start/Stop Characters”.
Select Length
Any length
4~55
One or two fixed lengths
Range (1~55)
Inter-Character Gap The Code 39 and Codabar symbologies have an
intercharacter gap that is typically quite small. Due to
various barcode printing technologies, this gap can grow
larger than the maximum size allowed, preventing the
scan engine from decoding a barcode.
Normal
91
Page 100

FORGE 9 Series Application Generator User Guide
If this problem occurs, set it to “Large Intercharacter
Gaps” to tolerate these out-of-specification barcodes.
Normal intercharacter gaps
Large intercharacter gaps
Note: Inter-Character Gap is supported on 2D scan engine for 9600/9300.
Code 128 Enable
GS1-128 (UCC/EAN-128) Enable
Replace Field
Separator
ISBT 128 Enable
Industrial 25 (Discrete 25) Enable
Select Length
Decide whether to replace the field separator. No
Any length
4~55
One or two fixed lengths
Range (1~55)
Interleaved 25 Enable
Convert to EAN-13 Convert a 14-character barcode into EAN-13 if the
following requirements are met:
No
The barcode must have a leading 0 and a valid EAN-13
check digit.
Verify Check Digit Decide whether to verify the check digit. If desired, select
one of the algorithms below. If the check digit is incorrect,
the barcode will not be accepted.
No
No
USS algorithm
OPCC algorithm
Transmit Check Digit Decide whether to include the check digit in the data being
transmitted.
No
Select Length
Any length
4~55
One or two fixed lengths
Range (1~55)
Code 39 Enable
Convert to Code 32 Convert to Italian Pharmacode. No
Code 32 Prefix Prefix character “A” to Code 32 barcodes. No
Verify Check Digit Decide whether to verify the check digit. If the check digit
is incorrect, the barcode will not be accepted.
Transmit Check Digit Decide whether to include the check digit in the data being
transmitted.
No
No
“Verify Check Digit” must be enabled.
Code 39 Full ASCII Code 39 Full ASCII includes all the alphanumeric and
special characters.
Disable
92
 Loading...