

Page 1

STREAM Wireless Studio
8000 / 8300 /8400/ 8500 / 9400 / 9500 Series
Mobile Computers
DOC Version 2.07
Page 2

Copyright © 2007~ 2009 CIPHERLAB CO., LTD.
All rights reserved
The software contains proprietary information of CIPHERLAB CO., LTD.; it is provided
under a license agreement containing restrictions on use and disclosure and is also
protected by copyright law. Reverse engineering of the software is prohibited.
Due to continued product development this information may change without notice. The
information and intellectual property contain ed herein is confidential between CIPHERLA B
and the client and remains the exclusive property of CIPHERLAB CO., LTD. If you find
any problems in the documentation, please report them to us in writing. CIPHERLAB
does not warrant that this document is error-free.
No part of this publication may be reproduced, stored in a retrieval system, or
transmitted in any form or by any means, electronic, mechanical, photocopying,
recording or otherwise without the prior written permission of CIPHERLAB CO., LTD.
For product consultancy and technical support, please contact your local sales
representative. Also, you may visit our web site for more information.
The CipherLab logo is a registered trademark of CIPHERLAB CO., LTD.
Microsoft, Windows, and the Windows logo are registered trademarks of Microsoft
Corporation in the United States and/or other countries.
Bluetooth is a trademark of Bluetooth SIG, Inc., U.S.A.
Other product names mentioned in this manual may be trademarks or registered
trademarks of their respective companies and are hereby acknowledged.
The editorial use of these names is for identification as well as to the benefit of the
owners, with no intention of infringement.
CIPHERLAB CO., LTD.
Website:
http://www.cipherlab.com
Page 3

Version Date Notes
2.07 May. 05, 2009
Modified: Add 8400 descriptions and delete 9500PPC descriptions.
2.06 Nov. 19, 2008
Modified: section 1.2.1 — Add database View manipulation
descriptions.
Modified: section 1.2.2 — Add “Action when matched” property
descriptions for database application.
Modified: section 1.3.1 — Add “Edit Screen Identifier”
descriptions.
2.05 Aug. 01, 2008
New UI introduced
Modified: section 1.1.2 —
replace the [Download Runtime
Program] button on the toolbar with [Export 9 Series Terminal
Setting]
Modified: sec tion 1.2.2 —
[More] field properties for Form: “Show
Soft Input Keypad” option available for 9400/9500
Modified: Appendix II~III support replacement of EAN-128 field
separator for all scan engines
2.04 Apr. 17, 2008
Modified: section 1.2.2 Database Application Template –
Field
Data: Max. Length issue
Modified: section 5.6.1 Load Program & Settings – Remove
Options > Function Bars > Task Bar from the client program
(9400/9500CE/9500PPC)
2.03 Mar. 07, 2008
New: section 1.1.1 Tools Menu > Install STREAM CE/PPC Cli ent
Modified: section 1.2.1 Database Source – ODBC Database
(supports “Enclose field/table name in square brackets when
sending SQL commands”.)
New: Appendix III, IV –
AIM Code ID (supports “Transmit AIM
Code ID” for LR/ELR Laser and 2D scan engines)
2.02 Oct. 12, 2007
New: Support 9400
2.01 Sep. 03, 2007
Modified: Licensing – implementation of key pro
Modified: section 1.1.3 Menu Tree – screenshots updated
Modified: section 1.2.1 Database Source – screenshots updated
New: section 2.2 Login/Logout – 9500CE
New: section 3.1. 2 9500 Simulator
2.00 Aug. 03, 2007 New Word template applied
Branded as Power Suite – STREAM Wireless Studio
Modified: 9500PPC, 9500CE client application
1.03 June 14, 2007
Modified: section 1.4 How It Works
Modified: Appendix II – CCD/Laser Scan Engine: add GTIN
Modified: A ppendix IV –
2D Scan Engine: add AIM Code ID, Focus
Mode…
RELEASE NOTES
Page 4

1.02 June 01, 2007
Modified: section 1.1 Features
New: section 1.4 How It Works
New: Appendix I – Scan Engine Settings
New: Appendix II – CCD/Laser Scan Engine
New: Appendix III – LR/ELR Scan Engine
New: Appendix IV – 2D Scan Engine
1.01 May 16, 2007
Modified: Provi des solutions for Database and Terminal Emulation
applications
1.00 Jan. 22, 2007 Initial release
Page 5

CONTENTS
RELEASE NOTES.......................................................................................- 3 -
INTRODUCTION........................................................................................... 1
Installing STREAM Wireless Studio ..................................................................1
How It Works ...........................................................................................4
Features.................................................................................................5
Licensing................................................................................................5
STREAM WIRELESS STUDIO - DESIGNER ............................................................. 7
1.1 User Interface .....................................................................................8
1.1.1 Menu Bar .....................................................................................8
1.1.2 Toolbar ..................................................................................... 12
1.1.3 Menu Tree.................................................................................. 13
1.2 Database Application........................................................................... 14
1.2.1 Database Source .......................................................................... 14
1.2.2 Database Application Template ........................................................ 21
1.3 Emulation Application.......................................................................... 30
1.3.1 Host/Server Source....................................................................... 30
1.3.2 Emulation Application Template ....................................................... 34
1.4 Users .............................................................................................. 44
1.4.1 User ID...................................................................................... 44
1.4.2 Password ................................................................................... 45
1.4.3 Template................................................................................... 45
1.4.4 Sign-On to Host/Telnet Server..........................................................45
1.5 Device Settings.................................................................................. 46
1.5.1 System...................................................................................... 47
1.5.2 Barcode..................................................................................... 50
1.5.3 Wireless LAN (8000/8300/8400/8500)................................................. 50
STREAM WIRELESS STUDIO - SERVER ...............................................................53
2.1 User Interface ................................................................................... 53
2.1.1 Menu Bar ...................................................................................53
2.1.2 Toolbar ..................................................................................... 57
2.1.3 Menu Tree.................................................................................. 58
2.2 Login/Logout .................................................................................... 60
2.2.1 Settings..................................................................................... 60
2.2.2 Log In .......................................................................................60
2.2.3 Log Out ..................................................................................... 62
2.3 Error Messages................................................................................... 63
2.3.1 Connection Error.......................................................................... 63
2.3.2 Login Error ................................................................................. 64
2.3.3 Template Setting Error................................................................... 65
Page 6

STREAM Wireless Studio User Guide
PROGRAM SIMULATION ................................................................................67
3.1 Launch the Simulator........................................................................... 67
3.1.1 8000/8300/8400/8500 Series ........................................................... 68
3.1.2 9400/9500 Series..........................................................................72
3.2 Exit the Simulator............................................................................... 73
3.2.1 8000/8300/8400/8500 Series ........................................................... 73
3.2.2 9400/9500 Series..........................................................................74
EVENT MANAGEMENT..................................................................................75
4.1 Open .............................................................................................. 76
4.2 Query ............................................................................................. 76
4.3 Exit................................................................................................ 76
USING STREAM WIRELESS STUDIO...................................................................77
5.1 System Management............................................................................77
5.1.1 Change System Language................................................................ 77
5.1.2 Change System Database ................................................................ 77
5.1.3 Configure the STREAM Server........................................................... 78
5.1.4 Analyze Activities......................................................................... 78
5.2 User Account..................................................................................... 79
5.2.1 Sign-On to Host/Telnet Server..........................................................79
5.2.2 Example .................................................................................... 79
5.3 Device Settings.................................................................................. 80
5.3.1 Download or Import Configuration ..................................................... 80
5.3.2 Localization (8000/8300/8400/8500).................................................. 81
5.4 Database Application........................................................................... 81
5.4.1 Choose Database Source................................................................. 82
5.4.2 Create a Template........................................................................83
5.5 Emulation Application.......................................................................... 84
5.5.1 Choose Host Source....................................................................... 85
5.5.2 Create a Template........................................................................85
5.6 Operation on the Mobile Computer .......................................................... 86
5.6.1 Load Program & Settings................................................................. 86
5.6.2 Login to Use an Template ...............................................................90
5.6.3 Collect Data................................................................................ 92
SCAN ENGINE SETTINGS ...............................................................................95
Symbologies Supported ............................................................................. 95
RFID Tags Supported ................................................................................ 97
CCD/LASER SCAN ENGINE .............................................................................99
Reader Settings Table............................................................................... 99
Symbology Settings Table .........................................................................101
LR/ELR LASER SCAN ENGINE........................................................................ 105
Reader Settings Table..............................................................................105
AIM Code ID – Code Characters................................................................105
AIM Code ID – Modifier Characters............................................................106
Page 7

STREAM Wireless Studio User Guide
Symbology Settings Table .........................................................................107
2D SCAN ENGINE...................................................................................... 111
Reader Settings Table..............................................................................111
AIM Code ID – Code Characters................................................................111
AIM Code ID – Modifier Characters............................................................112
Symbology Settings Table .........................................................................115
Page 8

Page 9

1
Successfully integrating and enhancing several existing CipherLab applications and
download utilities, the STREAM Wireless Studio software delivers powerful application
solutions in a single package. It is specifically designed for use with the wireles s mobile
computers capable of 802.11b/g connectivity. Real-time application services and centric
management are provided through the STREAM Server.
The STREAM Wireless Studio software consists of (1) the STREAM Designer for
configuring application templates and program simulation, and (2) the STREAM Server
for managing communications as well as surveillance. Currently, the software offers two
major solutions for users to collect data and send it back in real-time to a database
server or a server supports VT100/220 or 5250 emulation.
This user guide describes how the software provides a total solution for real-time data
collection linking with any back-end database. We recommend that you read it
thoroughly before use and keep it at hand for quick reference.
Thank you for choosing CipherLab products!
INSTALLING STREAM WIRELESS STUDIO
Install STREAM Wireless Studio from the Power Suite CD-ROM.
The following files can be located in "C:\CipherLab\Stream\" if you did not change to
install to a different folder:
File Name
Description
STREAM Wireless
Studio User Guide
A copy of this user guide in PDF format is available.
Language folder
Language support – English.lng
For multi-language o ptions, any additional *.lng files must be stored
in this folder.
Runtime folder Runtime programs for different mobile computers –
WS8000.shx, WS8300.shx, WS8400.shx and WS8500.shx can be
installed via Tools > Download Terminal Runtime Program.
WSClient94CE.exe and WSClient95CE.exe can be installed via Tools
> Install STREAM CE Client.
The device settings defined in the STREAM Designer will take effect after
being downloaded or copied to the mobile computer. While connecting to
the STREAM Server, a specific application template will be applied.
INTRODUCTION
Page 10

2
STREAM Wireless Studio User Guide
UserDB folder All user-defined databases will be stored in Microsoft Access format in
this folder for local access. The data can be imported from or exported to
a file in any of the following formats:
Text File (*.txt)
Microsoft Excel (*.xls)
Microsoft Access (*.mdb)
dBase (.dbf)
WS_DBAppSrv.exe Database Application Service provider – it will be executed automatically
when the mobile computer is connected to the computer through the
STREAM Server and intended to use a Database Application template.
It interacts with the mobile computer in the following ways:
Respond to the request from the mobile computer by accessing
back-end resources via the Database application template.
Allows the computer to process the data collected and update the
associated database.
WS_EmuAppSrv.exe Terminal Emulation Application Service provider – it will be executed
automatically when the mobile computer is connected to the computer
through the STREAM Server and intended to use a TE application
template.
It interacts with the mobile computer in the following ways:
Respond to the request from the mobile computer by accessing
back-end resources via the TE application template.
Allows the computer to process the barcode data collected and
reformat the emulation screens as pre-defined.
WS_Server .exe STREAM (Wireless Studio) Server – The program shortcut has been
created on the desktop after installation.
WS_Designer.exe STREAM (Wireless Studio) Designer – The program shortcut has been
created on the desktop after installation.
Sim.exe
Sim94.exe
Sim95.exe
Simulator, also accessible from inside the STREAM Designer.
Sim.exe for 8000/8300/8400/8500 Series
Sim94. exe for 9400
Sim95.exe for 9500CE
WlanLib.dll The dll file for wireless communication protocol (TCP/IP).
WS_App.ini The configuration file used to configure the initial settings (environmental
parameters).
WS_App.log Upon execution of STREAM Wireless Studio, it will generate a log file,
which is used to keep a record of the activities or events occurred in the
STREAM Designer or STREAM Server.
WS_Sample .mdb A sample database in Microsoft Access format, which is for use as
database source.
WS_SYSDB .mdb The default system database in Microsoft Access format. It stores
back-end resource information, application templates, user accounts and
device settings which are all defined in the STREAM Designer.
Page 11
3
Introduction
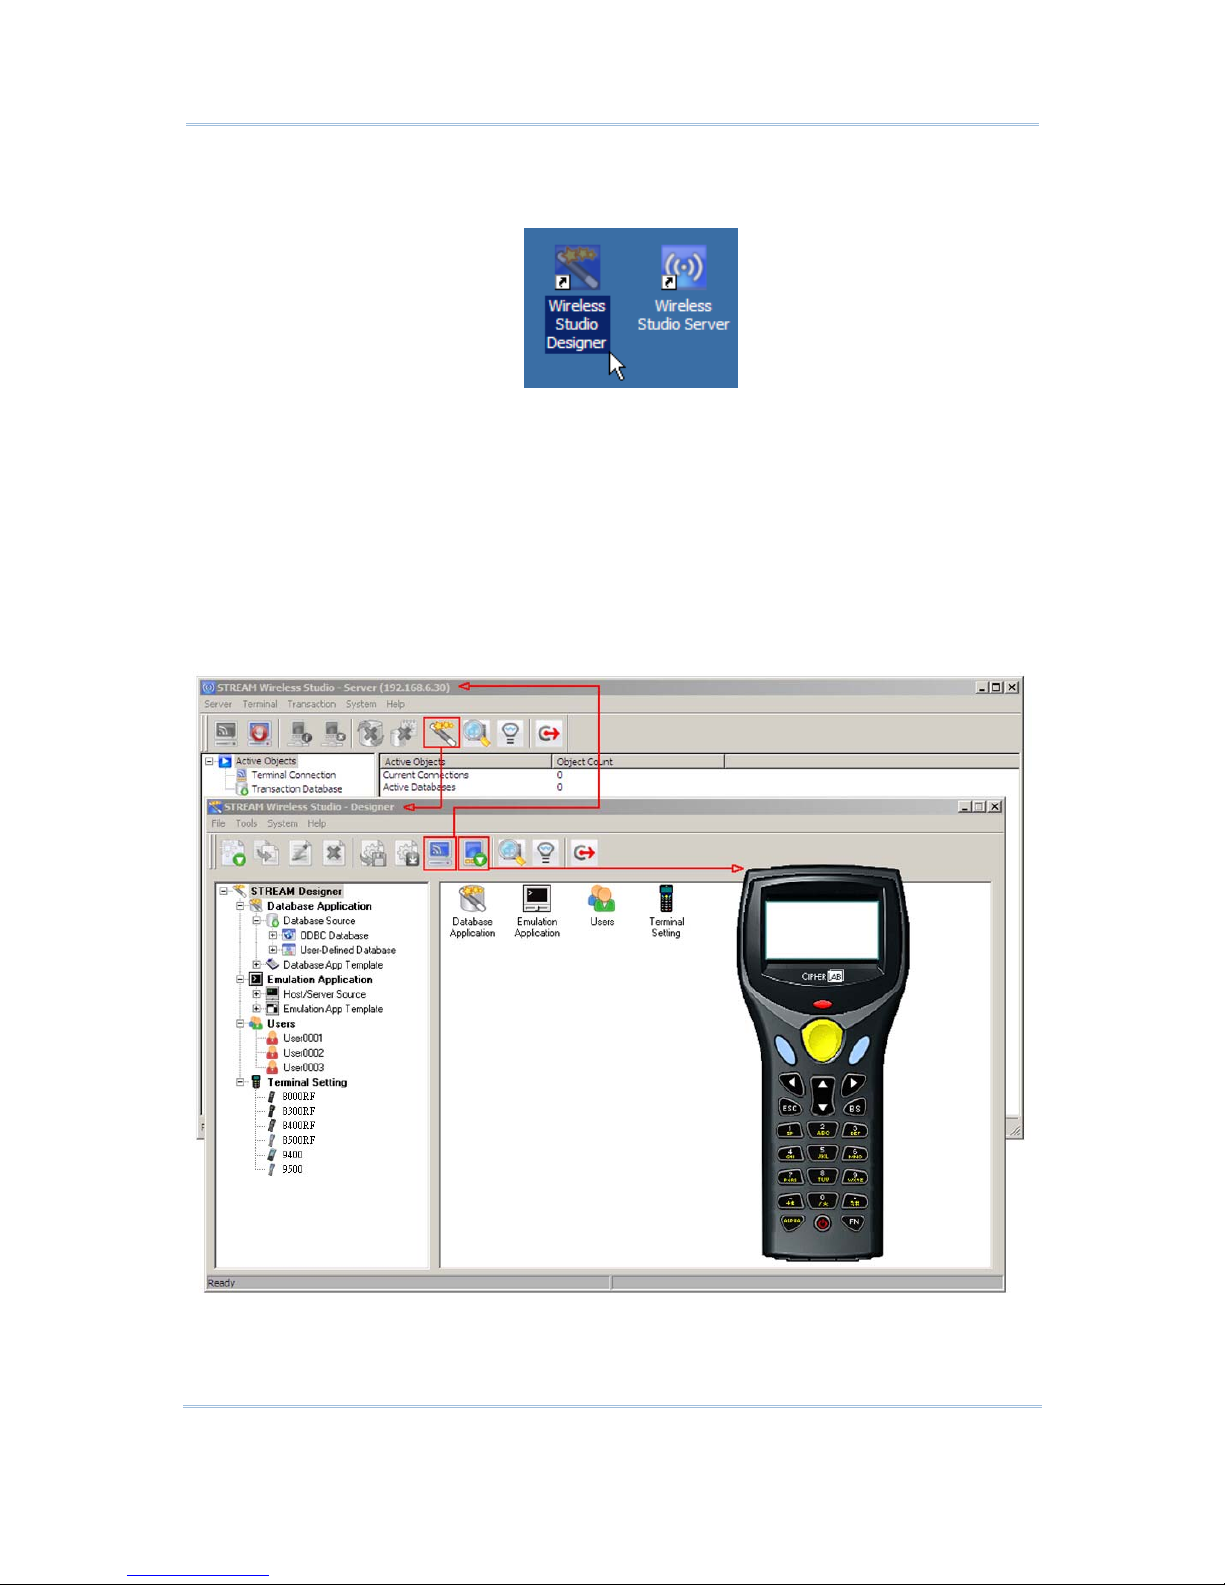
After installation, two program shortcuts are available on the computer desktop; each
stands for a component of the software package:
If you are using the application for the first time, double-click the shortcut to the
STREAM Designer to start with configuring device settings, the sequences of data
processing (templates-based), database links, etc.
To simulate the running sequences of the applications on the real mobile computer,
launch the Simulator from inside the STREAM Designer.
To link to the specif ied back-end database or host after having configured everything
necessary in the STREAM Designer, double-click the shortcut to launch the STREAM
Server or run it directly from inside the STREAM Designer.
The relationship among these components is as shown below.
Page 12
4
STREAM Wireless Studio User Guide
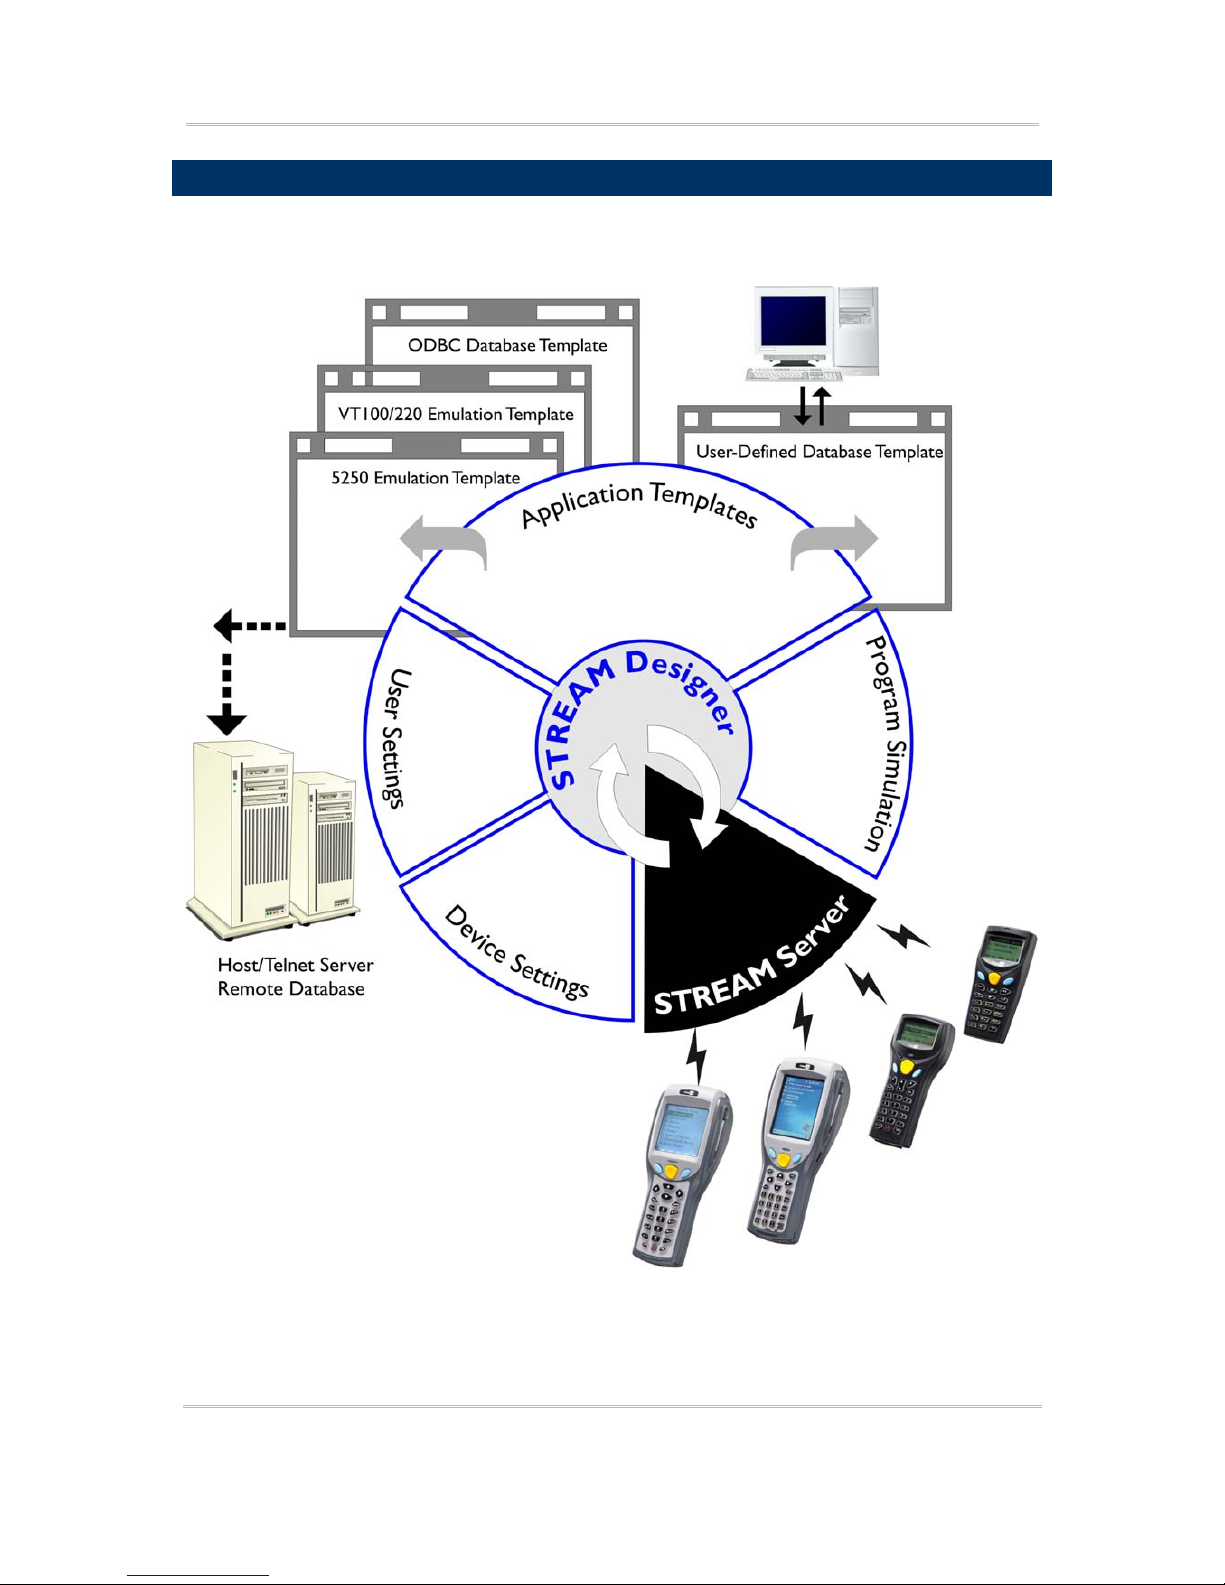
HOW IT WORKS
The illustration below depicts the deployment of Database and Terminal Emulation
applications.
Page 13

5
Introduction
FEATURES
Supports Microsoft Windows 2000 / XP / Vista
Centric management of back-end resources, application templates, and activities
- Templates & Users management via the STREAM Designer
- Activities management via the Event Manager
- Resource & Connectivity management via the STREAM Server
Simplified operation on the mobile computer
- Only need to download run-time program once
- Configure and download user settings to the mobile computer in a few clicks
Multi- and hetero- appli cat ions in one syst em for CipherLab Mobile Computers capable
of wireless connectivity
Application Options
Mobile Computer Options
Database application
Terminal Emulation application
8000 Series – 8071
8300 Series – 8330, 8370
8400 Series – 8470
8500 Series – 8570, 8590
9400 Series – 9400
9500 Series – 9500CE
Smart simulation for debugging, saving plenty time in designing applications
Easy customization for language support
LICENSING
The STREAM Wireless Studio software needs a hardware key for authentication, and a
USB dongle is provided for this purpose. The software allows a specific n umber of legal
users to be connected to the STREAM Server per purchased licenses. As long as the
STREAM Server is running, you must always have the dongle connected to a USB port of
your computer.
If this hardware key is not present, the STREAM Server will run in a restricted mode that
allows 30-minute use for each launch. The countdown is displayed on the status bar of
the STREAM Server, and the message flashes as shown below.
Please contact our sales representative for license terms and price information.
Page 14

6
STREAM Wireless Studio User Guide
Page 15
7
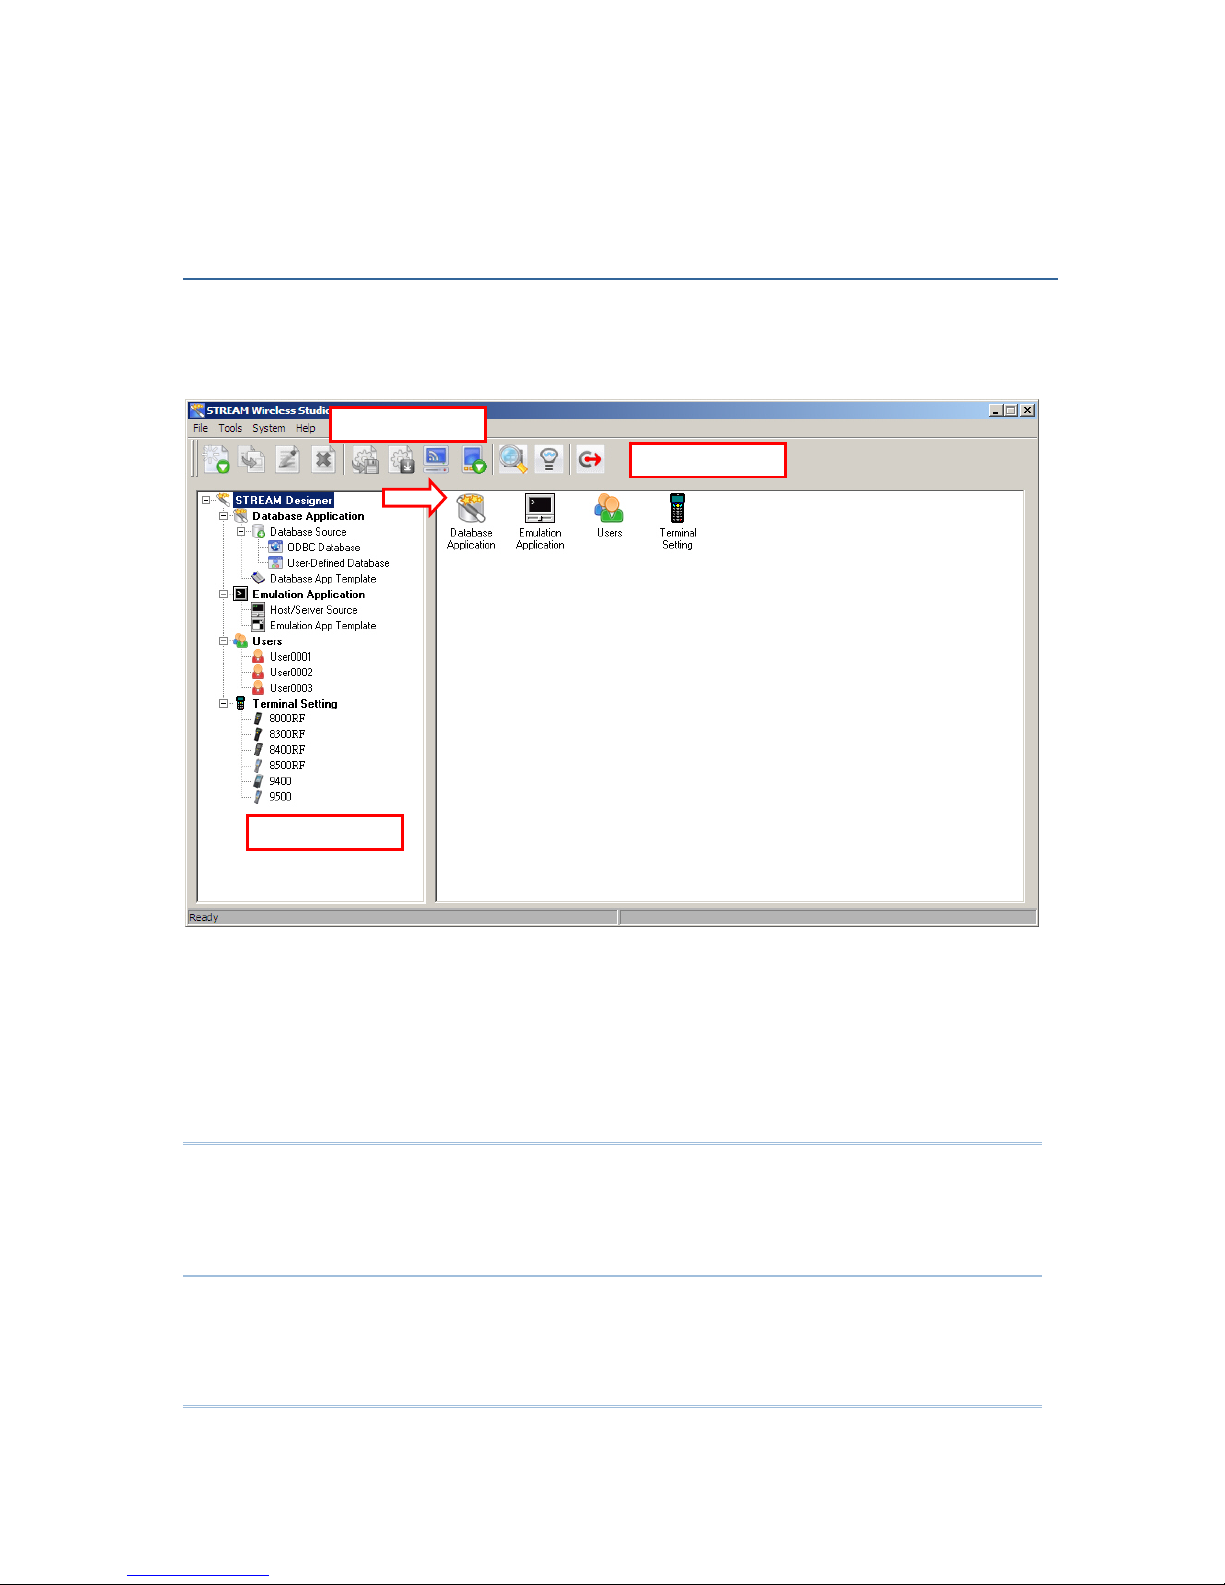
Double-click the program shortcut on the desktop of your computer to launch the
STREAM Designer. The work area appears as shown below, and each element is
described in the following sections.
In the STREAM Designer, work out your application solutions step by step:
1) Give back-end resource information and create an application template that can
access the back-end resources specified.
2) Create a user account so that you can log in and use the application template.
3) Configure associated device settings, such as the reader settings, WLAN settings,
status feedback, and so on.
Warning: The back-end resource information, application templates, user accounts
and device settings defined in the STREAM Designer will be stored in the
system database in Microsoft Access format. All the work you do in the
STREAM Designer can only be accessed and maintained when the same
system database is loaded.
Chapter 1
STREAM WIRELESS STUDIO - DESIGNER
Menu Tree
T
oolbar
Menu Bar
Page 16
8
STREAM Wireless Studio User Guide
IN THIS CHAPTER
1.1 User Interface............................................................. 8
1.2 Database Application.................................................. 14
1.3 Emulation Application................................................. 30
1.4 Users....................................................................... 44
1.5 Device Setti
ngs ......................................................... 46
1.1 USER INTERFACE
1.1.1 MENU BAR
The Menu Bar contains a number of menus that specify which task you want the system
to perform. Each menu contains a list of commands and sometimes sub-menus.
Some of the options carry out commands immediately, and others display a window so
that you can enter additional information. If an option is followed by [ …], it will display a
window. Otherwise, the command is carried immediately.
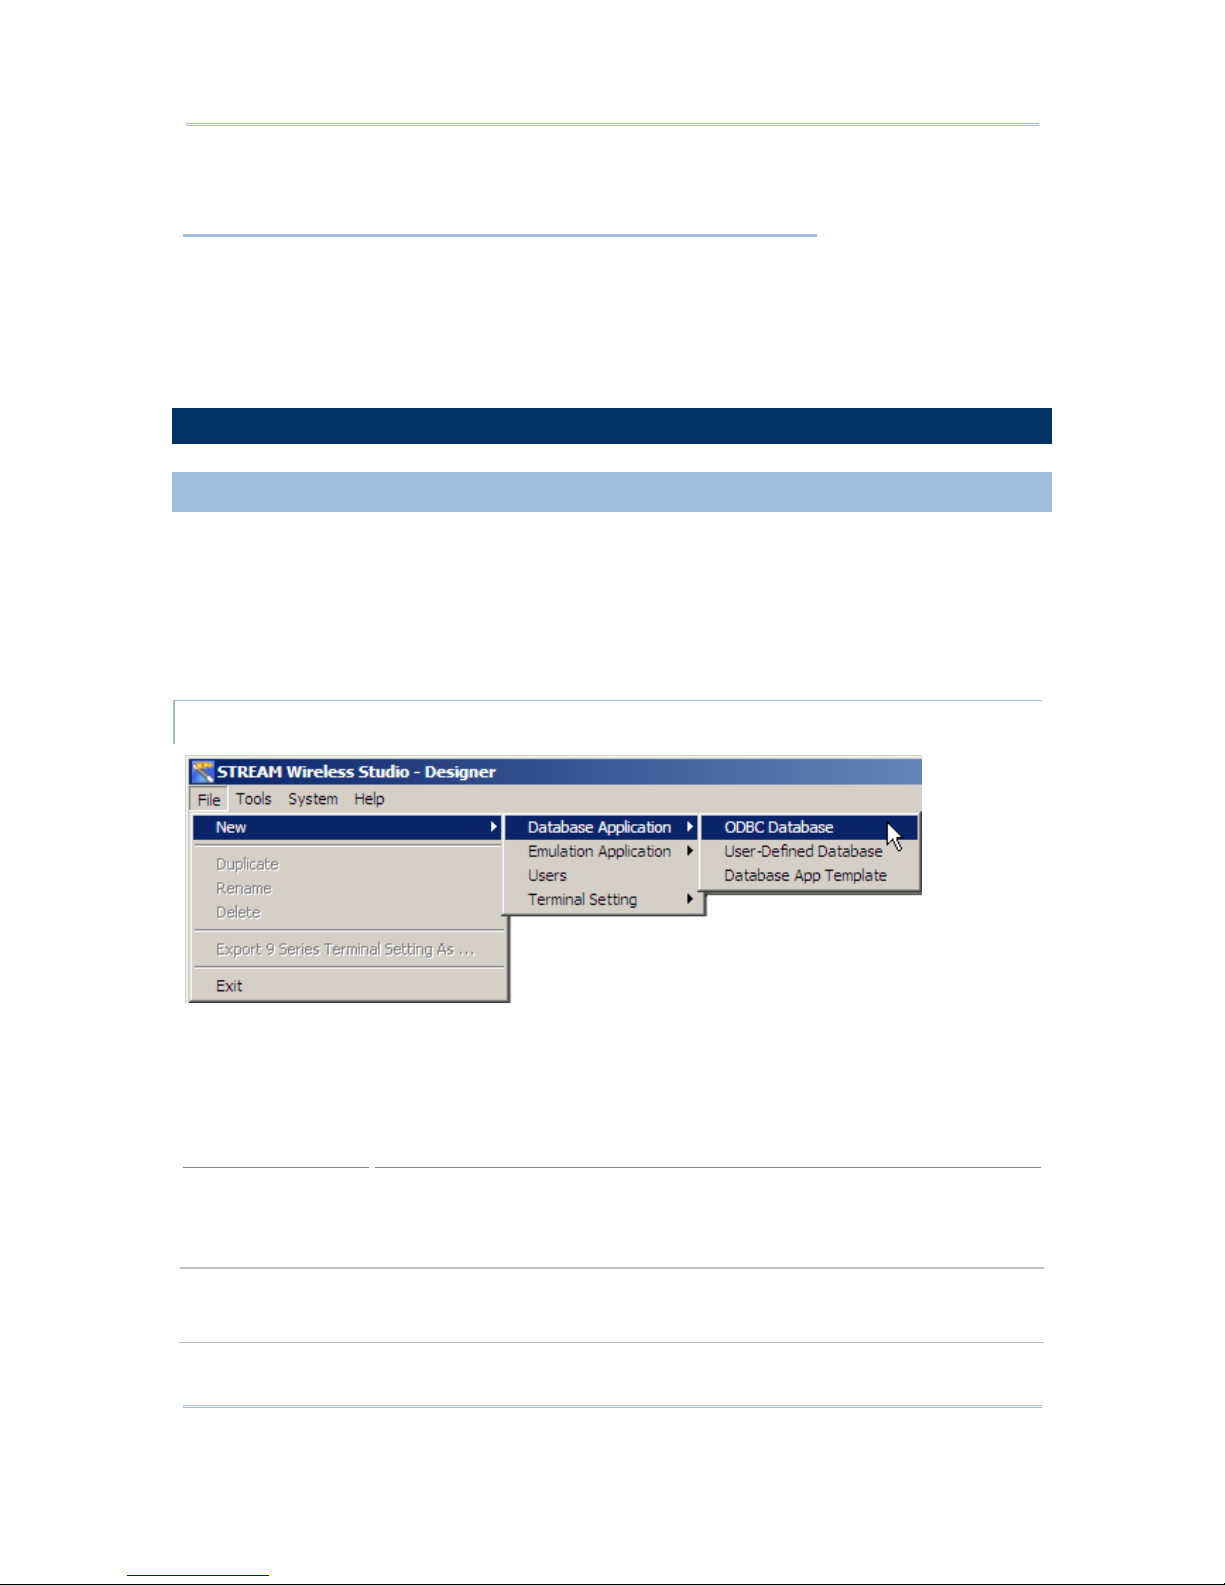
FILE MENU
If you are using the STREAM Designer for the first time, you must start with a new
task listed below. Refer to the related sections for details on these tasks.
After having created a new task, the [Duplicate], [Rename] and [Delete] commands
will become available.
Tasks
Description
Application Services
Database Application – define your database source and create a
template.
Emulation Application – define your host/server source and create a
template.
Users Establish a relationship between a user and a specific application template.
User accounts are used by the STREAM Server for authenticating one to the
system database.
Page 17
9
Chapter 1 STREAM Wireless Studio - Designer
Terminal Settings Configure device settings for different mobile computers -
8000/8300/8400/8500 Series: the associated settings must be
downloaded to the specific mobile computer.
9400/9500 S eries: the associated settings must be exported to a .W94
or .W95 file. Then, copy or move the configuration file to the mobile
computer via ActiveSync.
TOOLS MENU
Options
Description
Download Terminal
Runtime Program
8000/8300/8400/8500 Series: Before using a real mobile computer
to
start with data collection, you must download the corresponding runtime
(WS8*.SHX) program to the specific mobile computer.
9400/9500 Series: Not applicable
Download Terminal
Settings
Once the runtime program has been downloaded, proceed to download the
corresponding device settings to the mobile computer.
8000/8300/8400/8500 Series: This option will be available only when
you select an associated configuration record.
9400/9500 S eries: First, export the configuration record to a file (.W94
or .W95). Then, copy or move the file to the mobile computer.
Install STREAM CE
Client
Seat your mobile computer in the Cradle that connects to your computer via
ActiveSync, and install the client application. Depending on your mobile
computer, a specific set of the followings files will be installed to “\Program
Files\Stream\” –
WS9400_CE.exe and 9400CE_Dll.dll
WS9500_CE.exe and 9500CE_Dll.dll
Warning: Being installed to the default directory “\Program Files\Stream\” , the client
program and configuration file (.ini) on your mobile computer will be
removed automatically after hardware reset. Therefore, we suggest you to
use the Backup Utility for regular backups.
Page 18
10
STREAM Wireless Studio User Guide
Launch STREAM
Server
After everything is set, launch the STREAM Server so that you can run either
the corresponding Simulator or a real mobile computer to connect to the
STREAM Server. Refer to section 2. STREAM Wireless Studio - Server
.
Use the corresponding Simul ator to verify whether the mobile computer
will behave correctly in every aspect.
8000/8300/ 8400/850 0 Series: Af ter downloading the runtime and devi ce
settings to a real mobile computer, use the specific mobile computer to
establish a wireless connection with your computer.
9400/9500 S eries: After installi ng the STREAM CE Client to a real mobile
computer via ActiveSync (to \Program Files\Stream\), as well as copying
or moving the configuration record (.W94 or .W95), run the client
application (.exe) and establish a wireless connection with your
computer.
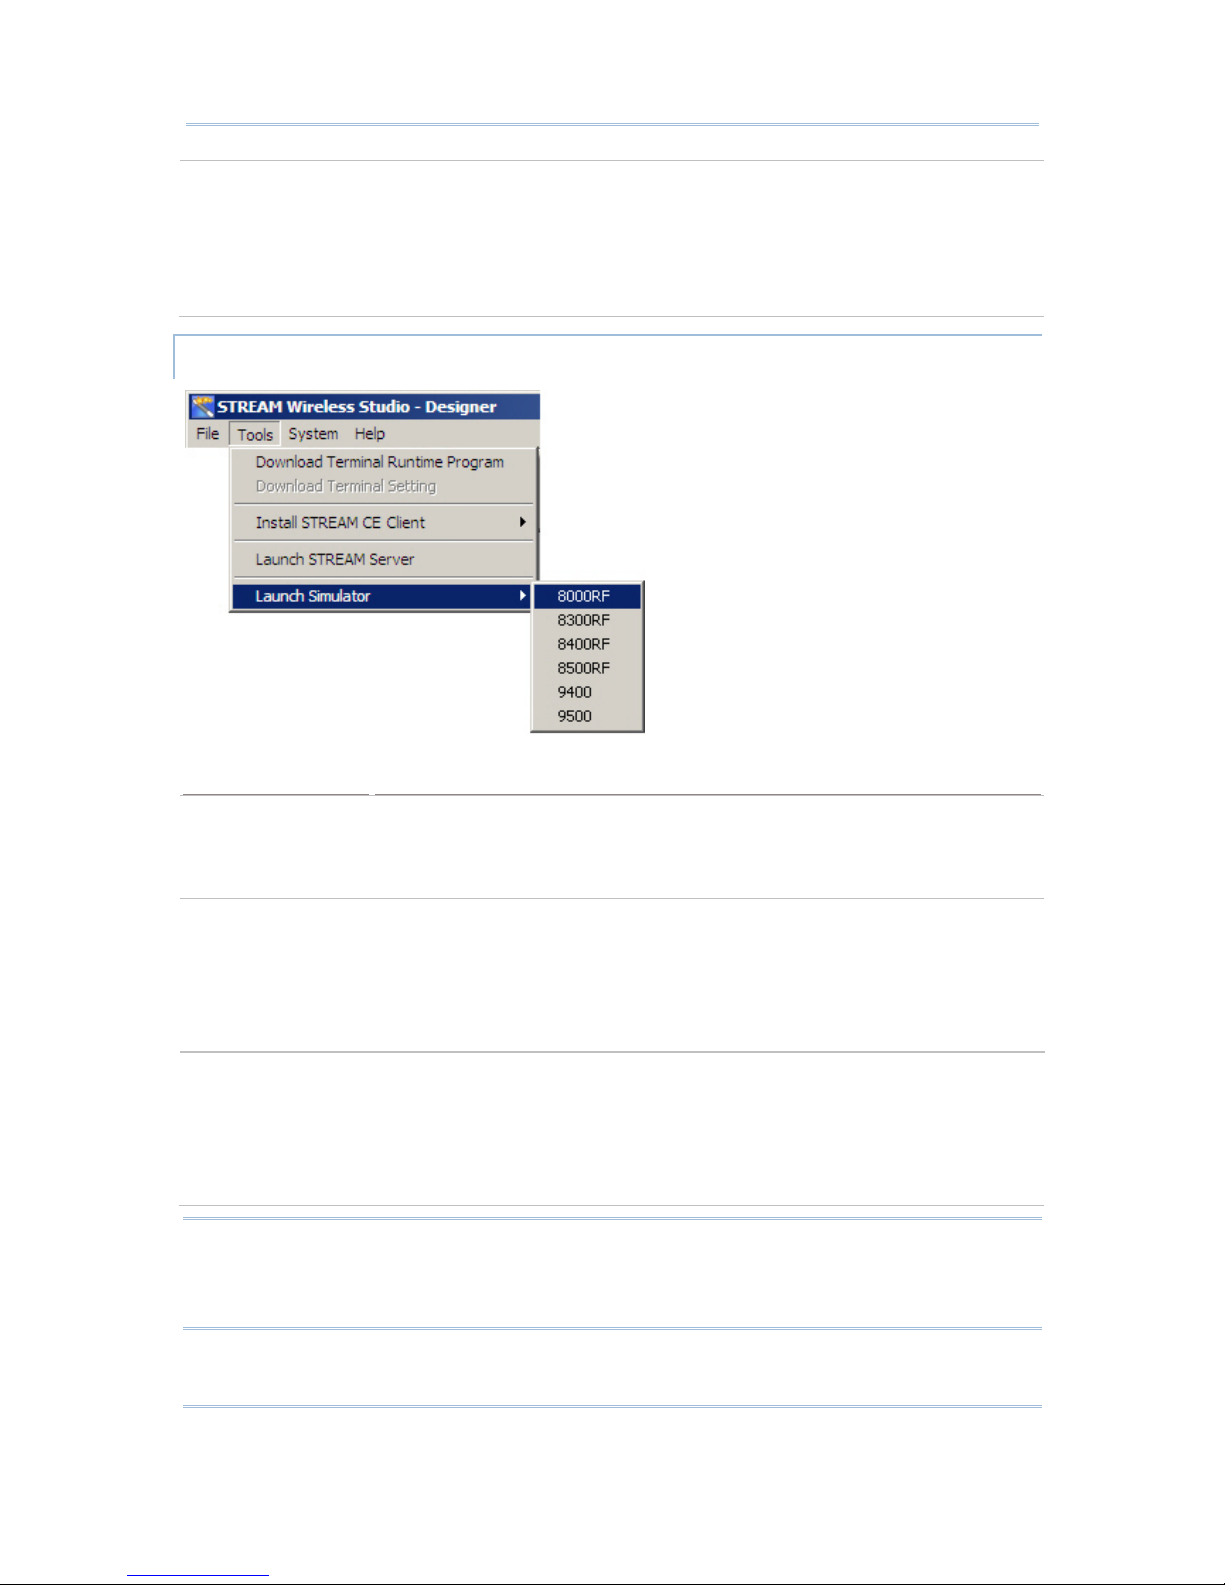
Launch Simulator After launching the STREAM Server, select the corresponding Simulator.
8000RF Si mulator for 8071 mobile computer
8300RF Si mulator for 8330 or 8370 mobile computer
8400RF Simulator for 8470 mobile computer
8500RF Si mulator for 8570 or 8590 mobile computer
9400 Si mulator for 9400 mobile computer
9500 Si mulator for 9500CE mobile computer
Refer to section 3. Program Simulation
.
SYSTEM MENU
Settings
Description
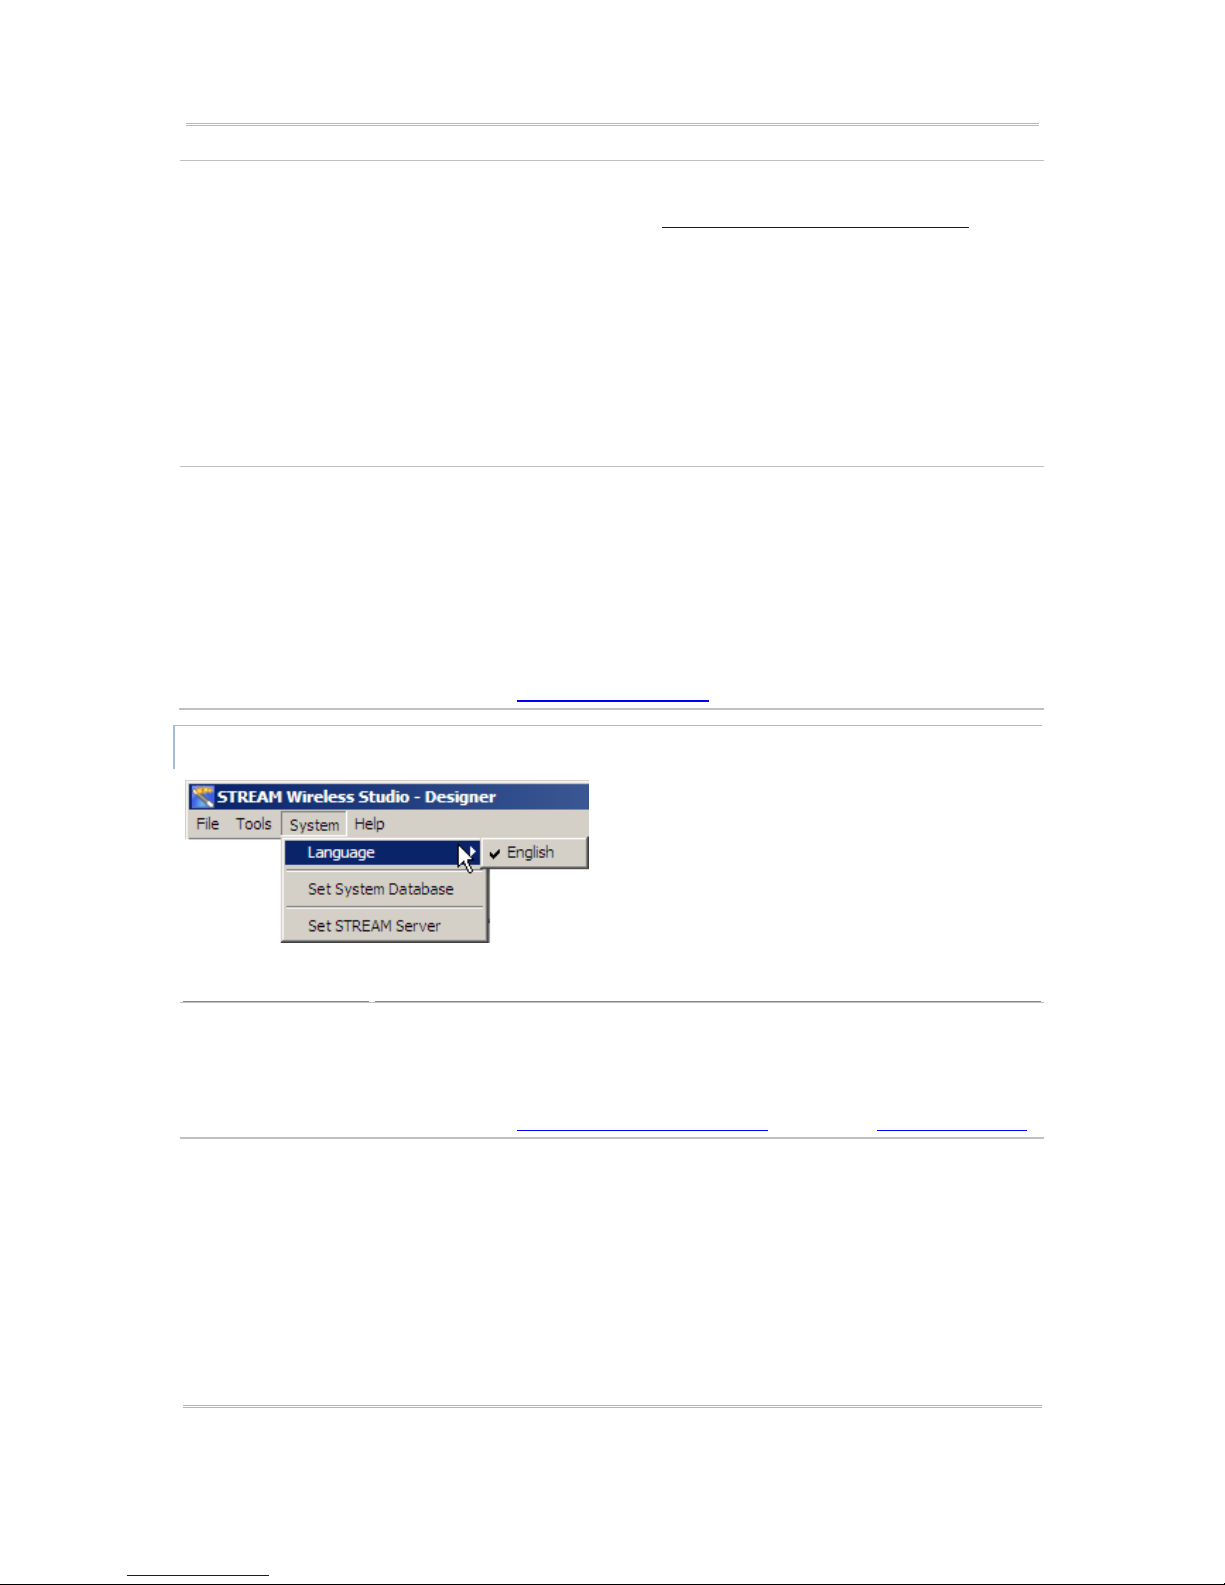
Language For multi-language options, any additional *.lng files, e.g. Traditional
Chinese, must be stored in the Language folder C:\CipherLab\Stream\Language\
Default: English
Refer to section 1.5.1 System - Prompt Items
and section 5.3.2 Localization.
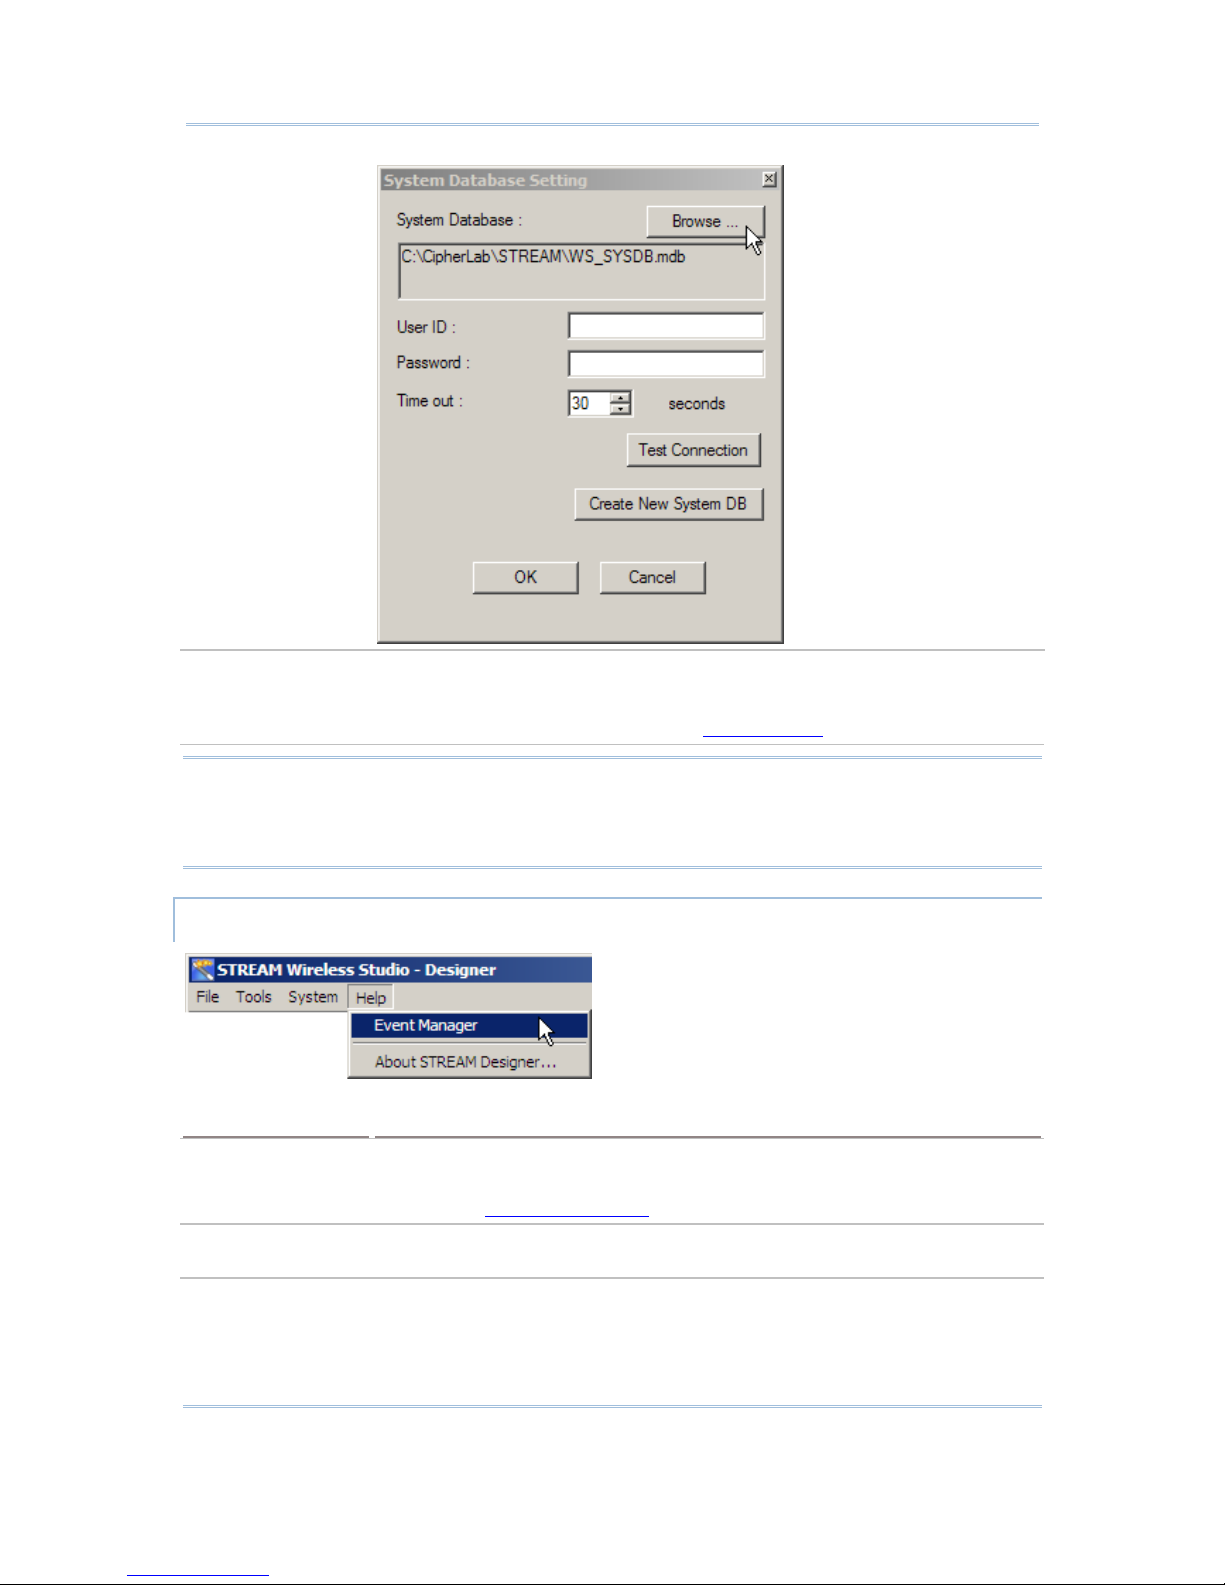
Set System
Database
The default system database is RFSYSDB.mdb, which stores back-end
resource information, application templates, user accounts and device
settings.
All the work you do in the STREAM Designer can only be accessed and
maintained when the same system database is loaded.
Click [Create New System DB] to create a new system database.
To apply a new database or change to an existing database, click
[Browse] to select it.
Page 19
11
Chapter 1 STREAM Wireless Studio - Designer
Set STREAM Server Configure login prompt and communication settings.
Telnet Port: 6000 (default)
Refer to the STREAM Server - section 2.2.1 Settings
.
Warning: Before you click [OK] to change the system database and close the System
Database Setting dialog box, you must close all the connections and exit
the STREAM Server. Otherwise, you may encounter errors while restarting
the STREAM Server.
HELP MENU
Options
Description
Event Manager Open the Event Manager, which keep a record of the activities or events
occurred in the STREAM Designer or the STREAM Server.
Refer to the Event Management
.
About STREAM
Designer
View information about the STREAM Designer.
Page 20
12
STREAM Wireless Studio User Guide
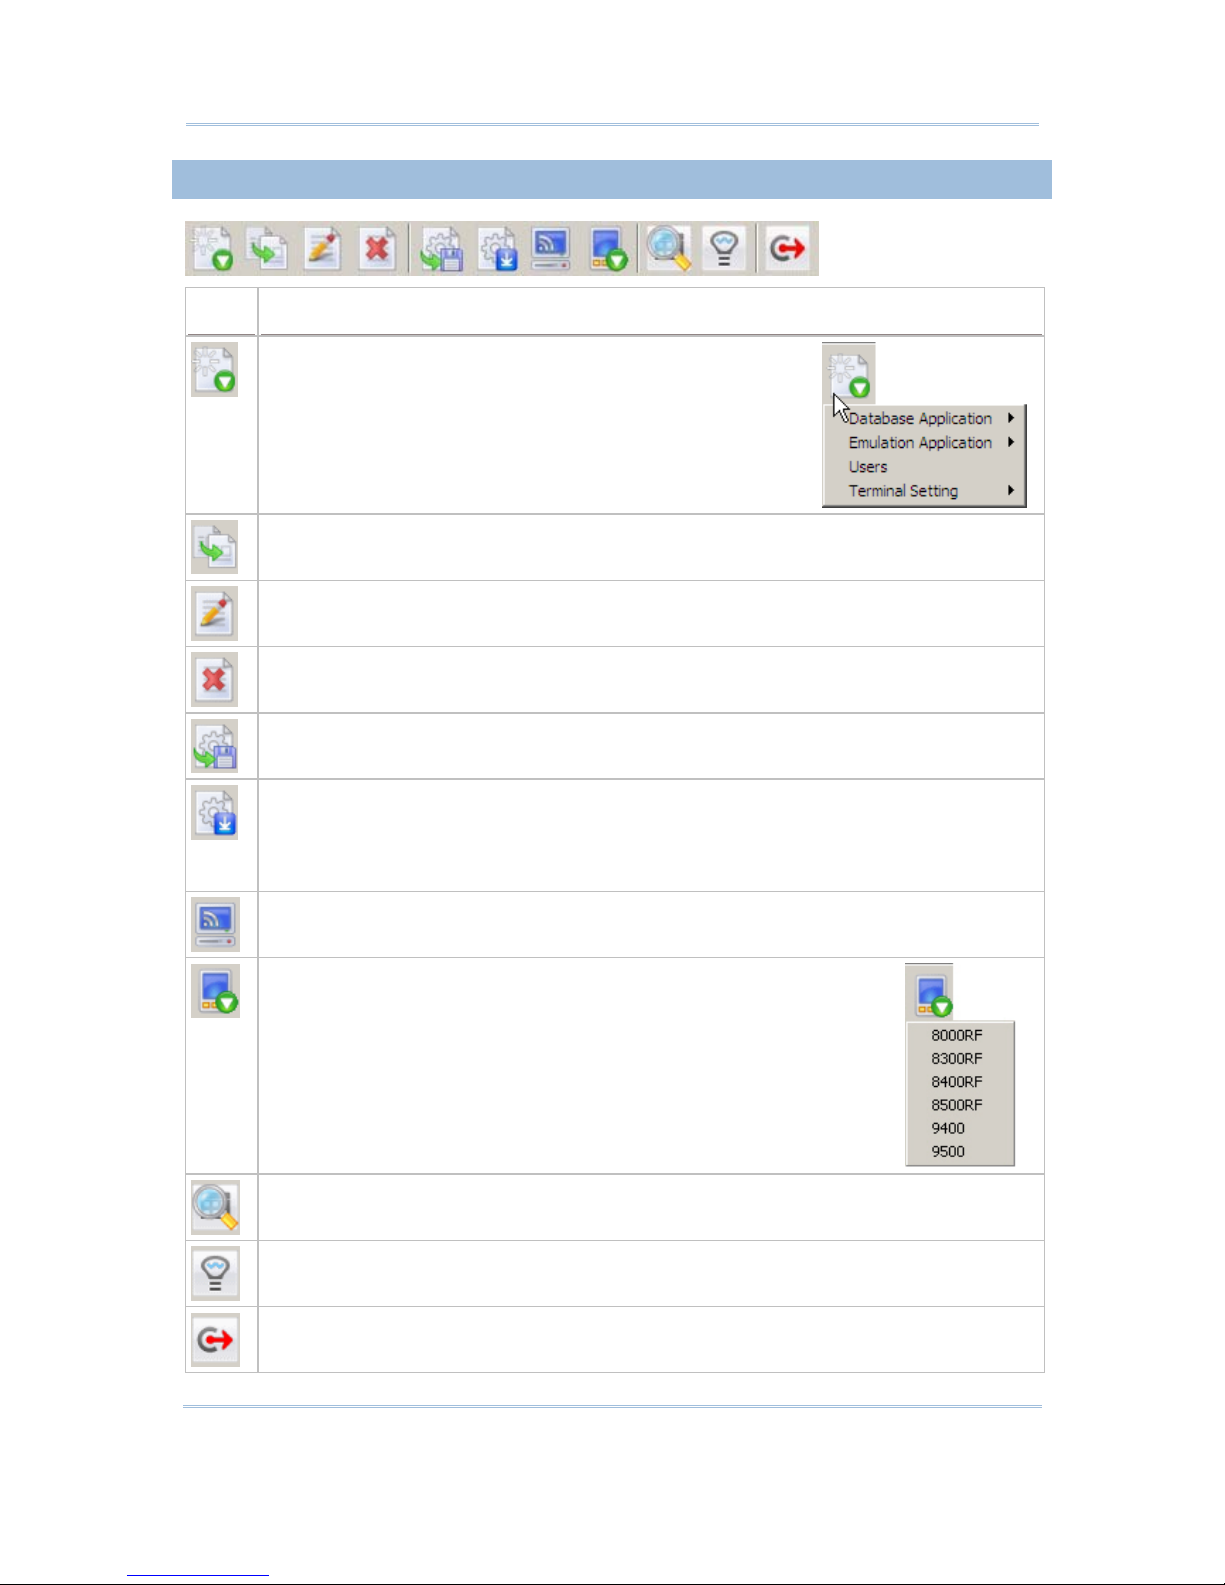
1.1.2 TOOLBAR
Icons
Description
To create a new task.
It does the same as menu command - File > New
To duplicate an existing task.
It does the same as menu command - File > Duplicate
To rename an existing task.
It does the same as menu command - File > Rename
To delete an existing task.
It does the same as menu command - File > Delete
To download 9 Series device settings to the 9400/9500CE mobile computers.
It’s the same as menu command - File > Export 9 Series Terminal Setting As…
To download device settings to the 8000/8300/8400/8500 Series mobile computers.
It does the same as menu command - Tools > Download Terminal Settings
To download the run-time program (*.SHX) to the 8000/8300/8400
/
8500 Series
mobile computers, go to Tools > Download Terminal Runtime Program
To launch the STREAM Server.
It does the same as menu command - Tools > Launch STREAM Server
To launch the Simulator.
It does the same as menu command - Tools > Launch Simulator
To open the Event Manager.
It does the same as menu command - Help > Event Manager
To view information about the STREAM Designer.
It does the same as menu command - Help > About the STREAM Designer
To exit the STREAM Designer.
It does the same as menu command - File > Exit
Page 21

13
Chapter 1 STREAM Wireless Studio - Designer
1.1.3 MENU TREE
In the work area, a menu tree is displayed on the left pane for navigation.
Click "+" to expand the tree or "-" to collapse it.
Click an existing item from the tree list. Its contents will be displayed on the right
pane.
Right-click an item from the t ree list. Its contents will be displayed on the righ t pane.
In addition, you can create a new task or execute any other commands available to
that item.
Right-click any w hite area on the right pane (not the grey area as shown above), you
can create a new task.
Page 22
14
STREAM Wireless Studio User Guide
1.2 DATABASE APPLICATION
The Database Application service allows you to gather data schema information from
local computer or remote server, depending on your database source. Based on your
mobile computer type, create an application template so that you can access a specific
database via the STREAM Server.
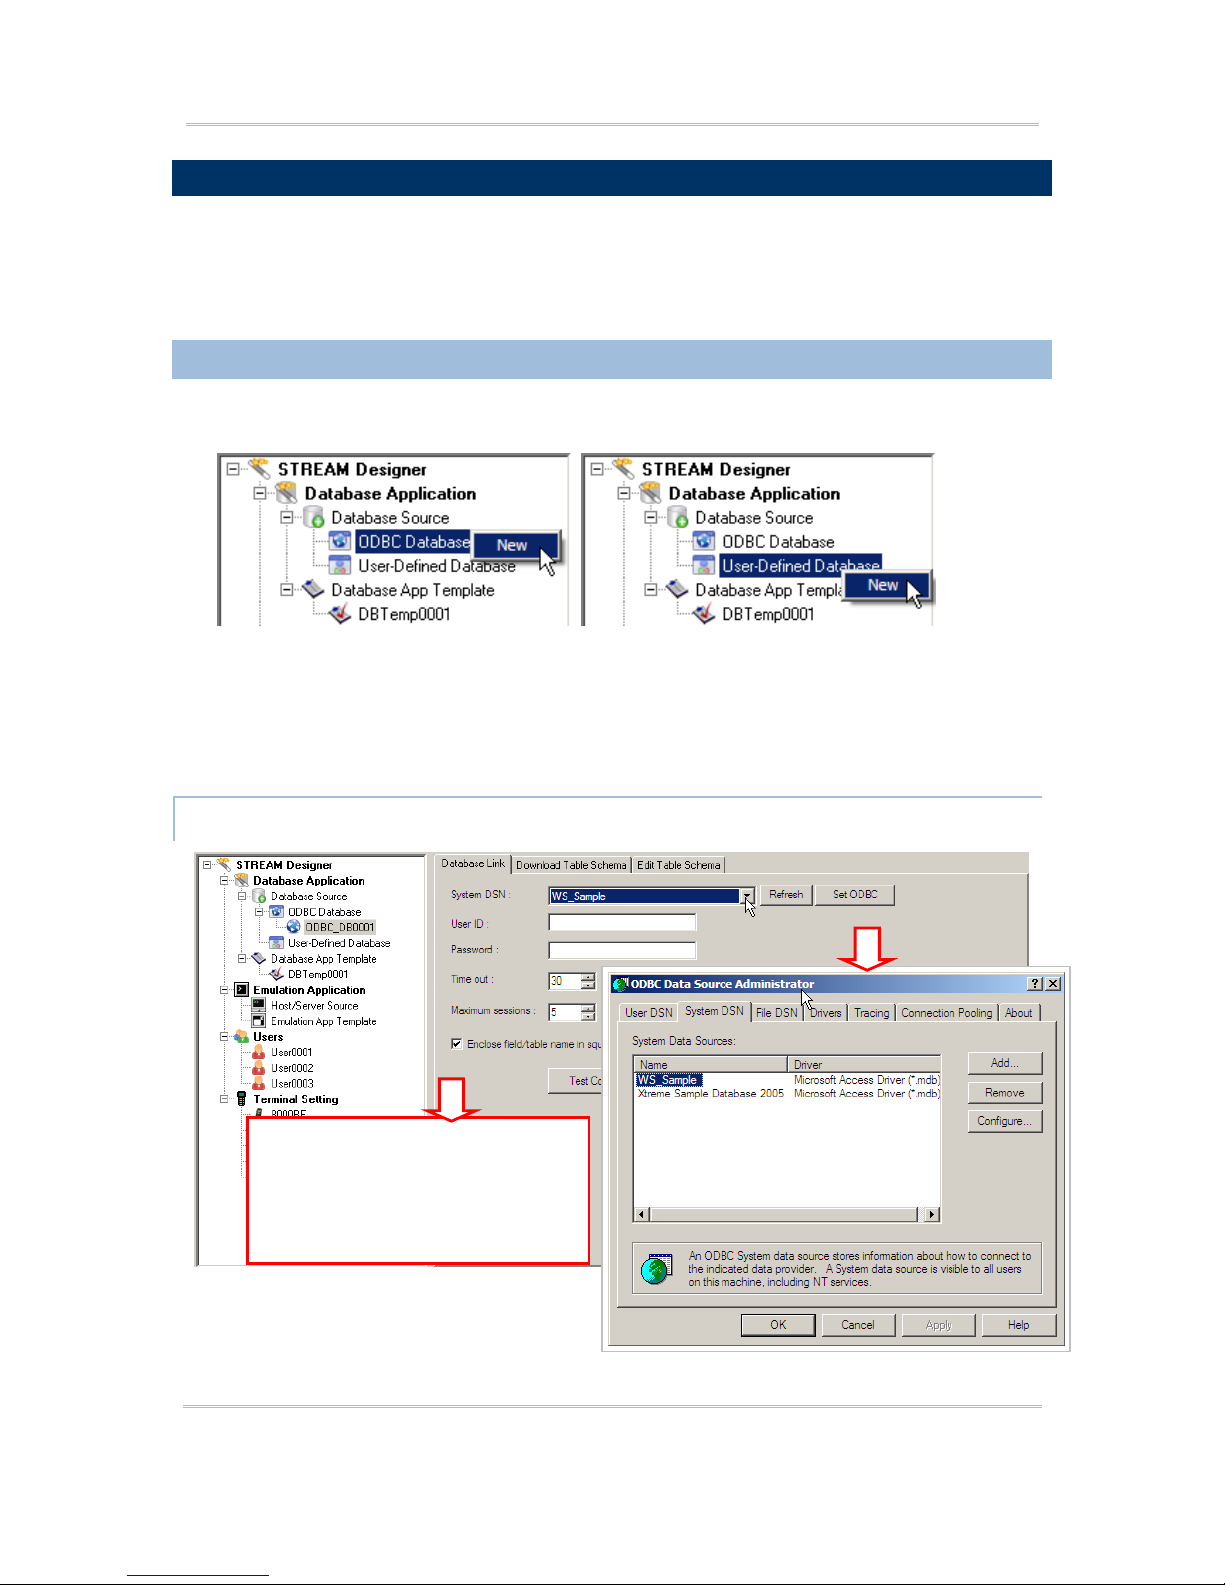
1.2.1 DATABASE SOURCE
1) Go to File Menu > New > Database Application > ODBC
Database/User-Defined Database and create your own database source.
ODBC Database – Access an existing database via ODBC, either a remote
database on the server or a local database on your computer.
User-Defined Database – Create a user database from scratch, and it will be
stored on your computer (C:\CipherLab\Stream\UsrDB) for local access only.
2) Specify how to access and make use of your database as follows.
ODBC DATABASE
If your database does not
accept field/table name that
contains special characters,
such as spaces, period, etc.,
make sure you select the check
box.
Page 23
15
Chapter 1 STREAM Wireless Studio - Designer
Database Link
Select your database by System DSN (Database Source Name). Click [Test Connection]
to verify whether the database link works. It will fail to access the database if the
information given is incorrect. For example, you may need user ID and/or passw ord to
access a database while not exceeding the given time and sessions allowed.
Note: Maximum sessions – en ter 0 if there is no limit on the number of connections.
If the desired database i s not on the drop-down menu of System DSN, click [Set ODBC] to add
it in the ODBC Data Source Administrator as shown above.
If you access the Administrative Tools – Data Sources (ODBC) from the Control Panel, click
[Refresh] to update the list.
If your database does not accept SQL commands with field/table name containing special
characters, such as spaces, period, etc., make sure you select the check box of [Enclose
field/table name in square brackets when sending SQL commands]. As a resul t, the field/table
names will be enclosed in a pair of square brackets when sending SQL commands, for example,
SELECT [Field 1], [Field 2] FROM [Table].
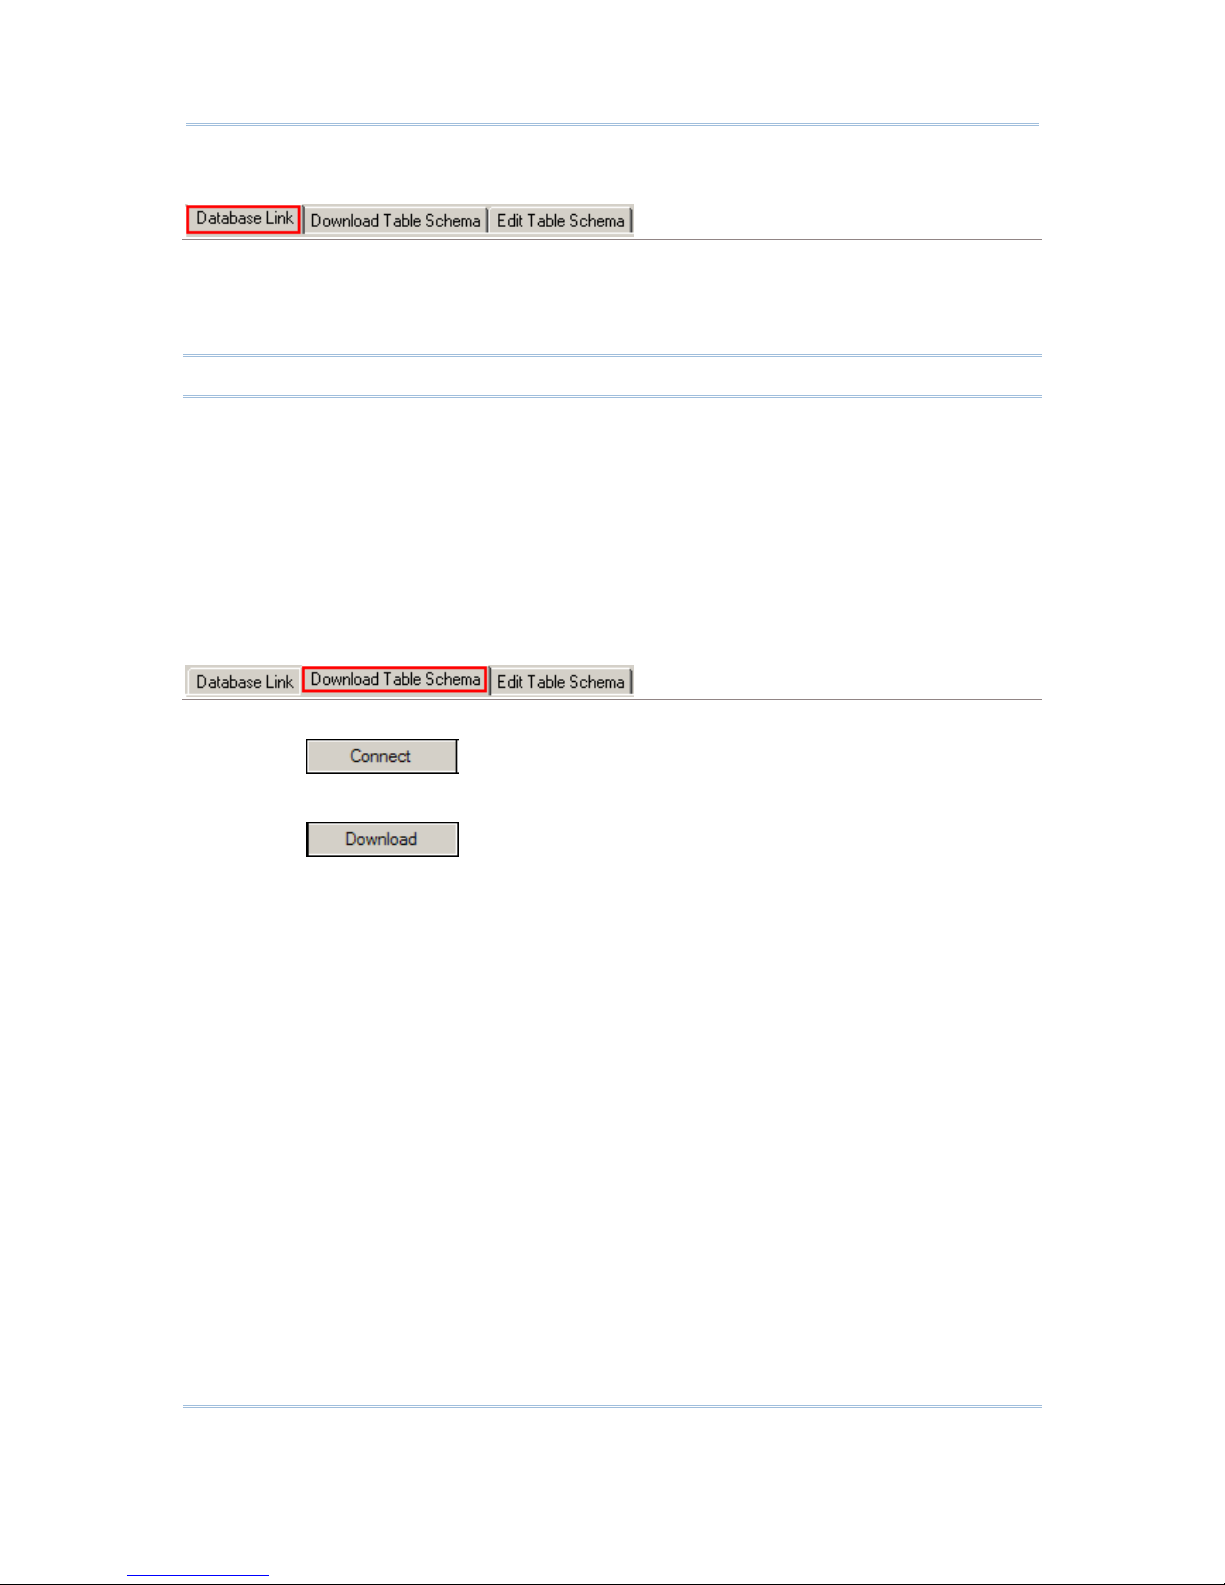
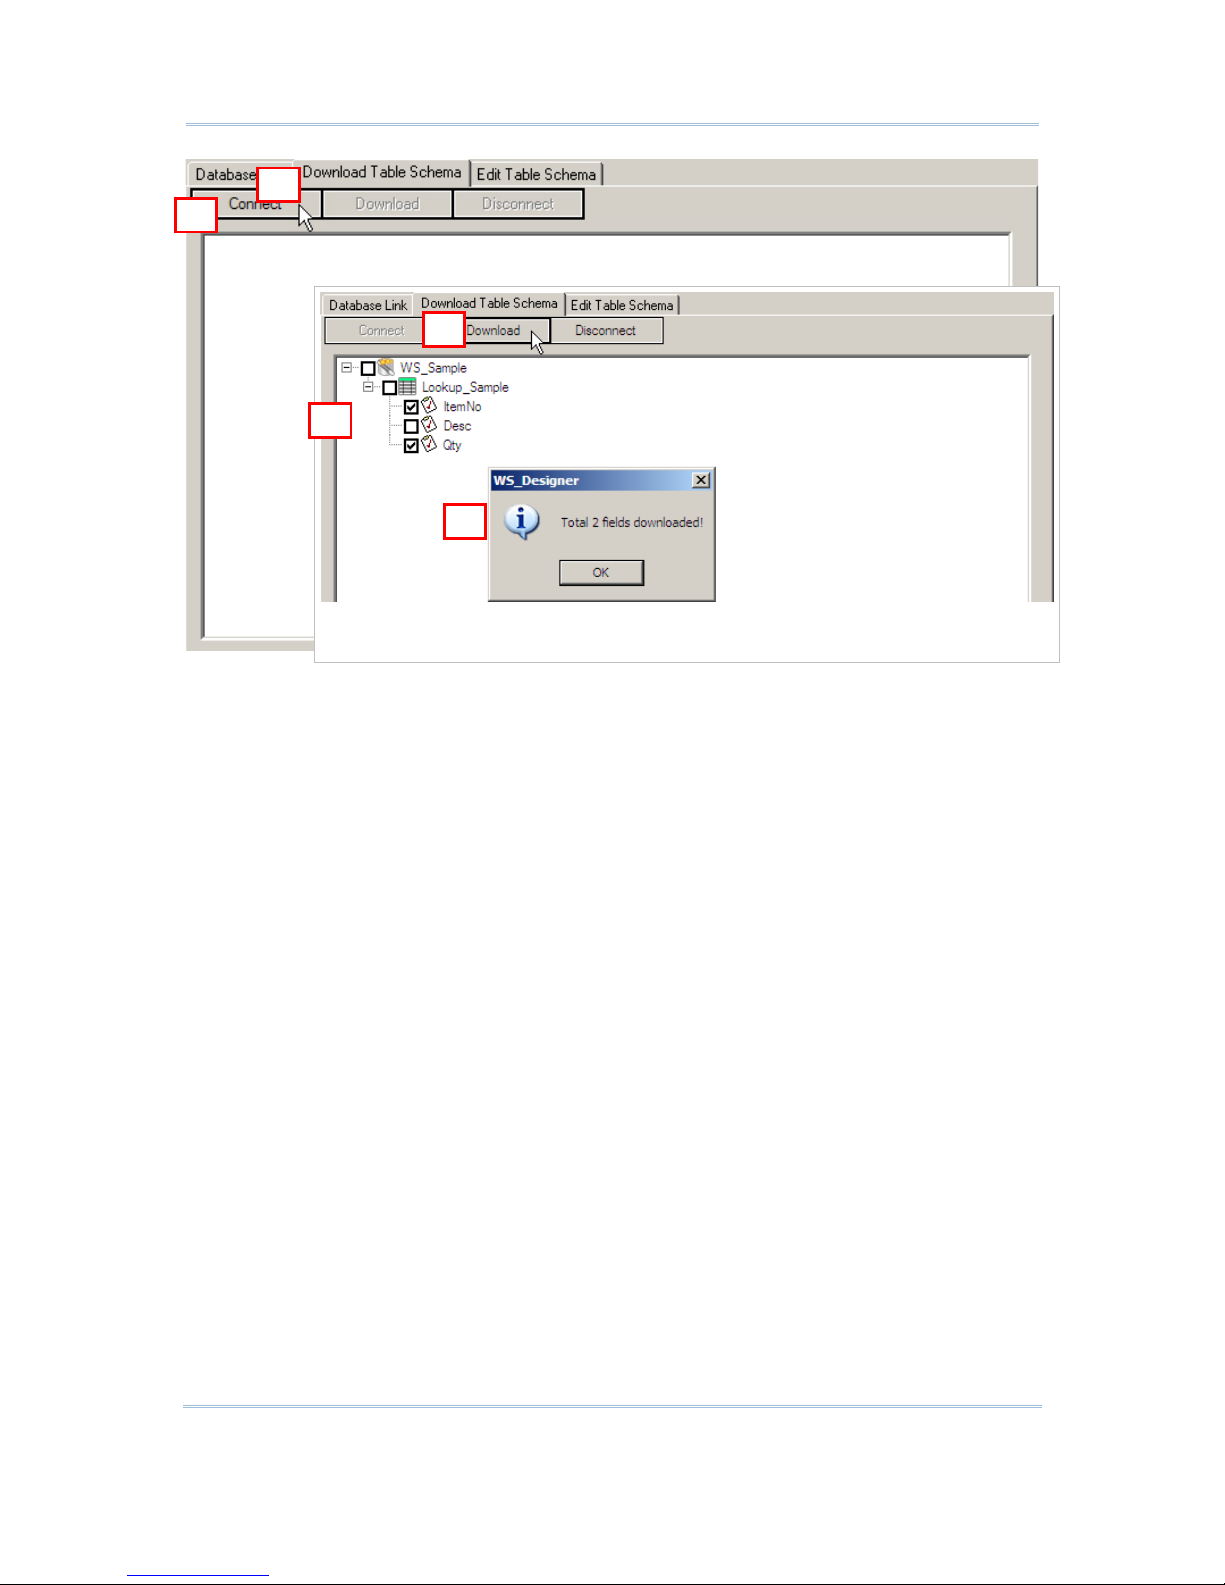
Download Table Schema
1. Click the Download Table Schema tab.
2. Click
to access the database.
3. Select which table(s) and fields(s) are needed for data collection.
4. Click
to download the selected table(s)/view(s) and field(s).
5. After downloading, click [OK].
Page 24
16
STREAM Wireless Studio User Guide
1
2
3
4
5
Page 25
17
Chapter 1 STREAM Wireless Studio - Designer
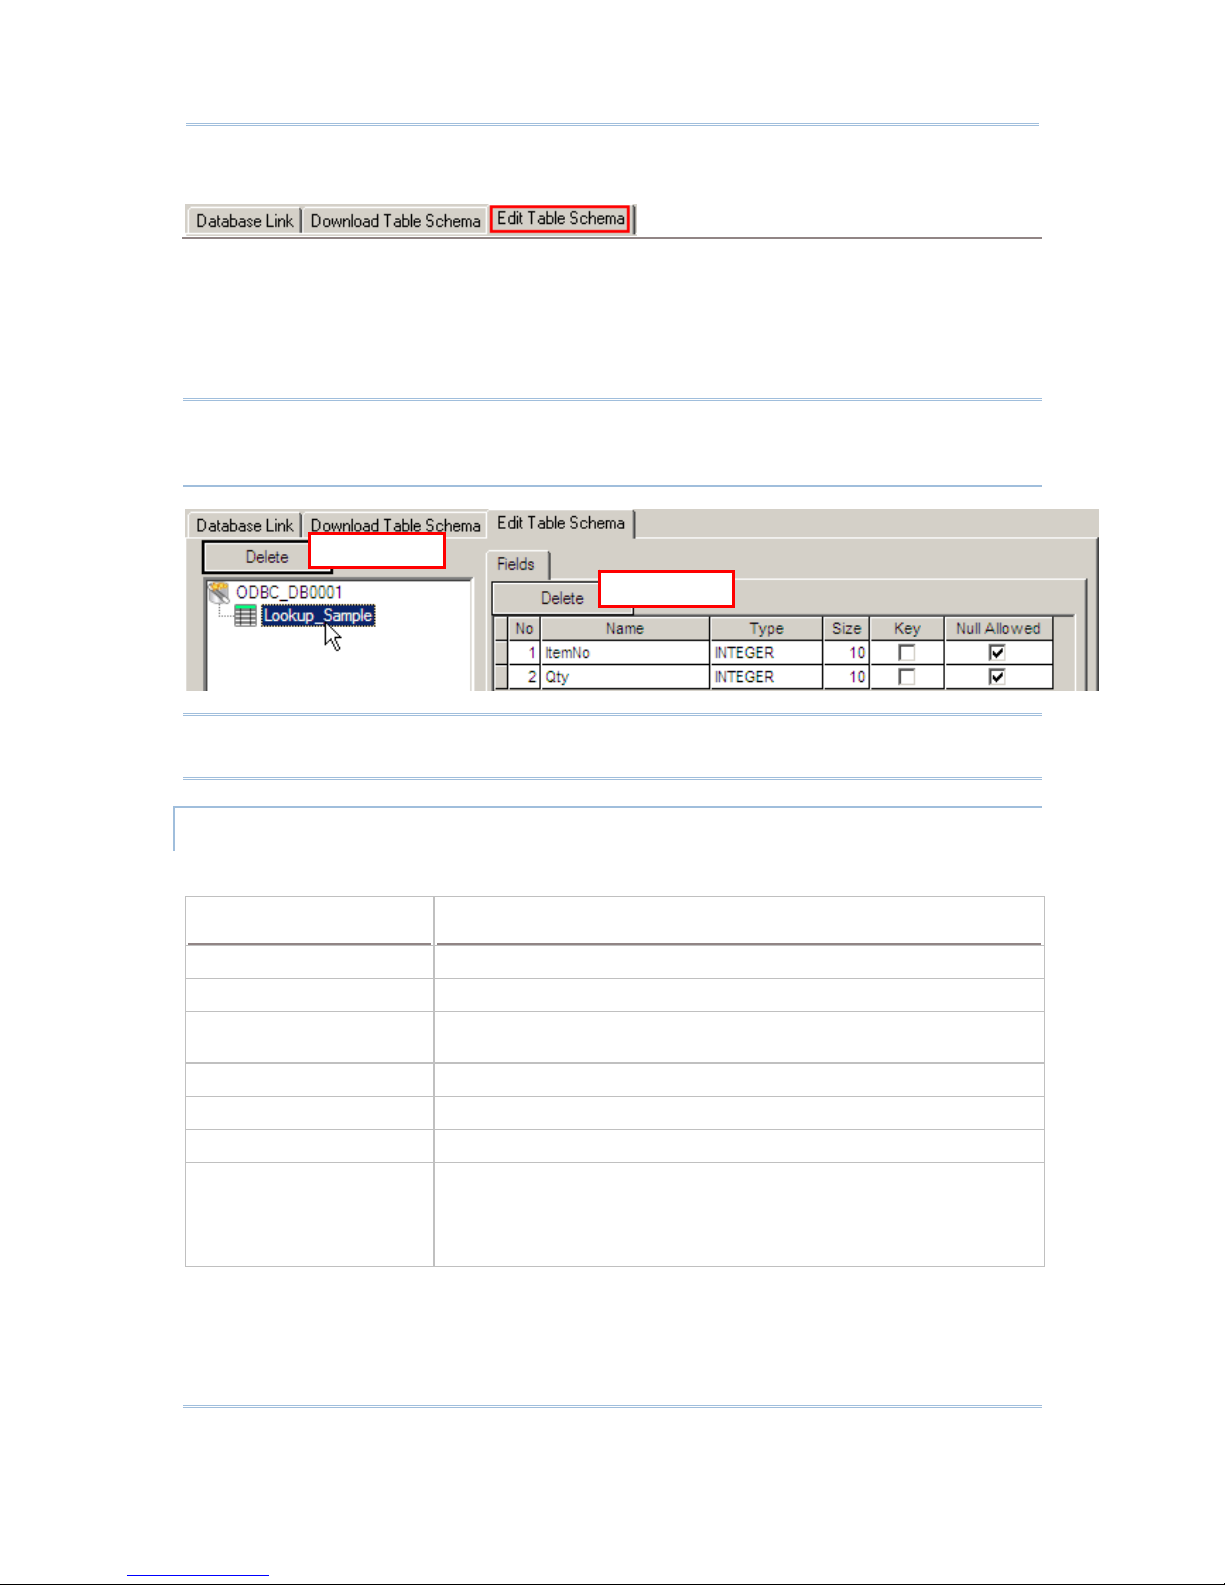
Edit Table Schema
Click the Edit Table Schema tab. You can view and manage the table schema.
Delete an unwanted table (on the left pane) or field (on the right pane) if necessary. To
restore a deleted item, repeat the Download Table Schema steps.
Set at least one key field, and decide whether a field can be left empty (Null Allowed).
Proceed to configure an application template.
Warning: At least one key field is required and must be referred in your form. It will
affect the settings of a database application template if you delete a
database, table or field that is referred to.
Note: If you click [Delete] on the right pane, the last field will be deleted. To delete a
specific field, select the field before you click [Delete].
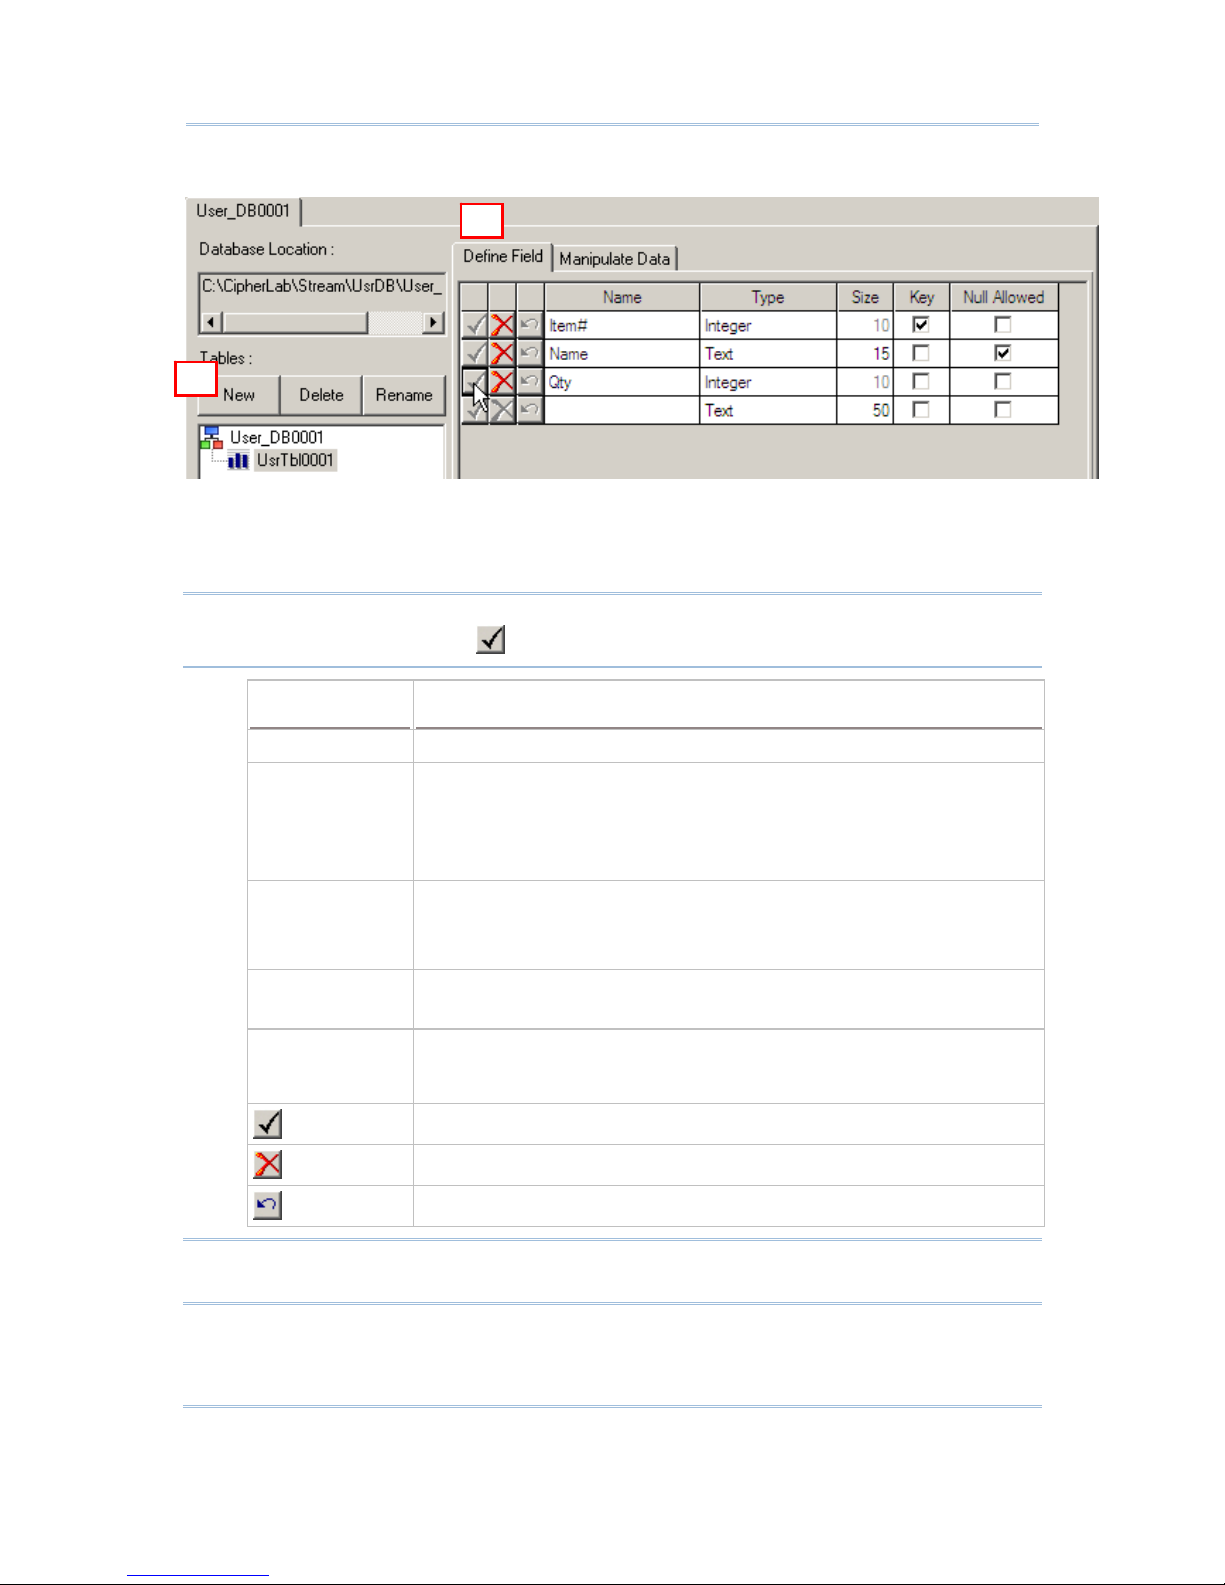
USER-DEFINED DATABASE
The databases defined in the STREAM Designer will be stored locally.
Items
Description
Database Location The default file path is C:\CipherLab\Stream\UsrDB.
New
To create a table from scratch.
Copy Structure/Data from
To create a table based on the structure/data of an existing
database.
Delete
To delete the selected table.
Rename
To change the name of the selected table.
Define Field
To configure field settings.
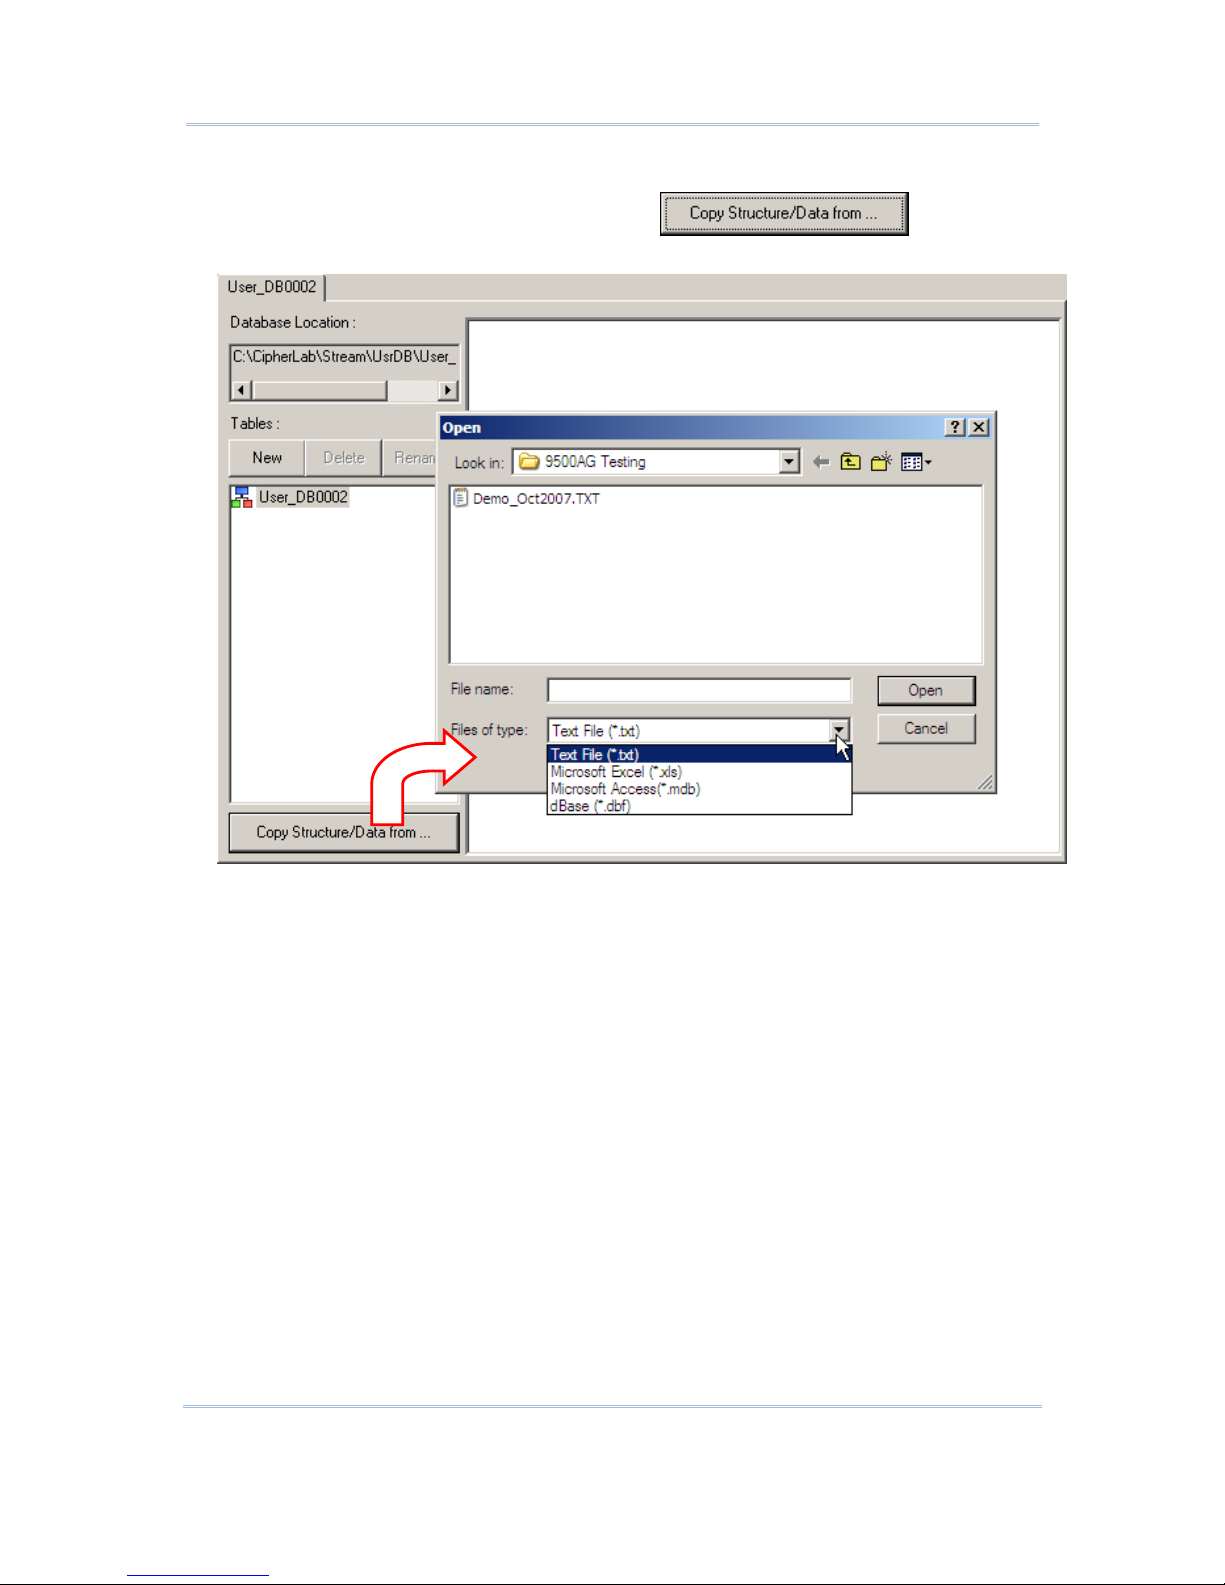
Manipulate Data You can import data from and export data to files in the following
formats: Text Files (*.txt), Microsoft Excel (*.xls), Microsoft Access
(*.mdb), and dBase (*.dbf).
The table will be updated while you are collecting data.
By table
By
fiel
d
Page 26
18
STREAM Wireless Studio User Guide
Approach I:
1. Click [New] to create a new table for the database. You can give it a frien dly n ame
or rename it later.
2. Define fields in the table one by one.
Warning: A new table will not be saved until at least one field is defined by clicking
the check mark to apply.
Field Settings Description
Name Give a name for the field
Type Specify data type:
Text
Integer
Real
Boolean
Size Specify filed length:
1~255 for Text
10 for Integer or Real
1 for Boolean
Key Select key field(s):
Single-field index
Multiple-field indexes
Null Allowed Specify whether a field can be skipped. Only when "Null Allowed" is
enabled, the data length setting of the corresponding field in a form can
be set 0.
To apply all the settings to the field.
To delete the field.
To undo the settings.
Warning: At least one key field is required and must be referred in your form. You
must click the check mark to apply all the settings by field.
3. Click the Manipulate Data tab.
1
2
Page 27
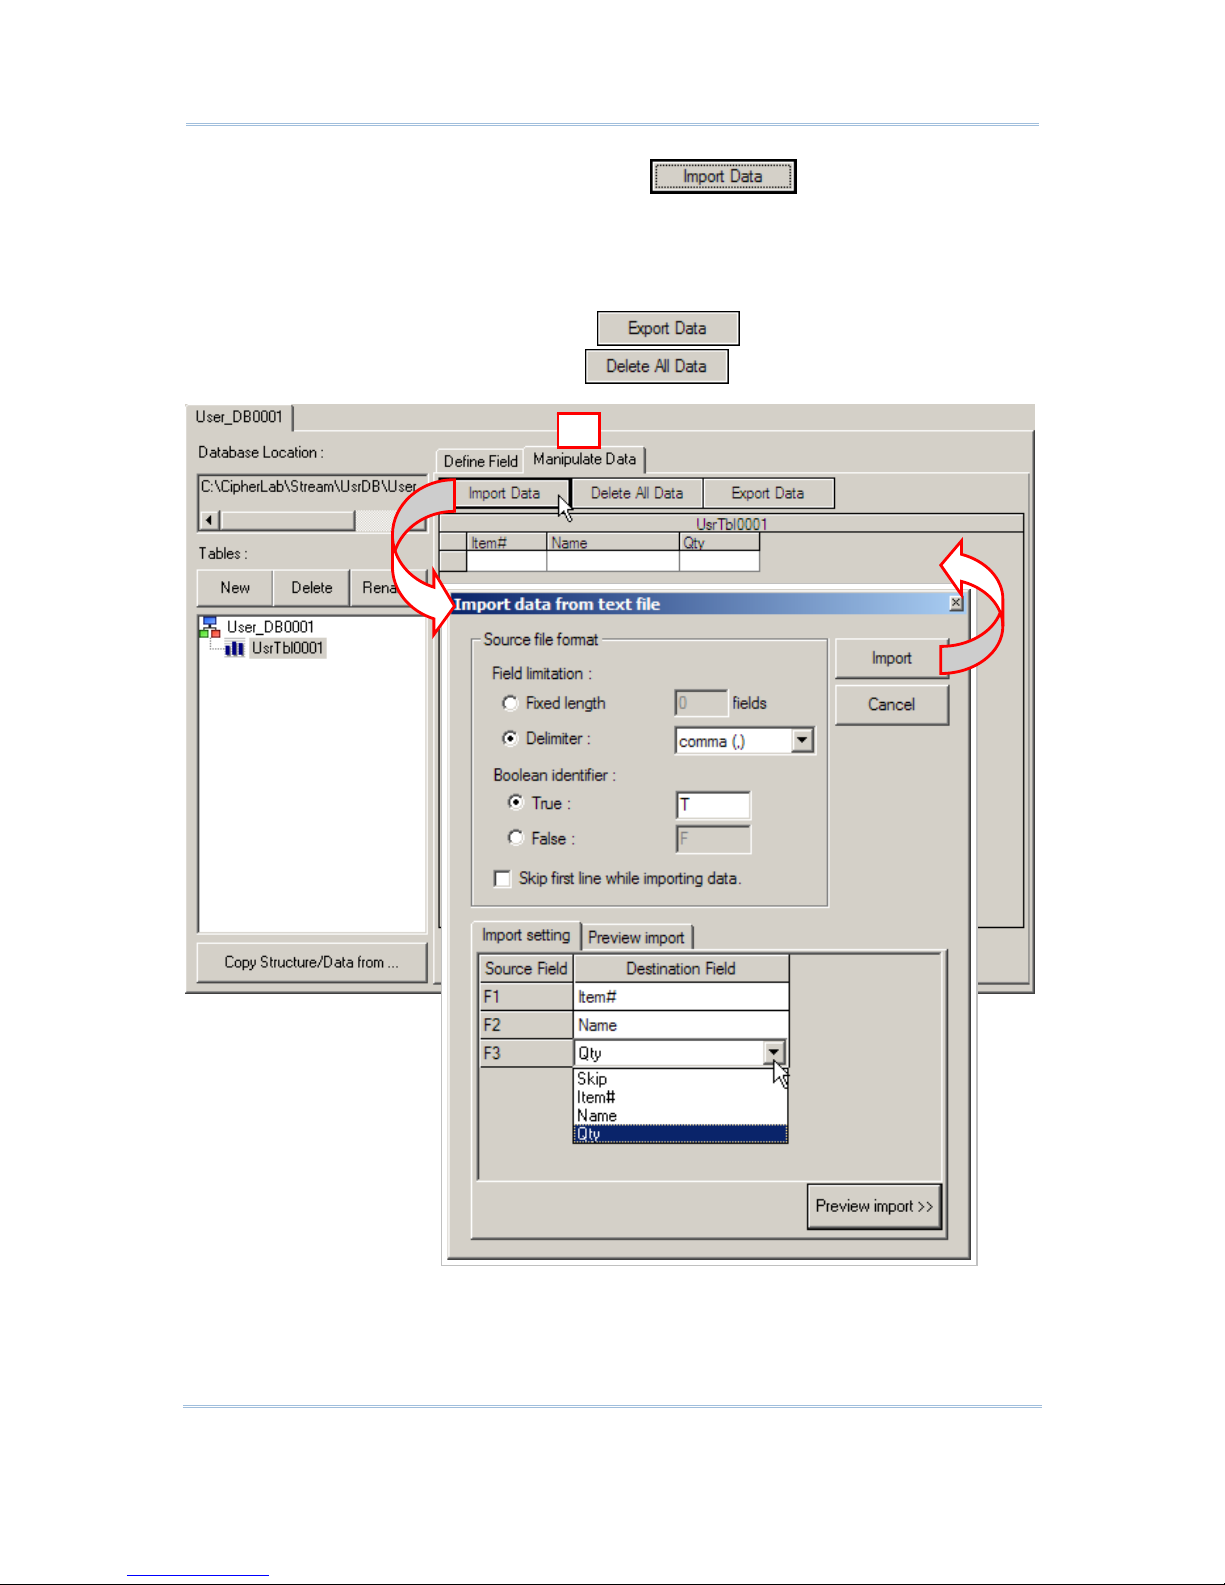
19
Chapter 1 STREAM Wireless Studio - Designer
You can leave the table empty or click to import data from an
existing table.
Existing records may be updated during data collection. If the data collected has
no match in the table, it depends on the [Action when the input has no match]
setting in the form.
When the job is done, you can click to save the data. If the data is
not desired any more, simply click
to clear the table.
3
Page 28
20
STREAM Wireless Studio User Guide
Approach II:
Instead of creating tables from scratch, click
to make use
of an existing table. Modify the field settings if necessary.
Page 29
21
Chapter 1 STREAM Wireless Studio - Designer
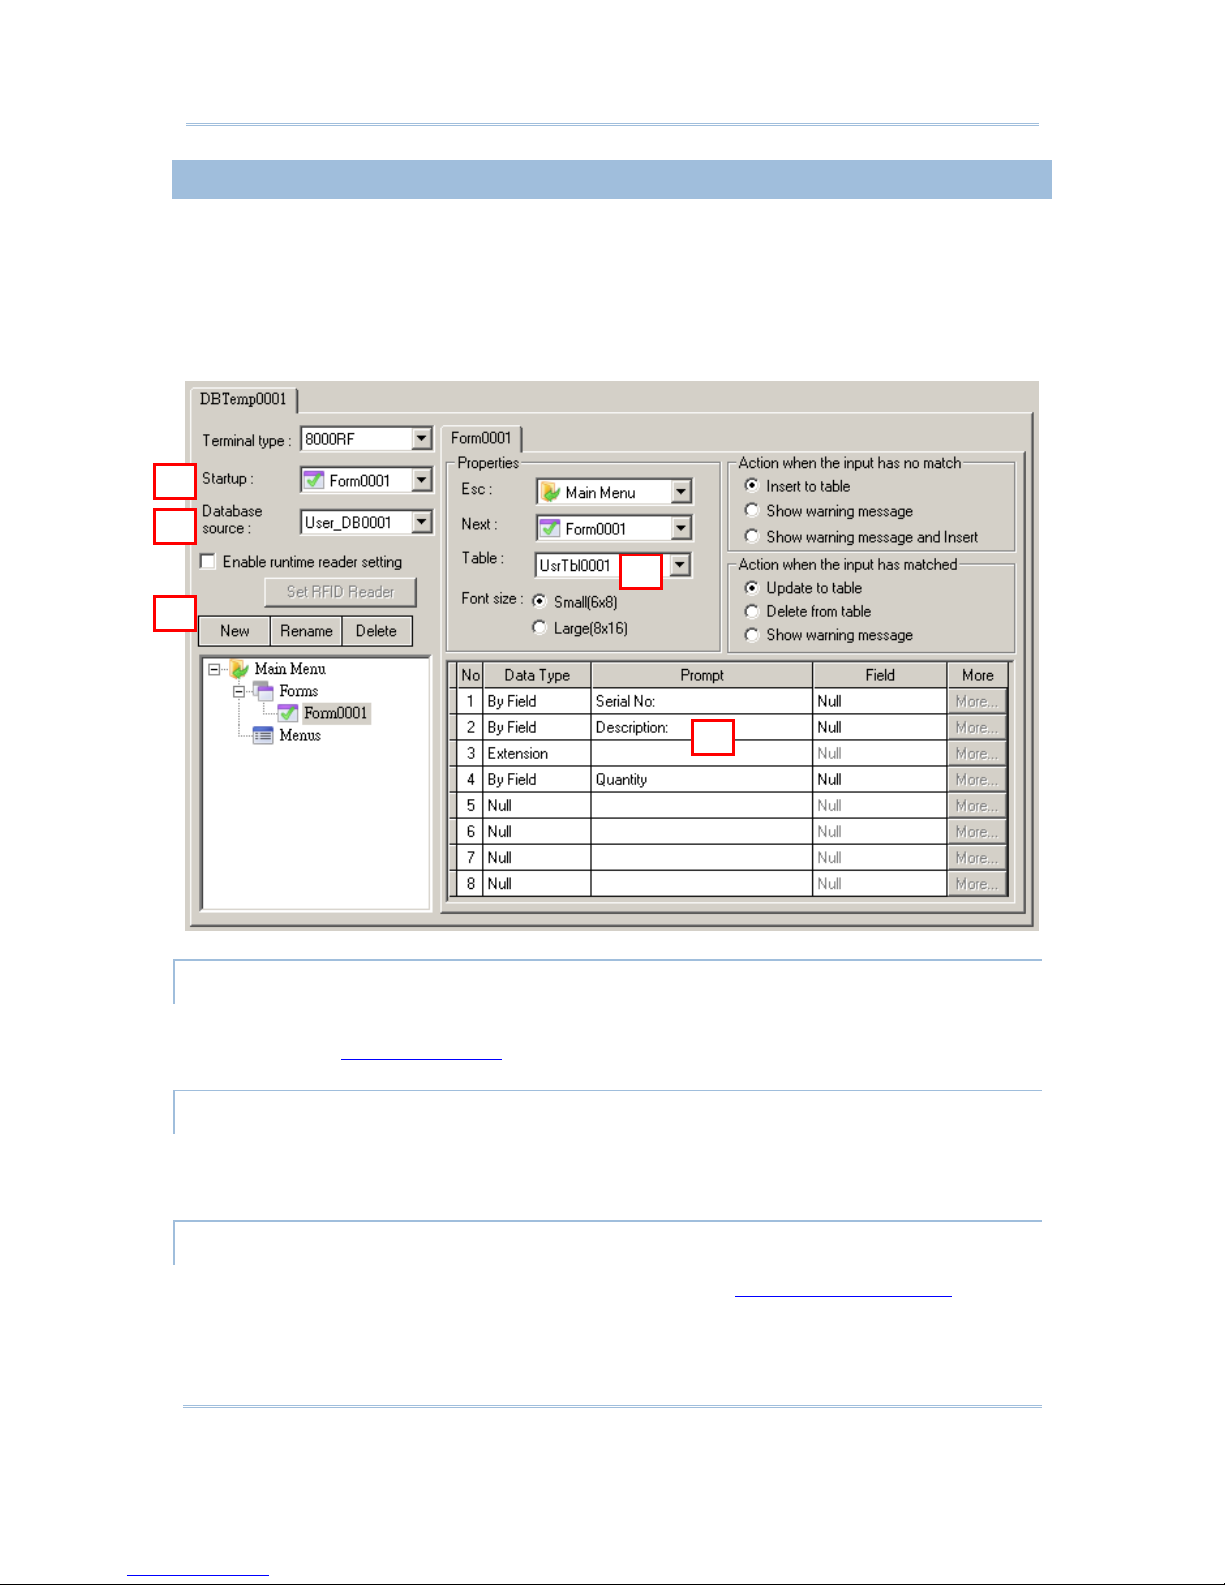
1.2.2 DATABASE APPLICATION TEMPLATE
Go to File Menu > New > Database Application > Database App Template. Define
your application template so that you can collect data for specific fields of a table in your
database.
The configuration of an application template is pretty much the same as what you used
to do with the Wireless Application Generator - the Form, Menu, and Lookup tabs.
TERMINAL TYPE
Select a terminal type that matches your mobile computer. Otherwise, it will fail to log in.
Refer to section 2.3.2 Login Error
.
STARTUP
Specify which form or menu to start with after logging in successfully. Associated forms
or menus must be created first!
DATABASE SOURCE
Select your database source, which is specified in section 1.2.1 Database Source.
1
2
3 4
5
Page 30
22
STREAM Wireless Studio User Guide
ENABLE RUNTIME BARCODE SETTINGS
You can specify how the barcode reader works and which symbologies are enabled in
section 1.5 Device Settings
. However, you must download or copy the configuration file
to your mobile computer for the settings to take effect.
Here is a convenient way to change the reader settings temporarily when you log in to
use the application template. Select the check box so that you can change the behavior
of barcode/RFID reader and associated settings on the mobile computer during run-time.
Note: When you log out, the reader settings will remain unchanged.
NEW/RENAME/DELETE
New
Select Forms or Menus, and then click
to create a form or user menu.
Alternatively, right-click Forms or Menus, and then select [New].
Rename
Select an existing form or menu, and then click
to change the name.
Alternatively, right-click a form or menu, and then select [R ename].
Delete
Select an existing form or menu, and then click
to change the name.
Alternatively, right-click a form or menu, and then select [Delete].
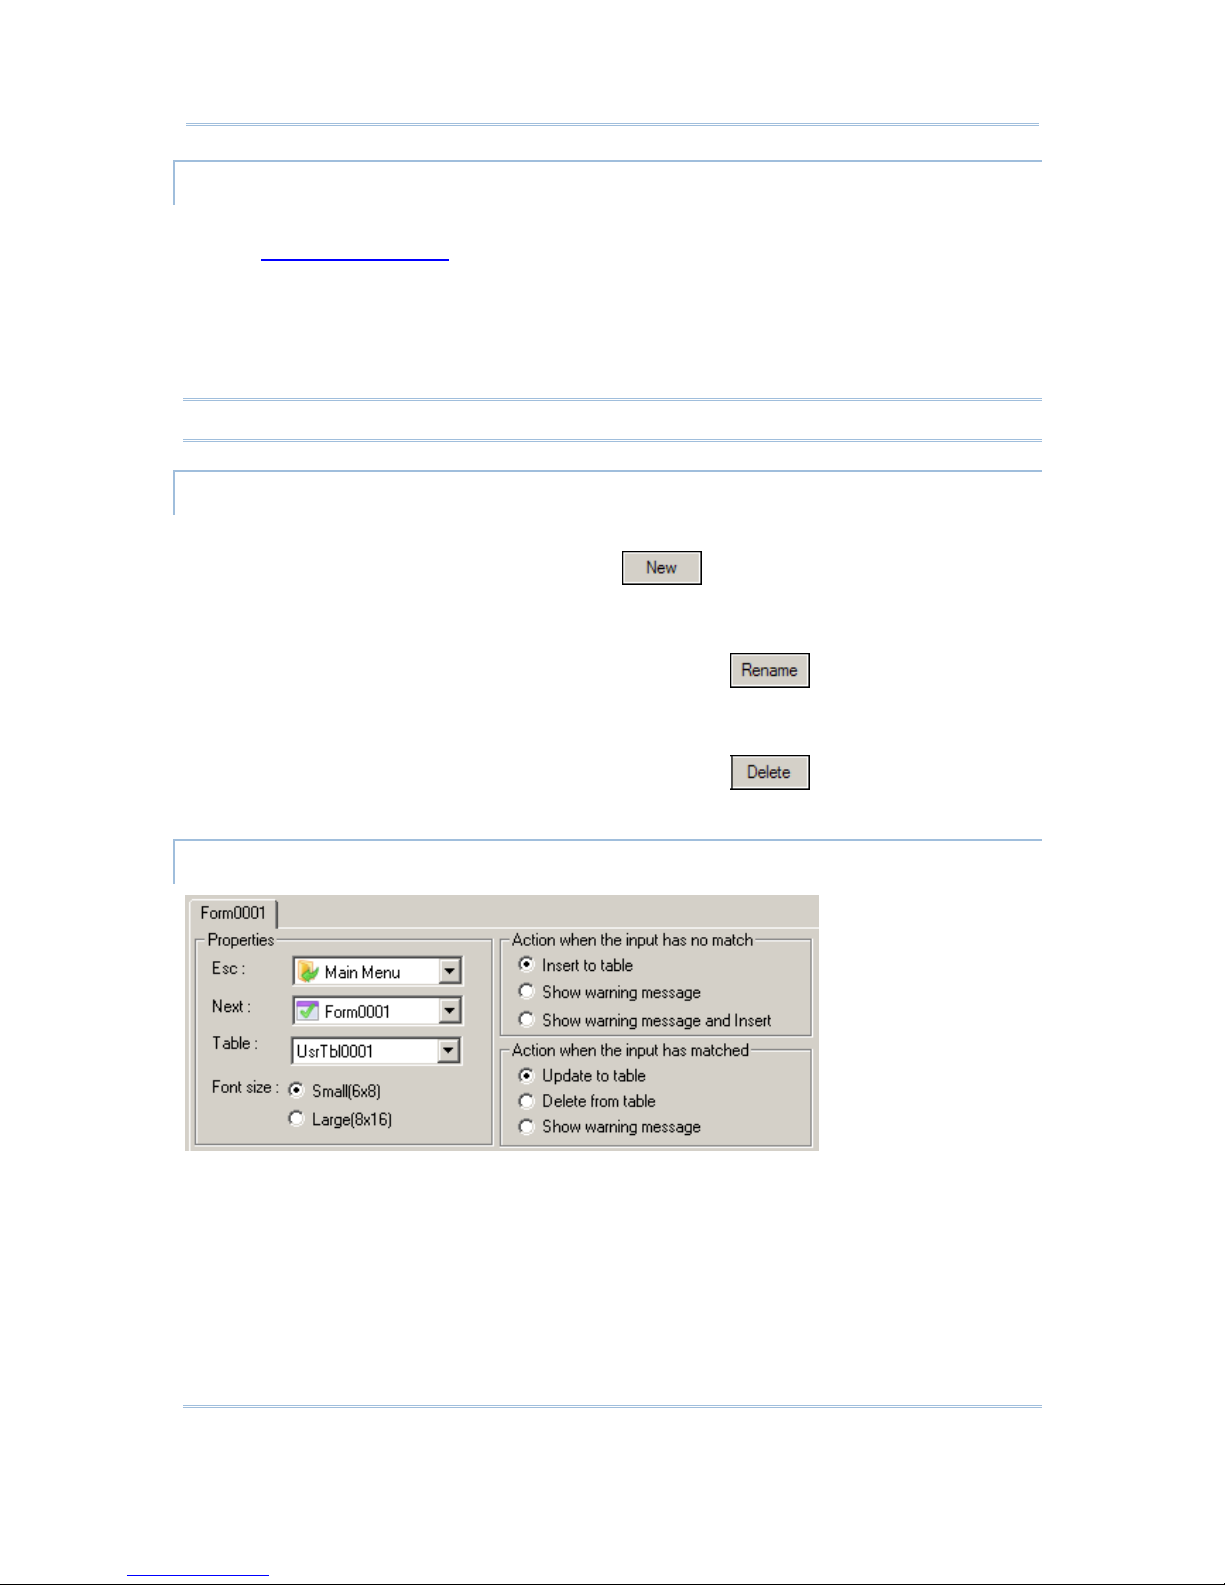
FORM – PROPERTIES
ESC
Select a form or menu that will be displayed wh en you press the [ESC] key on the
mobile computer. Normally, the [ESC] key is used to return to a previous form or
menu.
Next
Select a form or menu that will be displayed when the last inpu t field of the current
form has been completed. This function is invoked by sending the key value of [Enter]
when you finish with the last input field.
Page 31

23
Chapter 1 STREAM Wireless Studio - Designer
If the input source is limited to scanner only, you must have the setting of More
(Properties) > Barcode Input > Auto Enter enabled.
Table
This refers to lookup tables specified in section 1.2.1 Database Source
. A form is a
table with input fields. Select a lookup table associated with the form.
Font Size
On the Form and Menu property pages, font size needs to be changed accordingly.
Options
Description
Small font (6x8)
Large font
(8x16)
For 8000/8300/8400/8500 Series, Large font (8x16) must be applied for
double-byte languages, such as Chinese, Japanese, etc.
Local Setting
Fixed Size
For 9400/9500 Series, select “Fixed Size” or leave it to “Local Setting” to
apply the current setting of the mobile computer. Screen scrolling is
supported, allowing 50 characters by 80 lines.
FORM - ACTION WHEN NO MATCH
A form makes reference to a table of the database. There must be at least one input field
associated with the key field(s) of the table. Choose the appropriate action to take when
the input data does not match that of the key field.
Options
Description
Insert to table The input data will be inserted to the table.
Show warning message The program will suspend and prompt a warning message:
No match data.
Press any key...
Show warning message & Insert Inserting the input data to the table, the program will suspend
and prompt a warning message:
No match data.
Save OK!
Press any key ...
Page 32

24
STREAM Wireless Studio User Guide
FORM - ACTION WHEN MATCHED
When the input field has matched the key field of the table, choose the appropriate
action to take.
Options
Description
Update to table The input data will be updated to the table. When completed,
the program will prompt a message “Save OK” on terminal.
Delete from table The input data will be deleted from the table when key field
input matched the data in the table. The program will prompt a
message “Data deleted!” on terminal if data is successful
deleted.
Show warning message The program will suspend and prompt a warning message
“Exist same data!” to terminal.
FORM – EDITING
Elements Description
Data Type
By Field - based on the source fi eld
Extension
Pause
Prompt
(Screen) Prompt Only available when data type is By Field, Prompt or Pause.
(Lookup) Field Only available when data type is By Field.
If a key field is referred t o and the input data is found matching with the
lookup value, the lookup values of the rest input fields will be imported
from their associated source fields.
More (Properties) Only available when data type is By Field and a lookup field specified.
Warning: The key field of database must be referred in a form! When the lookup
values are displayed on your mobile computer, you must press [BkSp]
(Backspace) to modify or clear a value.
Page 33

25
Chapter 1 STREAM Wireless Studio - Designer
First, specify the data type for each input field according to your needs. Give a prompt
string if necessary.
Data Type
Description
Null Default setting. There will be single line spacing on the mobile computer screen.
No data input is allowed.
Prompt The prompt string will be displayed on the mobile computer screen but will not be
saved.
No data input is allowed.
Extension The line will be reserved as an "extensi on" of the previous line so that the whole
input data can be displayed on the mobile computer screen. You may need more
than one line of "Extension", depending on the font size, the size of the mobile
computer screen, and the maximum data length of the previous line.
Note that screen scrolling is supported on 9400/9500 Series that allows 50
characters by 80 lines.
Mobile Computer Small (Font 6x8) Large (Font 8x16)
8000 Series 16 characters by 8 lines 12 characters by 4 lines
8300 Series 20 characters by 8 lines 15 characters by 4 lines
8400 Series 26 characters by 19 lines 20 characters by 9 lines
8500 Series 26 characters by 19 lines 20 characters by 9 lines
No data input is allowed.
This is not applicable unless the data type of the previous input field is "By
Field".
Pause The prompt string will be displayed on the mobile computer screen temporarily
but will not be saved.
No data input is allowed.
This is not applicable unless the data type of the previous input field is "By
Field".
By Field The data type is based on the corresponding field of the lookup table.
Click to configure other properties if necessary.
Page 34

26
STREAM Wireless Studio User Guide
Lookup Option
This depends on the data type of the source field.
If it is a key field, the option is fixed to "Input acceptably - Replace".
Data Type of Source Field Text / Boolean Integer / Real
Display only v v
Input acceptably
Replace
v v
Accumulate
N/A v
Deduct
N/A v
Replace
Waiting for data input, the cursor will stay at the end of the lookup value tha t
is displayed on the mobile computer screen. Press [BkSp] (Backspace) to
modify or clear the lookup value.
Accumulate
Waiting for data input, the cursor will stay on the mobile computer screen after
the “+” sign that follows the lookup value.
Page 35

27
Chapter 1 STREAM Wireless Studio - Designer
Deduct
Waiting for data input, the cursor will stay on the mobile computer screen after
the “-” sign that follows the lookup value.
Field Data
Min length Specify the minimum length of an input field.
The minimum length cannot be set to 0 i f "Null Allowed" is not enabled in the
field setting of database.
If data input via the barcode reader is shorter, it will be considered
unacceptable. The system will prompt a warning message.
Max length Specify the maximum length of an input field, depending on the data type of
source field.
If data input via the barcode reader is longer, it will be considered
unacceptable. The system will prompt a warning message.
Default value
or text
An initial value or text specified here will be displayed in the input field. It is to be
replaced by input data. For example, it can be used to prompt an initial value for
quantity.
The length allowed depends on the maximum length.
Prefix code Only available when data type is By Field - Text. For example, a dollar sign ("$")
can be added to the front of the data input for price.
The length allowed depends on the maximum length.
Suffix code Only available when data type is By Field - Text. You can use the prefix and suffix
codes to wrap the input data.
The length allowed depends on the maximum length.
Input source
Specify from which source data can be collected.
Keypad By default, data input from the keypad is enabled. The system will accept data
even when it is longer than the screen can display. You may reserve some
"extension" lines to display the whole data.
“Show Soft Input Keypad” option is only available for 9400/9500
Scanner
(barcode)
For data input via the barcode reader, the system will prompt a warning message
when it is too short/long than the minimum/maximum length specified above.
Page 36

28
STREAM Wireless Studio User Guide
RFID reader For data input via the RFID reader, the system will prompt a warning message
when it is too short/long than the minimum/maximum length specified above.
Barcode Input
Check leading
code
The leading code refers to the digit in the start position of a barcode.
Select the check box to verify the barcode input. When the leading code is not
matching, the barcode will be rejected.
Leading code Barcode scanned Transaction record
9 9876543210 9876543210
2 9876543210 (Error: code not matching)
Read partial
barcode
By default, the system will return the whole barcode that has been decoded. When
the check box is selected, the system will return partial barcode according to the
settings of the start position and maximum length.
Start position Max. length Barcode scanned Transaction record
2 10 9876543210 876543210
2 3 9876543210 876
Read partial code + Check leading code:
Start position Max. length Leading code Barcode scanned Transaction record
2 7 8 9876543210 8765432
2 7 9 987654321 (Error)
Auto ENTER Normally, it is necessary to press the [Enter] key on the mobile computer upon
completion of one input field. Then, it will move either to the next input field, or to
the next form/menu specified. This function will automatically add a carriage
return to the end of the barcode input (= Scan+ENTER).
If the input source is limited to scanner only, you must have the setting of More
(Properties) > Barcode Input > Auto Enter enabled.
Page 37

29
Chapter 1 STREAM Wireless Studio - Designer
MENU – PROPERTIES
Menu Caption
Select the check box and specify a caption for the current menu. This is optional.
ESC
Select a form or menu that will be displayed wh en you press the [ESC] key on the
mobile computer. Normally, the [ESC] key is used to return to a previous form or
menu.
Font Size
On the Form and Menu property pages, font size needs to be changed accordingly.
Options
Description
Small font (6x8)
Large font (8x16)
For 8000/8300/8400/8500 Series, Large font (8x16) must be applied for
double-byte languages, such as Chinese, Japanese, etc.
Local Setting
Fixed Size
For 9400/9500 Series, select “Fixed Size” or leave it to “Local Setting” to
apply the current setting of the mobile computer. Screen scrolling is
supported, allowing 50 characters by 80 lines.
MENU – EDITING
Elements Description
Item Name Specify a name for each menu item.
Goto Select a form or menu that will be displayed when a menu item has been
selected. This function will be invoked when you press the [Up/Down] arrow
keys to select a menu item and press [Enter].
Page 38

30
STREAM Wireless Studio User Guide
1.3 EMULATION APPLICATION
The Terminal Emulation Application service allows you to reformat screens f rom a remote
host or server that runs VT100/220 or 5250 terminal emulation and process the collected
data back to it. Based on your mobile computer type, create an application template so
that you can access a specific host or server via the STREAM Server.
1.3.1 HOST/SERVER SOURCE
1) Go to File Menu > New > Emulation Application > Host/Server Source and
create your own host/server source.
2) Specify the emulation type, e.g. ANSI/VT, and how to access and reformat the host
screens as follows.
Host Link
Change IP
Click
to change the IP address of your host. After changing the
IP, click
again to apply the new IP.
Cancel Undo the action of changing host IP.
Telnet Port Specify the telnet port number. Port 23 is assigned by default.
Emulation Type Select the emulation type, ANSI/VT or 5250.
Keep Alive 0 ~ 65535, in units of second
Capture Screen
Connect Click the [Connect] button to establish a connection with the host.
Capture During the telnet session, click the [Capture] button to capture host screens
that needs editing.
Page 39

31
Chapter 1 STREAM Wireless Studio - Designer
Disconnect Upon completion with capturing the host screens needed, click [Disconnect]
to terminate this session. Proceed to edit screens.
Edit Screen
Rename Change the name of a captured screen.
Delete Delete a captured screen.
Input Field Click on a captured screen and the current cursor position will be displayed.
The field length will be 0. You may click and drag to define an input field,
and the field length will be calculated automatically.
Click the [Add] button to add a source field as specified.
Click the [Change] button to change the source field as specified.
See screenshots below for an example.
Edit Screen
Identifier
Edit the screen identification for Host screen reformatting.
1
2
3
Page 40

32
STREAM Wireless Studio User Guide
Note: Refer to 1.3.2 Emulation Application Template – Reformat Screen to deal with the
screens edited.
Page 41

33
Chapter 1 STREAM Wireless Studio - Designer
Manually check your desired options line by line or click the “Select All” or “Deselect All”
buttons to determine which the screen identifier lines should be when reformatting the
Host screen.
Select All: Click to select all the lines and every line will be the screen identifier.
Deselect All: Deselect all the lines and the screen will not be compared. The original
screen will be shown on the terminal.
1
2
Page 42

34
STREAM Wireless Studio User Guide
1.3.2 EMULATION APPLICATION TEMPLATE
EMULATION TEMPLATE SETTINGS
Source
Terminal Type Select your terminal type.
Host Source Select a host source associated with the above terminal type.
If your source supports ANSI/VT, proceed to configure VT
Emulation Settings.
If your source supports 5250, proceed to configure TN
Emulation Settings.
Enable runtime barcode
setting / Set RFID Reader
Select whether to enable runtime barcode setting as well as
RFID setting.
Font Size & Case
Small / Large
OR
Local Setting /
Fixed Size
The mobile computer screen size varies. Display capability, as shown in the table
below, depends on the screen size as well as the font you use. The font size
setting affects the default horizontal/vertical steps the cursor move at one time
on the host screen.
By default, small font (6x8) is applied. Data coming in from the host will be
displayed accordingly. You may select to use large font (8x16).
For 9400/9500 Series, select “Fixed Size” or leave it to “Local Setting” to
Page 43

35
Chapter 1 STREAM Wireless Studio - Designer
apply the current setting of the mobile computer.
Mobile Computer Small (Font 6x8) Large (Font 8x16)
8000 Series 16 characters by 8 li nes 12 characters by 4 lines
8300 Series 20 characters by 8 li nes 15 characters by 4 lines
8400 Series 26 characters by 19 l ines 20 characters by 9 lines
8500 Series 26 characters by 19 l ines 20 characters by 9 lines
Case
Conversion
By default, there is no case conversion. Data being sent to the host will be in
letter case matching to the original.
Options include "convert to l ower/upper case". For example, if you select "to
lower case", data being sent to the host will be converted to lower case; and
vice versa.
Screen Scroll & Control
Navigator
A navigator can be a graphic icon or miniature window on the mobile
computer screen, indicating the relationship between the mobile computer
screen and the host screen. A miniature cursor is blinking to indicate the
input position. Such navigator will be displayed on the bottom line on the
8500 Series mobile computer.
By default, a graphic icon is used for navigation.
Instead of the small icon, you may select "20*15" or "32*24" for a larger
icon.
To disable this feature, select "None".
Navigator Key
The navigator key works as the toggle of navigator. When you press the
navigator key on the mobile computer, it will disable/enable the navigator by
turns.
By default, the navigator key i s disabled. Select the navigator key (FN+0 ~
FN+9). The selected combination will become unavailable on the Function
Key Mapping list on the VT/TN Emulation Settings tab. For example, if you
select FN+6, you will find it mapped to "Navigator Key".
Horizontal
Steps
Specify how may horizontal steps (characters) th e c ursor will move at a time
on the host screen when you press the [FN] + [Left] or [FN] + [Right] keys.
By default, the setti ng will move the cursor one screenful horizontally. This
feature is associated with the font size.
This is not supporte d on the 8000 Series mobile computers for lack of the
[Left Arrow] and [Right Arrow] keys.
Vertical Steps
Specify how many vertical steps (characters) the cursor will move at a time
on the host screen when you press the [FN] + [Up] or [FN] + [Down] key.
By default, the setting will move the cursor one screenful vertically. This
feature is associated with the font size.
Cursor
Tracking
By default, the cursor tracking is enabled. The mobile computer screen will
automatically adjust itself so that the cursor will always be visible on the
screen. Cancel the check box if this feature is not desired.
Note: The Cursor Tracking only works when a screen refresh incident occurs on the host.
However, when the Lock Screen feature is enabled, the Cursor Tracking feature
will be disabled automatically; and vice versa.
Page 44

36
STREAM Wireless Studio User Guide
Trim Spaces To make the most use of the mobile computer screen, unnecessary spaces may
be discarded. Select the check box to enable this feature.
Note that spaces betw een characters will not be discarded.
Original line:
-> 1. Set up<-
Trimmed:
->1. Set up<-
Remove
Empty Line
(for 5250
only)
Select the check box to automaticall y ignore empty lines on the host screen.
Note that this feature can only be enabled when there is no contradiction
with 5250's field definition
Login Hot Key
User Name
Password
By default, the shortcut keys are disabled. That is, you need to enter
username/password manually.
Select the shortcut keys (FN+0 ~ FN+9) so that you can enter the text
string for Username/Password by two strokes. The selected key
combinations will become unavailable on the Function Key Mapping list. For
example, if you select FN+0 for “Username” and FN+1 for “Password”, you
will find them mapped to “Name Key” and “Password Key” individually in the
Function Key Mapping of the Emulation tab.
Enable Scanner
Always enable By default, the barcode reader is enabled. However, you may send an escape
sequence to control it.
Controlled by
ESC (or 5250)
commands
If selected, the barcode reader i s disabled after login. It will not work until
you send the specific ESC or 5250 command to enable it.
VT Emulation
Enable You may specify an ESC command other than the default
“ESC[2;1]”.
Disable You may specify an ESC command other than the default
“ESC[2;0]”.
Enable RFID Reader
Always enable By default, the RFID reader is enabled.
The RFID rea der co-exists wi th the barcode reader, whi ch is also called "dual
mode" because both readers can work at the same time.
Controlled by
ESC (or 5250)
commands
If selected, the RFID reader is disabled after login. It will not work until you send
the specific ESC or 5250 command to enable it.
VT Emulation
Enable You may specify an ESC command other than the default
“ESC[3;1]”.
Disable You may specify an ESC command other than the default
“ESC[3;0]”.
Page 45

37
Chapter 1 STREAM Wireless Studio - Designer
Barcode Input
Check leading
code
The leading code refers to the digit in the start position of a barcode. (It could
be a string of maximum 10 characters! This needs to be verified!) Select the
check box to verify the barcode input. When the leading code is not matching,
the barcode will be rejected.
Read partial
barcode
By default, the system will return the whole barcode that has been decoded.
Select the check box so that the system will return partial barcode according to
the settings of the start position and maximum length.
Check
barcode
length
Select the check box so that the system will perform a length check on the
barcode according to the length setting. When the barcode is found shorter than
the specified length, it will be rejected.
For 5250 emulation, refer to “Field Length if Exceed”.
Add prefix
code
Select the check box to prefix a code to the input data. Specify one or more
characters in the editing box next to it. For example, a dollar sign ("$") can be
added to the front of the data input for price.
Add suffix
code
Select the check box to suffix a code to the input data. Specify one or more
characters in the editing box next to it.
You may use prefix and suffix code(s) to wrap the input data.
Auto ENTER By default, a carriage return will be automatically added to the end of the
barcode input (= Scan+ENTER). It can then directly proceed to next task upon
completion of data input without requiring you to press the [Enter] key on the
mobile computer. For barcode scanning, it proves to be timesaving.
Page 46

38
STREAM Wireless Studio User Guide
VT EMULATION SETTINGS
Auto Sign On Identifier
User Name
Prompt,
Password
Prompt
Specify the prompt strings that request you to enter username/password. They
must be exactly the same as received from the host.
If the Auto Sign On is disabled, the host will request username and
password every time the mobile computer attempts to log on.
For “Auto Sign On” to work properly, User Name/Password and each prompt
string here must be specified correctly. Refer to section 1.4 Users.
Page 47

39
Chapter 1 STREAM Wireless Studio - Designer
Logout Hot Key
Logout Key
By default, no logout key is specified. To exit the host applications, you are
required to send the specific command.
Select the shortcut keys (FN+0 ~ FN+9). The selected combination will
become unavailable on the Function Key Mapping list. For example, if you
select FN+2, you will find it mapped to "Exit Key" in the Function Key
Mapping of the Emulation tab.
Logout String
The logout command depends on the host appli cations. For this feature to
work properly, the logout string must be specified correctly.
Function Key Mapping
By default,
FN+1 ~ FN+9
are mapped
to F1~F9.
The function keys are special keys on the mobile computer keypad that transmit
control codes. Control codes do not produce displayable characters but are codes
for functions. If these codes are received by the mobile computer, it will perform
the associated function as defined on the list.
Click an available function key. You may change its key combination or
re-define key code to meet a specific need.
Note: The fun ction key mapping list varies based on the availability of physical keys on
your mobile computer.
Page 48

40
STREAM Wireless Studio User Guide
TN EMULATION SETTINGS
Field Length if Exceed
Reject,
Truncate,
Split to Next
Field
In 5250's field definition, the length of data field is pre-defined. If the input data
is longer than the specified field length, you may decide how to deal with it by
selecting one of the options.
Options To Do…
Reject Simply reject the input data. (default)
Truncate Discard the part that exceeds the field length. The rest of data
is accepted.
Split to
Next Field
The whole data is accepted. The part that exceeds the field
length will be displayed in next field.
Screen Position
Lock Screen
The relationshi p between the mobile computer screen (small) and the host
screen (large) is based on the upper-left point of the screens. The
coordinates (0,0) on the mobile computer screen are related to (X,Y) on the
host screen. Thus, every screen received from the host will be first displayed
starting from (X,Y) regardless of the cursor. For example, when the cursor is
outside of the mobile computer screen, in order to locate the cursor or view
the hidden information, you need to adjust the mobile computer screen or
move the cursor manually.
By default, the upper-left point of the mobile computer screen is not locked
when the Cursor Tracking feature is enabled. That is, the mobile computer
screen will automatically adjust itself so that the cursor will always be visible
Page 49

41
Chapter 1 STREAM Wireless Studio - Designer
on the screen.
Select the check box if the Lock Screen feature i s desired. Then proceed to
specify the relative coordinates for the upper-left point of the mobile
computer screen when being mapped on the host screen.
Adjust Mobile computer Screen
To view the hidden information or locate the cursor, you need to adjust
the mobile computer screen manually. Press one set of the following keys
simultaneously to move one screenful at a time (depending on the setting
of Horizontal/Vertical Steps):
[FN] + [Left]
[FN] + [Right]
[FN] + [Up]
[FN] + [Down]
On the 8500 Series mobile computers, these function
keys are originally used to adjust LCD contrast ([FN] +
[Up]/[Down]) and backlight intensity ([FN] +
[Left]/[Right]). After logging on to a host, these keys
will be used to adjust the mobile computer screen
instead. That is, you cannot use them to adjust LCD
contrast and backlight intensity until you log out.
Move Cursor
To move the cursor to a desired input fiel d, press the function key that
is mapped to “Tab”.
To move the cursor to a desired input point, press the arrow keys
[Up], [Down], [Left], and [Right].
When the Cursor Tracking feature is enabl ed, there will be a warni ng beep t o
indicate that the mobile computer screen has reached the boundaries of the
host screen.
When the Lock Screen feature is enabled, there will be a warning beep to
indicate that for the first time the mobile computer screen has reached the
boundaries of the host screen. If you persist, the mobile computer screen
will be re-positioned to (X,Y).
Note: When the Lock Screen feature is enabled, the Cursor Tracking feature will be
disabled automatically; and vice versa.
TN5250 Message
Line Number On an IBM 5250 terminal, a message line is reserved to display messages from
the host. Now we provide a more flexible way to do this: take down the
message from the specified line and display it in a dialog box on your mobile
computer. Manipulating the dialog box by its display duration or recalling it by
pressing the associated function key, you will be able to follow the messages
more closely.
Specify which line on the host screen is the message line so that the mobile
computer can grab a message to a dialog box. The default is line 25.
Function Key This function key is used to recall the most recent dialog box after it has been
closed due to a specified time-out.
By default, the message key is disabled.
Select the message key (FN+0 ~ FN+9). The selected combination will
become unavailable on the Function Key Mapping list. For example, if you
select FN+7, you will find it mapped to “Message Key”.
Time Out Specify a period of time before the dialog box is closed, in units of second.
Page 50

42
STREAM Wireless Studio User Guide
Note that the message dialog box appears on the mobile computer
automatically whenever a message from the host is detected.
Exclude String To skip unnecessary messages, you may specify a text string so that any
message containing this string will be ignored. That is, no dialog box will appear
to display such message.
Function Key Mapping
By default,
FN+1 ~ FN+9
are mapped
to PF1~PF9.
The function keys are special keys on the mobile computer keypad that transmit
control codes. Control codes do not produce displayable characters but are codes
for functions. If these codes are received by the mobile computer, it will perform
the associated function as defined on the list.
Click an available function key. You may change its key combination or
re-define key code to meet a specific need.
PF1~PF9 – Program Function keys
Note: The fun ction key mapping list varies based on the availability of physical keys on
your mobile computer.
Page 51

43
Chapter 1 STREAM Wireless Studio - Designer
REFORMAT SCREEN
If you have edited screens and defined source fields, you will have to reformat the
screens to suit your needs here. For example, select “Input Field” for line 1 on the mobile
computer screen and map it to the source field 1 of the host screen you captured.
Note: Refer to 1.3.1 Host/Server Source for editing screens.
1
2
Page 52

44
STREAM Wireless Studio User Guide
1.4 USERS
Go to File Menu > New > Users and establish a relationship between a user and an
application template. You may easily switch the application template accessible to one
user, or have the same application template accessible to different users.
Users must identify themselves for the purposes of security, logging and resource
management. A user account allows one to authenticate to system database.
1.4.1 USER ID
A user ID is required for a legal user account. By default, a sequential number starting
from 100 is assigned automatically.
1) Click [Change ID] if you want to change the ID.
2) Enter a unique alphanumeric string, 1~30 characters long and case-sensitive.
3) Click [Change ID] again to apply the new user ID.
12 3
Page 53

45
Chapter 1 STREAM Wireless Studio - Designer
1.4.2 PASSWORD
No password is required by default. If you have security concerns, enter a unique
alphanumeric string, 1~30 characters long and case-sensitive.
1.4.3 TEMPLATE
A specific template is required for a valid user account. Select an application template
associated with this user account.
1.4.4 SIGN-ON TO HOST/TELNET SERVER
For Emulation Application, User Name and Password are required if “Auto Sign On” or
“Login Hot Key” is enabled.
Warning: You must at least have a valid user account for logging in!
Page 54

46
STREAM Wireless Studio User Guide
1.5 DEVICE SETTINGS
Go to File Menu > New > Terminal Setting and create a new configuration record for
a specific mobile computer.
After downloading the run-time program (.SHX) or client application (.EXE and .DL L) to
the mobile computer, you will need to configure and download the device settings for
starting a Telnet session.
8000/8300/8400/8500 Series
Go to Tools Menu > Download Terminal Setting to download the configuration
record to the mobile computer via Main Menu > 2. Utilities > 7. Download on the
mobile computer.
9400/9500 Series
Go to File Menu > Export 9 Series Terminal Setting As and export the
configuration record to a .W94 or .W95 file. Copy or move the file to the mobile
computer via ActiveSync.
Run the client application (WS9400_CE.exe or WS9500_CE.exe) and import the
configuration file via Options Menu > Utilities > Load Setting.
For 8000/8300/8400/8500 Series, if you have configured the TCP/IP settings correctly on
the Wireless LAN tab, you will be able to start a Telnet session successf ully on the mobile
computer via Main Menu > 1. Telnet.
Saving you from having to download the device settings to the mobile computer, you can
directly configure a number of settings on the mobile computer:
8000/8300/8400/8500 Series run-time - Main Menu > 2. Utilities
1. TCP/IP Settings
3. Backlight
5. Set Date & Time
6. Baud Rate
7. Download
9400/9500 Series client application - Options Menu > Configure > Server &
Screen tabs
Note: For temporary change on the reader settings, you can select [Enable run-time
barcode setting] in the application template settings.
Page 55

47
Chapter 1 STREAM Wireless Studio - Designer
1.5.1 SYSTEM
For system settings on 9400/9500 Series, refer to section 5.6 Operation on the Mobile
Computer demonstrating the client application (Options Menu > Configure > Server
& Screen tabs).
POWER ON (8000/8300/8400/8500)
Options Description
Resume Program Start from the last session of program before the mobile computer is turned
off.
Restart Program Fresh start from the first session of the program.
Auto Power Off The mobile computer will be turned off automatically when no operation is
taking place during a specified period of time.
Enter a value between 0 and 999.
To disable this function, enter 0.
BACKLIGHT (8000/8300/8400/8500)
Options Description
Turn Off By default, the backlight for the LCD and the keypad of the mobile computer is
turned off.
Turn On upon
power up
When the backlight is set to be turned on automatically, you may specify a
period of idle time so that it can be automatically turned off. Such time-out is
specified in the range of 1~9, in units of 10 seconds.
The default time-out is 20 seconds.
SECURITY (8000/8300/8400/8500)
For security concerns, you may specify a password and select the check box of one or
more tasks that need security checking.
By default, no password is required for configuring the device settings.
Page 56

48
STREAM Wireless Studio User Guide
A password can be up to 8 alphanumeric characters.
Note: The password is case-sensitive.
If a task is selected and provided with a password, you will not be allowed to enter a
submenu without the password.
TCP/IP Settings: Main Menu > 2. Utilities > 1. TCP/IP Settin gs
Set Date & Time: Main Menu > 2. Utilities > 5. Set Date & Time
MISCELLANEOUS (8000/8300/8400/8500)
Options Description
Download via
Cradle-IR
IrDA
RF
Baud Rate
115200 bps
57600 bps
38400 bps
9600 bps
Key Click By default, the key click is enabled.
Cancel the check box if a tone is not desired when you press a key on the mobile
computer.
Barcode Reader
1D CCD/Laser
1D (Extra) Long Range Laser
2D Reader
Set RFID Click the button to configure the RFID reader. Advanced settings are provided as
shown below.
Page 57

49
Chapter 1 STREAM Wireless Studio - Designer
Read UID: By default, the RFID reader is set to read UID (Unique
Identification) of the tag.
Read Data: Select the check box so tha t the data part of the RFID tag can be
read. If only partial data is required, specify the start position and maximum
length.
Use Delimiter: Select the check box and specify a delimiter to separate UID
from data.
Time Out: 1~255, i n units of second. The default time-out is three seconds.
Font Size
Small font (6 * 8)
Large font (8 * 16)
On the 8000/8300 Series mobile computers, the Main Menu and its submenu 2.
Utilities can be displayed in large font or small font.
Large font (8x16) must be applied for double-byte languages, such as Chinese,
Japanese, etc.
On the Form and Menu property pages, font size can be changed as well.
PROMPTS & MESSAGES
For non-English environment, all the screen prompts and messages on the mobile
computer can be re-defined in your local language. Change the prompts and messages
one by one here.
Instead of changing the prompts and messages one by one here, you can create a *.lng
file and store it in the Language folder (C:\CipherLab\Stream\Language\).
1) Go to File Menu > New > Terminal Setting and create a new configuration record
for a specific mobile computer.
2) Go to System Menu > Language and select your language. For example, select
Japanese.lng instead of the original English.lng.
3) Click [Reset to default Prompts & Messages] to update the prompts and messages in
the system database accordingly. Now the prompts and messages will be all Japanese,
depending on the contents of the Japanese.lng file.
Note: The default prompts and messages refer to those defined in the language file (.ln g)
currently in use when working on a configuration record.
Page 58

50
STREAM Wireless Studio User Guide
The maximum length of the prompts and messages depends on the font size and the size
of the mobile computer screen. If your prompt or message exceeds the limit, it will be
truncated automatically on the mobile computer.
8000/8300/8400/8500 Series
Mobile Computer Small (Font 6x8) Large (Font 8x16)
8000 Series 16 characters by 8 lines 12 characters by 4 lines
8300 Series 20 characters by 8 lines 15 characters by 4 lines
8400 Series 26 characters by 19 lines 20 characters by 9 lines
8500 Series 26 characters by 19 lines 20 characters by 9 lines
Font file: The appropriate font file has to be downloaded to the mobile computer so that it can
correctly display the system prompts and messages as well as Forms and Menus (user menus).
Font size: For double-byt e languages, such as Chinese and Japanese, large font (8x16) must
be applied in Forms and Menus of the application template.
9400/9500 Series
Screen scrolling is supported, allowing 50 characters by 80 lines.
1.5.2 BARCODE
The Barcode Reader Settings tab varies by the reader type you selected on the System
tab > Miscellaneous > Barcode Reader. Configure the associated reader settings and
symbologies. For details on each barcode reader, please refer to each appendix
separately.
Appendix I - Scan Engine Settings lists the symbologies and RFID tags supported.
Appendix II - CCD/Laser Scan Engine provides information on the reader set tings as
well as symbology settings for the CCD or Laser scan engine.
Appendix III - LR/ELR Laser Scan Engine provides information on the reader set tings
as well as symbology settings for the Long Range Laser or Extra Long Range Laser
scan engine.
Appendix IV - 2D Scan Engine provides information on the reader set tings as well as
symbology settings for the 2D scan engine.
1.5.3 WIRELESS LAN (8000/8300/8400/8500)
For IP and security settings on 9400/9500 Series, turn on the power to the 802.11b/g
module through the Wireless Power Manager, and then, go to Start > Settings >
(Control Panel) > Network and Dial-up Connections > WLAN1.
IP SETTINGS
Normally, DHCP is enabled and most of the settings can be obtained form the DHCP server.
Local Name: Enter a friendly name for identifying the mobile computer.
SSID: Enter the network name (Service Set ID). Usually, it is the SSID given to an access
point.
Page 59

51
Chapter 1 STREAM Wireless Studio - Designer
SECURITY
Usually, open system is selected for authentication.
Authentication: Share Key required implementing WEP key.
WEP (Wired Equivalent Privacy): Enter WEP Keys 1 ~ 4 using hexadecimal digits.
EAP (Extensible Authentication Protocol): Enter a user name and password (up to 32 characters)
for the mobile computer to logon to a wireless network via an access point.
STREAM SERVER
You may need to update the associ ated information about the STREAM Server. For 9400/9500
Series, refer to the System tab.
By default, the current IP of your computer will be displayed as Server IP. It will also be
displayed on the title bar of the STREAM Server. When it becomes out-of-date, you may modify
it here.
By default, the Telnet port is “6000” as specified in System Menu > Set STREAM Server. When it
becomes out-of-date, you may modify it here.
8000/8300/8400/8500
9400/9500
Page 60

Page 61

53
Double-click the shortcut on the desktop to launch the STREAM Server or run it directly
from inside the STREAM Designer. While running, it will listen to connection requests
from mobile computers and authenticate one to system database. It also allows for
managing connections and transaction.
Run the Simulator or a real mobile computer to connect to your computer through the
STREAM Server.
Simulator - Go to Tools Menu > Launch Simulator in the STREAM Designer. You
can use a corresponding simulator to verify whether a mobile computer will beh ave
correctly in most aspects.
8000/8300/8400/8500 Series - Make sure (1) the corresponding run-time program
(.SHX) has been downloaded to the mobile computer and (2) the TCP/IP settings are
configured correctly.
9400/9500 Series - Make sure (1) the corresponding client application package (.EXE
and .DLL) has been installed to the mobile computer and (2) the server IP/port
settings are configured correctly.
Warning: User accounts must be created for a user to log in and use an application
service. Otherwise, the connection attempt will fail.
IN THIS CHAPTER
2.1 User Interface........................................................... 53
2.2 Login/Logout............................................................. 60
2.3 Error M
essages.......................................................... 63
2.1 USER INTERFACE
2.1.1 MENU BAR
SERVER MENU
Chapter 2
STREAM WIRELESS STUDIO - SERVER
Page 62

54
STREAM Wireless Studio User Guide
Commands Description
Start Start the STREAM Server.
Restart Re-start the STREAM Server.
Stop Stop the STREAM Server.
Exit Exit the STREAM Server.
TERMINAL MENU
commands Description
System Information Get information about a specific mobile computer.
Disconnect Disconnect a specific mobile computer.
1) In the work area, click Active Objects > Terminal Connection on the left pane.
2) Select one entry from the Terminal Connection list on the right pane.
3) Go to Terminal Menu > System Information.
4) More information on your mobile computer will be displayed.
For 8000/8300/8400/8500, the information is the same as you obtained via the
following operation on your mobile computer – System Menu > 1. Information and
System Menu > 2. Settings > 7. Font.
1
2
3
Page 63

55
Chapter 2 STREAM Wireless Studio - Serve
r
TRANSACTION MENU
Commands Description
Remove Transaction Database Remove a specific transaction database.
Delete Transaction Delete a specific transaction record.
1) In the work area, click Active Objects > Transaction Database >
Source_SampleDB (Your Database Source) > (Active Table) on the left pane.
The active table name and transaction count is displayed on the right pane.
Note: A transaction database is maintained by the STREAM Server and allows for
accessing the back-end database. It lists the transaction record(s) received from a
connected mobile computer in a real-time way, and periodically gets updates from
the back-end database. There are times when a specific transaction database is
found no longer desired, such as when no mobile computers are connected to the
database, the list of transaction records is getting too long and needs to be
re-arranged, and so on.
2) To remove the temporary transaction database, go to Transaction Menu > Remove
Transaction Database.
To delete a transaction record, select one entry from the Active Table, and then, go to
Transaction Menu > Delete Transaction.
Warning: The transaction record will be removed from the temporary transaction
database as well as the back-end database.
SYSTEM MENU
1
2
Page 64

56
STREAM Wireless Studio User Guide
Commands Description
Launch STREAM Designer If you want to modify an application template in a real time way,
launch the STREAM Designer.
HELP MENU
Commands
Description
Event Manager Open the Event Manager, which lists the activities or events occurred
in the STREAM Designer or the STREAM Server.
Refer to section 4. Event Management for details.
About STREAM Server View information about the STREAM Server program.
Page 65

57
Chapter 2 STREAM Wireless Studio - Serve
r
2.1.2 TOOLBAR
Icons Description
To start the STREAM Server.
It does the same as menu command - Server > Start
To stop the STREAM Server.
It does the same as menu command - Server > Stop
To get information about a specific mobile computer.
It does the same as menu command - Terminal > System Information
To disconnect a specific mobile computer from the server.
It does the same as menu command - Terminal > Disconnect
To remove a specific transaction database.
It does the same as menu command - Transaction > Remove Transaction Database
To delete a specific transaction record.
It does the same as menu command – Transaction > Delete Transaction
To launch the STREAM Designer.
It does the same as menu command – System > Launch STREAM Designer
To open the Event Manager.
It does the same as menu command – Help > Event Manager
To view information about the STREAM Server.
It does the same as menu command – Help > About STREAM Server
To exit the STREAM Server.
It does the same as menu command – S erver > Exit
Page 66

58
STREAM Wireless Studio User Guide
2.1.3 MENU TREE
In the work area, a menu tree is displayed on the left pane for navigation.
Click "+" to expand the tree or "-" to collapse it.
Click an existing item from the tree list. Its contents will be displayed on the right
pane.
The STREAM Server allows you to monitor two things: Terminal Connection and
Transaction Database.
In the Active Objects list below, you can tell that
Current Connections: One mobile computer is connected to the server.
Active Databases: Two databases are ready. It implies that two mobile computers
were connected before, and now only one remains connected.
TERMINAL CONNECTION
It lists information of all mobile computer connections. Click one entry on the list , and go
to Terminal Menu > System Information for more information on your mobile
computer.
Information
Description
Serial Number A serial number assigned to the mobile computer for identification.
Same as the following operation on your mobile computer - System Menu
> 1. Information > S/N
If you are using the Simulator, it will be VTERM.
Terminal Type Hardware version for PCB.
Same as the following operation on your mobile computer - System Menu
> 1. Information > H/W
IP Address IP address of the mobile computer.
User Name User account used for login.
Current Service Application service applied through the template.
Database Application
Emulation Application
Application Template Application template in use.
Connect Time The time when the mobile computer is connected to the STREAM Server.
Elapse The elapsed time since the mobile computer has been connected to the
STREAM Server.
Status The status of current connection:
Active
Page 67

59
Chapter 2 STREAM Wireless Studio - Serve
r
Not active (=disconnected) -
If you have [Automatically disconnect after exceeding retrial times...]
enabled, the Terminal Connection list will leave out the disconnected
mobile computers.
If you have the option disabled, the list will keep the disconnected
mobile computers as "Not active".
Refer to section 2.2.1 Settings.
TRANSACTION DATABASE
It lists information of all transaction databases that have been accessed. If a listed
database is not desired any more, select it and go to Transaction Menu > Remove
Transaction Database to remove it from the list.
Information
Description
Database Name The name given to your database link.
Database Type The type of your database link -
ODBC
User-Defined D atabase
Data Source The database source specified.
If the database type is ODBC, the System DSN will be displayed.
If the database type is User-Defined Database, the file path to the
database will be displayed.
Maximum Session The maximum session number allowed accessing the database.
If the database type is ODBC, it will be "Unlimited" when you entered 0
for the number of connections allowed.
If the database type is User-D efined Database, it will be "Unlimited".
Current Session The current number of sessions that is accessing the database.
Current Terminal
Connection
The current number of mobile computers that are connected to the
STREAM Server. (Terminal Connection status is "Active").
Page 68

60
STREAM Wireless Studio User Guide
2.2 LOGIN/LOGOUT
2.2.1 SETTINGS
Go to System Menu > Set STREAM Server. The communication settings and login prompt can only
be changed in the STREAM Designer as shown below.
The default Telnet port is 6000. Make sure you use the same port number on the
mobile computer. Refer to section 1.5.3 Wireless LAN
.
The new settings will take effect after restarting the STREAM Server.
Warning: The server IP address and Telnet port number can be modified on the
mobile computer directly.
2.2.2 LOG IN
8000/8300/8400/8500 SERIES
1) When you turn on the mobile computer (or click the [Power] key on the Simulator),
the Main Menu will be displayed.
2) Select [1. Telnet] to start a telnet session. The login screen is displayed as shown
below.
Page 69

61
Chapter 2 STREAM Wireless Studio - Serve
r
The screen prompts are defined in the STREAM Designer as shown below. Go to System
Menu > Set STREAM Server.
3) Enter your user ID and password, which are defined in the user accounts in the
STREAM Designer.
4) After logging in, the screen you see depends on the application template applied.
9400/9500 SERIES
The 9400 Simulator is for 9400.
The 9500 Simulator is for 9500CE.
Toolbar
Option Menu Description
Options > Connect Connect to the STREAM Server.
Options > Disconnect Disconnect from the STREAM Server.
Options > Configure Configure server and screen settings.
Options > Utilities > Reader Test Perform reader test.
Options > Utilities > Load Setting Load device settings (.W94 or .W95)
Options > Exit Close the client application.
1) Tap from the toolbar to check whether the server IP and port settings are
configured correctly.
2) Tap
to establish a connection with the remote host.
2
3
4
3
4
1
2
1
Page 70

62
STREAM Wireless Studio User Guide
2.2.3 LOG OUT
8000/8300/8400/8500 SERIES
To log out or exit the Telnet session on the 8000/8300/8400/8500 Series mobile
computer, you must press the following key combination:
Mobile Computer
Key Combination to Log Out:
8000 Series Hold [FN] and then press [ESC].
8300 Series Hold [FN] and then press [ESC].
8400 Series Hold [FN] and then press [ESC].
8500 Series Hold [FN] and then press [ESC].
Note: If [ESC] is used to return to the Main Menu in the application template, it will
automatically exit the Telnet session after clicking [ESC] (= logging out).
9400/9500 SERIES
On the 9400/9500 Series mobile computer, tap from the toolbar to disconnect from
the remote host, and then tap
to exit the client application.
1 2
Page 71

63
Chapter 2 STREAM Wireless Studio - Serve
r
2.3 ERROR MESSAGES
2.3.1 CONNECTION ERROR
You can launch the Simulator to foresee a possible connection error and correct it.
However, a TCP/IP connection error can only be reflected when you use a real mobile
computer.
1) When you turn on the mobile computer (or click the [Power] key on the Simulator),
the main screen is displayed (left below).
2) Select [1. Telnet] to start a telnet session.
3) The mobile computer will initialize a TCP/ IP connection with the server.
4) When it succeeds, the mobile computer will proceed to connect to the STREAM
Server.
If it fails to establish a TCP/IP connection, the mobile computer will display an error
message.
Page 72

64
STREAM Wireless Studio User Guide
5) If the STREAM Server has not been launched, it will display an error message.
When it succeeds, the mobile computer will display th e login screen.
2.3.2 LOGIN ERROR
When the mobile computer has been connected to the STREAM Server successfully, the
login screen will be displayed.
Possible login errors are listed here for your reference.
If you enter an inva lid user ID or wrong password, the mobile computer will display
an error message - "Wrong UID/PWD!"
Even though you have entered the user ID and password correctly, you may still
encounter another problem - the mobile computer you use does not match the
terminal type specified in the corresponding application template.
Page 73

65
Chapter 2 STREAM Wireless Studio - Serve
r
For example, you are using one of the 8500 Series mobile computers to log in and
apply a template which is designed for the 8300 Series mobile computer. The mobile
computer will display an error message - "TM mismatch!" or "Terminal mismatch!"
2.3.3 TEMPLATE SETTING ERROR
Error Message Description
No key field!
You did not sel ect any key field(s). Refer to the Edit Table Schema
tab of your ODBC database or the Define Field tab of your own
database.
You did not associate one or more fi elds in the Form setting of your
application template to the key field(s) defined in your database.
Incomplete Setting!
Wrong Setting!
Setting Err!
You did not associate one form to a table of your database in the
Form setting of your application template.
You did not define field(s) in the Form setting of your application
template completely.
Page 74

66
STREAM Wireless Studio User Guide
Page 75

67
From the miniature mobile computer image on the computer, the Simulator can produce
instant feedback to the actions that have been taken with the application template. It
simulates the running sequences of the applications on a real mobile computer, even the
scanning job.
Warning: Database may be updated or changed during simulation.
IN THIS CHAPTER
3.1 Launch the Simulator ................................................. 67
3.2 Exit the Si
mulator...................................................... 73
3.1 LAUNCH THE SIMULATOR
After launching the STREAM Server, run the corresponding Simulator from inside the
STREAM Designer.
Chapter 3
PROGRAM SIMULATION
Page 76

68
STREAM Wireless Studio User Guide
3.1.1 8000/8300/8400/8500 SERIES
POWER ON
Click the [Power] key on the mobile computer image and it w ill start simulating program
sequences on a real mobile computer (left below).
Then, the Main Menu will be displayed on the screen (right below).
Page 77

69
Chapter 3 Program Simulation
START A TELNET SESSION
“1. Telnet” is highlighted on the Main Menu as shown below . To start a Telnet session,
simply click one of the [Enter] keys.
Page 78

70
STREAM Wireless Studio User Guide
LOG IN
The login screen is displayed as shown below. Enter your user ID and password, which
are defined in the user accounts in the STREAM Designer.
After logging in, the screen you see depends on the application template applied.
Page 79

71
Chapter 3 Program Simulation
LOG OUT
To log out or exit the Telnet session, you must press the [FN]+[ESC] key combination on
the 8000/8300/8400/8500 Series mobile computers. Refer to section 2.2.3 Log Out
.
However, it works a little differently in the Simulator.
1) In the Simulator, click the [FN] key first.
2) The screen will display an "F".
See the screenshot for the 8300 Series mobile computers (left below), and the one
for the 8500 Series mobile computers (right below).
In the Simulator for the 8000 Series mobile computers (8000RF), you need to click
the [FN/ALPHA] key three times (A->a->F):
3) Click the [ESC] key.
Note: If [ESC] is used to return to the Main Menu in the application template, it will
automatically exit the Telnet session after clicking [ESC] (= logging out).
Page 80

72
STREAM Wireless Studio User Guide
3.1.2 9400/9500 SERIES
The 9400 Simulator is for 9400 and the 9500 Simulator is for 9500CE.
The simulator works exactly the same as the real mobile computer. Refer to section 2.2
Login/Logout
for details.
1
2
3
Page 81

73
Chapter 3 Program Simulation
3.2 EXIT THE SIMULATOR
3.2.1 8000/8300/8400/8500 SERIES
1) To exit the Simulator, right-click anywhere on the mobile compu ter image.
2) The command menu will be displayed as shown below. Click [Exit].
Note: Please ignore "Setting" and "Dump files" in the command menu since they are for
debugging in Visual C++ environment.
Page 82

74
STREAM Wireless Studio User Guide
3.2.2 9400/9500 SERIES
9400 Simulator – Tap Options > Exit or tap from the toolbar.
9500 Simulator – Tap Options > Exit. (below)
Page 83

75
The Event Manager keeps a record of the activities or events occurred in the STREAM
Designer or the STREAM Server. The system log file is named WS_App.log and stored in
C:\CipherLab\Stream\ by default. It will be over-written every time you re-start the
STREAM Designer or the STREAM Server.
Menu Bar
Description
File > Save log as…
Save the log file to a different file path as a backup file.
By default, the log will always be saved to
WS_App.log in C:\CipherLab\Stream\
File > Save query result as…
Save the query result alone.
Chapter 4
EVENT MANAGEMENT
Page 84

76
STREAM Wireless Studio User Guide
File > Exit
Close the Event Manager.
Edit > Clear all events
Clear all the events in the query list manually.
Edit > Refresh
Re-arrange and update the query list by log time.
Help > About Event Manager
View information about the Event Manager.
4.1 OPEN
You can access the Event Manager from inside the STREAM Designer itself or the STREAM
Server.
4.2 QUERY
You can request for information based on a number of criteria that describe the event
conditions. Set your criteria and click the [Query] button.
Criteria
Description
Event Type Request based on event type:
All types (default)
General
Error
Event Date Request based on date, in the format of YYYY/MM/DD.
Event Time Request based on time, in the format of HH:MM:SS.
Terminal IP or Hostname Request bas ed on IP address or hostname of the mobile
computer.
4.3 EXIT
To close the Event Manager, simply go to File Menu > Exit or click the [Exit] button fro
the toolbar.
Page 85

77
IN THIS CHAPTER
5.1 System Management.................................................. 77
5.2 User Ac
count............................................................. 79
5.3 Device Setti
ngs ......................................................... 80
5.4 Database Application.................................................. 81
5.5 Emulation Application................................................. 84
5.6 Operation on the M
obile Computer ............................... 86
5.1 SYSTEM MANAGEMENT
5.1.1 CHANGE SYSTEM LANGUAGE
1) Locate the language file “English.lng” in C:\CipherLab\Stream\Language.
2) Open it in a text editor and edit it in your own language.
3) Save it to a new file and store the file in the same language folder.
4) In the STREAM Designer, go to System Menu > Language.
Multi-language options will be available now. Refer to section 5.3.2 Localization
.
5.1.2 CHANGE SYSTEM DATABASE
The default system database is WS_SysDB.mdb, which stores back-end resource
information, application templates, user accounts and device settings. All th e work you
do in the STREAM Designer can only be accessed and maintained when the same system
database is loaded.
1) In the STREAM Designer, go to System Menu > Set System Database.
2) Click
to create a new system database.
To apply a new database or change to an existing database, click
to
select it.
3) Close all the connections and exit the STREAM Server.
4) Click [OK] to confirm the change of system database and close the System Database
Setting dialog box.
5) Another dialog box will appear to remind you that it will re- start the STREAM Server.
Click [OK] to close the dialog box.
Chapter 5
USING STREAM WIRELESS STUDIO
Page 86

78
STREAM Wireless Studio User Guide
5.1.3 CONFIGURE THE STREAM SERVER
1) In the STREAM Designer, go to System Menu > Set STREAM Server.
2) Configure the login prompt and communication settings.
3) The new settings will take effect after restarting the STREA M Server.
Warning: The default Telnet port is 6000. Make sure you use the same port number
on your mobile computer.
5.1.4 ANALYZE ACTIVITIES
The Event Manager keeps a record of the activities or events occurred in the STREAM
Designer or the STREAM Server.
1) Open the Event Manager from inside the STREAM Designer or the STREAM Server.
2) Set your criteria and click the [Query] button.
3) Save the current log or query result to a new file.
Note: The system log file will be over-written every time you re-start the STREAM
Designer or the STREAM Server.
Page 87

79
Chapter 5 Using STREAM Wireless Studio
5.2 USER ACCOUNT
Create a user account for authentication.
1) In the STREAM Designer, go to File Menu > New > Users to create a user account.
Rename it if necessary.
2) Click the [Change ID] button if you want to change the default ID.
Enter a unique alphanumeric string, 1~30 characters long and case-sensitive.
Click the [Change ID] button again to apply the new user ID.
3) Use a password if you have security concerns.
Enter a unique alphanumeric string, 1~30 characters long and case-sensitive.
4) Associate a specific application template with the user account.
5.2.1 SIGN-ON TO HOST/TELNET SERVER
For Emulation Application, user name and password are required if “Auto Sign On” or
“Login Hot Key” is enabled.
5.2.2 EXAMPLE
The user ID and password input here is for A.J. to log in and use a specific template,
HostTemp0002.
Page 88

80
STREAM Wireless Studio User Guide
5.3 DEVICE SETTINGS
A number of important device settings must be configured, such as the barcode/RFID
settings, WLAN communications, etc. Create a configuration record to store your device
settings.
5.3.1 DOWNLOAD OR IMPORT CONFIGURATION
8000/8300/8400/8500 SERIES
1) In the STREAM Designer, go to File Menu > New > Terminal Setting to create a
configuration record for a specific mobile computer. Rename it if necessary.
2) On the System tab, configure important system settings on the mobile computer. For
example, you can change the screen prompts and messages to your own language.
3) On the barcode reader tab, configure barcode settings to meet your needs in
collecting data via the barcode reader - 1D CCD/Laser, 1D (Extra) Long Range Laser
or 2D reader.
You can configure the RFID reader settings on the System tab > Miscellaneous > Set
RFID.
4) On the Wireless LAN tab, configure WLAN settings for the mobile computer to connect
to your computer via a wireless network.
5) Go to Tools Menu > Download Terminal Setting to download the configuration
record to the mobile computer while selecting Main Menu > 2. Utilities > 7.
Download on the mobile computer.
Note: For temporary change on the reader settings, you can select [Enable run-time
barcode setting] in the application template settings.
9400/9500 SERIES
1) In the STREAM Designer, go to File Menu > New > Terminal Setting to create a
configuration record for a specific mobile computer. Rename it if necessary.
2) On the System tab, configure important system settings on the mobile computer.
For example, you can change the screen prompts and messages to your own
language.
3) On the barcode reader tab, configure barcode settings to meet your needs in
collecting data via the barcode reader - 1D CCD/Laser, 1D (Extra) Long Range Laser
or 2D reader.
You can configure the RFID reader settings on the System tab > Barcode Reader >
RFID and the [Set RFID] button.
4) For the mobile computer to connect to your computer via a wireless network, you
must turn on the power to the 802.11b/g module through the Wireless Power
Manager and configure the WLAN settings via Start > Settings > (Control Panel)
> Network and Dial-up Connections on the mobile computer.
Page 89

81
Chapter 5 Using STREAM Wireless Studio
5) In the STREAM Designer, go to File Menu > Export 9 Series Terminal Setting As
to export the configuration record to a .W94 or .W95 file.
6) Copy or move the configuration file to the mobile computer via ActiveSync.
7) Run the application program on the mobile computer. (Copy or move the client
application package WS9400_CE.exe or WS9500_CE.exe along with the DLL file to the
mobile computer via ActiveSync.)
8) Import the device settings via Options Menu > Utilities > Load Setting on the
mobile computer.
Note: For temporary change on the reader settings, you can select [Enable run-time
barcode setting] in the application template settings.
5.3.2 LOCALIZATION (8000/8300/8400/8500)
1) Create a *.lng file and store it in the Language folder
(C:\CipherLab\Stream\Language\).
2) Go to System Menu > Language and select your language.
3) In the device settings for a specific 8000/8300/8400/8500 Series mobile computer,
click [Reset to default Prompts & Messages] on the System tab to change the prompts
and messages accordingly.
4) In the associated application template, large font (8x16) must be applied in Forms
and Menus for double-byte languages.
5) Download the run-time program (.shx) and appropriate font file to the mobile
computer via System Menu > 6. Load Program by pressing the 7+9+Power keys.
6) Download the configuration record to the mobile computer via Main Menu > 2.
Utilities > 7. Download on the mobile computer.
Note: Localization is not applicable to the application programs for 9400/9500 Series
because Unicode is not supported.
5.4 DATABASE APPLICATION
You have to define and associate a template with your database source, either an ODBC
database or a local database created from scratch.
Page 90

82
STREAM Wireless Studio User Guide
5.4.1 CHOOSE DATABASE SOURCE
Choose your “Database Source” where data can be accessed and updated.
USE AN ODBC DATABASE
1) In the STREAM Designer, go to File Menu > New > Database Application > ODBC
Database to make use of an ODBC database. Rename it if necessary.
2) On the Database Link tab, describe how to connect to an existing database via ODBC.
Click [Test Connection] to verify whether the database is accessible.
3) On the Download Table Schema tab, you can connect to the database and download
the tables and fields you need.
4) On the Edit Table Schema tab, you can view and manage the table schema.
CREATE A USER DATABASE
1) In the STREAM Designer, go to File Menu > New > Database Application >
User-Defined Database to create a new database. Rename it if necessary.
2) Click [New] to create an empty table. Rename it if necessary.
Click [Copy Structure/Data from] to create a table based on the structure and data
imported from another database.
Page 91

83
Chapter 5 Using STREAM Wireless Studio
3) On the Define Field tab, create the fields one by one. Click to apply the settings
and save them to the table.
4) On the Manipulate Data tab, you can leave the table empty or click [Import Data] to
import data from an existing table.
During data collection, you can update an existing record. If the data collected has no
match in the table, it depends on the [Action when the input has no match] setting in
the form.
When the job is done, you can click [Export data] to save the data. If the data is not
desired any more, simply click [Delete all data] to clear the table.
Warning: At least one key field is required and must be referred in your form. It will
affect the settings of a database application template if you delete a
database, table or field that is referred to.
5.4.2 CREATE A TEMPLATE
1) In the STREAM Designer, go to File Menu > New > Database Application >
Database App Template to create a template for database application. Rename it if
necessary.
2) Configure the template to meet your needs. The work here is pretty much the same
as what you used to do with the Wireless Application Generator - the Form, Menu,
and Lookup tabs.
Page 92

84
STREAM Wireless Studio User Guide
Choose which mobile computer to use. For example, select 9500 for 9500CE.
Decide whether or not the barcode/RFID reader settings can be changed during
run-time.
Specify the program sequences on the wireless mobile computer after starting a
Telnet session and logging in successfully.
Create your menus and forms. Associate one form and its fields to one table and
its fields in your database.
Note: Select the check box of [Enable run-time barcode setting] so that you can change
the behavior of barcode/RFID reader and associated settings on the mobile
computer during run-time. When you log out, the reader settings will remain
unchanged.
5.5 EMULATION APPLICATION
You have to define and associate a template with a remote host or telnet server that runs
VT100/220 or 5250 terminal emulation.
Page 93

85
Chapter 5 Using STREAM Wireless Studio
5.5.1 CHOOSE HOST SOURCE
Choose your “Host Source” where data can be accessed and updated.
1) In the STREAM Designer, go to File Menu > New > Emulation Application >
Host/Server Source to give details of a host link. Rename it if necessary.
2) On the Capture Screen tab, capture host screens that need editing.
3) On the Edit Screen tab, define input fields for reformatting use.
5.5.2 CREATE A TEMPLATE
1) In the STREAM Designer, go to File Menu > New > Emulation Application >
Emulation App Template to create a template for emulation application. Rename it
if necessary.
2) Configure the template to meet your needs. The work here is pretty much the same
as what you used to do with the CipherNet programs.
Choose which mobile computer to use.
Decide whether or not the barcode/RFID reader settings can be changed during
run-time.
Map the physical keys to popular host keys.
Reformat the host screens if necessary.
Configure other terminal emulation settings.
Note: Select the check box of [Enable run-time barcode setting] so that you can change
the behavior of barcode/RFID reader and associated settings on the mobile
computer during run-time. When you log out, the reader settings will remain
unchanged.
Page 94

86
STREAM Wireless Studio User Guide
5.6 OPERATION ON THE MOBILE COMPUTER
When all is done with the STREAM Designer, launch the STREAM Server, and then, the
corresponding Simulator to debug program sequences step by step - powering ON,
starting a Telnet session, logging in, and running the program sequences designed in
your template.
If the simulation is found satisfactory, proceed to download the run-time program and
device settings to the mobile computer. Go on to start a Telnet session by logging in on
the real mobile computer.
Here we give a demonstration of the 9500CE mobile computer to show how it works.
5.6.1 LOAD PROGRAM & SETTINGS
Before we start with data collection application, you have created a database, an
application template, a user account for login, and configure necessary device settings in
the STREAM Designer.
1) First, make sure the client application has been installed to the mobile compu ter via
ActiveSync.
If so, double-tap the application program (.exe). Otherwise, go to Tools Menu >
Install STREAM CE Client to install it.
To restore the minimized window of the application, tap
on the taskbar (left
below). Select [STREAM 9500CE] from the pop-up menu.
To exit the application, tap Options > Exit or tap
from the toolbar (right below).
Page 95

87
Chapter 5 Using STREAM Wireless Studio
2) In the STREAM Designer, export the 9500 configuration file to a .W95 file, and copy it
to the mobile computer via ActiveSync. Load the new device settings via Options
Menu > Utilities > Load Setting.
3) If you need to modify the server IP and Telnet port number, tap Options Menu >
Configure > Load Setting.
Page 96

88
STREAM Wireless Studio User Guide
Warning: The server IP address and Telnet port number can be modified on the
mobile computer directly.
9400/9500 CLIENT – MENU BAR & TOOLBAR
You may tap to hide or show the Options Menu.
When the Options Menu is inaccessible from the menu bar, tap and hold anywhere
blank on the screen and the Options Menu will pop up as shown below.
Page 97

89
Chapter 5 Using STREAM Wireless Studio
Icons from left to right
Description
To hide or show the Options menu.
Tap and hold it so that you can horizontally drag the
toolbar to relocate it.
Options > Connect
To start a Telnet session.
Options > Disconnect
To end a Telnet session.
Options > Configure
To configure server and screen settings.
Options > Utilities > Reader
Test
To perform reader test.
Options > Utilities > Load
Setting
To load device settings.
Options > Function Bars To show or hide the function bars –
Menu Bar
Tool Bar
Status Bar
Options > About STREAM
Client
To view information about the STREAM Wireless Studio
client application.
Options > Exit
To exit the STREAM Wireless Studio client application.
TIPS FOR 8000/8300/8400/8500 SERIES
First, make sure the run-time program and associated device settings have been
downloaded to the specific mobile computer.
Operation on the mobile computer to download program - via System Menu > 6.
Load Program by pressing the 7+9+Power keys
Operation on the mobile computer to download settings - via Main Menu > 2.
Utilities > 7. Download.
If all is ready, launch the STREAM Server. Then, go back to the Main Menu > 1. Telnet
on the mobile computer and press [ENTER] to start a Telnet session by logging in.
Page 98

90
STREAM Wireless Studio User Guide
5.6.2 LOGIN TO USE AN TEMPLATE
1) Tap Options Menu > Connect to start a Telnet session.
In the login screen, input the user ID and password to log in and use the application
template "DBTemp0001".
2) Our application template has a user menu as shown below. It leads to two user forms:
1. Taking Order, 2. Serving.
Page 99

91
Chapter 5 Using STREAM Wireless Studio
Page 100

92
STREAM Wireless Studio User Guide
5.6.3 COLLECT DATA
1) Select "1. Taking Order" from the user menu and enter the user form "1. Taking
Order" as shown below. The contents on the mobile computer screen are decided by
the Form setting in the application template. See section 5.4.2 Create a Template
.
Input a number of records, and you will find the database is updated as well.
 Loading...