

CipherLab 8000, 8200, 8600, 8300, 8700 User Manual
...
FORGE Batch Application Generator
For 8 Series Mobile Computers:
8000 / 8200 / 8300 / 8400 / 8500 / 8600 / 8700
Version 4.03

Copyright © 2008~2014 CIPHERLAB CO., LTD.
All rights reserved
The software contains proprietary information of CIPHERLAB CO., LTD.; it is provided
under a license agreement containing restrictions on use and disclosure and is also
protected by copyright law. Reverse engineering of the software is prohibited.
Due to continued product development this information may change without notice. The
information and intellectual property cont ained herein is confident ial between CIPHER LAB
and the client and remains the exclusive property of CIPHERLAB CO., LTD. If you find
any problems in the documentation, please report them to us in writing. CIPHERLAB
does not warrant that this document is error-free.
No part of this publication may be reproduced, stored in a retrieval system, or
transmitted in any form or by any means, electronic, mechanical, photocopying,
recording or otherwise without the prior written permission of CIPHERLAB CO., LTD.
For product consultancy and technical support, please contact your local sales
representative. Also, you may visit our web site for more information.
The CipherLab logo is a registered trademark of CIPHERLAB CO., LTD.
Microsoft, Windows, and the Windows logo are registered trademarks of Microsoft
Corporation in the United States and/or other countries.
Bluetooth is a trademark of Bluetooth SIG, Inc., U.S.A.
Other product names mentioned in this manual may be trademarks or registered
trademarks of their respective companies and are hereby acknowledged.
The editorial use of these names is for identification as well as to the benefit of the
owners, with no intention of infringement.
CIPHERLAB CO., LTD.
Website:
http://www.cipherlab.com

RELEASE NOTES
Version Date Notes
4.03 Aug. 20, 2014
4.02 Jun. 25, 2014
4.01 Jun. 10, 2014
4.00 Jan. 15, 2014
Modified: AGX Template Conversion –
Modified: 5.1.4 – Mifare login key settings added
Modified: 5.1.5 – Upload method settings added with FastVPort
Modified: 5.1.6 – Download method settings added with FastVPort
Modified: 1.15.2 – Trim leading specified character function added
Modified: 6.2 –
Modified: 6.2 –
Modified: 1.13 – Max Length complying with Lookup when the form
Modified: 1.15.1 Field Data – further details for Comparison
Modified: 1.15.2 – ENTER option added for Auto ENTER
Modified: 3.3.1 – checkbox for updating lookup once added
Modified: 5.1.4 – RFID reader option (data in Hex / length i n bytes)
Modified: 6.2 – Turkish (Windows-1254) added
Modified: 7.2.1 Data_Read – notes for 8600 not supported
Modified: Appendix II – add ‘Code 39 Security Level’, ‘EAN8
Modified: Appendix III – add GS1 Formatting (Symbology Settings
Modified: Appendix IV – add ‘Read Redundancy’, ‘Mobile Display
Modified: Appendix IV –
New: 8600 support
Modified: FTP File Setting – refer to Appendix VI Creati ng a Script
New: 1.4 Color Properties (8600 only)
New: 2.4 Color Properties (8600 only)
Modified: 6. 2 Font Properties – table and pictures added
conversion between 8200
and 8600 added
for
8600 series
for 8600 series
LATIN (Multilingual Latin I), SLAVIC (Latin II),
POLISH (Central European, Latin II), Latin I (CP_1252) languages
added
Latin(Slovak) & Windows 1250 fonts are not
supported for 8600 series
refers to a lookup file
Operators
GTIN-13 format (5 zeros padded)’, GS1 Formatting in Symbology
Settings Table
Table (8300/8500) & (8700)); add ‘Code 39 Security Level’, ‘EAN8
GTIN-13 format (5 zeros padded)’ (Symbology Settings Table
(8700))
Mode’ in the Reader Settings Table
> TLC-39 default changed to ‘Disable’
> GS1 Formatting/Field Separator/Application ID mark added for
GS1 DataBar and Composite CC-A/B/C in the Symbology Settings
Table
File

New: 6.3 Color Properties (8600 only)
Modified: 7.3 MobileLink removed
Modified: Appendix I Scan Engine
updated
and RFID Tag Supported tables
Modified: Appendix V Command Line Syntax – AG_Load added
Modified: Appendix IV Creating a Script File added
3.23 Jun. 13, 2013
Modified: 3.3.1 – Description for “Show message when data is
matched” added
Modified: 7.3.7 – screenshot & related descriptions for “Add
Delimiter” and “Date Style” UI items updated
3.22 Mar. 13, 2013
3.21 Feb. 05, 2013
Modified: Appendix V Command Line Syntax – Data_Read
arguments appended
Modified: Chapter 1 - Form1 screenshot updated
Modified: 1.2.4 Enable MSQL - screenshots updated
Modified: 1.3 Font Size – Font Size table updated
Modified: 1.8 Data Type – screenshot updated
Modified: 1.8.6 Real – screenshot updated
Modified: Chapter 2 – Menu1 screenshot updated
Modified: Chapter 6 – screenshot updated
Modified: 6.2 Font Properties – descriptions revised
Modified: 7.2.1 Data_Read – screenshot updated
New: “Appendix III LR/ELR LASER SCAN ENGINE” – Symbology
Settings Table (8700) added
Modified: “Appendix IV 2D Scan Engine” – “Convert UPC-A to
EAN-13” included in “1D Symbologies Table”
3.20 Oct. 18, 2012
New: 1.8.20 Serial – “Data Type” added with “Serial” option
New: 1.14.1 Field Data – “Compare” checkbox added
New: 1.14 More – “Decimal symbol” pull -down menu added
New: 7.2.1 Data Read – pull-down menus for file selection added
Modified: 7.3 MobileLink –
service
launching MobileLink as a Windows
Modified: FTP File Settings – Lookup file settings
3.11 25
th
May 2012
New: Introduction | Using FTP Server to Transfer Files | WLAN
Security Settings – WPA/WPA2: If entered passphrase falls shorter
than 8 characters, a warning dialog pops up when OK button is hit to
submit changes.
New: 1.2.4. Enable MSQI – “TRACK”
by adjusting key field properties.
input screen can be removed
New: 7.3.7. Change Data File Settings – File-naming rule with
new “separator” feature and file extension customization
3.10 Apr. 24, 2012 MobileLink supports more communicative interfaces. Updates involved
are:
Modified: Introducti on | MobileLink Data Connection.
Modified: 7. 3. MobileLink.
3.01 Feb. 07, 2012
Modified: S ection 2.5: The option “Save the collected data for each
form to separate data files” renamed to “Separate Each Data File
and Edit Form Name” on Menu property page.

3.00 Dec. 16, 2011
2.28 Jul. 19, 2011
2.27 Jun. 03, 2011
2.26 May 17, 2011
2.25 Mar. 21, 2011
2.24 Jan. 04, 2011
Related update: Chapter 2 “Menu” property page screenshot
Modified: Section 5.2 “Function Key Setting”: Data collecti ng forms
aren’t supported by keypad shortcuts.
New: 8700 support
New: Introduction | Getti ng Started | Localizati on: Bundled font files
New: Introduction | “Title Bar”
New: “Data Type” supports date/tim e info. Updates involved are:
1.5 “Date & Time S tamp” updated
1.8.18 “Date ” newly inserted.
1.8.19 “Time” newly inserted.
Modified: 5. 1.5 “Upload Method”
8000, 8200, 8300 & 8400: The interface “Bluetooth SPP” is deleted
and replaced by “Bluetooth SPP_Master” and “Bluetooth SPP_Slave”.
Modified: 5. 1.6 “Download Method”
8000, 8200, 8300 & 8400: The interface “Bluetooth SPP” is deleted
and replaced by “Bluetooth SPP_Master” and “Bluetooth SPP_Slave”.
Modified: 7. 2.1 Data_Read.exe screenshot updated.
Modified: 7. 2.1 [Options] updated.
Modified: 7.2.1 [Auto upload and delete Data and Lookup files]
updated.
Modified: 7. 2.1 Data_Read — update screenshot and settings
Modified: add “Convert to 8200” feature for AG8300
Modified: 5. 1.5 Upload Method — add “USB VCOM_CDC” for AG8200
Modified: 5.1.6 Download Method — add “USB VCOM_CDC”
AG8200
for
Modified: Appendix IV — change Code 11 and MSI to “Disable” by
default
New: support 8200
Modified: Using FTP Server to Transfer Files — update screenshots
Modified: 7. 3.7 Change Data File Settings — add log file settings
Modified: 7.3.8 Manage Devices & 7.3.9 Manage Your Rules —
update screenshots
Modified: Appendix I~II — support UPC-E1 for CCD/Laser
Modified: Appendix I~II — support Coop 25 for CCD/Laser (8000/
8200/8300/8400)
Modified: Appendix II — add Aiming Duration (8000/8200/8300/
8400)
Modified: Appendix III — add Scan Mode options (8300 Only)
Time-out
and
Modified: A ppendix II~IV — change Time-out range to 0~255 sec.
Modified: Appendix III~IV — change Aiming Duration range to
1~255 sec.
Modified: Appendix IV — change Codabar, Code 93 and MSI
“Enable” by default
to
Modified: 1.8.16 Large Data — for collecting data via 2D scan engine
Modified: 1. 8.17 Read from 2D

2.23 Dec. 15, 2010
2.22 Nov. 01, 2010
Modified: 7. 1.3 ProgLoad — add support for command line
New: Appendix V Command Line Syntax (for utilities)
New: Introduction — add S y stem Requirements
Modified: Introduction —
Transfer Files over Network”
Getting Started, add “Using MobileLink to
Modified: 5. 3 Security Setting
New: 7.3.8 Manage Devices
New: 7.3.9 Manage Rules
Modified: Introducti on —
Transfer Files”
Modified: Introduction —
Settings”, “WLAN Communication Settings” and “FTP File Settings”
Getting Started, add “Using FTP Server to
Menu Bar, add “FTP Communication
Modified: 1. 8.15 Counter
2.21 Sep. 13, 2010
2.20 Apr. 02, 2010
2.19 Nov. 19, 2009
Modified: 7. 3 Mobile Link — update screenshots
Modified: 7. 3.3 View Link Status — 8000/8300 supports Auto Upload
Modified: 7. 3.7 Change Data File Settings — update Auto File Name
Modified: Appendix II —
default
Modified: Getting Started, Upload Data —
support of auto upload
change Negative Barcode to “Enable” by
describe icons indicating
Modified: 3. 2.4 DBF File Location (8400 Only)
Modified: 3.8 Action When the Format of Record Is Wrong
New: 7 Utilities
Modified: 7. 4 SD DBF Converter (8400 Only)
Modified: A ppendix I~IV — add more GS1 DataBar symbologies
Modified: Introduction —
Menu Tree
Getting Started, Menu Bar, Toolbar and
Modified: Installing FORGE Application Generator — DATA_READ
utility also synchronizes date/time on every host connection.
Modified: Get ting Started — (1) add U pload Appli cation Templ ate
Download Lookup Files (file path changed to “\AG\DBF” for lookup
files)
Modified: Menu Bar —
“\AG\DBF” for lookup files) (2) DATA_READ utility also synchronizes
date/time on every host connection.
(1) DBF Converter (file path changed to
(2)
Modified: 1. 14.1 Field Data — Decimal Places
Modified: 1. 2.4 Enable MSQI
Modified: 3.3.3 Trim Space When Lookup Data Can Be Uploaded
Modified: 5.1.6 Download Method —
“\AG\DBF” for lookup files)
AG8400 (file path changed to
Modified: 5.2 Functi on Key Setting — update screenshot, etc.
Modified: 5. 3.1 Upload .AGX — change 6-digit password to 5-digit
Modified: Appendix IV 2D Scan Engine — update
New: support 8400-2D
Modified: 5.1.5 Upload & Download Settings — Buzzer Volume
changed to LARGE_VOL
Modified: Appendix IV —
Chinese 25, Matrix 25, Picklist Mode, 1D

Inverse, 2D Inverse, UPU FICS Postal and USPS 4CB/One Code/
Intelligent Mail
2.18 June. 25, 2009
Modified: 3.2.4 “DBF File Location” and section 6.3.3 “DAT File
Location” features are added.
Modified: 5.1.5 — add DBF Converter, download and upload
information
2.17 May. 07, 2009
2.16 Jan. 19, 2009
2.15 Nov. 26, 2008
2.14 July 30, 2008
Modified: “Convert to 83 00” and other 8400 supported features are
added.
Modified: 8400 supported features are added.
Appli ed new GUI screen shots and modified the relative contents.
Modified: 6. 3 — add “Use Large Font for Data Browsing” for AG8000
and AG8300
Modified: Appendix II~III support replacement of EAN-128 field
separator for all scan engines
2.13 Jun. 26, 2008
Modified: 1.6 Record — add “remove from lookup” and “save &
remove” options
Modified: 3.11 Action When the Input Data Has No Match — add
“remove from lookup” and “save & remove” options
Modified: 4.1.2 RFID Reader — Automatically enabled after
initialization (checkbox removed from UI)
New: Long Range Laser option available for 8300
2.12 Nov. 06, 2007
2.11 Oct. 18, 2007
2.10 Sep. 19, 2007 New Word template applied
2.07 June 20, 2006
Modified: 4. 1.2 RFID Reader — RFID tags in proximity will be read
automatically by 8300/8500 when RFID reader is enabled
Modified: Features
Company name changed to CIPHERLAB CO., LTD. since April 2006
Modified: 5. 3 Barcode & Parameters
2.06 Apr. 14, 2006
Modified: 1. 2.2 — Font_12x12 not supported
Modified: 5. 1 & 5.2.6
Modified: 6. 2, 6.4 & 6.5
2.05 Apr. 10, 2006 AG for CPT-8500 is included


CONTENTS
RELEASE NOTES.............................................................................................................................. - 3 -
INTRODUCTION.................................................................................................................................... 1
System Requirements....................................................................................................................... 2
Intended Purpose.............................................................................................................................. 2
Features............................................................................................................................................. 2
Installing FORGE Batch AG ............................................................................................................... 3
Getting Started .................................................................................................................................. 4
Download AG Runtime................................................................................................................. 4
Download Application Templates................................................................................................ 5
Download Lookup Files................................................................................................................ 7
Collect & Edit Data ....................................................................................................................... 7
Upload Data.................................................................................................................................. 8
Upload Application Templates..................................................................................................... 8
Localization................................................................................................................................... 9
Using FTP Server to Transfer Files .................................................................................................11
FTP Communication Settings .................................................................................................... 11
FTP File Settings......................................................................................................................... 13
WLAN Communication Settings ................................................................................................15
WLAN Security Settings .............................................................................................................16
Remote Console Data Transfer ...................................................................................................... 18
Remote Console Settings ..........................................................................................................18
Title Bar............................................................................................................................................19
Software Version Info................................................................................................................. 19
Application Template’s Version Info .........................................................................................19
Menu Bar ......................................................................................................................................... 21
File Menu ......................................................................................................................................... 23
Preference .................................................................................................................................. 23
AGX Template Conversion .........................................................................................................24
Recent File List...........................................................................................................................28
Language ......................................................................................................................................... 28
Toolbar ............................................................................................................................................. 29
Tree Menu........................................................................................................................................ 29
FORM .................................................................................................................................................31
1.1 Select a Form............................................................................................................................ 33
1.2 Properties..................................................................................................................................33
1.2.1 Esc..................................................................................................................................... 33
1.2.2 Next................................................................................................................................... 33
1.2.3 Record............................................................................................................................... 34
1.2.4 Enable MSQI..................................................................................................................... 36
1.3 Font Properties .........................................................................................................................40
1.4 Color Properties (8600 only).................................................................................................... 40

FORGE Batch Application Generator User Guide
1.5 Lookup (File) .............................................................................................................................
41
1.6 Date & Time Stamp ..................................................................................................................42
1.7 Branch .......................................................................................................................................43
1.8 Reset Current Form .................................................................................................................. 43
1.9 Data Type .................................................................................................................................. 44
1.9.1 Nil ......................................................................................................................................45
1.9.2 Text.................................................................................................................................... 46
1.9.3 Integer............................................................................................................................... 46
1.9.4 Real ................................................................................................................................... 46
1.9.5 Letter................................................................................................................................. 48
1.9.6 Auto (+/-) ..........................................................................................................................48
1.9.7 Boolean............................................................................................................................. 49
1.9.8 Lookup .............................................................................................................................. 49
1.9.9 Fixed Data......................................................................................................................... 50
1.9.10 Prompt............................................................................................................................ 50
1.9.11 Counter........................................................................................................................... 50
1.9.12 Passdown ....................................................................................................................... 53
1.9.13 Extension........................................................................................................................ 53
1.9.14 Pause..............................................................................................................................54
1.9.15 Alphameric .....................................................................................................................54
1.9.16 Date ................................................................................................................................ 54
1.9.17 Time ................................................................................................................................54
1.9.18 Serial............................................................................................................................... 55
1.9.19 Large Data......................................................................................................................55
1.9.20 Read from 2D................................................................................................................. 56
1.9.21 GPS Latitude (8600 only).............................................................................................. 56
1.9.22 GPS Longitude (8600 only) ...........................................................................................56
1.10 Prompt ....................................................................................................................................56
1.11 Input Type ............................................................................................................................... 57
1.12 Minimum Length ....................................................................................................................57
1.13 Maximum Length....................................................................................................................57
1.13.1 Input via Barcode/RFID Reader....................................................................................58
1.13.2 Input via Keypad ............................................................................................................ 58
1.14 Variables/Field ....................................................................................................................... 59
1.14.1 Field ................................................................................................................................ 60
1.14.2 Variables......................................................................................................................... 61
1.15 More........................................................................................................................................ 62
1.15.1 Field Data ....................................................................................................................... 63
1.15.2 Barcode Input.................................................................................................................65
MENU ................................................................................................................................................. 67
2.1 Select a Menu........................................................................................................................... 68
2.2 Properties..................................................................................................................................68
2.2.1 Menu Caption ...................................................................................................................68
2.2.2 ESC....................................................................................................................................68
2.3 Font Properties .........................................................................................................................68
2.4 Color Properties (8600 only).................................................................................................... 69
2.5 Data ...........................................................................................................................................69
2.5.1 Save Caption ....................................................................................................................69

FORGE Batch Application Generator User Guide
2.5.2 Save Selected Item ..........................................................................................................
69
2.5.3 Pass Down ........................................................................................................................69
2.6 Separate Each Data File and Edit Form Name....................................................................... 69
2.7 Item Name ................................................................................................................................70
2.8 Next ...........................................................................................................................................70
2.9 Reset Current Menu ................................................................................................................. 70
LOOKUP..............................................................................................................................................71
3.1 Select a Lookup File ................................................................................................................. 73
3.2 Field Property............................................................................................................................ 73
3.2.1 Number of Fields..............................................................................................................73
3.2.2 Fixed Length ..................................................................................................................... 73
3.2.3 Delimiter ...........................................................................................................................73
3.2.4 DBF File Location (8200/8400/8600/8700 Only)....................................................... 74
3.3 Lookup Data.............................................................................................................................. 76
3.3.1 Only Read Data Once....................................................................................................... 76
3.3.2 Lookup Data Can Be Uploaded ....................................................................................... 76
3.3.3 Trim Space When Lookup Data Can Be Uploaded......................................................... 76
3.4 Action When the Input Data Has No Match ............................................................................ 77
3.4.1 Continue ...........................................................................................................................77
3.4.2 Show Warning Message ..................................................................................................77
3.4.3 Insert to Lookup File ........................................................................................................77
3.4.4 Show Warning Message & Insert .................................................................................... 78
3.4.5 Clear the Screen............................................................................................................... 78
3.4.6 Show Warning & Clear Screen ........................................................................................78
3.5 Offset......................................................................................................................................... 79
3.6 Length .......................................................................................................................................79
3.7 Key Field.................................................................................................................................... 79
3.8 Action When Record Format Is Wrong.....................................................................................80
3.8.1 Stop the Download Process ............................................................................................80
3.8.2 Truncate / Reformat the Record..................................................................................... 81
3.8.3 Skip the Record................................................................................................................ 82
3.9 Reset Current Lookup File .......................................................................................................82
SYMBOLOGY ...................................................................................................................................... 83
4.1 Reader Settings ........................................................................................................................ 84
4.1.1 Code ID .............................................................................................................................84
4.1.2 Reset................................................................................................................................. 84
4.2 Barcode & Parameters.............................................................................................................84
SETTINGS........................................................................................................................................... 85
5.1 Initial Settings ...........................................................................................................................86
5.1.1 Data Manipulation ...........................................................................................................86
5.1.2 Keypad & LCD ..................................................................................................................87
5.1.3 Notification .......................................................................................................................87
5.1.4 Reader Option ..................................................................................................................88
5.1.5 Upload Method................................................................................................................. 89
5.1.6 Download Method............................................................................................................ 92
5.1.7 Baud Rate & Modem Speed............................................................................................94

FORGE Batch Application Generator User Guide
5.1.8 Reset Settings ..................................................................................................................
94
5.2 Function Key Setting ................................................................................................................95
5.3 Security Setting......................................................................................................................... 96
5.3.1 Security Checking............................................................................................................. 96
5.3.2 Upload .AGX ......................................................................................................................98
STARTUP ............................................................................................................................................ 99
6.1 Application Start From............................................................................................................100
6.2 Font Properties .......................................................................................................................101
6.3 Color Properties (8600 only)..................................................................................................102
6.4 Data Field Properties..............................................................................................................103
6.4.1 Number of Delimiter ......................................................................................................103
6.4.2 Browse data font size ....................................................................................................103
6.4.3 DAT File Location............................................................................................................103
6.5 Redefine Prompts & Messages .............................................................................................103
6.6 Import Prompts & Messages .................................................................................................103
6.7 Reset Prompts & Messages to Default .................................................................................103
UTILITIES..........................................................................................................................................105
7.1 Download Utilities...................................................................................................................106
7.1.1 AG Load...........................................................................................................................106
7.1.2 DLookup..........................................................................................................................109
7.1.3 ProgLoad.........................................................................................................................112
7.2 Upload Utilities........................................................................................................................114
7.2.1 Data_Read......................................................................................................................114
7.2.2 AGX_Read .......................................................................................................................118
7.3 SD DBF Converter (8200/8400/8600/8700 Only) ............................................................120
7.4 Program Simulation................................................................................................................122
SCAN ENGINE SETTINGS.................................................................................................................125
Symbologies Supported ................................................................................................................126
RFID Tags Supported ....................................................................................................................128
CCD/LASER SCAN ENGINE..............................................................................................................131
Reader Settings Table...................................................................................................................131
Symbology Settings Table.............................................................................................................133
LR/ELR LASER SCAN ENGINE .........................................................................................................139
Reader Settings Table...................................................................................................................139
Symbology Settings Table (8300/8500) .....................................................................................140
Symbology Settings Table (8700) ................................................................................................144
2D SCAN ENGINE.............................................................................................................................149
Reader Settings Table...................................................................................................................149
Symbology Settings Table.............................................................................................................151
1D Symbologies .......................................................................................................................151
2D Symbologies .......................................................................................................................157

FORGE Batch Application Generator User Guide
COMMAND LINE SYNTAX.................................................................................................................
161
Download Utilities..........................................................................................................................162
DLookup....................................................................................................................................162
ProgLoad...................................................................................................................................163
AG_Load....................................................................................................................................164
Upload Utilities ..............................................................................................................................166
Data_Read................................................................................................................................166
CREATING A SCRIPT FILE.................................................................................................................171
Remote File Information ..........................................................................................................174
Local File Information ..............................................................................................................174
Version Control.........................................................................................................................175
Mandatory Flag.........................................................................................................................175
Update Script File.....................................................................................................................176
Update User Program...............................................................................................................177
Switch to a Different Server ....................................................................................................177
Wildcards for Remote File Name ............................................................................................178


INTRODUCTION
Easy-to-use and quick-to-apply, FORGE Batch Application Generator designed for
CipherLab 8-Series Mobile Computers (8000/8200/8300/8400/8500/8600/8700) enables
users to develop the custom templates that work with the AG runtime preloaded on the
mobile computers. Users are in the position to define their own application templates on
any desktop computer without writing any program code.
FORGE Batch Application Generator develops the templates for various application s such
as the following:
Receiving in Retail
Price Check
Product labeling & Tracking
Shelf Product Replenishment
Mobile Poin t of Sale (POS)
Mobile Inventory Management
Order Picking & Staging
Work-In-Process Tracking
Material Flow Control
Transportation & Distribution
Warehousing
Asset Management
FORGE Batch Application Generator simulates the program’s running sequences on the
actual mobile computer and allows you to design a new application template on your
personal computer in minutes. Offload the application template you have designed and
your lookup file(s) to the mobile computer so the data collection can commence
immediately.
This manual provides users with a comprehensive guide to FORGE Batch AG for 8-Series
Mobile Computers by relating the approaches while interspersing the examples for
various applications. We recommend that you read the document thoroughly before use
and keep it at hand for quick reference.
Thank you for choosing CipherLab products!
1

FORGE Batch Application Generator User Guide
SYSTEM REQUIREMENTS
To run the program, one of the Windows operating systems is required:
Windows 2000
Windows XP
Windows Vista
Windows 7
INTENDED PURPOSE
Data collection mainly consists of three elements: input (scanning or key-in), data
processing, and output (or updating database). FORGE Batch Application Generator for
8000/8200/8300/8400/8500/8600/8700 Series Mobile Computers is specifically designed
to deal with the sequences of data processing inside the mobile computers.
The Batch AG program and runtime package can be working with a wireless mobile
computer even if you don’t want to use its wireless connectivity. In particular, when you
use a Bluetooth mobile computer, say 8062 or 8330, you will be able to use Bluetooth
SPP for download and upload by selecting “RS-232/IrDA/USB VCOM”.
FEATURES
Definition of program flow
Editing of screens and data
Managing barcode reader and RFID reader
Font size options and program localization
Simple program simulation for debugging
Password-protected user settings to prevent unauthorized user intervention
Hot key selection for tasks or user settings’ menus
Definition of sy st em initial settings for a quick start
Easy cloning by downloading the template file
Integrated interface for downloading lookup files and uploading data
FTP client configuration for wireless mobile computers, as well as for 8200/8400 used
with Ethernet Cradle
2
Introduction
INSTALLING FORGE BATCH AG
Install FORGE Batch AG for 8000/8200/8300/8400/8500/8600/8700 Series Mobile
Computers from the Product CD. The Batch AG will be installed to the prompted
“C:\CipherLab\Forge\Batch\” directory if you don’t change the path to somewhere else.
Shortcuts to the AG program is created and placed in Start | All Programs |
CipherLab | Forge | Batch | Application Generator.
Shortcuts to the Remote Console utility is created and placed in Start | All
Programs | CipherLab | Forge | Batch | Remote Console. Refer to the Remote
Console user guide.
Shortcuts to the utilities are created and placed in Start | All Programs |
CipherLab | Forge | Batch | Utilities. Refer to
Utilities.
Shortcut Name of Utility
Remote Console RemoteConsole.exe To receive data from the mobile computer
AG_Load AG_Load.exe To download the current application
AGX_Read AGX_Read.exe To upload the current application template
Data_Read Data_Read.exe To receive data via Data_Read utility. It
DLookup DLookup.exe To download associated lookup file(s) to
Prog_Load ProgLoad.exe To download the AG runtime or font file
Simulator Simulator.exe To launch the simulator.
DBF_Converter DBF_Converter.exe To convert text file into DBF file.
Program Name Usage
via Remote Console utility.
template to the mobile computer.
from the mobile computer.
also synchronizes date/time on every host
connection.
the mobile computer
(.SHX) to the mobile computer.
3
FORGE Batch Application Generator User Guide
u
Toolba
GETTING STARTED
The 8 series mobile computer have to be preloaded with files as follows to commence
data collection:
an AG runtime (U8*.SHX)
an application template (*.AGX)
some other files such as lookup files
The 8 Series Batch Application Generator enables the data exchange between a mobile
computer and a host computer such as your PC. The aforesaid files the mobile computer
required are deliverable through such Batch AG. Please follow the inst ructions below to
proceed.
1) Run the 8 Series Batch AG program on your PC.
The work area appears as the picture shown below:
Menu Bar
r
Tree Men
DOWNLOAD AG RUNTIME
2) On the mobile computer, press [7] + [9] + [Power] simultaneously to enter System
Menu. Select Load Program and then select the transmission interface to receive
the AG runtime program from your computer.
3) On your PC, click Transfer | Send Program on the Batch AG menu bar to bring up
the [Program download] dialog box. Configure the communication settings that are
consistent with the settings on the mobile computer. Select the AG run time program
(U8*.SHX) corresponding to the specific model to send.
4
Introduction
Note: If you have installed the Batch AG to the default directory prompted by the
installation wizard, the AG runtime programs for 8 series models can be accessed
in the “C:\CipherLab\Forge\Batch\8 Series\RunTime\” directory. If not, browse to
where you have installed the Batch AG.
4) Click the OK button and then your PC starts sending the selected U8*.SHX file.
Note: To send a font file to the mobile computer, see
Localization.
DOWNLOAD APPLICATION TEMPLATES
After the downloaded runtime (U8*.SHX) is set up in the mobile computer, a user’s
application template (*.AGX) is further needed to enable the mobile computer to collec t
data. Such template carrying application menus and data collecting forms makes it
possible for users to collect data and edit/manage data.
In order to have an “application template” for the mobile computer, you need to
customize/design one by the Batch AG on your PC.
DESIGN APPLICATION TEMPLATES
5) From the menu bar of the Batch AG, click File | New or File | Open to open a new
or an existing application template. An application template is composed of six groups
of properties.
6) In the left pane of the Batch AG, click on the plus sign of the “Application
Template” to see the drop-downs. From the drop-downs, click
your customization of a new or a lately edited application template.
Warning: The reader type information is essential for sending the t emplate file to t he
mobile computer. Select Settings -> Initial -> Reader Option, and then click the
Reader Type drop-down menu to specify the barcode reader type that is consistent with
the reader actually integrated with the mobile computer; otherwise you will be alerted
with the "wrong reader type" message.
to start
5

FORGE Batch Application Generator User Guide
Property Groups Descriptions
Startup Configures the program sequences and customizes the user
interface that are to be presented on the mobile computer.
Settings Configures system settings so that they work when the mobile
computer is initializing.
Symbology Configures reader settings, symbologies and barcode parameters.
Menu Customizes the hierarchical menus to be accessed under the main
menu of the user’s application, e.g. 1. Collect Data | Menu 1 |
(Menu 2) | Form 1.
Lookup Configures the data structures for the lookup files to be referred to
by user’s applications. Up to 3 lookup files are supported.
Form A data collecting form covers multiple input fields that accept the
data input by the user. It may be arranged following up a menu. For
example: 1. Collect Data | (Menu 1) | Form 1.
7) When completing template customization, click File | Save or File | Save As to save
the currently edited template to an .AGX file. You may run program simulation by
selecting Tools | Simulator from the menu bar to verify if the program sequences
meet your requirements. Refer to
7.4 Program Simulation.
PROCEED TO DOWNLOAD
With the application template file created, follow steps below to send it to the mobile
computer:
8) Establish a proper connection between the mobile computer and the host computer
such as your PC.
9) Power on the mobile computer to have the AG runtime main menu show up.
10) On the mobile computer, select the appropriate download interface by 3. Utilities | 1.
Program Settings | 2. Download Program Interface. Press the Enter key to
confirm.
11) Go back to the previous menu, and then select 3. Utilities | 6. Load Application.
The mobile computer will enter connecting mode.
12) On your PC, run Batch AG. Select Transfer | Send Application from the menu bar.
A [Download AG] dialogue box displays. Configure the transmission interface that is
consistent with the download interface set on the mobile computer. Click the OK
button and then the Batch AG will proceed to send the t emplate file (*.AGX) to the
mobile computer.
13) When the mobile computer finishes the download, the main menu of the new user
application will display on the screen of the mobile comput er.
6

Introduction
Note: (1) As the template file includes the settings of the mobile computer’s
upload/download interface, those on the mobile computer w ill be overwritten after
the template file is sent to the mobile computer.
(2) SD Card option is provided from which the 8200/8400/8600/8700 mobile
computers can download template files (.AGX). The default import directory
automatically created on SD card is “\AG\IMPORT”.
(3) When your Batch AG is a version of 1.00.0005 or later, you are able to retrieve
the template file from the mobile computer. Refer to
5.3.2 Upload .AGX.
and
Upload Application Template
DOWNLOAD LOOKUP FILES
If you have assigned a lookup file to which the applicatio n template will refer, the mobile
computer needs to have that lookup file (Refer to
Lookup). Follow steps below for the mobile computer to download lookup files f rom your
PC:
14) On the mobile computer, select 3. Utilities | 8. Load Lookup File. The mobile
computer enters download lookup mode.
1.5 Lookup (File) and Chapter 3.
Note: If an application template doesn’t refer to any lookup file, the command 8. Load
Lookup File is absent from the 3. Utilities submenu.
15) Run Batch AG on your PC, click Transfer | Send Lookup (or run the “DLookup.exe”
utility). You can send up to three lookup files t o the mobile computer.
16) Upon the completion of dow nload, the main menu displays.
Note: (1) Users need to resend their lookup files every time they renew the application
templates even if the lookup files are the same.
(2) Lookup files can be stored on the SD Card of 8200/8400/8600/8700 mobile
computers. The default directory is “\AG\DBF”, which is automatically created on
the SD card. Refer to
7.3 SD DBF Converter (8200/8400/8600/8700 Only).
(3) Use the DBF Converter tool to convert lookup files to DBF format (.DB0) before
sending them to the mobile computer. Run DBF converter by selecting Tools |
DBF Converter from the menu bar of the Batch AG. In the DBF converter tool
window, you can select to copy the converted lookup files either to the SRAM of
the mobile computer or the directory “\AG\DBF” on the SD card inserted in the
mobile computer.
COLLECT & EDIT DATA
17) To collect data with the mobile computer, select 1. Collect Data from user’s
application main menu on the mobile computer.
18) To edit the collected data, select the follow ing submenus from user’s application main
menu on the mobile computer –
3. Utilities | 2. Browse Data
3. Utilities | 3. Delete Data (Refer to
5.1.1 Data Manipulation.)
7

FORGE Batch Application Generator User Guide
UPLOAD DATA
To upload the data collected by the mobile computer to your PC:
19) On the mobile computer, select 2. Upload Data. The following options will be
presented when lookup files are used.
Data file(s)
Lookup file(s), if any in use
All (one by one)
All (append), that is, all-in-one
20) On your PC, from the menu bar of the Batch AG, select Transfer | Direct-Link Data
Transfer or Transfer | Remote Console Data Transfer.
7.2.1 Data_Read for Direct-Link Data Transfer.
See
Refer to the Remote Console user guide for Remote Console Data Transfer.
Note: (1) Batch AG supports automatically uploading data to a host computer when the
upload interface is properly configured. Once the mobile computer is seated in the
cradle or connected via the RS-232 or USB Virtual COM cable, a running dot or a
hourglass icon displays on the upper-right corner of the screen indicating the
mobile computer is ready for auto upload. Refer to
(2) SD Card option is provided for 8200/8400/8600/8700 to store DAT files and
DBF files in the SD card. The files will be saved to the default directory
“\AG\EXPORT” on the SD card that is created automatically.
7.2.1 Data_Read.
UPLOAD APPLICATION TEMPLATES
To output the mobile computer’s application template to a host computer such as your
PC:
1) Establish a connection between your mobile computer and your PC.
2) For the transmission interface, make consistent settings on both your PC and the
mobile computer. On the mobile computer, go by 3. Utilities | 1. Program Settings
| 1. Upload Interface to configure the interface.
3) On your PC, run Batch AG. Select Transfer | Receive Application from the menu
bar. The [AGX_Read] dialog box displays. Make related settings in this dialog box and
fetch the application template from the mobile computer.
Note: In the [AGX_Read] dialogue box, type in the password that is previously set up
when the template file is created by Batch AG (version 1.00.0005 or later) on a
host computer. Refer to
4) Once the OK button is clicked, your PC will start t o receive the template file (*.AGX)
from the mobile computer.
5) If your Batch AG is a version of 1.00.0005 or later, you are able to retrieve the
template file from the mobile computer. Refer to
5.3.2 Upload .AGX
5.3.2 Upload .AGX.
8

Introduction
LOCALIZATION
If you feel the need to localize the entire application of the mobile computer, you must: 1)
translate the text on the UI of Batch AG, 2) translate the menu prompts/messages of the
application template, 3) Send a font file (*.SHX) to the mobile computer.
1) to localize the user’s interface of the Batch AG
1. Go to the directory where the Batch AG is installed on your PC. Find the language
folder.
2. If you haven’t selected an alternative directory when installing the Batch AG, the
language folder can be found inside C:\CipherLab\Forge\Batch\8 Series.
3. In [Language] folder, save the origin al language file (. lng) as a new file. Open the
newly saved language file with a text editor, and translate the text (the text of
Batch AG’s user interface) from English into another language.
4. Run Batch AG on your PC. From the menu bar of the Batch AG, select Language
to drop down the commands that present the available languages. You will see t he
newly saved language included in the submenu.
5. Select the new language. The user’s interface of the Batch AG shifts to the new
language.
2) to re-define/translate the menu (prompts and messages) of the template file
1. The template can only be re-defined / translated in the Bath AG.
2. Run the Batch AG on your PC. In the left pane, unfold [Application Template]. Find
Startup property page among the drop-downs.
3. On Startup property page, re-define or translate the menu prompts/messages of
the template file.
4. Send the re-defined / translated template file (*.AGX) to the mobile computer.
See Download Application Templates > Proceed to Download to send the template
file to your mobile computer.
5. Restart the mobile computer to apply the new application template.
Note: For 8000/8300, to apply double-byte characters such as Japanese, Chinese, etc.,
the menu prompts/messages of template file need to be re-defined / translated in
the Form and Menu property pages by Batch AG, so that characters can display
properly on the screen of the mobile computers. And note, for an input field, the
elements other than menu prompts and messages can only display in
alphanumeric characters.
3) Send a font file (*.SHX) to the mobile computer.
A set of font files are bundled with the Batch AG to support a few languages on 8000,
8200, 8300, 8400, 8500, 8600 and 8700 models. If you haven’t selected an
alternative directory when installing the Batch AG, these font files are accessible in
the “C:\CipherLab\Forge\Batch\8 Series\Font Files” directory.
To send a copy of the desired font file to the mobile computer:
9

FORGE Batch Application Generator User Guide
1. On the mobile computer, press [7], [9] and [Power] simultaneously to boot the
mobile computer into System Menu. Select 6. Load Program. And select a
download interface.
2. Run Batch AG on your PC. From the menu bar, select Transfer | Send Program
to send a desired font file (.SHX) to the mobile computer.
Note: Be sure to make consistent settings for the transmission interface on both your PC
and the mobile computer.
10
Introduction
USING FTP SERVER TO TRANSFER FILES
Creating template files by the Batch AG version 1.00.0008 or newer, a remote FTP server
is readily available to which the mobile computer is al lowed to log in and transfer files
whether wirelessly through Wi-Fi or wired by Ethernet Cradle.
FTP stands for File Transfer Protocol and is built on a client-server architecture. The
mobile computer accesses an FTP server to carry out the following:
Update the script file
Upload or download lookup files ( featuring version control)
Upload data files
Note: If you don’t make FTP communicat ion settings in t he template file, you can still do
it later on the mobile computer’s user application main menu. Select 3. Utilities | 1.
Program Settings | 10. FTP Settings.
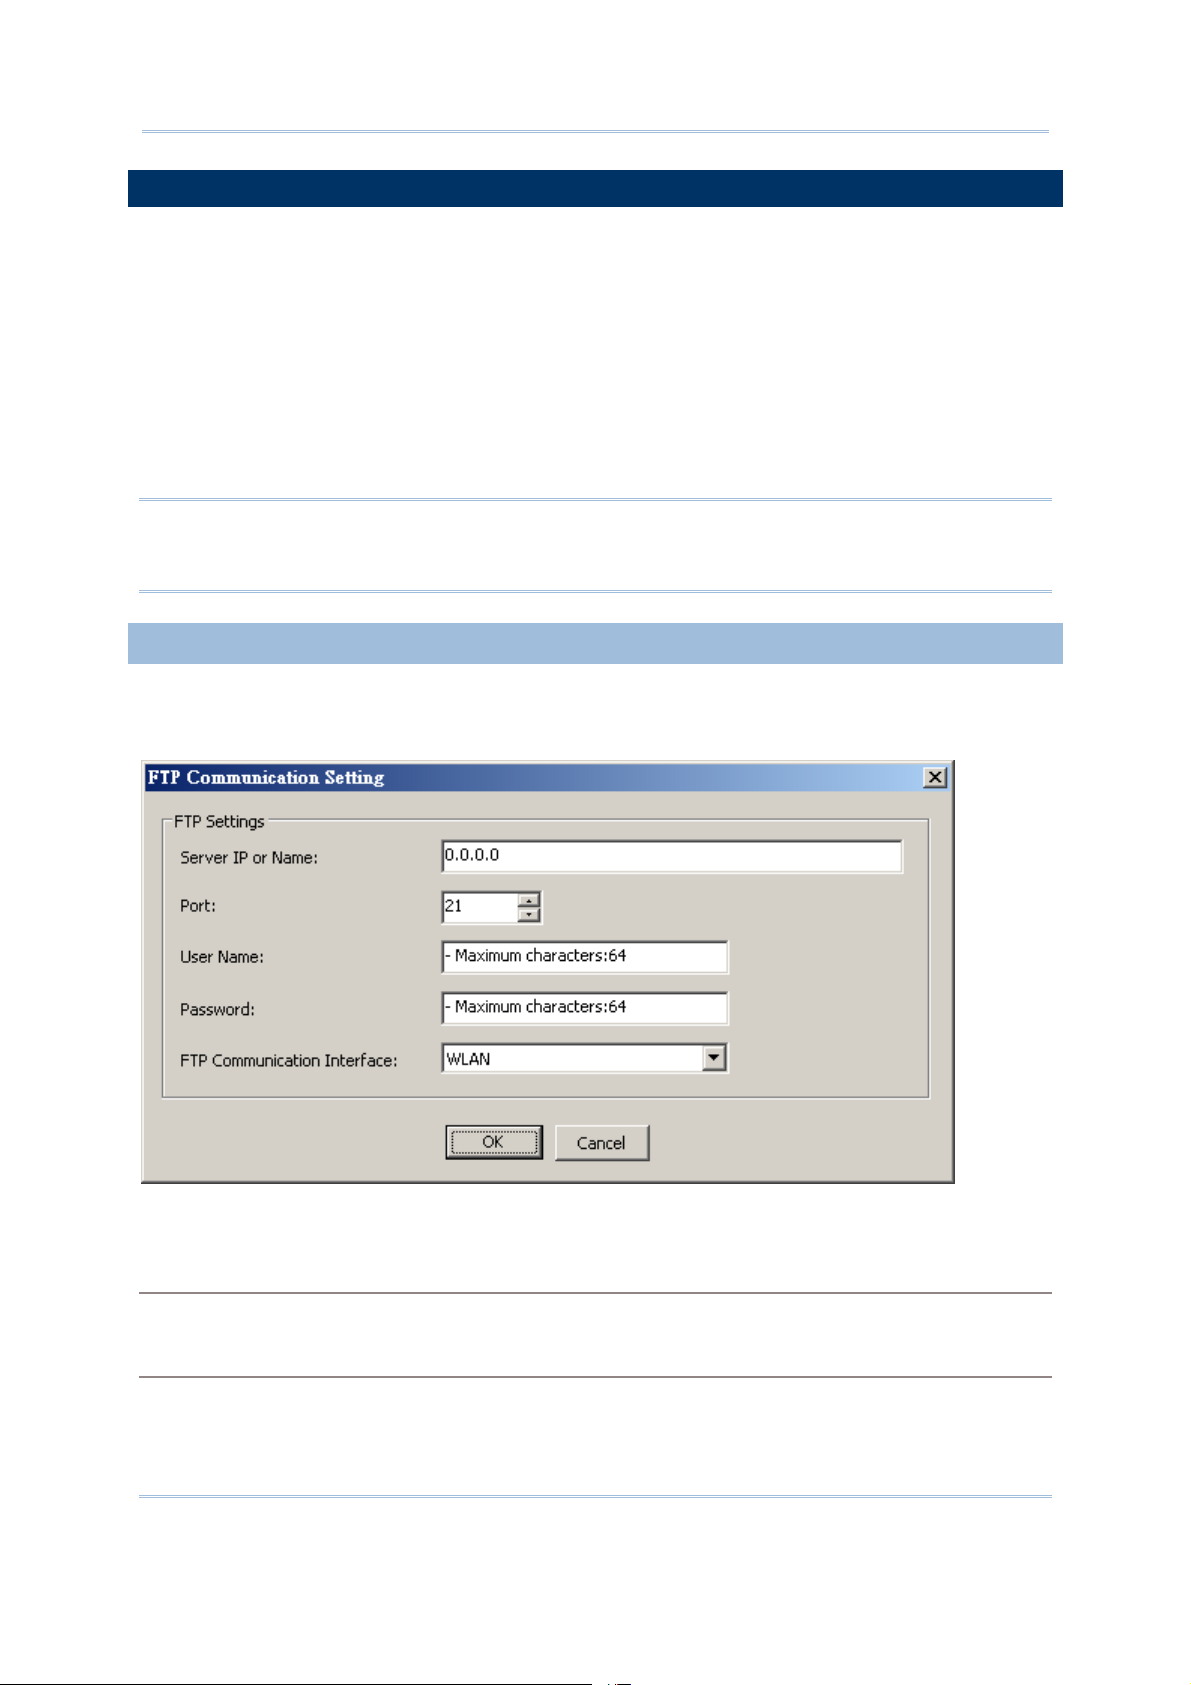
FTP COMMUNICATION SETTINGS
Run Batch AG on your PC. Select Transfer | FTP Communication Setting from the
menu bar to have the [FTP Communication Setting] dialogue box:
In this dialog box, make the settings one by one as detailed below:
Server IP or Name
Specify the IP address or the name of the FTP server.
Port
Specify the port number of the remote FTP server.
By default, TCP port 21 is used on the server for the control connection.
11

FORGE Batch Application Generator User Guide
User Name
Specify the user name for logging onto the remote FTP server. (64 characters maximum)
Password
Specify the password for logging onto the FTP server. (64 characters maximum)
FTP Communication Interface
Among 8-Series mobile computers, their communication with FTP servers are supported through
the following interfaces:
Options 8071 8200 8230 8330 8370 8400 8470 8630 8770 8790
WLAN
Ethernet Cradle
12
Introduction
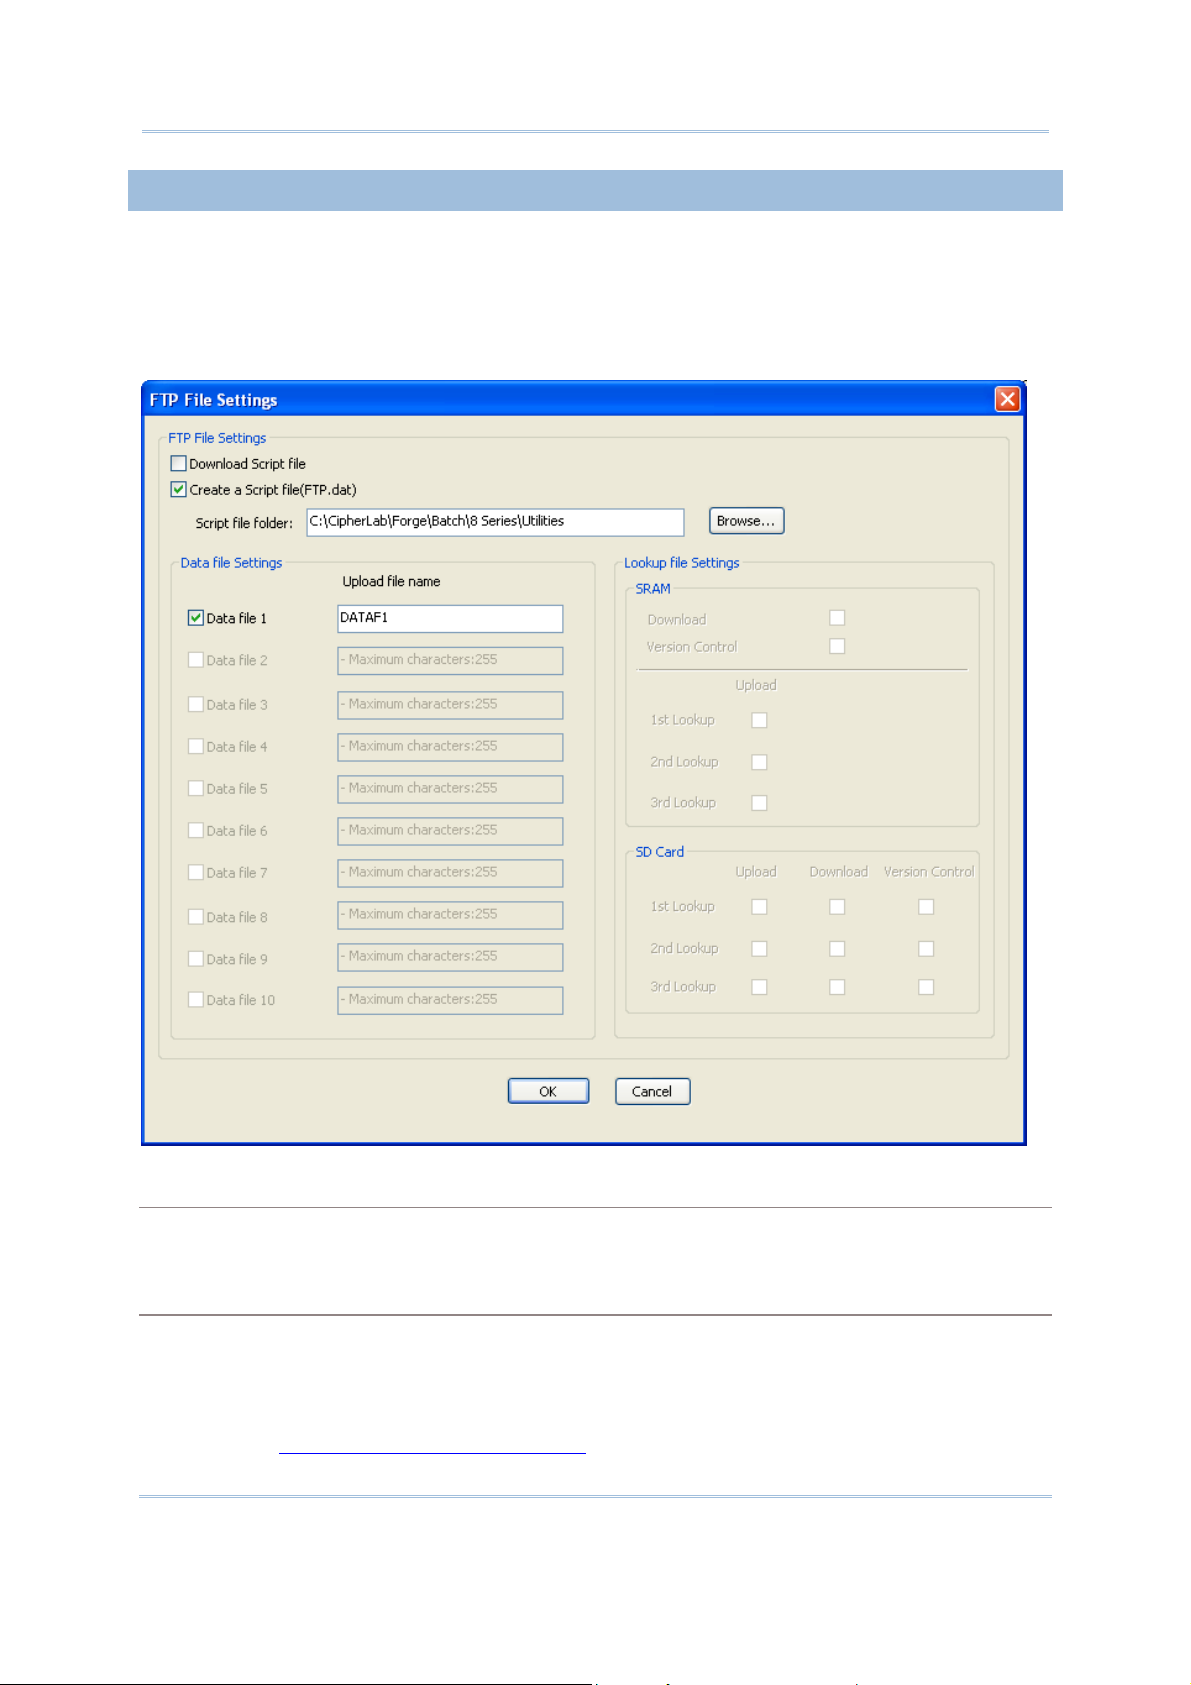
FTP FILE SETTINGS
After completing the configuration of an FTP server, you need to configure which files
should be copied to and from the mobile computer.
From the menu bar of the Batch AG, select Transfer | FTP File Setting to bring up the
[FTP File Setting] dialogue box. This dialogue box features the following settings:
Download Script File
Tick this checkbox to enable the mobile computer to download, from the FTP server, any update to
the script file “FTP.dat”.
Create a Script File (FTP.dat)
Tick this checkbox to create a script file “FTP.dat” on your PC and save the other FTP-related
settings into this file.
The file name “FTP.dat” is reserved for the script file. The file name must be uppercase while
the file extension is lowercase.
Please refer to Appendix VI
13
Creating a Script File on how to create a script file for further details.

FORGE Batch Application Generator User Guide
Data File Settings
In this group box, select which data files will be uploaded to the FTP server. Instead of using the
default file name “DATAF1~DATAF10”, you may change it if necessary.
The length of the file name plus the full directory path on the FTP server is maximum 255
characters.
When no directory path is specified, the data file will be uploaded to the root directory of the
FTP server.
Lookup File Settings
Select if to download or upload any lookup files.
When a “Download” checkbox is ticked for a particular lookup file, the “Upload” checkbox is
then ticked automatically. You can remove the tick if necessary. Note that there is only one set
of Download and Version Control boxes for SRAM lookup file settings.
When the “Download” checkbox is selected for a particular lookup file, you may apply version
control by ticking the “Version Control” checkbox if necessary. The system will show a message
dialog box to prompt you whether to check the lookup file only when the lookup file is
downloaded to the terminal for the first time.
The uploads will be saved in the root directory of the FTP server with file names of
“DBF1.txt~DBF3.txt” respectively.
The downloads will be saved to the SRAM or SD Card in
settings.
DBF format, depending on the Lookup
14
Introduction
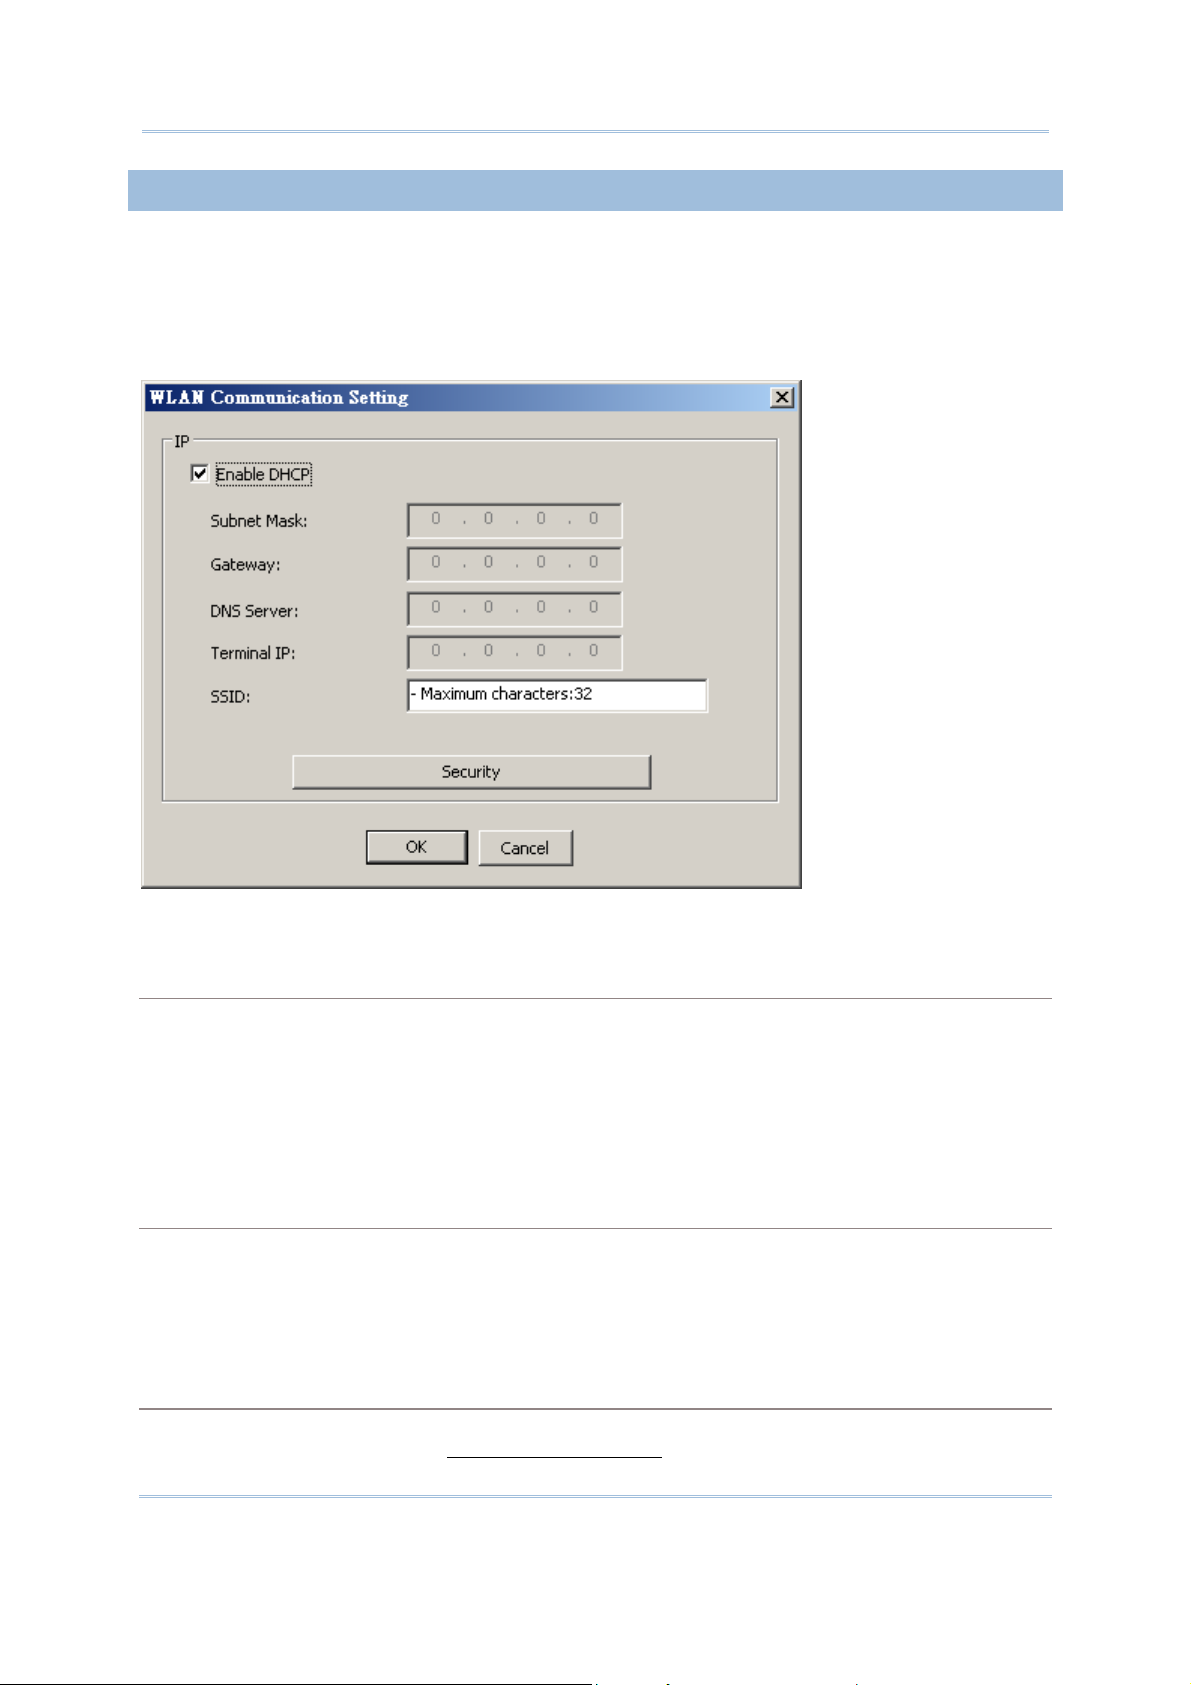
WLAN COMMUNICATION SETTINGS
Some of CipherLab’s 8-Series models support Wi-Fi networking. The configuration of
Wi-Fi connection is necessary for the mobile computer to log in to a WLAN network.
Run Batch AG on your PC. Select Transfer | WLAN Communication Setting from the
menu bar. A [WLAN Communication Setting] dialogue box displays:
In this dialogue box, make the following settings:
Enable DHCP
DHCP server is enabled by default and all settings can be obtained from it. If DHCP server is
disabled, you must provide the following information —
Subnet Mask
Gateway
DNS Server
Terminal IP
SSID
“SSID” refers to “Service Set Identifier”, which is the name of a wireless local network (WLAN) to
uniquely identify a group of wireless network devices used in a given “Service Set”. For example,
you need to specify the SSID being used by the access points so that the mobile computer can
associate to the access points.
SSID can be made up of 32 characters maximum.
Security
Authentication and encryption help provide data protection on the 802.11b/g network
(802.11b/g/n for 8600). Refer to
WLAN Security Settings.
15

FORGE Batch Application Generator User Guide
WLAN SECURITY SETTINGS
In order to prevent information theft, IEEE 802.11 standard has defined two
authentication processes to provide Wi-Fi security. They are “Open System
Authentication” (OSA) and “Shared Key Authentication (SKA)”. Make valid security
settings here to enable the mobile computer to access a WLAN network.
Click the Security button in the [WLAN Communication Setting] dialogue box. The
[WLAN Security Setting] dialogue box displays. Make the following settings:
Authentication
Selects between Open System and Shared Key.
Setting Remark
Open System By “Open System Authentication”, any wireless device can access any WEP
network and receive files that are not encrypted. When a client computer
attempts to connect to a WLAN AP, it sends out an authentication request to
that AP. The AP authenticates the request and the client gets to connect to the
network.
“Open System Authentication” allows any device network access. If no
encryption is enabled on the network, any device that has the SSID of the
access point can gain access to the network.
Shared Key By “Shared Key Authentication”, when a client computer attempts to connect to
a WLAN AP, it sends out an authentication request to that AP. Then a
16
 Loading...