


Cipherlab 8000, 8001, 8020, 8021, 8061 Manual
...Reference Manual for 8000, 8001, 8020, 8021, 8061, 8071
8000 Series Mobile
Computer
Version 2.00
Printed on 14 April, 2007
Copyright Notice
Copyright © 2007 CIPHERLAB CO., LTD.
All rights reserved
The software contains proprietary information of CIPHERLAB CO., LTD.; it is provided under a license agreement containing restrictions on use and disclosure and is also protected by copyright law. Reverse engineering of the software is prohibited.
Due to continued product development this information may change without notice. The information and intellectual property contained herein is confidential between CIPHERLAB and the client and remains the exclusive property of CIPHERLAB CO., LTD. If you find any problems in the documentation, please report them to us in writing. CIPHERLAB does not warrant that this document is error-free.
No part of this publication may be reproduced, stored in a retrieval system, or transmitted in any form or by any means, electronic, mechanical, photocopying, recording or otherwise without the prior written permission of CIPHERLAB CO., LTD.
For product consultancy and technical support, please contact your local sales representative. Also, you may visit our web site for more information.
The CipherLab logo is a registered trademark of CIPHERLAB CO., LTD.
CIPHERLAB CO., LTD.
Website: http://www.cipherlab.com
II
FCC Regulations
This equipment has been tested and found to comply with the limits for a Class B digital device, pursuant to Part 15 of the FCC Rules. These limits are designed to provide reasonable protection against harmful interference in a residential installation. This equipment generates, uses and can radiate radio frequency energy and, if not installed and used in accordance with the instructions, may cause harmful interference to radio communications. However, there is no guarantee that interference will not occur in a particular installation. If this equipment does cause harmful interference to radio or television reception, which can be determined by turning the equipment off and on, the user is encouraged to try to correct the interference by one or more of the following measures:
Reorient or relocate the receiving antenna.
Increase the separation between the equipment and receiver.
Connect the equipment into an outlet on a circuit different from that to which the receiver is connected.
Consult the dealer or an experienced radio/TV technician for help.
Important Safety Precautions
RISK OF EXPLOSION IF BATTERY IS REPLACED BY AN INCORRECT TYPE
DISPOSE OF USED BATTERIES ACCORDING TO THE INSTRUCTIONS
The use of any batteries or charging devices, which are not originally sold or manufactured by CipherLab, will void your warranty and may cause damage to human body or the product itself.
The charging and communication cradle uses an AC power adaptor. A socket outlet shall be installed near the equipment and shall be easily accessible. The power adaptor should comply with L.P.S test. Make sure there is stable power supply for the mobile computer or its peripherals to operate properly.
DO NOT disassemble, incinerate or short circuit the battery pack.
DO NOT expose the mobile computer or the battery pack to any flammable sources.
Under no circumstances, internal components are self-serviceable.
Per FDA and IEC standards, the scan engines described in this manual are not given a laser classification. However, the following precautions should be observed:
CAUTION
This laser component emits FDA/IEC Class 2 laser light at the exit port. Do not stare into beam.
III
Care & Maintenance
The 8000 Series is intended for enterprise logistics use, however, it may do damage to the mobile computer when being exposed to high temperatures or soaked wet.
When the body of the mobile computer gets dirty, use a clean and wet cloth to wipe off the dust. DO NOT use/mix any bleach or cleaner. Always keep the LCD dry.
For a liquid crystal display (LCD), use a clean, non-abrasive, lint-free cloth to wipe dust off the screen. DO NOT use any pointed or sharp object to move against the surface.
Battery disposal – For green-environment issue, it is important that batteries should be recycled in a proper way.
If you want to put away the mobile computer for a period of time, download the collected data to a host computer, and then take out the battery pack. Store the mobile computer and battery pack separately.
When the mobile computer resumes its work, the main and backup batteries will take a certain time to become fully charged.
If you shall find the mobile computer malfunctioning, refer to the Troubleshooting section for self help first.
If the problem persists, write down the specific scenario and consult your local sales representative.
Getting Started
Below are instructions of how to have the 8000 Series ready to work. This scenario makes use of a cradle, which may be replaced by the 4-slot battery charger or other specified interface to PC.
Set up the cradle for initial charging.
Install the battery pack to the mobile computer, and then seat the mobile computer in the cradle for charging.
When charging is done, turn on the mobile computer and enter the System Menu for system configuration, downloading programs and font file, and so on.
Before downloading, you must connect a serial cable between the cradle and a host computer. Refer to the System Menu > 6. Load Program for more information.
After charging and downloading, the mobile computer is ready for use. Install the hand strap if necessary.
IV

i
Contents
Copyright Notice |
II |
FCC Regulations |
III |
Important Safety Precautions |
III |
Care & Maintenance |
IV |
Getting Started |
IV |
Preface |
1 |
Revision History ........................................................................................................................................... |
1 |
CHAPTER 1 - Introduction |
3 |
1.1 Inside the Package .................................................................................................................................. |
3 |
1.2 Options.................................................................................................................................................... |
4 |
1.3 Product Highlights .................................................................................................................................. |
4 |
1.4 Overview................................................................................................................................................. |
5 |
1.4.1 Nomenclature ........................................................................................................................... |
5 |
1.4.2 Dimensions............................................................................................................................... |
7 |
1.5 Features................................................................................................................................................... |
8 |
1.5.1 Power........................................................................................................................................ |
8 |
1.5.2 CPU .......................................................................................................................................... |
9 |
1.5.3 Memory .................................................................................................................................... |
9 |
1.5.4 Keypad.................................................................................................................................... |
10 |
1.5.5 LCD ........................................................................................................................................ |
12 |
1.5.6 Status LED.............................................................................................................................. |
13 |
1.5.7 Buzzer..................................................................................................................................... |
13 |
1.5.8 Reader..................................................................................................................................... |
13 |
1.5.9 Wireless Support .................................................................................................................... |
15 |
1.5.9 Impact Resistance................................................................................................................... |
17 |
1.5.10 Application Software............................................................................................................ |
17 |
1.5.11 Programming Support........................................................................................................... |
17 |

ii |
Contents |
|
CHAPTER 2 - Installation |
19 |
|
|
2.1 Installing the Battery Pack.................................................................................................................... |
19 |
|
2.2 Setting up the Cradle............................................................................................................................. |
20 |
CHAPTER 3 - Software Architecture |
21 |
|
|
3.1 Overview............................................................................................................................................... |
21 |
|
3.2 System Configuration ........................................................................................................................... |
22 |
|
3.3 Application Programs ........................................................................................................................... |
23 |
|
3.3.1 Application Generator (AG) ................................................................................................... |
23 |
|
3.3.2 CipherNet ............................................................................................................................... |
23 |
|
3.3.3 User Program.......................................................................................................................... |
24 |
CHAPTER 4 - Configuration |
25 |
|
|
4.1 System Menu ........................................................................................................................................ |
26 |
|
4.1.1 Information ............................................................................................................................. |
26 |
|
4.1.2 Settings ................................................................................................................................... |
28 |
|
4.1.3 Tests........................................................................................................................................ |
30 |
|
4.1.4 Memory .................................................................................................................................. |
32 |
|
4.1.5 Power...................................................................................................................................... |
33 |
|
4.1.6 Load Program ......................................................................................................................... |
34 |
|
4.1.7 (1) Serial PPP Menu ............................................................................................................... |
35 |
|
4.1.7 (2) IR Network Menu (Ethernet via IR) ................................................................................. |
39 |
|
4.1.7 (3) Bluetooth Menu – for 8061............................................................................................... |
42 |
|
4.1.7 (4) Wi-Fi Menu – for 8071 ..................................................................................................... |
52 |
|
4.2 Program Manager ................................................................................................................................. |
60 |
|
4.2.1 Download ............................................................................................................................... |
60 |
|
4.2.2 Activate .................................................................................................................................. |
63 |
|
4.2.3 Upload .................................................................................................................................... |
64 |
|
4.3 Kernel Menu ......................................................................................................................................... |
65 |
|
4.3.1 Kernel Information ................................................................................................................. |
65 |
|
4.3.2 Load Program ......................................................................................................................... |
66 |
|
4.3.3 Kernel Update......................................................................................................................... |
68 |
|
4.3.4 Test & Calibrate ..................................................................................................................... |
69 |
|
4.3.5 Bluetooth Menu ...................................................................................................................... |
70 |
Specifications |
71 |
|
Troubleshooting |
73 |
|
APPENDIX I - Download Utilities |
77 |
|
|
ProgLoad.exe.............................................................................................................................................. |
78 |
|
Communication Type ...................................................................................................................... |
78 |
|
File Type.......................................................................................................................................... |
78 |
|
IRLoad.exe ................................................................................................................................................. |
79 |
|
Command Line ................................................................................................................................ |
79 |

Contents |
iii |
Download.exe ............................................................................................................................................. |
80 |
Command Line ................................................................................................................................ |
80 |

iv Contents
Table of Figures |
|
Figure 1: Nomenclature (front & back) |
.....................................................................................6 |
Figure 2: Dimensions ................................................................................................................... |
7 |
Figure 3: Keypad layout ............................................................................................................ |
10 |
Figure 4: Installing the Battery Pack ....................................................................................... |
19 |
Figure 5: Setting up the Cradle................................................................................................. |
20 |
Figure 6: Software Architecture ............................................................................................... |
21 |

1
Preface
Answering light industrial demands, the 8000 Series Mobile Computer is specifically designed for enterprise logistics use. Small-form-factor and light-weight, it proves to be an ace player in retail and healthcare applications.
This line of product comes with optional Bluetooth and 802.11b/g wireless technologies, enabling real time sharing of performance. The 8000 Series is bundled with powerful and rich features to ensure success in timely processing of information, and thus, makes an ideal choice for inventory control, shop floor management, warehousing and distribution operations. Being programmable, this handy device can run custom applications or terminal emulation applications.
This manual serves to guide you through how to install, configure, and operate the mobile computer. We recommend you to keep one copy of the manual at hand for quick reference or maintenance purposes. To avoid any improper disposal or operation, please read the manual thoroughly before use.
Thank you for choosing CipherLab products!
Revision History
|
Version |
|
Release Date |
|
Notes |
|
|
2.00 |
|
Apr. 14, 2007 |
|
New release |
|
|
|
|
|
|
|
|

2 8000 Series Reference Manual
3
C H A P T E R 1
Introduction
This chapter mainly explains the hardware parts and features of the 8000 Series Mobile Computer.
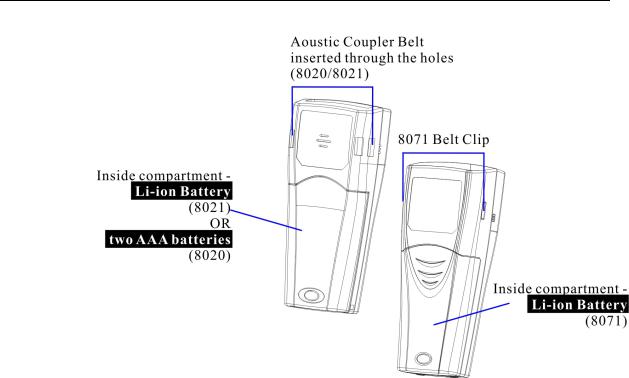
The 8000 family includes: |
|
||
|
8000 |
Batch type |
(powered by two AAA alkaline batteries) |
|
8001 |
Batch type |
(powered by Li-ion battery) |
|
8020 |
Acoustic Coupler |
(powered by two AAA alkaline batteries) |
|
8021 |
Acoustic Coupler |
(powered by Li-ion battery) |
|
8061 |
Bluetooth Class 1 |
(powered by Li-ion battery) |
|
8071 |
802.11b/g |
(powered by Li-ion battery) |
In This Chapter
1.1 |
Inside the Package ....................................................... |
3 |
1.2 |
Options......................................................................... |
4 |
1.3 |
Product Highlights....................................................... |
4 |
1.4 |
Nomenclature............................................................... |
5 |
1.5 |
Features........................................................................ |
8 |
1.1 Inside the Package
The following items are included in the package. Save the box and packaging material for future use in case you need to store or ship the mobile computer.
Items Inside Package |
8000 |
8001 |
8020 |
8021 |
8061 |
8071 |
Rechargeable Li-ion battery |
− |
√ |
− |
√ |
√ |
√ |
Wrist Strap |
√ |
√ |
− |
− |
√ |
√ |
Acoustic Coupler Belt |
− |
− |
√ |
√ |
− |
− |
Belt Clip |
− |
− |
− |
− |
− |
√ |
Software & Manual CD |
√ |
√ |
√ |
√ |
√ |
√ |

4 8000 Series Reference Manual
1.2 Options
Rich choices of optional accessories are available for you to enhance the total performance of the mobile computer.
Spare rechargeable Li-ion battery
4-slot Battery Charger
Communication Cradle
USB Cradle
Charging & Communication Cradle
Modem Cradle
Ethernet Cradle
Bluetooth Access Point
802.11b/g Access Point
1.3Product Highlights
Ergonomic design – small-form-factor with hand strap for secure hold.
Built light-weight to enhance mobility and ease data-intensive applications.
Flexible wireless solution - connectivity options includes Bluetooth or 802.11b/g.
Acoustic Coupler for US market, ideal for replacement of older style terminals.
Graphic monochrome LCD supports double-byte characters and bitmap graphics.
Programmable feedback includes buzzer and LED indicator.
Quick link to any backend database through Windows-based CipherNet programs for VT100/220 and IBM 5250 emulation.
Easy customization of AG applications through Windows-based Application Generator (AG) programs for preloaded AG Runtime.
Programming support includes BASIC & C compilers.

Chapter 1 Introduction |
5 |
1.4 Overview
1.4.1 Nomenclature
6 8000 Series Reference Manual
Figure 1: Nomenclature (front & back)
Chapter 1 Introduction |
7 |
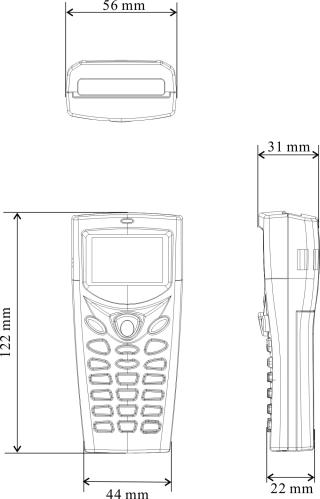
1.4.2 Dimensions
Below shows the dimensions of Model 8000.
Figure 2: Dimensions

8 8000 Series Reference Manual
1.5 Features
1.5.1 Power
Main Battery
Except that Model 8000/8020 is powered by two AAA alkaline batteries, Model 8001/8021/8061/8071 is powered by a rechargeable 3.7 V/700 mAh Li-ion battery pack, and it takes approximately two hours to fully charge it.
For power-saving purpose, always turn off the backlight while working in a well-lit area. When the backlight is on for extended periods of time, the main battery will become low sooner than expected.
The smart battery icon on the LCD screen shows the status of power consumption. There are two ways to monitor a low battery charge or discharged battery from the screen.
Examine the level of the battery icon
Monitor voltage level (see section 4.1.5 Power)
Backup Battery
In addition, one 3.0 V/7 mAh rechargeable Lithium button cell on the main board retains data in SRAM and maintains the running of the real-time clock and calendar. It takes at least twenty-four hours to fully charge the backup battery.
For a fully charged backup battery, it can last for at least 30 days. However, it is not necessary to fully charge the backup battery for the mobile computer to work.
Monitor voltage level (see section 4.1.5 Power)
Initial Charging
The rechargeable battery pack must be fully charged before using the mobile computer for the first time. Because the internal backup battery is constantly charged from the main battery, the initial charging requires installing the battery pack to the mobile computer and then seating the mobile computer in the cradle for charging. This will have both the main and backup batteries charged at the same time.
Note: For initial charging, it takes approximately 2 hours to fully charge the main battery.

Chapter 1 Introduction |
9 |
Caution of Low Battery Charge
The power source for the 8000 Series to work can be alkaline batteries (2*AAA for Model 8000/8020) or the rechargeable battery pack (for Model 8001/8021/8061/8071). The alkaline batteries or the battery pack charges the backup battery on the main board so that the data stored in SRAM can be retained properly. Therefore, when the main battery charge goes low, you must replace the alkaline batteries or the battery pack. For Model 8001/8021/8061/8071, you can charge it in the cradle as soon as possible. Always remember to save data before it is too late!
Warning: |
Data loss may occur with SRAM during low battery condition. Always |
|
save data before running out of power or keep a fresh battery or batteries |
|
for replacement. |
1.5.2 CPU
A 16-bit CMOS type CPU is utilized, low power consumption.
1.5.3 Memory
The collected data can be sent back to a host computer immediately or stored in memory (SRAM).
Program Memory
2 megabytes flash memory for core, OS, application programs, font, etc.
Data Memory
2 megabytes SRAM with contents backup by a 7 mAh rechargeable Lithium button cell.
Calendar
A calendar chip is equipped for accurate time/date logging.
Caution of Data Loss
When the main battery or batteries are removed or drained, the backup battery on the main board is to retain the contents of SRAM and maintain the running of the calendar for at least 30 days, on condition that the backup battery has already been fully charged.
10 8000 Series Reference Manual
If you want to put away the mobile computer for a couple of days, you should be aware that data loss occurs when both the main and backup batteries discharge completely. Therefore, it is necessary to save data in a host computer before putting away the mobile computer!
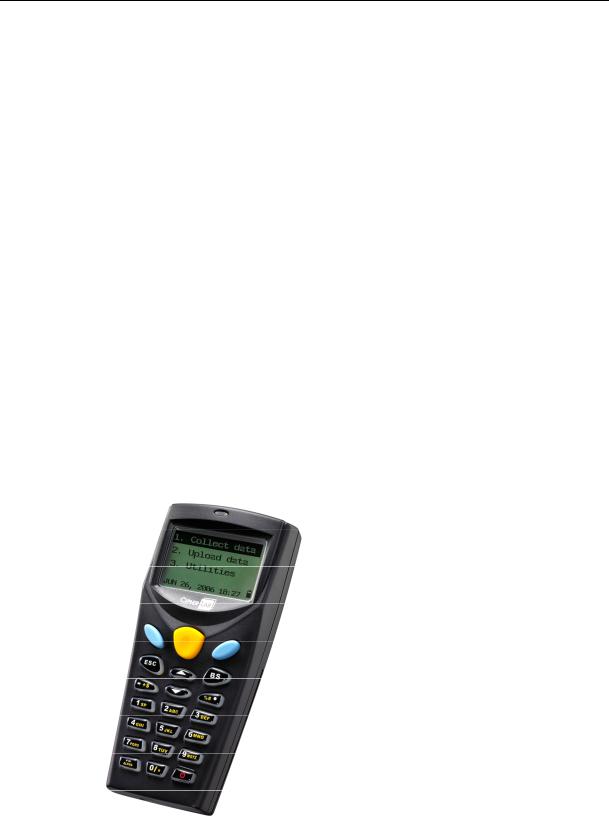
1.5.4 Keypad
The mobile computer can be equipped with a keypad of 21 keys for system setup, user entry and so on. The keypad comes with programmable LED backlight, like the screen. Silicon rubber has been chosen for their durability and prompt feedback. The key click can be configured through programming or the System Menu.
It consists of the following keys:
One scan button (the yellow one at top)
Two [ENTER] keys (the blue ones next to the scan button)
Two arrow keys for moving the cursor up or down, an alphanumeric keypad and assorted characters.
One [POWER] key (the red one at bottom)
By default, it is set to numeric mode. Press the [ALPHA/FN] key to enter alpha mode, capital or small letters.
Figure 3: Keypad layout

Chapter 1 Introduction |
11 |
Alpha/FN Key
This special function key is used to toggle among different input modes and the function mode. The icon will appear on the lower-right corner of the device screen.
Status Icon |
Alpha/FN Key |
Input/Function Mode |
|
None |
N/A |
|
Numbers |
|
|
|
|
“A” |
Press [Alpha/FN] key one time |
Capital letters |
|
|
|
|
|
“a” |
Press |
[Alpha/FN] key two times |
Small letters |
|
|
|
|
“F” |
Press |
[Alpha/FN] key three times |
Function Mode |
|
|
|
|
Note: It is not necessary to hold down the [Alpha/FN] key.
Input Mode
This alphanumeric keypad is set to numeric mode by default. The Alpha key serves as a toggle among numeric, alpha (lower-case alphabetic), and ALPHA (upper-case alphabetic) modes.
When using the 24-key keypad, each numeric key can be used to generate one of the three letters. For example, the numeric key [2] can be used to produce the letter [A], [B] or [C]. When you press the same key without halting longer than one second, the three letters will be displayed in a circulating way. Only when you stop pressing the key or hold it for more than one second or press another key, will the system send the real key code to the application program.
Function Mode
The [ALPHA/FN] (function) key serves as a modifier key. When you press a set of function keys, the system will send the associated key codes to the application program, and it is up to the application program to interpret the key codes.
1.To enable this modifier key, press [FN] on the keypad.
An italic "F" will appear on the lower-right corner of the device screen. This modifier key is hold down as long as the icon is displayed.
2.Now press another key to get the value of key combination (say, press [1] to get the value of F1). The icon will go off now.
3.To get the value of another key combination modified by the [FN] key, repeat the above steps. To abort the key modification, press [FN] again, and the icon will go off.

12 8000 Series Reference Manual
The functionality of each key combination is application-dependent. Below is a list of the factory setting for a variety of key combinations.
Press and hold [FN], and then, press one of the following keys for a specific function:
Key Combination |
Action |
[ENTER] |
Toggle ON/OFF the backlight of LCD and keypad at the same time |
|
|
[UP] |
Adjust LCD to high contrast |
|
|
[DOWN] |
Adjust LCD to low contrast |
|
|
1.5.5 LCD
The mobile computer comes with a FSTN graphic LCD, 100 by 64 pixels resolutions, which can be programmed to display text or graphics, such as specific font and company logo, to meet varying application needs.
Options |
Font Size (pixels) |
Characters by lines |
English font |
Font size 6×8 (pixels) |
16 characters by 8 lines |
|
Font size 8×16 (pixels) |
12 characters by 4 lines |
|
|
|
Chinese font |
Font size 16×16 (pixels) |
7 characters by 4 lines |
|
|
|
Other language fonts, company logo… |
Programmable |
|
|
|
|
Note: Normally, the last column (ICON_ZONE) is reserved to display status icons, such as the battery icon.
The backlight of screen and keypad helps ease reading under dim environments. Relevant settings can be configured or adjusted by pressing the following key combinations:
Settings |
Key Combination |
Backlight ON/OFF |
[FN] + [Enter] |
|
|
LCD Contrast |
[FN] + [Up] or [FN] + [Down] |
|
|
Chapter 1 Introduction |
13 |
1.5.6 Status LED
The dual-color LED above the [Scan] trigger can be programmed to provide information that helps diagnosing.
For example, if you are using AG Runtime, you will be informed of the scanning result immediately by this LED indicator:
Red LED - Error
Green LED - Good Read
1.5.7Buzzer
The buzzer is a low power transducer type and can be programmed for status feedback. Its pitch and duration are software programmable.
1.5.8 Reader
Options of 1D scan engines are available for delivering flexibility to meet different requirements.
CCD scan engine (Long Range Imager)
Standard Laser scan engine
Symbologies Supported & Enabled
The supported symbologies depend on the scan engine you use; some of the supported symbologies must be enabled through programming if not enabled by default.
CCD / Laser scan engine
|
Symbologies |
|
(Also Known As) |
|
Enabled by default |
|
Codabar |
|
(NW7) |
|
Yes |
|
|
|
|
|
|
|
Industrial 25 |
|
|
|
Yes |
|
|
|
|
|
|
|
Interleaved 25 |
|
|
|
Yes |
|
|
|
|
|
|
|
Matrix 25 |
|
|
|
No |
|
|
|
|
|
|
|
Code 39 |
|
|
|
Yes |
|
|
|
|
|
|
14 |
8000 Series Reference Manual |
|
|
|
|
|
|
|
|
|
|
|
|
Italian Pharmacode |
|
No |
|
|
|
|
|
|
|
|
|
CIP 39 |
(French Pharmacode) |
No |
|
|
|
|
|
|
|
|
|
Code 93 |
|
Yes |
|
|
|
|
|
|
|
|
|
Code 128 |
|
Yes |
|
|
|
|
|
|
|
|
|
EAN-128 |
|
Yes |
|
|
|
|
|
|
|
|
|
MSI |
|
No |
|
|
|
|
|
|
|
|
|
Plessey |
|
No |
|
|
|
|
|
|
|
|
|
RSS-14 |
|
No |
|
|
|
|
|
|
|
|
|
Telepen |
|
No |
|
|
|
|
|
|
|
|
|
EAN-8 |
|
Yes |
|
|
|
|
|
|
|
|
|
EAN-8 with Addon 2, Addon 5 |
|
Yes |
|
|
|
|
|
|
|
|
|
EAN-13 |
|
Yes |
|
|
|
|
|
|
|
|
|
EAN-13 with Addon 2, Addon 5 |
|
Yes |
|
|
|
|
|
|
|
|
|
GTIN |
|
No |
|
|
|
|
|
|
|
|
|
UPC-A |
|
Yes |
|
|
|
|
|
|
|
|
|
UPC-A with Addon 2, Addon 5 |
|
Yes |
|
|
|
|
|
|
|
|
|
UPC-E0/UPC-E1 |
|
Yes |
|
|
|
|
|
|
|
|
|
UPC-E0/UPC-E1 with Addon 2, Addon 5 |
|
Yes |
|
|
|
|
|
|
|

Chapter 1 Introduction |
15 |
1.5.9 Wireless Support
The 8000 Series supports state-of-the-art wireless technologies so that it can send / receive data in real time in an efficient way.
|
WPAN: |
Infrared (IR / IrDA) technology for data exchange, embedded |
|
WPAN: |
Bluetooth technology for cable replacement & data exchange (8061) |
|
WLAN: |
IEEE 802.11b/g for wireless networking (8071) |
IR / IrDA
The mobile computer has an integrated IR port on the bottom, which can directly establish connection with an IR device for printing or data exchange. Simply have the IR port of the mobile computer toward the IR port of the target device.
This IR port supports CipherLab proprietary IR communication protocol and standard IrDA protocol.
IrDA specification defines communications (transmit/receive data) between two IrDA enabled devices within a short range, line-of-sight.
IR / IrDA Specifications
Infra Red: |
Optical |
Data Rate: |
Up to 115200 bps |
Connected devices: |
Peer-to-Peer |
Coverage: |
From contact to 30 cm, line-of-sight |
Standard: |
CipherLab proprietary protocol and IrDA 1.0 |
Bluetooth
Bluetooth technology is for cable replacement & data exchange. Model 8061 can directly communicate with any Bluetooth enabled device, not necessarily line-of-sight.
Serial Port Profile (SPP) is for ad hoc networking, without going through any access point.
Personal Area Networking Profile (PAN) makes use of Bluetooth Network Encapsulation Protocol (BNEP) for IP networking over Bluetooth. Access points (AP) are required.
Dial-Up Networking Profile (DUN) makes use of a Bluetooth modem or mobile phone as a wireless modem.
Also, it can be used to activate the GPRS functionality on a mobile phone.

16 |
8000 Series Reference Manual |
|
|
|
|
|
|
|
|
|
|
|
|
Bluetooth Specification |
|
|
|
|
|
Frequency Range: |
2.4 GHz |
|
|
|
|
Data Rate: |
433 kbps |
|
|
|
|
Connected Devices: |
1 for DUN mode |
|
|
|
|
|
Up to 7 for SPP or PAN mode (AP required) |
|
|
|
|
Profiles: |
SPP, PAN, DUN |
|
|
|
|
Coverage: |
Class 1 – 250 meters line-of-sight |
|
|
|
|
Max. Output Power: |
Class 1 – 16 mW |
|
|
|
|
Spread Spectrum: |
FHSS |
|
|
|
|
Modulation: |
GFSK |
|
|
|
|
Standard: |
Bluetooth version 1.1 |
|
|
|
|
|
|
|
|
IEEE 802.11b/g
Model 8071 can easily connect to legacy networks through access points (APs). Roaming among different networks is possible.
IEEE 802.11b/g is an industrial standard for Wireless Local Area Networking (WLAN), which enables wireless communications over a long distance.
The speed of connection between two wireless devices will vary with range and signal quality. To maintain a reliable connection, the data rate of the 802.11b/g system will automatically fallback as range increases or signal quality decreases.
802.11b/g Specification
|
|
Frequency Range: |
|
2.4 GHz |
|
|
|
|
|
|
|
|
|
|
|
|
|
Data Rate: |
|
802.11b |
– 1, 2, 5.5, 11 Mbps |
|
|
|
|
|
|
802.11g |
– 6, 9, 12, 18, 24, 36, 48, 54 Mbps |
|
|
|
|
Connected Devices: |
|
1 for ad-hoc mode (No AP) |
|
|
|
|
|
|
|
Multiple for infrastructure mode (AP required) |
|
|
|
|
|
Profiles: |
|
IP/TCP/UDP |
|
|
|
|
|
|
|
|
|||
|
|
Coverage: |
|
350 meters line-of-sight |
|
|
|
|
|
Max. Output Power: |
|
50 mW (802.11b) |
|
|
|
|
|
Spread Spectrum: |
|
DSSS |
|
|
|
|
|
Modulation: |
|
802.11b |
– DBPSK (1 Mbps), DQPSK (2 Mbps), CCK (5.5 & 11 Mbps) |
|
|
|
|
|
|
802.11g |
– OFDM |
|
|
|
|
Standard: |
|
IEEE 802.11b/g, interoperable with Wi-Fi devices |
|
|
|
|
|
|
|
|
|
|
|
Chapter 1 Introduction |
17 |
1.5.9 Impact Resistance
The 8000 Series is proved to survive drop test by the following criteria:
Surface Type |
Distance to Surface |
Drop Times |
Concrete |
1.2 meters |
5 drops per 6 sides |
|
|
|
1.5.10 Application Software
Application Generator (AG)
For easy development of applications, the mobile computer ships with development tools on the CD-ROM. It includes Windows-based Application Generator programs, batch and WLAN, as well as relevant utilities.
Terminal Emulation
The mobile computer supports VT100/220 and IBM 5250 terminal emulation for accessing a backend database. The Windows-based CipherNet programs are available on the CD-ROM.
1.5.11 Programming Support
For developing custom applications, CipherLab provides BASIC and C compliers through licensing.

18 8000 Series Reference Manual
19
C H A P T E R 2
Installation
The mobile computer is designed for portable use, and it almost requires no installation except installing the rechargeable battery pack (or the alkaline batteries for Model 8000/8020).
Warning: |
Read Important Safety Precautions before installation. |
2.1 Installing the Battery Pack
Always prepare a spare battery pack, especially when you are on the road. To save power, turn off the backlight when you are working in a bright work area.
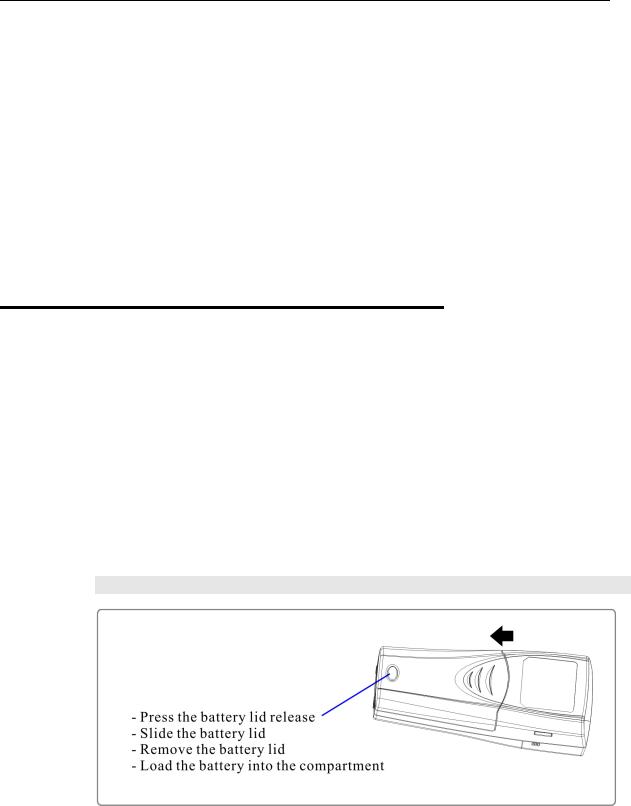
1.Hold the mobile computer face down in one hand.
2.Press the battery lid release and slide the battery lid.
3.Remove the battery lid by the other hand.
4.Slide the battery pack into the battery compartment at a proper angle (30°~45°) so that the contacts of the battery are pressed onto the protruding contacts inside the compartment. Make sure that the battery is snugly fit into the compartment.
5.Replace the battery lid and lock it firmly.
Note: For a new battery, make sure it is fully charged before use.
Figure 4: Installing the Battery Pack
 Loading...