

Page 1

2200 Omnidirectional Presentation
Scanner
Setup barcodes included.
Version 1.00
Page 2

Copyright © 2017 CIPHERLAB CO., LTD.
All rights reserved
The software contains proprietary information of CIPHERLAB CO., LTD.; it is provided
under a license agreement containing restrictions on use and disclosure and is also
protected by copyright law. Reverse engineering of the software is prohibited.
Due to continued product development this information may change without notice. The
information and intellectual property cont ained herein is confiden tial between CIPHE RLAB
and the client and remains the exclusive proper ty of CIPHERLAB CO., LTD. If finding any
problems in the documentation, please report them to us in writing. CIPHERLAB does
not warrant that this document is error-free.
No part of this publication may be reproduced, stored in a retrieval system, or
transmitted in any form or by any means, electronic, mechanical, photocopying,
recording or otherwise without the prior written permission of CIPHERLAB CO., LTD.
For product consultancy and technical support, please contact the local sales
representative. Alternatively, visit our web site for more information.
The CipherLab logo is a registered trademark of CIPHERLAB CO., LTD.
All brand, product and service, and trademark names are the property of their registered
owners.
The editorial use of these names is for identification as well as to the benefit of the
owners, with no intention of infringement.
CIPHERLAB CO., LTD.
Website: http://www.cipherlab.com
Page 3

IMPORTANT NOTICES
FOR USA
This equipment has been tested and found to comply with the limits for a Class B digital
device, pursuant to Part 15 of the FCC Rules. These limits are designed to provide
reasonable protection against harmful interference in a residential installation. This
equipment generates, uses and can radiate radio frequency energy and, if not installed
and used in accordance with the instructions, may cause harmful interference to radio
communications. However, there is no guarantee that interference will not occur in a
particular installation. If this equipment does cause harmful interference to radio or
television reception, which can be determined by turning the equipment off and on, the
user is encouraged to try to correct the interference by one or more of the following
measures:
Reorient or relocate t he receiving antenna.
Increase the separation between the equipment and receiver.
Connect the equipment into an outlet on a circuit different from that to which the
receiver is connected.
Consult the dealer or an experienced radio/TV technician for help.
This device complies with Part 15 of the FCC Rules. Operation is subject to t he following
two conditions: (1) This device may not cause harmful interf erence, and (2) this device
must accept any interference received, including interference that may cause undesired
operation.
FCC Caution: Any changes or modifications not expressly approved by the party
responsible for compliance could void the user's authority to operate this equipment.
This transmitter must not be co-located or operating in conjunction with any other
antenna or transmitter.
Radiation Exposure Statement:
This equipment complies with FCC radiation exposure limits set forth for an uncontrolled
environment. This equipment should be installed and operated with minimum distance
20cm between the radiator & your body.
Page 4

FOR EUROPE
This device complies with the essential requirements of the R&TTE Directive 1999/5/EC.
The following test methods have been applied in order to prove presumption of
conformity with the essential requirements of the R&TTE Directive 1999/5/EC:
- EN 60950-1: 2006+A11:2009+A1:2010+A12:2011+A2:2013
Safety of Information Technology Equipment
- EN 301 489-1 V2.1.1: 2016
Electromagnetic compatibility and Radio Spectrum Matters (ERM); ElectroMagnetic
Compatibility (EMC) standard for radio equipment and services; Part 1: Common
technical requirements
- EN 301 489-3 V2.1.0: 2016
Electromagnetic compatibility and Radio Spectrum Matters (ERM); ElectroMagnetic
Compatibility (EMC) standard for radio equipment and services; Part 3: Specific
conditions for Short-Range Devices (SRD) operating on frequencies between 9 kHz and
40 GHz
- EN 302 208-1 V3.1.1: 2016
Radio Frequency Identification Equipment operating in the band 865 MHz to 868 MHz
with power levels up to 2 W and in the band 915 MHz to 921 MHz w ith pow er levels u p to
4 W; Harmonised Standard covering the essential requirements of article 3.2 of the
Directive 2014/53/EU
SAFETY PRECAUTIONS
DO NOT expose the scanner to any flammable sources.
Under no circumstances, internal components are self-serviceable.
For AC power adaptor, a socket outlet shall be installed near the equipment an d shall
be easily accessible. Make sure there is stable power supply for the scanner or its
peripherals to operate properly.
CARE & MAINTENANCE
Use a clean cloth to wipe dust off the scanning window and the body of the scanner.
DO NOT use/mix any bleach or cleaner.
If find ing the scann er malfun ct ioning, w rite dow n the specific scen ari o and con sult th e
local sales representative.
Page 5

RELEASE NOTES
Version Date Notes
1.00 Nov. 24, 2017
Initial Release
Page 6

Page 7

CONTENTS
IMPORTANT NOTICES .......................................................................................................... - 3 -
For USA ....................................................................................................................................... - 3 -
For Europe .................................................................................................................................. - 4 -
Safety Precautions .................................................................................................................. - 4 -
Care & Maintenance ............................................................................................................... - 4 -
RELEASE NOTES ...................................................................................................................... - 5 -
INTRODUCTION .......................................................................................................................... 1
Inside the Package ...................................................................................................................... 2
Product Highlights ....................................................................................................................... 2
Symbologies Supported ............................................................................................................ 3
QUICK START ............................................................................................................................... 5
Enter Configuration Mode ......................................................................................................... 6
Exit Configuration Mode ............................................................................................................ 6
Default Settings ........................................................................................................................... 7
Save User Settings as Defaults ......................................................................................... 7
Restore User Defaults ........................................................................................................... 7
Restore System Defaults ..................................................................................................... 7
Read a Setup Barcode ............................................................................................................... 8
Configure Parameters ........................................................................................................... 8
List the Current Settings ................................................................................................... 12
Create One-Scan Setup Barcodes ....................................................................................... 14
1D One-Scan Barcode ........................................................................................................ 14
2D One-Scan Barcode ........................................................................................................ 15
SPECIFICATIONS ..................................................................................................................... 17
FIRMWARE UPGRADE ............................................................................................................ 19
Using RS-232 .............................................................................................................................. 19
Using USB Virtual COM ............................................................................................................ 21
HOST SERIAL COMMANDS ................................................................................................... 23
Serial Commands ...................................................................................................................... 23
Example ......................................................................................................................................... 24
KEYBOARD WEDGE TABLE ................................................................................................... 25
Key Type & Status ..................................................................................................................... 27
Key Type .................................................................................................................................. 27
Key Status ............................................................................................................................... 27
Example ......................................................................................................................................... 28
Page 8

2200 Omnidirectional Presentation Scanner User Guide
NUMERAL SYSTEMS ................................................................................................................ 29
Decimal System ......................................................................................................................... 29
Hexadecimal System ................................................................................................................ 30
ASCII Table .................................................................................................................................. 31
READING DRIVER LICENSES ............................................................................................. 33
License Parsing Setup .............................................................................................................. 33
File Type ................................................................................................................................... 33
Output Sequence Setup .......................................................................................................... 34
Separators and Fields .............................................................................................................. 40
Edit Separators ...................................................................................................................... 41
Edit Fields ................................................................................................................................ 42
KEYBOARD TYPE ONE-SCAN BARCODE ........................................................................ 43
Keyboard Wedge ........................................................................................................................ 43
Direct USB HID ........................................................................................................................... 48
Page 9

INTRODUCTION
Equipped with a 2D barcode reader, the scanner is capable of reading 1D and 2D
barcodes. The scanner is designed for desktop use with ease of installation. For particular
deployment, the scanner can be integrated with other devices, like POS, to achieve
systematic data colletion.
This manual contains information on operating the scanner and u sing its features. It is
better to keep one copy of the manual at hand for quick reference or maintenance
purposes. To avoid any improper disposal or operation, please read the manual
thoroughly before use.
Thank you for choosing CipherLab products!
1
Update
Page 10

2200 Omnidirectional Presentation Scanner User Guide
INSIDE THE PACKAGE
The items included in the package may be different, depending on order. Rich choices of
output interfaces are available to enhance the total performance of the scanner. Refer to
product specifications.
Save the box and packaging material for future use in case it is need to store or ship the
scanner.
PRODUCT HIGHLIGHTS
Small-form-factor and built tough to survive drop test
Extremely low power consumption
Firmware upgradeable
Supports most popular barcode symbologies, including GS1-128 (EAN-128), GS1
DataBar (RSS), etc.
Supports a variety of 2D symbologies
Supports different scan modes, including Aiming Mode and Multi-Barcode Mode
Note
Programmable feedback via LED indicator and beeper
Beeping tone and duration programmable for Good Read
Provides choices of output interfaces, including RS-232, Keyboard Wedge, and USB.
Programmable parameters include data output format, editing format, symbologies,
etc.
Note: In any scan mode other than Multi-Barcode Mode, a barcode acceptable to the
scanner can only contain data of 7 KB at most.
2
Enter Setup
Page 11

錯誤! 使用 [常用] 索引標籤將 Heading 1 套用到您想要在此處顯示的文字。
SYMBOLOGIES SUPPORTED
Most of the popular barcode symbologies are supported, as listed below. Each can be
individually enabled or disabled. The scanner will automatically discriminate and
recognize all the symbologies that are enabled. Refer to Chapter 3 錯誤! 找不到參照來源。
for details of each symbology.
Symbologies Supported: Enable/Disable
Codabar Enabled
Code 93 Enabled
MSI Disabled
Plessey Disabled
Telepen Disabled
Code 128 Code 128 Enabled
GS1-128 (EAN-128) Enabled
ISBT 128 Enabled
Code 2 of 5 Industrial 25 Enabled
Interleaved 25 Enabled
Matrix 25 Disabled
Code 3 of 9 Code 39 Enabled
Italian Pharmacode Disabled
French Pharmacode Disabled
EAN/UPC EAN-8 Enabled
EAN-8 Addon 2 Disabled
Default
EAN-8 Addon 511109951
EAN-13 Enabled
EAN-13 & UPC-A Addon 2 Disabled
EAN-13 & UPC-A Addon 5 Disabled
ISBN Disabled
UPC-E0 Enabled
UPC-E1 Disabled
UPC-E Addon 2 Disabled
UPC-E Addon 5 Disabled
UPC-A Enabled
Code 11 Disabled
GS1 DataBar GS1 DataBar Omnidirectional (RSS-14) Disabled
Disabled
3
Update
Page 12

2200 Omnidirectional Presentation Scanner User Guide
(RSS)
Composite
Code
2D
Symbologies
GS1 DataBar Truncated Disabled
GS1 DataBar Limited (RSS Limited) Disabled
GS1 DataBar Expanded (RSS Expanded) Disabled
Composite CC-A/B Disabled
Composite CC-C Disabled
PDF417 Enabled
MicroPDF417 Disabled
Data Matrix Enabled
Maxicode Enabled
QR Code Enabled
MicroQR Enabled
Aztec Enabled
Han Xin Disabled
4
Enter Setup
Page 13
QUICK START
The configuration of the scanner can be done by reading the setup barcodes (setup labels)
contained in this manual or via the ScanMaster software.
This section describes the procedure of configuring the scanner by reading the setup
barcodes and provides some examples for demonstration.
Note: If RS-232 or USB Virtual COM is selected for output interface, the host can directly
send serial commands to configure the scanner.
For example, run HyperTerminal.exe and type the 6-digit command located under
each setup barcode. Refer to Appendix II Host Serial Commands.
5
Update
Page 14

2200 Omnidirectional Presentation Scanner User Guide
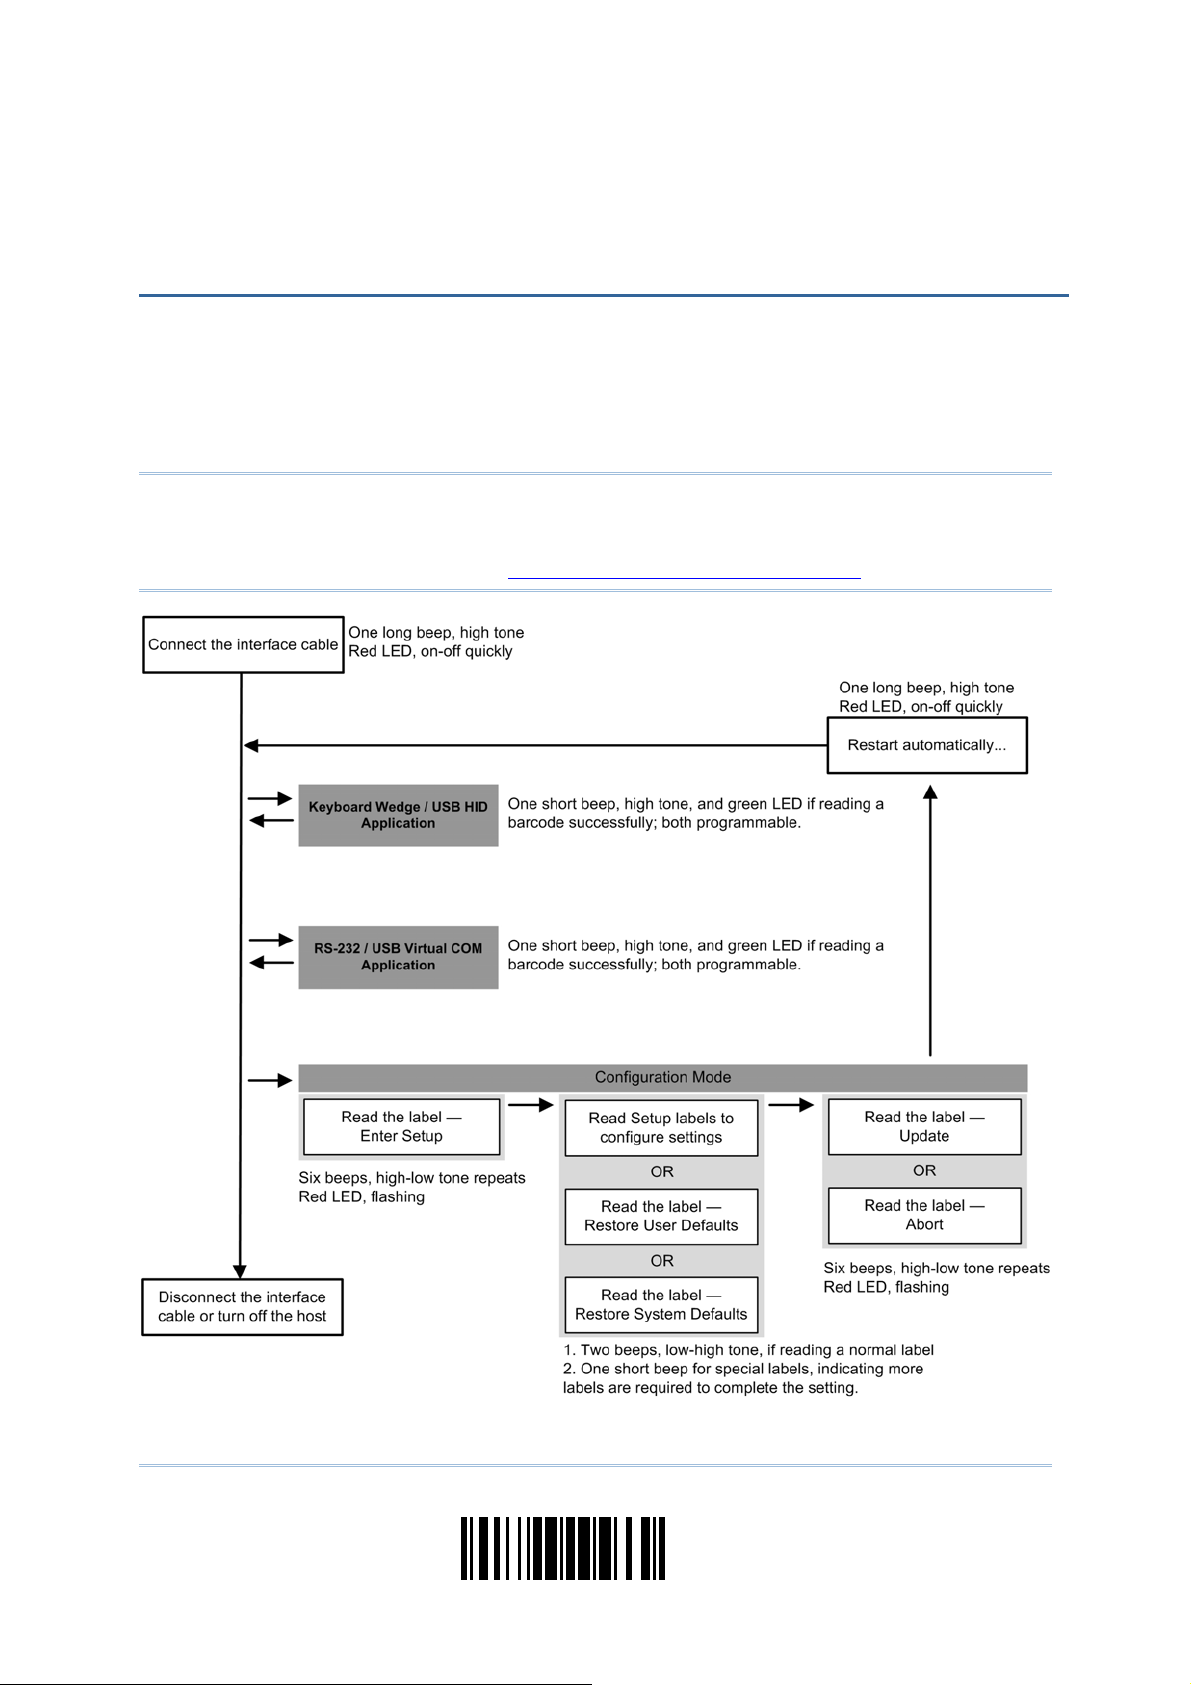
ENTER CONFIGURATION MODE
For the scanner to enter the configuration mode, have it read the "Enter Setup" barcode
located at the bottom of almost every even page of this manual.
The scann er will respond with six beeps and its LE D indicator will be come flashing red
after reading the barcode.
Enter Setup
For configuring scanner parameters, see “Read a Setup Barcode” below.
EXIT CONFIGURATION MODE
For the scanner to save settings and exit the configuration mode, have it read the
“Update” barcode located at the bottom of almost every odd page of this manual. To exit
the configuration mode without saving any changes, have the scanner read the “Abort”
barcode instead.
Just lik e reading the “Enter Setup” barcode, the scanner will respond with six beeps
and its LED indicator will become flashing red after reading the barcode. Wait for a
few seconds for the scanner to restart itself.
Update
Abort
6
Enter Setup
Page 15

錯誤! 使用 [常用] 索引標籤將 Heading 1 套用到您想要在此處顯示的文字。
S
DEFAULT SETTINGS
SAVE USER SETTINGS AS DEFAULTS
For the scanner to keep the customized settings as user defaults, have it read the “Save
as User Defaults” barcode. This is a normal setup barcode, and the scanner will respond
with two beeps (low-high tone).
After reading the “Update” barcode, the current settings will be saved as user
defaults.
ave as User
Defaults
RESTORE USER DEFAULTS
For the scanner to restore the user defaults saved earlier, have it read the “Restore User
Defaults” barcode. This is a normal setup barcode, and the scann er will respond with two
beeps (low-high tone).
After reading t he “Update” barcode, all the parameters of the scanner will return to
their customized values.
Restore User
Defaults
RESTORE SYSTEM DEFAULTS
For the scanner to restore the factory defaults, have it read the “Restore System
Defaults” barcode. This is a normal setup barcode, and the scann er will respond with two
beeps (low-high tone).
After reading t he “Update” barcode, all the parameters of the scanner will return to
their default values.
Restore System
Defaults
Note: The system default value (if there is) for each setting is indicated by an asterisk
“*”.
7
Update
Page 16

2200 Omnidirectional Presentation Scanner User Guide
READ A SETUP BARCODE
CONFIGURE PARAMETERS
For most of the scanner parameters, only one read is required to set them to new values.
The scanner will respond with two beeps (low-high tone) when each parameter is set
successfully.
But for a number of special parameters, multiple reads are required to complete the
setting. In this case, the scanner will respond with a short beep indicating it needs to
read more setup barcodes. These special parameters may require reading one or more
setup barcodes, such as
Numeric barcodes, say , f or keyboard type, inter-character delay, length qualification
Hexadecimal barcodes, say, for character strings as prefix, suffix, etc.
When “Keyboard Wedge” or “USB HID” is configured as the interface, Key Type and
Key Status will then become applicable. Decide whether or not t o change key status
when “Normal Key” is selected for Key Type.
To complete the configuration of these special parameters, it requires reading the
“Validate” barcode, and then the scanner will respon d with two beeps (low-high tone) t o
indicate the input values are validated.
8
Enter Setup
Page 17

錯誤! 使用 [常用] 索引標籤將 Heading 1 套用到您想要在此處顯示的文字。
T
T
T
The example below shows how to save settings as “User Default” to restore user defaults
later:
Steps
Action Scanner Feedback if Successful
1 Power on the scanner… The scanner will respond with a long beep
(high tone) and its LED indicator will
become solid red and go off quickly.
2 Enter the Configuration Mode…
he scanner will respond with six beeps
(high-low tone repeats three times), and
its LED indicator will be flashing red.
3 Read a Setup barcode…
For example,
he scanner will respond with two beeps
(low-high tone) if reading a normal setup
barcode.
4 Exit the Configuration Mode…
Same as for Enter the Configuration Mode.
OR
5 The scanner will automatically restart itself… Same as for Power on the scanner.
* When any configuration error occurs...
he scanner will respond with one long
beep (low tone).
9
Update
Page 18

2200 Omnidirectional Presentation Scanner User Guide
T
T
T
T
“
T
N
N
The example below shows how to set numeric parameters:
Steps
1 Power on the scanner...
2 Enter the Configuration Mode…
3 Read a Setup barcode...
ormal setup
barcode
ormal setup
barcode
Special setup
barcode
Decimal barcodes
4 Exit the Configuration Mode…
Action Scanner Feedback if Successful
For example,
he scanner will respond with a long beep
(high tone) and its LED indicator will
become solid red and go off quickly.
he scanner will respond with six beeps
(high-low tone repeats three times), and
its LED indicator will become flashing red.
he scanner will respond with two beeps
(low-high tone) if reading a normal setup
barcode.
he scanner will respond with one short
beep if reading a special setup barcode
such as “Max. Length”, indicating the
setup requires reading more barcodes.
Read the “Decimal Value” barcode(s).
Refer to Appendix IV
System”
he scanner will respond with two beeps
(low-high tone) when the input values are
validated.
Same as for Enter the Configuration Mode.
Decimal
5 The scanner will automatically restart itself… Same as for Power on the scanner.
OR
10
Enter Setup
Page 19

錯誤! 使用 [常用] 索引標籤將 Heading 1 套用到您想要在此處顯示的文字。
T
T
T
The example below shows how to set string parameters:
Steps
1 Power on the scanner...
2 Enter the Configuration Mode…
3 Read a Setup barcode...
Special setup
barcodes
Hexadecimal
barcodes
4 Exit the Configuration Mode…
Action Scanner Feedback if Successful
For example,
he scanner will respond with a long beep
(high tone) and its LED indicator will
become solid red and go off quickly.
he scanner will respond with six beeps
(high-low tone repeats three times), and
its LED indicator will become flashing red.
he scanner will respond with one short
beep if reading a special setup barcode
such as “Prefix Code”, indicating the setup
requires reading more barcodes.
When “Keyboard Wedge” or “USB HID” is
configured for interface, Key Type and Key
Status will then become applicable. Decide
whether or not to change key status when
“Normal Key” is selected for Key Type.
Refer to Appendix III
Read the “Hexadecimal Value” barcodes
for the desired character string. For
example, read “2” and “B” for the scanner
to prefix the character “+”.
Refer to Appendix IV “Hexadecimal
System”
The scanner will respond with two beeps
(low-high tone) when the input values are
validated.
Same as for Enter the Configuration Mode.
5 The scanner will automatically restart itself… Same as for Power on the scanner.
OR
11
Update
Page 20

2200 Omnidirectional Presentation Scanner User Guide
LIST THE CURRENT SETTINGS
The current settings of all scanner parameters can be sent to the host computer for user
inspection. The listing includes pages as shown below. Select the page of interest by
having the scanner read the “List Page x” barcode. The scanner will respond with two
beeps (low-high tone) and send the selected page to the host immediately.
Lists settings regarding Firmware Version,
Serial Number, Interface, Buzzer, and Other
Scanner Parameters
Lists settings regarding Prefix, Suffix, and
Length Code Setting (1/2)
Lists settings regarding Prefix, Suffix, and
Length Code Setting (2/2)
List Page 1
List Page 2
List Page 3
Lists settings regarding Code ID
Lists settings regarding: Readable Symbologies
(1/2)
Lists settings regarding: Readable Symbologies
(2/2)
Lists settings regarding Symbology Parameters
(1/3)
Lists settings regarding Symbology Parameters
(2/3)
Lists settings regarding Symbology Parameters
(3/3)
List Page 4
List Page 5
List Page 6
List Page 7
List Page 8
List Page 9
Reserved
List Page 10
12
Enter Setup
Page 21

錯誤! 使用 [常用] 索引標籤將 Heading 1 套用到您想要在此處顯示的文字。
Lists settings regarding Editing Format 1
(1/2)
Lists settings regarding Editing Format 1
(2/2)
Lists settings regarding Editing Format 2
(1/2)
Lists settings regarding Editing Format 2
(2/2)
Lists settings regarding Editing Format 3
(1/2)
Lists settings regarding Editing Format 3
(2/2)
List Page 11
List Page 12
List Page 13
List Page 14
List Page 15
List Page 16
Lists settings regarding Editing Format 4
(1/2)
Lists settings regarding Editing Format 4
(2/2)
Lists settings regarding Editing Format 5
(1/2)
Lists settings regarding Editing Format 5
(2/2)
Lists settings of Driver License parsing
List Page 17
List Page 18
List Page 19
List Page 20
List Page 22
13
Update
Page 22

2200 Omnidirectional Presentation Scanner User Guide
CREATE ONE-SCAN SETUP BARCODES
Most of the scanner parameters require only one read for setting new values. To facilitate
configuring the scanner, create One-Scan setup barcodes for use.
1D ONE-SCAN BARCODE
The requirements of a One-Scan setup barcode are:
a prefix of the “#@” characters
the six digits of command parameters
a suffix of the “#”character
For example, the scanner needs reading three setup barcodes for the command
parameter “109952” to take effect:
Enter Setup
List Page 3
Update
Now, it requires only one read:
One-Scan Setup Barcode
for 109952
Note: The scanner will restart automatically upon reading the One-Scan setup barcode
for changing the interface. It will respond with a long beep and its LED will come
on-off shortly.
14
Enter Setup
Page 23

錯誤! 使用 [常用] 索引標籤將 Heading 1 套用到您想要在此處顯示的文字。
2D ONE-SCAN BARCODE
Users can also scan a single 2D barcode combining with a series of serial commands to
configure the scanner. For example, if you want to change the suffix character to ‘#’, you
will need to input the serial commands in sequence as follows (un derlining th e digits is to
make them more readable):
#@CipherLab101231109902109903109994
Command Purpose
#@CipherLab Enter Setup
101231
109902 Give the first hexadecimal digit of 0x23
109903
109994 Validate the settings
Configure suffix
Give the second hexadecimal digit of 0x23 for taking ‘#’ as the suffix
The serial commands above can be combined to form a single 2D barcode:
2D One-Scan Setup Barcode for configuring suffix
15
Update
Page 24

2200 Omnidirectional Presentation Scanner User Guide
16
Enter Setup
Page 25

SPECIFICATIONS
Optical Characteristics
Scan Engine 2D Imager
Light Source Aiming pattern: 520~532nm LED
2200
Illumination: 616~625nm LED
Physical Characteristics
Indication Tri-color LED (Red/Green/Blue) and beeper
Interface Options Keyboard Wedge, RS-232, USB HID, USB Virtual COM
Weight Approx. 320g (2D Barcode Reader only); 380g (RFID included)
Dimensions 150 x 83 x 80 mm
Environmental Characteristics
Temperature Operating
Storage
Humidity
(Non-condensing)
Operating
Storage
0 °C to 40 °C
-40 °C to 60 °C
10% to 90%
5% to 95%
17
Update
Page 26

2200 Omnidirectional Presentation Scanner User Guide
Resistance
Splash / Dust Resistance IP 52
Electrostatic Discharge ± 15 kV air discharge, ± 8 kV contact discharge
Programming Support
Configuration via Setup Barcodes Use setup barcodes or host serial commands.
Software Windows®-based ScanMaster
Firmware upgradeable Download firmware updates via the download utility.
Accessories (means “supported”)
Keyboard Wedge Cable
RS-232 Cable
USB Cable
Dual-USB Cable
18
Enter Setup
Page 27

Appendix I
FIRMWARE UPGRADE
USING RS-232
1) Connect the RS-232 cable between the scanner and the computer, and join the power
supply cord.
2) Read the following barcodes in sequence to configure the scanner to use RS-232 as
download interface.
Enter Setup
Activate RS-232
115200 bps
Update
3) Read the following barcodes in sequence for the scanner to enter the download mode.
The scanner will respond with beeps to indicate it is ready for downloading.
Enter Setup
Download
19
Update
Page 28

2200 Omnidirectional Presentation Scanner User Guide
4) Run the download utility “ProgLoad.exe” on the computer.
Kernel Program
K250x_V*.shx STD250x_V*.shx
User Program
For the communication settings, select
“RS-232” and the correct COM port for
RS-232 or USB Virtual COM interface.
For RS-232, select 115200 bps for baud
rate; for USB Virtual COM, ignore the baud
rate setting.
For the file option, click [Browse] to select
the target file for firmware update.
Click [OK].
5) After upgrading kernel, you will need to restart the scanner manua lly.
After upgrading the user program, the scanner will automatically restart itself once
the download is completed successfully.
Note: The output interface remains unchanged as specified in step 2 (= RS-232 or USB
Virtual COM). For RS-232, the baud rate setting is still 115200 bps!
20
Enter Setup
Page 29

Appendix I 錯誤! 使用 [常用] 索引標籤將 Heading 1 套用到您想要在此處顯示的文字。
USING USB VIRTUAL COM
1) Connect the USB cable between the scanner and the computer.
If using USB Virtual COM for the first time, you must install its driver beforehand.
2) For Windows platform, read the following barcodes in sequence to configure the
scanner to use USB VCOM_CDC as download interface.
Enter Setup
Activate
Direct USB VCOM_CDC
Update
For non-Windows platform, read the following barcodes in sequence to configure the
scanner to use USB Virtual COM as download interface.
Enter Setup
Activate
Direct USB VCOM
Update
3) Read the following barcodes in sequence for the scanner to enter the download mode.
The scanner will respond with beeps to indicate it is ready for downloading.
Enter Setup
Download
4) Run the download utility “ProgLoad.exe” on the computer.
21
Update
Page 30

2200 Omnidirectional Presentation Scanner User Guide
Kernel Program User Program
K250x_V*.shx STD250x_V*.shx
For the communication settings, select
“RS-232” and the correct COM port for
RS-232 or USB Virtual COM interface.
For RS-232, select 115200 bps for baud
rate; for USB Virtual COM, ignore the baud
rate setting.
For the file option, click [Browse] to select
the target file for firmware update.
Click [OK].
5) After upgrading kernel, you will need to restart the scanner manua lly.
After upgrading the user program, the scanner will automatically restart itself once
the download is completed successfully.
Note: The output interface remains unchanged as specified in step 2 (= RS-232 or USB
Virtual COM). For RS-232, the baud rate setting is still 115200 bps!
22
Enter Setup
Page 31

S
L
HOST SERIAL COMMANDS
SERIAL COMMANDS
D
Purpose To disable the scanner.
Remarks
E
Purpose To enable the scanner.
Remarks
#@ nnnnnn <CR>
Purpose To configure the scanner.
Remarks nnnnnn – the six digits of command parameters.
“D”
“E”
For example, “109952” is to list the current Code ID settings.
Appendix II
ist Page 3
erial Command
“0x23” + “0x40” + “0x31” + “0x30” + “0x39” + “0x39” + “0x35” + “0x32” + “0x0d”
Note: After configuring the scanner, send the serial command “#@109999” to save the
settings.
#@ - - - -<CR>
Purpose To halt the scanner.
Remarks
#@ . . . . <CR>
Purpose To resume operation.
Remarks
#@////<CR>
Purpose To respond with a beep.
Remarks
“0x23” + “0x40” + “0x2d” + “0x2d” + “0x2d” + “0x2d” + “0x0d”
“0x23” + “0x40” + “0x2e” + “0x2e” + “0x2e” + “0x2e” + “0x0d”
“0x23” + “0x40” + “0x2f” + “0x2f” + “0x2f” + “0x2f” + “0x0d”
23
Update
Page 32

2200 Omnidirectional Presentation Scanner User Guide
#@TRIGOFF<CR>
Purpose Disable software trigger
Remarks
“0x23” + “0x40” + “0x54” + “0x52” + “0x49” + “0x47” + “0x4f” + “0x46” + “0x46”
+ “0x0d”
#@TRIGON<CR>
Purpose Enable software trigger
Remarks
“0x23” + “0x40” + “0x54” + “0x52” + “0x49” + “0x47” + “0x4f” + “0x4e” + “0x0d”
EXAMPLE
Run HyperTerminal.exe on the host computer to send serial commands to the scanner
via RS-232 or USB Virtual COM.
For the scanner to stop immediately –
D
For the scanner to resume working –
E
For the scanner to change the beeper to medium volume and beep –
#@101011<CR>
#@////<CR>
For the scanner to change the beeper to minimal volume and beep –
#@101010<CR>
#@////<CR>
For the scanner to change the beeper frequency to 8 kHz (for Good Read Beep only)
and beep –
#@101001<CR>
#@////<CR>
For the scanner to change the beeper length to longest (for Good Read Beep only)
and beep –
#@101008<CR>
#@////<CR>
For the scanner to save the settings, send the serial command “#@109999” –
#@101011<CR>
#@109999<CR>
Note: Configure more than one scanner connected to the host via RS-232 or USB Virtual
COM. To identify the scanner, please end the serial command to have it respond
with a beep.
24
Enter Setup
Page 33

Appendix III
KEYBOARD WEDGE TABLE
“Apply” Special Keyboard
0 1 2 3 4 5 6 7 8
0 F2 SP 0 @ P ` p
1 INS F3 ! 1 A Q a q
2 DLT F4 " 2 B R b r
3 Home F5 # 3 C S c s
4 End F6 $ 4 D T d t
5 Up F7 % 5 E U e u
6 Down F8 & 6 F V f v
7 Left F9 ' 7 G W g w
8 BS F10 ( 8 H X h x
9 HT F11 ) 9 I Y i y
A LF F12 * : J Z j z
B Right ESC + ; K [ k {
C PgUp Exec , < L \ l |
D CR CR* - = M ] m }
E PgDn . > N ^ n ~
F F1 / ? O _ o Dly ENTER*
Note: (1) ~: Digits of numeric keypad.
(2) CR*/ENTER*: ENTER key on the numeric keypad.
25
Update
Page 34

2200 Omnidirectional Presentation Scanner User Guide
“Bypass” Special Keyboard
0 1 2 3 4 5 6 7 8
0 SP 0 @ P ` p
1 ! 1 A Q a q
2 " 2 B R b r
3 # 3 C S c s
4 $ 4 D T d t
5 % 5 E U e u
6 & 6 F V f v
7 ' 7 G W g w
8 BS ( 8 H X h x
9 HT ) 9 I Y i y
A LF * : J Z j z
B ESC + ; K [ k {
C , < L \ l |
D CR - = M ] m }
E . > N ^ n ~
F / ? O _ o Dly
Note: (1) ~: Digits of numeric keypad.
(2) CR*/ENTER*: ENTER key on the numeric keypad.
26
Enter Setup
Page 35

Appendix III 錯誤! 使用 [常用] 索引標籤將 Heading 1 套用到您想要在此處顯示的文字。
KEY TYPE & STATUS
KEY TYPE
If “Keyboard Wedge” or “USB HID” is configured for interface, Key Type and Key Status
will then become applicable.
*Normal
Scan Code
KEY STATUS
Decide whether or not to change key status when “Normal Key” is selected for Key Type.
Add Shift
Add Left Ctrl
Add Right Ctrl
Add Left Alt
Add Right Alt
27
Update
Page 36

2200 Omnidirectional Presentation Scanner User Guide
EXAMPLE
KEY TYPE = NORMAL
For example, if you want to program the character “!” as the prefix code:
1. Read the “Configure Prefix” barcode.
2. Read the “Hexadecimal Value” barcode on page 30 for “2” and “1”.
3. Read the “Validate” barcode to complete this setting.
KEY TYPE = SCAN CODE
For example, if you want to program the character “a” (= “1C” on the scan code table) as the
prefix code:
1. Read the “Configure Prefix” barcode.
2. Read the “Scan Code” barcode.
3. Read the “Hexadecimal Value” barcode on page 30 for “1” and “C”.
4. Read the “Validate” barcode to complete this setting.
KEY TYPE = NORMAL + KEY STATUS = SHIFT
For example, if you want to program the character “!” (= “Shift” + “1” on keyboard) as the prefix
code:
1. Read the “Configure Prefix” barcode.
2. Read the “Add Shift” barcode.
3. Read the “Hexadecimal Value” barcode on page 30 for “3” and “1”.
4. Read the “Validate” barcode to complete this setting.
KEY TYPE = NORMAL + KEY STATUS = CTRL
For example, if you want to program “Ctrl+A” and “Ctrl+$” as the prefix code:
1. Read the “Configure Prefix” barcode.
2. Read the “Add Left Ctrl” barcode.
3. Read the “Hexadecimal Value” barcode on page 30 for “4”, “1” (= “A”).
4. Read the “Add Left Ctrl” barcode.
5. Read the “Hexadecimal Value” barcode on page 30 for “2”, “4” (= “$”).
6. Read the “Validate” barcode to complete this setting.
28
Enter Setup
Page 37

A
2
4 5 6
8
V
NUMERAL SYSTEMS
DECIMAL SYSTEM
Decimal
Appendix IV
0
1
3
7
9
Validate the Values
alidate
29
Update
bort
Page 38

2200 Omnidirectional Presentation Scanner User Guide
1
3
7
D
HEXADECIMAL SYSTEM
Hexadecimal
0
2
4
6
8
5
9
30
A
C
E
B
F
Enter Setup
Page 39

Appendix IV 錯誤! 使用 [常用] 索引標籤將 Heading 1 套用到您想要在此處顯示的文字。
A
Validate the Values
Validate
ASCII TABLE
0 1 2 3 4 5 6 7
0 DLE SP 0 @ P ` p
1 SOH DC1 ! 1 A Q a q
2 STX DC2 " 2 B R b r
3 ETX DC3 # 3 C S c s
4 EOT DC4 $ 4 D T d t
5 ENQ NAK % 5 E U e u
6 ACK SYN & 6 F V f v
7 BEL ETB ' 7 G W g w
8 BS CAN ( 8 H X h x
9 HT EM ) 9 I Y i y
A LF SUB * : J Z j z
B VT ESC + ; K [ k {
C FF FS , < L \ l |
D CR GS - = M ] m }
E SO RS . > N ^ n ~
F SI US / ? O _ o DEL
31
Update
bort
Page 40

2200 Omnidirectional Presentation Scanner User Guide
32
Enter Setup
Page 41

A
Appendix V
READING DRIVER LICENSES
The scanner is capable of reading 2D driver’s licenses and other American Association of
Motor Vehicle Administrators (AAMVA) compliant ID cards. For compliant 2D licensed
card scanning, it decodes the information embedded in the ID cards to a formatted data.
This appendix provides the setup barcodes required while ScanMaster utility prov ides GUI
setup that is oganized and easy-to-use.
Note: The configured settings are saved in flash memory for access once a driver’s
license is read.
LICENSE PARSING SETUP
*License Parse Disable
License Parse Enable
Parse Field Clear
FILE TYPE
You can check the file type of ANSI by scanning the barcode as below.
*Enable
Disable
33
Update
bort
Page 42

2200 Omnidirectional Presentation Scanner User Guide
OUTPUT SEQUENCE SETUP
The scanner supports arranging the sequences of license embedded data via separators
and fields. In order to present data in a consistent format, some barcodes (ex. First
Name, Middle Name/Initial, Last Name, Name suffix, Name Prefix, Birth Date and so on)
will return data based on the calculated actual data contained in the ID barcode.
Full Name
Last Name
First Name
Middle Name/Initial
Name Suffix
Name Prefix
Mailing Address
Line1
Mailing Address
Line2
Mailing Address City
Mailing Address
State
34
Enter Setup
Page 43

Appendix V 錯誤! 使用 [常用] 索引標籤將 Heading 1 套用到您想要在此處顯示的文字。
A
Mailing Address
Postal Code
Home Address Line1
Home Address Line2
Home Address City
Home Address State
Home Address Postal
Code
License ID Number
License Class
License
Restrictions
License
Endorsements
Height
(Feet and/or Inches)
Height
(Centimeters)
35
Update
bort
Page 44

2200 Omnidirectional Presentation Scanner User Guide
License Expiration
Weight
(Pounds)
Weight
(Kilograms)
Eye Color
Hair Color
Date
Birth Date
Gender
License Issue Date
Issue Timestamp
Number of Duplicates
Medical Codes
Organ Donor
36
Enter Setup
Page 45

Appendix V 錯誤! 使用 [常用] 索引標籤將 Heading 1 套用到您想要在此處顯示的文字。
A
Nonresident
Customer ID
Social Security
Number
AKA Birth Date
AKA Social Security
Name
AKA Full Name
AKA Last Name
AKA First Name
AKA Middle
Name/Initial
AKA Name Suffix
AKA Name Prefix
Weight Range
37
Update
bort
Page 46

2200 Omnidirectional Presentation Scanner User Guide
Federal Commission
Audit Information
Document
Discriminator
Country
Codes
Place of Birth
Inventory Control
Race/Ethnicity
Std Vehicle Class
Std Restrictions
Std Endorsements
Class Description
Endorsement
Description
38
Enter Setup
Page 47

Appendix V 錯誤! 使用 [常用] 索引標籤將 Heading 1 套用到您想要在此處顯示的文字。
A
Restrictions
Description
Permit Class
Permit Expiration
Date
Permit ID Number
Permit Issue Date
Permit Restrictions
Permit endorsements
Issuer ID Number
Family Name
Truncation
First Name
Truncation
Middle Name
Truncation
39
Update
bort
Page 48

2200 Omnidirectional Presentation Scanner User Guide
SEPARATORS AND FIELDS
Define the separators that separate fields during the transmission sequence of data
scanning. In addition to the built-in data elements, you can also specify up to 5
Additional Fields with 4 bytes characters. Program the transmission sequence by reading
the desired fields as additional fields.
Note: Up to 5 separators can be assigned.
Additional Field 1
Separator 1
(1 byte)
*“Space”
Separator 2
(1 byte)
*“Enter”
Separator 3
(1 byte)
*“,”
Separator 4
(1 byte)
*“.”
Separator 5
(1 byte)
*“-”
(4 bytes)
40
Additional Field 2
(4 bytes)
Additional Field 3
(4 bytes)
Additional Field 4
(4 bytes)
Additional Field 5
(4 bytes)
Enter Setup
Page 49

Appendix V 錯誤! 使用 [常用] 索引標籤將 Heading 1 套用到您想要在此處顯示的文字。
A
EDIT SEPARATORS
All the driver license fields can be split with a pre-selected separator, for example, “-” as
First Name-Last Name or “:” as First Name:Last Name.
Edit Separator 1
Edit Separator 2
Edit Separator 3
Edit Separator 4
Edit Separator 5
1) Read the barcode above to apply separator to driver license information separately ,
and follow steps 2~3.
2) Read the “Hexadecimal Value” barcode for the desired character string. For example,
read “3” and “A” for the separator to split the data with character [:].
3) Read the “Validate” barcode on the same page to complete this setting.
41
Update
bort
Page 50

2200 Omnidirectional Presentation Scanner User Guide
EDIT FIELDS
Up to five additional fields can be created for each editing format; each of them is
numbered from Additional 1 to Additional 5 accordingly.
If “Bluetooth
become applicable. You may decide whether or not to apply Key Status when “Normal Key” is
selected for Key Type.
Key Type Key Status
Scan Code Up to 2 scan code values are allowed. N/A
®
HID” or “USB HID” is configured for interface, Key Type and Key Status will then
Normal Key Up to 4 character strings are allowed.
Add Shift
Add Left Ctrl
Add Left Alt
Add Right Ctrl
Add Right Alt
Refer to Keyboard Wedge Table.
Edit Additional
Field 1
Edit Additional
Field 2
Edit Additional
Field 3
Edit Additional
Field 4
Edit Additional
Field 5
1) Read the barcode above to specify an additional field, one at a time.
2) Read the “Hexadecimal Value” barcode for the desired additional field.
3) Read the “Validate” barcode on the same page to complete this setting.
42
Enter Setup
Page 51

Appendix VI 錯誤! 使用 [常用] 索引標籤將 Heading 1 套用到您想要在此處顯示的文字。
A
Appendix VI
KEYBOARD TYPE ONE-SCAN BARCODE
KEYBOARD WEDGE
PCAT (US)
PCAT (French)
PCAT (German)
PCAT (Italian)
PCAT (Norwegian)
PCAT (Belgium)
PCAT (Swedish)
PCAT (UK)
43
Update
bort
Page 52

2200 Omnidirectional Presentation Scanner User Guide
PCAT (Portuguese)
PS55 A01-2 (Japanese)
PCAT (Spanish)
PS55 A01-1
PS55 001-1
PS55 001-2
PS55 A01-3
PS55 001-81
PS55 001-82
44
Enter Setup
Page 53

Appendix VI 錯誤! 使用 [常用] 索引標籤將 Heading 1 套用到您想要在此處顯示的文字。
A
PS55 001-3
PS55 001-8A
PS55 002-1, 003-1
PS55 002-81, 003-81
PS55 002-2, 003-2
PS55 002-3, 003-3
IBM 3477 Type 4 (Japanese)
PS55 002-82, 003-82
PS55 002-8A, 003-8A
45
Update
bort
Page 54

2200 Omnidirectional Presentation Scanner User Guide
IBM 34XX/319X, Memorex Telex 122 Keys
PCAT (Turkish)
PS2-30
User-defined table
PCAT (Swiss German)
PCAT (Russian)
PCAT (Hungarian)
PCAT (Danish)
PCAT (Cyrillic on Russian)
46
Enter Setup
Page 55

Appendix VI 錯誤! 使用 [常用] 索引標籤將 Heading 1 套用到您想要在此處顯示的文字。
A
PCAT (Armenian)
PCAT (Thai)
47
Update
bort
Page 56

2200 Omnidirectional Presentation Scanner User Guide
DIRECT USB HID
PCAT (French)
PCAT (Italian)
PCAT (US)
PCAT (German)
PCAT (Norwegian)
PCAT (Belgium)
PCAT (Swedish)
PCAT (UK)
PCAT (Spanish)
48
Enter Setup
Page 57

Appendix VI 錯誤! 使用 [常用] 索引標籤將 Heading 1 套用到您想要在此處顯示的文字。
A
PCAT (Portuguese)
PS55 A01-2 (Japanese)
User-defined table
PCAT (Turkish)
PCAT (Hungarian)
PCAT (Danish)
PCAT (Cyrillic on Russian)
PCAT (Swiss German)
PCAT (Russian)
49
Update
bort
Page 58

2200 Omnidirectional Presentation Scanner User Guide
PCAT (Thai)
PCAT (Armenian)
50
Enter Setup
 Loading...