

Page 1
THE CHRYSLER
300 QUICK REFERENCE GUIDE
Page 2

PASSIVE ENTRY
Keyless Enter-N-Go — Passive Entry
The Keyless Enter-N-Go system is an enhancement
to the vehicle’s key fob. This feature allows you to lock
and unlock the vehicle’s door(s) and liftgate without
having to press the key fob lock or unlock buttons.
To Unlock From The Driver Or Passenger Side
Grab The Door Handle To Unlock
With a valid Keyless Enter-N-Go key fob located
outside the vehicle and within 5 ft (1.5m) of the driver
or passenger side door handle, grab either front door
handle to unlock the door automatically.
To Lock The Vehicle
• Both front door handles have buttons located on
the outside of the handle. Withone ofthe vehicle's
Keyless Enter-N-Go key fobs located outside the
vehicle and within 5 ft (1.5 m) of the driver's or
passenger front door handle, push the door handle
button to lock all four doors and trunk.
• DO NOTgrab the door handle, when pushing the
door handle button. This could unlockthe door(s).
Page 3
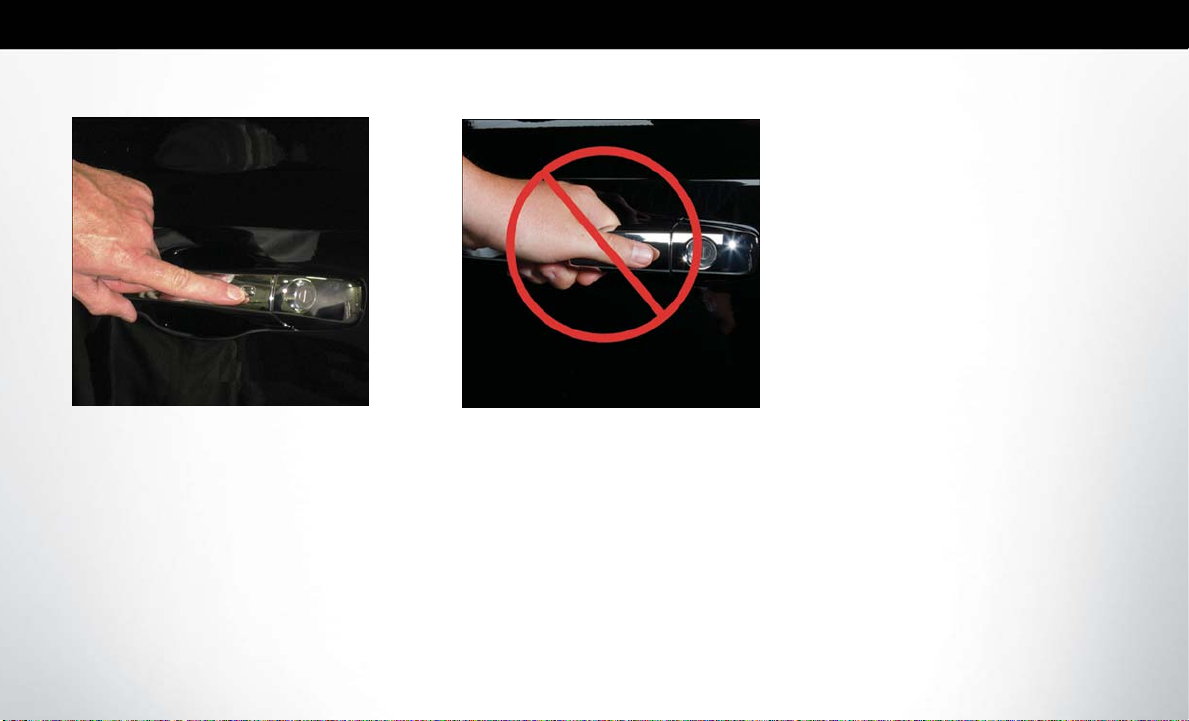
Push The Door Handle Button To Lock
Do Not Grab The Door Handle When Locking
NOTE:
If “Unlock All Doors 1st Press” is programmed, all
•
doors will unlock when you grab hold of the front
driver's doorhandle.To selectbetween “Unlock Driver
Door 1st Press” and “Unlock All Doors 1st Press.”
• If “Unlock All Doors 1st Press” is programmed, all
doors andtrunkwillunlock when you pushthetrunk
button. If “Unlock Driver Door 1st Press” is programmed only the trunk will unlock when you push
the trunk button. To select between “Unlock Driver
Door 1st Press” and “Unlock All Doors 1st Press.”
• If a key fob is detected in the vehicle when locking
the vehicle using the power door lock switch, the
doors and trunk will unlock, and the horn will chirp
three times.On the third attempt, yourkey fobcan
be locked inside the vehicle.
• After pushingtheKeylessEnter-N-Go lockbutton,
you must wait two seconds before you can lock or
unlock the vehicle using the door handle. This is
done to allow you to check if the vehicle is locked
by pulling the door handle without the vehicle reacting and unlocking.
• If a Keyless Enter-N-Go door handle has not been
used for 72 hours, the Keyless Enter-N-Go feature
for that handle may time out. Pulling the deactivated front door handle will reactivate the door
handle's Keyless Enter-N-Go feature.
Page 4
INSTRUMENT CLUSTER DISPLAY
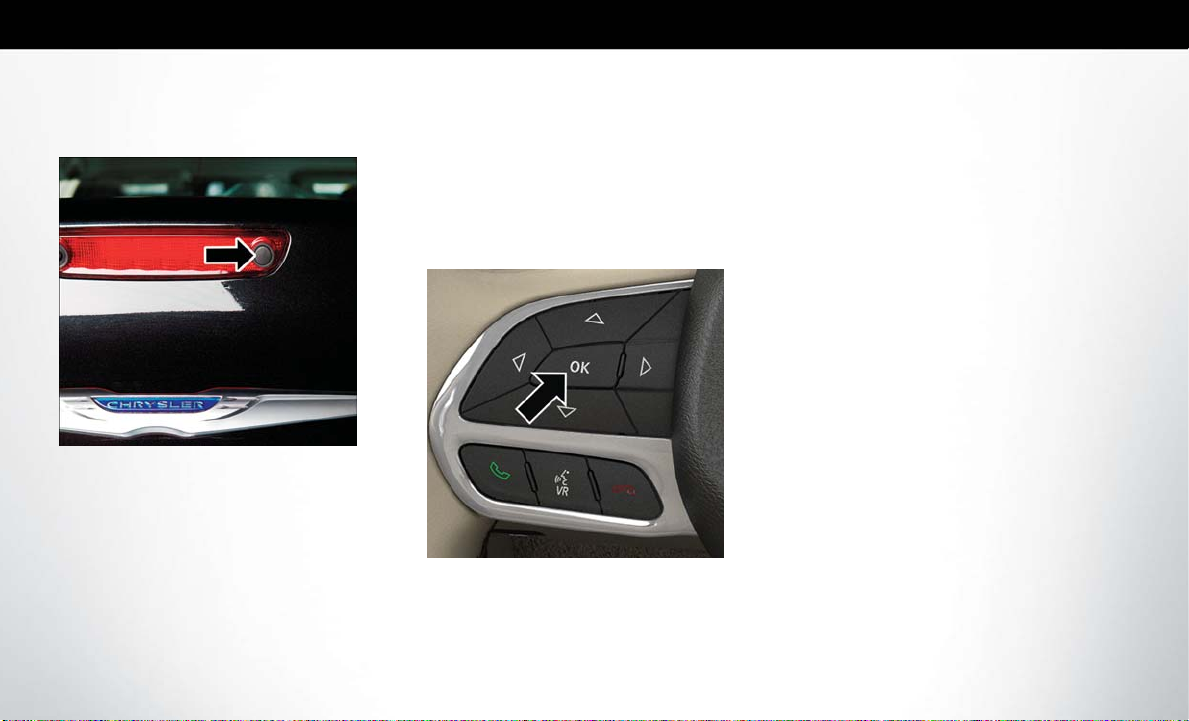
To Enter The Trunk
Trunk Unlock Button
• With a valid Keyless Enter-N-Go key fob located
outside the vehicle and within 5 ft (1.5 m) of the
deck lid, push the button located on the center of
the light bar which is located on the deck lid above
the license plate.
For further information, and applicable warnings and
cautions, please refer to your Owner’s Manual at
www.chrysler.com/en/owners/manuals/.
Cluster Display
The instrument cluster display features a driver interactive display that is located in the instrument cluster.
Pushing the controls on the left side of the steering
wheel allows the driver to select Vehicle Information
and Personal Settings.
Instrument Cluster Display Controls
• Push the up arrow button to scroll upward through
the mainmenus (Speedometer,Vehicle Info,Driver
Assist, Fuel Economy, Trip, Audio, Messages,
Screen Setup) and sub menus.
• Push the down arrow button to scroll downward
through the main menus and sub menus.
• Push the right arrow button to scroll forward to the
next menu or sub menu.
• Push the left arrow button to scroll back to a previous menu or sub menu.
• Push the OK button to access/select the information screens, the submenu screens of a main menu
item, or to select a personal setting in the setup
menu. Push and hold the OK button for two seconds to reset displayed/selected features that can
be reset.
Page 5
PHONE PAIRING
Compass Calibration
This compass is self-calibrating, which eliminates the
need toset the compassmanually. When thevehicle is
new, the compass may appear erratic, and the cluster
will display dashes(- -) until the compass is calibrated.
You may also calibrate the compass by completing
one or more 360 degree turns (in an area free from
large metal or metallic objects) until the dashes (- -)
displayed in the cluster turn off. The compass will now
function normally.
For further information, and applicable warnings and
cautions, please refer to your Owner’s Manual at
www.chrysler.com/en/owners/manuals/.
Pairing Procedure
Mobile phone pairing is the process of establishing a
wireless connection between a cellular phone and the
Uconnect system.
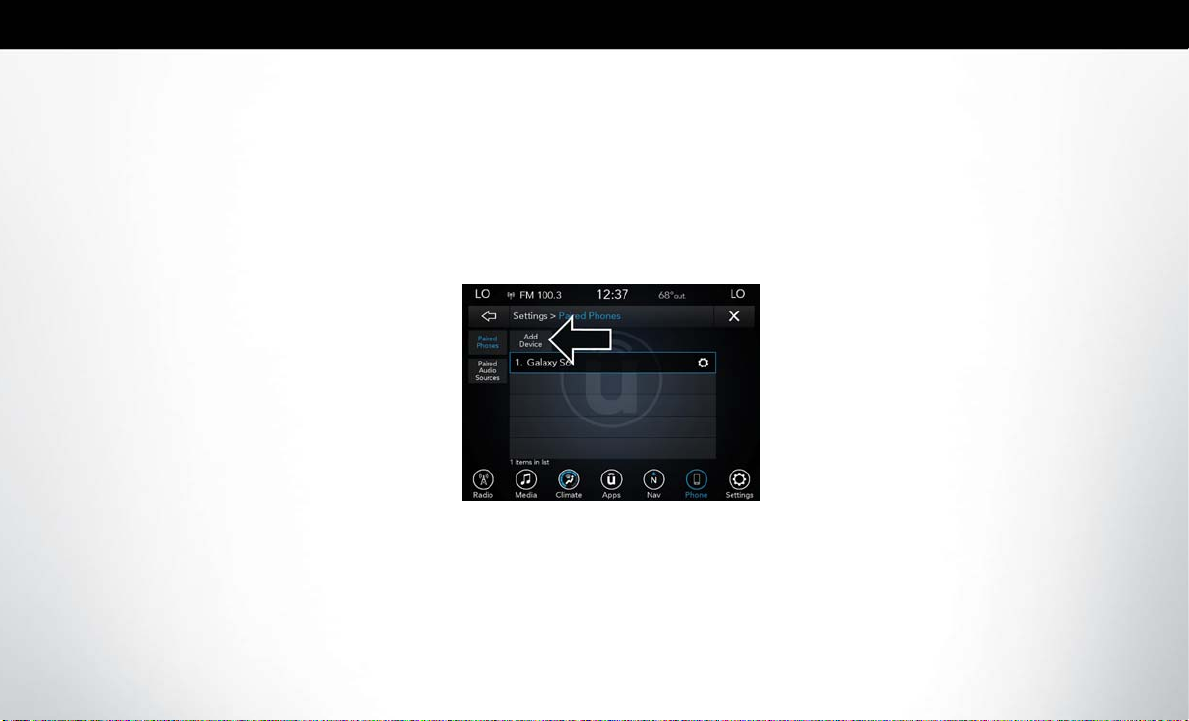
Start Pairing Procedure On The Radio
Uconnect 8.4, 8.4 NAV:
Uconnect 8.4 & 8.4 NAV
1. Place the ignition in the ACC or ON position.
2. Press the “Phone” button in the Menu Bar on the
touchscreen.
3. Select “Settings.”
4. Select “Paired Phones.”
5. Select “Add device.”
• Uconnect Phone will display an “In progress”
screen while the system is connecting.
Page 6

Pair Your iPhone:
3. When your mobile phone finds the Uconnect
system, select “Uconnect”.
Complete The iPhone Pairing Procedure:
Pair Your Android Device:
Uconnect Device
Bluetooth On/Uconnect Device
To search for available devices on your Bluetooth
enabled iPhone:
1. Press the Settings button.
2. Select Bluetooth.
• Ensure the Bluetooth feature is enabled. Once
enabled, the mobile phone will begin to search
for Bluetooth connections.
Pairing Request
1. When prompted on the mobile phone, accept the
connection request from Uconnect Phone.
NOTE:
Some mobile phones will require you to enter the PIN
number.
To search for available devices on your Bluetooth
enabled Android Device:
1. Push the Menu button.
2. Select Settings.
3. Select Connections.
Page 7

4. Turn Bluetooth setting to “On.”
• Ensure the Bluetooth feature is enabled. Once
enabled, the mobile phone will begin to search
for Bluetooth connections.
5. Once your mobile phone finds the Uconnect system, select “Uconnect”.
• You may bepromptedby your mobilephone to
download the phonebook, check “Do Not Ask
Again” to automatically download the phonebook. This is so you can make calls by saying
the name of your contact.
Complete The Android Pairing Procedure: 1. Confirm the passkey shown on the mobile phone
matches the passkey shown on the Uconnect system then accept the Bluetooth pairing request.
NOTE:
Some mobile phones require the PIN to be entered
manually, enterthePIN number shownon the Uconnect
screen.
For further information on Uconnect Phone, please
refer to“UconnectPhone”inthe vehicle’s User Guide.
Pairing Request
Page 8

LIGHTS
SPEED CONTROL
Automatic High Beam — If Equipped
This system automatically controls the operation of the
headlamp high beams as oncoming vehicles approach.
• The Automatic High BeamHeadlamp Control can
be turned on or off using the Uconnect System.
• Push the turn signal lever away from you.
• With the headlight switch in the “AUTO” position,
the high beams are controlled automatically
• Pull the turn signal lever toward you to manually
deactivate the system.
• To improve system recognition of crossing traffic
and to limit use in a residential area, the vehicle
must be moving at a speed greater than 20 mph
(32 km/h) before the Automatic High Beam
Module (AHBM) begins requesting high beam
activation.
NOTE:
If the windshield or Automatic High Beam Headlamp
Control mirror is replaced, the mirror must be reaimed to ensure proper performance. See your local
authorized dealer.
Adaptive Cruise Control (ACC) — If Equipped
If your vehicleis equipped with Adaptive Cruise Control, the controls operate exactly the same as the
standard cruise control, with one difference. You can
set a specified distance you would like to maintain
between you and the vehicle in front of you.
• If the ACC sensor detects a vehicle ahead, ACC
will apply limited braking or acceleration automatically to maintain a preset following distance while
matching the speed of the vehicle ahead.
• If the sensor does not detect a vehicle directly
ahead of you, it functions like a standard cruise
control system, maintaining the speed you set.
Adaptive Cruise Switches
1 — Adaptive Cruise Control (ACC) On/Off
2 — Distance Setting – Decrease
3 — Distance Setting – Increase
For further information and applicable warnings and
cautions, please refer to your Owner’s Manual at
www.chrysler.com/en/owners/manuals.
Page 9

Speed Control
When engaged, the Speed Control takes over accelerator operations atspeeds greater than 25 mph (40 km/h).
Speed Control Switches
1 — Push Cancel
2 — Push Set+/Accel
3 — Push Resume
4 — Push On/Off
5 — Push Set-/Decel
To Activate
Push the on/off button. To turn the system off, push
the on/off button a second time. The system should
be turned off when not in use.
To Set A Desired Speed
Turn the Speed Control on. When the vehicle has
reached the desired speed, push the SET button and
release. Release the accelerator and the vehicle will
operate at the selected speed.
To Deactivate
A soft tap on the brake pedal, pushing the CANC
button, or normal brake pressure while slowing the
vehicle will deactivate Speed Control without erasing
the set speed memory. Pushing the on/off button or
turning theignitionswitch OFF erasestheset speed in
memory.
To Resume Speed
To resume a previously set speed, push the RES button and release.
To Increase Speed
When the Speed Control is set, you can increase
speed by pushing the SET (+) button.
To Decrease Speed
When the Speed Control is set, you can decrease
speed by pushing the SET (-) button.
To Accelerate For Passing
Press the acceleratorasyou would normally. When the
pedal is released, the vehicle will return to the set
speed.
For further information and applicable warnings and
cautions, please refer to your Owner’s Manual at
www.chrysler.com/en/owners/manuals.
Page 10

SAFETY FEATURES
Forward Collision Warning With Mitigation — If Equipped
The Forward Collision Warning (FCW) system provides the driver with active braking, audible and visual
warnings (within the instrument cluster display) and
may apply a brake jerk to warn the driver when it
detects a potential frontal collision. The warnings and
limited braking are intended to provide the driver with
enough time to reactand avoidor mitigatethe potential collision.
FCW monitors the information from the forwardlooking sensor,as well as theElectronicBrake Controller (EBC ) and wheel speed sensors, to calculate the
probability ofa collision. Whenthesystem determines
that a collision is probable, a warning message (both
audible and visual) will be displayed within the cluster
display along with a brake jerk warning (previously
enabled in the Uconnect Settings). When the system
senses the driver applying the brakes to avoid a probable collision, additional brake force will be provided
to thevehicle. When thesystem determines acollision
with the vehicle in front of you is no longer probable,
the warning message will be deactivated.
NOTE:
The FCW feature can be customized and turned off
through the Uconnect System touchscreen.
For further information and applicable warnings and
cautions, please refer to your Owner’s Manual at
www.chrysler.com/en/owners/manuals.
LaneSense — If Equipped
The LaneSense systemis operationalat speeds above
37 mph(60km/h) and below 112mph(180 km/h). The
LaneSense system uses a forward looking camera to
detect lane markings and measure vehicle position
within the lane boundaries.
Turning LaneSense ON Or OFF
The default status of LaneSense is “OFF”. The LaneSense button is located on the switch panel below the
Uconnect display.
LaneSense Warning Message
The LaneSense system will indicate the current lane
drift condition through the instrument cluster display.
The instrument cluster display will provide a visual
warning depicting the unintentional lane departure.
When both lane markings are detected and the driver
unintentionally drifts out of the lane (no turn signal
applied), the LaneSense system provides a haptic
warning in the form of torque applied to the steering
wheel to prompt the driver to remain within the lane
boundaries. The driver may manually override the
haptic warning by applying torque into the steering
wheel at any time. When only a single lane marking is
detected and the driver unintentionally drifts across
the lane marking (no turn signal applied), the LaneSense system provides a visual warning through the
instrument cluster display to prompt the driver to
remain within the lane. When only a single lane marking is detected, a haptic (torque) warning will not be
provided.
NOTE:
The LaneSense system canbe customizedand turned
off through the Uconnect System touchscreen.
For further information and applicable warnings and
cautions, please refer to your Owner’s Manual at
www.chrysler.com/en/owners/manuals.
Page 11

SIRIUSXM GUARDIAN — IF EQUIPPED
Activation
To unlock the full potential of SiriusXM Guardian
in your vehicle, you must activate your SiriusXM
Guardian services.
1. Press the Apps icon on the bottom of your invehicle touchscreen.
2. Select the Activate Services icon from your list of
apps.
3. Select “Customer Care” to speak with a SiriusXM
Guardian Customer Care agent who will activate
services in your vehicle, or select “Enter Email” to
activate on the web.
Once you have activated your services, you’re only a
few steps away from using remote commands.
Mobile App
To use the SiriusXM Guardian app:
• Once you have activated your SiriusXM Guardian
services, download the SiriusXM Guardian app to
your mobile device. Use your Owner Account
login and password to open the app.
• Once on the “Remote” screen, you can beginusing
Remote Door Lock/Unlock, Remote Vehicle
Start, and activate your horn and lights remotely,
if equipped.
• Press the “Location” button on the bottom menu
bar of the app to bring up a map to locate your
vehicle or send a location to your Uconnect Navigation, if equipped.
• Press the “Settings” side menu in the upper left
corner of the app to bring up app settings and
access the Assist Call Centers.
For further information, please visit siriusxm.com/
guardian.
Page 12

Features
SiriusXM Guardian provides you with access to many
in-vehicle features, whereas the SiriusXM Guardian
Mobile App provides remote features.
In-Vehicle Features
SiriusXM Guardian enhances your ownership and
driving experience by connecting your vehicle to an
operable network connection. When connected to an
operable network, you can:
• Place a call to a local Emergency Services Agent
for emergency assistance.
• Get operator assistance using the ASSIST button
on your interior rearview mirror.
Remote Features
The SiriusXM Guardian Mobile App helps you activate
features from a distance. The remote features are:
• Place a SiriusXM Guardian Care call for customer
assistance.
• Use the Vehicle Finder feature to find where you
parked.
• Use the Send & Go feature to send a navigation
route from your mobile device to your vehicle’s
navigation system.
• Receive text or email notifications if your vehicle's
security alarm goes off.
• Receive stolen vehicle assistance, using GPS technology to help authoritieslocate your vehicle if it is
stolen.
• Remotely lock/unlock your doors, activate your
horn and lights, andstart your vehicle from virtually
anywhere, using the SiriusXM Guardian App from
your device. Youcan also dosobylogginginto your
owner site, or by calling SiriusXM Guardian Care
when your vehicle has an operable network connection. Services can only be used where coverage
is available; see coverage map for details.
• Receive monthly Vehicle Health Reports, and
Alerts whenever a problem is detected under the
hood.
For further information on SiriusXM Guardian, refer
to your Uconnect Owner’s Manual Supplement.
Vehicle Finder And Send & Go
Two of the most convenient remote features of the
SiriusXM Guardian Mobile App are Vehicle Finder
and Send & Go.
Vehicle Finder
Vehicle Finder allows you to find the location of your
vehicle when you have lost it. You can also sound the
alarm and flash thelights to make finding your vehicle
even easier. To find your vehicle:
1. Press the “Location” tab on theSiriusXM Guardian
Mobile App bottom bar.
2. Select the “Vehicle” icon to determine the location
of your vehicle.
3. Select the “Find Route” button that appears, once
your vehicle is located.
4. Select your preferred Navigation App to route a
path to your vehicle.
Page 13

VEHICLE USER GUIDE — IF EQUIPPED
Send & Go
Send & Go allows you to search for a destination on
your mobile device and then send the route to your
vehicle’s native navigation system. To send a navigation route to your vehicle:
1. Press the “Location” tab on theSiriusXM Guardian
Mobile App bottom bar.
2. Either type in the destination you would like to
navigate to, or search through one of the categories provided.
3. Select the destination you wanttoroutetofromthe
list that appears.
4. Press the “Send To Vehicle” button, and then con-
firm the destination by pressing “Yes,” to send the
navigation route to the Uconnect Navigation in
your vehicle.
5. Finally, confirm the route inside your vehicle by
pressing the “Go Now” option on the pop-up that
appears on the touchscreen, when the vehicle is
started.
Overview
Access yourOwner’sInformation– right throughyour
Uconnect 8.4 or 8.4 NAV touchscreen radio — If
Equipped.
To access the Vehicle User Guide on your Uconnect
Touchscreen: Push the Uconnect Apps button, then
push the Vehicle User Guide icon on your touch-
screen.
NOTE:
VehicleUserGuide features are not available whilethe
vehicle is moving. If you try toaccess while the vehicle
is in motion, the system will display: Feature not available while the vehicle is in motion.
Pre-Installed Features
• Your User Guide — Updated in real-time
• Available when and where you need it
• Touchscreen convenience
• Customizable interface
• Maintenance schedules and information
• Multilingual
• Comprehensive icon & symbol glossary
Vehicle User Guide Home Screen
Refer to your User Guide for further information.
Page 14

CHRYSLER VEHICLE
OWNER’S MOBILE APP
Key Features
• Owner Information For Your Vehicle
• Accident Assistant
• Parking Reminder
• Dealer Locator
• Brand Heritage
• Parts, Accessories, and Gear Store
To get this FREE application, go directly to the App
Store or Google Play Store and enter the search keyword “Chrysler”.
The Chrysler Vehicle Owner’s
Information Application is the
essential app for owners of
Chrysler brand vehicles. The
app puts driver and lifestyle information right in the palm of
your hand, anywhere you go.
Whether it’s providing information about specific
product features, taking a tour through your vehicle’s
heritage, knowing what steps to take following an
accident, or scheduling your next appointment, we
know you’ll find the app an important extension of
your Chrysler vehicle. Simply download the FREE
app, select your make and model and enjoy the ride.
Features/Benefits
• Available for free on iOS and Android smartphones and tablets.
• Select Chrysler brand vehicles from model year
2011 to current model year.
• Youcanalsoadd other Jeep, Dodge,Ram,FIAT, or
Alfa Romeo vehicles.*
• Easy access to vehicle information anywhere you
go usingcategories,bookmarks,search and anA-Z
index.
Page 15

MAINTAINING YOUR VEHICLE
• Vehicle information such as operating instructions,
maintenance, service history, vehicle controls and
emergency procedures.
• Find a dealer or an FCA-certified repair facility.
• Easily document and email an accident report.
• A parkingreminder that allows you todrop a pinon
your location and navigate back to your vehicle.
• Contact customer care with one click.
• Access to vehicle heritage, parts, accessories, and
social media networks.
• Schedule your next service appointment.
• Available in English and Spanish.
*App supports selected vehicles from model year
2011 to present.
To get this FREE application, go directly to the App
Store or Google Play Store and enter the search keyword “Chrysler”.
Vehicle Care
Due to the high performance nature of the brake
system, the wheelswill get coated with brake dust. It is
recommended that Mopar® Wheel Cleaner be used
on your wheels to avoid any possible damage to
the finish. However, do not use wheel cleaner if your
vehicle is equipped with Dark Vapor or Black Satin
Chrome wheels,which must only be cleanedwith mild
soap, water, and a soft cloth. Please see your Owner’s
Manual for further information.
Due to lower ground clearance, driving your vehicle
up steep driveways, approach ramps, or near parking
blocks may cause damage to the front fascia and
ground effects.
Caution should be taken when driving through water
or snow more than 4 inches (100 mm) deep to avoid
any potential for damage to your vehicle.
For further information, and applicable warnings and
cautions, please refer to your Owner’s Manual at
www.chrysler.com/en/owners/manuals.
Page 16

Whether it’s providing information about specific product features, taking a tour through
your vehicle’s heritage, knowing what steps to take following an accident, or scheduling your
next appointment, we know you’ll find the app an important extension of your Chrysler
vehicle. Simply download the app, select your make and model and enjoy the ride.
To get this app, go directly to the App Store or Google Play and
enter the search keyword “Chrysler” (U.S. market only).
Chrysler.com/EN/Owners provides special oers tailored to your needs,
customized vehicle galleries, personalized service records and more.
To get this information, just create an account and check back often.
Download a FREE electronic copy
of the Owner’s Manual and Warranty Booklets by visiting:
chrysler.com/en/owners/manuals or
chrysler.com/en/warranty (U.S.);
owners.mopar.ca/en (Canada).
chrysler.com/300 (U.S.)
chrysler.ca/300 (Canada)
©2017 FCA US LLC. All Rights Reserved.
Chrysler is a registered trademark of FCA US LLC.
THIRD EDITION • QUICK REFERENCE GUIDE
LX-QRG-AA • 300
 Loading...