

Christie Solaria One User Manual

Solaria One
User Manual
020-100841-02


Solaria One
USER MANUAL
020-100841-02

NOTICES
COPYRIGHT AND TRADEMARKS
© 2012 Christie Digital Systems USA, Inc. All rights reserved.
All brand names and product names are trademarks, registered trademarks or trade names of their respective holders.
REGULATORY
The product has been tested and found to comply with the limits for a Class A digital device, pursuant to Part 15 of the FCC Rules.
These limits are designed to provide reasonable protection against harmful interference when the product is operated in a
commercial environment. The product generates, uses, and can radiate radio frequency energy and, if not installed and used in
accordance with the instruction manual, may cause harmful interference to radio communications. Operation of the product in a
residential area is likely to cause harmful interference in which case the user will be required to correct the interference at the
user’s own expense.
This Class A digital apparatus complies with Canadian ICES-003.
Cet appareil numérique de la classe A est conforme à la norme NMB-003 du Canada.
이 기기는 업무용 (A 급 ) 으로 전자파적합등록을 한 기기이오니 판매자 또는 사용자는 이점을 주의하시기 바라며 , 가정 외의 지역에서
사용하는 것을 목적으로 합니다 .
GENERAL
Every effort has been made to ensure accuracy, however in some cases changes in the products or availability could occur which
may not be reflected in this document. Christie reserves the right to make changes to specifications at any time without notice.
Performance specifications are typical, but may vary depending on conditions beyond Christie's control such as maintenance of
the product in proper working conditions. Performance specifications are based on information available at the time of printing.
Christie makes no warranty of any kind with regard to this material, including, but not limited to, implied warranties of fitness for
a particular purpose. Christie will not be liable for errors contained herein or for incidental or consequential damages in
connection with the performance or use of this material.
The product is designed and manufactured with high-quality materials and components that can be recycled and reused. This
symbol means that electrical and electronic equipment, at their end-of-life, should be disposed of separately from regular
waste. Please dispose of the product appropriately and according to local regulations. In the European Union, there are separate
collection systems for used electrical and electronic products. Please help us to conserve the environment we live in!
Canadian manufacturing facility is ISO 9001 and 14001 certified.
GENERAL WARRANTY STATEMENTS
For complete information about Christie’s limited warranty, please contact your Christie dealer. In addition to the other limitations
that may be specified in Christie’s limited warranty, the warranty does not cover:
a. Damage occurring during shipment, in either direction.
b. Projector lamps (See Christie’s separate lamp program policy).
c. Damage caused by use of a projector lamp beyond the recommended lamp life, or use of a lamp supplied by a supplier other
than Christie.
d. Problems caused by combination of the product with non-Christie equipment, such as distribution systems, cameras, video
tape recorders, etc., or use of the product with any non-Christie interface device.
e. Damage caused by misuse, improper power source, accident, fire, flood, lightening, earthquake or other natural disaster.
f. Damage caused by improper installation/alignment, or by product modification, if by other than a Christie authorized repair
service provider.
g. For LCD projectors, the warranty period specified applies only where the LCD projector is in “normal use.” “Normal use”
means the LCD projector is not used more than 8 hours a day, 5 days a week. For any LCD projector where “normal use” is
exceeded, warranty coverage under this warranty terminates after 6000 hours of operation.
h. Failure due to normal wear and tear.
PREVENTATIVE MAINTENANCE
Preventative maintenance is an important part of the continued and proper operation of your product. Please see the
Maintenance section for specific maintenance items as they relate to your product. Failure to perform maintenance as required,
and in accordance with the maintenance schedule specified by Christie, will void the warranty.

Addendum
The CD included with this printed manual contains an electronic copy in English. Please read all
instructions before using or servicing this product.
手册中包含的光盘,带有着中文的电子副本,使用或维修本产品前,请仔细查阅所有的指示。
Le DC fourni avec ce manuel imprimé contient une copie électronique en français. S'il vous plaît
lire toutes les instructions avant d'utiliser ou de réparer ce produit.
Das CD, das mit diesem gedruckten Handbuch eingeschlossen ist, enthält eine elektronische
Kopie auf in deutscher Sprache. Vor der Anwendung oder der Instandhaltung dieses Produktes
lesen Sie bitte alle Anweisungen.
Il CD fornito con il manuale stampato contiene una copia elettronica in lingua italiano. Si prega di
leggere tutte le istruzioni prima di utilizzare o riparare questo prodotto.
この印刷されたマニュアルに同梱されております CD には、日本語での説明書が入っております。
この製品を使用あるいは修理点検される際に、ご参照下さい。
매뉴얼과 함께 포함되어 있는 CD에는 한글로 된 전자사본을 포함하고 있습니다. 본 제품을 사용 혹은
서비스하기 전에 모든 지침 사항들을 읽어 보시기 바랍니다 .
Поставляемый в комплекте с документацией компакт-диск (CD) содержит электронную копию
руководства пользователя на русском языке. Перед началом использования изделия или
проведения сервиса пожалуйста прочтите все инструкции изложенные в руководстве.
El DC incluido con este manual impreso contiene una copia electrónica en español. Por favor, lea
todas las instrucciones antes de usar o dar servicio a este producto.
Компакт диск, що постачається з цим друковане керівництво містить електронну копію
українською мовою. Будь ласка, прочитайте всі інструкції перед використанням або
обслуговуванням цього продукту.
O CD incluído com o impresso livro contém um eletrônico cópia em Português. Por favor lido
todas as instruções antes de usar ou prestando serviço esse resultado.


Table of Contents
1: Installation and Setup
1.1 Safety Precautions .......................................................................................................................1-1
1.1.1 AC/Power Precautions......................................................................................................... 1-1
1.1.2 Power Cords and Attachments............................................................................................. 1-2
1.1.3 Lamp Precautions ................................................................................................................1-2
1.2 Projector Components - Front .....................................................................................................1-3
1.3 Projector Components - Rear ......................................................................................................1-4
1.4 Position the Projector...................................................................................................................1-4
1.5 Stack Projectors ........................................................................................................................... 1-5
1.6 Adjust Tilt and Level the Projector .............................................................................................1-7
1.7 Install the Touch Panel Controller...............................................................................................1-7
1.8 Install the Lens.............................................................................................................................1-8
1.9 Install the Lamp ...........................................................................................................................1-9
1.10 Connect Devices to the Projector ..............................................................................................1-12
1.10.1 Projector Connections........................................................................................................1-12
1.10.2 Connect the Projector to a Computer................................................................................. 1-14
1.10.3 Connect the Projector to Network-attached Storage..........................................................1-14
1.10.4 Connect the Projector to Direct-attached Storage..............................................................1-14
1.10.5 Connect the Projector to a Digital Cinema Audio Processor.............................................1-15
1.10.6 Connect Devices to the 3D Sync Terminal........................................................................ 1-15
1.11 Connect Power........................................................................................................................... 1-15
1.12 Turn the Projector On ................................................................................................................1-16
1.13 Log On to the Projector .............................................................................................................1-17
1.14 Activate Marriage ......................................................................................................................1-17
1.15 Add the Projector to a Network................................................................................................. 1-17
1.16 Add the Lamp Information to the Lamp History....................................................................... 1-18
1.17 Turn the Lamp On .....................................................................................................................1-18
1.18 Align the Lamp.......................................................................................................................... 1-18
1.19 Adjust the Image to Fit Your Screen .........................................................................................1-19
1.20 Align Dual Projector Images ..................................................................................................... 1-21
1.21 Load a RealD 3D EQ Configuration File ..................................................................................1-22
1.22 Play Content ..............................................................................................................................1-22
2: Adjust the Image
2.1 Correct Keystone Effect ..............................................................................................................2-1
2.1.1 Correct Dual Projector Horizontal Keystone.......................................................................2-1
2.1.2 Correct Dual Projector Vertical Keystone ...........................................................................2-2
2.2 Correct Vignetting ....................................................................................................................... 2-3
2.3 Adjust Vertical Boresight Angle .................................................................................................2-3
2.4 Adjust Horizontal Boresight........................................................................................................ 2-4
2.5 Adjust DMD Convergence .......................................................................................................... 2-6
2.6 Fold Mirror Adjustment...............................................................................................................2-6
2.7 Color Calibration .........................................................................................................................2-7
2.8 Screen Masking ...........................................................................................................................2-8
2.9 Calibrate Screen Brightness (fL) .................................................................................................2-8
Solaria One User Manual i
020-100841-02 Rev. 1 (11-2012)

Table of Contents
3: Access the Projector and Run Diagnostics
3.1 The Touch Panel Controller.........................................................................................................3-1
3.2 The Main Screen ..........................................................................................................................3-1
3.3 Log On to the Projector ...............................................................................................................3-3
3.4 View the Status of Projector Components...................................................................................3-3
3.5 Run the Projector Interrogator .....................................................................................................3-4
3.6 Retrieve System Logs ..................................................................................................................3-4
3.7 Run a Server Test.........................................................................................................................3-4
3.8 Respond to Alarms.......................................................................................................................3-5
3.9 Turn the Projector Off..................................................................................................................3-5
4: Manage the DLP
4.1 Stop DLP Communication...........................................................................................................4-1
4.2 Reset the DLP ..............................................................................................................................4-1
4.3 Run a DLP Self Test ....................................................................................................................4-1
4.4 Download an ICP Certificate.......................................................................................................4-1
4.5 Disable the ICP Signature Test....................................................................................................4-2
5: Work with Channels
5.1 Create a New Channel .................................................................................................................5-1
5.2 Activate a Channel.......................................................................................................................5-3
5.3 Restore Default Channel Settings ................................................................................................5-3
5.4 Change the Channel Icon.............................................................................................................5-3
5.5 Add or Remove Preferred Channels from the Preferred Channels Pane.....................................5-3
6: Manage Lamp Information
6.1 Create a New Lamp File ..............................................................................................................6-1
6.2 Modify an Existing Lamp File.....................................................................................................6-1
6.3 Enable or Disable LiteLOC on a Lamp File ................................................................................6-1
6.4 Adjust Lamp Power .....................................................................................................................6-2
6.5 Change the Lamp Power Percentage ...........................................................................................6-2
6.6 View Lamp Information ..............................................................................................................6-2
6.7 Receive an Alarm when a Lamp Reaches Its Expiry Date ..........................................................6-2
6.8 Lamp Expiry Hours .....................................................................................................................6-2
6.9 Minimum and Maximum Lamp Power Ratings ..........................................................................6-3
6.10 Add a Lamp to the Lamp History ..............................................................................................6-3
6.11 Verify Current Lamp Intensity...................................................................................................6-3
7: Manage Projector Setting Files
7.1 Create a Source File.....................................................................................................................7-1
7.2 Modify a Source File ...................................................................................................................7-1
7.3 Create a Screen File .....................................................................................................................7-1
7.4 Modify a Screen File....................................................................................................................7-2
7.5 Create a MCGD File ....................................................................................................................7-2
ii Solaria One User Manual
020-100841-02 Rev. 1 (11-2012)

Table of Contents
7.6 Modify a MCGD File ..................................................................................................................7-2
7.7 Create a TCGD File..................................................................................................................... 7-3
7.8 Modify a TCGD File ...................................................................................................................7-3
8: Work with the Scheduler
8.1 Schedule the Projector to Turn On or Off ...................................................................................8-1
8.2 Edit a Scheduled Event................................................................................................................8-1
8.3 Delete a Scheduled Event ............................................................................................................8-2
8.4 Delete All Scheduled Events ....................................................................................................... 8-2
8.5 Turn the Scheduler Off ................................................................................................................8-2
9: View and Modify Projector Settings
9.1 Set Projector and TPC Preferences.............................................................................................. 9-1
9.2 Adjust Projector Time Settings....................................................................................................9-1
9.3 Modify Projector Communication Settings................................................................................. 9-2
9.4 Add a Network Device ................................................................................................................9-2
9.5 Access a Network Device............................................................................................................9-2
9.6 Calibrate the Internal Light Meter ...............................................................................................9-3
9.7 View the Microsoft Windows Task Manager..............................................................................9-3
9.8 View the Microsoft Windows Computer Management Console.................................................9-3
9.9 View Microsoft Windows Explorer ............................................................................................9-3
9.10 View the Microsoft Network Connections Window ................................................................. 9-3
9.11 View Projector Information.......................................................................................................9-4
9.12 Record the Lens Serial Number.................................................................................................9-4
10: Manage User Accounts
10.1 User Access Permissions ...........................................................................................................10-1
10.2 Add a User Account ..................................................................................................................10-1
10.3 Change a User Account Password or Permissions .................................................................... 10-1
10.4 Delete a User Account............................................................................................................... 10-2
11: Backup, Restore, and Upgrade Projector Files
11.1 Add an Upgrade File..................................................................................................................11-1
11.2 Remove an Upgrade File ...........................................................................................................11-1
11.3 Install an Upgrade...................................................................................................................... 11-1
11.4 Back up Projector Settings and Information..............................................................................11-2
11.5 Restore a File .............................................................................................................................11-2
11.6 Restore Factory Default Settings............................................................................................... 11-2
11.7 Move Files to the Projector .......................................................................................................11-2
11.8 Delete Projector Files ................................................................................................................11-3
12: Test Patterns
12.1 Add or Remove Test Patterns from the Preferred Test Patterns Pane.......................................12-1
12.2 Turn a Test Pattern On or Off.................................................................................................... 12-1
12.3 Display a Full Screen Test Pattern ............................................................................................12-1
Solaria One User Manual iii
020-100841-02 Rev. 1 (11-2012)

Table of Contents
13: Manage the Christie IMB
13.1 Content Management.................................................................................................................13-1
13.1.1 Control Content Playback ..................................................................................................13-1
13.1.2 Content Window Icons.......................................................................................................13-2
13.1.3 Load Content......................................................................................................................13-2
13.1.4 Loop Content......................................................................................................................13-2
13.1.5 Unload Content ..................................................................................................................13-2
13.1.6 View Content Stored Locally.............................................................................................13-3
13.1.7 View Details about Content Stored Locally ......................................................................13-3
13.1.8 Refresh the Locally Stored Content List............................................................................13-3
13.1.9 Delete Locally Stored Content...........................................................................................13-3
13.1.10 View All Keys..................................................................................................................13-3
13.1.11 View Expired Keys ..........................................................................................................13-3
13.1.12 View Keys Expiring Today..............................................................................................13-3
13.1.13 View Keys Not Yet Valid ................................................................................................13-4
13.1.14 Refresh the Keys List.......................................................................................................13-4
13.1.15 Delete a Key.....................................................................................................................13-4
13.1.16 Delete All Displayed Keys...............................................................................................13-4
13.1.17 View Ingestible Content...................................................................................................13-4
13.1.18 Ingest Content ..................................................................................................................13-4
13.1.19 Refresh the Ingestible Content List..................................................................................13-5
13.1.20 View the Progress of Ingestible Content..........................................................................13-5
13.1.21 Refresh the Ingest Status List...........................................................................................13-5
13.2 Play Lists....................................................................................................................................13-5
13.2.1 View an Existing Play List.................................................................................................13-5
13.2.2 Import a Play List...............................................................................................................13-5
13.2.3 Create a Play List ...............................................................................................................13-6
13.2.4 Export a Play List...............................................................................................................13-6
13.2.5 Copy a Play List.................................................................................................................13-6
13.2.6 Rename a Play List ............................................................................................................13-6
13.2.7 Add Content to a Play List.................................................................................................13-7
13.2.8 Change the Order of Content in a Play List .......................................................................13-7
13.2.9 View the Status of Play List Content .................................................................................13-7
13.2.10 Remove Content from a Play List....................................................................................13-7
13.2.11 Add Automation to a Play List ........................................................................................13-8
13.2.12 Modify When an Automation Occurs..............................................................................13-8
13.2.13 Remove Automation from a Play List .............................................................................13-9
13.2.14 Delete a Play List .............................................................................................................13-9
13.3 Schedule Views..........................................................................................................................13-9
13.3.1 View the Schedule Calendar View ....................................................................................13-10
13.3.2 View the Schedule Day View ............................................................................................13-10
13.3.3 Add a New Item to the Schedule .......................................................................................13-10
13.3.4 Edit a Schedule Item ..........................................................................................................13-11
13.3.5 Copy a Scheduled Item ......................................................................................................13-11
13.3.6 Copy a Day Schedule.........................................................................................................13-11
iv Solaria One User Manual
020-100841-02 Rev. 1 (11-2012)

Table of Contents
13.3.7 Delete a Schedule Item ......................................................................................................13-12
13.3.8 Delete a Day Schedule....................................................................................................... 13-12
13.3.9 Enable or Disable Auto Play.............................................................................................. 13-12
13.3.10 View the Calendar ...........................................................................................................13-12
13.4 Manage Christie IMB Settings .................................................................................................. 13-12
13.4.1 Restart the Server...............................................................................................................13-12
13.4.2 Download a Certificate ......................................................................................................13-13
13.4.3 Run a System Interrogation ...............................................................................................13-13
13.4.4 Remove Orphaned Assets.................................................................................................. 13-13
13.4.5 Restore Factory Default Settings .......................................................................................13-13
13.4.6 View Status Information.................................................................................................... 13-14
13.4.7 Add a License ....................................................................................................................13-14
13.5 Backup and Restore ...................................................................................................................13-14
13.5.1 Restore Files from an External Device ..............................................................................13-14
13.5.2 Create a Backup File..........................................................................................................13-14
13.5.3 Download a Backup File....................................................................................................13-15
13.5.4 Delete a Christie IMB Backup File....................................................................................13-15
13.6 Work with Configuration Files..................................................................................................13-15
13.6.1 Load a RealD 3D EQ Configuration File ..........................................................................13-15
13.6.2 Load a Default RealD 3D EQ Configuration File .............................................................13-15
13.7 Manage Storage Devices ...........................................................................................................13-16
13.7.1 Add a DAS.........................................................................................................................13-16
13.7.2 Edit DAS Settings.............................................................................................................. 13-16
13.7.3 Delete a DAS ..................................................................................................................... 13-16
13.7.4 Add a NAS.........................................................................................................................13-17
13.7.5 Edit NAS Settings.............................................................................................................. 13-17
13.7.6 Test NAS Connectivity...................................................................................................... 13-17
13.7.7 Test NAS Performance ......................................................................................................13-17
13.7.8 Refresh NAS Share Names................................................................................................13-18
13.7.9 Configure NAS Ethernet Port IP Addresses ......................................................................13-18
13.7.10 Delete a NAS ................................................................................................................... 13-18
13.8 Manage Automation .................................................................................................................. 13-19
13.8.1 Add Automation Devices...................................................................................................13-19
13.8.2 Test Connectivity to an Automation Device......................................................................13-19
13.8.3 Remove Automation Devices ............................................................................................13-19
13.8.4 Add a Macro ......................................................................................................................13-20
13.8.5 Add an Activity to a Macro ...............................................................................................13-20
13.8.6 Edit Macro Activity Settings .............................................................................................13-20
13.8.7 Change the Order of Activities ..........................................................................................
13-20
13.8.8 Remove an Activity ...........................................................................................................13-21
13.8.9 Remove a Macro................................................................................................................ 13-21
13.8.10 Add an Input Cue............................................................................................................. 13-21
13.8.11 Change Input Cue Settings ..............................................................................................13-22
13.8.12 Remove an Input Cue ......................................................................................................13-22
13.8.13 Add a Global Trigger....................................................................................................... 13-22
13.8.14 Change Global Trigger Settings ......................................................................................13-22
Solaria One User Manual v
020-100841-02 Rev. 1 (11-2012)

Table of Contents
13.8.15 Remove a Global Trigger.................................................................................................13-23
13.9 Manage Audio Settings..............................................................................................................13-23
13.9.1 Map Channels ....................................................................................................................13-23
13.9.2 Map Speakers.....................................................................................................................13-23
13.10 Upgrade Software ....................................................................................................................13-24
13.10.1 Upload the Christie IMB Software Upgrade Package .....................................................13-24
13.10.2 Install the Christie IMB Software Upgrade package .......................................................13-24
13.10.3 Delete an Upgrade File ....................................................................................................13-24
13.11 Logs .........................................................................................................................................13-25
13.11.1 Retrieve SMS Logs .........................................................................................................13-25
13.11.2 Retrieve SM Logs ............................................................................................................13-25
13.11.3 View Log Detail...............................................................................................................13-25
13.11.4 Download an SMS or SM Log.........................................................................................13-25
13.11.5 Download an SM Report..................................................................................................13-26
13.11.6 Clear the Log List ............................................................................................................13-26
14: View 3D Content
14.1 Display Requirements................................................................................................................14-1
14.2 3D Sync Terminal PIN Map ......................................................................................................14-1
14.3 Hardware Setup..........................................................................................................................14-2
14.4 Configure Dual Projectors for 3D..............................................................................................14-2
14.5 Create a High Frame Rate 3D File.............................................................................................14-3
14.6 Edit the Default 3D Lamp File ..................................................................................................14-4
14.7 Define a Measured Color Gamut Data File ...............................................................................14-4
14.8 Edit the 3D Flat 1998 x 1080 Channel ......................................................................................14-4
14.9 Edit the 3D Scope 2048 x 858 Channel.....................................................................................14-5
14.10 Display 3D Diagnostic Test Patterns .......................................................................................14-6
14.11 Verify 3D Cinema Content ......................................................................................................14-6
14.12 3D Troubleshooting .................................................................................................................14-6
15: Maintenance
15.1 Inspect Ventilation.....................................................................................................................15-1
15.2 Inspect the Lamp........................................................................................................................15-1
15.3 Inspect and Clean Optics ...........................................................................................................15-1
15.3.1 Clean the Lens....................................................................................................................15-2
15.4 Replace the Lamp ......................................................................................................................15-2
15.4.1 Remove the Existing Lamp................................................................................................15-2
15.4.2 Install the New Lamp.........................................................................................................15-4
15.5 Replace the Card Cage Filter .....................................................................................................15-5
15.6 Replace the Light Engine Compartment Filter ..........................................................................15-6
15.7 Replace the Lens........................................................................................................................15-7
16: Troubleshooting
16.1 Projector Functionality ..............................................................................................................16-1
16.2 Lamp Functionality....................................................................................................................16-1
vi Solaria One User Manual
020-100841-02 Rev. 1 (11-2012)

Table of Contents
16.3 Display Issues ............................................................................................................................16-2
16.4 Christie IMB ..............................................................................................................................16-4
A: Projector Specifications
A.1 Display........................................................................................................................................ A-1
A.1.1 Panel Resolution and Refresh Rate.....................................................................................A-1
A.1.2 Achievable Brightness (Measured at Screen Center) .........................................................A-1
A.1.3 Achievable Contrast Ratio .................................................................................................. A-1
A.1.4 Color and Gray Scale ..........................................................................................................A-1
A.1.5 White Point .........................................................................................................................A-1
A.1.6 Gamma................................................................................................................................ A-1
A.2 Control Signal Compatibility...................................................................................................... A-2
A.2.1 Ethernet Port .......................................................................................................................A-2
A.2.2 RS232-PIB ..........................................................................................................................A-2
A.2.3 3D Terminal ........................................................................................................................A-2
A.3 Touch Panel Controller...............................................................................................................A-2
A.4 Power Requirements................................................................................................................... A-3
A.4.1 AC Input (A) .......................................................................................................................A-3
A.4.2 UPS AC Input (B)............................................................................................................... A-3
A.5 Lamp ...........................................................................................................................................A-3
A.6 Physical Specifications ............................................................................................................... A-4
A.7 Regulatory...................................................................................................................................A-4
A.7.1 Safety ..................................................................................................................................A-4
A.7.2 Electro-Magnetic Compatibility .........................................................................................A-4
A.7.3 Environmental.....................................................................................................................A-4
A.7.4 Marking...............................................................................................................................A-5
A.7.5 RoHS, WEEE, Packaging ...................................................................................................A-5
A.8 Environment ...............................................................................................................................A-5
A.8.1 Operating Environment....................................................................................................... A-5
A.8.2 Non-Operating Environment ..............................................................................................A-5
A.9 Accessories .................................................................................................................................A-5
A.9.1 Standard (sold with product).............................................................................................. A-5
A.9.2 Accessories ........................................................................................................................A-6
A.10 Christie IMB Specifications .....................................................................................................A-6
A.10.1 SMPTE Compatible Cinema Formats - 2D Video (JPEG2000)....................................... A-6
A.10.2 SMPTE Compatible Cinema Formats - 3D Video ...........................................................A-6
A.10.3 Supported Audio Formats .................................................................................................A-7
A.10.4 AES3 Port PIN Map..........................................................................................................A-7
A.10.5 NAS Requirements ...........................................................................................................A-8
A.10.6 Ethernet Port .....................................................................................................................A-8
A.10.7 eSATA ..............................................................................................................................A-8
A.10.8 USB 1 Port ........................................................................................................................A-8
A.10.9 AES3 Audio Output.......................................................................................................... A-8
A.10.10 Security Policy ................................................................................................................A-8
A.10.11 Anti-Tampering Circuitry ...............................................................................................A-9
Solaria One User Manual vii
020-100841-02 Rev. 1 (11-2012)


1 Installation and Setup
WARNING
WARNING
WARNING
This manual is intended for professionally trained operators of Christie high-brightness projection systems.
These operators are qualified to replace the lamp and air filter, but should not attempt to install or service the
projector.
Only accredited Christie technicians who are knowledgeable about the hazards associated with high-voltage,
ultraviolet exposure, and the high temperatures generated by the projector lamp are authorized to assemble,
install, and service the projector. In addition, only Christie accredited personnel are authorized to perform
security procedures such as marriage.
This section provides information and procedures for positioning and installing the projector.
1.1 Safety Precautions
When installing the projector, observe these important safety rules to avoid personal injury or damage to the
projector:
Never look directly into the projector lens or at the lamp. The extremely high
brightness can cause permanent eye damage. For protection from ultraviolet radiation, keep
all projector housings intact during operation. Protective safety clothing and safety goggles
are recommended when servicing.
FIRE HAZARD! Keep hands, clothes, and all combustible material away from
the concentrated light beam of the lamp.
Position all cables where they cannot contact hot surfaces or be pulled or
tripped over.
This projector must be operated in an environment that meets the operating range specification, as listed in
Appendix A: Projector Specifications on page A-1.
1.1.1 AC/Power Precautions
• Use only the AC power cord that is provided with the projector. DO NOT attempt operation
if the AC supply is not within the specified voltage and power range.
• As a safety feature the projector is equipped with a three-wire plug with a third (grounding)
pin. If you are unable to insert the plug into the outlet, contact an electrician to have the
outlet replaced. DO NOT defeat the safety purpose of the grounding-type plug.
• DO NOT attempt operation if the AC supply is not within the rated voltage range, as speci-
fied on the license label.
• Disconnect projector from AC before opening any enclosure.
• DO NOT allow anything to rest on the power cord. Locate the projector where the cord can-
not be damaged by persons walking on it or objects rolling over it. Never operate the projector if the power cable appears damaged in any way.
• DO NOT overload power outlets and extension cords as this can result in fire or shock haz-
ards.
• Only qualified service technicians are permitted to open projector enclosures and only if the
projector is disconnected from AC power.
Solaria One User Manual 1-1
020-100841-02 Rev. 1 (11-2012)

1.1.2 Power Cords and Attachments
WARNING
DANGER
DANGER
A power cord rated for your region is provided with each projector. Ensure
that you are using a power cord, socket, and power plug that meets the appropriate local
rating standards. Use only an AC power cord recommended by Christie. DO NOT attempt
operation if the AC supply and cord are not within the specified voltage and power range.
NOTICE: Use only the attachments and/or accessories recommended by Christie. Use of others may result in
the risk of fire, shock and personal injury.
1.1.3 Lamp Precautions
EXPLOSION HAZARD! Wear authorized protective safety gear whenever the
lamp door is open! Never attempt to remove the lamp directly after use. The lamp is under
significant pressure when hot and cold, and may explode, causing personal injury and/or
property damage.
Any lamp used in the Solaria One is under high pressure and must be handled with great care at all times.
Lamps may explode if dropped or mishandled.
Protective Clothing
Never open the lamp door unless you are wearing protective clothing such as that included in a Christie
Protective Clothing Safety Kit (P/N: 598900-095). Recommended protective clothing includes, but may not be
limited to a polycarbonate face shield, protective gloves, and a quilted ballistic nylon jacket or a welder’s
jacket. NOTE: Christie’s protective clothing recommendations are subject to change. Any local or federal
specifications take precedence over Christie recommendations.
Cool the Lamp Completely
Lamp may explode causing bodily harm or death. Always wear protective
clothing whenever lamp door is open or while handling lamp. Ensure those within the vicinity
of the projector are also suited with protective clothing. Never attempt to access the lamp
while the lamp is ON. Wait at least 15 minutes after the lamp turns OFF before powering
down, disconnecting from AC and opening the lamp door.
1-2 Solaria One User Manual
020-100841-02 Rev. 1 (11-2012)
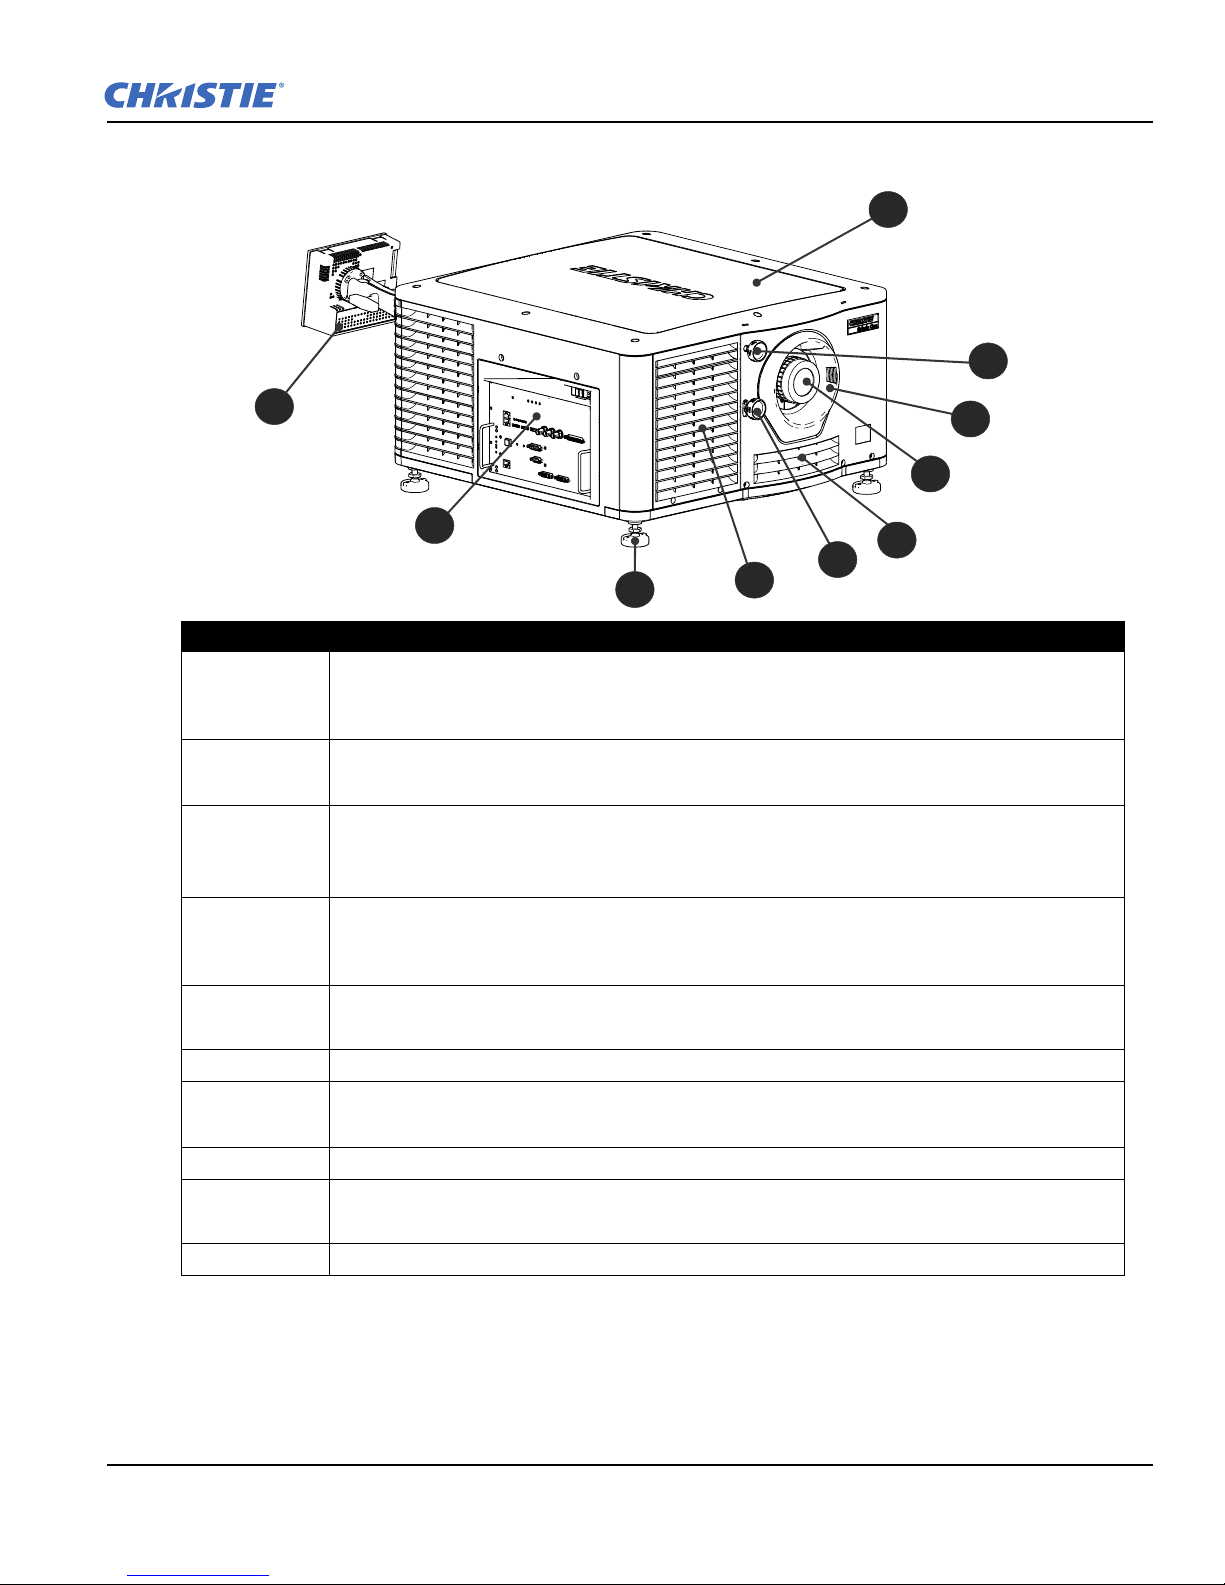
1.2 Projector Components - Front
1
2
3
4
5
7
9
6
8
10
Component Description
1 Touch Panel Controller (TPC)
A touch-sensitive screen used to control the projector. The TPC can remain mounted on the projector or it can be wall mounted.
2 Communications Panel
External devices are connected here. See
3 Adjustable Feet
Turn the adjustable feet to increase or decrease the projector height. See
the Projector on page 1-7
4 Air Filter Cover and Air Filter
Located behind the air filter cover is a replaceable air filter. The air filter filters the intake air
before it begins circulating in the front compartment to cool the main electronics.
5 Horizontal Lens Adjuster
Adjusts the horizontal position of the lens.
6 Air Filter
7 Projector Lens
See
Projector Specifications on page A-1 for a list of available lenses.
8 Lens Surround
9 Vertical Lens Adjuster
Adjusts the vertical position of the lens.
10 Top Lid
.
Projector Connections on page 1-12.
Adjust Tilt and Level
Solaria One User Manual 1-3
020-100841-02 Rev. 1 (11-2012)
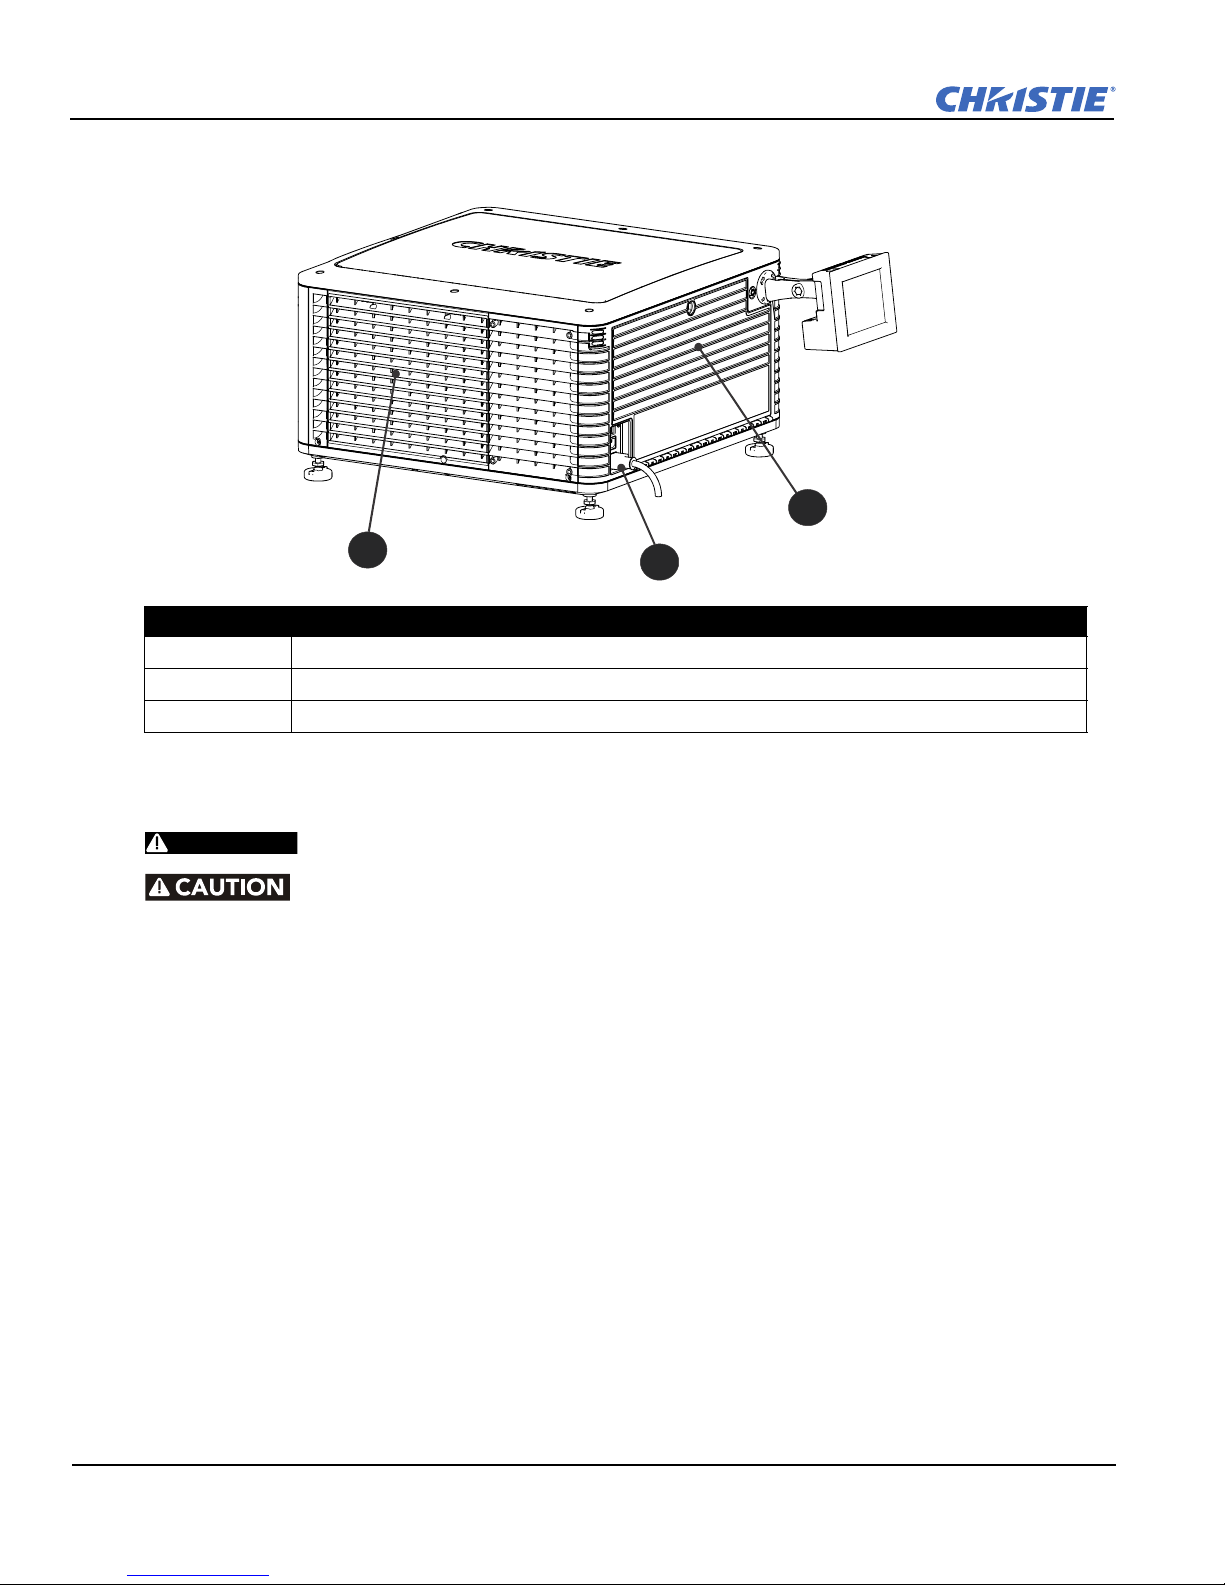
1.3 Projector Components - Rear
3
2
1
WARNING
Component Description
1 Service Access Door
2 Power Cord and AC Receptacle
3 Lamp Access Door
1.4 Position the Projector
Two people are required to safely lift and install the projector.
Complete a lamp adjust whenever you move or level the projector or replace
the lamp.
1. If you are installing the projector in the optional rack stand (P/N 108-416102-01) follow the instructions
provided with the rack stand to install it.
2. Position the projector so it is centered and parallel with the theatre screen. If space is limited, aim the
projector slightly off-center and use lens offset to center the image on the screen.
1-4 Solaria One User Manual
020-100841-02 Rev. 1 (11-2012)
1.5 Stack Projectors
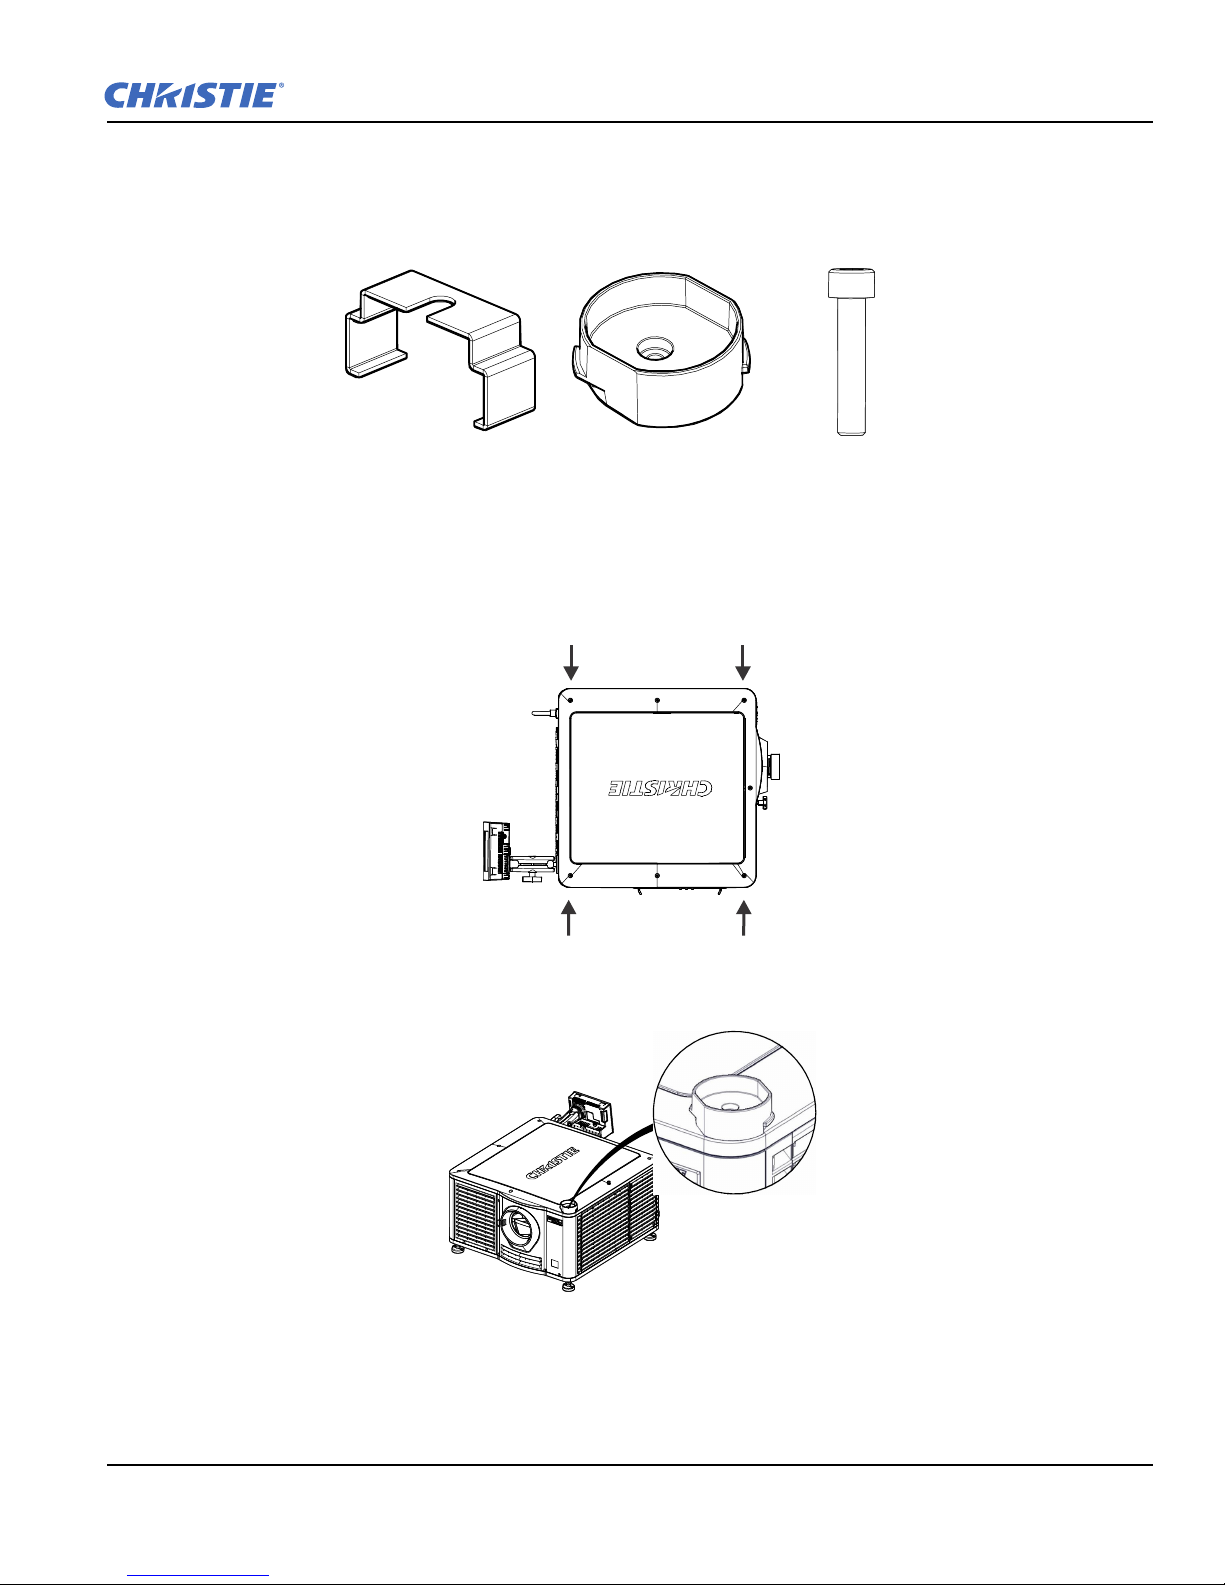
Locking Bracket x 4
Stacking Cup x 4
M6 Screw x 4
To stack Solaria One projectors, use the stacking kit provided with the projector. The Solaria One stacking kit
includes these parts:
NOTE: When stacking projectors, the optical axis of the projectors must be parallel to one another. The
maximum tilt for stacked projectors is 13 degrees. When you install the stacked projectors in a rack stand or on
a pedestal, the rack stand or the pedestal must remain horizontal. If you require tilt to align your images, you
must tilt the projectors and not the rack stand or pedestal.
1. On the bottom projector, remove the four corner screws securing the top lid.
2. Position a single stacking cup (011-104349-XX) over one of the empty screw holes so the higher side of
the cup faces outward and aligns with the projector skin.
3. Insert an M6 screw (012-101132-XX) through the stacking cup mounting hole and into the projector.
4. With a torque wrench, tighten the M6 screw to 15 in-lb.
5. Repeat steps 3 to 5 to install the three remaining stacking cups.
Solaria One User Manual 1-5
020-100841-02 Rev. 1 (11-2012)
6. With the assistance of another person, lift the second projector and position it on top of the bottom
Paral lel
projector so each of its feet fit into a stacking cup. The lenses of both projectors must face the same
direction and the optical axis of both projector lenses must align vertically and be parallel.
7. Complete the installation for both projectors, including:
a. Install the touch panel controller. See Install the Touch Panel Controller on page 1-7.
b. Install the lens. See Install the Lens on page 1-8.
c. Install the lamp. See Install the Lamp on page 1-9.
d. Connect devices to the projector. See Connect Devices to the Projector on page 1-12.
e. Connect power. See Turn the Projector On on page 1-16.
f. Adjust the bottom projector image to fit the screen. See Adjust the Image to Fit Your Screen on page 1-
19.
g. Align the top projector image to the bottom projector image. See Align Dual Projector Images on page
1-21.
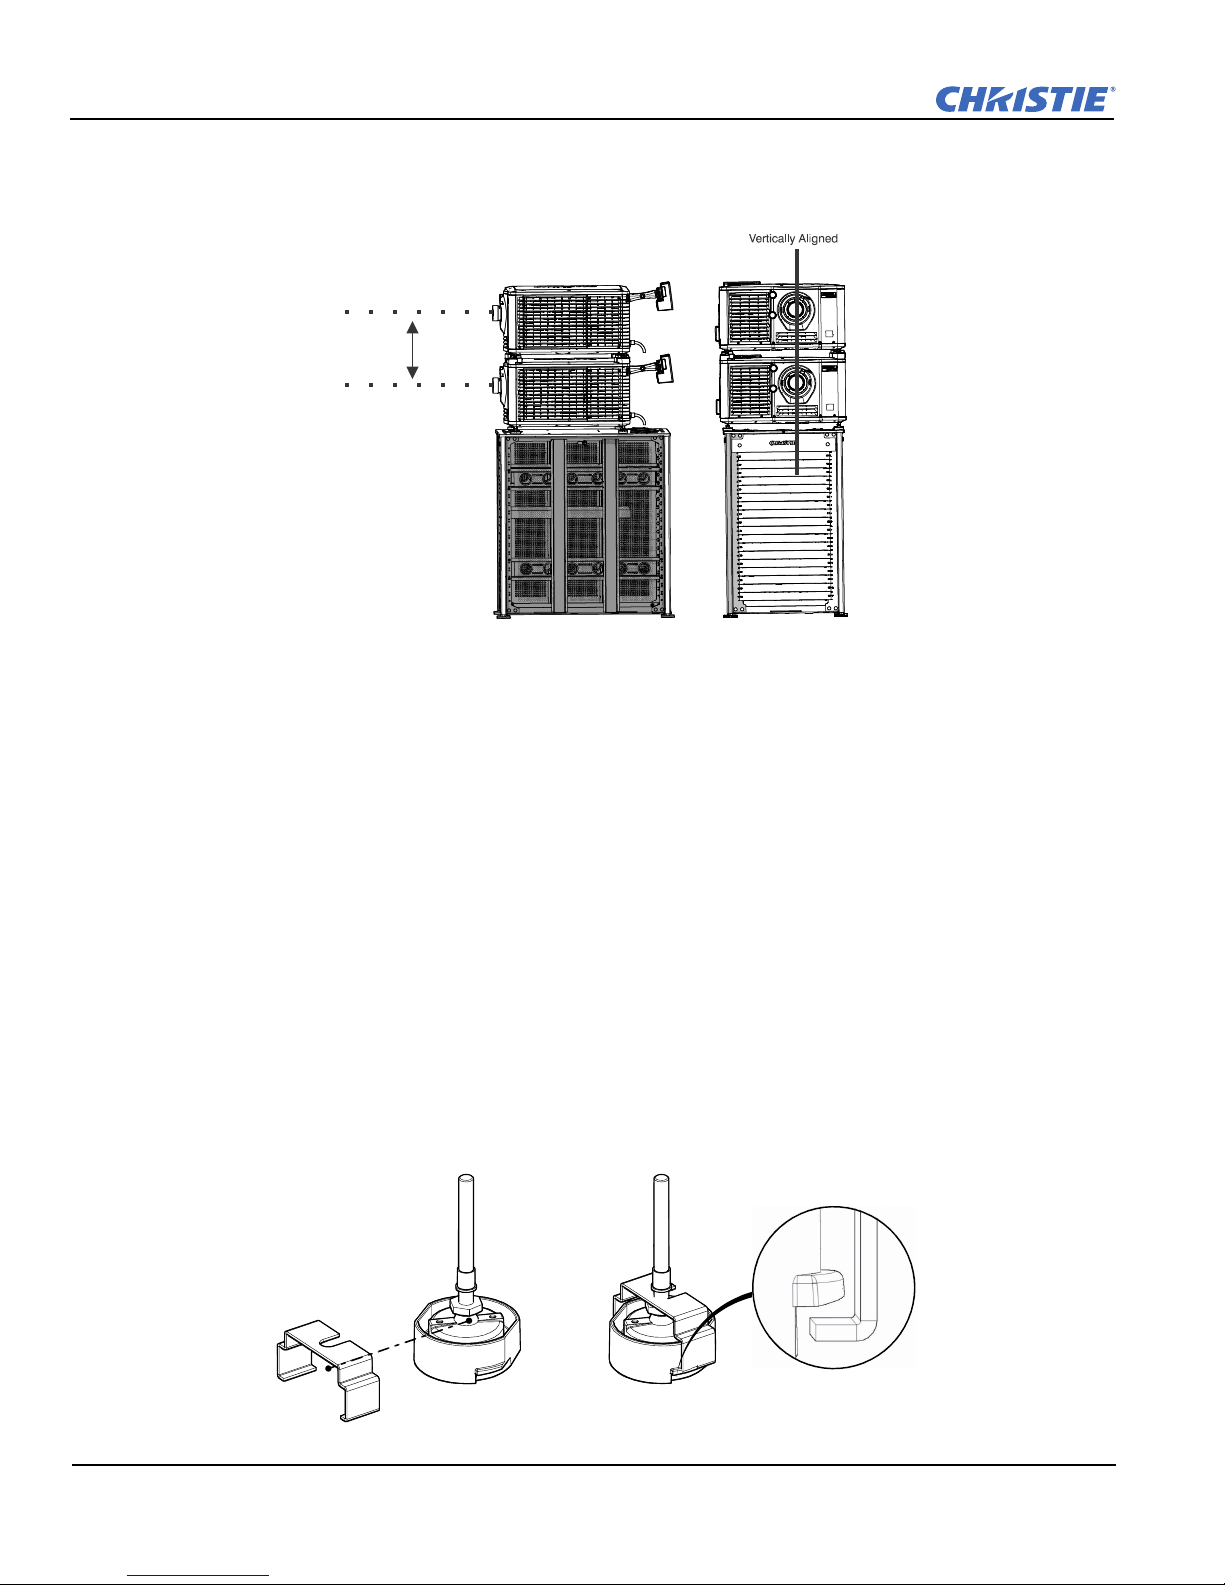
8. When both projectors are installed and aligned correctly, install the locking brackets on the feet of the top
projector:
a. Slide the locking bracket (011-104470-XX) over the flat sides of the stacking cup, so the notch in the
locking bracket fits around the projector leg and above projector foot nut.
b. Turn the locking bracket so the flanges of the locking bracket fit tightly below the stacking cup tabs.
c. Repeat steps a and b to install the 3 remaining locking brackets.
1-6 Solaria One User Manual
020-100841-02 Rev. 1 (11-2012)
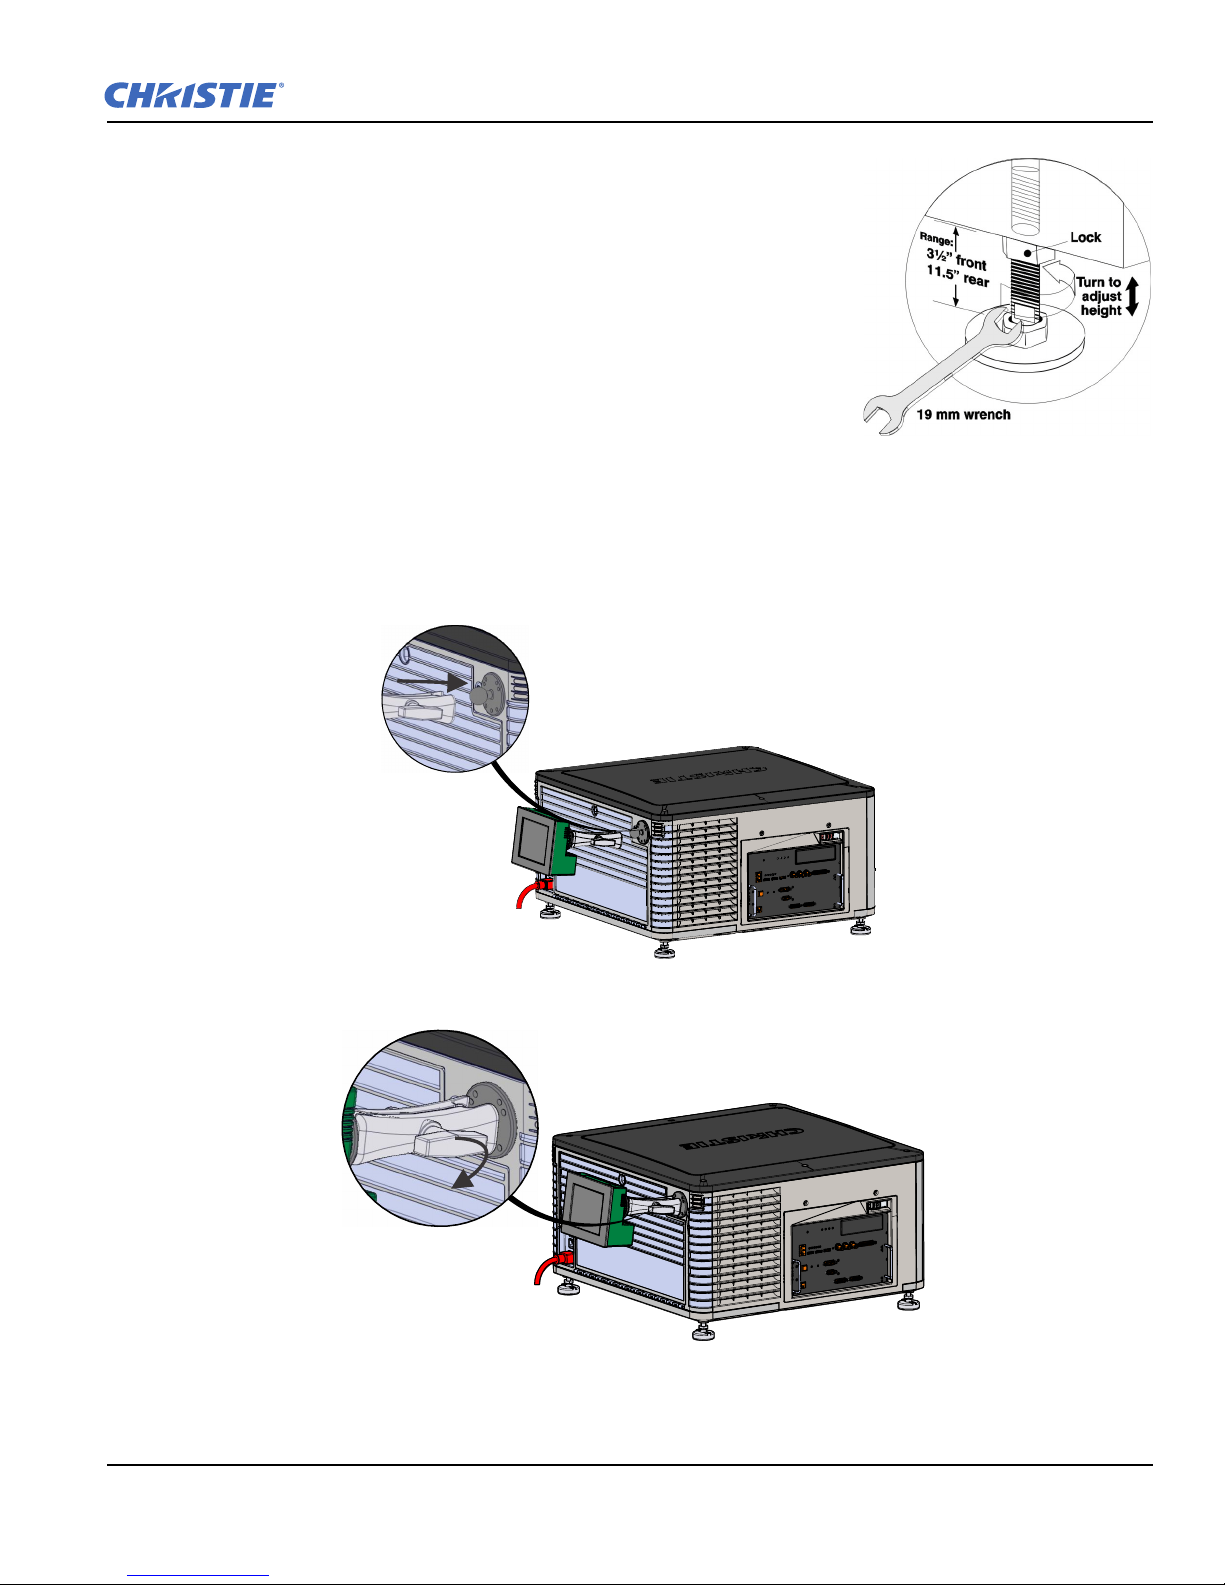
1.6 Adjust Tilt and Level the Projector
To ensure optimum performance of the projector, install the projector so it is
centered and parallel with the screen. To compensate for tilt or offset, you
can adjust the projector feet and the lens mount position.
To adjust the height of the projector, loosen the lock nut on the adjustable
feet on the bottom of the projector and then extend or retract the feet. When
the adjustment is correct, tighten the lock nut.
Use the lens mount to align the images of stacked projectors and not
projector tilt. If tilt is required to fit the image to the screen, tilt only the
lower projector.
NOTE: The front-to-back tilt of the projector must not exceed 15°.
1.7 Install the Touch Panel Controller
1. Loosen the mounting arm so that the end fits over the ball joint located on the rear panel of the projector.
2. Tighten the mounting arm until it fits tightly on the joint.
3. Connect the cable from the TPC to the connector located on the projector rear panel.
4. Tilt the TPC to adjust the viewing angle.
Solaria One User Manual 1-7
020-100841-02 Rev. 1 (11-2012)

1.8 Install the Lens
The lens seals the projection head, preventing contaminants from entering the main electronics area. Do not
operate the projector without a lens installed. Install a lens plug when you install or transport the projector.
1. Remove the lens surround.
2. Turn the lens clamp to the open position with a hex key. A hex key is attached to the lamp door.
3. Position the lens so the lens retaining ring mounts align with the lens mount.
4. Remove the lens caps from the front and rear of the lens.
NOTE: Lens caps must be removed or they can melt and damage the lens.
5. Insert the lens straight into the lens mount opening without turning. Magnets inside the lens mount help
position the lens.
1-8 Solaria One User Manual
020-100841-02 Rev. 1 (11-2012)
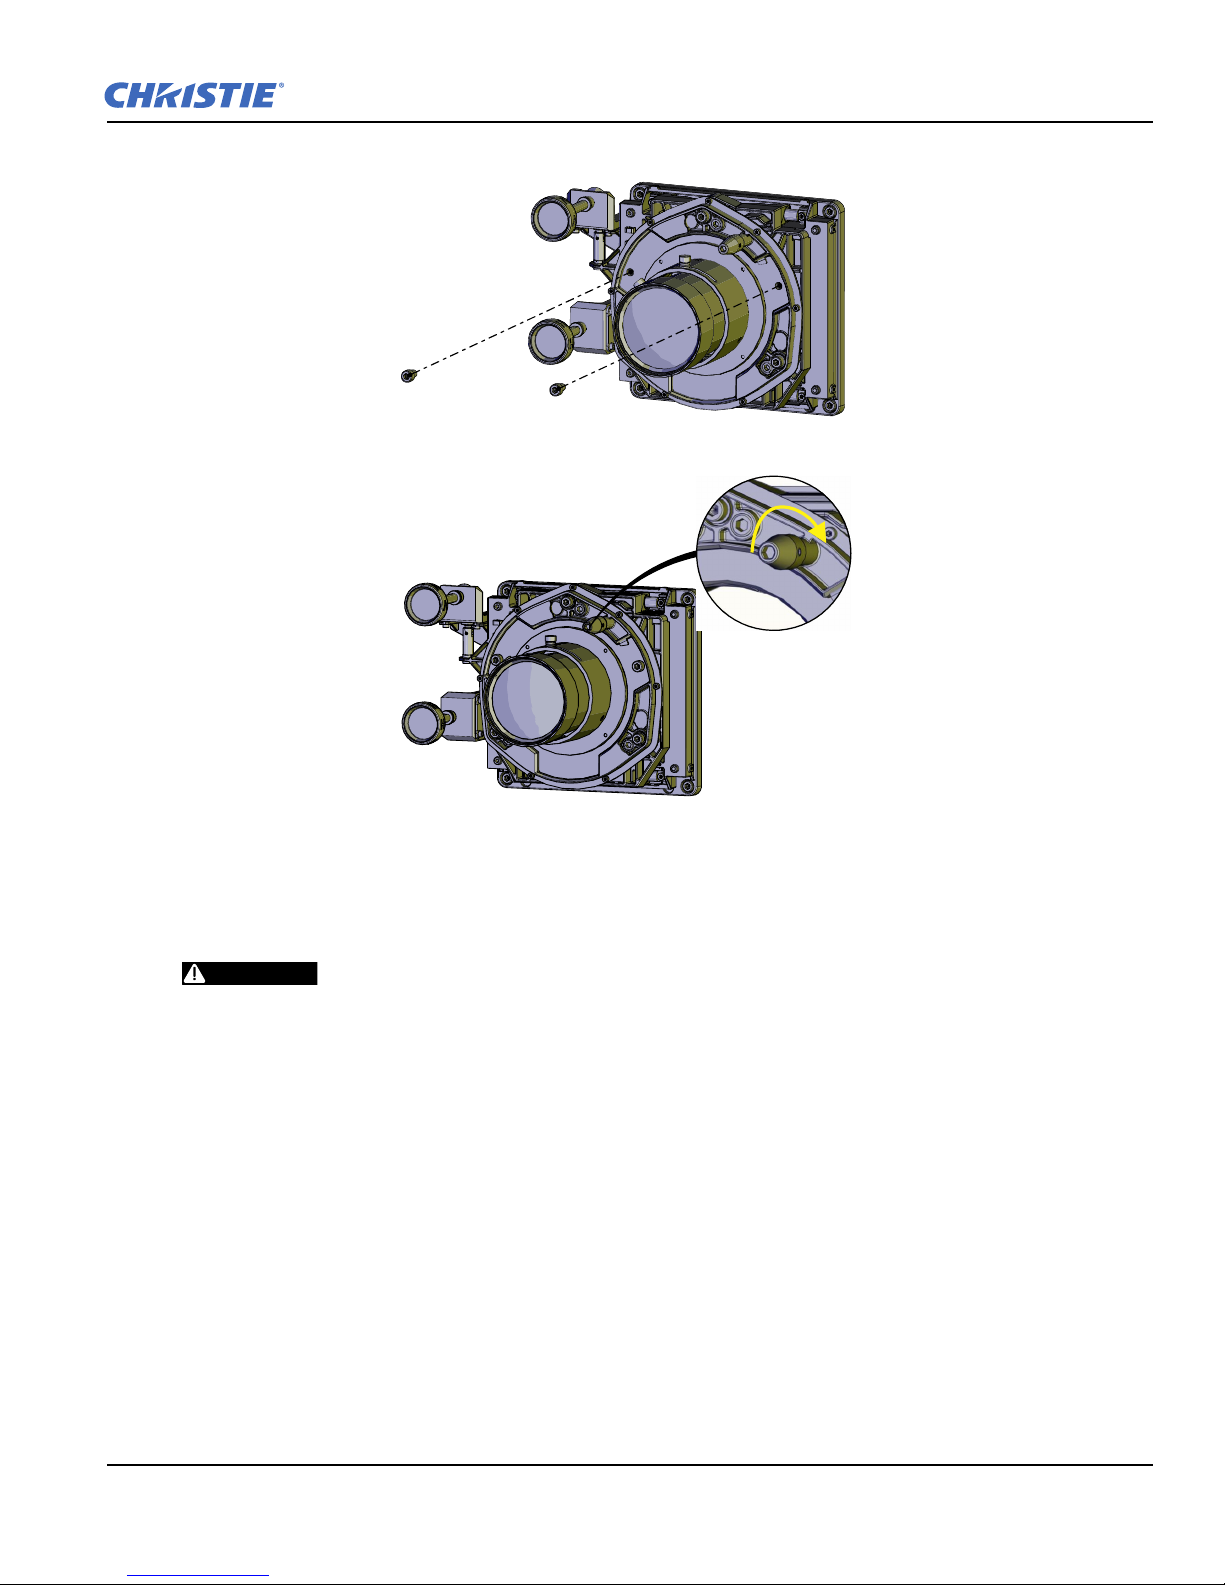
6. Insert and tighten the two lens mount hex screws shipped separately with the projector.
DANGER
7. Lock the lens assembly in place with a hex key.
8. Replace the lens surround.
1.9 Install the Lamp
This procedure should only be performed by a Christie accredited technician.
High-pressure lamp may explode if improperly handled. Always wear approved protective
safety clothing whenever the lamp door is open or when handling the lamp
1. If the projector is operating, turn it off and allow it to cool a minimum of 15 minutes.
2. Turn the breaker switch for the projector off.
3. Disconnect the projector from AC power.
4. Put on your protective clothing, face shield, and gloves.
5. Insert the key in the lamp door lock, turn the key, and then open the lamp door.
Solaria One User Manual 1-9
020-100841-02 Rev. 1 (11-2012)
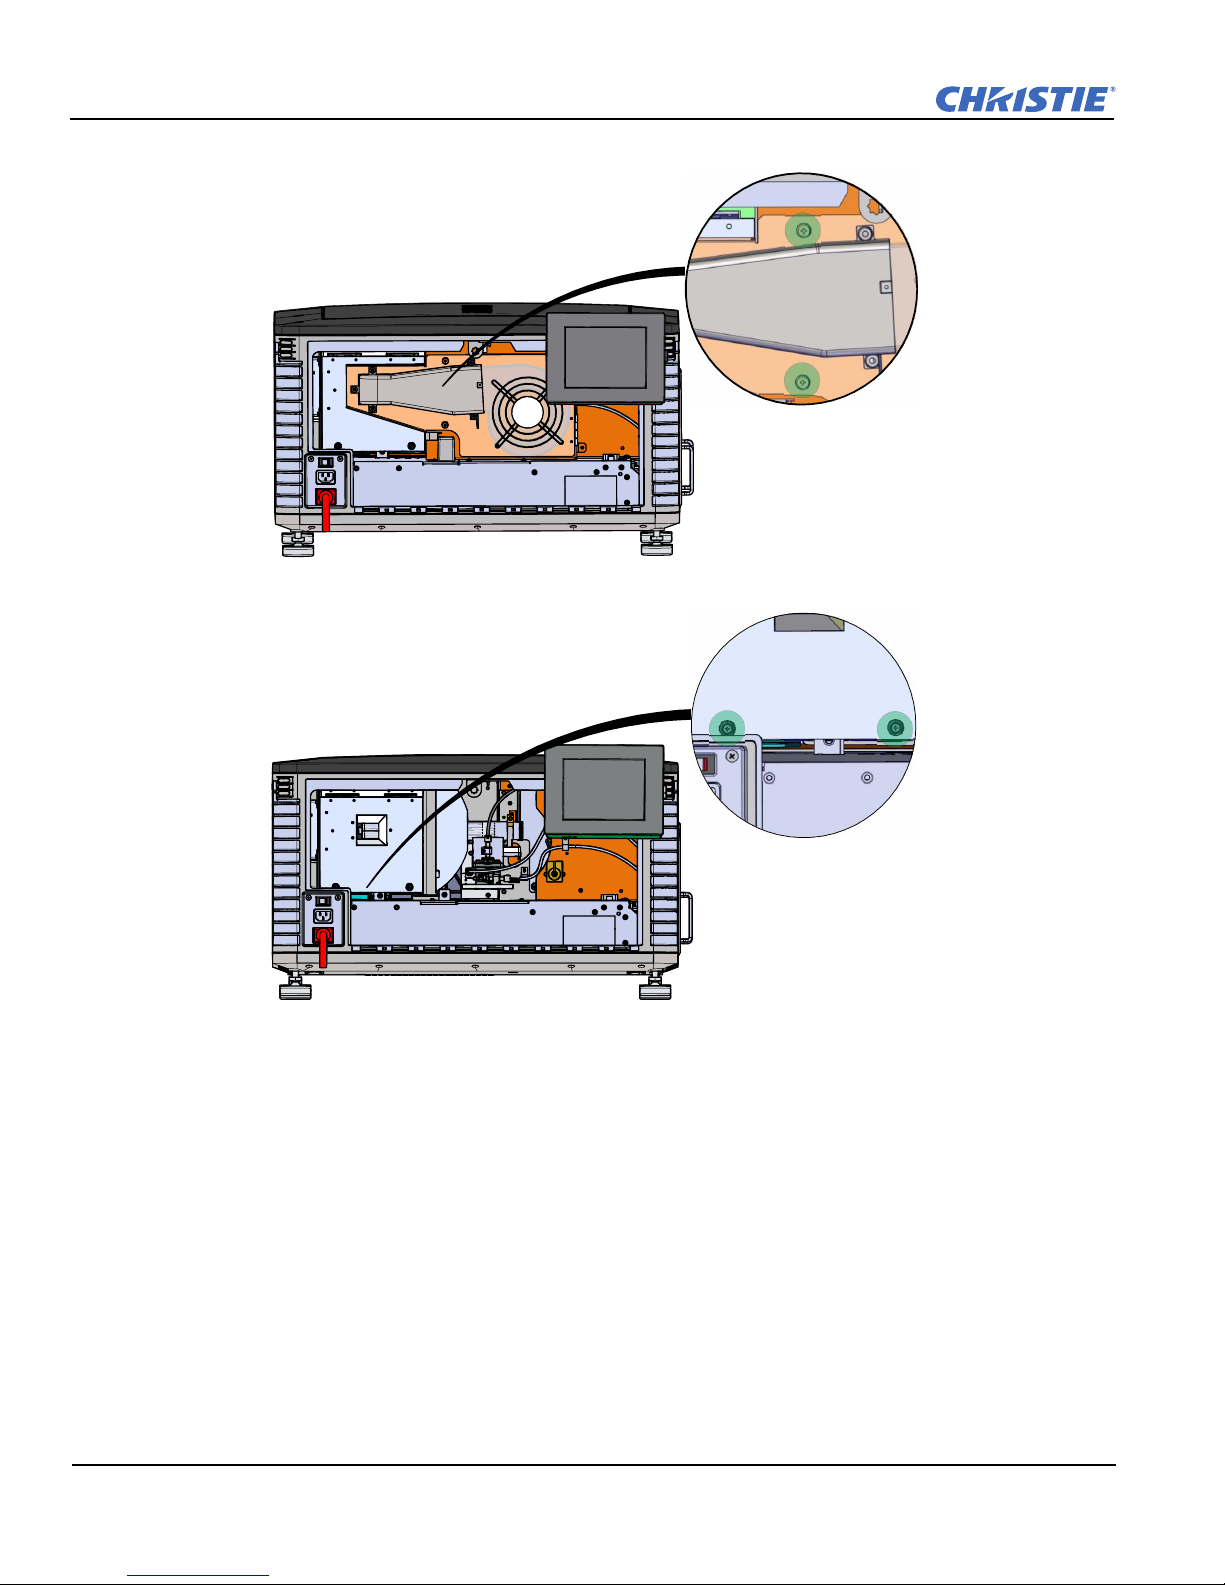
6. Loosen the 2 thumbscrews and open the fire wall door.
7. Loosen the 2 thumbscrews and open the lamp access door.
1-10 Solaria One User Manual
020-100841-02 Rev. 1 (11-2012)
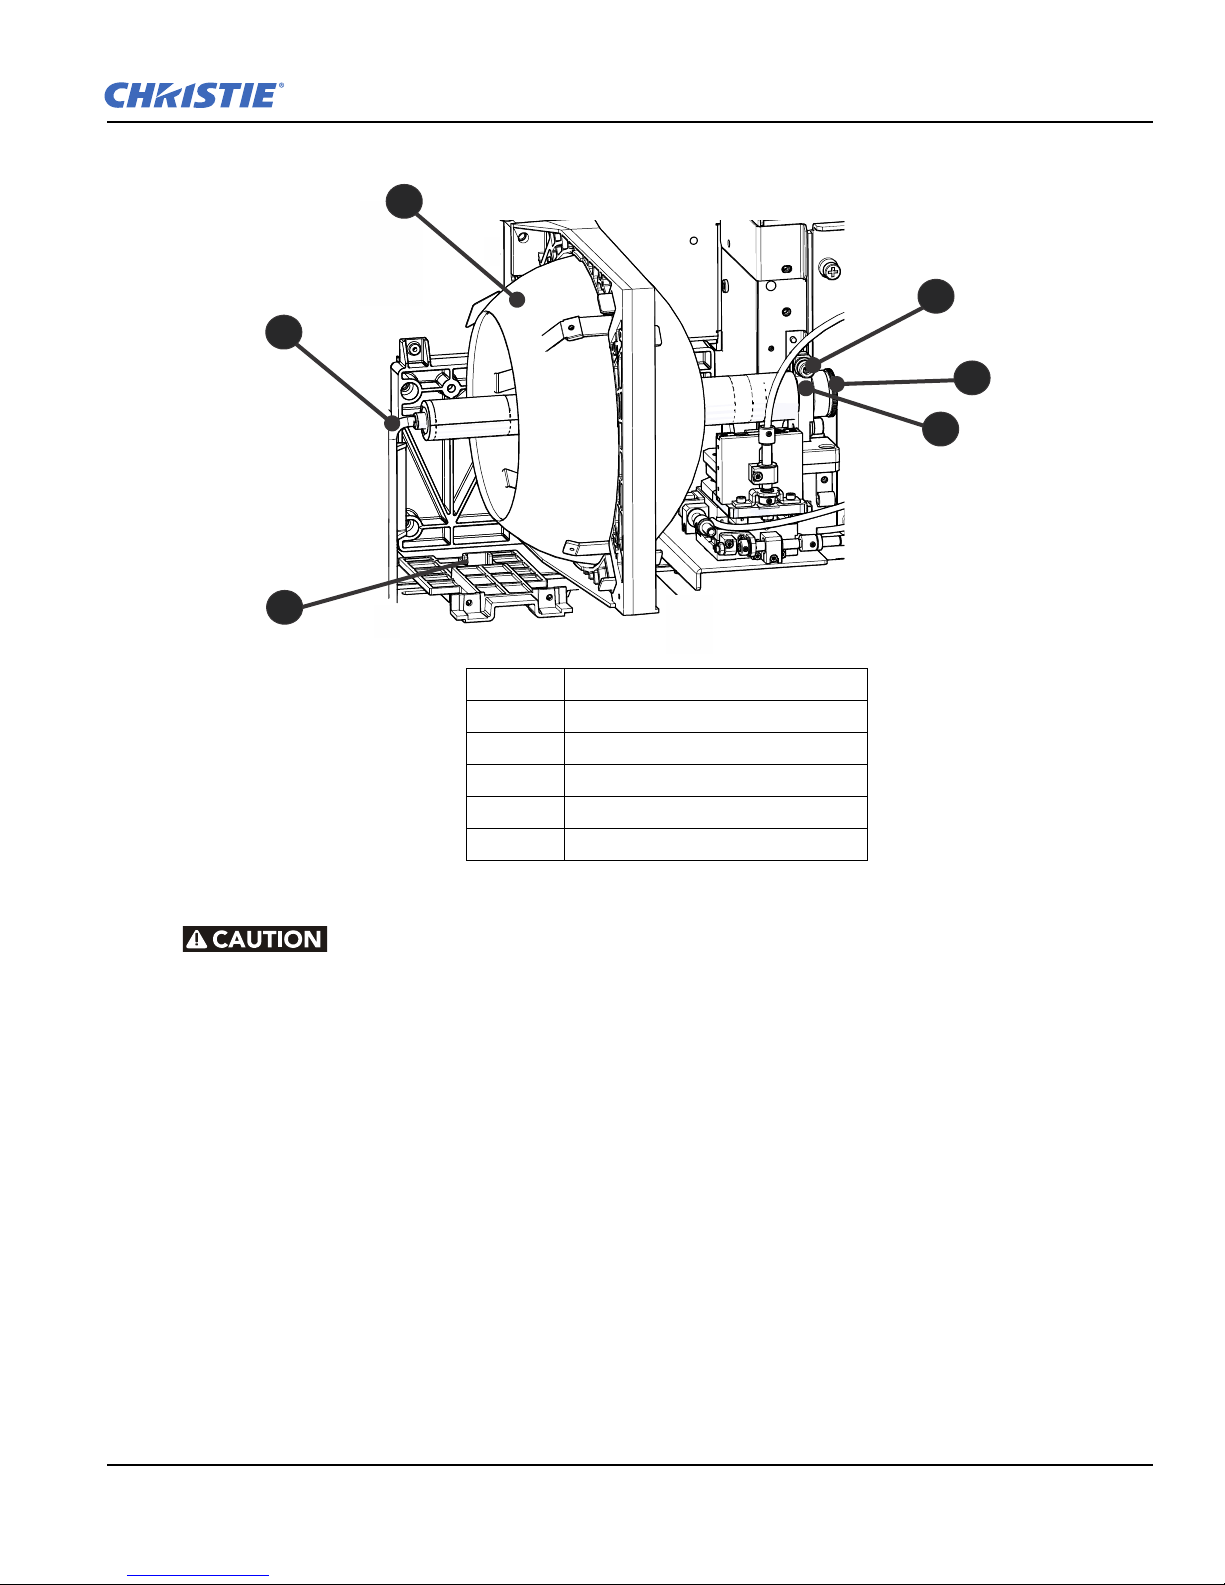
8. Loosen the cathode clamp with the 5 mm hex key attached to the lamp door.
2
3
456
1
1 Anode Terminal
2 Anode Wire
3 Reflector
4 Cathode Screw
5 Cathode Nut
6 Cathode Clamp
9. Install the lamp:
Handle the lamp by the cathode/anode end shafts only, never the glass. DO
NOT over-tighten. DO NOT stress the glass in any way. Check leads. Ensure the anode (+)
lead between the lamp and igniter is well away from any projector metal, such as the
reflector or fire wall.
a. Remove the tape from the ends of the protective case.
b. Remove the plastic packing material from the lamp.
c. Remove the cathode nut from the lamp before removing it from the case.
d. Hold the anode end of the new lamp in your left hand and angle it up through the hole in the back of
the reflector assembly. Insert your right index and middle finger through the back of the reflector and
guide the lamp onto the cathode clamp. Be careful not to hit the lamp against the reflector.
e. Thread on and hand-tighten the cathode nut. Ensure the smooth portion of the nut is against the
cathode clamp.
f. Tighten the cathode clamp (4) with a hex key.
g. Align the ring terminal on the anode wire (2) with the mounting position ensuring the crimped side of
the wire is facing out. Tighten the anode screw. NOTE: Route anode lead away from nearby metal
surfaces.
10. Close the lamp access door and tighten the 2 thumbscrews.
Solaria One User Manual 1-11
020-100841-02 Rev. 1 (11-2012)
11. Close the fire wall door and tighten the 2 thumbscrews.
IMB Power
FPGA Load
SM Run
FIPS
OS Load
SMS Run
Alarm
2
1
eSATA A eSATA B
USB/eSATA
DAS
Ingest
IMB
Reset
GEN Lock Sync Out LTC Out
AES3
NAS
SOFTST OSST FMTST
Main Power
TPC Disconnect
PIBS1 Health
ICP Health
IMB Health
Marriage Emergency
Start
System
Reset
3D Sync
Ethernet
RS 232 PIBS1
HDMI A / LEFT HDMI B / RIGHT
1
2
3
4 5 6
7 8
9
10
11
12
13
14
15
16
17
17
18
12. Close and lock the rear access door. NOTE: Ensure the hex key is placed back into its holder before
closing the rear access door.
1.10 Connect Devices to the Projector
To display content, you must connect a device that is capable of storing or playing content to the projector.
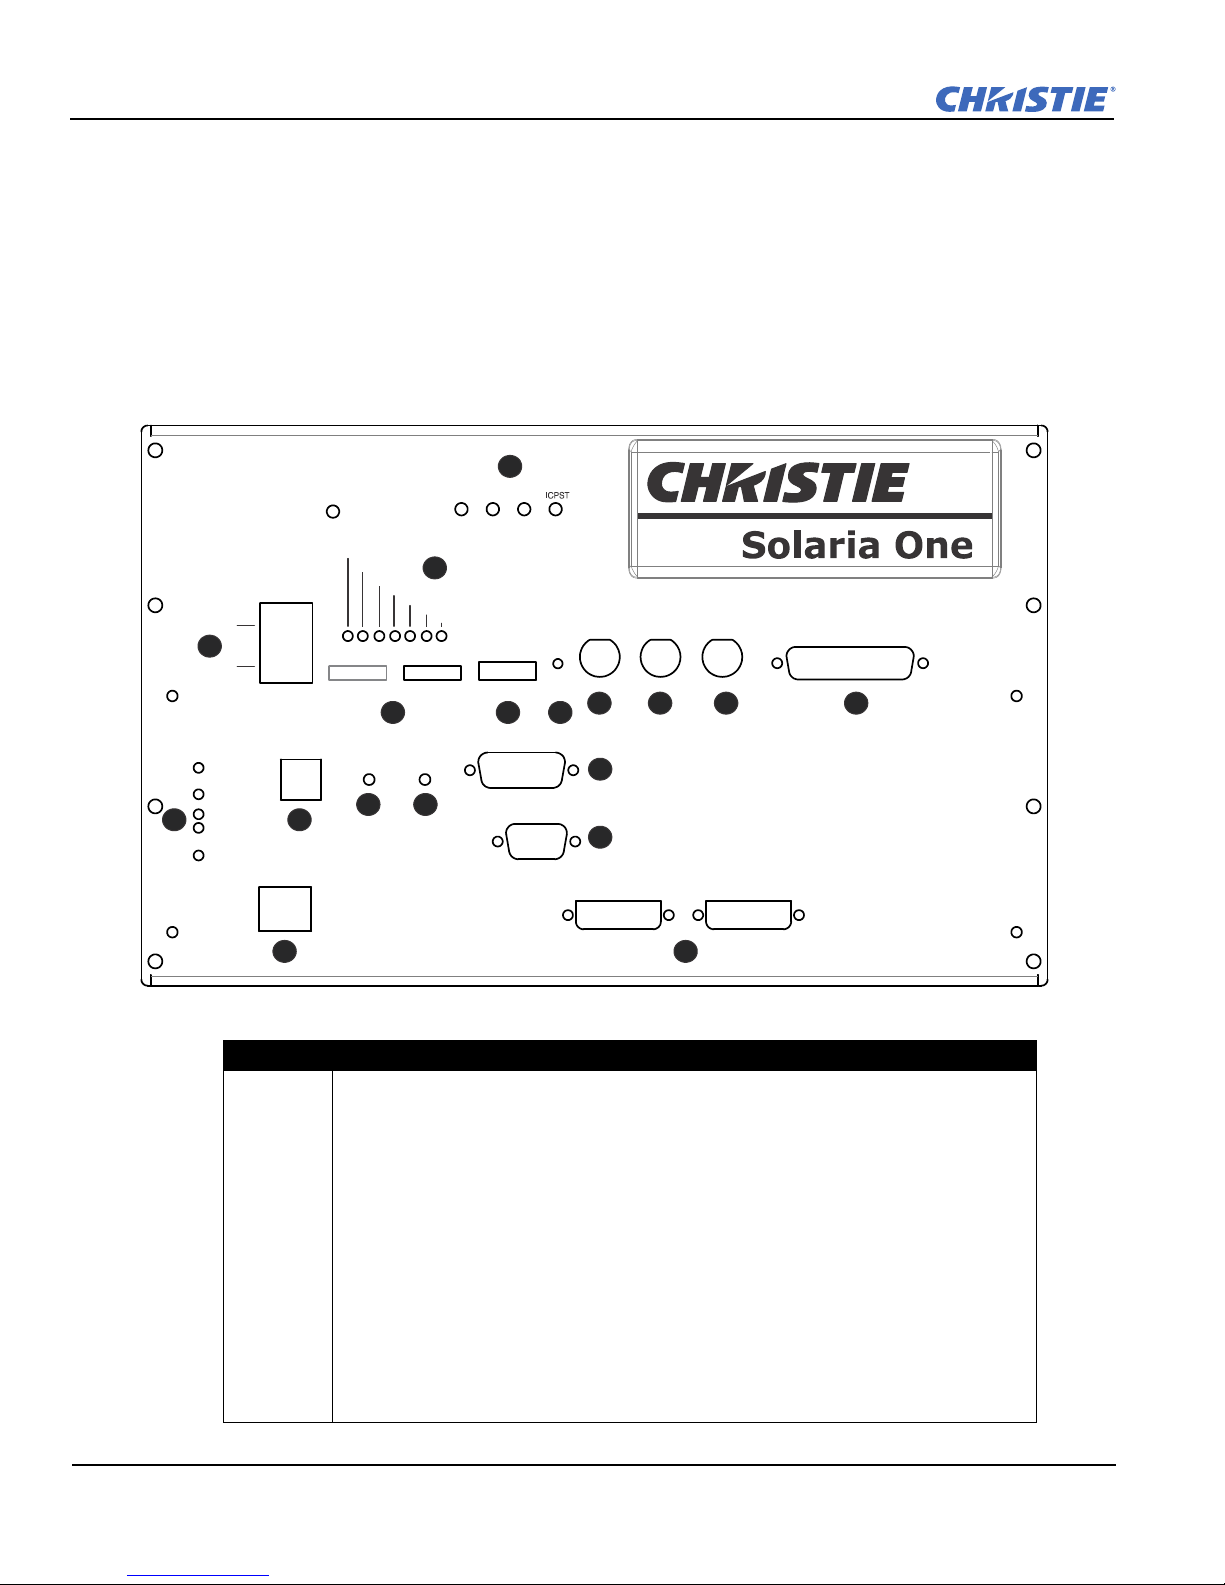
1.10.1 Projector Connections
Feature Description
1 LEDs indicating the status of projector components:
SOFTST - (Software State) Indicates the state of the software application running on
the ICP. During normal operation, this LED blinks. During start up, the LED changes
from off to blinking.
1-12 Solaria One User Manual
OSST - (Operating System State) Indicates the state of the ICP operating system.
During normal operation, the LED is green. During start up, the LED changes from
off to green.
FMTST - (FMT FPGA State) Indicates the state of the FMT FPGA. During normal
operation, the LED is green. When the power is turned on, the LED turns green
immediately.
ICPST - (ICP FPGA State) Indicates the configured state of the ICP FPGA. During
normal operation, the LED is green. When the power is turned on, the LED turns
green immediately.
020-100841-02 Rev. 1 (11-2012)
Feature Description
2 LEDs indicating the status of the Christie IMB:
IMB Power - Indicates if the Christie IMB is on or off.
FPGA Load - The LED is green when all FPGAS are successfully loaded.
SM Run - A heartbeat indicator that flashes green when the security manager (SM)
is running.
FIPS - Indicates the FIPS (Federal Information Processing Standards Publications)
security status. If the LED is red, an error has occurred. Restart the IMB. If the LED
remains red, return the IMB to Christie Digital.
OS Load - Indicates that the Christie IMB has successfully loaded the screen management system (SMS) operating system.
SMS Run - A heartbeat indicator for the screen management system (SMS).
Alarm - Indicates the alarm state of the screen management system (SMS).
3 Connect network-attached storage (NAS) devices to these terminals.
4 Connect direct attached storage (DAS) devices to these terminals.
5 Connect devices containing content you want to ingest to this terminal.
6 Resets the Christie IMB.
7 Input for multi-projector playback (Christie IMB to Christie IMB only).
8 Output for multi-projector playback.
9 Linear Time Code (LTC) output.
10 Connect digital audio devices to this terminal.
11 LEDs indicating the state of projector components:
Main Power - Indicates the projector is connected to AC power.
TPC Disconnect - The LED blinks yellow when the TPC is disconnected from the
projector. Not illuminated at any other time.
PIBS1 Health - The LED blinks green when PIBS1 initialization is complete.
ICP Health - The LED is green when ICP communication is operating correctly.
IMB Health - The LED is green when the Christie IMB is operating correctly.
12 Indicates the marriage state. In full power mode, a green LED indicates that the pro-
jector is properly married. A red LED indicates marriage is broken and you cannot
use the Christie IMB to display encrypted content.
13 Turns the projector and the lamp on and opens the douser. Press and hold the button
to close the douser, turn the lamp off, and keep the power on. It is recommended that
you use this button only when the TPC (Touch Panel Controller) is unavailable.
14 Resets the projector electronics. After restarting, the projector returns to its previous
power mode. You must strike the lamp manually.
15 Connect 3D devices such as MasterImage or RealD to this terminal.
16 Connect Christie or third-party automation equipment to this terminal. Utilizes the
Christie-proprietary protocol.
17 Connect a 10Base-T/100Base-TX Ethernet connection to this terminal.
18 Connect an HDMI or DVI source to these terminals.
Solaria One User Manual 1-13
020-100841-02 Rev. 1 (11-2012)

1.10.2 Connect the Projector to a Computer
Connect one end of an Ethernet or a RS232 cable to the Ethernet or the RS232 PIBS1 ports on the projector
communications panel and the other end to your computer. To communicate with the projector, the projector
must be added to the same network as the computer. See Add the Projector to a Network on page 1-17.
1.10.3 Connect the Projector to Network-attached Storage
Your network-attached storage (NAS) device must be configured to use the Network File System (NFS)
protocol. Your direct attached storage (DAS) device must be connected to the projector and turned on before
the projector is turned on. Christie recommends that you select a static IP address, see Configure NAS Ethernet
Port IP Addresses on page 13-18.
1. Follow the instructions provided by the manufacturer of your NAS to ensure it is set up and operating
correctly.
2. Connect one end of an Ethernet cable to the NAS-1 or NAS-2 ports on the projector communications panel
and the other end to your NAS device or network.
3. Turn the NAS device on.
4. Connect the projector to AC power. See Connect Power on page 1-15.
5. Turn the projector on. See Turn the Projector On on page 1-16.
6. Tap Menu > Christie IMB > System.
7. Tap Storage.
8. Tap Add NAS.
9. Tap Primary if this is your primary NAS device.
10. Tap Ye s.
11. Complete the information fields for the NAS device.
12. Tap Refresh Share Names.
13. Select a share in the Share list.
14. Tap OK.
15. Tap Save.
16. Tap OK.
1.10.4 Connect the Projector to Direct-attached Storage
The direct attached storage (DAS) device must be connected to the projector and turned on before the projector
is turned on.
1. Verify the direct attached storage (DAS) device is connected to one of the external serial ATA (eSATA)
ports on the projector communications panel.
2. Turn the DAS device on.
3. Connect the projector to AC power. See Connect Power on page 1-15.
4. Turn the projector on. See Turn the Projector On on page 1-16.
5. Tap Menu > Christie IMB > System.
6. Tap Storage.
1-14 Solaria One User Manual
020-100841-02 Rev. 1 (11-2012)

7. Tap Add DAS.
WARNING
8. Select a DAS in the list.
1.10.5 Connect the Projector to a Digital Cinema Audio Processor
1. Connect one end of the audio cable to the AES3 port on the projector communications panel and the other
end to a digital cinema audio processor.
2. Turn the digital cinema audio processor device on.
3. Connect the projector to AC power. See Connect Power on page 1-15.
4. Turn the projector on. See Turn the Projector On on page 1-16.
5. Click Menu > Christie IMB > System > Audio.
6. Select a surround sound type in the Mapping list.
7. Select a channel in the Channel list for each of the speakers in your set up.
8. Tap Speaker Mapping.
9. Select a delay in milliseconds in the Delay (ms) list. A positive value delays the audio after the content and
a negative value advances the audio ahead of the content.
10. Select Auto in the Audio Rate list to automatically match the audio rate to the content encoding.
- or -
Select 48 kHz to force all audio output to 48 kHz.
- or -
Select 96 kHz to force all audio output to 96 kHz.
11. Enter the name of the speaker that corresponds to the AES output number in the Speaker Name field.
12. Select a speaker in the Speaker Test list and then tap Test to test the speaker mapping. A tone is sent to the
selected speaker.
13. Tap Save.
1.10.6 Connect Devices to the 3D Sync Terminal
See View 3D Content on page 14-1.
1.11 Connect Power
Do not operate the projector if the AC power supply and cord are not within the specified voltage and power
range. Only use the power cord supplied with the projector.
A dedicated, protected earth wire must be installed on the projector before it can be connected to power.
The dedicated earth wire can only be installed by a Christie accredited service
technician or an electrician. The protected earth wire must be green/yellow 12 AWG
minimum. See Projector Specifications on page A-1 for power requirements.
1. If the projector is operating, turn it off and disconnect it from AC power.
Solaria One User Manual 1-15
020-100841-02 Rev. 1 (11-2012)
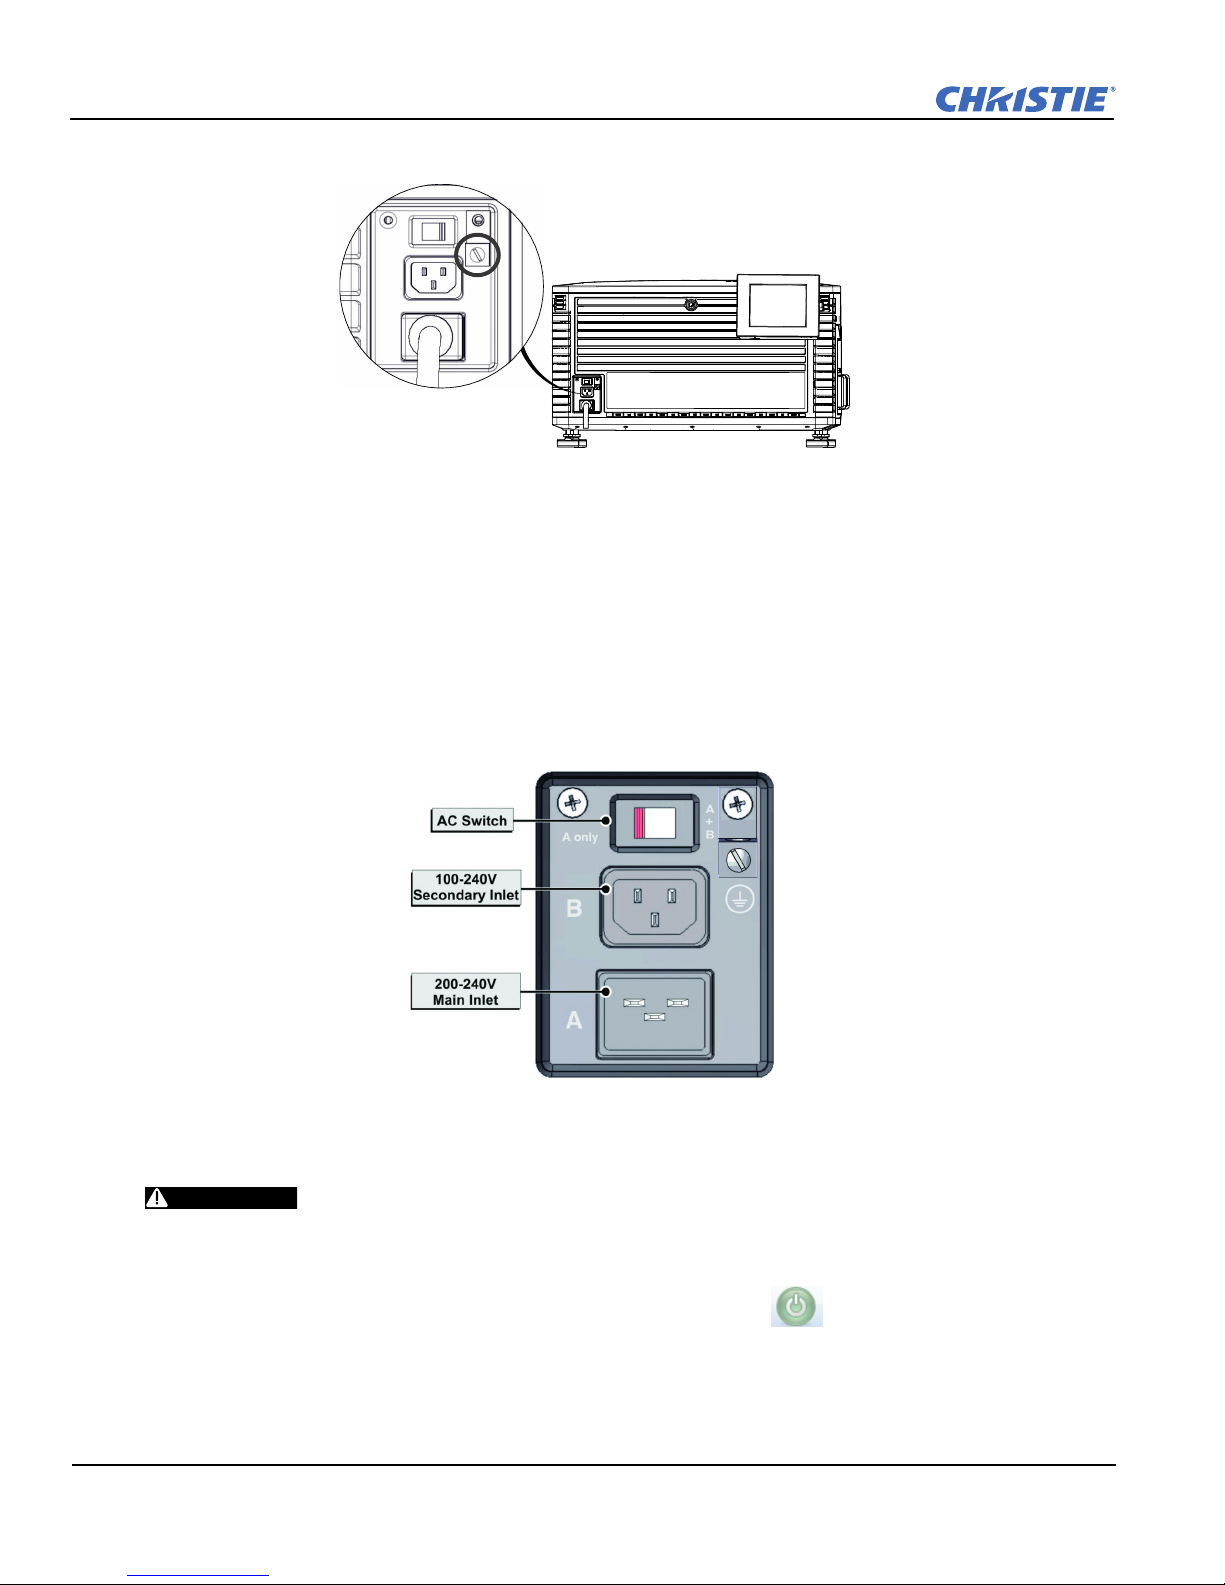
2. Loosen the threaded bolt on the ground lug on the AC receptacle on the rear corner of the projector.
WARNING
3. Remove 15 mm of insulated covering from both ends of the protected earth wire.
4. Insert a bare end of the protected earth wire into the hole on the top of the ground lug so it is beneath the
threaded bolt.
5. Tighten the threaded bolt to 50 in-lb.
6. Connect the other bare end of the protected earth wire to the building ground.
7. Connect one end of the projector power cord to the AC receptacle on the lower-left rear corner of the
projector and then connect the other end of the power cord to an AC receptacle.
If you are using an Uninterrupted Power Supply (UPS) to power the main electronics, move the AC switch
to A + B and connect the power cord provided with the UPS to the B outlet.
1.12 Turn the Projector On
DO NOT attempt to turn the projector on if the AC supply is not within the
specified voltage range. See Projector Specifications on page A-1 for power requirements.
1. Ensure the circuit breaker for the projector is ON.
2. On the touch panel controller (TPC), tap and hold the green power icon.
1-16 Solaria One User Manual
020-100841-02 Rev. 1 (11-2012)
 Loading...