

Christie FHD552-X User Manual

FHD552-X LCD Panel
User Manual
020-000741-01


FHD552-X LCD Panel
User Manual
020-000741-01

NOTICES
COPYRIGHT AND TRADEMARKS
© 2014 Christie Digital Systems USA Inc. All rights reserved.
All brand names and product names are trademarks, registered trademarks or trade names of their respective holders.
GENERAL
Every effort has been made to ensure accuracy, however in some cases changes in the products or availability could occur which may
not be reflected in this document. Christie reserves the right to make changes to specifications at any time without notice. Performance
specifications are typical, but may vary depending on conditions beyond Christie's control such as maintenance of the product in
proper working conditions. Performance specifications are based on information available at the time of printing. Christie makes no
warranty of any kind with regard to this material, including, but not limited to, implied warranties of fitness for a particular purpose.
Christie will not be liable for errors contained herein or for incidental or consequential damages in connection with the performance or
use of this material. Canadian manufacturing facility is ISO 9001 and 14001 certified.
WARRANTY
Products are warranted under Christie’s standard limited warranty, the complete details of which are available by contacting your
Christie dealer or Christie. In addition to the other limitations that may be specified in Christie’s standard limited warranty and, to the
extent relevant or applicable to your product, the warranty does not cover:
a. Problems or damage occurring during shipment, in either direction.
b. Projector lamps (See Christie’s separate lamp program policy).
c. Problems or damage caused by use of a projector lamp beyond the recommended lamp life, or use of a lamp other than a Christie
lamp supplied by Christie or an authorized distributor of Christie lamps.
d. Problems or damage caused by combination of a product with non-Christie equipment, such as distribution systems, cameras,
DVD players, etc., or use of a product with any non-Christie interface device.
e. Problems or damage caused by the use of any lamp, replacement part or component purchased or obtained from an
unauthorized distributor of Christie lamps, replacement parts or components including, without limitation, any distributor offering
Christie lamps, replacement parts or components through the internet (confirmation of authorized distributors may be obtained
from Christie).
f. Problems or damage caused by misuse, improper power source, accident, fire, flood, lightening, earthquake or other natural
disaster.
g. Problems or damage caused by improper installation/alignment, or by equipment modification, if by other than Christie service
personnel or a Christie authorized repair service provider.
h. Problems or damage caused by use of a product on a motion platform or other movable device where such product has not been
designed, modified or approved by Christie for such use.
i. Problems or damage caused by use of a projector in the presence of an oil-based fog machine or laser-based lighting that is
unrelated to the projector.
j. For LCD projectors, the warranty period specified in the warranty applies only where the LCD projector is in “normal use” which
means the LCD projector is not used more than 8 hours a day, 5 days a week.
k. Except where the product is designed for outdoor use, problems or damage caused by use of the product outdoors unless such
product is protected from precipitation or other adverse weather or environmental conditions and the ambient temperature is
within the recommended ambient temperature set forth in the specifications for such product.
l. Image retention on LCD flat panels.
m.Defects caused by normal wear and tear or otherwise due to normal aging of a product.
The warranty does not apply to any product where the serial number has been removed or obliterated. The warranty also does not
apply to any product sold by a reseller to an end user outside of the country where the reseller is located unless (i) Christie has an office
in the country where the end user is located or (ii) the required international warranty fee has been paid.
The warranty does not obligate Christie to provide any on site warranty service at the product site location.
PREVENTATIVE MAINTENANCE
Preventative maintenance is an important part of the continued and proper operation of your product. Please see the Maintenance
section for specific maintenance items as they relate to your product. Failure to perform maintenance as required, and in accordance
with the maintenance schedule specified by Christie, will void the warranty.
REGULATORY
The product has been tested and found to comply with the limits for a Class A digital device, pursuant to Part 15 of the FCC Rules.
These limits are designed to provide reasonable protection against harmful interference when the product is operated in a commercial
environment. The product generates, uses, and can radiate radio frequency energy and, if not installed and used in accordance with the
instruction manual, may cause harmful interference to radio communications. Operation of the product in a residential area is likely to
cause harmful interference in which case the user will be required to correct the interference at the user’s own expense.

CAN ICES-3 (A) / NMB-3 (A)
이 기기는 업무용 (A 급 ) 으로 전자파적합등록을 한 기기이오니 판매자 또는 사용자는 이점을 주의하시기 바라며 , 가정 외의 지역에서
사용하는 것을 목적으로 합니다 .
Environmental
Theproductisdesignedandmanufacturedwithhigh‐qualitymaterialsandcomponentsthatcanberecycledandreused.
This symbol means
thatelectricalandelectronicequipment,attheirend‐of‐life,shouldbedisposedofseparatelyfromregularwaste.Pleasedisposeoftheproduct
appropriatelyandaccordingtolocalregulations.IntheEuropeanUnio n,thereareseparatecollectionsystemsforusedelectricalandelectronic
products.Pleasehelpustoconservethe
environmentwelivein!


Addendum
Translated copies of this document are provided on the CD in the back of this document. The CD may
also contain additional product documentation. Read all instructions before using or servicing this
product.
本文档的翻译副本在本文档背面的CD 上提供。该CD 中还可能包含其他产品文
档。使用或维修本产品之前请务必阅读所有说明。
文件背面的光碟提供了本文件的翻譯副本。這張光碟可能另外包含其他產品文
件。請先閱讀所有指示再使用或送修本產品。
LeCDaudosdecedocumentcontientdestraductionsdecelui‐cidansdifférenteslangues.CeCDpeutégalement
contenirdeladocumentationsupplémentairesurleproduit.Liseztouteslesinstructionsavantd'utiliserou
d'entretenirceproduit.
Übersetzte Versionen dieses Dokuments werden auf der CD auf dem Vorsatzblatt dieses Dokuments
bereitgestellt. Die CD kann auch zusätzliche Produktdokumentation enthalten. Bitte lesen Sie diese
Anweisungen vor der Verwendung dieses Produkts oder vor der Ausführung von Wartungsarbeiten am
Produkt.
Le copie tradotte di questo documento sono fornite sul CD, sul retro di questo documento. Il CD
potrebbe anche contenere altra documentazione sul prodotto. Si prega di leggere tutte le istruzioni
prima di utilizzare questo prodotto o sottoporlo a manutenzione.
このドキュメントの翻訳版がこのドキュメントの裏面の CD で提供されています。CD に
は追加の製品マニュアルも収められています。この製品を使用したり、機能させたりす
る前に、すべての指示をお読みください。
이 문서의 번역된 사본이이 문서 후면의 CD 에서 제공됩니다 . 이 CD 에는 추가제품 설명
서가포함되어있을수 있습니다 . 이 제품을 사용하거나 수리하기 전에 모든 지침을 확인
하십시오 .
Copias traduzidas deste documento são fornecida no CD contido na parte de trás deste documento. O
CD pode conter documentação adicional do produto. Leia todas as instruções antes de usar ou prestar
serviço com este produto.
Переводданногодокументапредставленнакомпакт-дискенаоборотнойстороне
документа.Компакт-дискможеттакжесодержатьдополнительнуюдокументациюпо
продукту.Передиспользованиемилиобслуживаниемпродуктаознакомьтесьсовсеми
инструкциями.
Las copias traducidas de este documento se proporcionan en el CD que se encuentra en la parte
trasera. En el CD también puede encontrar documentación adicional del producto. Lea todas las
instrucciones antes de utilizar o realizar el mantenimiento de este producto.
Перекладеніекземплярицьогодокументамістятьсянакомпакт-диску,якийдоданодо
цьогодокумента.Накомпакт-дискуможетакожбутидодатковадокументаціядо
виробу.Першніжкористуватисявиробомабойогообслуговувати,прочитайтевсі
інструкції.

Table of Contents
Introduction . . . . . . . . . . . . . . . . . . . . . . . . . . . . . . . . . . . . . . . . . . . . . . . . 10
About This Manual . . . . . . . . . . . . . . . . . . . . . . . . . . . . . . . . . . . . . . . . . . . . . . 10
Target Audience . . . . . . . . . . . . . . . . . . . . . . . . . . . . . . . . . . . . . . . . . . . . . . 10
Textual and Graphic Conventions . . . . . . . . . . . . . . . . . . . . . . . . . . . . . . . . . . 10
Using This Manual . . . . . . . . . . . . . . . . . . . . . . . . . . . . . . . . . . . . . . . . . . . . . . 11
Description, Features and Benefits . . . . . . . . . . . . . . . . . . . . . . . . . . . . . . . . . . . 12
Key Features and Benefits . . . . . . . . . . . . . . . . . . . . . . . . . . . . . . . . . . . . . . . 12
Parts List . . . . . . . . . . . . . . . . . . . . . . . . . . . . . . . . . . . . . . . . . . . . . . . . . . 12
Package Handling . . . . . . . . . . . . . . . . . . . . . . . . . . . . . . . . . . . . . . . . . . . 13
Unpacking . . . . . . . . . . . . . . . . . . . . . . . . . . . . . . . . . . . . . . . . . . . . . . . . . . . . 13
Handling and Care . . . . . . . . . . . . . . . . . . . . . . . . . . . . . . . . . . . . . . . . . . . . . . 14
Cleaning . . . . . . . . . . . . . . . . . . . . . . . . . . . . . . . . . . . . . . . . . . . . . . . . . . . . .14
Controls and Functions . . . . . . . . . . . . . . . . . . . . . . . . . . . . . . . . . . . . . . . 15
Display at a Glance . . . . . . . . . . . . . . . . . . . . . . . . . . . . . . . . . . . . . . . . . . . . . . 15
Input Panel . . . . . . . . . . . . . . . . . . . . . . . . . . . . . . . . . . . . . . . . . . . . . . . . . . . 17
Remote Control Unit . . . . . . . . . . . . . . . . . . . . . . . . . . . . . . . . . . . . . . . . . . . . .19
Installation . . . . . . . . . . . . . . . . . . . . . . . . . . . . . . . . . . . . . . . . . . . . . 21
Remote Control . . . . . . . . . . . . . . . . . . . . . . . . . . . . . . . . . . . . . . . . . . . . . . . . 21
Notes on Batteries . . . . . . . . . . . . . . . . . . . . . . . . . . . . . . . . . . . . . . . . . . . . 21
Notes on Remote Control Operation . . . . . . . . . . . . . . . . . . . . . . . . . . . . . . . . 21
Locking and Unlocking the Remote Control . . . . . . . . . . . . . . . . . . . . . . . . . . .21
Quick Setup . . . . . . . . . . . . . . . . . . . . . . . . . . . . . . . . . . . . . . . . . . . . . . . . . . . 22
Installation Considerations . . . . . . . . . . . . . . . . . . . . . . . . . . . . . . . . . . . . . . . . .22
Handling Guidelines . . . . . . . . . . . . . . . . . . . . . . . . . . . . . . . . . . . . . . . . . . . 22
Ambient Heat . . . . . . . . . . . . . . . . . . . . . . . . . . . . . . . . . . . . . . . . . . . . . . . 23
Ventilation . . . . . . . . . . . . . . . . . . . . . . . . . . . . . . . . . . . . . . . . . . . . . . . . .23
Mounting the Display . . . . . . . . . . . . . . . . . . . . . . . . . . . . . . . . . . . . . . . . . . . . 23
Connections to the Display . . . . . . . . . . . . . . . . . . . . . . . . . . . . . . . . . . . . . . . . 24
Connecting a Control System or PC . . . . . . . . . . . . . . . . . . . . . . . . . . . . . . . . .24
IR Extender Connection . . . . . . . . . . . . . . . . . . . . . . . . . . . . . . . . . . . . . . . . .25
Connecting Source Components to the Display . . . . . . . . . . . . . . . . . . . . . . . . .25
Setting Up a Video Wall . . . . . . . . . . . . . . . . . . . . . . . . . . . . . . . . . . . . . . . . .28
FHD552-X LCD Panel User Manual 8
020-000741-01 Rev. 1 (07-2014)

Operation . . . . . . . . . . . . . . . . . . . . . . . . . . . . . . . . . . . . . . . . . . . . . . . . . . 30
Turning on the Power . . . . . . . . . . . . . . . . . . . . . . . . . . . . . . . . . . . . . . . . . . . . 30
Changing the OSD Language . . . . . . . . . . . . . . . . . . . . . . . . . . . . . . . . . . . . . . . 30
Avoiding Image Retention . . . . . . . . . . . . . . . . . . . . . . . . . . . . . . . . . . . . . . . . .30
Using the On-Screen Menus . . . . . . . . . . . . . . . . . . . . . . . . . . . . . . . . . . . . . . . . 32
Image Settings . . . . . . . . . . . . . . . . . . . . . . . . . . . . . . . . . . . . . . . . . . . . . . 33
Display Settings . . . . . . . . . . . . . . . . . . . . . . . . . . . . . . . . . . . . . . . . . . . . . . 38
Audio Settings . . . . . . . . . . . . . . . . . . . . . . . . . . . . . . . . . . . . . . . . . . . . . . . 39
Basic Settings . . . . . . . . . . . . . . . . . . . . . . . . . . . . . . . . . . . . . . . . . . . . . . . 40
Advanced Settings . . . . . . . . . . . . . . . . . . . . . . . . . . . . . . . . . . . . . . . . . . . . 42
System Status . . . . . . . . . . . . . . . . . . . . . . . . . . . . . . . . . . . . . . . . . . . . . . . 45
Using the Picture-in-Picture (PIP) . . . . . . . . . . . . . . . . . . . . . . . . . . . . . . . . . . . . 45
Maintenance and Troubleshooting . . . . . . . . . . . . . . . . . . . . . . . . . . . . . . . 48
Maintenance . . . . . . . . . . . . . . . . . . . . . . . . . . . . . . . . . . . . . . . . . . . . . . . . . . 48
Troubleshooting . . . . . . . . . . . . . . . . . . . . . . . . . . . . . . . . . . . . . . . . . . . . . . . .48
External Control . . . . . . . . . . . . . . . . . . . . . . . . . . . . . . . . . . . . . . . . . . . . . 50
Serial Communications . . . . . . . . . . . . . . . . . . . . . . . . . . . . . . . . . . . . . . . . . . . 50
RS232 Connection and Port Configuration . . . . . . . . . . . . . . . . . . . . . . . . . . . . 50
Command and Response Format . . . . . . . . . . . . . . . . . . . . . . . . . . . . . . . . . . 50
Command and Response Examples . . . . . . . . . . . . . . . . . . . . . . . . . . . . . . . . .51
Serial Command List . . . . . . . . . . . . . . . . . . . . . . . . . . . . . . . . . . . . . . . . . . 52
Using Video Wall Toolbox . . . . . . . . . . . . . . . . . . . . . . . . . . . . . . . . . . . . . . . . . . 57
Using Discrete IR Codes . . . . . . . . . . . . . . . . . . . . . . . . . . . . . . . . . . . . . . . . . . 62
IR Command Protocol . . . . . . . . . . . . . . . . . . . . . . . . . . . . . . . . . . . . . . . . . . 62
IR Control Code List . . . . . . . . . . . . . . . . . . . . . . . . . . . . . . . . . . . . . . . . . . . 63
Specifications . . . . . . . . . . . . . . . . . . . . . . . . . . . . . . . . . . . . . . . . . . . . . . . 64
Display Specifications . . . . . . . . . . . . . . . . . . . . . . . . . . . . . . . . . . . . . . . . . . . . 64
Supported Timings . . . . . . . . . . . . . . . . . . . . . . . . . . . . . . . . . . . . . . . . . . . . . . 66
Overall Dimensions . . . . . . . . . . . . . . . . . . . . . . . . . . . . . . . . . . . . . . . . . . . . . . 68
FHD552-X LCD Panel User Manual 9
020-000741-01 Rev. 1 (07-2014)

Introduction
i
About This Manual
This User Manual describes how to install, set up and operate the FHD552-X LCD Panel.
Target Audience
The manufacturer has prepared this manual to help end users get the most out of the display.
The manufacturer has made every effort to ensure that this manual is accurate as of the date it was
printed. However, because of ongoing product improvements and customer feedback, it may
require updating from time to time.
Textual and Graphic Conventions
Text Conventions
The following conventions are used in this manual, in order to clarify the information and
instructions provided:
• Remote and built-in keypad button identifiers are set in upper-case bold type; for example,
“Press EXIT to return to the previous menu.”
• Computer input (commands you type) and output (responses that appear on-screen) is shown
in monospace (fixed-width) type; for example: “To change the aspect ratio to Letterbox, type
07 00 02 41 53 50 03 08 <Enter>.”
• All keys with functional names are initial-capped, set in bold type and enclosed in angle
brackets. These keys are the following: <Enter>, <Spacebar>, <Control>, <Esc> and <Tab>.
• <Enter> indicates that you may press either the RETURN or ENTER key on your keyboard if it
has both keys.
In addition to these conventions, underlining, boldface and/or italics are occasionally used to
highlight important information, as in this example:
A carriage return must be used after each command or string.
FHD552-X LCD Panel User Manual 10
020-000741-01 Rev. 1 (07-2014)

Introduction
i
Graphic Conventions
These symbols appear in numerous places throughout the manual, to emphasize points that you must
keep in mind to avoid problems with your equipment or injury:
TIPS highlight time-saving short cuts and helpful guidelines for using certain features.
NOTICE emphasize text with unusual importance or special significance. They also provide
supplemental information.
CAUTIONS alert users that a given action or omitted action can degrade performance or
cause a malfunction.
WARNINGS appear when a given action or omitted action can result in damage to the
equipment, or possible non-fatal injury to the user.
DANGER appears when a given action can cause severe injury or death.
Using This Manual
Use the following table to locate the specific information you need in this manual.
If you need... ... Turn to page:
General information about the FHD552-X LCD
Panel
Installation instructions 21
First-time configuration instructions 33
Advanced configuration instructions 42
Troubleshooting tips 48
Product specifications 64
12
FHD552-X LCD Panel User Manual 11
020-000741-01 Rev. 1 (07-2014)

Introduction
Description, Features and Benefits
The FHD552-X LCD Panel is a cutting-edge direct-view LCD that, when tiled with multiple units, can
create enormous images in multiple configurations. The display combines a simple and slim design
with unparalleled image quality with configurable I/O to provide a perfect building block for largeformat video walls, which are idea in digital signage and control-room applications.
Key Features and Benefits
The display offers these key features and benefits:
• Full-HD Native Resolution: 1920 x 1080 (16:9 Native Aspect Ratio)
• High Brightness: Up to 500 nits
• 178-degree Viewing Angle
• DisplayPort 1.1a, HDMI and DVI Inputs with High-bandwidth Digital Content Protection (HDCP)
• Video Signal Looping
• Direct LED Backlight
• Video Wall Toolbox software [included] simplifies setting up a large video wall, with up to 25
displays, using a Windows PC
• Portrait- and Landscape-Mode Compatible
Parts List
Your display is shipped with the following items. If any items are missing or damaged, please
contact your dealer.
• FHD552-X LCD Panel
• Remote Control Unit and batteries
• AC Power cord
•DVI Cable
• RS232 Communications Cable
• RS485 Communications Cable
•IR Extender Cable
• Video Wall ToolBox Installation CD
FHD552-X LCD Panel User Manual 12
020-000741-01 Rev. 1 (07-2014)

Package Handling
Failure to comply with the
following could result in death
or serious injury:
• Do not drop the panel (even
a short distance), or apply
pressure to the sides of the
bezel. The small size of the
bezel, which enables
minimal image-to-image
gaps, means there is
reduced protection of the
LCD glass and components.
Dropping the panel or
applying unnecessary force
to the sides of the bezel will
result in permanent
damage.
• To avoid serious injury and/
or serious damage to the
LCD panel, moving the
panel requires at least two
people. Hold the white
handles on the shipping
package when moving/
shipping. Failure to properly
handle the package may
result in serious injury.
• Extreme care must be taken
when pushing the mounted
display into its locked
position. Always handle the
display on the opposing
corners of the frame to
avoid direct contact with
the LCD glass.
Due to the delicate nature of the display , we strongly recommend that you use the provided
packing materials and secure the package onto a pallet during shipment.
Unpacking
Each LCD panel is packed inside a box carton. To protect the panel during transportation, additional
packing material has been placed within the carton. Before unpacking, prepare a stable, level and
clean surface near a wall outlet for your LCD panel. Set the box in an upright position and pull out
the white carton locks. Lift up the top cover carton. Remove the ESD bag before removing the
display from the bottom tray carton.
FHD552-X LCD Panel User Manual 13
020-000741-01 Rev. 1 (07-2014)

Handling and Care
Make sure the power connector and any other cables are unplugged before moving the
product. Failure to comply could result in minor or moderate injury.
To avoid damaging your LCD panel, follow these guidelines when
handling or moving the panel:
• Hold and support the LCD panel at each side and keep at an
even height above the ground.
• Do not twist or bend the panel.
• Always use the handles on the back of the LCD panel. Do not
hold onto the frame when transporting.
• Two people are required when moving or raising the LCD panel.
Use both hands, one positioned on the top handle and the other
on the bottom handle.
• Use a cart to move several panels at one time.
Package Handling
• When the panel is sitting on a surface, do not tilt it more than
10° to avoid damaging the screen.
Cleaning
Unplug the power cord before cleaning the LCD panel. Do not use a liquid , spr ay clea ners, or
any abrasive cleaners to clean the LCD panel. Failure to comply may result in equipment
damage.
Use a cloth dampened with water or methyl alcohol to clean the screen surface. It is recommended
you keep the protective plastic sheet shipped with the panel to replace it each time the panels are
packed and shipped.
FHD552-X LCD Panel User Manual 14
020-000741-01 Rev. 1 (07-2014)

Controls and Functions
3
41 1
Display at a Glance
The illustration below shows the key display components, and the paragraphs that follow describe
them.
SOURCE
MENU/EXIT
1. HANDLES
Always use the handles when carrying the display. DO NOT touch or hold the screen face.
2. MAIN POWER SWITCH
Connects or disconnects the display panel from the AC power source.
3. STATUS LED
Lights orange to indicate that the display is in standby mode; blinks or ange if no input signal is
present; off if the main power switch is set to off.
FHD552-X LCD Panel User Manual 15
020-000741-01 Rev. 1 (07-2014)
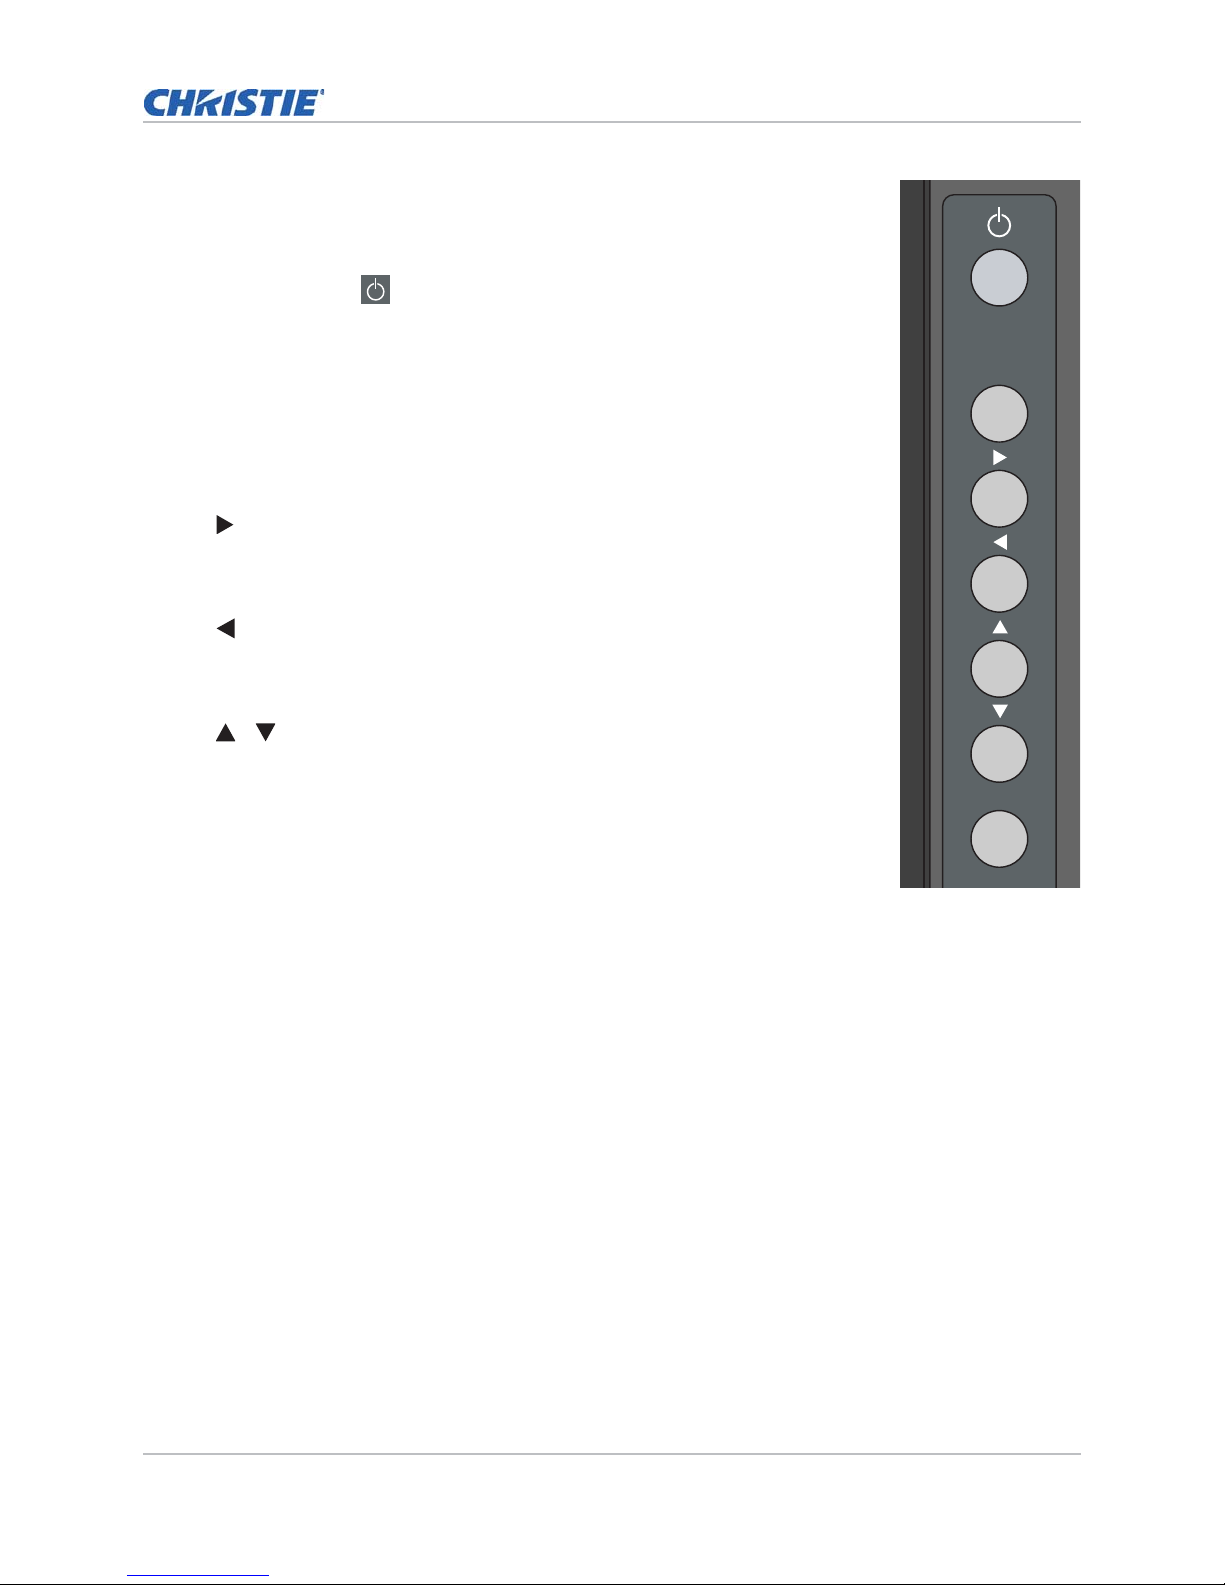
4. KEYPAD
SOURCE
MENU/EXIT
You can use the keypad instead of the remote control unit to operate the
on-screen display (OSD) controls. The keypad operates as follows:
On/Standby ( )
Press once to toggle from standby mode to on mode. Press it again to
return to standby mode.
SOURCE
To select a source, press the SOURCE button repeatedly (with no menus
visible on-screen).
When a menu is visible on-screen, this button operates identically to the
right-arrow (or ENTER) button on the display remote control unit.
When a menu is visible on-screen, this button operates identically to the
left-arrow button on the display remote control unit.
/
When a menu is visible on-screen, these buttons operate identically to the
up- and down-arrow buttons on the display remote control unit.
MENU/EXIT
Press this button to access the on-screen display (OSD) controls, or to exit
the current menu and return to the previous one.
Controls and Functions
FHD552-X LCD Panel User Manual 16
020-000741-01 Rev. 1 (07-2014)

Input Panel
2
3
9
13
17
15
10
14
16
18
4
6
8
7
1
5
11
12
The illustration below shows the display input panel.
Controls and Functions
1. Power Input (100 to 240 VAC)
Connect the display to power here.
2. DVI-D Out (HDCP-compliant)
VESA-standard digital video output from the display to the next display in a video wall.
3. VGA Out (15-pin D-Sub)
VESA-standard analog video output from the display to the next display in a video wall.
FHD552-X LCD Panel User Manual 17
020-000741-01 Rev. 1 (07-2014)

Controls and Functions
i
4. DisplayPort
DisplayPort 1.1a and DisplayPort-HDCP 1.1 compliant, SD/HD input for connecting SDTV, EDTV
or HDTV component video sources.
5. HDMI 1, HDMI 2
Two (2) HDCP-compliant digital video inputs for connecting HDMI or DVI sources.
6. DVI-D In (HDCP-compliant)
VESA-standard digital video input from a personal computer, or digital video from a DVD player
or HD set-top box.
7. VGA In (15-pin D-Sub)
For connecting components that have RGB or component output jacks such as a personal
computer or external DTV decoder (a break-out cable is needed for BNC-type connection).
8. PC Audio In
Connect the audio output from a personal computer here.
9. IR Extender
Connect the IR Extender cable provided with the display to this input.
10. Audio Out
For connecting external, powered speakers or an external audio receiver/amplifier.
11. Component
Standard- or high definition (up to 1080p), YPrPb component video input.
12. Comp. Audio
Stereo audio input from the Component video source.
13. S-Video
Standard S-video input for connecting a VCR, camcorder, gaming console, Super VHS (S-VHS)
VCR or other S-video source.
If both the Composite and S-video inputs are connected to sources, the S- vi deo in pu t t a k e s
precedence.
14. Video
Standard composite input for connecting a VCR, camcorder , gaming console or other composite
video source.
15. Video / S-V Audio
Stereo audio input from the Composite or S-video source.
16. RS232C In
A female, 9-pin D-sub connector for interfacing with a PC or home theater automation/control
system.
17. RS485 In
A female, 8-pin RJ-45 connector that connects to the previous display in a video wall.
18. RS485 Out
A female, 8-pin RJ-45 connector that connects to the next display in a video wall.
FHD552-X LCD Panel User Manual 18
020-000741-01 Rev. 1 (07-2014)
Controls and Functions
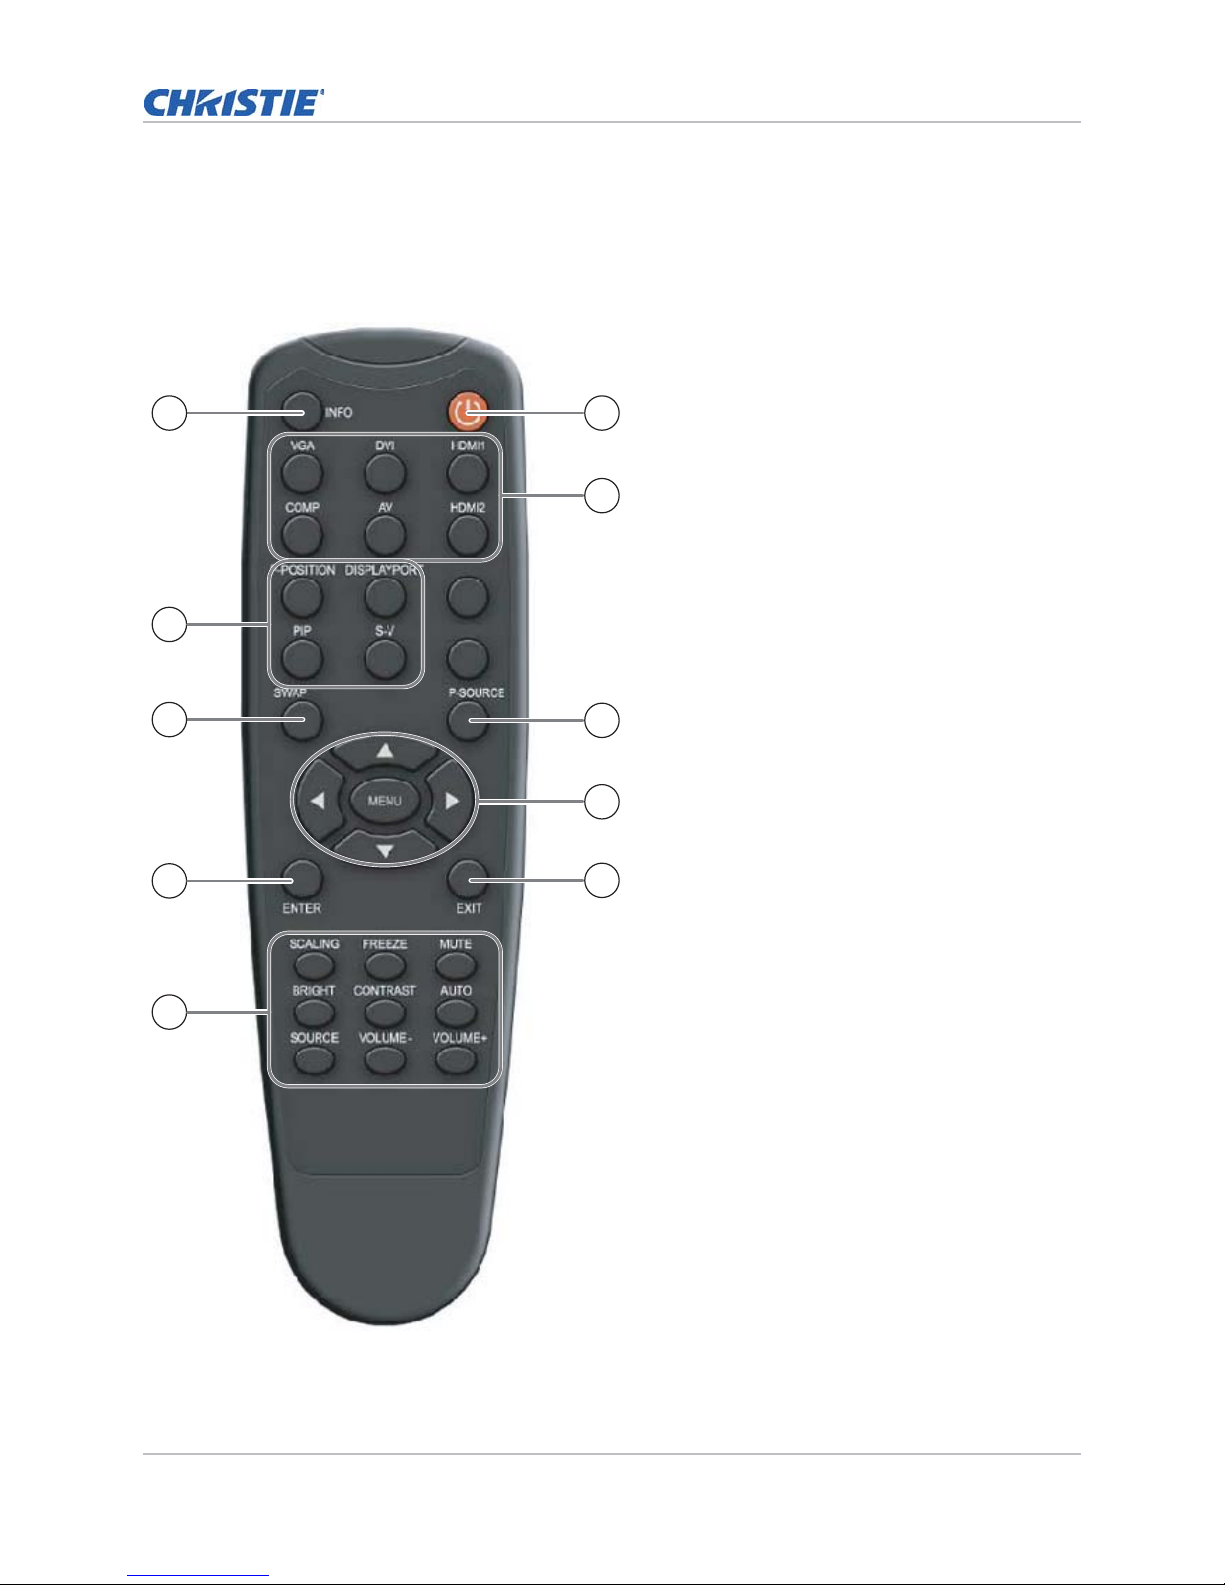
Remote Control Unit
The illustration below shows the display remote control, and the table that follows describes its
functionality.
2
1
3
4
6
5
7
8
9
10
FHD552-X LCD Panel User Manual 19
020-000741-01 Rev. 1 (07-2014)

Controls and Functions
Label Description
1 Turns the monitor on and off
2 INFO Provides source and resolution information
3 VGA Selects the PC RGB source
DVI Selects the PC DVI source
HDMI1 Selects the HDMI source 1
COMP Selects the Component source
AV Selects the Composite Video source
HDMI2 Selects the HDMI source 2
4 P-POSITION Selects the PIP position
DISPLAYPORT Select the DisplayPort source
PIP Turns the PIP feature on and off
S-V Sel ects the S-video source
5 P-SOURCE Selects the secondary sub-source
6 SWAP Swaps the main and PIP source
7 MENU Opens the monitor’s on-screen menu system. When
the menu system is already open, pressing this
button will select the previous submenu
, , ,
Navigates through submenus and settings
8 ENTER Selects highlighted menu choices
9 EXIT Closes the menu system
10 SCALING Selects each aspect ratio, in sequence: Full Screen,
Native, Letter Box and Pillar Box
FREEZE Freezes the current source image
MUTE Turns off the sound
BRIGHT Adjusts the brightness
CONTRAST Adjusts the contrast
AUTO Auto adjustment of VGA source
SOURCE Selects each source, in sequence
VOLUME- Decreases the sound volume
VOLUME+ Increases the sound volume
FHD552-X LCD Panel User Manual 20
020-000741-01 Rev. 1 (07-2014)

Installation
Installation must be performed by a qualified custom video installation specialist.
Remote Control
To install batteries in the remote control:
1. Press down the tab on the cover and pull the cover up.
2. Insert the included batteries. Ensure that the polarities correctly match the and markin gs
inside the battery compartment.
3. Insert the lower tab of the cover into the opening, and press down the cover until it clicks in
place.
Notes on Batteries
• Make sure that the battery polarities are correct when installing the batteries.
• Do not mix an old battery with a new one or different types of batteries.
• If you will not use the remote control for a long time, remove the batteries to avoid damage
from battery leakage.
• Do not expose batteries to excessive heat such as from sunshine, fire or the like.
Notes on Remote Control Operation
• Make sure that there is nothing obstructing the infrared beam between the remote control and
the IR receiver on the display.
• If the effective range of the remote control decreases, or it stops working, replace the batteries
with new ones.
• The remote control may fail to operate if the infrared remote sensor is exposed to bright
sunlight or fluorescent lighting.
• Ambient conditions may possibly impede the operation of the remote control. If this happens,
point the remote control at the display, and repeat the operation.
Locking and Unlocking the Remote Control
You can lock the remote control buttons to prevent unauthorized persons from changing settin gs on
the display. To do this, press ENTER, ENTER, EXIT, EXIT, ENTER and EXIT, in sequence. To
unlock a locked remote control unit, use the same sequence of button presses.
FHD552-X LCD Panel User Manual 21
020-000741-01 Rev. 1 (07-2014)
 Loading...