

Christie FHD462-X User Manual

User Manual
020-000769-02
FHD462-X LCD Panel

NOTICES
COPYRIGHT AND TRADEMARKS
Copyright ©2016 Christie Digital Systems USA Inc. All rights reserved.
All brand names and product names are trademarks, registered trademarks or trade names of their respective holders.
GENERAL
Every effort has been made to ensure accuracy, however in some cases changes in the products or availability could occur which may not be reflected in this
document. Christie reserves the right to make changes to specifications at any time without notice. Performance specifications are typical, but may vary
depending on conditions beyond Christie's control such as maintenance of the product in proper working conditions. Performance specifications are based
on information available at the time of printing. Christie makes no warranty of any kind with regard to this material, including, but not limited to, implied
warranties of fitness for a particular purpose. Christie will not be liable for errors contained herein or for incidental or consequential damages in connection
with the performance or use of this material. Canadian manufacturing facility is ISO 9001 and 14001 certified.
WARRANTY
Products are warranted under Christie’s standard limited warranty, the complete details of which are available by contacting your Christie dealer or Christie.
In addition to the other limitations that may be specified in Christie’s standard limited warranty and, to the extent relevant or applicable to your product, the
warranty does not cover:
a. Problems or damage occurring during shipment, in either direction.
b. Projector lamps (See Christie’s separate lamp program policy).
c. Problems or damage caused by use of a projector lamp beyond the recommended lamp life, or use of a lamp other than a Christie lamp supplied by
Christie or an authorized distributor of Christie lamps.
d. Problems or damage caused by combination of a product with non-Christie equipment, such as distribution systems, cameras, DVD players, etc., or
use of a product with any non-Christie interface device.
e. Problems or damage caused by the use of any lamp, replacement part or component purchased or obtained from an unauthorized distributor of
Christie lamps, replacement parts or components including, without limitation, any distributor offering Christie lamps, replacement parts or
components through the internet (confirmation of authorized distributors may be obtained from Christie).
f. Problems or damage caused by misuse, improper power source, accident, fire, flood, lightening, earthquake or other natural disaster.
g. Problems or damage caused by improper installation/alignment, or by equipment modification, if by other than Christie service personnel or a Christie
authorized repair service provider.
h. Problems or damage caused by use of a product on a motion platform or other movable device where such product has not been designed, modified
or approved by Christie for such use.
i. Problems or damage caused by use of a projector in the presence of an oil-based fog machine or laser-based lighting that is unrelated to the projector.
j. For LCD projectors, the warranty period specified in the warranty applies only where the LCD projector is in “normal use” which means the LCD
projector is not used more than 8 hours a day, 5 days a week.
k. Except where the product is designed for outdoor use, problems or damage caused by use of the product outdoors unless such product is protected
from precipitation or other adverse weather or environmental conditions and the ambient temperature is within the recommended ambient
temperature set forth in the specifications for such product.
l. Image retention on LCD flat panels.
m.Defects caused by normal wear and tear or otherwise due to normal aging of a product.
The warranty does not apply to any product where the serial number has been removed or obliterated. The warranty also does not apply to any product
sold by a reseller to an end user outside of the country where the reseller is located unless (i) Christie has an office in the country where the end user is
located or (ii) the required international warranty fee has been paid.
The warranty does not obligate Christie to provide any on site warranty service at the product site location.
PREVENTATIVE MAINTENANCE
Preventative maintenance is an important part of the continued and proper operation of your product. Please see the Maintenance section for specific
maintenance items as they relate to your product. Failure to perform maintenance as required, and in accordance with the maintenance schedule specified
by Christie, will void the warranty.
REGULATORY
The product has been tested and found to comply with the limits for a Class A digital device, pursuant to Part 15 of the FCC Rules. These limits are designed
to provide reasonable protection against harmful interference when the product is operated in a commercial environment. The product generates, uses, and
can radiate radio frequency energy and, if not installed and used in accordance with the instruction manual, may cause harmful interference to radio
communications. Operation of the product in a residential area is likely to cause harmful interference in which case the user will be required to correct the
interference at the user’s own expense.
CAN ICES-3 (A) / NMB-3 (A)
이 기기는 업무용 (A 급 ) 으로 전자파적합등록을 한 기기이오니 판매자 또는 사용자는 이점을 주의하시기 바라며 , 가정 외의 지역에서 사용하는 것을 목적
으로 합니다 .
Environmental
Theproductisdesignedandmanufacturedwithhigh‐qualitymaterialsandcomponentsthatcanberecycledandreused.
This symbol meansthatelectricaland
electronicequipment,attheirend‐of‐life,shouldbedisposedofseparatelyfromregularwaste.Pleasedisposeoftheproductappropriatelyandaccordingtolocal
regulations.IntheEuropeanUnion,thereareseparatecollectionsystemsforusedelectricalandelectronicproducts.Pleasehelpustoconservetheen
vironmentwe
livein!

Content
Package Handling . . . . . . . . . . . . . . . . . . . . . . . . . . . . . . . . . . . . . . . . . . . . 5
Unpacking . . . . . . . . . . . . . . . . . . . . . . . . . . . . . . . . . . . . . . . . . . . . . . . . . . . . .6
Handling and Care . . . . . . . . . . . . . . . . . . . . . . . . . . . . . . . . . . . . . . . . . . . . . . .6
Cleaning . . . . . . . . . . . . . . . . . . . . . . . . . . . . . . . . . . . . . . . . . . . . . . . . . . . . . .6
Introduction . . . . . . . . . . . . . . . . . . . . . . . . . . . . . . . . . . . . . . . . . . . . . . . . . 7
Key Features and Benefits . . . . . . . . . . . . . . . . . . . . . . . . . . . . . . . . . . . . . . . .7
Parts List . . . . . . . . . . . . . . . . . . . . . . . . . . . . . . . . . . . . . . . . . . . . . . . . . . .7
Controls and Functions . . . . . . . . . . . . . . . . . . . . . . . . . . . . . . . . . . . . . . . . 9
Display at a Glance . . . . . . . . . . . . . . . . . . . . . . . . . . . . . . . . . . . . . . . . . . . . . . .9
Input Panel . . . . . . . . . . . . . . . . . . . . . . . . . . . . . . . . . . . . . . . . . . . . . . . . . . . 11
Remote Control Unit . . . . . . . . . . . . . . . . . . . . . . . . . . . . . . . . . . . . . . . . . . . . .13
Installation . . . . . . . . . . . . . . . . . . . . . . . . . . . . . . . . . . . . . . . . . . . . . 15
Remote Control . . . . . . . . . . . . . . . . . . . . . . . . . . . . . . . . . . . . . . . . . . . . . . . . 15
Notes on Batteries . . . . . . . . . . . . . . . . . . . . . . . . . . . . . . . . . . . . . . . . . . . . 15
Notes on Remote Control Operation . . . . . . . . . . . . . . . . . . . . . . . . . . . . . . . .15
Locking and Unlocking the Remote Control . . . . . . . . . . . . . . . . . . . . . . . . . . .16
Quick Setup . . . . . . . . . . . . . . . . . . . . . . . . . . . . . . . . . . . . . . . . . . . . . . . . . . . 16
Installation Considerations . . . . . . . . . . . . . . . . . . . . . . . . . . . . . . . . . . . . . . . . .17
Handling Guidelines . . . . . . . . . . . . . . . . . . . . . . . . . . . . . . . . . . . . . . . . . . . 17
Ambient Heat . . . . . . . . . . . . . . . . . . . . . . . . . . . . . . . . . . . . . . . . . . . . . . . 17
Ventilation . . . . . . . . . . . . . . . . . . . . . . . . . . . . . . . . . . . . . . . . . . . . . . . . .18
Mounting the Display . . . . . . . . . . . . . . . . . . . . . . . . . . . . . . . . . . . . . . . . . . . . 18
Connections to the Display . . . . . . . . . . . . . . . . . . . . . . . . . . . . . . . . . . . . . . . . 18
Connecting a Control System or PC . . . . . . . . . . . . . . . . . . . . . . . . . . . . . . . . .19
IR Extender Connection . . . . . . . . . . . . . . . . . . . . . . . . . . . . . . . . . . . . . . . . .20
Connecting Source Components to the Display . . . . . . . . . . . . . . . . . . . . . . . . .21
Setting Up a Video Wall . . . . . . . . . . . . . . . . . . . . . . . . . . . . . . . . . . . . . . . . .22
Operation . . . . . . . . . . . . . . . . . . . . . . . . . . . . . . . . . . . . . . . . . . . . . . . . . . 25
Turning on the Power . . . . . . . . . . . . . . . . . . . . . . . . . . . . . . . . . . . . . . . . . . . . 25
Changing the OSD Language . . . . . . . . . . . . . . . . . . . . . . . . . . . . . . . . . . . . . . . 25
Avoiding Image Retention . . . . . . . . . . . . . . . . . . . . . . . . . . . . . . . . . . . . . . . . .26
Using the On-Screen Menus . . . . . . . . . . . . . . . . . . . . . . . . . . . . . . . . . . . . . . . . 27
FHD462-X LCD Panel User Manual 3
020-000769-02 Rev. 1 (01-2016)

Image Settings . . . . . . . . . . . . . . . . . . . . . . . . . . . . . . . . . . . . . . . . . . . . . . 30
Display Settings . . . . . . . . . . . . . . . . . . . . . . . . . . . . . . . . . . . . . . . . . . . . . . 35
Audio Settings . . . . . . . . . . . . . . . . . . . . . . . . . . . . . . . . . . . . . . . . . . . . . . . 36
Basic Settings . . . . . . . . . . . . . . . . . . . . . . . . . . . . . . . . . . . . . . . . . . . . . . . 37
Advanced Settings . . . . . . . . . . . . . . . . . . . . . . . . . . . . . . . . . . . . . . . . . . . . 39
Factory Reset . . . . . . . . . . . . . . . . . . . . . . . . . . . . . . . . . . . . . . . . . . . . . . .43
System Status . . . . . . . . . . . . . . . . . . . . . . . . . . . . . . . . . . . . . . . . . . . . . . . 44
Using the Picture-in-Picture (PIP) . . . . . . . . . . . . . . . . . . . . . . . . . . . . . . . . . . . . 44
Using the Display in Low Light Environments . . . . . . . . . . . . . . . . . . . . . . . . . . . .46
Maintenance and Troubleshooting . . . . . . . . . . . . . . . . . . . . . . . . . . . . . . . 48
Maintenance . . . . . . . . . . . . . . . . . . . . . . . . . . . . . . . . . . . . . . . . . . . . . . . . . . 48
Troubleshooting . . . . . . . . . . . . . . . . . . . . . . . . . . . . . . . . . . . . . . . . . . . . . . . .48
External Control . . . . . . . . . . . . . . . . . . . . . . . . . . . . . . . . . . . . . . . . . . . . . 50
RS232 and Ethernet Communications . . . . . . . . . . . . . . . . . . . . . . . . . . . . . . . . .50
RS232 Connection and Port Configuration . . . . . . . . . . . . . . . . . . . . . . . . . . . . 50
Command and Response Format . . . . . . . . . . . . . . . . . . . . . . . . . . . . . . . . . .50
Command and Response Examples . . . . . . . . . . . . . . . . . . . . . . . . . . . . . . . . .51
Serial Command List . . . . . . . . . . . . . . . . . . . . . . . . . . . . . . . . . . . . . . . . . . . . .52
Power control and input sources . . . . . . . . . . . . . . . . . . . . . . . . . . . . . . . . . . .52
Display adjustment . . . . . . . . . . . . . . . . . . . . . . . . . . . . . . . . . . . . . . . . . . . . 53
Other controls . . . . . . . . . . . . . . . . . . . . . . . . . . . . . . . . . . . . . . . . . . . . . . . 55
Using Video Wall Toolbox . . . . . . . . . . . . . . . . . . . . . . . . . . . . . . . . . . . . . . . . . . 59
Using Discrete IR Codes . . . . . . . . . . . . . . . . . . . . . . . . . . . . . . . . . . . . . . . . . . 64
IR Command Protocol . . . . . . . . . . . . . . . . . . . . . . . . . . . . . . . . . . . . . . . . . . 64
IR Control Code List . . . . . . . . . . . . . . . . . . . . . . . . . . . . . . . . . . . . . . . . . . . 65
Specifications . . . . . . . . . . . . . . . . . . . . . . . . . . . . . . . . . . . . . . . . . . . . . . . 66
Display Specifications . . . . . . . . . . . . . . . . . . . . . . . . . . . . . . . . . . . . . . . . . . . . 66
Supported Timings . . . . . . . . . . . . . . . . . . . . . . . . . . . . . . . . . . . . . . . . . . . . . . 68
Overall Dimensions . . . . . . . . . . . . . . . . . . . . . . . . . . . . . . . . . . . . . . . . . . . . . . 70
FHD462-X LCD Panel User Manual 4
020-000769-02 Rev. 1 (01-2016)
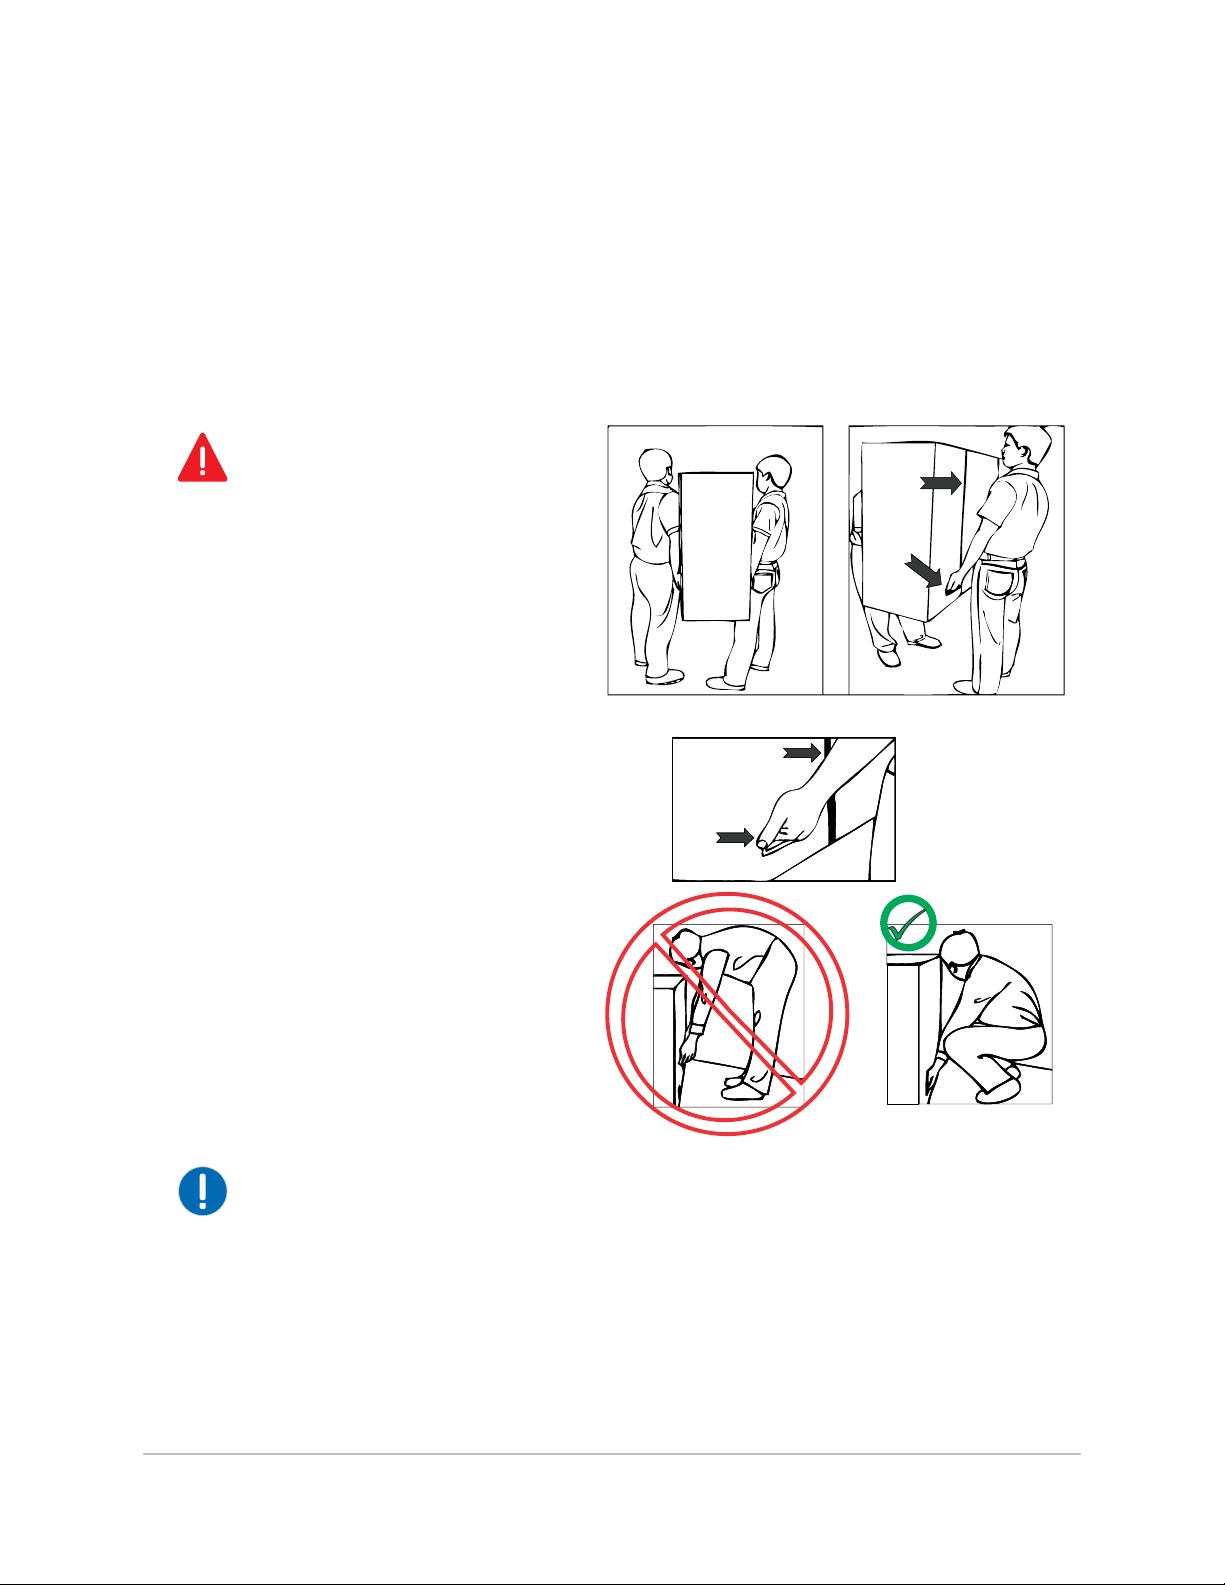
Package Handling
Danger! Failure to comply with the
following results in death or serio u s
injury.
• Do not drop the panel (even a short
distance), or apply pressure to the
sides of the bezel. The small size of
the bezel, which enables minimal
image-to-image gaps, means there is
reduced protection of the LCD glass
and components. Dropping the panel
or applying unnecessary force to the
sides of the bezel will result in
permanent damage.
• To avoid serious injury and/or serious
damage to the LCD panel, moving the
panel requires at least two people.
Hold the white handles on the
shipping package when moving/
shipping.
• Extreme care must be taken when
pushing the mounted display into its
locked position. Always handle the
display on the opposing corners of the
frame to avoid direct contact with the
LCD glass.
Notice. Failure to comply with the following may result in property damage.
• Due to the delicate nature of the display, we strongly recommend that you use the provided
packing materials and secure the package onto a pallet during shipment.
FHD462-X LCD Panel User Manual 5
020-000769-02 Rev. 1 (01-2016)

Package Handling
Unpacking
Each LCD panel is packed inside a box carton. To protect the panel during transportation, additional
packing material has been placed within the carton.
1. Before unpacking, prepare a stable, level and clean surface near a wall outlet for your LCD
panel.
2. Set the box in an upright position and pull out the white carton locks.
3. Lift up the top cover carton.
4. Remove the ESD bag before removing the display from the bottom tray carton.
Handling and Care
Warning! Failure to comply with the following could result in death or serious injury.
• Make sure the power connector and any other cables are unplugged before moving the product.
Failure to comply could result in minor or moderate injury.
To avoid damaging your LCD panel, follow these guidelines when
handling or moving the panel:
• Always use the handles on the back of the LCD panel. Do not
hold onto the frame when transporting.
• Two people are required when moving or raising the LCD
panel. Use both hands, one positioned on the top handle and
the other on the bottom handle.
• Hold and support the LCD panel at each side and keep at an
even height above the ground.
• Do not twist or bend the panel.
• Use a cart to move several panels at one time.
• When the panel is sitting on a surface, do not tilt it more than
10° to avoid damaging the screen.
Cleaning
Notice. Failure to comply with the following may result in property damage.
• Unplug the power cord before cleaning the LCD panel. Do not use a liquid, spray cleaners, or any
abrasive cleaners to clean the LCD panel. Failure to comply may result in equipment damage.
Use a cloth dampened with water or methyl alcohol to clean the screen surface. We recommend
that you keep the protective plastic sheet shipped with the panel to replace it each time the panels
are packed and shipped.
FHD462-X LCD Panel User Manual 6
020-000769-02 Rev. 1 (01-2016)

Introduction
The FHD462-X LCD Panel is a cutting-edge direct-view LCD that, when tiled with multiple units, can
create enormous images in multiple configurations. The display combines a simple and slim design
with unparalleled image quality with configurable I/O to provide a perfect building block for largeformat video walls, which are ideal in digital signage and control-room applications.
Key Features and Benefits
The display offers these key features and benefits:
• Full-HD Native Resolution: 1920 x 1080 (16:9 Native Aspect Ratio)
• High Brightness: Up to 500 nits
• 178-degree Viewing Angle
• DisplayPort 1.2a, HDMI 1.4 and DVI Inputs with High-bandwidth Digital Content Protection
(HDCP)
• DisplayPort 1.2 input and output to support daisy-chaining 4 displays using Multi-Stream
Transport (MST)*
• Allows 4K content on a 2x2 video wall for sources that support Multi-Stream Transport (MST)*
• Video Signal Looping
• Direct LED Backlight
• Video Wall Toolbox software [included] simplifies setting up a large video wall, with up to 100
displays, using a Windows PC
• Portrait- and Landscape-Mode Compatible
Parts List
Your display is shipped with the following items. If any items are missing or damaged, please
contact your dealer.
• FHD462-X LCD Panel
• Remote Control Unit and batteries
• AC Power cord
•DVI Cable
• RS232 Communications Cable
• RS485 Communications Cable
FHD462-X LCD Panel User Manual 7
020-000769-02 Rev. 1 (01-2016)

•IR Extender Cable
• Video Wall ToolBox Installation CD
Introduction
1
1.* M u l t i -Stream Tr a n s port ( M S T ) require s using a vid e o card t h at s u p p o r t s this feature a n d Dis-
playPort 1.2. Contact your dealer for more details on how to use MST.
FHD462-X LCD Panel User Manual 8
020-000769-02 Rev. 1 (01-2016)

Controls and Functions
1
1
1
1
2
4
3
Display at a Glance
The illustration below shows the key display components, and the paragraphs that follow describe
them.
1. HANDLES
FHD462-X LCD Panel User Manual 9
020-000769-02 Rev. 1 (01-2016)
Always use the handles when carrying the display. DO NOT touch or hold the screen face.
2. MAIN POWER SWITCH
Connects or disconnects the display panel from the AC power source.
3. STATUS LED
Lights orange to indicate that the display is in standby mode; blinks or ange if no input signal is
present; off if the main power switch is set to off.

4. KEYPAD
SOURCE
MENU/EXIT
You can use the keypad instead of the remote control unit to operate the
on-screen display (OSD) controls. The keypad operates as follows:
On/Standby ( )
Press once to toggle from standby mode to on mode. Press it again to
return to standby mode.
SOURCE
To select a source, press the SOURCE button repeatedly (with no menus
visible on-screen).
When a menu is visible on-screen, this button operates identically to the
right-arrow (or ENTER) button on the display remote control unit.
When a menu is visible on-screen, this button operates identically to the
left-arrow button on the display remote control unit.
/
When a menu is visible on-screen, these buttons operate identically to the
up- and down-arrow buttons on the display remote control unit.
MENU/EXIT
Press this button to access the on-screen display (OSD) controls, or to exit
the current menu and return to the previous one.
Controls and Functions
FHD462-X LCD Panel User Manual 10
020-000769-02 Rev. 1 (01-2016)

Input Panel
1
2
3
4
5
6
7
8
9
10
11
12
13
14
15
16
17
The illustration below shows the display input panel.
Controls and Functions
1. Power Input (100 to 240 VAC)
Connect the display to power here.
2. RS485 Out
A female, 8-pin RJ-45 connector that connects to the next display in a video wall.
3. RS485 In
A female, 8-pin RJ-45 connector that connects to the next video source.
4. RS232 In
A female, 9-pin D-sub connector for interfacing with a PC or home theater automation/control
system.
5. LAN
An RJ-45 connector for connecting to Ethernet via a Cat 5 cable.
FHD462-X LCD Panel User Manual 11
020-000769-02 Rev. 1 (01-2016)

Controls and Functions
6. DisplayPort Out
DisplayPort 1.2 and HDCP-compliant digital video output for connecting the display to the next
display in a video wall.
7. IR Receiver
An IR sensor that sends information of an infrared remote control to another device by
receiving and decoding signals.
8. VGA Out (15-pin D-sub)
VESA-standard analog video output for connecting the display to the next display in a video
wall.
9. DVI 1 In (HDCP-compliant)
VESA-standard digital video input for connecting DVI sources.
10. DVI 1 Out (HDCP-compliant)
VESA-standard digital video output for connecting the display to the next display in a video
wall.
11. DisplayPort In
DisplayPort 1.2 and HDCP-compliant digital video input for connecting DisplayPort sources.
12. HDMI 1, 2
Two (2) HDCP-compliant digital video inputs for connecting HDMI or DVI sources.
13. DVI 2 In (HDCP-compliant)
VESA-standard digital video input from a personal computer, or digital video from a DVD player
or HD set-top box.
14. VGA In (15-pin D-sub)
VESA-standard analog video input for connecting a personal computer or other analog video
source.
15. Audio In
For connecting an external audio device, such as a player, audio mixer or microphone.
16. IR Extender
Connect the IR Extender cable provided with the display to this input.
17. Audio Out
For connecting external, powered speakers or an external audio receiver/amplifier.
FHD462-X LCD Panel User Manual 12
020-000769-02 Rev. 1 (01-2016)

Controls and Functions
Remote Control Unit
The illustration below shows the display remote control, and the table that follows describes its
functionality.
2
4
6
8
1
3
5
7
9
10
FHD462-X LCD Panel User Manual 13
020-000769-02 Rev. 1 (01-2016)

Label Description
1 Turns the monitor on and off
2 INFO Provides source and resolution information
3 VGA Selects the VGA source
DVI Selects the DVI source 1
HDMI1 Selects the HDMI source 1
DVI-2/AV Selects the DVI source 2
HDMI2 Selects the HDMI source 2
4 P-POSITION Selects the PIP position
DISPLAYPORT Select the DisplayPort source
PIP Turns the PIP feature on and off
5 P-SOURCE Selects the secondary sub-source
6 SWAP Swaps the main and PIP source
Controls and Functions
7 MENU Opens the monitor’s on-screen menu system. When the menu system is already
open, pressing this button will select the previous submenu
, , ,
Navigates through submenus and settings
8 ENTER Selects highligh ted menu choices
9 EXIT Closes the menu system
10 SCALING Selects each aspect ratio , in se quence: Full Scree n, Native, Letter Box an d Pillar Box
FREEZE Freezes the current source image
MUTE Turns off the sound
BRIGHT Adjusts the brightness
CONTRAST Adjusts the contrast
AUTO Auto adjustment of VGA source
SOURCE Selects each source, in sequence
VOLUME- Decreases the sound volume
VOLUME+ Increases the sound volume
FHD462-X LCD Panel User Manual 14
020-000769-02 Rev. 1 (01-2016)

Installation
Notice. Failure to comply with the following may result in property damage.
• Installation must be performed by a qualified custom video installation specialist.
Remote Control
To install batteries in the remote control:
1. Press down the tab on the cover and pull the cover up.
2. Insert the included batteries. Ensure that the polarities correctly match the and markings
inside the battery compartment.
3. Insert the lower tab of the cover into the opening, and press down the cover until it clicks in
place.
Notes on Batteries
• Make sure that the battery polarities are correct when installing the batteries.
• Do not mix an old battery with a new one or different types of batteries.
• If you will not use the remote control for a long time, remove the batteries to avoid damage
from battery leakage.
• Do not expose batteries to excessive heat such as from sunshine, fire or the like.
Notes on Remote Control Operation
• Make sure that there is nothing obstructing the infrared beam between the remote control and
the IR receiver on the display.
• If the effective range of the remote control decreases, or it stops working, replace the batteries
with new ones.
• The remote control may fail to operate if the infrared remote sensor is exposed to bright
sunlight or fluorescent lighting.
• Ambient conditions may possibly impede the operation of the remote control. If this happens,
point the remote control at the display, and repeat the operation.
FHD462-X LCD Panel User Manual 15
020-000769-02 Rev. 1 (01-2016)

Installation
Locking and Unlocking the Remote Control
You can lock the remote control buttons to prevent unauthorized persons from changing settings on
the display. To do this, press ENTER, ENTER, EXIT, EXIT, ENTER and EXIT, in sequence. To
unlock a locked remote control unit, use the same sequence of button presses.
Quick Setup
Here is a quick overview of the display installation process. The sections following this one provide
detailed instructions.
Step Procedure For Details, Refer to
page...
1 Mount the display(s) on a wall (optional) 18
2 Connect other external equipment to the display (optional):
• Automation/control system (RS232 or Ethernet)
• IR extender
3 Connect signal sources to the display 21
4 For video wall installations, connect video cables and control cables to each
display in a series (optional)
5 Apply power to the display 25
19
20
6 Change the OSD language (optional) 25
7 Display calibration: adjust the following for each input:
• Aspect ratio • Color level
• Brightness • Tint
• Contrast • Input position
• Color temperature and white balance
30
FHD462-X LCD Panel User Manual 16
020-000769-02 Rev. 1 (01-2016)

Installation
Installation Considerations
Proper installation of your display will ensure a satisfying viewing experience. Whether you are
installing a display temporarily or permanently , you should tak e the following into account to ensure
your display performs optimally.
Handling Guidelines
Narrow bezel displays such as the FHD462-X are inherently very fragile devices. To avoid damaging
your LCD panel, follow these guidelines when handling or moving the panel. Please note that
damage due to improper handling is not covered under warranty.
• Always use the handles on the back of the LCD panel. Do not hold the display by its edges
(outer bezel).
• T wo people are required when moving or raising the LCD panel. Use both hands, one positioned
on the top handle and the other on the bottom handle.
• Do not twist or bend the panel.
• Hold and support the LCD panel at each side and keep at an even height above the ground.
• Use a cart to move multiple panels at one time.
• When the panel is sitting on a surface, do not tilt it more than 10° to avoid damaging the
screen.
Ambient Heat
Keep the ambient temperature constant and below 40°C (104°F). Keep the display away from
heating and/or air conditioning vents.
FHD462-X LCD Panel User Manual 17
020-000769-02 Rev. 1 (01-2016)

Installation
Wall
15 mm
(0.59
"
)
Ventilation
If you are mounting the display in an enclosure, leave sufficient space on all sides between it and
surrounding objects, as shown below. This allows heat to disperse, maintaining the proper
operating temperature. For very thin installations, to mount the display close to a wall it may be
necessary to remove the handles prior to installation.
Mounting the Display
You can mount the display on a wall.
If you do decide to wall-mount the display, ensure that the wall-mount bracket is installed
according to the instructions included with it. The wall must be capable of supporting a redundant
weight factor three (3) times the weight of the display, or be reinforced.
We recommend that this be done by a custom installation specialist.
Notice. Failure to comply with the following may result in property damage.
• Use only the approved wall-mount kit designed for your display.
Connections to the Display
Proceed as follows to connect the display to your video sources, external controller(s) – if present –
and AC power.
When connecting your equipment:
• Turn off all equipment before making any connections.
• Use the correct signal cables for each source.
FHD462-X LCD Panel User Manual 18
020-000769-02 Rev. 1 (01-2016)

Installation
to Automation/
Control System
or PC
2 Receive Data
(to ctrl. system)
3 Transmit Data
(from ctrl. system)
5 Ground
1
2
345
7
89
6
• For best performance and to minimize cable clutter, use high-quality cables that are only as
long as necessary to connect two devices. (Don’t use a 20-foot cable when a 6-foot cable will
suffice.)
• Ensure that the cables are securely connected. Tighten the thumbscrews on connectors that
have them.
Connecting a Control System or PC
RS232 Connection
Use a straight-through RS232 cable with a 9-pin male connector to connect a PC or control/
automation system (if present) to the RS232 port on the display.
For more information about using this connection, refer to External Control on page 50.
FHD462-X LCD Panel User Manual 19
020-000769-02 Rev. 1 (01-2016)
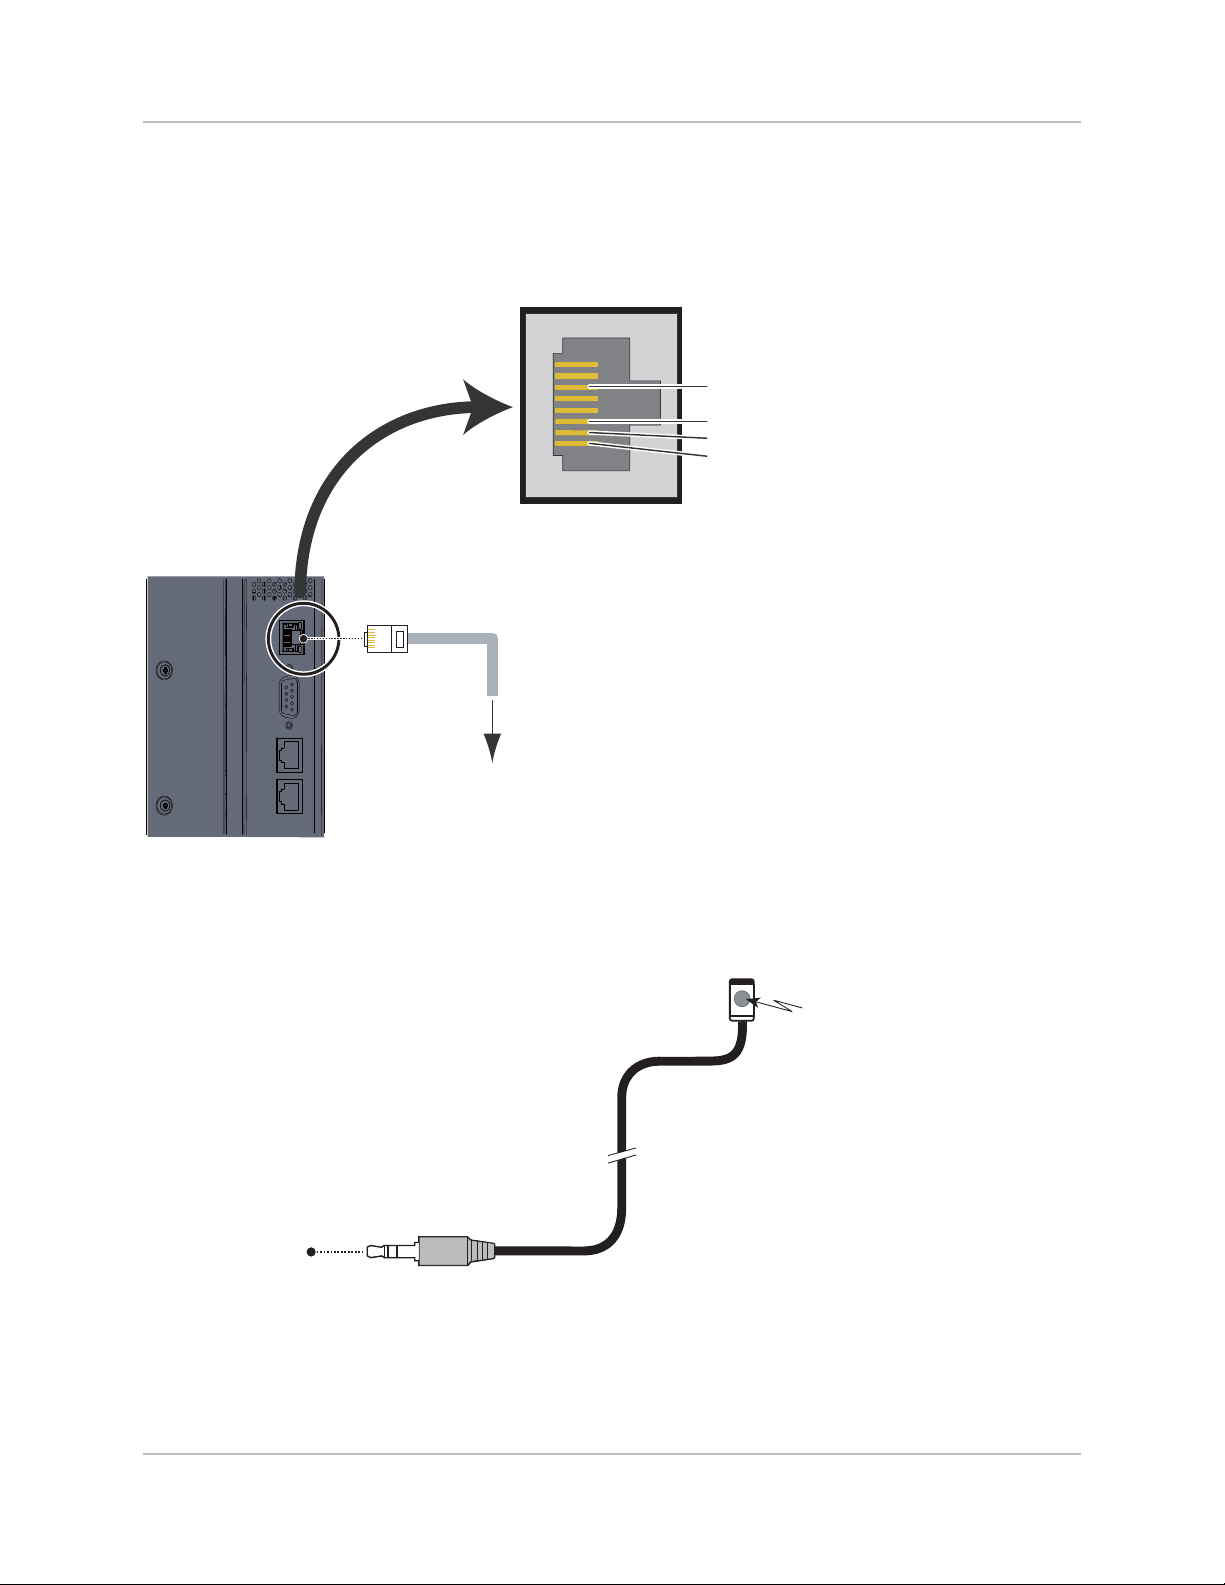
Installation
to Ethernet Hub,
Router or Gateway
8
1
6 Receive Data -
3 Receive Data +
2 Transmit Data 1 Transmit Data +
(3.5-mm, mini
phono plug)
Remote Control
Ethernet Connection
Use a standard Ethernet cable with an RJ45 male connector to connect a PC or control/automation
system (if present) to the Ethernet port on the display.
For more information about using this connection, refer to External Control on page 50.
IR Extender Connection
Connect the provided IR extender cable to the IR Extender input as shown below.
FHD462-X LCD Panel User Manual 20
020-000769-02 Rev. 1 (01-2016)

Installation
Connecting Source Components to the Display
Connect your video sources to the display as shown and described in the sections that follow.
DisplayPort Source Connection
Note: DisplayPort 1.2 input and output support daisy-chaining 4 dis plays using Multi-Stream
Tr anspor t ( MS T) .
HDMI and DVI-D Source Connections
HDMI or
DVI-to-HDMI Cable
(sold separately)
Audio Cable
(Sold Separately)
DVI-D Cable
Rear of the PC
BD/HD-DVD/
DVD/DTV STB
FHD462-X LCD Panel User Manual 21
020-000769-02 Rev. 1 (01-2016)

Installation
D-Sub 15-pin Cable
Audio Cable
(Sold Separately)
Rear of the PC
VGA Source Connection
Connect a personal computer or other RGB source to the VGA input as shown below. Refer to
Supported Timings on page 68 for a list of compatible input signals.
Setting Up a Video Wall
Connecting video
To use Multi-Display Control commands, described on page 44, all displays in a video wall should
receive the same video signal. This can be accomplished using an external video splitter (often referred
to as a distribution amplifier), or you can use the display’s video output connector to daisy-chain
monitors together.
When daisy-chaining video, note the followin g:
• The video output connectors are provided for convenience, to avoid using an external video
splitter. They perform the same function as an external video splitter.
• Daisy-chaining displays using the video output connectors has limitations depending on the
connector type.
• Daisy-chaining can be used in combination with an external video splitter if more displays are
required.
Daisy-chaining video using VGA: To daisy-chain displays using VGA, connect the upstream video
source to VGA In and connect the downstream display to VGA Out. A maximum of 4 displays can
be daisy-chained using VGA.
Daisy-chaining video using D VI: To daisy-chain displays using DVI, connect the upstream video
source to DVI 1 In and connect the downstream display to DVI 1 Out. A maximum of 6 displays
can be daisy-chained using DVI.
Daisy-chaining video using Di sp layPo rt: To daisy-chain displays using DisplayPort, connect the
upstream video source to DisplayPort In and connect the downstream display to DisplayPort Out. A
maximum of 16 displays can be daisy-chained using DisplayPort.
FHD462-X LCD Panel User Manual 22
020-000769-02 Rev. 1 (01-2016)
 Loading...