


CPM-3300

CHORD
Pre-amplifiers and integrated amplifiers

welcome
Thank you for buying a Chord product.
Before you start to enjoy using to your Chord product, please take a couple of
minutes to read how to connect your audio equipment and loudspeakers to your
pre-amplifier or integrated amplifier and how to maximise your listening experience.
user guide for
pre-amplifiers
CPA 2200
CPA 3200E
CPA 4000E
integrated amplifiers
CPM 2600
CPM 3300
1

pre-amplifiers
CPA 2200, CPA 3200E, CPA 4000E
The pre-amplifier is the control centre of your system. By connecting your audio
sources to it you can choose the source you want at any particular time and
control it.
You can also adjust the balance and volume before the signal is sent to a power
amplifier. Your pre-amplifiers can be operated manually or via the Chord remote
control.
integrated amplifiers
CPM 2600, CPM 3300
Chord’s integrated amplifiers are based on a combination of our highly
successful pre-amplifiers and power amplifiers together with a few features of
their own.
The power amplifier is based on Chord’s tried and tested technology of ultra high
frequency ESR power supply which has the ability to store more energy far more
efficiently than conventional designs.
A variety of outputs means that you can choose to drive up to two sets of
loudspeakers, use your integrated amplifier as a pre-amplifier or use it in conjunction
with another power amplifier for bi-amping.
2
background
We want you to be confident using your new Chord amplifier.
You’re probably an audiophile with extensive knowledge of audio equipment.
However, you may not be!
So in the following section we explain a few basics to help you get started, or get you
back up to speed if you’re a little rusty.
connecting your equipment
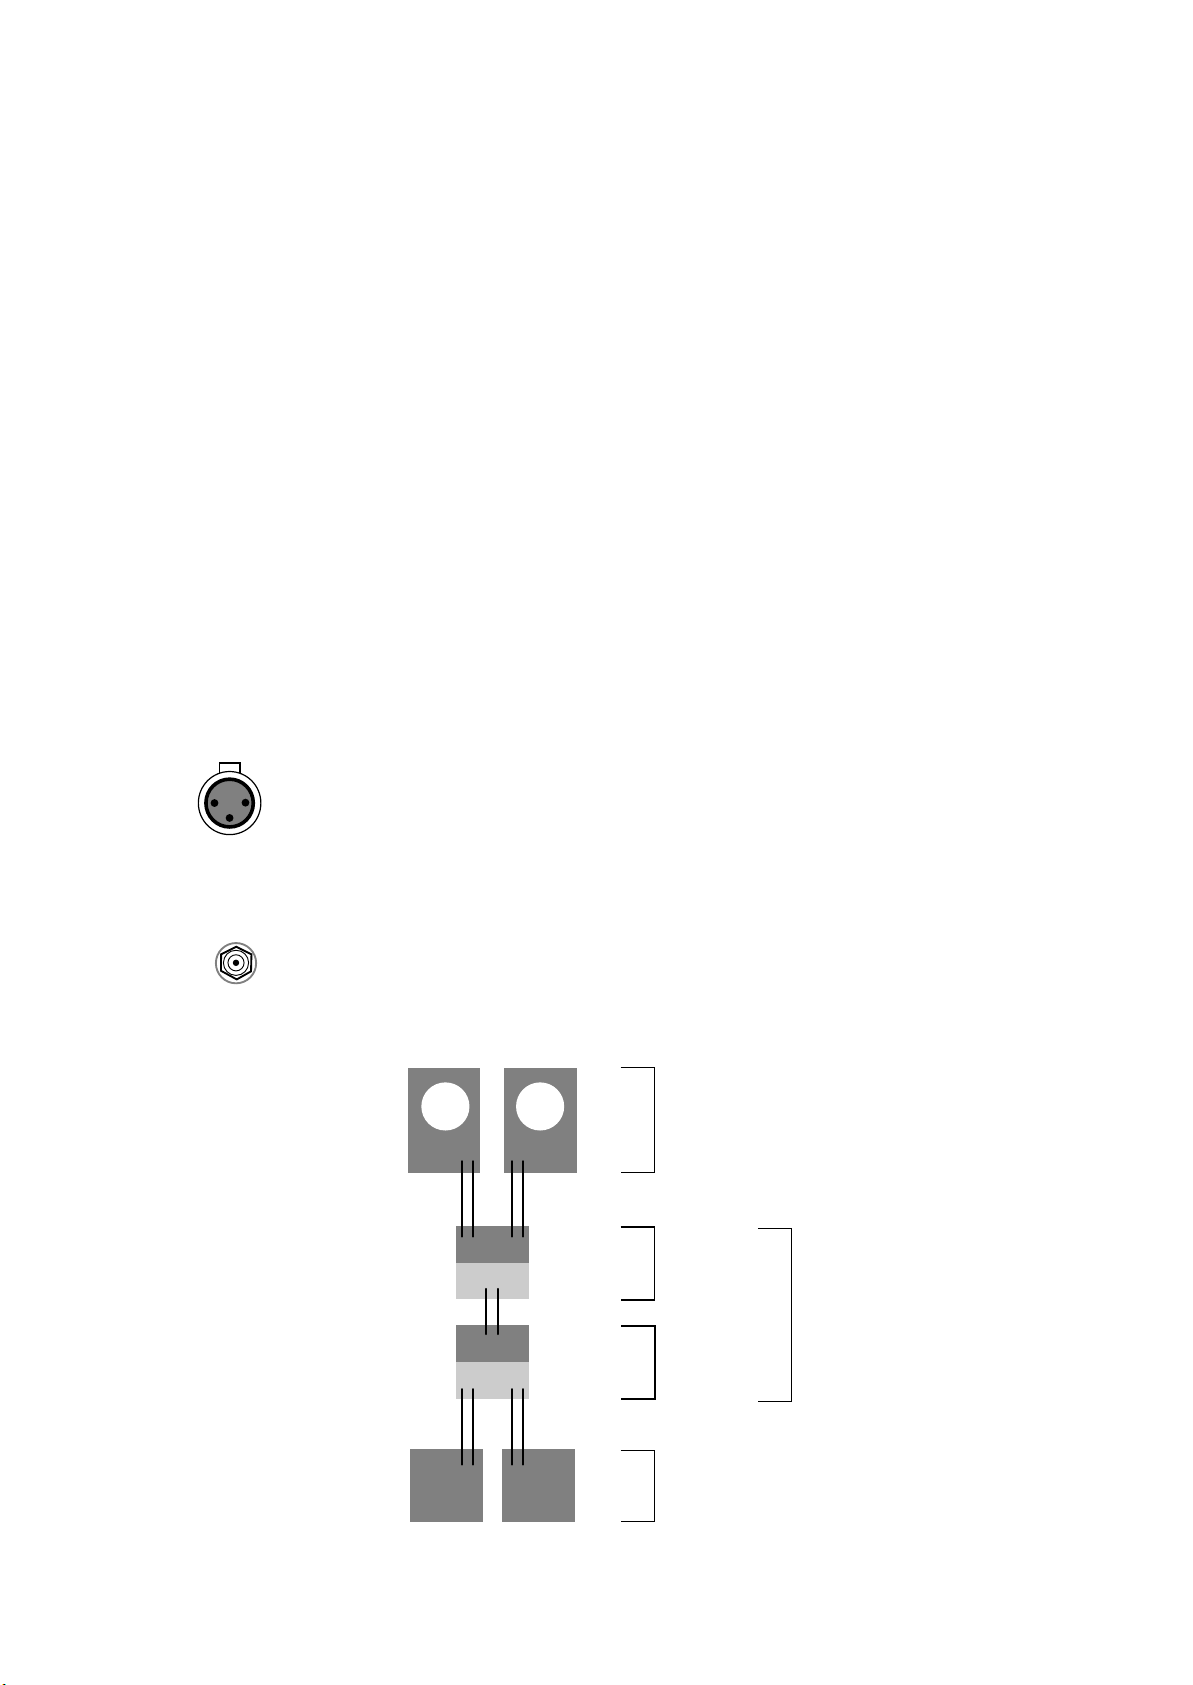
Chord amplifiers are supplied with and designed to be connected using balanced
inputs. The interconnecting cables you use will depend on the available input and
output sockets on your other equipment. We have installed unbalanced inputs on all
Chord equipment, thus enabling you to mix Chord and other manufacturer’s
equipment.
Balanced inputs carry twice the strength of signal of unbalanced inputs and are able
to be fed down long lengths of cable with less deterioration of signal. They are also
less prone to interference than unbalanced inputs. Balanced inputs have three pins
and use Neutric XLR style connectors. Pin 1 is earth, pin 2 is positive and pin 3 is
negative.
Unbalanced inputs use RCA phono connectors which are gold plated with teflon
high performance dielectric insulators for optimum performance.
outputs
speakers
power amplifier
pre-amplifier
or
integrated
amplifier
audio source
inputs
outputs
inputs
CD player tuner
PUSH
1
3
2
3

when setting up
To ensure that your Chord integrated amplifier works efficiently and safely, please pay particular attention to the
following issues.
ventilation
Your Chord integrated amplifier should have at least 5cm of clear space all around it to ensure a free flow of air at
all times. When driven continuously at well above average levels, the temperature at the back of the unit may exceed
50ºC. This is normal and no cause for concern, although it does highlight the need for adequate ventilation around
the unit. We recommend that you do not place your integrated amplifier directly on a carpet.
mains lead and plug
All Chord equipment comes supplied with the correct mains lead and plug. This should be used at all times.
if you need to fit a plug for UK/Europe
Connect the blue wire to the neutral terminal
Connect the brown wire to the live terminal
Connect the yellow/green wire to the earth terminal
if you need to fit a plug for US/Canada
Connect the white wire to the neutral terminal
Connect the black wire to the live terminal
Connect the green to the earth terminal
earthing issues in Europe
In some European countries a hum may occur if your integrated/pre-amplifier is connected to mains sockets that do
not have an earth. If this is the case please ensure that:
1. Your integrated/pre-amplifier is connected via a multi-way mains block which contains an earth point at each
socket outlet. This is to ensure that the chassis metalwork of each item is connected together.
2. Use the connecting points on your Chord unit and connect to an available earth point.
3. We recommend that an earthing method for your building is implemented.
safety warnings
It is important that your integrated/pre-amplifier is earthed at all times via its own mains lead. Failure to do this may
be hazardous. The power supply components within the amplifier are designed to be operated at lethal voltages and
energy levels. Circuit designs that embody these components conform with applicable safety requirements. Precautions
must be taken to prevent accidental contact with power-line potentials. Do not connect grounded test equipment.
These units comply with EN 50081-1 and IEC 801/2
4

outputs on the CPA 2200
You need to connect the outputs on the back of your pre-amplifier to a power
amplifier in order to drive your loudspeakers. There are three pairs of outputs, each
of which will drive a 68 load. You can connect to either the XLR or RCA outputs
numbered 1, but not to both types at the same time.
connecting to your power amplifier if it has balanced XLR style inputs
1. Use XLR style connectors to connect Right O/P 1 to Right IN on your power
amplifier, and connect Left O/P 1 to Left IN on your power amplifier.
2. On your remote control press PRE and then O/P 1 to select output 1.
connecting to your power amp if it has unbalanced RCA style inputs
1. Use RCA style connectors to connect Right O/P 1 to Right IN on your power
amplifier, and connect Left O/P 1 to Left IN on your power amplifier.
2. On your remote control press PRE and then O/P 1 to select output 1.
if you want to bi-amp
Bi-amping is a technique where you use one amplifier to drive the loudspeakers’
woofers (low frequencies) and another to drive the tweeters (mid and high
frequencies).
1. Use XLR style connectors to connect Right and Left O/P 1 to your first power
amplifier.
2. Use XLR style connectors to connect Right and Left O/P 2 to your second
power amplifier.
3. Connect the outputs of your first power amplifier to your loudspeaker’s low
frequency inputs.
4. Connect the outputs of your second power amplifier to your loudspeaker’s high
frequency inputs.
Remove any shorting links in the speaker binding posts.
5. On your remote control press PRE and then OP 1/2 to select both outputs 1 and 2.
See Figure 1 on page 19 for wiring details.
1
3
2
1
3
2
1
3
2
1
3
2
1
3
2
1
3
2
1
3
2
5

outputs on the CPA 3200E
CPA 4000E
You need to connect the outputs on the back of your pre-amplifier to a power
amplifier in order to drive your loudspeakers. There are three pairs of outputs, each
of which will drive a 68 load. You can connect to either the XLR or RCA
outputs numbered 1, but not to both types at the same time.
connecting to your power amplifier if it has balanced XLR style inputs
1. Use XLR style connectors to connect Right O/P 1 to Right IN on your power
amp, and connect Left O/P 1 to Left IN on your power amplifier.
2. On your remote control press PRE and then O/P 1 to select output 1.
connecting to your power amplifier if it has unbalanced RCA style inputs
1. Use RCA style connectors to connect Right O/P 1 to Right IN on your power
amplifier, and connect Left O/P 1 to Left IN on your power amplifier.
2. On your remote control press PRE and then O/P 1 to select output 1.
if you want to bi-amp
Bi-amping is a technique where you use one amplifier to drive the loudspeakers’
woofers (low frequencies) and another to drive the tweeters (mid and high
frequencies).
1. Use XLR style connectors to connect Right and Left O/P 1 to your first power
amplifier.
2. Use XLR style connectors to connect Right and Left O/P 2 to your second
power amplifier.
3. Connect the outputs of your first power amplifier to your loudspeaker’s low
frequency inputs.
4. Connect the outputs of your second power amplifier to your loudspeaker’s high
frequency inputs.
Remove any shorting links in the binding posts.
5. On your remote control press PRE and then OP 1/2 to select both outputs 1 and 2.
See figure 1 on page 19 for wiring details.
1
3
2
1
3
2
1
3
2
1
3
2
1
3
2
1
3
2
6
 Loading...