

Chord DSX1000 User Manual
1
DSX1000 Network Music Player

2
CONTENTS
PRODUCT DESCRIPTION .................................................................................................................. 3
INVENTORY .......................................................................................................................................... 3
WHEN SETTING UP ............................................................................................................................ 4
SAFETY WARNINGS ........................................................................................................................... 5
AC POWER CONNECTION ................................................................................................................ 6
CONNECTING YOUR EQUIPMENT ................................................................................................ 7
FRONT PANEL ..................................................................................................................................... 8
REAR PANEL CONNECTIONS .......................................................................................................... 8
NETWORK CONNECTION ................................................................................................................ 9
OUTPUT CONNECTIONS ................................................................................................................. 11
HEADPHONES .................................................................................................................................... 12
EVERYDAY USE OF YOUR DSX1000 ............................................................................................. 12
USER MENUS ...................................................................................................................................... 13
SETTINGS MENU ............................................................................................................................... 19
FAVOURITES MENU ................................ ................................ ......................................................... 21
USING THE FRONT PANEL CONTROL ....................................................................................... 22
USING THE REMOTE CONTROL .................................................................................................. 23
PLAYING MUSIC FROM AN PORTABLE DEVICE APP OR DESKTOP PROGRAM ........... 25
MAINTENANCE ................................................................................................................................. 26
FREQUENTLY ASKED QUESTIONS ............................................................................................. 27
PRODUCT SPECIFICATION ............................................................................................................ 28

3
DSX1000 Network Music Player
Thank you for buying a Chord Electronics product.
Before you start to enjoy your DSX1000, please take a couple of minutes to read how to connect your
audio equipment and how to maximise your listening experience.
Product Description
The DSX1000 is a fully featured digital network player using our state of the art DAC technology. It
features uPNP/DLNA access and control and HD audio support for the very latest high quality audio
playback. It is compatible with smart phone applications allowing easy remote browsing and playing of
networked stored audio.
The digital heart of the DSX1000 uses the latest generation field programmable gate array device
(FPGA) as found in the QBD76. The FPGA handles all the digital data decoding, clocking, WTA
filtering, and the 5th generation Pulse Array DAC. The improvements to the Pulse Array DAC have
been further complimented with improved power supply design and layout giving the very best digital
to analogue conversion.
Inventory
As well as your DSX1000 and this user manual, you should also have received the following items.
1. Remote Control
2. Power cord
3. Chord guarantee registration card
4. RJ45 Network cable

4
When setting up
To ensure that your DSX1000 works efficiently and safely, please pay particular attention to the
following issues.
ventilation
Your DSX1000 should have at least 5cm of clear space all around it to ensure a free flow of air at all
times. We do not recommend that you place DSX1000 directly on a carpet. If you have the integra leg
system fitted it is recommended that the power amplifiers sit above the DSX1000.
AC lead and plug
All Chord equipment comes supplied with the correct power lead and plug. This should be used at all
times.
if you need to fit a plug for UK/Europe
Connect the blue wire to the neutral terminal
Connect the brown wire to the live terminal
Connect the yellow/green wire to the earth terminal
if you need to fit a plug for US/Canada
Connect the white wire to the neutral terminal
Connect the black wire to the live terminal
Connect the green to the earth terminal
Earthing issues
In some countries a hum may occur if your DSX1000 is connected to mains sockets that do not have an
earth. If this is the case please ensure that:
1. Your product is connected via a multi-way mains block, which contains an earth point at each socket
outlet. This is to ensure that the chassis metalwork of each item is connected together.
2. We recommend that an earthing method for your building be implemented.

5
Safety Warnings
It is important that your DSX1000 is earthed at all times via its own mains lead. Failure to do this may
be hazardous. The power supply components within the DSX1000 are designed to operate at lethal
voltages and energy levels. Circuit designs that embody these components conform to applicable safety
requirements. Precautions must be taken to prevent accidental contact with power-line potentials. Do
not connect grounded test equipment.
There are no user serviceable parts within the DSX1000 Reference Preamplifier. Unauthorised
tampering or dismantling of this product will invalidate the warranty and could cause injury.
6
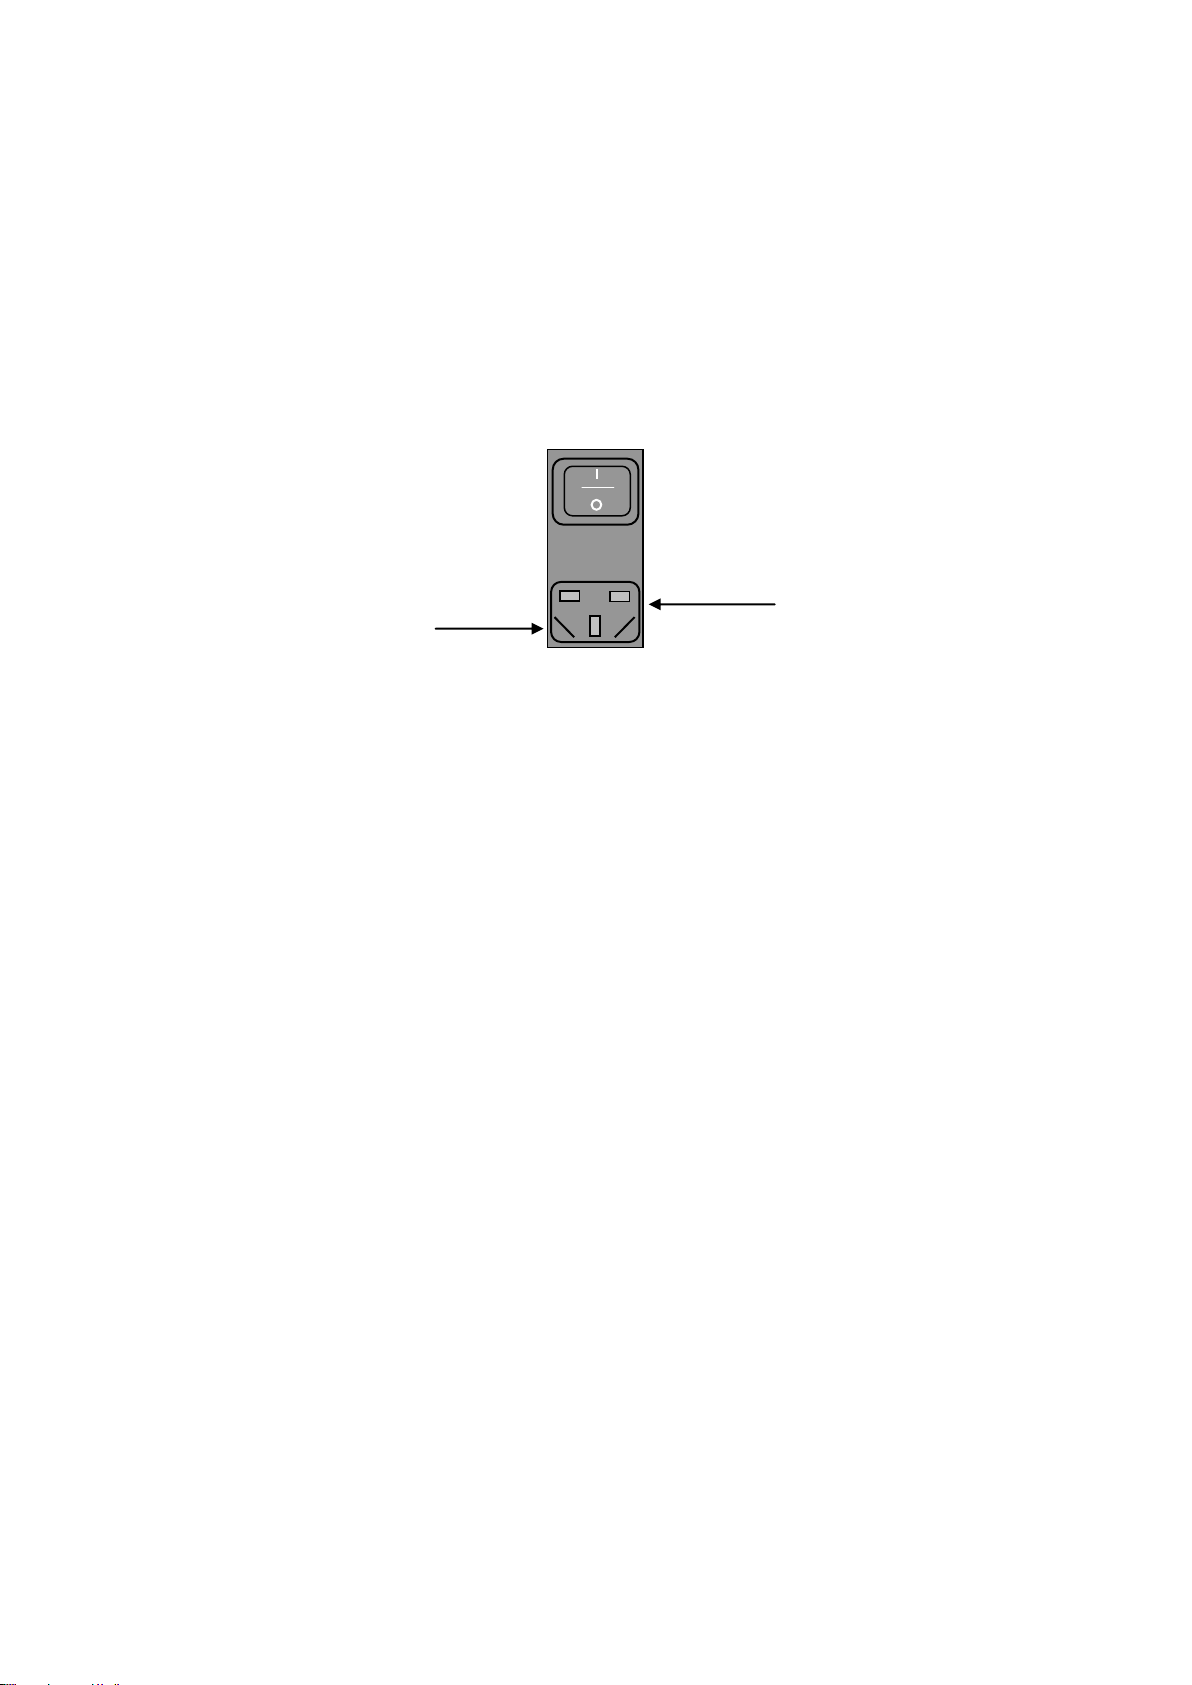
AC Power connection
AC Connector
IEC 10A
EARTH
The AC power connector on the DSX1000 is at the back of the unit. Plug the female end (socket) of the
power cord into the power connector of the preamplifier, and the male end(plug) of the power cord into
AC wall socket or AC extension socket. The DSX1000 features a universal voltage high frequency
power supplied and will operate automatically from 65V to 260V AC, 50 or 60Hz.
For optimum operation it is recommended that the DSX1000 is connected directly to the wall
socket via the power cord provided.
AC Connector
Powering up
Press the rear panel power switch to the on position. The internal illumination will light up followed by
the front panel display 10 seconds later. The DSX1000 will run through a boot sequence where the
display will show the Chord logo and after about 30 seconds the main menu will be displayed and the
unit is ready for use.
Standby mode
Press the standby button on the remote control to enter low power standby mode.
Press the standby button again to switch the DSX1000 back on.
Full Power down
Press the rear panel switch to the off position. The DSX1000 utilises soft start circuitry so the power
can switched on and off as often as required. There is no need to leave the DSX1000 permanently
switched on.
7
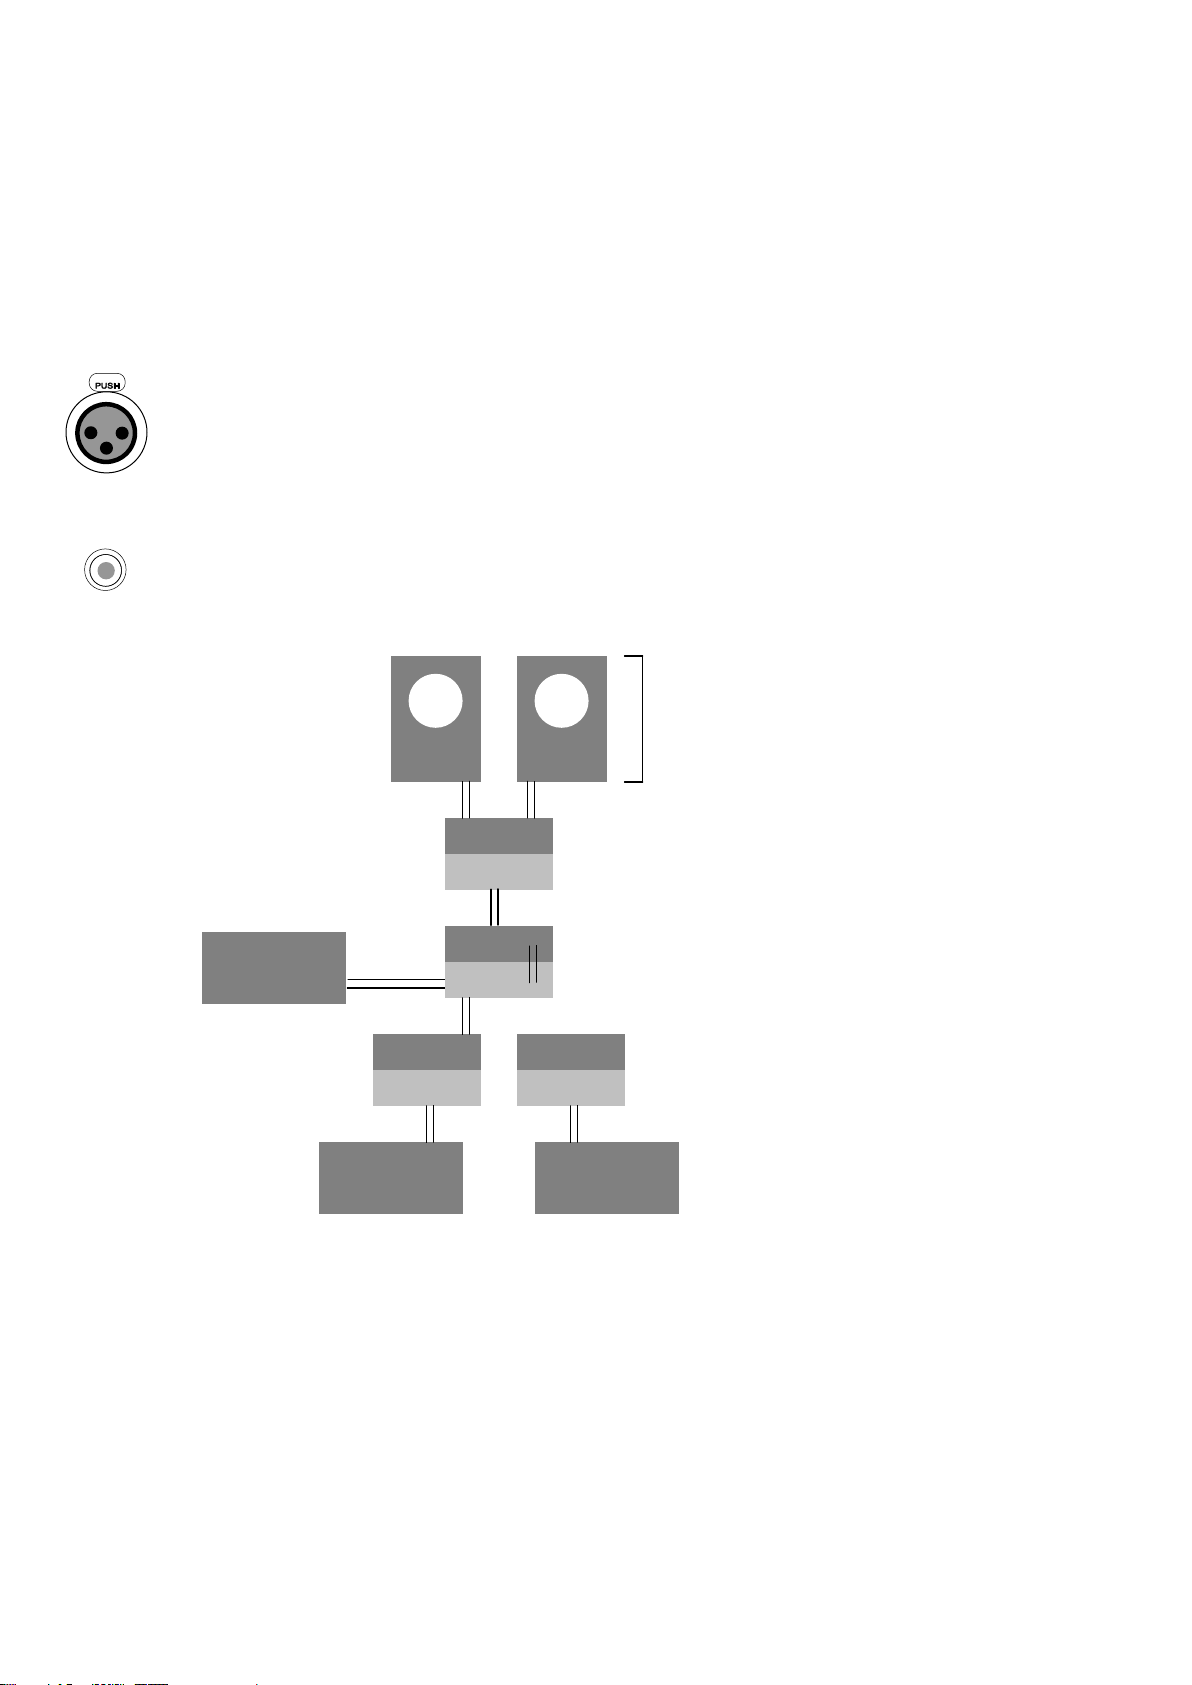
Connecting your equipment
1
2
3
outputs
inputs
CD Transport
Network
Router
outputs
inputs
outputs
inputs
outputs
network
QBD76
DSX1000
power amplifier
pre-amplifier
speakers
- Amplfication
- Switching and
level control
- Data and
analogue
conversion
- Signal
Source
Red Reference
CD Player
CD Player
Chord amplifiers are supplied with and designed to be connected using balanced inputs. The
interconnecting cables you use will depend on the available input and output sockets on your other
equipment. We have installed unbalanced inputs on all Chord equipment, thus enabling you to mix
Chord Electronics and other manufacturer’s equipment.
Balanced inputs carry twice the strength of signal of unbalanced inputs and are able to be fed down
long lengths of cable with less deterioration of signal. They are also less prone to interference than
unbalanced inputs. Balanced inputs have three pins and use XLR style connectors. Pin 1 is earth, pin 2
is positive and pin 3 is negative.
Unbalanced inputs use RCA phono connectors, which are gold plated with teflon high performance
dielectric insulators for optimum performance.
Basic system diagram
8
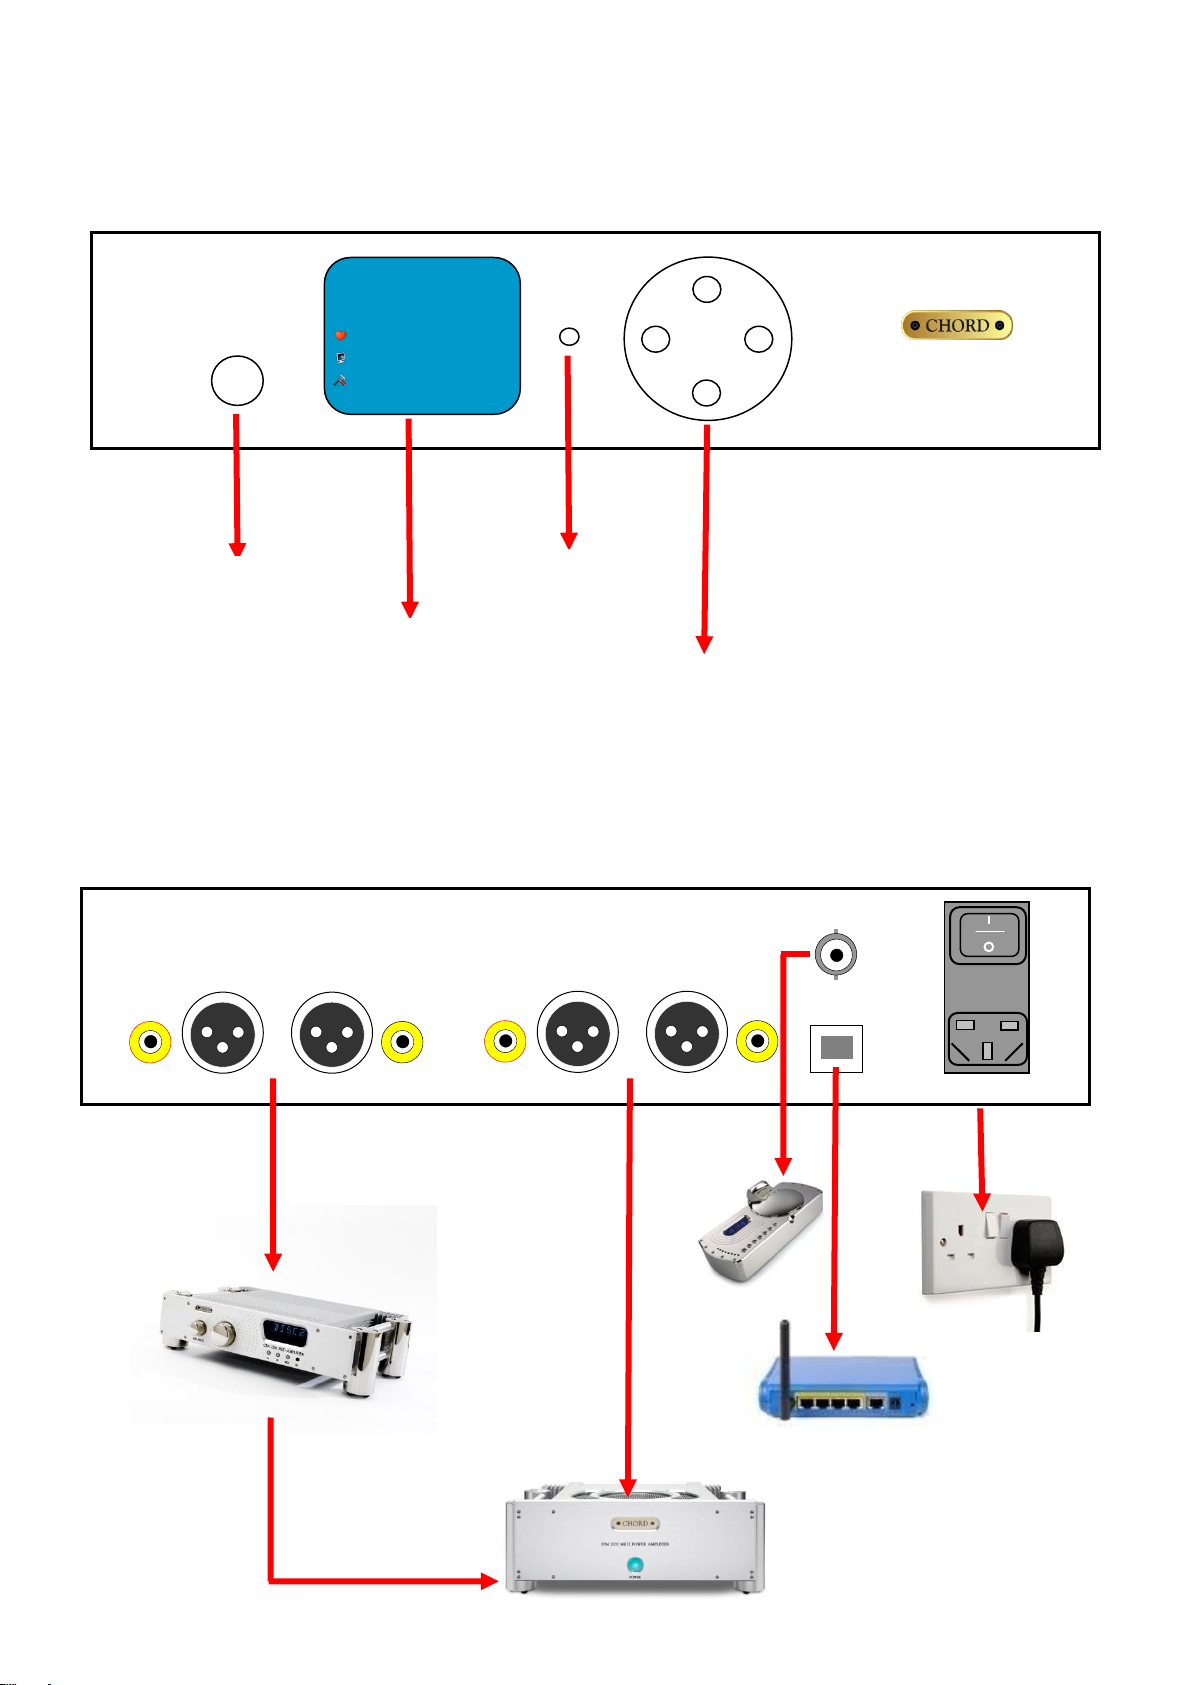
Favourites
Media Server
Settings
¼ “ Headphone Jack Socket
Display
IR Remote Control
Receiver
Menu Selection Buttons
Up, Down, Left, Right functions
Press any button hard for select
function
Front Panel
LINE LEVEL OUTPUT
VARIABLE OUTPUT
AC IN
NETWORK
RIGHT
LEFT
RIGHT
LEFT
PRE AMPLIFIER
POWER AMPLIFIER
INTERNET ROUTER
AC WALL SOCKET
CD TRANSPORT
DIGITAL INPUT
Rear Panel Connections

9
Network Connection
The DSX1000 has an RJ45 ( Cat 5 ) Ethernet network cable connection. This should be plugged into
your network router so that the DSX1000 has access to the internet and also the other computers or
network storage for music streaming.
When the connection has successfully been made the DSX1000 will show an active network symbol on
the display.
NO NETWORK CONNECTION
NETWORK CONNECTED
If your network connection or router is not located near your HiFi equipment then we recommend the
use of power line network adapters. You simply plug one device into an available AC wall socket near
your HiFi equipment and then another device into an AC wall socket near your network router. The
network signal is carried over the AC power line wiring rather than having to run any additional cables.
This system is very convenient but not suitable for every situation so you should check compatibility
first.
Network example using power line adapters
 Loading...