

Page 1

Instructions for installation,
maintenance and adjustment of model 55P9 and 53L1
I. Explanation of operation
1. How to turn power on/off
©Press the button of main power supply and the power indicator light comes on. Press STANDBY button
or P+/P-button on the panel and TV set is on.
©If you want the TV set to pause, press STANDBY button on the remote controller.
©If you want to cut off the power supply of the TV set, press the button of main power supply.
2. How to search for channels full-automatically
©Press MENU button and a window-type menu appears on the screen. Use PROGRAM button (P+ or P-)
to select "search" menu. Press VOLUME button (V+ or V-) to enter into "search" menu.
©Press PROGRAM button (P+ or P-) to select "auto search" item.
©Press VOLUME button (V+ or V-) to launch auto search. At this time, frequency channel indicator
mark "HI | mill..." on the screen changes from blue color to red color. TV set would automatically memorize
the searched TV programs in the sequence of VHF-L, VHF-H and UHF.
©After completion of channel search, TV set will automatically enter into a regular program receiving
status and be set to the program numbered 0,
3. How to search for channels semi-automatically
©Enter into "search" menu and press PROGRAM button (P+ or P-) to select "program number" item.
©Press VOLUME button (V+ or V-) to select a program number you want to use, the range of usable
program number is 0-254.
©Use PROGRAM button (P+ or P-) to select "search" item and press VOLUME button (V+ or V-). Then
TV set automatically searches for channels upwards or downwards until receiving programs.
4. How to fine tune manually and automatically
©Enter into "search" menu and press PROGRAM button (P+ or P-) to select "fine tune" mode
©Press and hold VOLUME button (V+ or V-) and the fine tuning upwards or downwards is launched to
improve image and sound quality until a satisfactory effect is obtained.
5. Adjustment of image
©Press MENU button and a window-type menu appears on the screen. Use PROGRAM button (P+ or
P-) to select "frame " menu. Press VOLUME button (V+ or V-) to enter into "frame" menu.
©Press PROGRAM (P+ or P-) to select an item you want to adjust (among them, the tint functions only
on NTSC signal). Press VOLUME button (V+ or V-) to adjust the item until a satisfactory effect is
obtained.
©Press MENU button to close the menu and return to a regular program receiving mode.
6. Adjustment of sound (suitable for AV stereo model)
©Press "AV/TV" button to enter AV mode.
©Press "MENU" button and a window menu appears on the screen. Use VOLUME (V+ or V-) to enter
into "sound" menu.
©Use PROGRAM (P+ or P-) to select "balance" item. Use VOLUME (V+ or V-) to adjust left and right
set values until a satisfactory effect is obtained.
7. PP (remote control button)
Press PP button. The image quality repeats in the following sequence:
Standard ———»• soft ———> bright ———> dynamic
L———————— frame pre-adjustment -4——————'
8. TV channel
©Select a TV program
Press program button P+/- on the remote controller to select a program with a contiguous number
upwards or downwards.
©Program number is one digit
Press program number button "0, 2, 3, ...... 9" on the remote controller to directly select the
program with the corresponding number. For example, to select the program with a program
number 6, press button "6".
@ Program number is two or three digits
First of all, press button "-/--" on the remote controller. "--" appears on the screen. Then use
number buttons to input the program number you want.
9. To adjust volume
Press VOLUME (V+ or V-). "+" is for volume increase; "-" is for volume decrease.
Page 2
10. Mute (remote control button)
Press MUTE button and sound fades immediately. To restore the volume prior to muting, press
MUTE button once again.
11. Receive external video signal (for example, VCD/DVD/video tape and etc.)
® Connect video/audio output terminal of the external video device to video/audio input terminal
of the TV set respectively
® Press AV/TV (AV/TV mode) button and "video" appears on the screen. Now you can receive
external signal.
12. Select Chinese/English menu
Press MENU (function menu) button, a window-type menu appears in the screen. Use PROGRAM
button (P+ or P-) to select "system" menu. Press V+ button to enter into "system" menu. Press
PROGRAM button (P+ or P-) to select "language" mode. Press VOLUME button (V+ or V-) to
select Chinese or English menu. Press MENU button to close the menu and return to regular
program receiving mode.
Prior to shipment, the menu has been preset to Chinese language.
13. How to set timed shut-down
With timing shut-down function, TV set can automatically cut power off and enter into Standby
mode when the preprogrammed time comes. Every time you press timed shut-down (SLEEP)
button, the time for timed shut-down will change in the following sequence (unit: minute):
i—— 0 «- 30 «— 60 «——i
If you want to cancel timed shut-down, set the time to "O". The shut-down timer will stop working.
14. Special function buttons
® Press "DISP" button on the remote controller and the current program number, color system and
sound system appear on the TV screen. Press the button once again and the status information
will disappear.
Press SCAN button (electronic scanning) to preview the selected programs.
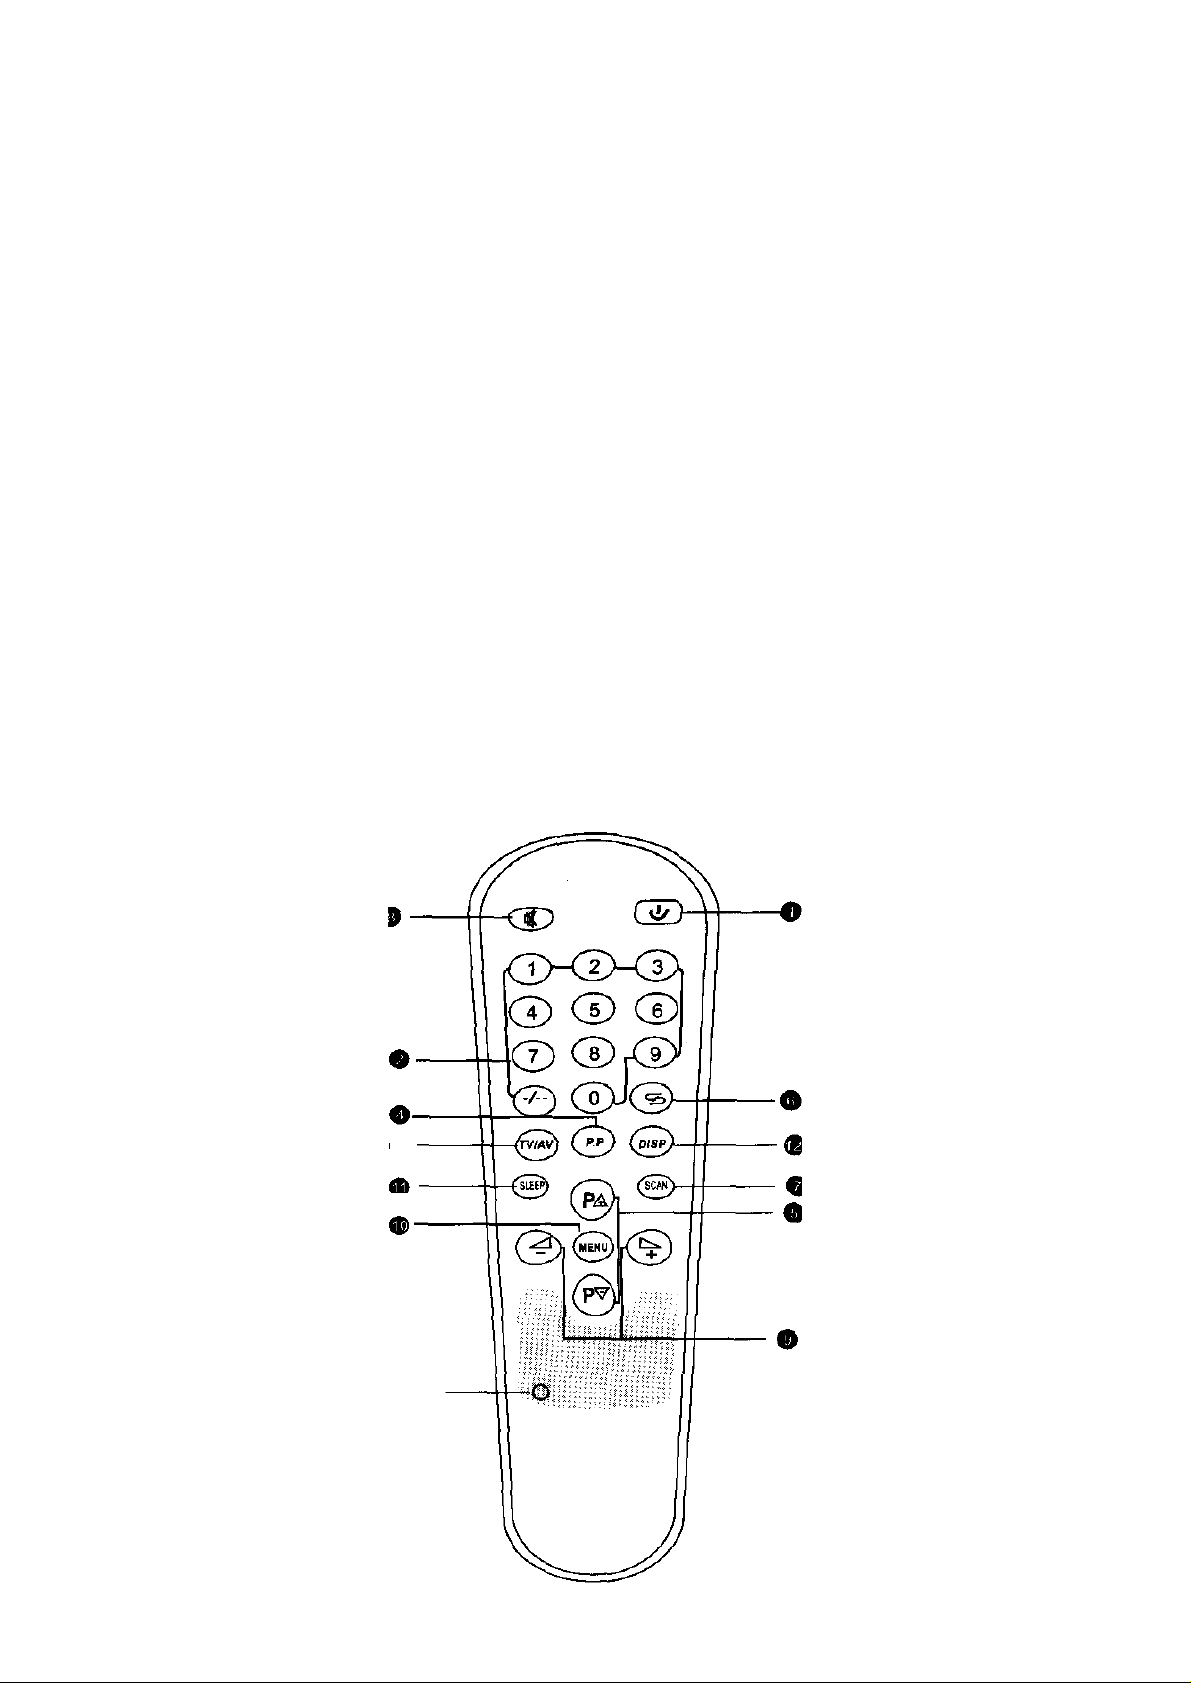
II. Schematic diagram of remote controller
function (right figure)
mute st by
program number
T1 [for maintenance ]
Page 3

III. Information of installation and adjustment:
adjustment
(software)
dark balance
balance delaying
(hardware)
exit factory menu when
off/black/white cross
option (0-T... 1%)
Press the "MENU" button on the remote controller
to enter into the menu, and then input the password
"6483" to enter into the menu of factory adjustment.
The method of factory adjustment is the same as
above.
Two methods for exiting the factory adjustment
menu:
1. After pressing the MENU key on the remote
controller to input the password "8633", here
enter into the "PRODUCT" status, and then repeat
the above operation (after pressing MENU button,
input the password "8633") to return to the normal
status;
Adjust the "PROD MODE" option in the
MENU03 to 0, and then press the "MENU" button
to directly exit the factory adjustment menu.
The detail of the factory adjustment menu:
The adjustable items of the factory menu appears from MENUO to MENU 19, MENU 16 to MENU 19
after inputting the code "76818". During the production, only setup the items ofMENU4-MENU19
well on the master slice, for the same type of the product with the same function, only copy the
EEPROM. The setup of MENUO-MENU3 items is for the production adjustment.
LA76810 OPTION MENUOOValueRangeDescriptionLA76810 OPTION MENU 02ValueRangeDescription
H-PAHSE/50(60)110...31Horizontal phase
V-POS/50(60)340...127Vertical position
V-SIZE/50(60)170...127Vertical size
V-L1NE/50(60)18H...31Vertical linearity
V-SC20...3]Vertical S chastening
OSD-V/50(60)50...31OSD Vertical
LA76810 OPTION MENU 01ValueRangeDescriptionH-BLK-L40...7Horizontal blanking
RB1350...255Red bias of
GB2170...255Green bias of
BB1650...255Blue bias of
RD980...127Red drive of
GD15()...[5Green drive of
BD960...127Blue drive of
SUB-BRIGHT960...127Subsidiary bright
CROSS-B/W30...3Built-in testing signal
SUB-SHARP20O...G3Subsidiary sharp
SUB-CONT990...127Subsidiary contrast
SUB-COLOR340...63Subsidiary color
SUB-TINT410...127Subsidiary tint
OSD-H-POS220...63OSD Horizontal posit
H-BLK-R40...7Horizontal blanking
LA76810 OPTION MENU 03ValueRangeDescription
AGC-DELAY20O...G3RFAGC delaying
B-Y DC80...15SECAM white
R-Y DC80...15SECAM white
AC. HIGH00...63Alarm controlling for close
AC.LOW630...&3Alarm controlling for close
PROD MODE00, 1Press "MENU" button to
ENG. OPTION00, 1Displaying engineer
Note: on the off/on key, 0 is used to close down, and 1 is used to start up.
Editing LOGO:
If editing the LOGO, firstly enter the factory menu MENU06 to set the "LOGO-EDIT" to " 1", then
press the "FACTORY" key to exit and enter into the no signal status (notice: here enable to increase
some signals for the mainframe), here will enter into the editing status:
Press the "-/--" button to shift to "COLOR" or "SIZE" status, after modifying, press the "VOL+/-"
button to shift the modified line, and press the "MENU" button to exit the editing status.
Editing function:
• "CHAR": modify the character, press the "VOL+/-" button to move the cursor, and press the
"POS+/-" button to modify the character
• "COLOR": modify the color, press the "VOL+/-"button to modify the color of the character,
and press the "POS+/-" button to shift the modified line.
• "SIZE": modify the size, press the "VOL+/-"button to modify the size of the character, and
press the "POS+/-" button to shift the modified line.
Page 4

• "POSITION": modify the position, press the "VOL+/-"button to move from side to side, and
press the "POS+/-" button to move up and down.
IV.. Explanation for modification
1 .Vertical size is too large or too small:
When you do installation and adjustment, you can adjust the value of resistor R45 1 (8.2K-3.9K).
When R45 1 increases, vertical size decreases; when R45 1 decreases, vertical size increases.
At the same time adjustment of vertical size in the bus control is supplemented until a satisfactory
result is obtained.
2.Horizontal size is too large or too small:
When you do installation and adjustment, first of all, you should change the position of horizontal
deflection lead (red wire) plug. You can select among Tl, T2 and T3. Select a socket with a
relatively low deviation. Then you can appropriately adjust the capacitance of return capacitor
C438 and C435 (adjustment in a small range) and the capacitance ofS-correction capacitor
until a satisfactory result is obtained.
V. Important information
1 -The intermediate-period of intermediate-frequency Audio Frequency Transformer (AFT) in
the chip of the model has been precisely tuned to 38M before shipment. Do not adjust magnetic
core of TlOl too quick in order to avoid abnormal functioning of the model.
2.Before turn the model on, check if the ground wire of display tube is securely connected to
the ground wire socket of the tube base
3 .If the value of field deflection resistor of display tube you use is too high (about 50 Q), you
can change the field deflection from serial connection to parallel connection.
4.YDT6 13-B (3 W8Q) speaker should be used.
 Loading...