

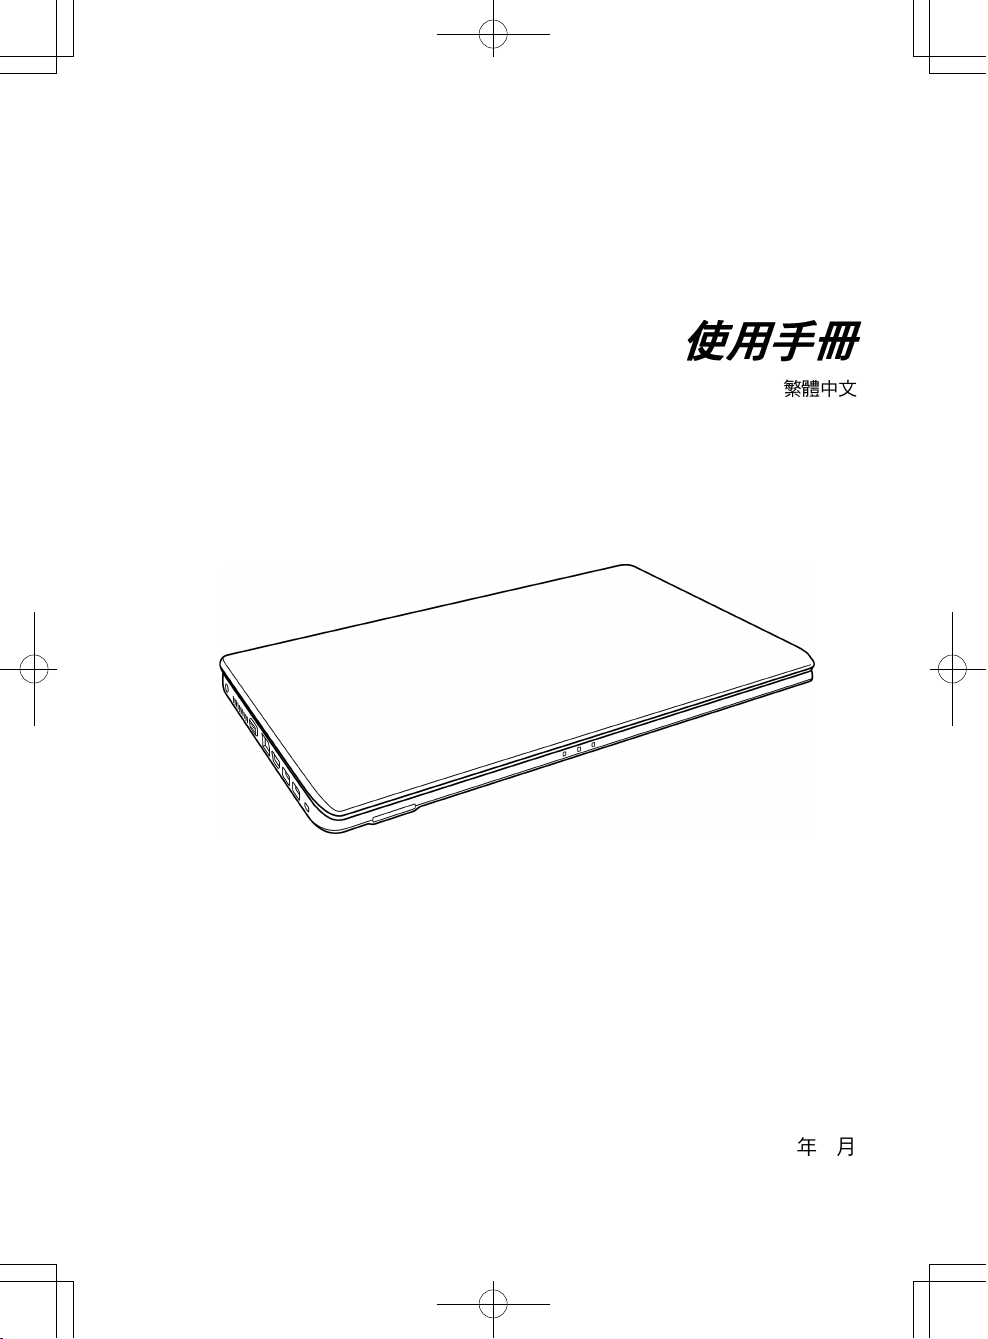
Page 1

USER'S MANUAL
ENGLISH
March 2012
Page 2

ENGLISH
CONTENTS
BEFORE YOU START ............................................................................................. 5
Make sure you have everything ..................................................................................... 5
Familiarize yourself with the computer ........................................................................ 6
OPENING THE DISPLAY PANEL ................................................................................ 6
FRONT OVERVIEW .................................................................................................... 7
LEFT SIDE OVERVIEW .............................................................................................. 9
RIGHT SIDE OVERVIEW .......................................................................................... 11
BACK OVERVIEW ..................................................................................................... 12
FRANÇAIS
DEUTSCH
BOTTOM OVERVIEW ................................................................................................ 13
GETTING STARTED ............................................................................................. 14
Power Sources ............................................................................................................. 14
CONNECTING THE POWER ADAPTERS ............................................................... 14
RECHARGING THE BATTERY ................................................................................. 15
Starting Your Notebook................................................................................................. 16
POWER ON .............................................................................................................. 16
Status Indicators ...................................................................................................... 17
Using Function Keys ................................................................................................ 19
Using the TouchPad................................................................................................. 20
Memory Module Upgrade......................................................................................... 21
TROUBLESHOOTING ........................................................................................... 22
Identifying the Problem................................................................................................. 22
ESPAÑOL
ITALIANO
2
Page 3

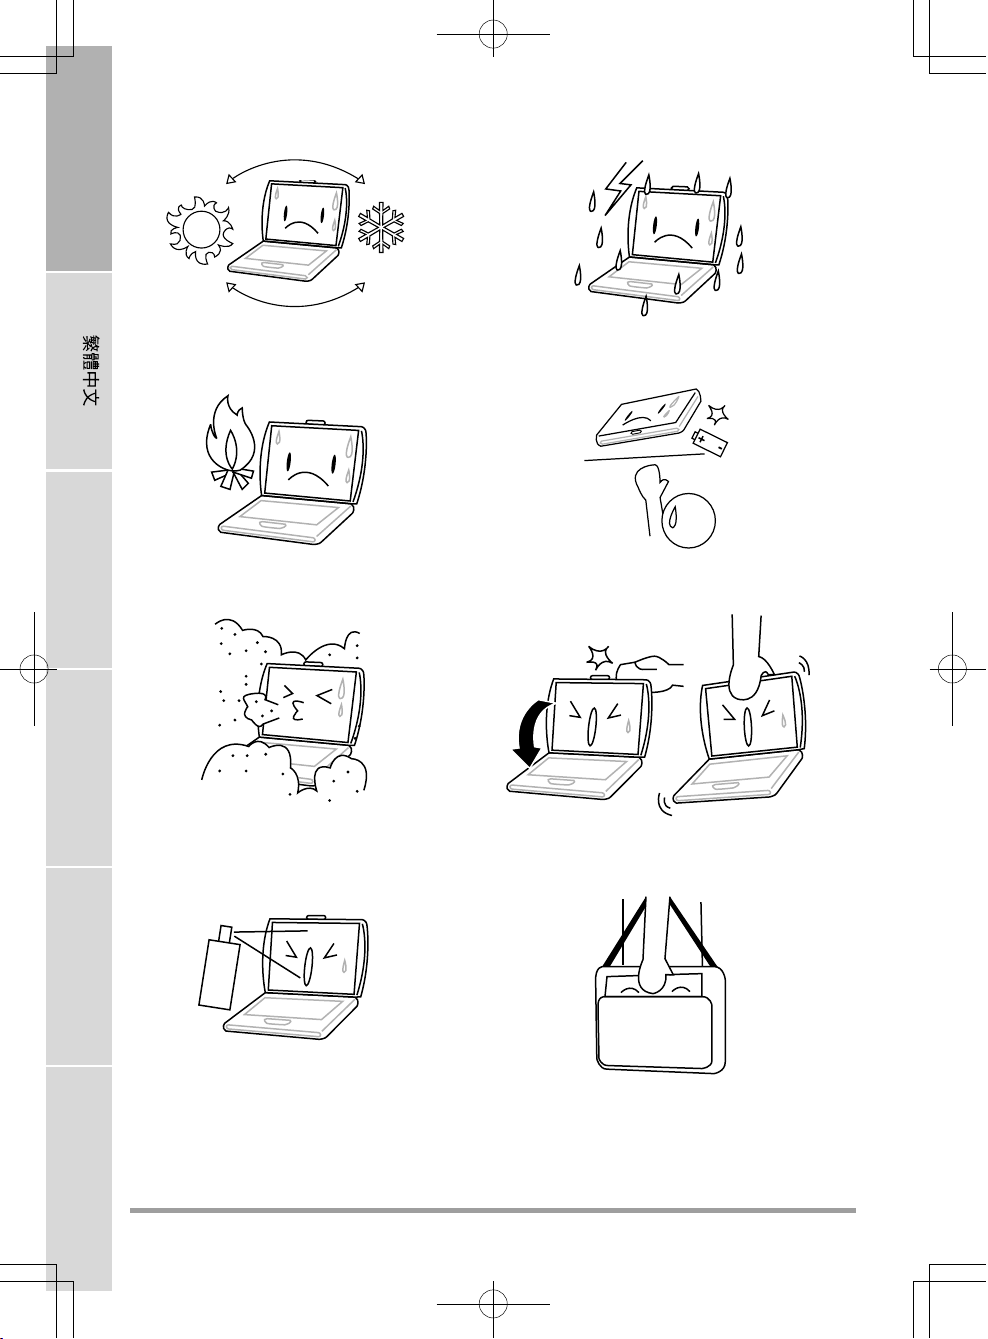
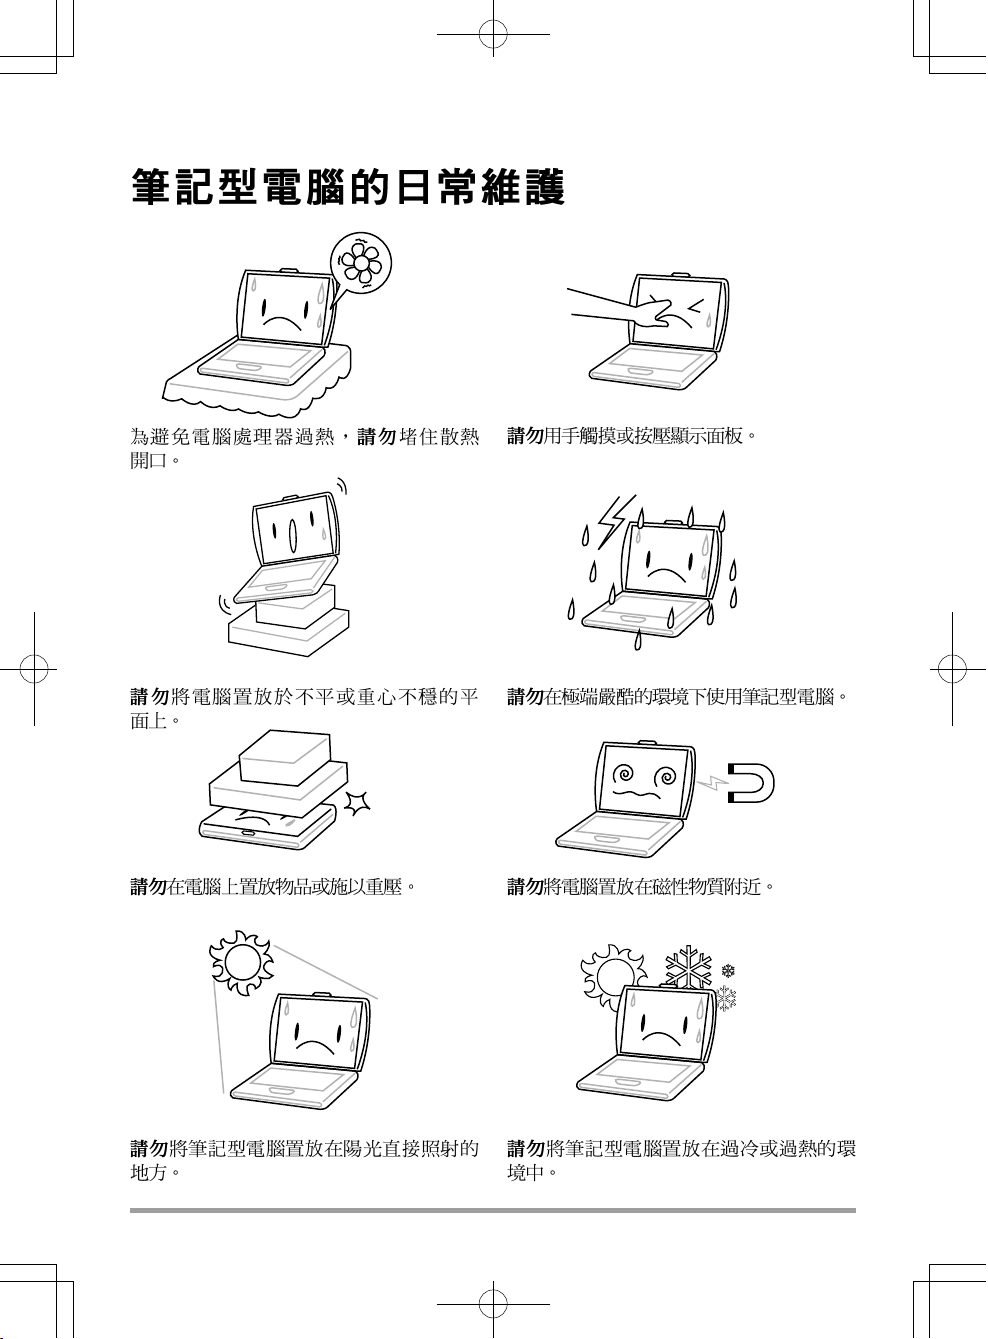
TAKING CARE OF YOUR NOTEBOOK PC
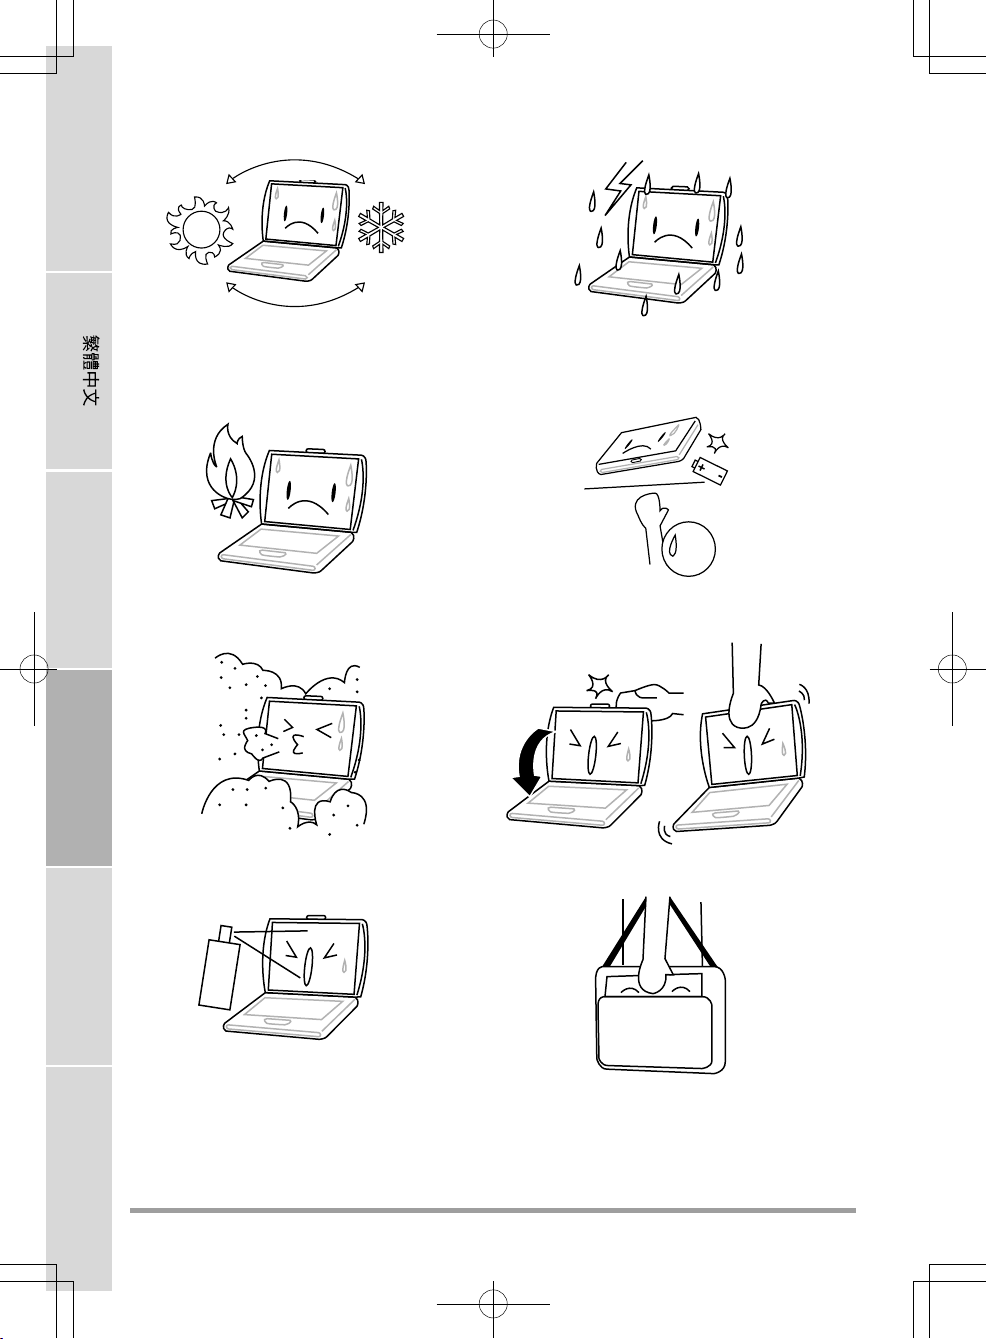
To prevent possible overheating of the computer's
processor, make sure you don't block the openings provided for ventilation.
DO NOT place on uneven or unstable work
surfaces.
DO NOT place or drop objects on the computer
and DO NOT apply heavy pressure on it.
DO NOT press or touch the display panel.
DO NOT use your notebook computer under
harsh conditions.
DO NOT subject the computer to magnetic
fields.
DO NOT expose to direct sunlight. DO NOT use or store in extreme temperatures.
3
Page 4
ENGLISH
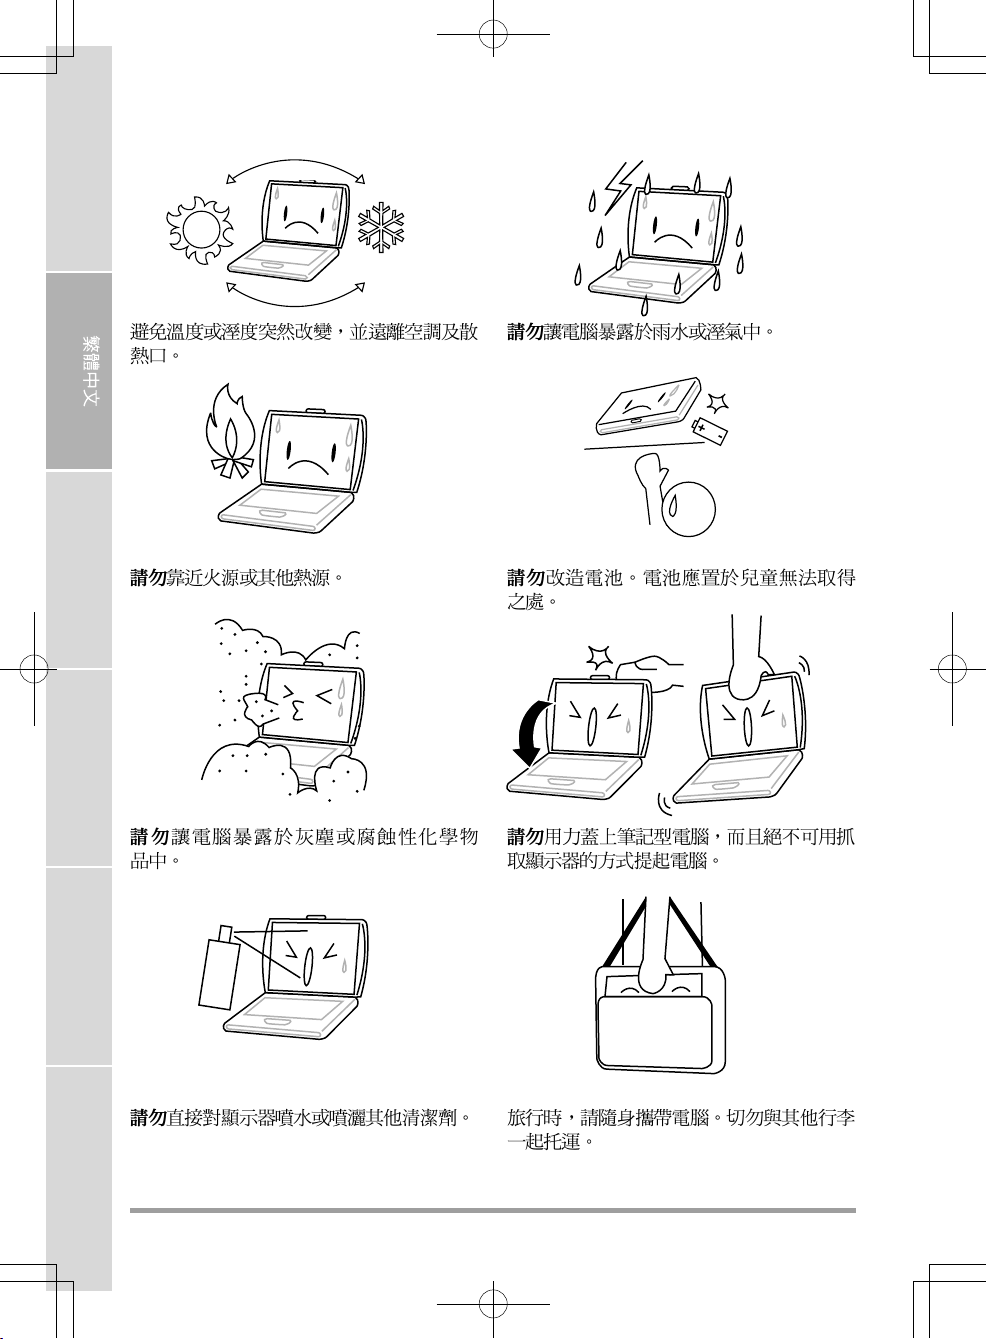
Avoid sudden changes in temperature or humidity by keeping it away fromA/C and heating vents.
FRANÇAIS
DO NOT place near fire or other sources of heat. DO NOT tamper with the batteries. Keep them
DEUTSCH
DO NOT expose to dust and/or corrosive
chemicals.
ESPAÑOL
DO NOT expose the computer to rain or
moisture.
away from children.
DO NOT slam your notebook shut and never
pick up or hold your notebook by the display.
ITALIANO
DO NOT spray water or any other cleaning fluids
directly on the display.
4
If you are traveling with your computer, remember to carry it as hand luggage. Do not check it in
as baggage.
Page 5
BEFORE YOU START
Make sure you have everything
When you receive your notebook PC, unpack it carefully, and check to make sure you have all the
items listed below. For a pre-configured model you should have the following:
• Notebook Computer
• Lithium-Ion battery
• AC adapter with power cord
• Driver and Applications CD
• Quick Start Guide or User Guide
Depending upon the configuration of your notebook, you may also need the following items:
• Dual DVD+/-RW Application CD
• Super Multi DVD RW Application CD
• Blu-ray/DVD RW Application Disc
Once you have checked and confirmed that your notebook system is complete, read through the
following pages to learn about all of your notebook components.
NOTE
Depending on the model you purchased, the actual appearance of your notebook may vary from that shown in this manual.
5
Page 6
ENGLISH
BEFORE YOU START
Familiarize yourself with the computer
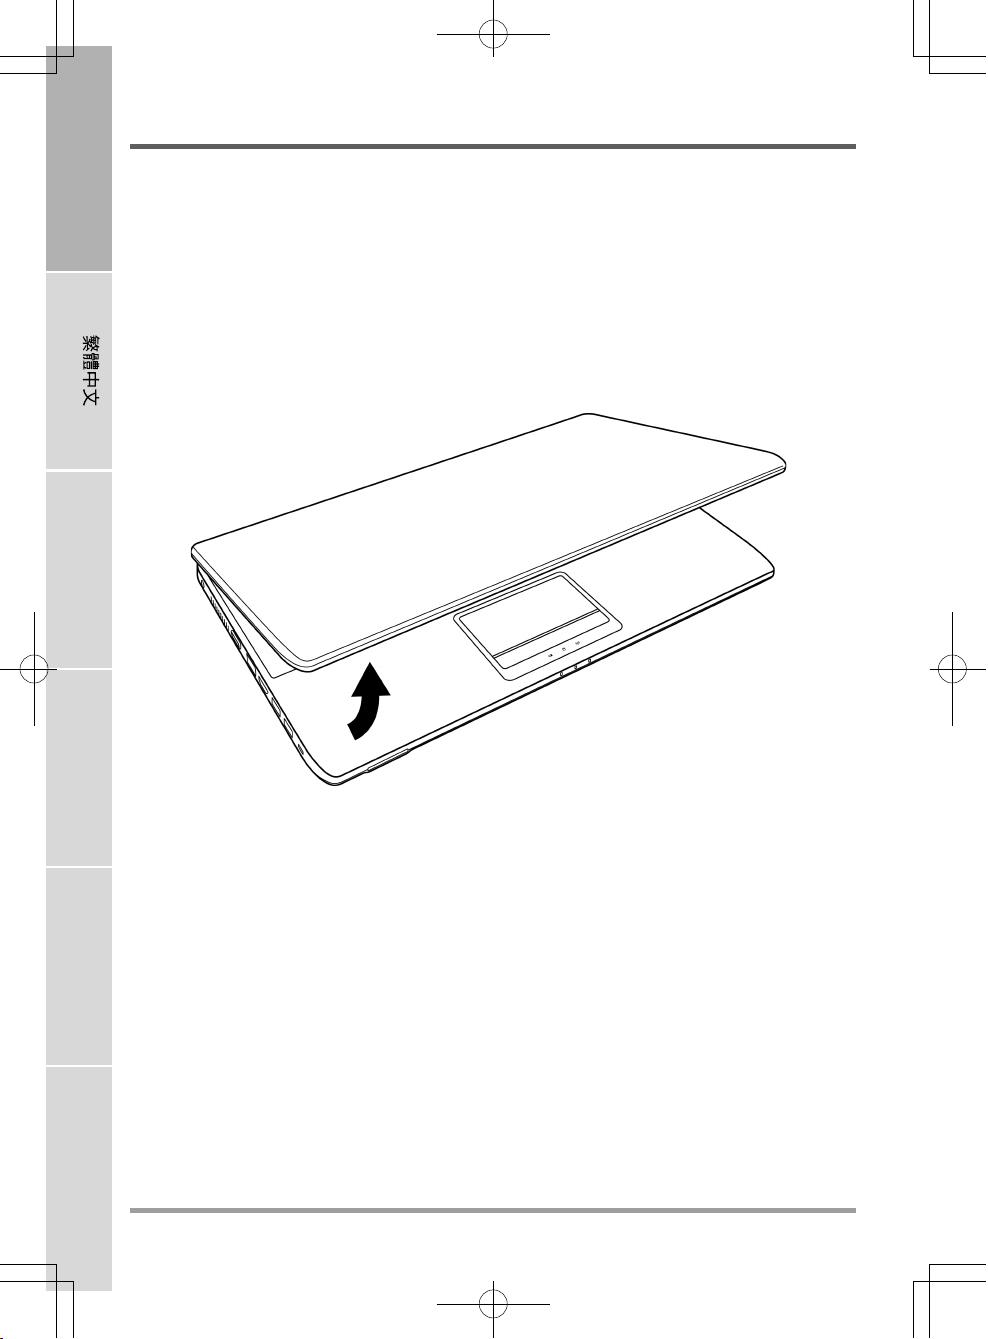
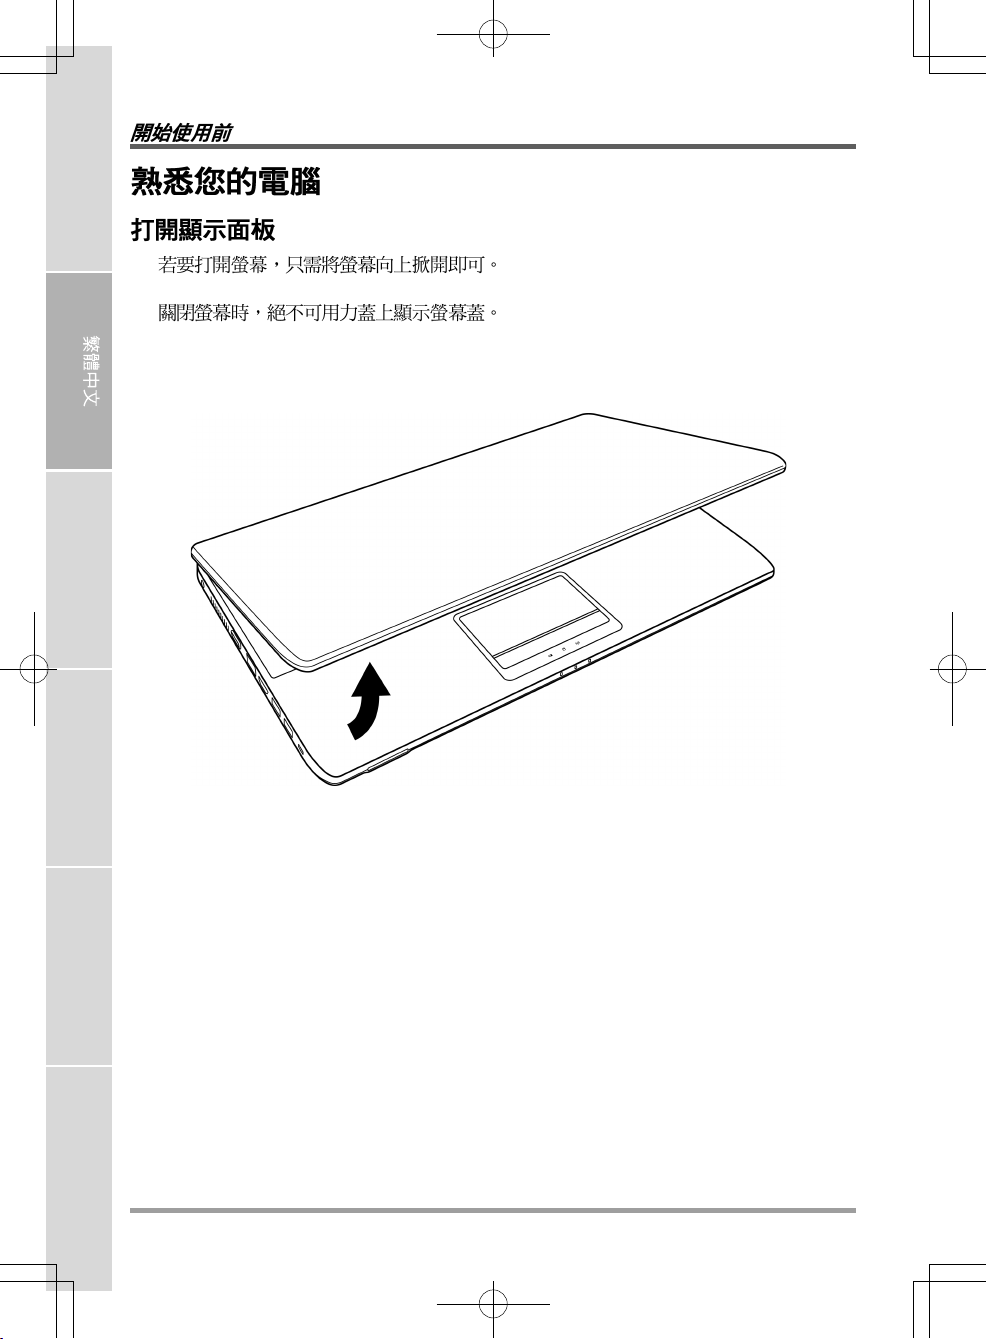
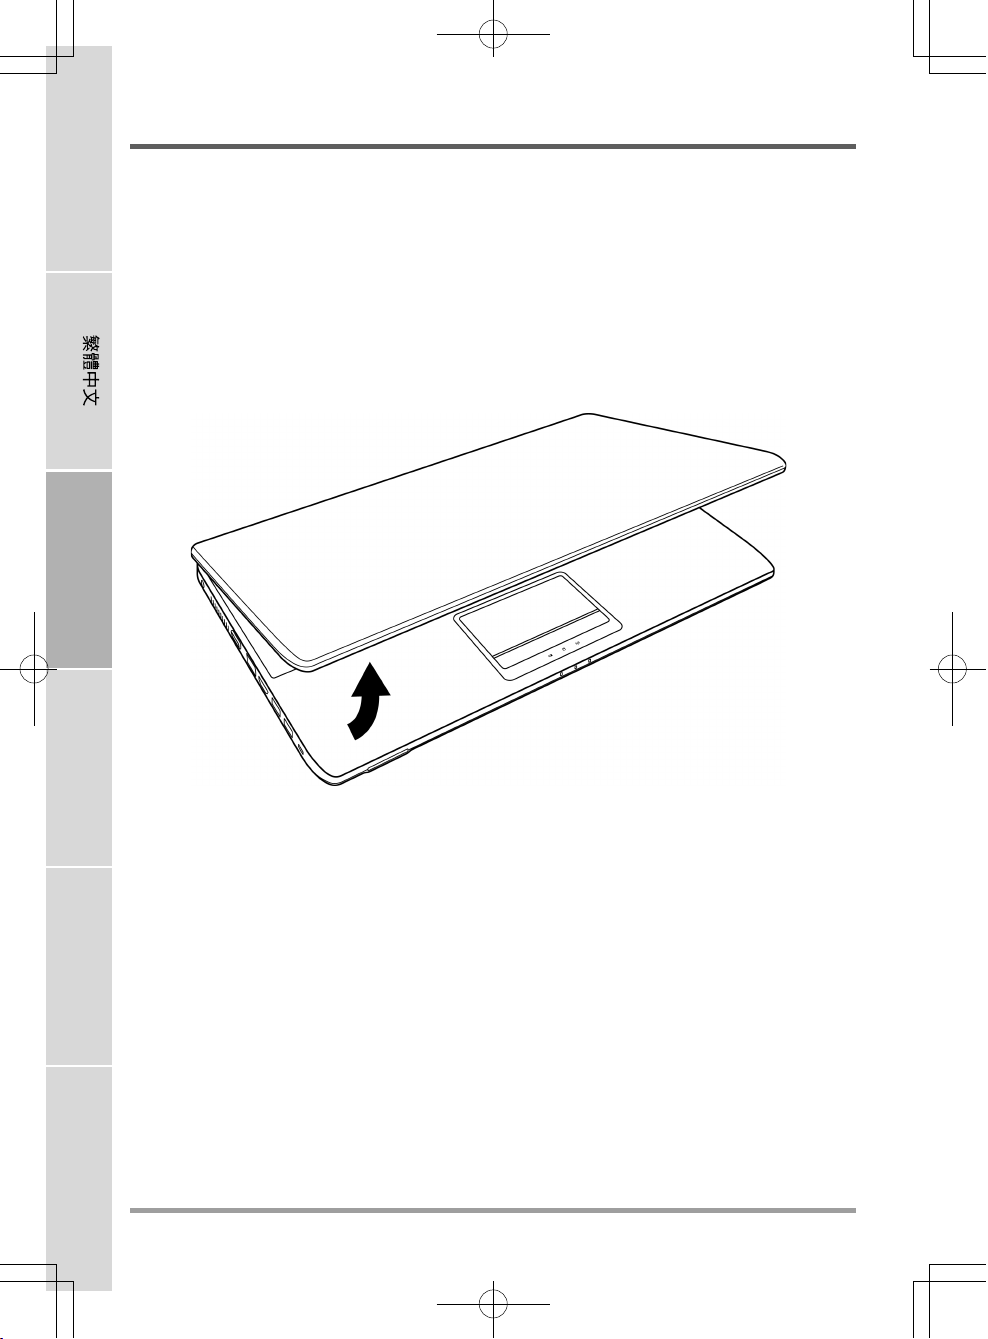
OPENING THE DISPLAY PANEL
To open the display panel, simply lift the lid up.
When closing it, be sure not to slam it shut.
FRANÇAIS
DEUTSCH
ESPAÑOL
ITALIANO
6
Page 7

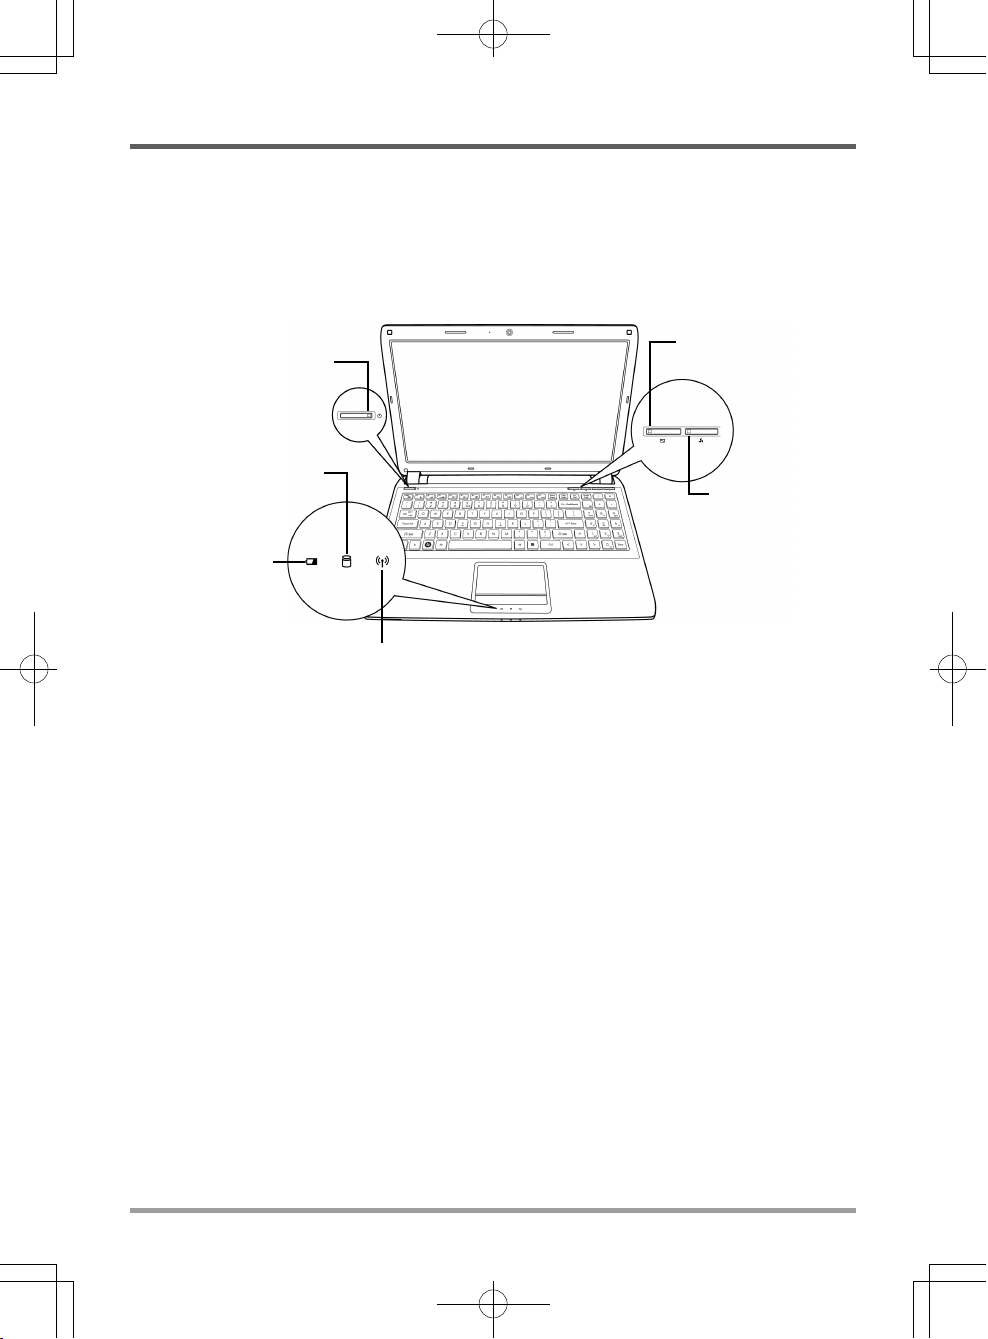
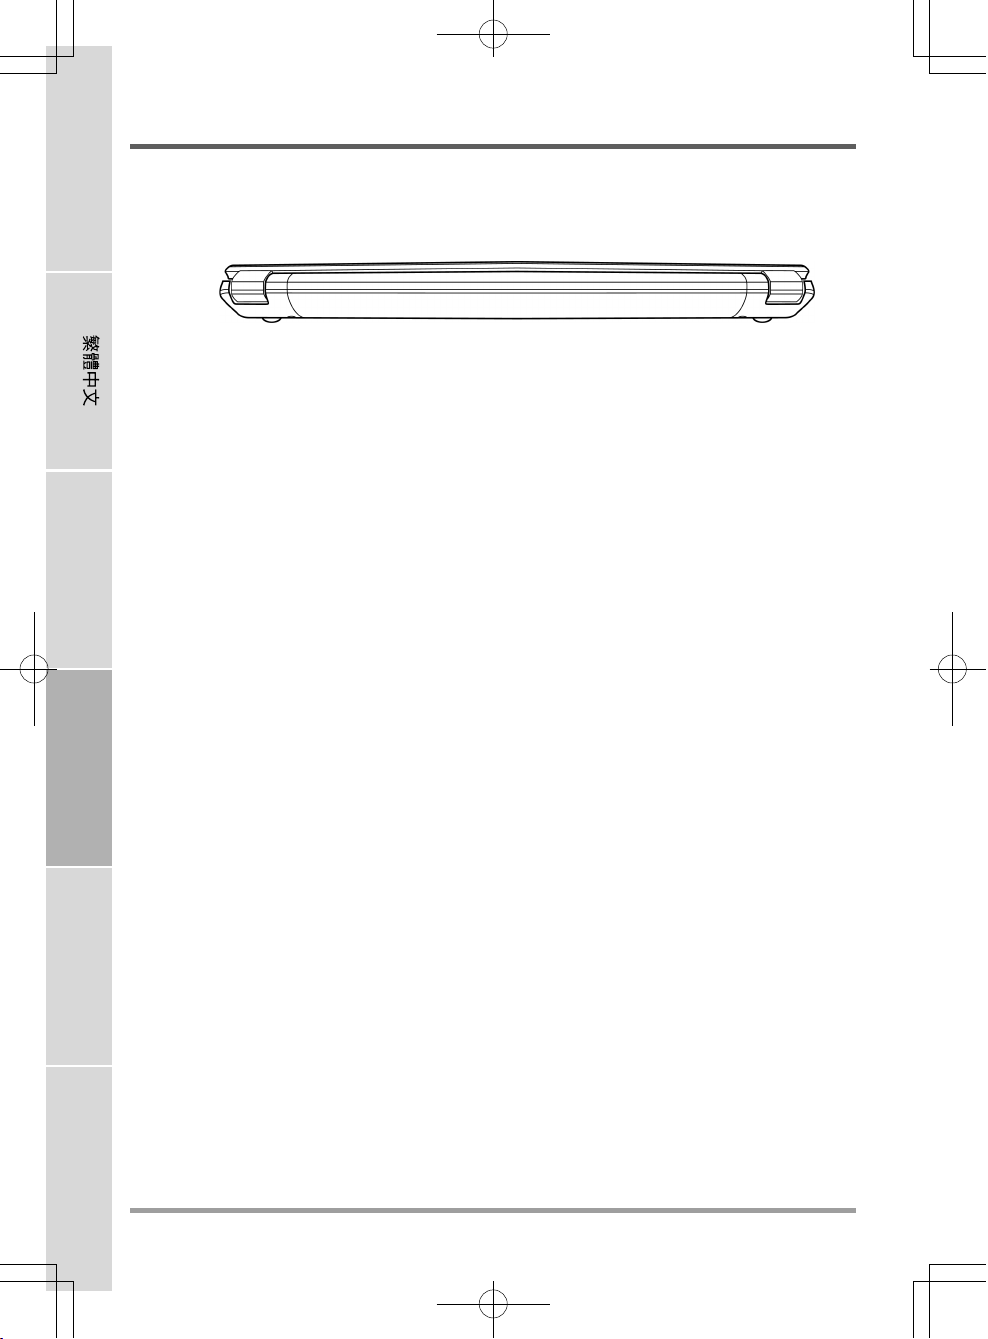
FRONT OVERVIEW
The following is an overview of the front of the notebook.
BEFORE YOU START
Microphone
Suspend/Power On
Button
Memory Card Reader
Camera
Display Panel
Control Buttons
Keyboard
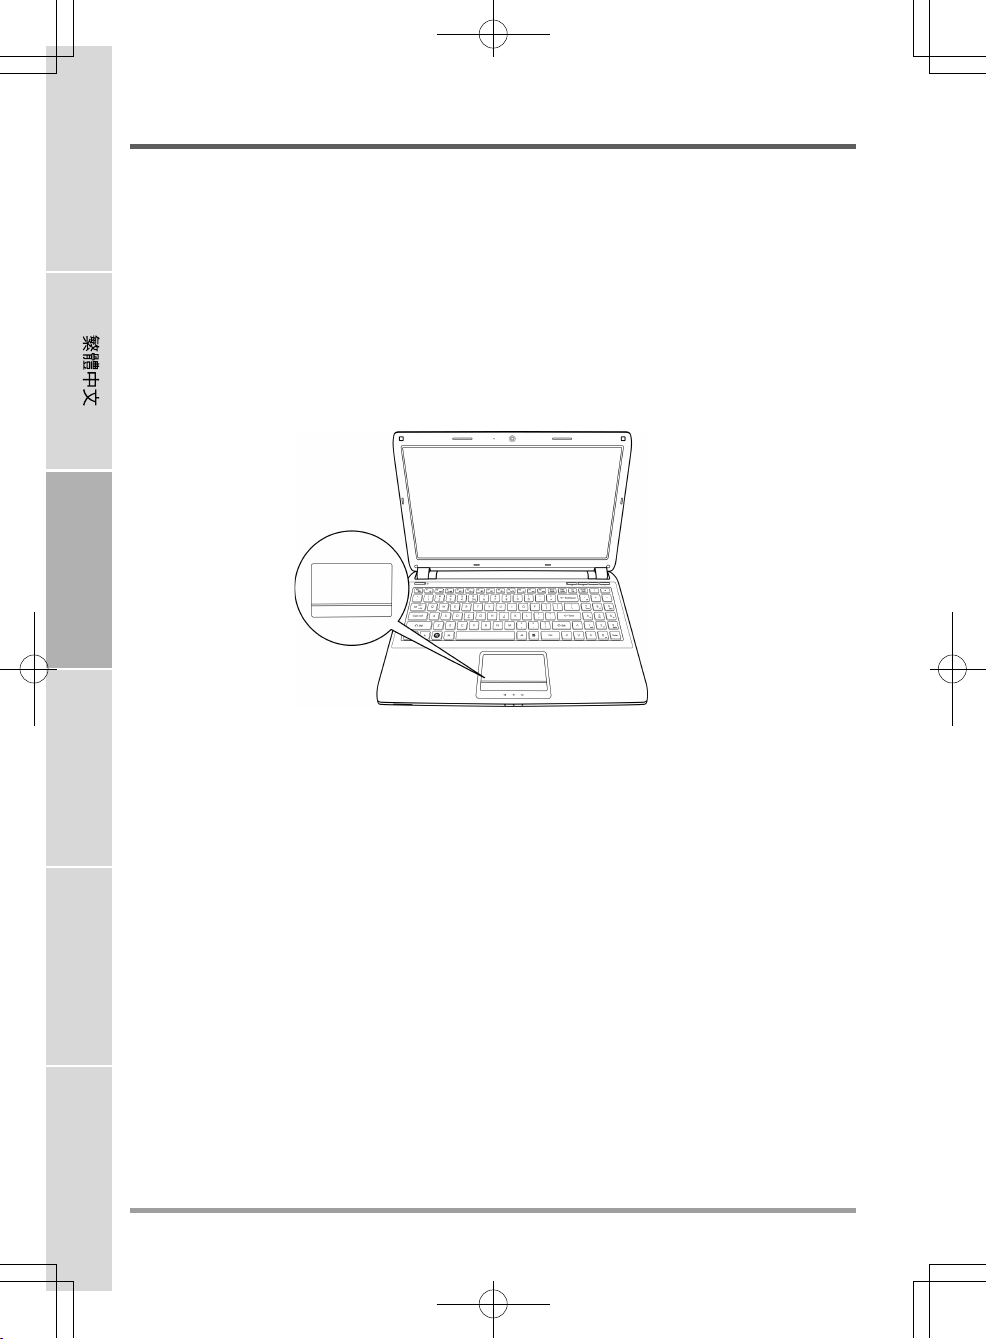
TouchPad
Pointing Device
Status Indicator Lights
Microphone
The built-in microphone allows for the reception and transmission of voice and/or other audio data
to any program capable of accepting such input.
Camera
The built-in 0.3 or 1.3 megapixel camera allows you to snap a photo or create a video chat or video
conference with just a click.
Display Panel
The display panel is a color LCD panel with back lighting for the display of text and graphics.
7
Page 8
ENGLISH
BEFORE YOU START
Control Buttons
The Control buttons provide quick access to frequently used functions. The buttons are: Display
off, CPU throttling, volume down and volume up. The Display off button allows you to quickly
turn your display off and on again. The CPU throttling button allows you to enable/disable CPU
throttling in order to conserve power or to reduce the amount of heat generated by the CPU.
Keyboard
A full-size keyboard with the numeric keys and the dedicated Windows® keys.
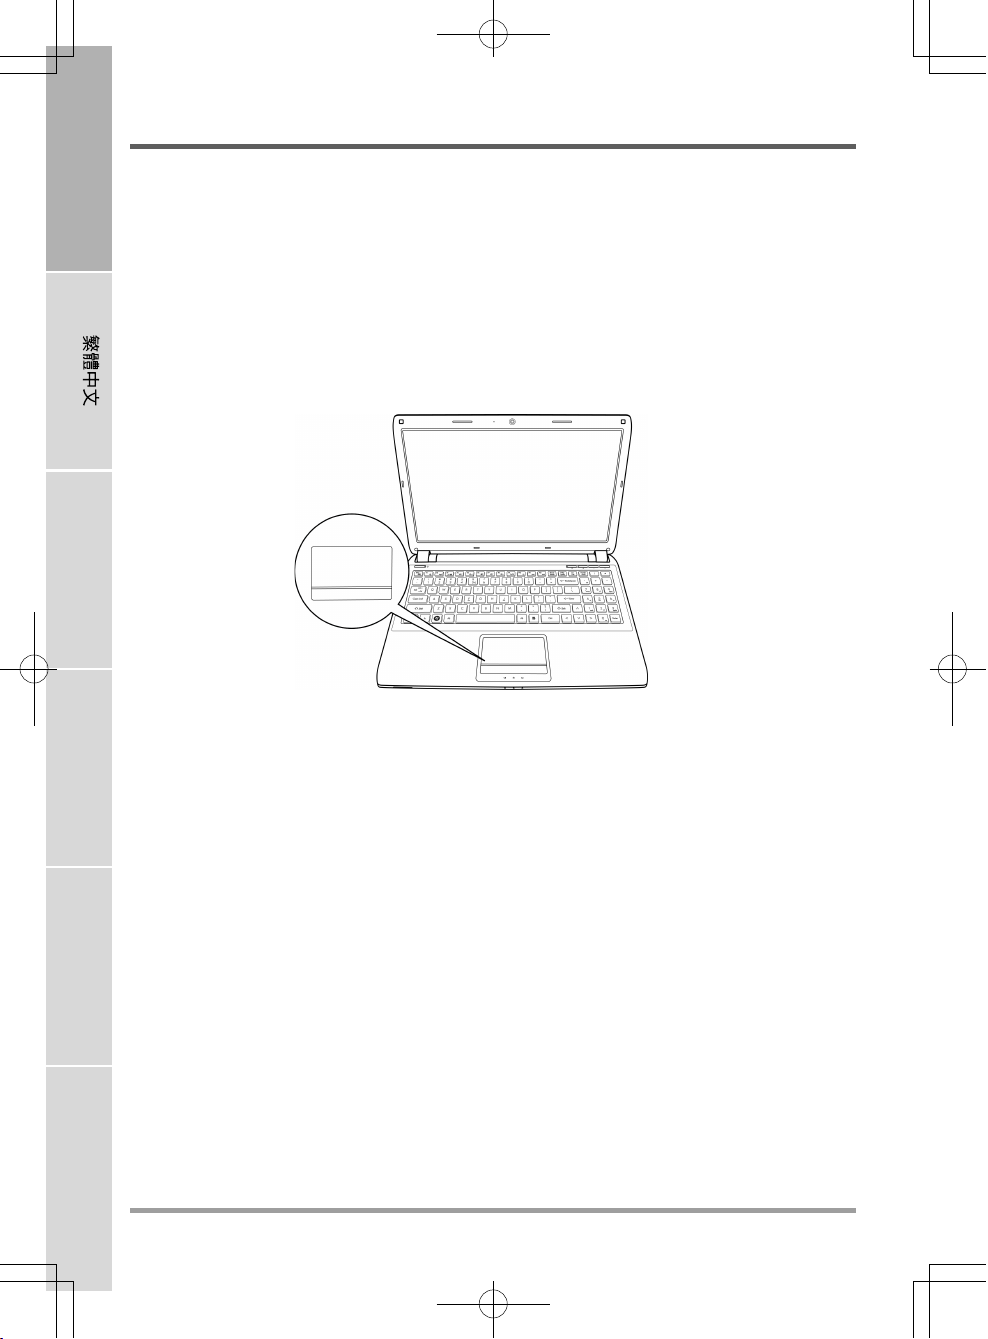
TouchPad Pointing Device
The TouchPad pointing device is a mouse-like cursor control with two buttons and a touch
sensitive movement pad.
FRANÇAIS
Status Indicator Lights
The Status indicator lights correspond to specific operating modes. These modes are: battery/AC
adapter status, hard drive activity (HDD) and Wireless LAN activity.
Memory Card Reader
The memory card reader offers the fastest and most convenient method to transfer pictures, music
and data between your notebook and flash compatible devices such as digital cameras, MP3
players, mobile phones, and PDAs.
DEUTSCH
Suspend/Power On Button
This button turns your notebook on and off or puts it to sleep. (See Suspend/Power On Button
in the Power On section for more information.)
ESPAÑOL
ITALIANO
8
Page 9
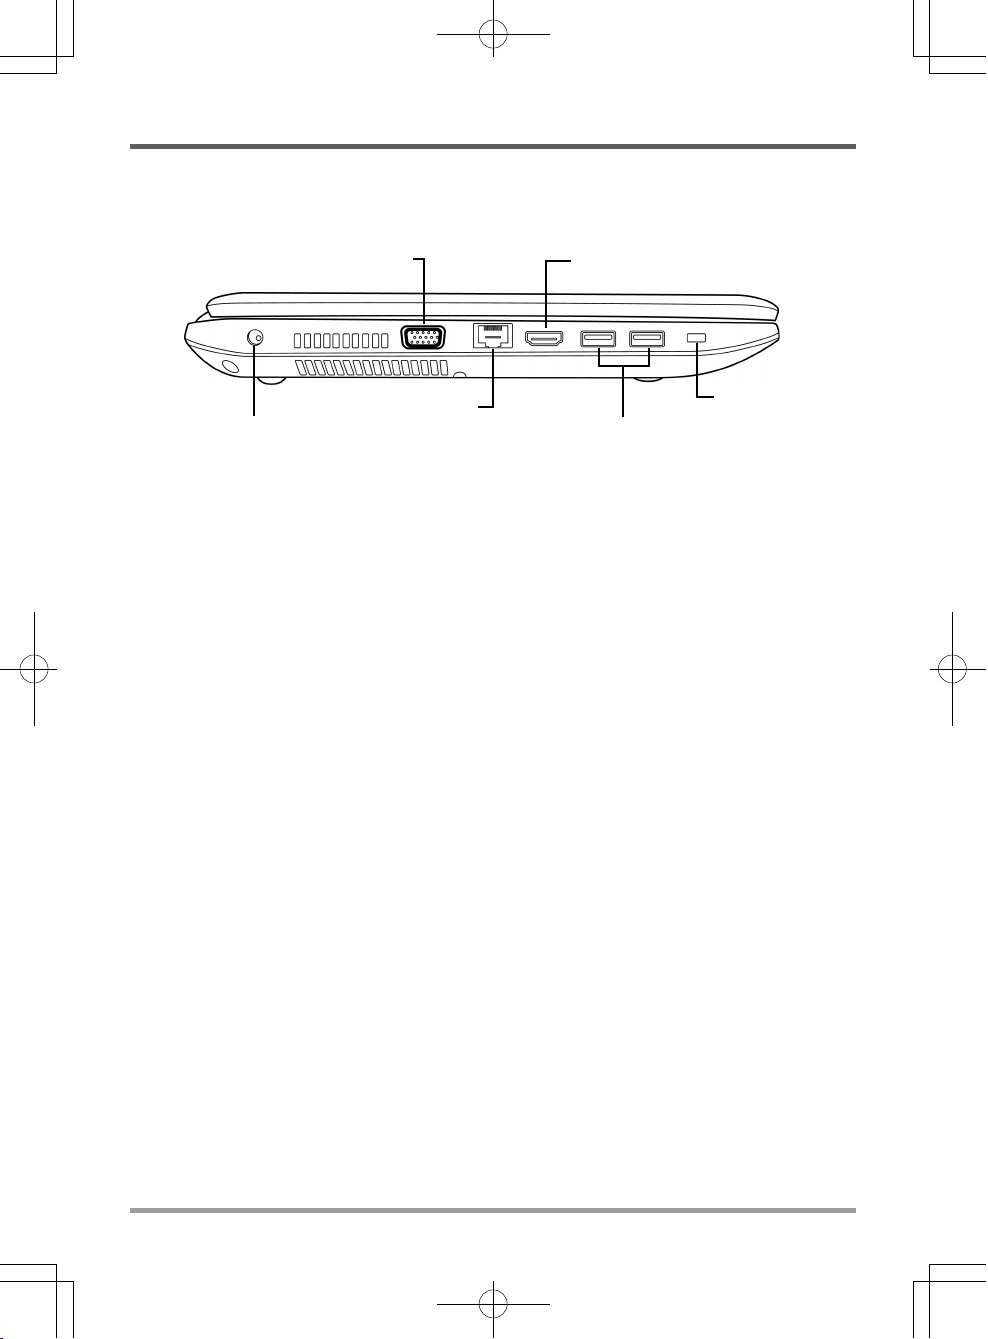
LEFT SIDE OVERVIEW
The following is a brief description of the left side of the notebook.
HDMI PortExternal Monitor Port
BEFORE YOU START
Kensington Lock
Slot
Power Adapter Port
LAN (RJ-45) Port
USB Ports
Power Adapter Port
The power adapter port allows you to plug in the AC adapter to power your notebook and charge
the internal Lithium-Ion battery.
External Monitor Port
The external monitor port allows you to connect an external monitor.
LAN (RJ-45) Port
The LAN port is designed to support a 10/100/1000 Base-T standard RJ-45 plug.
HDMI Port
The HDMI port allows you to connect a video device such as a television, a projector, or a VCR
to your computer.
USB Ports
The USB ports allow you to connect Universal Serial Bus devices. They support v3.0 of the USB
standard, which allows data exchange rates as high as 4.8 Gb/s. The USB port on the right
supports sleep-and-charge functionality. USB 3.0 is backwards compatible with USB 2.0.
9
Page 10
ENGLISH
BEFORE YOU START
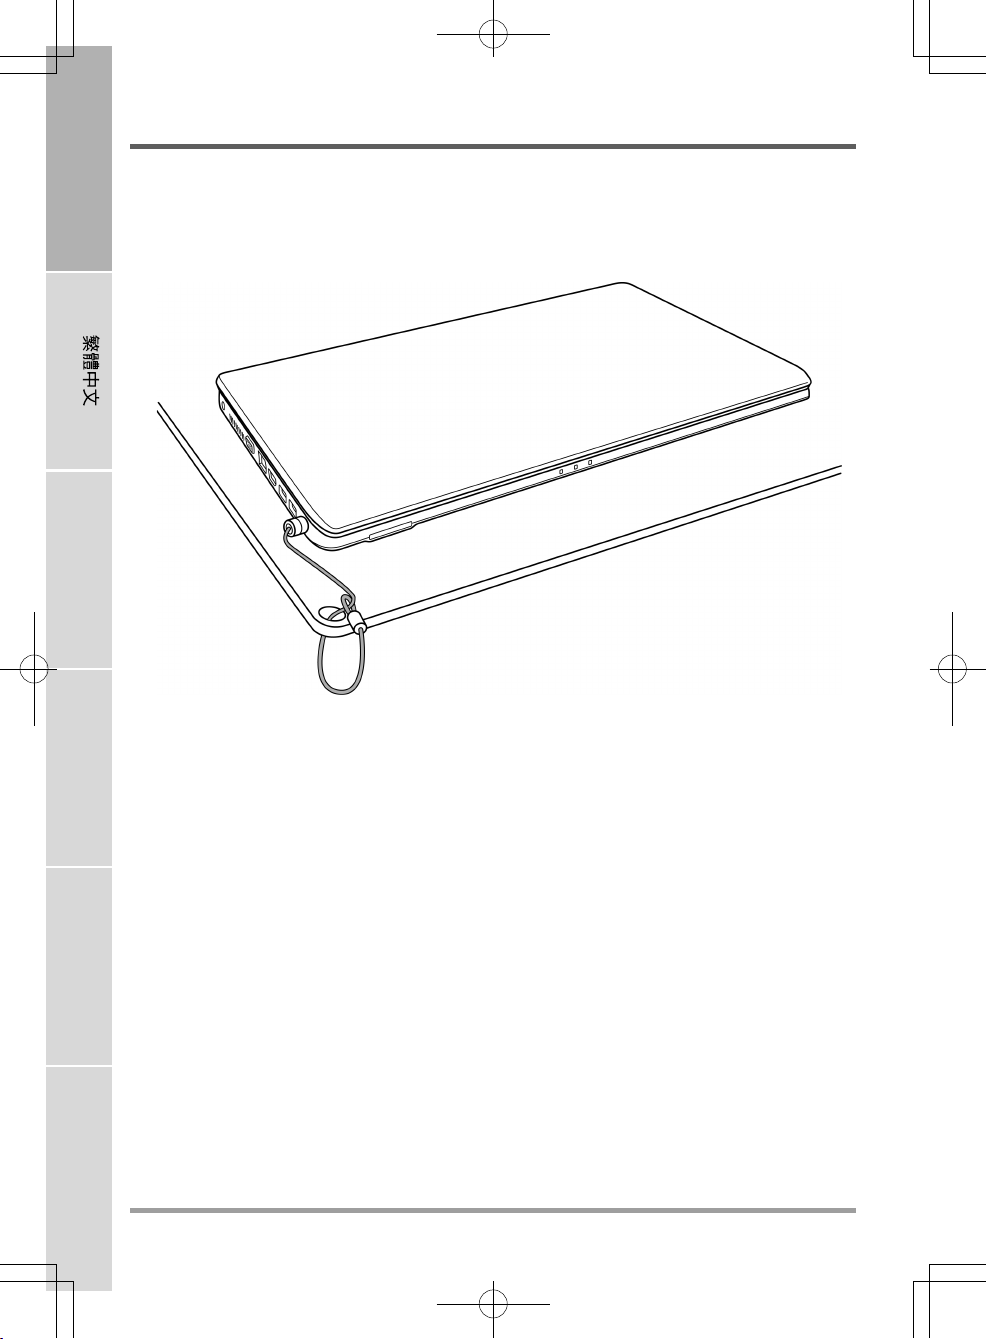
Kensington Lock Slot
The Kensington lock slot allows you to secure your notebook to an immovable object with an
optional security cable.
FRANÇAIS
DEUTSCH
ESPAÑOL
ITALIANO
10
Page 11
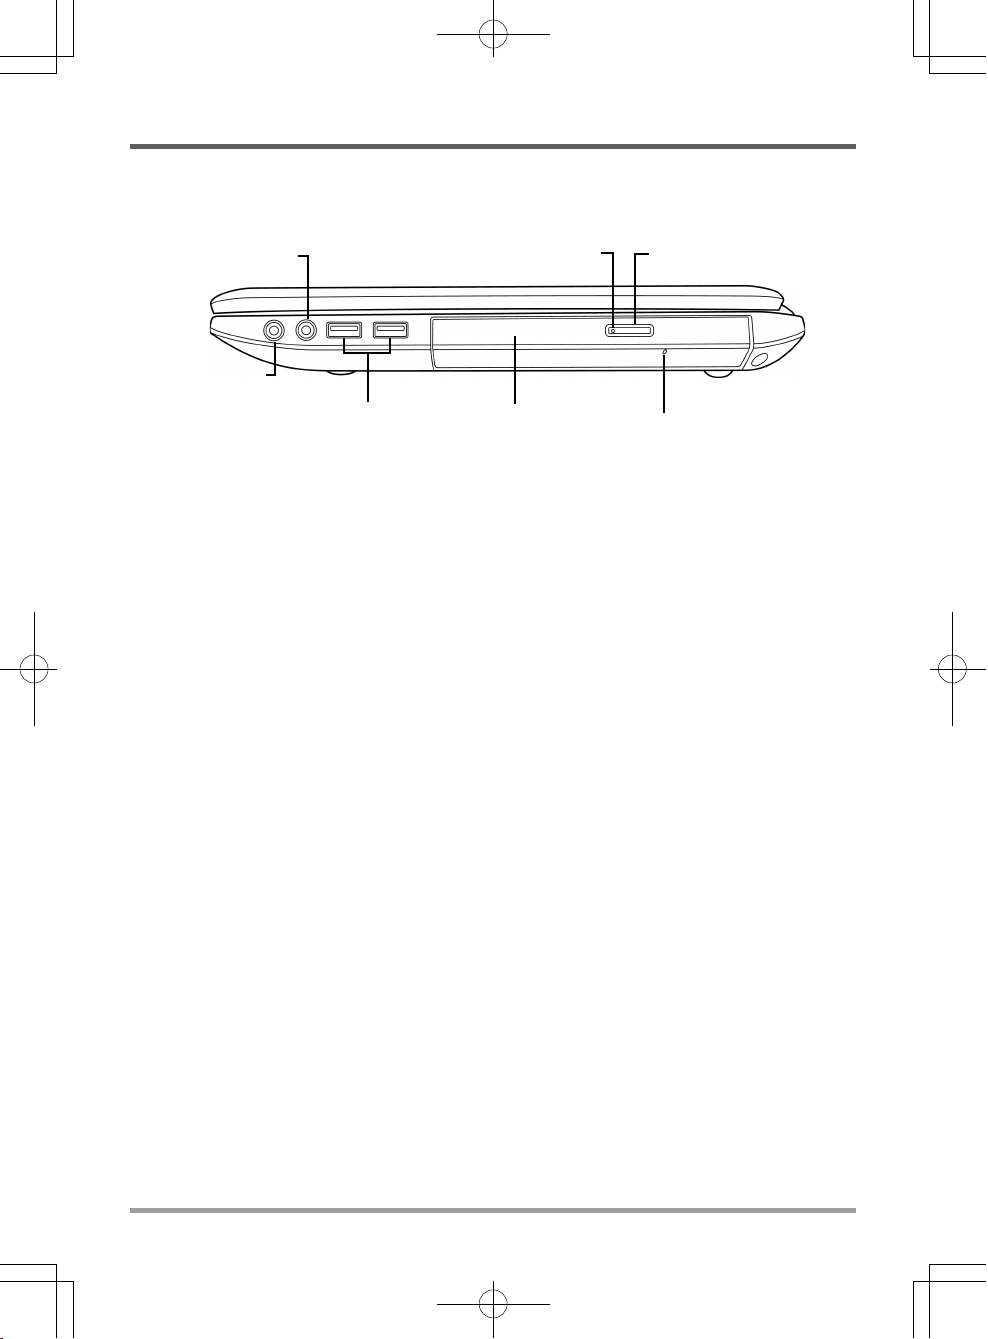
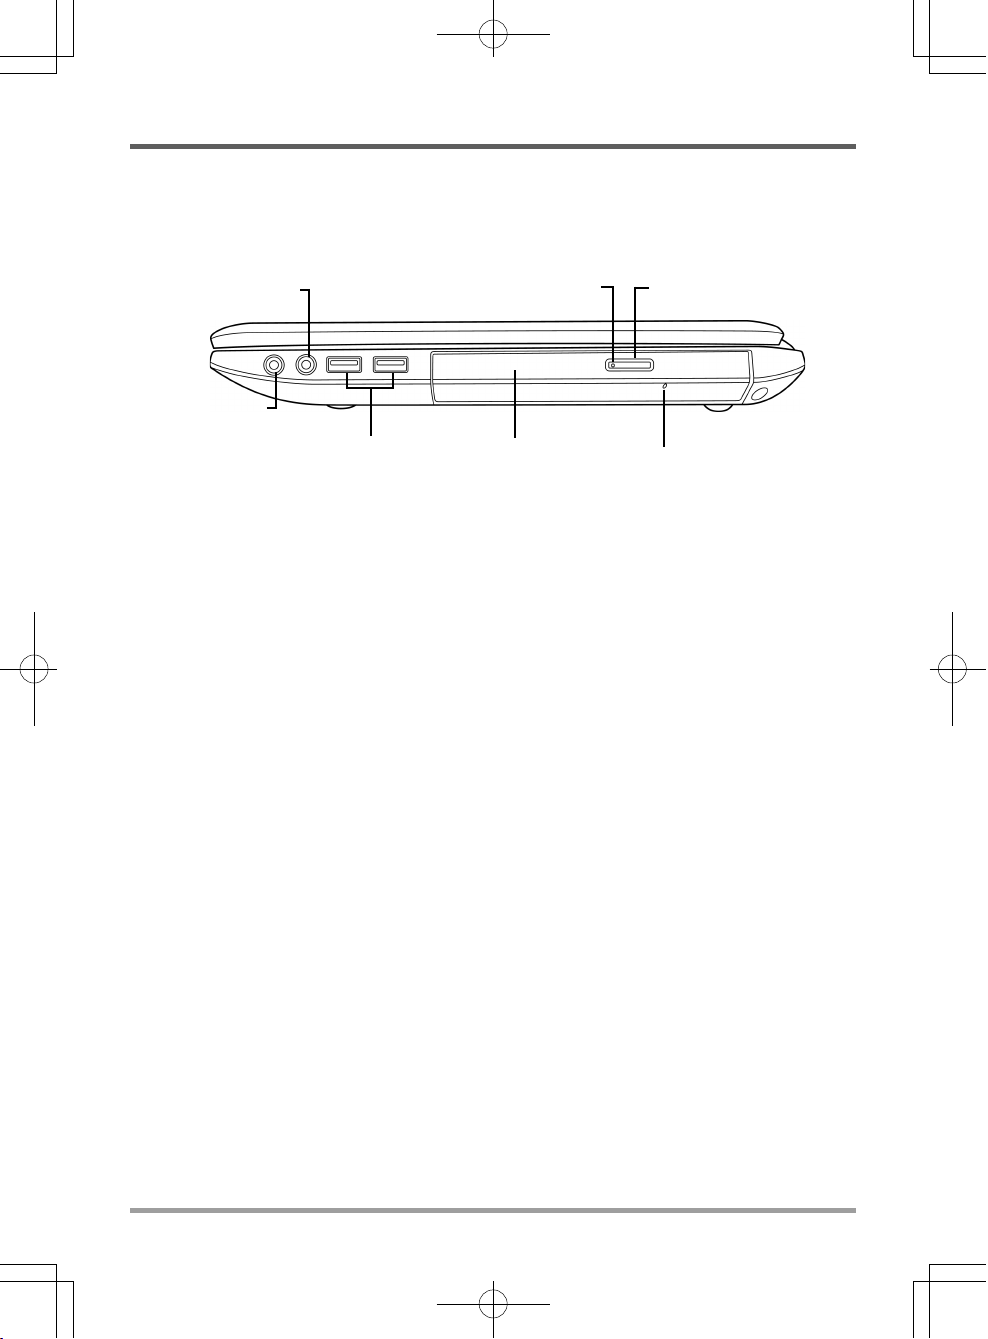
RIGHT SIDE OVERVIEW
The following is a brief description of the right side of the notebook.
BEFORE YOU START
Headphone Jack
Microphone Jack
Optical Drive Activity Indicator
USB Ports
Optical Drive
Optical Drive Eject Button
Emergency Tray Release
Microphone Jack
The microphone jack allows you to connect an external mono microphone.
Headphone Jack
The headphone jack allows you to connect headphones or external speakers and amplifiers.
USB Ports
The USB ports allow you to connect Universal Serial Bus devices. They support v2.0 of the USB
standard, which allows data exchange rates as high as 480 Mb/s.
Optical Drive
The optical drive allows you to play back media discs such as CDs and DVDs. Depending on the
configuration of your notebook, it may also allow you to burn CDs and DVDs.
Optical Drive Activity Indicator
This light flickers to indicate activity when the ODD is playing a media disc or is being accessed
by the operating system.
Optical Drive Eject Button
The optical drive eject Button allows you to open the optical drive tray to remove or insert a DVD
or CD.
Emergency Tray Release
The emergency tray release allows you to open the optical drive tray without powering on your
notebook.
11
Page 12
ENGLISH
BEFORE YOU START
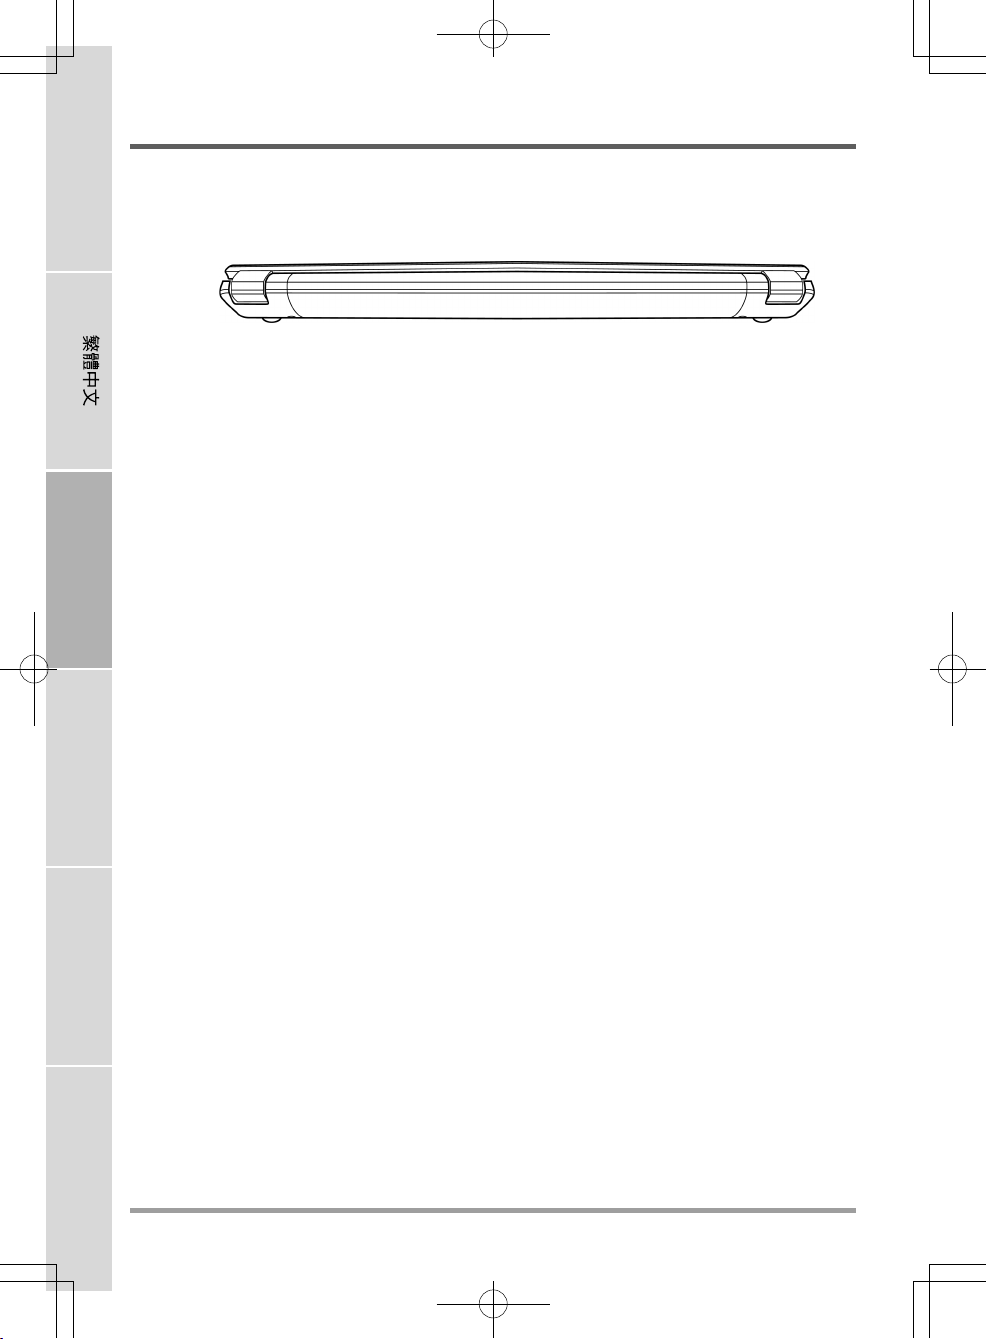
BACK OVERVIEW
The following is an overview of the back of the notebook.
FRANÇAIS
DEUTSCH
ESPAÑOL
ITALIANO
12
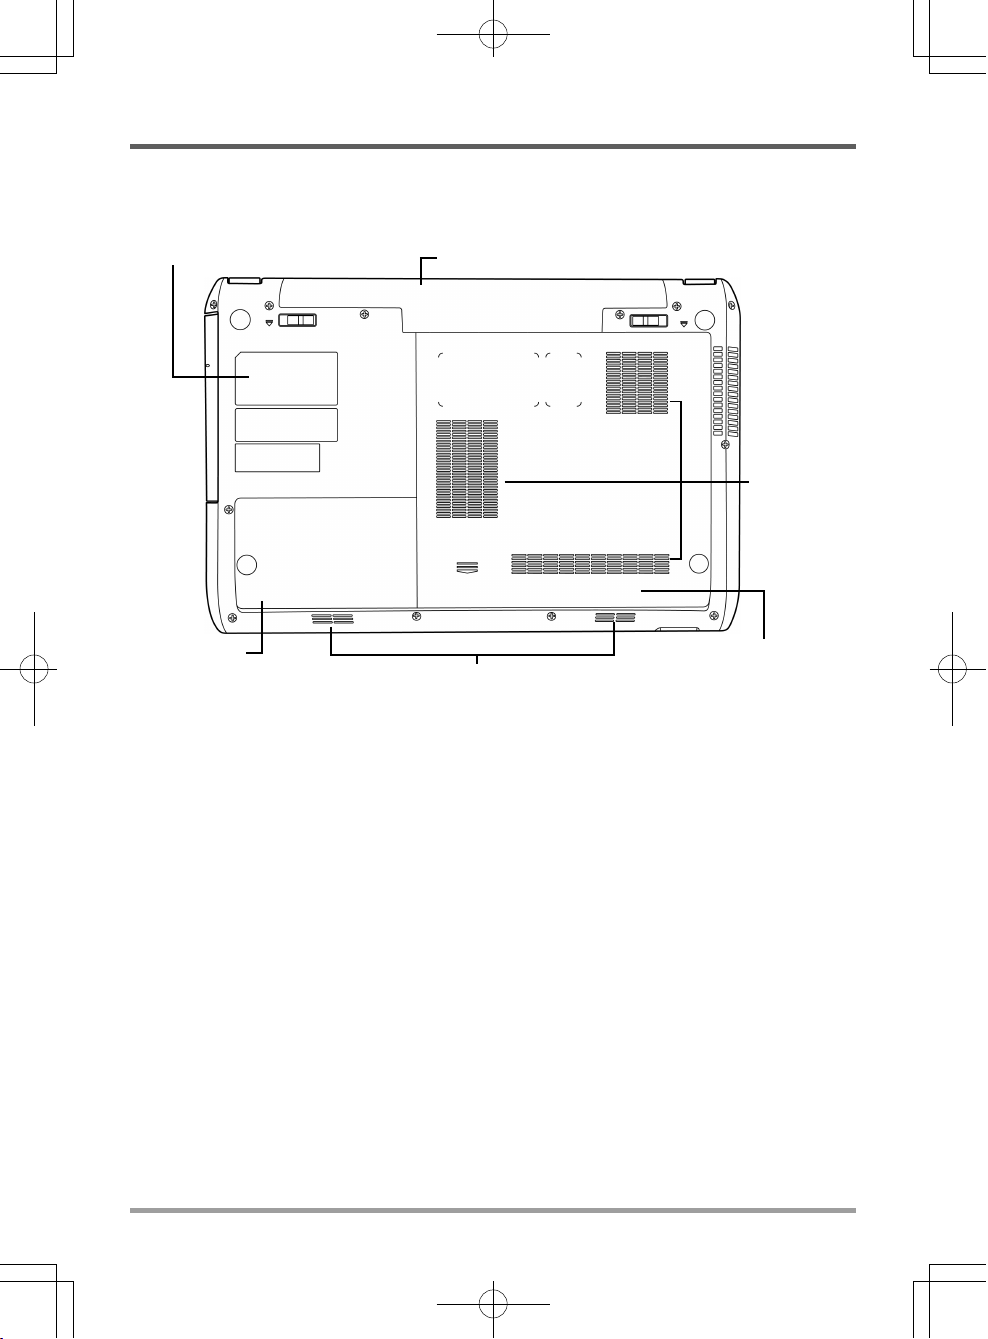
Page 13

BOTTOM OVERVIEW
The following is an overview of the bottom of the notebook.
Lithium-Ion Battery Bay
Rating
Label
BEFORE YOU START
Fan
Outlets
Compartment
Cover
Stereo Speakers
Compartment
Cover
Lithium-Ion Battery Bay
The battery bay contains the internal Lithium-Ion battery. It can be opened for the removal of the
battery when stored over a long period of time or for swapping a discharged battery with a
charged Lithium-Ion battery.
Fan Outlets
These are open ports for the fan to dissipate heat from the computer's internal components. Do
not block or place the computer in such a position that you inadvertently allow the outlets to
become blocked.
Compartment Covers
The main compartment contains the Wireless LAN card (Not available in all configurations),
memory modules and CPU. The hard disk drive compartment contains the internal hard disk
drive. You must first remove the main compartment cover before you can remove the hard disk
drive compartment cover.
Rating Label
The label shows the model number and other information about your notebook.
Stereo Speakers
The built-in dual speakers allow for stereo sound.
13
Page 14

ENGLISH
GETTING STARTED
Power Sources
Your computer has two types of power source: a Lithium-Ion battery or an AC adapter.
CONNECTING THE POWER ADAPTERS
The AC adapter provides power for operating your notebook PC and charging the battery.
Connecting the AC Adapter
FRANÇAIS
1. Plug the DC output cable into the DC power jack of your notebook PC.
2. Plug the AC adapter into an AC electrical outlet.
Switching from AC Adapter Power to Battery Power
1. Be sure that you have at least one charged battery installed.
2. Remove the AC adapter. Your notebook will automatically switch from DC power to battery
power.
NOTE
DEUTSCH
ESPAÑOL
ITALIANO
14
The Lithium-Ion battery is not charged upon purchase. Initially, you will need
to connect the AC adapter to use your notebook PC.
Page 15
GETTING STARTED
RECHARGING THE BATTERY
The Lithium-Ion battery is recharged internally using the AC adapter. To recharge the battery,
make sure the battery is installed and the computer is connected to the AC.
There is no "memory effect" in Lithium-Ion batteries; therefore you do not need to discharge the
battery completely before recharging. The charge times will be significantly longer if your notebook
PC is in use while the battery is charging. If you want to charge the battery more quickly, put
your computer into Suspend mode, or turn it off while the adapter is charging the battery.
Low Battery State
When the battery charge is low, a notification message appears. If you do not respond to the low
battery message, the battery continues to discharge until it is too low to operate. When this
happens, your notebook PC goes into Suspend mode. There is no guarantee your data will be
saved once the notebook reaches this point.
CAUTION
To protect your computer from damage, use only the power adapter that came
with it because each power adapter has its own power output rating.
Battery Replacement
There is danger of explosion of an incorrect battery type is used for replacement. For computers
equipped with a replaceable lithium-ion battery pack, the following applies:
• if the battery is placed in an OPERATOR ACCESS AREA, there shall be a marking close to
the battery, or a statement in both the operating and the servicing instructions;
• if the battery is placed elsewhere in the computer, there shall be a marking close the battery
or a statement in the servicing instructions.
The marking or statement shall include the following or similar text:
CAUTION
Once your note computer goes into Suspend mode as a result of a dead battery you will be unable
to resume operation until you provide a source of power either from an adapter, or a charged
battery. Once you have provided power, you can press the Suspend/Resume button to resume
operation. In Suspend mode, your data is maintained for some time, but if a power source is not
provided promptly, the Power indicator stops flashing and the goes out, in which case you have
lost the data that was not saved. Once you provide power, you can continue to use your computer
while an adapter charges the battery.
Risk of explosion if battery is replaced with an incorrect type. Dispose of used
batteries according to the instructions.
15
Page 16
ENGLISH
GETTING STARTED
Starting Your Notebook
POWER ON
Suspend/Power On Button
The suspend/power on switch is used to turn on your notebook from its off state. Once you have
connected your AC adapter or charged the internal Lithium-Ion battery, you can power on your
notebook by pressing the suspend/power on button located above the keyboard. If you need to
take an extended break press the button again to turn it off.
CAUTION
FRANÇAIS
When you power on your notebook, it will perform a Power On Self Test (POST) to check the
internal parts and configuration for correct functionality. If a fault is found, your computer emits
an audio warning and or displays and error message.
Depending on the nature of the problem, you may be able to continue by starting the operating
system or by entering the BIOS setup utility and revising the settings.
After satisfactory completion of the Power On Self Test (POST), your notebook loads the
DEUTSCH
ESPAÑOL
installed operating system.
CAUTION
Do not carry your notebook around with the power on or subject it to shocks or
vibration, as you risk damaging the hard disk.
Never turn off your notebook during the Power On Self Test (POST), or an
unrecoverable error may occur.
ITALIANO
16
Page 17
GETTING STARTED
Status Indicators
The status indicator lights correspond to specific operating modes. These modes are: Power on/
Suspend status, Battery/AC Adapter status, hard drive activity (HDD), Wireless LAN activity,
Display Off status and CPU Throttling status.
Power On/
Suspend Status Indicator
Hard Disk Drive (HDD)
Activity Indicator
Battery Indicator
Wireless LAN Activity Indicator
Display Off Status
Indicator
Power On Indicator
This light on the power button illuminates when the computer is powered on.
Suspend Status Indicator
This light flashes when the computer is in the Suspend mode.
CPU Throttling
Status Indicator
Battery Indicator
The Battery indicator tells you whether the Lithium-Ion battery is charging or is already fully
charged.
• If you are charging your battery, the Battery indicator remains on even if your notebook is
shut off.
• If there is no battery activity, the power adapters are not connected, or the power switch is
Off, the Battery indicator will also be off.
• Batteries subjected to shocks, vibrations or extreme temperatures can be permanently damaged.
17
Page 18

ENGLISH
GETTING STARTED
Hard Disk Drive (HDD) Activity Indicator
The Hard Disk Drive (HDD) Activity indicator tells you whether your internal hard drive is being
accessed and, if so, how fast.
Wireless LAN Activity Indicator
The Wireless LAN Activity indicator tells you whether your computer is connected to a wireless
network or not.
Display Off Status Indicator
When the Display off button is pressed, the light on the button illuminates amber.
CPU Throttling Status Indicator
FRANÇAIS
When the CPU Throttling button is pressed, the light on the button illuminates amber.
DEUTSCH
ESPAÑOL
ITALIANO
18
Page 19
GETTING STARTED
Using Function Keys
Your computer has 12 function keys, F1 through F12. The functions assigned to these keys differ
for each application. You should refer to your software documentation to find out how these keys
are used.
The [FN] key provides extended functions for the notebook and is always used in conjunction
with another key.
• [FN+F1]: Places the notebook in Suspend mode. Pressing the Power button returns it to
active mode.
• [FN+F2]: Enables or disables the wireless network connection.
• [FN+F3]: Allows you to change your selection of where to send your display video. Each
time you press the combination of keys you will step to the next choice. The choices, in
order, are: built-in display panel only, both built-in display panel and external monitor, or
external monitor only.
• [FN+F4]: Decreases the screen Brightness.
• [FN+F5]: Increases the screen Brightness.
• [FN+F6]: Mutes the computer's volume.
• [FN+F7]: Decreases the computer's volume.
• [FN+F8]: Increases the computer's volume.
• [FN+F9]: Plays or pauses the current multimedia track.
• [FN+F10]: Stops the current multimedia track.
• [FN+F11]: Goes to the previous multimedia track.
• [FN+F12]: Goes to the next multimedia track.
• [FN+Esc]: Enables or disables the TouchPad function.
19
Page 20
ENGLISH
GETTING STARTED
Using the TouchPad
A TouchPad pointing device comes built into your computer. It is used to control the movement
of the pointer to select items on your display panel.
The TouchPad consists of a cursor control, a left and right button, and a scroll bar. The cursor
control works the same way a mouse does, and moves the cursor around the display. It only
requires light pressure from the tip of your finger. The left and right buttons function the same as
mouse buttons. The actual functionality of the buttons may vary depending on the application
that is being used. Finally, the scroll bar allow you to navigate quickly through pages, without
having to use the on-screen cursor to manipulate the up and down scroll bars.
FRANÇAIS
DEUTSCH
Clicking
Clicking means pushing and releasing a button. To left-click, move the cursor to the item you wish
to select, press the left button once, and then immediately release it. To right click, move the
mouse cursor to the item you wish to select, press the right button once, and then immediately
release it. You also have the option to perform the clicking operation by tapping lightly on the
TouchPad once.
Double-Clicking
ESPAÑOL
Double-clicking means pushing and releasing the left button twice in rapid succession. This
procedure does not function with the right button. To double-click, move the cursor to the item
you wish to select, press the left button twice, and then immediately release it. You also have the
option to perform the double-click operation by tapping lightly on the TouchPad twice.
Dragging
Dragging means pressing and holding the left button, while moving the cursor. To drag, move the
cursor to the item you wish to move. Press and hold the left button while moving the item to its
new location and then release it. Dragging can also be done using the TouchPad. First, tap the
ITALIANO
TouchPad twice over the item you wish to move making sure to leave your finger on the pad after
the final tap. Next, move the object to its new location by moving your finger across the TouchPad,
and then release your finger. Using the Scroll bar allows you to navigate through a document
quickly without using the window's scroll bars. This is particularly useful when you are navigating through on-line pages.
20
Page 21

GETTING STARTED
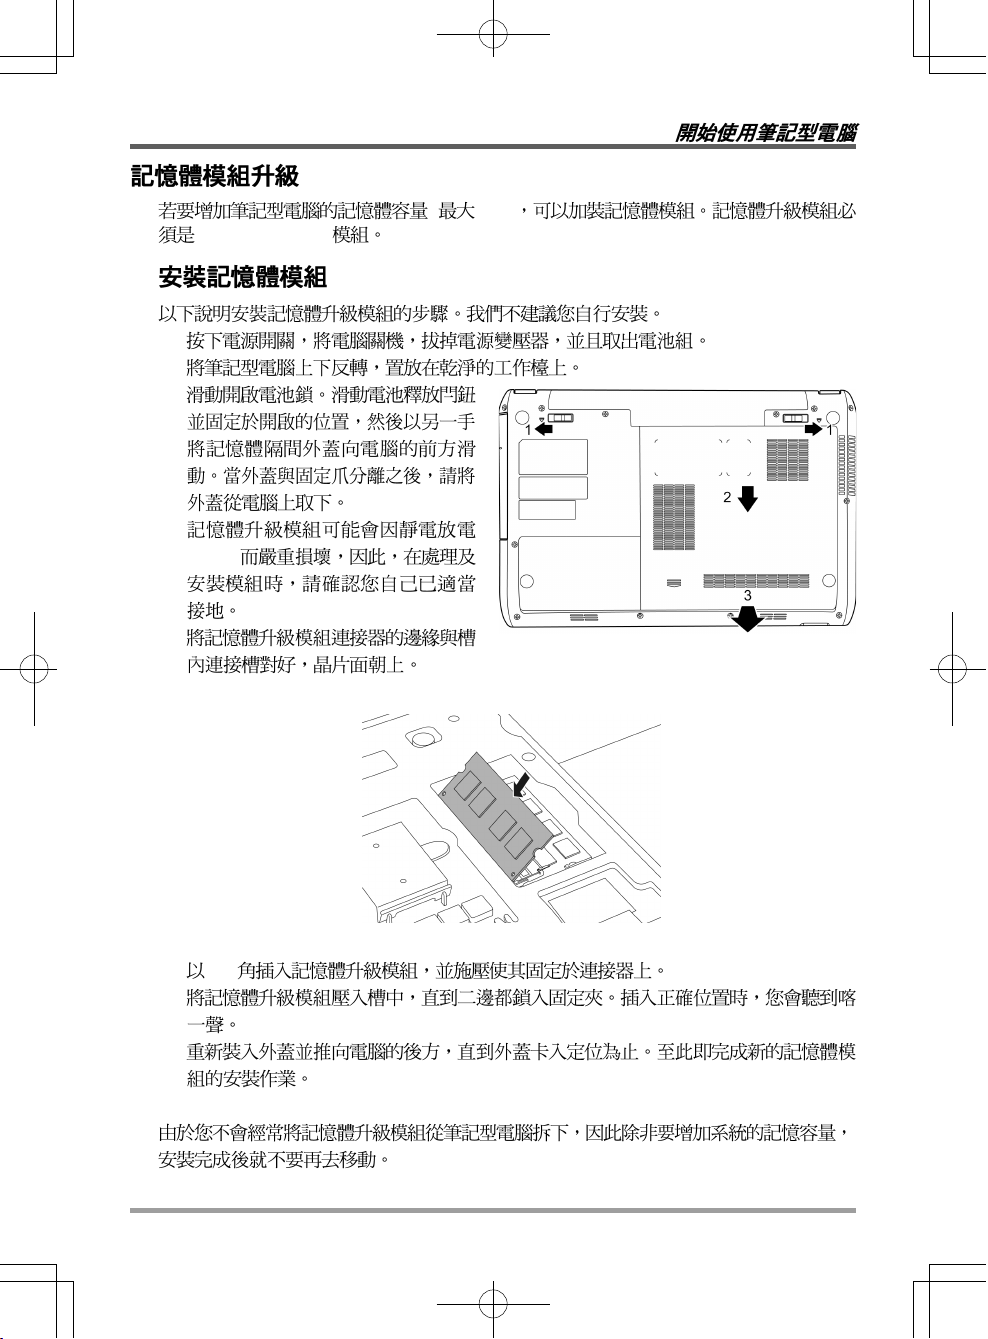
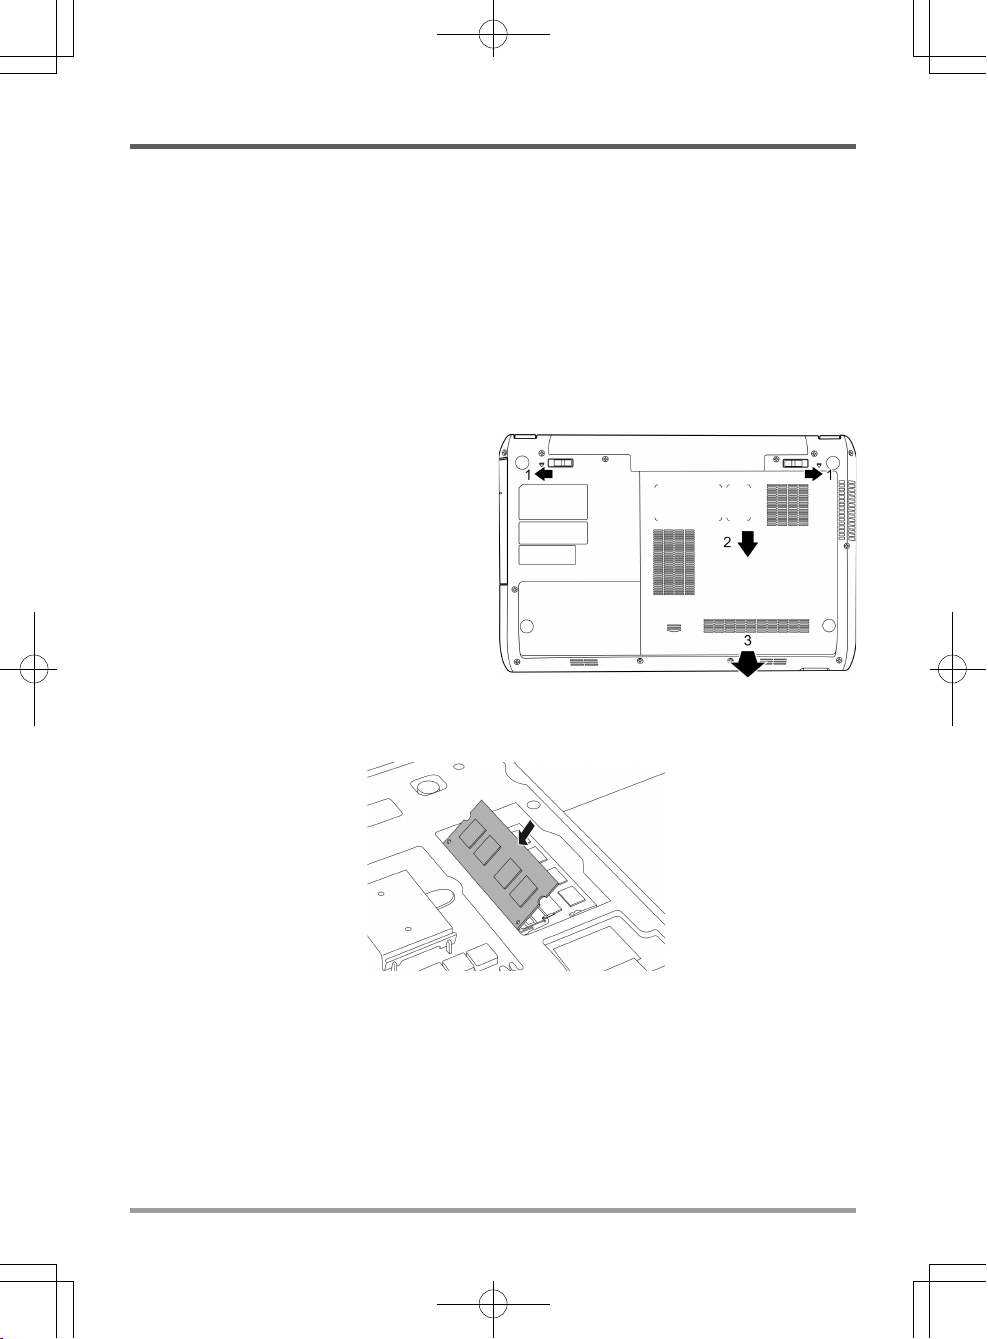
Memory Module Upgrade
To increase your notebook's memory capacity (up to 8 GB maximum), additional memory modules may be installed. The memory upgrade must be a dual-in-line (DIMM) SDRAM module.
Installing a Memory Module
The following steps describe how to install a memory upgrade module. We do not recommend
that you do this yourself.
1. Turn off power to your notebook using the power switch, disconnect the power adapter, and/
or remove the battery pack.
2. Place your notebook upside-down on a clean work surface.
3. Slide open the battery lock. Slide and hold
the battery release latch in the open
position and use the other hand to slide
the memory compartment cover toward
the front of the system. Once the cover
is released from the securing tabs, lift it
away from the system.
4. The memory upgrade module can be
severely damaged by electrostatic
discharge (ESD). Be sure you are
properly grounded when handling and
installing the module.
5. Align the connector edge of the memory upgrade module, chip side up, with the connector slot
in the compartment.
6. Insert the memory upgrade module at a 45
7. Press the memory upgrade module down into the compartment until it locks into the retaining
clips on either side. You will hear a click when it is properly in place.
8. Replace the cover and slide toward the back of the system until it clicks into place. Installation
of the new memory module is now complete.
The memory upgrade module is not something you routinely remove from your notebook PC. Once
it is installed, you should leave it in place unless you want to increase system memory capacity.
o
angle and press it firmly onto the connector.
21
Page 22
ENGLISH
TROUBLESHOOTING
Your notebook PC is sturdy and subject to few problems in the field. However, you may encounter simple setup or operating problems that you can solve on the spot, or problems with peripheral devices, that you can solve by replacing the device. The information in this section helps you
isolate and resolve some of these straightforward problems and identify failures that require
service.
Identifying the Problem
If you encounter a problem, go through the following procedure before pursuing complex
FRANÇAIS
DEUTSCH
troubleshooting:
1. Turn off your notebook.
2. Make sure the AC adapter is plugged into your notebook and to an active AC power source.
3. Make sure that any card installed in the PC Card slot is seated properly. You can also remove
the card from the slot, thus eliminating it as a possible cause of failure.
4. Make sure that any devices connected to the external connectors are plugged in properly. You
can also disconnect such devices, thus eliminating them as possible causes of failure.
5. Turn on your notebook. Make sure it has been off at least 10 seconds before you turn it on.
6. Go through the boot sequence.
7. If the problem has not been resolved, contact your support representative.
Before you place the call, you should have the following information ready so that the customer
support representative can provide you with the fastest possible solution:
• Product name
• Product configuration number
• Product serial number
ESPAÑOL
ITALIANO
• Purchase date
• Conditions under which the problem occurred
• Any error messages that have occurred
• Hardware configuration
• Type of device connected, if any
See the Configuration Label on the bottom of your notebook for configuration and serial numbers.
22
Page 23
MEMO
Federal Communications Commission (FCC) Statement
This device complies with Part 15 of the FCC Rules. Operation is subject to the following two
conditions:
(1) This device may not cause harmful interference.
(2) This device must accept any interference received, including interference that maycause
undesired operation.
Any changes or modifications (including the antennas) made to this device that are not expressly
approved by the manufacturer may void the user’s authority to operate the equipment. FCC RF
Radiation Exposure Statement: This equipment complies with FCC RF radiation exposure limits
set forth for an uncontrolled environment. This device and its antenna must not be co-located or
operating in conjunction with any other antenna or transmitter. This equipment has been tested
and found to comply with the limits for a class B digital device, pursuant to part 15 of the FCC
Rules. These limits are designed to provide reasonable protection against harmful interference in
a residential installation.
This equipment generates, uses and can radiate radio frequency energy and, if not installed and
used in accordance with the instructions, may cause harmful interference to radio communications.
However, there is no guarantee that interference will not occur in a particular installation. If this
equipment does cause harmful interference to radio or television reception, which can be determined by turning the equipment off and on, the user is encouraged to try to correct the interference by one or more of the following measures:
• Reorient or relocate the receiving antenna.
• Increase the separation between the equipment and receiver.
• Connect the equipment into an outlet on a circuit different from that to which the receiver is
connected.
• Consult the dealer or an experienced radio/TV technician for help.
FCC RF Radiation Exposure Statement:
1. This Transmitter must not be co-located or operating in conjunction with any other antenna or
transmitter.
2. This equipment complies with FCC RF radiation exposure limits set forth for an uncontrolled
environment. To maintain compliance with FCC RF exposure compliance requirements, avoid
direct contact to the transmitting antenna during transmitting.
23
Page 24
MEMO
Page 25
2012 3
Page 26
ENGLISH
FRANÇAIS
DEUTSCH
.............................................................................................................. 5
.................................................................................................................... 5
.................................................................................................................... 6
.............................................................................................................. 6
......................................................................................................................... 7
......................................................................................................................... 9
....................................................................................................................... 11
....................................................................................................................... 12
....................................................................................................................... 13
............................................................................................. 14
................................................................................................................................. 14
......................................................................................................... 14
............................................................................................................ 15
....................................................................................................... 16
........................................................................................................................... 16
................................................................................................................ 17
................................................................................................................ 19
................................................................................................................ 20
......................................................................................................... 21
................................................................................................................ 22
.......................................................................................................................... 22
ESPAÑOL
ITALIANO
2
Page 27
3
Page 28
ENGLISH
FRANÇAIS
DEUTSCH
ESPAÑOL
ITALIANO
4
Page 29
•
•
•
• CD
•
• Dual DVD+/-RW CD
• Super Multi DVD RW
• Blu-ray/DVD RW
5
Page 30
ENGLISH
FRANÇAIS
DEUTSCH
ESPAÑOL
ITALIANO
6
Page 31

/
30 130
7
Page 32

ENGLISH
CPU CPU
CPU
CPU /
Windows
FRANÇAIS
DEUTSCH
ESPAÑOL
/ (HDD)
MP3 PDA
/
(
/ )
ITALIANO
8
Page 33

HDMI
LAN (RJ-45)
USB
Kensington
LAN (RJ-45)
LAN 10/100/1000 Base-T RJ-45
HDMI
HDMI
USB
USB USB USB v3.0 4.8 Gb/s
USB USB 3.0 USB 2.0
9
Page 34

ENGLISH
Kensington
Kensington
FRANÇAIS
DEUTSCH
ESPAÑOL
ITALIANO
10
Page 35

USB
USB
USB (USB) USB v2.0
480 Mb/s
CD DVD
CD DVD
ODD
DVD CD
11
Page 36
ENGLISH
FRANÇAIS
DEUTSCH
ESPAÑOL
ITALIANO
12
Page 37

( ) CPU
13
Page 38

ENGLISH
2
FRANÇAIS
DEUTSCH
ESPAÑOL
1.
2.
1.
2.
ITALIANO
14
Page 39

/
15
Page 40

ENGLISH
/
/
/
FRANÇAIS
DEUTSCH
ESPAÑOL
(POST)
BIOS
(POST)
(POST)
ITALIANO
16
Page 41

(HDD)
/ /AC
(HDD) CPU
/
CPU
17
Page 42
ENGLISH
(HDD)
CPU
CPU
FRANÇAIS
DEUTSCH
ESPAÑOL
ITALIANO
18
Page 43

[FN]
[FN+F1]
[FN+F2]
[FN+F3]
[FN+F4]
[FN+F5]
[FN+F6]
[FN+F7]
[FN+F8]
[FN+F9]
12 F1~F12
[FN+F10]
[FN+F11]
[FN+F12]
[FN+Esc]
19
Page 44

ENGLISH
FRANÇAIS
DEUTSCH
ESPAÑOL
ITALIANO
2 2
20
Page 45
(DIMM) SDRAM
1.
2.
3.
4.
(ESD)
5.
( 8GB)
6. 45
7.
8.
o
21
Page 46
ENGLISH
FRANÇAIS
DEUTSCH
ESPAÑOL
1.
2.
3. PC PC
4.
5. 10
6.
7.
ITALIANO
22
Page 47
(1)
(2)
MEMO
(FCC)
(FCC)
FCC 15
( )
FCC (RF) FCC
FCC 15 B
/
FCC (RF)
1.
2. FCC FCC
23
Page 48

MEMO
Page 49
MANUEL DE L’UTILISATEUR
FRANÇAIS
Mars 2012
Page 50
ENGLISH
TABLE DES MATIÈRES
AVANT DE COMMENCER ....................................................................................... 5
Vérifiez que vous avez tout ............................................................................................ 5
Familiarisez-vous avec l’ordinateur .............................................................................. 6
OUVRIR LE PANNEAU D’AFFICHAGE ...................................................................... 6
PRÉSENTATION DE LA FACE AVANT ......................................................................... 7
PRÉSENTATION DU CÔTÉ GAUCHE ........................................................................ 9
PRÉSENTATION DU CÔTÉ DROIT .......................................................................... 11
PRÉSENTATION DE LA FACE ARRIÈRE .................................................................. 12
FRANÇAIS
DEUTSCH
VUE DE DESSOUS ................................................................................................... 13
MISE EN ROUTE ................................................................................................... 14
Sources d’alimentation ................................................................................................ 14
CONNECTER L’ADAPTATEUR D’ALIMENTATION .................................................. 14
RECHARGER LA BATTERI ...................................................................................... 15
Démarrer votre Notebook ............................................................................................ 16
MISE EN MARCHE .................................................................................................... 16
Témoins d’état ......................................................................................................... 17
Utilisation des touches de fonction ......................................................................... 19
Utilisation du TouchPad ........................................................................................... 20
Mise à niveau du module mémoire ........................................................................ 21
DÉPANNAGE ......................................................................................................... 22
Identifier le problème.................................................................................................... 22
ESPAÑOL
ITALIANO
2
Page 51

PRENDRE SOIN DE VOTRE NOTEBOOK
Pour éviter toute surchauffe du processeur de
l’ordinateur, faites attention à ne pas boucher les
ouvertures prévues pour la ventilation.
NE PAS le placer sur une surface de travail
instable.
NE PAS placer ni faire tomber d'objets sur
l'ordinateur et NE PAS y appliquer une forte
pression.
NE PAS toucher ni appuyer sur le panneau
d'affichage.
NE PAS utiliser votre notebook dans des conditions particulièrement difficiles.
NE PAS soumettre l'ordinateur à des champs
magnétiques.
NE PAS exposer aux rayons directs du soleil. NE PAS utiliser ou stocker à des températures
extrêmes.
3
Page 52

ENGLISH
Eviter les changements soudains de température
ou d’humidité en le maintenant à l’écart d’orifices
d’A/C et de chauffage.
FRANÇAIS
NE PAS placer près d'un feu ou autre source de
chaleur.
DEUTSCH
NE PAS exposer à la poussière et/ou à des
produits corrosifs.
ESPAÑOL
NE PAS exposer l'ordinateur à la pluie ou à
l'humidité.
NE PAS agir à la légère avec les batteries. Rangezles hors de portée des enfants.
NE PAS fermer votre notebook en le claquant et
ne prenez ou ne soulevez jamais votre notebook
par l'affichage.
ITALIANO
NE PAS vaporiser d'eau ou tout autre liquide de
nettoyage directement sur l'affichage.
4
Si vous voyagez avec votre ordinateur, pensez à
le prendre comme bagage à main. Ne l’enregistrez
pas comme bagage de soute.
Page 53

AVANT DE COMMENCER
Vérifiez que vous avez tout
Quand vous recevez votre notebook, déballez-le avec précaution, et vérifiez que vous avez tous
les éléments mentionnés ci-dessous. Pour un modèle pré-configuré vous devez avoir ce qui suit:
• Ordinateur Notebook
• Batterie Lithium Ion
• Adaptateur CA avec cordon d’alimentation CA
• CD de pilotes et d’applications
• Guide de démarrage rapide ou Guide de l’utilisateur
En fonction de la configuration de votre notebook, vous aurez peut-être aussi besoin des éléments
suivants:
• CD d’application du DVD+/- RW Double
• CD d’application du Super Multi DVD RW
• Disque d'application Blu-ray/DVD RW
Après avoir vérifié et confirmé que votre notebook est complet, lisez les pages suivantes pour en
savoir plus sur tous les composants de votre notebook.
Selon le modèle acheté, l’apparence de votre notebook peut être différent de
celui présenté dans ce manuel.
5
Page 54
ENGLISH
AVANT DE COMMENCER
Familiarisez-vous avec l’ordinateur
OUVRIR LE PANNEAU D’AFFICHAGE
Pour ouvrir le panneau d’affichage, soulevez simplement le couvercle.
Quand vous le fermez, prenez soin de ne pas le claquer.
FRANÇAIS
DEUTSCH
ESPAÑOL
ITALIANO
6
Page 55

PRÉSENTATION DE LA FACE AVANT
Voici une présentation de la face avant du notebook.
AVANT DE COMMENCER
Microphone
Bouton Suspension/
Marche
Lecteur de carte
mémoire
Lampes témoin d’état
Appareil Photo
Panneau d’affichage
Boutons de
commande
Clavier
Périphérique
de pointage
TouchPad
Microphone
Le microphone intégré permet la réception et la transmission de données vocales et/ou d’autres
données audio à tout programme pouvant accepter une telle entrée.
Appareil Photo
L’appareil photo intégré de 0,3 ou 1,3 mégapixels vous permet de prendre une photo ou de créer
un chat vidéo ou une conférence vidéo en un clic.
Panneau d’affichage
Le panneau d’affichage est un panneau LCD couleur avec rétroéclairage pour l’affichage du texte
et des graphiques.
7
Page 56
ENGLISH
AVANT DE COMMENCER
Boutons de commande
Les boutons de commande permettent un accès rapide aux fonctions fréquemment utilisées. Les
boutons sont : Affichage désactivé, Limitation du CPU, Diminution du volume et Augmentation
du volume. Le bouton Affichage désactivé vous permet d’éteindre et de rallumer rapidement votre
affichage. Le bouton Limitation du CPU vous permet d’activer/désactiver la limitation du CPU
afin d’économiser l’énergie ou de réduire la quantité de chaleur générée par le CPU.
Clavier
Un clavier pleine taille avec les touches numériques et les touches dédiées de Windows®.
Périphérique de pointage TouchPad
Le périphérique de pointage TouchPad est un contrôle du curseur fonctionnant comme une souris
à deux boutons et un pavé tactile sensible aux mouvements.
FRANÇAIS
Lampes témoin d’état
Les lampes témoin d’état correspondent à des modes de traitement spécifiques. Ces modes sont:
Etat Batterie/Adaptateur CA, activité du disque dur (HDD) et activité LAN sans fil.
Lecteur de carte mémoire
Le lecteur de carte mémoire offre la méthode la plus récente et la plus pratique pour transférer des
photos, de la musique et des données entre votre notebook et des périphériques compatibles flash
DEUTSCH
tels que des appareils photo numériques, des lecteurs MP3, des téléphones mobiles et des PDA.
Bouton Suspension/Marche
Ce bouton allume et éteint votre notebook ou le met en veille. (Voir Bouton Suspension/Marche
dans la section Mise sous tension pour plus d’informations.)
ESPAÑOL
ITALIANO
8
Page 57

PRÉSENTATION DU CÔTÉ GAUCHE
Voici une brève description du côté gauche du notebook.
AVANT DE COMMENCER
Port HDMIPort du moniteur externe
Logement de
verrouillage
Kensington
Port d’adaptateur
d’alimentation
Port LAN (RJ-45)
Ports USB
Port d’adaptateur d’alimentation
Le port d’adaptateur d’alimentation vous permet de brancher un adaptateur d’alimentation CA
pour alimenter votre notebook et charger la batterie Lithium Ion interne.
Port du moniteur externe
Le moniteur externe vous permet de connecter un moniteur externe.
Port LAN (RJ-45)
Le port LAN est conçu pour prendre en charge une prise RJ-45 Base-T standard 10/100/1000.
Port HDMI
Le port HDMI vous permet de connecter un périphérique vidéo tel qu’une télévision, un projecteur,
ou un magnétoscope à votre ordinateur.
Ports USB
Les ports USB vous permettent de connecter des périphériques USB. Ils supportent la version
v3.0 de la norme USB, offrant des vitesses d’échange de données allant jusqu’à 4,8 Gb/s. Le port
USB droit supporte la fonctionnalité veille-et-charge. USB 3.0 est compatible avec USB 2.0.
9
Page 58

ENGLISH
AVANT DE COMMENCER
Logement de verrouillage Kensington
Le connecteur du verrouillage Kensington vous permet d’attacher votre notebook à un objet
inamovible à l’aide du câble de sécurité optionnel.
FRANÇAIS
DEUTSCH
ESPAÑOL
ITALIANO
10
Page 59

PRÉSENTATION DU CÔTÉ DROIT
Voici une brève description du côté droit du notebook.
AVANT DE COMMENCER
Prise casque
Prise Microphone
Témoin d’activité du lecteur optique
Ports USB
Lecteur optique
Bouton d’éjection du lecteur
optique
Ouverture de secours du tiroir
Prise Microphone
La prise microphone vous permet de connecter un microphone mono externe.
Prise casque
La prise casque vous permet de connecter des casques ou des haut-parleurs externes et des
amplificateurs.
Ports USB
Les ports USB vous permettent de connecter des périphériques USB. Ils supportent la version
v2.0 de la norme USB, offrant des vitesses d’échange de données allant jusqu’à 480 Mb/s.
Lecteur optique
Le lecteur optique vous permet de lire des disques média, tels que des CD et des DVD. Selon la
configuration de votre notebook, il peut aussi vous permettre de graver des CD et des DVD.
Témoin d’activité du lecteur optique
Cette lumière clignote pour indiquer l’activité quand l’ODD lit un disque média ou est en cours
d’accès par le système d’exploitation.
Bouton d’éjection du lecteur optique
Le bouton d’éjection du lecteur optique vous permet d’ouvrir le tiroir du lecteur optique pour
retirer ou insérer un DVD ou CD.
Ouverture de secours du tiroir
L’ouverture de secours du tiroir vous permet d’ouvrir le tiroir du lecteur optique sans allumer
votre notebook.
11
Page 60
ENGLISH
AVANT DE COMMENCER
PRÉSENTATION DE LA FACE ARRIÈRE
Vous trouverez ci-dessous une présentation de la face arrière du notebook.
FRANÇAIS
DEUTSCH
ESPAÑOL
ITALIANO
12
Page 61

VUE DE DESSOUS
Voici une présentation de la partie inférieure du notebook.
Baie de batterie Lithium Ion
Label de
contrôle
AVANT DE COMMENCER
Sorties de
ventilation
du
ventilateur
Couvercles des
compartiments
Haut-parleurs stéréo
Couvercles des
compartiments
Baie de batterie Lithium Ion
La baie de la batterie contient la batterie Lithium Ion interne. Elle peut être ouverte pour retirer la
batterie lors d’un stockage pour une période prolongée ou pour échanger une batterie déchargée
par une batterie Lithium Ion chargée.
Sorties de ventilation du ventilateur
Ce sont des ouvertures permettant au ventilateur de dissiper la chaleur provenant des composants
internes de l’ordinateur. Faites attention à ne pas obstruer les orifices de ventilation en installant
votre ordinateur.
Couvercles des compartiments
Le compartiment principal contient la carte LAN sans fil (Pas disponible dans toutes les
configurations), les modules de mémoire et le CPU. Le compartiment du disque dur contient le
disque dur interne. Vous devez d’abord retirer couvercle du compartiment principal avant de
pouvoir retirer le couvercle du compartiment du disque dur.
Label de contrôle
Le label indique le numéro du modèle et autres informations concernant votre notebook.
Haut-parleurs stéréo
Les haut-parleurs stéréo offrent un son stéréo.
13
Page 62

ENGLISH
MISE EN ROUTE
Sources d’alimentation
Votre ordinateur possède deux sources d’alimentation : une batterie Lithium-Ion et un adaptateur
CA.
CONNECTER L’ADAPTATEUR D’ALIMENTATION
L’adaptateur CA fournit l’alimentation pour faire fonctionner votre notebook et recharger la
batterie.
FRANÇAIS
Connexion de l’adaptateur CA
1. Branchez le câble de sortie CC dans la prise d’alimentation CC de votre notebook.
2. Branchez l’adaptateur CA à la prise de courant CA.
Passer de l’alimentation par adaptateur CA à l’alimentation par
batterie
1. Veillez à avoir au moins une batterie chargée d’installée.
DEUTSCH
ESPAÑOL
2. Retirez l’adaptateur CA. Votre notebook passera automatiquement de l’alimentation CC à
l’alimentation par batterie.
La batterie Lithium-Ion n’est pas chargée à l’achat. Lors de la première
utilisation, vous devrez connecter l’adaptateur CA pour utiliser votre notebook.
ITALIANO
14
Page 63

MISE EN ROUTE
RECHARGER LA BATTERI
La batterie Lithium-Ion est rechargée de façon interne à l’aide de l’adaptateur CA. Pour recharger
la batterie, vérifiez que la batterie est installée et que l’ordinateur est connecté à l’alimentation
CA.
Les batteries Lithium-Ion n’ont pas d’“effet mémoire”; vous n’avez donc pas à décharger
entièrement la batterie avant de la recharger. La durée de charge sera sensiblement plus longue si
vous utilisez votre notebook pendant le chargement de la batterie. Si vous voulez charger la
batterie plus rapidement, placez votre ordinateur en mode Veille ou éteignez-le pendant que
l’adaptateur recharge la batterie.
Batterie déchargée
Quand la batterie est déchargée, un message d’avertissement apparaît. Si vous ne répondez pas au
message de batterie faible, la batterie continue de se décharger jusqu’à ce qu’elle soit trop faible
pour opérer. Lorsque cela se produit, votre PC notebook passe en mode Suspendu. Il n’y a
aucune garantie que vos données seront sauvegardées une fois que le notebook atteint cet état.
Pour éviter d’endommager votre ordinateur, utilisez uniquement l’adaptateur
d’alimentation fourni avec celui-ci car chaque adaptateur d’alimentation possède
son propre étalonnage de sortie.
Remplacement de la batterie
Il y a risque d’explosion si la batterie est remplacée par un type de batterie non approprié. Pour
les ordinateurs équipés d’une batterie lithium-ion remplaçable, les règles suivantes s’appliquent :
• Si la batterie est placée dans une ZONE D’ACCÈS D’OPÉRATEUR, il devrait y avoir une
marque près de la batterie, ou une indication dans les instructions d’utilisation et d’entretien;
• Si la batterie est placée ailleurs dans l’ordinateur, il devrait y avoir une marque près de la
batterie ou une indication dans les instructions d’entretien.
La marque ou l’indication doivent comporter le texte suivant ou un texte similaire :
Il y a risque d’explosion si la batterie est remplacée par un type de batterie non
approprié. Eliminez les batteries usagées conformément aux instructions.
Quand votre notebook entre en mode Suspension du fait que la batterie est déchargée, vous ne
pourrez pas continuer à travailler avant d’avoir fourni une source d’alimentation provenant d’un
adaptateur, ou d’une batterie rechargée. Une fois que vous avez fourni l’alimentation, vous
pouvez appuyer sur le bouton Veille/Reprise pour reprendre l’utilisation. En mode Veille, vos
données sont conservées un certain temps, mais si vous ne fournissez pas rapidement une source
d’alimentation, l’indicateur d’Alimentation s’arrête de clignoter et s’éteint, et vous perdez les
données non enregistrées. Une fois que vous avez fourni l’alimentation, vous pouvez continuer à
utiliser votre ordinateur pendant que l’adaptateur recharge la batterie.
15
Page 64

ENGLISH
MISE EN ROUTE
Démarrer votre Notebook
MISE EN MARCHE
Bouton Suspension/Marche
Le commutateur de suspension/marche est utilisé pour allumer votre notebook quand il est éteint.
Une fois que vous avez connecté votre adaptateur CA ou rechargé la batterie Lithium-Ion interne,
vous pouvez allumer votre notebook en appuyant sur le bouton suspension/marche situé audessus du clavier. Si vous devez faire une pause prolongée, appuyez à nouveau sur le bouton pour
l’éteindre.
Ne déplacez pas votre notebook quand il est allumé, ou ne lui faites pas subir
des chocs ou des vibrations, cas vous risquez d’endommager son disque dur.
FRANÇAIS
Quand vous allumez votre notebook, il effectue un Auto-test de démarrage (POST) pour vérifier
que les parties internes et la configuration sont correctes. Si une erreur est trouvée, votre ordinateur
émet un son d’avertissement et/ou affiche un message d’erreur.
En fonction de la nature du problème, vous pourrez continuer en redémarrant le système
d’exploitation ou en entrant dans l’utilitaire de configuration du BIOS et en modifiant les paramètres.
DEUTSCH
Après l’exécution réussie de l’Auto-test de démarrage (POST), votre notebook charge le système
d’exploitation installé.
ESPAÑOL
ITALIANO
16
N’éteignez jamais votre notebook pendant l’Auto-test de démarrage (POST),
ou une erreur irrécupérable risque de se produire.
Page 65

MISE EN ROUTE
Témoins d’état
Les lampes témoin d’état correspondent à des modes de traitement spécifiques. Ces modes sont :
Marche/Veille, Batterie/Adaptateur CA, activité du disque dur (HDD), activité LAN sans fil,
Affichage désactivé et Limitation du CPU.
Témoin de Marche/
Témoin d’état de
Suspension
Témoin d’activité du
disque dur (HDD)
Témoin de
Batterie
Témoin d’activité de LAN sans fil
Indicateur d’état
Affichage désactivé
Indicateur d’état
Limitation du
CPU
Témoin de Marche
Ce voyant sur le bouton d’alimentation s’illumine lorsque l’ordinateur est mis sous tension.
Témoin d’état de Suspension
Cette lumière clignote quand l’ordinateur est en mode Suspension.
Témoin de Batterie
La lampe témoin de Batterie vous indique si la batterie Lithium Ion est en train de se charger ou si
elle est déjà entièrement rechargée.
• Si vous rechargez votre batterie, la lampe témoin de batterie reste allumée même si votre
notebook est éteint.
• S’il n’y a pas d’activité de batterie, si les adaptateurs d’alimentation ne sont pas connectés, ou
si le commutateur d’alimentation est sur la position Eteint, la lampe témoin de batterie sera
aussi éteint.
• Les batteries soumises à des chocs, des vibrations ou des températures extrêmes peuvent être
irrémédiablement endommagées.
17
Page 66

ENGLISH
MISE EN ROUTE
Témoin d’activité du disque dur (HDD)
Le témoin d’activité du disque dur (HDD) vous indique si votre disque dur interne est en cours
d’accès et, si c’est le cas, à quelle vitesse.
Témoin d’activité de LAN sans fil
Le témoin d’activité de LAN sans fil vous indique si votre ordinateur est connecté ou non à un
réseau sans fil.
Indicateur d’état Affichage désactivé
Lorsque le bouton Affichage désactivé est enfoncé, le voyant sur le bouton s’illumine en couleur
ambre.
Indicateur d’état Limitation du CPU
FRANÇAIS
Lorsque le bouton Limitation du CPU est enfoncé, le voyant sur le bouton s’illumine en couleur
ambre.
DEUTSCH
ESPAÑOL
ITALIANO
18
Page 67

MISE EN ROUTE
Utilisation des touches de fonction
Votre ordinateur possède 12 touches de fonction, F1 à F12. Les fonctions attribuées à ces touches
diffèrent pour chaque application. Vous devez vous reporter à la documentation de votre logiciel
pour découvrir comment ces touches sont utilisées.
La touche [FN] offre des fonctions étendues pour le notebook et est toujours utilisée
conjointement avec une autre touche.
• [FN+F1]: Met le notebook en mode Suspension. Appuyer sur le bouton d’alimentation
pour le rétablir en mode actif.
• [FN+F2]: Active ou désactive la connexion réseau sans fil.
• [FN+F3]: Vous permet de changer votre sélection de l’endroit où envoyer votre vidéo
d’affichage. Chaque fois que vous appuyez sur la combinaison de touches vous passez au
choix suivant. Les choix, dans l’ordre, sont : panneau d’affichage intégré seulement, à la fois
le panneau d’affichage intégré et le moniteur externe, ou moniteur externe seulement.
• [FN+F4]: Diminue la luminosité de l’écran.
• [FN+F5]: Augmente la luminosité de l’écran.
• [FN+F6]: Désactive le volume de l’ordinateur.
• [FN+F7]: Diminue le volume de l’ordinateur.
• [FN+F8]: Augmente le volume de l’ordinateur..
• [FN+F9]: Lit ou met en pause la piste multimédia en cours.
• [FN+F10]: Arrête la piste multimédia en cours.
• [FN+F11]: Va à la piste multimédia précédente.
• [FN+F12]: Va à la piste multimédia suivante.
• [FN+Esc]: Active ou désactive la fonction TouchPad.
19
Page 68
ENGLISH
MISE EN ROUTE
Utilisation du TouchPad
Un dispositif de pointage TouchPad est intégré à votre ordinateur. Il est utilisé pour contrôler le
mouvement du pointeur pour sélectionner les éléments sur votre panneau d’affichage.
Le TouchPad est composé d’un contrôle du curseur, un bouton gauche et droit, et une barre de
défilement. Le contrôle du curseur fonctionne de la même façon que celui d’une souris, et déplace
le curseur sur l’affichage. Il nécessite seulement une légère pression du bout du doigt. Les boutons
gauche et droit fonctionnent de la même façon que les boutons d’une souris. La fonctionnalité
effective des boutons peut varier en fonction de l’application utilisée. Enfin, la barre de défilement
vous permet de parcourir rapidement les pages, sans avoir à utiliser le curseur à l’écran pour
manipuler les barres de défilement haut et bas.
FRANÇAIS
DEUTSCH
Cliquer
Cliquer signifie appuyer sur un bouton et le relâcher. Pour faire un clic gauche, déplacez le curseur
sur l’élément que vous désirez sélectionner, appuyez une fois sur le bouton gauche, et relâchezle immédiatement. Pour faire un clic droit, déplacez le curseur sur l’élément que vous désirez
sélectionner, appuyez une fois sur le bouton droit, et relâchez-le immédiatement. Vous avez aussi
la possibilité d’effectuer le clic en tapant légèrement une fois sur le TouchPad.
Double-cliquer
Double cliquer signifie appuyer et relâcher deux fois le bouton gauche en succession rapide. Cette
ESPAÑOL
procédure ne fonctionne pas avec le bouton droit. Pour faire un double clic, déplacez le curseur
sur l’élément que vous désirez sélectionner, appuyez deux fois sur le bouton gauche, et relâchezle immédiatement. Vous avez aussi la possibilité d’effectuer le double clic en tapant légèrement
deux fois sur le TouchPad.
Faire glisser
Faire glisser signifie appuyer sur le bouton gauche et le maintenir enfoncé, tout en déplaçant le
curseur. Pour faire glisser, déplacez le curseur sur l’élément que vous désirez déplacer. Appuyez
sur le bouton gauche et maintenez-le enfoncé tout en déplaçant l’élément à son nouvel emplacement et relâchez-le ensuite. Faire glisser peut aussi être effectué à l’aide du TouchPad. D’abord,
tapez deux fois sur le TouchePad au-dessus de l’élément que vous désirez déplacer en prenant soin
ITALIANO
de laisser votre doigt sur le pavé tactile après le taper final. Ensuite, déplacez l’objet à son nouvel
emplacement en déplaçant votre doigt sur le TouchPad, et en relâchant ensuite la pression de votre
doigt. Le fait d’utiliser la barre de défilement vous permet de parcourir rapidement un document
sans utiliser les barres de défilement de la fenêtre. Ceci est particulièrement utile quand vous
parcourez des pages en ligne.
20
Page 69
MISE EN ROUTE
Mise à niveau du module mémoire
Pour augmenter la capacité de la mémoire de votre notebook (jusqu’à 8 Go maximum), des
modules mémoire supplémentaires peuvent être installés. L’extension de la mémoire doit être un
module SDRAM dual-in-line (DIMM).
Installer un module mémoire
Les étapes suivantes décrivent comment installer un module de mise à niveau de la mémoire. Nous
ne vous conseillons pas de le faire vous-même.
1. Eteignez votre notebook à l’aide de l’interrupteur d’alimentation, débranchez l’adaptateur
d’alimentation, et/ou retirez la batterie.
2. Placez votre notebook à l’envers sur une surface de travail propre.
3. Ouvrez le verrou de la batterie. Faites
glisser et maintenez le loquet en position
ouverte et de l’autre main faites glisser le
couvercle du compartiment de la
mémoire vers l’avant du système. Une
fois le couvercle est libéré des pattes de
fixation, enlevez-le du système.
4. Le module mémoire peut être gravement
endommagé par les décharges
électrostatiques (ESD). Vérifiez que vous
êtes correctement raccordé à la terre quand
vous manipulez et installez le module.
5. Alignez le bord du connecteur du module
mémoire, puce vers le haut, avec le logement du connecteur dans le compartiment.
6. Insérez le module mémoire dans un angle de 45° et appuyez fermement celui-ci sur le connecteur.
7. Enfoncez sur le module mémoire dans le compartiment jusqu’à ce qu’il se verrouille dans les clips
de maintient situés de chaque côté. Vous entendez un clic quand il est correctement en place.
8. Remettez le couvercle et faites-le glisser vers l’arrière du système jusqu’à ce qu’il s’enclenche.
L’installation du nouveau module de mémoire est maintenant terminée.
Le module mémoire n’est pas quelque chose que vous retirez régulièrement de votre notebook.
Une fois qu’il est installé, vous devez le laisser en place à moins que vous ne vouliez augmenter
la capacité mémoire du système.
21
Page 70

ENGLISH
DÉPANNAGE
Votre notebook est robuste et présente rarement de problèmes dans ce domaine. Cependant, vous
pouvez rencontrer de simples problèmes de configuration ou d’utilisation que vous pouvez
résoudre sur place, ou des problèmes avec des périphériques, que vous pouvez résoudre en
remplaçant le périphérique. Les informations contenues dans cette section vous aident à isoler et
résoudre certains de ces problèmes simples et à identifier les pannes qui nécessitent une réparation.
Identifier le problème
Si vous rencontrez un problème, effectuez tout d’abord la procédure suivante avant de vous lancer
FRANÇAIS
DEUTSCH
dans un dépannage complexe.
1. Eteignez votre notebook.
2. Vérifiez que l’adaptateur CA est branché à votre notebook et à une source d’alimentation CA.
3. Vérifiez que toute carte installée dans le logement de Carte du PC est correctement en place.
Vous pouvez aussi retirer la carte du logement, éliminant ainsi un problème possible de panne.
4. Vérifiez que les périphériques connectés aux connecteurs externes sont correctement branchés.
Vous pouvez aussi déconnecter ces périphériques, éliminant ainsi les causes possibles de
panne.
5. Allumez votre notebook. Assurez-vous qu’il est resté éteint au moins 10 secondes avant de le
rallumer.
6. Effectuez la séquence de démarrage.
7. Si le problème n’a pas été résolu, contactez votre représentant de l’assistance technique.
Avant d’appeler, vous devez préparer les informations suivantes afin que le représentant
d’assistance technique puisse vous fournir la solution la plus rapide possible :
• Nom du produit
ESPAÑOL
ITALIANO
• Numéro de configuration du produit
• Numéro de série du produit
• Date d’achat
• Conditions dans lesquelles le problème s’est produit
• Tout message d’erreur ayant apparu
• Configuration matérielle
• Type de périphérique connecté, le cas échéant
Voir l’étiquette de configuration sous votre notebook pour connaître les numéros de configuration
et de série.
22
Page 71

MEMO
Déclaration de Conformité de la Commission Fédérale des
Communications (FCC)
Ce matériel est conforme à l’Article 15 des Règlements FCC. L’utilisation de cet appareil est
soumise aux deux conditions suivantes :
(1) Cet appareil ne doit pas générer d’interférences nuisibles.
(2) Cet appareil doit accepter toutes les interférences reçues, y compris celles pouvant provoquer
un fonctionnement indésirable.
Tous les changements ou modifications (y compris les antennes) apportés à cet appareil n’ayant
pas été expressément approuvés par le fabricant peuvent priver l’utilisateur du droit de faire
fonctionner l’équipement. Déclaration de la FCC relative à l’exposition aux radiations RF : Cet
équipement est conforme aux limites d’exposition aux radiations RF de la FCC établies pour un
environnement non contrôlé. Cet appareil et son antenne ne doivent pas être installés à proximité
ou fonctionner conjointement avec toute autre antenne ou émetteur. Ce matériel a été testé et
déclaré conforme aux normes des appareils numériques de Classe B, conformément à la partie 15
du Règlement de la FCC. Ces limites sont conçues pour fournir une protection raisonnable contre
les interférences nuisibles dans une installation résidentielle.
Cet équipement génère, utilise et peut émettre des fréquences radio et, s’il n’est pas installé et
utilisé conformément aux instructions, peut causer des interférences nuisibles aux communications radio. Cependant, il n’existe aucune garantie que des interférences ne se produiront pas dans
une installation particulière. Si cet équipement provoque des interférences nuisibles à la réception
radio ou de télévision, qui peut être déterminé en mettant l’équipement hors tension, l’utilisateur
est encouragé à essayer de corriger l’interférence par une ou plusieurs des mesures suivantes :
• Réorienter ou déplacer l’antenne de réception.
• Augmenter la distance entre l’appareil et le récepteur.
• Brancher l’appareil dans une prise sur un circuit différent de celui auquel le récepteur est
branché.
• Consulter le vendeur ou un technicien radio/TV expérimenté.
Déclaration de la FCC relative à l’exposition aux radiations RF :
1. Cet émetteur ne doit pas être installé à proximité ni utilisé conjointement avec toute autre
antenne ou émetteur.
2. Cet équipement est conforme aux limites d’exposition aux radiations RF de la FCC établies
pour un environnement non contrôlé. Pour conserver la conformité avec les exigences de
conformité d’exposition RF de la FCC, évitez tout contact direct avec l’antenne de transmission
pendant la transmission.
23
Page 72

MEMO
Page 73

BENUTZERHANDBUCH
DEUTSCH
März 2012
Page 74

ENGLISH
INHALT
ZUM BEGINN .......................................................................................................... 5
Überprüfen der Lieferung auf Vollständigkeit .............................................................. 5
Lernen Sie das Notebook kennen ................................................................................. 6
ÖFFNEN DES BILDSCHIRMS .................................................................................... 6
VORDERSEITE .......................................................................................................... 7
LINKE SEITE .............................................................................................................. 9
RECHTE SEITE ........................................................................................................ 11
RÜCKSEITE ............................................................................................................. 12
FRANÇAIS
DEUTSCH
UNTERSEITE ........................................................................................................... 13
ERSTE SCHRITTE ................................................................................................ 14
Stromversorgung .......................................................................................................... 14
ANSCHLIESSEN DES NETZADAPTER ................................................................... 14
WIEDERAUFLADEN DES AKKUS ............................................................................ 15
Einschalten des Notebooks ......................................................................................... 16
EINSCHALTEN ......................................................................................................... 16
Statusanzeigen ......................................................................................................... 17
Die Funktionstasten ................................................................................................. 19
Benutzen des TouchPads ........................................................................................ 20
Aufrüsten des Speichermoduls .............................................................................. 21
FEHLERBEHEBUNG ............................................................................................. 22
Identifizieren eines Problems ...................................................................................... 22
ESPAÑOL
ITALIANO
2
Page 75

PFLEGE DES NOTEBOOKS
Achten Sie darauf, dass die Lüftungsöffnungen
nicht verdeckt werden, um eine Überhitzung des
Prozessors zu vermeiden.
Legen Sie das Notebook NICHT auf unebene oder
wacklige Unterlagen.
Stellen oder legen Sie KEINE Gegenstände auf
das Notebook, und lassen Sie nichts darauf fallen.
Üben Sie KEINE Gewalt auf das Gerät aus.
Drücken Sie NICHT auf den Bildschirm.
Verwenden Sie das Notebook NICHT bei
extremen Umgebungsbedingungen.
Setzen Sie das Notebook KEINEN Magnetfeldern
aus.
Setzen Sie das Notebook KEINEM direkten
Sonnenlicht aus.
Setzen Sie das Notebook NICHT extremen
Temperaturen aus.
3
Page 76
ENGLISH
Vermeiden Sie plötzliche Veränderungen von
Temperatur und Luftfeuchtigkeit, und stellen Sie
das Notebook nicht in die Nähe von Adaptern
und Lüftungsöffnungen anderer Geräte.
FRANÇAIS
Stellen Sie das Notebook NICHT in der Nähe
von Feuer und anderen Wärmequellen auf.
DEUTSCH
Setzen Sie das Notebook NICHT Staub und/oder
korrosiven Chemikalien aus.
ESPAÑOL
Setzen Sie das Notebook NICHT Regen und
Feuchtigkeit aus.
Versuchen Sie NICHT, den Akku zu manipulieren.
Halten Sie ihn außerhalb der Reichweite von
Kindern.
Schlagen Sie das Notebook NICHT zu, und heben
Sie es nicht am Bildschirm hoch.
Sprühen Sie KEIN Wasser oder andere
ITALIANO
Reinigungsflüssigkeiten direkt auf den Bildschirm.
4
Wenn Sie das Notebook auf Reisen mitnehmen,
achten Sie darauf, es als Handgepäck
mitzunehmen. Checken Sie es nicht mit dem
anderen Gepäck ein.
Page 77

ZUM BEGINN
Überprüfen der Lieferung auf Vollständigkeit
Wenn Sie das Notebook erhalten haben, packen Sie es vorsichtig aus, und überprüfen Sie, ob alle
nachfolgend aufgeführten Teile enthalten sind. Bei einem vorkonfigurierten Modell sollten die
folgenden Teile dabei sein:
• Notebook
• Lithium-Ionen-Akku
• AC-Netzadapter mit Netzkabel
• Treiber- und Programm-CD
• Kurzanleitung oder Benutzerhandbuch
Je nach Konfiguration des Notebooks ist es möglich, dass noch die folgenden Teile benötigt
werden:
• Programm-CD für das DVD+/-RW-Laufwerk
• Super Multi DVD RW Anwendungs-CD
• Blu-ray/DVD RW-Anwendungsdisc
Wenn Sie sichergestellt haben, dass das Notebook-System vollständig ist, lesen Sie sich die
folgenden Seiten durch, um alles über die Komponenten des Notebooks zu erfahren.
Je nachdem, welches Modell Sie erworben haben, kann Ihr Notebook von dem
in diesem Benutzerhandbuch abgebildeten Notebook abweichen.
5
Page 78

ENGLISH
ZUM BEGINN
Lernen Sie das Notebook kennen
ÖFFNEN DES BILDSCHIRMS
Um mit dem Gerät zu arbeiten, klappen Sie einfach den Deckel hoch.
Achten Sie beim Schließen darauf, dass der Deckel nicht zugeknallt wird.
FRANÇAIS
DEUTSCH
ESPAÑOL
ITALIANO
6
Page 79

VORDERSEITE
Hier sehen Sie eine Ansicht des Notebooks von vorne.
ZUM BEGINN
Mikrofon
Taste Suspend/
Wiederaufnahme
Speicherkartenleser
Statusanzeigelampen
Kamera
Bildschirm
Bedientasten
Tastatur
TouchPadZeigegerät
Mikrofon
Alle eingehenden Sprach- und/oder sonstige Audiodaten können hier über ein entsprechendes
Programm aufgenommen werden.
Kamera
Mit der integrierten 0,3- oder 1,3-Megapixelkamera können Sie mit nur einem Klick Fotos machen
oder einen Videochat oder eine Videokonferenz starten.
Bildschirm
Beim Bildschirm handelt es sich um einen LCD-Farbmonitor mit Hintergrundbeleuchtung. Auf
ihm werden die Texte und Grafiken angezeigt.
7
Page 80

ENGLISH
ZUM BEGINN
Bedientasten
Mit den Bedientasten haben Sie einen schnellen Zugriff auf häufig verwendete Funktionen.
Bedientasten: Monitor Ein/Aus, CPU-Drossel, Lautstärke erhöhen/verringern. Mit der Monitor
Ein/Aus-Taste können Sie den Monitor ein- und ausschalten. Mit der CPU-Drossel können Sie
die CPU-Drossel aktivieren/deaktivieren, damit die CPU weniger Strom verbraucht oder weniger
Wärme erzeugt.
Tastatur
Eine Volltastatur mit Zifferntasten und speziellen Windows®-Tasten.
TouchPad-Zeigegerät
Beim TouchPad handelt es sich um eine mausähnliche Einrichtung zur Steuerung des Cursors mit
zwei Tasten (Links, Rechts und zwei Scroll-Tasten) und einem berührungsempfindlichen
FRANÇAIS
Bewegungsfeld.
Statusanzeigelampen
Die Statusanzeigelampen entsprechen den spezifischen Betriebsmodi. Diese Modi sind: Betriebs-/
Suspend-Status, Batterie-/Netzadapterstatus, Festplattenaktivität (HDD) und Wireless-LANAktivität.
Speicherkartenleser
DEUTSCH
Der Speicherkartenleser bietet die schnellste und bequemste Möglichkeit, Bilder, Musik und
Daten zwischen Ihrem Notebook und anderen Flash-kompatiblen Geräten wie Digitalkameras,
MP3-Playern, Handys oder PDAs zu übertragen.
Taste Suspend/Wiederaufnahme
Mit dieser Taste schalten Sie das Notebook ein, aus und in den Ruhezustand. (Weitere Informationen
dazu finden Sie im Abschnitt Einschalten unter Taste Suspend/Wiederaufnahme.)
ESPAÑOL
ITALIANO
8
Page 81

LINKE SEITE
Hier folgt eine kurze Beschreibung der linken Seite des Notebooks.
ZUM BEGINN
HDMI-AnschlussAnschluss für externen Monitor
Öffnung für
Kensington-Schloss
Netzadapteranschluss
LAN-Port (RJ-45)
USB-Anschlüsse
Netzadapteranschluss
Hier wird der AC-Netzadapter für die Stromversorgung des Notebooks und das Aufladen des
eingesetzten Lithium-Ionen-Akkus angeschlossen.
Anschluss für externen Monitor
An diesen Anschluss kann ein externer Monitor angeschlossen werden.
LAN-Port (RJ-45)
Der LAN-Port ist für einen RJ-45-Stecker für den Standard 10/100/1000 Base-T vorgesehen.
HDMI-Anschluss
An den HDMI-Anschluss können Sie ein Videogerät wie etwa ein Fernsehgerät, einen Projektor
oder einen Videorekorder an das Notebook anschließen.
USB-Anschlüsse
An die USB-Anschlüsse können USB-Geräte angeschlossen werden. Sie unterstützen den
USB-Standard v3.0 mit Datenübertragungsraten von bis zu 4,8 Gb/s. Der USB-Port an der rechten
Seite unterstützt die Schlaf- und Ladefunktion. USB 3.0 ist rückwärts kompatibel mit USB 2.0.
9
Page 82

ENGLISH
ZUM BEGINN
Öffnung für Kensington-Schloss
Mit Hilfe des Stahlkabels des Kensington-Schlosses können Sie das Notebook an einem festen
Gegenstand befestigen und sichern.
FRANÇAIS
DEUTSCH
ESPAÑOL
ITALIANO
10
Page 83
RECHTE SEITE
Hier folgt eine kurze Beschreibung der rechten Seite des Notebooks.
ZUM BEGINN
Kopfhöreranschluss
Mikrofonanschluss
USB-Anschlüsse
Anzeige für Aktivität des
optischen Laufwerks
Optisches Laufwerk
Auswurftaste des
optischen Laufwerks
Notauswurföffnung
Mikrofonanschluss
An den Mikrofonanschluss können Sie ein externes Mono-Mikrofon anschließen.
Kopfhöreranschluss
An den Kopfhöreranschluss können Sie Kopfhörer oder externe Lautsprecher und Verstärker
anschließen.
USB-Anschlüsse
An die USB-Anschlüsse können Sie USB-Geräte anschließen. Sie unterstützen den USB-Standard
v2.0 mit Datenübertragungsraten von bis zu 480 Mb/s.
Optisches Laufwerk
Mit Hilfe des optischen Laufwerks können Sie Medien-Discs wie CDs und DVDs abspielen. Bei
bestimmten Notebookkonfigurationen können Sie damit auch CDs und DVDs brennen.
Anzeige für Aktivität des optischen Laufwerks
Diese Anzeige leuchtet bei Aktivität des Laufwerks, wenn auf dem optischen Laufwerk eine Disc
abgespielt wird oder wenn das Betriebssystem darauf zugreift.
Auswurftaste des optischen Laufwerks
Drücken Sie auf die Auswurftaste des optischen Laufwerks, um das optische Laufwerk zu öffnen,
wenn Sie eine DVD oder CD einlegen möchten.
Notauswurföffnung
Mit Hilfe der Notauswurföffnung können Sie das optische Laufwerk auch bei ausgeschaltetem
Notebook öffnen.
11
Page 84
ENGLISH
ZUM BEGINN
RÜCKSEITE
Hier sehen Sie eine Ansicht des Notebooks von hinten.
FRANÇAIS
DEUTSCH
ESPAÑOL
ITALIANO
12
Page 85
UNTERSEITE
Hier sehen Sie eine Ansicht des Notebooks von unten.
ZUM BEGINN
Konfigurationsetikett
Abgedeckte
Kartensteckpläte
Fach für den Lithium-Ionen-Akku
Stereo-Lautsprecher
Lüftungsöffnungen
Abgedeckte
Kartensteckpläte
Fach für den Lithium-Ionen-Akku
Das Akkufach enthält den Lithium-Ionen-Akku. Das Fach kann geöffnet werden, um den Akku zu
entnehmen, wenn das Notebook z.B. über einen längeren Zeitraum nicht benutzt wird oder wenn
ein entladenen Akku durch einen gefüllten ersetzt wird.
Lüftungsöffnungen
Diese Lüftungsöffnungen dienen als Auslass für die heiße Luft, die der Lüfter zum Kühlen der
Bauteile im Innern nach außen befördert. Legen Sie das Notebook immer so hin, dass die
Lüftungsöffnungen nicht verdeckt werden.
Abgedeckte Kartensteckpläte
Das Hauptfach enthält die Wireless LAN-Karte (nicht bei allen Konfigurationen verfügbar), die
Speichermodule und die CPU. Im Festplattenfach befindet sich die interne Festplatte. Das
Festplattenfach kann erst geöffnet werden, wenn Sie den Deckel des Hauptfachs entfernt haben.
Konfigurationsetikett
Auf dem Konfigurationsetikett sind die Modellnummer und andere Informationen über das Notebook verzeichnet.
Stereo-Lautsprecher
Die zwei eingebauten Lautsprecher geben Stereoton aus.
13
Page 86

ENGLISH
ERSTE SCHRITTE
Stromversorgung
Das Notebook kann auf zwei Arten mit Strom versorgt werden: mit einem Lithium-Ionen-Akku
oder einem AC-Netzadapter, der an das Stromnetz angeschlossen wird.
ANSCHLIESSEN DES NETZADAPTER
Der AC-Netzadapter versorgt das Notebook mit Strom und lädt gleichzeitig den Akku, wenn
dieser sich im Notebook befindet.
FRANÇAIS
Anschließen des AC-Netzadapters
1. Schließen Sie das DC-Kabel an die DC-Netzanschlussbuchse des Notebooks an.
2. Verbinden Sie den AC-Netzadapter mit einer Netzsteckdose.
Wechseln zwischen Netzstrom und Akkustrom
1. Stellen Sie sicher, dass der eingesetzte Akku geladen ist.
2. Trennen Sie den AC-Netzadapter ab. Das Notebook wechselt automatisch zur Stromversorgung
über den Akku.
DEUTSCH
ESPAÑOL
Der Lithium-Ionen-Akku ist beim Kauf nicht geladen. Wenn Sie also das Notebook benutzen möchten, muss es zunächst mit Netzstrom versorgt werden.
ITALIANO
14
Page 87
ERSTE SCHRITTE
WIEDERAUFLADEN DES AKKUS
Der Lithium-Ionen-Akku wird im Gerät aufgeladen, wenn das Notebook an eine Netzsteckdose
angeschlossen ist. Wenn Sie also den Akku aufladen möchten, muss sich dieser im Notebook
befinden, und das Notebook muss an das Stromnetz angeschlossen sein.
Bei Lithium-Ionen-Akkus tritt kein “Memory-Effekt” auf, so dass Sie den Akku vor dem
Neuaufladen nicht erst vollständig entladen müssen. Die Ladedauer ist bedeutend länger, wenn Sie
während des Ladevorgangs mit dem Notebook arbeiten. Der Akku wird schneller aufgeladen, wenn
sich das Notebook im Suspend-Modus befindet oder ausgeschaltet ist.
Niedriger Akkuladestand
Wenn der Akkuladestand sehr niedrig ist, erscheint eine entsprechende Meldung. Nachdem die
Akkuwarnung erschienen ist, läuft das Gerät so lange weiter, bis die Ladung für einen weiteren
Betrieb nicht mehr ausreicht. In diesem Fall wechselt das Notebook in den Suspend-Modus.
Wenn das Notebook diesen Punkt erreicht hat, ist eine Datenspeicherung nicht mehr sicher.
Verwenden Sie nur den Netzadapter, den Sie zusammen mit dem Notebook
erhalten haben, da dieser genau die benötigten Ausgabestromwerte hat. Wenn
Sie andere Netzadapter verwenden könnte das Notebook beschädigt werden.
Auswechseln des Akkus
Wenn ein falscher Akkutyp verwendet wird, besteht Explosionsgefahr. Computer, die mit einem
austauschbaren Lithium-Ionen-Akku ausgestattet sind, trifft folgendes zu:
• Wenn sich der Akku in einem OPERATOR ACCESS AREA (Betreiber-Zugriffsbereich)
befindet, muss sich nahe beim Akku eine Kennzeichnung oder ein Hinweis zu Betrieb und
Reparatur befinden;
• Befindet sich der Akku an einem anderen Ort im Computer, muss sich nahe beim Akku eine
Kennzeichnung oder ein Hinweis zu Betrieb und Reparatur befinden.
Auf der Kennzeichnung oder dem Hinweis sollte sich der folgende oder ein ähnlicher Text befinden:
Bei Verwendung eines falschen Akkutyps besteht Explosionsgefahr. Entsorgen
Sie Akkus entsprechend den Anweisungen.
Wenn das Notebook aufgrund niedriger Akkuladung in den Suspend-Modus versetzt wurde, kann
er erst wieder gestartet werden, wenn er entweder über den Netzadapter an das Stromnetz
angeschlossen, oder wenn ein geladener Akku eingesetzt wird. Sobald das Gerät wieder mit Strom
versorgt wird, können Sie es durch Drücken auf die Taste Suspend/Wiederaufnahme wieder starten.
Im Suspend-Modus werden die Daten einige Zeit lang gespeichert. Wenn das Gerät aber nicht bald
wieder mit Strom versorgt wird, wird das Gerät abgeschaltet, die Stromanzeigelampe geht aus, und
alle Daten, die nicht gespeichert wurden, gehen verloren. Wenn Sie das Gerät über das Stromnetz
mit Strom versorgen, können Sie mit dem Notebook arbeiten, während gleichzeitig der Akku neu
geladen wird.
15
Page 88
ENGLISH
ERSTE SCHRITTE
Einschalten des Notebooks
EINSCHALTEN
Taste Suspend/Wiederaufnahme
Ist das Notebook ausgeschaltet, müssen Sie auf die Taste Suspend/Wiederaufnahme drücken, um
es einzuschalten. Das Notebook kann eingeschaltet werden, wenn es mit dem AC-Netzadapter an
das Stromnetz angeschlossen oder über den internen Lithium-Ionen-Akku mit Strom versorgt
wird. Drücken Sie zum Einschalten auf die Taste Suspend/Wiederaufnahme, die sich oberhalb der
Tastatur befindet. Wenn Sie eine längere Arbeitspause machen, drücken Sie noch einmal auf diese
Taste um das Notebook auszuschalten.
Das Notebook darf nicht in eingeschaltetem Zustand transportiert und Stößen
FRANÇAIS
Wenn Sie das Notebook einschalten, wird zunächst ein POST-Test (Power On Self Test) ausgeführt,
bei dem überprüft wird, ob alle Bauteile und Konfigurationen einwandfrei funktionieren. Wird ein
Fehler gefunden, ertönt ein Warnsignal und/oder es wird eine Fehlermeldung angezeigt.
oder Vibrationen ausgesetzt werden, da dabei die Festplatte beschädigt werden
kann.
DEUTSCH
ESPAÑOL
ITALIANO
Je nach Art des Problems können Sie einfach fortfahren, indem Sie das Betriebssystem starten,
oder Sie müssen in das BIOS-Programm gehen, um die entsprechenden Einstellungen zu ändern.
Nach erfolgreichem Abschluss des POST-Tests wird das installierte Betriebssystem geladen.
16
Schalten Sie das Notebook niemals während des POST-Tests aus, da dadurch
nicht behebbare Fehler auftreten können.
Page 89

ERSTE SCHRITTE
Statusanzeigen
Die Statusanzeigelampen entsprechen den spezifischen Betriebsmodi. Diese Modi werden angezeigt:
Betriebs-/Ruhestatus, Akku-/Netzadapterstatus, Festplattenaktivität (HDD), WLAN-Aktivität,
Monitor Aus-Status und CPU-Drosselstatus.
Einschaltanzeige/
Suspendstatus-Anzeige
Anzeige für
Festplattenaktivität (HDD)
Akkuanzeige
Anzeige für LAN-Aktivität
Monitor Aus-Statusanzeige
CPU-Drosselstatusanzeige
Einschaltanzeige
Diese Lampe an der Ein/Aus-Taste leuchtet, wenn das Notebook eingeschaltet wird.
Suspendstatus-Anzeige
Diese Lampe blinkt, wenn sich das Notebook im Suspend-Modus befindet.
Akkuanzeige
Anhand der Akkuanzeige können Sie erkennen, ob der Lithium-Ionen-Akku gerade geladen wird
oder ob er bereits voll geladen ist.
• Während des Ladevorgangs leuchtet die Akkuanzeige auch dann weiter, wenn Sie das Notebook
ausgeschaltet haben.
• Die Akkuanzeige ist auch dann ausgeschaltet, wenn der Akku nicht aktiv ist, wenn der
Netzadapter nicht angeschlossen ist oder wenn das Notebook ausgeschaltet ist.
• Wenn Akkus Stößen, Vibrationen und extremen Temperaturen ausgesetzt werden, können sie
dauerhaft beschädigt werden.
17
Page 90

ENGLISH
ERSTE SCHRITTE
Anzeige für Festplattenaktivität (HDD)
An dieser Anzeige können Sie erkennen, ob und mit welcher Geschwindigkeit das System gerade
auf die Festplatte zugreift.
Anzeige für LAN-Aktivität
An der Wireless-LAN-Anzeige können Sie erkennen, ob das Notebook an ein drahtloses Netzwerk
angeschlossen ist.
Monitor Aus-Statusanzeige
Wenn Sie auf die Monitor Aus-Taste drücken, leuchtet die Anzeige orangerot.
CPU-Drosselstatusanzeige
FRANÇAIS
Wenn Sie auf die CPU-Drossel-Taste drücken, leuchtet die Anzeige orangerot.
DEUTSCH
ESPAÑOL
ITALIANO
18
Page 91

ERSTE SCHRITTE
Die Funktionstasten
Das Notebook verfügt über 12 Funktionstasten, Taste F1 bis F12. Je nach Programm sind die
Funktionen, die diesen Tasten zugewiesen sind, unterschiedlich. In der Software-Dokumentation
finden Sie die Funktionen der jeweiligen Tasten.
Die Taste [FN] bietet dem Notebook zusätzliche Funktionen und wird immer zusammen mit einer
anderen Taste gedrückt.
• [FN+F1]: Versetzt das Notebook in den Suspend-Modus. Durch Drücken der Ein/AusTaste wird das Notebook wieder aktiviert.
• [FN+F2]: Aktiviert bzw. deaktiviert die Drahtlosnetzwerkverbindung.
• [FN+F3]: Hier wird festgelegt, auf welchem Gerät das Bild angezeigt werden soll. Bei jedem
Drücken dieser Tastenkombination wird die nächste Option angezeigt. Die Reihenfolge ist:
nur eingebauter Monitor, eingebauter Monitor und externer Monitor, nur externer Monitor.
• [FN+F4]: Verringert die Helligkeit des Bildschirms.
• [FN+F5]: Erhöht die Helligkeit des Bildschirms.
• [FN+F6]: Stellt den Ton des Computers aus.
• [FN+F7]: Verringert die Lautstärke des Computers.
• [FN+F8]: Erhöht die Lautstärke des Computers.
• [FN+F9]: Startet die Wiedergabe bzw. unterbricht die Wiedergabe des aktuellen Multimedia-Tracks.
• [FN+F10]: Stoppt die Wiedergabe des aktuellen Multimedia-Tracks.
• [FN+F11]: Wechselt zum vorhergehenden Multimedia-Track.
• [FN+F12]: Wechselt zum nächsten Multimedia-Track.
• [FN+Esc]: Aktiviert bzw. deaktiviert die TouchPad-Funktion.
19
Page 92
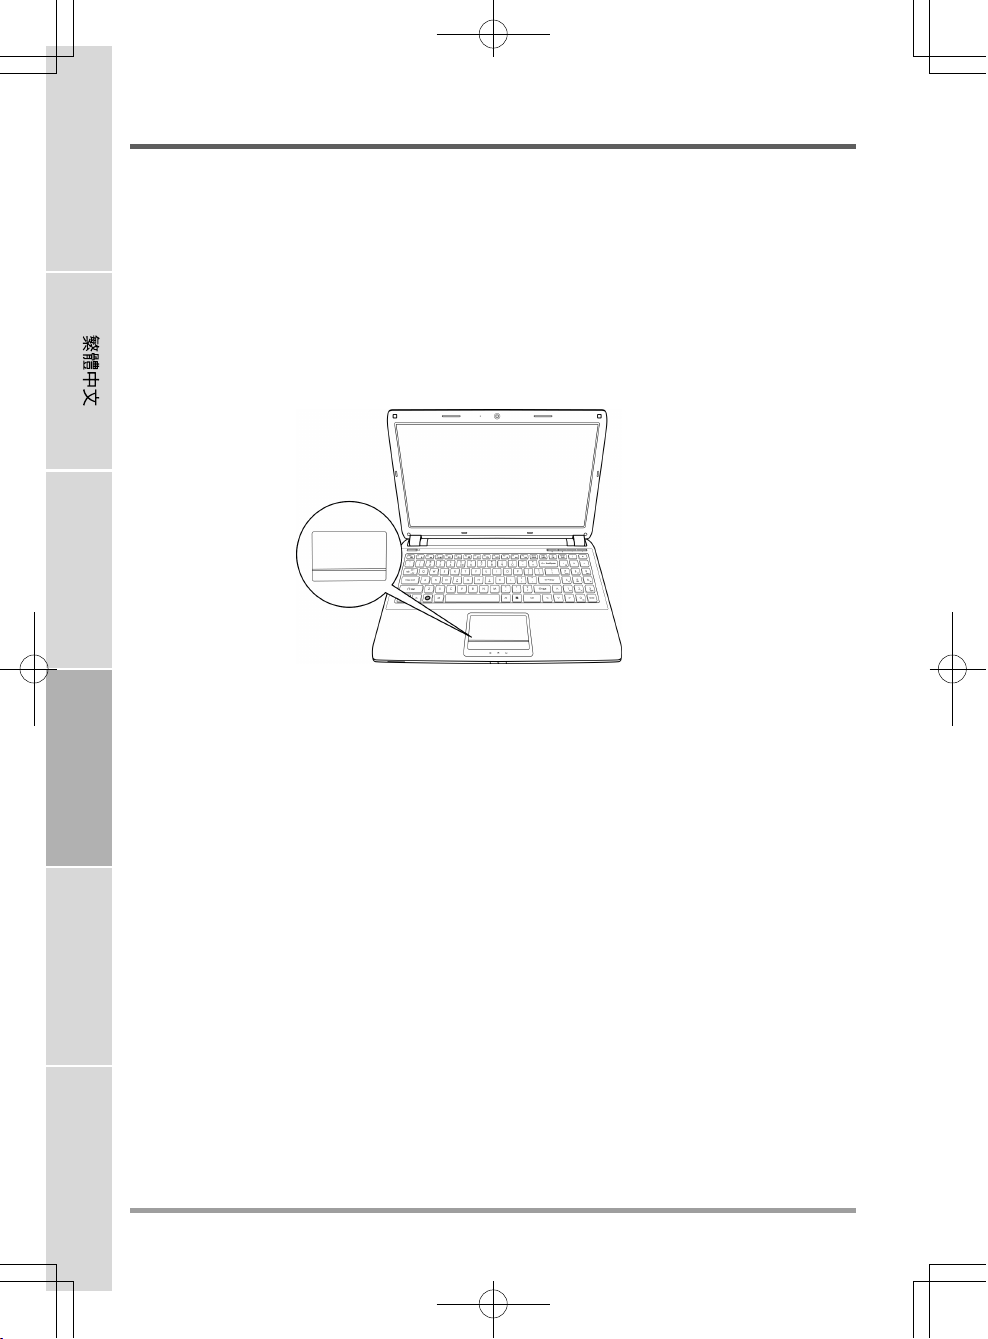
ENGLISH
ERSTE SCHRITTE
Benutzen des TouchPads
Das TouchPad ist ein Zeigegerät, das in das Notebook integriert ist. Es kann zur Steuerung der
Cursorbewegungen auf dem Bildschirm verwendet.
Das TouchPad bestetht aus der Cursorsteuerung, einer linken und einer rechten Taste sowie einer
Scroll-Leiste. Die Cursorsteuerung kann wie eine Maus den Cursor über den Bildschirm steuern.
Sie müssen dazu die Fläche nur ganz leicht mit den Fingerspitzen berühren. Die linke und rechte
Taste haben die gleiche Funktion wie Maustasten. Je nach Programm kann sich die Funktion der
Tasten unterscheiden. Mit der Scroll-Leiste können Sie ohne den Cursor oder die Scroll-Leisten
bewegen zu müssen schnell durch die Seiten blättern.
FRANÇAIS
DEUTSCH
Klicken
Klicken bedeutet ein kurzes Drücken und wieder Loslassen einer Taste. Bei einem Linksklick
bewegen Sie den Cursor auf das Element, das Sie auswählen möchten, und drücken dann kurz auf
die linke Taste. Bei einem Rechtsklick bewegen Sie den Cursor auf das Element, das Sie auswählen
möchten, und drücken dann kurz auf die rechte Taste. Sie können auch klicken, indem Sie einmal
kurz das TouchPad berühren.
Doppelklicken
Beim Doppelklicken klicken Sie zweimal schnell hintereinander die linke Taste an. Der Doppelklick
funktioniert nur bei der linken Taste. Bei einem Doppelklick bewegen Sie den Cursor auf das
ESPAÑOL
Element, das Sie auswählen möchten, und drücken dann kurz zweimal auf die linke Taste. Sie
können auch doppelklicken, indem Sie zweimal kurz das TouchPad berühren.
Verschieben
Beim Verschieben halten Sie die linke Taste gedrückt während der Cursor verschoben wird.
Schieben Sie zunächst den Cursor auf das Element, das verschoben werden soll. Drücken Sie dann
auf die linke Taste und halten diese gedrückt. Verschieben Sie dabei das Element an die neue
Position und lassen dann die Taste los. Auch mit Hilfe des TouchPads können Sie ein Element
verschieben. Schieben Sie den Cursor auf das Element, das verschoben werden soll. Berühren Sie
dann zweimal schnell hintereinander mit dem Finger das TouchPad. Nach dem zweiten Berühren
ITALIANO
muss der Finger auf dem Pad liegen bleiben. Verschieben Sie dann das Element an die neue Position,
indem Sie den Finger über das TouchPad schieben. Nehmen Sie dann den Finger hoch, um das
Element loszulassen. Mit Hilfe der Scroll-Tasten können Mit Hilfe der Scroll-Leiste können Sie
ein Dokument ganz schnell durchblättern, ohne die Scroll-Leisten des Fensters verschieben zu
müssen. Das ist besonders dann sinnvoll, wenn Sie Internetseiten durchblättern möchten.
20
Page 93

ERSTE SCHRITTE
Aufrüsten des Speichermoduls
Um die Speicherkapazität des Notebooks zu erhöhen (bis maximal 8 GB), können zusätzliche
Speichermodule installiert werden. Zum Aufrüsten des Speichermoduls müssen Sie ein DIMMSDRAM-Modul verwenden.
Installieren eines Speichermoduls
Nachfolgend wird Schritt für Schritt beschrieben, wie Sie das Notebook mit einem Speichermodul
aufrüsten. Es wird nicht empfohlen, das selbst auszuführen.
1. Schalten Sie das Notebook durch Drücken der Ein/Aus-Taste aus, trennen Sie den Netzadapter
ab und/oder entfernen Sie den Akku.
2. Drehen Sie das Notebook um, und legen Sie es auf eine saubere Unterlage.
3. Schieben Sie den Akkufachriegel in die
Entriegelungsposition. Halten Sie ihn in
dieser Position, und schieben Sie den
Akkufachdeckel in Richtung Vorderseite
des Geräts. Wenn sich der Deckel aus den
Sicherungslaschen herauslöst, können Sie
ihn abnehmen.
4. Das Speichermodul kann durch
elektrostatische Entladung schwer
beschädigt werden. Achten Sie deshalb
darauf, dass Sie ausreichend geerdet sind,
wenn Sie das Modul in die Hand nehmen
und installieren.
5. Richten Sie die Kontaktleiste des Speichermoduls (mit der Chipseite nach oben) an den
Kontakten im Speicherfach aus.
6. Schieben Sie das Speichermodul in einem Winkel von 45° in das Fach hinein, und drücken Sie
es fest in die Kontakte.
7. Drücken Sie das Speichermodul so weit nach unten in das Fach hinein, bis es an beiden Seiten
in den Montageklammern einrastet. Sie hören beim Einrasten des Moduls ein Klicken.
8. Setzen Sie den Deckel wieder auf, und schieben Sie ihn in Richtung Rückseite des Geräts, bis
er einrastet. Die Installation des neuen Speichermoduls ist abgeschlossen.
Das Speichermodul gehört nicht zu den Bestandteilen des Notebooks, die routinemäßig vom
entfernt werden. Wenn es einmal installiert ist, sollten Sie es erst wieder herausnehmen, wenn Sie
den Systemspeicher wieder erweitern möchten.
21
Page 94

ENGLISH
FEHLERBEHEBUNG
Das Notebook ist sehr robust und sollte in dieser Hinsicht keinen Anlass zu Beschwerden geben.
Es ist jedoch möglich, dass einfache Installations- und Betriebsprobleme auftreten, die Sie auf der
Stelle beheben können. Es kann auch Probleme mit Peripheriegeräten geben, die behoben werden
können, indem Sie das entsprechende Gerät austauschen. Die Informationen dieses Abschnitts
sollen Ihnen dabei helfen, die einfachen Probleme von den schwerwiegenden Fehlern zu
unterscheiden und selbst zu lösen.
Identifizieren eines Problems
Wenn Sie auf ein Problem stoßen sollten, führen Sie vor einer komplexen Fehlerbehebung zunächst
FRANÇAIS
DEUTSCH
die folgenden Schritte aus:
1. Schalten Sie das Notebook aus.
2. Stellen Sie sicher, dass der AC-Netzadapter angeschlossen und dieser mit einer funktionierenden
Netzsteckdose verbunden ist.
3. Stellen Sie sicher, dass alle im PC-Karten-Steckplatz eingesteckten Karten richtig eingeführt
wurden. Sie können die Karte auch aus dem Steckplatz entnehmen und so eine mögliche
Fehlerquelle ausschließen.
4. Stellen Sie sicher, dass alle an die externen Anschlüsse angeschlossenen Geräte richtig
angeschlossen wurden. Sie können auch diese Geräte abtrennen, und so weitere mögliche
Fehlerquellen ausschließen.
5. Schalten Sie das Notebook an. Es sollte nach dem Ausschalten mindestens 10 Sekunden lang
ausgeschaltet bleiben, ehe Sie es wieder anschalten.
6. Lassen Sie das Notebook den Bootvorgang ausführen.
7. Wenn das Problem weiterhin besteht, wenden Sie sich an den technischen Kundendienst.
Halten Sie für den Anruf die folgenden Daten zur Verfügung, so dass der Kundendienst Ihnen
ESPAÑOL
ITALIANO
schnellstmöglich helfen kann:
• Produktname
• Konfigurationsnummer des Produkts
• Seriennummer des Produkts
• Kaufdatum
• Bedingungen, bei denen das Problem aufgetreten ist
• Alle Fehlermeldungen, die angezeigt wurden
• Hardwarekonfiguration
• Art der angeschlossenen Geräte, falls zutreffend
Die Konfigurations- und Seriennummer des Geräts finden Sie auf dem Konfigurationsetikett, das
sich auf der Unterseite des Notebooks befindet.
22
Page 95

MEMO
FCC-Erklärung
Dieses Gerät entspricht Abschnitt 15 der FCC-Vorschriften. Der Betrieb unterliegt den folgenden
zwei Bedingungen:
(1) Dieses Gerät darf keine Störungen verursachen.
(2) Das Gerät muss alle Störungen aufnehmen können, auch solche, die einen unerwünschten
Betrieb zur Folge haben können.
Alle Änderungen am Gerät (einschließlich an den Antennen), die nicht ausdrücklich vom Hersteller
genehmigt wurden, können zum Entzug der Betriebserlaubnis führen. FCC-Erklärung zur
Strahlenbelastung im Funkwellenbereich: Dieses Gerät entspricht den FCC-Grenzwerten für die
Strahlenbelastung im Funkwellenbereich in unkontrollierter Umgebung. Dieses Gerät und seine
Antenne dürfen sich nicht in der Nähe von anderen Antennen und Sendern befinden oder mit
diesen zusammen verwendet werden. Dieses Gerät wurde geprüft und entspricht gemäß Abschnitt
15 der FCC-Vorschriften den Grenzwerten eines digitalen Geräts der Klasse B. Diese Grenzwerte
dienen einem angemessenen Schutz vor funktechnischen Störungen in Wohnräumen.
Dieses Gerät erzeugt und verwendet Hochfrequenzenergie und kann diese auch abstrahlen. Wenn
es nicht entsprechend den Anweisungen installiert und betrieben wird, können funktechnische
Störungen auftreten. Es kann jedoch nicht ausgeschlossen werden, dass in bestimmten Geräten
dennoch Störungen auftreten. Wenn dieses Gerät Störungen beim Radio- oder Fernsehempfang
verursachen sollte, was Sie feststellen können,
indem Sie das Gerät aus- und wieder einschalten, können Sie versuchen, diese Störungen durch
eine oder mehrere der folgenden Maßnahmen beheben:
• Richten Sie die Empfangsantenne neu aus, oder stellen Sie sie an einen anderen Ort.
• Vergrößern Sie den Abstand zwischen dem Gerät und dem Empfänger.
• Schließen Sie das Gerät und den Empfänger an zwei unterschiedliche Stromkreise an.
• Wenden Sie sich an einen Fachhändler oder an einen Radio-/Fernsehtechniker.
FCC-Erklärung zur Strahlenbelastung im Funkwellenbereich:
1. Dieser Sender darf sich nicht in der Nähe von anderen Antennen und Sendern befinden oder mit
diesen zusammen verwendet werden.
2. Dieses Gerät entspricht den FCC-Grenzwerten für die Strahlenbelastung im Funkwellenbereich
in unkontrollierter Umgebung. Um den Anforderungen gemäß den FCC-Vorschriften zur
Strahlenbelastung im Funkwellenbereich zu entsprechen, vermeiden Sie während des
Sendevorgangs den direkten Kontakt mit der Sendeantenne.
23
Page 96

MEMO
Page 97

MANUAL DEL USUARIO
ESPAÑOL
Marzo 2012
Page 98
ENGLISH
CONTENIDO
ANTES DE COMENZAR .......................................................................................... 5
Asegúrese de tenerlo todo ............................................................................................ 5
Familiarícese con el ordenador ..................................................................................... 6
ABRIR LA PANTALLA .................................................................................................. 6
VISTA PREVIA FRONTAL ............................................................................................ 7
VISTA PREVIA DEL LATERAL IZQUIERDO ................................................................ 9
VISTA PREVIA DEL LATERAL DERECHO ................................................................ 11
VISTA PREVIA POSTERIOR ...................................................................................... 12
FRANÇAIS
DEUTSCH
VISTA PREVIA INFERIOR ......................................................................................... 13
PRIMEROS PASOS .............................................................................................. 14
Fuentes de alimentación .............................................................................................. 14
CONECTAR LOS ADAPTADORES DE ALIMENTACIÓN .......................................... 14
CARGAR LA BATERÍA ............................................................................................... 15
Iniciar su portátil ........................................................................................................... 16
ENCENDER ............................................................................................................. 16
Indicadores de estado ............................................................................................. 17
Usar las teclas de función ....................................................................................... 19
Usar el TouchPad..................................................................................................... 20
Ampliación del módulo de memoria ....................................................................... 21
SOLUCIÓN DE PROBLEMAS .............................................................................. 22
Identificar el problema ................................................................................................. 22
ESPAÑOL
ITALIANO
2
Page 99

CUIDADOS DE SU PC PORTÁTIL
Para evitar el posible calentamiento del procesador
del ordenador, asegúrese de no bloquear las
aperturas de ventilación.
NO lo coloque en superficies desiguales o
inestables.
NO coloque o deje caer objetos sobre el ordenador
y NO ejerza una presión fuerte sobre él.
NO presione ni toque la pantalla.
NO utilice su ordenador portátil en condiciones
adversas.
NO exponga el ordenador a campos magnéticos.
NO lo exponga a la luz directa del sol. NO lo utilice ni lo almacene a temperaturas
extremas.
3
Page 100

ENGLISH
Evite cambios bruscos de temperatura o humedad
manteniéndolo alejado del aire acondicionado y
calefactores.
FRANÇAIS
NO lo coloque cerca del fuego u otras fuentes de
calor.
DEUTSCH
NO lo exponga al polvo y/o a químicos corrosivos. NO cierre de golpe el portátil y nunca levante o
ESPAÑOL
NO exponga el ordenador a la lluvia o a la
humedad.
NO manipule las baterías. Manténgalas fuera del
alcance de los niños.
sostenga el portátil por la pantalla.
ITALIANO
NO pulverice agua u otros fluidos de limpieza
directamente sobre la pantalla.
4
Si viaja con el ordenador, recuerde llevarlo como
equipaje de mano. No lo facture como equipaje.
 Loading...