


 Loading...
Introduction (English)
This Concise User’s Guide introduces the main features of your computer. The English version of this guide begins on page 1. The expanded User’s Manual is on the
Device Drivers & Utilities + User’s Manual CD-ROM.
Einführung (Deutsch)
Dieses Ausführliche Benutzerhandbuch führt Sie in die Hauptfunktionen des Notebooks ein. Die deutsche Version des Handbuchs beginnt auf Seite 41. Das erweiterte Benutzerhandbuch finden Sie auf der CD-ROM für die Gerätetreiber und Hilfsprogramme (CD-ROM Device Drivers & Utilities + User's Manual).
Présentation (Français)
Ce Guide Utilisateur Concis présente les fonctionnalités principales de votre ordinateur. La version française de ce guide commence à la page 81. Le Manuel de l'Utilisateur étendu se trouve sur le CD-ROM de Pilotes & Utilitaires + Manuel de l'Utilisateur (CD-ROM Device Drivers & Utilities + User's Manual).
Introducción (Español)
Esta Guía del Usuario Concisa le presenta las características principales de su ordenador. La versión española de esta guía comienza en la página 121. El Manual del usuario completo se encuentra en el CD-ROM de Controladores del dispositivo y Utilidades + Manual del usuario (CD-ROM Device Drivers & Utilities + User's Manual).
Introduzione (Italiano)
La presente Guida Rapida per l'Utente introduce le caratteristiche principali del computer. La versione italiana di questa guida inizia da pagina 161. Il Manuale utente completo si trova nel CD contenente driver e utilità + Manuale utente (CD-ROM Device Drivers & Utilities + User's Manual).
I

Contents |
|
Notice ................................................................................................ |
1 |
About this Concise User Guide ......................................................... |
2 |
Instructions for Care and Operation .................................................. |
3 |
System Startup .................................................................................. |
7 |
System Map: Top View with LCD Panel Open ................................ |
9 |
LED Indicators ................................................................................ |
10 |
Hot Key Buttons & Keyboard ......................................................... |
11 |
Function Keys ................................................................................. |
12 |
Recording Audio ............................................................................. |
13 |
System Map: Front & Rear Views .................................................. |
16 |
System Map: Left View .................................................................. |
17 |
System Map: Right View ................................................................ |
18 |
System Map: Bottom View ............................................................. |
19 |
Windows XP Start Menu & Control Panel ..................................... |
20 |
Video Features ................................................................................ |
21 |
Attaching Other Displays ................................................................ |
23 |
Audio Features ................................................................................ |
24 |
Power Management Features .......................................................... |
25 |
Port Replicator Module ................................................................... |
26 |
Driver Installation ........................................................................... |
27 |
Troubleshooting .............................................................................. |
35 |
Specifications .................................................................................. |
36 |
Inhalt |
|
Hinweis ............................................................................................ |
41 |
Über das Ausführliche Benutzerhandbuch ...................................... |
42 |
Hinweise zu Pflege und Betrieb ...................................................... |
43 |
Schnellstart ...................................................................................... |
47 |
Systemübersicht: Ansicht von oben mit geöffnetem |
|
LCD-Bildschirm .............................................................................. |
49 |
LED-Anzeigen ................................................................................ |
50 |
Hot-Key-Tasten & Tastatur ............................................................. |
51 |
Funktionstasten ................................................................................ |
52 |
Systemübersicht: Ansicht von vorne und Rückansicht ................... |
56 |
Systemübersicht: Ansicht von links ................................................ |
57 |
Systemübersicht: Ansicht von rechts .............................................. |
58 |
Systemübersicht: Ansicht von unten ............................................... |
59 |
Windows XP Startmenü und Systemsteuerung ............................... |
60 |
Grafikfunktionen ............................................................................. |
61 |
Audiofunktionen .............................................................................. |
64 |
Energieverwaltungsfunktionen ........................................................ |
65 |
Port-Replikator ................................................................................ |
66 |
Installation der Treiber .................................................................... |
67 |
Fehlerbehebung ............................................................................... |
75 |
Technische Daten ............................................................................ |
76 |
II

Sommaire |
|
Avertissement ................................................................................. |
81 |
A propos de ce Guide Utilisateur Concis ........................................ |
82 |
Instructions d’entretien et d’utilisation ........................................... |
83 |
Guide de démarrage rapide ............................................................. |
87 |
Carte du système : Vue du dessus avec l’écran LCD ouvert .......... |
89 |
Indicateurs LED .............................................................................. |
90 |
Boutons Hot-Key & Clavier ........................................................... |
91 |
Touches fonction ............................................................................. |
92 |
Carte du système : Vues de face & arrière ...................................... |
96 |
Carte du système : Vue gauche ....................................................... |
97 |
Carte du système : Vue droite ......................................................... |
98 |
Carte du système : Vue d’en dessous .............................................. |
99 |
Menu Démarrer & Panneau de configuration de Windows XP .... |
100 |
Caractéristiques vidéo ................................................................... |
101 |
Caractéristiques Audio .................................................................. |
104 |
Caractéristiques de gestion de l’alimentation ............................... |
105 |
Réplicateur de port ........................................................................ |
106 |
Installation du pilote ..................................................................... |
107 |
Dépannage ..................................................................................... |
115 |
Spécifications ................................................................................ |
116 |
Contenidos |
|
Aviso ............................................................................................. |
121 |
Acerca de esta Guía del Usuario Concisa ..................................... |
122 |
Instrucciones para el cuidado y funcionamiento ........................... |
123 |
Guía rápida para empezar .............................................................. |
127 |
Mapa del sistema: Vista superior con panel LCD abierto ............. |
129 |
Indicadores LED ........................................................................... |
130 |
Botones Hot-Key & Teclado ......................................................... |
131 |
Teclas de función .......................................................................... |
132 |
Mapa del sistema: Vistas frontal y posterior ................................. |
136 |
Mapa del sistema: Vista izquierda ................................................ |
137 |
Mapa del sistema: Vista derecha ................................................... |
138 |
Mapa del sistema: Vista inferior ................................................... |
139 |
Menú Inicio y Panel de control de Windows XP .......................... |
140 |
Parámetros de vídeo ...................................................................... |
141 |
Características de audio ................................................................. |
144 |
Funciones de administración de energía ....................................... |
145 |
Replicador de puertos .................................................................... |
146 |
Instalación de controladores .......................................................... |
147 |
Solución de problemas .................................................................. |
155 |
Especificaciones ............................................................................ |
156 |
III

Sommario |
|
Avviso ........................................................................................... |
161 |
Informazioni sulla Guida Rapida per l'Utente .............................. |
162 |
Istruzioni per la custodia e il funzionamento ................................ |
163 |
Guida di avvio rapido .................................................................... |
167 |
Descrizione del sistema: Vista superiore con pannello LCD |
|
aperto ............................................................................................. |
169 |
Indicatori LED .............................................................................. |
170 |
Pulsanti Hot-Key & Tastiera ......................................................... |
171 |
Tasti funzione ................................................................................ |
172 |
Descrizione del sistema: Vista anteriore e posteriore ................... |
176 |
Descrizione del sistema: Vista sinistra ......................................... |
177 |
Descrizione del sistema: Vista destra ........................................... |
178 |
Descrizione del sistema: Vista inferiore ....................................... |
179 |
Menu Start e Pannello di controllo di Windows XP ..................... |
180 |
Funzioni video .............................................................................. |
181 |
Funzionalità audio ......................................................................... |
184 |
Funzioni di risparmio energetico .................................................. |
185 |
Replicatore di porte ....................................................................... |
186 |
Installazione driver ........................................................................ |
187 |
Risoluzione dei problemi .............................................................. |
195 |
Specifiche tecniche ....................................................................... |
196 |
IV

Concise User’s Guide
Notice
The company reserves the right to revise this publication or to change its contents without notice. Information contained herein is for reference only and does not constitute a commitment on the part of the manufacturer or any subsequent vendor. They assume no responsibility or liability for any errors or inaccuracies that may appear in this publication nor are they in anyway responsible for any loss or damage resulting from the use (or misuse) of this publication.
This publication and any accompanying software may not, in whole or in part, be reproduced, translated, transmitted or reduced to any machine readable form without prior consent from the vendor, manufacturer or creators of this publication, except for copies kept by the user for backup purposes.
Brand and product names mentioned in this publication may or may not be copyrights and/or registered trademarks of their respective companies. They are mentioned for identification purposes only and are not intended as an endorsement of that product or its manufacturer.
©June 2006
Trademarks
This product incorporates copyright protection technology that is protected by method claims of certain U.S. patents and other intellectual property rights owned by Macrovision Corporation and other rights owners. Use of this copyright protection technology must be authorized by Macrovision Corporation, and is intended for home or other limited viewing uses only unless otherwise authorized by Macrovision Corporation. Reverse engineering or disassembly is prohibited.
AMD Turion™ and AMD Sempron™ are trademarks of Advanced Micro Devices, Inc.
English
Notice - 1

English
Concise User’s Guide
About this Concise User Guide
This quick guide is a brief introduction to getting your system started. This is a supplement, and not a substitute for the expanded English language User’s Manual in Adobe Acrobat format on the Device Drivers & Utilities + User’s Manual CD-ROM supplied with your computer. This CD-ROM also contains the drivers and utilities necessary for the proper operation of the computer.
Some or all of the computer’s features may already have been setup. If they aren’t, or you are planning to re-configure (or re-install) portions of the system, refer to the expanded User’s Manual. The Device Drivers & Utilities + User’s Manual CD-ROM does not contain an operating system.
Regulatory Information
Regulatory notices and information are contained in the expanded User’s Manual on the Device Drivers & Utilities + User’s Manual CD-ROM.
2 - About this Concise User Guide

Concise User’s Guide
Instructions for Care and Operation
The notebook computer is quite rugged, but it can be damaged. To prevent this, follow these suggestions:
1.Don’t drop it, or expose it to shock. If the computer falls, the case and the components could be damaged.
2.Keep it dry, and don’t overheat it. Keep the computer and power supply away from any kind of heating element. This is an electrical appliance. If water or any other liquid gets into it, the computer could be badly damaged.
3.Avoid interference. Keep the computer away from high capacity transformers, electric motors, and other strong magnetic fields. These can hinder proper performance and damage your data.
4.Follow the proper working procedures for the computer. Shut the computer down properly and don’t forget to save your work. Remember to periodically save your data as data may be lost if the battery is depleted.
5.Take care when using peripheral devices.
Wireless Device Operation Aboard Aircraft
The use of any portable electronic transmission devices aboard aircraft is usually prohibited. Make sure the modules are OFF if you are using the computer aboard aircraft.
English
Instructions for Care and Operation - 3

English
Concise User’s Guide
Power Safety
The computer has specific power requirements:
•Only use an AC/DC adapter approved for use with this computer.
•Your AC/DC adapter may be designed for international travel but it still requires a steady, uninterrupted power supply. If you are unsure of your local power specifications, consult your service representative or local power company.
•The AC/DC adapter may have either a 2-prong or a 3-prong grounded plug. The third prong is an important safety feature; do not defeat its purpose. If you do not have access to a compatible outlet, have a qualified electrician install one.
•When you want to unplug the power cord, be sure to disconnect it by the plug head, not by its wire.
•Make sure the socket and any extension cord(s) you use can support the total current load of all the connected devices.
•Before cleaning the computer, make sure it is disconnected from any external power supplies.
Power Safety Warning
Before you undertake any upgrade procedures, make sure that you have turned off the power, and disconnected all peripherals and cables (including telephone lines). It is advisable to also remove your battery in order to prevent accidentally turning the machine on.
4 - Instructions for Care and Operation
Concise User’s Guide
Cleaning
Do not apply cleaner directly to the computer, use a soft clean cloth. Do not use volatile (petroleum distillates) or abrasive cleaners on any part of the computer.
Servicing
Do not attempt to service the computer yourself. Doing so may violate your warranty and expose you and the computer to electric shock. Refer all servicing to authorized service personnel. Unplug the computer from the power supply. Refer servicing to qualified service personnel under any of the following conditions:
•When the power cord is damaged or frayed.
•If the computer has been exposed to rain or other liquids.
•If the computer does not work normally when you follow the operating instructions.
•If the computer has been dropped or damaged (do not touch the poisonous liquid if the LCD panel breaks).
•If there is an unusual odor, heat or smoke coming from your computer.
Power Off Before Traveling
Make sure that your notebook is completely powered off before putting it into a travel bag (or any such container). Putting a notebook which is powered on in a travel bag may cause the vent(s)/fan intake(s) to be blocked. To prevent your computer from overheating make sure nothing blocks the vent(s)/fan intake(s) while the computer is in use.
English
Instructions for Care and Operation - 5

Concise User’s Guide
Battery Precautions
English |
• Only use batteries designed for this computer. The wrong battery type may explode, leak or damage the computer. |
|
• Do not continue to use a battery that has been dropped, or that appears damaged (e.g. bent or twisted) in any way. |
||
|
||
|
Even if the computer continues to work with a damaged battery in place, it may cause circuit damage, which may pos- |
|
|
sibly result in fire. |
|
|
• Recharge the batteries using the notebook’s system. Incorrect recharging may make the battery explode. |
|
|
• Do not try to repair a battery pack. Refer any battery pack repair or replacement to your service representative or qual- |
|
|
ified service personnel. |
|
|
• Keep children away from, and promptly dispose of a damaged battery. Always dispose of batteries carefully. Batteries |
|
|
may explode or leak if exposed to fire, or improperly handled or discarded. |
|
|
• Keep the battery away from metal appliances. |
|
|
• Affix tape to the battery contacts before disposing of the battery. |
|
|
• Do not touch the battery contacts with your hands or metal objects. |
Battery Disposal & Caution
The product that you have purchased contains a rechargeable battery. The battery is recyclable. At the end of its useful life, under various state and local laws, it may be illegal to dispose of this battery into the municipal waste stream. Check with your local solid waste officials for details in your area for recycling options or proper disposal.
Danger of explosion if battery is incorrectly replaced. Replace only with the same or equivalent type recommended by the manufacturer. Discard used battery according to the manufacturer’s instructions.
6 - Instructions for Care and Operation
Concise User’s Guide
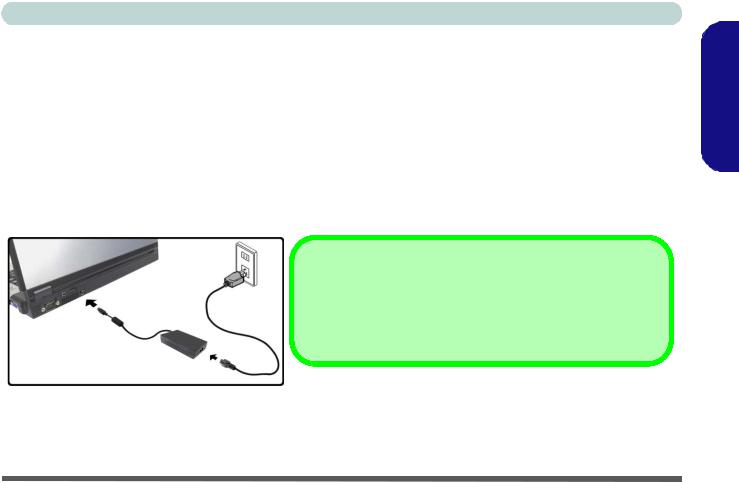
System Startup
4. |
Attach the AC/DC adapter to the DC-In jack at the rear of the computer, then plug the AC power cord into an outlet, and |
English |
1. |
Remove all packing materials. |
|
2. |
Place the computer on a stable surface. |
|
3. |
Securely attach any peripherals you want to use with the notebook (e.g. keyboard and mouse) to their ports. |
|
|
connect the AC power cord to the AC/DC adapter (Note: If you have included the Port Replicator in your purchase option see |
|
|
page 40). |
|
5. |
Raise the lid/LCD to a comfortable viewing angle, and press the power button to turn the computer “on”. |
|
6. |
Adjust the LCD panel to a comfortable viewing angle. |
|
7. |
The LED indicators show the power and battery status of the computer. |
|
Shutdown
Please note that you should always shut your computer down by choosing the Turn Off Computer command from the Start menu in Windows. This will help prevent hard disk or system problems.
Figure 1 - AC/DC Adapter In
System Startup - 7

English
Concise User’s Guide
Design Differences
This notebook series includes two different design types, however only one design is pictured in this guide.
System Software
Operating Systems (e.g. Windows XP etc.) and applications (e.g. word processing, spreadsheet and database programs) have their own manuals, so please consult the appropriate manuals. Your computer may already come with system software pre-installed. Where this is not the case, or where you are re-configuring your computer for a different system, you will find this manual refers to the Microsoft Windows XP operating system. Further information on installing the drivers and utilities is available in Chapters 4 & 7 of the expanded User’s Manual on the Device Drivers & User’s Manual CD-ROM.
Drivers
If you are installing/re-installing new system software, you will need to install the appropriate drivers. Drivers are programs which act as an interface between the computer and a hardware component e.g. a wireless network module. It is very important that you install the drivers in the order listed in Table 5, on page 27. You will be unable to use most advanced controls until the necessary drivers and utilities are properly installed.
8 - System Startup
Concise User’s Guide
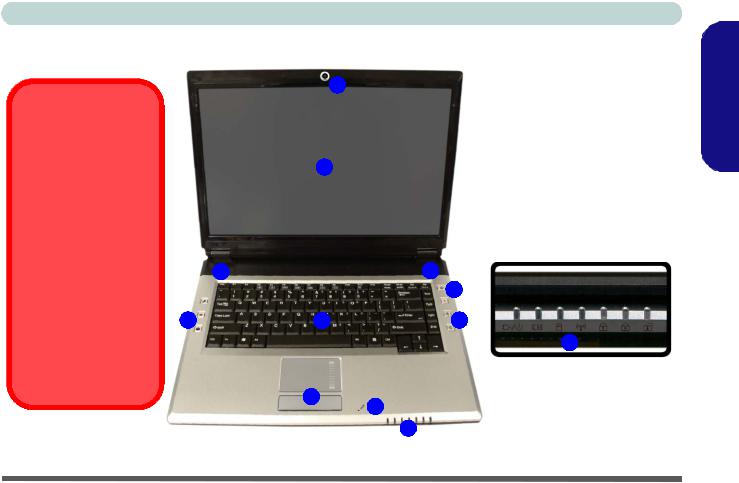
System Map: Top View with LCD Panel Open
|
|
1 |
1. |
Optional Built-In PC Camera |
|
|
|
2. |
LCD |
Wireless Device |
|
|
3. |
Speakers |
|
|
4. |
Power Button |
|
Operation Aboard |
|
|
||
Aircraft |
|
2 |
5. |
Hot Key Buttons |
The use of any portable |
|
6. |
Keyboard |
|
electronic transmission de- |
|
|
7. |
TouchPad and Buttons |
vices aboard aircraft is usu- |
|
|
8. |
Built-In Microphone |
ally prohibited. Make sure |
|
|
9. |
LED Indicators |
the module(s) are OFF if |
|
|
||
|
|
|
|
|
you are using the computer |
|
|
|
|
aboard aircraft. |
|
|
3 |
|
Use the key combinations |
|
3 |
|
|
|
|
4 |
|
|
to toggle power to the |
|
|
|
|
WLAN/Bluetooth modules, |
5 |
6 |
5 |
|
and check the LED indica- |
|
|||
tor icon to see if the mod- |
|
|
|
9 |
ules are powered on or not |
|
|
|
(see Table 1, on page 10/ Table 3, on page 12).
7 |
8 |
|
|
|
9 |
Figure 2 - Top View with LCD Panel Open
English
System Map: Top View with LCD Panel Open - 9
English
Concise User’s Guide
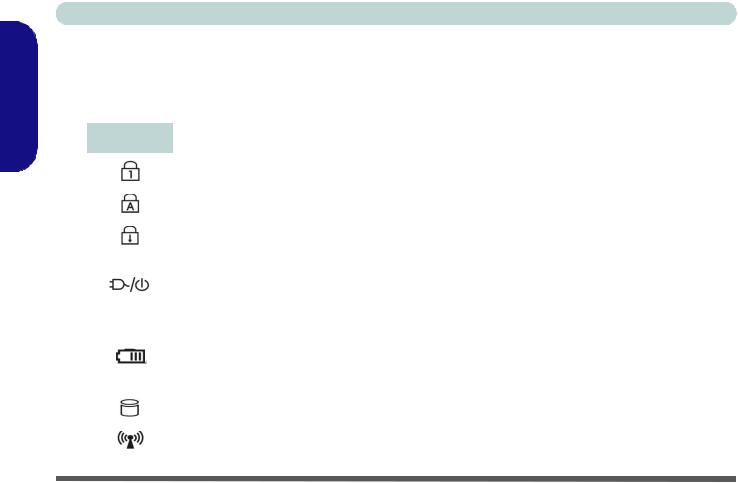
LED Indicators
The LED indicators display helpful information about the current status of the computer.
|
|
|
|
Table 1 - LED Indicators |
|
|
|
|
|
|
Icon |
Color |
Description |
|
|
|
|
|
|
|
|
|
Green |
Number Lock Activated |
|
|
|
|
|
|
|
|
Green |
Caps Lock Activated |
|
|
|
|
|
|
|
|
Green |
Scroll Lock Activated |
|
|
|
|
|
|
|
|
Green |
The Computer is On |
|
|
|
|
|
|
|
|
Blinking Green |
The Computer is in Stand by Mode |
|
|
|
|
|
|
|
|
Orange |
The AC/DC Adapter is Plugged In & the Computer is Powered Off |
|
|
|
|
|
|
|
|
Orange |
The AC/DC Adapter is Plugged In & the Battery is Charging |
|
|
|
|
|
|
|
|
Blinking Orange |
The Battery has Reached Critically Low Power Status |
|
|
|
||
|
|
|
|
|
|
|
|
|
|
|
|
|
Green |
The Battery is Fully Charged |
|
|
|
|
|
|
|
|
Green |
Hard Disk Activity |
|
|
|
|
|
|
|
|
Green |
The WLAN/Bluetooth Module(s) is/are Powered On |
|
|
|
|
|
10 - LED Indicators
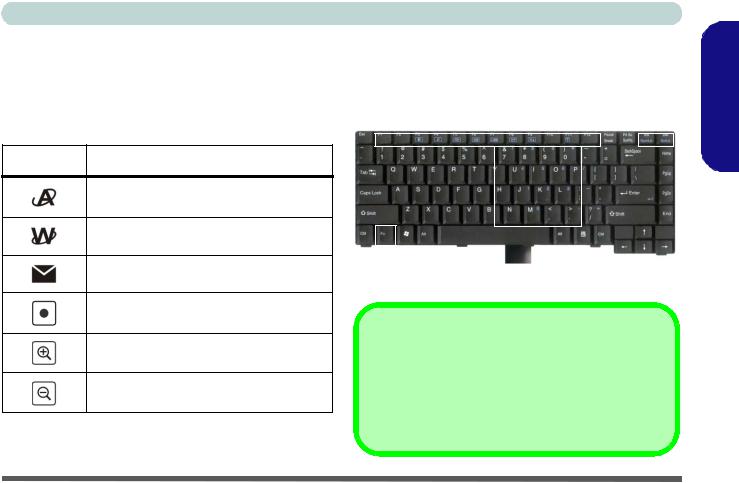
Hot Key Buttons & Keyboard
These buttons give instant access to the functions indicated in the table below.
Table 2 - Hot Key Buttons
Hot Key |
Function |
|
|
Activate the BisonCap program/Take Still
Picture (see page 15)
Activate the Default Internet Program
Activate the Default E-Mail Browser
Audio Record Start/Stop (see page 13)
Camera Zoom-In (see page 15)
Camera Zoom-Out (see page 15)
Concise User’s Guide
The keyboard has an embedded numerical keypad for easy numeric data input. It also features function keys to allow you to change operational features instantly.
Function Keys
NumLk &
Numeric ScrLk Keys
Keypad
Fn Key
Figure 3 - Keyboard
Other Keyboards
If your keyboard is damaged or you just want to make a change, you can use any standard USB keyboard. The system will detect and enable it automatically. However special functions/hot-keys unique to the system’s regular keyboard may not work.
English
Hot Key Buttons & Keyboard - 11
English
Concise User’s Guide
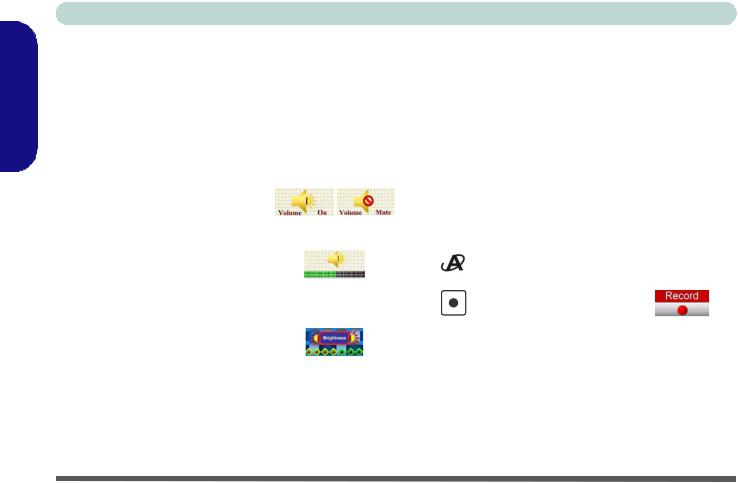
Function Keys
The function keys (F1 - F12 etc.) will act as hot keys when pressed while the Fn key is held down. In addition to the basic function key combinations; visual indicators are available for certain key combinations/hot keys when the hot key driver is installed (see “Hot Key” on page 31).
Fn/Hot Key |
Function |
Fn/Hot Key |
Function |
|
|
|
|
Fn + F1 |
TouchPad Toggle |
Fn + F10 |
PC Camera Power Toggle |
|
|
|
|
Fn + F3 |
Mute Toggle |
Fn + F11 |
WLAN Module Power Toggle |
|
|
|
|
Fn + F4 |
Sleep Toggle |
Fn + F12 |
Bluetooth Module Power Toggle |
|
|
|
|
Fn + F5/F6 |
Volume Decrease/ |
|
Activate BisonCap Program/ Take Still Pic- |
Increase |
|
ture |
|
|
|
||
|
|
|
|
Fn + F7 |
Display Toggle |
|
Audio Record Start/ |
|
Stop (see over) |
||
|
|
|
|
|
|
|
|
Fn + F8/F9 |
Brightness |
|
|
Decrease/Increase |
|
|
|
|
|
|
|
|
|
|
|
Table 3 - Function Keys/Hot Keys & Visual Indicators
Note: The hot key functions will only be displayed if the program is running (i.e. the icon  is displayed in the taskbar). You can run it from the Start menu (Start > Programs > Startup > HotKey Driver) in Windows.
12 - Function Keys

Concise User’s Guide
Recording Audio
The  audio record hot key button allows you to record audio from either the built-in microphone, or from a microphone connected to the microphone-in jack. To record on the computer, setup the audio recording options in Windows as follows (see Figure 4 on page 14).
1.Click Start, point to Settings and click Control Panel (or just click Control Panel).
2.Double-click Sounds & Audio Devices (icon) - in the Sounds, Speech, and Audio Devices category.
3.Click Advanced in the Volume > Device volume tab.
4.Click Options and scroll down and click Properties.
5.Select Realtek HD Audio input from the Mixer device menu.
6.Make sure the Mic Volume (check box) is checked, then click OK.
7.Boost the volume in the Recording section (in the Recording Control menu) as high as it will go.
8.Close the Recording Control window, and then click OK.
9.Press the audio record hot key button  to begin the recording process (the record icon
  will flash in the top left of the screen).
10.Press the audio record hot key button  again to stop the recording process (the record icon will disappear from the top left of the screen).
11.The recorded audio file (in .wav format) will appear in the Shared Documents > Wav folder in My Computer.
12.Double-click the file to playback the recorded audio.
English
Recording Audio - 13

Concise User’s Guide
English
Figure 4 - Audio Setup for Recording (Windows XP)
14 - Recording Audio
Concise User’s Guide
PC Camera Hot Key Buttons
You can use the PC Camera hot key buttons 
 to run the BisonCap program, to take still pictures and to zoom the camera in and out (if you have installed the hot key and PC Camera drivers - see “Hot Key” on page 31 & “PC Camera” on page 32).
1.Make sure the PC Camera is on (use the Fn + F10 key combination to power on the camera).
2.Press the  application hot key button once.
3.The BisonCap application will run.
4.Use the zoom hot key buttons to obtain the picture required.
5.Press the  application hot key button for a second time (you will hear a camera motor sound to indicate the picture is being taken).
6.The picture (in JPEG format) will be placed in the Snapshot folder on the desktop.
Snapshot Folder
The Snapshot folder’s default location is on the desktop. Do not move this folder or an error may appear when you try to take a still picture using the application hot key button.
If you accidentally delete or move the folder, you can create a new Snapshot folder on the desktop in order to capture the files.
Figure 5 - Snapshot Folder
English
Recording Audio - 15
English
Concise User’s Guide
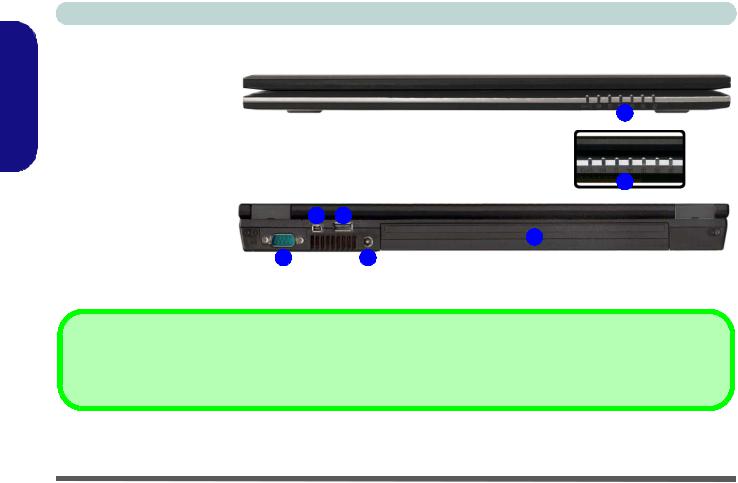
System Map: Front & Rear Views
1.LED Indicators
2.Serial Port
3. |
Mini-IEEE 1394 Port |
1 |
4. |
1 * USB Port |
|
5. |
DC-In Jack |
|
6. |
Battery |
1 |
|
|
|
|
3 |
4 |
|
|
6 |
|
2 |
5 |
Figure 6 - Front & Rear Views
Mini-IEEE 1394
The Mini-IEEE 1394 port only supports SELF POWERED IEEE 1394 devices.
16 - System Map: Front & Rear Views
System Map: Left View
1 |
2 |
|
Changing DVD Regional Codes
Go to the Control Panel and double-click System > Hardware (tab), click Device Manager, then click the + next to DVD/CD-ROM drives. Double-click on the DVD-ROM device to bring up the Properties dialogue box, and select the DVD Region (tab) to bring up the control panel to allow you to adjust the regional code.
DVD region detection is device dependent, not OS-de- pendent. You can select your module’s region code 5 times. The fifth selection is permanent. This cannot be altered even if you change your operating system or you use the module in another computer.
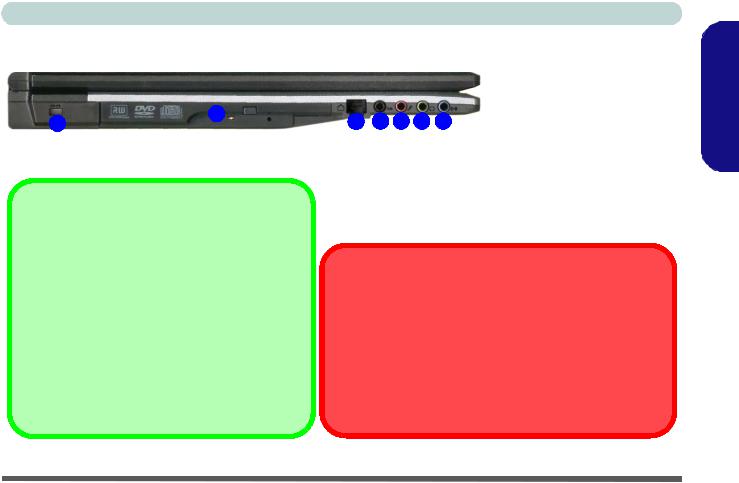
Concise User’s Guide
Figure 7 - Left View
1.Security Lock Slot
3 4 5 6 7 |
2. |
Optical Device Drive Bay |
|
3. |
RJ-11 Modem Jack |
|
4. |
S/PDIF-Out Jack |
|
5. |
Microphone-In Jack |
|
6. |
Headphone-Out Jack |
|
7. |
Line-In Jack |
CD Emergency Eject
If you need to manually eject a CD/DVD (e.g. due to an unexpected power interruption) you may push the end of a straightened paper clip into the emergency eject hole. Do not use a sharpened pencil or similar object that may break and become lodged in the hole.
Media Warning
Don’t try to remove a floppy disk/CD/DVD while the system is accessing it. This may cause the system to “crash”.
English
System Map: Left View - 17
English
Concise User’s Guide
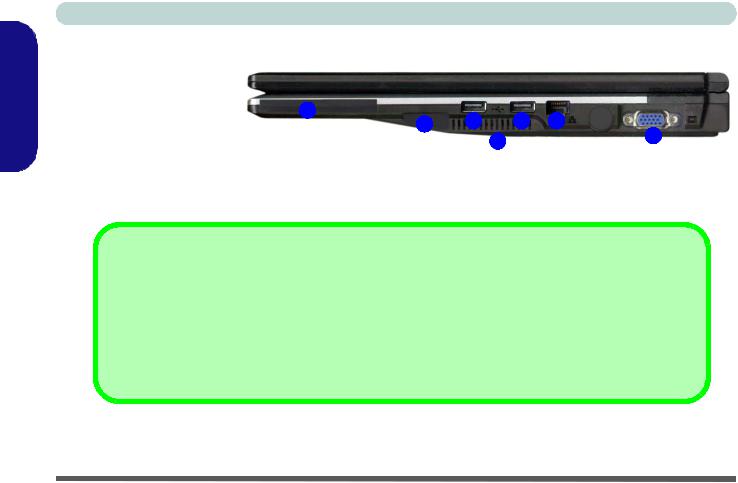
System Map: Right View
Figure 8 - Right View
1. |
ExpressCard Slot |
1 |
|
|
|
2. |
7-in-1 Card Reader |
3 |
3 |
5 |
|
3. |
2 * USB 2.0 Ports |
2 |
|||
|
|
4 |
6 |
||
4. |
Vent/Fan Intake |
|
|
|
|
|
|
|
|
5.RJ-45 LAN Jack
6.External Monitor Port
ExpressCard Slot
The ExpressCard Slot accepts either ExpressCard/34 or ExpressCard/54 formats.
7-in-1 Card Reader
The card reader allows you to use the most popular digital storage card formats:
MMC (MultiMedia Card) / SD (Secure Digital) / MS (Memory Stick) / MS Pro (Memory Stick Pro) MS Duo (requires PC adapter) / Mini SD (requires PC adapter) / RS MMC (requires PC adapter)
18 - System Map: Right View
Concise User’s Guide
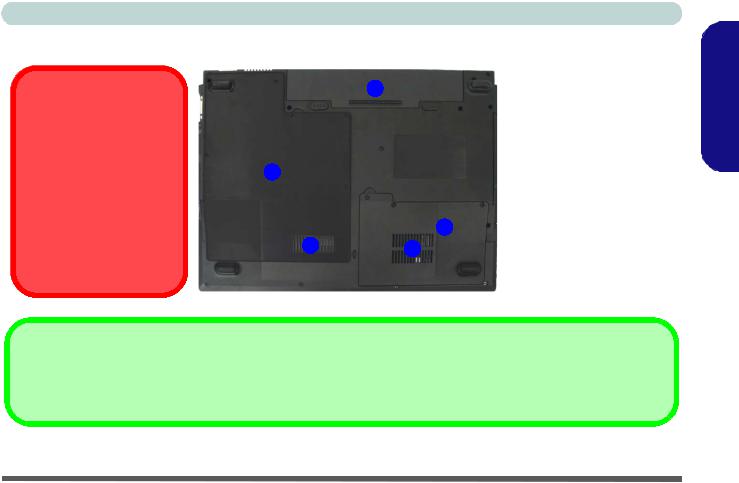
System Map: Bottom View
|
2 |
Figure 9 - Bottom View |
|
1. Vent/Fan Intake |
|||
|
|
CPU
The CPU is not a user serviceable part. Opening this compartment, or accessing the CPU in
any way, may violate your war- 4 ranty.
Overheating
2.Battery
3.Hard Disk Bay Cover
4.CPU/RAM Bay Cover
To prevent your computer from |
3 |
1 |
1 |
overheating make sure nothing blocks any Vent/Fan Intake while the computer is in use.
Battery Information
Always completely discharge, then fully charge, a new battery before using it. Completely discharge and charge the battery at least once every 30 days or after about 20 partial discharges.
English
System Map: Bottom View - 19
English
Concise User’s Guide
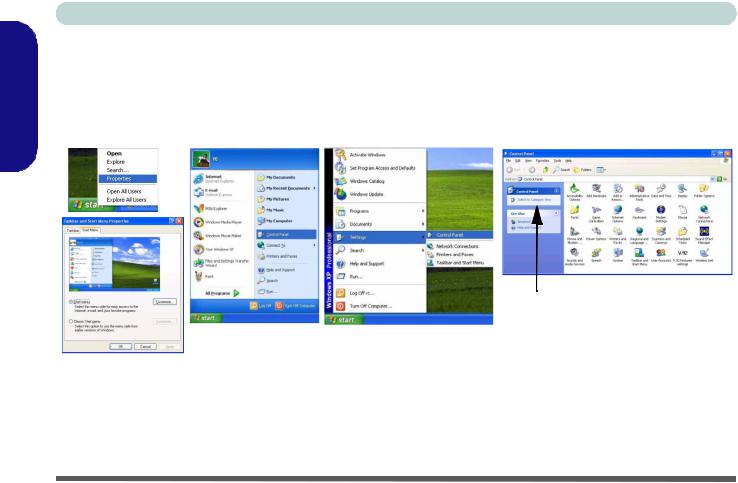
Windows XP Start Menu & Control Panel
Most of the control panels, utilities and programs within Windows XP (and most other Windows versions) are accessed from the Start menu. When you install programs and utilities they will be installed on your hard disk drive, and a shortcut will usually be placed in the Start menu and/or the desktop. You can customize the look of the Start menu by right-clicking the Start menu and selecting Properties from the menu.
Click here to toggle Category View
Figure 10 - Start Menu & Control Panel
In many instances throughout this manual you will see an instruction to open the Control Panel. The Control Panel is accessed from the Start menu, and it allows you to configure the settings for most of the key features in Windows (e.g. power, video, network, audio etc.). Windows XP provides basic controls for many of the features, however many new controls are added (or existing ones are enhanced) when you install the drivers listed in Table 5, on page 27. To see all controls it may be necessary to toggle off Category View.
20 - Windows XP Start Menu & Control Panel

Concise User’s Guide
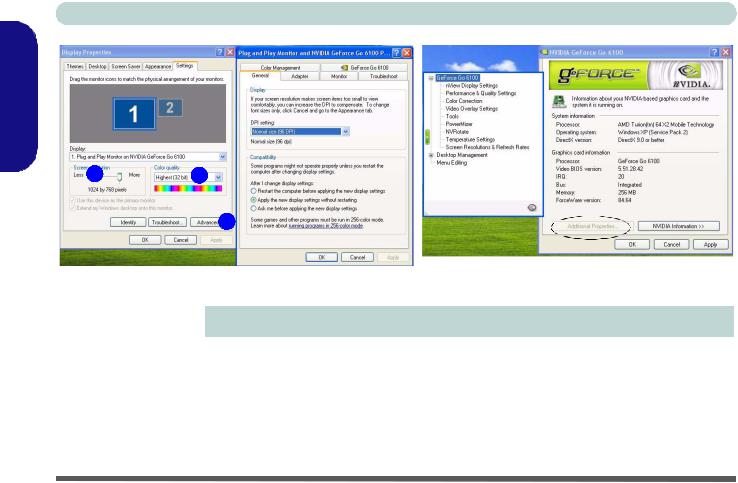
Video Features
Your computer will have built-in NVIDIA (GeForce Go 6100) on-board video. You can switch display devices, and configure display options, from the Display Properties control panel in Windows as long as the appropriate video driver is installed.
To access Display Properties in Windows:
1.Click Start, point to Settings and click Control Panel (or just click Control Panel).
2.Double-click Display (icon) - in the Appearances and Themes category.
3.Click Settings (tab) in the Display Properties dialog box.
4.Move the slider to the preferred setting in Screen resolution 1 (Figure 11 on page 22).
5.Click the arrow, and scroll to the preferred setting in Color quality 2 (Figure 11 on page 22).
6.Click the Advanced button 3 (Figure 11 on page 22) to bring up the Advanced properties tabs.
7.Click the GeForce Go 6100 tab, and click Additional Properties to make any video adjustments you require.
8.You can also access Display Properties by right-clicking the desktop and scrolling down and clicking Properties. Click Settings (tab) and adjust as above.
Display Devices & Options
Besides the built-in LCD, you can also use an external VGA monitor (CRT)/external Flat Panel Display as your display device. See Table 4, on page 22 for a summary of the display modes available.
English
Video Features - 21
Concise User’s Guide
English
1 |
2 |
|
|
3 |
|
|
|
Figure 11 - Display Properties Desktop |
|
|
|
NVIDIA Display Mode |
|
Description |
|
|
|
Single |
|
One of the connected displays is used as the display device |
|
|
|
Clone |
|
Both connected displays output exactly the same view |
|
|
|
Horizontal/Vertical Span |
|
Both connected displays are treated as a single virtual desktop, resulting in a large workspace |
|
|
|
Dualview |
|
Both connected displays are treated as separate devices, and act as a virtual desktop |
|
|
|
|
|
Table 4 - Display Options |
22 - Video Features
Concise User’s Guide
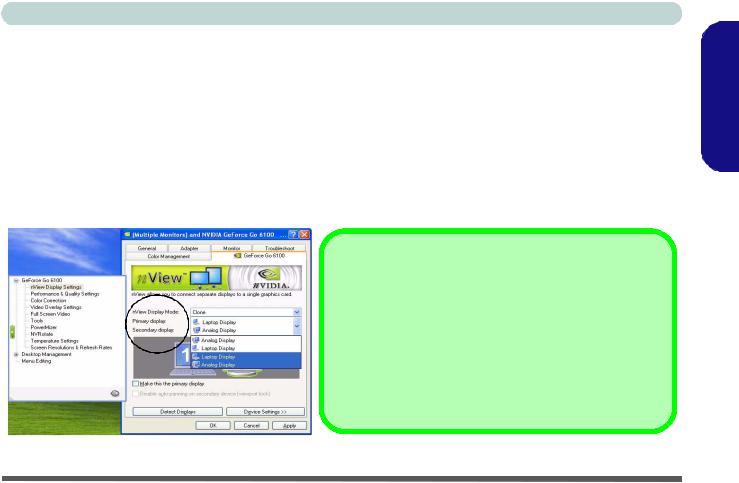
Attaching Other Displays
If you prefer to use a monitor or flat panel display, connect it to the external monitor port on the right of the computer.
1. Attach your external display to the external monitor port and turn it on.
2. Go to Additional Properties in the GeForce Go 6100 control panel tab (see Figure 11 on page 22). 3. Select nView Display Settings.
4. Select the display mode from the nView Display Mode drop box. 5. Select Apply.
6. Click Yes to confirm the settings.
7. Select the display option from the Primary Display/ Secondary Display dropbox and Apply the appropriate option.
Device Settings
Click the display icon to select it, then click the Device Settings button to make any adjustments for the selected display (including
Screen Resolutions & Refresh Rates).
Click Apply to confirm any setting changes.
Detect Displays
Click Detect Displays (button) to automatically update the attached display information.
Figure 12 - nView Display Settings
English
Attaching Other Displays - 23
English
Concise User’s Guide
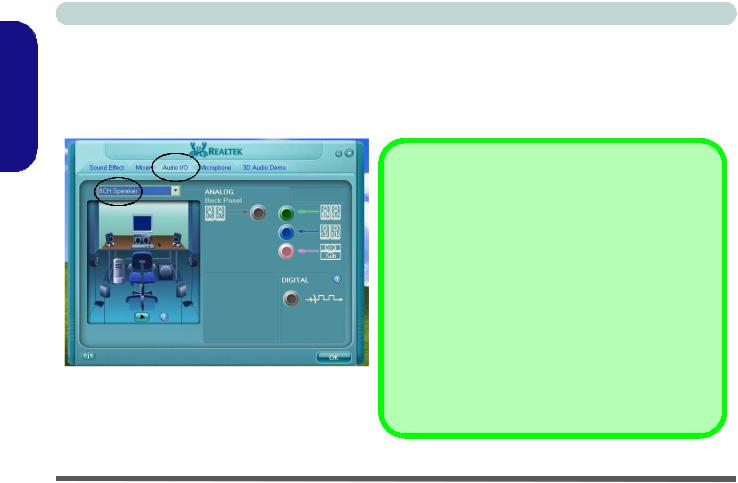
Audio Features
You can configure the audio options on your computer from the Sounds and Audio Devices  Windows control panel, or from the Realtek HD Audio Manager
  icon in the taskbar/control panel (this will bring up the Realtek Audio Configuration menus). The volume may also be adjusted by means of the Fn + F5/F6 key combination.
Figure 13
Realtek Audio Control Panel
8 Channel Sound Support
To configure your system for 8 channel sound support, select 8CH Speaker from the pull-down menu in Audio I/O (tab) and click OK. Connect the cables to the following audio jacks:
•Side Speaker Out - Connect to S/PDIF Out (Black)
•Center/Subwoofer Speaker Out - Connect to Microphone In (Pink)
•Front Speaker Out - Connect to Speaker/Headphone Out (Green)
•Rear Speaker Out - Connect to Line In (Blue)
Sound Volume Adjustment
How high the sound volume can be set depends on the setting of the volume control within Windows. Click the Volume icon  in the taskbar to check the setting.
24 - Audio Features
Loading...