

Page 1
ContentsContents
User's GuideUser's Guide
Chapter 1:Use of the Computer
Packing List
Insert the battery
Connect power
Chapter 2:Activation of the Computer
Top View with LCD Panel Open
Running the notebook
Use the shortcuts
Chapter 3:Install Operation System and Driver
Install the Operation System
Other settings of SCU
Install the Driver program
Chapter 4:Extension of the computer functions
Expand the interface devices
Dear customer
2
2
2
Thank you for choosing this product!
Your computer has powerful information processing capabilities
and mobile characteristic, as well. Whether you are in the office or
at home or travel, it is your effective assistant, and accompanies
you all the time.
The following text will help you master the methods and the
techniques for use of the product.
3
3
4
5
5
8
9
Chapter 1:Use of the ComputerChapter 1:Use of the Computer
NO.1.1 Packing List
When you receive the Notebook, please open the package outside box and
carefully remove the content; if there is any omission or damage, please
contact the computer supplier immediately.
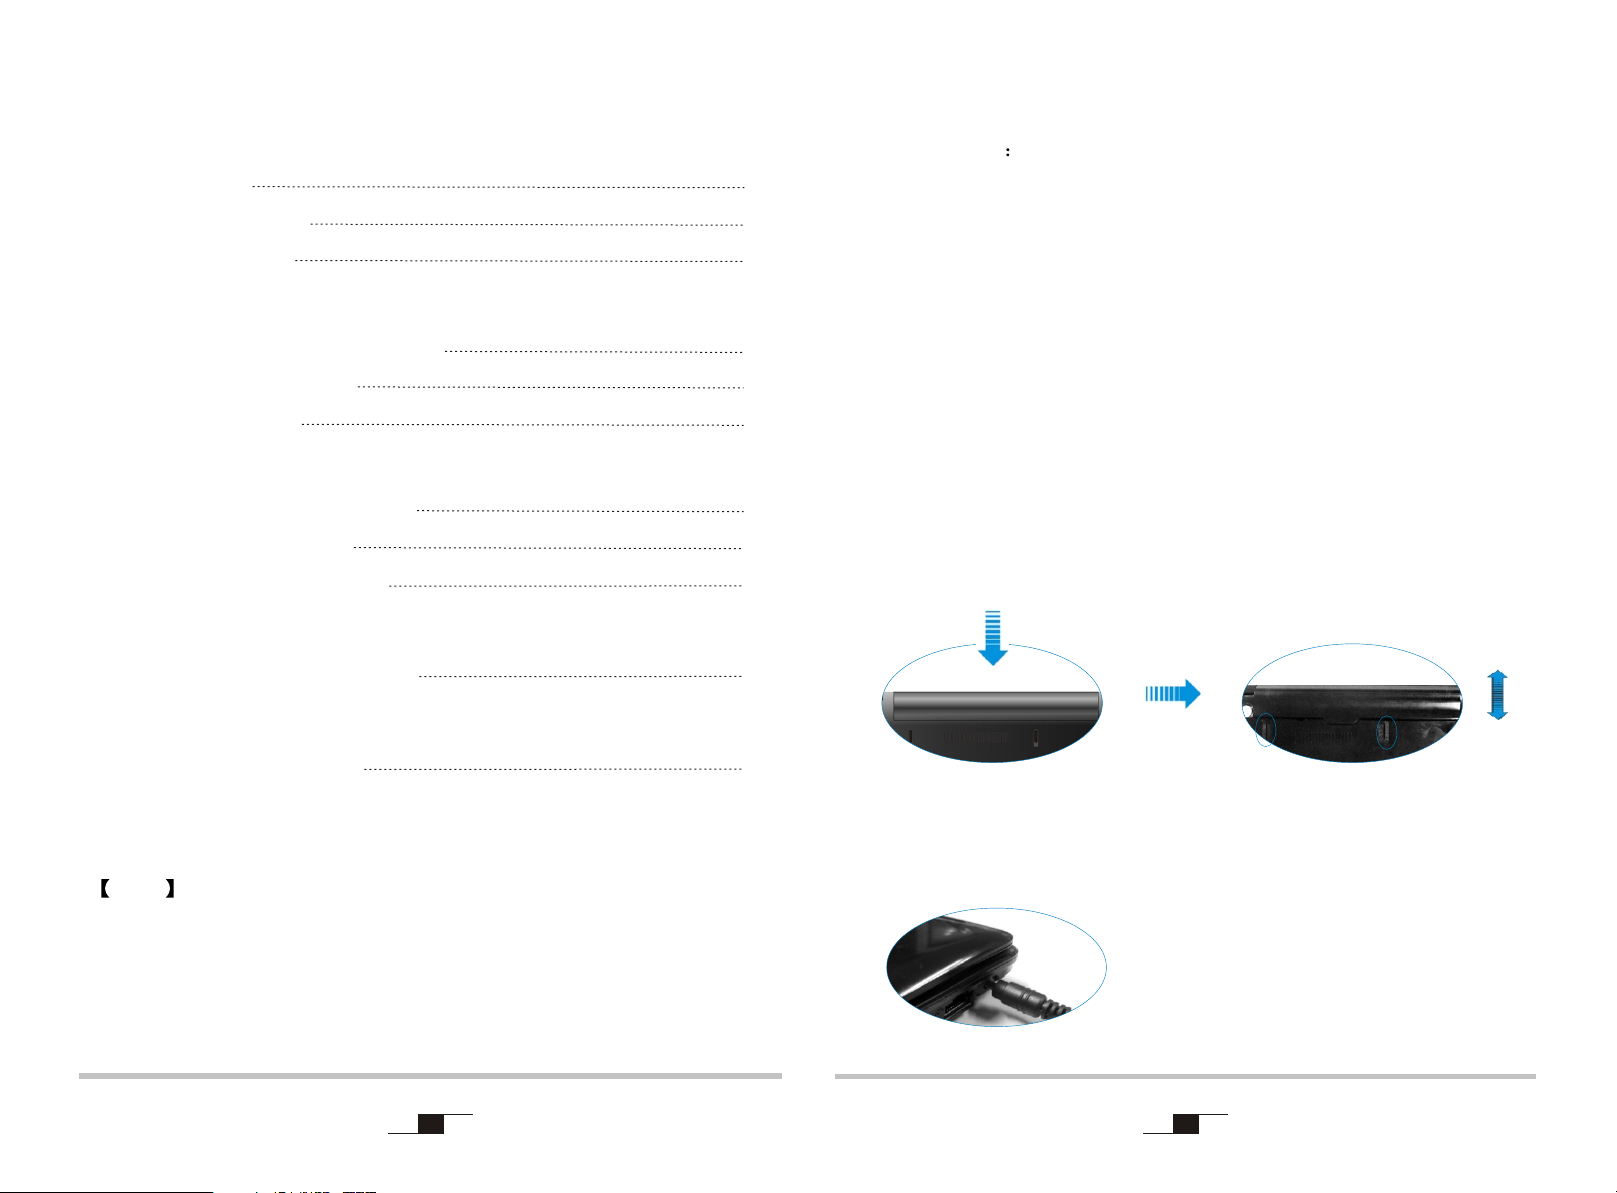
NO.1.2 Insert the battery
Chapter 5:Control Center Functions
Use the control Center
Note : The appearance, color, features, and pictures in the
manual are for reference only; if different, please see
the actual products.
Our company reserves the right to update the products and the
manual without prior notice.
1
10
Insert Battery
NO.1.3 Connect power
Remove Battery
2
Page 2
Chapter 2:Activation of the ComputerChapter 2:Activation of the Computer
NO.2.3 Use the shortcuts
Reference Version
NO.2.1 Top View with LCD Panel Open
Open up directly to the LCD (as show), to adjust the angle of the cover to get the
most appropriate visual effect. Be careful when open and shut down the computer
cover, please gently; forced open or shut down with the way of rejection may
cause the computer damage.
NO.2.2 Running the notebook
Make sure the computer has connected the adapter or the battery before press
the power button for one second to run the computer.
Key Key
Fn+Esc
Fn+F1
Fn+F2
Fn+F3
Fn+F4
Fn+F5
Fn+F6
Fn+F7
Fn+F8
Fn+F9
Fn+F10
Fn+F11
Fn+F12
Description Description
Enter Suspend state
Enable or disable the Touchpad
None
Enable or disable the wireless module(option)
Enable or disable sound
Decrease the lightness of LCD
Increase the lightness of LCD
Switch LCD/CRT
Open or Close the Display
Customized; The default is to quickly open Internet
Customized; The default is to quickly open Email
Customized; The default is to quickly open Media player
Customized; The default is to quickly open Bluetooth (option)
1
Power indicator; blue light flashing means into sleep appearance.
The battery and charging status indicator; if the light being amber means
2
the battery is charging, if the light being blue means it's been fully charged.
3
Fn+
Fn+
Fn+
Fn+
Fn+
Fn+
Increase the volume
Decrease the volume
Page up
Page down
Home
End
4
Page 3
Chapter 3:Install Operation System and DriverChapter 3:Install Operation System and Driver
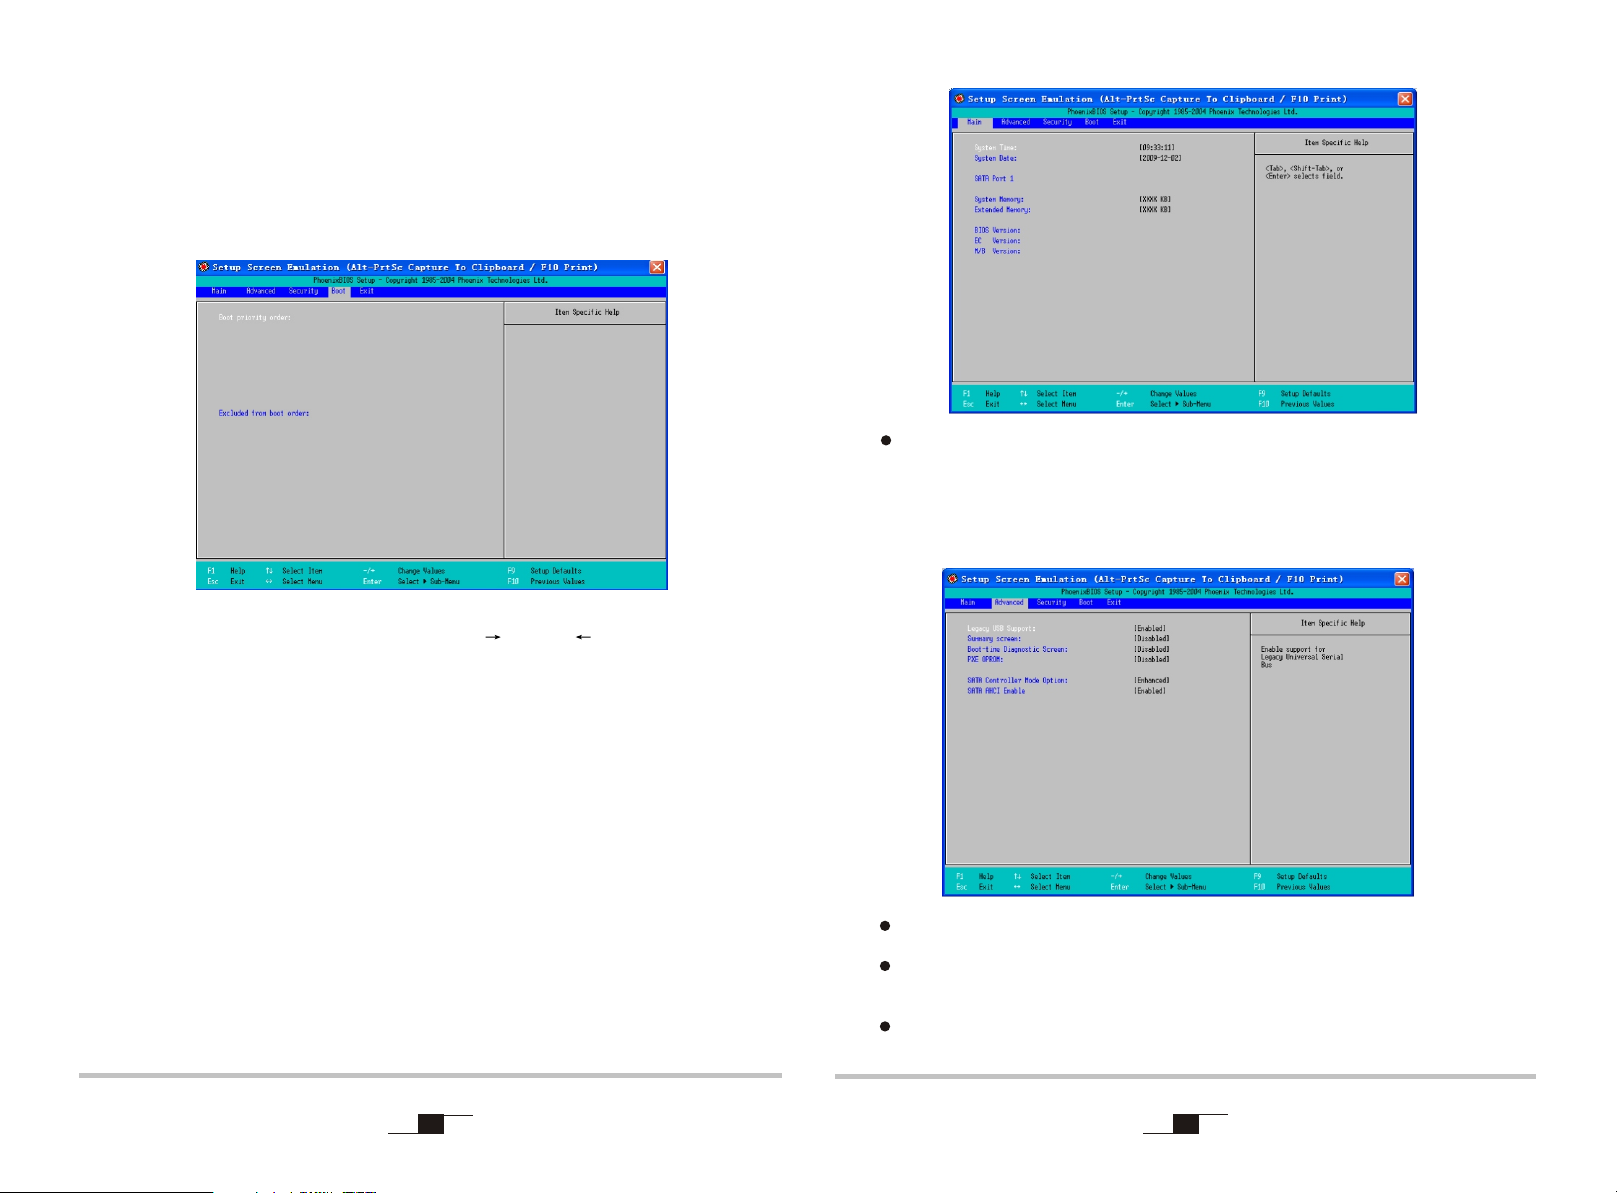
NO.3.1 Install the Operation System
Before installing OS, you need set USB-CD/DVD to the boot device according
to the following instructions. Open the computer, when display test, press [F2]
key to enter the BIOS Setup screen.
When enter the BIOS Setup screen, use the [ ] key or [ ]key on the keyboard
to choose Boot, select one device in the Boot priority order, and press the [ + ]
or [ - ] button to set priorities; press the [ X ] in the exclude from boot order
options to adjust the contained option to the Boot priority order.
Sata Port: Sata port connect sata device information.
The specific operation can be found in the System promoted screens.
Advanced menu: Conduct the following superior settings.
NO.3.2 Other settings of SCU
Main menu: Set system time and date, check the related information such
as: BIOS, EC, MB version, System Memory, and the extended Memory, etc.
5
Legacy USB: under the DOS system, set if the USB device can be used.
Summary screen: set whether it need to display the system configuration
during boot-time.
Boot-time Diagnostic Screen: in the POST process to set the image
display mode or the text isplay mode.
6
Page 4

PXE OPROM: network card start switch.
Sata Controller Mode Option: set the HDD working mode.
If install the Windows XP, need disabled AHCI.
AHCI Enable: it is effective when HDD working mode is set as Enable;
The Enabled/Disabled is optional.
Security menu: Security menu: the security setting to enter the system.
Supervisor password is: to display whether has settings when entering
the Setup utility; if has setting, it will display Set, if doesn't have setting,
it display Clear.
Exit menu: exit the BIOS Setup after completed the relevant setup.
Exit Saving Changes store the value and exit.
Exit Discarding Changes: without storing the value and exit.
Load Setup Defaults restore the factory value.
Discard Changes: discard this setting, and return to the last setting.
Save Changes save the setting.
NO.3.3 Install the Driver program
User password is: to display whether has settings when entering the
Setup utility; if has setting, it will display Set, if doesn't have setting,
it display Clear.
Set User Password: set the password to enter Setup utility.
Set supervisor Password: set the password to enter Setup utility,
authority higher than User password.
Password on boot: the need to set startup password.
Set Harddisk Password: set the password to enter HDD.
Warning : Please remember the password you set, otherwise it will
cause inconvenience for you.
7 8
Please use the CD attached with the machine to operate in accordance with the
CD operation interface.
Option 1: Computer-specific driver.
Option 2: Application Software.
Choose the driver program you need and operate according to the screen
instruction. System will install the driver program automatically; during the
process, the system may restart.
Page 5

Chapter 4:Extension of the computer functionsChapter 4:Extension of the computer functions
Chapter 5:Control Center FunctionsChapter 5:Control Center Functions
NO.4 Expand the interface devices
1 2
435 6 7 8 9
Item Item
1
Security Lock Slot
2
Ventilation slot
3
Card reader
Description Description
Connect the key-type security lock
System running and the ventilation slot should not
be obstructed
Insert SD/MMC to expand the computer functions
NO.5 Use the control Center
You can search all kinds of information through control center, conduct system
settings and view the help information.
Note : If you want to make sure of the control center, please
install the computer attached data driver program.
Control center can make the modification after the printing; if there
is any different , please see the actual product, and this picture just
for reference.
4
Microphone-in jack
5
Headphone-out Jack
6
USB port
7
VGA port
8
RJ-45 LAN Jack
9
DC-in jack
Attention : Your Computer may not have all the interface above according
to the specific type, please check with the real.
External microphone
Audio output or 2.1 pre-output can connect
headphones and speakers
Connect USB devices, such as: printer etc.
External monitor
Connect the net cable
AC Adapter
9 10
System Information
Click the system information mark on the home-page of control center so that
you can see the system basic information, as the following picture:
Page 6

Note : Click the drop-down menu on the lower right corner to
search more information.
Click the battery mark on the home-page of the control center to view the system
power supply information and auto-warning settings.
as shown in the following picture:
Click the cooling control mark on the home-page of the control center to view the
relevant CPU and fan information.as shown in the following picture:
Click the display mark on the home-page of the control center to carry out the
display settings and adjust the lightness of the LCD black light.
as shown in the following picture:
11
The method to adjust the display device is that when it connects the external monitors
such as CRT, click CRT display mark first, click the switch to the selected display
device button which will transmit the image to the corresponding display.
Note : It maximum allows two display devices to display simultaneously.
12
Page 7

Click the shortcuts mark on the home-page of the control center to select the
programs you want to startup. If you want to return to the factory device, click the
restore default button.
Windows Vista operation system
Click the profile icon on the home-page of the control center so that you can set
the different power cases by yourself according to the need.
Windows XP operation system
Click the device control icon on the homepage of the center control to view your
computer device state, as shown in the following picture:
Note : based on the different models, the picture you see may
be different with the chapter; please see the actual product.
13
14
 Loading...