

Page 1
GR. 0+
0-13Kg
Page 2
2
3
Istruzioni d’uso Pag. 9-14
Instructions for use Pag. 15-20
Mode d’emploi Pag. 21-26
Gebrauchsanleitung Pag. 27-32
Instrucciones de uso Pag. 33-38
Instruções de utilização Pag. 39-44
Gebruiksaanwijzing Pag. 45-50
Οδηγίες χρήσης Pag. 51-56
Brugsanvisning Pag. 57-62
Käitöohjeet Pag. 63-68
Návod K Použití Pag. 69-74
Bruksanvisning Pag. 75-80
Instrukcja sposobu użycia Pag. 81-86
Használati Utasítás Pag. 87-92
Upute Za Uporabu Pag. 93-98
Инструкция по использованию Pag. 99-104
Návod K Použitiu Pag. 105-110
Navodila Za Uporabo Pag. 111-116
Kullanım bilgileri Pag. 117-122
Instrucţiuni de folosire Pag. 123-128
Инструкции за употреба Pag. 129-135
I
GB
F
D
E
P
NL
GR
DK
FIN
CZ
S
HR
RUS
SLO
SK
BG
H
R
PL
TR
Page 3
3
1
3
5
2
4
6
A
D
C
E
Page 4
4
5
7
11
8
12
10a9a
9c
9b 10b
Page 5
5
13
15
17
14
16
18
Page 6
6
7
CLACK
19
21
23a 23b
20
22
24
Page 7
7
27a 27b
25 26
28
3029
Page 8

899
Page 9

CHICCO
AUTO-FIX FAST
Gr. 0+ (0-13kg)
ISTRUZIONI D’USO
INDICE:
1. INTRODUZIONE
1.1 AVVERTENZE
1.2 CARATTERISTICHE DEL PRODOTTO
1.3 DESCRIZIONE COMPONENTI
1.4 POSIZIONI DEL MANIGLIONE
1. 5 LI MI TAZ IO NI E REQ UI SI TI D ’U SO REL AT IVI AL PRODOTTO E AL SEDILE AUTO
2. INSTALLAZIONE IN AUTO
2.1 CONFIGURAZIONE INIZIALE DEGLI
SPA LLACCI
2.2 INSTALLAZIONE CON BASE
2.3 INSTALLAZIONE SENZA BASE
3. ULTERIORI OPERAZIONI
3.1 ALLOGGIAMENTO DEL BAMBINO NEL
SEGGIOLINO
3.2 REGOLAZIONE DELLA POSIZIONE
DELLE CINTURE
3.3 POSIZIONE FISSA O BASCULANTE DEL
SEGGIOLINO (USO SDRAIETTA)
3.4 UTILIZZO CON PASSEGGINO
3.5 PULIZIA E CONSERVAZIONE
1. INTRODUZIONE
1.1 AVVERTENZE
IMPORTANTISSIMO: DA LEGGERE SUBITO
• C O N S E R V A R E Q U E S T O M A N U A L E P E R
UTILIZZI FUTURI.
• P e r i l m o n t a g g i o e l ’ i n s t a l l a z i o n e d e l p r o -
do tto seg uir e sc ru pol osa me nte l e is tr uzi oni . Ev ita re c he q ual cun o ut ili zzi il p rod ot to
senza aver letto le istruzioni.
• A T T E N Z I O N E ! I n b a s e a l l e s t a t i s t i c h e s u g l i
incidenti, generalmente i sedili posteriori
del veicolo sono più sicuri di quello anteriore: si consiglia pertanto di installare il
Seggiolino sui sedili posteriori. In particolare il sedile più sicuro è quello centrale
posteriore, se dotato di cintura a 3 punti.
• A T T E N Z I O N E ! G R A V E P E R I C O L O ! N o n
ut ili zz are m ai q ue sto S eg gio lin o su un se dile an terio re dotato di airb ag fro ntale . E’
possibile installare il Seggiolino sul sedile
anteriore soltanto se l’airbag frontale è
stato disattivato: vericare con la casa
automobilistica o sul manuale d’istruzioni
dell’auto la possibilità di disinserire l’airbag.
Si consiglia in ogni caso di arretrare il più
possibile il sedile compatibilmente con
la presenza di altri passeggeri sul sedile
posteriore.
• S i r a c c o m a n d a c h e t u t t i i p a s s e g g e r i o ccupanti siano informati della modalità
di sgancio del bambino in caso di emergenza.
• P r e s t a r e a t t e n z i o n e a c o m e s i i n s t a l l a i l
Se ggi oli no i n au to in mod o da e vit are che
un sedile mobile o la portiera possano
interferire con esso.
• N e s s u n S e g g i o l i n o p u ò g a r a n t i r e l a t o t a l e
si cur ez za d el b amb ino in c aso d’i nci de nte,
ma l’utilizzo di questo prodotto riduce il
rischio di lesioni gravi o di morte.
• I l r i s c h i o d i s e r i d a n n i a l b a m b i n o , n o n
so lo i n ca so d ’in cid ent e, ma an che in al tre
circostanze
(per es. brusche frenate, ecc.) aumenta se
le indicazioni riportate in questo manuale
non vengono seguite in modo scrupoloso:
vericare sempre che il Seggiolino sia agganciato correttamente al sedile.
• N e l c a s o i n c u i i l S e g g i o l i n o f o s s e d a n n e g giato, deformato o fortemente usurato,
questo deve essere sostituito, potrebbe
aver perso le caratteristiche originali di
sicurezza.
• N o n e f f e t t u a r e m o d i c h e o a g g i u n t e a l
prodotto senza l’approvazione del costruttore.
• N o n i n s t a l l a r e a c c e s s o r i , p a r t i d i r i c a m b i o e
componenti non forniti dal costruttore.
• N o n l a s c i a r e m a i i l b a m b i n o i n c u s t o d i t o
nel Seggiolino per nessun motivo.
• N o n l a s c i a r e m a i i l S e g g i o l i n o s u l s e d i l e
dell’auto non agganciato, potrebbe urtare
e ferire i passeggeri.
• N o n i n t e r p o r r e n u l l a , c h e n o n s i a u n a c ces sori o appr ovato p er il p rodot to, né tra
il sedile auto e il seggiolino, né tra il Seggiolino e il bambino: in caso di incidente
il Seggiolino potrebbe non funzionare
correttamente.
I
Page 10
10
11
• N e l c a s o i n c u i l ’ a u t o v e n i s s e l a s c i a t a s o t to il sole diretto si consiglia di coprire il
Seggiolino.
• I n s e g u i t o a d u n i n c i d e n t e a n c h e l i e v e i l
Seggiolino può subire danni non sempre
vi sibi li a oc chio n udo: è pe rta nto ne ces sario sostituirlo.
• N o n u t i l i z z a r e S e g g i o l i n i d i s e c o n d a m a n o :
pot rebbero avere s ubito danni struttura li
no n vi sib ili a oc chi o nu do, ma c omp ro mettenti la sicurezza del prodotto.
• L a f o d e r a p u ò e s s e r e s o s t i t u i t a e s c l u s i v a me nte con una app rov ata dal cos tru tto re ,
po ich è co sti tui sc e un a pa rte int egr ant e de l
Seggiolino. Il Seggiolino non deve essere
ma i us ato sen za la f ode ra , pe r no n co mp romettere la sicurezza del bambino.
• C o n t r o l l a r e c h e i l n a s t r o d e l l a c i n t u r a n o n
ri sul ti a tto rci gli ato ed e vit are che que st ’ul ti mo o par ti d el Seg gio lin o ve nga no p iz zica te t ra l e po rt ier e o s fre ghi no c ont ro p unt i
ta gli ent i. Q ua lor a la cin tur a pr es ent i ta gli o
slacciature è necessario sostituirla.
• V e r i c a r e c h e n o n v e n g a n o t r a s p o r t a t i , i n
particolare sul ripiano posteriore all’interno del veicolo, oggetti o bagagli che non
siano stati ssati o posizionati in maniera
si cur a: i n ca so d i in cid en te o b ru sca fre na ta
potrebbero ferire i passeggeri.
• A s s i c u r a r s i c h e t u t t i i p a s s e g g e r i d e l l ’ a u t o
ut ili zzi no l a p rop ria cin tur a di sic ure zz a sia
pe r la pro pr ia si cur ez za s ia p erc hé d ura nte
il viaggio, in caso di incidente o brusca
frenata, potrebbero ferire il bambino.
• I n c a s o d i l u n g h i v i a g g i f a t e d e l l e s o s t e
frequenti. Il bambino si stanca molto facilmente. Per nessuna ragione estrarre il
ba mbi no d al S eg gio lin o me ntr e l’a uto è in
movimento. Se il bambino ha bisogno di
at ten zio ne, è ne ces sa rio trov ar e un p ost o
sicuro e accostare.
• N e o n a t i p r e m a t u r i n a t i c o n m e n o d i 3 7
settimane di gestazione possono essere a
rischio nel Seggiolino. Tali neonati possono
avere difcoltà respiratorie mentre sono
seduti nel Seggiolino. Consigliamo quindi
di riv olg er vi a l vo st ro m edi co o al p er son ale
dell’ospedale afnché possano valutare il
vo str o ba mbi no e ra cco man dar e il Seg gi olino adatto prima di lasciare l’ospedale.
• L a s o c i e t à A r t s a n a d e c l i n a o g n i r e s p o n s a b i lità per un uso improprio del prodotto.
1.2 CARATTERISTICHE DEL
PRODOT TO
• Q u e s t o S e g g i o l i n o è o m o l o g a t o “ G r u p p o
0+”, per il trasporto di bambini dalla nasc ita no a 1 3 kg d i pe so (da 0 a 10 mes i/1
anno circa), nel rispetto del regolamento
europeo ECE R44/04.
• L’ o m o l o g a z i o n e è d i t i p o “ U n i v e r s a l ” ,
quindi il Seggiolino può essere utilizzato su qualsiasi modello di automobile.
ATTENZIONE! “Universal” signica che
è compatibile con la maggior parte, ma
non con tutti i sedili auto.
AVVISO IMPORTANTE
1. Questo è un dispositivo di ritenuta bam-
bini “Universale”, omologato secondo
Regolamento ECE R44/04 e compatibile con la maggior parte, ma non tutti,
i sedili auto.
2. La per fe tta com pat ibi lit à è p iù f ac ilm ent e
ot ten ibi le n ei c asi in c ui i l cos tr utt ore del
veicolo dichiara nel manuale veicolare che
il vei col o pre ved e l’ ins ta lla zio ne d i di spo sitivi di ritenuta bambini “Universali” per
la fascia d’età in questione.
3. Questo dispositivo di ritenuta è stato
classicato “Universale” secondo criteri
di omologazione più severi rispetto a
modelli precedenti che non dispongono
del presente avviso.
4. Adatto per l’impiego nei veicoli dotati
di cintura di sicurezza a 3 punti, statica
o con arrotolatore, omologata in base
al Regolamento UN/ECE N°16 o altri
standard equivalenti.
5. In caso di dubbio, contattare il produt-
tore del dispositivo di ritenuta oppure il
rivenditore.
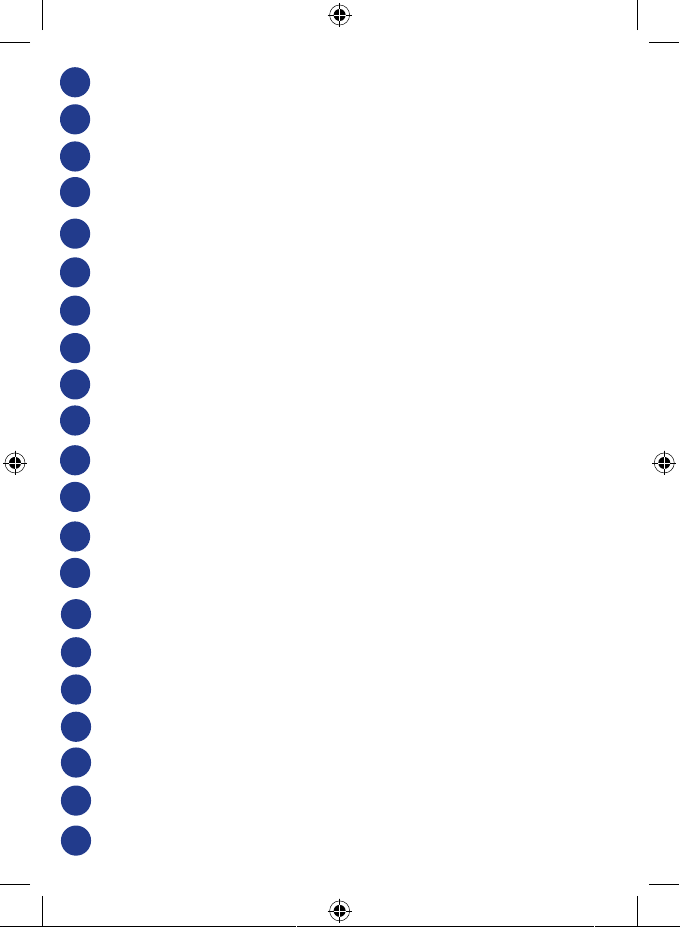
1.3 DESCRIZIONE COMPONENTI
Fig. 1 (3/4)
A. Maniglione
B. Capote parasole
C. Rivestimento tessile
D. Cuscino riduttore (*)
E. Base (**)
Fig. 2 (Fronte)
F. Asole di passaggio delle cinture
G. Cinture del Seggiolino
H. Spallacci (*)
Page 11

11
I . Pu lsa nte di r ego la zio ne d ell e ci ntu re ( sot to
la patella in tessuto)
J. Nastro di regolazione delle cinture
Fig. 3 (Profilo)
K. Guida cintura auto addominale sul Seg-
giolino
L. Guida cintura auto addominale sulla
base
M. Pulsanti per la rotazione del maniglio-
ne
N. Perni Clik Clak (per aggancio a passeg-
gino)
Fig. 4 (Dietro)
O. Guida cintura auto diagonale
P. Maniglia di sgancio (dalla base e dal pas-
seggino)
Q. Asole di passaggio delle cinture
R. Elemento di guida delle cinture del Seg-
giolino
S. Fermo stabilizzatore
(*) Forma e modello possono differire a
seconda delle versioni di Seggiolino.
(**) Opzionale
1.4 POSIZIONI DEL MANIGLIONE
Il maniglione del S eggiolino è regolabile in
4 posizioni (Fig. 5).
A. Posizione di trasporto in auto (ATTEN-
ZIONE: questa è l’unica posizione con-
sentita durante il trasporto in auto).
B. Posizione trasporto a mano.
C. Posizione uso sdraietta a dondolo o per
aggancio a passeggino Chicco predi-
sposto.
D. Posizione uso sdraietta ssa.
Per effettuare la regolazione premere contemporaneamente i pulsanti (M) sul maniglione ruotandolo nella posizione prescelta
no a udire uno scatto.
1.5 LIMITAZIONI E REQUISITI
D’USO RELATIVI AL PRODOTTO
E AL SEDILE AUTO
ATTENZIONE! Rispettare scrupolosamente le seguenti limitazioni e requisiti d’uso
relativi al prodot to e al sedile auto: in caso
contrario non è garantita la sicurezza.
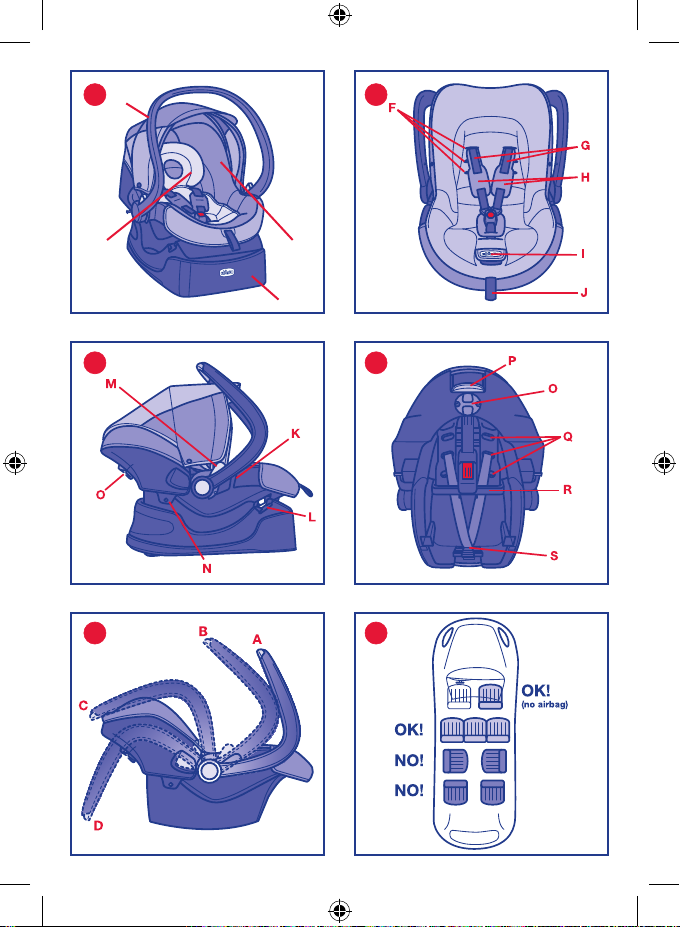
• I l S e g g i o l i n o p u ò e s s e r e i n s t a l l a t o s u l s e -
dile anteriore lato passeggero o su uno
qua lsias i dei sedi li poster iori. In ogni ca so
il sedile dell’auto deve essere rivolto in
se nso di m arc ia. Non uti liz za re m ai q ues to
Seggiolino su sedili rivolti lateralmente o
opposti al senso di marcia (Fig. 6).
• I l s e d i l e d e l l ’ a u t o d e v e e s s e r e d o t a t o d i
ci ntu ra d i si cur ez za a 3 pu nti , st ati ca o c on
arrotolatore, omologata in base al Regolamento UNI/ECE N°16 o altri standard
equivalenti (Fig. 7).
• A T T E N Z I O N E ! N o n i n s t a l l a r e m a i i l S e g gi oli no c on l a ci ntu ra d ell ’aut o a d ue p unt i
di ancoraggio (Fig. 8).
• N o n u t i l i z z a r e m a i i l c u s c i n o r i d u t t o r e s e i l
bambino ha un peso superiore a 6 kg.
2. INSTALLAZIONE IN AUTO DEL
SEGGIOLINO
Il Seg gio li no p uò e sse re i nst all ato sia con l a
base (opzio nale) che senza. In entrambe le
congurazioni, deve essere installato solo
in senso contrario rispetto alla direzione
di marcia.
2.1 CONFIGURA ZIONE INIZIALE
DEGLI SPALLACCI
Il Seggiolino è dotato di 2 differenti tipologie
di spallacci (A e B) a seconda delle versioni.
Prima di procedere all’utilizzo del Seggiolino,
pe r pr ov ved ere al m ont ag gio deg li s pal la cci ,
procedere come segue:
• S p a l l a c c i v e r s i o n e A ( F i g . 9 A , 9 B e 9 C ) : f a r
passare gli spallacci attraverso le asole del
rivestimento tessile (non della struttura
sottostante) in modo che le cinture rima nga no p osi zio na te so pr a di e ss i. I nl are
la patella infragambe attraverso la bbia
delle cinture.
• S p a l l a c c i v e r s i o n e B ( F i g . 1 0 A e 1 0 B ) : f a r
pa ss are le ci ntu re d el Seg gio lin o at tr ave rso
i d ue s pal lac ci. In la re l a pa tell a in fr aga mbe attraverso la bbia delle cinture.
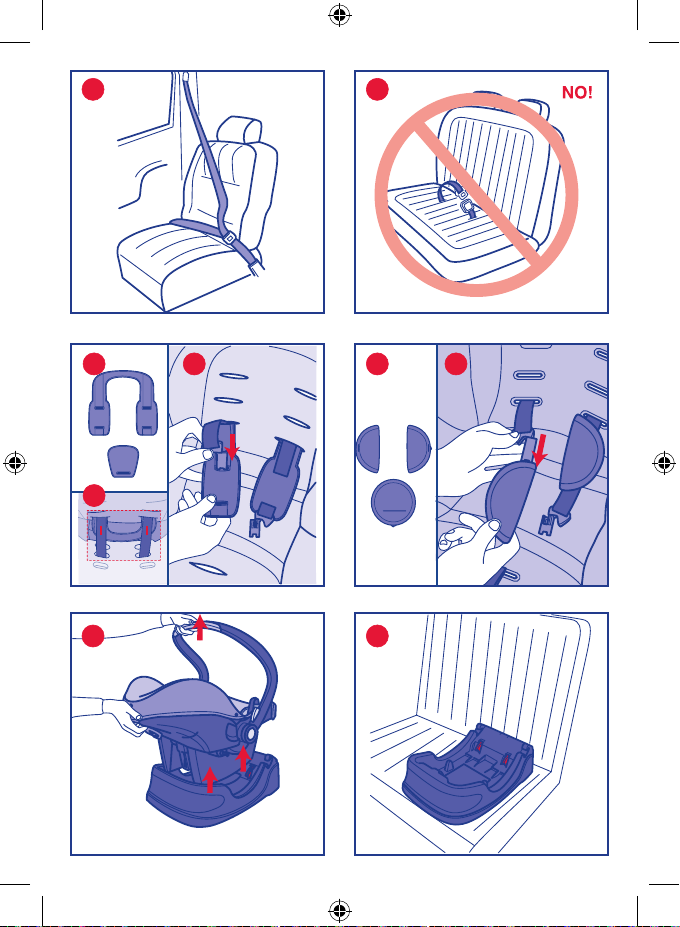
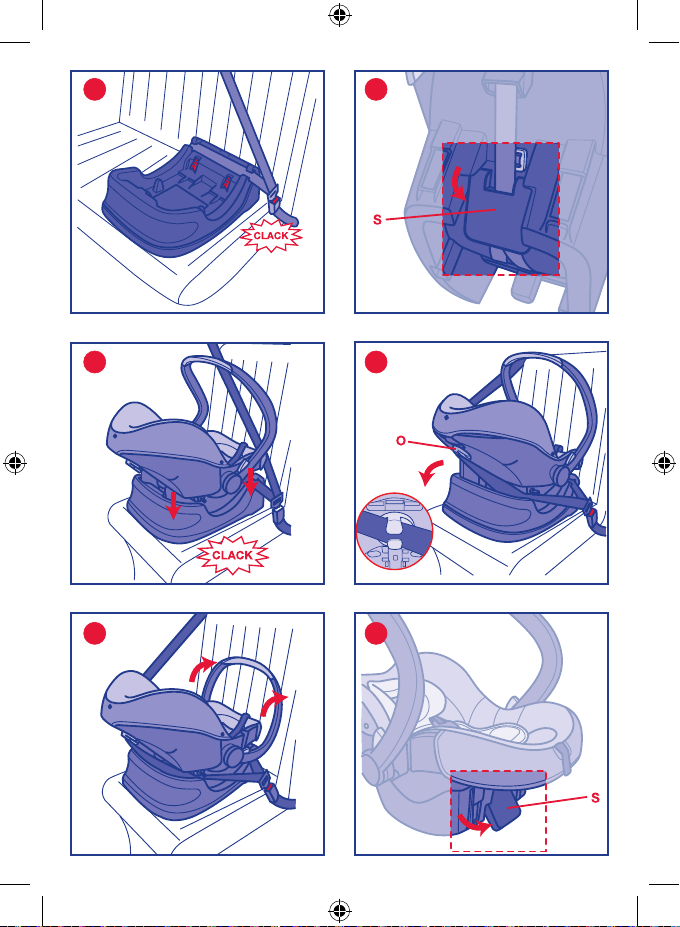
2. 2 INSTALLAZIONE CON BASE
Per installare il Seggiolino con la base sul
sedile dell’auto, procedere come segue:
1. Sganciare il Seggiolino dalla base tiran-
do la maniglia di sgancio posta dietro lo
schienale e contemporaneamente sollevarlo attraverso il maniglione (Fig. 11).
2 . Po siz ion are la b ase sul sed ile pre sc elto pe r
l’installazione, orientandola come in Fig.
Page 12
12
13
12, facendo in modo che sia a contatto
con lo schienale del sedile dell’auto.
3. Tirare la cintura di sicurezza dell’auto ed
agganciarla alla corrispondente bbia,
facendo passare la parte orizzontale
(addominale) nelle due apposite guide
(L) contrassegnate dalla freccia azzurra
e tenderla il più possibile (Fig. 13).
4. Prima di inserire il Seggiolino nella base,
vericare che il fermo stabilizzatore sia
chiuso (Fig. 14).
5. Inserire il Seggiolino nella base (rivolto
in sen so c ont rar io d i ma rci a) s pin gen dol o
verso il basso no ad ottenere l’aggancio
(udirete un “clack” di ssaggio) (Fig. 15).
6 . Ver i car e il cor ret to a gg anc io d el S eg gio -
lino alla base tentando di sollevarlo sia
dalla parte anteriore che posteriore.
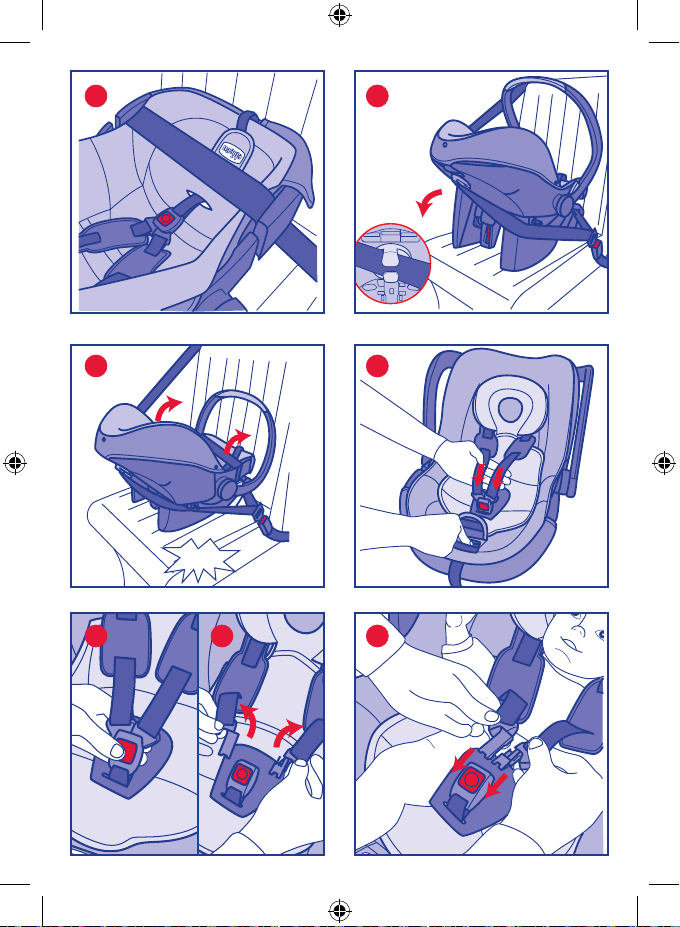
7. Impugnare la cintura diagonale dell’auto
e farla passare nell’apposita guida (O)
posta sul retro dello schienale del Seggiolino (Fig. 16). ATTENZIONE! La cintura diagonale durante il trasporto deve
SEMPRE rimanere inserita all’interno di
questa guida.
8. Tendere il più possibile la cintura, senza
lasciare eccessi di nastro ed assicurandosi
che non risulti attorcigliata.
9. Ruotare il maniglione in posizione A
vericando che appoggi contro il sedile
dell’auto (Fig. 17).
ATTENZIONE! dopo l’installazione vericare SEMPRE che la cintura dell’auto sia
correttamente in tensione e che sia distribu ita u nifo rmem ente in tut ti i punti, se nza
presentare attorcigliamenti. Non far passare
MA I la cin tur a de ll’a uto in p osiz io ni di ver se
da quelle indicate.
Per disinstallare il seggiolino mantenendo
la base installata sull’auto:
1 . S la re da lla gu ida su llo sc hie na le l a c int ur a
diagonale senza sganciarla dalla bbia.
2. riportare il maniglione in posizione verticale B (Fig. 5).
3. Sganciare il Seggiolino come illustrato
in precedenza.
2.3 INSTALLA ZIONE SENZA BASE
Pe r ins tall are il Se ggiol ino s enz a bas e, pr ocedere come segue:
1. Estrarre il fermo stabilizzatore e posi-
zionare il Seggiolino sul sedile dell’auto
prescelto (Fig. 18).
2. Tirare la cintura di sicurezza dell’auto ed
agganciarla alla corrispondente bbia,
fa cen do p as sar e la par te o riz zo nta le (a ddominale) della cintura nelle due apposite
guide (K) del seggiolino contrassegnate
dalla freccia azzurra (Fig. 19).
3. Im pug nar e il ram o di ago na le d ell a ci ntu ra
dell’auto e farlo passare nell’apposita
guida (O) posta sul ret ro dello schienale
del Seggiolino (Fig. 20). ATTENZIONE!
La cin tur a di ago nal e du ra nte i l tr as por to
deve SEMPRE rimanere inserita all’interno
di questa guida.
4. Tendere il più possibile la cintura, senza
lasciare eccessi di nastro ed assicurandosi
che non risulti attorcigliata.
5. Ruotare il maniglione in posizione A
vericando che appoggi contro il sedile
dell’auto (Fig. 21).
Per disinstallare il seggiolino:
1. Sganciare la cintura dell’auto premendo
la bbia.
2. Riportare il maniglione in posizione B
(verticale).
3. Slare la cintura dalla guida diagonale e
da quelle orizzontali.
3. ULTERIORI OPERAZIONI
3.1 ALLOGGIAMENTO DEL
BAMBINO NEL SEGGIOLINO
1. Sollevare la patella in tessuto, mantenere premuto il pulsante di regolazione e
tirare le cinture del Seggiolino in modo
da allentarle (Fig. 22).
2. Aprire la bbia, premendone il bottone rosso, e tenere divaricate le cinture
(Fig. 23).
3. Alloggiare il bambino.
4. So vra pp orr e le due lin gue tte del la bb ia e
in ser ir le un a vo lta uni te n ell a b bia no a
se nti re u n “cl ick ” ( Fig. 24). ATT ENZ IO NE!
Non inlare mai le linguette nella bbia
una alla volta o una sola.
5. Tensionare le cinture di sicurezza del
Seggiolino tirando l’apposito nastro di
regolazione (Fig. 25).
Page 13
13
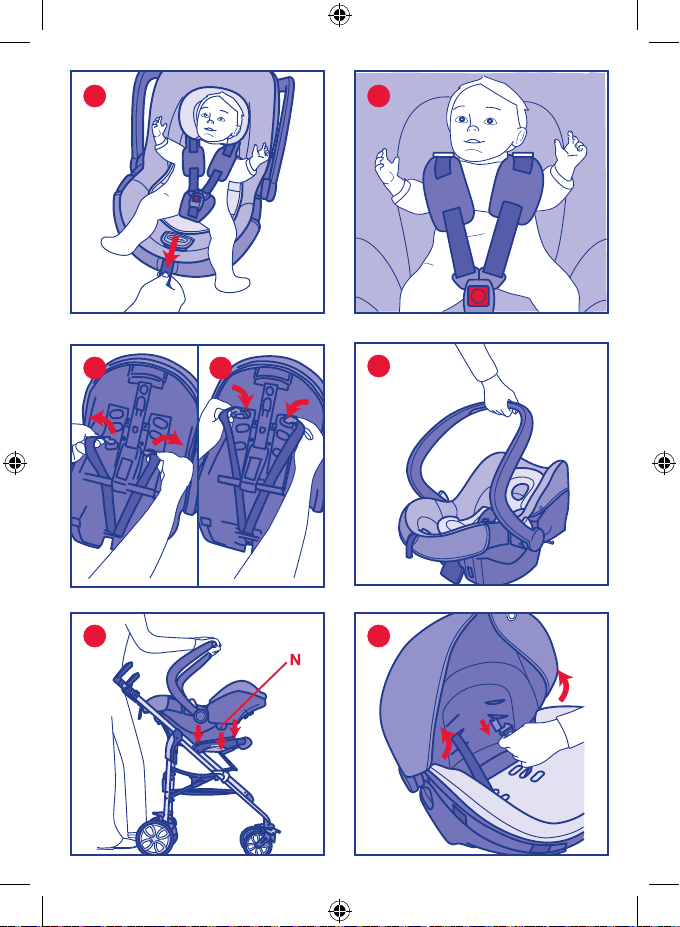
3.2 REGOL AZIONE DELL A
POSIZIONE DELLE CINT URE
ATTENZIONE! Le cinture devono sempre
essere adattate alla crescita del bambino.
Pr ima di i nst al lar e il Seg gio lin o i n au to bi so gna posizionarle all’altezza corretta.
Pe r un a co rre tta reg ola zio ne, le c int ure devo no u scir e da llo s chi ena le a ll’al tez za d ell e
spalle del bambino (Fig. 26).
Il seggiolino dispone di 3 posizioni in altezza.
Pe r ef fet tua re l o sp ost am ent o de lle c int ure
procedere come segue:
1. Rimuovere gli spallacci slandoli dalle
asole del rivestimento tessile.
2. Ap rir e la bb ia d ell e ci ntu re p rem end one
il bottone rosso.
3. Slare le cinture da dietro lo schienale e
inlarle nell’asola più adatta all’altezza
del bambino (Fig. 27A e 27B).
ATTENZIONE! Assicurarsi che le cinture
passino sempre tra l’elemento di guida (R)
e il guscio.
ATTENZIONE! Il cuscino riduttore garantisce al bambino dalla nascita no a 6 kg il
corretto contenimento e la posizione ideale
per collo e schiena.
3.3 POSIZIONE FISSA O
BASCULANTE DEL SEGGIOLINO
(USO SDR AIETTA)
Quando non viene utilizzato in auto, il
Seggiolino può anche essere usato come
dondolino o sdraietta.
Per renderlo basculante, chiudere il fermo
stabilizzatore (Fig. 14) e posizionate il maniglione in posizione C (Fig. 5).
Per utilizzarlo in posizione ssa, estrarre il
fermo stabilizzatore e posizionare il manico
nella posizione D (Fig. 5).
Po siz ion are s olo su s upe r ci s tab ili e d or izzontali.
ATT ENZION E! Prima di t rasport are il Se ggiolino, riportare sempre il maniglione in
posizione B (verticale).
AVVERTENZA! Non lasciare il
bambino incustodito.
AVVERTENZA! Utilizzare sempre
il sistema di ritenuta.
AVVERTENZA! E’ pericoloso utilizzare il Seggiolino su una supercie
sopraelevata, come tavoli, sedie,
ecc.
AVVERTENZA! Questo Seggiolino
non è inteso per prolungati periodi
di sonno.
AVVERTENZA! Non utilizzare il
Seggiolino se il bambino è in grado
di stare seduto da solo.
Il S eggioli no non so stitu isce un letto o una
culla. Se il bambino necessita di dormire,
dovrebbe essere posto in un letto o in una
culla adatta.
Non usare il Seggiolino se qualsiasi parte
fosse rotta o mancante.
3.4 UTILIZZO CON PASSEGGINO
ATTENZIONE! Per l’utilizzo insieme al
passeggino fare riferimento alle istruzioni
del passeggino. I Passeggini CHICCO dotati di sistema CLIK CLAK hanno braccioli
con speciali dispositivi che permettono di
agganciare il Seggiolino direttamente sul
passeggino, senza dover utilizzare ulteriori
accessori.
Per agganciare il Seggiolino al passeggino
procedere come segue:
1. Imp ugn ar e il s eg gio lin o co n il man igl ion e
in posizione verticale (B) (Fig. 28).
2. Agganciare i due perni di aggancio Clik
Clak del Seggiolino (N) ai braccioli del passeggino, prestando particolare attenzione
al fatto c he si aggancino s u entrambi i l ati.
Si udirà un clik di aggancio (Fig. 29).
AVVERTENZA Prima dell’uso controllare
che i dispositivi di ssaggio del Seggiolino
siano correttamente innestati.
Per sganciare il Seggiolino dal passeggino:
1. Riportare il maniglione in posizione verticale (B).
2. Tirare la maniglia di sgancio posteriore.
3. Spostare e appoggiare il Seggiolino su
una super cie piana.
ATTENZIONE: L’aggancio e lo sgancio si
possono effettuare anche con il bambino nel
Page 14
14
15
Se gg iol ino anc he s e co n il pes o d el b amb ino
le ope ra zio ni s udd ett e po tre bbe ro r isu lta re
meno agevoli. In questo caso si raccomanda
attenzione nell’effettuare le operazioni di
cui sopra.
3.5 PULIZIA E CONSERVAZION E
PULIZIA DELLA FODER A
Il riv est im ento tes sil e de l Se gg iol ino è co mpl eta men te s fod era bi le e l ava bil e a m ano o
in lavatrice a 30°C.
Per lavarlo, slacciare le cinture ed estrarre
il rivestimento tessile dopo aver slato i
due rami cinture e la bbia dalle rispettive
asole (Fig. 30).
Pe r il lav agg io s egu ire le i str uzi oni rip or tat e
sull’etichetta del rivestimento contenente i
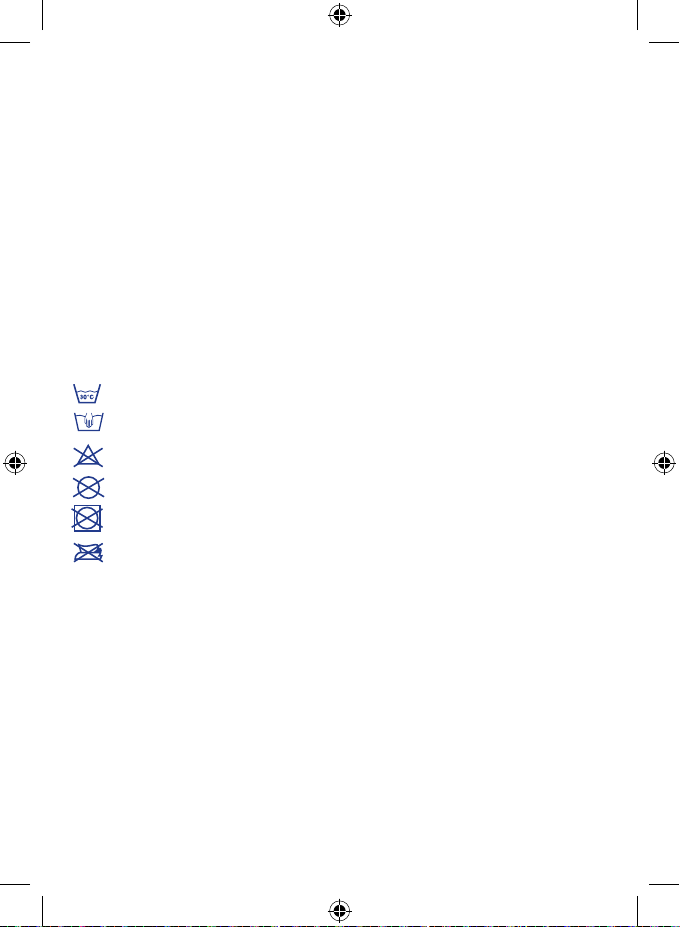
seguenti simboli per il lavaggio:
Lavaggio in lavatrice a 30°C
Lavaggio a mano
Non candeggiare
Non lavare a secco
Non asciugare in asciugatrice
Non stirare
Non usare mai detergenti abrasivi o solventi. Non centrifugare la fodera e lasciarla
asciugare senza strizzarla.
PULIZIA DELLE PARTI PLASTICHE E
DI METALLO
Per la pulizia delle parti in plastica o in
metallo verniciato utilizzare solamente un
pa nn o um ido . No n ut ili zz are mai det erg ent i
abrasivi o solventi.
Le parti mobili del Seggiolino non devono
essere in alcun modo lubricate.
CONTROLLO DELL’INTEGRITA’ DEI
COMPONENTI
Si raccomanda di vericare regolarmente
l’integrità e lo stato di usura dei seguenti
componenti:
• R i v e s t i m e n t o t e s s i l e : v e r i c a r e c h e n o n
fuoriescano imbottiture o che non ci sia
rilascio di par ti di esse. Vericare lo stato
delle cuciture che devono essere sempre
integre.
• C i n t u r e : v e r i c a r e c h e n o n c i s i a u n a n o -
mal o sbr amen to dell a trama te ssile con
ev ide nte rid uzi one del lo s pe sso re i n co rri spondenza del nastro di regolazione, dello
spartigambe, sui rami spalle e nella zona
della piastra di regolazione delle cinture.
• P l a s t i c h e : v e r i c a r e l o s t a t o d i u s u r a d i
tutte le parti in plastica che non devono
presentare evidenti segni di danneggia-
mento o di scolorimento.
AT TENZ ION E! N el c aso i n cui il Se ggi oli no
risultasse deformato o fortemente usurato
deve essere sostituito: potrebbe aver perso
le caratteristiche originali di sicurezza.
CONSERVAZIONE DEL PRODOTTO
Quando non installato sull’auto si raccomanda di conservare il Seggiolino in un
pos to asciutto, lo ntano da fo nti di c alore e
al riparo da polvere, umidità e luce solare
diretta.
SMALTIMENTO DEL PRODOTTO
Rag giun to il li mite di ut ilizzo p revis to per il
Se gg iol ino , in ter rom pe re l’ uso del lo s tes so e
de pos ita rl o tr a i r iu ti. Per mot ivi di r isp et to
de ll’a mbi ent e, s epa ra re i div ers i ti pi di ri ut i
secondo quanto previsto dalla normativa
vigente nel proprio Paese.
PER ULTERIORI INFORMAZION I:
ARTSANA SPA
Servizio Clienti
Via Saldarini Catelli, 1
22070 Grandate COMO-ITALIA
Tel. N° verde 800.188.898
www.chicco.com
Page 15
15
CHICCO
AUTO-FIX FAST
Gr. 0+ (0-13kg)
INSTRUCTIONS FOR USE
INDEX
1. INTRODUCTION
1.1 WARNINGS
1.2 PRODUCT FEATURES
1.3 DESCRIPTION OF THE PARTS
1.4 POSITIONS OF THE HANDLE
1.5 RESTRICTIONS AND REQUISITES REGARDING THE USE OF THE PRODUCT
AND CAR SEAT
2. CAR INSTALLATION
2.1 INITIAL CONFIGURATION OF THE
SHOULDER STRAPS AND PADS
2.2 INSTALLATION WITH THE BASE
2.3 INSTALLATION WITHOUT THE BASE
3. OTHER OPERATIONS
3.1 SEATING THE CHILD IN THE CAR
SE AT
3.2 ADJUSTING THE POSITION OF THE
HARNESS STRAPS
3.3 FIXED OR ROCKING POSITION OF THE
CAR SEAT (ROCKER CHAIR MODE)
3.4 USE WITH THE STROLLER
3.5 CLEANING AND STORAGE
1. INTRODUCTION
1.1 WARNINGS
VERY IMPORTANT: TO BE READ IMMEDI ATE LY
• KEEP THIS MANUAL FOR FUTURE RE-
FERENCE.
• Read these instructions carefully before
t tin g an d in st all ing the pro duc t. T he pro duct must not be used by anybody who
has not read these instructions.
• W A R N I N G ! A c c o r d i n g t o c a r a c c i d e n t s t a -
ti sti cs , th e rea r s eat s of a veh icl e ar e ge ne ra lly saf er t han the fro nt sea t: i t is t he ref ore
re com men de d to t th e ch ild car sea t in to
the rear seats of th e car. In par ticul ar, the
ce ntra l rea r se at is t he s afes t, wh en tted
with a 3-point safety strap.
• W A R N I N G ! S E R I O U S D A N G E R ! N e v e r u s e
this child car seat tted on front vehicle
seats tted with front airbags. The child
car seat can only be installed on a front
vehicle seat if the front airbag has been
disabled: check with the car manufacturer
or the rel ati ve u se r ma nua l fo r in str uc tio ns
on how to disable the airbag. It is always
re com men ded to sl ide the veh icle sea t as
far back as possible, according to whether
passengers are travelling in the back.
• It is recommended to ensure that all passe nge rs k no w ho w to r ele as e th e ch ild f ro m
the car seat in the case of an emergency.
• Pa y cl ose att ent ion on h ow t o t the chi ld
car seat inside the vehicle, to prevent a
loose seat or car door from interfering
with it.
• N o c h i l d c a r s e a t c a n g u a r a n t e e t h e t o t a l
safety of your child in the event of an acci den t, b ut t he u se o f th is p rod uct red uce s
the risk of serious injuries or death.
• T h e r i s k o f s e r i o u s i n j u r i e s t o t h e c h i l d i n c r e as es, not onl y in the cas e of acc ide nt s, b ut
also in other circumstances (e.g. sudden
braking, etc.) if the instructions provided
in this manual a re not followed c arefully :
al way s ch ec k th at t he c hil d ca r se at i s t ted
correctly onto the vehicle seat.
• I f th e ch ild c ar s eat is d ama ged , de for me d
or worn out, it must be replaced, as its
original safety features may have been
compromised.
• T h i s p r o d u c t m u s t n o t b e m o d i e d i n a n y
way, unless the modication is approved
by the manufacturer.
• Do not install accessories, spare parts,
or any component not supplied by the
manufacturer.
• Never leave your child unattended in the
car seat.
• N e v e r p l a c e t h e c h i l d s e a t o n a v e h i c l e
se at w ith out fas ten ing it s ecu rel y in pla ce;
it could hurt or injure other passengers
in the car.
• N eve r pl ace any thi ng e xce pt a n ap pro ved
accessory between the vehicle seat and
the child car seat or between the child
car seat and the child: in the event of an
accident, the child car seat may not operate correctly.
• I t i s r e c o m m e n d e d t o c o v e r t h e c h i l d c a r
GB
Page 16
16
17
seat if the vehicle is left exposed to direct
sunlight.
• After an accident, even a minor one, the
child seat incurs damage, even if it is not
vi sib le to the nak ed e ye. I t mu st t he refo re
be replaced.
• Do not use second hand child car seats:
th ey m ay h ave suf fer ed s tr uct ura l da ma ge
which is not visible to the naked eye but
however compromise the safety of the
product.
• T he s eat fab ric mus t on ly b e re pl ace d wi th
another approved by the manufacturer as
it constitutes an integral part of the child
car seat. To ensure the safet y of the child
car seat, never use it without its fabric
cover.
• Check that the harness straps are not
twisted and try to prevent them, or any
other part of the car seat from getting
tr ap ped in t he c ar d oor or r ubb ing aga ins t
sharp objects. Should the belt be slashed
or frayed it must be replaced.
• D o n o t t r a n s p o r t l o o s e o r u n s e c u r e d
objects or baggage on the back shelf of
the vehicle: in the event, of an accident
or sudden braking, they may injure the
passengers.
• Ensure that all the car passengers fasten
their seat belts, for their own safety and
because, during the journey, they may
in jur e th e ch ild in th e ev ent of a n ac cid ent
or sudden braking of the car.
• On long journeys make frequent stops.
Ch ild ren tir e eas ily . Ne ver, f or a ny r eas on,
rem ove your chi ld from the child car seat
wh il st t he c ar i s mo vin g. I f yo ur c hil d ne eds
attention, nd a safe place and pull over.
• P r e m a t u r e b a b i e s b o r n b e f o r e t h e 3 7 t h
week of pregnancy can be at risk if placed in a child car seat. These newborn
ba bie s ma y en co unte r b rea thi ng p rob lem s
when s at in a c hild car s eat. We there fore
recommend you contact your doctor or
hospital staff, before leaving the hospital,
so they can evaluate your baby properly
and recommend the most suitable type
of child car seat.
• A rt san a de cli ne s al l re spo nsi bil ity in c ase s
of incorrect use of this product.
1.2 PRODUCT FEATURES
• T h i s c h i l d c a r s e a t i s a p p r o v e d f o r “ G r o u p
0+ ”, for the tr ans por t of bab ie s fr om b irt h
up to 13 Kg in weight (from 0 to 10/12
months approximately), and conforms to
European Standard ECE R 44/04.
• T h i s a p p r o v a l i s “ U n i v e r s a l ” , w h i c h m e a n s
that the child car seat can be used on all
ty pe s of v ehi cle s. WARN IN G! “ Un ive rsa l”
me ans tha t it is c omp ati ble wit h mo st, but
not all car seats.
IMPORTANT INFORMATION
1. This is a “Universal” child restraint devi-
ce. It is approved to ECE Regulation No.
44.04, and it will t most, but not all
car seats.
2. A correct t is likely if the vehicle manu-
facturer has declared that the vehicle is
capable of accepting a “Universal” child
restraint device for this age group.
3. Th is c hil d re str ain t de vic e ha s b een cla ssi -
ed as “Universal” under more stringent
conditions than those that were applied
to ear lie r de sig ns t hat do n ot d isp lay thi s
notice.
4. It is only suitable if the vehicle is tted
with a 3-point static or 3-point retractor safety belts approved to UN/ECE
Regulation No.16, or other equivalent
standards.
5. If in doubt, consult either the child re-
straint device manufacturer or your
retailer.
1.3 DESCRIPTION OF THE PARTS
Diag. 1 (3/4)
A. Carry Handle
B. Sun hood
C. Fabric lining
D. Booster cushion (*)
E. Base (**)
Diag. 2 (Front)
F. Belt threading slots
G. Child car seat restraint harness
H. Shoulder pads (*)
I. Restraint harness adjustment button
(under the fabric ap)
J. Restraint harness adjustment strap
Diag. 3 (Profile)
Page 17

17
K. Abdominal car safety belt slot on the
child car seat
L. Abdominal car safety belt slot on the
base
M. Buttons to rotate the carry handle
N. Clik Clak pins (to fasten it to the strol-
ler)
Diag. 4 (Back)
O. Release handle (from the base and the
stroller)
P. Diagonal car safety belt slot
Q. Belt threading slots
R. Slot elements for the child car seat har-
ness straps
S. Stabiliser block
(*) Shape and model can differ according to
the child car seat version being used.
(**) Optional
1.4 POSITIONS OF THE HANDLE
Th e ch ild car sea t ca rr y ha nd le c an b e ad justed to 4 positions (Diag. 5)
A. Position when travelling by car (WAR-
NING: this is the only position allowed
when travelling by car).
B. Position when carried by hand.
C. Rocker chair mode position or when
you need to fasten it to an appropriate
Chicco stroller.
D. Fixed rocker chair position.
To adjust the position, press both buttons
(M) on the handle bar together and rotate
it to the desired position until you hear it
click into place.
1.5 RESTRICTIONS AND REQUISITES REGARDING THE USE OF THE
PRODUCT AND C AR SEAT
WARNING! Read these restrictions and
requisites carefully to ensure the product
an d ca r se at a re u se d sa fel y: i f yo u do n’t , th e
safety levels cannot be guaranteed.
• T h e c h i l d c a r s e a t c a n b e t t e d o n t o t h e
front passenger seat or any other back
seats. In any case the vehicle seat must
be facing forwards. Never use this child
car seat on ve hicle seats which are fa cing
sideways or facing rearwards (diag. 6)
• T h e v e h i c l e s e a t m u s t b e t t e d w i t h a
3-point static or 3-point retractor safety
belts approved to UN/ECE Regulation
No.16, or other equivalent standards
(Diag. 7).
• W A R N I N G ! N e v e r t t h e c h i l d c a r s e a t t o
a v ehi cle s eat tha t is onl y eq uip ped wit h a
2-point safety belt (Diag. 8)
• N e v e r u s e t h e b o o s t e r c u s h i o n i f t h e c h i l d
weighs more than 6 kg.
2. CAR INSTALLATION
The child car seat can be installed with or
without the base (optional). In both cases,
the child car seat must always be installed
facing rearwards.
2.1 INITIAL CONFIGURATION OF
THE HARNESS STRAPS AND
SHOULDER PADS
The child car seat is tted with 2 different
types of shoulder straps (A and B) according
to the v ersio n being u sed. B efore using the
ch ild car sea t, a sse mb le th e sh ou lde r st rap s
as follows:
• S h o u l d e r s t r a p s v e r s i o n A ( D i a g . 9 A , 9 B
an d 9C ): t hre ad t he har nes s s tra ps t hro ugh
the slots in the fabric cover (not through
th e se at s tru ctu re b elo w) s o th at th ey a re
visible on the seat. Thread the harness
buckle through the crotch pad.
• S h o u l d e r s t r a p s v e r s i o n B ( D i a g . 1 0 A a n d
10B): thread the harness straps though
th e t wo sh ou lde r pa ds. Th rea d th e ha rne ss
buckle through the crotch pad.
2. 2 INSTALLATION WITH THE BASE
To install the child car seat with base on the
vehicle seat, proceed as follows:
1. Remove the child car seat from the base
by pulling the release lever behind the
backrest whilst using the carry handle
to lift it upwards (Diag. 11).
2. Position the base on the chosen vehicle
seat, position it as seen in Diag. 12 so that
it touches the vehicle seat backrest.
3. Pull the vehicle safety belt and connect
it to the relative buckle, threading the
abdominal belt through the two slots (L)
indicated by the light blue arrows; pull it
as tight as possible (Diag. 13).
4. Before attaching the child car seat onto
the base, check that the stabiliser block
is closed (Diag. 14).
Page 18

18
19
5. Attach the child car seat onto the base
(in a rear facing position) and push it
downwards until you hear it click into
place (Diag. 15).
6. Check that the child car seat is correctly
t ted to t he b ase by li ft ing t he f ro nt an d
rear sections.
7. P ul l th e di ag ona l c ar s afe ty be lt a nd t hr ead
it thr oug h th e re lat ive slo t (O) on t he b ac k
of the child car seat backrest (Diag. 16)
WARNING! When travelling by car, this
diagonal safety belt must ALWAYS be
threaded through this slot.
8. Pul l th e be lt a s tig ht a s po ssi ble , wi tho ut
leaving any slack and making sure it is
not twisted.
9. Turn the carry handle to position A checking it rests against the vehicle seat
(Diag. 17).
WARNING!
After installing the child car seat, ALWAYS
ch eck that th e veh icle s afet y belt i s tigh tened properly along the entire length of the
be lt a nd n o pa rt s ar e tw is ted . NE VER t t he
car safety belt in any way other than that
indicated in these instructions.
To remove the child car seat leaving the
base on the vehicle seat:
1. Unthread the diagonal belt through the
sl ots in t he b ack res t wi tho ut r emo vin g it
from the buckle.
2. Bring the handle bar into a vertical position (Diag. 5).
3. Remove the child car seat as illustrated
above (Diag. 5).
2.3 INSTALLATION WITHOUT THE
BASE
To i nst all the chi ld c ar s ea t wi tho ut t he b ase ,
proceed as follows:
1. Fold out the stabiliser block and position
the child car seat on the desired vehicle
seat (Diag. 18).
2. Pull the vehicle safety belt and connect
it to the relative buckle, threading the
horizontal abdominal belt through the
two slots (K) indicated by the light blue
arrows (Diag. 19).
3. Take the diagonal car safety belt and thre ad i t th rou gh t he r ela tiv e sl ot ( O) on the
back of the child car seat backrest (Diag.
20) WARNING! When travelling by car,
this diagonal safety belt must ALWAYS
be threaded through this slot.
4. Pull the belt as tight as possible, without
leaving any slack and making sure it is
not twisted.
5. Turn the carry handle to position A checking it rests against the vehicle seat
(Diag. 21).
To remove the child car seat:
1. Release the car safety belt by pressing
the buckle.
2. Bring the carry handle into a vertical
position (B).
3. Unthread the belt through the diagonal
and horizontal slots.
3. OTHER OPERATIONS
3.1 SEATING THE CHILD IN THE
CAR SEAT
1. Raise the fabric ap, whilst pressing
the adjuster button and pull the child
car seat harness straps to loosen them
(Diag. 22).
2 . P res s t he r ed b ut ton to o pe n th e b uck le a nd
release the harness straps (Diag. 23).
3. Sit the baby inside.
4. Overlap the two ends of the harness
straps, insert them together inside the
bu ckl e un til you hea r th em c li ck i nto p la ce
(Diag. 24) WARNING! Never insert just
one end of the harness into the buckle
and do not insert them one at a time.
5. Tig hte n th e sa fet y ha rn ess by p ull ing the
adjuster strap (Diag. 25)
3.2 ADJUSTING THE POSITION OF
THE HARNESS STRAPS
WA RNI NG ! Th e ha rn ess str aps mus t a lwa ys
be adjusted to adapt to the child’s growth
phase. Before installing the child car seat
in sid e th e ve hic le, adj ust the har nes s s tra ps
to the right height.
To a dju st t hem cor re ctl y, th e h arn ess st rap s
must come out from the backrest at the
height of the child’s shoulders (Diag. 26)
Th e ch ild car sea t st rap s ca n be adj ust ed t o
3 height positions.
To adjust the harness straps, proceed as
follows:
Page 19

19
1. Remove the shoulder pads by unthreadi ng th em th rough t he s lots in th e fab ric
cover.
2. Pre ss t he r ed b utt on t o op en t he h ar nes s
buckle.
3. Sli de t he h arn es s st rap s ou t fr om b ehi nd
th e ba ck res t an d th rea d th em tho ugh the
sl ot w hic h is m ost sui tab le f or t he c hild ’s
height (Diag. 27A and 27B).
WARNING! Make sure that the harness
straps are always threaded between the
slot element ( R) and the shell.
WARNING! The booster cushion guarantees correct containment and the ideal
position for the neck and back of babies
from when they are born until they weigh
about 6 Kg.
3.3 FIXED OR ROCKING POSITION
OF THE CHILD SEAT (ROCKER
CHAI R MODE)
When the child car seat is not used inside
the vehicle, it can be used as a rocking or
static chair.
To a llo w it t o ro ck, clo se t he s tab ili ser blo ck
(Diag. 14) and move the carry handle to
position B (Diag. 5).
To u se i t in xe d mo de, fol d ou t th e st abi lis er
bloc k and move the h andle bar to position
D (Diag. 5).
Only place the child seat on stable horizontal surfaces.
WARNING! Before carrying the child car
seat, always bring the carry handle into a
vertical position (B).
WARNING! Never leave your child
unattended.
WARNING! Always use the restraint harness.
WARNING! Using the child car seat
on raised surfaces such as tables,
chairs etc can be very dangerous.
WARNING! This child car seat is
not designed for long periods of
sleep.
WARNING! Do not use the seat
when the child is able to sit up on
his own.
Th is c hil d ca r se at i s no t a re pl ace men t fo r a
bed or cot. If the child needs to sleep, they
should be moved to a bed or a cot.
Do not use the chi ld s eat i f so me o f it s pa rt s
are broken or missing.
3.4 USE WITH THE STROLLER
WA RNI NG ! Ple as e rea d t he St rol le r in str uction manual when using the child car seat
on the str oll er. The CHI CCO str oll ers , w hic h
use the CLIK CLAK system, have armrests
wi th s pec ia l de vic es t hat all ow yo u to fas te n
th e ch ild s eat to t he s tro ller fra me w ith out
any need for additional xtures.
To i nst all the chi ld se at o n th e st rol ler, pro ceed as follows:
1. Bring the carry handle into a vertical position (Diag. 28).
2. Connect the two Clik Clak fastener pins
on the child seat (N) to the arm rests on
the Stroller, making s ure that both sid es
are fastened correctly. You will hear them
click into place (Fig. 29).
WARNING!
Before use, ensure that all the child seatfastening devices are correctly tted in
place.
To remove the child seat from the stroller:
1. Bring the carr y handle into a vertical
position (B).
2. Pull the rear release handle.
3. Rem ove an d pl ace the chi ld s eat on a at ,
stable surface.
WAR NIN G: Th e chi ld sea t can be fa sten ed
an d un fas ten ed w it h th e ba by in sid e; t he se
pr oce dur es c oul d pr ove to b e mo re di f cul t
du e to the weig ht o f th e ba by. B e ve ry car eful when performing the above-indicated
procedures.
3.5 CLEANING AND STORAGE
HOW TO CLEAN THE FABRIC
COVER
The child seat’s fabric cover can be removed and cleaned by hand or in a washing
Page 20
20
21
machine at 30°C.
To wash it, undo the harness straps, unthre ad t he t wo s tr aps and buc kle thr oug h th e
relative slots and then remove the fabric
cover (Diag. 30).
Please refer to the cleaning instructions
on the fabric label, which illustrates the
following washing symbols:
Machine washable at 30°
Hand washable
Do not bleach
Do not dry clean
Do not spin dry
Do not iron
Never use abrasive detergents or solvents.
Do not spin dry the fabric cover; let it dry
without wringing it.
HOW TO CLEAN THE PLA STIC OR
METAL PARTS
Clean the plastic and coated metal parts
wi th a dam p cl oth onl y. Ne ver use abr as ive
detergents or solvents.
Th e mo va ble par ts of t he c hil d ca r se at m ust
not be lubricated.
CHECKING THE CONDITION OF
THE COMPONENTS
It is recommended to regularly check the
condition of the following components
to ensure that they are not damaged or
worn out:
• F a b r i c c o v e r : c h e c k t h a t t h e p a d d i n g d o e s
not come out f rom the seams. Chec k the
co ndi tio n of the sea ms: the y mu st a lwa ys
be intact and undamaged.
• H a r n e s s s t r a p s : c h e c k t h a t t h e f a b r i c w e f t
is not frayed or the harness strap worn
out in the parts corresponding to the
adjustment strap, crotch, shoulders and
harness adjustment plate.
• P l a s t i c p a r t s : c h e c k t h a t t h e p l a s t i c p a r t s
are not worn out, damaged or faded.
WA RNI NG! If t he c hil d ca r se at i s de for med
or worn out, it must be replaced: it may
no longer comply with the original safety
standards.
STORING THE PRODUCT
When it is not tted into the car, it is recommended to store the child car seat in
a d ry p lace , awa y fr om so urce s of h eat an d
to pro tec t it f ro m du st, hum idi ty a nd d ire ct
sunlight.
DISPOSING OF THE PRODUCT
Wh en t he c hil d ca r se at n o lo nge r co mpl ies
with the original safety standards, stop using
it and dis pos e of it at an a pp rop ria te c oll ection point. Dispose of the product as laid
down in the environmental regulations in
force in the country of use.
FOR FURTHER INFORMATION:
ARTSANA SPA
Customer Care
Via Saldarini Catelli, 1
22070 Grandate COMO-ITALIA
Tel. N° verde 800.188.898
www.chicco.com
Chicco UK Ltd
Prospect Close
Lowmoor Raod Business Park
Kirkby in Asheld
Nottinghamshire
NG17 7LF
Tel: 01623 750870
Page 21

21
CHICCO
AUTO-FIX FAST
Gr. 0+ (0-13kg)
MODE D’EMPLOI
TABLE DES MATIÈRES :
1. INTRODUCTION
1.1 AVERTISSEMENTS
1.2 CARACTÉRISTIQUES DU PRODUIT
1.3 DESCRIPTION DES COMPOSANTS
1.4 POSITIONS DE L A POIGNÉE
1.5 LIMITATIONS ET CONDITIONS D’UTILI-
SATION RELATIVES AU SIÈGE-AUTO
2. INSTALL ATIO N DANS L A VOITURE
2.1 MISE EN PLACE DES COUVRE-HAR-
NAIS
2.2 INSTALLATION AVEC LA BASE
2.3 INSTALLATION SANS LA BASE
3. AUTRES OPÉRATIONS
3.1 INSTALLATION DU BÉBÉ DANS LE
SIÈGE-AUTO
3.2 RÉGLAGE DE LA HAUTEUR DES HAR-
NAIS
3 .3 P OS IT IO N FI XE OU À BA SC UL E D U S IÈ-
GE-AUTO (UTILISATION TRANSAT)
3.4 FIXATION SUR LA POUSSETTE
3.5 NETTOYAGE ET CONSERVATION
1. INTRODUCTION
1.1 AVERTISSEMENTS
TRÈS IMPORTANT : À LIRE IMMÉDIATEMENT
• CO NSE RVE R CE MOD E D ’EM PLO I PO UR
TOUTE UTILISATION FUTURE.
• P our le m ont age et l ’in sta lla tio n du pro du it , su ivr e at ten tiv eme nt l e mo de d ’em plo i.
Ne pas utiliser le produit avant d’avoir lu
le mode d’emploi.
• ATTENTION ! D’après les statistiques sur
le s ac cid ent s, les s ièg es a rr ièr e du véh icu le
sont en général plus sûrs que les sièges
av ant : il est par con séq uen t co nse ill é d’ in staller le siège-auto sur les sièges arrière.
Pl us p réc isé men t, l e si ège le p lus s ûr e st l e
siège central arrière, s’il est équipé d’une
ceinture à 3 points.
• ATTENTION ! GRAVE DANGER ! Ne jamais utiliser ce siège-auto sur un siège
avant équipé d’un airbag avant. Il est
possible d’installer le siège-auto sur le
siège avant que si l’airbag avant a été
désactivé : vérier avec le fabricant du
véhicule ou dans le mode d’emploi qu’il
est possible de désactiver l’airbag. Il est
dans tous les cas conseillé de reculer au
ma xim um l e si ège , to ut e n ten an t co mpte
de la présence d’autres passagers sur le
siège arrière.
• Il est conseillé d’informer tous les passagers de la modalité de décrochage du
siège-auto en cas d’urgence.
• Faire attention à l’installation du siègeauto dans la voiture an d’éviter qu’un
si ège p ivo tant ou q ue l a por ti ère p uis sen t
interférer avec celui-ci.
• A ucu n si ège -au to n e pe ut g ara nti r la séc uri té to ta le du béb é e n ca s d’a cci den t, m ais
l’utilisation de ce produit réduit le risque
de graves blessures ou de décès.
• Le risque de dommages sérieux pour le
bébé augmente, en cas d’accident, mais
aussi dans d’autres circonstances (par ex.
freinage brusque, etc…) si les indications
co nte nue s da ns c e mo de d ’em plo i ne son t
pas suivies scrupuleusement : toujours
vérier que le siège-auto est xé correctement au siège du véhicule.
• Si le s ièg e-a uto est en dom mag é, d éfo rmé
ou for tem en t us é, il doi t êt re r emp la cé c ar
il pourrait avoir perdu ses caractéristiques
d’origine en matière de sécurité.
• Ne pas apporter de modications ou
d’ajouts au produit sans l’approbation du
fabricant.
• N e pa s in sta lle r d’a cce ss oir es, de p ièc es d e
rechange et de composants non fournis
par le fabricant.
• Ne laisser en aucun cas le bébé sans surveillance dans le siège-auto.
• N e ja mai s la iss er l e si ège -au to s ur l e siè ge
de la voiture sans l’attacher, il pourrait
heurter et blesser les passagers.
• Ne rien mettre, sauf un accessoire approuvé pour le produit, entre le siège de
la voiture et le siège-auto, ou entre le
siège-auto et le bébé : en cas d’accident,
le siège-auto pourrait ne pas fonctionner
correctement.
F
Page 22
22
23
• S i la v oit ure est lai ss ée e n ple in s ole il , il e st
conseillé de couvrir le siège-auto.
• Suite à un accident, même léger, le siègeau to p eut sub ir d es d omm age s qu i ne son t
pas toujours visibles à l’œil nu : il est par
conséquent nécessaire de le remplacer.
• Ne pas utiliser de siège-auto d’occasion
: ils pourraient avoir subi des dommages
structuraux invisibles à l’œil nu, mais qui
peuvent compromettre la sécurité du
produit.
• L a ho uss e ne peu t êt re r emp la cée q ue par
une autre approuvée par le fabricant, car
el le f ait par ti e int égr an te du siè ge- au to. L e
siège -au to ne doit jama is êt re ut ilis é san s
sa housse pour ne pas compromettre la
sécurité du bébé.
• Contrôler que les bretelles du harnais ne
sont pas entortillées et éviter que cellesci ou que des parties du siège-auto se
coincent entre les portières ou se frottent contre des parties coupantes. Si les
bretelles présentent des coupures ou des
eflochures, il faut les remplacer.
• Vé ri er q u’a ucu n ob jet o u ba gag e no n xé
ou non positionné en toute sécurité n’est
transporté, tout particulièrement sur la
plage arrière à l’intérieur du véhicule : en
cas d’accident ou de freinage brusque, ils
pourraient blesser les passagers.
• Vé ri er que tou s le s pa ssa ge rs d e la voi tur e
mettent leur ceinture de sécurité, pour leur
propre sécurité et parce que pendant le
voyage, en cas d’accident ou de freinage
brusque, ils pourraient blesser le bébé.
• En cas de longs voyages, s’arrêter souvent.
L’en fan t se fat igu e tr ès f aci lem ent . N e pa s
enlever le bébé du siège-auto lorsque la
voi ture e st en m arche. S i le bébé a beso in
d’a tte nt ion , il e st néc ess air e de tro uve r un
lieu sûr et de s’arrêter.
• Les nouveau-nés prématurés, nés après
moins de 37 semaines de gestation, peuvent courir un risque dans le siège-auto.
Ils peuvent avoir des difcultés respiratoires lorsqu’ils sont assis dans le siègeau to. Nou s vo us c ons eil lon s do nc d e vo us
adresser à un médecin ou au personnel
de l’hôpital pour recommander le siègeauto le plus adapté à votre béb é avant de
quitter l’hôpital.
• La société Chicco décline toute respon-
sabilité en cas d’utilisation incorrecte du
produit.
1.2 CARACTÉRISTIQUES DU
PRODUIT
Ce siè ge- aut o es t ho mol ogu é “G rou pe 0 +”,
po ur le t ran spor t d’e nfan ts de la na issa nce
jusqu’à 13 kg (de 0 à 10 mois/12 mois environ), conformément à l’homologation
ECE R44/04.
L’homologation est de type “Universel”, le
siège-auto peut par conséquent être utilisé
da ns n ’im por te que lle voi tur e. AT TE NT ION !
“Universel” signie qu’il est compatible
avec la majorité des sièges-auto (sauf exceptions).
AVERTISSEMENT IMPORTANT
1. Cec i es t un dis pos iti f de rete nu e “U niv er-
sel” pour enfant, homologué conformément à la norme ECE R44/04 et compatible avec la majorité (sauf exceptions)
des sièges auto.
2. La parfaite compatibilité est plus faci-
lement obtenue lorsque le fabricant du
véhicule déclare dans le mode d’emploi
que le véhicule prévoit l’installation de
dispositifs de retenue “Universel” pour
la tranche d’âge en question.
3. Ce dispositif de retenue est classé “Uni-
versel” sur la base de critères d’homologation plus stricts par rapport à des
modèles précédents qui ne disposent
pas de cet aver tissement.
4. Adapté uniquement pour l’utilisation
dans des véhicules dotés de ceinture de
sécurité à 3 point s, statique ou à enrouleurs, homologuée conformément à la
norme UN/ECE N°16 ou autres standards
équivalents.
5. En cas d’incertitude, contacter le fa-
bricant du dispositif de retenue ou le
revendeur.
1.3 DESCRIPTION DES
COMPOSANTS
Fig. 1 (3/4)
A. Poignée
B. Canopy pare-soleil
C. Revêtement textile
D. Coussin réducteur (*)
E. Base (**)
Page 23

23
Fig. 2 (Avant)
F. Passants des harnais
G. Harnais de sécurité du siège-auto
H. Couvre-harnais (*)
I. Bouton de réglage des harnais (sous le
revêtement textile)
J. Sangle de réglage des harnais
Fig. 3 (Profil)
K. Guide de la ceinture abdominale de la
voiture sur le siège-auto
L. Guide de la ceinture abdominale de la
voiture sur la base
M. Boutons de rotation de la poignée
N. Pivots de xation (pour la xation sur
la poussette)
Fig. 4 (Profil)
O. Guide de la ceinture diagonale de la
voiture
P. Poignée de décrochage (depuis la base et
depuis la poussette)
Q. Passants des harnais
R. Passants des guides ceintures du siè-
ge-auto
S. Blocage stabilisateur
(*) La for me e t le m od èle peu ven t di ffé re r en
fonction des modèles de sièges-auto.
(**) Optionnel
1.4 POSITIONS DE L A POIGNÉE
La poi gné e du s iège -a uto e st r égla ble sur 4
positions (Fig. 5).
A . Po sit ion de t ra nsp or t en voi tur e (AT TE N-
TION : c’est la seule position autorisée
pendant le transport en voiture).
B. Position de transport à la main.
C. Position conguration transat à bascule
ou à xer à la poussette Chicco prévue
à cet effet.
D. Position conguration transat xe.
Pour effectuer le réglage, appuyer simultanément sur les boutons (M) de la poignée en la tournant sur la position choisie
jusqu’au clic.
1.5 LIMITATIONS ET CONDITIONS
D’UTILISATION RELATIVES AU
SIÈGE-AUTO
ATTENTION ! Respecter particulièrement
les limitations et les conditions d’utilisation
su iva nte s re la tiv es a u si ège -a uto : da ns l e ca s
contraire, la sécurité n’est pas garantie.
• L e siè ge -au to p eut êtr e in sta llé sur le si ège
av ant côt é pa ssa ger ou s ur n’ im por te q uel
si ège arr ièr e. D ans tou s le s ca s, l e siè ge d e
la voiture doit être orienté dans le sens
de la marche. Ne jamais utiliser ce siègeauto sur des sièges orientés latéralement
ou dans le sens contraire de la marche
(Fig. 6).
• Le siège de la voiture doit être doté d’une
ceinture de sécurité à 3 points, statique
ou à enrouleurs, homologuée conforméme nt à la norm e UN/ ECE N °16 o u aut res
standards équivalents (Fig. 7).
• AT TE NTI ON ! Ne jam ais ins tal ler le si ège -
auto avec la ceinture de la voiture à deux
points de xation (Fig. 8).
• Ne pas utiliser le coussin réducteur si le
bébé pèse plus de 6 kg.
2. INSTALLATION DU SIÈGE-AUTO
DANS LA VOITU RE
Le siè ge- aut o pe ut ê tre ins tal lé a vec la b ase
(option) ou sans. Dans les deux congurations, il doit êt re installé unique ment dans
le sens contraire de la marche.
2.1 CONFIGURATION INITIALE DES
COUVRE-HARNAIS
Le siè ge- aut o es t éq uip é de 2 t ypo log ies de
co uvr e- har na is (A et B ) en fon cti on d es modè les . Av ant d’u til ise r le s ièg e- aut o, mo nte r
les couvre-harnais de la façon suivante :
• Couvre-harnais version A (Fig. 9A, 9B
et 9C) : faire passer les couvre-harnais
da ns l es p ass ant s d u tis su ( pas cel les de l a
structure se trouvant en-dessous) an que
les bretelles harnais reste positionné audessus de celles-ci. Enler l’entrejambes
dans la boucle du harnais.
• C ouv re -ha rna is v er sio n B (F ig. 10A et 1 0B) :
faire passer les bretelles du harnais du
siège-auto dans les deux couvre-harnais.
Enler l’entrejambes dans la boucle du
harnais.
Page 24

24
25
2. 2 INSTALLATION AVEC LA BASE
Po ur i nst all er l e siè ge -au to av ec l a ba se s ur
le siège de la voiture, il faut :
1. Décrocher le siège-auto de la base en
tirant la poignée de décrochage située
derrière le dossier et le soulever à l’aide
de la poignée (Fig. 11).
2. Positionner la base sur le siège choisi
pour l’installation, en l’orientant comme
sur la Fig. 12, en faisant en sorte qu’elle
soit en contact avec le dossier du siège
de la voiture.
3. Tirer la ceinture de sécurité de la voiture
et l’accrocher à la boucle correspondante,
en faisant passer la partie abdominale
dans les deux guides (L) caractérisés par
la èche bleue et la tendre le plus possible (Fig. 13).
4. Ava nt d ’i nst all er l e si ège -au to s ur l a ba se,
vérier que le blocage stabilisateur est
fermé (Fig. 14).
5. Monter le siège-auto sur la base (tourné
dos à la route) en le pouss ant vers le b as
jusqu’à ce qu’il soit xé (vous entendrez
un clic de xation) (Fig. 15).
6. Vérier que le siège-auto est correctement xé à la base en essayant de le
soulever par l’avant et par l’arrière.
7. Saisir la ceinture diagonale de la voiture
et la faire passer dans le guide (O) situé
à l’arrière du dossier du siège-auto (Fig.
16). ATTENTION ! Pendant le transport,
la ceinture diagonale doit TOUJOURS
rester insérée dans ce guide.
8. Tendre la ceinture le plus possible, sans
en laisser en trop, et vérier qu’elle n’est
pas entortillée.
9. Mettre la poignée en position A en vériant qu’elle s’appuie contre le siège de
la voiture (Fig. 17).
ATTENTION ! Après l’installation, TOUJO UR S vé ri er q ue l a ce int ure d e la voi tur e
es t co rre cte me nt te nd ue et qu’e lle est uni forme à tous les endroits, sans entortillements. Ne JAMAIS faire passer la ceinture
de la v oit ure par d’au tre s en dro it s qu e ce ux
indiqués.
Pour enlever le siège-auto tout en laissant
la base dans la voiture :
Retirer la ceinture diagonale du guide se
trouvant sur le dossier sans la décrocher
de la boucle.
Remettre la poignée en position verticale
B (Fig. 5).
Décrocher le siège-auto comme illustré
précédemment.
2.3 INSTALLATION SANS L A BASE
Pour installer le siège-auto sans la base,
il faut :
1. Extraire le blocage stabilisateur et positionner le siège-auto sur le siège de la
voiture choisi (Fig. 18).
2. Tirer la ceinture de sécurité de la voiture
et l’accrocher à la boucle correspondante,
en fai san t pa sse r la cei ntu re a bdo min ale
dans les deux guides (K) du siège-auto
caractérisés par la èche bleue (Fig. 19).
3. Saisir la ceinture diagonale de la voiture
et la faire passer dans le guide (O) situé
à l’arrière du dossier du siège-auto (Fig.
20 ). AT TEN TI ON ! Pen dan t le tra nsp or t,
la ceinture diagonale doit TOUJOURS
rester insérée dans ce guide.
4. Tendre la ceinture le plus possible, sans
qu ’ell e dé pa sse et e n vé ri ant qu’ ell e n’e st
pas entortillée.
5. Tourner la poignée en position A en vériant qu’elle s’appuie contre le siège de
la voiture (Fig. 21).
Pour enlever le siège-auto :
1. Décrocher la ceinture de la voiture en
appuyant sur la boucle.
2. Remettre la poignée en position B (verticale).
3. Retirer la ceinture du guide diagonal et
des guides horizontaux.
3. AUTRES OPÉRATIONS
3.1 INSTALLATION DU BÉBÉ DANS
LE SIÈGE-AUTO
1. Sou lev er l a ho us se, a pp uye r su r le bou ton
de rég lag e et tir er l e ha rna is d u si ège -a uto
an de les desserrer (Fig. 22).
2. Ou vri r la bou cle , en app uya nt s ur l e bo uton rouge , et te nir les s angl es du har nais
écartées (Fig. 23).
3. Installer le bébé.
4. Superposer les deux languettes de la
boucle et les insérer une fois unies dans
la boucle jusqu’au clic de xation (Fig.
Page 25

25
24). ATTENTION ! Ne jamais enler les
languettes dans la boucle l’une après
l’autre ou une seule uniquement.
5. Tend re l es c ein tur es d e sé cur ité du s ièg eau to e n ti ran t la san gle de r égl age pré vue
à cet effet (Fig. 25).
3.2 RÉGL AGE DE L A POSITION DU
HARNAIS
AT TEN TI ON ! Le ha rn ais doi t tou jou rs ê tre
ad apt é à l a cr ois san ce d u bé bé. Ava nt d ’in staller le siège-auto dans la voiture, il faut
régler le harnais à la bonne hauteur.
Po ur u n bo n ré gla ge, les bre tel les du h ar nai s
doivent être à la hauteur des épaules du
bébé (Fig. 26).
Le siège-auto dispose de 3 hauteurs de
harnais.
Pour ajuster les bretelles du harnais, il
faut:
1. E nle ver les cou vre -h arn ais en l es re tir an t
des passants du tissu.
2. Ouvrir la boucle du harnais en appuyant
sur le bouton rouge.
3. Ret ire r le s br ete lle s du har nai s de l’ar ri ère
du dossier et les enler dans le passant
le plus adapté à la taille du bébé (Fig.
27A et 27B).
ATTENTION ! Vérier que les bretelles du
harnais passent toujours entre la barre de
positionnement (R) et la coque.
AT TEN TI ON ! Le c ous sin réd uct eur gar ant it
au béb é, d e la nai ssa nc e jus qu ’à un poi ds d e
6 kg, un bon maintien et la position idéale
pour le cou et le dos.
3.3 POSITION FIXE OU À BASCULE
DU SIÈGE-AUTO (UTILISATION
TR AN SAT)
Qu an d il n ’es t pa s ut ili sé e n vo itu re, le si ège auto peut également être utilisé comme
bascule ou comme transat.
Po ur l e re ndr e ba scu lan t, f erm er le bl oc age
stabilisateur (Fig. 14) et mettre la poignée
en position C (Fig. 5).
Pour l’utiliser en position xe, enlever le
blocage stabilisateur et mettre la poignée
en position D (Fig. 5).
Ne l e posi tionn er qu e sur des s urfa ces sta bles et horizontales.
ATTENTION ! Avant de transporter le siège-auto, toujours remettre la poignée en
position B (verticale).
AVERTISSEMENT ! Ne pas laisser
le bébé sans surveillance.
AVERTISSEMENT ! Toujours utiliser
le système de retenue.
AVE RTISS EMENT ! Il e st dangere ux
d’utiliser le siège-auto sur une surface surélevée, comme une table,
une chaise, etc.
AVERTISSEMENT ! Ce siège auto
n’est pas prévu pour des périodes
de sommeil prolongées.
AVERTISSEMENT ! Ne pas utiliser
le siège-auto si le bébé arrive à se
tenir assis tout seul.
Le siège-auto ne remplace pas un lit ou un
berceau. Si le bébé a besoin de dormir, il
do it ê tre mis dan s un lit o u da ns u n be rce au
adaptés.
Ne pas utiliser le siège-auto s’il comporte une partie cassée ou manquante.
3.4 UTILISATION AVEC
POUSSETTE
ATTENTION ! Pour l’utilisation avec la
poussette, consulter le mode d’emploi
de la poussette. Les Poussettes CHICCO
équipées d’un système CL IC CLAC ont des
ac cou doi rs d oté s de dis pos iti fs s péc iau x qu i
permettent de xer le siège-auto directement sur la poussette, sans devoir utiliser
d’autres accessoires. Pour xer le siège-auto
à la poussette, il faut :
1. Saisir le siège-auto par sa poignée en
position verticale (B) (Fig. 28).
2. Fixer les deux pivots Clic Clac du siège-
auto (N) aux accoudoirs de la poussette,
en veillant à ce qu’ils soient xés sur les
deux côtés. On entendra un clic de xa-
tion (Fig. 29).
AVERTISSEMENT Avant l’utilisation, contrôler que les dispositifs de xation du siègeauto sont correctement enclenchés.
Pour décrocher le siège-auto de la poussette :
Page 26
26
27
1. Remettre la poignée en position verticale (B).
2. Appuyer sur la manette de décrochage
arrière.
3. Décrocher et mettre le siège-auto sur
une surface plane.
ATTENTION : La xation et le décrochage
pe uve nt é gal eme nt ê tre eff ec tué s si le b ébé
est dans le siège-auto, même si le poids
du bébé peut rendre les opérations moins
faciles. Dans ce cas, il est conseillé de faire
attention lors des opérations ci-dessus.
3.5 NETTOYAGE ET
CONSERVATION
NET TOYAGE DE LA HOUSSE
La hou ss e du s ièg e- aut o es t co mpl ète men t
am ovi ble et l ava ble à la mai n ou en m ac hin e
à 30°C.
Pour le laver, détacher les ceintures et extraire la housse après avoir retiré les deux
sangl es et la bo ucle d e leur s fente s respectives (Fig. 30).
Pour le lavage, suivre les instructions se
trouvant sur l’étiquette du revêtement
contenant les symboles de lavage suivants :
Lavage en machine à 30°C
Lavage à la main
Ne pas blanchir
Ne pas laver à sec a secco
Ne pas utiliser de sèche-linge
Ne pas repasser
Ne jam ais uti lis er d e dé ter gen ts a br asi fs o u
de solvants. Ne pas essorer la housse et la
faire sécher sans la tordre.
NET TOYAGE DES PARTIES EN PLASTIQUE ET EN MÉTAL
Pour le nettoyage des par ties en plastique
ou en m éta l ve rn i, u til ise r un chi ff on h umi de.
Ne jam ais uti lis er d e dé ter gen ts a br asi fs o u
de solvants.
Le s pa rt ies mob ile s du siè ge -au to n e do ive nt
en aucun cas être lubriées.
CONTRÔLE DE L’ÉTAT DES
COMPOSANTS
Il est conseillé de vérier fréquemment l’état
et l’usure des composants suivants :
• Revêtement textile : vérier que le rembou rrag e ne sort pas ou qu’aucu ne par tie
n’est eflochée. Vérier l’état des coutures
qui doivent toujours être parfaites.
• Harnais de sécurité : s’assurer que le tissu
n’est pas efloché, entraînant une réduction évidente de l’épaisseur au niveau de
la sangle de réglage, de l’entrejambes,
au-dessus des épaules et au niveau des
passants de réglage des bretelles du harnais.
• P las tiq ues : vé ri er l ’éta t d’ usu re d e to utes
les parties en plastique qui ne doivent
présenter aucun signe d’endommagement
ou de décoloration.
ATT ENT ION ! Si l e sièg e-au to es t défo rmé
ou trè s us é, i l do it ê tre r em pla cé : il p our rai t
avoir perdu ses caractéristiques d’origine en
matière de sécurité.
CONSERVATION DU PRODUIT
Qu and il n ’est pas ins ta llé d an s la voit ure , il
es t co nse ill é de con se rve r le siè ge -au to d ans
un endroit sec, loin des sources de chaleur
et à l’abri de la poussière, de l’humidité et
des rayons du soleil.
ÉLIMINATION DU PRODUIT
Une fois la limite d’utilisation prévue pour
le siè ge- aut o at tei nte, ne p lus l’ut ili ser et le
jeter. Pour des motifs de respect de l’environnement, séparer les différents types de
déchets conformément à la réglementation
en vigueur dans le Pays.
POUR PLUS D’INFORMATIONS :
CHICCO Puériculture de France S.A.S
17-19, avenue de le Métallurgie
93210 Saint-Denis La Plaine
www.chicco.fr
Page 27

27
CHICCO
AUTO-FIX FAST
Gr. 0+ (0-13kg)
GEBRAUCHSANLEITUNG
INHALTSVERZEICHNIS:
1. EINFÜHRUNG
1.1 HINWEISE
1.2 PRODUKTEIGENSCHAFTEN
1.3 BESCHREIBUNG DER BESTANDTEILE
1.4 POSITION DES TRANSPOSTBÜGELS
1.5 FÜR DAS PRODUKT UND DEN FAHRZEUGSITZ GELTENDE EINSCHRÄNKUNGEN UND NUTZUNGSBESTIMMUNGEN
2. BE FESTIGUNG IM AUTO
2.1 ERSTE EINSTELLUNGEN DER SCHUL-
TERPOLSTER
2.2 BEFESTIGUNG MIT STANDBA SIS
2.3 BEFESTIGUNG OHNE STANDBASIS
3. WEITERE MAßNAHMEN
3.1 HINEINSETZEN DES KINDES IN DEN
KINDERAUTOSITZ
3.2 VERSTELLEN DER GURTPOSITION
3.3 FIX- ODER SCHWENKPOSITION DES
KINDERAUTOSITZES (VERWENDUNG
ALS WIPPE)
3.4 VERWENDUNG MIT DEM SPORT WA-
GEN
3.5 REINIGUNG UND AUFBEWAHRUNG
1. EINFÜHRUNG
1.1 HINW EISE
SEHR WICHTIG: BITTE UNBEDINGT LESEN
• DIESE GEBRAUCHSANLEITUNG FÜR ZU-
KÜNFTIGEN NACHSCHL AGEN AUFBEWAHR EN.
• Halten Sie sich bei der Montage und der
Befestigung dieses Produkts streng an die
Anweisungen. Verwenden Sie das Produkt
nicht, ohne zuvor die Anweisungen gelesen
zu haben.
• WARNUNG! Auf der Grundlage der Unfall-
statist iken sind die Hinte rsitze des Autos im
Allgemeinen sicherer als die Vordersitze: Es
wird daher dazu geraten, den Kinderautositz
auf den Hintersitzen zu befestigen. Insbesondere der Sit z in der Mitte hinten ist am
sichersten, wenn dieser mit einem 3-PunktSicherheitsgurt ausgestattet ist.
• WARNUNG! GROSSE GEFAHR! Verwenden Sie diesen Kinderautositz niemalsmals
auf einem mit Frontairbag ausgestatteten
Vordersitz. Es ist nur dann möglich, einen
Kinderautositz auf dem Vordersitz zu befestigen, wenn das Frontairbag deaktiviert
wurde: Prüfen Sie mit dem Autohersteller
oder in dem Kfz-Handbuch die Möglichkeit
einer Deaktivierung des Airbags. Es wird in
jedem Fall dazu geraten, den Fahrzeugsitz so
weit wie möglich nach hinten zu schieben,
sofern dies mit den anderen Mitfahrern auf
den Hintersitzen vereinbar ist.
• Es wird empfohlen, dass alle Mitfahrer darüber informiert werden, wie das Kind im
Notfall abgeschnallt werden soll.
• A cht en S ie a uf d ie B efe st igu ng d es K in der au tosit zes im Auto und ver meiden Sie es, dass
ein verstellbarer Autositz oder die Autotür
mit diesem in Berührung kommen.
• Kein Kinderautositz kann für die absolute Sicherheit des Kindes bei Unfällen garantieren,
allerdings verringert der Gebrauch dieses
Produkts das Risiko schwerer oder tödlicher
Verletzungen.
• Das Risiko schwerer Schäden am Kind wird
- nicht nur bei Unfällen, sondern auch in anderen Situationen (zum Beispiel bei plötzlichem
Bremsen, etc.) - erhöht, wenn die in dieser
Gebrauchsanleitung aufgeführten Anweisungen nicht gewissenhaft befolgt werden:
Üb er prü fen Sie ste ts , da ss d er Kin der au tos itz
richtig am Sitz festgemacht ist.
• Sollte der Kinderautositz beschädigt, verformt
oder stark abgenutzt sein, ist er zu ersetzen,
denn die ursprünglichen Sicherheitseigenschaften könnten nicht mehr gegeben sein.
• Keine Änderungen oder Ergänzungen am
Pr odu kt ohn e d ie Z ust im mun g d es H er ste lle rs
vornehmen.
• Montieren Sie weder Zubehör noch Ersatzteile und Komponenten, die nicht vom Hersteller
geliefert wurden.
• Lassen Sie das Kind niemalsmal s und aus
keinem Grund unbeaufsichtigt im Kinderautositz sitzen.
• Der Kinderautosit z muss stets angeschnallt
au f de m Fa hr zeu gsi tz s te hen (so woh l mi t al s
auch ohne Kind), er könnte gegen die Insassen
stoßen und diese verletzen.
• Legen Sie keine Gegenstände zwischen den
Autositz und den Kinderautositz oder zwi-
D
Page 28
28
29
schen den Kinderautositz und das Kind, was
kein genehmigtes Zubehörteil für das Produkt
ist: Bei Unfällen könnte der Kinderautositz
nicht richtig funktionieren.
• Sollte das Auto unter direkter Sonneneinstrahlung stehen gelassen werden, wird empfohlen, den Kinderautositz abzudecken.
• Infolge eines auch nur leichten Unfalls kann
der Kinderautositz Schäden davontragen, die
nicht mit bloßem Auge sichtbar si nd: Daher
ist es erforderlich, diesen zu ersetzen.
• Verwenden Sie keine Kinderautositze aus
zweiter Hand: Sie könnten Strukturschäden
da von get rag en h ab en, die mit blo ßem Aug e
nicht sichtbar sind, jedoch die Sicherheit des
Produkts beeinträchtigen könnten.
• Der Bezug kann ausschließlich durch einen
vom Hersteller genehmigten Bezug ersetzt
werden, da er ein Bestandteil des Kinderautosit zes ist. Der K indera utositz darf niem als
ohne den Bezug verwendet werden, damit
die Sicherheit des Kindes nicht beeinträchtigt wird.
• Überprüfen Sie, dass das Gurtband nicht
ve rdr eht is t un d ve rm eid en S ie e s, das s di es es
oder Teile vom Kinderautositz in die Autotüren geklemmt werden oder an scharfen
Stellen streifen. Sollte der Gurt Schnitte
aufweisen oder ausgefranst sein, ist er zu
ersetzen.
• Überprüfen Sie, dass insbesondere auf der
Hutablage des Autos keine Gegenstände oder
Gepäck abgelegt werden, die nicht befestigt
oder sicher positioniert wurden: Bei Unfällen
oder plötzlichem Bremsen könnten diese die
Insassen verletzen.
• Vergewissern Sie sich, dass alle Mitfahrer im
Auto ihren eigenen Sicherheitsgurt angeschnallt haben, und zwar sowohl zur eigenen
Sicherheit als auch aufgrund der Tatsache,
dass sie bei Unfällen oder plötzlichem Bremsen das Kind verletzen könnten.
• Machen Sie während einer langen Autofahrt
öf ter s Pa us e: D as K ind er müd et s eh r sc hne ll .
Das Kind in keinem Fall während der Fahrt
aus dem Kinderautositz nehmen. Wenn das
Kind Ihre Aufmerksamkeit benötigt, ist es
erforderlich, dass Sie einen sicheren Platz
nden und anhalten.
• Frühgeborene, die vor der 37. Schwangerschaftswoche zur Welt gekommen sind,
könnten im Kinderautositz einem Risiko
ausgesetzt sein. Diese Säuglinge können
Atembeschwerden haben, während sie im
Kinderautositz sitzen. Wir empfehlen Ihnen
daher, sich an Ihren Arzt oder an das Krankenhauspersonal zu wenden, damit diese Ihr
Kind untersuchen und Ihnen einen geeigneten
Kinderautositz empfehlen können, bevor Sie
das Krankenhaus verlassen.
• Die Gesellschaft Artsana übernimmt keine
Haftung für die unangemessene Verwendung
des Produkts.
1.2 PRODUKTEIGENSCHAFTEN
Di ese r Kin der auto sit z ist für d ie „G rup pe 0 +”
zur Beförderung von Kindern ab der Geburt bis
zu 13 k g Kö rpe rge wi cht (vo n 0 bi s 10 Mo nat en/
ca.1 Jahr) unter Einhaltung der Europäischen
Norm ECE R44/04 zugelassen.
Die Zulassung ist „Universell“, d.h. der Kinderautositz kann in allen Automodellen verwendet werden. WARNUNG! “Universell“
be de ute t, d ass er f ür d ie m eis te n, j edo ch n ic ht
alle PKW-Sitze passend ist.
WICHTIGER HINWEIS:
1. Die s is t e ine „Un ive rs al“ - Rüc kha lte ein ri ch-
tung für Kinder, die gemäß der Norm ECE
R44/04 zugelassen und für die meisten,
jedoch nicht alle PKW-Sitze passend ist.
2. Der ordnungsgemäße Sit z der Einrichtung
kann vorausgesetzt werden, wenn der
Fahrzeughersteller im Fahrzeughandbuch
erklär t, dass das Fahrzeug für den Einbau
einer „Universal“ - Rückhalteeinrichtung
für Kinder der jeweiligen Altersgruppe geeignet ist.
3. Diese Rückhalteeinrichtung für Kinder
wurde nach strengeren Bedingungen in
die Kategorie „Universal“ eingestuft als die
früheren Ausführungen, die diese Aufschrift
nicht tragen.
4. Nur gee ign et , we nn d as Fa hr zeu g mi t Dr ei -
punkt-/Statik-/Retraktor-Sicherheitsgurten
au sge rüs tet ist , di e na ch ECE- Re gel ung Nr.
16 oder anderen vergleichbaren Normen
zugelassen sind.
5. Sollten Zweifel bestehen, den Hersteller der
Rückhalteeinrichtung oder den Fachhändler
befragen.
1.3 BESC HREIBUN G DER
BESTANDTEILE
Abb. 1 (3/4)
A. Tragebügel
B. Verdeck
C. Stoffbezug
Page 29

29
D. Sitzverkleinerer (*)
E. Standbasis (**)
Abb. 2 (Vorderseite)
F. Gurtführungsschlitze
G. Gurte des Kinderautositzes
H. Schulterpolster (*)
I. Gurtlängen-Verstelltaste (unter der Stoff-
scheibe)
J. Gurtlängen-Verstellband
Abb. 3 (Seitlich)
K. Beckengurtführung im Kinderautositz
L. Beckengurtführung auf der Standbasis
M. Tasten für die Neigung des Tragebügels
N. Andock-Stifte „Clik Clak“ (zum Andocken
am Sportwagen)
Abb. 4 (Rückseite)
O. Diagonale Gurtführung
P. Entriegelungsgriff (von der Standbasis und
vom Sportwagen)
Q. Führungsschlitze für die Gurte
R. Positionsstange für die Gurte des Kinder-
autositzes
S. Schaukelsperre
(*) Je n ac h Mo del l ka nn der Kin de rau tos it z mit
Schulterpolster A oder B ausgestattet sein.
(**) Optional
1.4 POS ITION DES TRAGE BÜGELS
De r Tr age büg el d es K in der au tosi tz es k an n in 4
Positionen verstellt werden (Abb. 5).
A. Transportposition im Auto (WARNUNG:
Dies ist die einzige erlaubte Position wäh-
rend der Beförderung im Auto).
B. Position zur manuellen Beförderung.
C. Position zur Verwendung als Wippe oder
zum Andocken an den entsprechenden
Chicco-Sportwagen.
D. Position zur Verwendung als Wippe in
Fix-Position.
Um den Tragebügel zu verstellen, die Tasten
(M) auf dem Griff gleichzeitig drücken und
diesen bis zum hörbaren Einrasten in die gewünschte Position drehen.
1.5 FÜR DAS PRODU KT UND DEN
FAHRZEUGSITZ GELTENDE
EINSCHRÄNKUNGEN UND
NUTZUNGSBESTIMMUNGEN
WARNUNG! Folgende Einschränkungen und
Nutzungsbestimmungen in Bezug auf das
Produkt und den Fahrzeugsitz aufmerksam
befolgen: Andernfalls wird die Sicherheit nicht
gewährleistet.
Der Kinderautositz kann auf dem vorderen
Beifahrersitz oder auf jedem der Rücksitze
montiert werden. In jedem Fall muss der
Fahrzeugsitz in Fahrtrichtung ausgerichtet
sein. Den Kinderautositz niemals auf Sitzen
verwenden, die seitlich oder gegen die Fahrtrichtung ausgerichtet sind (Abb. 6).
Der Fahrzeugsitz muss mit Dreipunkt-/Statik-/Retraktor-Sicherheitsgurten ausgerüstet
sein, die nach UNI/ECE-Norm Nr. 16 oder
anderen vergleichbaren Normen zugelassen
sind (Abb. 7).
WA RNU NG ! De n Ki nde ra uto sit z ni ema ls mit
dem Zwei-Punkt-Sicherheitsgurt des Autos
(Abb. 8) befestigen.
Niemals den Sitzverkleinerer verwenden,
wenn das Kind mehr als 6 kg wiegt.
2. BEFESTIGU NG DES
KIND ERAUTOSITZES IM AUTO
De r Kin der auto sit z kan n sow ohl m it a ls au ch
ohne Standbasis (optional) befestigt werden.
In bei den Kon gu ra tio nen dar f d ies er n ur g egen die Fahrtrichtung befestigt werden.
2.1 ERSTE EI NSTELLUNGEN KONFI-
GUR ATION DER SCHULTERPOLSTER
Der Kinderautositz ist je nach Ausführung
mit 2 unterschiedlichen Schulterpolster (A
od er B ) au sge st att et. Bev or d er Kin der au tos itz
verwendet wird, müssen die Schulterpolster
folgendermaßen befestigt werden:
• Schulterpolster Version A (Abb.en 9A, 9B
und 9C): Die Schulterpolster so durch die
Schlitze des Stoffbezugs (nicht der Schale
darunter) laufen lassen, dass die Gurte über
diesen positioniert bleiben. Das Gurtschloss
durch das Schlosspolster führen.
• Schulterpolster Version B (Abb.en 10A und
10B): Die G urte des Kinderautositzes durch
die zwei Schulterpolster führen. Das Gurtschloss durch das Schlosspolster führen.
2. 2 BEFESTIGUNG M IT STANDBAS IS
Um den Kinderautositz mit der Standbasis
auf dem Fahr zeugsitz zu befestigen, folgendermaßen vorgehen:
1. Lösen Sie den Kinderautositz von der
Standbasis, indem Sie den Entriegelungsgriff hinter der Rückenlehne ziehen und
Page 30

30
31
den Kinderautositz gleichzeitig durch den
Tragebügel anheben (Abb. 11).
2. Positionieren Sie die Standbasis auf dem
ausgewählten Fahrzeugsitz. Drehen Sie
sie hierbei wie in Abb. 12 dargestellt und
sorgen Sie dafür, dass sie die Rückenlehne
des Autosit zes berührt.
3 . Zie he n Si e a n de m S ic her he it sg ur t d es A ut os
un d sc hna lle n Si e e s an . Da bei den hor iz ontalen Teil (Becken) durch die beiden dafür
vorgesehenen, durch einen blauen Pfeil
gekennzeichneten Führungen (L) gezogen
wird und ihn korrekt spannen (Abb. 13).
4. Bevor Sie den Kinderautositz in die Standbasis einsetzen, überprüfen Sie, dass die
Schaukelsperre geschlossen ist (Abb. 14).
5. De n Ki nd era uto sit z in die Sta nd bas is e ins etze n (g ege n di e Fa hr tri cht ung ger ic hte t) un d
nach unten drücken, bis er hörbar einrastet
(„Klack“-Geräusch) (Abb. 15).
6. Überprüfen Sie, dass der Kinderautositz
korrekt auf der Standbasis eingehakt ist,
indem Sie versuchen, diesen sowohl an
der Vorder- als auch an der Rückseite
hochzuheben.
7. Nehmen Sie den diagonalen Autogur t in
die Hand und ziehen Sie diesen durch die
eigens dafür vorgesehene Führung (O) auf
der Rückseite der Rückenlehne des Kinderau tos it zes (Ab b. 1 6). WAR NU NG! Der dia go na le G ur t mu ss w äh ren d de s Au tot ra nsp or ts
STETS in dieser Führung bleiben.
8. Der Fahrzeuggurt so weit wie möglich um
den Kinderautositz spannen, ohne dass er
locker und vergewissern Sie sich, dass er
nicht verdreht ist.
9. Den Tragebügel in Position A drehen und
dabei überprüfen, dass dieser den Fahrzeugsitz berührt (Abb. 17).
WARNUNG! Vergewissern Sie sich nach der
Be fes tig un g ST ETS , d ass der Aut ogu rt kor rek t
ge span nt i st un d das s di ese r gle ichm äßi g auf
al le P unk te v er tei lt u nd n ich t ve rdr eht is t. L asse n Si e de n Au tog ur t NI EMA LS in a nde re n al s
den angegebenen Positionen verlaufen.
So wir d de r Ki nde ra uto sit z au s de r St and ba sis
genommen ohne diese vom Auto zu lösen:
1. Den diagonalen Gur t aus der Führung der Rük-
kenlehne ziehen, ohne ihn abzuschnallen.
2. De n Tra ns por tb üge l in die ver ti kal e Po sit ion
B zurück setzen (Abb. 5).
3. Den Kinderautositz wie zuvor aufgeführ t
entriegeln.
2. 3 BEFESTI GUNG OHN E STANDBAS IS
Um den Kinderautositz ohne Standbasis zu
befestigen, gehen Sie folgendermaßen vor:
1. Die Schaukelsperre herausziehen und den
Ki nde ra uto sit z au f de m ge wün sc hte n Fah rzeugsitz positionieren (Abb. 18).
2 . Z ieh en Sie an d em Sic he rh eit sg ur t de s A uto s
un d sc hna lle n Si e e s an . Da bei den hor iz ontalen Teil (Becken) durch die beiden dafür
vorgesehenen, durch einen blauen Pfeil
gekennzeichneten Führungen (K) laufen
lassen (Abb. 19).
3. Ne hme n Si e d en d iag ona len Aut ogu rt in d ie
Ha nd u nd z ie hen Sie die se n du rch die eig ens
dafür vorgesehene Führung (O) auf der
Rückseite der Rückenlehne des Kinderautosi tze s (A bb . 20 ). WA RN UNG ! De r d iag ona le
Gu rt mu ss wä hren d des Trans por ts S TET S
in dieser Führung bleiben.
4. Der Fahrzeuggur t so weit wie möglich um
den Kinderautositz spannen, ohne dass er
locker und vergewissern Sie sich, dass er
nicht verdreht ist.
5. Den Transportbügel in Position A drehen
und dabe i über prüf en, d ass di eser den Au tositz berührt (Abb. 21).
Um den Kinderautositz zu entfernen:
1. Schnallen Sie den Autogurt ab, indem Sie
auf das Schloss drücken.
2. Setzen Sie den Transportbügel in Position
B zurück (vertikal).
3. Ziehen Sie den Gurt aus der diagonalen
Führung und aus den horizontalen Führungen.
3. WEI TERE MAßNAHMEN
3.1 H INEINSETZ EN DES KIND ES IN
DEN KI NDERAUTOSIT Z
1. Heb en Sie die S tof fp ols te run g ho ch, hal ten
Si e di e Ver st ell tas te g edr üc kt u nd z ie hen Sie
an den Gur te n de s Ki nd era uto sit ze s, b is s ich
diese lockern (Abb. 22).
2. Das Schloss durch Drücken auf den roten
Kn opf öf fne n. H al ten Sie d ie G ur te g esp re izt
(Abb. 23).
3. Das Kind in den Kinderautositz setzen.
4. Die zwei Teile des Schlosses übereinan-
derlegen und zusammen in das Schloss
ei nfü hre n, b is e s hö rb ar e inr as tet (Ab b. 24 ).
WARNUNG! Führen Sie die Schlossteile
niemals nacheinander oder einzeln in das
Schloss ein.
Page 31

31
5. Die Sicherheitsgurte des Kinderautositzes
spannen, indem Sie an dem dafür vorgesehenen Verstellband ziehen (Abb. 25).
3.2 VER STELLEN DER GUR TPOSITIO N
WA RNU NG ! Di e Gu rt e mü sse n si ch s tet s d em
Wachstum des Kindes anpassen. Bevor der
Ki nde ra uto sit z im Aut o be fes ti gt w ird , si nd d ie
Gurte auf der korrekten Höhe einzustellen.
Die Gur te sin d dan n ric htig e inge stel lt, we nn
sie in Schulterhöhe des Kindes aus der Rükkenlehne kommen (Abb. 26).
Der Kinderautositz verfügt über 3 Höhenpositionen.
Um das Verstellen der Gurte durchzuführen,
gehen Sie folgendermaßen vor:
1. Die Schulterpolster entfernen. Diese hierzu
aus den Schlitzen des Stoffbezugs ziehen.
2. Das Schloss durch Drücken auf den roten
Knopf öffnen.
3. Die Gurte hinter der Rückenlehne herausziehen u nd sie du rch die z ur Höhe des Kindes
passende Öffnung durchziehen (Abb.en
27A und 27B).
WARNUNG! Vergewissern Sie sich, dass die
Gu rte ste ts z wi sch en d er Po sit ion sst an ge (R )
und der Schale geführt sind.
WARNUNG! Der Sitzverkleinerer garantiert
dem Kin d von de ssen Gebu rt an bis zu m Gewicht von 6 kg die korrekte Haltung und die
ideale Position für Hals und Rücken.
3.3 FIX- ODER SCH WENKPOSITION
DES KINDERAUTOSITZES (VERWENDUNG A LS WIPPE)
Wenn der Kinderautositz nicht im Auto verwendet wird, kann der Kinderautositz auch
als Wippe verwendet werden.
Da mit der Kin de rau tos itz wip pt , sc hli eße n Si e
die Schaukelsperre (Abb. 14) und drehen Sie
den Transportbügel in Position C (Abb. 5).
Um ihn in Fix-Position zu verwenden, ziehen
Si e di e Sc hau kel sp err e he ra us u nd d reh en S ie
den Tragebügel in Position D (Abb. 5).
Positionieren Sie den Kinderautositz ausschließlich auf stabilen und horizontalen
Oberächen.
WA RNU NG ! Se tze n S ie d en Tr age bü gel imm er
in Position B (ver tikal) zurück, bevor Sie den
Kinderautositz transportieren.
WARNUNG! Lassen Sie das Kind
niemals unbeaufsichtigt.
WARN UNG ! Ver wenden Sie ste ts
das Rückhaltesystem.
WARNUNG! Es ist gefährlich, den
Kinderautositz auf einer erhöhten
Oberäche wie Tische, Stühle, etc.
zu stellen.
WARNUNG! Dieser Kinderautositz
ist nicht für längere Schlafzeiten
geeignet.
WARNUNG! Verwenden Sie den
Kinderautositz nicht, wenn das
Kind selbständig sitzen kann.
De r Kin der auto sitz ist k ein E rsat z fü r ein Bet t
oder eine Wiege. Wenn das Kind schlafen
möchte, sollte es in ein Bett oder in eine geeignete Wiege gelegt werden.
Verwenden Sie den Kinderautositz nicht,
wenn ein Teil davon defekt oder verloren
gegangen ist.
3.4 VERWE NDUNG MIT D EM
SPORTWAGEN
WARNUNG! Beziehen Sie sich auf die Gebrauchsanleitung des Sportwagens, wenn
Sie den Kinderautositz zusammen mit dem
Sportwagen verwenden. Die CHICCO Sportwagen, die mit einem CLIK CL AK AndockSystem ausgestattet sind, haben Armlehnen
mit Spezialvorrichtungen, die es ermöglichen,
den Kinderautositz ohne weitere Zubehörteile
direkt auf dem Sportwagen zu befestigen.
Um den Kin der au tos itz am S por tw age n fe stzumachen, gehen Sie folgendermaßen vor:
1. Den Kinderautositz mit dem Tragebügel
in vertikaler Position (B) (Abb. 28) in die
Hand nehmen.
2. Die beiden Andock-Stifte Clik Clak des
Kinderautositzes (N) an den Armlehnen
des Sportwagens festmachen. Hierbei
besonderes Augenmerk darauf richten,
dass diese auf beiden Seiten eingehakt
sein müssen. Man hört einen Klick beim
Einhaken (Abb. 29).
WARNUNG! Kontrollieren Sie vor dem Gebrauch, dass die Feststellvorrichtungen des
Kinderautositzes korrekt eingeführt wurden.
Um den Kinderautositz vom Sportwagen zu
lösen:
Page 32

32
33
Bringen Sie den Tragebügel in ver tikale Position (C) zurück.
An dem hinteren Entriegelungsgriff ziehen.
Den Kinderautositz auf eine ebene Oberäche
bringen und abstellen.
WARNUNG: Die Befestigung und das Lösen
können auch mit dem Kind im Kinderautositz durchgeführt werden, auch wenn die
genannten Maßnahmen durch das Gewicht
des Kindes erschwert werden. In diesem Fall
wird darauf hingewiesen, dass beim Durchführen der genannten Maßnahmen vorsichtig
vorzugehen ist.
3.5 REINIGU NG UND
AUFBEWAHRUNG
REIN IGUNG DES BEZUGS
Der Stoffbezug des Kinderautositzes kann
komplett abgenommen und von Hand oder in
der Maschine bei 30°C gereinigt werden.
Um den Stoffbezug zu reinigen, öffnen Sie
die Gurte und ziehen Sie ihn ab, nachdem Sie
di e zw ei G ur ts trä nge und da s Sc hlo ss a us d en
jeweiligen Schlitzen herausgezogen haben
(Abb. 30).
Zur Reinigung befolgen Sie die auf dem Etikett
des Bezugs aufgeführten Anweisungen, die
folgende Waschsymbole enthalten:
In der Maschine bei 30°C waschen
Von Hand waschen
Nicht bleichen
Nicht chemisch Reinigen
Nicht im Trockner trocknen
Nicht bügeln
Verwenden Sie keine Scheuer- oder Lösungsmittel. Den Bezug nicht schleudern und ohne
Auswringen trocknen lassen.
REINIGUNG DER KUNSTSTOFFUND METALLTEILE
Für die Reinigung der Kunststoff- oder der
lackierten Metallteile, verwenden Sie nur ein
feuchtes Tuch. Verwenden Sie keine Scheueroder Lösungsmittel.
Die beweglichen Teile des Kinderautositzes
dürfen in keiner Weise geschmiert werden.
KONTROLLE DER UNVERSEHRTHEIT DER BESTANDTEILE
Es wird empfohlen, regelmäßig die Unversehrtheit und den Verschleiß folgender Bestandteile zu überprüfen:
Stoffbezug: Überprüfen Sie, dass keine Füllung
heraustritt oder dass Teile von dieser verloren
gehen. Überprüfen Sie die Beschaffenheit der
Nähte, die stets unbeschädigt sein müssen.
Gu rt e: Ve rge wis se rn S ie s ich , da ss am Ve rs tel lband, am Mittelsteg, an den Schulterbändern
und im Bereich der Verstellplatte der Gurte
kein unnormales Zerfransen des Stoffs mit
sichtbarer Ausdünnung auftritt.
Kunststoffteile: Kontrollieren Sie den Verschleiß aller Kunststoffteile, die nicht beschädigt oder entfärbt sein dürfen.
WARNUNG! Sollte der Kinderautositz verformt oder stark abgenutzt sein, ist er zu
ersetzen, denn die ursprünglichen Sicherheitseigenschaften könnten nicht mehr gegeben sein.
AUFBE WAHRUNG DES PRODUKTS
We nn d er K ind er aut osi tz n ich t im Aut o mo ntiert ist, wird empfohlen, diesen an einem
trockenen Ort, von Wärmequellen entfernt
und vor Staub, Feuchtigkeit und direktem
Sonnenlicht geschützt aufzubewahren.
ENTSORGUNG DES PRODUKTS
Bei Erreichen der vorgesehenen Gebrauchsgrenze des Kinderautositzes stellen Sie den
Gebrauch ein und entsorgen Sie ihn. Trennen
Sie der Umwelt zuliebe die verschiedenen
Ar ten vo n Mül l je nachd em, w as von der ge ltenden Regelung Ihres Landes vorgeschrieben
wird.
WEITERE INFORMATIONEN:
CHICCO Babyausstattung GmbH
Postfach 2036
D – 63120 Dietzenbach
www.chicco.com
Page 33

33
CHICCO
AUTO-FIX FAST
Gr. 0+ (0-13kg)
INSTRUCCIONES DE USO:
ÍNDICE
1. INTRODUCCIÓN
1,1 ADVERTENCIAS
1.2 CARACTERÍSTICAS DEL PRODUCTO
1.3 DESCRIPCIÓN COMPONENTES
1.4 POSICIONES DEL ASA
1. 5 L IMI TACI ON ES Y REQ UIS ITO S DE USO
RELATIVOS AL PRODUCTO Y AL ASIENTO DEL AUTOMÓVIL
2. INSTALAC IÓN EN EL AUTOM ÓVIL
2.1 CONFIGURACIÓN INICIAL DE LAS
HOMBRERAS
2.2 INSTALACIÓN CON BASE
2.3 INSTALACIÓN SIN BASE
3. OTR AS OPERACIONES
3.1 ALOJAMIENTO DEL NIÑO EN LA SI-
LLITA
3.2 REGULACIÓN DE LA POSICIÓN DE
LOS CINTURONES
3. 3 P OSI CIÓ N FI JA O BAS CU LA NTE DE L A
SILLITA (USO HAMACA)
3.4 UTILIZACIÓN CON SILL A DE PASEO
3.5 LIMPIEZA Y MANTENIMIENTO
1. INTRODUCCIÓN
1,1 ADVERTENCIAS
IMPORTANTÍSIMO: PARA LEER INMEDIATAM ENT E
• G U A R D A R E S T E M A N U A L P A R A F U T U R A S
CO NSU LTAS.
• P a r a e l m o n t a j e y l a i n s t a l a c i ó n d e l p r o d u c-
to seguir estrictamente las instrucciones.
Evitar que alguien utilice el producto sin
haber leído las instrucciones.
• ¡ A T E N C I Ó N ! S e g ú n l a s e s t a d í s t i c a s s o b r e
los accidentes, generalmente los asientos
posterio res del vehículo son más seguros
qu e lo s de lan ter os: po r ta l mo tiv o, se aco nse ja i nst ala r la sil lit a en los asi ent os tr as ero s. E n es pec ia l, e l as ien to m ás s egu ro e s el
central posterior, siempre que disponga de
cinturón de seguridad de 3 puntos.
• ¡ A T E N C I Ó N ! ¡ P E L I G R O G R A V E ! N o u t i l i z a r
nunca es ta sillita en un asiento d elantero
que disponga de airbag frontal. Se puede
instalar la sillita en el asiento delantero
só lo si e l air bag f rontal h a sid o des acti vado: comprobar con el concesionario del
co che o en el m anu al d e in str ucc ion es d el
automóvil la posibilidad de desactivar el
ai rba g. S e ac ons eja igu alm ent e ti rar hac ia
at rás lo m áxi mo p osi ble el a sie nto hac ién do lo c omp ati ble con la p res enc ia d e ot ros
pasajeros en el asiento posterior.
• S e a c o n s e j a q u e t o d o s l o s p a s a j e r o s q u e
viajen en el automóvil estén informados
sobre la forma de desenganche del niño
en caso de emergencia.
• P r e s t a r a t e n c i ó n a l a p o s i c i ó n e n q u e d e b e
instalarse la sillita en el automóvil para
evitar interferencias entre ésta y un asiento
móvil o la puerta.
• N i n g u n a s i l l i t a p u e d e g a r a n t i z a r l a s e g u ridad total del niño en caso de accidente,
pero el uso de este producto reduce el
riesgo de lesiones graves o de muerte.
• E l r i e s g o d e s e r i o s d a ñ o s a l n i ñ o , n o s ó l o
en caso de accidente, también en otras
circunstancias (por ej, frenadas bruscas,
et c) au me nta si n o se sig uen est ric ta men te
las indicaciones presentes en este manual:
comprobar siempre que la sillita esté enganchada correctamente en el asiento.
• E n e l c a s o d e q u e l a s i l l i t a s e h u b i e r a d a ñ a do, deformado o si está desgastada, se
ac ons eja su s ust itu ció n pu est o qu e po dr ía
haber perdido las características originales
de seguridad.
• N o r e a l i z a r m o d i c a c i o n e s o e l e m e n t o s
adicionales al producto sin la aprobación
del fabricante.
• N o i n s t a l a r a c c e s o r i o s , r e c a m b i o s y
componentes no proporcionados por el
fabricante.
• N o d e j a r n u n c a e l n i ñ o s i n v i g i l a n c i a e n l a
sillita por ningún motivo.
• N o d e j a r n u n c a l a s i l l i t a e n e l a s i e n t o d e l
automóvil sin enganchar pues podría golpear y herir a los pasajeros.
• N o i n t e r p o n e r n a d a , q u e n o s e a u n a c c e s o rio a probado pa ra el producto, ni entre el
as ien to d el a uto móv il y la si lli ta , ni e ntr e la
si lli ta y el n iño : en cas o de acc ide nte la s ill i-
E
Page 34

34
35
ta podría no funcionar correctamente.
• E n e l c a s o d e q u e s e d e j e e l a u t o m ó v i l
baj o los r ayos di rect os del sol se aco nseja
cubrir la sillita.
• A c a u s a d e u n a c c i d e n t e t a m b i é n l e v e l a
sillita puede sufrir daños que no siempre
son visib les a simp le vista: por lo tanto es
necesario sustituirla.
• N o u t i l i z a r s i l l i t a s d e s e g u n d o m a n o : p o dr ían hab er suf rid o da ños es tru ct ura les no
visibles a simple vista pero que comprometen la seguridad del producto.
• L a f u n d a p u e d e s u s t i t u i r s e e x c l u s i v a m e n t e
con la aprobación del fabricante porque
co nst itu ye p ar te i nteg ra nte d e la sil lit a. L a
sillita no debe usarse nunca sin la funda,
para no comprometer la seguridad del
niño.
• C o n t r o l a r q u e l a c o r r e a d e l c i n t u r ó n n o e s t é
retorcida y evitar que ésta o partes de la
sillita quedan atrapadas entre la puerta o
ro cen c ont ra p unt os co rt ante s. E n el c as o
de que el c int uró n pr es ent e co rte s o d esh ilachados, es necesario sustituirlo.
• N o t r a n s p o r t a r , e s p e c i a l m e n t e e n l a p a r t e
tr as era del veh ícu lo, obj etos o ma let as q ue
no est én s uje ta das o po sic ion ad as d e mo do
seguro: en caso de accidente o frenado
brusco podrían herir los pasajeros.
• A s e g u r a r s e d e q u e t o d o s l o s p a s a j e r o s d e l
auto usen su cintu rón de segur idad tanto
por su seguridad como durante el viaje,
pu es to qu e en ca so d e ac cid ent e o f ren ado
brusco podrían herir al niño.
• E n c a s o d e v i a j e s l a r g o s , d e t é n g a s e f r e c u e n temente. Los niños se cansan muy fácilme nte . Po r ni ngú n mo tiv o sa qu e al n iñ o de
la sil lit a co n el v eh ícul o en mov imi ent o. S i
el niño requiere atención, busque un lugar
seguro y pare.
• L o s n i ñ o s r e c i é n n a c i d o s ( p r e m a t u r o s ) c o n
menos de 37 semanas de gestación pueden
correr riesgo en la sillita. Dichos bebés
pueden tener dicultades respiratorias
mi ent ra s es tán sen ta dos en l a si lli ta. Por lo
ta nto , ac ons eja mos dir igi rse a su méd ico o
al per so nal del hos pit al p ara que eva lúe n a
vu es tro niñ o y le aco ns eje n el tip o de sil lit a
adecuada antes de dejar el hospital.
• L a s o c i e d a d A r t s a n a d e c l i n a t o d a r e sponsabilidad por un uso inapropiado
del producto.
1.2 CARACTERÍSTICAS DEL
PRODUCTO
• E s t a s i l l i t a h a s i d o h o m o l o g a d a c o m o
“Grupo 0+”, para el transporte de niños
desde su nacimiento hasta 13 kg de peso
(de 0 a 10 meses / alrededor de 1 año),
en conformidad con lo dispuesto por el
reglamento europeo ECE R44/04.
• La homologación es de tipo “Universal”,
por lo tanto, la sillita puede utilizarse en
cualquier modelo de automóvil. ¡ATENCIÓN! “Universal” signica que es compa tib le c on l a ma yor ía, per o no con tod os,
los asientos de los vehículos.
AVISO IMPORTANTE
1. És te e s un dis pos iti vo d e re ten ció n pa ra n i-
ños “Universal”, homologado de acuerdo
al Reglamento ECE R44/04 y compatible
co n la may orí a, p ero no t odo s, los a sie nto s
de vehículos.
2. La perfecta compatibilidad se obtiene
en aquellos casos en que el fabricante
de l veh ícul o de clar e ex pres ame nte e n el
ma nua l qu e ha sid o pr evi st a la ins tal ac ión
de dispositivos “Universales” de sujeción
para niños cuya edad esté comprendida
dentro del rango considerado.
3. Este dispositivo de retención es “Uni-
versal” según los más severos criterios
de homologación respecto de modelos
precedentes que no cuentan con la presente indicación.
4. Apt o so lam en te pa ra s u us o en veh ícu los
que posean cinturón de seguridad de 3
pu nto s de sis tem a es tát ico o in erc ial , ho mologado de acuerdo al Reglamento UN/
ECE N° 16 u otro estándar equivalente.
5. En c aso de d uda s, c ont ac tar al f abr ic ante
de l di spo sit ivo de r ete nci ón o con el p unt o
de venta.
1.3 DESCRIPCIÓN DE LOS
COMPONENTES
Fig. 1 (3/4)
A. Asa
B. Capota parasol
C. Funda textil
D. Cojín reductor (*)
E. Base (**)
Page 35

35
Fig. 2 (Frente)
F. Ranura de paso de los cinturones
G. Cinturones de la sillita
H. Hombreras (*)
I. Botón de regulación de los cinturones
(debajo de la solapa de tela)
J. Correa de regulación de los cinturones
Fig. 3 (Per fil)
K. Guía cinturón auto abdominal en la
Sillita
L. Guía cinturón auto abdominal en la
base
M. Botones para la rotación del asa
N. Pernos clik clak (para el enganche en la
silla de paseo)
Fig. 4 (Parte posterior)
O. Guía cinturón auto diagonal
P. Ma nil la r de d es eng anc he (d e la bas e y d e
la silla de paseo)
Q. Ranura de paso de los cinturones
R. Elemento de guía de los cinturones de
la sillita
S. Seguro estabilizador
(*) Forma y modelo pueden diferir según
las versiones de sillita.
(**) Opcional
1.4 POSICIONES DEL ASA
El asa de la sillita se puede regular en 4
posiciones (Fig. 5).
A. Posición de transporte en auto (ATEN-
CI ÓN : és ta e s la úni ca p osi ció n p erm iti da
durante el transporte en auto).
B. Posición transporte a mano.
C . Po sic ión u so h am aca con bal anc ín o par a
enganche en silla de paseo Chicco pre-
dispuesta para tal n.
D. Posición uso hamaca ja.
Para realizar la regulación presionar contemporáneamente los botones (M) del asa
girándola hasta la posición deseada hasta
escuchar un clic.
1.5 LIMITACIONES Y REQUISITOS
DE USO RELATIVOS AL PRODUCTO
Y AL ASIENTO DEL AUTOMÓVIL
¡ATENCIÓN! Respetar estrictamente las
siguientes limitaciones y requisitos de uso
relativos al p roducto y al asiento del automó vil : de lo c ont rar io n o es ta rá g ara nti za da
la seguridad.
• L a s i l l i t a p u e d e i n s t a l a r s e e n e l a s i e n t o
de lan ter o de l la do p as aje ro o e n un o cu alquiera de los asientos traseros. Igualmente
el asi ent o de l au tom óvi l de be e st ar d iri gid o
en sen tid o de mar ch a. N o ut ili zar es ta s ill ita sob re a sie nto s dir igi dos lat era lm ente u
opuestos al sentido de marcha (Fig. 6).
• El asiento del automóvil debe disponer
de cinturón de seguridad de 3 puntos de
sistema estático o inercial, homologado
de acuerdo al Reglamento UN/ECE N° 16
u otro estándar equivalente.
• ¡ A T E N C I Ó N ! N o i n s t a l a r l a s i l l i t a c o n e l
cinturón del auto de dos puntos de anclaje (Fig. 8).
• N o u t i l i z a r n u n c a e l c o j í n r e d u c t o r s i e l
niño pesa más de 6 kg.
2. INSTALACIÓN DE LA SILLITA EN
EL AUTOMÓVIL
La sillita puede instalarse con la base (opcional) o sin la misma. En ambas conguraciones, debe instalarse sólo en el sentido
contrario a la dirección de marcha.
2.1 CONFIGURACIÓN INICIAL DE
LAS HOMBRER AS
La silli ta dispone de 2 t ipologías diferentes
de hombreras (A y B) en función de las versi one s. A nte s de usa r la sill ita , pa ra m ont ar
las hombreras realizar lo siguiente:
• H o m b r e r a s v e r s i ó n A ( F i g . 9 A , 9 B y 9 C ) :
hacer pasar las hombreras a través de las
ranuras del tejido (no de la estructura de
ab ajo ) pa ra q ue l os ci ntu ro nes per ma nez can colocados sobre las mismas. Introducir
la solapa de la entrepierna a través de la
hebilla de los cinturones.
• H o m b r e r a s v e r s i ó n B ( F i g . 1 0 A y 1 0 B ) : h a c e r
pasar los cinturones de la sillita a través
de las dos hombreras. Introducir la solapa
de la entrepierna a través de la hebilla de
los cinturones.
2. 2 INSTALACIÓN CON BASE
Pa ra i nst al ar l a si lli ta c on l a ba se e n el asi en to del auto, realizar lo siguiente:
1. Des en gan cha r la sil lit a de la b ase tir and o
la man ill a de de sen gan che sit uad a po r d e-
Page 36

36
37
trás del respaldo y contemporáneamente
alzarla mediante el asa (Fig. 11).
2. Posicionar la base en el asiento escogido
para la instalación, orientándolo como se
il ust ra e n la F ig. 1 2, d e mo do ta l qu e es té
en contacto con el respaldo del asiento
del automóvil.
3. Tirar el cinturón de seguridad del auto
y engancharlo en la hebilla correspondiente, haciendo pasar la parte horizontal
(abdominal) en las dos guías respectivas
(L) marcadas con la echa azul y tensarla
todo lo máximo posible (Fig. 13).
4. An tes de c olo car la s ill ita en l a ba se, com probar que el retén estabilizador esté
cerrado (Fig. 14).
5. Introducir la sillita en la base (dirigida en
sentido contrario de marcha) empujándola hacia abajo hasta que se enganche
(se escuchará un “clac” de jación) (Fig.
15).
6. Comprobar el enganche correcto de la
si lli ta e n la bas e tr at and o de alz ar la d es de
la parte anterior y posterior.
7. Coger el cinturón diagonal del auto y
hacerlo pasar en la respectiva guía (O)
si tua da e n la par te tra ser a d el r esp ald o de
la sil lit a (F ig. 1 6). ¡ATE NCI ÓN ! El c int uró n
di ago nal dur an te e l tr ans por te deb e es ta r
SIEMPRE colocado dentro de esta guía.
8 . Ten sar tod o lo que sea pos ibl e el cin tur ón
sin que queden excedentes de correa y
asegurándose de que no esté retorcido.
9. Girar el asa hacia la posición A comprobando que se apoye contra el asiento del
automóvil (Fig. 17).
¡ATENCIÓN!
después de la instalación, comprobar SIEMPRE que el cinturón del auto esté tensado
co rre ct ame nte y qu e es té d ist ri bui do u nif orme me nte e n to dos los pun tos , si n pr ese nt ar
torsiones. Nunca pase el cinturón del coche
por otras posiciones que non sean aquellas
indicadas.
Para desmontar la sillita manteniendo la
base instalada en el auto:
1. Sacar el cinturón diagonal de la guía
del respaldo sin desengancharlo de la
hebilla.
2 . Vol ver a co loc ar e l as a e n po sic ión ver tic al
B (Fig. 5).
3. Desenganchar la sillita como ha sido
ilustrado anteriormente.
2.3 INSTAL ACIÓN SIN BA SE
Para instalar la sillita sin la base, realizar
lo siguiente:
1. Extraer el seguro estabilizador y colocar
la sill ita en e l asie nto esc ogido d el coc he
(Fig. 18).
2. Tirar el cinturón de seguridad del auto
y engancharlo en la hebilla correspondiente, haciendo pasar la parte horizontal
(ab do min al) del cin tur ón e n la s do s gu ías
re spe ct iva s (K ) de l a si lli ta m arc ada s co n
la echa azul (Fig. 19).
3. Cog er e l tr amo dia gon al d el c int uró n de l
au to y h ac erl o pa sar en l a re spe ct iva guí a
(O) sit uad a en la p ar te t ras era del res pal do de la sillita (Fig. 20). ¡ATENCIÓN! El
cinturón diagonal durante el transporte
debe SIEMPRE estar colocado dentro
de esta guía.
4. Ten sar tod o lo que sea pos ibl e el cin tur ón
sin que queden excedentes de correa y
asegurándose que no esté retorcida.
5. Girar el asa hacia la posición A comprobando que se apoye contra el asiento del
automóvil (Fig. 21).
Para desmontar la sillita:
1. Desenganchar el cinturón del coche pre-
sionando la hebilla.
2. Volver a colocar el asa en la posición B
(Vertical).
3. Sac ar e l ci ntu rón de l a gu ía d iag ona l y d e
aquellas horizontales.
3. OTR AS OPERACIONES
3.1 ALOJAMIENTO DEL NIÑO EN LA
SI LLI TA
1. Alzar la solapa de tela, mantener pre-
sio nado el bo tón de r egulació n y tirar d e
los cinturones de la sillita para aojarlos
(Fig. 22).
2. Abrir la hebilla, presionando el botón
rojo y mantener abiertos los cinturones
(Fig. 23).
3. Acomodar al niño.
4. Sobreponer las dos lengüetas de la hebilla
e i ntr odu cir la s, u na ve z q ue e stá n un ida s,
en la hebilla hasta oír un “clic” (Fig. 24).
Page 37

37
¡AT EN CIÓ N! N o in tro duc ir l as l eng üe tas
en la hebilla una a una, o una sola.
5. Tensar los cinturones de seguridad de
la sillita tirando la respectiva correa de
regulación (Fig. 25).
3.2 REGULACIÓN DE LA POSICIÓN
DE LOS CINTURONES
¡AT EN CIÓ N! L os c int uro ne s de ben ada pt arse siempre al crecimiento del niño. Antes
de ins tal ar l a si lli ta e n el coc he e s ne ces ar io
colocarlos en la altura correcta.
Para una regulación correcta, los cinturones
deben salir del respaldo a la altura de los
hombros del niño (Fig. 26).
La sillita dispone de 3 posiciones en altura
de cinturones.
Pa ra c am bia r de lug ar lo s ci nt uro nes se d ebe
realizar lo siguiente:
1. Quitar las hombreras sacándolas desde
las ranuras de la funda de tela.
2. Abrir la hebilla de los cinturones presionando el botón rojo.
3. Sacar los cinturones desde atrás del respaldo e introducirlos en la ranura más
adecuada a la altura del niño (Fig. 27A
e 27B).
¡ATENCIÓN! Asegurarse de que los cinturones pasen siempre entre el elemento de
guía (R) y el armazón.
¡ATENCIÓN! El cojín reductor garantiza al
ni ño, d esd e el n aci mie nto h ast a los 6 kg d e
peso, la contención correcta y la posición
ideal del cuello y de la espalda.
3.3 POSICIÓN FIJA O BASCULANTE
DE LA SILLITA (USO HAMACA)
Cuando la sillita no s e la utiliz a en el coch e
puede usarse también como mecedora o
hamaca.
Para que se balancee, cerrar el seguro estabilizador (Fig. 14) y posicionar el asa en
la posición C (Fig. 5).
Para utilizarla en posición ja, extraer el
seguro estabilizador y colocar el manillar
en la posición D (Fig. 5).
Posicionar sólo sobre supercies estables
y horizontales.
¡ATENCIÓN! Antes de transportar la sillita, colocar siempre el asa en la posición
B (vertical).
¡ADVERTENCIA! No dejar al niño
sin vigilancia.
¡ADVERTENCIA! Utilizar siempre
el sistema de sujeción.
¡ADVERTENCIA! Es peligroso usar
la sillita sobre supercies altas
como mesas, sillas, etc.
¡ADVERTENCIA! Esta sillita no
debe utilizarse para períodos prolongados de sueño.
¡ADVERTENCIA! No utilizar la sillita si el niño puede sentarse solo.
La sil lit a no sus tit uye una cam a o u na c una .
Si el n iño nec esi ta d or mir, ést e de be e st ar e n
una cama o en una cuna adecuada.
No usa r la sil lit a si pre sen ta r otu ras o fa lta n
piezas.
3.4 UTILIZACIÓN CON SILLA DE
PAS EO
¡ATENCIÓN! Para su uso junto con la silla
de paseo, remitirse a las instrucciones de
la silla de paseo. Las sillas de paseo CHICCO dotadas del sistema CLIK CLAK tienen
br azo s co n di spo sit ivo s es pec ial es q ue p ermiten enganchar la sillita directamente en
la silla de paseo sin tener que emplear otros
accesorios.
Para enganchar la sillita a la silla de paseo,
realizar lo siguiente:
1. Agarrar la sillita con el asa en posición
vertical (B) (Fig. 28).
2. Enganchar los dos pernos de enganche
Clik Clak de la sillita (N) a los brazos
de la silla de paseo, prestando especial
atención al hecho de que se enganchen
en ambos lados. Se escuchará un clic de
enganche (Fig. 29).
ADVERTENCIA Antes del uso controlar que
lo s di spo sit ivo s de ja ció n de l a si lli ta e sté n
acoplados correctamente.
Para desenganchar la sillita de la silla de
paseo:
1. Volver a colocar el asa en la posición
vertical (B).
2. Tirar el manillar de desenganche pos-
terior.
Page 38

38
39
3. Desplazar y apoyar la sillita sobre una
supercie plana.
ATENCIÓN: El enganche o el desenganche
se pueden realizar también con el niño en
la sillita; las antedichas operaciones, con el
pe so d el n iño , po dr ían ser más di cul tos as.
Se aconseja prestar atención al realizar las
operaciones citadas anteriormente.
3.5 LIMPIEZA Y MANTENIMIENTO
LIMPIEZ A DE LA FUNDA
La funda de tela de la sillita es totalmente
desenfundable y lavable a mano o en lavadora a 30ºC.
Para lavarla, desabrochar los cinturones
y extraer la funda de tela después de haber quitado los dos tramos de cinturones
y la hebilla de las respectivas ranuras (Fig.
30).
Para el lavado seguir las instrucciones
presentes en la etiqueta de la funda que
contiene los siguientes símbolos para el
lavado:
Lavado en lavadora a 30°C
Lavado a mano
No decolorar
No lavar en a seco
No secar en secadora
No planchar
No usa r de ter ge nte s ab ras ivo s o d iso lve nte s.
No centrifugar la funda y dejarla secar sin
escurrirla.
LIMPIEZA DE LAS PARTES
PLÁSTIC AS Y DE METAL
Para la limpieza de las partes plásticas o
metálicas barnizadas, utilizar sólo un paño
húmedo. No usar detergentes abrasivos o
disolventes.
Las partes móviles de la sillita no deben
lubricarse.
CONTROL DEL BUEN ESTADO DE
LOS COMPONENTES
Se aconseja comprobar regularmente el
bue n estado y el es tado d e desgast e de los
siguientes componentes:
• F u n d a d e t e l a : c o m p r o b a r q u e n o s o b r e s a l ga el relleno o que no escapen partes del
mi smo . Co mpr oba r el es tad o de las cos turas que deben estar siempre íntegras.
• C i n t u r o n e s : c o m p r o b a r q u e l a t r a m a d e l
tejido no esté deshilachada con una reducción evidente del grosor en correspondencia de la correa de regulación, del
separapie rnas , en los t ramo s de lo s hom br os y en l a zon a de la p lac a de reg ula ció n
de los cinturones.
• P l á s t i c a s : c o m p r o b a r e l e s t a d o d e d e s g a s t e
de todas las partes plásticas que no deben
presentar signos evidentes de daño o de
decoloración.
¡ATENCIÓN! Si la sillita estuviera deformada o muy desgastada debe sustituirse:
podría haber perdido las características
originales de seguridad.
CONSERVACIÓN DEL PRODUCTO
Cuando no está instalada en el coche se
aconseja guardar la sillita en un lugar seco,
lejos de las fuentes de calor y al reparo del
polvo, de la humedad y de la luz solar directa.
ELIMINACIÓN DEL PRODUCTO
Alcanzado el límite de uso previsto para la
sillita, dejar de usarla y depositarla entre
los desechos. Por razones de respeto del
ambiente, separar los distintos tipos de
desecho según lo previsto por la norma
vigente en el propio país.
CHICCO ESPAÑOLA S. A.
C/. Industrias, 10
Poligono Industrial Urtinsa
28923 Alcorcón Madrid
Servicio de atencion al Consumidor: 902
190 089
www.chicco.es
Page 39

39
CHICCO
AUTO-FIX FAST
Gr. 0+ (0-13kg)
INSTRUÇÕES DE UTI LIZAÇÃO
ÍNDICE:
1. INTRODUÇÃO
1.1 ADVERTÊNCIAS
1.2 CARACTERÍSTICAS DO PRODUTO
1.3 DESCRIÇÃO DOS COMPONENTES
1.4 POSIÇÃO DA ALÇA
1.5 LIMITAÇÕES E REQUISITOS DE UTILIZAÇÃO RELATIVOS AO PRODUTO E
AO BANCO DO AUTOMÓVEL
2. INSTALAÇÃO NO AUTOMÓVEL
2.1 CONFIGURAÇÃO INICIAL DAS PRO-
TECÇÕES PARA OS OMBROS
2.2 INSTALAÇÃO COM BASE
2.3 INSTALAÇÃO SEM BASE
3. OUTRAS OPER AÇÕES
3.1 COLOCAÇÃO DO BEBÉ NA CADEIRA
AUTO
3.2 REGULAÇÃO DA ALTURA DAS COR-
REIAS
3.3 UTILIZAÇÃO COMO ESPREGUIÇADEI-
RA (POSIÇÃO DE BALOIÇO OU FIX A)
3.4 UTILIZAÇÃO NO CARRINHO DE PAS-
SEIO
3.5 LIMPEZA E CONSERVAÇÃO
1. INTRODUÇÃO
1.1 ADVERTÊNCIAS
MUITO IMPORTANTE. LEIA DE IMEDIATO
• C O N S E R V E E S T E M A N U A L P A R A F U T U -
RAS CONSULTAS.
• P a r a a m o n t a g e m e i n s t a l a ç ã o d o p r o d u t o ,
si ga e scr upu los am ent e as i ns tru çõe s. N ão
pe rm ita q ue a lg uém uti liz e o pr od uto s em
ter lido as instruções.
• A T E N Ç Ã O ! S e g u n d o a s e s t a t í s t i c a s s o b r e
acidentes, de um modo geral os bancos
traseiros do veículo são mais seguros do
que o banco da frente: é aconselhável,
po rt ant o, in st ala r a c ade ira aut o num dos
bancos de trás. Nomeadamente, o lugar
mais seguro é o do meio, se tiver cinto
de 3 pontos.
• A T E N Ç Ã O ! P E R I G O G R A V E ! N u n c a u t i l i z e
esta cadeira auto num banco da frente
eq uip ad o co m ai rba g fr ont al . Po de i nst ala r
a cadeira auto no banco da frente, desde
que o airbag frontal tenha sido desactivado: verique no stand da marca ou no
manual de instruções do automóvel se é
po ssí vel des lig ar o air bag . Em tod o o c aso ,
é a con sel háv el r ecu ar o ban co o mai s po ssí vel , te ndo em c ont a a p re sen ça d e ou tro s
passageiros no banco de trás.
• É a c o n s e l h á v e l q u e t o d o s o s p a s s a g e i r o s
oc upan tes d o aut omóv el sa ibam como libertar a criança, em caso de emergência.
• P r e s t e a t e n ç ã o à f o r m a c o m o i n s t a l a a
cadeira auto no automóvel, de forma a
evitar que um banco móvel ou a porta
possam interferir com ela.
• N e n h u m a c a d e i r a a u t o p o d e g a r a n t i r a t o ta l se gur an ça d o be bé e m c aso de a cid ent e,
mas a utilização deste produto reduz o
risco de lesões graves ou morte.
• O r i s c o d e s é r i o s d a n o s p a r a o b e b é , n ã o s ó
em caso de acidente mas também noutras
circunstâncias (por ex. travagens bruscas,
et c.), au men ta s e as ind ica çõ es d ada s ne ste
ma nua l nã o fo rem rig oro sam ent e re spe itadas: verique sempre se a cadeira auto
está correctamente xada no banco do
automóvel.
• S e a c a d e i r a a u t o e s t i v e r d a n i c a d a , d e formada ou muito desgastada, deve ser
substituída, pois pode ter perdido as características originais de segurança.
• N u n c a i n t r o d u z a q u a i s q u e r a l t e r a ç õ e s n o
produto sem a aprovação do fabricante.
• N ã o i n s t a l e a c e s s ó r i o s , p e ç a s d e s u b s t i tuição ou componentes não fornecidos
pelo fabricante.
• N u n c a d e i x e o b e b é n a c a d e i r a a u t o s e m
vigilância, por motivo algum.
• N u n c a d e i x e a c a d e i r a a u t o n o b a n c o d o
automóvel sem estar xa, pois pode magoar ou ferir os passageiros.
• N ã o c o l o q u e n a d a q u e n ã o s e j a u m a c e s só rio apr ova do p el o fa bri can te n em e ntr e
o banco do automóvel e a cadeira auto
nem entre a cadeira auto e a criança: em
caso de acidente, a cadeira auto poderá
não funcionar correctamente.
• S e o a u t o m ó v e l f o r d e i x a d o a o s o l , é a c o n -
P
Page 40

40
41
selhável tapar a cadeira auto.
• A p ó s u m a c i d e n t e , a i n d a q u e l i g e i r o , a
cadeira auto pode ter sofrido danos nem
sem pre visíveis a ol ho nu: p orta nto, é necessário substituí-la.
• N ã o u t i l i z e c a d e i r a s a u t o e m s e g u n d a m ã o :
podem ter sofrido danos estruturais não
vi sív eis a ol ho n u ma s qu e co mpr ome tem
a segurança do produto.
• O f o r r o s ó p o d e s e r s u b s t i t u í d o p o r o u t r o
ap rov ad o pe lo fab ri can te , da do s er uma par te int egr an te d a ca de ira au to. A ca dei ra aut o
nu nc a de ver á s er u sa da s em o fo rro , pa ra não
comprometer a segurança do bebé.
• C e r t i q u e - s e d e q u e o c i n t o n ã o c a t o r cido e evite que o mesmo ou partes da
ca dei ra a uto que m pr eso s na s por ta s ou
raspem em pontos cortantes. Se o cinto
estiver cortado ou desado, é necessário
substituí-lo.
• C e r t i q u e - s e d e q u e n ã o s ã o t r a n s p o r tados, nomeadamente na plataforma
do banco traseiro do carro, objectos ou
bagagens que não estejam presos ou
colocados de forma segura: em caso de
acidente ou travagem brusca podem ferir
os passageiros.
• C e r t i q u e - s e d e q u e t o d o s o s p a s s a g e i r o s
do automóvel colocam o cinto de segurança, não só para sua própria segurança
mas também porque, durante a viagem,
em cas o de aci den te o u tr ava gem bru sca ,
podem magoar o bebé.
• N o c a s o d e v i a g e n s l o n g a s f a ç a p a r a g e n s
frequentes. O bebé cansa -se muito facilme nte . Po r mo tiv o al gum ret ire o beb é d a
ca dei ra a uto com o ca rro em m ovi men to.
Se o be bé p rec isa r d e ate nç ão, p ro cur e um
local seguro e encoste.
• O s r e c é m - n a s c i d o s p r e m a t u r o s c o m m e nos de 37 semanas de gestação podem
correr perigo na cadeira auto porque pode m te r di cu lda de em r esp ir ar s e fo rem ali
sentados. Assim, é aconselhável consultar
o s eu m édi co o u o p ess oa l ho spi tal ar a nte s
de deixar o hospital, para que observem
o seu lho e recomendem a cadeira auto
ou alcofa auto mais adequada.
• A e m p r e s a A r t s a n a d e c l i n a q u a l q u e r
responsabilidade pelo uso indevido do
produto.
1.2 C ARACTERÍSTICAS DO
PRODUTO
• E s t a c a d e i r a a u t o e s t á h o m o l o g a d a p a r a
o “G rupo 0+”, pa ra o t rans por te de c rian ças desde o nascimento até aos 13 kg de
pe so ( de 0 a 10 m es es/ 1 an o, a pro xim ada mente), em conformidade com a norma
europeia ECE R44/04.
• A h o m o l o g a ç ã o é d o t i p o “ U n i v e r s a l ” ,
portanto, a cadeira auto pode ser utiliza da em qualquer modelo de automóvel.
ATENÇÃO! “Universal” signica que é
compatível com a maior parte mas não
todos os bancos de automóvel.
AVISO IMPORTANTE
1. Este é um dispositivo “Universal” de re-
tenção para crianças, homologado de
acordo com o Regulamento ECE R44/04 e
co mpa tív el c om a mai or p ar te d os b anc os
de automóvel, mas não todos.
2. Obtém-se mais facilmente a compatibilida-
de per fe ita nos cas os e m q ue o con str uto r
do automóvel declara, no manual do veículo, que o mesmo prevê a instalação de
dispositivos “Universais” de retenção para
crianças, para a faixa etária em questão.
3. Este dispositivo de retenção foi classi-
cado “Universal” de acordo com critérios
de homologação mais rigorosos relativamente a modelos anteriores, que não
incluem este aviso.
4. Adequado para a utilização em veículos
equipados com cinto de segurança de
3 pontos, estático ou com enrolador,
homologado segundo o Regulamento
UN/ECE N°16 ou outras normas standard
equivalentes.
5. Em caso de dúvida, contacte o fabri-
cante do dispositivo de retenção ou o
revendedor.
1.3 DESCRIÇÃO DOS
COMPONENTES
Fig. 1 (3/4)
A. Alça de transporte
B. Capota de Sol
C. Revestimento têxtil
D. Almofada redutora (*)
E. Base (**)
Page 41

41
Fig. 2 (Frente)
F. Ranhuras de passagem das correias dos
ombros
G. Cinto de 3 pontos da cadeira auto
H. Protectores acolchoados dos ombros
(*)
I. Botão de regulação do cinto (debaixo da
aba de tecido)
J. Correia reguladora central da tensão do
cinto
Fig. 3 (Per fil)
K. Guia de passagem da correia abdominal
do cinto auto (na cadeira auto)
L. Guia de passagem da correia abdominal
do cinto auto (na base)
M. Botões para regulação da alça
N. Pernos metálicos Clik Clak (para xação
no carrinho de passeio)
Fig. 4 (Trás)
O. Guia de passagem da correia diagonal
do cinto auto
P. Manípulo para soltar a cadeira da base ou
do chassis do carrinho de passeio
Q. Ranhuras de passagem das correias dos
ombros
R. Guia posterior das correias da cadeira
auto
S. Estabilizador
(*) A forma e o modelo podem variar de
acordo com as versões da cadeira auto.
(**) Opcional
1.4 POSIÇÃO DA ALÇA
A alça da cadeira auto é regulável em 4
posições (Fig. 5):
A. Posição para transporte no automóvel
(ATENÇÃO: esta é a única posição permitida durante o transporte no auto-
móvel).
B. Posição para o transporte à mão.
C. Posição para utilização como espreguiça-
de ira de b al oiç o ou qua ndo mo nta da n um
carrinho de passeio Chicco (compatível
com a mesma).
D. Posição para utilização como espregui-
çadeira, na posição xa.
Para regular a alça, pressione simultaneamente os botões (M) da mesma, rodando-a
para a posição escolhida até ouvir um estalido e bloqueio.
1.5 LIMITAÇÕES E REQUISITOS DE
UTILIZAÇÃO RELATIVOS AO
PRODUTO E AO BANCO DO
AUTOMÓVEL
ATEN ÇÃO! Respeite es crup ulosa mente as
seguintes limitações e requisitos de utilização relativos ao produto e ao banco do
au tom óve l, p ois cas o co ntr ár io a s eg ura nça
do bebé será comprometida.
• A c a d e i r a a u t o p o d e s e r i n s t a l a d a n o b a n c o
da frente, no lado do passageiro ou em
qualquer um dos bancos traseiros. Em
todo o caso, o banco do carro deve estar
virado no sentido da marcha. Nunca instale esta cadeira auto em bancos virados
lateralmente ou no sentido contrário à
marcha. (Fig. 6).
• O b a n c o d o a u t o m ó v e l d e v e e s t a r e q u i -
pa do c om c int o de seg ura nça de 3 pon tos
de xação, estático ou com enrolador,
homologado segundo o Regulamento
UNI/ECE N°16 ou outras normas standard
equivalentes. (Fig. 7).
• A T E N Ç Ã O ! N u n c a i n s t a l e a c a d e i r a a u t o
co m um cin to d e au tom óve l de doi s po nto s
de xação (Fig. 8).
• N ã o u t i l i z e m a i s a a l m o f a d a r e d u t o r a q u a n -
do o bebé atingir um peso superior a 6 kg.
2. INSTALAÇÃO DA CADEIRA AUTO
A cadeira auto pode ser instalada com ou
sem a base (opcional). Em ambas as congurações, deve ser instalada apenas no
sentido contrário à marcha.
2.1 CONFIGURAÇ ÃO INICIAL DOS
PROTECTORES DOS OMBROS
A c ade ir a au to es tá equ ipa da c om 2 tip os d ife ren tes de p rot ect ore s do s om bro s (A e B),
dependendo das versões. Antes de utilizar
a c adei ra a uto, p ara colo car os pr otec tor es
dos ombros, proceda da seguinte forma:
• P r o t e c t o r e s d o s o m b r o s v e r s ã o A ( F i g . 9 A ,
9B e 9C ): p as se o s pr otec to res dos omb ros
at rav és d as ran hur as do r eve sti me nto têx til
(n ão d a es tru tur a p or b aix o), d e mo do que
as correias quem colocadas sobre eles.
Pa sse o pr ote cto r da cor re ia s epa rad or a de
pernas através do fecho do cinto.
• P r o t e c t o r e s d o s o m b r o s v e r s ã o B ( F i g . 1 0 A
e 10B): passe as correias da cadeira auto
Page 42

42
43
at ravé s dos dois prot ecto res d os omb ros.
Pa sse o pr ote cto r da cor re ia se pa rad or a de
pernas através do fecho do cinto.
2. 2 INSTALAÇÃO COM BASE
Para instalar a cadeira auto com a base no
banco do automóvel, proceda da seguinte
forma:
1. Solte a cadeira auto da base, puxando
o manípulo situado atrás do encosto e,
ao mesmo tempo, erguendo-a pela alça
(Fig. 11).
2. Coloque a base sobre o banco escolhido
para a instalação, orientando-a como
indica a Fig. 12 e de modo que que em
contacto com o encosto do banco do
automóvel.
3. Pux e o c into de s egu ra nça do a uto móv el
e prenda-o no fecho correspondente,
fazendo passar a correia horizontal (abdominal) pelas duas guias próprias (L),
assinaladas pela seta azul e estique-o o
mais possível (Fig. 13).
4. Antes de colocar a cadeira auto na base,
ver ique se o estab iliza dor está bem fe chado (Fig. 14).
5. Co loq ue a cad eir a au to n a ba se ( vir ada no
sentido contrário à marcha), empurran do -a par a ba ixo até ca r pr es a (ou vir á u m
estalido indicando a xação) (Fig. 15).
6. Verique se a cadeira auto está bem -
xada na base, tentando levantá-la tanto
na frente como trás.
7. Pe gu e na c or rei a di ago nal do a uto móv el e
pa sse -a pel a re sp ect iva gui a (O ) ex ist ent e
na parte de trás do encosto da cadeira
au to ( Fig . 16) . ATE NÇ ÃO! Dur an te o t ra nsporte, a correia diagonal deve permanecer
SEMPRE introduzida nesta guia.
8 . Es ti que o ma is p oss íve l o c int o, s em d ei xar
folgas nas correias e certicando-se de
que não ca torcido.
9. Rode a alça para a posição A, apoiando-a
no banco do automóvel (Fig. 17).
ATENÇÃO! Após a instalação, verique
SEMPRE se o cinto do automóvel está corre ct ame nte est ica do , se m te r c ado tor cid o
e s e a te ns ão e stá uni for mem en te di str ib uída . NU NC A pa ss e o ci nto do a uto móv el e m
posições diferentes das indicadas.
Pa ra r eti ra r a c ade ira aut o, m ant end o a b ase
instalada no automóvel:
1. Retire a correia diagonal da guia atrás do
encosto, sem abrir o cinto.
2. Coloque a alça na posição vertical B (Fig. 5).
3. Solte a cadeira auto conforme ilustrado
anteriormente.
2.3 INSTALAÇÃO SEM BASE
Par a inst alar a cadeira auto se m base, proceda da seguinte forma:
1. Fec he o est abi liz ad or e col oqu e a c ade ira
auto no banco do automóvel (Fig. 18).
2. Pux e o c into de s egu ra nça do a uto móv el
e prenda-o no fecho correspondente,
fazendo passar a correia horizontal (abdominal) pelas duas respectivas guias
(K ) da cad eir a au to, ass ina lad as p el a se ta
azul (Fig. 19).
3. Pegue na correia diagonal do automóvel
e p ass e- a pe la r esp ec tiv a gu ia ( O) si tua da
at rás do e nc ost o da c ad eir a au to ( Fig . 20) .
ATEN ÇÃO! Durante o transpor te, a co rreia diagonal deve permanecer SEMPRE
introduzida nesta guia.
4 . Es tiq ue o ma is p oss íve l o c int o, s em d eix ar
folgas nas correias e certicando-se de
que não ca torcido.
5. Rode a alça para a posição A, apoiando-a
no banco do automóvel. (Fig. 21).
Para retirar a cadeira auto:
1. Retire o cinto do automóvel abrindo-o
no fecho.
2. Coloque a alça na posição B (vertical).
3. Retire o cinto da guia diagonal e das
horizontais.
3. OUTRAS OPER AÇÕES
3.1 COLOCAÇ ÃO DO BEBÉ NA
CADEIR A AUTO
1. Levante a aba de tecido, mantenha pressionado o botão de regulação e puxe
as correias da cadeira auto de modo a
afrouxá-las (Fig. 22).
2. Abra o fecho pressionando o botão
vermelho e mantenha as correias dos
ombros afastadas (Fig. 23).
3. Coloque a criança.
4. Sobreponha as duas linguetas e intro-
duza-as de uma vez no fecho, até ouvir
Page 43

43
um esta lid o (Fi g. 24). ATEN ÇÃO ! Nun ca
in tro duz a n o fec ho u ma l ing uet a d e ca da
vez ou apenas uma.
5. Aperte o cinto de segurança da cadeira
auto, puxando a correia reguladora de
tensão (Fig. 25).
3.2 REGULAÇÃO DA ALTURA DAS
CORREIAS DOS OMBROS
ATE NÇÃ O! A s co rrei as d os om bro s dev em
estar sempre adaptadas ao crescimento do
bebé. Antes de instalar a cadeira auto no
au tom óve l, d eve rá v er ic ar a alt ura cor re cta
das correias. Para uma regulação correcta,
as correias devem sair do encosto à altura
dos ombros do bebé (Fig. 26).
A cadeira auto dispõe de 3 posições em
altura.
Para mudar a altura das correias, proceda
da seguinte forma:
1. Ret ire os p rote ct ore s do s om bro s, d ese n-
ando-os das ranhuras do revestimento
têxtil.
2. Abra o fecho do cinto, pressionando o
botão vermelho.
3. Retire as correias do lado de trás do encosto e volte a inseri-las nas ranhuras
mais adequadas à altura do bebé (Fig.
27A e 27B).
ATENÇÃO! Certique-se de que as correias
passam sempre entre a guia (R) e o casco.
ATE NÇ ÃO! A al mof ada red uto ra gar ant e ao
bebé, desde o nascimento até aos 6 kg de
pe so, uma ret enç ão c orr ec ta e uma pos içã o
ideal para o pescoço e as costas.
3.3 POSIÇ ÃO FIXA OU DE BALOIÇO
DA CADEIR A AUTO (USO
ESPREGUIÇADEIR A)
Quando não é utilizada no carro, a cadeira auto também pode ser usada como
espreguiçadeira, nas posições de baloiço
ou xa. Para a posição de baloiço, feche o
estabilizador (Fig. 14) e coloque a alça na
posição C (Fig. 5).
Pa ra a uti li zar na p os içã o xa, abr a o est ab ili zador e coloque a alça na posição D (Fig. 5).
Po sic ion e a c ade ir a ap ena s so br e su per fí cie s
estáveis e horizontais.
ATEN ÇÃO! A ntes de tra nspor tar a c adeir a
auto, coloque sempre a alça na posição B
(vertical).
ADVERTÊNCIA! Não deixe o bebé
sem vigilância.
ADVERTÊNCIA! Utilize sempre
o cinto de segurança (da cadeira
auto).
ADVERTÊNCIA! É perigoso utilizar
a cadeira auto sobre superfícies
elevadas como mesas, cadeiras,
etc.
ADVERTÊNCIA! Esta cadeira auto
não é adequada para períodos de
sono prolongados.
ADVERTÊNCIA! Não utilize a cadeira auto (como espreguiçadeira)
se o bebé já for capaz de se sentar
sozinho.
A cadeira auto não substitui uma cama ou
um berço. Se o bebé precisar de dormir,
deverá deitá-lo numa cama ou num berço
adequado.
Não use a cadeira auto se houver alguma
peça partida ou em falta.
3.4 UTILIZAÇ ÃO NO CARRIN HO DE
PAS SEI O
ATENÇ ÃO! Pa ra ut iliz ar com o car rinh o de
pa ssei o, con sulte as in struçõ es do mesm o.
Os carrinhos de passeio CHICCO equipados com o sistema CLIK CL AK têm apoios
de braços com dispositivos especiais que
pe rm item x ar a c ad eir a au to d ire cta me nte no chassis, sem precisar de acessórios
adicionais.
Para xar a cadeira auto no carrinho de
passeio, proceda da seguinte forma:
1. Segure na cadeira auto com a alça na
posição vertical (B) (Fig. 28).
2. Insira os dois pernos de engate Clik Clak
da cadeira auto (N) nas ranhuras dos
apoios de braços do carrinho de passe io, ten do e m ate nç ão q ue d eve rão ca r
bloqueados nos dois lados. Ouvirá um
estalido de bloqueio (Fig. 29).
ADVERTÊNCIA! Antes de utilizar, verique
se os d isp osi tiv os d e x aç ão d a ca dei ra a uto
estão correctamente bloqueados. Para sol-
Page 44

44
45
tar a cadeira auto do carrinho de passeio:
1. Coloque a alça na posição vertical (B).
2. Puxe o manípulo posterior para soltar
a cadeira.
3. Retire a cadeira auto e coloque-a sobre
uma superfície plana e estável.
ATENÇÃO: as operações de montagem e
desmontagem também podem ser feitas
com a criança na cadeira auto, embora
com o seu peso, possam tornar-se mais
difíceis. Neste caso, é aconselhável ter o
máximo cuidado enquanto efectua estas
operações.
3.5 LIMPE ZA E CONSERVAÇÃO
LIMPEZA DO FORRO
O revestimento têxtil da cadeira auto é
co mpl eta me nte r emo ví vel e lav áve l, à mão
ou na m áqu ina d e lav ar a 3 0°C (cons oan te
in dic aç ão d ada na e tiq uet a). P ar a la var, abr a
o c int o e re tir e o r eve sti men to t êxt il d ep ois
de des en ar as d uas cor rei as d os o mb ros e o
fecho das respectivas ranhuras (Fig. 30).
Para a lavagem, siga as instruções que
constam na etiqueta do revestimento e
que podem incluir os seguintes símbolos
de lavagem:
Lavagem na máquina a 30°C
Lavagem à mão
Não usar lixívia
Não limpar a seco
Não secar na máquina
Não passar a ferro
Nu nc a uti liz e de ter gen tes abr as ivos ou s olve nte s. N ão c ent ri fug ue o for ro e est end a- o
sem o torcer.
LIMPEZA DOS COMPONENTES DE
PLÁSTICO E DE METAL
Para a limpeza dos componentes em plástico o u em m etal p inta do, util ize a pena s um
pano húmido. Nunca utilize detergentes
abrasivos ou solventes.
As partes móveis da cadeira auto não devem, de modo algum, ser lubricadas.
CONTROLO DA INT EGRIDADE DOS
COMPONENTES
É a con sel háv el v er ic ar r egu lar me nte a in tegr ida de e o es ta do d e de sga ste dos seg uin tes
componentes:
• F o r r o : c e r t i q u e - s e d e q u e n ã o e s t ã o a
de sfa zer -se n em a sai r pa ra f ora do r eves timento partes do enchimento. Verique
o estado das costuras, que devem estar
sempre intactas.
• C i n t o s : v e r i q u e s e o m a t e r i a l t ê x t i l e s t á a
desfazer-se e se há uma evidente redução
da esp es sur a na zon a da cor re ia r egu lad or a,
na correia separadora de pernas, nas correias dos ombros e na zona das ranhuras
de regulação das mesmas.
• P l á s t i c o s : v e r i q u e o e s t a d o d e d e s g a s t e
de todos os componentes em plástico que
nã o de vem apr ese nt ar ev id ent es si na is de
deterioração nem perda de cor.
ATENÇÃO! Se a cadeira auto estiver deformada ou muito desgastada deve ser
substituída, pois poderá ter perdido as características originais de segurança.
CONSE RVAÇÃO DO PRODUTO
Quando não está instalada no automóvel,
é aconselhável conservar a cadeira auto
num local seco, longe de fontes de calor
e ao abrigo do pó, da humidade e da luz
solar directa.
ELIM INAÇÃO DO PRODUTO
At ing ido o li mite de u til iza çã o pr evi sto p ar a
a cadeira auto, deixe de a usar e c oloque -a
no l ixo. Por re speito pelo ambie nte, sepa re
os diferentes tipos de resíduos de acordo
com a legislação vigente no seu País.
PARA MA IS INFORMAÇÕES:
FARSANA PORTUGAL, S.A.
Serviço Consumidor
Rua Humberto Madeira, 9, Queluz de
Baixo
2730-097 Barcarena - PORTUGAL
Tel. N° verde 800 20 19 77
www.chicco.com
Page 45

45
CHICCO
AUTO-FIX FAST
Gr. 0+ (0-13kg)
GEBRUIKSAANWIJZING
INHOUDSOPGAVE:
1. INLEIDING
1.1 WAARSCHUWINGEN
1.2 KENMERKEN VAN HET PRODUCT
1.3 BESCHRIJ VING VAN DE ONDERDELEN
1.4 STAND VAN DE HANDGREEP
1.5 BEPERKINGEN EN GEBRUIKSVEREISTEN VAN HET ARTIKEL EN DE AUTOZITTING
2. INSTALLATIE IN DE AUTO
2.1 BEGINUIT VOERING VAN DE SCHOU-
DERBANDEN
2.2 INSTALLATIE MET BASIS
2.3 INSTALLATIE ZONDER BASIS
3. VERDERE HANDELINGEN
3.1 HET KIND IN HET AUTOSTOELTJE
ZETTEN
3.2 DE STAND VAN DE GORDELS AF-
STELLEN
3.3 VASTE OF SCHOMMELSTAND VAN
HET STOELTJE (GEBRUIK ALS LIGSTO ELTJ E)
3.4 GEBRUIK MET DE WANDELWAGEN
3.5 ONDERHOUD EN BEWARING
1. INLEIDING
1.1 WAARSCHUWINGEN
ZEER BELANGRIJK: METEEN LEZEN
• B E W A A R D E Z E H A N D L E I D I N G V O O R
EVENTUELE LATERE RA ADPLEGING.
• V o l g d e i n s t r u c t i e s v o o r d e m o n t a g e e n d e
in sta ll ati e va n he t pr od uct nau wg eze t. L aa t
niemand het artikel gebruiken zonder eerst
de instructies te hebben gelezen.
• L E T O P ! V o l g e n s d e s t a t i s t i e k e n o v e r o n -
gelukken is de achterbank van het voertu ig v eil ige r da n de v oo rzi tti nge n: d aa rom
wordt aangeraden het autostoeltje op de
ac hte rba nk t e in sta lle ren . De vei lig ste z itti ng i s de mid del ste ach ter zi tti ng , al s de ze
is uitgerust met een driepuntsgordel.
• L E T O P ! E R N S T I G G E V A A R ! G e b r u i k d i t
autostoeltje nooit op een voorzitting uitgerust met een frontale airbag. Het stoeltje kan alleen op een voorzitting worden
geïnstalleerd, als de frontale airbag is uitgeschakeld: controleer bij de autofabrikant,
of in d e geb ru iks aa nwi jzi ng v an d e au to, o f
de airbag kan worden uitgeschakeld. Het
wordt in ieder geval aangeraden de zitting
zo ver mog eli jk a cht eru it t e ze tte n, v oor zo ver de aanwezigheid van andere passagiers
op de achterbank dit toelaat.
• H e t w o r d t a a n b e v o l e n a l l e i n z i t t e n d e n t e
in for mer en o ver hoe het kin d in g eva l va n
nood kan worden losgekoppeld.
• L e t e r o p h o e h e t a u t o s t o e l t j e i n d e a u t o
wordt geïnstalleerd om te voorkomen dat
een mobiele zitting of het portier stoor t.
• G e e n e n k e l a u t o s t o e l t j e k a n d e a b s o l u t e
veiligheid van het kind in geval van een
ongeluk garanderen, maar het gebruik
va n di t ar ti kel v erm in der t he t ge vaa r vo or
ernstig letsel of de dood.
• H e t g e v a a r v o o r e r n s t i g l e t s e l v a n h e t
kind, en niet alleen bij een ongeluk, maar
ook in andere omstandigheden (bijv. bij
hard remmen, enz.) wordt groter, als de
aa nwi jzi nge n di e in dez e ha ndl eid ing worden beschreven niet nauwgezet in acht
worden genomen: controleer altijd dat
het autostoeltje correct aan de zitting is
bevestigd.
• I n d i e n h e t a u t o s t o e l t j e b e s c h a d i g d , v e r vormd of ernstig versleten mocht zijn,
moet het worden vervangen. Het kan zijn
oorspronkelijke veiligheidskenmerken hebben verloren.
• V e r r i c h t g e e n w i j z i g i n g e n a a n h e t a r t i k e l e n
vo eg e r ni ets aan toe zon der toe ste mm ing
van de fabrikant.
• B r e n g g e e n n i e t d o o r d e f a b r i k a n t g e l e verde accessoires, reserveonderdelen of
onderdelen aan.
• L a a t h e t k i n d n o o i t e n o m g e e n e n k e l e
reden zonder toezicht in het autostoeltje
achter.
• L a a t h e t a u t o s t o e l t j e n o o i t o n b e v e s t i g d
op de autozitting. Het kan tegen andere
passagiers stoten en deze verwonden.
• Z e t n i e t s d a t g e e n v o o r h e t a r t i k e l g o e d gekeurd accessoire is tussen de autozitting
en het aut ost oel tje , of t uss en h et a uto sto -
NL
Page 46

46
47
eltje en het kind: in geval van een ongeluk
ka n he t da n ge beu ren dat het aut ost oel tje
niet goed functioneert.
• Als de auto in de rechtstreekse zon wordt
achtergelaten, wordt aangeraden het autostoeltje te bedekken.
• O o k n a e e n n i e t e r n s t i g o n g e l u k k a n h e t
autostoeltje schade opgelopen hebben,
die echter niet altijd met het blote oog
zichtbaar is: het moet daarom worden
vervangen.
• G e b r u i k g e e n t w e e d e h a n d s a u t o s t o e l t j e s :
de ze k unn en voo r he t bl ote o og o nz ich tba re structurele schade hebben opgelopen,
die zodanig is dat de veiligheid van het
artikel niet langer gewaarborgd wordt.
• D e h o e s k a n u i t s l u i t e n d w o r d e n v e r v a n g e n
met een door de fabrikant goedgekeurde
ho es , om dat dez e in tegr aa l de el u itm aak t
van het autostoeltje. Het autostoeltje mag
nooit zonder hoes worden gebruikt, om
de v eilighe id va n het k ind n iet op het spel
te zetten.
• C o n t r o l e e r d a t d e b a n d v a n d e g o r d e l n i e t
verdraaid zit en voorkom dat deze of een
gedeelte van het autostoeltje tussen de
portieren komt of over scherpe punten
wrijft. Als de gordel scheuren of rafels
vertoont, moet hij worden vervangen.
• C o n t r o l e e r o f e r g e e n v o o r w e r p e n o f b a gage, in het bijzonder op de hoedenplank
in het voertuig worden vervoerd, die niet
zijn vastgemaakt of veilig zijn geplaatst:
bij een ongeluk of hard remmen, kunnen
deze de passagiers verwonden.
• V e r z e k e r u e r v a n d a t a l l e p a s s a g i e r s v a n d e
auto hun eigen veiligheidsgordel gebruiken,
zo wel voo r hu n ei gen veil igh eid , al s o mda t
zij tijdens de reis bij een ongeluk of bij hard
remmen het kind kunnen verwonden.
• S t o p v a a k t i j d e n s l a n g e r e i z e n . E e n k i n d i s
het al gauw beu. Haal het kind om geen
enkele reden uit het autostoeltje, terwijl
de a uto rijd t. Al s het kind a anda cht n odig
heeft, moet u een veilige plek zoeken en
stoppen.
• T e v r o e g g e b o r e n k i n d e r e n , d i e z i j n g e b o r e n
vóór de 37ste week zwangerschap, kunne n ge vaa r lo pen in h et a uto sto elt je. Dez e
baby’s kunnen ademhalingsmoeilijkheden
hebben, terwijl ze in het autostoeltje zitten. We raden u dus aan u tot uw ar ts
of het ziekenhuispersoneel te wenden,
zodat uw kind kan worden beoordeeld
en het geschikte autostoeltje kan worden
aangeraden, voordat u uit het ziekenhuis
komt.
• D e r m a A r t s a n a w i j s t e l k e v o r m v a n
aansprakelijkheid af voor een oneigenlijk
gebruik van het product.
1.2 KENMERKEN VAN HET
PRODUCT
• D i t a u t o s t o e l t j e i s m e t i n a c h t n e m i n g v a n
de Europese voorschriften ECE R44/04
goedgekeurd voor “Groep 0+”, voor het
vervoer van kinderen vanaf de geboorte
tot 13 kg lichaamsgewicht (ongeveer van
0 tot 10 maanden/1 jaar).
• D e g o e d k e u r i n g i s v a n h e t “ U n i v e r s e l e ”
type, dus kan het autostoeltje in elke
model auto worden gebruikt. LET OP!
“Universeel” betekent dat het compatibel is met de meeste, maar niet met alle
autozittingen.
BELANGRIJKE MEDEDELINGEN
1. Dit is een “Universeel” kinderbeveiligings-
systeem, dat goedgekeurd is volgens het
reglement ECE R44/04 en compatibel is
met de meeste, maar niet alle, autozittingen.
2. De perfecte compatibiliteit is eenvoudiger
te verkrijgen indien de fabrikant van het
voertuig in de handleiding ervan verklaa rt dat het voe rtuig ge schikt is om er
“universele” kinderbeveiligingssystemen
voor kin deren van deze leef tijdsgroep in
te installeren.
3. Di t ki nde rb evei lig ing ss yst eem is a ls “ Un i-
verseel” geclassiceerd volgens goedkeuringscriteria die strenger zijn ten opzichte
van vorige modellen die niet met deze
mededeling zijn uitgerust.
4. Geschikt om te worden gebruikt in
voertuigen met vaste of oprolbare driepuntsgordel, die goedgekeurd is volgens
het reglement UN/ECE N°16 of andere
gelijkwaardige standaarden.
5. Ne em i n gev al v an t wi jfe l con ta ct o p me t
de fabrikant van het kinderbeveiligingssysteem of met de dealer.
Page 47

47
1.3 BESCHRIJVING VAN DE
ONDERDELEN
Fig. 1 (3/4)
A. Handgreep
B. Zonnekap
C. Stoffen bekleding
D. Verkleinkussen (*)
E. Basis (**)
Fig. 2 (Voorkant)
F. Openingen waar de gordels doorheen
gehaald worden
G. Gordels van het autostoeltje
H. Schouderbanden (*)
I. Verstelknop van de gordels (onder het
stoffen paneel)
J. Verstelband van de gordels
Fig. 3 (Zijaanzicht)
K. Geleiding van de autobuikgordel op het
autostoeltje
L. Geleiding van de autobuikgordel op de
basis
M. Knoppen om de handgreep te draaien
N. Klikklakpinnen (voor bevestiging aan de
wandelwagen)
Fig. 4 (Achterkant)
O. Geleiding van de diagonale autogordel
P. Losk opp el han dgr eep (va n de bas is e n va n
de wandelwagen)
Q. Openingen waar de gordels doorheen
gehaald worden
R. Geleidingselement van de gordels van
het autostoeltje
S. Stabiliserend blokkeersysteem
(*) De v or m en h et m od el k unn en a fha nke li jk v an d e ui tvo er ing en v an h et a uto sto elt je
verschillen.
(**) Optie
1.4 PLAATSEN VAN DE
HANDGREEP
De handgreep van het autostoeltje kan op
4 standen worden versteld (Fig. 5).
A . St an d vo or ve rv oe r in d e a uto ( LE T OP : di t
is d e en ige s tan d, di e tij dens het ver voer
in de auto toegestaan is).
B. Stand voor vervoer met de hand.
C. Stand voor gebruik als schommelend
ligstoeltje of om aan de Chicco wandelwagen te bevestigen, die hiervoor
gemaakt is.
D. Stand voor gebruik als vast ligstoeltje.
Om d e handgr eep te v erstell en, dr ukt u de
knoppen (M) op de handgreep tegelijk in
en draait u hem op de gekozen stand tot
u een klik hoort.
1.5 BEPERKINGEN EN GEBRUIKS-
VEREISTEN VAN HET ARTIKEL
EN DE AUTOZ ITTING
LET OP! Neem de volgende beperkingen en
gebruiksvereisten betreffende het artikel en
de auto zit tin g na uwge zet in a cht : and ers is
de veiligheid niet verzekerd.
• H e t a u t o s t o e l t j e k a n v o o r i n o p d e p a s -
sagierszitting worden aangebracht, of op
éé n va n de ach ter zi tti nge n. D e au toz itt ing
moet in elk geval met de rijrichting mee
worden geplaatst. Gebruik dit autostoeltje
nooit op zittingen die zijdelings gekeerd of
tegen de rijrichting in staan (Fig. 6).
• D e a u t o z i t t i n g d i e n t u i t g e r u s t t e z i j n m e t
een vaste of oprolbare driepuntsgordel, die
goedgekeurd is volgens de Voorschriften
UNI/ECE N°16 of andere gelijkwaardige
standaarden (Fig. 7).
• LET OP! Installeer het autostoeltje nooit
met de tweepuntsgordel van de auto
(Fig. 8).
• G e b r u i k h e t v e r k l e i n k u s s e n n o o i t a l s h e t
kind meer dan 6 kg weegt.
2. HET AUTOSTOELTJE IN DE AUTO
INSTALLEREN
He t au tos toe ltj e ka n zo wel met bas is (o pt ie)
als zonder worden geïnstalleerd. Bij beide
uitvoeringen mag het alleen tegen de rijrichting in worden geïnstalleerd.
2.1 BEGINUITVOERING VAN DE
SCHOUDERBANDEN
He t au tos toe ltj e is afh an kel ijk van de u it voe ringen uitgerust met 2 verschillende soorten
schouderbanden (A en B). Voordat u het
autostoeltje gebruikt, handelt u als volgt
om de schouderbanden te monteren:
• S c h o u d e r b a n d e n u i t v o e r i n g A ( F i g . 9 A , 9 B
en 9C): laat de schouderbanden door de
op en ing en i n d e st off en bek le din g (n iet doo r
Page 48

48
49
het eronder liggende frame) lopen, zodat de
gordels erop blijven liggen. Steek het tussenbeenstuk door de gesp van de gordels.
• S c h o u d e r b a n d e n u i t v o e r i n g B ( F i g . 1 0 A
en 10B): haal de gordels van de het autostoeltje door de twee schouderbanden.
Steek het tussenbeenstuk door de gesp
van de gordels.
2. 2 INSTALLATIE MET BASIS
Om het aut ost oel tje m et b asi s op de a uto zitting te installeren, handelt u als volgt:
1. Koppel het autostoeltje van de basis
door aan de loskoppelhandgreep aan de
achterkant van de rugleuning te trekken en het stoeltje tegelijkertijd aan de
handgreep op te tillen (Fig. 11).
2. Zet de basis op de voor de installatie ge-
koz en z it tin g en d ra ai h em, zoa ls i n Fi g. 1 2
wordt getoond, zodanig, dat hij tegen de
rugleuning van de autozitting staat.
3. Trek aan de veiligheidsgordel van de auto
en haak hem aan zijn gesp vast. Laat het
horizontale gedeelte (buikgordel) door de
twee speciale geleidingen (L) lopen, die
ge mer kt zij n me t ee n bl au w pij ltj e en spa n
hem zoveel mogelijk (Fig. 13).
4. Voordat u het autostoeltje op de basis zet,
controleert u of het stabiliserend blokkeersysteem gesloten is (Fig. 14).
5. Zet het autostoeltje (tegen de rijrichting in)
op de b as is e n d uw h et om laa g to t h et v as tz it
(u hoort een klik ter beve stiging) (Fig. 15).
6. Controleer of het autostoeltje goed aan
de basis vastzit, door te proberen het
zowel aan de voor- al s de achterkant op
te tillen.
7. Pak de diagonale gordel van de auto vast
en laa t he m do or de s pec ial e ge lei din g (O )
aan de achterkant van de rugleuning van
he t au tos toe ltj e lo pe n (F ig. 1 6). LE T OP ! De
diagonale gordel moet tijdens het vervoer
ALTIJD in deze geleiding blijven zitten.
8. Span de gordel zo veel mogelijk zonder
te veel band over te laten en verzeker u
ervan dat hij niet verdraaid zit.
9. Draai de handgreep op stand A en con-
tr ole er o f hij teg en d e zi tti ng v an d e au to
steunt (Fig. 17).
LE T O P! Co ntr ole er n a de ins ta lla tie A LTI JD
of de autogordel correct gespannen is en
of hij over alle punten gelijk is verdeeld,
zonder verdraaid te zijn. Laat de autogordels
NOOIT op andere plaatsen lopen dan de
aangeduide.
Om het autostoeltje los te koppelen en de
basis in de auto geïnstalleerd te laten:
1. Haal de diagonale gordel uit de geleiding
op de r ugl eun ing zon der hem uit de ge sp
te nemen.
2. Zet de handgreep weer op de verticale
stand B (Fig. 5).
3. Koppel het autostoeltje los, zoals voor-
heen werd toegelicht.
2.3 INSTALLATIE ZONDER BASIS
Om het aut ost oel tje zon der bas is t e in sta lleren, handelt u als volgt:
1. Trek het stabiliserend blokkeersysteem
ui t en z et he t aut ost oelt je op de ge koze n
autozitting (Fig. 18).
2. Trek aan de veiligheidsgordel van de
auto en haak hem aan zijn gesp vast.
Laat het horizontale gedeelte van de
gordel (buikgordel) door de twee speciale geleidingen (K) van het autostoeltje
lopen, die gemerkt zijn met een blauw
pijltje (Fig. 19).
3. Pak het diagonale gedeelte van de auto-
gordel vast en laat hem door de speciale
geleiding (O) aan de achterkant van de
rugleuning van het autostoeltje lopen
(Fig. 20). LET OP! De diagonale gordel
moet tijdens het vervoer ALTIJD in deze
geleiding blijven zitten.
4. Span de gordel zo veel mogelijk zonder
te veel band over te laten en verzeker u
ervan dat hij niet verdraaid zit.
5. Draai de handgreep op stand A en con-
tr ole er o f hij teg en d e zi tti ng v an d e au to
steunt (Fig. 21).
Om het autostoeltje los te koppelen:
1. Maak de autogordel los door op de gesp
te drukken.
2. Zet de handgreep weer op stand B (ver-
ticaal).
3. Haal de gordel uit de diagonale en hori-
zontale geleidingen.
3. VERDERE HANDELINGEN
3.1 HET KIND IN HET
AUTOSTOELTJE ZETTEN
1. Ti l he t st off en p ane el o p, h ou d de v er ste l-
Page 49

49
knop ingedrukt en trek aan de gordels van
het autostoeltje om ze losser te maken
(Fig. 22).
2. Op en de g es p do or op d e r ode kn op te d ruk ken en houd de go rdels uit elkaar (Fig. 2 3).
3. Zet het kind in het autostoeltje.
4. Leg de twee lipjes van de gesp op elkaar
en steek ze vervolgens in de gesp tot u
een klik hoort (Fig. 24). LET OP! Steek
de lipjes nooit één voor één in de gesp
of slechts één.
5. Span de veiligheidsgordels van het auto-
st oel tje doo r aa n de spe cia le v ers tel ba nd
te trekken (Fig. 25).
3.2 DE STAND VAN DE GORDELS
AFSTELLEN
LET OP! De gordels moeten altijd aan de
groei van het kind worden aangepast. Voorda t u h et a utos to eltj e in de a uto ins tal lee rt ,
moet u ze op de juiste hoogte plaatsen.
Voor een goede afstelling moeten de gordels ter hoogte van de schouders van het
kind uit de rugleuning komen (Fig. 26).
He t au tos toe ltj e ka n op 3 st an den in h oog te
worden versteld.
Handel als volgt om de gordels te verplaatsen:
1. Verwijder de schouderbanden door ze
uit de openin gen in de s toffen b ekledin g
te halen.
2. Open de gesp van de gordels door op de
rode knop te drukken.
3. Haal de gordels uit de achterkant van de
ru gle uni ng e n d oe z e in d e vo or d e gr oo tte
van het kind meest geschikte opening
(Fig. 27A en 27B).
LET OP! Verzeker u ervan dat de gordels
altijd tussen het geleidingselement (R) en
het dragende element doorlopen.
LE T O P! He t ve rkl ein ku sse n ga ran dee rt dat
het kind vanaf de geboorte tot 6 kg goed
ondersteund wordt en dat de nek en rug de
ideale houding hebben.
3.3 VASTE OF SCHOMMELSTAND
VAN HET STOELTJE (GEBRUIK
ALS LIGSTOELTJE)
Als het stoeltje niet in de auto wordt gebruikt, kan het ook worden gebruikt als
schommel- of ligstoeltje.
Om het te laten schommelen, sluit u het
stabiliserend blokkeersysteem (Fig. 14) en
zet u de handgreep op stand C (Fig. 5).
Om het op d e va ste st and te ge br uik en, tre kt
u het stabiliserend blokkeersysteem uit en
zet u de handgreep op stand D (Fig. 5).
Zet het alleen op een stevige en horizontale
ondergrond.
LET OP! Voordat u het stoeltje vervoert,
zet u de handgreep altijd weer op stand
B (verticaal).
WAARSCHUWING! Laat het kind
nooit zonder toezicht achter.
WAARSCHUWING! Gebruik altijd
het veiligheidssysteem.
WAARSCHUWING! Het is gevaarlijk het autostoeltje op een
verhoging te gebruiken, zoals tafels, stoelen, enz.
WAARSCHUWING! Dit autostoeltje is niet bedoeld om er lange
tijd in te slapen.
WAARSCHUWING! Gebruik het
autostoeltje niet als het kind in
staat is alleen te zitten.
Het autostoeltje vervangt geen bedje of
wi eg. Als het kin d mo et s la pen , mo et h et i n
een bed of geschikte wieg worden gelegd.
Gebruik het autostoeltje niet als er onderdelen stuk zijn of ontbreken.
3.4 GEBRUIK MET DE
WANDELWAGEN
LE T O P! Om het aut ost oel tje sam en m et d e
wa nde lw age n te g ebr ui ken, ra adp lee gt u de
in str uc tie s va n de wan de lwa gen . De CHI CCO w an del wag ens , di e me t ee n KL IK K LA K
systeem uitgerust zijn, hebben armleuningen met speciale mechanismen, waardoor
he t au tos toe ltj e dir ec t op de w and elw age n
kan worden bevestigd, zonder verdere accessoires te moeten gebruiken.
Om het autosto eltje aan de wandelwagen
te bevestigen, handelt u als volgt:
1. Ne em h et a uto sto elt je v ast met de h and -
greep op de verticale stand B (Fig. 28).
2. Bevestig de twee Klik Klak bevesti-
gingspinnen van het autostoeltje (N) op
Page 50

50
51
de armleuningen van de wandelwagen
en let er g oed op d at z e aa n be ide kan ten
vast komen te zitten. U hoort een beves-
tigingsklik (Fig. 29).
WAARSCHUWING Controleer voor het
ge bru ik o f de bev es tig ing sme cha nis me n va n
het autostoeltje goed zijn vastgemaakt.
Om het autostoeltje van de wandelwagen
los te koppelen:
1. Zet de handgreep weer op de verticale
stand (B).
2. Trek aan de loskoppelhandgreep aan de
achterkant.
3. Verplaats het autostoeltje en zet het op
een vlak oppervlak.
LET OP: het autostoeltje kan ook met het
kind erin worden vast- en losgehaakt, ook al
kunnen deze handelingen door het gewicht
va n he t ki nd e ch ter m in der gem akk eli jk z ijn .
In dit geval wordt aangeraden goed op te
letten bij het verrichten van bovenbeschreven handelingen.
3.5 ONDERHOUD EN BEWARING
DE HOES REINIGEN
De stoffen bekleding van het autostoeltje
kan geheel verwijderd en op de hand, of op
30°C in de wasmachine gewassen worden.
Om ze te wassen, maakt u de gordels los
en verwijdert u de bekleding, na de twee
gordels en de gesp uit hun openingen te
hebben gehaald (Fig. 30).
Volg bij het wassen de instructies op het
etiket van de bekleding, waar de volgende
wassymbolen op staan:
Op 30°C in de wasmachine wassen
Handwas
Niet bleken
Niet chemisch reinigen
Niet in de droger drogen
Niet strijken
Gebruik nooit schuur- of oplosmiddelen.
Centrifugeer de hoes niet en hang ze op
zonder ze uit te wringen.
DE PLASTIC EN METALEN ONDERDELEN REINIGEN
Gebruik alleen een vochtige doek om de
ku nst stof of me tale n de len t e rei nige n. G ebr ui k no oit sch uur - of o pl osm idd ele n. De b ewe gen de d ele n v an h et a uto sto elt je m oge n
op geen enkele wijze worden gesmeerd.
CONTROLE OP BESCHADIGING EN
SL IJTA GE
Aangeraden wordt de volgende onderdelen
regelmatig op beschadiging en slijtage te
controleren:
• S t o f f e n b e k l e d i n g : c o n t r o l e e r d a t d e v u l l i n g
ni et u itp uil t of d at e r ge en d ele n lo szi tte n.
Co ntr ole er d e st aat van de n ade n di e al tij d
intact moeten zijn.
• G o r d e l s : c o n t r o l e e r d a t d e s t o f n i e t r a f e l t
of duidelijk dun is geworden ter hoogte
van de afstelband, het tussenbeenstuk,
de schouderbanden en het gebied van de
afstelplaat van de gordels.
• K u n s t s t o f d e l e n : c o n t r o l e e r d e s l i j t a g e staat van alle kunststof delen, die geen
duidelijke beschadigingen of verkleuring
mogen hebben.
LET OP! Indien het autostoeltje vervormd
mocht zijn of ernstig versleten, dient het
te worden vervangen: het kan de originele
veiligheidskenmerken hebben verloren.
HET ARTIKEL OPBERGEN
Als het niet in de auto geïnstalleerd is, wordt
aangeraden het autostoeltje op een droge
plaats, uit de buurt van warmtebronnen en
beschermd tegen stof, vocht en rechtstreeks
zonlicht te bewaren.
HET PRODUCT AFDANKEN
Al s de voo rz ien e ge br uik sgr ens van het auto sto elt je i s be rei kt, geb ru ikt u he t ni et m eer
en zet u het bij het afval. Uit respect voor
he t mi lie u sc he idt u de ver sch ill en de s oor te n
afval volgens wat door de geldende voorschriften in uw land is voorgeschreven.
VOOR MEER INFORMATIE:
PHARSANA N.V.
Temselaan 5 - 1853 Strombeek-Bever
www.chicco.be
Page 51

51
CHICCO
AUTO-FIX FAST
Gr. 0+ (0-13k G )
ΟΔΗΓΙΕΣ ΧΡΗΣΗ Σ
ΠΕΡΙΕΧΟΜΕΝΑ:
1. ΕΙΣΑΓΩΓΗ
1.1 ΠΡΟΕΙΔΟΠΟΙΗΣΕΙΣ
1.2 ΧΑΡΑΚΤΗΡΙΣΤΙΚ Α ΤΟΥ ΠΡΟΪΟΝΤΟΣ
1.3 ΠΕΡΙΓΡΑΦΗ ΕΞΑΡΤΗΜΑΤΩΝ
1.4 ΘΕΣΕΙΣ ΤΟΥ ΧΕΡΟΥΛΙΟΥ
1.5 ΠΕΡΙΟΡΙΣΜΟΙ ΚΑΙ ΠΡΟΫΠΟΘΕΣΕΙΣ ΧΡΗΣΗΣ
ΣΧΕΤΙΚΕΣ ΜΕ ΤΟ ΠΡΟΪΟΝ ΚΑΙ ΜΕ ΤΟ ΚΑΘΙΣΜΑ ΤΟΥ ΑΥΤΟΚΙΝΗΤΟΥ
2. ΕΓΚΑΤΑΣΤΑΣΗ ΤΟ Υ ΚΑΘΙΣΜΑΤΟΣ ΣΤΟ
ΑΥΤΟΚΙΝΗΤΟ
2.1 ΑΡΧΙΚΗ ΔΙΑΜΟΡΦΩΣΗ ΤΩΝ ΕΠΩΜΙΔΩΝ
2.2 ΕΓΚΑΤΑΣΤΑΣΗ ΜΕ ΒΑΣΗ
2.3 ΕΓΚΑΤΑΣΤΑΣΗ ΧΩΡΙΣ ΒΑΣΗ
3. ΠΕΡΑΙΤΕΡΩ ΕΝΕΡΓΕΙΕΣ
3.1 ΤΟΠΟΘΕΤΗΣΗ ΤΟΥ ΠΑΙΔΙΟΥ ΣΤΟ Κ ΑΘΙΣΜΑ
3.2 ΡΥΘΜΙΣΗ ΤΗΣ ΘΕΣΗΣ ΤΩΝ ΖΩΝΩΝ
3.3 ΣΤΑΘΕΡΗ Η’ ΛΙΚΝΙΖΟΜΕΝΗ ΘΕΣΗ ΤΟΥ ΚΑ-
ΘΙΣΜΑΤΟΣ (ΧΡΗΣΗ ΡΗΛΑΞ)
3.4 ΧΡΗΣΗ ΜΕ ΤΟ ΚΑΡΟΤΣΙ ΠΕΡΙΠΑΤΟΥ
3.5 ΚΑΘΑΡΙΣΜΟΣ ΚΑΙ ΣΥΝΤΗΡΗΣΗ
1. ΕΙΣΑΓΩΓΗ
1.1 ΠΡΟΕΙΔΟΠΟΙΗΣΕΙΣ
ΕΞΑΙΡΕΤΙΚΑ ΣΗΜΑΝΤΙΚΟ: ΔΙΑΒΑΣΤΕ ΑΜΕΣΩΣ
• Κ Ρ ΑΤ Η Σ Τ Ε Α Υ Τ Ο Τ Ο Ε Γ Χ Ε Ι Ρ Ι Δ Ι Ο Γ Ι Α
ΜΕΛΛΟΝΤΙΚΗ ΧΡΗΣΗ.
• Γ ι α τ η σ υ ν α ρ μ ο λ ό γ η σ η κ α ι τ η ν ε γ κ α τ ά σ τ α σ η
του προїόντος ακολουθείτε πιστά τις οδηγίες.
Μην επιτρέπετε σε κανένα να χρησιμοποιεί
το προϊόν χωρίς πριν να έχει διαβάσει τις
οδηγίες.
• Π Ρ Ο Σ Ο Χ Η ! Μ ε β ά σ η τ ι ς σ τ α τ ι σ τ ι κ έ ς τ ω ν
ατυχ ημάτων, εν γέ νει τα πίσω καθίσματα του
οχ ήμα τος ε ίνα ι πι ο ασ φα λή απ ό το μπρο στ ινό :
συ νεπ ώς σ υνι στ άτα ι να τοπο θε τεί τε το παι δικό
κάθ ισ μα ε πάν ω σ τα πί σω κ αθί σμα τα. Ιδι αίτ ερα ,
το π ίσω κε ντρ ικό κ άθι σμα είν αι τ ο πιο ασφ αλ ές,
εάν είναι εξοπλισμένο με ζώνη 3 σημείων.
• Π Ρ Ο Σ Ο Χ Η ! Σ Ο Β Α Ρ Ο Σ Κ Ι Ν Δ Υ Ν Ο Σ ! Μη ν
χρησιμοποιείτε ποτέ το παιδικό κάθισμα επάνω
σε ένα μπρ οσ τιν ό κάθ ισμ α οχ ήμα τος που ε ίνα ι
εξοπλισμένο με μετωπικό αερόσακο. Μπορείτε
να τοπο θε τήσ ετ ε το π αιδ ικό κ άθι σμα επά νω σ ε
μπροστινό κάθισμα, μόνο όταν ο με τωπικός
αερόσακος έχει απενεργοποιηθεί: ελέγξτε με
τον κατασκευαστή ή διαβάστε στο εγχειρίδιο
οδηγιών του αυτοκινήτου, τη δυνατότητα
αποσύνδεσης του αερόσακου. Συνιστάται, για
κάθ ε πε ρίπ τω ση, να τρ αβ άτε πίσ ω το κ άθι σμα
όσο το δυνατόν περισσότερο, προσεκτικά
ώστε να μην ενοχλούνται οι επιβάτες που
μπορεί να υπάρχουν στο πίσω κάθισμα.
• Ό λ ο ι ο ι ε π ι β ά τ ε ς τ ο υ ο χ ή μ α τ ο ς π ρ έ π ε ι ν α
είναι καλά πληροφορημένοι, για τον τρόπο
απελευθέρωσης του παιδιού, σε περίπτωση
έκτακτης ανάγκης.
• Π ρ ο σ έ χ ε τ ε τ ο π ώ ς τ ο π ο θ ε τ ε ί τ ε τ ο π α ι δ ι κ ό
κάθισμα στο αυτοκίνητο ούτως ώσ τε να
αποφύγετε τη παρεμπόδιση κάποιου κινητού
καθίσματος ή της πόρτας σε αυτό.
• Κ α ν έ ν α π α ι δ ι κ ό κ ά θ ι σ μ α δ ε ν μ π ο ρ ε ί ν α
εγγυηθεί την απόλυτη ασφάλεια του παιδιού
σε περίπτωση ατυχήματος, η χρήση όμως
αυτού του προϊόν τος μειώνει τον κίνδυνο
σοβαρού τραυματισμού ή θανάτου.
• Ο κ ί ν δ υ ν ο ς σ ο β α ρ ο ύ τ ρ α υ μ α τ ι σ μ ο ύ τ ο υ
παιδ ιού, όχ ι μόνο σ ε περί πτωσ η ατυ χήματ ος,
αλλά και σε άλλες συνθήκες (π.χ. απότομα
φρεναρίσματα, κ.λπ.), αυξάνεται αν δεν
ακολουθείτε πιστά τις παρούσες οδηγίες
χρήσης: ε λέγχετε πάντα ότι το κάθισμα είναι
σωστά τοπο θετημένο στο κάθισμα του
οχήματος.
• Σ τ η ν π ε ρ ί π τ ω σ η κ α τ ά τ η ν ο π ο ί α τ ο κ ά θ ι σ μ α
είναι κατεστραμμένο, παραμορφωμένο
ή παρουσιάζει έντονη φθορά, πρέπει να
αντικατασ ταθεί, γιατί μπορεί να έχει χάσει τα
αρχικά χαρακτηριστικά ασφαλείας.
• Μ η ν κ ά ν ε τ ε μ ε τ α τ ρ ο π έ ς ή π ρ ο σ θ ή κ ε ς
στο προϊόν χωρίς την έγκριση του
κατασκευαστή.
• Μ η ν τ ο π ο θ ε τ ε ί τ ε α ξ ε σ ο υ ά ρ , α ν τ α λ λ α κ τ ι κ ά
και εξαρτήματα που δε ν παρέχει ο
κατασκευαστής.
• Μ η ν α φ ή ν ε τ ε π ο τ έ , γ ι α κ α ν έ ν α λ ό γ ο , τ ο π α ι δ ί
χωρίς επίβλεψη στο παιδικό κάθισμα.
• Μ η ν α φ ή ν ε τ ε π ο τ έ τ ο π α ι δ ι κ ό κ ά θ ι σ μ α ε π ά ν ω
στο κάθισμα του αυτοκινήτου αποσυνδεδεμένο,
θα μπορούσε να προσκρούσει και να
τραυματίσει τους επιβάτες.
• Μ η ν τ ο π ο θ ε τ ε ί τ ε τ ί π ο τ α π ο υ δ ε ν ε ί ν α ι
εγκεκριμέ νο για το προϊόν αξεσουάρ, είτε
μεταξύ του καθίσματος αυτοκινήτου και του
παιδικού καθίσματος είτε μεταξύ του παιδικού
καθίσματος και του παιδιού: σε περίπτωση
GR
Page 52

52
53
ατυχήματος το παιδικό κάθισμα θα μπορούσε
να μην λειτουργήσει σωσ τά.
• Στ η ν π ε ρ ί π τ ω σ η κ α τ ά τ η ν ο π ο ί α τ ο α υ τ ο κ ί ν η τ ο
πρόκειται να μείνει κάτω από τον ήλιο,
συνιστάται να καλύψετε το παιδικό κάθισμα.
• Μ ε τ ά α π ό έ ν α έ σ τ ω κ α ι μ ι κ ρ ό α τ ύ χ η μ α ,
το παιδικό κάθισμα μπορεί να υποστεί
ζημιές οι οποίες δεν είναι πάντα ορατές με
γυμνό μάτι: γι’ αυτό είναι απαραίτητο να το
αντικαταστήσετε.
• Μ η ν χ ρ η σ ι μ ο π ο ι ε ί τ ε κ α θ ί σ μ α τ α α π ό δ ε ύ τ ε ρ ο
χέρι: μπορεί να έχουν υποστεί ζημιές μη
ορατές με γυμνό μάτι που μπορούν όμως να
επηρεάσουν την ασφάλεια του προϊόν τος.
• Η ε π έ ν δ υ σ η μ π ο ρ ε ί ν α α ν τ ι κ α τ α σ τ α θ ε ί
απ οκλ εισ τι κά μ ε μί α άλ λη ε γκ εκρ ιμέ νη α πό τ ον
κατασκευαστή , γιατί αποτελεί αναπόσ παστο
τμ ήμα τ ου κ αθί σμα τος . Το κά θισ μα δ εν π ρέπ ει
να χρησιμ οποιηθεί ποτέ χωρίς την επέ νδυσή
του, για να μην τεθεί σε κίνδυνο η ασφά λεια
του παιδιού.
• Ε λ έ γ χ ε τ ε ό τ ι η ζ ώ ν η α σ φ α λ ε ί α ς δ ε ν ε ί ν α ι
μπ ερδ εμέ νη κ αι μη ν αφ ήνε τε α υτή ή τμ ήμα τα
του καθίσματος, να σκαλώνουν σ τις πόρτες
ή να τρίβονται πάνω σε αιχμηρά σημεία. Στη
πε ρίπ τωσ η πο υ η ζ ώνη ασφ αλ εία ς παρ ουσ ιάζ ει
σχισίματα ή ξεφτίσματα είναι απαραίτητο να
την αντικαταστήσετε.
• Ε λ έ γ χ ε τ ε ό τ ι δ ε ν μ ε τ α φ έ ρ ο ν τ α ι , ι δ ι α ί τ ε ρ α
στο πίσω εσωτερικό μέρος του αυτοκινήτου,
αντικείμενα ή αποσκευές που δεν έχουν
στερεωθεί ή τοποθετηθεί με ασφαλή
τρόπο: σε περίπτωση ατυχήματος ή
απότομου φρεναρίσματος θα μπορούσαν
να τραυματίσουν τους επιβάτες.
• Β ε β α ι ω θ ε ί τ ε ό τ ι ό λ ο ι ο ι ε π ι β ά τ ε ς τ ο υ
αυτοκινήτου χρησιμοποιούν τη δική τους ζώνη
ασ φαλ εία ς εί τε γ ια τ ην ασ φά λει ά το υς εί τε γ ια τί
κατά τη διάρκεια του ταξιδιού, σε περίπτωση
ατ υχήμ ατος ή απότο μου φ ρενα ρίσμ ατος , θα
μπορούσαν να τραυματίσουν το παιδί.
• Κ α τ ά τ η δ ι ά ρ κ ε ι α μ ε γ ά λ ω ν τ α ξ ι δ ι ώ ν σ υ ν ι σ τ ά τ α ι
να κάνε τε συχ νές στ άσε ις. Το παι δί κο υρά ζετ αι
πολύ εύκολα. Για κανένα λόγο μην βγάζετε το
πα ι δ ί α π ό το π αι δ ι κό κ άθ ι σ μα ε ν ώ το α υ το κ ί νη τ ο
βρίσκεται σε κίνηση. Αν το παιδί έχει ανάγκη
από προσοχή, είναι απαραίτητο να βρείτε ένα
ασφαλές μέρος και να σταθμεύσετε.
• Π ρ ό ω ρ α ν ε ο γ ν ά π ο υ γ ε ν ν ή θ η κ α ν π ρ ι ν τ η ν 3 7 η
εβδομάδα κύησης, μπορούν να κινδυνεύουν
στο παιδικό κάθισμα. Αυτά τα νεογ νά μπορεί
να αντιμετωπίσουν δυσκολία στην αναπνοή
ενώ βρίσκονται στο κάθισμα. Συνιστούμε
λοιπόν να απευθυνθείτε στον γιατρό σας ή
στο προσωπικό του νοσοκομείου προκειμένου
να εξετάσουν το μωρό σας και πριν αφήσε τε
το νοσοκομείο, να σας συμβουλέψουν για το
κατάλληλο κάθισμα μεταφοράς.
• Η ε τ α ι ρ ε ί α A r t s a n a δ ε ν α ν α λ α μ β ά ν ε ι
καμία ευθύνη για ακατάλληλη χρήση του
προϊόντος.
1.2 ΧΑΡΑΚΤΗ ΡΙΣΤΙΚΑ ΤΟΥ ΠΡΟΪΟ ΝΤΟΣ
• Α υ τ ό τ ο κ ά θ ι σ μ α ε ί ν α ι ε γ κ ε κ ρ ι μ έ ν ο γ ι α τ η ν
“Ομάδα 0+”, για τη μεταφορά παιδιών από
τη γέννηση έως 13 κιλά βάρος (από 0 έως
10 μηνών/1 έτους περίπου), σύμφωνα με τον
ευρωπαϊκό κανονισμό ECE R4 4/04.
• Η έ γ κ ρ ι σ η ε ί ν α ι τ ύ π ο υ “ U n i v e r s a l ” ( Γ ε ν ι κ ή ς
χρή σης) σ υνεπώ ς το κάθ ισμα μ πορεί ν α χρησιμοποιηθεί επάνω σε οποιοδήποτε μοντέλο
αυτοκινήτου. ΠΡΟΣΟΧΗ! “Universal” (Γενικής
χρήσης) σημαίνει ότι είναι συμβατό με τα
περισσότερα, όχι όμως με όλα, τα καθίσματα
αυτοκινήτων.
ΣΗΜΑΝΤΙΚΗ ΕΙΔΟΠΟΙΗΣΗ
1. Αυτή είναι μία συσκευή μεταφοράς παιδιών
“Universal” (Γενικής χρήσης), εγκεκριμένη
σύμφωνα με τον Κανονισμό ECE R44/04 και
συμβατή με τα περισσότερα, όχι όμως με
όλα, τα καθίσματα αυτοκινήτων.
2. Η τέλεια συμβατότητα αποκτάται πιο εύ-
κολα σ τις περιπτώσεις κατά τις οποίες, ο
κατασκευαστής του οχήματος δηλώνει στο
εγχειρίδιο του ιδίου, ότι το όχημα προβλέπει την εγκατάσταση συσκευών μεταφοράς
παιδιών “Universal” (Γενικής χρήσης), για τη
συγκεκριμέ νη ηλικία.
3. Αυτ ή η σ υσκ ευή μ ετ αφορ άς έ χει κατ ατα χθε ί
ως “Universal” (Γενικής χρήσης), σύμφωνα
με τα πιο αυστηρά κριτήρια έγκρισης, σε
σύγκριση με τα προηγούμενα μοντέλα που
δεν διαθέτουν τη παρούσα ειδοποίηση.
4. Κατάλληλη για χρήση σε οχήματα εξοπλισμέ-
να με ζώνη ασφαλείας 3 σημείων, στα τική ή
με περιτύλιξη, εγκεκριμένη βάσει του Κανονισμ ού UN /E CE Αρ ιθ. 16 ή ά λλω ν ισ οδύ ναμ ων
προ τύ πων.
5. Σε περίπτωση αμφιβολίας, επικοινωνήστε με
τον κατασκευαστή της συσκευής μεταφοράς
παιδιών ή με το κατάστημα πώλησης.
1.3 ΠΕΡΙΓΡΑΦΗ ΕΞΑΡΤ ΗΜΑΤΩΝ
Εικ. 1 (3/4)
A. Χερούλι
B. Κουκούλα ήλιου
C. Υφασμάτινη επένδυση
Page 53

53
D. Μαξιλαράκι μειωτήρας (*)
E. Βάση (**)
Εικ. 2 (Μπροσ τά)
F. Σχισμές περάσματος ζωνών
G. Ζώνες Καθίσματος
H. Επωμίδες (*)
I. Πλήκ τρο ρύθμισης ζωνών (κάτω από την
υφασμάτινη πατ)
J. Ταινία ρύθμισης ζωνών
Εικ. 3 (Προφί λ)
K. Οδηγός κοιλιακής ζώνης αυτοκινήτου στο
παιδικό κάθισμα
L. Οδηγός κοιλιακής ζώνης αυτοκινήτου στη
βάση
M. Πλήκτρα για την περισ τροφή του χερου-
λιού
N. Αξόνια Clik Clak (για σύνδεση με το καρότσι
περιπάτου)
Εικ. 4 (Πίσω)
O. Οδηγός διαγώνιας ζώνης αυτοκινήτου
P. Λαβή αποσύνδεσης (από τη βάση και από το
καρότσι περιπάτου)
Q. Σχισμές περάσματος ζωνών
R. Στοιχείο οδήγησης των ζωνών του καθί-
σματος
S. Μηχανισμός σ ταθεροποίησης
(*) Το σ χήμα και το μοντέλο μπορεί να διαφέρουν ανάλογα με τη παραλλαγή του καθίσματος.
(**) Προαιρετικό
1.4 ΘΕΣΕΙΣ ΤΟΥ ΧΕ ΡΟΥΛΙΟΥ
Το χερούλι του καθίσματος μπορεί να ρυθμιστεί
σε 4 θέσεις (Εικ. 5).
A. Θέση μεταφοράς με αυτοκίνητο (ΠΡΟΣΟΧΗ:
αυτή είναι η μόνη θέση που επιτρέπεται κατά
τη διάρκεια μεταφοράς με αυτοκίνητο).
B. Θέση μεταφοράς με το χέρι.
C. Θέση χρήσης λικνιζόμενου ρηλάξ ή για σύν-
δεση με το κατάλληλο καρότσι περιπάτου
της Chicco.
D. Θέση χρήσης σταθερού ρηλάξ.
Για να εκ τελέσετε τη ρύθμιση πιέστε ταυτόχρονα τα πλήκτρα (M) επάνω στο χερούλι,
περιστρέφοντας το ίδιο στην προεπι λεγμένη
θέση έως ότου να ακουσ τεί ένα κλικ.
1.5 ΠΕΡΙΟΡΙΣΜΟΙ Κ ΑΙ ΠΡΟΫΠΟΘΕΣΕΙ Σ ΧΡΗΣΗΣ
ΣΧΕΤΙΚΕ Σ ΜΕ ΤΟ ΠΡΟΪΟΝ ΚΑΙ ΜΕ ΤΟ Κ ΑΘΙΣΜΑ
ΤΟΥ ΑΥΤΟΚΙΝΗΤΟΥ
ΠΡΟΣΟΧΗ! Τηρήστε σχολαστικά τους ακόλουθους περιορισμούς και προϋποθέσεις χρήσης
σχετικές με το προϊόν και με το κάθισμα του
αυ τοκ ινή του: στ ην α ντ ίθε τη περ ίπτ ωσ η η ασ φά λεια δεν είναι ε γγυημένη.
• Τ ο π α ι δ ι κ ό κ ά θ ι σ μ α μ π ο ρ ε ί ν α τ ο π ο θ ε τ η θ ε ί
επά νω στο κάθισμ α του συ νοδηγο ύ ή επά νω
σε ένα οποιοδήποτε πίσω κάθισμα. Σε κάθε
περίπτ ωση, το κάθισμα του αυτοκινήτου
πρέπει να είναι σ τραμμένο σ την κατεύθυνση πορείας. Μην χρησιμοποιείτε ποτέ αυτό
το παι δικό κάθι σμα επά νω σε καθ ίσματα που
εί ναι στρ αμμ ένα στ ο πλά ι ή πρ ος την α ντ ίθε τη
κατεύθυνση πορείας (Εικ. 6).
• Τ ο κ ά θ ι σ μ α τ ο υ α υ τ ο κ ι ν ή τ ο υ π ρ έ π ε ι ν α ε ί ν α ι
εξοπλισμένο με ζώνη ασφαλείας 3 σημείων,
στατική ή με περιτύλιξη, εγκεκριμένη βάσει
του Κανονισμού UN/ECE Αριθ. 16 ή ά λλων
ισοδύναμων προτύπων (Εικ. 7).
• Π Ρ Ο Σ Ο Χ Η ! Μ η ν τ ο π ο θ ε τ ε ί τ ε π ο τ έ τ ο π α ι δ ι κ ό
κάθισμα, σε κάθισμα αυτοκινήτου με ζώνη
δύο σημείων σύνδεσης (Εικ. 8).
• Μ η ν χ ρ η σ ι μ ο π ο ι ε ί τ ε π ο τ έ τ ο μ α ξ ι λ α ρ ά κ ι μ ε ι ωτήρα αν το βάρος του παιδιού ξεπερνάει
τα 6 κιλά.
2. ΕΓΚΑΤΑΣΤΑΣΗ ΤΟ Υ ΚΑΘΙΣΜΑΤΟΣ ΣΤΟ ΑΥ ΤΟΚΙ-
ΝΗΤΟ
Το παιδικό κάθισμα μπορεί να εγκατασταθεί είτε
με τη βάση (προαιρετική) είτε χωρίς τη βάση.
Σε αμφότερες τις διαμορφώσεις, πρέπει να
εγκατασταθεί μόνο σε αντίθετη κατεύθυνση σε
σύγκριση με την κατεύθυνση πορείας.
2.1 ΑΡΧΙΚΗ ΔΙΑΜΟΡΦ ΩΣΗ ΤΩΝ ΕΠΩΜΙΔΩΝ
Το παιδικο κάθισμα διαθέτει 2 διαφορετικούς
τύπους επωμίδων (A και B) ανάλογα με την
παραλλαγή του καθίσματος. Πριν προχωρήσετε στη χρήση του καθίσματος , για την συναρμολόγηση των επωμίδων, ε νεργήστε ως
ακολούθ ως:
• Ε π ω μ ί δ ε ς π α ρ α λ λ α γ ή ς A ( Ε ι κ . 9 A , 9 B κ α ι 9 C ) :
περάστε τις επωμίδες ανάμεσα από τις σχισμές
της υφασμάτινης επένδυσης (όχι της υποκείμενης δομής) έτσι ώστε οι ζώνες να παραμένουν τοποθ ετημένες πάνω τους. Περάσ τε τη
διαχωριστική για τα πόδια πατ ανάμεσα από
την πόρπη των ζωνών.
• Ε π ω μ ί δ ε ς π α ρ α λ λ α γ ή ς B ( Ε ι κ . 10 A κ α ι 10 B ) :
περάστε τις ζώνες του καθίσματος ανάμεσα
απ ό τις δύο επω μίδ ες. Περ άσ τε τ η δια χωρ ισ τική για τα πόδια πατ ανάμεσα από την πόρπη
των ζωνών.
Page 54

54
55
2.2 ΕΓΚΑΤΑΣ ΤΑΣΗ ΜΕ ΒΑΣΗ
Για να τοποθ ετήσε τε το παιδικό κάθισμα με τη
βάση επάνω στο κάθισμα του αυτοκινήτου,
ενεργήστε ως ακολούθως:
1. Αποσυνδέσ τε το παιδικό κάθισμα από τη
βάση τραβώντας τη λαβή αποσύνδεσης που
βρίσκεται πίσω από την πλάτη και ταυτόχρονα σ ηκώστε το πιά νοντας το ίδιο από το
χερούλι (Εικ. 11).
2. Τοπο θετ ήσ τε τ η βά ση ε πάν ω σ το πρ οε πιλ εγ μέν ο για τ ην εγκα τάστα ση κάθι σμα, πρ οσανατολίζοντας την ίδια όπως στην εικόνα Εικ.
12, έτσι ώστε να βρίσκεται σε επαφή με την
πλάτη του καθίσματος του αυτοκινήτου.
3. Τραβήξτε τη ζώνη ασφαλείας του αυτοκινήτου, συνδέστε την ίδια με την αντίστοιχη πόρπη, περνώντας το οριζόντιο τμήμα
(κοιλιακό) στους δύο ειδικούς οδηγούς (L)
που ε πισημ αίνον ται με τ ο γαλάζ ιο βέλ ος και
τεν τώστε την όσο το δυνα τόν περισσότερο
(Εικ. 13).
4. Πριν τοποθετήσε τε το παιδικό κάθισμα στη
βά ση, ελ έγξ τε ό τι ο μηχα νισ μό ς στ αθε ροπ οίησης είναι κλειστός (Εικ. 14).
5. Τοποθετήστε το κάθισμα στη βάση (στραμμένο στην αντίθετη κατεύθυνση πορείας)
σπρ ώχνο ντας τ ο ίδιο πρ ος τα κά τω μέ χρι να
συ νδε θεί (θα α κού σετ ε έν α “κ λακ ” σ ταθ ερο ποίησης) (Εικ. 15).
6. Ελέγξτε τη σωστή σύνδεση του καθίσματος
με τη βάση, προσπαθώντας να το σηκώσετε τόσο από το μπροστινό όσο και από το
πίσω μέρος.
7. Πιάστε τη δια γώνια ζώνη του αυτοκινήτου
και περάσ τε την στον ειδικό οδηγό (O) που
βρίσκεται στο πίσω μέρος της πλάτης του
παιδικού καθίσματος (Εικ. 16). ΠΡΟΣΟΧΗ! Η
διαγώνια ζώνη κατά τη διάρκεια μεταφοράς
πρέπει να παραμένει ΠΑΝΤΑ βαλμένη στο
εσωτερικό αυτού του οδηγού.
8. Τεντώστε τη ζώνη όσο το δυνατόν περισσό-
τερο χωρίς να αφήσε τε περισσεύματα και
βεβαιωθείτε ότι δεν είναι περιτυλιγμένη.
9. Περισ τρέψτε το χερούλι στη θέση A ελέγχοντ ας ότ ι ακου μπά ει κόν τρα σ το κ άθισ μα το υ
αυτοκινήτου (Εικ. 17).
ΠΡΟΣΟΧΗ! Μετά την εγκατάσταση ελέγχετε
ΠΑ ΝΤΑ ότ ι η ζ ώνη του α υτο κιν ήτο υ εί ναι σωσ τά
τεντωμένη, ότι είναι ομοιόμορφα διανεμημένη
σε όλα τα σημεία και ότι δεν έχει μπερδευτεί.
Μην περνάτε ΠΟΤΕ τη ζώνη του αυτοκινήτου
σε θέσεις διαφορετικές από εκείνες που ενδείκνυνται.
Για να με τατοπίσετε το παιδικό κάθισμα δια-
τηρώντας τη βάση εγκατεστημένη σ το αυτοκίνητο:
1. Βγάλτε από τον οδηγό στην πλάτη τη διαγώνια ζώνη χωρίς να την αποσυνδέσετε
από την πόρπη.
2. Επαναφέρετε το χερούλι στην κάθετη θέση
B (Εικ. 5).
3. Αποσυνδέστε το κάθισμα όπως περιγράφεται
παραπάνω.
2.3 ΕΓΚΑΤΑΣ ΤΑΣΗ ΧΩΡΙΣ ΒΑΣΗ
Για ν α εγ κατ αστ ήσε τε το πα ιδι κό κά θισ μα χ ωρί ς
βάση, ενεργήστε ως ακολούθως:
1. Βγάλτε τον μηχανισμό σταθεροποίησης και
τοπ οθε τή στε το πα ιδι κό κά θισ μα ε πάν ω σ το
προεπιλεγμένο κάθισμα του αυτοκινήτου
(Εικ. 18).
2. Τραβ ήξ τε τη ζώ νη ασ φα λ εί ας τ ου αυ το κι νή το υ
και συνδέσ τε την με την αν τίστοιχη πόρπη,
περνώντας το οριζόντιο τμήμα (κοιλιακό)
της ζώνης σ τους δύο ειδικούς οδηγούς (K )
του καθίσματος που επισημαίνονται με το
γαλάζιο βέλος (Εικ. 19).
3. Πιάστε το διαγώνιο τμήμα της ζώνης του αυ-
τοκ ινή του και π ερά στ ε το σ τον ειδ ικό ο δηγ ό
(O) που βρίσκεται στο πίσω μέρος της πλάτης
του καθίσματος (Εικ. 20). ΠΡΟΣΟΧΗ! Η διαγώνι α ζών η κα τά τ η δι άρκ εια μ ετ αφο ράς πρέ πει
να παραμένει ΠΑΝΤΑ βαλμένη στο εσωτερικό
αυτού του οδηγού.
4. Τεντώστε τη ζώνη όσο το δυνατόν περισσό-
τερο χωρίς να αφήσε τε περισσεύματα και
βεβαιωθείτε ότι δεν είναι περιτυλιγμένη.
5. Περιστρέψτε το χερούλι στη θέση A ελέγχο-
ντ ας ότ ι ακο υμπά ει κό ντρ α στ ο κάθ ισμα του
αυτοκινήτου (Εικ. 21).
Για να μετατο πίσετε το παιδι κό κάθισμα:
1. Λύστε τη ζώνη του αυτοκινήτου πιέζοντας
την πόρπη.
2. Επαναφέρετε το χερούλι σ τη θέση B (κά-
θετ η).
3. Βγάλτε τη ζώνη από τον διαγώνιο οδηγό και
από τους οριζόντιους οδηγούς.
3. ΠΕΡΑΙΤΕΡΩ ΕΝΕΡΓΕΙΕΣ
3.1 ΤΟΠΟΘΕΤΗΣΗ ΤΟΥ ΠΑΙΔ ΙΟΥ ΣΤΟ ΚΑΘΙΣΜ Α
1. Σηκώστε την υφασμάτινη πατ, κρατώντας
πατημένο το πλήκτρο ρύθμισης και τραβήξτε
τις ζώ νες του καθ ίσματος για να τις χ αλαρώσετε (Εικ. 22).
2. Ανοίξτε την πόρπη πατώντας το κόκκινο
κουμπί της και κρατήστε διευρυμένες τις
Page 55

55
ζώνες (Εικ. 23).
3. Τοποθετήστε το παιδί.
4. Τοποθετήστε επάλληλα τις δύο γλωσσίτσες
της πόρπης και αφού ενωθούν βάλτε τις ίδιες
στην πόρπη μέχρι να ακούσετε ένα “κλικ”
(Εικ. 24). ΠΡΟΣΟΧΗ! Μην βάζετε ποτέ τις
γλωσσίτσες στην πόρπη μία κάθε φορά ή
μία μόνο.
5. Τεντώστε τις ζώνες ασφαλείας του καθίσματος τραβώντας την ειδική ταινία ρύθμισης
(Εικ. 25).
3.2 ΡΥΘΜΙΣ Η ΤΗΣ ΘΕΣΗΣ ΤΩΝ ΖΩΝΩΝ
ΠΡΟΣΟΧΗ! Οι ζώνες πρέπει να προσαρμόζον ται
πάντα με την ανάπτυξη του παιδιού. Πριν τοποθετήσετε το παιδικό κάθισμα σ το αυτοκίνητο
πρέπει να τις τοποθετήσετε σ το σωστό ύψος.
Για μια σωστή ρύθμιση, οι ζώνες πρέπει να
βγαίνουν από την πλάτη στο ύψος των ώμων
του παιδιού (Εικ. 26).
Το κάθισμα διαθέτει 3 θέσεις ύψους.
Για να με τατοπίσετε τις ζώνες ενεργήσ τε ως
ακολούθ ως:
1. Αφαιρέσ τε τις επωμίδες βγάζοντας τις ίδιες
από τις σχισμές της υφασμάτινης επένδυσης.
2. Ανοίξτε την πόρπη των ζωνών πατώντας το
κόκκινο κουμπί της.
3. Βγά λτε τ ις ζ ώνε ς από πίσ ω απ ό την πλά τη κ αι
βά λτε τις ί διε ς σ την π ιο κ ατά λλ ηλη σχ ισμή στ ο
ύψος του παιδιού (Εικ. 27A και 27B).
ΠΡΟΣΟΧΗ! Βεβαιωθείτε ότι οι ζώνες περνούν
πάντα ανάμεσα από το στοιχείο οδήγησης (R)
και το περίβλημα.
ΠΡΟΣΟΧΗ! Το μαξιλαράκι μειωτήρας εγγυάται
σ το πα ιδί , από τη γ έν νησ η έω ς 6 κ ιλά , τη σωσ τή
συγκράτηση και την ιδανική θέση για τον λαιμό
και την πλάτη.
3.3 ΣΤΑΘΕΡΗ Ή ΛΙΚΝΙΖΟ ΜΕΝΗ ΘΕΣΗ ΤΟΥ ΚΑΘΙ ΣΜΑ-
ΤΟΣ (ΧΡΗΣΗ ΡΗ ΛΑΞ)
Όταν δεν χρησιμοποιείται στο αυτοκίνητο, το
κάθισμα μπορεί επίσης να χρησιμοποιηθεί ως
ρηλάξ (σταθερό ή λικ νιζόμενο).
Για να το καταστήσετε λικνιζόμε νο, κλείστε τον
μηχ ανισ μό σ ταθερ οποί ησης ( Εικ. 14) και τ οποθετήσ τε το χερούλι στη θέση C (Εικ. 5).
Για να το χρησιμοποιήσετε στη σταθερή θέση,
βγάλτε τον μηχανισμό σ ταθεροποίησης και
τοποθετήσ τε τη λαβή στη θέση D (Εικ. 5).
Να το τοποθετείτε μόνο ε πάνω σε σταθερές
και οριζόντιες επιφάνειες.
ΠΡΟΣΟΧΗ! Πριν μεταφέρετε το παιδικό κάθισμα,
επαναφέρε τε πάντα το χερούλι σ τη θέση B
(κάθε τη).
ΠΡΟΕΙΔΟΠΟΙΗΣΗ! Μην αφήνετε
το παιδί χωρίς επίβλεψη.
ΠΡΟΕΙΔΟΠΟΙΗΣΗ! Χρησιμοποιείτε
πάντα το σύστημα συγκράτησης.
ΠΡΟΕΙΔΟΠΟΙΗΣΗ! Είναι επικίνδυνο να χρησιμοποιείτε το παιδικό
κάθισμα επάνω σε υπερυψωμένες
επιφάνειες, όπως τραπέζια, καρέκλες, κ.λπ.
ΠΡΟΕΙΔΟ ΠΟΙΗΣΗ ! Αυτ ό το κάθισ μα
δεν προορίζεται για παρατεταμένες περιόδους ύπνου.
ΠΡΟΕΙΔΟΠΟΙΗΣΗ! Μην χρησιμοποιείτε το κάθισμα αν το παιδί είναι σε θέση να κάθεται από μόνο
του.
Το παιδικό κάθισμα δεν αντικαθιστά ένα κρεβατάκι ή ένα λίκνο. Όταν το παιδί χρειάζε ται ανάπαυ ση , θα πρέ πει ν α το βάζ ετε σε έ να κ ρε βατ άκι
ή σε ένα κατάλ ληλο λίκνο.
Μην χρησιμοποιείτε το κάθισμα αν ένα οποιοδήποτε τμήμα του είναι σπασμένο ή απουσιάζει.
3.4 ΧΡΗΣΗ ΜΕ ΤΟ Κ ΑΡΟΤΣΙ ΠΕΡΙΠΑΤΟΥ
ΠΡΟΣΟΧΗ! Για τη χρήση μαζί με το καρότσι περιπάτου, διαβάστε τις οδηγίες του καροτσιού. Τα
καρότσια περιπάτου της CHICCO που διαθέτουν
σύ στ ημα CLI K CL AK, έχο υν β ραχ ίον ες με ειδ ικο ύς
μη χαν ισμ ούς που ε πι τρέ που ν τη ν άμ εση σ ύν δεσ η
του καθίσματος με το καρότσι, χωρίς να είναι
απαραίτητη η χρήση επιπλέον εξαρτ ημάτων.
Για ν α συ νδέ σετ ε το κάθι σμα με τ ο καρ ότσ ι ε νερ γήστε ως ακολούθ ως:
1. Πιάσ τε το κάθισμα με το χερούλι στην κάθετη
θέση (B) (Εικ. 28).
2. Συνδέστε τα δύο αξόνια σύνδεσης Clik Clak
του καθίσματος (N) με τους βραχίονες του
καροτσιού, δίνοντας ιδιαίτερη προσοχή σ το
γεγονός ότι γαντζώνουν και στις δύο πλευρές.
Θα ακουστεί έ να κλικ σύνδεσης (Εικ. 29).
ΠΡΟΕΙΔΟΠΟΙΗΣΗ: Πριν από τη χρήση ελέγχετε
ότι οι μηχανισμοί σ τερέωσης του καθίσματος
είναι σωσ τά συνδεδεμένοι.
Για να αποσυνδέσετε το κάθισμα από το καρότσι:
1. Επαν αφέρετε το χερούλι στη κάθε τη θέση (B).
Page 56

56
57
2. Τραβήξτε τη λαβή της πίσω αποσύνδεσης.
3. Μετακινήσ τε και τοποθετήστε το κάθισμα
επάνω σε μια επίπεδη επιφάνεια.
ΠΡΟΣΟΧΗ: Η σύνδεση και η αποσύνδεση μπο ρο ύν ν α γί νου ν ακ όμα και μ ε το παιδ ί σ το κά θισ μα
έσ τω κ ι αν με τ ο βά ρος του π αιδ ιού οι πα ραπ άν ω
εν έργ ειε ς θα μπο ρού σαν να π ροκ ύψο υν λ ιγό τερ ο
εύκολες. Σε αυτή την περίπ τωση συνισ τάται
προσοχή στην εκτέλεση των ενεργειών που
ανωτέρω αναφέρονται.
3.5 ΚΑΘΑΡΙΣΜ ΟΣ ΚΑΙ ΣΥΝΤΗΡΗΣΗ
ΚΑΘΑΡΙΣΜΟΣ ΤΟΥ ΥΦΑΣΜΑΤΟΣ
Η υφ ασμά τινη ε πένδ υση το υ καθί σματο ς αφαι ρείται εντελώς και πλένεται στο χέρι ή στο πλυντήριο στους 30°C.
Για ν α την πλύ νε τε, λ ύσ τε τ ις ζ ώνες και βγά λτε τ ην
υφασμάτινη επένδυση αφού πριν έχετε βγάλει
τα δύο τμήματα ζωνών και την πόρπη από τις
αντίσ τοιχες σχισμές (Εικ. 30).
Για το πλύσιμο, ακολουθήστε τις οδηγίες που
αναγράφονται στην ετικέτα του υφάσματος, η
οποία φέρει τα ακόλουθα σύμβ ολα:
Πλύσιμο στο πλυν τήριο στους 30°C
Πλύσιμο στο χέρι
Μην χρησιμοποιείτε χλωρίνη
Μην κάνετε σ τεγνό καθάρισμα
Μην στεγ νώνετε στο στεγνωτήριο
Μην σιδερώνε τε
Μην χρησιμοποιείτε ποτέ απορρυπαντικά που
χαράζουν ή διαλυτικά. Μην στύβετε το ύφασμα
στο πλυντήριο και απλώστε το χωρίς να το στύψετε με το χέρι.
ΚΑΘΑΡΙΣΜΟΣ ΤΩΝ ΠΛΑΣΤΙΚΩΝ ΚΑΙ ΜΕΤΑΛΛΙΚΩΝ
ΤΜΗΜ ΑΤΩΝ
Για τον καθαρισμό των πλαστικών ή των βερνικωμένων μεταλλικών τμημάτων, χρησιμοποιείτε
μόνο έ να υγρό πανί. Μην χρησιμοποιείτε ποτέ
απορρυπαντικά που χαράζουν ή διαλυτικά.
Τα κινητά μέρη του καθίσματος δεν πρέπει, για
κανένα λόγο, να λιπαίνονται.
ΕΛΕΓΧΟΣ Τ ΗΣ ΑΚΕΡΑΙΟΤΗΤΑΣ ΤΩΝ ΕΞΑ ΡΤΗΜΑΤΩΝ
Συνιστάται να ελέγχε τε τακτικά την ακεραιότητα και την κατάσταση φθοράς των ακόλουθων
εξαρτημάτων:
• Υ φ α σ μ ά τ ι ν η ε π έ ν δ υ σ η : β ε β α ι ω θ ε ί τ ε ό τ ι δ ε ν
προεξέχουν ή βγαίνουν στοιχεία της εσωτερικής γέμισης. Βεβαιωθείτε για την ακεραιότητα
των ραφών.
• Ζ ώ ν ε ς : ε λ έ γ ξ τ ε ό τ ι δ ε ν έ χ ε ι ξ η λ ω θ ε ί τ ο ύ φ α σ μ α
με εμφανή μείωση του πάχους σ το ύψος της
ταινίας ρύθμισης, του διαχωριστικού των ποδιών, στα τμήματα των ώμων και στο σημείο
του κλιπ ρύθμισης των ζωνών.
• Π λ α σ τ ι κ ά τ μ ή μ α τ α : β ε β α ι ω θ ε ί τ ε γ ι α τ η ν α κ ε ραιότητα όλων των πλαστικών τμημάτων που
δεν θα πρέπει να παρουσιάζουν εμφανή ίχνη
ζημιάς ή αποχρωματισμού.
ΠΡΟΣΟΧΗ! Σε περίπτωση που το κάθισμα είναι
παραμορφωμένο ή πολύ φθαρμένο πρέπει να
αντικατασταθεί: μπορεί να έχει χάσει τα αρχικά
χαρακτηριστικά ασφαλείας.
ΑΠΟΘΗΚΕΥ ΣΗ ΤΟΥ ΠΡΟΪΟΝΤΟΣ
Όταν δεν εί ναι τοποθετημένο σ το αυτοκίνητο
το κάθισμα, πρέ πει να φυλάσσε ται σε σ τεγνό
χώρο μακριά από πηγές θερμότητας και προστατευόμενο από τη σκόνη, την υγρασία και το
άμεσο ηλιακό φως.
ΑΠΟΡΡΙΨΗ ΤΟΥ ΠΡΟ ΪΟΝΤΟΣ
Όταν το κάθισμα δεν χρησιμοποιείται πλέον
πρέπει να απορρίπ τεται. Για λόγους σεβασμού
προς το περιβάλλον, χρησιμοποιήστε τους ειδικούς κάδους ανακύκλωσης, σύμφωνα με τους
ισχύον τες κανονισμούς κάθε χώρας.
ΓΙΑ ΠΕΡΙΣΣΟΤΕ ΡΕΣ ΠΛΗΡΟΦΟΡΙΕ Σ:
ARTSANA SPA
Υπηρεσία Πελατών
Via Saldarini Catelli, 1
22070 Grandate COMO-ITALIA
Tηλ. Αριθ. ατελούς κ λήσης 800.188.898
www.ch icco.com
Page 57

57
CHICCO
AUTO-FIX FAST
Gr U p p e 0+ (0-13 k G )
BRUGSANVISNING
INDHOLDSFORTEGNELSE:
1. INDLEDNING
1.1 VIGTIGE OPLYSNINGER
1.2 PRODUKTETS EGENSKABER
1.3 BESKRIVELSE AF DELENE
1.4 HÅNDTAGETS INDSTILLINGER
1.5 BEGR ÆNSNINGER OG ANVENDELSESKRAV I FORBINDELSE MED PRODUKTET OG
BILSÆDET
2.MONTERIN G I BILEN
2.1 STARTINDSTILLING AF SKULDERSTYKKERNE
2.2 MONTERING MED BASE
2.3 MONTERING UDEN BASE
3. YDERLIGERE IND GREB
3.1 ANBRINGELSE AF BARNET I STOLEN
3.2 JUSTERING AF SELERNES INDSTILLING
3.3 FAST ELLER VIPPENDE INDSTILLING AF
STOLEN (SOM SKRÅSTOL)
3.4 ANVENDELSE MED KLAPVOGN
3.5 RENGØRING OG OPBEVARING
1. INDLEDNING
1.1 VIGTIGE OPLYSNINGER
MEGET VIGTIGT: LÆS DETTE FØRST
• O P B E V A R D E N N E B R U G S A N V I S N I N G T I L
SENERE BRUG.
• F ø l g a n v i s n i n g e r n e m e g e t o m h y g g e l i g t , n å r
produktet monteres og installeres. Undgå
at nogen anvender produktet uden først at
have læst anvisningerne.
• V I G T I G T ! I h e n h o l d t i l u l y k k e s s t a t i s t i k k e r n e e r
bilens bagsæder som regel mere sikre end
fo rsæ det : De t an bef ale s de rfo r at mon tere s
stolen på et af bagsæderne. Især er den sikreste plads på det midterste bagsæde, såfremt
det er udstyret med en 3-punktssele.
• V I G T I G T ! Y D E R S T FA R L I G T ! A n v e n d a l d r i g
denne stol på et forsæde, der er udstyret
med en frontal airbag. Stolen må kun in-
stalleres på forsædet, såfremt den frontale
airbag er blevet deaktiveret. Forhør dig hos
bilforhandleren eller se bilens instruktionsbog med hensyn til muligheden for at deaktivere airbag’en. Det anbefales under alle
omstændigheder at rykke sædet så langt
tilbage som muligt under hensyntagen til
andre passagerer på bagsædet.
• S ø r g f o r a t a l l e b i l e n s p a s s a g e r e r v e d ,
hvordan barnet frigøres fra stolen i nødstilfælde.
• V æ r o m h y g g e l i g m e d , h v o r d a n s t o l e n m o n teres i bilen, så det undgås, at den kommer i
vejen for et ytbart sæde eller en bildør.
• I n g e n a u t o s t o l k a n g a r a n t e r e b a r n e t s s i k kerhed fuldstændigt i tilfælde af en ulykke,
men dette produkt reducerer risikoen for
alvorlig tilskadekomst eller død.
• R i s i k o e n f o r a t b a r n e t k o m m e r a l v o r l i g t t i l
skade - ikke kun i tilfælde af en ulykke, men
også under andre omstændigheder (f.eks.
ved hårde opbremsninger, osv.) - forøges,
såfremt anvisningerne i denne brugsanvisning ikke følges meget omhyggeligt.
Kontroller altid at autostolen er fastspændt
korrekt på sædet.
• S å f r e m t s t o l e n b e s k a d i g e s , d e f o r m e r e s
eller er nedslidt, skal den udskiftes, da den
muligvis ikke længere opfylder de originale
sikkerhedsegenskaber.
• F o r e t a g i n g e n æ n d r i n g e r e l l e r t i l f ø j e l s e r t i l
produktet uden producentens godkendelse.
• M o n t e r i k k e t i l b e h ø r , r e s e r v e d e l e e l l e r a n d r e
dele, som ikke er leveret af producenten.
• E f t e r l a d a l d r i g u n d e r n o g e n o m s t æ n d i g h e der barnet i stolen uden opsyn.
• E f t e r l a d a l d r i g s t o l e n p å b i l s æ d e t u d e n a t
den er fastspændt, da den vil kunne støde
ind i og beskadige passagererne.
• A n b r i n g a l d r i g n o g e t , s o m i k k e e r t i l b e h ø r
godkendt af producenten, hverken mellem bilsædet og autostolen eller mellem
autostolen og barnet: I tilfælde af en ulykke
vil stolen i så fald ikke kunne fungere på
korrekt måde.
• S å f r e m t b i l e n e f t e r l a d e s i d i r e k t e s o l s k i n ,
anbefales det at tildække autostolen.
• I t i l f æ l d e a f s e l v e t m i n d r e b i l u h e l d k a n a u tostolen have fået skader, der ikke altid er
DK
Page 58

58
59
synlige med det blotte øje: Det vil derfor
være nødvendigt at udskifte den.
• B r u g i k k e e n a u t o s t o l k ø b t b r u g t : D e n k a n
have været udsat for strukturelle skader, der
ikke kan ses med det blotte øje, men som
nedsætter produktets sikkerhed.
• B e k l æ d n i n g e n m å k u n u d s k i f t e s m e d e n
anden, som er godkendt af producenten,
idet den er en integreret del af autostolen. Autostolen må aldrig anvendes uden
beklædningen for ikke at nedsætte barnets
sikkerhed.
• K o n t r o l l e r a t s i k k e r h e d s s e l e n s b å n d i k k e
er viklet om sig selv og pas på at denne
eller stolens dele ikke kommer i klemme i
bil døre n ell er gni der o p ad sk arp e punk ter.
Såfremt selen er skåret eller osser, er det
nødvendigt at udskifte den.
• K o n t r o l l e r a t d e r u n d e r t r a n s p o r t e n i k k e
bender sig genstande eller bagage, som
ikke er fastspændt eller anbragt på sikker
måde, især i forbindelse med pladen under bagruden: I tilfælde af en ulykke eller
hård opbremsning vil de kunne beskadige
passagererne.
• S ø r g f o r a t a l l e b i l e n s p a s s a g e r e r a n v e n d e r
deres sikkerhedssele, både af hensyn til
deres egen sikkerhed men også fordi de i
tilfælde af en ulykke eller hård opbremsning
vil kunne beskadige barnet.
• I t i l f æ l d e a f r e j s e r o v e r l a n g e a f s t a n d e b ø r
der ofte foretages ophold. Barnet bliver
me get hur tig t tr æt. Bar net må u nde r ing en
omstændigheder tages op fra autostolen,
mens bilen er i bevægelse. Hvis barnet har
be hov for opm ærk som he d, er det nød ven digt at holde ind på et sikkert sted.
• D e t k a n v æ r e f a r l i g t f o r b ø r n , d e r e r f o r
tidligt født inden 37 ugers graviditet, at
anvende autostolen. Disse nyfødte kan få
åndedrætsproblemer ved anvendelse af
autostolen. Det tilrådes derfor at konsultere
lægen eller hospitalspersonalet, inden hospitalet forlades, for en vurdering af barnets
tilstand og anbefaling af, hvilken autostol
der egner sig bedst.
• F i r m a e t A r t s a n a f r a l æ g g e r s i g e t h v e r t a n s v a r
for en forkert brug af produktet.
1.2 PRODUKTE TS EGENSKABER
• D e n n e a u t o s t o l e r t y p e g o d k e n d t s o m
"Gruppe 0+" til transport af børn fra fødsle n og o p ti l en v ægt på 13 k g (ca . fr a 0 t il 10
måneder/1 år) i henhold til den europæiske
norm ECE R44/04.
• Ty p e g o d k e n d e l s e n e r " U n i v e r s a l " , o g a u t o stolen kan derfor anvendes i en hvilken som
helst bil. PAS PÅ! "Universal" indebærer, at
den kan anvendes på størsteparten af bilsæderne, men ikke på alle.
VIGTIG OPLYSNING
1. D ett e er en ”U niv ers al” aut osto l ti l bø rn o g
typegodkendt i henhold til normen ECE
R44/04 og den er kompatibel med størsteparten af bilsæder, men ikke med alle.
2. Der kan reg nes m ed e n pe rf ekt til pas nin g,
såfremt bilkonstruktøren i instruktionsbogen for det pågældende køretøj erklærer, at
bil en er egn et til mont erin g af e n aut osto l
af typen ”Universal” til børn i den pågældende aldersgruppe.
3. Denne autostol til børn er klassiceret som
”Universal” i overensstemmelse med typegodkendelseskriterier, der er mere krævende i forhold til tidligere modeller, der
ikke er mærket med denne oplysning.
4. Autostolen kan kun anvendes i køretøjer,
der er udstyret med en selvoprullende
statisk 3-punkts sikkerhedssele, som er typegodkendt i henhold til normen UN/ECE
Nr. 16 eller tilsvarende standarder.
5. I tvivlstilfælde bedes du kontakte autosto-
lens producent eller forhandleren.
1.3 BESKRIVEL SE AF DELENE
Fig. 1 (3/4)
A. Håndtag
B. Kaleche
C. Stofbeklædning
D. Reduktionspude (*)
E. Base (**)
Fig. 2 (Forsiden)
F. Huller til indføring af selerne
G. Autostolens sikkerhedsseler
H. Skulderstykker (*)
I. Trykknap til justering af selerne (under
Page 59

59
stofpladen)
J. Bånd til justering af selerne
Fig. 3 (Profil)
K. Holder til bilens bækkensele på autostolen
L. Holder til bilens bækkensele på basen
M. Trykknapper til drejning af håndtaget
N. Clik-Clak tapper (til fastspænding på
klapvogn)
Fig. 4 (Bagsiden)
O. Holder til bilens diagonale sele
P. Frigørelsesgreb (fra basen og fra klapvog-
nen)
Q. Huller til indføring af selerne
R. Holder til autostolens seler
S. Stabilitetsblokering
(*) Udf orm nin g og mod el k an v ari ere af hæn gigt af autostolens udgave
(**) Ekstraudstyr
1.4 HÅNDTAGETS INDSTILLI NGER
Autostolens håndtag kan reguleres til 4 indstillinger (Fig. 5).
A. Indstilling for transport i bilen (PAS PÅ!:
Dette er den eneste tilladte indstilling
under transporten i bil).
B. Indstilling når stolen skal bæres.
C. Indstilling som vippestol eller ved fast-
spænding på en dertil indrettet Chicco
klapvogn.
D. Indstilling som fast skråstol.
For at foretage indstillingen trykker du samtidi gt p å kn app er ne (M ) på hån dta get og d rej er
det herefter til den ønskede indstilling, indtil
du kan høre, at det klikker fast.
1.5 BEGRÆNSN INGER OG ANVENDELSE SKRAV I
FORBINDELSE ME D PRODUKTET OG AUTOST OLEN
PAS PÅ! De følgende begrænsninger og anvendelseskrav i forbindelse med produktet
og autostolen skal overholdes nøje: I modsat
fald kan sikkerheden ikke garanteres.
• A u t o s t o l e n k a n m o n t e r e s p å f o r s æ d e t i
passagersiden eller på et af bagsæderne.
Bilsædet skal under alle omstændigheder
være vendt i kørselsretningen. Anvend aldrig
denne autostol på sidestillede bilsæder eller
sæder, der vender modsat kørselsretningen
(Fig. 6).
• B i l s æ d e t s k a l v æ r e u d s t y r e t m e d e n s e l v o p rullende eller statisk 3-punkts sikkerhedssele,
som er typegodkendt i henhold til normen
UN/ECE Nr. 16 eller tilsvarende standarder
(Fig. 7).
• PA S P Å ! M o n t e r a l d r i g a u t o s t o l e n m e d e n
2-punkts forankret sikkerhedssele i bilen
(Fig. 8).
• A n v e n d a l d r i g r e d u k t i o n s p u d e n , h v i s b a r n e t
vejer mere end 6 kg.
2. SÅDAN MONTERES AU TOSTOLEN I BILEN
Au tos tole n ka n bå de m ont ere s me d en b as e
(ekstraudstyr) og uden. I begge tilfælde må
stolen kun monteres vendt i kørselsretningen.
2.1 STARTINDSTILLING AF SKULDE RSTYKKERNE
Autostolen er udstyret med 2 forskellige
typer skulderstykker (A og B) afhængigt af
udgaven. Før autostolen anvendes, skal skulderstykkerne monteres ved at følge denne
fremgangsmåde:
• S k u l d e r s t y k k e r v e r s i o n A ( F i g . 9 A , 9 B o g
9C): Før skulderstykkerne ind gennem hullerne i stofbeklædningen (men ikke i den
underliggende struktur), således at selerne
bender sig over disse. Stik skridtremmen
ind gennem selernes spænde.
• S k u l d e r s t y k k e r v e r s i o n B ( F i g . 1 0 A o g 1 0 B ) :
Før autostolens seler ind gennem de to
skulderstykker. Stik skridtremmen ind gennem selernes spænde.
2.2 MONTERIN G MED BASE
Hv is a utos tol en s kal mon tere s me d ba sen på
bilsædet følges denne fremgangsmåde:
1. Frigør autostolen fra basen ved at trække i
frigørelsesgrebet på bagsiden af ryglænet,
samtidigt med at den løftes op i håndtaget
(Fig. 11).
2. Anbring basen på det ønskede bilsæde
med retning som vist på Fig. 12, og sørg
for at den er helt i kontakt med bilsædets
ryglæn.
3. Træk i bilens sikkerhedssele og sæt den
fast i det tilhørende spænde efter at have
Page 60

60
61
ført den horisontale del (bækkenselen) ind
gennem de to dertil indrettede holdere
(L) angivet med den blå pil, stram selen
så meget som muligt (Fig. 13).
4. Før autostolen anbringes på basen, skal
det kontrolleres, at stabilitetsblokeringen
er lukket (Fig. 14).
5. Anbring autostolen på basen (vendt i kørse lsr etni ng en) o g tr yk den ned ad, ind til den
er spændt korrekt på (du vil kunne høre et
”klik”, når den er fastspændt) (Fig. 15).
6. Kontroller om autostolen er spændt korrekt
på bas en ve d at for søg e at løf te d en o pad
både i den forreste og i den bageste del.
7. Tag fat i bilens diagonale sikkerhedssele og
før den ind gennem den dertil indrettede
holder (O), der bender sig på bagsiden
af autostolens ryglæn (Fig. 16). PAS PÅ!
Den diagonale sikkerhedssele skal ALTID
bende sig inde i denne holder under
transporten.
8. Stram selen så meget som muligt, der må
ikke være dele med frit spil, og se efter at
selen ikke er viklet om sig selv.
9. Drej håndtaget til position A og kontroller,
at det hviler mod bilsædet (Fig. 17).
PAS PÅ! Nå r st ole n er mon tere t, s kal det ALTI D
kontrolleres, at bilens sikkerhedssele er strammet korrekt til, og at den er løber glat gennem
alle punkter uden at være viklet om sig selv.
Før ALDRIG bilens sikkerhedssele ind gennem
andre punkter end de angivne.
Sådan a fmontere s autostol en, hvis bas en skal
forbl ive monter et i bilen:
1. Træk den diagonale sele ud fra holderen
på r yglænet uden at løsne selen fra sit
spænde.
2. Før håndtaget op til lodret indstilling (Fig.
5).
3. Frigør autostolen som vist tidligere.
2.3 MONTERIN G UDEN BASE
Hvis autostolen skal monteres uden base
følges denne fremgangsmåde:
1. Træk stabilitetsblokeringen ud og anbring
autostolen på det ønskede bilsæde (Fig.
18).
2. Træk i bilens sikkerhedssele og sæt den fast
i det tilhørende spænde efter at have ført
selens horisontale del (bækkenselen) ind
gennem de to dertil indrettede holdere
(K) på autostolen, som angivet med den
blå pil (Fig. 19).
3. Tag fat i bilens diagonale sikkerhedssele og
før den ind gennem den dertil indrettede
holder (O), der bender sig på bagsiden
af autostolens ryglæn (Fig. 20). PAS PÅ!
Den diagonale sikkerhedssele skal ALTID
bende sig inde i denne holder under
transporten.
4. Stram selen så meget som muligt, der må
ikke være dele med frit spil, og se efter at
selen ikke er viklet om sig selv.
5. Drej håndtaget til position A og kontroller,
at det hviler mod bilsædet (Fig. 21).
Sådan afmonteres autostolen:
1. Frigør bilens sikkerhedssele ved at trykke
på spændet.
2. Anbring håndtaget i position B (lodret).
3. Træk selen ud af den diagonale og den
horisontale holder.
3. YDERLIGERE IND GREB
3.1 ANBRINGELSE AF BARNET I STO LEN
1. Løf t stofpladen, mens du holder justeringsknappen trykket ind, og træk i autostolens
seler for at løsne dem (Fig. 22).
2. Åbn spændet ved at trykke på den røde
knap og hold selerne ud til siden (Fig.
23).
3. Anbring barnet.
4. Anbring spændets to tapper over hinanden
og sti k de m in d i sp ænd et, når de e r sa mle t,
indtil du hører et ”klik” (Fig. 24). PAS PÅ!
Stik aldrig tapperne ind i spændet en ad
gangen eller kun den ene.
5. Stram autostolens sikkerhedsseler ved at
trække i det dertil indrettede justeringsbånd (Fig. 25).
3.2 JUSTERING AF SE LERNES INDSTILLING
PAS PÅ! Selerne skal altid tilpasses barnet,
ef ter hån den som det vok ser. Før auto sto len
mo nter es i bil en sk al s ele rne anb rin ges i de n
rigtige højdeindstilling.
For at være korrekt justeret skal selerne føres
Page 61

61
ud gennem ryglænet i barnets skulderhøjde
(Fig. 26).
Autostolen er udstyret med huller til 3 højdeindstillinger.
For at ytte selernes placering går du frem
som følger:
1. Fjern skulderstykkerne ved at trække
dem ud gennem hullerne i stofbeklædningen.
2. Åbn selernes spænde ved at trykke på
den røde knap.
3. Træk selerne ud fra bagsiden af ryglænet og
st ik d em in d i d et h ul, d er p ass er t il b arn ets
højde (Fig. 27A og 27B).
PAS PÅ! Sørg for at selerne altid føres ind
mellem holderen (R) og stellet.
PAS PÅ! Reduktionspuden sikrer, at barnet
fastholdes korrekt og i den ideelle position
for både hals og ryg fra fødslen og indtil en
vægt på 6 kg.
3.3 FAST ELLER VIPPEND E INDSTILLING AF STOLEN (SOM SKRÅ STOL)
Når stolen ikke anvendes i bilen, kan den også
bruges som vippestol eller skråstol.
For at få stolen til at vippe, lukker du stabilitetsblokeringen (Fig. 14) og indstiller håndtaget til position C (Fig. 5).
For at anvende den i fast indstilling trækkes stabilitetsblokeringen ud og håndtaget
indstilles til position D (Fig. 5).
Stolen må kun anbringes på stabile og horisontale overader.
PAS PÅ! Før stolen transporteres, skal håndtaget altid indstilles i position B (lodret).
ADVARSEL! Efterlad aldrig dit barn alene
uden opsyn.
ADVARSEL! Brug altid fastspændingsselerne.
ADVARSEL! Det er farligt at anvende autostolen på hævede overader, som f.eks.
borde, stole, osv.
ADVARSEL! Denne stol er ikke beregnet til,
at barnet sover i den i længere tid.
ADVARSEL! Brug ikke stolen, hvis barnet er
i stand til at sidde opret alene.
Stolen kan ikke erstatte en barneseng eller
en vugge. Hvis barnet har brug for at sove,
bør det anbringes i en passende seng eller
vugge.
Brug ikke stolen, hvis der er beskadigede eller
manglende dele.
3.4 ANVENDELS E MED KLAPVOGN
PAS PÅ! Hvis stolen skal anvendes sammen
med en klapvogn henvises til klapvognens
brugsanvisning. CHICCO klapvogne, der er
udstyret med ”CLIK CLAK”-systemet, har armlæn med særlige anordninger, således at
au tos tole n ka n fa st spæn des dir ekt e på kla pvognen uden behov for særligt tilbehør.
Fo r at f as tsp ænd e au tos tole n på kla pvo gne n
går du frem som følger:
1. Tag fat i autostolen i det lodretstillede
håndtag (B) (Fig. 28).
2. Hægt autostolens to Clik-Clak tapper (N)
fast på klapvognens armlæn, og pas på at
de er spændt korrekt til på begge sider. Du
vil kunne høre, at de klikker fast (Fig. 29).
AD VARS EL! F ør d u br uge r k lapv ogn en, sk al du
kontrollere, at stolens fastspændingsbeslag
er indsat korrekt.
Sådan frigøres autostolen fra klapvognen:
1. Før håndtaget op til lodret indstilling (B).
2. Træk i det bageste frigørelsesgreb.
3. Tag stolen op og anbring den på en jævn
overade.
PAS PÅ!: Stolen kan tages af og sættes på,
mens barnet sidder i den, selv om det med
barnets vægt i stolen kan være lidt vanskeligere at udføre ovenstående. Det anbefales
i dette tilfælde at være meget forsigtig, når
ovenstående udføres.
3.5 RENGØRING O G VEDLIGEHOLDELSE
RENGØRING AF BEKL ÆDNINGEN
Autostolens stofbeklædning kan tages fuldstændigt af og kan vaskes i hånden eller i en
vaskemaskine på 30°C.
For at vaske beklædningen løsner du selerne
og trækker disse og spændet ud gennem de
tilhørende huller, hvorefter du kan trække
stofbeklædningen af (Fig. 30).
Følg vaskeanvisningerne på beklædningens
mærkat, hvor du vil nde de følgende vaskesymboler:
Page 62

62
63
Vaskemaskine på 30°C
Vask i hånden
Må ikke hånden
Ikke kemisk rensning
Tør ikke i tørretumbler
Må ikke stryges
Anvend aldrig skrappe rengøringsmidler
eller opløsningsmidler. Beklædningen må
ikke centrifugeres og skal hænges til tørre
uden opvridning.
RENGØRING AF PL ASTIK- OG METALDELE
Til rengøring af plastikdele og lakerede metaldele skal der kun anvendes en fugtig klud.
Anvend aldrig skrappe rengøringsmidler eller
opløsningsmidler.
Autostolens bevægelige dele må under ingen omstændigheder smøres.
KONTROL AF DELENE S BESKAFFENHED
Det anbefales at foretage en regelmæssig
kontrol af, at de følgende dele er i god stand
og ikke er slidt:
• S t o f b e k l æ d n i n g : S e e f t e r a t b e k l æ d n i n g e n
ikke taber eller har mistet foringsmateriale.
Kontroller syningernes tilstand, som altid
skal være intakte.
• S e l e r : K o n t r o l l e r a t d e r i k k e f o r e k o m m e r s t e der med u norma lt løs e bre eller om sel en
er synligt tyndere omkring justeringsbåndet,
skridtremmen, skulderselerne og i området
omkring selernes justeringsplade.
• P l a s t i k d e l e : K o n t r o l l e r a l l e p l a s t i k d e l e n e f o r
slidtage, der må ikke forekomme synlige
tegn på beskadigelse eller aarvning.
PAS PÅ! Såfremt autostolen er deformeret
eller stærkt nedslidt, skal den skiftes ud: Den
kan have mistet sine oprindelige sikkerhedsegenskaber.
OPBEVARING AF PRODU KTET
Når autostolen ikke er monteret i bilen, anbefales det at opbevare den på et tør t sted,
bo rte fr a va rme kil der og b esk yt tet mo d st øv,
fugtighed og direkte sollys.
BORTSK AFFELSE AF PRODUKTET
Ved afslutningen af autostolens levetid bør
den ikke længere anvendes, men skal bortskaes som aald. Af hensyn til miljøet bør
den opdeles i de forskellige aaldsmaterialer i
henhold til gældende regler i brugslandet.
FOR YDERLIGER E OPLYSNINGER:
ARTSANA SPA
Servizio Clienti (Kundeser vice)
Via Saldarini Catelli, 1
22070 Grandate COMO-ITALIA
Tlf. Afgiftsfrit tlf.nr. 800.188.898
www.chicco.com
Page 63

63
CHICCO
AUTO-FIX FAST
Gr. 0+ (0-13k G )
KÄYTTÖOH JEET
SI SÄLT Ö:
1. JOHDANTO
1.1 VAROITUKSIA
1.2 TUOTTEEN OMINAISUUKSIA
1.3 OSIEN KUVAUS
1.4 KANTOKAHVAN ASENNOT
1.5 TUOTTEELLE JA AUTON ISTUIMELLE
ASETETTUJA KÄYTTÖÖN LIITTYVIÄ
RAJOITUKSIA JA VAATIMUKSIA
2. AUTOON SIJOIT TAMINEN
2.1 OLKAINTEN MUOTO ALUSSA
2.2 ALUSTALLE ASENNUS
2.3 ASENNUS ILMAN ALUSTAA
3. LISÄTOIMENPITEITÄ
3.1 LAPSEN ASETTAMINEN ISTUIMEEN
3.2 VÖIDEN ASENNON SÄÄTÖ
3.3 ISTUIMEN LIIKKUMATON TAI KEINUVA
ASENTO (SITTERIASENTO)
3.4 KÄYTTÖ LASTENRATTAISSA
3.5 PUHDISTUS JA SÄILYTYS
1. JOHDANTO
1.1 VAROITUKSIA
ERITTÄIN TÄRKEÄÄ: LUETTAVA HETI
• S Ä I LY T T Ä K Ä Ä N Ä M Ä K ÄY T T Ö O H J E E T
MYÖS TULEVAA KÄYTTÖÄ VARTEN .
• S e u r a t k a a k ä y t t ö o h j e i t a t a r k a s t i k u n k o koatte ja asennatte tuotteen. Välttäkää
tuotteen käyttämistä jos käyttöohjeita
ei ole luettu.
• H U O M I O ! A u t o - o n n e t t o m u u s t i l a s t o j e n
mukaan takaistuimet ovat etuistuimia
turvallisempia: kehotamme että asennatte
turvaistuimen auton takapenkille. Nimenomaan keskimmäinen paikka takaistuimella on kaikista turvallisin, jos siitä löytyy
kolmikiinnitteinen turvavyö.
• H U O M I O ! V A K A V A V A A R A ! Ä l k ä ä k ä y t -
täkö koskaan tätä Turvaistuinta sellaisessa
etuistuimessa jossa on edestä laukeava
airbag. Istuin voidaan asentaa etuistuimeen vain jos airbag voidaan poistaa
käytöstä: tarkistakaa autotehtaalta tai
auton käyttöohjeista, voitteko poistaa
airbagin käytöstä. Siirtäkää istuinta joka
tapauksessa mahdollisimman paljon
taaksepäin, takaistuimella istuvien matkustajien tarpeiden mukaan.
• K a i k k i e n a u t o s s a m a t k u s t a v i e n o n t i e d e t tävä miten lapsi otetaan pois istuimesta
hätätilanteessa.
• H u o m i o i k a a e t t ä i s t u i n o n a s e n n e t t a v a
niin, että liikkuvat istuimet tai auton ovi
eivät häiritse sen käyttöä.
• E i v o i d a t a a t a e t t ä m i k ä ä n t u r v a i s t u i n
suojaisi lasta täydellisesti onnettomuuden sattuessa, mutta tämän istuimen
käyttö vähentää vakavien vaurioiden ja
kuoleman vaaraa.
• V a a r a e t t ä l a p s i s a a v a k a v i a v a u r i o i t a , e i
ainoastaan onnettomuuden sattuessa,
vaan myös muissa tapauksissa (esim. äkilliset jarruttamiset, jne) lisääntyy, jos tämän
käyttöohjeen neuvoja ei seurata tarkasti:
tarkistakaa joka kerta että Turvaistuin on
kiinnitetty kunnolla auton istuimeen.
• J o s t u r v a i s t u i n o n r i k k i , m u o d o t o n t a i
paljosta käytöstä kulunut, se on vaihdetta va u ute en; v oi o lla ett ä se on m ene ttä ny t
alkuperäiset turvaominaisuudet.
• Ä l k ä ä t e h k ö t u o t t e e s e e n m u u t o k s i a t a i
lisäyksiä ilman valmistajan lupaa.
• Ä l k ä ä a s e n t a k o l i s ä l a i t t e i t a , v a r a o s i a t a i
muita osia joita valmistaja ei toimita.
• Ä l k ä ä k o s k a a n j a m i s s ä ä n t a p a u k s e s s a
jättäkö lasta yksin Turvaistuimeen.
• Ä l k ä ä j ä t t ä k ö Tu r v a i s t u i n t a k o s k a a n a u t o o n
ki inn itt ämä tt ä sit ä is tui mee n, s e vo i töy tä istä tai haavoittaa autossa matkustajia.
• Ä l k ä ä l a i t t a k o m i t ä ä n h y v ä k s y m ä t ö n t ä l i s ä ä
auton istuimen ja Turvaistuimen väliin tai
lapsen ja Turvaistuimen väliin: onnettomuud en s att ues sa vo i ol la e ttä Turv ais tui n ei
toimikaan oikealla tavalla.
• J o s j ä t ä t t e a u t o n s u o r a a n a u r i n g o n p a i s t e eseen, peittäkää Turvaistuin.
• P i e n e n k i n o n n e t t o m u u d e n s e u r a u k s e n a
FIN
Page 64

64
65
Turvaistuin voi vioittua niin että sitä ei
silmämääräisesti huomaa: istuin on joka
tapauksessa vaihdettava.
• Ä l k ä ä k ä y t t ä k ö t o i s t e n j o k ä y t t ä m ä ä i s t u inta: voi olla että siinä on näkymättömiä
vaurioita jotka voivat vähentää sen turvallisuutta.
• P ä ä l l y s t e e n v o i v a i h t a a v a i n v a l m i s t a j a n
hyväksymällä päällysteellä, koska se on
välttämätön osa Turvaistuinta. Turvaistuinta ei saa koskaan käyttää ilman päällystettä
lapsen turvallisuuden takia.
• T a r k i s t a k a a e t t ä t u r v a v y ö n n a u h a e i o l e
ki er teel lä j a väl tt äkä ä se n tai mui den i stu imen osien joutumista ovien väliin tai etteivät ne joudu hankaukseen leikkaavien
pintojen kanssa. Jos turvavyössä on viiltoja
tai rispaantumisia, se on vaihdettava.
• T a r k i s t a k a a e t t ä a u t o s s a e i o l e , e n n e n k a i kkea takaikkunan tavaratilassa, irrallisia tai
huonosti asetettuja, kiinnittämättömiä
esineitä tai matkatavaroita, jotka voivat
vahingoittaa matkustajia jarrutuksen tai
onnettomuuden sattuessa.
• V a r m i s t a k a a e t t ä k u k i n a u t o n m a t k u s t a j i s t a
käyttää omaa turvavyötään oman turvallisuuden vuoksi, näin vältytään lapsen
loukkaantumiselta sekä ajon aikana että
onnettomuuden tai voimakkaan jarrutuksen yhteydessä.
• P i t k i e n m a t k o j e n a i k a n a o n p y s ä h d y t t ä v ä
usein. Lapsi väsyy helposti. Koskaan lasta
ei saa irrottaa Turvaistuimesta ajon aikana.
Jo s la psi t ar vit see huo mio ta, ets ikä ä so piv a
paikka ja pysähtykää.
• E n n e n 3 7 r a s k a u s v i i k k o a s y n t y n e i l l e v a u voille Turvaistuin voi olla vaarallinen, koska
näin pienillä vastasyntyneillä voi olla hengitysvaikeuksia jos ne pannaan istumaan
Turvaistuimeen. Ennen kuin lähdette kotiin laitokselta, kääntykää lääkärinne tai
sairaalan osaston henkilökunnan puoleen,
he voivat määritellä, millaisen Turvaistuimen vauvanne tarvitsee.
• A r t s a n a e i v a s t a a t u o t t e e n v ä ä r ä s t ä k ä y t ö stä johtuvista vahingoista.
1.2 TUOTTEEN OMI NAISUUKSIA
• T ä l l ä T u r v a i s t u i m e l l a o n “ R y h m ä 0 + ” - h y väksyntä, lasten kuljettamiseen syntymästä - 13 kg pain oon saa kk a (0 k uuk aud est a
10 kuukauteen/noin yhteen vuoteen),
EU:n Säädöksen ECE R44/04 mukaan.
• H y v ä k s y n t ä o n “ U n i v e r s a l ” - t y y p p i n e n ,
Tur vai stu int a voi sii s käy t tää k aik iss a au tomalleissa. HUOMIO! “Universal” merkitsee
sitä että se soveltuu suurimpaan osaan,
muttei silti kaikkiin autojen istuimiin.
TÄRKEÄ TIEDOTUS
1. Tämä on lapsille tarkoitettu turvaistuin
“Universal”, jolla on EU:n Säädöksen ECE
R4 4/0 4 mu kai nen h yv äks ynt ä ja se s opii
melkein kaikkiin autojen istuimiin.
2. Paras mahdollinen sopivuus saadaan
kun auton valmistaja ilmoittaa auton käsikirjassa että autoon voidaan asettaa kyseessä olevaan ikään kuuluva “Universal”tyyppinen lapsen turvaistuin.
3. Tämä turvaistuin on luokiteltu “Univer-
sal” -tyyppiseksi aikaisempia malleja tiukempien arvosteluperusteiden mukaan,
joissa ei ole tätä tiedotusta.
4. Se o n so piv a kä yte tt äväk si auto iss a jo iss a
on kolmikiinnitteiset staattiset tai kokoonkelaajalla varustetut turvavyöt, joilla
on Säädöksen UN/ECE N°16 ja muiden
vastaavien Standardien hyväksyntä.
5. Tarpeen vaatiessa voitte kääntyä tur-
vaistuimen valmistajan tai jälleenmyyjän
puoleen.
1.3 OSIEN KUVAUS
Kuva (Fig) 1 (3/4)
A. Kantokahva
B. Aurinkokuomu
C. Kangaspäällinen
D. Säätötyyny (*)
E. Alusta (**)
Kuva 2 (Edes tä)
F. Vöiden läpimenoreiät
G. Turvaistuimen vyöt
H. Olkaimet (*)
I. Vöiden säätönappi (kangasläpän alla)
J. Vöiden säätönauha
Page 65

65
Kuva 3 (Siv usta)
K. Turvaistuimen vatsan yli menevä auton
turvavyön ohjainlovi.
L. Alustassa oleva, vatsan yli menevän au-
ton turvavyön ohjainlovi.
M. Painonapit kantokahvan kääntämi-
seen.
N. Klik Klak-pultit (lastenrattaisiin kiinnittä-
mistä varten)
Kuva 4 (Takaa)
O. Viistossa olevan auton turvavyön oh-
jainlovi
P. Irroituskädensija (alustasta ja lastenrat-
taista)
Q. Vöiden läpimenoreiät
R. Turvaistuimen vöiden ohjainelementti
S. Tukilevy
(*) Muoto ja malli voivat vaihdella erilaisissa
Turvaistuinversioissa.
(**) Valinnainen
1.4 KANTOK AHVAN ASENNOT
Turvaistuimen kantokahvan voi säätää 4
eri asentoon (Kuva 5).
A. Asento autossa kuljetuksen aikana (HUO-
MIO: tämä on ainoa sallittu asento kulje-
tuksen aikana autossa).
B. Asento käsin kannettaessa.
C. Keinuva sitteri-asento tai myös kun
halutaan kiinnittää sopiviin Chicco-
lastenrattaisiin.
D. Liikkumaton sitteri-asento.
Säädetään painamalla yhtä aikaa nappeja
(M) kantokahvalla, kääntäen halutun asennon suuntaan kunnes kuuluu napsaus.
1.5 TUOTTEELLE JA AUTON IS TUIMELLE ASETETTUJA KÄYTTÖÖN LIITTYVIÄ RAJOITUKSIA JA
VAATIMUKSIA
HUOMIO! Noudattakaa tarkasti seuraavia
tuotteelle ja auton istuimelle annettuja
rajoituksia ja vaatimuksia: ellei ohjeita noudateta, ei turvallisuutta voida taata.
• Turvaistuimen voi asentaa etuistuimelle
matkustajan puolelle tai mille tahansa
takaistuimelle. Joka tapauksessa auton istuimen on oltava ajosuuntaan päin. Älkää
käyttäkö tätä turvaistuinta koskaan auton
istuimissa jotka ovat sivulle tai ajosuuntaa
vastaan suunnattuja. (Kuva 6).
• A u t o n i s t u i m e s s a o n o l t a v a k o l m i k i i n nitteiset, staattiset tai kokoonkelaajalla
varustetut turvavyöt, joilla on Säädöksen
UN/ECE N°16 ja muiden vastaavien Standardien hyväksyntä. (Kuva 7).
• H U O M I O ! Ä l k ä ä k o s k a a n a s e n t a k o T u r v a i s tuinta sellaisella auton turvavyöllä jolla on
kaksi kiinnepistettä. (Kuva 8).
• Ä l k ä ä k o s k a a n k ä y t t ä k ö s ä ä t ö t y y n y ä j o s
lapsi painaa yli 6 kg.
2. TURVAISTUIMEN A SENTAMINEN AUTOON
Turvaistuimen voi asentaa sekä alustalla
(valinnainen) että ilman sitä. Kummassakin
tapauksessa se on asennettava yksinomaan
auton ajosuunnan vastaisesti.
2.1 OLKAINTEN MUOTO ALUSSA
Turvaistuimessa on 2 erilaista olkaintyyppiä
(A ja B), istuimen mallin mukaan. Ennen Turva ist uim en k äyt töö not to a, as et tak aa e nsin
olkaimet seuraavien ohjeiden mukaan:
• O l k a i m e t v e r s i o A ( K u v a 9 A , 9 B j a 9 C ) :
työntäkään olkaimet kangaspäällysteessä ole vie n rei ki en lä pi (m ut ta e i all aol eva n
rakenteen läpi) niin että olkaimet jäävät
sen päälle. Työntäkää jalkojen väliläppä
vöiden solkien läpi.
• O l k a i m e t v e r s i o B ( K u v a 1 0 A j a 1 0 B ) : V i e k ä ä
Turvaistuimen vyöt kummankin olkaimen
läpi. Työntäkää jalkojen väliläppä vöiden
solkien läpi.
2.2 ALUSTALLE ASENNUS
Turvaistuimen asentamiseksi alustalle auton istuimelle, toimikaa seuraavasti:
1. Irrottakaa Turvaistuin alustasta vetämällä
irrotuskädensijasta joka on selkänojan
takana ja nostakaa se samanaikaisesti
kantokahvalla ylös (Kuva 11).
2. Asettakaa alusta valitsemallenne istui-
melle, suunnaten se kuten Kuvassa 12,
toimien siten että se on kosketuksissa
auton selkänojaan.
3. Vetäkää auton turvavyötä ja kiinnittä-
kää se siihen kuuluvaan solkeen, pan-
Page 66

66
67
kaa vaakasuora (vatsan yli menevä) osa
kulkemaan kahden ohjainloven kautta
(L) jotka on merkitty sinisellä nuolella
ja kiristäkää mahdollisimman tiukkaan
(Kuva 13).
4. Ennen kuin laitatte Turvaistuimen alustaan, varmistakaa että tukilevy on kiinni
(Kuv a 14).
5. Asettakaa Turvaistuin alustaan (auton
ajosuunnan vastaisesti) työntäen alaspäin kunnes se lukkiutuu (kuuluu ”lukitusnapsaus” klik) (Kuva 15).
6. Tarkistakaa että Turvaistuin on asetettu
oikein alustaan, yrittämällä nostaa sitä
edestä ja takaa.
7. Ottakaa auton vinosti kulkeva turvavyö
käteen ja kuljettakaa se ohjainloven (O)
kautta joka on Turvaistuimen selkäpuolella (Kuva 16). HUOMIO! Vinosti kulkevan
turvavyön on AINA oltava tämän ohjainloven sisällä kun lasta kuljetetaan.
8. Kiristäkää vyö mahdollisimman tiukalle
jä ttä mät tä l öys ää j a hu ole htik aa s iit ä et tä
vyö ei ole kiertynyt.
9. Kääntäkää kantokahva asentoon A, tarki sta kaa ett ä se on a uton ist uint a va ste n
(Kuva 17).
HUOMIO! Asennuksen jälkeen tarkistakaa
AINA että auton turvavyö on riittävän kireällä ja että pingotus on tasainen joka
paikassa, ja että vyössä ei ole kiertymisiä.
Älkää KOSKAAN asettako turvavyötä muulla
tavalla kuin edellä on selostettu.
Kun haluatte ottaa Turvaistuimen pois autosta mutta jättää alustan autoon:
1. Ottakaa vinosti kulkeva turvavyö selkänojassa olevasta ohjainlovesta avaamatta solkea.
2. Viekää kantokahva pystyasentoon B
(Kuva 5).
3. Ottakaa Turvaistuin irti kuten edellä on
neuvottu.
2.3 ASENNUS IL MAN ALUSTAA
Kun haluatte asettaa Turvaistuimen ilman
alustaa, tehkää seuraavasti:
1. Vetäkää tukilevy ulos ja asettakaa Turvaistuin valitsemallenne auton istuimelle
(Fig. 18).
2. Vetäkää auton turvavyötä ja kiinnittäkää
se asiaankuuluvaan solkeen, viemällä
vyön vaakasuora osa (vatsan yli kulkeva)
kahden turvaistuimessa olevan sinisellä
nuolella merkityn ohjausloven (K) läpi
(Kuva 19).
3. Ottakaa auton turvavyön vinosti kulkeva
osa käteen ja viekää se asianomaisen
ohjainloven (O) läpi joka löytyy Turvaistuimen selkänojasta (Kuva 20). HUOMIO!
Vinosti kulkevan turvavyön on oltava
AINA tämän loven sisällä kun lasta kuljetetaan.
4. Kiristäkää vyö mahdollisimman tiukalle
jättämättä löysää ja huolehtikaa siitä että
vyö ei ole kiertynyt.
5. Kääntäkää kantokahva asentoon A, tarki sta kaa ett ä se on a uton ist uint a va ste n
(Kuva 21).
Kun haluatte ottaa Turvaistuimen pois
autosta:
1. Löysätkää auton turvavyö painamalla
solkea.
2. Viekää kantokahva pystyasentoon B.
3. Ottakaa vyö pois vinosti kulkevasta
ohjainlovesta ja vaakasuorista ohjainlovista.
3. LISÄTOIMENPITEITÄ
3.1 LAPSEN ASETTAMINEN ISTUIMEEN
1. Kohottakaa kangasläppä, pitäkää säätönappia painettuna ja vetäkää turvaistuimen vöitä jotta ne löysty vät (Kuva 22).
2. Avatkaa solki painamalla punaista laattaa,
pitäkää vöitä levitettyinä (Kuva 23).
3. Pankaa lapsi istuimeen.
4. Laittakaa soljen kaksi kielekettä päällekkäin ja painakaa ne sitten soljen sisään
kunnes kuulette napsauksen “klik” (Kuva
24). HUOMIO! Älkää koskaan työntäkö
vain yhtä kielekettä kerrallaan tai vain
yhtä kielekettä solkeen.
5. Kiristäkää Turvaistuimen turvavyöt vetämällä säätönauhasta (Kuva 25).
Page 67

67
3.2 VÖIDEN ASENN ON SÄÄTÖ
HUOMIO! Vyöt on aina sovellutettava lapsen kasvun mukaan. Ennen Turvaistuimen
asentamista autoon vyöt on asetettava
sopivalle korkeudelle.
Oi kein sää det tä ess ä vö iden on t ult ava ulo s
selkänojasta lapsen olkapäiden korkeudella.
(Kuva 26).
Turvaistuimessa on kolme säätökorkeutta.
Kun vöitä halutaan siirtää, toimikaa seuraavasti:
1. Ottakaa olkaimet pois vetämällä ne ulos
kangaspäällysteiden aukoista.
2. Avatkaa vöiden solki painamalla punaista
laattaa.
3. Vetäkää vyöt ulos selkänojan takaa ja
asettakaa ne lapsen korkeudelle sopiviin
reikiin (Kuva 27A ja 27B).
HUOMIO! Varmistakaa aina että vyöt kulkevat ohjainelementin (R) ja kuoren välistä.
HUOMIO! Säätötyyny takaa lapselle oikean
pidon ja parhaan asennon sekä niskalle että
selälle syntymästä 6 kg painoon saakka.
3.3 ISTUIMEN LIIKKUVA TAI KEINUVA ASENTO
(SITTERI-ASENTO)
Ku n Tur vais tui nta ei k äyt etä auto ssa , si tä v oi
käyttää myös keinuna tai sitterinä.
Sen saa keinuvaksi sulkemalla tukilevyn
(Ku va 14 ) ja a set ta mall a ka nto kahv an a sen toon C (Kuva 5).
Jos haluatte käyttää sitä liikkumattomassa
asennossa, vetäkää tukilevy ulos ja asettakaa kantokahva asentoon D (Kuva 5).
Asettakaa istuin vain vaakasuorille, tukeville
alustoille.
HUOMIO! Ennen kuin lähdette kantamaan
Turvaistuinta, viekää kantokahva aina asentoon B (pystysuora).
HUOMIO! Älkää jättäkö lasta yksin.
HUOMIO! Käyttäkää aina suojasysteemiä.
HUOMIO! On vaarallista asettaa
Turvaistuin korkeille paikoille kuten
pöydät, tuolit jne.
HUOMIO! Tätä Turvaistuinta ei ole
tarkoitettu pitkille nukkumisjaksoille.
HUOMIO! Älkää käyttäkö Turvaistuinta jos lapsi pystyy istumaan
yksin.
Turvaistuin ei vastaa vauvan vuodetta. Kun
lapsi haluaa nukkua, hänet on pantava sopivalle vuoteelle tai vauvan sänkyyn.
Älkää käyttäkö Turvaistuinta jos siitä puuttuu osa tai jos se on rikki.
3.4 KÄYT TÖ LASTENRATTAISSA
HUOMIO! Kun haluatte käyttää turvaistuinta lastenrattaissa, seuratkaa rattaiden
kä yt töo pas ta. KLI K- K LAK - sy ste emi llä v aru stetuissa CHICCO lastenrattaissa on käsinojat
joissa on erikoiset laitteet, joiden avulla
Turvaistuimen voi asettaa suoraan rattaisiin
ilman muita apuvälineitä.
Turvaistuin asetetaan lastenrattaille seuraavasti:
1. Ottakaa kiinni Turvaistuimen yläasennossa olevasta kantokahvasta (B) (Kuva 28).
2. Kiinnittäkää Turvaistuimen kaksi kiinnityspulttia Klik- Klak (N) lastenrattaiden
käsinojiin, huolehtikaa että se kiinnittyy
kummaltakin puolelta. Kuulette napsahduksen Klik kun ne kiinnittyvät. (Kuva
29).
VAROITUS! Ennen käyttöä tarkistakaa että
Turvaistuimen kiinnitysvälineet on oikein
asennettu.
Turvaistuimen otto pois rattaista:
1. Viekää kantokahva pystyasentoon (B).
2. Vetäkää takana olevasta irrotuskädensijasta.
3. Siirtäkää Turvaistuin ja asettakaa se tasaiselle pinnalle.
HUOMIO: Turvaistuimen rattaisiin asetus
ja rattaista poisto voidaan suorittaa vaikka
lapsi on Turvaistuimessa; lapsen painon
takia siirtojen suoritus voi kuitenkin olla
hankalampaa. Siksi nämä suoritusoperaa-
Page 68

68
69
tiot vaativat entistä suurempaa varovaisuutta.
3.5 PUHDISTUS JA SÄILYT YS
PÄÄLLISEN PUHDIS TUS
Turvaistuimen päällisen voi poistaa kokonaan ja sen voi pestä pesukoneessa 30°C.
Pesua varten, vapauttakaa vyöt ja ottakaa
päällinen pois sen jälkeen kun olette vetäneet vöiden kaksi osaa ja soljen reikien
kautta ulos. (Kuva 30).
Seuratkaa pesuohjeita jotka löytyvät päällyskankaan etiketistä:
Pesu koneessa 30°C
Käsipesu
Ei saa valkaista
Ei kuivapesua
Ei saa kuivata rummussa
Ei silitystä
Älkää käyttäkö hankaavia tai liuottavia pesuaineita. Älkää lingotko päällistä, antakaa
sen kuivua vääntämättä.
MUOVI- JA METALLIOSIEN PUHD ISTUS
Muovisten ja maalattujen metalliosien
puhdistukseen on käytettävä ainoastaan
kosteaa kangaspyyhettä. Älkää käyttäkö
hankaavia tai liuottavia pesuaineita.
Turvaistuimen liikkuvia osia ei tarvitse
voidella.
OSIEN EHEYD EN TARKISTUS
Suosittelemme että tarkistatte säännöllisesti seuraavien osien eheyden ja kulumistilan:
• K a n g a s p ä ä l l i n e n : t a r k i s t a k a a e t t ä p e h m u s teita ei tule ulos päällysteestä. Tarkistakaa
että saumat ovat ehjät.
• V y ö t : t a r k i s t a k a a e t t ä n i i d e n k u d o k s e s s a
ei näy kuitujen tuhoutumista niin että
vyö on ohentunut säätönauhan, jalkojen
väliläpän, olkainten ja vöiden säätölevyn
kohdalla.
• M u o v i o s a t : t a r k i s t a k a a o s i e n k u n t o ; n i i s s ä
ei saa olla vaurioiden merkkejä tai värin
haalistumista.
HUOMIO! Jos Turvaistuin näyttää epämuotoiselta tai kovasti käytetyltä, se on
va ihd ett ava : vo i oll a et tä s e on men et täny t
alkuperäiset turvallisuusominaisuutensa.
TUOTTEEN SÄILY TYS
Kun Turvaistuinta ei ole asennettu autoon,
säilyttäkää se kuivassa, pölyttömässä paikassa, kaukana lämpölähteistä sekä suorasta auringon valosta.
TUOTTEEN PO ISTO
Kun Turvaistuimen ennakoitu käyttöaika on
loppunut, poistakaa se käytöstä ja pankaa
se roskiin. Ympäristönsuojelusyistä istuin
on enn en p oish eit toa pur ett ava ja j aet tav a
erilaisiin jätteisiin, kussakin maassa voimassaolevien sääntöjen mukaisesti.
LISÄTIETOJA SAATTE:
ARTSANA SPA
Servizio Clienti (Kuluttajapalvelu)
Via Saldarini Catelli, 1
22070 Grandate COMO-ITALIA
Puh. Ilmainen palvelunumero (toimii vain
Italiassa) 800.188.898
www.chicco.com
Amo Oy:n kuluttajapalvelu:
puh. 02-284 1153
kuluttajapalvelu@amo.
Page 69

69
CHICCO
AUTO-FIX FAST
Tř í d A 0+ (0-13k G )
NÁVOD K POUŽITÍ
OBSAH:
1. ÚVOD
1.1 UP OZORNĚN Í
1.2 VLASTNOSTI VÝROBKU
1.3 POPIS SOUČÁSTÍ
1.4 POLOHY RUKOJETI
1.5 OMEZENÍ PŘI POUŽÍVÁNÍ VÝROBKU A
POŽADAVKY NA SEDADLO VOZIDLA
2. PŘIPEVNĚNÍ DO VOZID LA
2.1 NASTAVENÍ VÝŠKY UCHYCENÍ PÁSŮ AUTOSEDAČKY
2.2 UPEVNĚNÍ AUTOSEDAČKY SE ZÁKLAD-
NOU
2. 3 UP EV NĚNÍ AUTO SEDA ČKY BEZ ZÁK LAD -
NY
3. DALŠÍ ÚKONY
3.1 USAZENÍ DÍTĚTE DO AUTOSEDAČKY
3.2 ÚPRAVA POLOHY BEZPEČNOSTNÍCH
PÁS Ů
3. 3 PE VNÁ NEBO HOU PACÍ P OLOH A AUT O-
SEDAČKY (POUŽITÍ JAKO LEHÁTKO)
3.4 POUŽITÍ NA KOČÁREK
3.5 ČIŠTĚNÍ A ULOŽENÍ
1. ÚVOD
1.1 UPOZORNĚNÍ
VELMI DŮLEŽITÉ: IHNED SI PŘEČTĚTE
• U S C H O V E J T E T E N T O N Á V O D P R O P Ř Í P A D N É
DALŠÍ POUŽITÍ.
• P ř i m o n t á ž i a p ř i p e v ň o v á n í v ý r o b k u s e
přesně řiďte tímto návodem. Nedovolte,
aby kdokoliv používal výrobek, aniž by se
dříve neobeznámil s tímto návodem.
• P O Z O R ! Z e s t a t i s t i k n e h o d v y p l ý v á , ž e
zadní sedadla jsou bezpečnější než přední:
doporučujeme proto připevnit autosedačku
na zadní sedadla. Nejbezpečnější je
pr ost řed ní z adn í se dad lo, pok ud j e v yba veno tříbodovým bezpečnostním pásem.
• P O Z O R ! V E L M I N E B E Z P E Č N É ! N i k d y
neupevňujte tuto autosedačku na předním
sedadle, pokud je vybaveno čelním airbagem. Autosedačku je možné připevnit na
přední sedadlo, pouze pokud je airbag
vyřazen: ověřte si možnost v yřadit airbag
přímo u výrobce nebo v příručce k vozidlu.
Pokud umístíte autosedačku na přední sedadlo, doporučujeme posunout sedadlo co
nejvíce dozadu, samozřejmě dle možnosti
pokud jsou vzadu spolucestující.
• D o p o r u č u j e m e , a b y v š i c h n i s p o l u c e s t u j í c í
byli obeznámeni se způsobem odepnutí
dítěte v případě nutnosti.
• P ř i u p e v n ě n í a u t o s e d a č k y d o v o z i d l a v ě n u j t e
zvláštní pozornost tomu, aby nepřekážela
posuvnému sedadlu nebo dveřím auta.
• Ž á d n á a u t o s e d a č k a n e z a r u č í ú p l n o u
bezpečnost dítěte v případě nehody, ale
její použití sníží riziko zranění nebo smrti
dítěte.
• R i z i k o v á ž n é h o z r a n ě n í d í t ě t e s e z v y š u j e ,
a to nejen v případě nehody, ale i v jiných
situacích (např. prudké zabrzdění, atd.)
pokud nejsou přesně dodržovány pokyny
uvedené v tomto návodu k použití: vždy
zkontrolujte, zda je autosedačka správně
upevněna k sedadlu.
• P o k u d j e a u t o s e d a č k a p o š k o z e n á , d e f o r movaná, velmi opotřebovaná nebo po kud jí dokonce nějaká část chybí, musí být
vyměněna, protože už nemusí splňovat
původní požadavky na bezpečnost.
• N a v ý r o b k u n e s m í b ý t p r o v e d e n a ž á d n á
úprava nebo změna bez předchozího
souhlasu výrobce..
• N e p o u ž í v e j t e d o p l ň k y , n á h r a d n í d í l y n e b o
části, které nejsou dodávány výrobcem.
• N i k d y z ž á d n é h o d ů v o d u n e n e c h á v e j t e d í t ě
v autosedačce bez dozoru.
• N i k d y n e n e c h á v e j t e a u t o s e d a č k u n a s e dadle vozidla neupevněnou, mohla by při
nárazu zranit spolucestující.
• N e p o u ž í v e j t e ž á d n ý p ř e d m ě t , p o k u d n e n í
označen výrobcem jako doplněk, ať už mezi
sedadlem vozidla a autosedačkou nebo
mezi autosedačkou a dítětem: v případě
nehody by autosedačka nemusela být
plně funkční.
• P o k u d n e c h á t e a u t o d l o u h o s t á t n a p ř í m é m
slunci, doporučujeme autosedačku
CZ
Page 70

70
71
přikrýt.
• I p ř i m a l é d o p r a v n í n e h o d ě m ů ž e d o j í t
k poškození autosedačky, neznatelnému
pouhým okem: proto je nutné ji vyměnit.
• N e p o u ž í v e j t e a u t o s e d a č k y z a k o u p e n é j a k o
po uži té, m ohl o do jít k vá žné mu p ošk ozen í
struktury autosedačky, i když není znatelné pouhým okem, ale které mohlo snížit
bezpečnost výrobku.
• P o t a h m ů ž e b ý t n a h r a z e n p o u z e p o t a h e m
schváleným výrobcem, neboť je nedílnou
součástí autosedačky. Autosedačku nikdy
nepoužívejte bez potahu, abyste neohrozili
bezpečnost dítěte.
• Z k o n t r o l u j t e , z d a n e n í p o p r u h p á s ů
překroucený a zabraňte tomu, aby se popruh nebo části autosedačky mohly přivřít
ve dveř ích aut a ne bo s e tř ely o os tré h ran y.
Je -li pás po řez aný n eb o roz tř epe ný, j e tře ba
jej nahradit.
• Z k o n t r o l u j t e , z d a n e v e z e t e v e v o z i d l e v o l n ě
le žíc í ne bo š pat ně p řip evn ěné pře dmět y a
zavazadla, a to zvláště na zadní odkládací
desce. V případě nehody nebo prudkého
zabrzdění by mohly zranit osoby ve vozidle.
• U j i s t ě t e s e , z d a m a j í v š i c h n i s p o l u j e z d c i z a p nut bezpečnostní pás a to jak pro jejich vlastní bezpečnost, tak i proto, že by v případě
nehody nebo prudkého zabrzdění mohli
zranit vaše dítě.
• B ě h e m d l o u h ý c h c e s t d ě l e j t e č a s t o
zastávky. Dítě se velmi snadno unaví.
Z žádného důvodu nevyndavejte dítě za
jízdy z autosedačky. Pokud dítě vyžaduje
pozornost, je nutné najít vhodné místo
a zastavit.
• P r o d ě t i n a r o z e n é p ř e d č a s n ě p ř e d 3 7. t ý d nem těhotenství může být autosedačka
nebezpečná. Tito novorozenci usazení
do autosedačky mohou mít problémy
s dýcháním. Doporučujeme Vám obrátit se
na vašeho lékaře nebo na lékařský personál,
aby zvážil stav vašeho dítě a doporučil vám
vhodnou autosedačku dříve, než odejdete
z porodnice.
• S p o l e č n o s t A r t s a n a n e n e s e ž á d n o u
odpovědnost za nesprávné používání
výrobku.
1.2 VLASTNO STI VÝROBKU
• Ta t o a u t o s e d a č k a j e h o m o l o g o v á n a p r o
“Třídu 0+”. To znamená, že byla schválena
pro přepravu novorozenců a dětí s váhou
do 13 kg (od 0 do 10 měsíců/přibližně 1
ro ku), p od le di spo zic evr opsk é no rmy ECE
R44/04.
• Ta t o a u t o s e d a č k a b y l a k l a s i k o v á n a j a k o
„univerzální“, tudíž může být používána
v jakémkoli autě. POZOR! „Univerzální“
znamená, že autosedačka je použitelná
na většině sedadel vozidla, i když ne na
všech.
DŮLEŽITÉ UPOZORNĚNÍ
1. Jedná se o „univerzální“ dětské zádrž-
né zařízení, které bylo schváleno podle
evropské normy ECE R44/04. Je použitelné na většině sedadel vozidla, i když
ne na všech.
2. Autosedačka je plně kompatibilní, pokud
výrobce v příručce k vozidlu uvádí, že se
pro dané vozidlo předpokládá použití
dětských zádržných zařízení univerzálního
typu pro danou věkovou kategorii.
3. Tato autosedačka byla klasikována jako
„univerzální“, protože vyhovuje přísnějším požadavkům pro homologaci oproti předcházejícím modelům, které takto
označeny nejsou.
4. Je vhodná pouze pro použití ve vozidle-
ch, vybavených tříbodovými bezpečnostními pásy, pevnými nebo s automatickým navíjením, které byly schváleny dle
dispozic normy UN/ECE č. 16 nebo jiné
odpovídající normy.
5. V případě jakýchkoliv pochybností se
obraťte na výrobce autosedačky nebo
na příslušnou prodejnu.
Page 71

71
1.3 POPIS SOUČ ÁSTÍ
Obr. 1 (3/4)
A. Rukojeť
B. Sluneční stříška
C. Textilní potah
D. Přídavné polstrování (*)
E. Základna (**)
Obr. 2 (Předn í strana au tosedačk y)
F. Otvory na výškové nastavení pásů
G. Pásy autosedačky
H. Vycpávky (*)
I. Tlačítko na úpravu délky pásů (pod textilní
výplní )
J. Pás na utažení pásů autosedačky
Obr. 3 (Z pro filu)
K. Vodící přezka břišního popruhu auto-
sedačky
L. Vodící přezka břišního popruhu základ-
ny
M. Tlačítka na úpravu polohy rukojeti
N. Čepy Clik Clak (na připevnění kočárku)
Obr. 4 (Zad ní strana)
O. Vodící přezka ramenního popruhu vozidla
P. Rukojeť na uvolnění (od základny a od
kočárku)
Q. Otvory na výškové nastavení pásů
R. Upevňovací destička pásů autosedačky
S. Upevňovací páčka
(*) For ma a mod el s e mo hou liši t po dl e ty pu
aut osed ačk y.
(**) Volitelné vybavení
1.4 POLOHY RUKOJE TI
Rukojeť autosedačky je možno nastavit do
4 poloh (Obr. 5).
A. Poloha pro převoz v autě (POZOR: toto
je jediná poloha, která je povolena při
převozu v autě).
B. Poloha pro přenášení v ruce.
C. Houpací poloha nebo poloha pro upev-
nění na kočárek Chicco vybavený při-
pevňovací soupravou.
D. Pevná poloha při použití jako lehátko.
Pokud chcete upravit polohu rukojeti, stiskněte současně obě tlačítka (M) na rukojeti,
pak otočte rukojeť do požadované polohy,
dokud neuslyšíte cvaknutí.
1.5 OMEZENÍ PŘI POU ŽÍVÁNÍ VÝROBKU A PO ŽADAVKY NA SEDAD LO VOZIDLA
POZOR! Pečlivě dodržujte následující omezení při používání výro bku a po žadavk y na
se dad lo: v opa čné m př ípa dě n ení z ar učen a
plná bezpečnost.
• A u t o s e d a č k a m ů ž e b ý t p ř i p e v n ě n a n a
předním sedadle pro spolujezdce nebo
na jakémkoliv ze zadních sedadel. Sedadlo
vozidla musí být vždy otočeno ve směru
jízdy. Nikdy nepřipevňujte autosedačku na
sedadla, která jsou otočena do boku nebo
proti směru jízdy (Obr. 6).
• S e d a d l o v o z i d l a m u s í b ý t v y b a v e n o t ř í b o dovým bezpečnostním pásem, pevným
nebo s automatickým navíjením, který
byl schválen podle dispozic normy UNI/
ECE č. 16 nebo jiné jí odpovídající normy
(Obr. 7).
• P O Z O R ! N i k d y n e p ř i p e v ň u j t e a u t o s e d a č ku na sedadlo vybavené pouze dvoubodovým bezpečnostním pásem (Obr. 8).
• N i k d y n e p o u ž í v e j t e p ř í d a v n é p o l s t r o v á n í ,
pokud je hmotnost dítěte vyšší než 6 kg.
2. PŘIPEVNĚNÍ AUTOS EDAČKY DO VOZIDL A
Autosedačka může být upevněna jak se
základnou (volitelné vybavení) tak bez
základny. V obou provedeních musí být
připevněna pouze proti směru jízdy.
2.1 NASTAVENÍ VÝŠK Y UCHYCENÍ PÁSŮ AUTO-
SEDAČKY
Autosedačka je vybavena 2 různými typy
pásů (A a B) podle modelu autosedačky.
Dříve než budete autosedačku používat,
je nutné nastavit výšku uchycení pásů. Postupujte následujícím způsobem:
• P á s y t y p u A ( O b r . 9 A , 9 B a 9 C ) : P r o t á h n ě t e
vycpávky otvory v textilním potahu ( ne
strukturou pod ním) tak, aby pásy zůstaly
na d ni mi. N avl ékn ěte mez ino žní výp lň p řes
sponu pásů.
• P á s y t y p u B ( O b r . 1 0 A a 1 0 B ) : P r o v l é k n ě t e
pásy autosedačky oběma vycpávkami.
Navlékněte mezinožní výplň přes sponu
pásů.
Page 72

72
73
2.2 UPEVNĚNÍ AU TOSEDAČKY SE ZÁKL ADNOU
Při upevňování autosedačk y se základnou
do vozidla postupujte následovně:
1. Nejdříve uvolněte autosedačku ze základny. Zatáhněte za uvolňovací rukojeť na
zadní straně opěrky zad a autosedačku
zároveň zvedněte za rukojeť (Obr. 11).
2. Umístěte základnu na sedadlo, na které
chcete autosedačku připevnit a otočte ji
tak, jak je znázorněno na Obr. 12. Dbejte, aby základna přiléhala k opěradlu
sedadla.
3. Natáhněte bezpečnostní pás vozidla a
zapněte jej do příslušné spony. Protáhněte vodorovný (břišní) popruh oběma
vodícími přezkami (L) označenými modrou šipkou a co nejvíce jej utáhněte
(Obr. 13).
4. Dříve než připevníte autosedačku na
základnu, zkontrolujte, zda je sklopená
upevňovací páčka (Obr. 14).
5. Nasaďte autosedačku (otočenou proti
směru jízdy) na základnu a tlačte ji směrem
dolů, dokud se nezahákne (uslyšíte zacvaknutí pojistky) (Obr. 15).
6. Ověřte si, zda je autosedačka správně
uchycena na základně a pokuste se ji
zvednout jak vepředu tak i vzadu.
7. Uchopte ramenní popruh bezpečnostní-
ho pásu vozidla a provlékněte jej vodící
přezkou (O) na zadní straně opěrky zad
autosedačky (Obr. 16). POZOR! Ramenní
popruh musí při přepravě VŽDY zůstat
zasunutý uvnitř této vodící přezky.
8. Co možná nejvíce napněte bezpečnostní
pás, aniž by kdekoli volně visel a ověřte si,
zda není nikde překroucený.
9. Nastavte rukojeť do polohy A a zkontrolujte, zda je opřená proti sedadlu vozidla
(Obr. 17).
POZOR! Po upevnění autosedačky VŽDY
zkontrolujte, zda je bezpečnostní pás řádně napnutý a stejnoměrně prochází všemi
body, aniž by byl někde překroucený. NIKDY neprotahujte bezpečnostní pás vozidla
jinými než znázorněnými místy.
Pokud chcete autosedačku uvolnit od
základny upevněné ve vozidle:
1. Vyvlékněte ramenní pás z vodící pře-
zky na opěrce zad, aniž byste jej odepli
ze spony.
2. Přetočte rukojeť do svislé polohy B
(Obr. 5).
3. Autosedačku uvolněte podle přechozího
návodu.
2.3 UPEVNĚNÍ AUT OSEDAČKY BEZ ZÁKL ADNY
Při upevňování autosedačky bez základny
postupujte následovně:
1. Vytáhněte upevňovací páčku a umístěte
autosedačku na sedadlo, na které ji hodláte připevnit (Obr. 18).
2. Natáhněte bezpečnostní pás vozidla a
zapněte jej do příslušné spony. Protáhněte
břišní popruh bezpečnostního pásu oběma vodícími přezkami (K) autosedačk y,
označenými modrou šipkou (Obr. 19).
3. Uchopte ramenní popruh bezpečnostní-
ho pásu vozidla a provlékněte jej vodící
přezkou (O) na zadní straně opěrky zad
autosedačky (Obr. 20). POZOR! Ramenní
popruh musí při přepravě VŽDY zůstat
provléknutý touto vodící přezkou.
4. Co možná nejvíce napněte bezpečnostní
pás, aniž by kdekoli volně visel a ověřte si,
zda není nikde překroucený.
5. Nastavte rukojeť do polohy A a zkontro-
lujte, zda je opřená proti sedadlu vozidla
(Obr. 21).
Pokud chcete autosedačku uvolnit:
1. S tis kně te s pon u a ro zep nět e be zpe čno st ní
pás vozidla.
2. Přetočte rukojeť do polohy B (svislé).
3. Vyvlékněte bezpečnostní pás z vodící pře-
zky diagonální a z vodorovných vodících
přezek.
3. DALŠÍ ÚKONY
3.1 USAZENÍ DÍTĚTE DO AUTOSE DAČKY
1. Zvedněte textilní výplň, stiskněte tlačít-
ko na úpravu pásů a současně táhněte
za pásy autosedačky tak, aby se uvolnily
(Obr. 22).
2. Stiskněte červené tlačítko na sponě, otevřete
ji a držte pásy roztažené (Obr. 23).
3. Nyní je možné usadit dítě do autose-
dač ky.
Page 73

73
4. Přeložte přes sebe oba jaz ýčky přezky a
zasuňte je do spony, dokud neuslyšíte
za cv akn utí poj ist ky (Obr . 24). P OZOR ! Ni kdy
nezasunujte jazýčky do spony jeden po
druhém nebo pouze jeden z nich.
5. Zatáhněte za příslušný pás na utažení
pásů a napněte bezpečnostní pásy autosedačky (Obr. 25).
3.2 ÚPRAVA POLOH Y BEZPEČNOSTNÍCH PÁSŮ
POZO R! P ásy mus í bý t vž dy u pra veny po dle
výšky dítěte. Dříve než umístíte autosedačku
do vozidla, je nutné upravit polohu uchycení
pásů.
Správná výška pásů je nastavena, pokud
pá sy v ys tup ují z op ěrk y z ad n a úro vni ram en
dítěte (Obr. 26).
Autosedačka je vybavena 3 polohami pro
výškové nastavení pásů.
Při úpravě výšky uchycení pásů postupujte
následovně:
1. Vysuňte vycpávky z otvorů v textilním
potahu a vyjměte je.
2. Stiskněte červené tlačítko spony a rozepněte přezku bezpečnostních pásů.
3. Vy táhněte pásy opěrkou autosedačky na
zadní stranu a poté je vsuňte do otvorů,
které jsou pro výšku vašeho dítěte nejvhodnější (Obr. 27A a 27B).
POZOR! Ověřte si, zda oba pásy procházejí vždy mezi upevňovací destičkou (R)
a krytem.
POZOR! Přídavné polstrování umožní novorozence a děti s váhou do 6 kg správně
připnout a zajistí jim vhodnou polohu pro
krk a záda.
3.3 PEVNÁ NEBO HOU PACÍ POLOHA AUTOSEDAČ-
KY (POUŽ ITÍ JAKO LEHÁTKO)
Pokud není autosedačka používána
v autě, může také sloužit jako kolébka
nebo lehátko.
Houpací polohu zvolíte, když zasunete
upevňovací páčku (Obr. 14) a posunete
rukojeť do polohy C (Obr. 5).
Pokud chcete autosedačku zablokovat
v p evn é po loz e, v yt áhn ěte u pev ňov ací páč ku a přesuňte rukojeť do polohy D (Obr. 5).
Pokládejte autosedačku pouze na pevné a
vodorovné plochy.
POZOR! Dříve než začnete autosedačku
přenášet, přetočte vždy rukojeť do polohy
B (svislé).
UPOZORNĚNÍ! Nikdy nenechávejte
dítě bez dozoru.
UPOZORNĚNÍ! Vždy používejte
zádržné zařízení.
UPOZOR NĚNÍ! Je nebezp ečné p okládat autosedačku na vyvýšené
plochy jako jsou stoly, židle atd.
UPOZORNĚNÍ! Tato autosedačka
není určena k tomu, aby v ní dítě
déle spalo.
UPOZORNĚNÍ! Nepoužívejte
autosedačku, když už dítě umí
samo sedět.
Autosedačka nenahrazuje postýlku nebo
kolébku. Pokud si dítě potřebuje odpočinout, doporučujeme jej uložit do vhodné
kolébky nebo postýlky.
Autosedačku nepoužívejte, pokud je rozbitá nebo nějaká část chybí.
3.4 POUŽITÍ NA KOČ ÁREK
POZOR! Pokud chcete používat autosedačku při pev něn ou n a ko čáre k, řiď te s e po ky ny
uvedenými v návodu ke kočárku. Kočárky
značky CHICCO vybavené systémem CLIK
CLAK mají opěrky na ruce vybaveny speciálním úchytným zařízením, které umožňuje
připevnit autosedačku přímo na kočárek
bez použití dalších doplňků.
Pokud chcete připevnit autosedačku na
kočárek, postupujte následujícím způsobem:
1. Uchopte autosedačku za rukojeť ve svislé
poloze (B) (Obr. 28).
2. Připněte oba čepy upínacího systému Clik
Clak autosedačky (N) k opěrkám na ruce
na kočárku. Věnujte zvláštní pozornost
tomu, aby se zahákla na obou stranách.
Uslyšíte cvaknutí pojistky (Obr. 29).
UPOZORNĚNÍ Před použitím si ověřte, že
Page 74

74
75
je upínací systém autosedačky správně
zajištěn. Pokud chcete odstranit autosedačku z kočárku:
1. Přetočte rukojeť do svislé polohy (B).
2. Táhněte za zadní uvolňovací rukojeť.
3. Uchopte autosedačku a položte ji na
rovnou plochu.
POZOR: Připevnění a odstranění může být
provedeno i s dítětem v autosedačce. Váha
dítěte může ztížit provedení tohoto úkonu.
Při provádění těchto úkonů s dítětem v autosedačce buďte zvláště opatrní.
3.5 ČIŠTĚNÍ A ULOŽENÍ
ČIŠTĚNÍ POTAHU AUTOSEDAČKY
Textilní potah autosedačky je možno celý
sejmout a vyprat buď ručně nebo v pračce na 30°C. Pokud chcete potah vyprat,
protáhněte oba pásy a přezku příslušnými
otvory (Obr. 30), rozepněte pásy a potah
stáhněte. Při praní se řiďte pokyny uvedenými na štítku potahu, který obsahuje
následující symboly pro praní:
Perte v pračce na 30°C
Perte v ruce
Nebělte
Nečistěte chemicky
Nesušte v sušičce
Nežehlete
Nikdy nepoužívejte tekutý písek ani ředidla. Potah neždímejte a nechejte jej volně
uschnout.
ČIŠTĚNÍ KOVOV ÝCH A UMĚLOHMOTNÝCH ČÁ STÍ
Části z umělé hmoty nebo lakovaného
kovu čistěte pouze navlhčeným hadříkem.
Nikdy nepoužívejte na čištění těchto částí
tekuté písky ani ředidla.
Pohyblivé části autosedačky nesmí být
nijak olejovány.
KONTROLA CELIS TVOSTI VŠECH ČÁST Í
Doporučujeme pravidelně kontrolovat stav
a stupeň opotřebení následujících částí:
• Te x t i l n í h o p o t a h u : K o n t r o l u j t e , j e s t l i
vycpávka někde nev yčnívá nebo jestli
se nedrolí. Kontrolujte stav švů. Musí být
pevné a nesmí se nikde párat.
• P á s ů : K o n t r o l u j t e , j e s t l i o s n o v a l á t k y n e ř í d ne a jestli viditelně neslábne tloušťka pásů
v blízkosti regulačního pásu, pásu mezi
nohama dítěte, na úrovni ramen a okolo
destičky na uchycení pásů.
• U m ě l ý c h h m o t : K o n t r o l u j t e s t u p e ň
opotřebení všech částí z umělé hmoty,
které nesmí být ani viditelně poškozené
ani vybledlé.
POZOR! Pokud je autosedačka deformovaná nebo velmi opotřebovaná, musí
být vyměněna: nemusela by už splňovat
původní požadavky na bezpečnost.
ULOŽENÍ V ÝROBKU
Pokud není autosedačka používána ve
vozidle, doporučujeme ji uschovat mimo
dosah tepelných zdrojů a uložit ji tak, aby
byla chráněna před prachem, vlhkostí a
přímým slunečním světlem.
ZPŮSOB LIK VIDACE VÝROBKU
V případě, že autosedačka jeví známky
většího opotřebení v důsledku častého
používání, přestaňte ji používat a vyhoďte
ji. Za účelem ochrany životního prostředí,
rozdělte části v ýrobku do tříděného odpadu v souladu s platnými národními
pře dpis y.
DALŠÍ INFORMACE VÁ M POSKYTNE:
ARTSANA SPA Piccollo, spol.s.r.o.
Servizio Clienti Pernerova 35
Via Saldarini Catelli, 1 186 00 Praha 8
22070 Grandate COMO-ITALIA Česká Republika
Telefon 800.188.898 www.chiccocz.cz
www.chicco.com
Page 75

75
CHICCO
AUTO-FIX FAST
Gr. 0+ (0-13k G )
BRUKSANVISNING
INNEHÅLL
1. INTRODUKTION
1.1 VARNING
1.2 PRODUKTENS EGENSKAPER
1.3 BESKRIVNING AV KOMPONENTER
1.4 HANDGREPPETS POSITIONER
1.5 BEGRÄNSNINGAR OCH KRAV FÖR
ANVÄNDNING AV PRODUKTEN OCH
BI LS ÄTE T
2. MONTERING I BIL
2.1 STARTINSTÄLLNING AV AXELBANDEN
2.2 MONTERING MED UNDERREDE
2.3 MONTERING UTAN UNDERREDE
3. YTTERLIG ARE ÅTGÄRDER
3.1 PLACERA BARNET I STOLEN
3.2 REGLERA SÄKERHETSBÄLTENA
3.3 FAST ELLER GUNGANDE POSITION AV
STOLEN (SOM BABYSITTER)
3.4 ANVÄNDA MED SITTVAGNEN
3.5 RENGÖRING OCH FÖRVARING
1. INTRODUKTION
1.1 VARNING
MYCKET VIKTIGT! LÄS GENAST
• F Ö R V A R A B R U K S A N V I S N I N G E N F Ö R
FRAMTIDA ANVÄNDNING.
• F ö l j i n s t r u k t i o n e r n a n o g g r a n t f ö r i h o p -
sättning och montering av produkten.
Låt inte någon använda produkten utan
att ha läst instruktionerna.
• V A R N I N G ! E n l i g t o l y c k s s t a t i s t i k e n ä r b i l -
barnstolar som sätts i fordonets baksäte
säkrare än de som sätts i framsäte: du bör
dä rfö r mo nter a s tole n i b aks äte t. D en s äkraste platsen är särskilt den mitt i baksätet,
förutsatt att den har 3-punktsbälte.
• V A R N I N G ! A L L V A R L I G F A R A ! S ä t t a l d r i g
stolen på ett framsäte med frontal krockkudde. Stolen kan bara sättas på framsäte
om kro ckk udd en i nte ä r ak tiv : kon tro lle ra
med biltillverkaren eller bilens bruksanvisni ng om det går att ta ur kro ckk udd en. Vi
rekommenderar i varje fall att skjuta sätet
bakåt så mycket som möjligt om andra
passagerare sitter i baksätet.
• A l l a p a s s a g e r a r e b ö r v a r a i n f o r m e r a d e
om hur barnstolens säkerhetsbälte hakas
loss vid nödfall.
• Var uppmärksam med hur du monterar
barnstolen i bilen så att den inte störs av
ett fällbart säte eller en dörr.
• I n g e n b a r n s t o l k a n g a r a n t e r a t o t a l s ä k e r he t fö r ba rne t i fa ll a v ol yck a, m en an vän dningen av denna produkt minskar risken
för allvarliga eller dödliga skador.
• R i s k e n f ö r a l l v a r l i g a s k a d o r p å b a r n e t ,
inte bara vid olycka, men även i andra
situationer
(t.ex. plötsliga inbromsningar etc.) ökar, om
indikationerna i den här bruksanvisningen
inte följs noggrant: Kontrollera alltid att
barnstolen hakats fast korrek t vid bilsätet.
• O m s t o l e n ä r s k a d a d , d e f o r m e r a d e l l e r
mycket sliten, ska den bytas ut, eftersom
den kan ha förlorat sina ursprungliga säkerhetsegenskaper.
• G ö r i n g a m o d i e r i n g a r e l l e r t i l l ä g g p å
produkten utan att ha tillverkarens godkännande.
• A n v ä n d i n t e t i l l b e h ö r , r e s e r v d e l a r e l l e r
komponenter som inte kommer från
tillverkaren.
• L ä m n a a l d r i g b a r n e t u t a n t i l l s y n i s t o l e n .
• Lämna aldrig stolen på bilsätet utan att
haka fast den, den kan stöta i och skada
passagerare.
• S ä t t i n t e i n n å g o t , s o m i n t e ä r e t t t i l l b e h ö r
som godkänts för produkten, mellan bilsätet och stolen eller mellan stolen och
barnet: i fall av olycka kanske stolen inte
skulle fungera korrekt.
• O m b i l e n s k u l l e l ä m n a s u n d e r d i r e k t s o l
bör stolen täckas över.
• T i l l f ö l j d a v ä v e n d e n m i n s t a o l y c k a k a n
S
Page 76

76
77
stolen tillfogas skador som inte alltid är
synliga för blotta ögat: den måste därför
bytas ut.
• Använd inte bilbarnstolar som erhållits i
andra hand: Strukturen kan ha fått skador
utan att det syns för blotta ögat, men vilka
komprometterar produktens säkerhet.
• F o d r e t k a n b a r a b y t a s u t m e d g o d k ä n nande från tillverkaren, eftersom det utgör
en integrerande del av bilbarnstolen. Bilbarnstolen får aldrig användas utan fodret
för att inte riskera barnets säkerhet.
• K o n t r o l l e r a a t t b ä l t b a n d e t i n t e ä r s n o t t
och undvik att detta eller delar av bilbarnstolen kläms mellan dörrar eller skavs mot
vassa punkter. Om bältet fått skåror eller
trådar rivits upp, måste det bytas ut.
• K o n t r o l l e r a a t t i n g a f ö r e m å l e l l e r b a g a g e
som inte är fastspända eller placerade på
säkert sätt transporteras, i synnerhet på
ha tth yll an b ako m bak sä tet inne i fo rdo net :
i fall av olycka eller plötslig inbromsning
kan passagerarna skadas.
• S e t i l l a t t a l l a b i l p a s s a g e r a r e a n v ä n d e r s i t t
eget säkerhetsbälte för den egna säkerheten och därför att de under resa kan
skada barnet, i fall av olycka eller plötslig
inbromsning.
• V i d l å n g a r e s o r b ö r m a n g ö r a m å n g a p a u ser. Barnet kan bli trött. Barnet får inte av
något skäl tas ur barnstolen innan bilen
stannat. Om barnet behöver uppmärksamhe t mås te man nna e n säke r par kering och stanna först.
• D e t k a n v a r a f a r l i g t f ö r s p ä d b a r n s o m
fötts efter mindre än 37 veckors fostertid
att sitta i bilstol. Dessa spädbarn kan få
andningssvårigheter medan de sitter i
bi lsto len. Vi re komm ende rar därf ör at t ni
vä nde r er t ill er lä kar e el ler p ers ona len på
sjukhuset för att värdera risken för barnet
och få rekommendation av rätt sorts bilstol innan sjukhuset lämnas.
Företaget Artsana frånsäger sig allt ansvar
för oriktig användning av produkten.
1.2 PRODUKTENS EG ENSKAPER
• D e n h ä r b i l b a r n s t o l e n ä r t y p g o d k ä n d
för “Grupp 0+”, för transport av barn från
fö del sen till och me d 13 kg vik t (f rån 0 ti ll 10
mån./cirka 1 år) i enlighet med den europeiska lagbestämmelsen ECE R44/04.
• T y p g o d k ä n n a n d e t ä r a v t y p e n “ U n i v e r s a l ”,
därför kan stolen användas på vilken bilmodell som helst. VARNING! “Universal”
in neb är at t d en är kom pat ibe l me d st örre
delen, men inte med alla bilsäten.
VIKTIG INFORMATION
1. Detta är en fastspänningsanordning för
barn av typ “Universal”, som typgodkänts
enligt lagbestämmelser ECE R44/04 och
är komp ati bel med stö rre del en m en in te
alla bilsäten.
2. Fullständig kompatibilitet är lättare att
uppnå i de fall där tillverkaren av fordonet försäkrar i bilens bruksanvisning att
fordonet är avsett att användas med
fastspänningsanordningar för barn av
typen ”Universal” för ifrågavarande åldersgrupp.
3. Denna fastspänningsanordning har
klassicerats som “Universal” enligt de
strängaste kriterier för typgodkännande i
förhållande till föregående modeller som
inte har denna information.
4. Bilens säte måste ha ett säkerhetsbälte
med 3 punkter, trepunktsbälte, statiskt
el ler m ed u ppr ull ning , t ypg odk änt i en lighet med lagbestämmelse UNI/ECE nr
16 eller andra motsvarande standarder.
5. Kontakta tillverkaren av fastspännings-
anordningen eller återförsäljaren, om
du har frågor.
1.3 BESKRIVNING AV KOMP ONENTER
Fig. 1 (3/4)
A. Handtag
B. Solskydd
C. Textilklädsel
D. Kuddinlägg (*)
E. Underrede (**)
Page 77

77
Fig. 2 (fram)
F. Öppningar för passage av bältena
G. Stolens bälten
H. Axelbälten (*)
I. Knapp för bältesreglering (under tyget)
J. Band för bältesreglering
Fig. 3 (Profi l)
K. Skena för internbälte på bilbarnstolen
L. Skena för internbälte på underredet
M. Knappar för vridning av handtag
N. Stif t Clik Clak (för fasthakning på sittvagn)
Fig. 4 (Bak)
O. Skena för diagonalt bilbälte
P. Handtag för losstagning (från underredet
och från sittvagnen)
Q. Hål för bältespassage
R. Element för skena till bilbarnstolens
bälten
S. Stopp
(*) For m oc h mo del l kan var ier a be roe nde
på bilbarnstolens version.
(**) Extra tillval
1.4 HANDGREPPETS L ÄGEN
Bilbarnstolens handgrepp kan ställas in i 4
olika lägen (Fig. 5).
A. För transport i bil (OBS! det här är det
enda läget som är tillåtet för transport
i bil).
B. Bärläge.
C . L äg e f ör a nv än dni ng so m ba by si tt er m ed
gungfunktion eller för fasthakning på
särskild sittvagnsmodell från Chicco.
D. Läge för användning som stillastående
babysitter.
För reglering tryck samtidigt på knapparna
(M) på handgreppet och vrid i önskat läge
tills ett klickljud hörs.
1.5 BEGRÄNSNINGAR O CH KRAV FÖR ANVÄNDNING AV PRODUKT OC H BILSÄTE
OBS! Observera noga följande begränsningar och krav för användning som gäller
produkten och bilsätet: i annat fall garanteras inte säkerheten.
• B i l b a r n s t o l e n k a n s ä t t a s i f r a m s ä t e t s
passerarsida eller på vilken som helst av
baksätena. I varje fall ska bilsätet vara vänt
i färdriktningen. Använd aldrig bilbarnstolen på säten som är vända sidledes
eller bakåt i förhållande till färdriktningen.
(Fig. 6).
• Bilsätet ska ha ett 3-punktsbälte, statiskt
eller med upprullning, typgodkänt enligt lagbestämmelser UNI/ECE nr 16 eller
andra motsvarande standarder (Fig. 7).
• V A R N I N G : M o n t e r a a l d r i g b i l b a r n s t o l e n
med bilbälte som bara har två förankringspunkter (Fig. 8).
• Använd inte kuddinlägget om barnet
väger mer än 6 kg.
2. MONTERING AV BILBARNST OLEN I BIL
Bilbarnstolen kan monteras med underrede (extra tillval) eller utan. I båda fallen
få r de n end ast mon ter as i m ots att rik tni ng
i förhållande till färdriktningen.
2.1 STARTINSTÄLLNING AV AXELBANDEN
Bilstolen har 2 olika typer av axelband (A
och B) beroende på versionen. För att montera axelbanden innan du börjar använda
stolen, gör på följande sätt:
• A x e l b a n d a v v e r s i o n A ( F i g . 9 A , 9 B o c h
9C): stick axelbanden genom hålen i klädse ln (i nte u nde r st ruk tur en) s å at t bä lte na
sitter ovanför. Stoppa in grenskyddet i
bälteslåset.
• A x e l b a n d a v v e r s i o n B ( F i g . 1 0 A o c h 1 0 B ) :
stick in bilbarnstolens bälten mellan de
båda axelbanden. Stoppa in grenskyddet
i bälteslåset.
2.2 MONTERING M ED UNDERREDE
Gör på följande sätt för att montera bilbarnstolen med underrede på bilsätet:
1. Lossa bilbarnstolen från underredet ge-
nom att dra i losstagningshandtaget på
ba ksi dan av r ygg stö det och ly ft s amt idi gt
mot stolens handgrepp (Fig. 11).
Page 78

78
79
2. Placera underredet på det valda sätet
och rikt a in so m på Fig. 12, s å att det ha r
kontakt med bilsätets ryggstöd.
3. Dra i bilbältet och fäst i motsvarande
lås genom att sticka den horisontella
de len (int ern del en) i de t vå m ots var and e
låsskenorna (L) som är markerade med
en blå pil och sträck så mycket det går
(Fig. 13).
4. Innan du sätter i stolen på underredet,
kontrollera att stoppet är spärrat (Fig.
14).
5. S ätt i st ole n på unde rre det (vä nd t vär temot färdriktningen) och skjut neråt tills
den fäster (ett klickljud hörs vid låsning)
(Fig. 15).
6. Kontrollera att stolen fästs korrekt vid
underredet genom att försöka lyfta
den uppåt både på framsidan och på
baksidan.
7. Ta tag i bilens diagonala bälte och för
det genom skenan (O) på baksidan av
bilbarnstolens ryggstöd (Fig. 16). OBS!
Det diagonala bältet ska ALLTID sitta i
denna skena under körning.
8. Spänn bältet så mycket som möjligt utan
att lämna för mycket band fritt, och se
till att det inte trasslar sig.
9. Vrid handgreppet i position A och kontrollera att det stöder mot bilsätet (Fig.
17 ).
OBS! kontrollera ALLTID efter montering
att bilbältet är korrekt spänt och att det är
jä mnt d ist rib uer at på all a pun kte r, ut an a tt
sn o sig . Sä tt A LDR IG b ält et i a ndr a lä gen än
de indikerade.
När du tar ur bilbarnstolen ska du låta underredet sitta kvar i bilen:
1. Lossa det diagonala bältet från skenan på
ryggstödet, utan att ta ur det ur låset.
2. ställ tillbaka handgreppet i vertikalt läge
B (Fig. 5).
3. Lossa bilbarnstolen på samma sätt som
illustrerats tidigare.
2.3 MONTERING UTAN UNDER REDE
För att montera bilbarnstolen utan underrede gör du på följande sätt:
1. D ra ur sto ppe t oc h pl acer a st ole n på d et
valda bilsätet (Fig. 18).
2. Dra i bilbältet och fäst i motsvarande
lås genom att sticka den horisontella
de len (int ern del en) i de t vå m ots var and e
låsskenorna (K) på stolen och som är
markerade med en blå pil (Fig. 19).
3. Ta tag i bilens diagonala bälte och för
det genom skenan (O) på baksidan av
bilbarnstolens ryggstöd (Fig. 20). OBS!
Det diagonala bältet ska ALLTID sitta i
denna skena under körning.
4. Sträck ut bältet så mycket som möjligt
ut an a tt l ämna för myc ket b and fri tt , oc h
se till att det inte trasslar sig.
5. Vrid handgreppet i position A och kontrollera att det stöder mot bilsätet (Fig.
21).
Ta ur bilbarnstolen så här:
1. Lossa bilbältet genom att trycka på
låset.
2. För tillbaka handgreppet i läge B (vertik alt).
3. Lossa bältet från den diagonala skenan
och från de horisontella.
3. YTTERLIG ARE ÅTGÄRDER
3.1 PLACERA BARNET I STOLEN
1. Lyft textilstycket, håll reglerknappen
intryckt och dra i stolens bälten för att
lossa dem (Fig. 22).
2. Öppna låset, tryck in den röda knappen
och håll isär bältena (Fig. 23).
3. Sätt i barnet.
4. Lägg över de båda låsgaarna och stick
in dem då du fått båda i nivå med låset,
tills du hör ett klickljud (Fig. 24). OBS! Stick
al dri g in d em e n i t age t, e ller bar a på ena
sidan av låset.
5. Spänn stolens säkerhetsbälten genom att
dra i rätt regleringsband (Fig. 25).
Page 79

79
3.2 HUR DU REGLERAR B ÄLTENA
OBS! Bältena måste alltid anpass as till barnets tillväxt. Innan du monterar stolen i
bilen måste höjden ställas in korrekt.
För korrekt reglering ska bältena komma
ut ur ryggstödet i höjd med barnets axlar
(Fig. 26).
Stolen har 3 höjdlägen.
För att ytta bältena gör du så här:
1. Ta a v axe lba nde n ge nom att dra u t de m
ur hålen i textilklädseln.
2. Öppna bälteslåset genom att trycka på
den röda knappen.
3. Lossa bältena bakifrån ryggstödet och
stick in dem i hålet på lämplig höjd för
barnet (Fig. 27A e 27B).
OBS! Se till att bältena alltid går mellan
skenan (R) och skalet. Se till att bältena
alltid passerar mellan skenelementet (R)
och skalet.
OBS! Kuddinlägget garanterar korrekt skydd
och idealiskt läge för nacke och rygg för
barn från födelsen till 6 kg vikt.
3.3 STOLENS FASTA LÄGE ELLER G UNGFUNK-
TION (BABYSITTER)
När stolen inte används i bilen kan den
också användas i gungfunktion eller som
babysitter.
För att ställa in gungfunktionen ska stoppet
stängas (Fig. 14) och handgreppet ställas
i läget C (Fig. 5).
För att använda stolen i stillastående läge,
ska stoppet dras ur och handgreppet ställs
i läget D (Fig. 5).
Ställ endast på stadiga och plana ytor.
OBS! Innan du bär stolen se alltid till att
handgreppet står i läget B (vertikalt).
VARNING! Lämna aldrig barnet
utan tillsyn.
VARNING! Använd alltid fastspänningsanordningen.
VARNING! Det är farligt att använda
stolen på upphöjda ytor, t.ex. bord,
stolar med mera.
VARNING! Den här stolen är inte
avsedd att användas för barnets
längre sovstunder.
VARNING! Använd inte stolen om
barnet redan kan sitta självt.
Stolen ersätter inte en säng eller vagga.
Om barnet behöver sova ska det läggas i
en säng eller vagga.
Använd inte stolen om någon del gått
sönder eller saknas.
3.4 ANVÄNDA MED SITT VAGNEN
OBS! Se sittvagnens bruksanvisning, om
du vill använda stolen med sittvagnen.
CHICCO:s sittvagnar som är försedda med
systemet CLIK CLAK har armstöd med särskilda anordningar där stolen kan fästas
direkt på sittvagnen, utan att andra tillbehör behövs.
För att fästa bilbarnstolen på sittvagnen
gör du på följande sätt:
1. Ta tag i stolen med handgreppet i vertikalt läge (B) (Fig. 28).
2. Fäst de båda fäststiften Clik Clak på stolen (N) vid sittvagnens armstöd, se upp
särskilt så att de fäster på båda sidorna.
Det hörs ett klickljud när de fastnar (Fig.
29).
VARNING Kontrollera före användning att
stolens fästanordningar satts i ordentligt.
Lossa stolen från sittvagnen så här:
1. För tillbaka handgreppet i det vertikala
läget (B).
2. Dra i det bakre handtaget för losstag-
ning.
3. Flytta över och ställ stolen på en plan
yta.
OBS! Fastsättning och losstagning kan även
utföras med barnet sittandes i stolen, även
om det kan bli lite svårare i och med barnet s vikt . Vi råd er i så f all att var a försik tiga
när detta utförs.
Page 80

80
81
3.5 RENGÖRING OCH FÖ RVARING
RENGÖRING AV FODRET
Tygklädseln på stolen är avtagbar och kan
tvättas för hand eller i maskin i 30° C.
Lossa bältena och dra av klädseln efter att
ha dragit ur de två grenbältena och låset
ur respektive hål. (Fig. 30).
Följ tvättinstruktionerna på klädselns etikett
som innehåller följande tvättsymboler:
Tvättas i maskin i 30°C
Tvättas för hand
Använd ej blekmedel
Får ej kemtvättas
Får ej torktumlas
Stryk inte
Använd aldrig repande rengöringsmedel
eller lösningsmedel. Centrifugera inte fodret och låt torka utan att krama ur.
RENGÖRING AV PLA ST- OCH METALLDELAR
An vän d bar a en fuk ti g duk för ren gör ing a v
plastdelar eller lackerad metall, inte repande
rengöringsmedel eller lösningsmedel.
Rörliga delar på stolen får inte smörjas.
KONTROLLERA ATT KOM PONENTERNA ÄR HELA
Du bör regelbundet kontrollera att följande
komponenter är hela och inte är slitna:
• Textilklädseln: se till att ingen stoppning
sticker ut eller att delar av den ramlat ur
och undersök sömmarna, vilka alltid måste
vara hela.
• B ä l t e n : k o n t r o l l e r a a t t i n g a f e l p å t e x t i l brerna förekommer med förtunning
som följd vid regleringsband, grenbälte,
axelband och kring plattan för bältesreglering.
• P l a s t d e l a r : k o n t r o l l e r a a t t a l l a p l a s t d e l a r
är hela och att inget slitage förekommer,
eftersom dessa inte får uppvisa några
tecken på skador eller missfärgning.
OBS! Om stolen skulle vara deformerad
eller mycket sliten måste den bytas ut:
den kan då ha förlorat sina ursprungliga
säkerhetsegenskaper.
FÖRVARING AV PRODUKTE N
Nä r sto len int e sit ter i bi len bör den för var as
på torrt ställe, på avstånd från värmekällor
och i skydd från damm, fukt och direkt
solljus.
HUR DU KASS ERAR PRODUKTEN
Då gränsen för stolens livslängd uppnåtts,
får den inte användas mer och ska kasseras
bland annat avfall. Med hänsyn till miljön
ska olika typer av avfall skiljas åt, i enlighet
med gällande lagstiftning i landet där bilbarnstolen använts.
FÖR YTTER LIGARE INFORMATION:
ARTSANA SPA
Servizio Clienti
Via Saldarini Catelli, 1
22070 Grandate – Como – Italien
Tfn. nr +39 800.188.898
www.chicco.com
Page 81

81
CHICCO
AUTO-FIX FAST
Gr. 0+ (0-13k G )
INSTRUKCJA UŻY TKOWANIA
SPIS TREŚCI:
1. WPROWADZENIE
1.1 OSTRZEŻENIA
1.2 CECHY WYROBU
1.3 OPIS ELEMENTÓW SKŁADOWYCH
1.4 POZYCJE UCHWYTU
1.5 OGRANICZENIA I W YMAGANIA DOTYCZ ĄCE UŻYC IA PR ODU KT U OR AZ S IEDZE NIA
SAMOCHODOWEGO
2. INSTALOWANIE W SAMO CHODZIE
2.1 POCZĄTKOWA KONFIGURACJA PODKŁADEK NA PASY
2.2 INSTALOWANIE Z BAZĄ
2.3 INSTALOWANIE BEZ BAZY
3. DODATKOWE CZ YNNOŚCI
3.1 UMIESZCZENIE DZIECKA W FOTELIKU
3.2 REGULOWANIE POZYCJI PASÓW
3.3 POZYCJA STAŁA LUB BUJANA FOTELIKA
(UŻYCIE JAKO LEŻACZEK)
3.4 UŻYCIE W POŁĄCZENIU ZE SPACERÓWKĄ
3.5 CZYSZCZENIE I KONSERWACJA
1. WPROWADZENIE
1.1 OSTRZEŻENIA
BARDZO WAŻNE: PROSZĘ NATYCHMIAST
PR ZE CZ Y TAĆ
• N A L E Ż Y Z A C H O W A Ć N I N I E J S Z Ą I N S T R U K C J Ę
NA PRZYSZŁOŚĆ.
• P o d c z a s m o n t a ż u i i n s t a l o w a n i a n a l e ż y s k r u pulatnie przestrzegać niniejszej instrucji.
Produkt nie powinien być używany przez
osoby, które nie zapoznały się z instrukcją
• U W A G A ! Z b a d a ń s t a t y s t y c z n y c h d o t y c z ą cych wypadków samochodow ych wynika,
że z reguły t ylne siedzenia samochodu są
bezpieczniejsze niż przednie: dlatego też zaleca się instalować fotelik właśnie z tyłu. Najbezpieczniejszym miejscem jest zwłaszcza
tylne, środkowe siedzenie, jeśli wyposażone
jest w 3-punktowy pas zabezpieczając y.
• U W A G A ! P O W A Ż N E Z A G R O Ż E N I E ! N i e n a -
leży nigdy instalować fotelika na przednim
siedzeniu wyposażonym w poduszkę powietrzną. Fotelik może być instalowany na
przednim siedzeniu tylko wtedy gdy poduszka pow iet rz na p rze d ni m zos ta ła w ył ącz ona
lu b jej nie ma: spr awd zić w ins tr ukcj i ob słu gi
samochodu czy możliwe jest wyłączenie
poduszki powietrznej lub skontaktować się
z producentem samochodu. Dla większego
bezpieczeństwa zaleca się jak najbardziej
cofnąć siedzenie, o ile pozwoli na to obecność innych, siedzących z tyłu pasażerów.
• Zaleca się, aby wszyscy pasażerowie zostali
po inf orm owa ni o spo sob ie o dpi ęci a dz iec ka
w razie zagrożenia.
• Należy zwrócić uwagę na sposób instalowania fotelika w samochodzie, aby zapobiec
ruszającemu się siedzeniu lub przeszkadzającym drzwiom samochodow ym.
• W r a z i e w y p a d k u ż a d e n f o t e l i k n i e m o ż e
zagwarantować dziecku całkowitego bezpieczeństwa, ale użycie tego produktu
zmniejsza ryzyko poważnych obrażeń lub
śmierci.
• R y z y k o o d n i e s i e n i a p o w a ż n y c h o b r a ż e ń
przez dziecko, nie tylko w razie wypadku
lecz również w innych okolicznościach (np.
pr zy gwa łto wny m ha mow ani u, i td.) , wz ras ta
jeśli nie przestrzega się dokładnie zaleceń
przytoczonych w niniejszej instrukcji: należy
za wsz e sp raw dzi ć cz y f otel ik j est pop raw nie
przymocowany do siedzenia.
- Jeśli fotelik jest uszkodzony, zdeformowany
lub zbytnio zużyty musi być wymieniony,
po nie waż mó gł u tra cić swo je p ier wot ne w ła ściwości, zapewniające bezpieczeństwo.
• P r o d u k t n i e m o ż e b y ć w ż a d e n s p o s ó b m o dykowany, chyba że modykacje te zostały
zatwierdzone przez producenta.
• N ie m onto wać na f ote liku akc eso rió w, c zęśc i
zamiennych lub innych elementów, które nie
zostały dostarczone przez producenta.
• Nigdy nie pozostawiać dziecka bez opieki
w foteliku.
• N i g d y n i e p o z o s t a w i a ć f o t e l i k a s a m o c h o dowego na siedzeniu samochodu bez
jego uprzedniego przymocowania. Należy
zawsze przyczepić fotelik do siedzenia, w
przeciwnym razie może uderzyć i zranić
pasażerów.
• N i e n a l e ż y u ż y w a ć n i c z e g o , z a w y j ą t k i e m
akcesoriów zatwierdzonych dla wyrobu,
PL
Page 82

82
83
tak pomiędzy fotelikiem i siedzeniem samochodowym jak też fotelikiem i dzieckem: w
razie wypadku mogłoby to spowodować
nieprawidłowe działanie fotelika.
• Z a l e c a s i ę p r z y k r y ć f o t e l i k s a m o c h o d o w y ,
jeśli samochód został pozostawiony na
słońcu.
• W w y n i k u n a w e t n i e g r o ź n e g o w y p a d k u
samochodowego, fotelik może ulec uszkodz eni om ni ewi do czn ym g oł ym o kie m: s tąd
należy go wymienić.
• Nie należy stosować fotelików używanych:
mogą posiadać niewidoczne gołym okiem
uszkodzenia konstrukcyjne, wpływające na
bezpieczeństwo produktu.
• P o n i e w a ż o b i c i e s t a n o w i i n t e g r a l n ą c z ę ś ć
fotelika, może ono być zastąpione wyłącznie
oryginalnym obiciem zatwierdzonym przez
producenta. Fotelik nie powinien być nigdy
używany bez obicia, może to stwarzać zagrożenie dla dziecka.
• S p r a w d z i ć c z y p a s n i e j e s t s k r ę c o n y i z w r ó c i ć
uwagę czy pas i części fotelika nie zostały przyciśnięte drzwiami pojazdu lub nie
ocierają się o ostre krawędzie. Jeżeli pas
jest uszkodzony lub zniszczony należy go
wymienić.
• N i e p r z e w o z i ć p o z o s t a w i o n y c h l u ź n o l u b n i e za bez pi ecz ony ch pr ze dmi otów lub b aga ży
zwłaszcza na tylnej półce wewnątrz pojazdu:
w razie kolizji lub gwałtownego hamowania
mogą zranić pasażerów.
• Upewnić się, czy wszyscy pasażerowie
pojazdu zapięli pasy bezpieczeństwa nie
tylko dla ich własnego bezpiec zeństwa, ale
też dlatego, że w trakcie podróży, w razie
wypadku lub gwałtownego hamowania,
mogliby zranić dziecko.
• W t r a k c i e d ł u g i c h p o d r ó ż y n a l e ż y c z ę s t o
zatrzymywać się. Dzieci bardzo łatwo się
męczą. W żadnym wypadku podczas jazdy samochodem nie należy wyjmować
dziecka z fotelika. Jeżeli dziecko potrzebuje
opieki należy zatrzymać się w bezpiecznym
miejscu.
• W c z e ś n i a k i u r o d z o n e p r z e d 3 7 t y g o d n i e m
ciąży mogą być zagrożone w foteliku. Te niemowlęta znajdując się w foteliku mogą mieć
pro ble my z o ddy chan iem . Z te go po wod u,
przed opuszczeniem szpitala, pediatra lub
położna powinni ocenić stan zdrowia Waszego dziecka i zalecić najodpowiedniejszy
model fotelika.
• P r o d u c e n t , c z y l i r m a A r t s a n a z r z e k a s i ę
odpowiedzialności w przypadku niewłaściwego używania wyrobu.
1.2 CECHY W YROBU
• F o t e l i k t e n p o s i a d a h o m o l o g a c j ę d l a “ G r u p y
0+”, to zn ac zy p rz ezn acz ony jes t on do p rze wozu d zieci o d urodzen ia do 13kg (od 0 d o
około 10/12 miesiąca życia), zgodnie z europejskim rozporządzeniem ECE R44/04.
• F o t e l i k z o s t a ł z a t w i e r d z o n y j a k o “ U n i w e r s a l ny”, co oznacza, że może być on używany
we wszystkich typach pojazdów. UWAGA!
Typ “Uniwersalny” oznacza, że jest on kompatybilny z większością lecz nie wszystkimi
siedzeniami samochodowymi.
WAŻNA INFORM ACJA
1. Niniejsze urządzenie zabezpieczająco-
przytrzymujące zostało zakwalikowane
jako “Uniwersalne”, zgodnie z kryteriami
homologacyjnymi Rozporządzenia ECE
R44/04 i pasuje do większości, lecz nie do
wszystkich siedzeń samochodowych.
2. Prawidłowe dopasowanie jest najbardziej
prawdopodobne, kiedy producent samochodu oświadcza w podręczniku pojazdu,
że w sa moc hod zie pr zew idz ian e je st i nst alo wanie “Uniwersalnych” fotelików samochodowych dla danej grupy wiekowej.
3. Niniejszy fotelik samochodowy został za-
kwalikowany jako “Uniwersalny” zgodnie
z kryteriami homologacyjnymi znacznie
bardziej wymagającymi w stosunku do
kryteriów poprzednich modeli, które nie
przytaczają niniejszej informacji.
4. Może on być stosowany tylko w pojazdach
wyposażonych w 3-punktowy pas zabezpieczający, statyczny lub bezwładnościowy, posiadający homologację zgodnie z
Ro zpo rz ądze nie m UN /EC E Nr16 lub i nny mi
równorzędnymi standardami.
5. W razie wątpliwości należy skontaktować
się z producentem niniejszego ur ządzenia
zabezpieczająco-przytrzymującego lub z
jego sprzedawcą.
1.3 OPIS ELEMENTÓW S KŁADOWYCH
Rys. 1 (3/4)
A. Uchwy t
B. Daszek przeciwsłonec zny
Page 83

83
C. Obicie
D. Poduszka redukcyjna (*)
E. Podstawa (**)
Rys. 2 (Z Pr zodu)
F. Otwory na pasy
G. Pasy fotelika
H. Nakładki na pasy (*)
I. Przycisk do regulacji pasów (pod płatem
materiałowym)
J. Taśma do regulacji pasów
Fig. 3 (Z Bok u)
K. Prowadnica biodrowego pasa samocho-
dowego w foteliku
L. Prowadnica biodrowego pasa samocho-
dowego w podstawie
M. Przyciski do obrotu uchw ytu
N. Sworznie Clik Clak (do zaczepienia na
spacerówce)
Fig. 4 (Z Tyłu)
O. Prowadnica poprzecznego pasa samo-
chodowego
P. Uchwyt odczepiający (od podstaw y i od
spacerówki)
Q. Otwory przesuwowe pasów
R. Element prowadzący pasy fotelika
S. Zacisk blokujący
(*) Kształt i wzór mogą się różnić w zależności
od modelu fotelika.
(**) Opcja
1.4 POZYC JE UCHWYTU
Uchwyt fotelika ustawiany jest w 4 pozycjach
(Rys. 5).
A. Pozycja do transportu w samochodzie
(UWAGA: jest to jedyna pozycja dozwolona
podczas transpor tu w samochodzie).
B. Pozycja do ręcznego transportu.
C. Pozycja pozwalająca na użycie jako buja-
czek lub do przyczepienia na dostosowa-
nym do fotelika wózku Chicco.
D. Pozycja poz walająca na użycie jako leża-
czek.
Aby przeprowadzić regulację należy jednocześnie nacisnąć przyciski (M) na uchwycie
obracając go do wybranej pozycji aż da się
usłyszeć odgłos zapadki.
1.5 OGRANICZENIA I WYMAGANIA DOTYCZĄCE
UŻYCIA PROD UKTU ORAZ SIED ZENIA SAMOCHODOWEGO
UWAGA! Nale ży dok ładnie p rzestr zegać p oni ższ yc h og ran icz eń i wy maga ń do ty czą cy ch
użycia produktu oraz siedzenia samochodoweg o: w pr zeci wnym w ypad ku nie gwara ntuje się bezpieczeństwa.
• F o t e l i k m o ż e b y ć i n s t a l o w a n y n a p r z e d n i m
siedzeniu po stronie pasażera lub na jakimkolwiek tylnym siedzeniu. Siedzenie samochodowe musi być skierowane zgodnie z
kierunkiem jazdy. Nie należy nigdy używać
tego fotelika na siedzeniach ustawionych
w poprzek lub w kierunku przeciwnym do
kierunku jazdy (Rys. 6).
• S i e d z e n i e s a m o c h o d o w e p o w i n n o b y ć
wyposażone w 3-punktow y pas bezpieczeństwa, statyczny lub bezwładnościowy,
posiadający homologację zgodnie z Rozporządzeniem UNI/ECE Nr 16 lub innymi
równorzędnymi standardami (Rys. 7).
• U W A G A ! N i e n a l e ż y n i g d y m o c o w a ć f o t e l i k a
za pomocą dwupunktowego pasa samochodowego (Rys. 8).
• N i e n a l e ż y u ż y w a ć m a t e r a c y k a r e d u k c y j n e g o
jeżeli waga dziecka przekracza 6 kg.
2. INSTALOWANIE FOTELIKA W S AMOCHODZIE
Fotelik może być instalowany tak z bazą
(opcja) jak i bez. W obydwu konguracjach
musi być zawsze zainstalowany w kierunku
przeciwnym do kierunku jazdy.
2.1 POCZĄTKOWA KONFIGURACJA NAKŁADEK
NA PASY
Fotelik, w zależności od modelu, posiada 2
różne typy nakładek na pasy (A i B). Przed przystąpieniem do użytkowania fotelika należ y
nałożyć podkładki, w tym celu postępować
w następujący sposób:
• N a k ł a d k i w e r s j i A ( R y s . 9 A , 9 B i 9 C ) : p r z e ł o ż y ć
nakładki przez otwory materiałowego obicia (a nie znajdującej się poniżej obudowy)
tak, aby pasy były umieszczone nad nimi.
Przełożyć element rozdzielający nogi przez
klamrę pasów.
• N a k ł a d k i w e r s j i B ( R y s . 1 0 A i 1 0 B ) : p r z e ł o ż y ć
pasy fotelika przez dwie nakładki. Przełożyć
element rozdzielający nogi przez klamrę
pas ów.
Page 84

84
85
2.2 INSTALOWANIE Z BA ZĄ
Aby zainstalować fotelik z podstawą na siedzeniu samochodowym należy postąpić w
następujący sposób:
1. Odczepić fotelik od bazy pociągając za
uchwyt odczepiający położony z t yłu
oparcia i jednocześnie unieść go do góry
poprzez uchwyt (Rys. 11).
2. Ustawić bazę na wybranym do instala-
cji siedzeniu, kierując ją tak jak na Rys. 12,
baza musi przylegać do oparcia siedzenia
samochodu.
3. Pociągnąć samochodowy pas bezpieczeń-
stwa i zapiąć go w odpowiedniej klamrze
ta k, a by o dci nek poz iom y (b iod row y) p rze szedł przez dwie stosowne prowadnice (L)
oznaczone niebieską strzałką i jak najbardziej go napręż yć (Rys. 13).
4. Przed umieszczeniem fotelika na bazie
należy sprawdzić czy zacisk blokujący jest
zamknięty (Rys. 14).
5. Nałożyć fotelik na bazę (skierowany tyłem
do kierunku jazdy) dociskając go do dołu,
aby go zaczepić (da się słyszeć odgłos zapadki “clack” ) (Rys. 15).
6. Sprawdzić poprawne zaczepienie fotelika
na bazie unos ząc go do gór y tak z przo du
jak i z tyłu.
7. Uchwycić poprzec zny pas samochodowy
i przeprowadzić go przez stosowną prowadnicę (O) znajdującą się z tyłu oparcia
fotelika (Rys. 16). UWAGA! Podczas transportu poprzeczny pas musi być ZAWSZE
umieszczony w tej prowadnicy.
8. Napiąć dobrze pas bezpieczeństwa,
upewniając się czy nie jest poluzowany
ani skręcony.
9. Obrócić uchwyt na pozycję A i sprawdzić
czy opiera się o siedzenie samochodu
(Rys. 17).
UWAGA! po zainstalowaniu należy ZAWSZE
sprawdzić czy pas jest odpowiednio naprężony we wszystkich punktach i czy nie jest
sk ręcon y.
NIGDY nie należy przeprowadzać pasa
samochodowego przez pozycje inne od
wskazanych.
Aby odczepić fotelik pozostawiając bazę
zainstalowaną w samochodzie należy:
1. Wyciągnąć poprzec zny pas z prowadnicy
oparcia nie odpinając go od klamr y.
2. Ustawić uchwyt w pionowej pozycji B
(Rys. 5).
3. Odczepić fotelik tak jak opisano pow yżej.
2.3 INSTALOWANIE BEZ BA ZY
Ab y za ins tal owa ć fot eli k be z ba zy n ale ży postępować w następujący sposób:
1. Wyciągnąć zacisk blokujący i ustawić fotelik
na wybranym siedzeniu samochodowym
(Rys. 18).
2. Pociągnąć samochodowy pas bezpieczeństwa i zapiąć go w stosownej klamrze, przeprowadzić odcinek poziomy pasa
(biodrowy) przez stosowne prowadnice
(K) fotelika oznakowane niebieską strzałką
(Rys. 19).
3. Uchwycić poprzeczny odcinek pasa samochodowego i przeprowadzić go przez
stosowną prowadnicę (O) znajdującą się z
ty łu o par cia fote lik a (R ys. 20). UWAG A! Po dczas transportu poprzeczny pas musi być
ZAWSZE umieszczony w tej prowadnicy.
4. Napiąć dobrze pas bezpieczeństwa,
upewniając się czy nie jest poluzowany
ani skręcony.
5. Obrócić uchwyt na pozycję A i sprawdzić
czy opiera się o siedzenie samochodu
(Rys. 21).
Aby odczepić fotelik należy:
1. Odpiąć samochodowy pas bezpieczeństwa
naciskając na klamrę.
2. Ustawić uchwyt w pozycjil B (pionowo).
3. Wyciągnąć pas z prowadnic y poprzec znej
i z prowadnic poziomych.
3. DODATKOWE CZ YNNOŚCI
3.1 UMIESZCZENIE DZIE CKA W FOTELIKU
1. Unieść do gór y materiałowy płat, trz ymać
wciśnięty przycisk do regulacji pasów i pociągnąć do siebie pasy fotelika tak, aby je
poluzować (Rys. 22).
2. Odpiąć klamrę, wciskając czerwony przycisk
i rozłożyć pasy do zewnątrz (Rys. 23).
3. Posadzić dziecko w foteliku.
4. Nałożyć na siebie dwa kliny klamry i zdecydowanym ruchem włożyć je do sprzączki,
aż da się usłyszeć odgłos zapadki “click” (Rys.
24). UWAGA! Nie należy nigdy wkładać tylko
jednego klinu do sprzączki lub wkładać je
pojedyńczo.
Page 85

85
5. Pociągając za stosowną taśmę do regulowani a pas ów, n apr ęż yć p asy bez pie cze ńst wa
fotelika (Rys. 25).
3.2 REGULOWANIE POZ YCJI PASÓW BEZ PIECZEŃ-
STWA FOTELIK A
UWAGA! Pasy muszą być zawsze dostosowane
do wzrostu dziecka. Przed zainstalowaniem
fotelika w samochodzie należy ustawić je na
prawidłowej w ysokości.
Po poprawnym uregulowaniu pasy muszą
wychodzić z oparcia na wysokości ramion
dziecka (Rys. 26).
Fotelik posiada pasy regulowane do 3 wysokości.
Aby w yregulować długość pasów należy
postępować w następujący sposób:
1. Zdjąć nakładki przeprowadzając je przez
materiałowe otwory w obiciu.
2. Odpiąć spr zączkę pasów naciskając czewony przycisk.
3. Wyciągnąć pasy z tyłu oparcia i włożyć je
do otworu dostosowanego do wzrostu
dziecka (Rys. 27A i 27B).
UWAGA! Należy zawsze upewnić się czy pasy
przechodzą pomiędzy elementem prowadnicy (R) a skorupą fotelika.
UWAGA! Materac yk redukcyjny zapewnia
właściwe podtrzymanie oraz prawidłową
pozycję szyi i kręgosłupa dzieci w wieku od
urodzenia do 6 kg.
3.3 POZYC JA STAŁA LUB BUJANA FOTELIK A (UŻY-
CIE JAKO LEŻAC ZEK LUB BUJACZEK)
Jeżeli fotelik nie jest używany w samochodzie może być w ykorzystany jako bujaczek
lub leżaczek.
Aby mógł się bujać należy zamknąć zacisk
blokujący (Rys. 14) i ustawić uchwyt w pozycji
C (Rys. 5).
Ab y mó gł b yć u ży wan y w p oz ycji sta łe j nal eż y
wyciągnąć zacisk blokujący i ustawić uchwyt
w pozycji D (Rys. 5).
Fotelik należy zawsze ustawiać na stabilnych
i poziomych powierzchniach.
UWAGA! Przed transportem fotelika należy
zawsze ustawić uchwyt w pozycji B (pionowo).
UWAGA! Nie pozostawiać dziecka
bez nadzoru.
UWAGA! Używać zawsze pasów
bezpieczeństwa fotelika.
UWAG A! Używa nie fotelika na p odwyższonych płaszczyznach jak stoły, stołki itd. jest niebezpieczne.
UWAGA! Fotelik nie został opracowany z myś lą o spaniu w nim dziecka przez dłuższy okres czasu.
UWAGA! Nie należy używać fotelika
jeżeli dziecko jest w stanie samodzielnie siedzieć.
Fotelik nie zastępuje łóżeczka lub kołyski.
Jeżeli dziecko potrzebuje odpoczynku lub
jest śpiące, należy położyć je w stosownym
łóżeczku lub kołysce.
Nie należy używać fotelika jeśli jakikolwiek
jego element został uszkodzony lub zgubiony.
3.4 UŻYCIE W PO ŁĄCZENIU ZE SPACERÓ WKĄ
UWAGA! Aby zainstalować fotelik w po łączeniu ze spacerówką należ y przeczy tać instrukcję obsługi wózka. Spacerówki CHICCO
posiadające na podłokietnikach sy tem CLIK
CLAK, pozwalają umocować fotelik bezpośrednio na ramie wózka bez zastosowania
dodatkowych elementów mocując ych.
Ab y za mon towa ć fo tel ik na spa cer ówce nal eży postępować w następując y sposób:
1. Ustawić rączkę fotelika w pozycji pionowej
(B) (Rys. 28).
2. Za cze pić dwa swo rz nie zac ze pow e Cli k Cl ak
fo teli ka ( N) n a po dło ki etn ika ch sp ace rów ki,
zwrócić uwagę, aby zostały prawidłowo
za cze pio ne p o o bydw óch st rona ch. Bę dzi e
słychać odgłos zapadki clik oznaczając y
zaczepienie (Rys. 29).
UWAGA Przed przystąpieniem do użytkowania fotelika należy zawsze sprawdzić, c zy
wszystkie mechanizmy blokujące zostały
prawidłowo zamocowane.
Aby odczepić fotelik od wózka należy:
1. Ustawić rączkę fotelika w pozycji pionowej (B).
2. Pociągnąć tylny uchwyt odczepiając y.
3. Wyjąć fotelik i postawić go na płaskiej po wierzchni.
Page 86

86
87
UWAGA: Czynności montażu i demontażu
mogą być wykonywane również gdy dziecko
znajduje się w foteliku, chociaż mogą one okazać się trudniejsze do wykonania ze względu
na wag ę dz iec ka. W t ym p rz ypa dku , po dc zas
wykonywania powyższych czynności, należy
zachować jak największą ostrożność.
3.5 CZYSZC ZENIE I KONSERWACJA
CZYSZCZENIE OBICIA
Materiałowe obicie fotelika jest całkowicie
zdejmowane i może być prane ręcznie lub
w pralce w temperaturze 30°C.
Aby wyprać obicie należy odpiąć pasy bezpieczeństwa fotelika i po przeprowadzeniu
dwóch odcinków pasów i klamry przez otwory, zdjąć materiałowe obicie (Rys. 30).
W praniu należy dostosować się do instrukcji
przytoczonych na wszywce obicia zawierającej następujące symbole prania:
Prać w pralce w temp. 30°C
Pranie ręczne
Nie wybielać
Nie czyścić chemicznie
Nie suszyć w suszarce. Nie wirować.
Nie prasować prasprasować
Nie używać nigdy żrących detergentów ani
rozpuszczalników. Aby wysuszyć obicie nie
należy go odwirowy wać ani wyciskać.
CZYS ZCZENIE PLASTI KOWYCH ORAZ ME TALOWYCH
ELEMENTÓW
Do c zyszczenia elementów z plastiku lub
lakierowanego metalu, należy używać t ylko
wilgotnej szmatki. Nie używać nigdy żrących
detergentów ani rozpuszczalników.
Ruchome części fotelika nie powinny być
absolutnie naoliwiane.
KONTROLA STANU ELE MENTÓW SKŁADOW YCH
Zaleca się regularnie sprawdzać stan oraz
stopień zużycia następujących elementów:
• O b i c i e : s p r a w d z i ć c z y n i e j e s t p r z e t a r t e i n i e
wychodzi z niego wyściółka. Sprawdzić stan
szwów, które nie powinny być rozprute.
• P a s y : s p r a w d z i ć c z y n i e m a d z i w n e g o o d -
włóknienia wątka tkaniny oraz czy taśma
pasów nie przetarła się zbytnio w pobliżu
taśmy regulacyjnej, elementu rozdzielającego nogi, na odcinkach ramion i w stree
płytki regulacyjnej pasów.
• E l e m e n t y p l a s t i k o w e : s p r a w d z i ć s t a n z u ż y c i a
wszystkich elementów plastikowych, które
nie powinny być uszkodzone ani wypło-
wiałe.
UWAGA! Jeśli fotelik jest zdeformowany lub
zniszczony, powinien być wymieniony: możliwe, że u tra cił ory gin aln e ce chy z ap ewni ają ce
jego bezpieczne użytkowanie.
KONSERWACJA W YROBU
Kiedy fotelik nie jest zainstalowany w samochodzie, należy go przechowywać w suchym
mie jscu i z da la od źród eł c iepł a or az ch ronić
przed kurzem, wilgocią i bezpośrednim działaniem promieni słonecznych.
LIKWIDACJ A WYROBU
Po zakończeniu okresu eksploatacji fotelika,
nie powinien być on uż ywany i należy go
w yrz uci ć. Z e wz glę du n a oc hro nę ś rod owi ska ,
należy wysegregować różnego rodzaju odpady zgodnie z przepisami obowiązującymi
w Kraju użytkownika.
W CELU UZYSKANIA DODATKOWYCH INFORMACJI
KONTAKTOWAĆ SIĘ Z:
Serwis Baby Collection
ul. Miła 12
05-090 Raszyn-Rybie
Tel. (022) 720 22 19, (022) 720 22 14
e-mail: serwis@chicco.pl
www.chicco.pl
Page 87

87
CHICCO
AUTO-FIX FAST
Gr. 0+ (0-13 k G )
HASZNÁLATI UTASÍTÁS
TAR TAL OM JEG YZ ÉK :
1. BEVEZETÉS
1.1. F IGY ELM EZ TET ÉSE K
1.2. A TERMÉK JELLEMZŐI
1.3. AZ ALKOTÓRÉSZEK LEÍRÁSA
1.4. A FOGANTYÚ ÁLLÁSAI
1.5. A TERMÉK ÉS AZ AUTÓÜLÉS HASZNÁLATÁRA VONATKOZÓ KORLÁTOZÁSOK ÉS
KÖVETELMÉNYEK
2. BESZERELÉS AZ AUTÓBA
2.1. A VÁLLVÉDŐK ELŐZETES FELSZERELÉSE
2.2. BESZERELÉS TALPPAL EGYÜTT
2.3. BESZERELÉS TALP NÉLKÜL
3. TOVÁBBI MŰVELETEK
3.1. A GYERMEK ELHELYEZÉSE A GYEREKÜLÉSBEN
3.2. A BIZTONSÁGI ÖVEK BEÁLLÍTÁSA
3.3. A GYEREKÜLÉS ÜLŐ VAGY FEKTETET T
HE LYZ E TE
3.4. HASZNÁLATA BABAKOCSIKÉNT
3.5. TISZTÍTÁS ÉS MEGÓVÁS
1. BEVEZETÉS
1.1. FIGYELMEZTETÉSEK
RENDKÍVÜL FONTOS: AZONNAL OLVASSUK EL!
• Ő R I Z Z E M E G E Z T A K É Z I K Ö N Y V E T A J Ö -
VŐBENI KONZULTÁCIÓKHOZ IS.
• A g y e r e k ü l é s ö s s z e á l l í t á s á n á l é s b e s z e r e -
lésénél szigorúan be kell tartani az előírásokat. Senki ne használja a terméket a
használati utasítás elolvasása nélkül.
• F I G Y E L E M ! A b a l e s e t e k r ő l s z ó l ó s t a t i s z t i k a i
adatok szerint általában a gépjárművek
hátsó ülései biztonságosabbak az első
üléseknél: éppen ezért javasoljuk, hogy a
Gyerekülést a jármű hátsó ülésén helyezzük el. Különösen a hátsó ülés középső
ülése a legbiztonságosabb, amennyiben 3
pontos biztonsági övvel van felszerelve.
• F I G Y E L E M ! S Ú LY O S V E S Z É L Y H E L Y Z E T ! S o h a
ne használjuk a Gyerekülést a jobb első
ülésen akkor, ha az autóban aktív elülső
légzsák található! Csak akkor szabad a
Gyerekülést az első ülésen elhelyezni,
am enny ib en a l égz sá kot k iik ta ttá k: é rde klődjünk a gyártó cég képviselőjénél vagy
a használati utasítás alapján győződjünk
me g ar ról , leh et ség es- e a l égz sák kii kt atá sa. Mindenesetre javasoljuk, hogy az ülést
toljuk a lehető leghátrább, olyanannyira,
amennyire ez a hátsó ülésen utazóktól
lehetséges.
• A j á n l a t o s a z ö s s z e s u t a s t t á j é k o z t a t n i a r r ó l ,
hogyan kell a gyermeket kiszabadítani
a gyerekülésből, esetleges vészhelyzet
esetén.
• A m i k o r a G y e r e k ü l é s t b e s z e r e l j ü k a z a u tóba, gondosan ügyeljünk arra, hogy ne
ütközhessen például egy mozgó ülésbe
vagy az ajtónak.
• B a l e s e t e s e t é n s e m m i l y e n G y e r e k ü l é s n e m
biztosítja a gyermek teljes biztonságát, de
ennek a típusnak a használata csökkenti
a súlyos sérülések vagy az elhalálozás
kockázatát.
• A g y e r m e k s ú l y o s s é r ü l é s é n e k v e s z é l y e
ne mcs ak b ales et e seté n, ha nem más k örülmények között is (például hirtelen, erős
fékezéskor, stb.) növekszik akkor, ha a jelen
használati utasításban leírtakat szigorúan
ne m ta rtj ák b e: mi nde n es etb en m eg ke ll
gy őződ ni a rró l, ho gy a Gye rek ülé s me gfe lelően van-e rögzítve az üléshez.
• A m e n n y i b e n a G y e r e k ü l é s m e g s é r ü l t ,
eldeformálódott vagy erősen elhasználódott, azt ki kell cserélni, mert elveszíthette eredeti, a biztonságos használatot
garantáló tulajdonságait.
• A g y á r t ó h o z z á j á r u l á s a n é l k ü l s e m m i l y e n
átalakítást ne végezzünk.
• N e s z e r e l j ü n k f e l o l y a n t a r t o z é k o k a t , c s e r e alkatrészeket és alkotó elemeket, amelyek
nem a gyártótól származnak.
• S o h a , s e m m i l y e n o k b ó l n e h a g y j u k a
gyermeket felügyelet nélkül a Gyerekülésben.
• S o h a n e h a g y j u k a G y e r e k ü l é s t a z a u t ó
ülésén rögzítés nélkül, mert neki ütközhet
H
Page 88

88
89
az utasoknak, sérüléseket okozhat.
• N e s z e r e l j ü n k f e l s e m m i t - k i v é v e a t e r mékhez tartozó, engedélyezett kellékeket
- sem az autó ülése és a Gyerekülés, sem
pedig a Gyerekülés és a gyermek közé:
ez ugyanis akadályozhatja a Gyerekülés
megfelelő működését baleset esetén.
• A m e n n y i b e n a z a u t ó t t ű z ő n a p o n h a g y j u k ,
javasoljuk a Gyerekülés letakarását.
• E g y , a k á r k i s e b b b a l e s e t e s e t é n i s a G y e r e külésben károk keletkezhetnek, amelyek
szabad szemmel talán nem is lathatók:
ilyen eseteben ki kell azt cserélni.
• N e h a s z n á l j u n k h a s z n á l t a n v á s á r o l t G y e rekülést, mert olyan, szabad szemmel
nem látha tó károk is kel etkezhe ttek benne, amelyek veszélyeztethetik a termék
biztonságos alkalmazását.
• A h u z a t o t c s a k i s a g y á r t ó e n g e d é l y é v e l l e het kicserélni, mivel az a termék tartozéka,
annak szerves részét képezi. A Gyerekülést
soha ne használjuk a huzat nélkül, mert ez
veszélyeztetné a gyermek biztonságát.
• E l l e n ő r i z z ü k , h o g y a z ö v n i n c s - e m e g c s a varodva és ügyeljünk arra, hogy az öv vagy
a Gy erekü lés má s rész e ne c sukód hassé k
oda az ajtó bezárásakor, illetve ne dörzsölődjön éles részekhez. Amennyiben az
övön vágások keletkeztek, vagy szálakra
bomlott, azt ki kell cserélni.
• G y ő z ő d j ü n k m e g a r r ó l , h o g y a g é p j á r műben, különösen annak hátsó ülésén
vannak-e olyan tárgyak vagy csomagok,
amelyek nincsenek rögzítve, illetve biztonságosan elhelyezve: baleset vagy hirtelen
fékezés esetén azok sérülést okozhatnak
az utasoknak.
• Ellenőrizzük, hogy az autó minden utasa
bekapcsolta-e a biztonsági övet, egyrészt
saját biztonsága érdekében, másrészt
az ért , me rt az u taz ás k özb en, b ale set vag y
hir telen fékez és ese tén sér ülést ok ozhatnak a gyermeknek.
• H o s s z ú u t a z á s e s e t é n g y a k r a n k e l l p i h e n ő t
tartani. A gyermek ugyanis nagyon hamar
elfárad. Semmilyen okból ne vegyük ki a
gyermeket a Gyerekülésből addig, amíg
az autó mozgásban van. Amennyiben a
gyermeknek gyelemre van szüksége,
biztonságos helyet kell találni és meg
kell állni.
• K o r a s z ü l ö t t , a t e r h e s s é g 3 7. h e t e e l ő t t v i l á g ra jöt t új szü löt tek szá már a a Gy erm ekü lés
veszélyes lehet. Ezeknél az újszülötteknél
ugyanis légzési nehézségek adódhatnak a
Gyermekülésben. Éppen ezért javasoljuk,
hogy a kórház elhagyása előtt a szülők
ké rje nek tan ács ot a g yer me kor vos tól vag y
a kórházi szakemberektől, milyen típusú
Gyerekülést ajánlanak a koraszülöttnek.
• A z A r t s a n a C é g m i n d e n f e l e l ő s s é g e t e l h á rí t, a mel y a te rmé k ne m ren del teté ssz erű
használatából ered.
1.2 A TERMÉK JELLEM ZŐI
• Ez a „Gruppo 0+” csoportba sorolt és hitelesített biztonsági Gyerekülés gyermekek
szállítására szolgál, a születéstől 13 kg-os
súlyig (0 hónapostól körülbelül 10 hónapos/1
éves korig), s megfelel az ECE R44/04 európai
szabvány előírásainak.
• A h i t e l e s í t é s „ U n i v e r s a l ” t í p u s ú , t e h á t b á r milyen típusú gépkocsiban használható.
FIGYELEM! „Universal” azt jelenti, hogy a
legtöbb típusnál alkalmazható, de nem
minden autóülés esetén.
FONTOS FIGYELMEZTETÉS!
1. Ez az „univerzális”, gyermekek szállítására
szolgáló biztonsági ülés megfelel az ECE
R4 4/0 4 sz abv ány elő írá sai nak é s a l egt öbb ,
de nem minden típusú autó esetében alkalmazható.
2. A tökéletes használat biztosított, amennyi-
ben az autógyártók a gépjármű használati
utasításában feltüntették, hogy a megfelelő életkorú gyermekek számára készült
„univerzális” gyerekülés a gépkocsiba beszerelhető.
3. Ez a gyerekülés „univerzális”-nak minősül,
s szigorúbb hitelesítési előírásoknak felel
meg, mint a korábbi típusok, amelyek nem
viselik ezt a jelzőt.
4. Oly an au tó kb a l ehe t b es ze re lni , a me ly ek be n
3 pontos, x vagy automata biztonsági öv
va n, a mel y me gfe lel az U N/ ECE 16 -o s sz ám ú
sz abvá nyna k, v agy m ás, a zza l me gegy ező
tartalmú előírásoknak.
5. Kétség esetén érdeklődjön a gyerekülés
gyártójától vagy forgalmazójától.
Page 89

89
1.3 AZ ALKOTÓRÉS ZEK LEÍRÁSA
1-es ábr a (3/4)
A. Fogantyú
B. Napfény tető
C. Textil huzat
D. Fejszűkítő párna (*)
E. Talp (**)
2-es ábr a (Elölnézet)
F. Nyílás az övek átbújtatásához
G. A gyerekülés övei
H. Vállvédők (*)
I. Övszabályozó gomb (a textil nyelv alatt)
J. Övszabályozó szíj
3-as ábr a (Oldalnéze t)
K. Biz to nsá giö v-v eze tő a m ede nce övr ész hez
a Gyerekülésen
L. Biz ton ság iöv -ve zet ő a m ede nce övr ész hez
a talpon
M. A fogantyút mozgató gombok
N. Clik Clak pecek (a babakocsira rögzítéshez)
4-es á bra (Hátulné zet)
O. Átlós biztonságiöv-vezető
P. Kioldó gomb (a talpról és a babakocsiról)
Q. Nyílás az övek átbújtatásához
R. A gyerekülés övvezetőjének része
S. Kitámasz tó rögzítő
(*) A forma és a típus változhat a Gyerekülés
típusától függően.
(**) Választható
1.4 A FOGANTY Ú ÁLLÁSAI
A Gyerekülés fogantyúja 4 különböző helyzetbe állítható (5-ös ábra).
A. Autóban történő szállítás (FIGYELEM: ez az
egyetlen megengedett pozíció az autóban
történő szállítás esetén).
C. Kézi szállítás.
D. Fekvő helyzet, ringatáshoz vagy pedig
az arra alkalmas Chicco babakocsi- vázra
rögzítéshez.
E. Stabil fekvő helyzet.
A kívánt pozíció beállításához egyszerre kell
megnyomni a fogantyún lévő gombokat
(M), s a fogantyút a kívánt helyzetbe kell fordítani, olymódon, hogy a kattanást hallani
lehessen.
1.5 A TERMÉK ÉS AZ AUTÓÜLÉS HASZNÁLATÁRA
VONATKOZÓ KORLÁTOZ ÁSOK ÉS KÖVETELMÉ NYEK
FIGYELEM! A termék és az autóülés használatára vonatkozó, alábbiakban felsorolt korlátozásokat és követelményeket szigorúan be
kell tartani: ellenkező esetben a biztonság
nem garantált.
• A G y e r e k ü l é s t b e l e h e t s z e r e l n i a j o b b o l d a l i
első ülésre vagy pedig bármelyik hátsó ülésre. Mindenesetre az autóülésnek a haladási
iránynak megfelelő pozícióban kell lennie.
Soha ne helyezzük el ezt a Gyerekülést oldalra fordított vagy a menetiránynak hát tal
lévő üléseken (6- os ábra).
• A z a u t ó ü l é s é n x v a g y a u t o m a t a , 3 p o n t o s
biztonsági övnek kell lennie, az UNI/ECE
16-os számú szabványnak, vagy más, azzal
megegyező tartalmú előírásoknak megfelelően (7-es ábra).
• F I G Y E L E M ! S o h a n e s z e r e l j ü k b e a G y e r e k ü l é s t
2 p onto s rö gzí tés ű bi zto nsá gi öv ve l re nde lkező autóba (8-as ábra).
• S o h a n e h a s z n á l j u k a f e j s z ű k í t ő p á r n á t ,
amennyiben a gyermek súlya már meghaladta a 6 kilogrammot.
2 A GYEREKÜ LÉS BESZERELÉSE A GÉPKOC SIBA
A Gy ere kül és b esz ere lhe tő mi nd t alp pal (opcionális), mind pedig talp nélkül. Mindkét
esetben csakis a menetiránnyal ellenkező
irányban lehet beszerelni.
2.1 A vállvéd ők előzetes f elszere lése
A Gyereküléshez két különböző típusú vállvédő tartozik (A és B), a modelltől függően.
A Gyerekülés használatba vétele előtt fel kell
szerelni a vállvédőket, a következők szerint:
• A t í p u s ú v á l l v é d ő k ( Á b r á k : 9 A , 9 B é s 9 C ) e s e tén: bújtassuk át a vállvédőket a textilhuzaton
lévő nyílásokon (nem az alatta lévő szerkezet en) ol ymó don, h ogy az öve k a vá llvé dők
fölött maradjanak. Fűzzük be a lábak közotti
szíjat az öv csatjába.
• B t í p u s ú v á l l v é d ő k ( Á b r á k : 10 A é s 1 0 B ) : a
Gyerekülés öveit bújtassuk át a két vállvédőn. A lábak közöt ti szíjat fűzzük be az öv
csatjába.
2.2 BESZERELÉS TALPPAL EGYÜTT
A talppal is rendelkező biztonsági Gyerekülés felszerelésekor a következők szerint kell
eljárni:
Page 90

90
91
1. Csatoljuk le a Gyerekülést a talpról a háttámla mögött található kioldó kar meghúzásával, s ezzel egyidejűleg emeljük fel a
fogantyú segítségével (11-es ábra).
2. A talpat helyezzük az autó kiválasztott
ülésére a 12-es számú ábra szerint. Úgy
kell a Gyerekülést elhelyezni, hogy az neki
támaszkodjék az autóülés támlájának.
3. Húzzuk ki az autó biztonsági övét és csa-
toljuk be a megfelelő helyre. Vízszintesen
(a medence résznél) húzzuk át a két megfelelő övvezetőben (L), amelyeket kék nyíl
jelez, s a lehető legjobban feszítsük meg
(13-as ábra).
4. Mielőtt a biztonsági Gyerekülést ráhe-
lyeznénk a talpra, győződjünk meg arról,
hogy a kitámasztó rögzítő zárva van-e
(14-es ábra).
5. Hel yez zük rá a tal pra a bi zto nsá gi G yere kü-
lést (a menetiránnyal ellentétes irányban).
Addig nyomjuk lefelé, amíg be ne m akadt
(hallani lehet a helyes rögzítésre utaló
„clack”-ot). (15-ös ábra).
6. Ellenőrizzük, hogy a biztonsági Gyerekü-
lés megfelelően rákapcsolódott-e a talpra:
próbáljuk meg kiemelni az első és a hátsó
részénél fogva.
7. Vegyük kézbe az autó átló irányú biztonsági
övét és helyezzük be a megfelelő öv vezetőbe (O), amely a Gyerekülés háttámlájának
hátulján található (16-os ábra). FIGYELEM!
Az átló irányú övnek az utazás ideje alatt
MINDIG benne kell maradnia ebben az
övvezetőben.
8. A lehető legjobban feszítsük meg a bizton-
sági övet, s győződjünk meg arról, hogy az
öv nincs-e megcsavarodva.
9. Fordítsuk a fogantyút A pozícióba, s győ-
ződjünk meg arról, hogy megfelően neki
támaszkodik-e az autó ülésének (17-es
ábr a).
FIGYELEM! A beszerelést követően MINDIG
ellenőrizni kell, hogy az autó biztonsági öve
korrekt módon megfeszül-e és egyenletes-e
minden pontnál, illetve nincs-e megcsavarodva. SOHA ne kapcsoljuk be a biztonsági övet a
fentiekben leírtaktól eltérő módon.
A biztonsági gyerekülés kiemelése a talp
kiszerelése nélkül.
1. Húzzuk ki a gyerekülés támláján elhelyezett
övvezetőből az átlós biztonsági övet, anél-
kül, hogy kicsatolnánk az övcsatból.
2. Állítsuk vissza a fogantyút függőleges (B)
állásba (5-ös ábra).
3. Oldjuk ki a Gyerekülést a korábbiakban
leírtak szerint.
2.3 BESZERELÉS TALP NÉLKÜL
Amennyiben a biztonsági Gyerekülést talp
nélkül szereljük be, az alábbiak szerint kell
eljárni:
1. Hajtsuk ki a kitámasztó rögzítőt és helyezzük a biztonsági Gyerekülést a kiválasztott
helyre (18-as ábra).
2. Húzzuk ki az autó biztonsági övét és csatoljuk be a megfelelő helyre, úgy, hogy az
öv víz szi nte s (me den ce) r ész ét h ely ezz ük a
Gyerekülés két övvezetőjébe (K), amelyeket
kék nyilak jeleznek (19-es ábra).
3. Vegyük kézbe az autó biztonsági övének
átló irányú szárát és helyezzük a Gyerekülés
háttámlájának hátulján található övvezetőbe (O) (20-as ábra). FIGYELEM! Az átló irányú
övnek az utazás ideje alatt MINDIG benne
kell maradnia ebben az övvezetőben.
4. Az övet a lehető legjobban meg kell feszíteni, tovbbá ellenőrizni kell, hogy nincs-e
valahol megcsavarodva.
5. A fogantyút A állásba kell fordítani, úgy,
hogy az neki támaszkodjék az autó ülésének
(21-es ábra).
A biztonsági gyerekülés kiszerelése:
1. Kapcsoljuk ki az autó biztonsági övét az
övcsat megnyomásával.
2. A fogantyút állítsuk vissza függőleges (B)
helyzetbe.
3. Húz zuk ki az övet az átlós és a vizszíntes
övvezetőkből.
3. TOVÁBBI MŰVELETEK
3.1 A GYERMEK ELHELYEZÉSE A GYEREKÜLÉSBEN
1. Hajtsuk fel az ülőkén lévő textil nyelvet, s
tartsuk benyomva az alatta található övszabályozó gombot. Lehúzással lazítsuk meg
a Gyerekülés öveit (22-es ábra).
2. Csatoljuk ki az övcsatot a piros gomb benyomásával és az öveket rakjuk szét két
oldalra (23-as ábra).
3. Ültessük be a gyermeket.
4. Helyezzük egymásra a két csatot és együtt
csatoljuk be azokat úgy, hogy a „click” kat-
Page 91

91
tanás hallatszódjék (24-es ábra). FIGYELEM!
Soha ne próbáljuk meg egyenként beledugni és becsatolni a két övet.
5. A Gye rek ülé s bi zto nsá gi öv eit húz zu k me g
és rögzítsük az arra szolgáló övszabályozó
szíj segítségével (25- ös ábra).
3.2 AZ ÖVEK HOSSZÚSÁGÁNAK BEÁLLÍTÁSA
FIGYELEM! Az öveket mindig a gyermek
növekedéséhez kell igazítani. A Gyerekülés
beszerelése előtt az öveket a megfelelő magasságba kell állítani.
Akkor megfelelő a beállítás, ha az övek a háttámlából a gyermek vállának magasságában
indulnak (26-os ábra).
Az öv vállmagassága 3 fokozatban állítható.
Az övek áthelyezésekor a következők szerint
kell eljárni:
1. El kell távolítani a vállvédőket, kihúzva azokat
a textil huzat nyílásain keresztül.
2. A piros gomb benyomásával csatoljuk ki
az öveket.
3. Hátulról húzzuk ki az öveket a háttámlából,
majd fűzzük be a gyermek magasságának
leginkább megfelelő nyíláson (Ábrák: 27A
és 27B).
FIGYELEM! Győződjünk meg arról, hogy az
övek mindig az öv vezetők (R) és a borítás
között haladjanak.
FI GYEL EM! A fe jsz űkí tő pá rna biz tos ítj a, h ogy
az újszülött a 6 kg-os súly elérésig a megfelelő
körülmények között tartózkodjon a gyerekülésben, a feje és a nyaka mindig az ideális
pozícióban legyen.
3.3 A GYEREK ÜLÉS ÜLŐ VAGY RINGATÓ HELYZETE
(ALVÓ POZÍCIÓ)
Amikor a gyerekülés nincs az autóba beszerelve, ringatóként vagy alvó pozícióban is
használható.
Ringathatóvá úgy tehető, ha behajtjuk az ülőke alatti kitámasztó rögzítőt (14-es ábra) és a
fogantyút a C helyzetbe állítjuk (5-ös ábra).
Ha x, ülő helyzetben kívánjuk használni, ki kell
ha jta ni a k it áma szt ó rö gzí tőt é s a f oga nt yút D
pozícióba kell állítani (5-ös ábra).
A g yer ekü lés t cs ak s ta bil és v ízs zin tes fel üle ten
szabad elhelyezni.
FIGYELEM! A Gyerekülés hordozása előtt
a fogantyút mindig állítsuk vissza a B
(függőleges) helyzetbe.
FIGYEL MEZ TETÉ S! A g yermeke t ne
hagyjuk felügyelet nélkül.
FIGYELMEZTETÉS! Mindig biztonságos őrzésre szolgáló eszközöket
használjunk.
FIGYEL MEZ TETÉ S! Veszél yes a Gyerekülést magasan, például asztalon,
széken, stb. Elhelyezni.
FIGYELMEZTETÉS! Ez a Gyerekülés
nem alkalmas hosszú ideig történő
alvásra.
FIGYELMEZTETÉS! Ne használjuk
a gyerekülést, ha a gyermek már
egyedül képes ülni.
A gyerekülés nem helyettesíti a kiságyat vagy
a bölcsőt. Amikor a gyermek aludni akar, megfelelő kiságyba vagy bölcsőbe kell fektetni.
Ne használjuk a Gyerekülést, ha bármelyik
része eltörött vagy megsérült.
3.4 HASZNÁL ATA BABAKOCSIKÉNT
FIGYELEM! A babakocsiként történő használat
esetén a babakocsi használati utasításában
foglaltak az irányadók. A CHICCO babakocsik
ún. CLICK CLACK szisztémával vannak ellátva, a vázon különleges szerkezet található,
amely lehetővé teszi a Gyerekülés felszerelését
közvetlenül a babakocsira, minden egyéb
tartozék használata nélkül.
A Gyerekülést az alábbiak szerint lehet a babakocsira szerelni:
1. Vegyük kézbe a Gyerekülést, úgy, hogy
an nak fog ant yúj a B ( füg gől ege s) h ely zet be n
legyen (28-as ábra).
2. Illesszük a Gyerekülés két Clik Clak csatlakozó
csonkját (N) a babakocsi vázára, különös
gyelmet fordítva arra, hogy azok mindkét oldalon a megfelelő helyre kerüljenek.
Hal lani l ehet a beak adást jelző click -et (2 9es ábra).
FIGYELMEZTETÉS! A használat előtt ellenőrizzük, hogy a babakocsi és a Gyerekülés
rögzítő szerkezetei megfelelően egymásba
illeszkedtek-e.
A Gyerekülés leszerelése a babakocsiról:
1. A fogantyút helyezzük vissza a függőleges
helyzetbe (B).
Page 92

92
93
2. Húzzuk meg a hátsó kioldó kart.
3. Emeljük le a Gyerekülést és helyezzük megfelelő, vízszintes felületre.
FIGYELEM: A Gyerekülés beakasz tása és kioldása úgy is elvégezhető, hogy a gyermek
benne ül, még akkor is, ha a baba súlya kissé
megnehezíti a művelet végrehajtását. Ebben
az esetben ajánlatos különös gondossággal
végrehajtani a fent leírtakat.
3.5 TISZTÍTÁS ÉS ME GÓVÁS
A HUZAT TISZTÍTÁSA
A Gyerekülés textilből készült huzata levehető
és mosható, kéz zel vagy mosógépben, 30
fokos vízben.
Először csatoljuk ki az öveket, majd húzzuk ki
a két övet és az övcsatot a megfelelő nyíláson, s ezt követően vegyük le a textil huzatot
(30-as ábra).
A mosásnál kövessük a huzaton lévő címke
utasításait, amelyen az alábbi jelek találhatók:
Gépi mosás 30°C
Kézi mosás
Nem fehéríthető
Szárazon nem
moshatò moshatòmoshatò
Szárìtógépben nem száí ìtható
Nem vasalható
Soha ne használjunk durva mosószereket
vagy oldószert. A huzatot ne centrifugázzuk,
kicsavarás nélkül hagyjuk megszáradni.
A MŰANYAG ÉS FÉM RÉSZE K TISZTÍTÁSA
A műanyagból vagy befestett, fémből készült
ré sze k tis zt ítá sáh oz k izá ról ag e gy n edv es tö rlőkendőt használjunk. Soha ne használjunk
durva mosószert vagy oldószer t.
A Gyerekülés mozgatható, eltávolítható
részeit soha nem kell semmilyen módon
beolajozni.
AZ EGYES ELEMEK ÉPSÉGÉNEK ELLENŐRZÉSE
Ajánlott az alábbi alkotó elemek épségének
és elhasználódottságának rendszeres ellenőrzése:
• A t e x t i l h u z a t : e l l e n ő r i z z ü k , h o g y a b é l é s
épségben van-e, nem látszik-e ki a huzatból.
Ellenőrizzük a varrásokat, ezeknek mindig
hibátlannak kell lenni.
• Ö v e k : e l l e n ő r i z z ü k , n i n c s e n e k - e r e n d e l l e n e sen kiszálasodva a textilből készült részek, s
emiatt nincs-e elvékonyodva a szabályozó
szíj, a lábak közötti szíj, a vállövek, továbbá a
szabályozó gomb mentén lévő övrész.
• M ű a n y a g o k : e l l e n ő r i z z ü k a z ö s s z e s , m ű anyagból készült rész elhasználódását.
Nem lehetnek rajtuk sérülések vagy elszíneződések.
FIGYELEM! Amennyiben a Gyerekülés eldeformálódott vagy erősen elhasználódott, ki kell
cs eré lni : elv esz ít het te a biz ton ság os h asz nál atot garantáló jellemző tulajdonságait.
A TERMÉK MEGÓVÁSA
Amikor a Gyerekülés nincs beszerelve a gépkocsiba, ajánlatos annak száraz helyen történő
tárolása, hőtől, portól, nedvességtől, tűző
napfénytől távol.
A TERMÉK HULL ADÉKKÉNT TÖRTÉNŐ FELD OLGOZÁSA
Amennyiben a Gyerekülés használati ideje
le jár t, s nem alk alm az zuk tová bb, hel yez zü k a
hulladékgyűjtőbe. A környezet megkímélése
érdekében különítsük el egymástól a különböző alapanyagból készült részeket, a szelektív
hulladékgyűjtésre vonatkozó, adott országban
érvényes jogszabályok szerint
TOVÁBBI INFORMÁCIÓK:
ARTSANA SPA
Servizio Clienti – Ügyfélszolgálat
Via Saldarini Catelli 1
22070 Grandate (COMO)
Italia
Telefon – (olaszországi) zöld szám:
80 0.18 8. 898
www.chicco.com
Page 93

93
CHICCO
AUTO-FIX FAST
Gr. 0+ (0-13k G )
UPUTE ZA UPOR ABU
SADRŽA J:
1. UVOD
1.1 NAPOMENE
1.2 OBILJEŽJA PROIZVODA
1.3 OPIS SASTAVNIH DIJELOVA
1.4 POLOŽAJ RUČKE
1.5 OGRANIČENJA I UVJETI UPORABE KOJI
SE ODNOSE NA PROIZVOD I NA SJEDIŠTE U AUTOMOBILU
2. INSTALACIJA U AUTOMOB ILU
2.1 POČETNA KONFIGURACIJA NARAMENICA
2.2 INSTALACIJA S BAZOM
2.3 INSTALACIJA BEZ BAZE
3. DALJNJE RAD NJE
3.1 POSTAVLJANJE DJETETA NA SJEDALI-
CU
3.2 PODEŠAVANJE POLOŽAJA POJASEVA
3. 3 FI KSN I ILI POK RE TNI POLOŽ AJ SJE DALA
(UPORABA U LEŽEĆEM POLOŽAJU)
3.4 UPORABA S KOLICIMA
3.5 ČIŠĆENJE I ČUVANJE
1. UVOD
1.1 NAPOMENE
VRLO VAŽNO: ODMAH PROČITATI
• Č U V A T I O V A J P R I R U Č N I K Z A B U D U Ć E
POTREBE.
• Z a m o n t i r a n j e i i n s t a l i r a n j e p r o i z v o d a
strogo se pridržavati uputa. Izbjegavati korištenje proizvoda od strane druge
osobe koja nije pročitala upute.
• PA Ž N J A ! N a o s n o v u s t a t i s t i k a o n e s r e ć a -
ma, općenito su stražnja sjedišta u vozilu
sigurnija od prednjih: preporuča se dakle
instalirati Sjedalicu na stražnjem sjedištu.
Najsigurnije sjedište je stražnje u sredini,
ako je opremljeno pojasom u tri točke.
• PA Ž N J A ! O Z B I L J N A O PA S N O S T ! N i k a d n e
koristiti ovu Sjedalicu na prednjem sjedištu
koje je opremljeno frontalnim zračnim
jastukom. Sjedalica se može instalirati na
prednjem sjedištu samo ako je frontalni zračni jastuk deaktiviran: provjeriti sa
proizvođačem automobila ili u priručniku
s uputama za automobil mogućnost isključivanja zračnog jastuka. Preporuča se
u svakom slučaju povući što je moguće
više unatrag sjedište ovisno o tome ima li
drugih putnika na stražnjem sjedištu.
• U svakom slučaju preporučljivo je da svi
putnici u automobilu budu informirani o
načinu na koji se oslobađa dijete u slučaju
opasnosti.
• P r i p a z i t i k a k o s e i n s t a l i r a S j e d a l i c a u a u t o mobilu kako pokretno sjedište ili vrata ne
bi utjecala na istu.
• N i j e d n a S j e d a l i c a n e m o ž e j a m č i t i p o t p u n u
sigurnost djeteta u slučaju nezgode, ali
uporaba ovog proizvoda smanjuje rizik
od teških ozljeda ili smrti.
• R i z i k o d t e š k i h o z l j e d a d j e t e t a , n e s a m o
u slučaju nezgoda, već i u drugim situacijama
(npr. kod naglih kočenja itd.) povećava se
ukoliko se upute iz ovog priručnika ne slijede strogo: uvijek provjeriti da je Sjedalica
ispravno zakačena za sjedište.
• U s l u č a j u d a j e S j e d a l i c a o š t e ć e n a , d e f o r mirana ili jako istrošena, mora se zamijeniti
novom, obzirom da bi to moglo značiti da
je izgubila izvorna obilježja sigurnosti.
• N e v r š i t i n i k a k v e i z m j e n e i l i d o d a t k e n a
proizvodu bez odobrenja proizvođača.
• N e i n s t a l i r a t i d o d a t k e , r e z e r v n e d i j e l o v e
ili komponente koje ne dostavlja proizvođač.
• N e p u s t i t i n i k a d d i j e t e s a m o u S j e d a l i c i b e z
nadzora, ni u kojem slučaju.
• Nikad ne pustiti nezakačenu Sjedalicu na
sjedištu automobila, mogla bi udariti ili
ozlijediti putnike.
• N i k a d n e p o s t a v l j a t i b i l o š t o , o s i m d o z v o l j e ni h do dat aka za p roi zvo d, i zm eđu s jed išt a
automobila i sjedalice, ili između Sjedalice
i djeteta: u slučaju nezgode Sjedalica bi
mogla neispravno raditi.
HR
Page 94

94
95
• U s l u č a j u d a s e a u t o m o b i l o s t a v i i z r a v n o n a
suncu, preporuča se pokriti Sjedalicu.
• K a o p o s l j e d i c a , č a k i m a n j e n e z g o d e ,
Sjedalica bi se mogla oštetiti bez da se
to vidi golim okom: stoga je potrebno
zamijeniti je.
• N e k o r i s t i t i r a b l j e n e S j e d a l i c e : s t r u k t u r a
bi mogla biti oštećena a da se to ne vidi
golim okom, dok bi sigurnost proizvoda
mogla biti ugrožena.
• P r e s v l a k a s e m o ž e z a m i j e n i t i i s k l j u č i v o
drugom koju odobri proizvođač, Obzirom da predstavlja sastavni dio Sjedalice.
Sjedalica se ne smije nikad koristiti bez
presvlake, kako se sigurnost djeteta ne
bi ugrozila.
• P r o v j e r i t i d a t r a k a p o j a s a n i j e z a p e t l j a n a , t e
pripaziti da se pojas ili dijelovi Sjedalice ne
zaglave u vratima ili da se ne trljaju o oštre
predmete. Ukoliko se na pojasu pojave
rezovi ili se niti odvajaju neophodno je
zamijeniti ga.
• P r o v j e r i t i d a s e n e p r e v o z e p r e d m e t i i l i
prtljaga koji nisu sigurno pričvršćeni, i to
pogotovo na stražnjoj površini unutar vozila: u slučaju nezgode ili naglog kočenja
mogli bi ozlijediti putnike.
• P r o v j e r i t i d a s v i p u t n i c i u a u t o m o b i l u k o r i st e vl ast iti sig urn osn i po jas i to z bo g vl ast ite
sigurnosti a i zato da u tijeku vožnje, u
slučaju nezgode ili naglog kočenja, ne bi
ozlijedili dijete.
• U s l u č a j u d u l j e v o ž n j e p o t r e b n o j e č e s t o
za ust avl jati se. Dij ete s e vr lo l ako umo ri. N i
u kojem slučaju ne smije se vaditi dijete
sa Sjedalice dok je automobil u pokretu.
Ukoliko je djetetu potrebna pažnja, valja
pronaći sigurno mjesto i zaustaviti se.
• N o v o r o đ e n č a d k o j a j e p r e r a n o r o đ e n a , s a
manje od 37 tjedana trudnoće mogla bi
biti u opasnosti u Sjedalici. Ta novorođenčad bi mogla imati teškoća u disanju dok
sjedi u Sjedalici. Preporučamo dakle da
se obratite vašem liječniku ili bolničkom
osoblju kako bi procijenili Vaše dijete i
preporučili odgovarajuću Sjedalicu prije
nego li odete iz bolnice.
• T v r t k a A r t s a n a o t k l a n j a s v a k u o d g o v o r n o s t
za neprimjerenu uporabu proizvoda.
1.2 OBILJEŽ JA PROIZVODA
• O v a S j e d a l i c a j e h o m o l o g i r a n a k a o “ G r u p a
0+”, za p rije voz dje ce od rođ enja do 13 k g
težine (od 0 do 10 mjeseci/godinu dana
otprilike), poštujući europski pravilnik ECE
R44/04.
• Homologacija je tipa “Universal”, tako da
se Sjedalica može koristiti u bilo kojem
modelu automobila. PAŽNJA! “Universal”
znači da je kompatibilna sa većinom, ali ne
i sa svim sjedištima automobila.
VAŽNA NAPOMENA
1. Ovo je proizvod za držanje djeteta
“Universal”, homologiran u skladu sa
Pravilnikom ECE R44/04 te kompatibilan
sa većinom, ali ne i sa svim sjedištima
automobila.
2. Do savršene kompatibilnosti lakše se
dolazi u slučajevima kada proizvođač
automobila izjavi u priručniku za uporabu da vozilo predviđa instalaciju “Univerzalnih” proizvoda za držanje djece
navedene dobi.
3. Ovaj proizvod za držanje klasiciran je
kao “Univerzalan” u skladu sa strožim
kriterijima homologacije u odnosu na
prethodne modele koji ne sadrže ovu
napomenu.
4. Prikladan za uporabu u vozilima opre-
mljenim sigurnosnim pojasom u 3 točke,
statičkim ili sa elementom za namotavanje, homologiranim na osnovu Pravilnika UN/ECE br. 16 ili drugih istovrijednih
standarda.
5. U slučaju dvojbe, obratiti se proizvođaču
proizvoda za držanje ili prodavaču.
1.3 OPIS SASTAVNIH DIJELO VA
Slika 1 (3/4)
A. Ručka
B. Krović za zaštitu od sunca
C. Tekstilna podloga
D. Jastuk za podešavanje (*)
E. Baza (**)
Slika 2 (Pr ednja str ana)
F. Otvori za prolaz pojasa
G. Pojasevi Sjedalice
Page 95

95
H. Naramenice (*)
I. Gumb za podešavanje pojaseva (ispod
tekstilne strukture)
J. Traka za podešavanje pojaseva
Slika 3 (Pr ofil)
K. Vodilica pojasa vozila na Sjedalici
L. Vodilica pojasa vozila na bazi
M. Gumbi za okretanje ručke
N. Klik Klak osovine (za pričvršćivanje na
kolica)
Slika 4 (Od ostraga)
O. Vodilica dijagonalnog pojasa automobila
P. Ručka za otkačivanje (s baze i sa kolica)
Q. Otvori za prolaz pojasa
R. Element vodilica za pojaseve Sjedalice
S. Element za blokiranje i stabiliziranje
(*) Oblik i model mogu se razlikovati u ovisnosti o inačicama Sjedalice.
(**) Opcionalno
1.4 POLOŽAJ R UČKE
Ručka Sjedalice podesiva je u 4 položaja
(Slika 5).
A. Položaj prijevoza u automobilu (PAŽNJA:
to je jedini dozvoljeni položaj za vrijeme
vožnje u automobilu).
B. Položaj za ručni prijenos.
C. Ležeći položaj za ljuljanje ili za zakačiti
za predviđena kolica Chicco.
D. Fiksni ležeći položaj.
Za podešavanje pritisnuti istovremeno
gumbe (M) na ručki i okrenuti u odabrani
položaj sve dok ne čujete skok.
1.5 OGRANIČENJA I UVJETI UPORABE KOJI
SE ODNOSE NA PROIZVOD I NA SJEDIŠTE U
AUTOMOBILU
PAŽNJA! Strogo se pridržavati slijedećih
ograničenja i uvjeta uporabe koji se odnose
na proizvod i sjedište u automobilu u protivnom sigurnost nije zajamčena.
• S j e d a l i c a s e m o ž e i n s t a l i r a t i n a p r e d n j e m
sjedištu automobila do vozača ili na bilo
kojem stražnjem sjedištu. U svakom slučaju sjedište automobila mora biti okrenuto
u smjeru kretanja. Nikad ne koristiti ovu
Sjedalicu na sjedištima koji su okrenuti bočno ili obrnuto od smjera kretanja
(Slika 6).
• S j e d i š t e a u t o m o b i l a m o r a b i t i o p r e m l j e n o
sigurnosnim pojasom u 3 točke, statičkim
ili sa elementom za namotavanje, homologiranim na osnovu Pravilnika UN/ECE
Br. 16 ili drugih istovrijednih standarda
(Slika 7).
• PAŽNJA! Nikad ne instalirati Sjedalicu sa
pojasom automobila pričvršćenim u samo
dvije točke (Slika 8).
• Nikad ne koristiti jastuk za regulaciju ako
je dijete teško više od 6 kg.
2. INSTALACIJA SJE DALICE U AUTOMOBILU
Sjedalica se može instalirati sa bazom (opcionalno) ili bez. U oba slučaja konguracije,
mora se instalirati samo obrnuto u odnosu
na smjer kretanja.
2.1 POČETNA KONFIGURACIJA NARAMENICA
Sjedalica je opremljena s 2 različita tipa naramenica (A i B) ovisno o inačici. Prije nego
li se koristi Sjedalica, kako bi se montirale
naramenice, postupiti kako slijedi:
• Naramenice inačica A (Slika 9A, 9B i 9C):
provući naramenice kroz otvore tekstilnog dijela (ne donje strukture) kako bi
pojasevi ostali postavljeni iznad istih. Provući element između nogu kroz kopču
pojaseva.
• N a r a m e n i c e i n a č i c a B ( S l i k a 1 0 A i 1 0 B ) :
provući pojaseve Sjedalice kroz dvije naramenice. Provući element između nogu
kroz kopču pojaseva.
2.2 INSTALACIJA S BA ZOM
Za instalaciju Sjedalice sa bazom na sjedištu
automobila, postupiti kako slijedi:
1. Otkačiti Sjedalicu sa baze na način da
povučete ručicu za otkačivanje postavljenu ispod leđnog naslona i istovremeno
podići pomoću ručke (Slika 11).
2. Postaviti bazu na odabrano sjedište za
instaliranje, te je okrenuti kao na Slici
12, tako da bude u dodiru sa naslonom
Page 96

96
97
sjedišta automobila.
3. Povući sigurnosni pojas automobila i
zakačiti ga za odnosnu kopču, tako da
provučete vodoravni dio (trbušni) kroz
dvije predviđene vodilice (L) označene
plavom strelicom te što je više moguće
nategnuti pojas (Slika 13).
4. Prije nego li umetnete Sjedalicu u bazu,
provjeriti da je element za blokiranje
dobro zatvoren (Slika 14).
5. Umetnuti Sjedalicu u bazu (okrenutu u
obrnutom smjeru u odnosu na smjer
kretanja) i gurnuti je prema dolje sve dok
se ne z aka či (č uti će s e zv uk k oji pot vrđ uje
da je zakačen) (Slika 15).
6. Provjeriti da je Sjedalica ispravno zakačen a za ba zu p okuš aje m po di zanj a ka ko
prednje tako i stražnje strane.
7. Uhvatiti dijagonalni pojas automobila i
provući kroz predviđenu vodilicu (O) na
stražnjoj strani naslona Sjedalice (Slika
16). PAŽNJA! Dijagonalni pojas za vrijeme vožnje mora UVIJEK biti uvršten u
navedenu vodilicu.
8. Što je više moguće nategnuti pojas, bez
da ostane previše trake i dobro provjerivši
da nije zapetljan.
9. Okrenuti ručku u položaj A provjerivši
da se naslanja na sjedište automobila
(Slika 17).
PAŽNJA! nakon instalacije UVIJEK provjeriti
da je pojas automobila ispravno nategnut
i da je ravnomjerno raspoređen u svim
dijelovima, te isto tako da nije zapetljan.
NIKAD ne postavljati pojas automobila u
položaje različite od navedenih.
Za deinstaliranje sjedalice ostavivši bazu
instaliranu u automobilu:
1. Izvući iz vodilice naslona dijagonalni
pojas bez da se otkači od kopče.
2. vratiti ručku u okomiti položaj B (Slika
5).
3. Otkačiti Sjedalicu kao što je prikazano u
prethodnom tekstu.
2.3 INSTALACIJA BE Z BAZE
Za instalaciju Sjedalice bez baze, postupiti
kako slijedi:
1. Izvaditi element za blokiranje i stabilizaciju i postaviti Sjedalicu na odabrano
sjedište automobila (Slika 18).
2. Povući sigurnosni pojas automobila i
zakačiti ga za odnosnu kopču, tako da
provučete vodoravni dio (trbušni) kroz
dvije predviđene vodilice (K) sjedalice
označene plavom strelicom (Slika 19).
3. Uhvatiti dijagonalni dio pojasa automobila i provući kroz predviđenu vodilicu
(O) na stražnjoj strani naslona Sjedalice
(Slika 20). PAŽNJA! Dijagonalni pojas za
vrijeme vožnje mora UVIJEK biti uvršten
u navedenu vodilicu.
4. Što je više moguće nategnuti pojas, bez
da ostane previše trake i dobro provjerivši
da nije zapetljan.
5. Okrenuti ručku u položaj A provjerivši
da se naslanja na sjedište automobila
(Slika 21).
Za deinstaliranje sjedalice:
1. Otkačiti pojas automobila pritiskom na
kopču.
2. Vratiti ručku u položaj B (okomiti).
3. Izvući pojas iz dijagonalne vodilice i iz
vodoravnih.
3. DODATNE RADNJE
3.1 POSTAVLJANJE DJETETA NA SJEDALIC U
1. Podignuti međunožni element od tkanine, držati pritisnutim gumb za regulaciju
te povući pojaseve Sjedalice na način da
ih olabavite (Slika 22).
2. Otvoriti kopču, pritisnuvši crveni gumb, i
držati pojaseve odvojene (Slika 23).
3. Položiti dijete.
4. Preklopiti dva jezička kopče i umetnuti
ih zajednički u kopču sve dok ne čujete
klik (Slika 24). PAŽNJA! Nikad ne umetnuti jezičke u kopču jedan po jedan ili
samo jedan.
5. Napeti sigurnosne pojaseve Sjedalice na
način da povučete predviđenu traku za
podešavanje (Slika 25).
Page 97

97
3.2 PODEŠAVANJE P OLOŽAJA POJASE VA
PAŽNJA! Pojasevi uvijek moraju biti prilagođeni rastu djeteta. Prije nego li instalirate
Sjedalicu u automobilu potrebno ih je podesiti na ispravnu visinu.
Za ispravno podešavanje, pojasevi moraju
izaći iz naslona na visini ramena djeteta
(Slika 26).
Sjedalica sadrži 3 položaja u visini.
Za premještanje pojaseva postupiti kako
slijedi:
1. Ukloniti naramenice tako da ih izvučete
iz otvora tekstilnog dijela.
2. Otvoriti kopču pojaseva pritisnuvši crveni gumb.
3. Izvući pojaseve iza naslona i umetnuti
ih u otvor prikladniji visini djeteta (Slika
27A i 27B).
PAŽNJA! Provjeriti da pojasevi uvijek prolaze
između elementa vodilice (R) i oklopa.
PAŽNJA! Jastuk za regulaciju jamči djetetu
od rođenja do 6 kg ispravan položaj za
vrat i leđa.
3.3 FIKSNI ILI LJ ULJAJUĆI POLOŽ AJ SJEDALA
(UPORABA U LEŽEĆEM POLOŽAJU)
Kada se ne koristi u automobilu, Sjedalica se može isto tako koristiti za ljuljanje
ili ležanje.
Kako bi se mogla ljuljati, zatvoriti element za
blokiranje i stabiliziranje (Slika 14) podesiti
ručku u položaj C (Slika 5).
Kako biste koristili Sjedalicu u ksnom
položaju, izvući element za blokiranje i
stabilizaciju te postaviti ručku u položaj
D (slika 5).
Postaviti samo na stabilnim i vodoravnim
površinama.
PAŽNJA! Prije vožnje Sjedalice, uvijek vratiti
ručku u položaj B (okomiti).
NAPOMENA! Ne ostavljati dijete
bez nadzora.
NAPOMENA! Uvijek koristiti sustav
za zadržavanje.
NAPOMENA! Opasno je koristiti Sjedalicu na podignutim površinama
kao što su stolovi, stolice, itd.
NAPOMENA! Ova Sjedalica nije
predviđena za dulja razdoblja
spavanja.
NAPOMENA! Ne koristiti Sjedalicu
ukoliko je dijete u stanju biti samostalno u sljedećem položaju.
Sjedalica ne zamjenjuje krevet ili kolijevku.
Ukoliko je djetetu potreban san, trebalo
bi ga položiti u prikladni krevetić ili kolijevku.
Ne koristiti Sjedalicu ukoliko je bilo koji dio
razbijen ili nedostaje.
3.4 UPORABA S KOLIC IMA
PAŽNJA! Za uporabu sa kolicima pridržavati se priručnika za kolica. Kolica CHICCO
opremljena sustavom “CLIK CLAK” imaju
ru čke s a po sebn im e leme ntim a ko ji om ogućuju pričvršćivanje Sjedalice izravno na
kolica, bez da je potrebno koristiti dodatni
pribor.
Kako biste zakačili Sjedalicu za kolica postupiti kako slijedi:
1. Uhvatiti sjedalicu s ručkom u okomitom
položaju B (Slika 28).
2. Zakačiti dvije osovine za pričvršćivanje
“Clik Clak” Sjedalice (N) za ručke kolica,
posebnu pažnju obrativši na to da se
zakači za obje strane. Čuti će se zvuk
zakačivanja (Slika 29).
NAPOMENA Prije uporabe provjeriti da su
uređaji za pričvršćivanje Sjedalice ispravno
zakačeni.
Za otkačivanje Sjedalice od kolica:
1. Vratiti ručku u okomiti položaj (B).
2. Povući stražnju ručku za otkačivanje.
3. Pomaknuti i položiti Sjedalicu na ravnu
površinu.
PAŽ NJA: Zak ači van je i otk ači vanj e mo gu s e
vršiti i dok je dijete u Sjedalici iako bi zbog
težine djeteta te radnje mogle biti manje
praktične. U tom slučaju preporuča se vršiti
iste radnje s posebnom pažnjom.
Page 98

98
99
3.5 ČIŠĆENJE I ČU VANJE
ČIŠĆENJE PRESVLAKE
Tekstilna presvlaka Sjedalice može se potpuno odvojiti i prati ručno ili u perilici na
30°C.
Kako biste je oprali, otkačiti tekstilni dio
nakon što ste izvukli dva kraja pojaseva i
kopču iz odnosnih otvora (Slika 30).
Za pranje slijediti upute navedene na etiketi
presvlake koja sadrži slijedeće simbole za
pranje:
Pranje u perilici na 30°C
Ručno pranje
Ne izbjelivati
Ne prati kemijski ecco
Ne sušiti u sušilici
Ne glačati stirare
Nikad ne koristiti abrazivna sredstva za
čišćenje ili rastvarače. Ne centrigurati presvlaku i pustiti da se osuši bez ožimanja.
ČIŠĆENJE PL ASTIČNIH I METALNIH DIJELOVA
Za čišćenje plastičnih dijelova ili dijelova
od lakiranog metala koristiti samo vlažnu
krpu. Nikad ne koristiti abrazivna sredstva
za čišćenje ili rastvarače.
Pokretni dijelovi Sjedalice ne smiju se nikako
podmazivati.
KONTROLA CJELOVIT OSTI DIJELOVA
Preporuča se redovito provjeravati cjelovitost ili stanje istrošenosti slijedećih
komponenata:
• Te k s t i l n a p r e s v l a k a : P r o v j e r a v a t i d a n e
izlazi podstava ili da se ne gube dijelovi
iste. Provjeriti stanje šavova koji moraju
uvijek biti cjeloviti.
• P o j a s e v i : p r o v j e r i t i d a n i j e d o š l o d o v i d ljivog oslabljenja tekstilne strukture sa
smanjenjem debljine oko trake za po-
dešavanje, elementa između nogu, oko
naramenica i u dijelu ploče za podešavanje pojaseva.
• P l a s t i k e : p r o v j e r i t i s t a n j e i s t r o š e n o s t i
plastičnih dijelova koji ne smiju pokazivati vidljive znakove oštećenja ili da su
izblijedjeli.
PAŽNJA! U slučaju da je Sjedalica oštećena,
deformirana ili jako istrošena, mora se zamijeniti: to bi moglo značiti da je izgubila
izvorna obilježja sigurnosti.
ČUVANJE PROIZ VODA
Kada nije instalirana na automobilu preporuča se čuvanje Sjedalice na suhom mjestu,
dalje od izvora topline i zaštićena od prašine, vlage i izvorne sunčeve svjetlosti.
ZBRINJAVANJE PROIZ VODA
Kada se dostigne predviđeni limit uporabe
Sjedalice, potrebno je prekinuti uporabu
iste i zbrinuti je. U cilju poštivanja okoline,
odvojiti različite vrste otpada u skladu sa
zakonskim odredbama na snazi u vlastitoj
zemlji.
ZA DODATNE INFORM ACIJE:
ARTSANA SPA
Služba za Korisnike
Via Saldarini Catelli, 1
22070 Grandate COMO-ITALIA
Tel. N° verde 800.188.898
www.chicco.com
Page 99

99
CHICCO
AUTO-FIX FAST
Гр. 0+ (0-13к Г )
ИНСТРУК ЦИЯ ПО ЭКСПЛУАТАЦИИ
СОДЕРЖАНИЕ:
1. ВСТУПЛЕНИЕ
1.1 МЕРЫ ПРЕДОСТОРОЖНОСТИ
1.2 ХАРАКТЕРИСТИКИ ИЗДЕЛИЯ
1.3 ОПИСАНИЕ КОМПОНЕНТОВ
1.4 ПОЛОЖЕНИЕ РУЧКИ
1.5 ОГРАНИЧЕНИЯ И ТРЕБОВАНИЯ ПРИ ИСПОЛЬЗОВАНИИ ИЗДЕЛИЯ И СИДЕНИЯ
АВТОМОБИ ЛЯ
2. УСТАНОВКА В А ВТОМОБИЛЕ
2.1 ПЕРВОНАЧАЛЬНАЯ КОНФИГУРАЦИЯ
ЛЯМОК
2.2 УСТАНОВКА С ОСНОВАНИЕМ
2.3 УСТАНОВКА БЕЗ ОСНОВАНИЯ
3. ПОСЛЕДУ ЮЩИЕ ОПЕРАЦИИ
3.1 РАЗМЕЩЕНЕИ РЕБЕНКА В АВТОКРЕСЛЕ
3.2 РЕГУЛИРОВКА РЕМНЕЙ
3.3 НЕПОДВИЖНОЕ ИЛИ КАЧАЮЩЕЕСЯ
ПОЛОЖЕНИЕ КРЕСЛА (ШЕЗЛОНГ ИЛИ
КАЧАЛКА)
3.4 ИСПОЛЬЗОВАНИЕ С ПРОГУЛОЧНОЙ
КОЛЯСКОЙ
3.5 ЧИСТКА И ХРАНЕНИЕ
1. ВСТУПЛЕНИЕ
1.1 МЕРЫ ПРЕДОСТОРОЖНО СТИ
ОЧЕНЬ ВАЖНО: СРАЗУ ЖЕ ОЗНАКОМИТЬСЯ
С СОДЕРЖАНИЕМ
• С О Х РА Н И Т Е Д А Н Н О Е Р У К О В О Д С Т В О Д Л Я
ОБРАЩЕНИЯ В БУДУЩЕМ.
• Д л я м о н т а ж а и у с т а н о в к и и з д е л и я т о ч н о
следуйте инструкции. Избегайте использования изделия без предварительного
ознакомления с инс трукцией.
• В Н И М А Н И Е ! С о г л а с н о с т а т и с т и ч е с к и м д а н -
ны м о Д ТП з адн ие с иден ья а вто моб иля яв ля ютс я бол ее б езо пас ным и по срав нен ию
с передними: поэтому рекомендуется устанавливать автокресло на задние сиденья.
Особенно безопасно центральное заднее
сиденье, если оно снабжено ремнем безопасности с креплением в трех точках.
• В Н И М А Н И Е ! С Е Р Ь Е З Н А Я О П А С Н О С Т Ь ! Н е в
ко ем с лу чае не и сп оль зуй те э то а вто кре сл о
на переднем сидении, оснащенном фронтальной воздушной подушкой. Установка
детского автокресла на переднем сидении
возможна только при отключенной фронтальной воздушной подушке безопасности: уточните у автомобильного дилера или
в руководстве пользователя, можно ли
отключить воздушную подушку безопасности. В любом случае, рекомендуется
отодвинуть сиденье максимально назад с
учетом пассажиров на задних сидениях.
• Н е о б х о д и м о п р о и н ф о р м и р о в а т ь в с е х п а с сажиров автомобиля о способе отцепки
ребенка в случае аварии.
• У с т а н а в л и в а й т е а в т о к р е с л о в а в т о м о б и л е
та к, ч тоб ы не доп уст ить его сто лкн ове ний с
передвижным сиденьем или дверью.
• Н и о д н о а в т о к р е с л о н е м о ж е т г а р а н т и ровать полную безопасность ребенка в
случае дорожно-транспортного происшествия, но использование данного изделия уменьшает риск серьезных травм
или смерти.
• Р и с к с е р ь е з н ы х т р а в м р е б е н к у , н е т о л ь к о
в случае дорожно-транспортного происшествия, но также и в других обстоятельствах (например, при резких торможениях
и т.д.), увеличивается при неточном следовании приведенным в данном руководстве указаниям: всегда проверяйте, чтобы
автокресло было правильно пристегнуто
к сидению.
• Поврежденное, деформированное или
сильно изношенное автокресло подлежит
замене, так как оно более не отвечает исходным характеристикам безопасности.
• Н е п ы т а й т е с ь в н о с и т ь и з м е н е н и я в к о н с трукцию автокресла.
• З а п р е щ а е т с я у с т а н а в л и в а т ь а к с е с с у а р ы ,
сменные части и компоненты, не поставляемые производителем.
• Н и к о г д а н е о с т а в л я й т е р е б е н к а б е з п р и смотра в автокресле.
• Н и к о г д а н е о с т а в л я й т е а в т о к р е с л о н е
закрепленным к сидению автомобиля,
это может привести к травмированию
пассаж иров.
• Н е в с т а в л я й т е н и ч е г о , ч т о н е я в л я е т с я п р и надлежностью, утвержденной для изделия,
между автомобильным сиденьем и автокреслом и между автокреслом и ребенком:
RUS
Page 100

100
101
в случае дорожно-транспортного происшествие автокресло может исполнять свои
функции неправильно.
• П р и п л а н и р у е м о м д о л г о м п р е б ы в а н и и
автомобиля на солнце рекомендуется
прикрыть автокресло.
• Д о р о ж н о - т р а н с п о р т н о е п р о и с ш е с т в и е ,
в том числе легкое, может вызвать повре жд ени я авт окр ес ла, не вс егд а за мет ные :
поэтому оно подлежит замене.
• Н е и с п о л ь з у й т е б ы в ш и е в у п о т р е б л е н и и а в токресла: они могут иметь конструктивные
повреждения, невидимые не вооруженным глазом, но отрицательно влияющие
на безопасность изделия.
• Ч е х о л м о ж е т б ы т ь з а м е н е н т о л ь к о п о
согласованию с производителем, так как
составляет неотъемлемую часть автокресла. Во избежание опасности для ребенка
запрещается использовать автокресло без
прилагающегося чех ла.
• У б е д и т е с ь , ч т о р е м н и б е з о п а с н о с т и н е
за щем ило две рцей авт омо бил я, и что тес ьма ремней не трется об острые выступы
си день я ил и сал она авто моб иля . В с луча е
износа или разрыва ремней безопасности
следует заменить их новыми.
• П р о в е р ь т е , ч т о б ы н е п е р е в о з и л и с ь , о с о бенно на задней полке внутри автомобиля, предметы или багаж, которые не
прикреплены или не установлены безопасны м об раз ом: в сл уча е ав ари и ил и ре зког о
торможения они могут нанести травмы
пассажирам.
• У б е д и т е с ь в т о м , ч т о в с е п а с с а ж и р ы а в т о мобиля используют собственные ремни
безопасности. Это необходимо для их
собственной безопасности, а также во
избежание травмирования ребенка в случае аварии или резкого торможения.
• В с л у ч а е д л и т е л ь н ы х п о е з д о к д е л а й т е ч а с тые остановки. Ребенок легко утомляется
в п ути . Ни в кое м с луч ае не вын има йте ребе нка из ав ток рес ла, пок а ав том оби ль на ходится в движении. Если ребенок требует
внимания, необходимо найти безопасное
место и остановиться.
• И с п о л ь з о в а н и е а в т о к р е с л а м о ж е т б ы т ь
опасным для недоношенных детей, родившихся до наступления 37 недели беременности. При нахождении их в автокресле возможны сложности с дыханием.
Поэтому, перед выпиской из больницы,
обратитесь к своему педиатру или больничному персоналу для оценки состояния
вашего ребенка и рекомендации по тому
или иному автокреслу.
• К о м п а н и я A r t s a n a с н и м а е т с с е б я к а к у ю либо ответственность при использовании
изделия не по назначению.
1.2 ХАРАКТЕРИ СТИКИ ИЗДЕЛИЯ
Настоящее автокресло сертифицировано
как «Группа 0+», для перевозки детей от
рождения и до достижения веса в 13 кг
(возрастом от 0 до 10 мес яцев/1 год приблизительно), в соответствии с европейским
стандартом ECE R44/04.
Сертификация соответствует типу «Универсал», поэтому автокресло может использоваться на любых моделях автомобилей.
ВН ИМАН ИЕ! «Уни вер сал » озн ача ет, ч то ав токр есл о со вме ст имо с бол ьши нст вом , но не
со всеми автомобильными сидениями.
ОБРАТИТЕ ВНИМАНИЕ
1. Данное удерживающее устройство для
детей «Универсал» сертифицировано
согласно с тандарту ECE R44/04 и совместимо с большей частью, но не всеми,
автомобильными сидениями.
2. Превосходная совместимость легче до-
стигается в случаях, когда производитель
автомобиля заявляет в руководстве по
эксплуатации автомобиля, что автомобиль предусматривает установку средств
для сидения детей «Универсал» рассматриваемой возрастной категории.
3. Это средство для сидения классифициру-
етс я как «Унив ерса льно е», сог ласно критериям сертификации, более строгим по
сравнению с предыдущими моделями, в
которых данное замечание отсутствует.
4. Средство предназначено исключительно
для применения на транспортных средствах, снабженных ремнями безопасности,
статическими или со втягивающим механизмом и с креплением в трех точках,
сертифицированными на основании
Стандарта UN/ECE № 16 или других равнозначных стандартов.
5. В случае сомнения свяжитесь с произ-
водителем средства для сидения или
поставщиком.
 Loading...