

Page 1
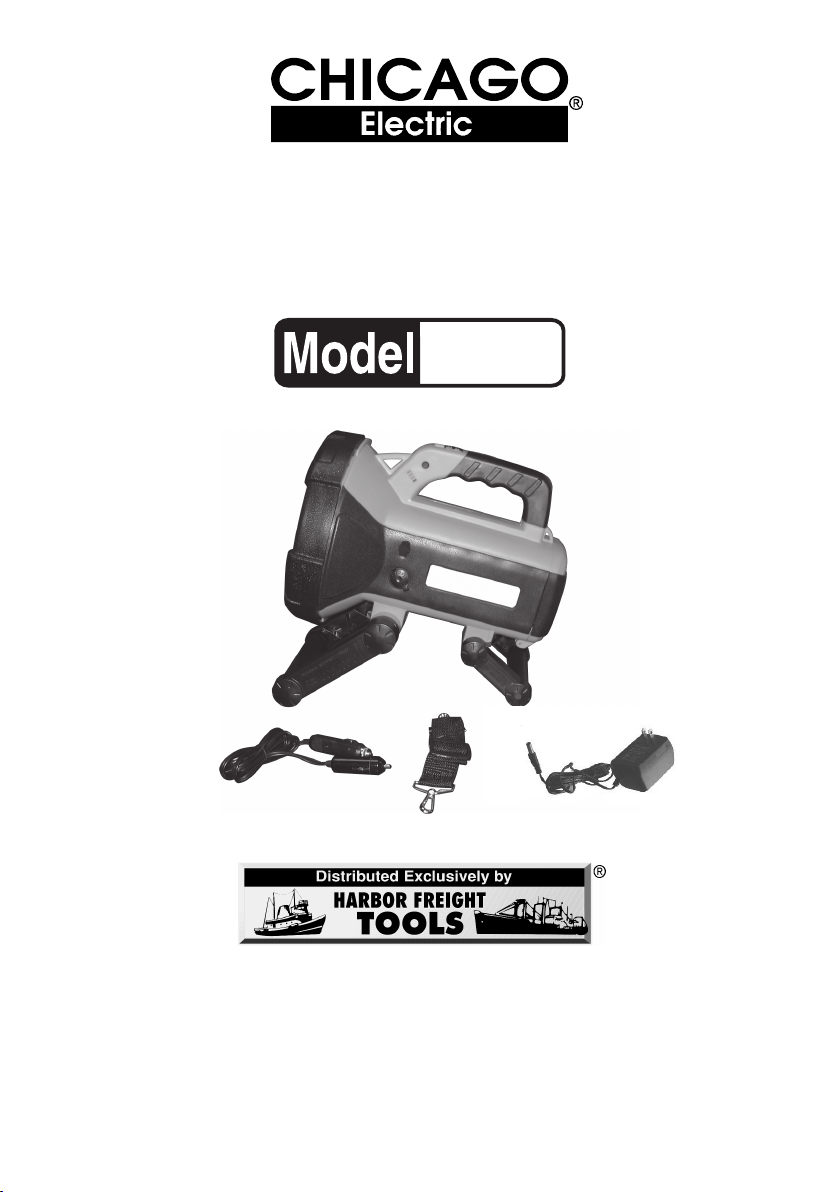
SPOTLIGHT
10 MILLION CANDLE POWER
93255
ASSEMBLY AND OPERATING INSTRUCTIONS
Due to continuing improvements, actual product may differ slightly from the
product described herein.
3491 Mission Oaks Blvd., Camarillo, CA 93011
Visit our Web site at http://www.harborfreight.com
Copyright© 2005 by Harbor Freight Tools®. All rights reserved. No portion of this
manual or any artwork contained herein may be reproduced in any shape or form
without the express written consent of Harbor Freight Tools.
For technical questions and replacement parts, please call 1-800-444-3353
REV 01/07
Page 2

Specifications
metInoitpircseD
ecruoSrewoPhA7/CDV21,dica-daeldelaes,yrettaB
bluBthgiL,W09/001V214H
sneLrotcelferhtiwretemai
retpadAgnigrahCAm005/CDV51otCAV021
retpadAnoitarepO esufA01ni-tliubhtiwretpadaCDV21gulp"rethgilett
thgieW.sbl54.9
serutaeF ;dnatselbatsujdA;partsgniyrraC;rotacidnisutatsgnigrahC
dhcni8
eragic"dedne-elbuoD
ewopA01/CDV21asadesueboslanaC
ylppusr
Save This Manual
You will need the manual for the safety warnings and precautions, assembly
instructions, operating and maintenance procedures, parts list and diagram. Keep
your invoice with this manual. Write the invoice number on the inside of the front
cover. Keep the manual and invoice in a safe and dry place for future reference.
Safety Warnings and Precautions
WARNING: When using tool, basic safety precautions should always be
followed to reduce the risk of personal injury and damage to equipment.
Read all instructions before using this tool!
1. Avoid eye damage. Do not shine light directly into the eyes of people or
animals. Temporary blindness can occur.
2. Avoid burns. Do not touch the Spotlight lens during operation. It becomes
very hot. Allow the Spotlight to cool down before performing any maintenance.
3. Avoid overheating the Spotlight. Do not block the lens and reflector during
operation.
4. Observe work area conditions. Do not use in damp or wet locations. Don’t
expose to rain. Do not use electrically powered tools in the presence of
flammable gases or liquids.
5. Keep children away. Children must never be allowed in the work area. Do
not let them handle machines, tools, or extension cords.
6. Store idle equipment. When not in use, tools must be stored in a dry location
to inhibit corrosion.
REV 01/07
SKU 93255 For technical questions, please call 1-800-444-3353. Page 2
Page 3

7. Use the right tool for the job. Do not attempt to force a small tool or attachment
to do the work of a larger industrial tool. There are certain applications for
which this tool was designed. It will do the job better and more safely at the
rate for which it was intended. Do not modify this tool and do not use this tool
for a purpose for which it was not intended.
8. Maintenance. For your safety, service and maintenance should be performed
by a qualified technician as a high voltage hazard exists within the unit circuitry.
Battery replacement is not hazardous, however.
9. Check for damaged parts. Before using any tool, any part that appears
damaged should be carefully checked to determine that it will operate properly
and perform its intended function. Do not use if any parts are broken; or any
other condition that may affect proper operation. Any part that is damaged
should be properly repaired or replaced by a qualified technician. Do not use
the tool if any switch does not turn On and Off properly.
10. Replacement parts and accessories. When servicing, use only identical
replacement parts. Use of any other parts will void the warranty. Only use
accessories intended for use with this tool. Approved accessories are available
from Harbor Freight Tools.
11. Grounded tools must be plugged into an outlet properly installed and
grounded in accordance with all codes and ordinances. Never remove
the grounding prong or modify the plug in any way. Check with a qualified
electrician if you are in doubt as to whether the outlet is properly grounded.
If the tools should electrically malfunction or break down, grounding provides
a low resistance path to carry electricity away from the user.
12. Avoid body contact with grounded surfaces such as pipes, radiators,
ranges, and refrigerators. There is an increased risk of electric shock if your
body is grounded.
13. Do not abuse the Adapter Power Cord. Never use the Power Cord to
carry the adapter or pull the Plug from an outlet. Keep the Power Cord
away from heat, oil, sharp edges, or moving parts. Replace damaged
Power Cords immediately. Damaged Power Cords increase the risk of electric
shock.
14. When operating a power tool outside, use an outdoor extension cord
marked “W-A” or “W”. These extension cords are rated for outdoor use, and
reduce the risk of electric shock.
Note: Performance of this Spotlight may vary depending on variations in local line
voltage while charging, or Spotlight Battery power.
SKU 93255 For technical questions, please call 1-800-444-3353. Page 3
Page 4
Battery Precautions
1. Read all instructions and warnings
on the Battery before charging the
battery.
2. To avoid accidents, charge the
supplied Battery only. Use only the
supplied charging adapters for
charging the internal Battery.
3. Replace a dead Battery with only the
same type (See Specifications, page
2).
4. Do not expose the Battery to rain or
wet conditions.
5. To avoid damage of cable and plug,
never pull the cable to disconnect
the Adapter.
6. Do not use the Adapters if the cable
or plug are damaged.
permanently damaged. Never overdischarge a Battery by using the tool
even after tool performance is
decreasing. When tool performance
begins to diminish, stop the tool, and
recharge the Battery.
13. Always remove the Battery from the
Spotlight before performing
inspection, maintenance, cleaning
procedures, or storage.
Warning: The warnings, cautions, and
instructions discussed in this
instruction manual cannot cover all
possible conditions and situations
that may occur. It must be understood
by the operator that common sense
and caution are factors which cannot
be built into this product, but must be
supplied by the operator.
Unpacking
7. Repairs should be carried out by a
qualified technician.
8. Do not touch the Battery poles with
any conductive source.
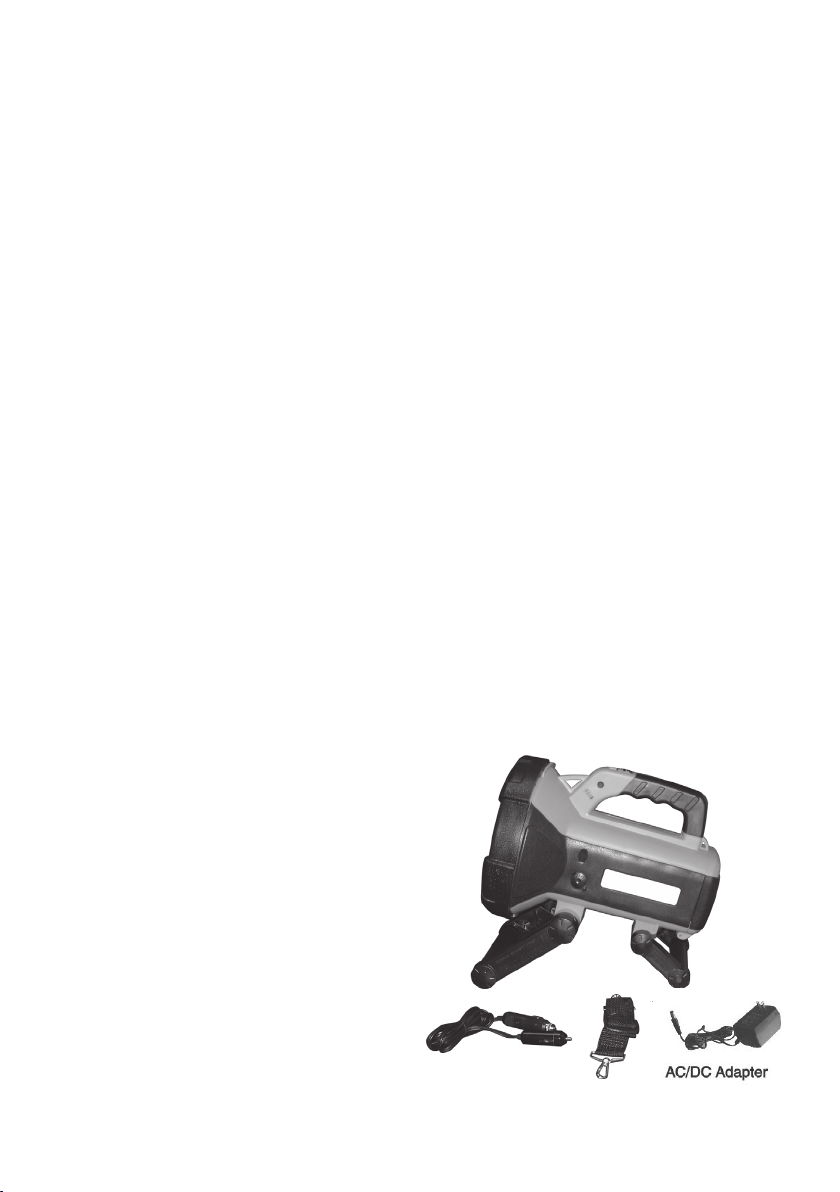
When unpacking, check to make sure
the following parts are included. If any
parts are missing or broken, please call
Harbor Freight Tools at the number on
the cover of this manual.
9. Do not store the Battery in a box with
other metal objects.
Main Unit
10. Do not throw the Battery in a fire or
in the general trash. Contact your
local hazardous waste disposal
authority for proper disposal.
11. Do not drain the Battery completely
before recharging. Recharge fully
when low, or quarterly when stored.
12. Always recharge the Battery when
tool performance begins to diminish.
Severe heat is most destructive to a
Battery; the more heat generated,
the faster the Battery loses power.
A Battery that gets too hot can be
Car Plug Adapter
AC/DC Adapter
Shoulder
Strap
REV 01/07
SKU 93255 For technical questions, please call 1-800-444-3353. Page 4
Page 5

Charging Battery
Caution: Set the Spotlight On/Off Switch to the Off position before charging.
Never charge the Battery for over 16 hours. Charge only until the red LED
Battery Status Indicator shuts off. Do not operate the Spotlight while charging.
1. Open the Charging Port Cover (10) and plug the AC/DC Adapter (37) into the
charging port underneath, and the other end into the 120 VAC electrical outlet.
The Charging Status Indicator turns red, indicating charging. The Battery will
charge for approximately 13-16 hours if the AC Adapter is used.
When charging is complete, the Charging Status Indicator turns off, indicating
charging is complete.
2. Unplug the Adapter from the power source and store again in the Adapter
compartment of the Spotlight. Latch the Back Cover.
Note: Never attempt to charge the Battery (25) by using the Car Plug Adapter (36).
This Adapter should only be used to power the spotlight when the battery is
out of power.
Operation
Warning: Avoid eye damage. Do not shine light directly into the eyes of people
or animals. This Spotlight emits a high intensity beam and could cause
temporary blindness if shined directly into the eyes.
1. To turn the Spotlight on, hold the Rubber Grip handle with one hand, and push
the On/Off Switch with the other. The first stop is the low setting and the
second stop is the high setting.
2. To check the battery charge status, press the Battery Status Button (34) with
the light on. Note the number of yellow LEDs that illuminate. If there are 3, the
unit is almost fully charged. If there is only one, switch the unit off and recharge
it.
3. To position the Spotlight at rest, move the Stands to the desired position.
4. To turn the Spotlight off, pull the On/Off Switch back.
5. A 12VDC device that draws less than 10 Amps can be plugged into the 12V
Inlet/Outlet (8) and powered by this unit’s battery. This will only work while the
ON/OFF switch is in its OFF position. Never try to power a device that uses
more than 10 Amps.
SKU 93255 For technical questions, please call 1-800-444-3353. Page 5
Page 6
Maintenance
1. Store in a clean and dry location.
2. Charge the Battery after each use, and every three months if not used.
3. If the 12 VDC cord does not function, the fuse may be blown. Unscrew the
metal nut at one end of the cord and remove the old fuse. If the wire inside is
broken, replace with another F10A250V (Fast-acting, 10 Amp, 250 Volt) fuse
of the same type.
Battery Replacement
1. Remove the screws at the top back of the spotlight and open the Hatch (26).
2. Carefully pull out the existing Battery and pull off the wire terminals.
3. Replace the Battery with a new one of the same type (See page 2).
4. Push the red wire connector onto the positive (+) Battery terminal and the
black wire connector onto the negative (–) Battery terminal. Be sure that the
wires are connected properly. Otherwise, the Spotlight will be damaged.
5. Place Battery back into the battery compartment. Close the Back Cover, and
install and tighten screws.
6. Charge the new Battery as described on page 4.
Bulb Replacement
Note: Make sure all parts are cool to the touch before
replacing the bulb.
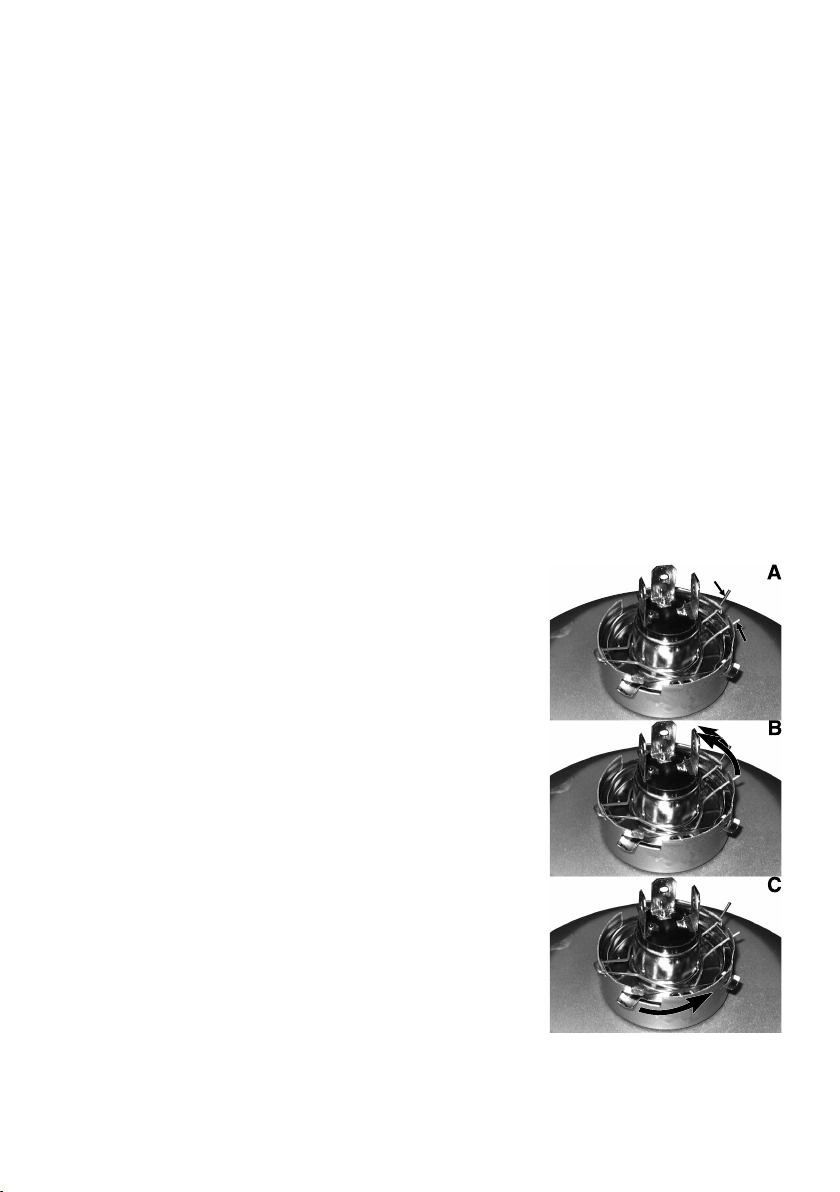
1. Pull the Lens Ring Cover (1) off and set it aside.
Un-thread the Lens Holding Ring (2), being careful
not to allow the Lens (3) to fall out.
2. Be careful - the edges of the Lens may be sharp!
Remove Lens and
3. Remove the Refractor (4) and detach the three
wires leading to the Bulb (5).
4. Squeeze the ends of the Bulb Retaining Spring
(6) together, and hold them - see A, right.
5. Swing the Bulb Retaining Spring (6) up and remove
it - see B, right.
6. Turn the Bulb (5) slightly counterclockwise and
slide it out - see C, right.
7. Using a clean rag, cloth or gloved hand, install a
proper replacement Bulb without touching the bulb
portion. If the bulb is touched, it must be cleaned with rubbing alcohol and
allowed to dry before being installed.
gently
set it aside, it is fragile.
(Bulb replacement continued on next page.)
SKU 93255 For technical questions, please call 1-800-444-3353. Page 6
Page 7
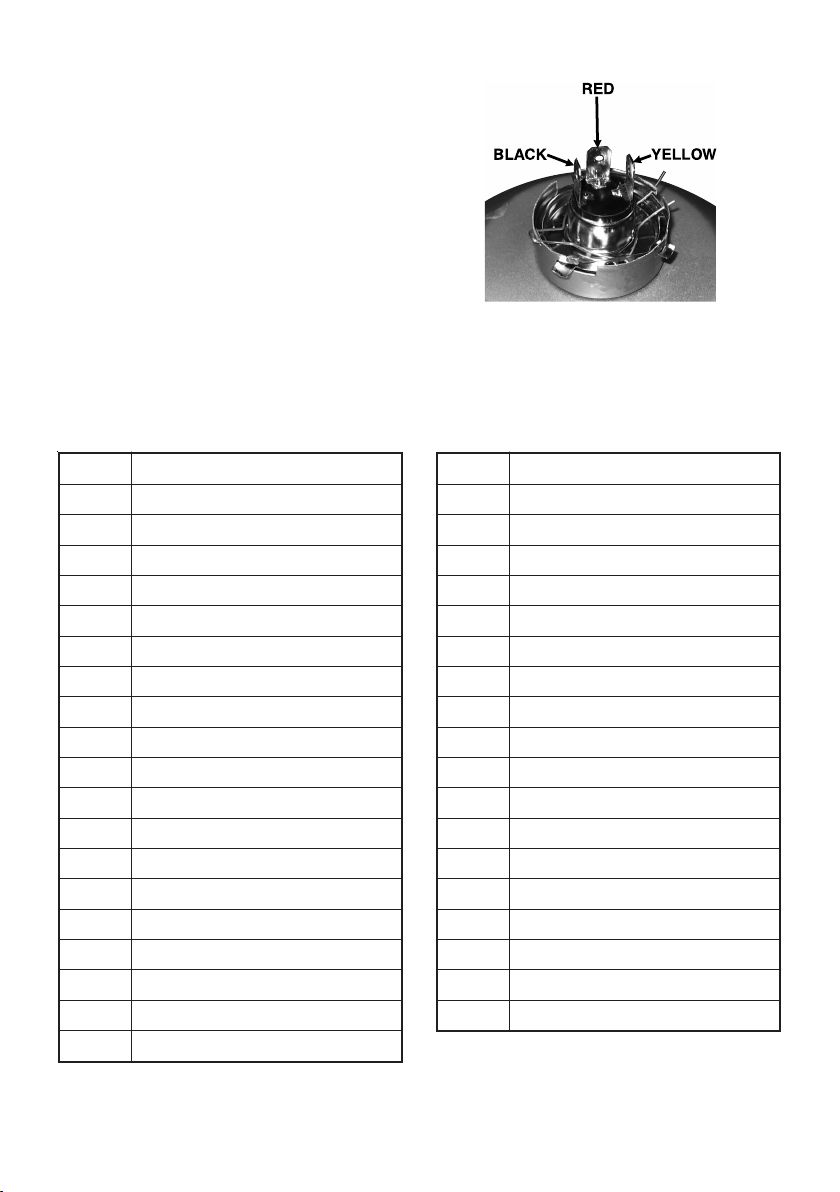
8. Reassembly is the reverse of the
earlier steps. When reattaching the
wires, be certain that the wires are
reattached in the order shown to the
right.
Parts List
traPnoitpircseDtraPnoitpircseD
1revoCgniRsneL02geLdnatSraeRtfeL
2gniRgnidloHsneL12egniHdnatSraeR
3sneL22raBdnatSraeR
4rotcarfeR32raBdnatSraeRreppU
5),09/001V214H(bluB42geLdnatSraeRthgiR
6gnirpSgniniateRbluB52yrettaBV21,hA7
7gn
8teltuO/telnIV2172revoChctaHyrettaB
9revoCgnisuoHtfeL82gnisuoHthgiR
01revoCtroPgnigrahC92re
11revoCteltuO/telnIV2103revoCgnisuoHthgiR
21eldnaHtfeL13eldnaHthgiR
31raBdnatStnorFreppU23redilS
41raBdn
51revoCegniHdnatStnorF43nottuBsutatSyrettaB
61geLdnatStnorFtfeL53draoBtiucriC
71egniHdnatSt
81geLdnatStnorFthgiR73retpadAgnigrahCCD/CA
91revoCegniHdnatSraeR
isuoHtfeL62hctaHyrettaB
atStnorFrewoL33hctiwS
norF63retpadAgulPraC
rewoL
voCyrettaB
NOTE: Some parts are listed and shown for illustration purposes only
and are not available individually as replacement parts.
SKU 93255 For technical questions, please call 1-800-444-3353. Page 7
Page 8
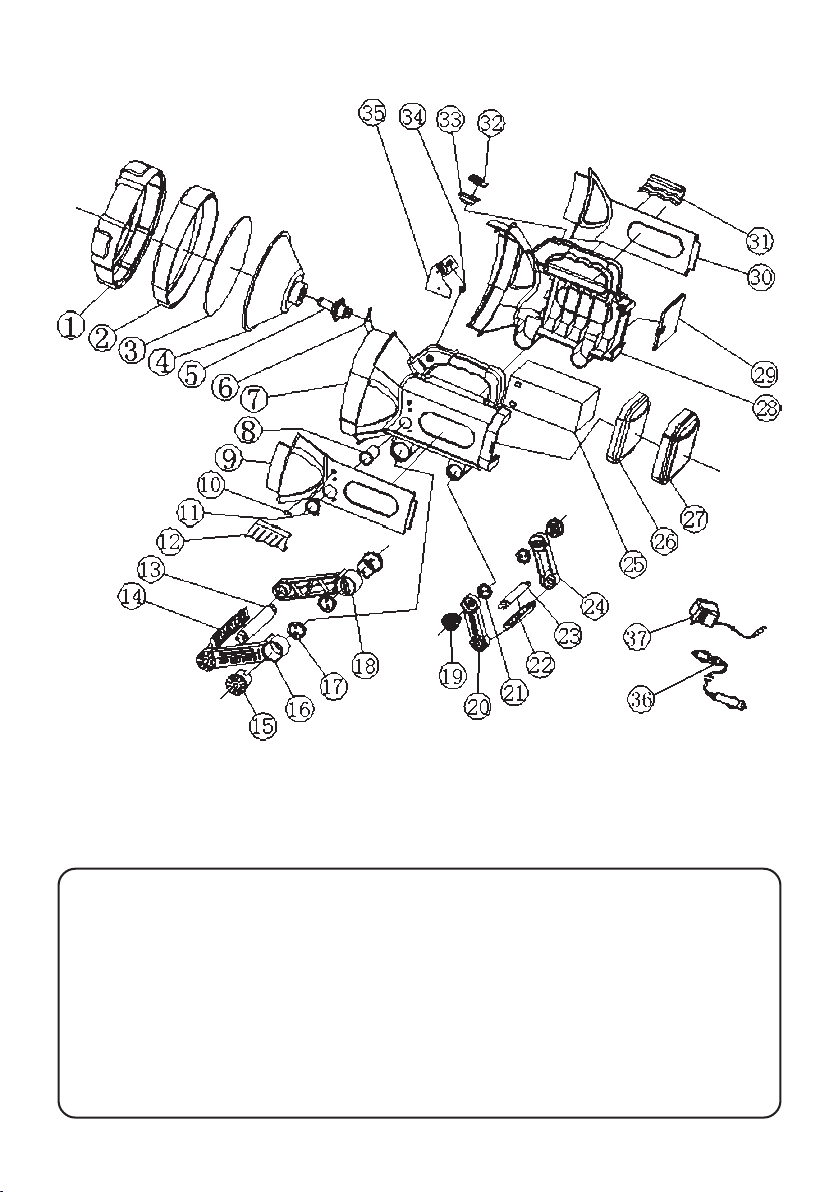
Assembly Diagram
PLEASE READ THE FOLLOWING CAREFULLY
THE MANUFACTURER AND/OR DISTRIBUTOR HAS PROVIDED THE PARTS DIAGRAM IN THIS
MANUAL AS A REFERENCE TOOL ONLY. NEITHER THE MANUFACTURER NOR DISTRIBUTOR
MAKES ANY REPRESENTATION OR WARRANTY OF ANY KIND TO THE BUYER THAT HE OR
SHE IS QUALIFIED TO MAKE ANY REPAIRS TO THE PRODUCT OR THAT HE OR SHE IS QUALIFIED
TO REPLACE ANY PARTS OF THE PRODUCT. IN FACT, THE MANUFACTURER AND/OR
DISTRIBUTOR EXPRESSLY STATES THAT ALL REPAIRS AND PARTS REPLACEMENTS SHOULD
BE UNDERTAKEN BY CERTIFIED AND LICENSED TECHNICIANS AND NOT BY THE BUYER. THE
BUYER ASSUMES ALL RISK AND LIABILITY ARISING OUT OF HIS OR HER REPAIRS TO THE
ORIGINAL PRODUCT OR REPLACEMENT PARTS THERETO, OR ARISING OUT OF HIS OR HER
INSTALLATION OF REPLACEMENT PARTS THERETO.
SKU 93255 For technical questions, please call 1-800-444-3353. Page 8
 Loading...