

Page 1
CORDLESS SPRACORDLESS SPRA
CORDLESS SPRA
CORDLESS SPRACORDLESS SPRA
Y GUNY GUN
Y GUN
Y GUNY GUN
18 VOL18 VOL
18 VOL
18 VOL18 VOL
TSTS
TS
TSTS
90880
ASSEMBLY AND OPERATING INSTRUCTIONS
3491 Mission Oaks Blvd., Camarillo, CA 93011
Visit our Web site at http://www.harborfreight.com
Copyright © 2003 by Harbor Freight Tools®. All rights reser ved. No portion of
this manual or any artwork contained herein may be reproduced in any shape
or form without the express written consent of Harbor Freight Tools.
For technical questions and replacement parts, please call 1-800-444-3353
Page 2

Specifications
Item Description
Power Consumption Battery, 18 VDC, 1.7 Amp Hours
Canister Capacity 15 oz. (500 ml)
Battery Capacity 15 to 20 containers per full battery charge
Battery Type 18 VDC, Ni-Cad, 1.7 AH
Battery Charger Class II, 120 V A C, 60 H z ; O utput: 24 VDC , 20 0 mA
Delivery 10 oz. (300 ml) per minute (w ater) (max im um )
Viscosity 30 DIN-sec (maximum)
Stainless Steel
Nozzles
Spray Functions 4 settings, adjustable
Dimensions 10 (H) x 3-1/4 (W) inches; At canister 9-5/8 (L) inches;
Weight 4.6 lbs.
Accessories Blow mold case
2 – Round jet, 0.019” (dia.) 0.5 mm; For lighter
body and sealer liquids
1 – Angle Nozzle Adapter, 0.023” (dia.) 0.6 mm;
Slightly flexible; For latex, stain, and oil base paint
Side Handle: 4 (L) inches
Viscosity cup with hanger
Cleaning needle
Nozzle Extension
Save This Manual
You will need the manual for the safety warnings and precautions, assembly instructions,
operating and maintenance procedures, parts list and diagram. Keep your invoice with this
manual. Write the invoice number on the inside of the front cover. Keep the manual and
invoice in a safe and dry place for future reference.
General Safety Warnings and Precautions
WARNING: When using tool, basic safety precautions should alwa ys be f ollowed to reduce the risk of personal injury and damage to equipment.
Read all instructions before using this tool!
1. Keep work area clean. Cluttered areas invite injuries.
2. Observe work area conditions. Do not use machines or power tools in damp or wet
locations. Don’t expose to rain. Keep work area well lighted. Do not use electrically
powered tools in the presence of flammable gases or liquids.
3. Keep children away. Children must never be allowed in the work area. Do not let
them handle machines, tools, or extension cords.
4. Store idle equipment. When not in use, tools must be stored in a dry location to
inhibit rust. Always lock up tools and keep out of reach of children.
5. Use the right tool for the job. Do not attempt to force a small tool or attachment to
do the work of a larger industrial tool. There are certain applications for which this tool
was designed. It will do the job better and more safely at the rate for which it was
intended. Do not modify this tool and do not use this tool for a purpose for which it
was not intended.
6. Dress properly. Do not wear loose clothing or jewelry as they can be caught in
moving parts. Protective, electrically non-conductive clothes and non-skid footwear
are recommended when working. Wear restrictive hair covering to contain long hair.
Page 2SKU 90880
Page 3

7. Use eye, nose and mouth protection. Always wear ANSI approved impact safety
goggles. Wear an ANSI approved dust mask or respirator when working chemical
and paint dusts and mists.
8. Do not overreach. Keep proper footing and balance at all times. Do not reach over
or across running machines.
9. Maintain tools with care. K eep tools clean f or better and saf er performance. F ollo w
instructions for lubricating and changing accessories. Inspect tool cords periodically
and, if damaged, have them repaired by an authorized technician. The handles must
be kept clean, dry, and free from oil and grease at all times.
10. Disconnect power. Unplug Battery Charger when not in use.
11. Avoid unintentional starting. Be sure the s witch is in the Off position when not in
use and before plugging Battery in. Do not carry any tool with your finger on the
trigger.
12. Stay alert. Watch what you are doing, use common sense. Do not operate any tool
when you are tired.
13. Check for damaged parts. Before using any tool, any part that appears damaged
should be carefully checked to determine that it will operate properly and perform its
intended function. Check for alignment and binding of moving parts; any broken parts
or mounting fixtures; and any other condition that may affect proper operation. Any
part that is damaged should be proper ly repaired or replaced by a qualified
technician. Do not use the tool if any switch does not turn On and Off properly.
14. Replacement parts and accessories. When servicing, use only identical
replacement parts. Use of any other parts will void the warranty. Only use accessories
intended for use with this tool. Approved accessories are available from Harbor
Freight Tools.
15. Do not operate tool if under the influence of alcohol or drugs. Read warning
labels if taking prescription medicine to determine if your judgment or reflexes are
impaired while taking drugs. If there is any doubt, do not operate the tool.
16. Maintenance. For your safety, service and maintenance should be performed
regularly by a qualified technician.
17. Pacemaker safety warning. People with pacemakers should consult with their
physician(s) before using this product; operation of equipment in close proximity to a
heart pacemaker could cause interference or failure of the pacemaker.
18. Use tools with both hands when required. Many tools such as chain saws, drills,
routers, etc., require the use of both hands when operating. This helps maintain tool
stability and keeps hands away from the working area of the tool.
Note: Performance of this tool may vary depending on variations in battery power.
Warning: The warnings, cautions, and instructions discussed in this instruction manual
cannot cover all possible conditions and situations that may occur. It must be understood by the operator that common sense and caution are factors which cannot be
built into this product, but must be supplied b y the operator.
Page 3SKU 90880
Page 4

Battery Precautions
1. Read all instructions and warnings on the battery before charging the battery .
2. To avoid accidents, charge the supplied battery only . Do not use a different charger
with this battery.
3. Do not expose the battery to rain or wet conditions.
4. To avoid damage of cable and plug, never pull the cable to disconnect the charger.
5. Do not use the charger if the cable or plug are damaged.
6. Repairs should be carried out by a qualified technician.
7. Do not touch the battery poles with any conductive source.
8. Do not store the battery in a box with other metal objects; store the battery in the
carrying case.
9. Do not throw the battery in a fire or in the general trash. Contact your local hazardous
waste disposal authority for proper disposal.
10. Do not drain the battery completely before recharging. Recharge fully.Always use a
fresh battery when tool performance begins to diminish. Severe heat is most
destructive to a battery; the more heat generated, the f aster the battery loses power . A
battery that gets too hot can be permanently damaged. Never over-discharge a battery
by using the tool even after tool performance is decreasing. Never attempt to
discharge a tool’s battery by continuing to pull the tool trigger. When tool performance
begins to diminish, stop the tool, recharge the battery and use the fresh battery for
optimal performance.
11. Recharge the battery monthly even if not used.
12. Always remove the battery from the Spray Gun before performing inspection,
maintenance, cleaning procedures, or storage.
Specific Safety Rules for the Spray Gun
1. Never point the Spray Gun towards people or animals.
2. The Spray Gun must be used only for paints and solvents with a 21 degree C
minimum flashpoint.
3. The high pressure spray can potentially cause severe skin damage, Never allow any
part of the body to come in contact with the spray.
4. In case of skin injection by the high pressure spray, contact a physician immediately.
The physician should be told the type of sprayed material involved.
5. Do not smoke or eat in the area where the Spray Gun is used.
6. Provide sufficient ventilation to keep the air in the spraying area free from the
accumulation of flammable vapors.
7. Do not spray any material of unknown composition.
Page 4SKU 90880
Page 5
8. Do not operate the Spray Gun without the nozzle Locknut (3) in place.
9. Never use gasoline or other flammable liquids to clean the Spray Gun. Fire or
explosion could occur. Damage to Spray Gun components could occur.
10. Always read the paint manufacturer’s thinning recommendations or instructions before
using paint or other materials.
11. Always carefully cover areas that are not to be painted to pre vent property damage.
12. Stop using the Spray Gun if it becomes overly hot; allow the tool to cool down before
using it again.
WARNING: This product contains lead, which is a chemical known to the State of
California to cause cancer and birth defects or other reproductive harm.
(California Health & Safety Code 25249.5,
et seq.
)
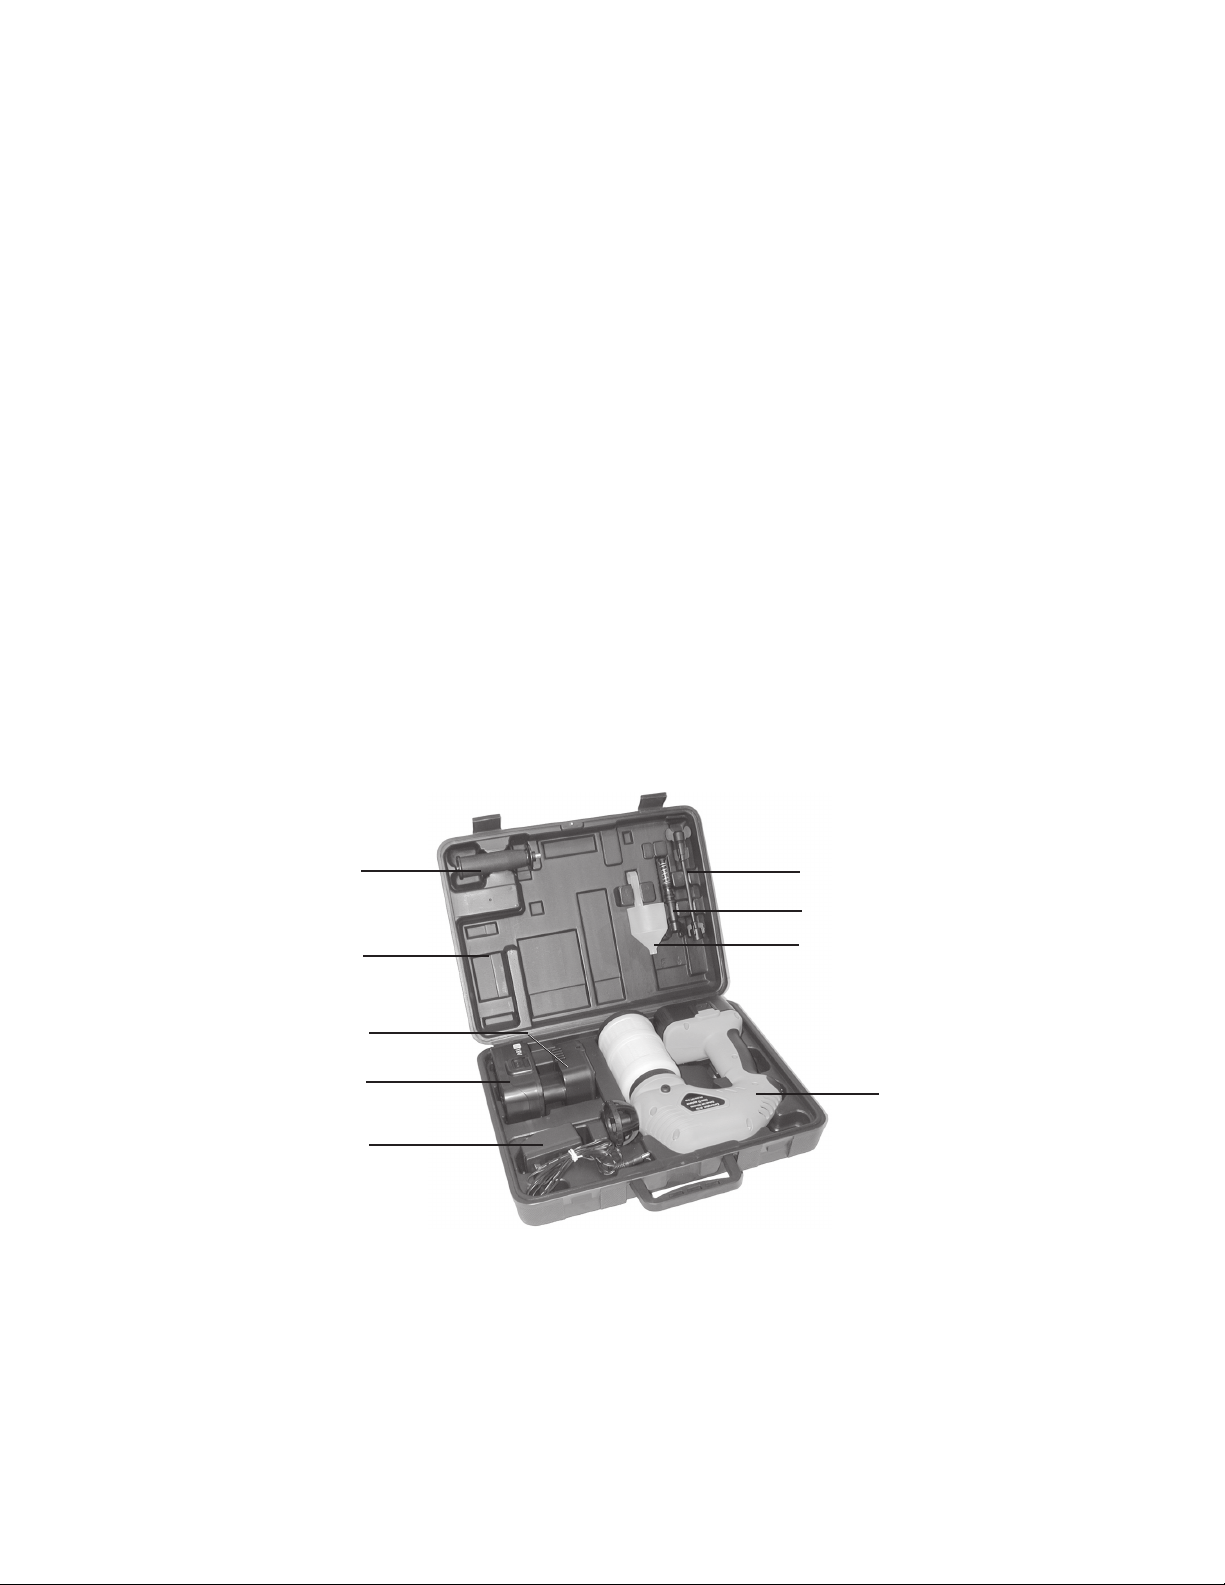
Unpacking
When unpacking, check to make sure the following parts are included. If any parts are
missing or broken, please call Harbor Freight Tools at the number on the cover of this
manual as soon as possible.
Side Handle (28)
Blow Mold Case (33)
Battery (26)
Charger Base (31)
AC Adapter (32)
Nozzle Extension
V alv e (2)
Viscosity Cup (30)
Spray Gun
Page 5SKU 90880
Page 6

Operation
CHARGING BATTERY
The Battery (26) does not come charged from the factory . Charge the Battery before using.
Battery (26)
AC Adapter (32)
Charger Base (31)
1. Insert the Battery (26) into the Charger Base (31). The Battery can only insert one way.
2. Insert the AC Adapter (32) cord plug into the Charger Base as shown above.
3. Plug the AC Adapter module into an electrical outlet.
The Charging Indicator turns green, indicating charging. The Battery will charge for
approximately 5 hours on the first charge. Subsequent charges should only take
about one hour.
When the Battery is completely charged, the Charger will automatically shut off, and
the Indicator turns red.
4. Remove the Battery when it is fully charged.
5. Unplug the AC Adapter from the electrical outlet.
Note: The operation time of a new batter y will ramp up as it is properly used (drained) and
recharged. It will take about 5 recharging cycles before the Battery is at maximum efficiency.
Caution: If two or more batteries are to be charged, avoid damaging the Charger by
allowing it to cool down between charges. Wait for the Battery to cool down before
placing in the Spray Gun.
INSERTING BATTERY
Caution: Before inserting the Battery Pack into the tool, be certain that the Trigger
Switch (20) is in the Off position.
1. Push the Operational Lock (21) to the Off position.
2. Insert Battery into the receptacle at the handle-bottom of the Spray Gun.
3. Secure the Lock-spring Clasps to each side of the handle.
PREPARATION OF SURFACE TO BE SPRAYED
Page 6SKU 90880
REV 10/04
Page 7

The surface to be spra y ed should be free of dust, dirt, and grease. In some instances, a
primer coat should be applied before spraying the final coat.
PREPARATION OF PAINT TO BE SPRAYED
Most paints and stains are supplied ready for brush applications. They may need to be
thinned before using in the Spray Gun. Refer to the paint manufacturer’s recommendations
for thinning their product. Test the viscosity of the product before thinning.
1. Purchase fresh paint and have it mixed thoroughly by machine.
When using lacquer, stir to mix the liquid. When shaken, air bubbles are produced
which may give an uneven spray. If the paint or other fluid is old, it may be necessary
to strain the fluid of all debris and lumps before spraying.
2. Check the viscosity of the paint using the Viscosity Cup (30).
After mixing the paint, fill the Viscosity Cup (30) up to the brim with paint. Do this over
the paint container. Measure the time it takes for the cup to empty. The time should be
between 15 and 30 seconds for proper operation in the Spray Gun. The table below
gives the recommended (viscosity) times for various types of paints and stains.
Spraying Materials Recommend Viscosity Time
(in Seconds)
Plastic and latex paint 24 ~ 28
Water based paints 20 ~ 25
Primers 24 ~ 28
Varnishes 20 ~ 25
Oil based paints 18 ~ 22
Enamel paints 18 ~ 22
Aluminum paints 22 ~ 25
Car under-seal 25 ~ 35
Wood sealers 28 ~ 35
Wood preservatives No thinning required
Wood stains No thinning required
(30)
If the paint takes longer than the recommended time to empty from the Viscosity Cup,
then further thinning is necessary. Mix in a small quantity of the appropriate thinner
and test the viscosity again until the correct viscosity is achieved. If particles or lumps
are present, strain the paint using a disposable strainer (not supplied) until clean.
FILLING THE CANISTER
1. Push the Switch Lock (21) to the Off position.
2. Unscrew the Canister (25) from the Canister Lid (11).
3. Carefully pull off the Suction Tube (23).
4. Turn the Spray Gun upside down and apply a few drops of light oil into the two holes
(X and Y) under the Lid (11). This helps k eep the Spray Gun parts lubricated and
minimizes clogging. Refer to the photo at the top of page 8.
Page 7SKU 90880
Page 8

Lock Nut (3)
Nozzle (1)
Canister Lid (11)
(Y)
(X)
Suction T ube (23)
Switch Lock (21)
Trigger Switch (20)
5. Push the Suction T ube (23) back into the Canister Lid.
6. Fill the Canister (25) with paint of the correct viscosity, then carefully screw the
Canister back into the Canister Lid. Securely tighten.
The easiest way to do this without spilling paint is to leave the full Canister on a flat
surface. Lift the Spray Gun and carefully place the Suction Tube into the Canister.
When the top of the Canister reaches the Canister Lid, begin turning the Canister
until it screws into the Canister Lid. Securely tighten.
BEGIN SPRAYING
Note: Always carefully cover areas and objects that are not to be painted to prevent
property damage.
1. Verify that Lock Nut (3) and Nozzle (1) are tightened securely. See photo abo v e .
2. Push the Switch Loc k (21) to the On position. This activ ates the T rigger Switch (20).
3. Hold the Spray Gun horizontally and press the Trigger Switch (20).
The Spray Gun should begin spraying. It is recommended to spray for two minutes,
then leave off for three minutes. This prevents overheating and lengthens Battery use.
4. Adjust the Spray output by pressing the spray adjust Button (15) while spraying.
Press once for each level of spray. Above the Button (15) are four Spray Control
Regulator (14) LED lights. Each LED represents a different level of spray volume.
When lit, the left LED indicates the maximum spray output. The right LED indicates
the minimum spray output.
5. When Spraying is complete, release the Trigger Switch (20) and press the Switch
Lock (21) to the Off position.
(14)
(15)
Left LED Lit
Page 8SKU 90880
Right LED Lit
Page 9

MOUNTING THE SIDE HANDLE
For ease of use and more spraying control, it may be desirable to mount the Side Handle
(28) to the Housing (27). It can be mounted to either the left or right side of the Housing
(27).
1. To mount the Side Handle (28), remove the rubber cap covering the threaded
connector (on either side of the housing).
2. Screw the Side Handle into the housing until securely tightened.
SPRA YING TECHNIQUES
The following are some general tips while spray painting. Also refer to the illustrations
below.
• Keep the Spray Gun level and perpendicular to the surface being painted.
• Keep the Nozzle 10 to 12 inches from the spraying surface.
• Spray evenly: side-to-side, up and down, with smooth and even strokes at one speed.
• Spraying at an angle will cause drips.
• Move the Spray Gun using a sweeping arm motion, rather than wrist motion.
• Never start or stop spraying while aimed at the surface being painted.
• Spraying strokes at a fast speed will produce a light coat. Strokes at a slow speed will
produce a heavier coat.
• Spray only one coat at a time. Allow paint to properly dry before applying another coat.
• Do not tip the Spray Gun more than 45 degrees while spraying.
Page 9SKU 90880
Page 10

CHANGING THE NOZZLE
1. Push the Switch Lock (21) to the Off position, and
(3)
(2)
(1)
remove the battery .
2. Unscrew the Nozzle (1) by turning it
counterclockwise.
Make sure that the Valve (2) remains in the
Cylinder (4).
3. Insert the new Nozzle (1) into the Cylinder (4) and
securely tighten it clockwise.
MOUNTING THE NOZZLE EXTENSION
The Nozzle Extension accessory can be used to paint in areas of limited access. It should
be used to paint ceilings and floors.
Unscrew
(1)
1. Push the Switch Lock (21) to the Off position,
and remove the battery .
2. Unscrew the Nozzle (1) by turning it
counterclockwise. Remove it from the
Cylinder (4). Mak e sure the Valve (2) remains
in the Cylinder.
(2) (1)
Nozzle
Extension
(4)
Screw In
(2)
3. Screw the Nozzle Extension securely onto
the Cylinder (4).
4. Carefully bend the Nozzle Extension into the required position (up or down) for
spraying.
The Spray Gun should be kept level (horizontal) during spraying.
CHANGING THE PISTON ASSEMBL Y
(3)
1. Push the Switch Lock (21) to the Off
position, and remove the battery .
(2)
(1)
2. Loosen the Nozzle (1) slightly by turning it
counterclockwise, and unscrew the Lock Nut
(3).
3. Pull the Nozzle (1) and Piston Assembly (3,
(7)
4, 6, and 7) out of the unit.
(6)
(4)
3. Unscrew the Nozzle (1) and slide the Lock
Nut (3) from the Piston (7) assembly. Store or clean Piston (7).
4. Remove the Nozzle (1) from the new Piston (7) assembly and slide the Piston Spring
(6) and Cylinder (4) onto the new Piston (7).
5. Slide the whole Piston (7) assembly into the unit and secure by screwing the Lock Nut
(3) clockwise onto the unit.
6. Screw on the Nozzle (1) until secure.
Page 10SKU 90880
Page 11

Maintenance
Caution: Before performing any repair or maintenance procedure, remove the Battery
from the Spray Gun Handle. Never immerse the Spray Gun in water to clean.
Clean the Spray Gun components immediately after each use as described below.
1. Unscrew the Canister (25) and pour the remaining paint back into the paint can.
2. Thoroughly clean the Canister with the appropriate thinner/cleaner (water or paint
thinner).
3. Pour some appropriate thinner (water or paint thinner) into the Canister, and operate
the Spray Gun until only clean thinner comes out of the Nozzle.
4. Unscrew the Canister and remove the Suction Tube (23) and Filter (24). Thoroughly
clean with the appropriate thinner. See illustration at bottom-left.
5. Loosen the Nozzle (1) slightly, unscrew the Lock Nut (3), then pull the Nozzle and
Piston (7) assembly out of the unit. See illustration at bottom-left.
6. Remove the Nozzle (1) and Lock Nut (3) from the Cylinder (4). Remove Valve (2) from
the Cylinder (4). Thoroughly clean these components. See illustration bottom-center.
7. Use the Cleaning Pin accessory to clear the Nozzle (1) and the swirl head of Valve
(2).
8. Apply a few drops of light lubricating oil to the Piston (7), Piston Spring (6), and
Cylinder (4). See illustration at bottom-right.
9. Reassembly the Nozzle (1) and Piston (7) assembly as described on the previous
page.
10. Reassembly the Suction Tube (23), Filter (24), and Canister (25).
11. Clean the outside of the Spray Gun with a clean, moist cloth.
12. Recharge the batteries as previously described on page 6.
13. Store Spray Gun and accessories in the Blow Mold Case, and place in a clean and
dry location.
Page 11SKU 90880
Page 12

Troubleshooting
Symptom Probable Cause Possible Solution
Motor hums but no
spraying occurs; Or,
irregular spraying
Spray atomization is not
good
Over painting and
dripping
Motor is louder than
normal
Operating sound not
normal
Orange peel effect when
spraying; E x ce ss ive
fogging
Spray Gun operates only
for a short time
1. Worn Valve
2. Piston Stuck
3. Suction Tube not in place
4. Blocked Suction Tube and/or
Filter
5. Blocked Nozzle
6. Loosened Lock Nut
1. Nozzle or Lock Nut is not
tightened
2. Paint is too thick
1. Spra y G u n to o clo s e to th e
object being sprayed
2. Too much paint being sprayed
3. Viscosity is too lo w
Spray Gun components are not
clean or lubricated
1. Poor output adjustment
2. Not enough paint in the Canister
3. Not diluted properly or not
passing through the Suction
Tube
4. Battery charge is low
1. Incorrect thinner being used
2. Spray Gun too far from the
surface
3. Paint is too thick
1. Battery is not fully charged
2. Charger is defective
3. Battery life is expired
1. Replace Valve
2. Clean Piston with thinner
3. Adjust Suction Tube
4. Clean Suction Tube and Filter
with thinner
5. Clean Nozzle with thinner
6. Tighten Lock Nut
1. Tighten the Nozzle and Lock
Nut
2. Check the viscosity of the
paint
1. Keep Spray Gun 10” to 12”
from the surface
2. Adjust the Spray Control
Regulator to reduce spraying
volume
3. Check paint viscosity
Disassemble and clean Spray
Gun components, and lubricate
1. Adjust the Spray Control
Regulator to reduce spraying
volume
2. Refill Canister with paint
3. Check Suction Tube and
viscosity
4. Recharge battery
1. Completely clean Spray Gun
components and start again
with the correct thinner
2. Hold Spray Gun closer to
surface
3. Paint is too thin
1. Fully charge the Battery
2. Replace Charger Base and/or
AC Adapter
3. Replace Battery with same
type
Page 12SKU 90880
Page 13

Parts List
Item De s c rip tio n
1.
2.
3.
4.
5.
6.
7.
8.
9.
10. Sleeve
11. Canister Lid
12. Coil
13. Electronic Control
14. Regulator, Spray Control
15. Button
16. Cover, Regulator
17. Co n n e c to r , B a tte r y
18. Sw itc h , Safety
19. Spring
20. Switch, T r ig ger
21. Lock, Switch
22. Absorber
23. Tube, Suction
24. Filter
25. Canister
26. Battery Pack, 18V, Ni-Cad, 1.7 AH
27. Housing x 2
28. Side Handle
29. Screw, 4.2x16
30. Viscosity Cup
31. Charger Base
32. AC Adapter
33. Blow Mold Case
34. Cleaning Pin Accessory
35. Nozzle Extension
NOTE
illustra tion p u rp o se s o n ly a nd a r e n o t a va ila b le
individually as replacement parts.
Nozzle
Valve
Lock Nut
Cylinder
Airtight Ring
Piston Spring
Piston
Drive Housing
Armature
: Some parts are listed and shown for
PLEASE READ THE FOLLOWING CAREFULLY
THE MANUFA CTURER AND/OR DISTRIBUT OR HAS PRO VIDED THE PARTS DIAGRAM IN THIS
MANUAL AS A REFERENCE TOOL ONLY. NEITHER THE MANUFACTURER NOR DISTRIBUTOR MAKES ANY REPRESENTA TION OR W ARRANTY OF ANY KIND TO THE BUYER THAT HE
OR SHE IS QUALIFIED TO MAKE ANY REPAIRS TO THE PRODUCT OR THAT HE OR SHE IS
QUALIFIED TO REPLACE ANY PARTS OF THE PRODUCT. IN FACT, THE MANUFACTURER
AND/OR DISTRIBUTOR EXPRESSLY STATES THA T ALL REP AIRS AND PARTS REPLACEMENTS
SHOULD BE UNDERTAKEN BY CERTIFIED AND LICENSED TECHNICIANS AND NO T BY THE
BUYER. THE BUYER ASSUMES ALL RISK AND LIABILITY ARISING OUT OF HIS OR HER
REPAIRS TO THE ORIGINAL PRODUCT OR REPLACEMENT PARTS THERETO, OR ARISING
OUT OF HIS OR HER INSTALLATION OF REPLACEMENT PARTS THERETO.
Page 13SKU 90880
Page 14

Assembly Drawing
Page 14SKU 90880
 Loading...