

Chevrolet ranger rt Owner's Manual
Owner's Manual
RangerRT
Roadtrek, Inc.
PDF generated at: Thu, 04 Sep 2014 14:17:03 EDT

Contents
Articles
Introduction 1
Copyright 2
Do's and Don'ts 3
Before you head out 8
Coming Home 9
Interior Living Space 11
Sleeping Facilities 21
Bathroom Facilities 24
Appliances 28
Outside your Roadtrek 32
Utilities 37
Heating and Cooling 40
Electrical System 43
Monitor Panel 47
Distribution Panel 51
Alarms and Warnings 52
Maintenance 55

Spare Tire Storage 59
Obtaining Service 61
Specifications 62
Warranty 63
Registration 67
Regulatory Notices 69
HOWTO: Monitor Panel 70
HOWTO: Setting Up Your Campsite 76
HOWTO: Shore Power 80
HOWTO: Potable Water Use 84
HOWTO: Waste Water Dumping 87
HOWTO: Cable and TV Reception 93
HOWTO: Propane System 98
HOWTO: Water System Winterizing 104
HOWTO: De-Winterizing 109

Introduction
Introduction
Congratulations on the purchase of your Roadtrek and welcome to the Roadtreking family. The information included in this
manual is meant to help and guide you through the use of your vehicle so that you know how to properly use the many
functions your Roadtrek has to offer.
Please keep this manual in your vehicle as a reference for when you are travelling. If you have any questions or comments on
information found in this document please contact us at manuals@roadtrek.com
References
[1] mailto:manuals@roadtrek. com
[1]
or 1-888-ROADTREK.
1
© 2014 by Roadtrek, Inc.

Copyright
Copyright
This manual is released under a Creative Commons Attribution-NonCommercial-NoDerivatives 4.0
International License
In summary, you may:
•• Copy any portion of this manual in any form for personal use;
•• Distribute this manual complete with all of its original unmodified content;
•• Modify this manual for your own personal, non-commercial use.
You may not:
•• Use this manual for any commercial use whatsoever;
•• Modify this manual except as provided for in the full license and then distribute the resulting work;
•• Charge for this manual other than reasonable media and shipping costs.
All images used in this manual remain the property of Roadtrek, Inc. They are for illustrative purposes only and may or may
not be representative of the upfits in your Roadtrek.
Contact Roadtrek, Inc. for alternate licensing arrangements if you want to use or distribute this manual commercially.
[1]
.
2
References
[1] http:/ / creativecommons. org/ licenses/ by-nc-nd/ 4. 0/
© 2014 by Roadtrek, Inc.

Do's and Don'ts
Do's and Don'ts
Symbol Legend
For your information. May be useful information to know.
Warning. Not following this can lead to bad results.
Caution. You really should follow this to avoid bad results.
Don't do it. Doing this can result in injury, severe damage, or death.
Information, cautions, and warnings
Level Item Comment
3
SEAT BELTS Use only forward facing seats equipped with factory installed seat belts while the vehicle is in
motion. All passengers must be seated in these seats only, with the seat belts fastened while
the vehicle is in motion.
TV Turn the TV off and stow it while the vehicle is in motion.
TV The flat screen TV should not be stored inside the Roadtrek in cold temperatures. Remove it to
reduce the chance of damage from the cold. Check the Owner's Manual for the TV for storage
and operating temperatures.
© 2014 by Roadtrek, Inc.

Do's and Don'ts
4
TV To remove the TV, remove the four mounting bolts on the back of the TV mounting bracket
and remove the RCA cables, power supply cable and antenna cable.
PROPANE Do not store propane tanks inside your vehicle. Propane tanks are equipped with safety
devices which relieve excessive pressure by discharging gas to the atmosphere.
PROPANE Do not refuel the propane tank to more than 80% of its capacity.
PROPANE The propane tank valve must be closed and ALL PILOT LIGHTS, APPLIANCES, AND THEIR
IGNITERS, MUST BE TURNED OFF during refueling of the motor fuel tank and/or the propane
fuel tank. Only qualified personnel should refuel your propane tank.
PROPANE Purchase propane from a reputable propane facility. Contaminated propane is a common
cause of system failure and is not covered under any warranty.
PROPANE The BBQ quick disconnect is regulated to 10 P.S.I. Please ensure that all devices connected to
this are either rated for “high pressure” or have their own regulator. Many grills sold in the
United States are "low pressure" (1/2 P.S.I.) and will require an additional regulator to step the
pressure down to a useable level. If hooked directly to the BBQ quick disconnect they will be a
severe fire hazard.
PROPANE LEAK
Do not block the air circulation in the area where the Propane Leak Detector is located.
DETECTOR
PROPANE LEAK
Battery disconnect switch must be in the “ON” position for the propane detector to function.
DETECTOR
© 2014 by Roadtrek, Inc.

Do's and Don'ts
5
FLAMMABLE
Do not store gasoline or other flammable liquids inside your vehicle.
LIQUIDS AND
GASSES
HEATING Never use cooking appliances or unvented propane heaters for space heating purposes. They
need fresh air for safe operation.
HEATING The heating furnace provides its own outside combustion air and exhausts to the outside.
HEATING Portable fuel burning equipment, including wood, charcoal, and liquid fuel grills and stoves,
should not be used inside your vehicle. Use of this type of equipment inside your vehicle may
cause a fire or asphyxiation.
CARBON MONOXIDE
LEAK DETECTOR
CARBON MONOXIDE
LEAK DETECTOR
Do not block the air circulation in the area where the Carbon Monoxide Leak Detector is
located
Battery disconnect switch must be in the “ON” position for the Carbon Monoxide Leak Detector
to function.
110 VOLT
ELECTRICAL
SERVICING
EXTERIOR ACCESS
DOORS
Prior to servicing the 110 volt Galley GFCI & Audio/Video cabinet interior receptacles, unplug
the output lead from the power inverter.
Ensure the shore power cord and city water supply lines are disconnected and in their stored
positions before the vehicle is put in motion.
© 2014 by Roadtrek, Inc.

Do's and Don'ts
6
AWNINGS Close the sliding side door prior to opening or closing the awning.
CLOVERLEAF
The cloverleaf dining table is heavy. Use proper lifting techniques.
DINING TABLE
EXTRA COUNTER
Make sure the stove is off and has cooled prior to lowering the stove cover.
SPACE
BATTERY Battery acid can burn your skin and damage clothing. Protective eye wear and gloves should
be worn while handling batteries. Effective June 2010 all Roadtrek installed batteries
are sealed AGM batteries that do no require the addition of water.
BATTERY Disconnect the inverter/charger prior to disconnecting the auxiliary battery.
GENERATOR Never submerge the generator. Use a spotter when launching a boat or crossing streams.
GENERATOR When using the generator as the main power source to run the appliances, refer to the
generator owner’s manual for proper use and maintenance.
GENERATOR The generator cannot run all the appliances at the same time.
© 2014 by Roadtrek, Inc.

Do's and Don'ts
7
WASTE WATER
Close both the black and gray water gate valves before using the waste water system.
STORAGE AND
DUMPING SYSTEM
FREEZING Under moderate subfreezing conditions, antifreeze is required in the exterior fresh water tank,
black and gray waste water tanks. Use RV antifreeze in accordance with the manufacturer's
instructions.
ELECTRICAL
SERVICING
This unit has 12 volt, 110 volt and potentially 36 volt solar system. These systems need to be
disconnected before working on them.
GENERATOR The generator is not compatible with E-85 fuel. If the vehicle is equipped with a generator,
avoid the use of E-85 fuel.
ENGINE BATTERY The Chevrolet engine battery will be drawn down by the GM electronics to a no-start condition
if left unattended for extended periods. Plug the vehicle in, drive the vehicle for at least three
hours every two weeks to keep the engine and auxiliary batteries charged, or disconnect the
engine battery to keep it in good condition. Battery maintenance is the vehicle owner’s
responsibility.
© 2014 by Roadtrek, Inc.

Before you head out
Before you head out
Your new Roadtrek is ready to go with just a little bit of preparation.
To prepare for your first trip, you should:
•• Read this manual.
•• Contact your dealer with any questions.
•• Plan your trip.
Then use this quick checklist.
•• The day before your trip:
•• charge your batteries by plugging in overnight
•• cool your refrigerator by turning it on
•• chill any beverages in your home refrigerator
•• fill your fresh water tank with clean tap water
•• The day of the trip:
•• Load the refrigerator with cold food (from your home refrigerator)
8
© 2014 by Roadtrek, Inc.
Coming Home
Coming Home
When you come home, there are a few maintenance tasks you should do to get your Roadtrek ready to go for next time.
Refer to other sections in this manual for the procedures listed here.
• On your way home, dump the gray and black tanks at a convenient facility. See the HOWTO: Waste Water Dumping section
for a concise description of the procedure to do this. Some RV parks and gas stations will let you dump for a fee, some city
wastewater plants will let you dump for free, but there is no real pattern, so local knowledge is vital in locating dump
stations. The website http:/ / www. sanidumps. com is a good resource. The maps for each state and province are
especially helpful: http:/ / www. sanidumps. com/ maps/ help. php
•• At home, flush the water tank and fill it with fresh chlorinated water if you will be using it in the next few days. Otherwise,
drain the tank. Don't let water you are planning to use sit in your tank for more than a week or so, and don't let ANY water
sit in your tank for more than two weeks, whether you plan on using it or not. Over time, the chlorine goes away, and the
microbes come out to play.
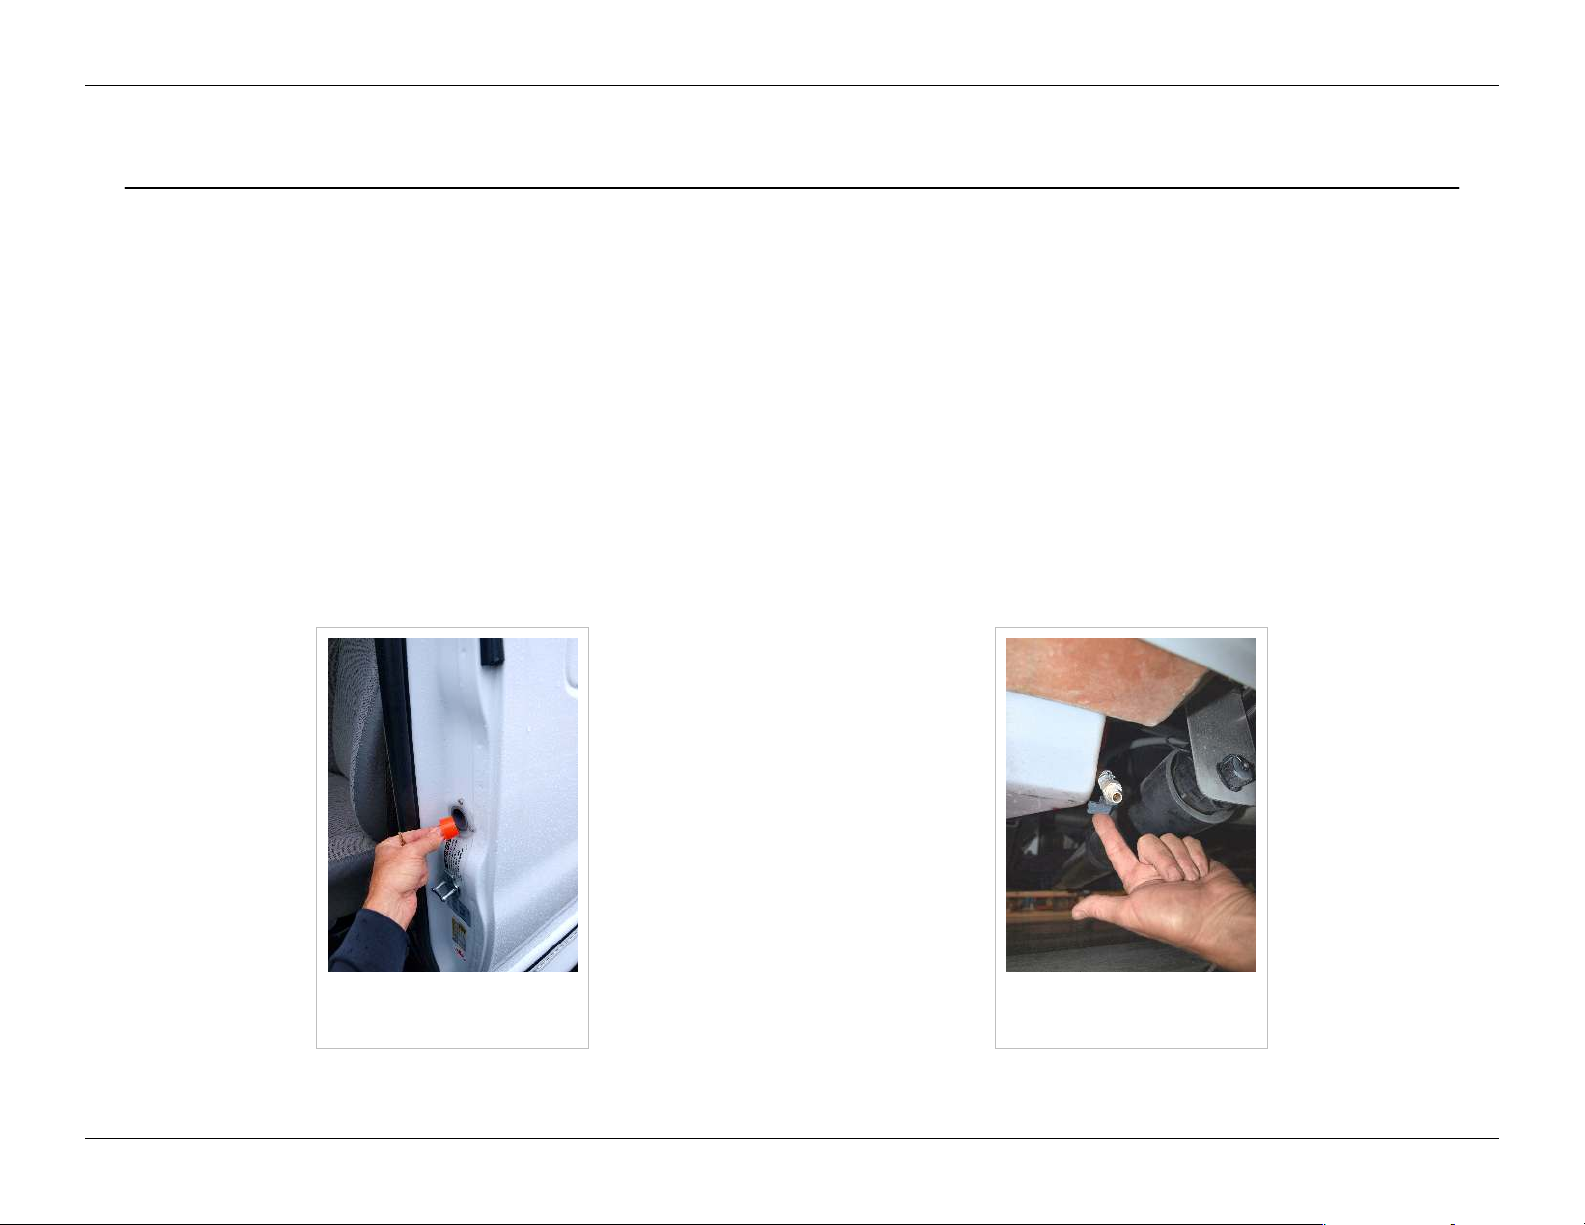
•• To flush the tank, fill it using the gravity fill in the driver's doorframe, and open the fresh water tank drain under the rear of
the driver's doorstep.
9
Gravity fill in driver's
doorframe
Fresh water tank drain,
under driver's doorstep
© 2014 by Roadtrek, Inc.
Coming Home
•• Plug in overnight to fully charge batteries.
•• Turn off and clean out the refrigerator and prop the door open to let it air out
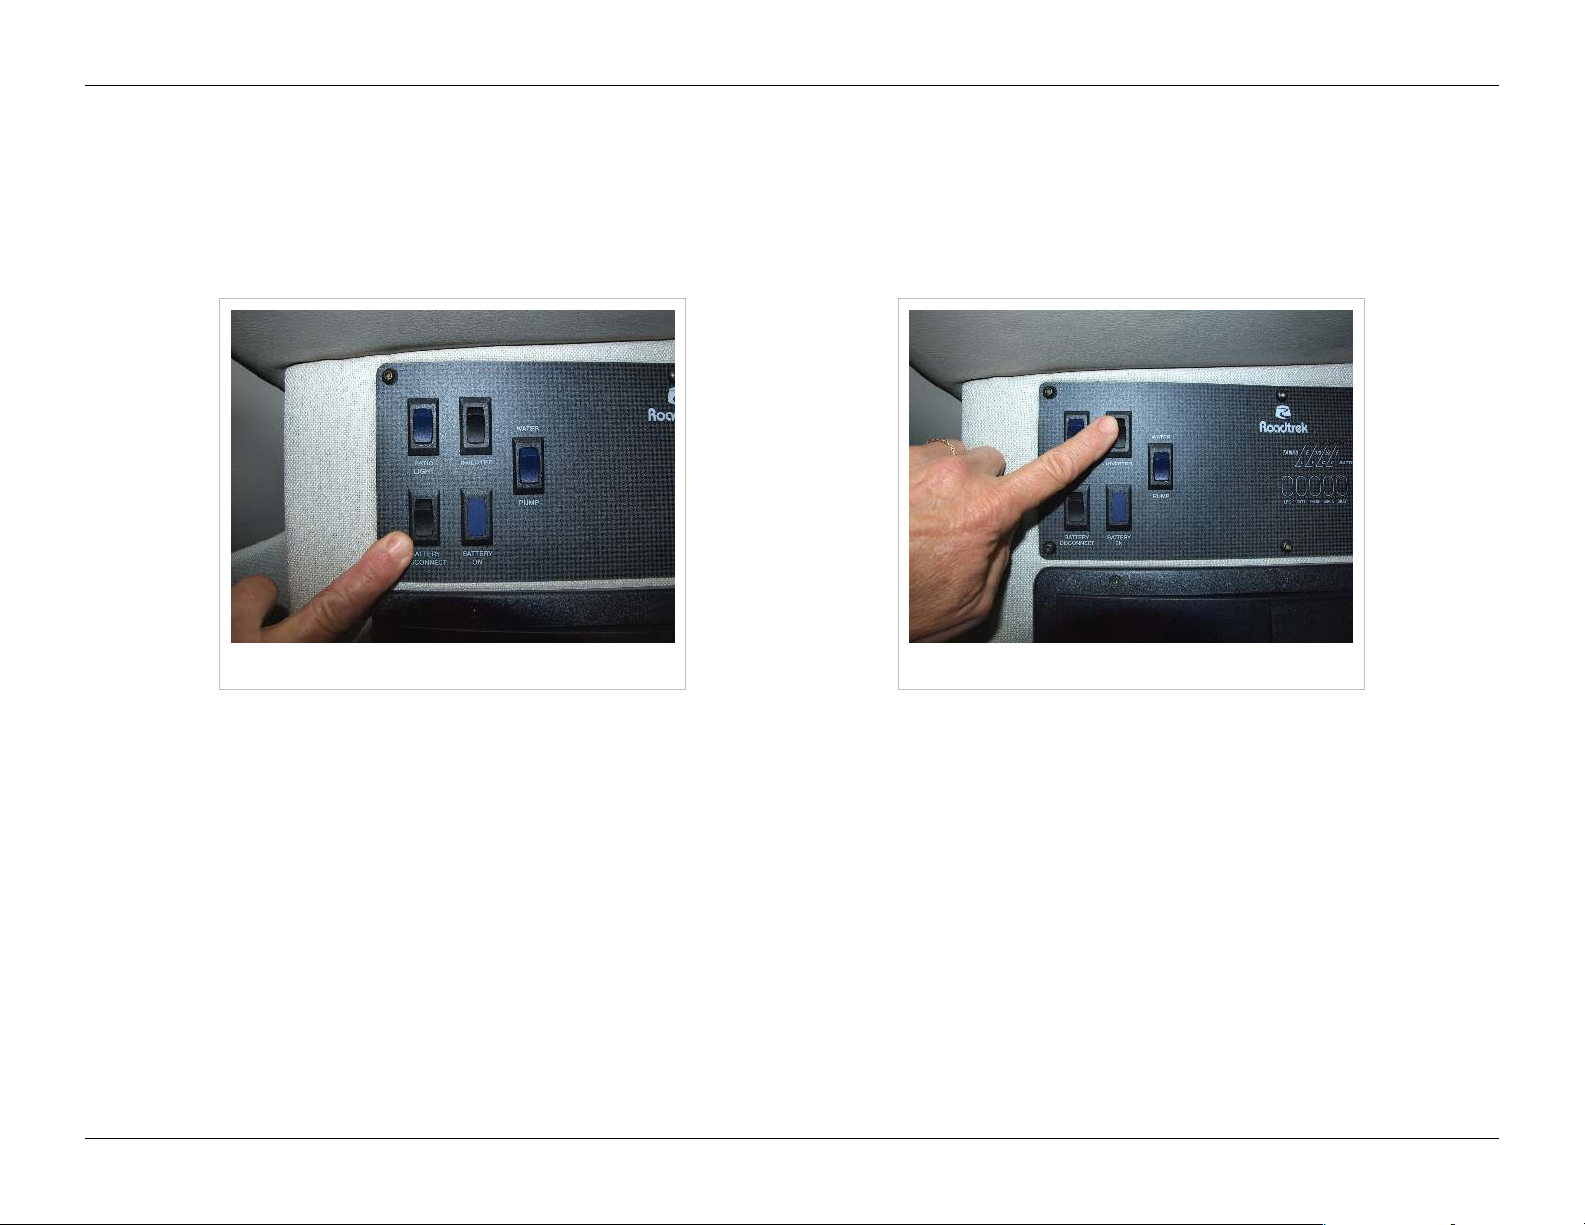
•• Turn off two important switches to keep from draining your batteries
•• the battery disconnect switch on your monitor panel
•• the inverter switch on your monitor panel
10
Battery disconnect switch Inverter switch
While storing the vehicle for long periods, it would be prudent to check the coach battery state of charge every month or so
and charge them if necessary. If you don't turn everything off, you will probably come back to dead batteries.
That's it! You're ready for the next trip.
© 2014 by Roadtrek, Inc.
Interior Living Space
Interior Living Space
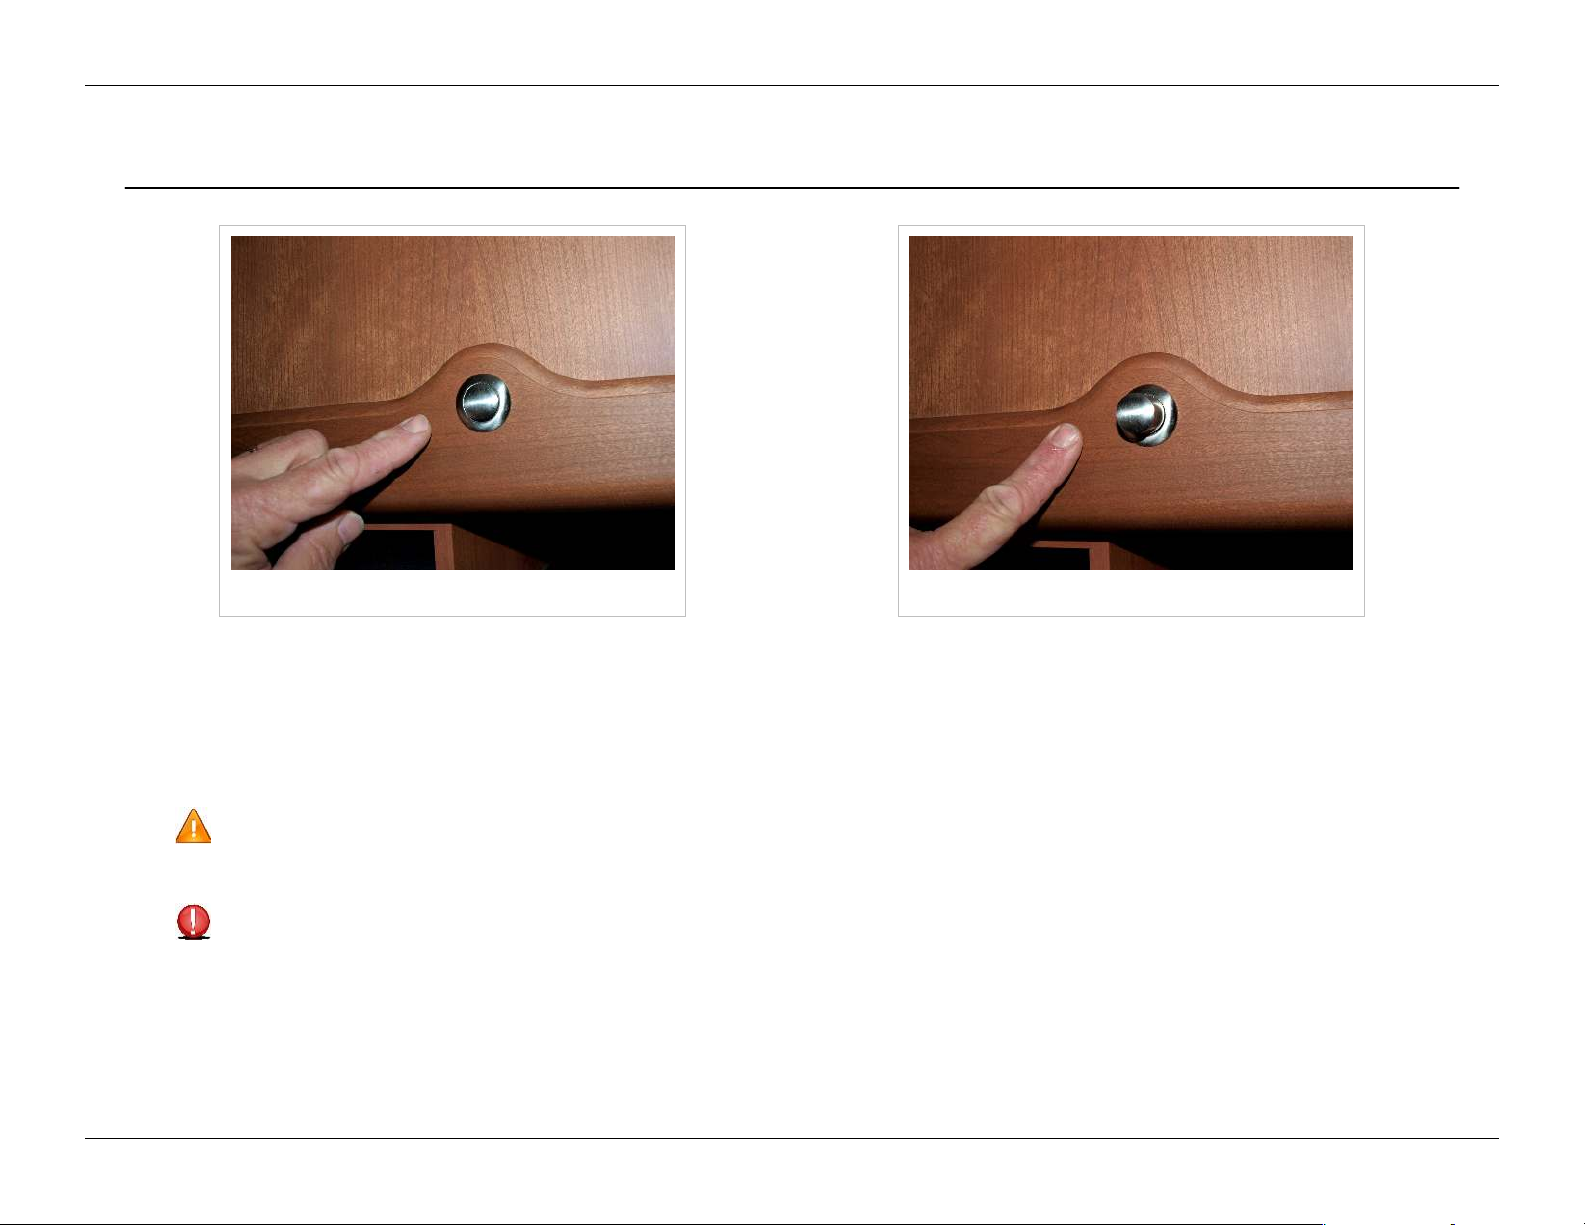
Pushbutton Latch closed Pushbutton latch open
Your Roadtrek is equipped with cabinet latches which prevent the contents from falling out while the vehicle is in motion. The
pushbuttons on the cabinet latches toggle from latched (button in) to openable (button out) by pressing the button.
11
To open a cabinet, press the button to pop the latch, pull gently on the latch, and the cabinet door will open.
To close a cabinet, make sure the latch is still open (button out), then close the door. Once the cabinet door is closed, press
the latch button in to lock the cabinet.
Do not attempt to close the cabinet doors while the latch button is pressed in. This will break the latch. Always make
sure the button is out before attempting to close a cabinet door.
Do not keep large, round, and/or heavy objects in a cabinet unsecured - they will roll around and apply excessive
pressure to the inside of the cabinet doors as you drive. Even if the force of such objects doesn't break the latch, they
can shift position with vehicle motion and be leaning against the inside of the cabinet door, waiting to fall when you open
the cabinet. For this reason, Roadtrek recommends that you not store anything in the overhead cabinets that you
wouldn't want to get hit over the head with.
© 2014 by Roadtrek, Inc.
Interior Living Space
If you load a large amount of weight into a cabinet, experience large swings in temperature or humidity, drive on bumpy
roads at high speeds frequently, or sometimes as part of normal wear and tear, the cabinet hinges may go out of adjustment.
You will know the cabinet is out of adjustment when it will not open with the button out, or not latch with the button in.
12
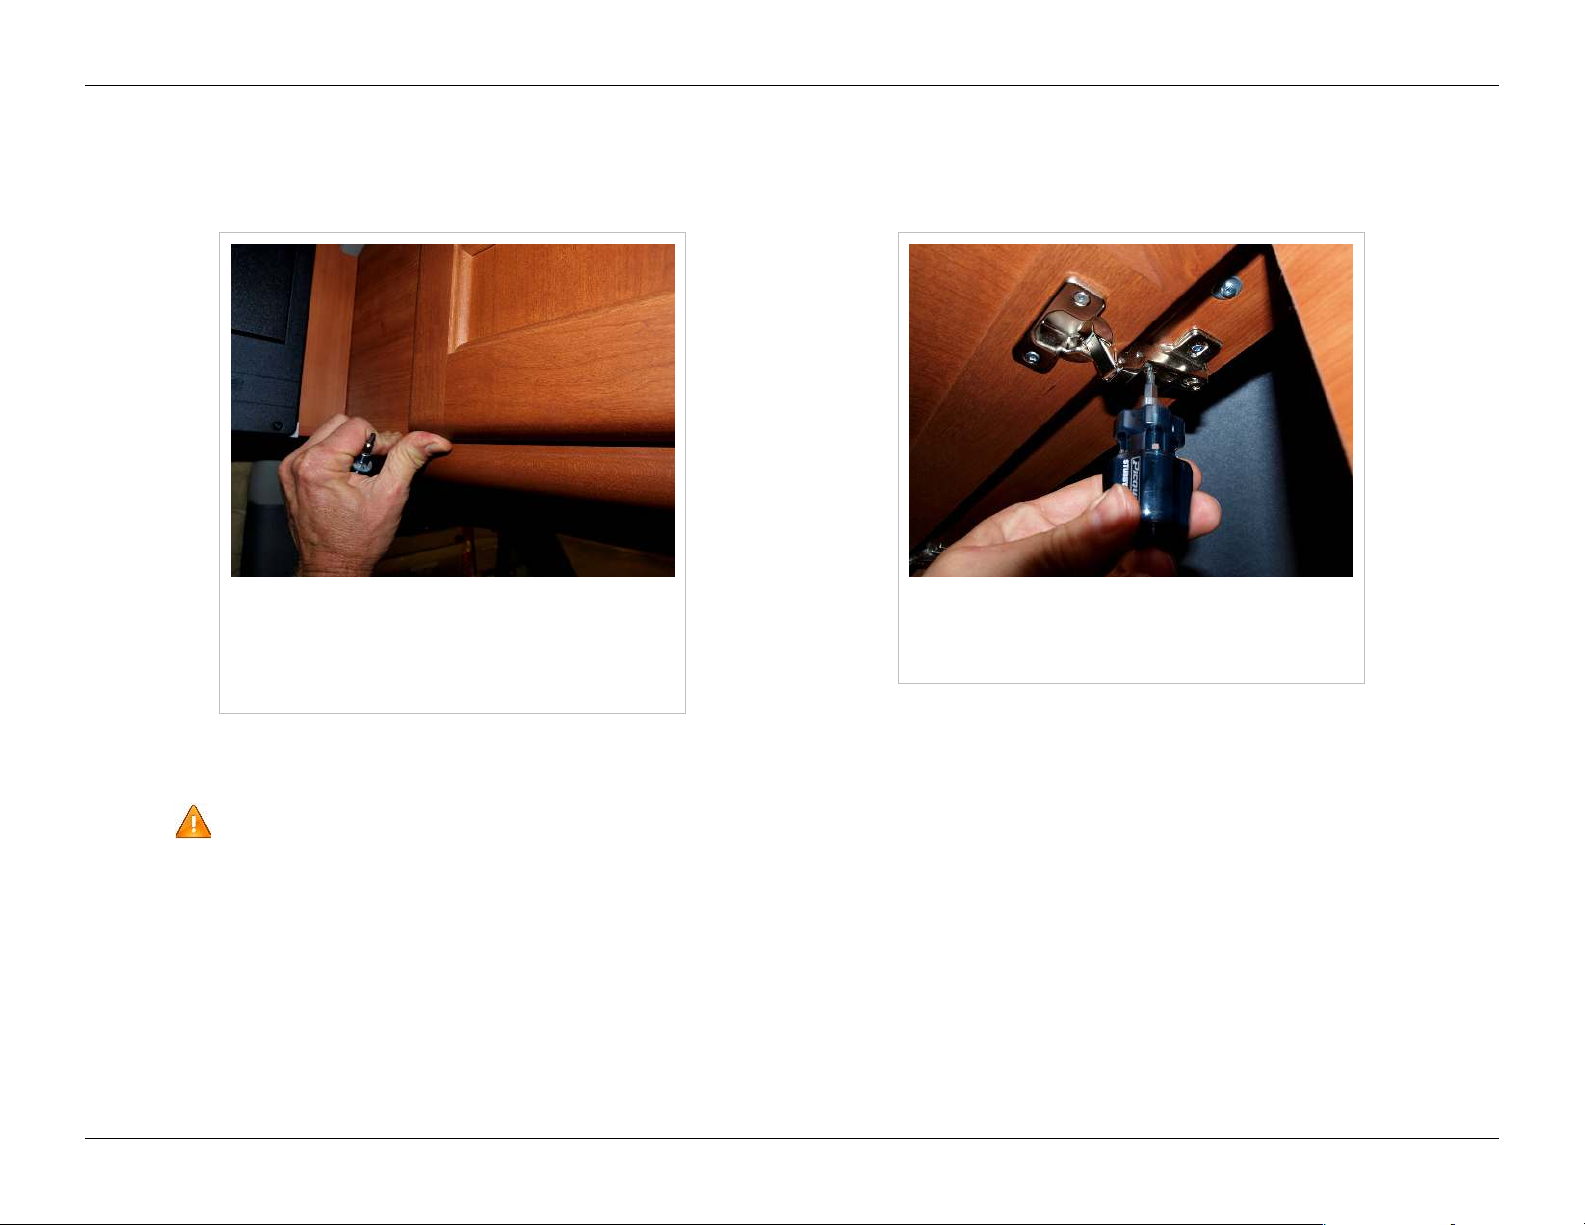
Apply moderate upward pressure and
GENTLE outward pressure with both
thumbs on the bottom corners of the
Turn screw clockwise to lower cabinet
face (if it won't latch), counterclockwise
to raise it (if it won't open)
door to open a stuck cabinet
To open a cabinet stuck shut with the button out, apply pressure UPWARD with your thumbs on both bottom corners of the
cabinet door while simultaneously applying gentle pressure to open it, as shown above left.
DO NOT FORCE THE DOOR OPEN BY PULLING OR PRYING ON IT - you will break the latch.
The screw in the top part of the hinge nearest the pivot point adjusts the vertical location of the door, as shown above right.
Screw out to raise the door and fix stuck doors; screw in to lower the door and fix doors that won't stay shut when latched.
© 2014 by Roadtrek, Inc.
Interior Living Space
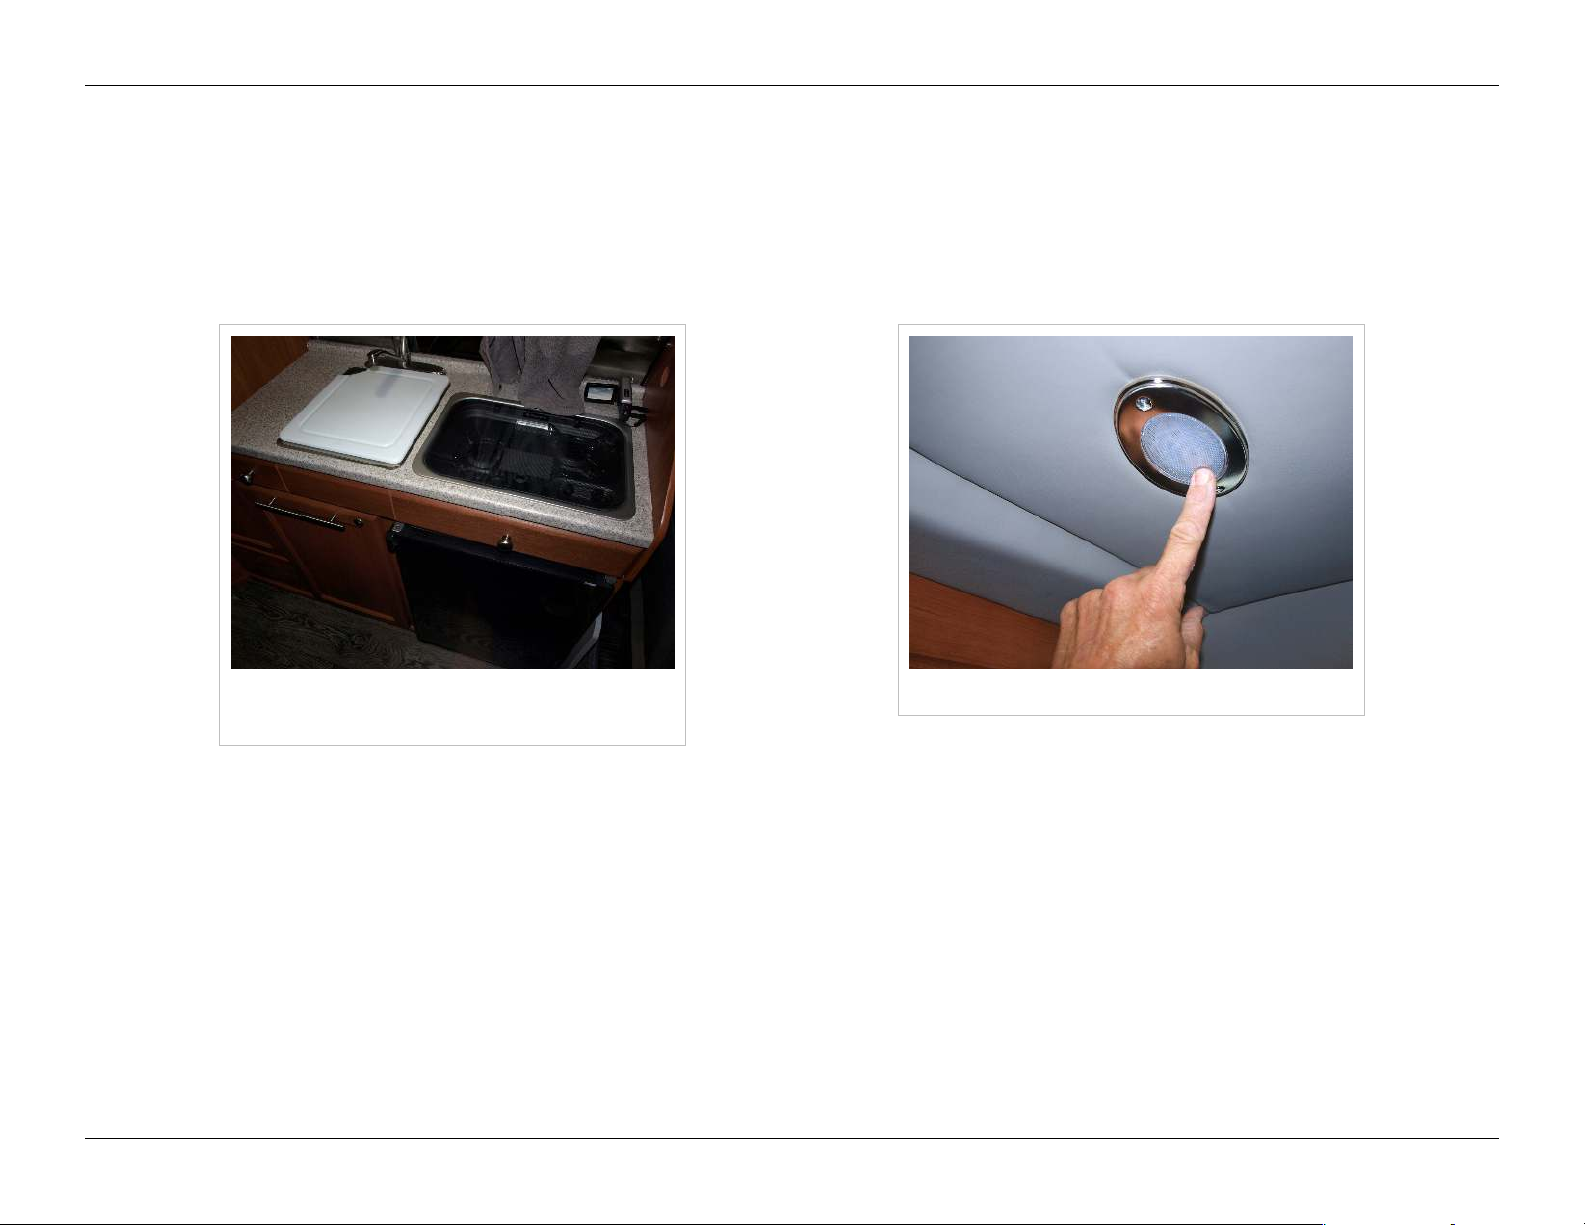
Galley cabinets
Immediately beneath the galley countertop there are drawers to the left and right of the food preparation surface to hold
silverware and small cooking utensils. The center panel in front of the sink is fixed, and is not a drawer.
The refrigerator is below these drawers on the right; on the left is a cabinet with three shelves to store larger cooking utensils
and food.
13
Galley cabinets, with optional propane
cooktop
Tap light
© 2014 by Roadtrek, Inc.

Interior Living Space
Lights
The oval ceiling lights are all individually controlled, and are tap lights - to turn them off or on, press on the lens area. The
battery disconnect switch must be on for any of these lights to work. These are LED lights, and consume very little electricity.
Tables
14
Table leg storage in wardrobe to left of
galley
There are front and rear tables to use either the front or rear lounge areas for dining, playing cards, or computer use. The
table legs are stored in the closet to the left of the galley, next to the water heater. The legs key into a T-Nut fitting in the
floor plate. To install either table leg in the floor plate, unscrew the T-nut all the way on the end of the table leg and insert the
T-Nut into the key in the floor plate. Rotate the table leg clockwise and it will tighten into place within a couple of turns. If it
does not, unscrew the T-nut all the way and try again.
Table leg T-Nut attachment
© 2014 by Roadtrek, Inc.
Interior Living Space
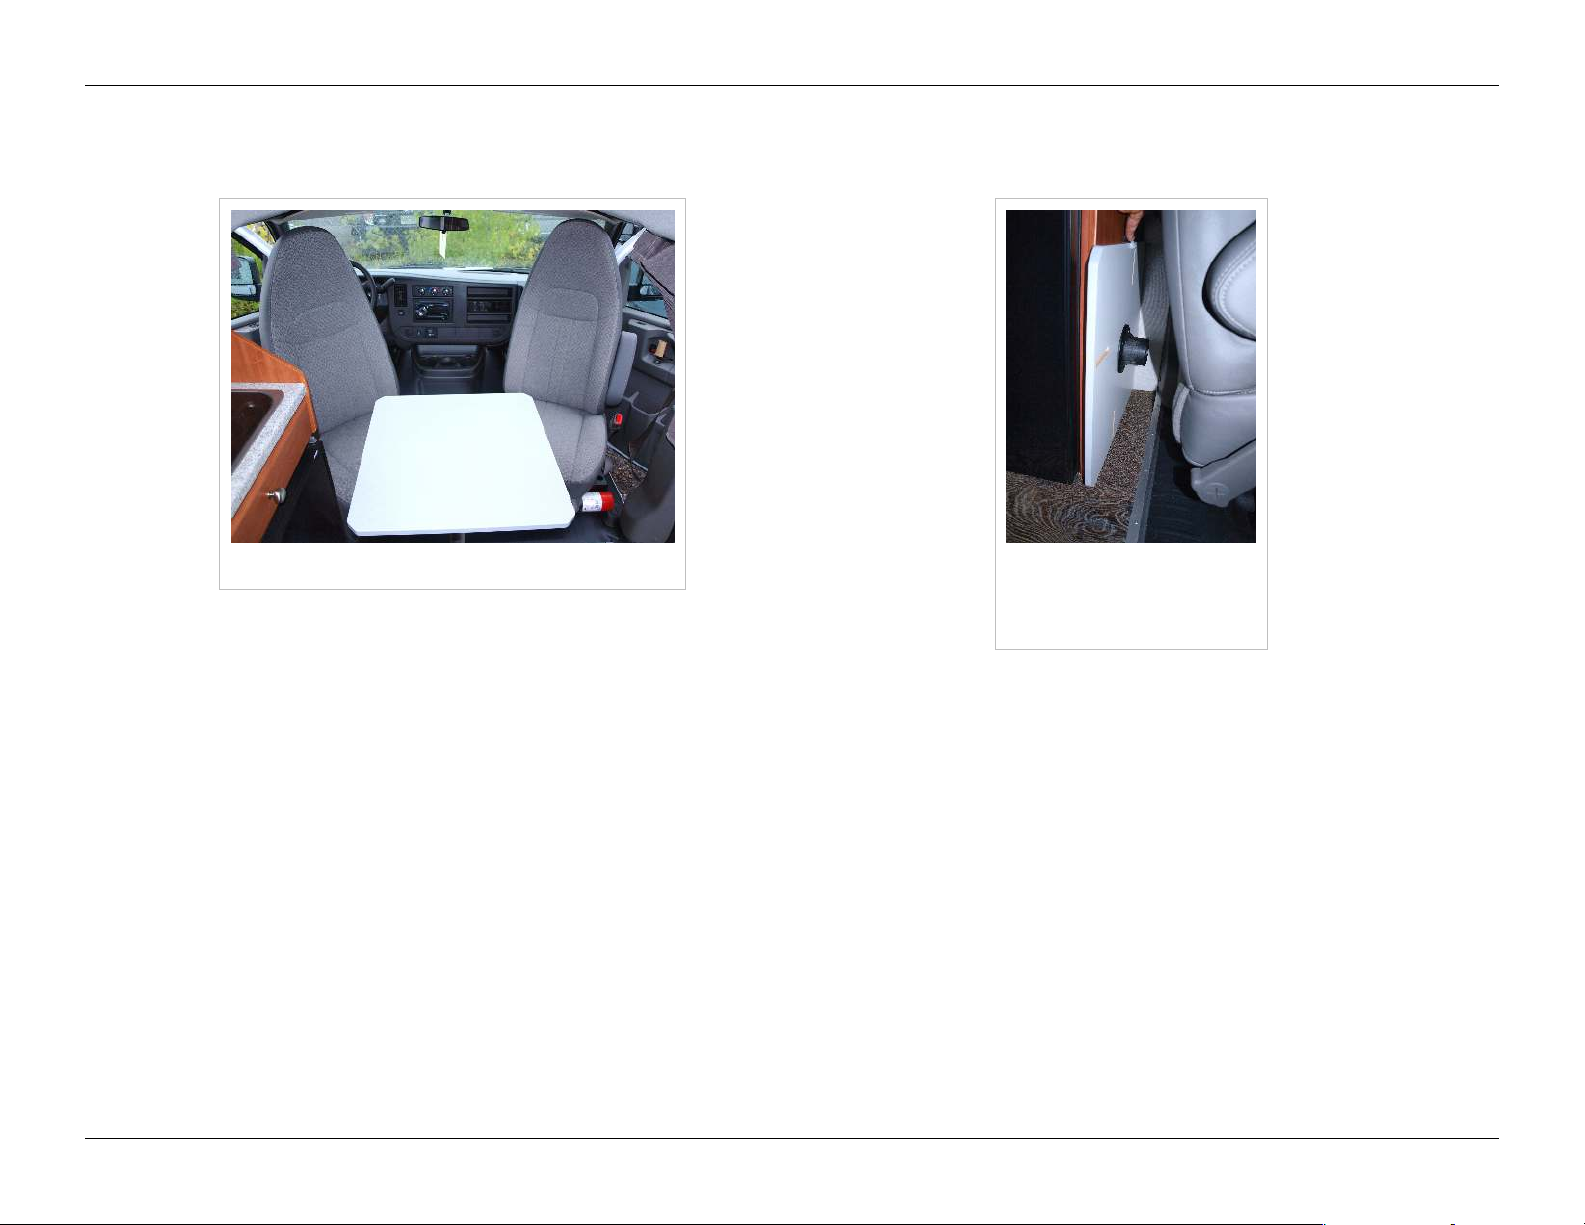
Front Table
15
Front lounge table Front lounge table
stored behind driver's
seat
The front table top is stored behind the driver's seat. Rotating plastic tabs keep it in place.
© 2014 by Roadtrek, Inc.
Interior Living Space
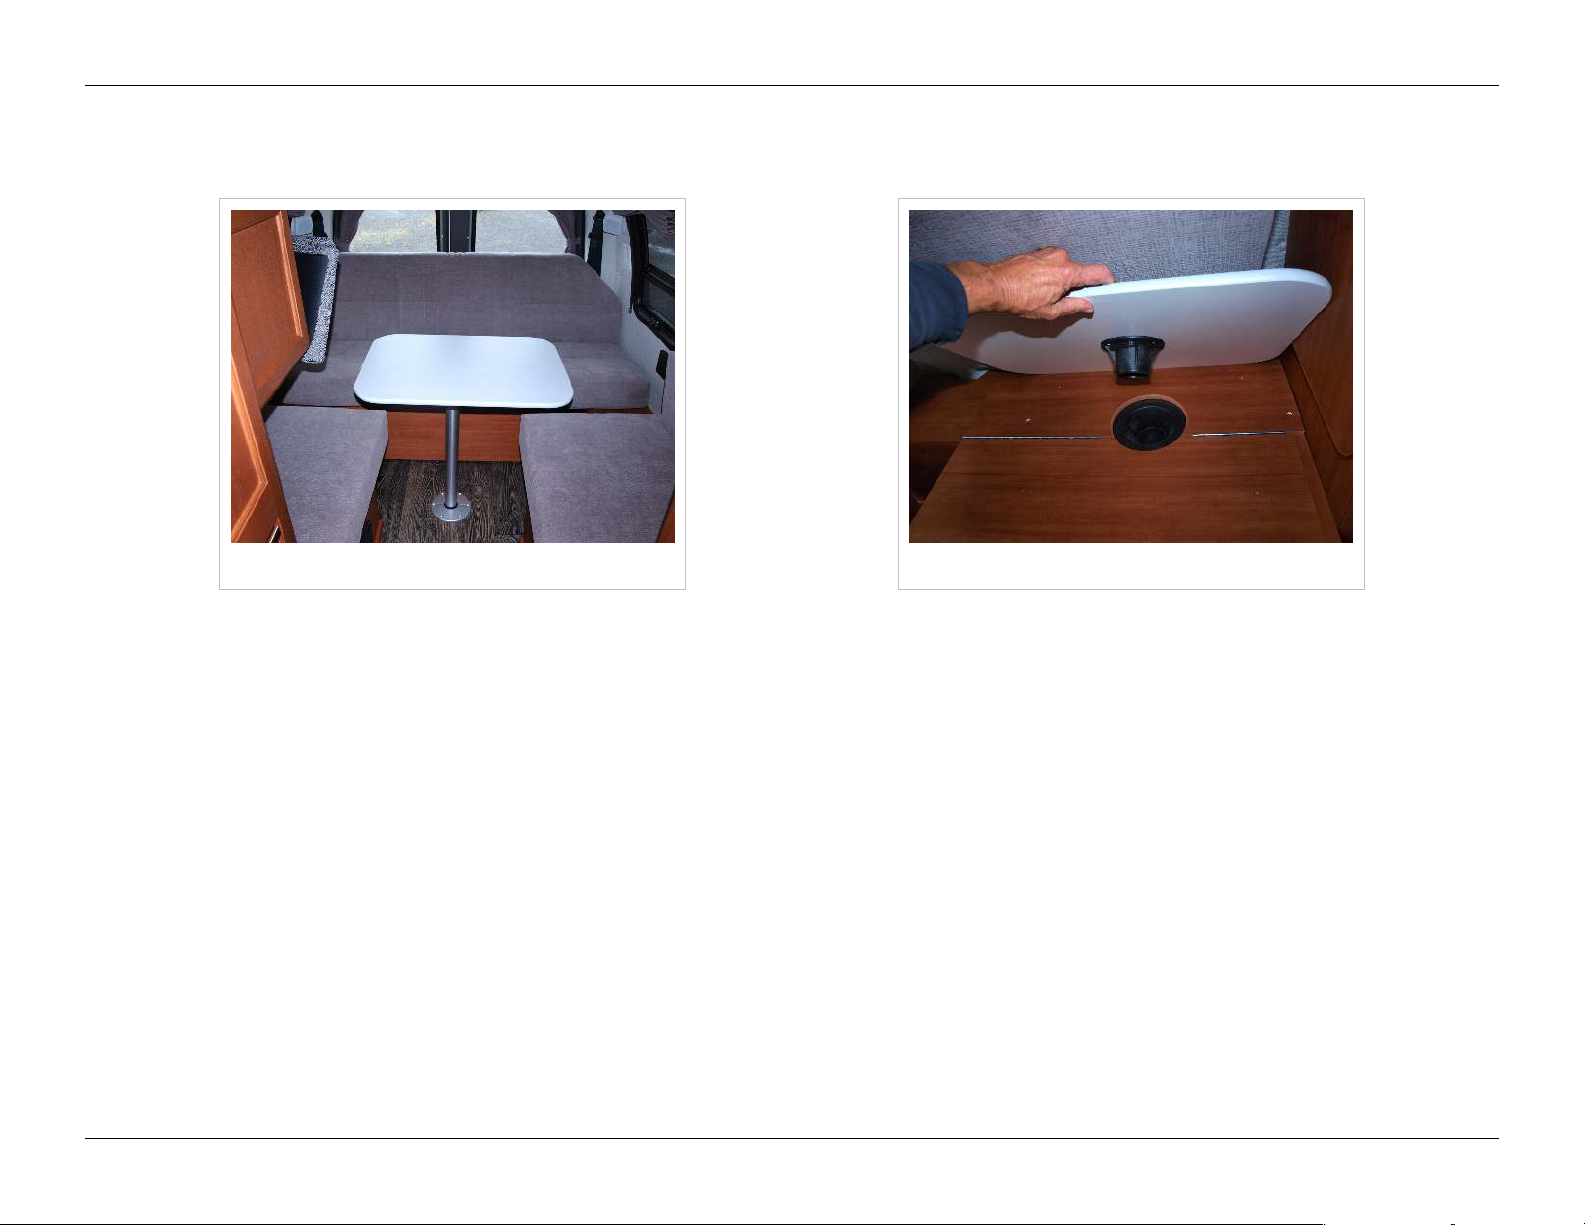
Rear Table
Rear dining table Rear dining table storage
The rear tabletop is stored under the driver's side rear bench seat, and its leg is stored inside the wardrobe.
16
The dining table for the rear seating area is located under the driver's side rear bench cushion, directly across from the TV.
Lift the cushion and remove the table top. The table leg is located in the cabinet behind the driver's seat. Place the table top
on top of the table leg and make sure it's securely seated in the socket.
The table leg is off center, so it will extend more to the right or left depending on how you install it. Rotate the table top to
suit your needs.
To store the table, place the table top back under the cushion with its base going down into the hole in the bench seat base.
Since the table base is off-center, rotate it so that it will lie flat on the bench seat base. Remove the table leg from the floor
socket by unscrewing it and return the table leg to the proper location in the wardrobe, clipped into place for proper storage.
© 2014 by Roadtrek, Inc.
Interior Living Space
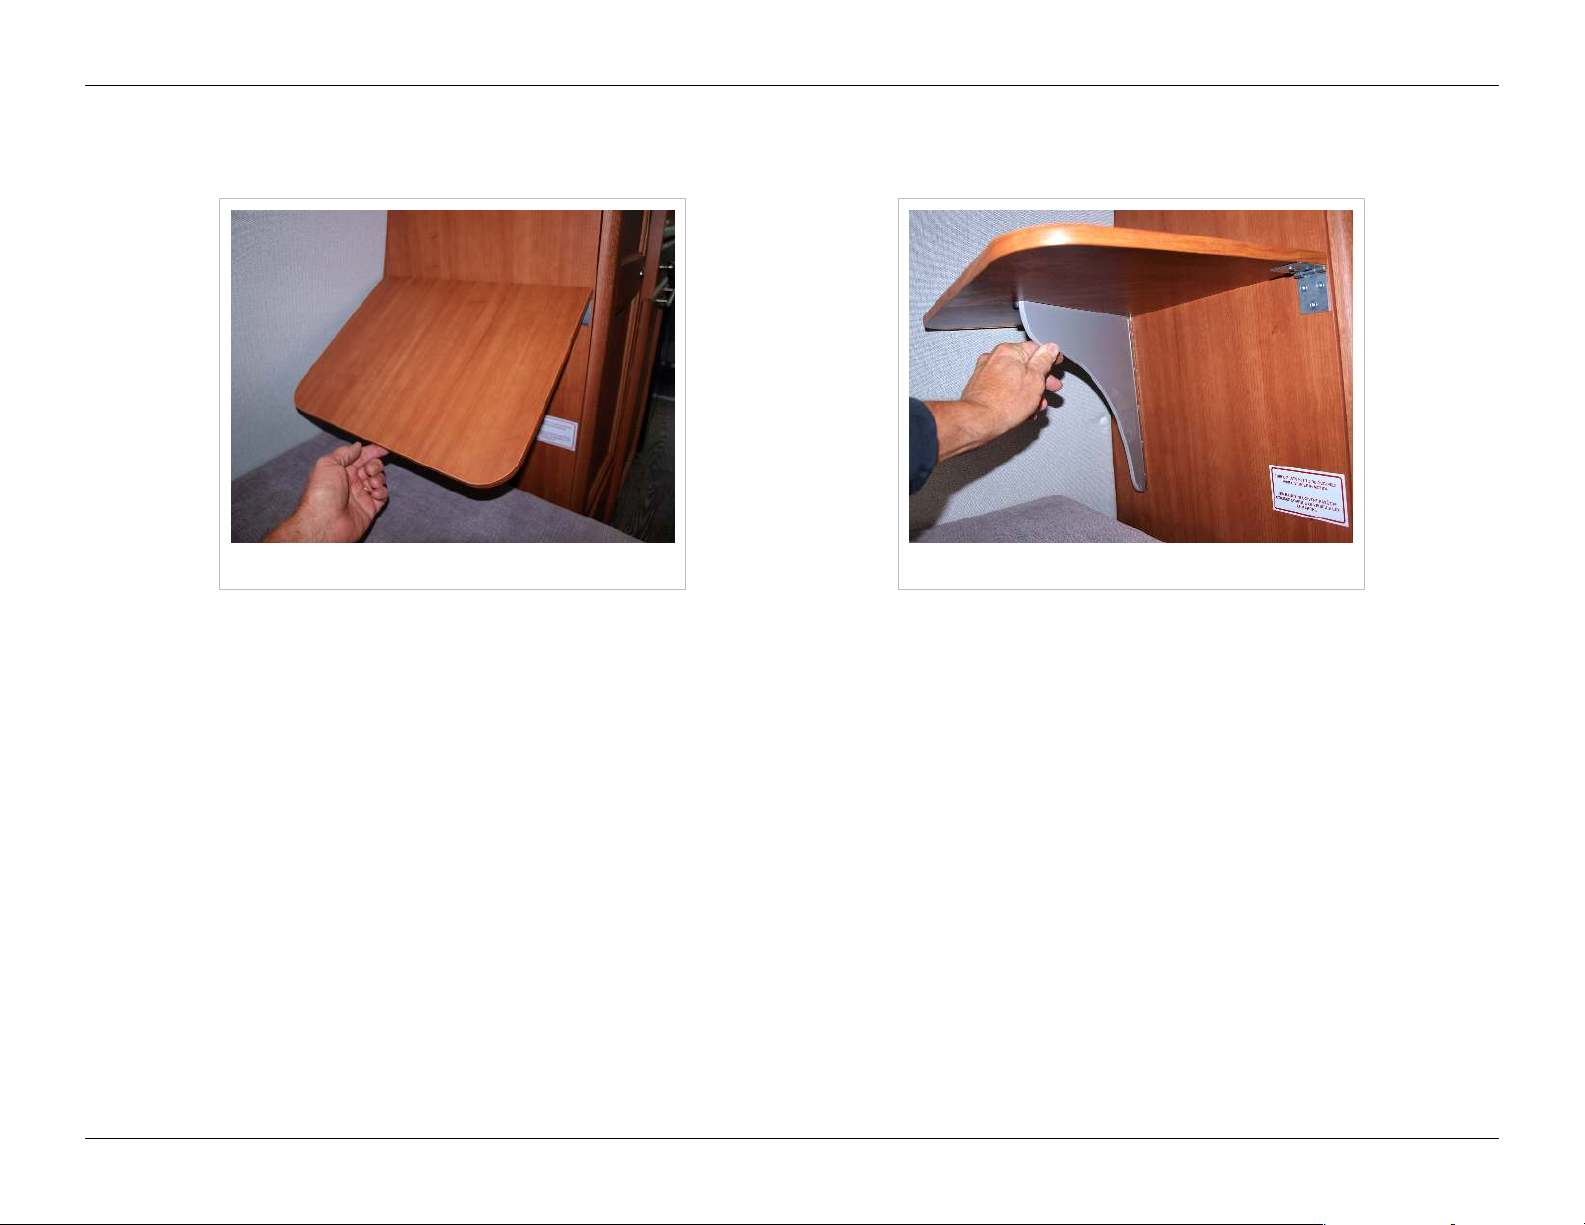
Computer Desk
Computer desk Computer desk support
The computer desk is located on the driver's side in the rear lounge area. Lift up the table leaf and use the support to hold it
in position.
17
© 2014 by Roadtrek, Inc.
Interior Living Space
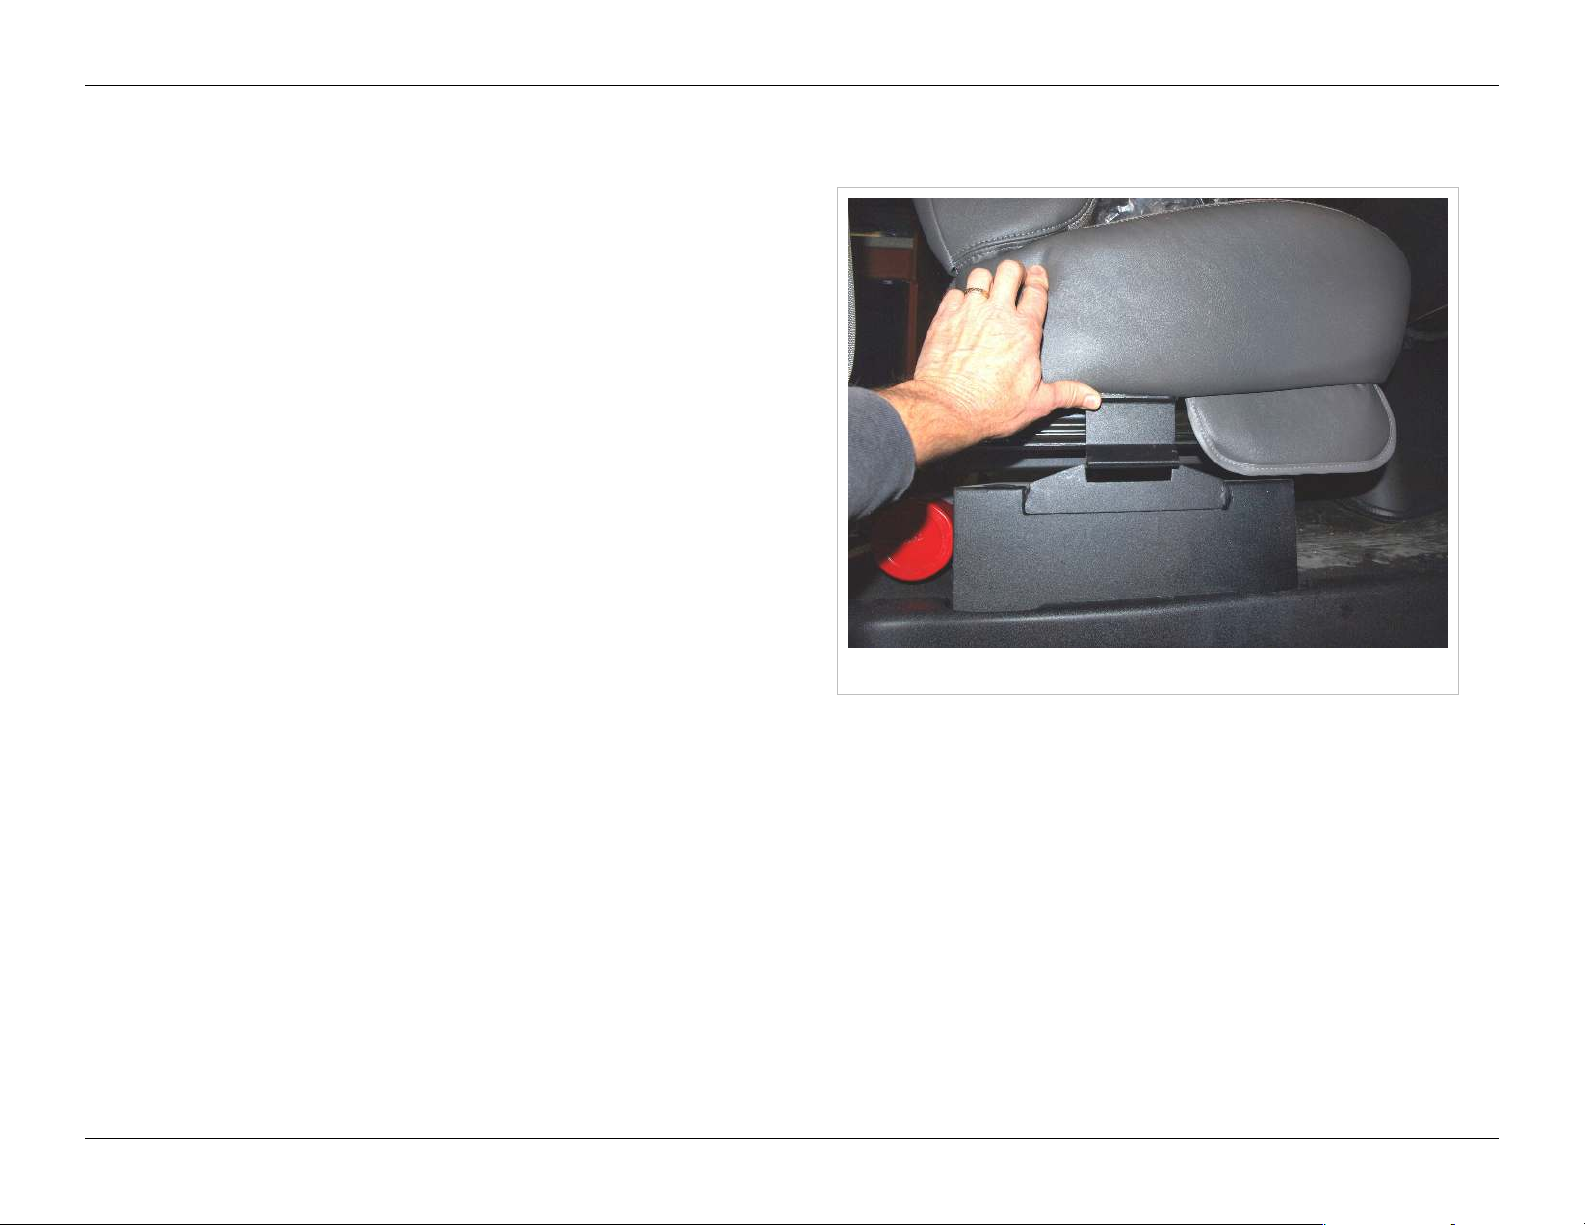
Captain's Seats
The two captain's seats in the front of your Ranger are
adjustable fore and aft by pulling up on the bar under the front
of the seat, and will swivel when the swivel tab - the black metal
bar on the side of the chair base - is pressed up. Always return
the seats to the forward-facing position when driving. They will
lock into this position, and stay locked until the swivel tab is
raised again.
To create a front lounge area, first ensure that the seats are fully
upright by loosening the recline adjustment and bringing the
backs of the seats forward. Do not attempt to pivot a reclined
seat. Use the fore-and-aft adjustment while pivoting the seats to
allow the sides of the chairs to clear the armrests on the vehicle
doors, the engine cover, and other obstructions. Do not force the
seats around. Swiveling the driver's seat may require you to
loosen the tilt steering wheel adjustment and move the steering
wheel as far forward and up as possible. Opening the front doors
slightly will allow you to clear the door armrests easily.
18
Front seat swivel tab
© 2014 by Roadtrek, Inc.
Interior Living Space
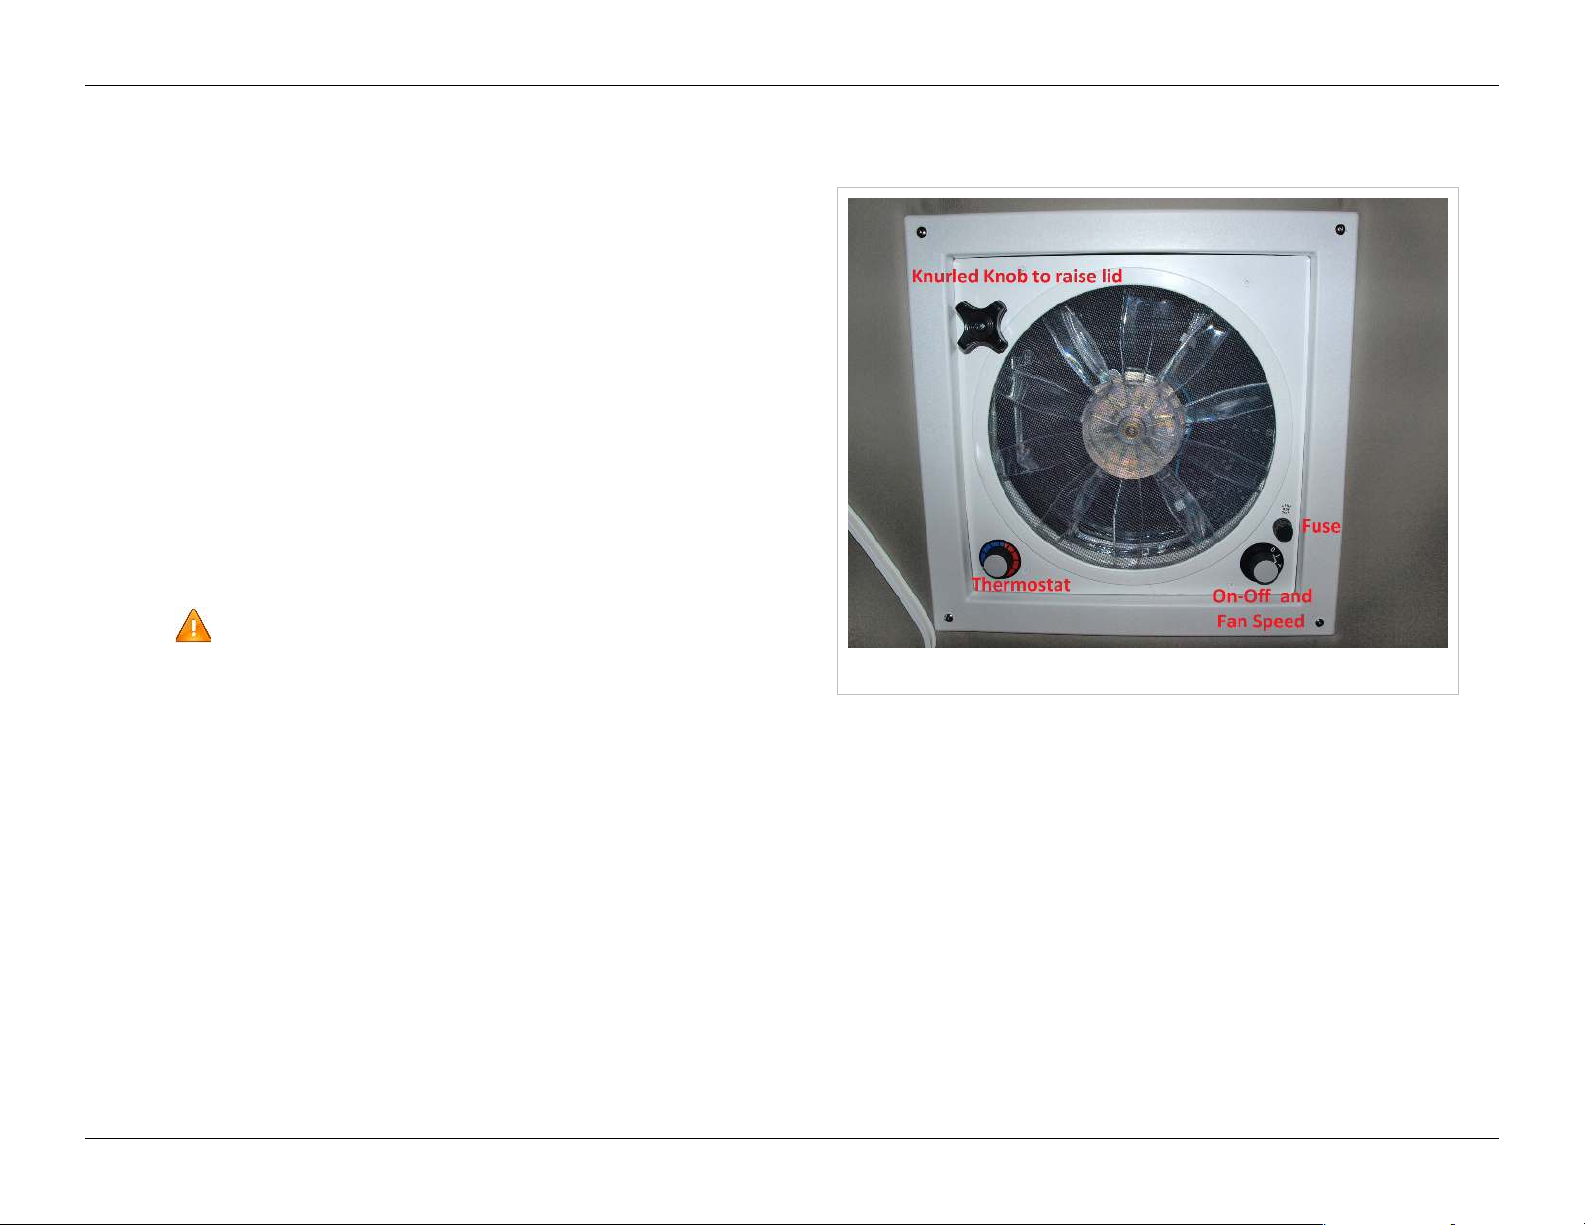
Ventilation
Your Roadtrek is equipped with a ceiling mounted ventilation
fan.
The fan has a cover that must be raised by turning the large
knurled knob before the fan will operate. Raise the cover, then
turn the switch to the desired speed.
The fan also has a thermostat, which will allow you to set the
temperature at which the fan comes on. If you want the fan to
operate at all temperatures, turn the thermostat all the way
toward the blue section of the dial.
There is also a fuse in the body of the fan, in addition to the fuse
in the distribution panel. Check both this fuse and the one on the
12 volt fuse panel if your fan stops working.
For more details, please refer to the Fantastic Fan manual.
Turn the fan off and close the cover completely before
driving. The cover will rattle and might be damaged by wind
pressure if you drive with it open.
19
Exhaust fan
© 2014 by Roadtrek, Inc.

Interior Living Space
Window Treatments
Curtains Curtain rails and clips
The window curtains slide on tracks. It's best to use two hands, one at each track, to pull curtains closed and open.
20
The curtains have snaps and clips at the end of the track to hold them in place. The front curtain meets in the middle and is
secured with hook and loop fasteners along this edge.
© 2014 by Roadtrek, Inc.
Sleeping Facilities
Sleeping Facilities
Your Roadtrek has beds that can be configured as a king bed or twin bed. Experiment with different configurations to find
what works best for you.
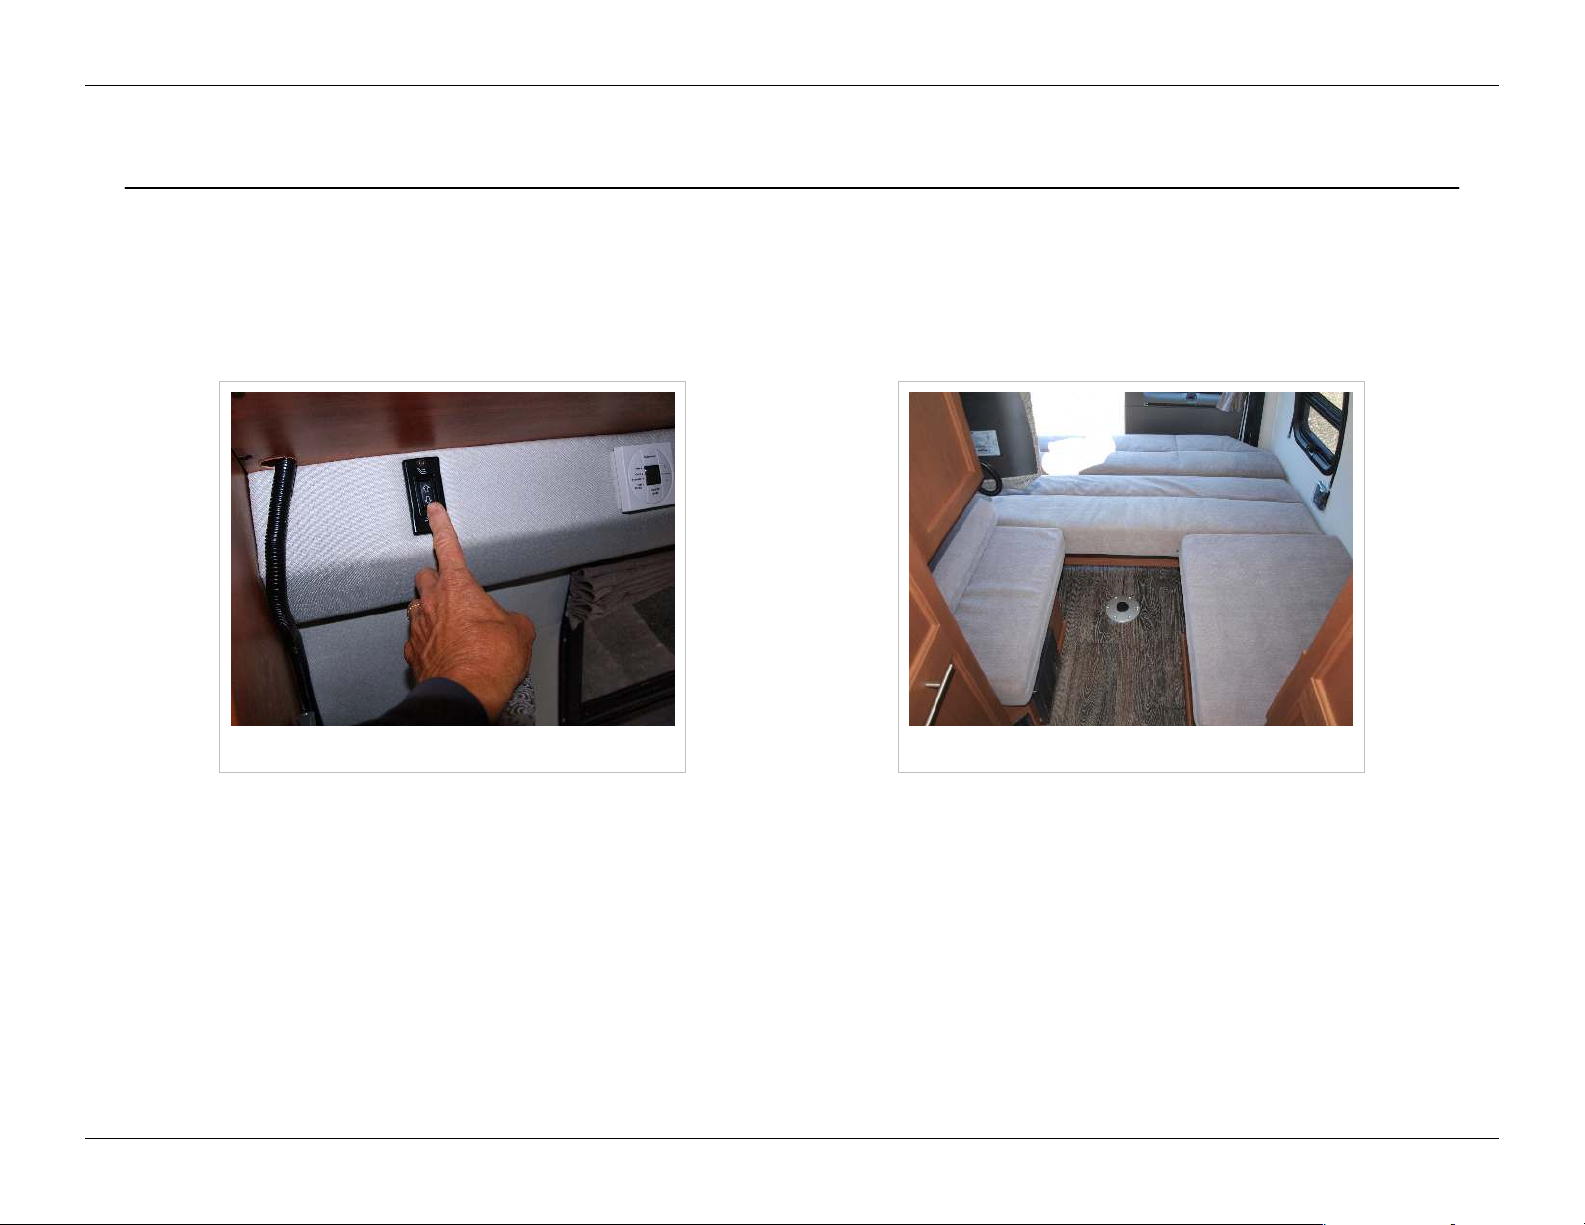
Power Sofa
21
Ranger power sofa switch Twin beds
The switch to lower the sofa into the bed position is located on the passenger side in the rear next to the thermostat.
The seatbelts for the power sofa are attached to the floor behind the power sofa. In order to use the power sofa as a seating
position while driving, these seat belts must be threaded up through the gap between the seat back and bottom and used
together with the shoulder belts to secure passengers in these seating positions.
© 2014 by Roadtrek, Inc.
Sleeping Facilities
Twin Beds
You create two twin beds by lowering the sofa. The sofa makes a continuous sleeping surface with the two bench seats,
leaving the center aisle to make it easy to get in and out of bed.
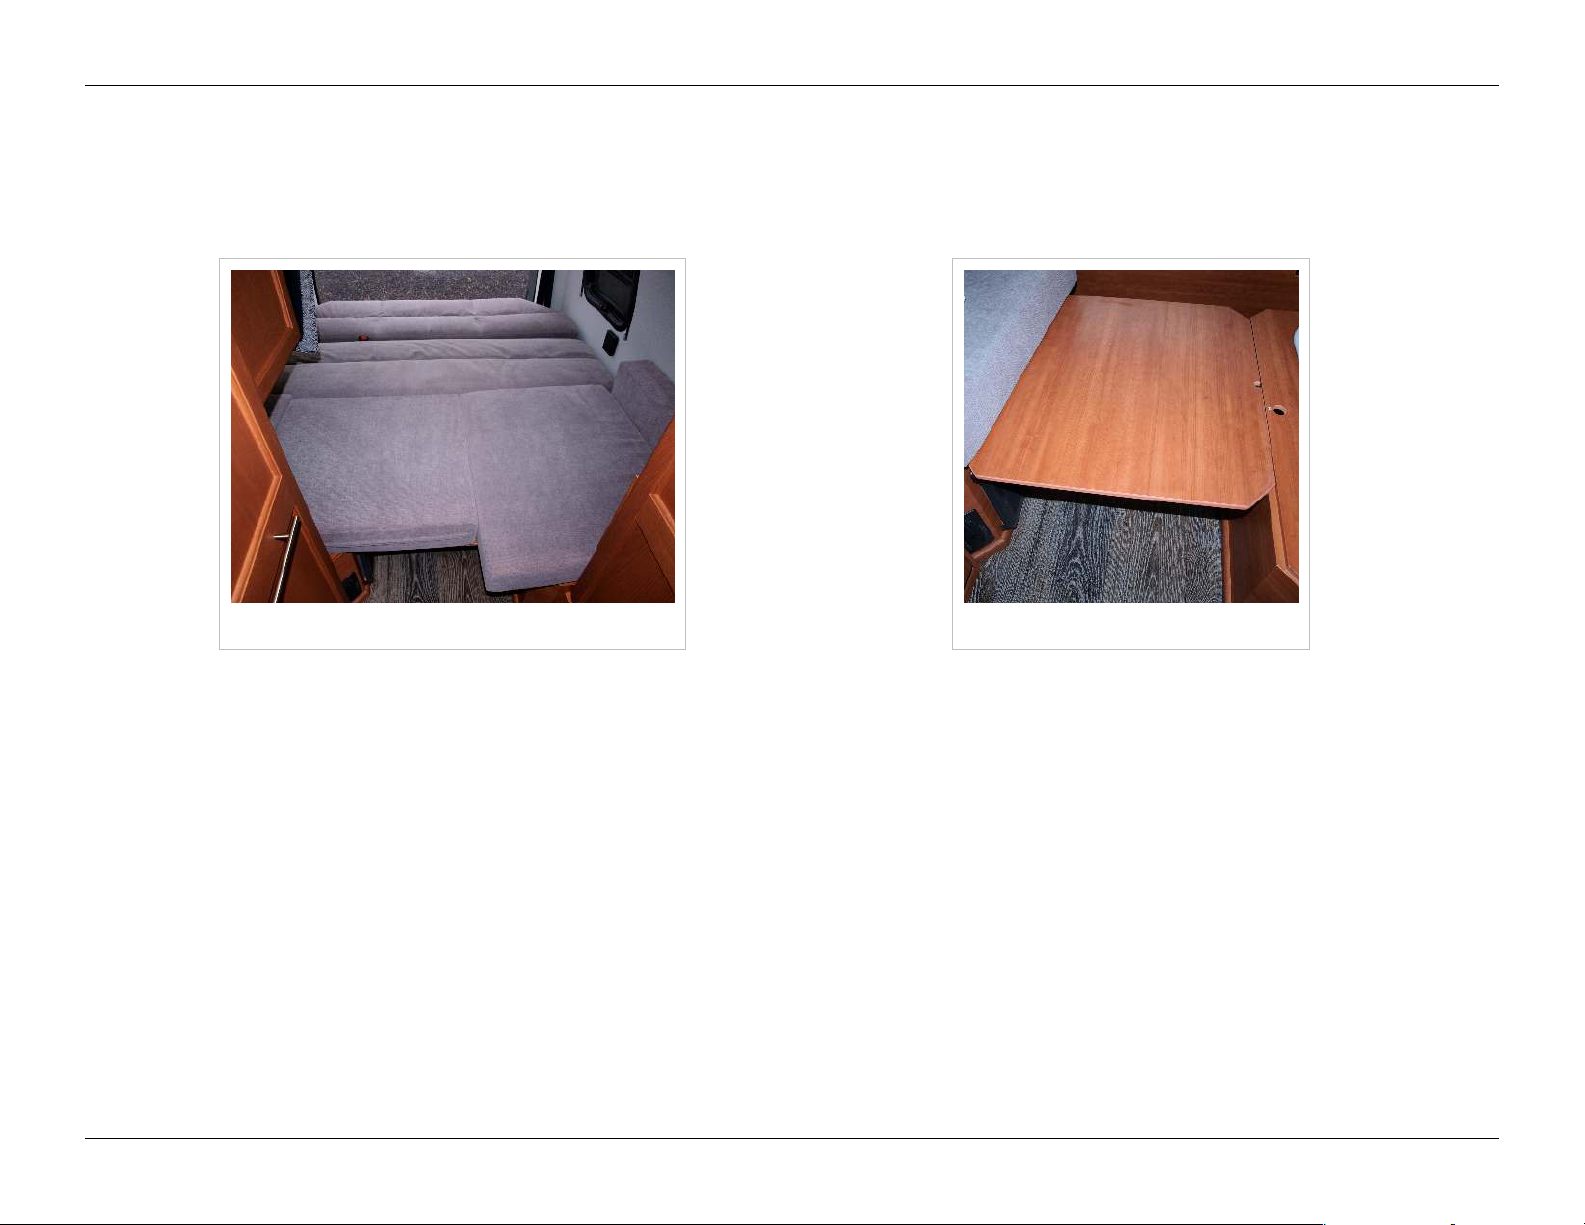
King bed Making the king bed
22
King Bed
To make a full size bed, slide the panel under the passenger side bench seat out into the open space between the two bench
seats, and secure it into the notches on the two inner surfaces of the bench seat bases. Move the bottom cushion for the
bench seats together over this panel, and place the vertical cushions for the bench seats between these and the outer walls
of the Roadtrek.
© 2014 by Roadtrek, Inc.
Sleeping Facilities
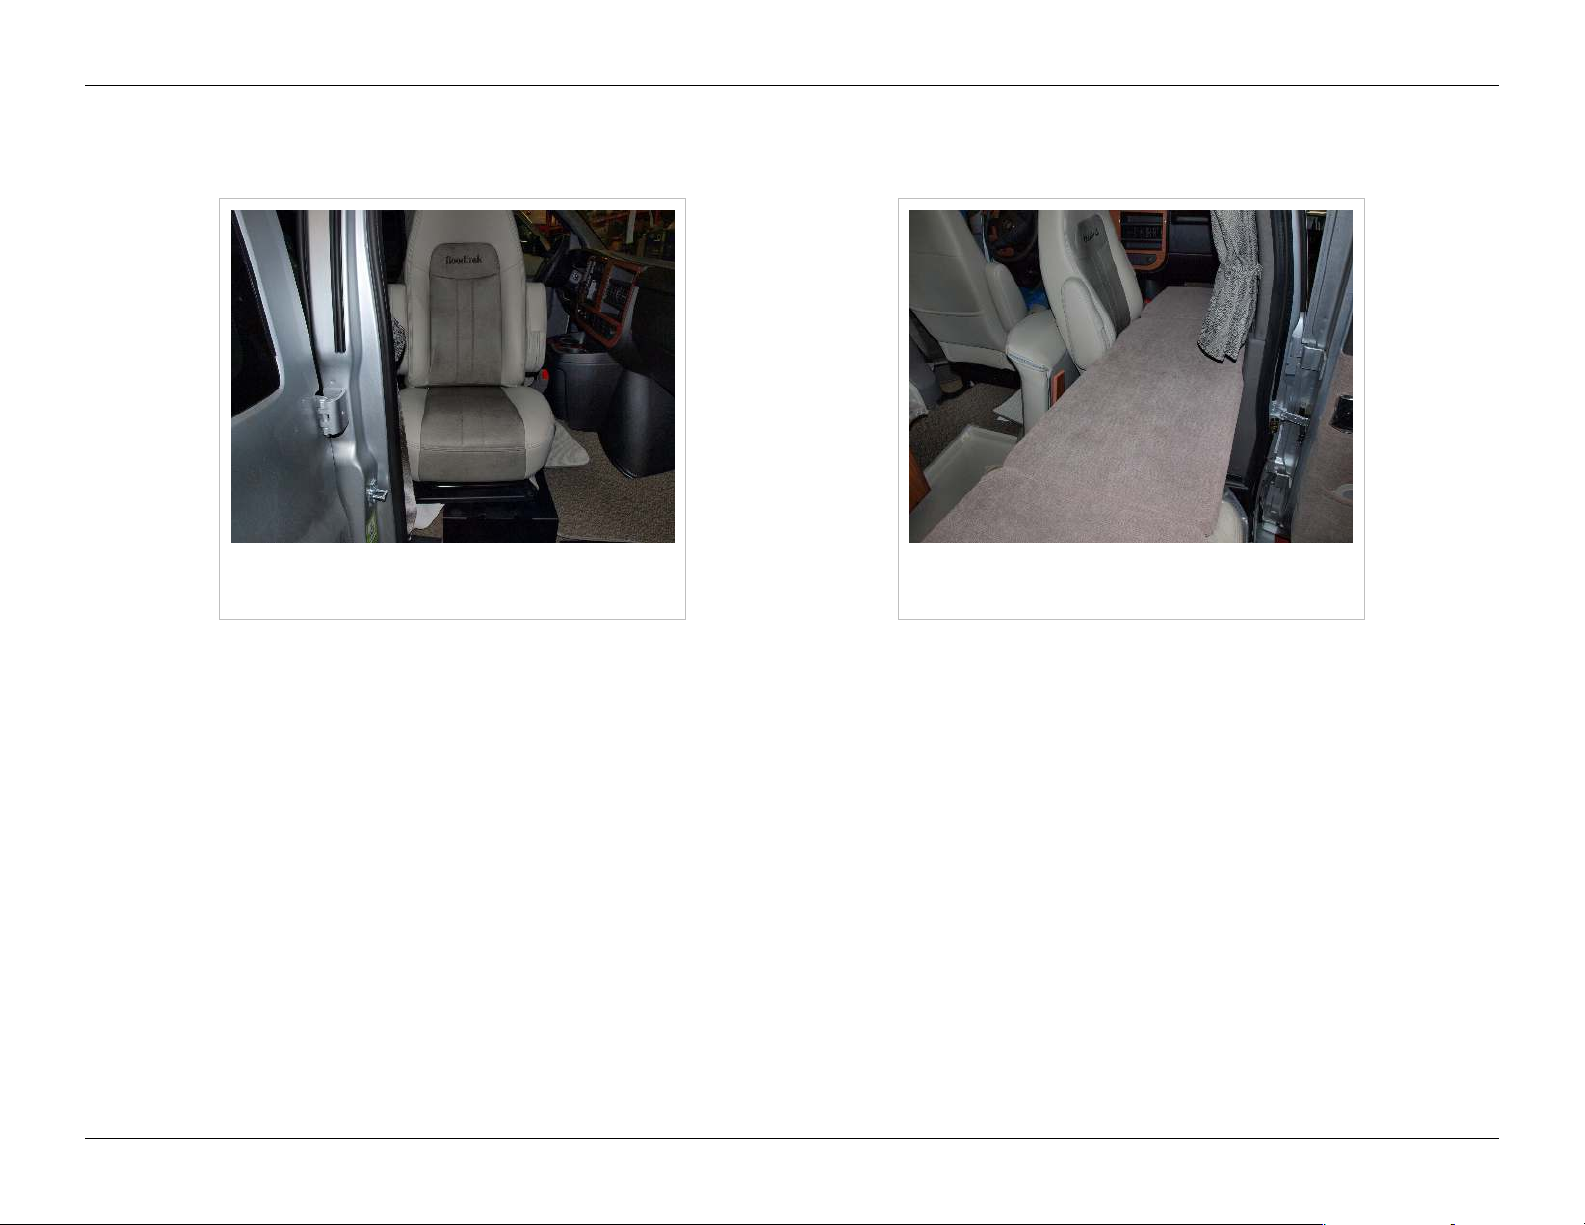
Front Seat Bed
23
Front captain's seat in position for folding
mattress
To set up a front bed with the optional folding mattress, turn the front passenger side captain's seat so that it is facing
outward toward the front door, remove the second row seat back by lifting it up, and place the optional folding mattress on
the front and second row seat bottom cushions. With the front seat facing the door, slide it as far back (toward the center
aisle) as possible to accommodate the folding mattress.
Passenger side folding mattress in
position
© 2014 by Roadtrek, Inc.

Bathroom Facilities
Bathroom Facilities
Door
24
Bathroom door pin
The bathroom doors are secured by a pin which is attached to the right door. To secure the doors for driving, close the left
door first, then the right door, and then push the pin down so that it engages behind the lip at the front of the bathroom floor.
Push gently on the top to secure the latch along the upper enclosure lip. This will prevent the doors from swinging open when
the vehicle is in motion.
Always engage this pin before moving the vehicle, even for a short distance.
© 2014 by Roadtrek, Inc.

Bathroom Facilities
Toilet
Toilet pedal
The enclosed bathroom in the Ranger contains a marine toilet. To flush the toilet, press the foot pedal located at the bottom
of the front of the toilet bowl.
25
© 2014 by Roadtrek, Inc.
Bathroom Facilities
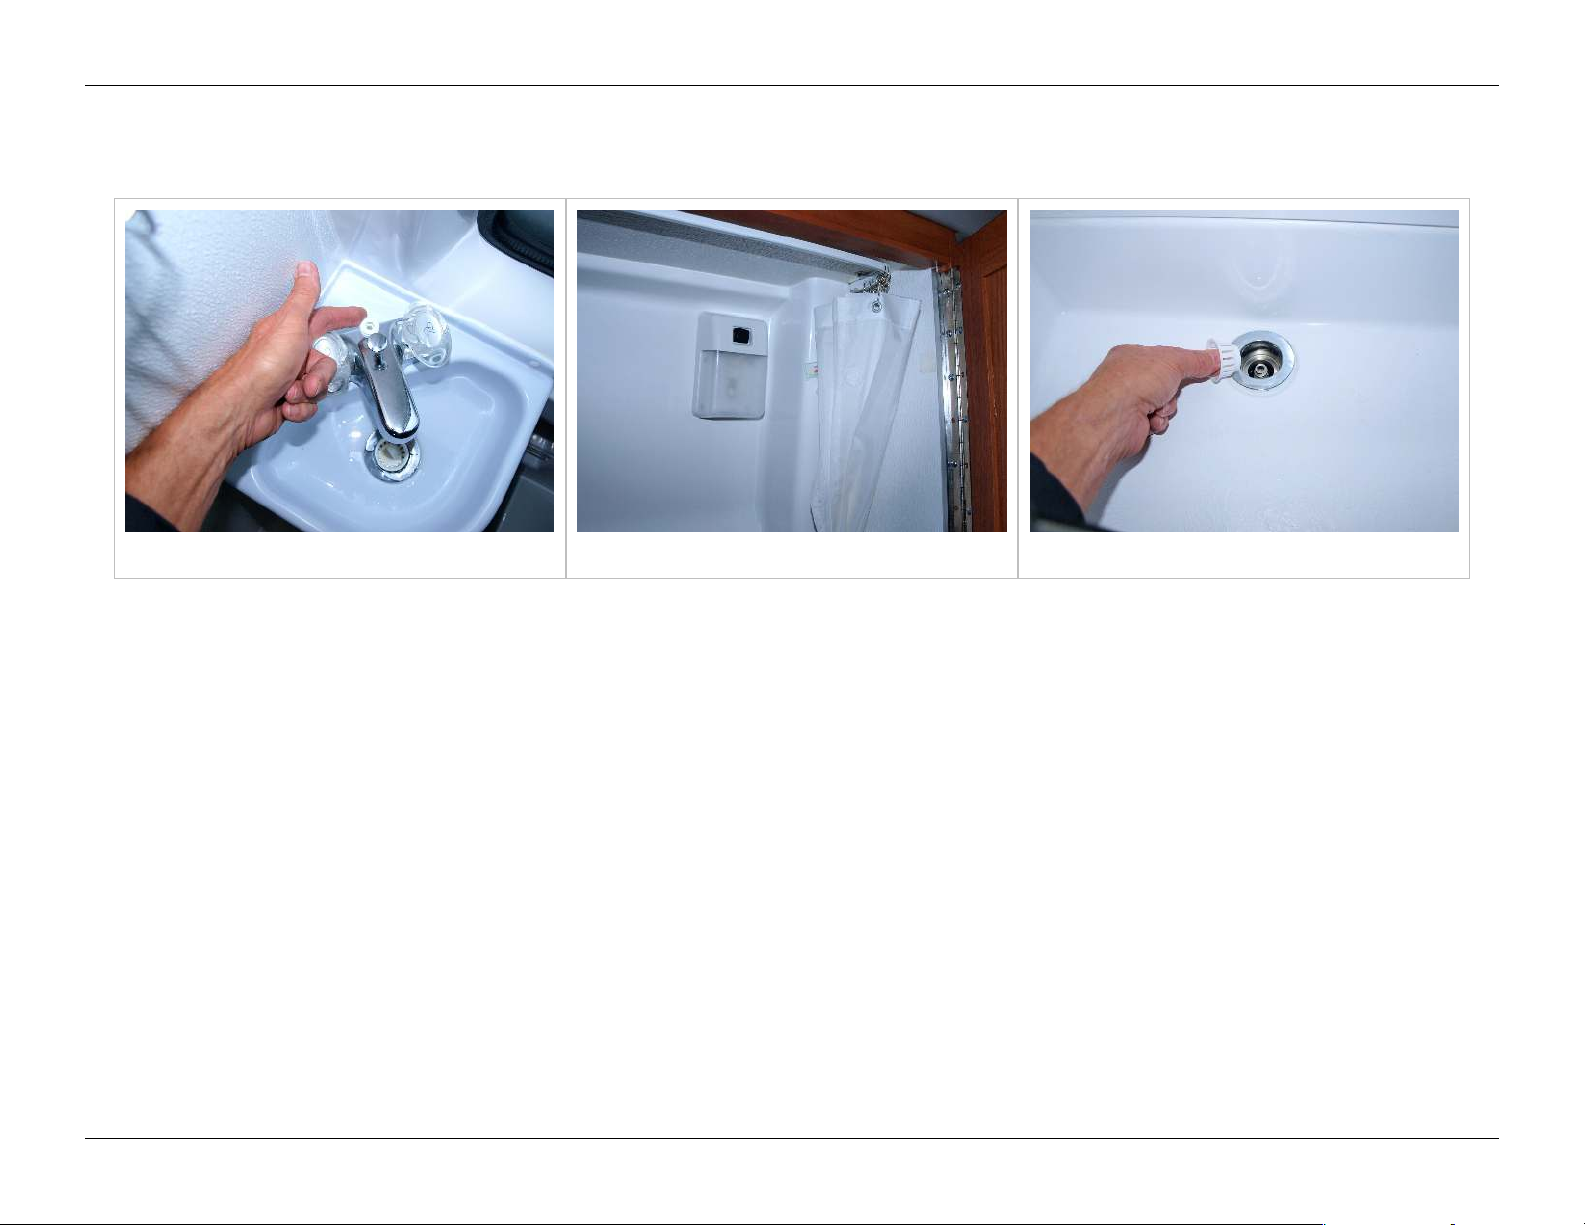
Shower
Shower connection and knob Shower curtain and light Shower drain
To take a shower, unscrew the drain stopper in the center of the bathroom floor. Release the hook and loop fastener straps
retaining the shower curtain, and slide the shower curtain along its track to enclose the shower space. Screw the end of the
shower hose onto the connection right behind the bathroom sink faucets, and pull the knob on the spout up. Adjust the water
temperature as desired. There is a water cutoff on the shower nozzle to conserve water. When finished, either towel off or air
dry the curtain before storing it, refasten the drain stopper to prevent the contents of the gray water tanks from sloshing up
into the shower area while driving, and remove the shower hose from the sink connection. Push the knob back down to
change the sink back into normal mode.
26
© 2014 by Roadtrek, Inc.
Bathroom Facilities
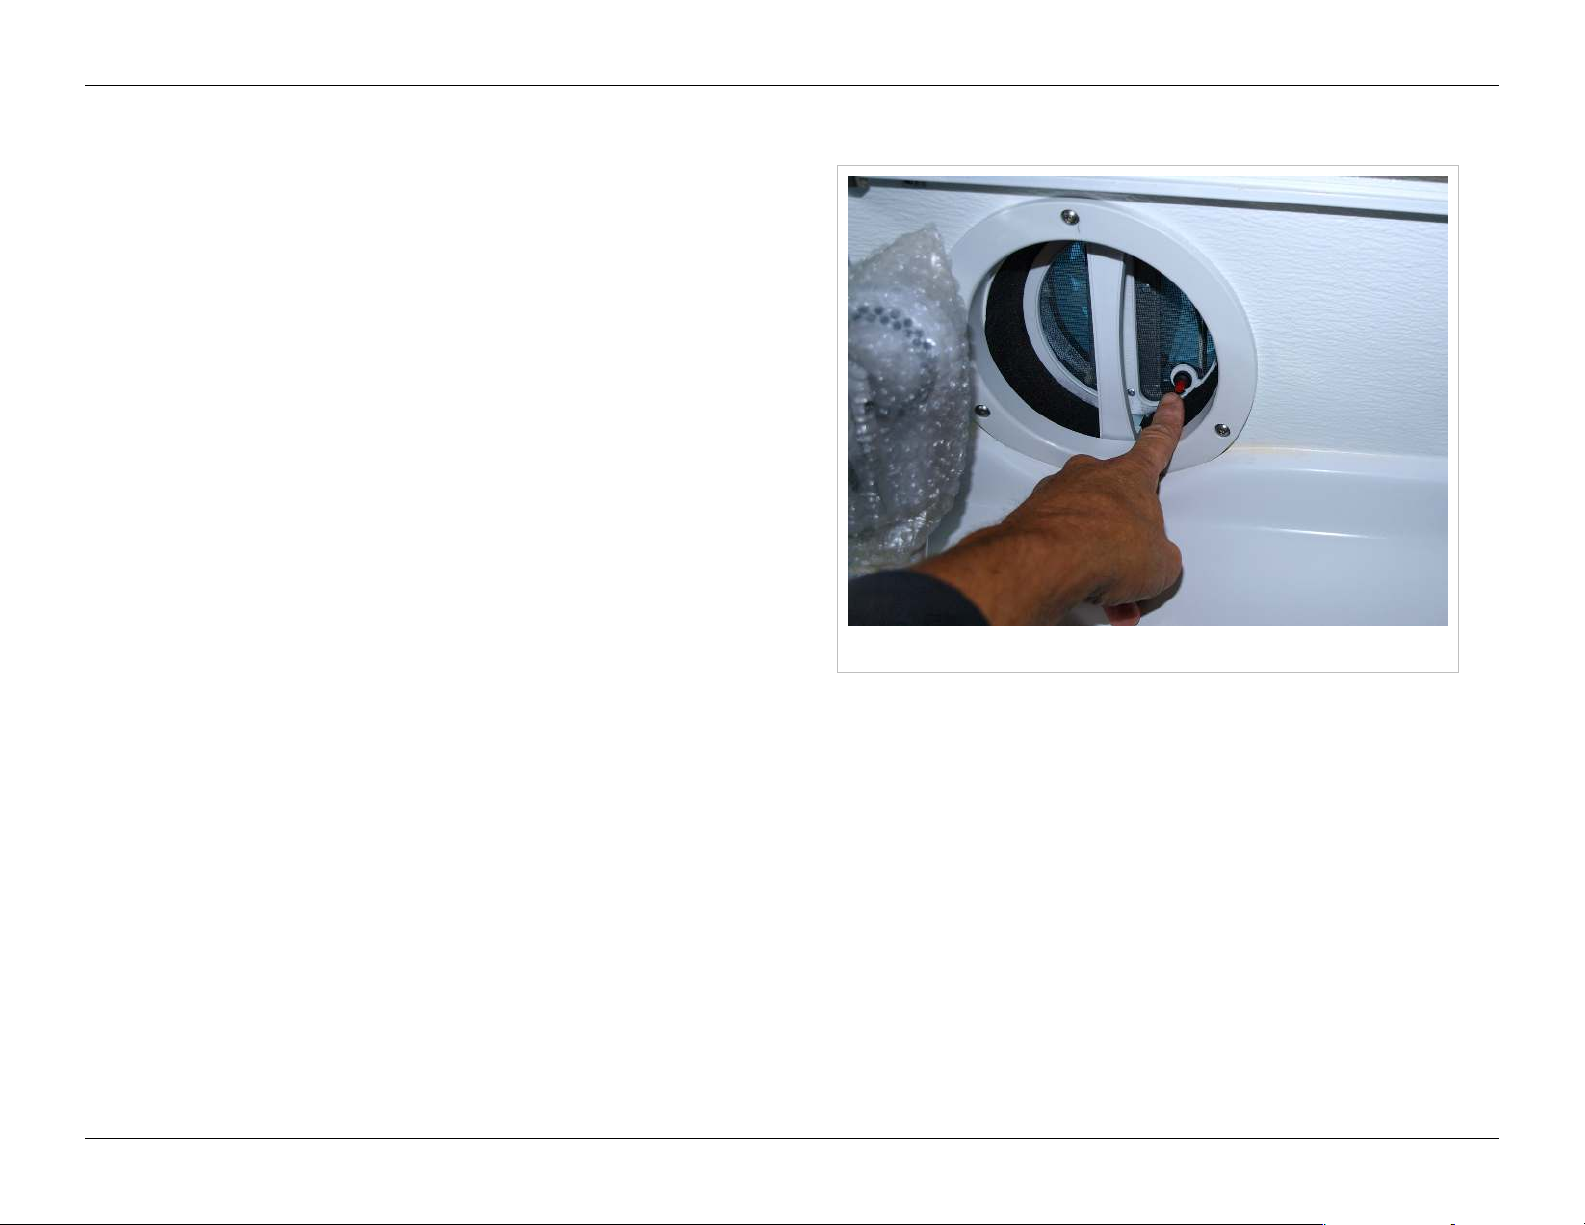
Exhaust fan
The Ranger has an exhaust fan in the bathroom. Push upward
and pull down on the white bar to open and close the vent, and
turn on the fan by pushing the power button.
Outside Shower
The outside shower is located on the driver's side, towards the
rear wheel. See Outside your Roadtrek for more details on
location.
27
Exhaust fan
© 2014 by Roadtrek, Inc.
 Loading...