


Chevrolet Camaro High Performance Owner Manual (GMNA-Localizing-U.S./
Canada/Mexico-13556307) - 2020 - CRC - 10/7/19
Contents
Introduction . . . . . . . .. . . . . . . .. . . . . . 2
Seats and Restraints . . . . . . . . . . . . 3
Instruments and Controls . . . . . . . . 4
Infotainment System . . . . . . . . . . . . . 8
Driving and Operating . . . . . . . . . . 14
Vehicle Care ... . . . . . . . . . . . . . . . . . 30
Service and Maintenance . . . . . . . 45
Technical Data . . . . . . . . . . . . . . . . . 47
Index . . . . . . . . . . . . . . . . . . . . . 51

Chevrolet Camaro High Performance Owner Manual (GMNA-Localizing-U.S./
Canada/Mexico-13556307) - 2020 - CRC - 10/7/19
2 Introduction
Introduction
The names, logos, emblems,
slogans, vehicle model names, and
vehicle body designs appearing in
this manual including, but not limited
to, GM, the GM logo, CHEVROLET,
the CHEVROLET Emblem,
CAMARO, and the CAMARO
Emblem are trademarks and/or
service marks of General Motors
LLC, its subsidiaries, affiliates,
or licensors.
For vehicles first sold in Canada,
substitute the name “General
Motors of Canada Company” for
Chevrolet Motor Division wherever it
appears in this manual.
This manual describes features that
may or may not be on the vehicle
because of optional equipment that
was not purchased on the vehicle,
model variants, country
specifications, features/applications
that may not be available in your
region, or changes subsequent to
the printing of this owner ’s manual.
Refer to the purchase
documentation relating to your
specific vehicle to confirm the
features.
Keep this manual in the vehicle for
quick reference.
Canadian Vehicle Owners
A French language manual can be
obtained from your dealer, at
www.helminc.com, or from:
Propriétaires Canadiens
On peut obtenir un exemplaire de
ce guide en français auprès du
concessionnaire ou à l'adresse
suivante:
Helm, Incorporated
Attention: Customer Service
47911 Halyard Drive
Plymouth, MI 48170
USA
Using this Supplement
This supplement contains
information specific to the unique
components of the vehicle. It does
not explain everything you need to
know about the vehicle. Read this
supplement along with the owner ’s
manual to learn about the vehicle's
features and controls.
Index
A good place to look for what you
need is the Index in the back of this
supplement. It is an alphabetical list
of what is in the supplement, and
the page number where you will
find it.
Litho in U.S.A.
Part No. 84295539 B Second Printing
©
2019 General Motors LLC. All Rights Reserved.

Chevrolet Camaro High Performance Owner Manual (GMNA-Localizing-U.S./
Canada/Mexico-13556307) - 2020 - CRC - 10/7/19
Seats and Restraints
Seat Belts
Lap-Shoulder Belt . . . . . . ... . . . . . . 3
Seat Belts
Lap-Shoulder Belt
On coupe models, the driver seat
belt has a shoulder belt retractor
lock feature. This feature is useful in
performance driving scenarios
where the driver wants to be held in
the seat more tightly to take
advantage of the aggressive
bolstering of the seat.
To use:
1. Move the seat 8–10 cm
(3–4 in) rearward from the
normal driving position.
2. Pull the driver shoulder belt out
as far as it will go, until it stops,
to set the lock. While holding
the shoulder belt in this
position, buckle the belt.
Seats and Restraints 3
When you release the shoulder
belt, the retractor will make a
ratchet sound when it retracts.
When the retractor lock is set,
the belt can be tightened but
not pulled out of the retractor.
3. Adjust the belt close to your
body, and then move the seat
forward 8–10 cm (3–4 in) to the
desired driving position. This
will hold the belt to your body
even tighter. The belt fit should
be tight, but not uncomfortable.
To unlatch the belt, press the button
on the buckle. The belt should
return to its stowed position.

Chevrolet Camaro High Performance Owner Manual (GMNA-Localizing-U.S./
Canada/Mexico-13556307) - 2020 - CRC - 10/7/19
4 Instruments and Controls
Instruments and Controls
Warning Lights, Gauges, and
Indicators
Instrument Cluster . . . . . . . . . . . . . . 5
Boost Gauge . . . . . . . .. . . . . . .. . . . . 6
Chevrolet Camaro High Performance Owner Manual (GMNA-Localizing-U.S./
Canada/Mexico-13556307) - 2020 - CRC - 10/7/19
Warning Lights, Gauges, and Indicators
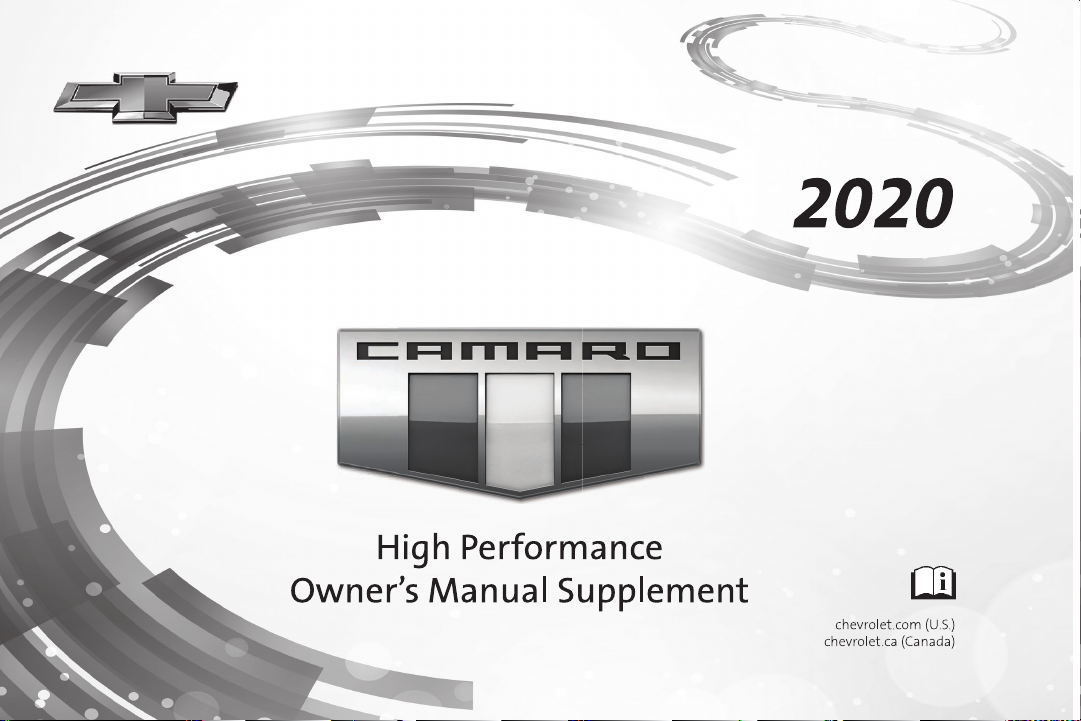
Instrument Cluster
English Cluster Shown, Metric Cluster Similar
Instruments and Controls 5
Chevrolet Camaro High Performance Owner Manual (GMNA-Localizing-U.S./
Canada/Mexico-13556307) - 2020 - CRC - 10/7/19
6 Instruments and Controls
Cluster Menu
There is an interactive display area
in the center of the instrument
cluster.
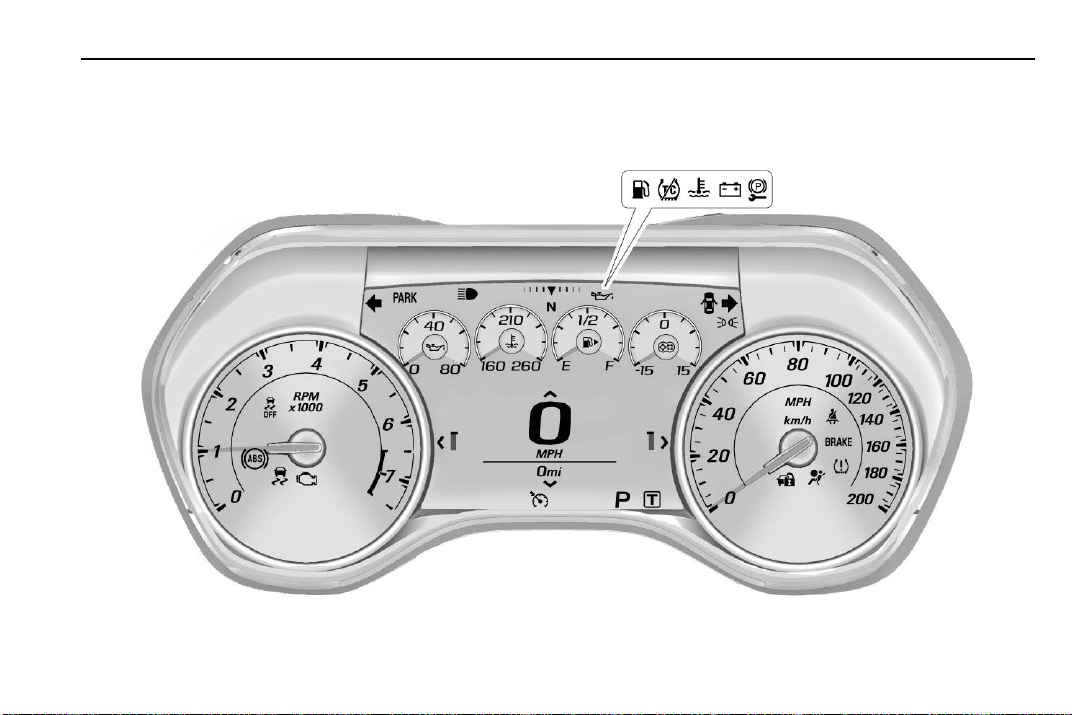
Use the right steering wheel control
to open and scroll through the
different items and displays.
Press
o to access the cluster
applications. Use
through the list of applications.
Press SEL to select the application
from the list.
w or x to scroll
Performance
Press SEL to enter the Performance
menu. Use
the available items.
Tire Temperature : Displays tire
temperature status. Unknown may
display if information is unavailable.
Tire temperature states:
.
Cold — Drive with caution as tire
performance may be degraded.
.
Cool — Drive with caution as tire
performance may be degraded.
.
Normal — Tires are at normal
driving temperature.
.
Warm — Tires are ready for
aggressive driving.
.
Overheated — Tire temperature
may be higher than optimal.
w or x to scroll through
eLSD and Wheel Slip : The upper
eLSD display indicates the eLSD
clutch locking percentage. The
lower Wheel Slip display indicates
the rear tire slip compared to the
speed of the front tires. See
Limited-Slip Differential 0 27 and
Track Events and Competitive
Driving 0 14.
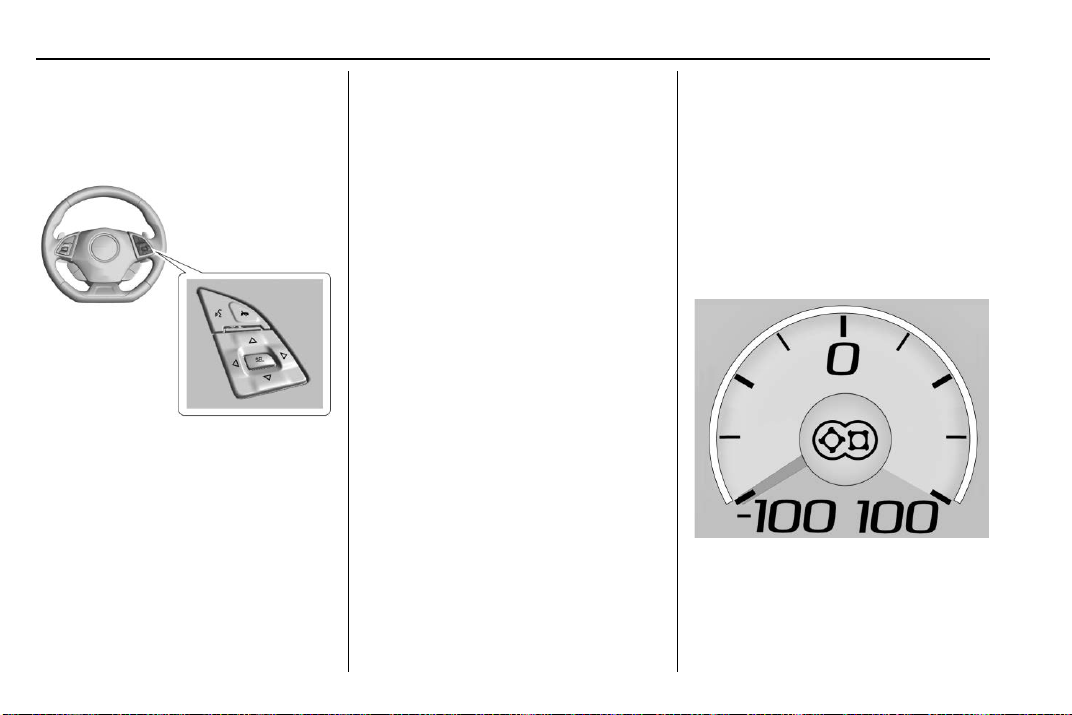
Boost Gauge
Metric
Chevrolet Camaro High Performance Owner Manual (GMNA-Localizing-U.S./
Canada/Mexico-13556307) - 2020 - CRC - 10/7/19
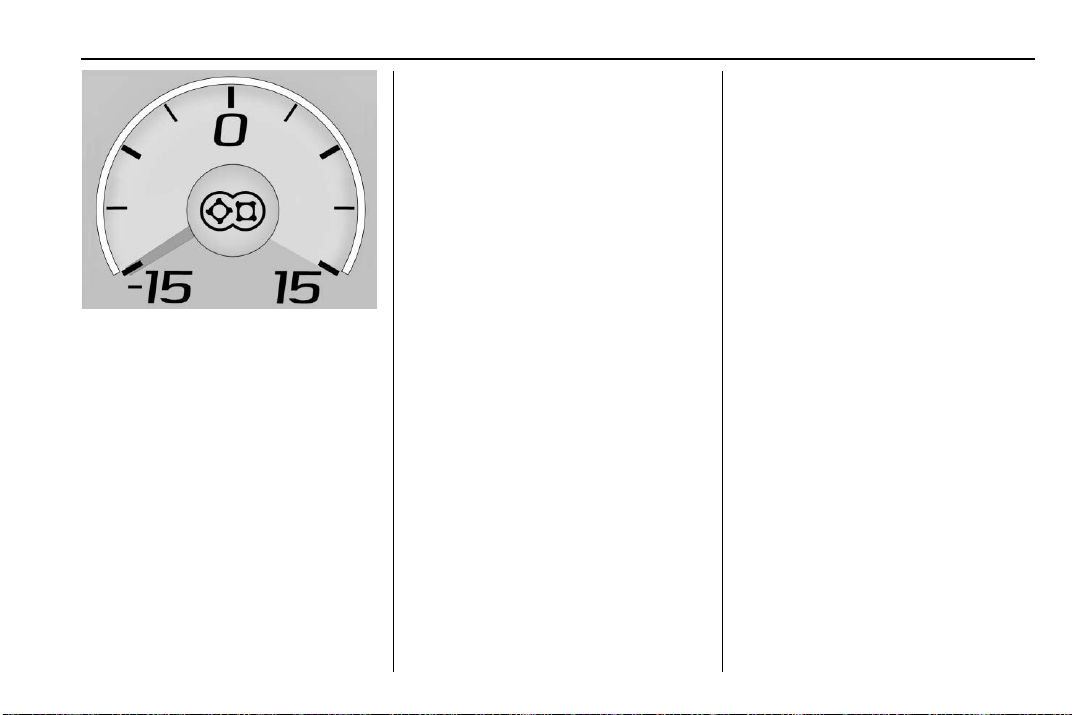
English
This gauge indicates vacuum during
light to moderate throttle and boost
under heavier throttle.
It displays the air pressure level in
the intake manifold before it enters
the engine's combustion chamber.
The gauge is automatically centered
at zero every time the engine is
started. Actual vacuum or boost is
displayed from this zero point.
Changes in ambient pressure, such
as driving in mountains and
changing weather, will slightly
change the zero reading.
Instruments and Controls 7

Chevrolet Camaro High Performance Owner Manual (GMNA-Localizing-U.S./
Canada/Mexico-13556307) - 2020 - CRC - 10/7/19
8 Infotainment System
Infotainment System
Performance Data Recorder (PDR)
Performance Data
Recorder (PDR) . . . . . . . . . . . . . . . 8
Performance Data
Recorder (PDR)
If equipped, the PDR icon displays
on the Home Page.
Important Information
Use of the PDR may be prohibited
or legally restricted in certain
countries and situations. Ensure
compliance with applicable laws and
regulations, including, but not
limited to: privacy laws, laws related
to camera surveillance and
recordings, road traffic and security
laws, and laws on the protection of
publicity and personality rights.
.
Do not use the PDR if it causes
distraction.
.
Do not rely on camera footage to
steer the vehicle.
.
Comply with any notice and
consent requirements before
capturing and/or recording the
voices or images of other
persons or before collecting
other personal data.
.
Notify other drivers of your
vehicle of the above rules and
require them to comply.
.
General Motors does not accept
any responsibility or liability in
connection with use that is not
permitted.
.
Law enforcement authorities
may have the right to seize
video recordings and use them
as evidence of criminal/driving
offenses against you or third
parties.
The PDR records video, audio, and
vehicle data. This data is stored on
a removable SD card. The SD card
reader is below the instrument panel
to the left of the steering wheel and
just above the hood release.
The recorded data is not stored
anywhere else and is only
accessible from the SD card.
To begin, insert a FAT32 formatted
SD card, Class 10 required, 8, 16,
or 32 GB recommended, into the SD
card reader.
Chevrolet Camaro High Performance Owner Manual (GMNA-Localizing-U.S./
Canada/Mexico-13556307) - 2020 - CRC - 10/7/19
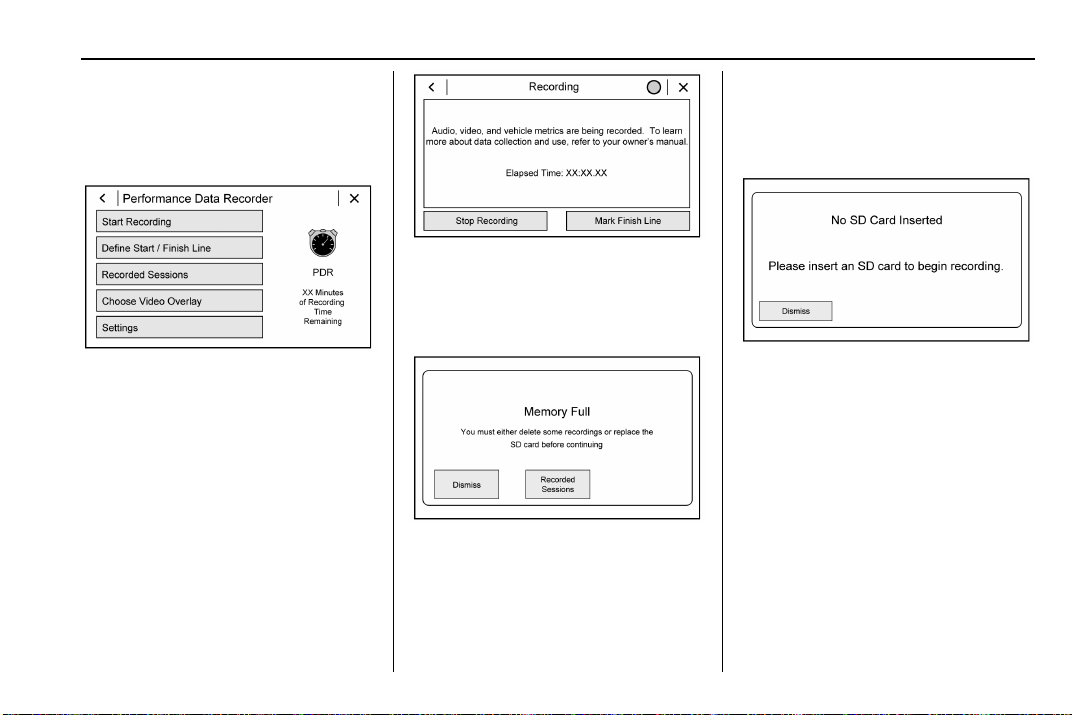
Touch the PDR icon to access the
PDR menu. The options
displayed are:
Start Recording
Infotainment System 9
To delete a recording, go to the
Recorded Sessions menu and touch
V next to the item. See “Recorded
Sessions” later in this section.
The elapsed time will show when
recording. To define a finish line,
see “Define Finish Line” later in this
section.
If the system is unable to begin
recording, the Start Recording
button is grayed out.
Touch Start Recording to begin
recording. After recording begins,
this button changes to Stop
Recording. Touch to stop the
recording session.
The recording must be stopped and
the file closed before removing the
SD card, or the recording cannot be
reviewed.
If there is no available space on the
SD card, a message displays.
Delete or transfer recordings on the
SD card or use another SD card
with free space.
If no SD card is inserted, a message
displays.
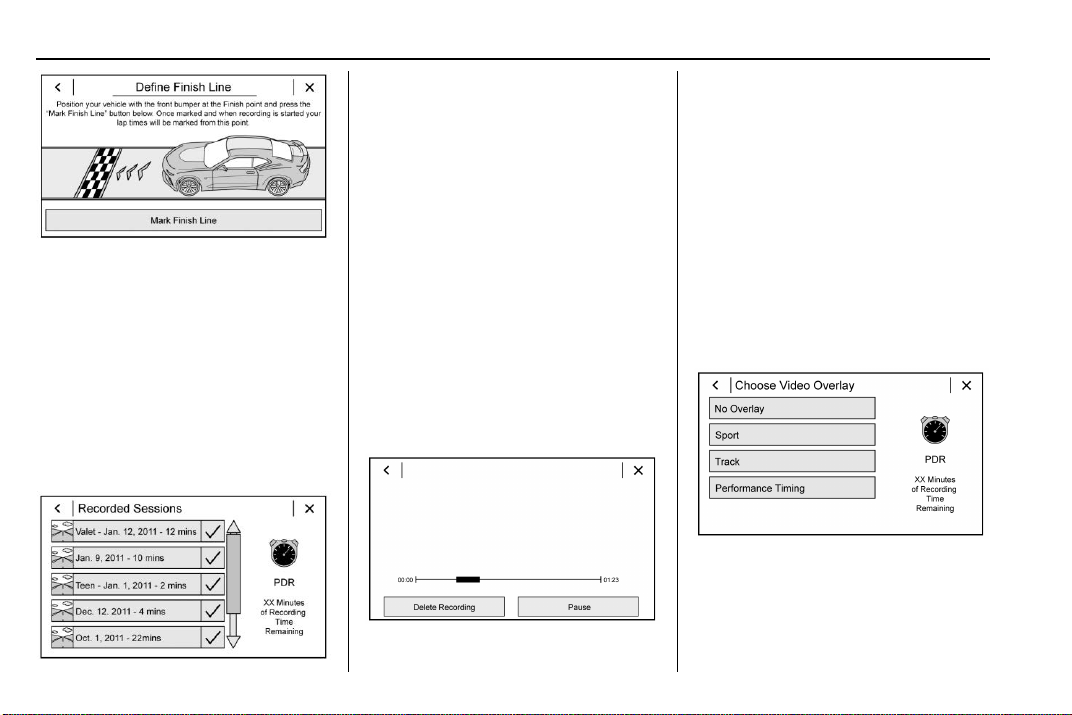
Define Finish Line
To track and record the vehicle’s lap
times, the starting point of a lap
must be set. Crossing this point
activates the lap timer when
recording.
Chevrolet Camaro High Performance Owner Manual (GMNA-Localizing-U.S./
Canada/Mexico-13556307) - 2020 - CRC - 10/7/19
10 Infotainment System
A list of recordings displays.
Select the recording to start
playback.
Touch
V next to an item to delete
that recording. Touch Yes to delete
or No to cancel on the confirmation
screen.
To set the finish line, position the
vehicle with the front bumper at the
start/finish point. From the PDR
menu, touch Define Finish Line and
then touch Mark Finish Line. This
can be done with the vehicle
moving.
Recorded Sessions
To view recorded videos, touch
Recorded Sessions.
Video playback is not allowed while
the vehicle is in motion.
Tap the screen while the video is
playing to display the video controls:
Video Scrubber : Changes the
position and playback. The length of
the bar corresponds to the time of
the video. Advance or rewind the
video by dragging along the bar.
Delete Recording : Touch to delete
the video. A confirmation screen
displays. Touch Yes to delete or No
to cancel.
Pause/Play : Touch to play or
pause the video. The button will
change when touched.
/ : Touch to display the previous
screen.
Exit : Touch to exit the current
display.
Choose Video Overlay
Touch Choose Video Overlay to
display the menu.
Select one:
.
No Overlay
.
Sport
Chevrolet Camaro High Performance Owner Manual (GMNA-Localizing-U.S./
Canada/Mexico-13556307) - 2020 - CRC - 10/7/19
.
Track
.
Performance Timing
No Overlay:
No vehicle data displays on top of
the recorded video. Vehicle data is
still available with the video when
accessed in the toolbox software.
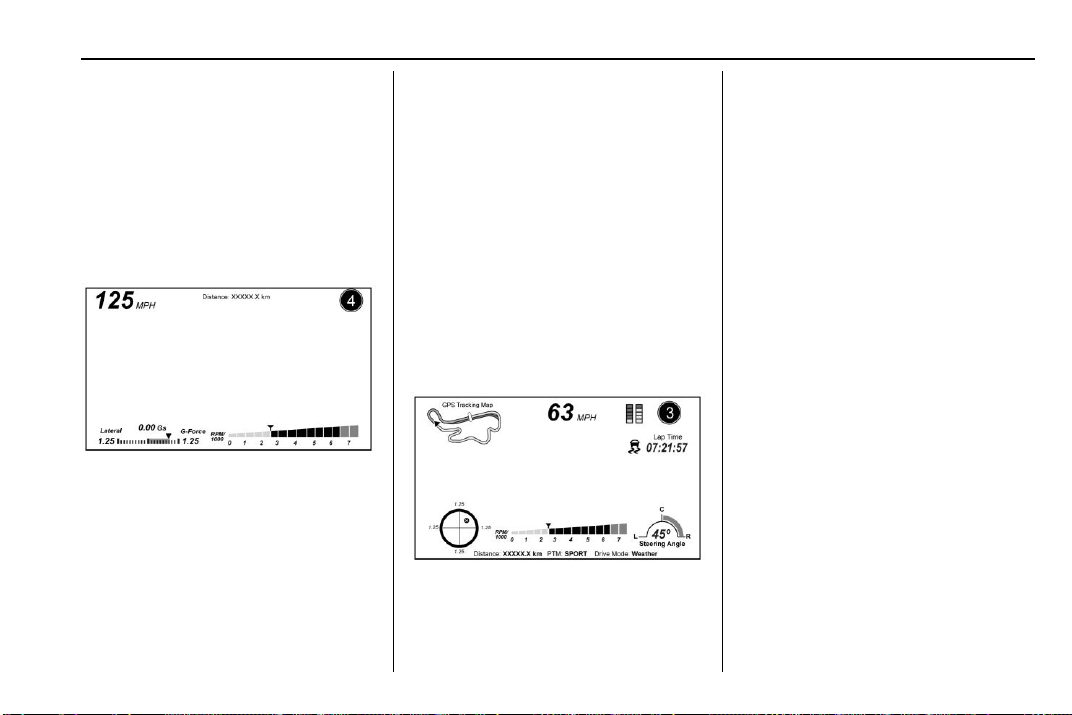
Sport:
Displays these vehicle metrics:
.
Vehicle Speed: Up to three digits
are displayed in km/h or MPH
depending on vehicle settings.
.
Engine Rotations Per Minute
(RPMs): The vertical line and
triangle show current RPMs. As
the RPMs increase, the backfill
follows.
.
Transmission State (Current
Gear): Automatic and manual
transmissions display 1, 2, etc.
.
Lateral G-Force Graphic: Left
and Right G-Forces are
displayed. The graphic fills to the
left or the right depending on the
measure value. The measured
G-Force displays as a number at
the top of the graphic.
.
Event Odometer: This displays
the distance driven since the
recording began.
Track:
Displays these vehicle metrics:
.
Vehicle Speed: Same as Sport.
Infotainment System 11
.
GPS Tracking Map: Shows the
vehicle’s current position relative
to a known route.
.
Engine Rotations Per Minute
(RPMs): The vertical line and
triangle indicate current RPMs.
As the RPMs increase, the
backfill follows.
.
Transmission State (Current
Gear): Same as Sport.
.
Friction Bubble Graphic: Lateral
and longitudinal G-Forces are
displayed as a dot within a
bubble. A red dot displays when
the vehicle starts braking and
turns green when the vehicle
accelerates. The dot is white
when the vehicle is not moving.
A white dot is the default.
.
Brake and Throttle Graphic:
Displays the percentage value of
brake and throttle pedal position
from 0–100%.
.
Steering Angle: The graphic fills
from the center to the left or right
depending on the direction of
Chevrolet Camaro High Performance Owner Manual (GMNA-Localizing-U.S./
Canada/Mexico-13556307) - 2020 - CRC - 10/7/19
12 Infotainment System
steering. The numerical steering
angle displays below the
graphic.
.
StabiliTrak/Electronic Stability
Control (ESC) Active Indicator:
The graphic only displays if the
active handling systems are
activated.
.
Performance Traction
Management (PTM) Mode:
Displays the current PTM mode.
The options are Wet, Dry, Sport
1, Sport 2, or Race.
.
Current Lap Time: Displays the
elapsed lap time if the finish line
is defined and the vehicle has
crossed the defined finish line at
least once.
.
Event Odometer: Displays the
distance driven since the
recording began.
.
Drive Mode: Displays the
vehicle’s current drive mode.
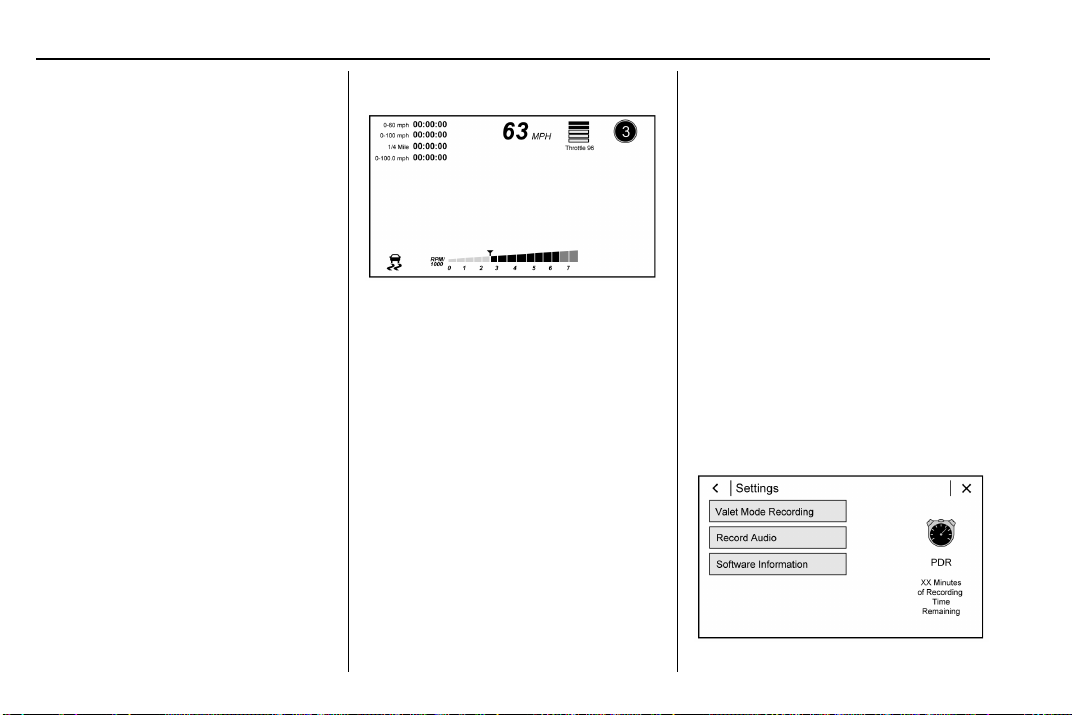
Performance Timing:
Displays these vehicle metrics:
.
Vehicle Speed: Same as Sport.
.
Engine Rotations Per Minute
(RPMs): Same as Sport.
.
Transmission State (Current
Gear): Same as Sport.
.
0–100 km/h (0–60 mph),
0–200 km/h (0–100 mph), 400 m
(1/4 mi), and 0–200–0 km/h
(0–100–0 mph): The timer starts
recording as soon as the vehicle
accelerates. As the vehicle
passes each speed and distance
milestone, it is displayed on the
overlay.
.
Throttle Position: Displays
the percentage of throttle applied
from 0–100%.
.
StabiliTrak/ESC Active Indicator:
The graphic only displays if the
active handling systems are
activated.
Naming Convention
The recorded video file name is
stored as the recorded date and the
length of the recording.
If the recorded session was
recorded while the system was in
Valet Mode, the file name will
display the mode, date, and length
of time.
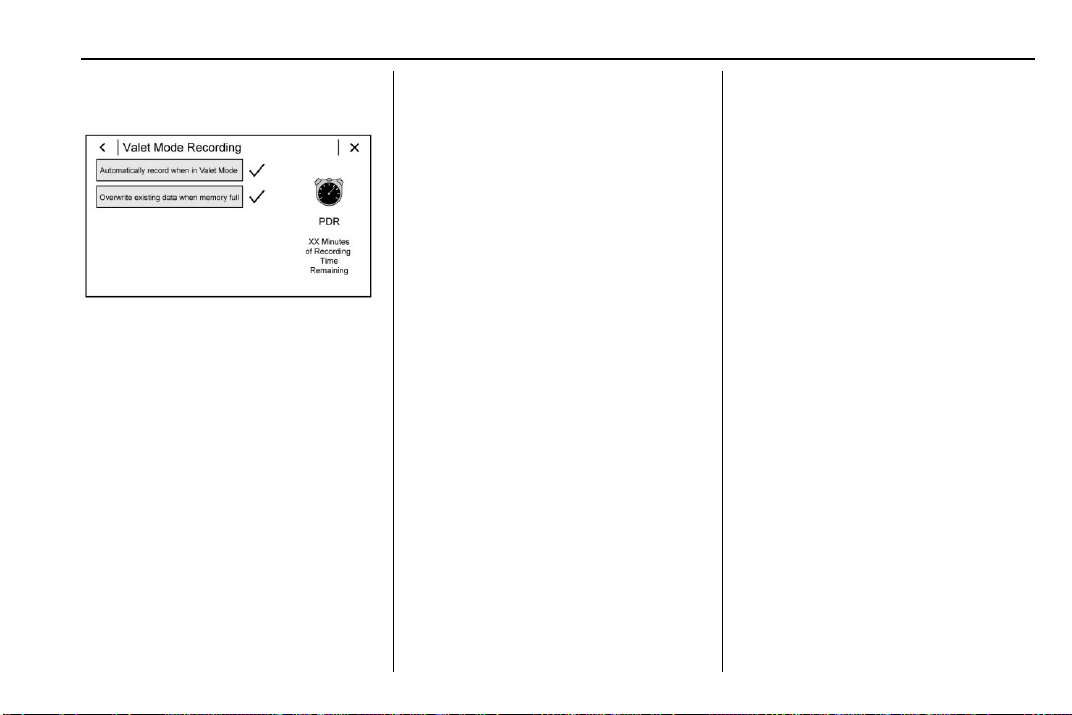
Settings
Chevrolet Camaro High Performance Owner Manual (GMNA-Localizing-U.S./
Canada/Mexico-13556307) - 2020 - CRC - 10/7/19
Touch Settings on the PDR menu to
display settings.
Valet Mode Recording : Allows
recording preferences to be
selected. It is recommended that a
blank SD card be used. Available
choices are:
.
Automatically record when in
Valet Mode: Enables the PDR to
begin recording as soon as the
vehicle is in Valet Mode.
.
Overwrite existing data when
memory full: Allows manual
overwriting of previous
recordings, one at a time starting
with the oldest, when the current
recording requires additional
storage to continue.
Audio will not record during
Valet Mode.
Record Audio : Allows audio to be
recorded along with video.
Audio will not record during
Valet Mode.
Software Information : Displays
PDR software information and
version numbers.
Toolbox Software : Allows for the
evaluation of the driver and the
vehicle performance on a personal
computer after a recorded event.
See www.chevrolet.com or your
dealer for details to download the
software.
Infotainment System 13
Chevrolet Camaro High Performance Owner Manual (GMNA-Localizing-U.S./
Canada/Mexico-13556307) - 2020 - CRC - 10/7/19
14 Driving and Operating
Driving and Operating
Driving Information
Track Events and Competitive Driving
Driving Information
Track Events and Competitive
Driving . . . . . . . . . . . . . . . . .. . . . . . 14
Automatic Transmission
Automatic Transmission . . . . . . . 22
Ride Control Systems
Competitive Driving Mode . . . . . 24
Limited-Slip Differential . . . . . . . . 27
Fuel
Top Tier Fuel . . . . . . . . . . . . . . . . . . 28
Recommended Fuel . . . . . . . . . . . 29
Prohibited Fuels . . . . . . . . . . . . . . . 29
High-performance features are
intended for use only on closed
tracks by experienced and
qualified drivers and should not
be used on public roads.
High-speed driving, aggressive
cornering, hard braking, and other
high-performance driving can be
dangerous. Improper driver inputs
for the conditions may result in
loss of control of the vehicle,
which could injure or kill you or
others. Always drive safely.
This section covers specific track
events and competitive driving
information for the Camaro High
Performance models only. For
additional track events and
competitive driving information, see
the owner’s manual.
{
Danger
Track events or competitive driving
may affect the vehicle warranty. See
the warranty manual before using
the vehicle for racing or other
competitive driving.
The Engine Sound Management
setting should not be set to Stealth
Mode during track events and
competitive driving. See “Driver
Mode Control” in the owner ’s
manual.
Warning
{
Prior to each track event and
again before returning to public
roads, tighten the wheel nuts with
a torque wrench to the proper
torque specification. Wheel nuts
that are improperly or incorrectly
tightened can cause the wheels
to become loose or come off,
resulting in a crash. See
“Capacities and Specifications” in
the owner’s manual for wheel nut
torque specifications.
Chevrolet Camaro High Performance Owner Manual (GMNA-Localizing-U.S./
Canada/Mexico-13556307) - 2020 - CRC - 10/7/19
Engine Oil
Caution
If you use the vehicle for racing or
other competitive driving, the
engine may use more oil than it
would with normal use. Low oil
levels can damage the engine.
For information on how to add oil,
see Engine Oil 0 32.
Be sure to check the oil level
often during racing or other
competitive driving and keep the
level at or near the upper mark
that shows the proper operating
range on the engine oil dipstick.
The LT1 and LT4 engines are
factory filled with 0W-40 dexos2 oil.
0W-40 dexos2 engine oil is
approved for both track and street
use with the LT1 and LT4 (ZL1 only,
not ZL1 1LE) engines. 15W-50 full
synthetic engine oil may also be
used for track use and is required
on the ZL1 1LE, but after track use
must be changed back to 0W-40
dexos2 for street use. See
Capacities and Specifications 0 48.
Fuel
Consider using 100 octane
unleaded gasoline if the air
temperature is above 30 °C (86 °F)
at a track event. Do not use any fuel
with conditions listed in Prohibited
Fuels 0 29.
Driving and Operating 15
Automatic Transmission Fluid
Transmission fluid should be
changed after every 15 hours of
track use. Any transmission level
set or change should be performed
at your dealer.
Manual Transmission Fluid
Manual transmission fluid should be
changed after every 15 hours of
track usage.
Tire Pressures
Tire pressure specifications are
listed in psi (kPa). Limit the vehicle
weight to a maximum of the driver
and one passenger, with no
additional cargo.
Chevrolet Camaro High Performance Owner Manual (GMNA-Localizing-U.S./
Canada/Mexico-13556307) - 2020 - CRC - 10/7/19
16 Driving and Operating
Model Axle
ZL1 1LE Tire
Pressure Settings
Road course
cold starting
pressures (
Front 180 kPa
(26 psi)
Road course target
1
)
Rear 180 kPa
(26 psi)
ZL1 Tire Pressure
Settings
Front 190 kPa
(28 psi)
Rear 190 kPa
(28 psi)
SS 1LE Tire
Pressure Settings
Front 190 kPa
(28 psi)
Rear 190 kPa
(28 psi)
LS/LT 1LE Tire
Pressure Settings
Front 210 kPa
(30 psi)
Rear 210 kPa
(30 psi)
1
) Value will vary based on driving
(
(2) Autobahn, standing mile, etc. Before leaving the track event, reset
style, track, temperature, and
weather conditions.
hot pressures (
220–240 kPa (32–
35 psi)
220–240 kPa (32–
35 psi)
240–255 kPa (35–
37 psi)
255–270 kPa (37–
39 psi)
240–255 kPa (35–
37 psi)
255–270 kPa (37–
39 psi)
250–260 kPa (36–
38 psi)
250–260 kPa (36–
38 psi)
Drag strip cold
1
)
starting
pressures
Sustained
high speed
cold starting
pressures (
N/A 300 kPa
(44 psi)
N/A 300 kPa
(44 psi)
220 kPa
(32 psi)
180 kPa
(26 psi)
300 kPa
(44 psi)
300 kPa
(44 psi)
N/A 300 kPa
(44 psi)
N/A 300 kPa
(44 psi)
N/A 280 kPa
(41 psi)
N/A 280 kPa
(41 psi)
tire pressures to the recommended
inflation pressures on the Tire and
Loading Information label.
2
)

Chevrolet Camaro High Performance Owner Manual (GMNA-Localizing-U.S./
Canada/Mexico-13556307) - 2020 - CRC - 10/7/19
Front License Plate/Bracket
Removal (ZL1 Only)
For track use, the front license plate
and bracket can be removed from
the fascia for increased airflow.
Remove the license plate to access
the four screws that attach the
license plate bracket to the front
fascia.
Water Deflector
If operating a ZL1 on a closed
course in hot temperatures, remove
the water deflector to increase
airflow and improve cooling.
Remove the three bolts. Replace
immediately after track use to
protect the engine compartment
from water intrusion. Torque to
4.5 Y (40 lb in).
Driving and Operating 17
Wicker Bill
A rear spoiler wicker bill is available
for LS/LT and SS with the 1LE
package only. If equipped with a
wicker bill, use the instructions for
installation.
Underbody Air Deflector Tire
Dam Kit
The underbody air deflector tire dam
kit provided with ZL1 vehicles
reduces the amount of aerodynamic
lift on the front axle for better
handling. The original tire dams

Chevrolet Camaro High Performance Owner Manual (GMNA-Localizing-U.S./
Canada/Mexico-13556307) - 2020 - CRC - 10/7/19
18 Driving and Operating
must be reinstalled after the track
event. For installation, see the
instructions provided with the kit.
Supplemental Power Steering
Deflectors
The supplementary power steering
deflectors, if equipped, provide
additional cooling to the power
steering gear during track events.
Remove the noise shields and
install the deflectors as directed by
the enclosed instruction sheet.
Remove the deflectors and reinstall
the noise shields immediately after
track use to protect the engine
compartment from additional water
intrusion.
Adjustable Front Struts
(ZL1 1LE Only)
Camber Position for Track Events
The front strut top mount can be
positioned two ways. The original
setting is in the street position, but it
can be turned 180° to the track
position for additional negative
camber on the front.
To adjust the position:
1. Raise the vehicle so the tires
are slightly off the ground.
2. From the bottom side of the
strut top mount, remove the
Allen bolt that secures the top
mount alignment pin to the top
mount.
3. Remove the three strut mount
bolts and the alignment pin.

Chevrolet Camaro High Performance Owner Manual (GMNA-Localizing-U.S./
Canada/Mexico-13556307) - 2020 - CRC - 10/7/19
4. Using the hex feature on the
top of the mount, turn the top
mount 180° until the TRACK
CAMBER text is visible and the
second set of top mount holes
aligns with the strut tower
holes.
5. Reinstall the top mount bolts
and torque to 29 Y
(21.4 lb ft).
6. Keep the top mount alignment
pin and bolt for reinstallation
when the struts are returned to
the street position following the
track event.
7. Verify and adjust the vehicle
alignment per track alignment
specifications to optimize
vehicle performance for the
track event.
8. Verify and re-adjust the vehicle
alignment as needed following
the track event.
Strut Spring Seat Adjustment
The front struts have a threaded
spring seat that allows adjustment
of the preload on the front springs.
The vehicle corner weights and front
trim heights can be adjusted.
Driving and Operating 19
The spring seat can be adjusted
approximately 10 mm (0.4 in) up or
down from the nominal position.
Each complete turn of the spring
perch will change the vehicle height
approximately 1.4 mm (0.06 in). Do
not allow the spring seat to contact
the black seal cap when adjusting in
the maximum upward direction.
To adjust the lower spring seat:
1. Raise the vehicle so the tires
are completely off the ground.

Chevrolet Camaro High Performance Owner Manual (GMNA-Localizing-U.S./
Canada/Mexico-13556307) - 2020 - CRC - 10/7/19
20 Driving and Operating
2. Loosen the lower spring seat
bolt. Do not completely remove
the bolt.
3. Turn the spring perch upward
to increase spring preload,
or downward to decrease
spring preload.
4. Torque the spring seat bolt to
10 Y (7.4 lb ft).
5. Verify and adjust the vehicle
alignment as needed following
the spring seat adjustment.
Adjustable Rear Stabilizer Bar
(ZL1 1LE Only)
The rear stabilizer bar ends have
three attachment positions that
allow the rear roll stiffness of the
vehicle to be adjusted.
The stabilizer bar stiffness
increases approximately 15% using
the rearward holes, or decreases
approximately 10% using the
forward holes.
To change the attachment position:
1. Raise and support the rear of
the vehicle.
2. Remove the stabilizer bar link
nut while holding the ball
stud end.
3. Reposition the stabilizer bar
link stud to the desired hole
and tighten to 43 Y (32 lb ft).
Use the same hole position for
both sides of the vehicle.
Wheel Alignment
Track alignment specifications are
for vehicle at curb weight conditions
(full tank of fuel, zero ballast).

Chevrolet Camaro High Performance Owner Manual (GMNA-Localizing-U.S./
Canada/Mexico-13556307) - 2020 - CRC - 10/7/19
Driving and Operating 21
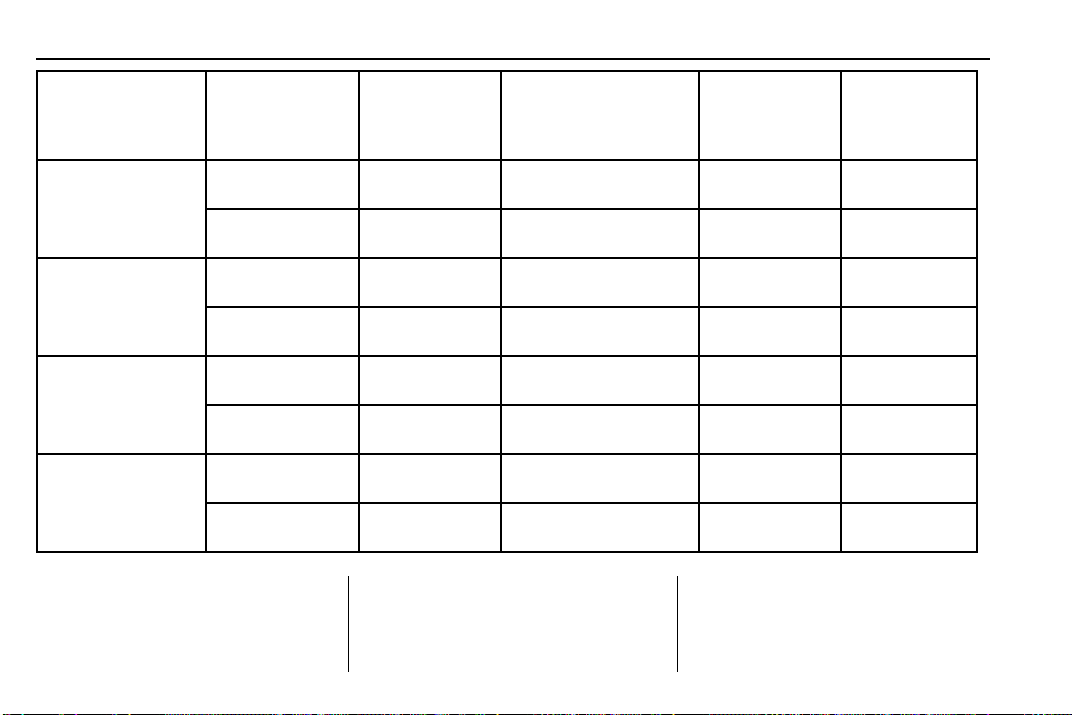
Racing and competitive driving wheel alignment settings can be set as follows for increased handling performance:
Track Wheel Alignment Specifications
Model Axle
ZL1 1LE
Track
Alignment
Settings
ZL1 Track
Alignment
Settings
SS 1LE
Track
Alignment
Settings
LS/LT 1LE
Track
Alignment
Settings
Caster (Not
Adjustable) Camber Total Toe
Left Right Left Right (Left + Right)
Front 7.9° 7.9° −2.7°
± 0.15°
Rear — — −2.0°
± 0.15°
Front 6.9° 6.9° −2.0°
± 0.15°
Rear — — −1.5°
± 0.15°
Front 6.9° 6.9° −2.0°
± 0.15°
Rear — — −1.5°
± 0.15°
Front 7.2° 7.2° −2.0°
± 0.15°
Rear — — –1.25°
± 0.15°
−2.7°
± 0.15°
−2.0°
± 0.15°
−2.0°
± 0.15°
−1.5°
± 0.15°
−2.0°
± 0.15°
−1.5°
± 0.15°
−2.0°
± 0.15°
–1.25°
± 0.15°
0.1° ± 0.05° 0.0° ± 3.5° —
0.1° ± 0.05° — 0.0° ± 0.1°
0.1° ± 0.05° 0.0° ± 3.5° —
0.1° ± 0.05° — 0.0° ± 0.1°
0.1° ± 0.05° 0.0° ± 3.5° —
0.1° ± 0.05° — 0.0° ± 0.1°
0.1° ± 0.05° 0.0° ± 3.5° —
0.1° ± 0.05° — 0.0° ± 0.1°
Steering
Wheel Angle Thrust Angle
(Left −
Right)/2

Chevrolet Camaro High Performance Owner Manual (GMNA-Localizing-U.S./
Canada/Mexico-13556307) - 2020 - CRC - 10/7/19
22 Driving and Operating
Caution
Using these wheel alignment
settings may cause excessive tire
wear. Only use these wheel
alignment settings for racing or
competitive driving. Excessive tire
wear is not covered under the
vehicle warranty.
Automatic Transmission
The Driver Information Center (DIC)
displays the current range selected
in the lower right corner. If Manual
Mode is active, M and the current
gear selected is displayed. The DIC
also displays the currently selected
Drive Mode. When Tour Mode is
selected, T is displayed. When
Sport Mode is selected, S is
displayed and if equipped Track
Mode, Tr will be displayed.
P : This position locks the drive
wheels. It is the best position to use
when starting the engine because
the vehicle cannot move easily.
Warning
{
It is dangerous to get out of the
vehicle if the shift lever is not fully
in P (Park) with the parking brake
firmly set. The vehicle can roll.
Do not leave the vehicle when the
engine is running. If you have left
the engine running, the vehicle
can move suddenly. You or others
could be injured. To be sure the
vehicle will not move, even when
you are on fairly level ground,
always set the parking brake and
move the shift lever to P (Park).
Make sure the shift lever is fully in
P (Park) before starting the engine.
The vehicle has an automatic
transmission shift lock control
system. The regular brake must be
fully applied first and then the shift
lever button must be pressed before

Chevrolet Camaro High Performance Owner Manual (GMNA-Localizing-U.S./
Canada/Mexico-13556307) - 2020 - CRC - 10/7/19
shifting from P (Park) when the
ignition is on. If you cannot shift out
of P (Park), ease pressure on the
shift lever, then push the shift lever
all the way into P (Park) as you
maintain brake application. Then
press the shift lever button and
move the shift lever into
another gear.
R : Use this gear to back up.
Caution
Shifting to R (Reverse) while the
vehicle is moving forward could
damage the transmission. The
repairs would not be covered by
the vehicle warranty. Shift to
R (Reverse) only after the vehicle
is stopped.
N : In this position, the engine does
not connect with the wheels. To
restart the engine when the vehicle
is already moving, use
N (Neutral) only.
Warning
{
Shifting into a drive gear while the
engine is running at high speed is
dangerous. Unless your foot is
firmly on the brake pedal, the
vehicle could move very rapidly.
You could lose control and hit
people or objects. Do not shift
into a drive gear while the engine
is running at high speed.
Caution
Shifting out of P (Park) or
N (Neutral) with the engine
running at high speed may
damage the transmission. The
repairs would not be covered by
the vehicle warranty. Be sure the
engine is not running at high
speed when shifting the vehicle.
Driving and Operating 23
D : This position is for normal
driving. If more power is needed for
passing, press the accelerator
pedal down.
Caution
If the vehicle does not shift gears,
the transmission could be
damaged. Have the vehicle
serviced right away.
Performance Shifting
While driving in Sport Mode and
Track Mode, if Tap Shift has not
been activated, the transmission
determines when the vehicle is
being driven in a competitive
manner. The transmission may
remain in a gear longer than it
would in the normal driving mode
based on throttle input and vehicle
lateral acceleration. If there is a
rapid reduction in throttle from a
heavy throttle position at high rpm,

Chevrolet Camaro High Performance Owner Manual (GMNA-Localizing-U.S./
Canada/Mexico-13556307) - 2020 - CRC - 10/7/19
24 Driving and Operating
the transmission will maintain the
current gear up to near redline rpm.
While braking, the transmission will
automatically downshift to the next
lower gear keeping engine speed
above approximately 3000 rpm.
If the vehicle is then driven for a
short time at a steady speed, and
without high cornering loads, the
transmission will upshift one gear at
a time, until 10 (Tenth) gear. After
shifting to 10 (Tenth) gear, or coming
to a complete stop, the transmission
will return to normal Sport Mode
shifting.
Ride Control Systems
Competitive Driving Mode
Competitive Driving Mode,
Performance Traction Management,
and Launch Control are systems
designed to allow increased
performance while accelerating and/
or cornering. This is accomplished
by regulating and optimizing the
engine, brakes, and suspension
performance. These modes are for
use at a closed course race track
and are not intended for use on
public roads. They will not
compensate for driver inexperience
or lack of familiarity with the race
track. Drivers who prefer to allow
the system to have more control of
the engine, brakes, and suspension
are advised to turn the normal
Traction Control System (TCS) and
StabiliTrak/Electronic Stability
Control (ESC) on.
Caution
Attempting to shift when the drive
wheels are spinning and do not
have traction may cause damage
to the transmission. Damage
caused by misuse of the vehicle
is not covered by the vehicle
warranty. Do not attempt to shift
when the drive wheels do not
have traction.
Competitive Driving Mode allows full
engine power while StabiliTrak/ESC
helps maintain directional control of
the vehicle by selective brake
application. In this mode, TCS is off
and Launch Control is available.
Adjust your driving style to account
for the available engine power. See
“Launch Control” later in this
section.
Do not use cruise control in
performance driving situations.
When StabiliTrak/ESC is in a
performance driving state by
pressing
Driving Mode or Performance
Y twice for Competitive

Chevrolet Camaro High Performance Owner Manual (GMNA-Localizing-U.S./
Canada/Mexico-13556307) - 2020 - CRC - 10/7/19
Traction Management Mode, or by
pressing and holding
five seconds to turn StabiliTrak/ESC
off, the cruise control buttons on the
left side of the steering wheel will be
inoperative.
To regain cruise control capability,
press
Y once to return to regular
StabiliTrak/ESC operation.
Y for
Performance Traction
Management (PTM) (ZL1 Only)
PTM is not available on
convertibles. Convertibles have
Competitive Driving Mode instead.
See “Competitive Driving Mode”
previously in this section.
PTM integrates the TCS,
StabiliTrak/ESC, and Competitive
Driving Mode systems to provide
improved and consistent
performance when cornering. The
amount of available engine power is
based on the mode selected, track
conditions, driver skill, and radius of
each corner.
These lights are on when the
vehicle is in PTM Mode.
Driving and Operating 25
With Track Mode engaged, select
the optional handling mode by
pressing
the PTM modes will appear.
.
.
.
.
.
To experience the performance
benefit of PTM, after entering a
curve and at the point where you
would normally start to increase
acceleration, fully press the
accelerator pedal. The PTM system
will modify the level of engine power
for a smooth and consistent
corner exit.
Y two times. A menu with
Wet
Dry
Sport 1
Sport 2
Race

Chevrolet Camaro High Performance Owner Manual (GMNA-Localizing-U.S./
Canada/Mexico-13556307) - 2020 - CRC - 10/7/19
26 Driving and Operating
‐ StabiliTrak/ESC is on and engine
power is reduced based on
conditions.
PTM Sport 1
‐ For use by drivers familiar with
the track.
‐ Dry conditions only.
‐ StabiliTrak/ESC is on and more
engine power is available than
lower modes.
To select a mode while in PTM,
press MODE up or down.
PTM Wet
‐ Intended for all driver skill levels.
‐ Ideal for wet or damp conditions
only; not intended for heavy rain
or standing water.
‐ StabiliTrak/ESC is on and engine
power is reduced based on
conditions.
PTM Dry
‐ For use by less experienced
drivers or while learning a new
track.
‐ Dry conditions only.
PTM Sport 2
‐ For use by drivers familiar with
the track.
‐ Dry conditions only.
‐ StabiliTrak/ESC is off and engine
power available is the same as in
Sport 1.
PTM Race
‐ For use by drivers familiar with
the track.
‐ Dry conditions only.
‐ StabiliTrak/ESC is off and engine
power is available for maximum
cornering speed.
In any PTM Mode, Launch Control
is available. Use PTM Race for the
most consistent performance during
drag strip use. See “Custom Launch
Control” in Track Events and
Competitive Driving in the owner ’s
manual.
Press and release
PTM and return to TCS and
StabiliTrak/ESC. The traction off
i and StabiliTrak/ESC OFF
light
light
g will go out.
Y to turn off
Launch Control
If equipped, Launch Control is
available within Competitive Driving
Mode and Performance Traction
Management (PTM) to allow high
levels of vehicle acceleration in a
straight line. Launch Control is a
form of traction control that
manages tire spin while launching
the vehicle. This feature is intended
for use during closed course race
events where consistent zero to
60 and quarter mile times are
desirable.

Chevrolet Camaro High Performance Owner Manual (GMNA-Localizing-U.S./
Canada/Mexico-13556307) - 2020 - CRC - 10/7/19
Launch Control is only available
when the following criteria are met:
.
Competitive Driving Mode is
selected or any of the
Performance Traction
Management modes are
selected. The traction off light
comes on in the instrument
cluster and the appropriate
Driver Information Center (DIC)
message displays.
.
The vehicle is not moving.
.
The steering wheel is pointing
straight.
Manual Transmissions
.
The clutch is fully pressed and
the transmission is in
1 (First) gear.
.
The accelerator pedal is rapidly
applied and held to wide open
throttle.
Launch Control will initially limit
engine speed as you rapidly apply
the accelerator pedal to wide open
throttle. Allow the engine rpm to
stabilize. A smooth, quick release of
the clutch, while maintaining the
fully pressed accelerator pedal, will
manage wheel slip.
Automatic Transmissions
.
The brake pedal is firmly
pressed to the floor, equivalent
to a panic brake event.
.
The accelerator pedal is rapidly
applied to wide open throttle.
If the vehicle rolls due to wide
open throttle, release the
throttle, press the brake pedal
more firmly, and re-apply the
accelerator to wide open throttle.
Launch Control will initially limit
engine speed as you rapidly apply
the accelerator pedal to wide open
throttle. Allow the engine rpm to
stabilize. A smooth, quick release of
the brake pedal, while maintaining
the fully pressed accelerator pedal,
will manage wheel slip.
After the vehicle is launched, the
system continues in Competitive
Driving Mode or PTM.
Driving and Operating 27
Competitive Driving Mode, PTM,
and Launch Control are systems
designed for a closed course race
track and not intended for use on
public roads. The systems are not
intended to compensate for lack of
driver experience or familiarity with
the race track.
Custom Launch Control may be
available through the Settings
menu, if equipped. See “Custom
Launch Control” in Track Events
and Competitive Driving in the
owner’s manual.
Limited-Slip Differential
The Electronic Limited-Slip
Differential (eLSD) is a hydraulically
actuated clutch system. It can
infinitely vary the clutch
engagement between 0 and 2000
Y (1475 lb ft) of breakaway torque
between the rear wheels.
It responds to full engagement
within 0.150 seconds when
necessary. Smaller clutch
adjustments happen even faster.

Chevrolet Camaro High Performance Owner Manual (GMNA-Localizing-U.S./
Canada/Mexico-13556307) - 2020 - CRC - 10/7/19
28 Driving and Operating
.
The eLSD:
.
Uses the vehicle sensors and
driver inputs to determine the
optimum amount of clutch
engagement for the conditions.
.
Improves traction while
cornering by changing the
engagement to achieve a
balance between directional
control and acceleration.
.
Provides optimal engagement
for high-speed control and
stability without affecting precise
steering and turn-in.
.
Improves vehicle stability during
spirited driving and evasive
maneuvers. Is fully integrated
with the Active Handling and
Performance Traction
Management (PTM) systems.
There are unique calibrations based
on the Traction Control System
(TCS) setting. eLSD modes change
automatically when
No unique input from the driver is
required.
Y is pressed.
Mode 1 is the standard mode
when the vehicle is started.
It provides a touring calibration
with an emphasis on vehicle
stability. Mode 1 is also used in
PTM Wet mode.
.
Mode 2 is engaged when both
TCS and StabiliTrak/Electronic
Stability Control (ESC) are
turned off. This calibration
provides more nimble corner
turn-in, and is biased for better
traction out of corners.
.
Mode 3 is engaged when PTM is
engaged in Dry, Sport 1 & 2, and
Race modes. This is a nimble
calibration with similar
functionality as eLSD Mode 2,
however, it is integrated to work
with PTM.
.
Mode 4 is engaged when TCS is
selected off, but StabiliTrak/ESC
remains on. Vehicle stability is
still the priority, while allowing for
optimized traction out of corners.
The ZL1 1LE, ZL1 coupe, and SS
1LE are calibrated uniquely and
optimized for their unique powertrain
and chassis combinations.
Fuel
Top Tier Fuel
GM recommends the use of TOP
TIER Detergent Gasoline to keep
the engine clean, reduce engine
deposits, and maintain optimal
vehicle performance. Look for the
TOP TIER Logo or see
www.toptiergas.com for a list of TOP
TIER Detergent Gasoline marketers
and applicable countries.

Chevrolet Camaro High Performance Owner Manual (GMNA-Localizing-U.S./
Canada/Mexico-13556307) - 2020 - CRC - 10/7/19
Driving and Operating 29
Recommended Fuel
Use premium unleaded gasoline
meeting ASTM specification D4814
with a posted octane rating of 93 —
(R+M)/2. If unavailable, unleaded
gasoline with a posted octane rating
of 91 may be used, but with reduced
performance and fuel economy.
If the octane is less than 91, the
engine could be damaged and the
repairs would not be covered by the
vehicle warranty. If heavy knocking
is heard when using gasoline rated
at 93 octane, the engine needs
service.
Do not use any fuel labeled E85 or
FlexFuel. Do not use gasoline with
ethanol levels greater than 15% by
volume.
Prohibited Fuels
Caution
Do not use fuels with any of the
following conditions; doing so
may damage the vehicle and void
its warranty:
.
For vehicles that are not
FlexFuel, fuel labeled
greater than 15% ethanol by
volume, such as mid-level
ethanol blends (16–50%
ethanol), E85, or FlexFuel.
.
Fuel with any amount of
methanol, methylal,
ferrocene, and aniline.
These fuels can corrode
metal fuel system parts or
damage plastic and rubber
parts.
(Continued)
Caution (Continued)
.
Fuel containing metals such
as methylcyclopentadienyl
manganese tricarbonyl
(MMT), which can damage
the emissions control
system and spark plugs.
.
Fuel with a posted octane
rating of less than the
recommended fuel. Using
this fuel will lower fuel
economy and performance,
and may decrease the life of
the emissions catalyst.

Chevrolet Camaro High Performance Owner Manual (GMNA-Localizing-U.S./
Canada/Mexico-13556307) - 2020 - CRC - 10/7/19
30 Vehicle Care
Vehicle Care
Vehicle Checks
Engine Compartment
Overview . . . . . . . . .. . . . . . .. . . .. 31
Engine Oil . . . . . . . . . . . . . . . . . . . . . 32
Engine Air Filter Life System . . . 34
Engine Air Cleaner/Filter . . . . . . . 35
Cooling System . . . . . . . . . . . .. . . . 36
Engine Overheating . . . . . . . . . . . . 37
Wheels and Tires
Low-Profile Tires . . . . . . . . . . .. . . . 37
Competition Oriented Tires . . . . 37
Summer Tires . . . . . . . . . . . . . . . . . . 38
Tire Pressure for High-Speed
Operation . . . . . . . . . . . . . . . . . . . . 39
Towing the Vehicle
Towing the Vehicle . . . . . . . . .. . . . 40
Appearance Care
Exterior Care . . . . . . . . . . . . . . . . . . 41

Chevrolet Camaro High Performance Owner Manual (GMNA-Localizing-U.S./
Canada/Mexico-13556307) - 2020 - CRC - 10/7/19
Vehicle Checks
Engine Compartment Overview
Vehicle Care 31

Chevrolet Camaro High Performance Owner Manual (GMNA-Localizing-U.S./
Canada/Mexico-13556307) - 2020 - CRC - 10/7/19
32 Vehicle Care
.
1. Windshield Washer Fluid
Reservoir.
2. Engine Coolant Surge Tank
and Pressure Cap.
3. Engine Oil Dipstick.
4. Engine Oil Fill Cap.
5. Brake/Clutch Fluid Reservoir.
6. Engine Air Cleaner/Filter.
7. Engine Cooling Fan (Out
of View).
8. Engine Compartment Fuse
Block.
9. Negative (–) Battery Terminal.
10. Positive (+) Battery Terminal.
Engine Oil
To ensure proper engine
performance and long life, careful
attention must be paid to engine oil.
Following these simple, but
important steps will help protect
your investment:
Use engine oil approved to the
proper specification and of the
proper viscosity grade. See
“Selecting the Right Engine Oil”
in this section.
.
Check the engine oil level
regularly and maintain the
proper oil level. See “Checking
Engine Oil” and “When to Add
Engine Oil” in this section.
.
Change the engine oil at the
appropriate time. See “Engine
Oil Life System” in the owner’s
manual.
.
Always dispose of engine oil
properly. See “What to Do with
Used Oil” in this section.
Checking Engine Oil
Check the engine oil level regularly,
every 650 km (400 mi), especially
prior to a long trip. The engine oil
dipstick handle is a loop. See
Engine Compartment Overview 0 31
for the location.
Warning
{
The engine oil dipstick handle
may be hot; it could burn you.
Use a towel or glove to touch the
dipstick handle.
If a low oil Driver Information Center
(DIC) message displays, check the
oil level.
Follow these guidelines:
.
To get an accurate reading, park
the vehicle on level ground.
Check the engine oil level after
the engine has been off for at
least two hours. Checking the
engine oil level on steep grades
or too soon after engine shutoff
can result in incorrect readings.
Accuracy improves when
checking a cold engine prior to
starting. Remove the dipstick
and check the level.
.
If unable to wait two hours, the
engine must be off for at least
15 minutes if the engine is
warm, or at least 30 minutes if
the engine is not warm. Pull out

Chevrolet Camaro High Performance Owner Manual (GMNA-Localizing-U.S./
Canada/Mexico-13556307) - 2020 - CRC - 10/7/19
the dipstick, wipe it with a clean
paper towel or cloth, then push it
back in all the way. Remove it
again, keeping the tip down, and
check the level.
When to Add Engine Oil
If the oil is below the cross-hatched
area at the tip of the dipstick and
the engine has been off for at least
15 minutes, add 1 L (1 qt) of the
recommended oil and then recheck
the level. See “Selecting the Right
Engine Oil” later in this section for
an explanation of what kind of oil to
use. For engine oil crankcase
capacity, see Capacities and
Specifications 0 48.
Do not add too much oil. Oil
levels above or below the
acceptable operating range
shown on the dipstick are harmful
to the engine. If the oil level is
above the operating range (i.e.,
the engine has so much oil that
the oil level gets above the
cross-hatched area that shows
the proper operating range), the
engine could be damaged. Drain
the excess oil or limit driving of
the vehicle, and seek a service
professional to remove the
excess oil.
See Engine Compartment Overview
0 31 for the location of the engine
oil fill cap.
Add enough oil to put the level
somewhere in the proper operating
range. Push the dipstick all the way
back in when through.
Caution
Vehicle Care 33
Selecting the Right Engine Oil
Selecting the right engine oil
depends on both the proper oil
specification and viscosity grade.
See Recommended Fluids and
Lubricants 0 46.
Specification
Use engine oils that meet the
dexos2 specification. Engine oils
that have been approved by GM as
meeting the dexos2 specification
are marked with the dexos2
approved logo. See
www.gmdexos.com.
Caution
Failure to use the recommended
engine oil or equivalent can result
in engine damage not covered by
the vehicle warranty.

Chevrolet Camaro High Performance Owner Manual (GMNA-Localizing-U.S./
Canada/Mexico-13556307) - 2020 - CRC - 10/7/19
34 Vehicle Care
Viscosity Grade
Use SAE 0W-40 viscosity grade
engine oil for the LT1 and LT4
engines.
When selecting an oil of the
appropriate viscosity grade, it is
recommended to select an oil of the
correct specification. See
“Specification” earlier in this section.
If 0W-40 dexos2 oil is not available,
SAE 5W-30 dexos1 full synthetic
engine oil may be used for
street use.
Engine Oil Additives/Engine
Oil Flushes
Do not add anything to the oil. The
recommended oils meeting the
dexos specification are all that is
needed for good performance and
engine protection.
Engine oil system flushes are not
recommended and could cause
engine damage not covered by the
vehicle warranty.
What to Do with Used Oil
Used engine oil contains certain
elements that can be unhealthy for
your skin and could even cause
cancer. Do not let used oil stay on
your skin for very long. Clean your
skin and nails with soap and water,
or a good hand cleaner. Wash or
properly dispose of clothing or rags
containing used engine oil. See the
manufacturer's warnings about the
use and disposal of oil products.
Used oil can be a threat to the
environment. If you change your
own oil, be sure to drain all the oil
from the filter before disposal. Never
dispose of oil by putting it in the
trash or pouring it on the ground,
into sewers, or into streams or
bodies of water. Recycle it by taking
it to a place that collects used oil.
Engine Air Filter Life System
When to Change Engine Air
Filter
If equipped, this feature provides an
indication of when to change the
engine air filter. It is based on
driving conditions, which can cause
when to change to vary greatly. It is
possible an air filter change may not
be indicated for up to four years.
When the "Replace at Next Oil
Change" message displays, the
engine air filter should be replaced
at the time of the next engine oil
change. When the "Replace Engine
Air Filter Now" message displays,
the engine air filter should be
replaced as soon as possible. Reset
the engine air filter life system after
the engine air filter is replaced. See
your dealer for service and to reset
the system.

Chevrolet Camaro High Performance Owner Manual (GMNA-Localizing-U.S./
Canada/Mexico-13556307) - 2020 - CRC - 10/7/19
How to Reset Engine Air Filter
Life System
Reset the system whenever the
engine air filter is replaced so that
the system can calculate the next
engine air filter change.
To reset:
1. Place the vehicle in P (Park).
2. Select Engine Air Filter Life on
the DIC menu. See “Driver
Information Center (DIC)” in the
owner manual.
3. Press
4. 100% Air Filter Life will be
p to move to the Reset/
Disable display area. Select
Reset then press SEL. Then
press Yes to confirm the reset.
displayed when the Engine Air
Filter Life System is
successfully reset.
Engine Air Cleaner/Filter
The engine air cleaner/filter is in the
engine compartment on the driver
side of the vehicle.
When to Inspect the Engine Air
Cleaner/Filter
.
For intervals on changing and
inspecting the engine air filter,
see “Maintenance Schedule” in
the owner’s manual.
.
If equipped with Engine Air Filter
Life System, see Engine Air
Filter Life System 0 34.
.
If driving in very dusty areas,
follow the engine air filter
inspecting and changing
intervals, see “Maintenance
Schedule” in the owner’s
manual.
How to Inspect the Engine Air
Cleaner/Filter
Do not start the engine or have the
engine running with the engine air
cleaner/filter housing open. Before
removing the engine air cleaner/
filter, make sure that the engine air
cleaner/filter housing and nearby
components are free of dirt and
debris. Remove the engine air
cleaner/filter. Lightly tap and shake
the engine air cleaner/filter (away
from the vehicle), to release loose
Vehicle Care 35
dust and dirt. Inspect the engine air
cleaner/filter for damage, and
replace if damaged. Do not clean
the engine air cleaner/filter or
components with water or
compressed air.
To inspect or replace the engine air
cleaner/filter:
1. Remove the five screws and lift
the cover assembly. Use
caution not to drop any of the
loose screws.
2. Inspect or replace the air
cleaner/filter.
3. Reverse Steps 1 and 2 to
reinstall the housing cover.

Chevrolet Camaro High Performance Owner Manual (GMNA-Localizing-U.S./
Canada/Mexico-13556307) - 2020 - CRC - 10/7/19
36 Vehicle Care
Warning
{
Operating the engine with the air
cleaner/filter off can cause you or
others to be burned. Use caution
when working on the engine. Do
not start the engine or drive the
vehicle with the air cleaner/filter
off, as flames may be present if
the engine backfires.
Caution
If the air cleaner/filter is off, dirt
can easily get into the engine,
which could damage it. Always
have the air cleaner/filter in place
when driving.
Cooling System
The cooling system allows the
engine to maintain the correct
working temperature.
1. Engine Coolant Surge Tank
and Pressure Cap
2. Engine Cooling Fan (Out
of View)
Warning
{
An underhood electric fan can
start up even when the engine is
not running and can cause injury.
Keep hands, clothing, and tools
away from any underhood
electric fan.
Warning
{
Do not touch heater or radiator
hoses, or other engine parts.
They can be very hot and can
burn you. Do not run the engine if
there is a leak; all coolant could
leak out. That could cause an
engine fire and can burn you. Fix
any leak before driving the
vehicle.

Chevrolet Camaro High Performance Owner Manual (GMNA-Localizing-U.S./
Canada/Mexico-13556307) - 2020 - CRC - 10/7/19
Vehicle Care 37
Caution
Do not use anything other than a
mix of DEX-COOL coolant that
meets GM Standard
GMW3420 and clean, drinkable
water. Anything else can cause
damage to the engine cooling
system and the vehicle, which
would not be covered by the
vehicle warranty.
Engine Coolant
See ”Engine Coolant” under
“Cooling System” in the owner ’s
manual.
Engine Overheating
See “Engine Overheating” in the
owner’s manual.
Wheels and Tires
Low-Profile Tires
If the vehicle has 285/30ZR20,
305/30ZR20, 305/30ZR19,
or 325/30ZR19 size tires, they
are classified as low-profile tires.
Caution
Low-profile tires are more
susceptible to damage from road
hazards or curb impact than
standard profile tires. Tire and/or
wheel assembly damage can
occur when coming into contact
with road hazards like potholes,
or sharp edged objects, or when
sliding into a curb. The warranty
does not cover this type of
damage. Keep tires set to the
correct inflation pressure and
when possible, avoid contact with
curbs, potholes, and other road
hazards.
Competition Oriented Tires
This vehicle may come with
305/30ZR19 and 325/30ZR19
Goodyear Eagle F1 Supercar 3R
competition oriented tires that are
DOT approved for street use.
Competition oriented tires use a
special tread pattern and compound
that provide more grip than normal
road tires. The minimum tread depth
will be reached earlier than typical
tires, resulting in reduced tire life.
This special tread pattern and
compound will have decreased
performance in cold climates, heavy
rain, and standing water. It is
recommended that winter tires be
installed on the vehicle when driving
at temperatures below
approximately 10 °C (50 °F) or on
ice or snow covered roads.

Chevrolet Camaro High Performance Owner Manual (GMNA-Localizing-U.S./
Canada/Mexico-13556307) - 2020 - CRC - 10/7/19
38 Vehicle Care
Warning
{
Driving on wet roads, in heavy
rain, or through standing water
with competition oriented tires
may cause hydroplaning and loss
of control. Use extreme caution
and drive slowly on wet roads.
Warning
{
Driving with competition oriented
tires on snow, ice, or cold road
surfaces can cause loss of control
or a crash. Competition oriented
tires are summer season tires and
are not intended to be driven on
snow, ice, or road surfaces below
10 °C (50 °F). Do not drive a
vehicle with competition oriented
tires in these conditions.
Competition oriented tires have
rubber compounds that lose
flexibility and may develop
surface cracks in the tread area
at temperatures below −7 °C
(20 °F). Always store competition
oriented tires indoors and at
temperatures above −7 °C (20 °F)
when not in use. If the tires have
been subjected to −7 °C (20 °F) or
less, let them warm up in a
heated space to at least 10 °C
(50 °F) for 24 hours or more
before being installed or driving a
vehicle on which they are
installed. Do not apply heat or
blow heated air directly on the
tires. Always inspect tires
before use.
Caution
Summer Tires
High Performance Summer Tires
ZL1, SS with the 1LE package, and
LS/LT with the 1LE package are
equipped with high performance
summer tires. These tires have a
special tread and compound that
are optimized for maximum dry and
wet road performance. This special
tread and compound will have
decreased performance in cold
climates, and on ice and snow. It is
recommended that winter tires be
installed on the vehicle if frequent
driving at temperatures below
approximately 5 °C (40 °F) or on ice
or snow covered roads is expected.
See “Winter Tires” in the owner’s
manual.
Caution
High performance summer tires
have rubber compounds that lose
flexibility and may develop
surface cracks in the tread area
at temperatures below −7 °C
(20 °F). Always store high
performance summer tires
indoors and at temperatures
above −7 °C (20 °F) when not in
use. If the tires have been
subjected to −7 °C (20 °F) or less,
(Continued)

Chevrolet Camaro High Performance Owner Manual (GMNA-Localizing-U.S./
Canada/Mexico-13556307) - 2020 - CRC - 10/7/19
Caution (Continued)
let them warm up in a heated
space to at least 5 °C (40 °F) for
24 hours or more before being
installed or driving a vehicle on
which they are installed. Do not
apply heat or blow heated air
directly on the tires. Always
inspect tires before use. See “Tire
Inspection” in the owner’s
manual.
Warning (Continued)
Some high-speed rated tires
require inflation pressure
adjustment for high-speed
operation. When speed limits and
road conditions allow the vehicle
to be driven at high speeds, make
sure the tires are rated for
high-speed operation, are in
excellent condition, and are set to
the correct cold tire inflation
pressure for the vehicle load.
Tire Pressure for High-Speed Operation
Warning
{
Driving at high speeds, 160 km/h
(100 mph) or higher, puts
additional strain on tires.
Sustained high-speed driving
causes excessive heat buildup
and can cause sudden tire failure.
This could cause a crash, and
you or others could be killed.
(Continued)
ZL1 and SS with the 1LE package
are equipped with 285/30ZR20
(95Y) and 305/30ZR20 (99Y) or
305/30ZR19 (98Y) and 325/30ZR19
(101Y) size tires that are capable of
high-speed use. Make sure vehicles
with this size tires are inflated to
300 kPa (44 psi) before operating
the vehicle at sustained high-speed
operation at speeds over 160 km/h
(100 mph).
Vehicle Care 39
LS/LT with the 1LE package is
equipped with 245/40ZR20 95Y and
275/35ZR20 98Y size tires that are
capable of high-speed use. Make
sure vehicles with this size tires are
inflated to 280 kPa (41 psi) before
operating the vehicle at sustained
high-speed operation at speeds
over 160 km/h (100 mph).
Return the tires to the
recommended cold tire inflation
pressure when high-speed driving
has ended. See “Vehicle Load
Limits” and “Tire Pressure” in the
owner’s manual.

Chevrolet Camaro High Performance Owner Manual (GMNA-Localizing-U.S./
Canada/Mexico-13556307) - 2020 - CRC - 10/7/19
40 Vehicle Care
Towing the Vehicle
Caution
Incorrectly towing a disabled
vehicle may cause damage. The
damage would not be covered by
the vehicle warranty. Do not lash
or hook to suspension
components. Use the proper
straps around the tires to secure
the vehicle. Do not drag a locked
wheel/tire. Use tire skates or
dollies under any locked wheel/
tire while loading the vehicle. Do
not use a sling type lift to tow the
vehicle. This could damage the
vehicle.
GM recommends a flatbed tow truck
to transport a disabled vehicle. Use
ramps to help reduce approach
angles, if necessary. A towed
vehicle should have its drive wheels
off the ground. Contact Roadside
Assistance or a professional towing
service if the disabled vehicle must
be towed.
To tow the vehicle behind another
vehicle for recreational purposes,
such as behind a motor home, see
the owner’s manual.
SS 1LE, and ZL1 Only
Due to low ramp angles on ZL1 and
SS 1LE vehicles, use care when
loading the vehicle onto a flatbed
carrier. Front spring spacers are
provided for lifting the front
suspension if more clearance is
necessary when towing.
ZL1 1LE Only
Due to the high spring rate and
spring design used on ZL1 1LE
vehicles, spring spacers are not
provided. If more clearance is
needed when towing, raise the
adjustable spring seat to lift the front
suspension. See "Strut Spring Seat
Adjustment" in Track Events and
Competitive Driving 0 14.
Tow Eye Socket
Caution
Improper use of the tow eye can
damage the vehicle. If equipped,
use the tow eye to load a
disabled vehicle onto a flatbed
tow truck from a flat road surface,
or to move the vehicle a short
distance. Use caution and low
speeds. The transmission must
be in (N) Neutral when moving
the vehicle.
The ZL1 vehicle is equipped with a
front tow eye that can be used to
pull the vehicle onto a flatbed car

Chevrolet Camaro High Performance Owner Manual (GMNA-Localizing-U.S./
Canada/Mexico-13556307) - 2020 - CRC - 10/7/19
carrier from a flat road surface. Do
not use the tow eye to pull the
vehicle from snow, mud, or sand.
The tow eye is in the rear
compartment storage area.
To install the tow eye:
1. Locate the tow eye socket
through the opening in the
grille.
2. Install the tow eye into the
socket by turning it clockwise
until it stops.
3. When finished, place the tow
eye back in the vehicle.
Appearance Care
Exterior Care
Automatic Car Washes
Do not use automatic car washes.
Vehicles with the ZL1 or the 1LE
package (or any accessory ground
effects package) have reduced
ground clearance.
Vehicles equipped with an
accessory ground effects
package have reduced ground
clearance. Damage can occur in
automatic car washes, when
approaching curbs, or on steep
inclines. Do not use automatic car
washes. Approach curbs and
inclines with caution.
Vehicle Care 41
Caution
Stepping on the rocker molding
could damage the molding. The
repairs would not be covered by
the vehicle warranty. Do not step
on the rocker molding.
Hood Extractor
Caution

Chevrolet Camaro High Performance Owner Manual (GMNA-Localizing-U.S./
Canada/Mexico-13556307) - 2020 - CRC - 10/7/19
42 Vehicle Care
Caution
Using wax on low gloss black
finish stripes can increase the
gloss level and create a
non-uniform finish. Clean low
gloss stripes with soap and
water only.
It is not recommended that the ZL1
hood extractor be waxed, as it will
change the gloss level of the
surface. In addition, care must be
used when waxing around the hood
extractor. If a small amount of wax
is applied to the hood extractor it
can create an irregular appearance
in the surface of the panel. If wax,
debris, or other materials create
stains on the hood extractor, see
your dealer for the recommended
cleaner.
There is a water deflector on the
underside of the hood extractor.
Remove it for track use only.
Hood Wrap (1LE Only)
Caring for Vehicle Graphics
Wash regularly.
.
Wash whenever the car appears
dirty. Contaminants allowed to
remain on the graphic may be
more difficult to remove during
cleaning.
.
Rinse off as much dirt and grit
as possible with a spray of
water.
.
Never scrub the hood wrap
surface.
.
Use a wet, non-abrasive
detergent.
.
Do not buff or apply polishes to
the hood wrap.
.
Rinse thoroughly with clean
water. To reduce water spotting,
immediately use a silicone
squeegee to remove water.
Finish with a clean microfiber
cloth.
Pressure Washing
.
Ensure the water pressure is
kept below 14,000 kPa
(2,000 psi).
.
Keep water temperature below
80 °C (180 °F).
.
Use a spray nozzle with a
40 degree wide angle spray
pattern.
.
Keep the nozzle at least 30 cm
(1 ft) away from and
perpendicular (at 90 degrees) to
any graphics.

Chevrolet Camaro High Performance Owner Manual (GMNA-Localizing-U.S./
Canada/Mexico-13556307) - 2020 - CRC - 10/7/19
Pressure Washing Underhood
Components
.
Ensure the water pressure is
kept below 11,000 kPa
(1,600 psi).
.
Keep water temperature below
25 °C (77 °F).
.
Use a spray nozzle with a
40 degree wide angle spray
pattern.
.
Keep the nozzle at least 30 cm
(1 ft) away from and
perpendicular (at 90 degrees) to
any graphics.
the vehicle as soon as possible.
If necessary, use non-abrasive
cleaners that are marked safe for
painted surfaces to remove foreign
matter.
Occasional hand waxing or mild
polishing should be done to remove
residue from the paint finish. See
your dealer for approved cleaning
products.
Do not apply waxes or polishes to
uncoated plastic, vinyl, flat paint,
or matte or textured finishes as
damage can occur.
Finish Care
Application of aftermarket clearcoat
sealant/wax materials is not
recommended. If painted surfaces
are damaged, see your dealer to
have the damage assessed and
repaired. Foreign materials such as
calcium chloride and other salts, ice
melting agents, road oil and tar, tree
sap, bird droppings, chemicals from
industrial chimneys, etc., can
damage the vehicle's finish if they
remain on painted surfaces. Wash
Machine compounding or
aggressive polishing on a
basecoat/clearcoat paint finish
may damage it. Use only
non-abrasive waxes and polishes
that are made for a basecoat/
clearcoat paint finish on the
vehicle.
Vehicle Care 43
To keep the paint finish looking new,
keep the vehicle garaged or
covered whenever possible.
ZL1 1LE Spoiler
Caution
It is not recommended that the
ZL1 1LE spoiler be waxed, as it will
change the gloss level of the
surface. In addition, care must be
used when waxing around the
spoiler. If a small amount of wax is
applied to the spoiler it can create
an irregular appearance to the
surface of the panel. If wax, debris,
or other materials create stains on
the spoiler, see your dealer for the
recommended cleaner.

Chevrolet Camaro High Performance Owner Manual (GMNA-Localizing-U.S./
Canada/Mexico-13556307) - 2020 - CRC - 10/7/19
44 Vehicle Care
Fuel Spills
Wipe off fuel spills immediately to
avoid degrading the vinyl and
adhesive. Then wash, rinse,
and dry.

Chevrolet Camaro High Performance Owner Manual (GMNA-Localizing-U.S./
Canada/Mexico-13556307) - 2020 - CRC - 10/7/19
Service and Maintenance
Recommended Fluids,
Lubricants, and Parts
Recommended Fluids and
Lubricants . . . . . . . .. . . . . . . . . . . . 46
Maintenance Replacement
Parts . . . . . . .. . . . . . .. . . .. . . .. . . 46
Service and Maintenance 45

Chevrolet Camaro High Performance Owner Manual (GMNA-Localizing-U.S./
Canada/Mexico-13556307) - 2020 - CRC - 10/7/19
46 Service and Maintenance
Recommended Fluids, Lubricants, and Parts
Recommended Fluids and Lubricants
The following fluid applies to the Camaro ZL1 only. For other fluids not listed here, see “Recommended Fluids and
Lubricants” in the owner’s manual.
Usage Fluid/Lubricant
Automatic Transmission (10 Speed) DEXRON ULV Automatic Transmission Fluid (GM Part No. 19352619, in
Manual Transmission (6 Speed) Manual Transmission Fluid (GM Part No. 88861800, in Canada 88861801).
Maintenance Replacement Parts
Replacement parts identified below by name, part number, or specification can be obtained from your dealer.
Part GM Part Number ACDelco Part Number
Engine Oil Filter 12640445 PF64
Spark Plugs 12642722 41-128
Canada 19352620).

Chevrolet Camaro High Performance Owner Manual (GMNA-Localizing-U.S./
Canada/Mexico-13556307) - 2020 - CRC - 10/7/19
Technical Data
Vehicle Data
Capacities and
Specifications . . . . . . . . . . . . . . . . 48
Engine Drive Belt Routing . . . . . 50
Technical Data 47

Chevrolet Camaro High Performance Owner Manual (GMNA-Localizing-U.S./
Canada/Mexico-13556307) - 2020 - CRC - 10/7/19
48 Technical Data
Vehicle Data
Capacities and Specifications
The following approximate capacities are given in metric and English conversions.
The below values are for ZL1 (LT4 engine) vehicles only. For capacities and specifications for 1LE vehicles, see the
owner's manual.
Application
Engine Cooling System*
6.2L V8 Engine (LT4) 10.4 L 11.0 qt
6.2L V8 Engine Low Temperature Radiator (LT4) 2.0 L 2.1 qt
Engine Oil with Filter 9.5 L 10.0 qt
Rear Axle Fluid (ZL1 Convertible Only) 1.1 L 1.2 qt
Rear Axle Fluid (Coupe Only with eLSD) 1.5 L 1.6 qt
eLSD Clutch System Hydraulic Actuation Fluid (ZL1 and SS
with the 1LE package)
All capacities are approximate. When adding, be sure to fill to the approximate level, as recommended in this
manual. Recheck fluid level after filling
*Engine cooling system capacity values are based on the entire cooling system and its components.
Metric English
160 ml 5.4 oz
Capacities

Chevrolet Camaro High Performance Owner Manual (GMNA-Localizing-U.S./
Canada/Mexico-13556307) - 2020 - CRC - 10/7/19
Technical Data 49
Engine Specifications
Engine VIN Code Transmission Spark Plug Gap Firing Order
6.2L V8 Engine (LT4) 6 Automatic
Spark plug gaps are preset by the manufacturer. Re-gapping the spark plug is not recommended and can damage
the spark plug.
Manual
Engine Data
Engine Horsepower Torque Displacement Compression Ratio
6.2L
V8 Engine (LT4)
650 650 lb ft 6.2L 10.0:1
0.725–0.875 mm
(0.029–0.034 in)
1–8–7–2–6–5–4–3

Chevrolet Camaro High Performance Owner Manual (GMNA-Localizing-U.S./
Canada/Mexico-13556307) - 2020 - CRC - 10/7/19
50 Technical Data
Engine Drive Belt Routing
6.2L V8 Engine (LT4)

Chevrolet Camaro High Performance Owner Manual (GMNA-Localizing-U.
S./Canada/Mexico-13556307) - 2020 - CRC - 10/7/19
Index
A
Air Cleaner/Filter, Engine . . . . . . . . 35
Air Filter
Life System . . . . . . . . . . . . . . . . .. . . . 34
Appearance Care
Exterior . . . . . . . . . . . . . . . . . . . . . . . . . 41
Automatic
Transmission . . . . . . . . . . . . . . . . .. .22
B
Boost Gauge . . . . . . . . . . . . . . .. . . . . . 6
C
Canadian Vehicle Owners . . . . . . . . 2
Capacities and Specifications . . . . 48
Cleaning
Exterior Care . . . . .. . . . . . . . . . . . . . 41
Cluster, Instrument . . . . . . . . . . . . . . . 5
Competition Oriented Tires . . . . . . 37
Competitive Driving Mode . . . . . . . 24
Cooling System . . . . . . . . . . . . .. . . . . 36
D
Data Recorder
Performance . . . . . . . . . . .. . . . . . . . . . 8
Differential, Limited-Slip . . . . . . . . . 27
Drive Belt Routing, Engine . .. . . . . 50
Index 51
Driving
Competitive . . . . . . . . .. . . . . . . . . . . . 24
Track Events and
Competitive . . . . . . .. . . . . . . . . . . . 14
E
Engine
Air Cleaner/Filter . . . . . . . . . . . . . . . 35
Compartment Overview . . . . . . . . . 31
Cooling System . . . . . . . . . . . . .. . . . 36
Drive Belt Routing . . . . .. . . . . . . . . 50
Overheating . . . . . . . . . . . . . . . . . . . . 37
Engine Air Filter Life System . . . . . 34
F
Filter,
Engine Air Cleaner . . . . . . . . . . . . . 35
Fuel
Prohibited Fuels . . . . . . . . . . . . . .. .29
Recommended . . . . .. . . . . . . . . . . . 29
Top Tier . . . . . . . .. . . . . . . . . . . . . . . . 28
G
Gauges
Boost . . . . . . . . . . . . . . . . . .. . . . . . . . . . 6
H
High-Speed Operation . . . . . . . . . . . 39

Chevrolet Camaro High Performance Owner Manual (GMNA-Localizing-U.
S./Canada/Mexico-13556307) - 2020 - CRC - 10/7/19
52 Index
I
Instrument Cluster . . . . .. . . . . . . . . . . 5
Introduction . . . . . . . . . . . .. . . . . . . . . . . 2
L
Lap-Shoulder Belt . . . . . . . . . . . . . . . . 3
Limited-Slip Differential . . . . . . . . . . 27
Low-Profile Tires . . . .. . . . . . . . . . . . . 37
M
Maintenance Schedule
Recommended Fluids and
Lubricants .. . . . . . . . . . . . . . . . . .. .46
O
Oil
Engine . . . . . . . . . . . . . .. . . . . . . . . . . . 32
Overheating, Engine . . . . . . . . . .. . . 37
P
Performance Data
Recorder (PDR) . . . . . . . . . . . . . . . . . 8
Prohibited Fuels . . . . . . . . . . . . . .. . . 29
R
Recommended
Fuel . . . . . . . . . . . . . . . . . . .. . . . . . . . . 29
Recommended Fluids and
Lubricants .. . . . . . . . . . . . . . . . . .. . . 46
Replacement Parts
Maintenance . . . . . . . . . . . . .. . . . . . . 46
Ride Control Systems
Enhanced Traction
System (ETS) . . . . . . . . . . . . . . . . . 27
Routing, Engine Drive Belt . .. . . . . 50
S
Seat Belts
Lap-Shoulder Belt . . . . . . . . . . . . . . . 3
Specifications and Capacities . . . . 48
Summer Tires . . . . . . . . . . .. . . . . . . . 38
Supplement
Using . . . . . . . . . . . . . . . . . .. . . . . . . . . . 2
System
Engine Air Filter Life . . . . .. . . . . . . 34
T
Tires
Competition Oriented . . . . . . . . . . . 37
Low Profile . . . . . . . . .. . . . . . . . . . . . 37
Pressure . . . . . . . . . . . . . . . . . . . . . .. .39
Top Tier Fuel . . . . . . . . . . . . . . . . . . . . 28
Towing
Vehicle . . . .. . . . . . . . . . . . . . . . . . . . . 40
Track Events and Competitive
Driving . . .. . . . . . . . . . . . . . . . . . . . . . 14
Traction
Limited-Slip Differential . . . . . . . . . 27
Transmission
Automatic . . . . . . . . . . . . . . . . . . . . . . . 22
U
Using This Supplement . . . . . . . . . . . 2
V
Vehicle
Canadian Owners . . . . . . . . . . . .. . . 2
Towing . . . . . . . . . . . . . .. . . . . . . . . . . . 40

 Loading...