


Foreword
Thank you for purchasing your new Chery automobile. To correctly operate and maintain your vehicle and understand its
features and controls, please take the time to read this manual carefully.
After you read this manual, it should be stored in the vehicle for convenient reference and remain with the vehicle
when sold so that the new owner will be aware of all safety warnings.
Chery Automobile Co., Ltd. reserves the right to make changes in design and specifications, and / or make additions
to or improvement to its products without imposing any obligation upon itself to install them on products previously
manufactured.
Authorized Chery dealers are service professionals and are exclusively authorized by Chery Automobile Co., Ltd. When
it comes to service, remember that your authorized dealer knows your vehicle best, has the factory-trained technicians
and OEM parts to best provide the customer satisfaction that you require.
Depending on the vehicle equipment or features specific to your vehicle, some descriptions and illustrations may differ from the equipment found on your vehicle.
Please access our website for further information.
Website: www.cheryinternational.com
娀 2009 Chery Automobile Co., Ltd.
All rights reserved. This material may not be reproduced or copied, in whole or in part, without the written permission
of Chery Automobile Co., Ltd.
Chery Automobile Co., Ltd.

TABLE OF CONTENTS
CHAPTER PAGE
1
2
3
4
5
6
7
8
9
10
INTRODUCTION
BEFORE OPERATING YOUR VEHICLE
FEATURES OF YOUR VEHICLE
STARTING AND OPERATING YOUR VEHICLE
YOUR INSTRUMENT PANEL
IN CASE OF AN EMERGENCY
CUSTOMER ASSISTANCE
PROPER MAINTENANCE OF YOUR VEHICLE
MAINTENANCE SCHEDULES
INDEX
....................................................................... 143
.................................................................. 3
................................................. 15
...................................................... 33
........................................................ 73
....................................................... 95
......................................................... 105
...................................................... 125
........................................... 53
.......................................... 109

2
Chery Automobile Co., Ltd.

CONTENTS
3
INTRODUCTION
䉴 Introduction 4
䉴 How to Read This Manual 4
컄 Table of Contents
컄 Vehicle Symbols
컄 Index
䉴 Vehicle Features 6
䉴 New Vehicle Inspection 6
컄 Inspection Certification for
4
4
4
Vehicle Delivery
컄 Vehicle Delivery Card
Chery Automobile Co., Ltd.
䉴 Personal Service 10
컄 ⬙PERSON-TO-PERSON⬙
Service Advisor Card
䉴 Warnings and Cautions 13
7
䉴 Vehicle Identification
Number 13
8
䉴 Vehicle Modifications 13
11

4 – INTRODUCTION
Introduction
Congratulations on selecting your new
Chery vehicle. To correctly operate
and maintain your vehicle and understand its features and controls, please
take the time to read this manual carefully.
This manual contains important instructions and tips concerning the routine driving and regular maintenance
of your vehicle. The more familiar you
are with the operation of your vehicle,
the more you will ensure your safety
and overall economic benefit while
driving. Failure to operate this vehicle
correctly may result in loss of control
or an accident.
Regular routine maintenance will keep
your vehicle operating at its best. We
suggest you have your vehicle serviced at recommended intervals by an
authorized Chery dealer who uses authorized Chery replacement parts. Any
damage caused by failing to follow
recommended operation or maintenance may not be covered by your
warranty.
How to Read This Manual
Table of Contents
Consult the Table of Contents to determine which section of the Owner’s
Manual contains the information you
desire.
Vehicle Symbols
Consult the symbol table on the following page for a description of the
symbols that may be used on your vehicle and throughout the Owner’s
Manual.
Index
The detailed index at the back of this
Owner’s Manual contains a complete
listing for all vehicle subject matter.
Chery Automobile Co., Ltd.

INTRODUCTION – 5
Chery Automobile Co., Ltd.

6 – INTRODUCTION
Vehicle Features
This manual includes the current features and information regarding the
Chery A3. All material (including all
standard and available features) contained in this publication is based on
the latest information at the time it
was printed. Therefore, please note
that some of the equipment and ac-
cessories in this publication may not
appear on your vehicle.
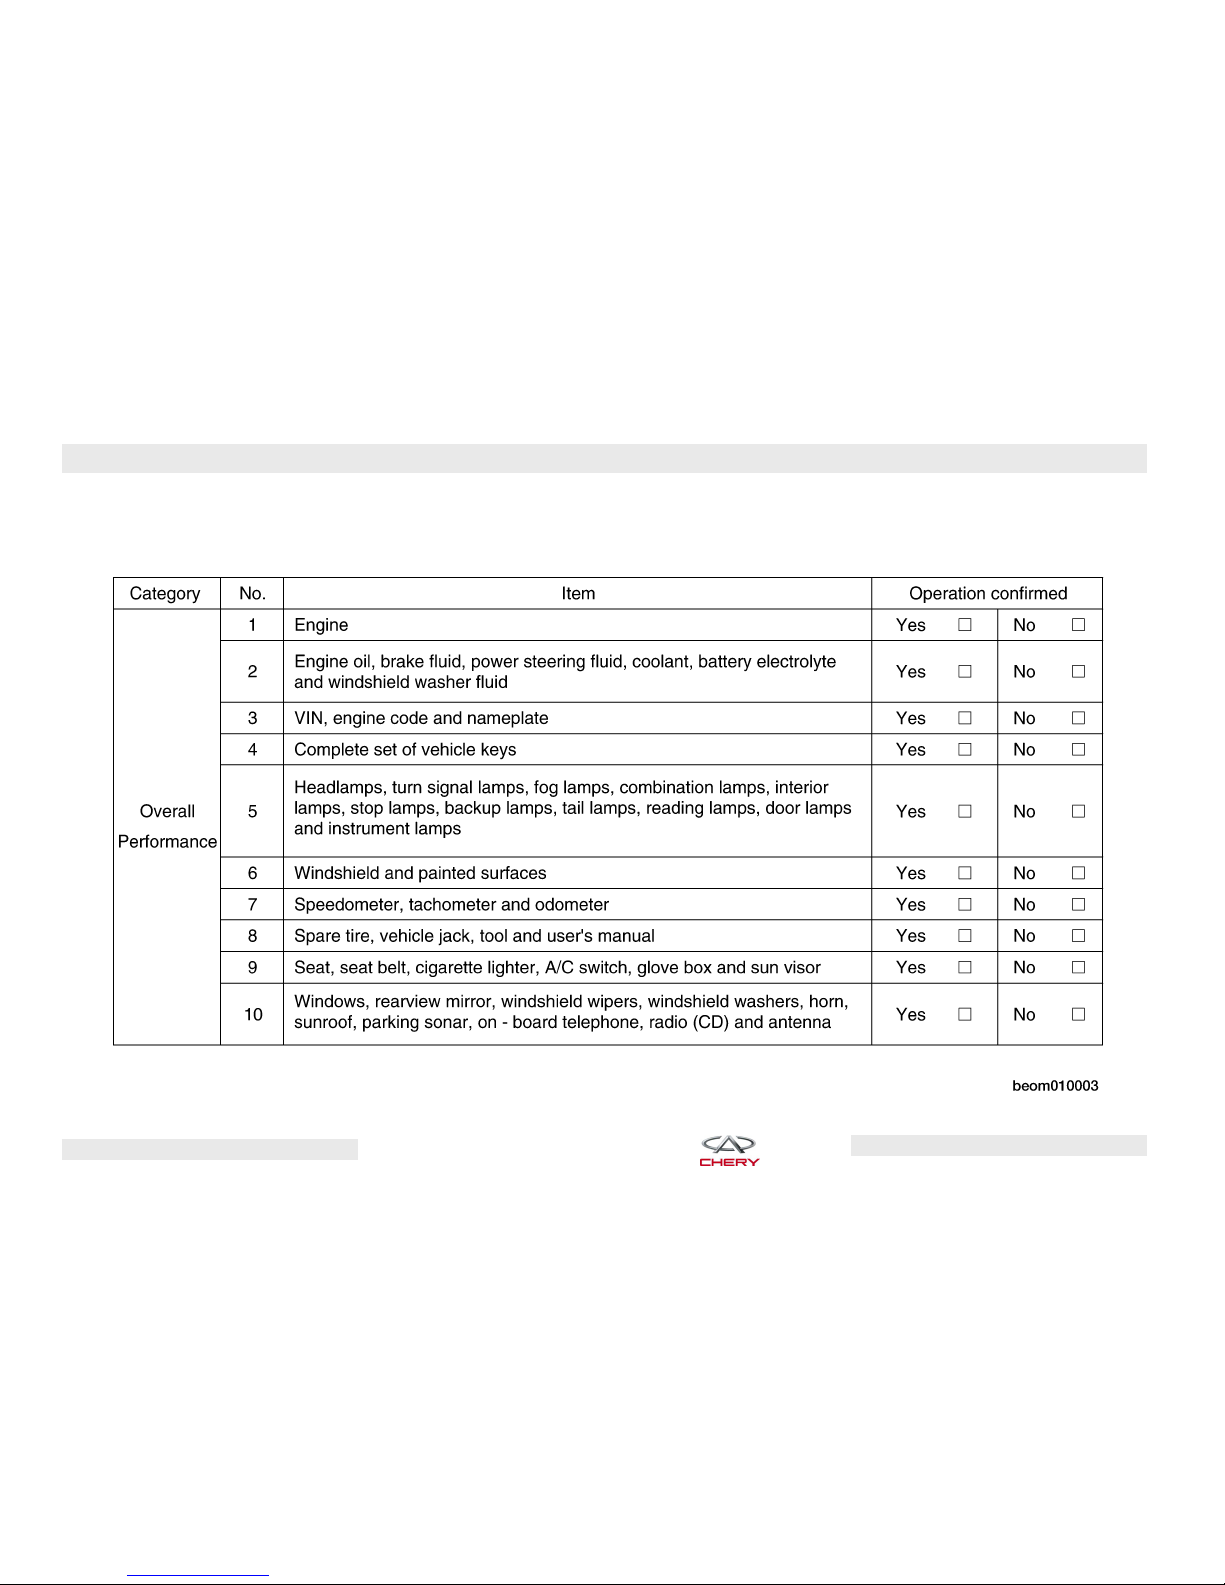
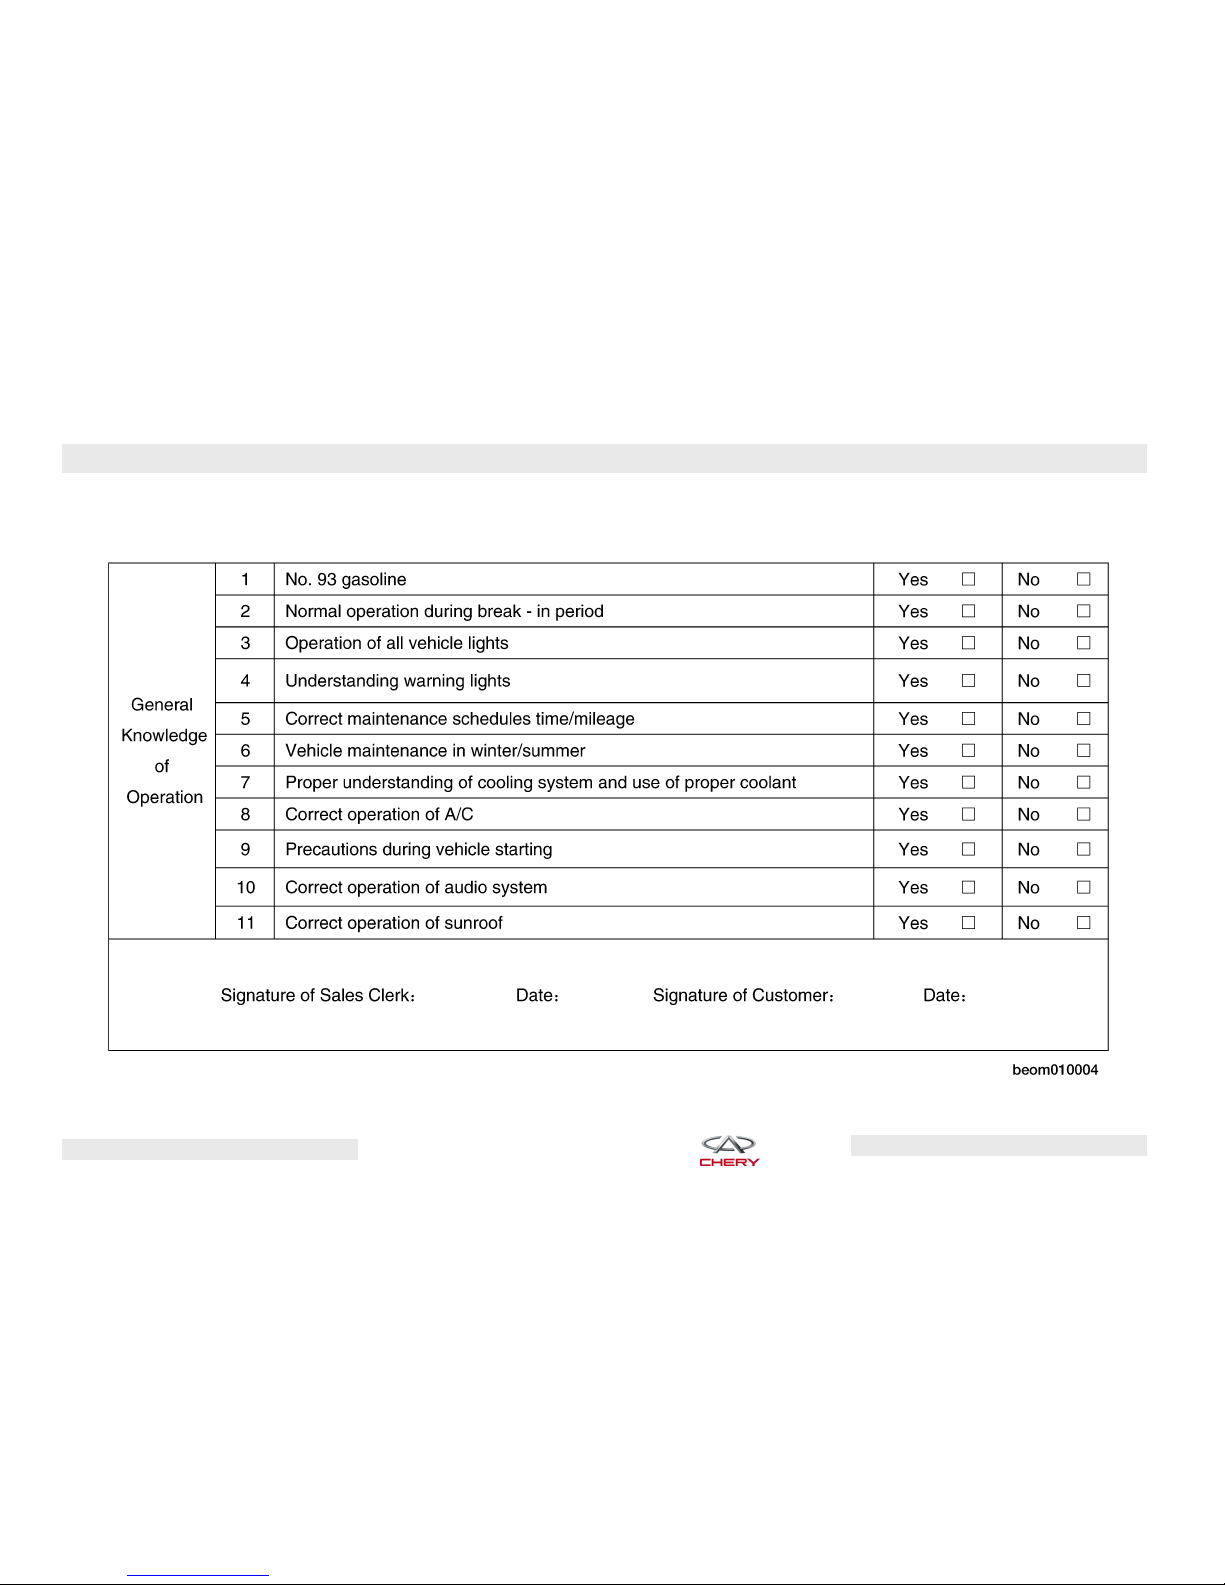
New Vehicle Inspection
Prior to your purchase, your authorized Chery dealer inspected your vehicle based upon the guidelines of the
Chery Automobile Co., Ltd. The dealer
will record the delivery date and affix
its common seal to the inspection certificate.
Before you sign the inspection certification, your authorized dealer will instruct you regarding your vehicle’s
performance capabilities according to
its Vehicle Delivery Card, as well as
provide you with general knowledge
of its features and regular operation.
Chery Automobile Co., Ltd.
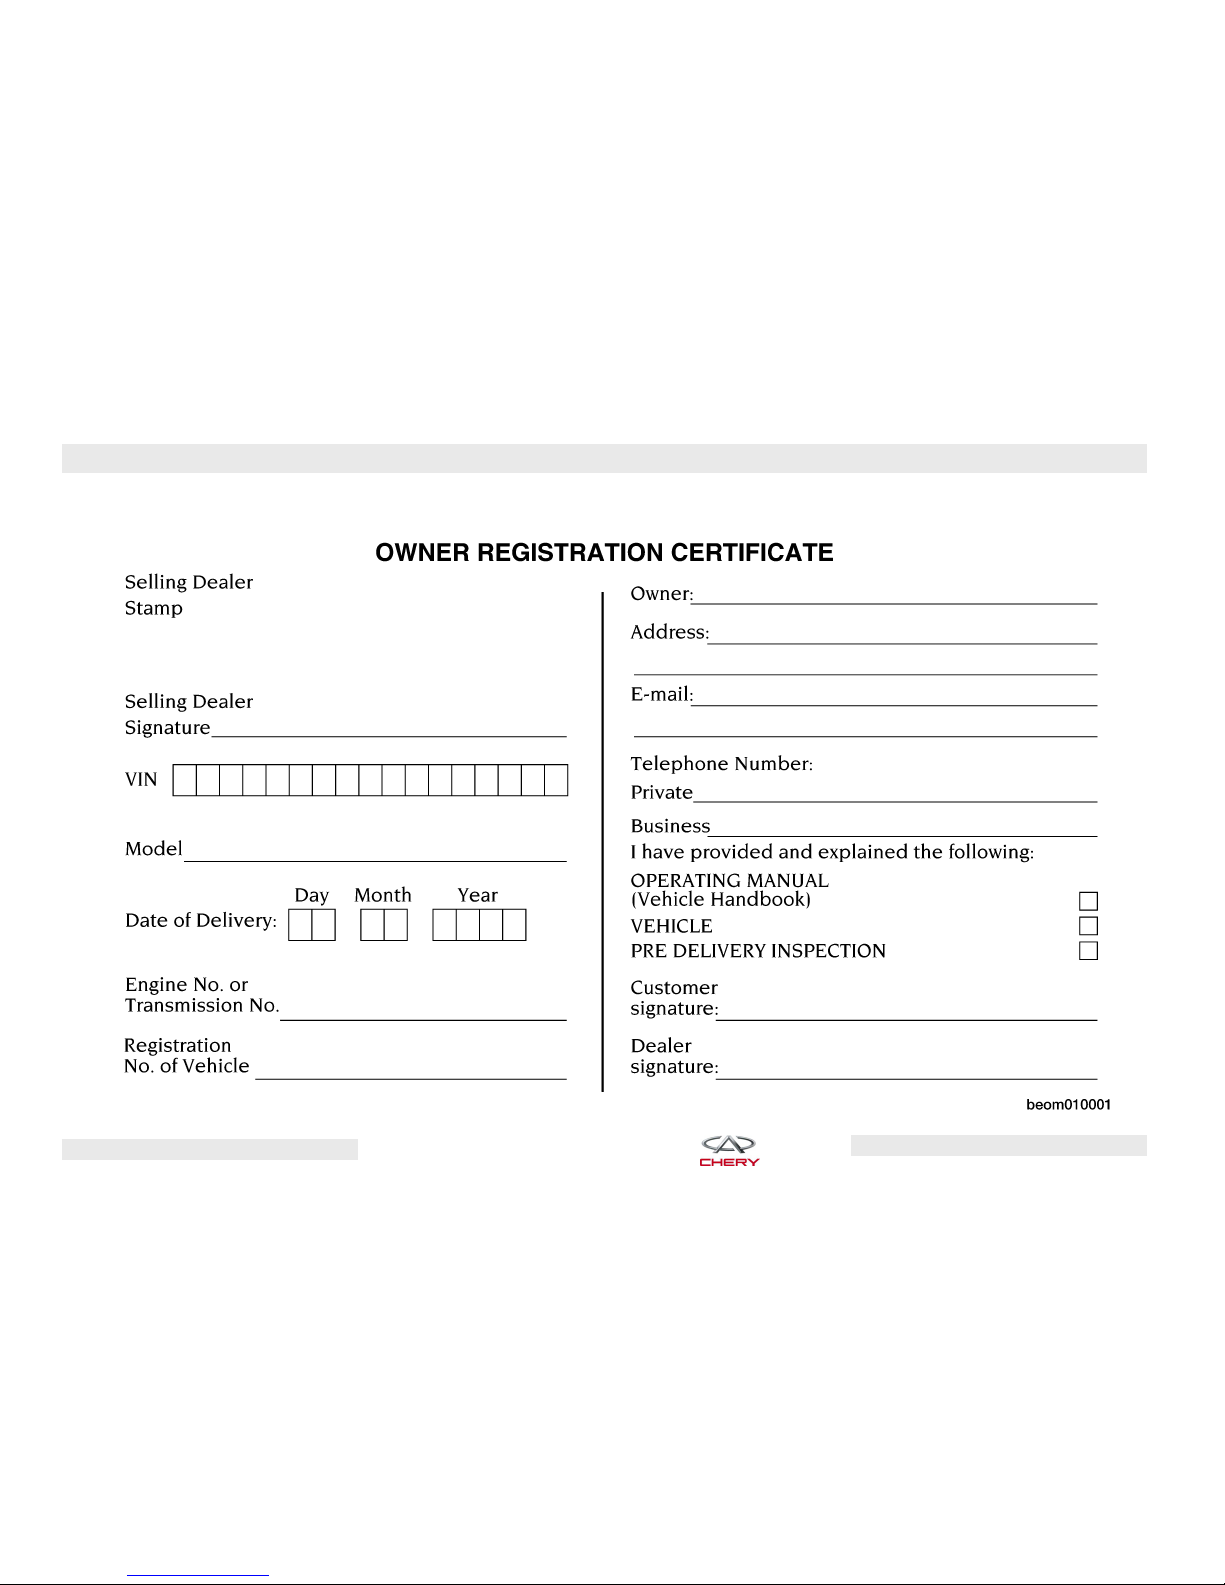
Inspection Certification for Vehicle Delivery
INTRODUCTION – 7
Chery Automobile Co., Ltd.
8 – INTRODUCTION
Vehicle Delivery Card
Chery Automobile Co., Ltd.
INTRODUCTION – 9
Chery Automobile Co., Ltd.

10 – INTRODUCTION
Personal Service
To provide you the best service, your
authorized Chery dealer will provide a
personal service advisor for you during your purchase. If you have any
questions regarding your vehicle,
please ask your service advisor.
Chery Automobile Co., Ltd.
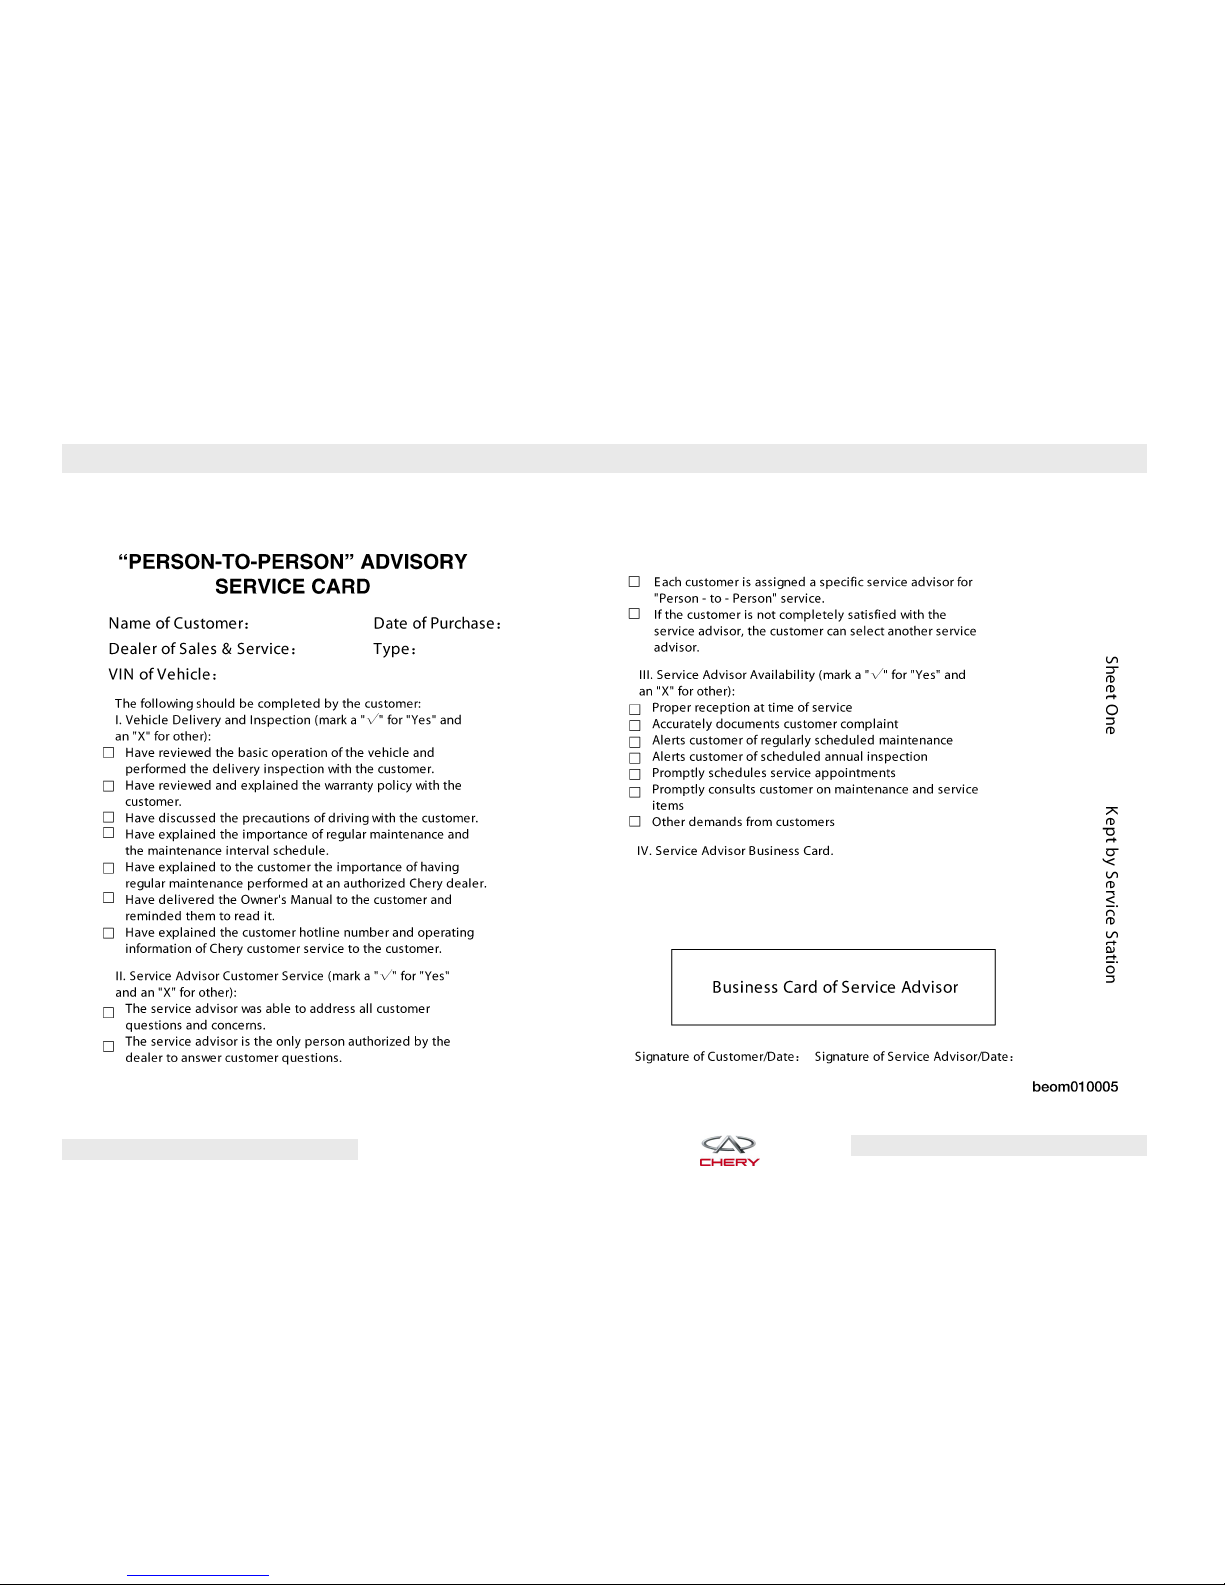
ⴖPERSON-TO-PERSONⴖ Service Advisor Card
INTRODUCTION – 11
Chery Automobile Co., Ltd.
12 – INTRODUCTION
Chery Automobile Co., Ltd.

INTRODUCTION – 13
Warnings and Cautions
The Owner’s Manual contains Warnings and Cautions regarding operating
procedures that could result in an accident or damage to your vehicle.
Please observe all Warnings and Cautions before operating your vehicle.
Vehicle Identification Number
Vehicle Identification Number (VIN)
Location:
The VIN is on the front corner of the
instrument panel on the driver side. It
is visible from outside of the vehicle
through the windshield.
VIN Location
Vehicle Modifications
Modifications to this vehicle could affect its performance and totally void
the manufacturer’s warranty.
WARNING!
Any modifications or alterations to this
vehicle could affect its safety and may
lead to an accident resulting in serious injury or death.
Chery Automobile Co., Ltd.

14
Chery Automobile Co., Ltd.

CONTENTS
15
BEFORE OPERATING YOUR VEHICLE
䉴 Ignition Key 17
컄 Ignition Key Removal
컄 Key-In-Ignition Reminder
컄 Locking Doors With The
Key
컄 Replacement Keys
컄 Remote Keyless Entry
컄 Transmitter Battery
Replacement
17
17
17
17
18
18
䉴 Anti-Theft Security
Protection 19
컄 Vehicle Alarm
컄 Electronic Key Identification
19
19
䉴 Steering Wheel 20
컄 Adjusting Steering Wheel
컄 Horn
20
20
䉴 Door Locks 20
컄 Manual Door Locks
컄 Power Door Locks
컄 “Child-Protection” Door Lock
System (Rear Doors)
20
21
21
䉴 Power Windows 22
컄 Power Window Switches
컄 Auto-Down Feature
컄 Rear Window Safety Switch
Chery Automobile Co., Ltd.
22
22
22
䉴 Occupant Restraints 23
컄 Lap/Shoulder Belts
컄 Lap/Shoulder Belt Warning
Light
컄 Lap/Shoulder Belt Operating
Instructions
컄 Central Two-Point Seat Belt
For Rear Seat
컄 Adjustable Upper Shoulder
Belt Anchorage
컄 Maintenance For Seat Belt
컄 Airbag
컄 Airbag Warning Light
컄 Child Restraint
23
23
23
24
24
25
25
26
26

16 – BEFORE OPERATING YOUR VEHICLE
䉴 Operating Safety Tips 28
컄 Transporting Passengers
컄 Locking Your Vehicle
컄 Exhaust Gas
컄 Interior Vehicle Safety
Inspection
28
28
29
29
컄 Exterior Vehicle Safety
Inspection
䉴 New Vehicle Break-In
Recommendations 30
컄 Engine Break-In
Recommendations
30
30
컄 Braking System Break-In
Recommendations
컄 Tire and Wheel Break-In
Recommendations
31
31
Chery Automobile Co., Ltd.
BEFORE OPERATING YOUR VEHICLE – 17
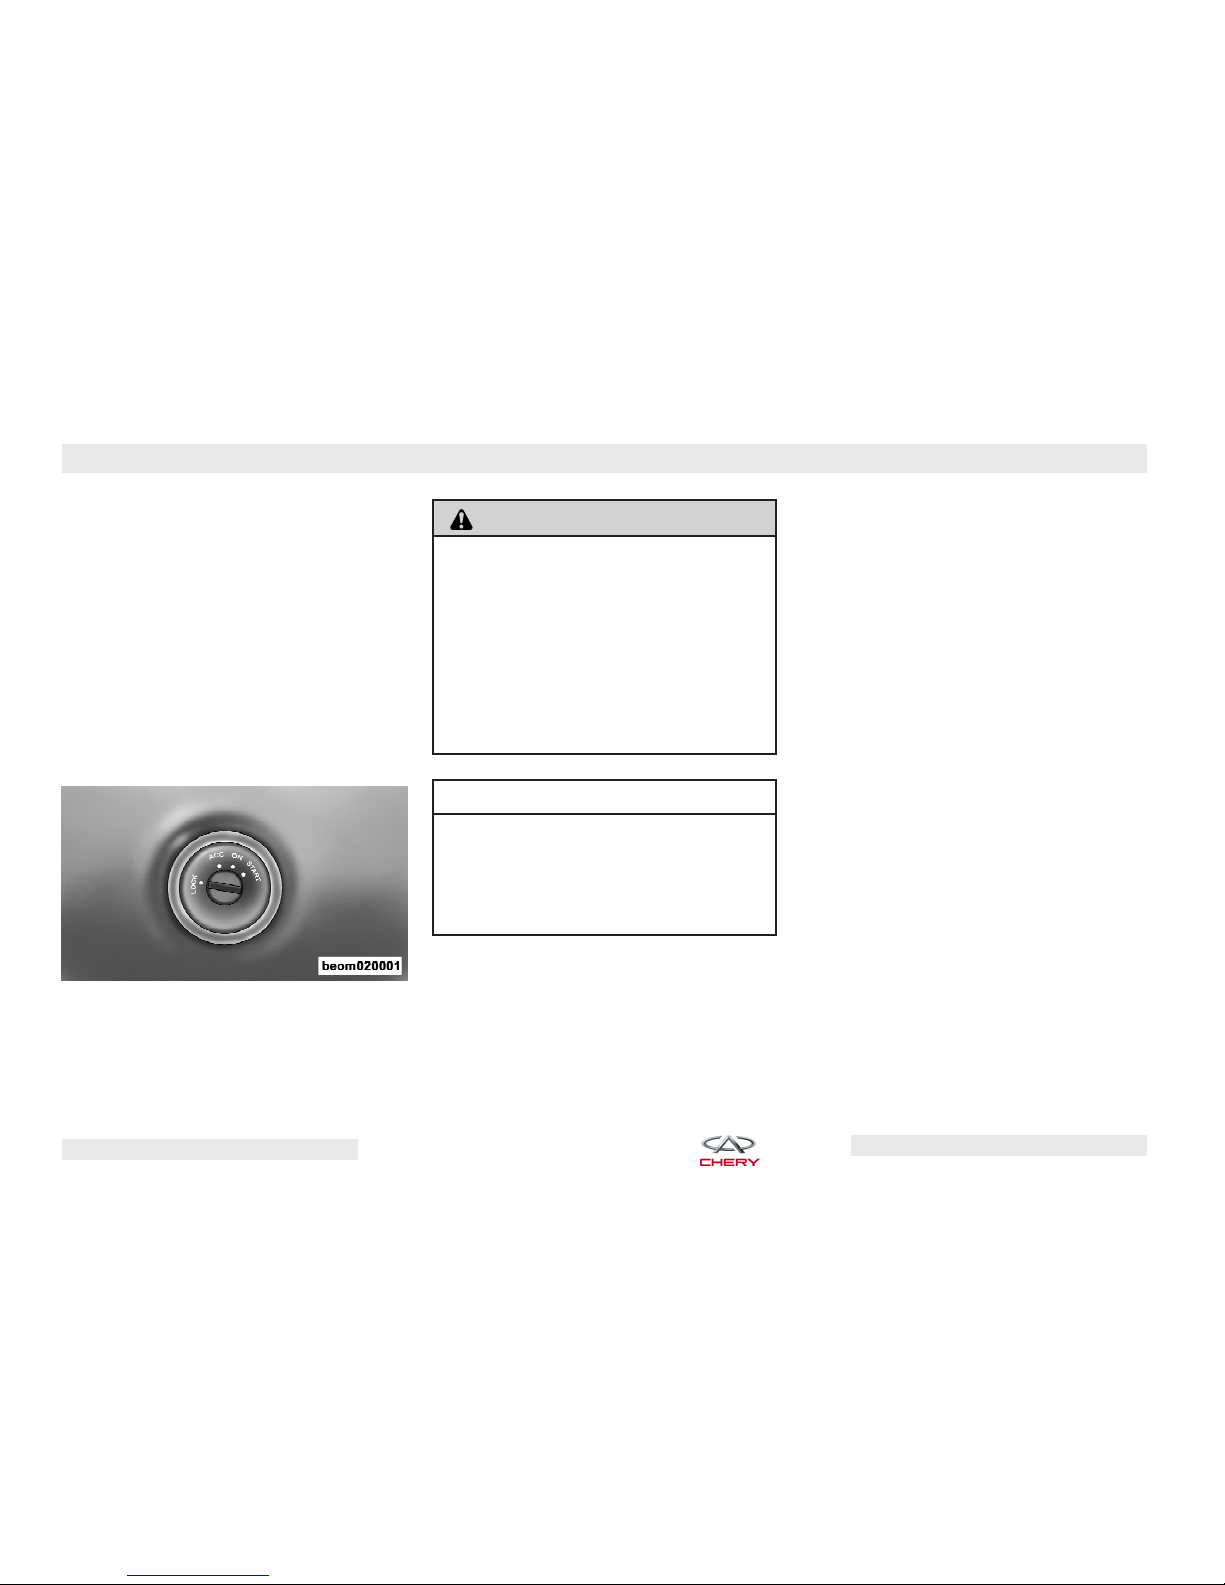
Ignition Key
Ignition Key Removal
Manual Transaxle
To remove the ignition key from the
ignition switch, place the shift lever in
NEUTRAL, apply the parking brake,
turn the ignition switch to the ACC position, push the key inward, rotate the
key to the LOCK position and remove
the key.
Ignition Key Positions
WARNING!
NEVER leave children unattended in
a vehicle. Leaving children unattended
in a vehicle is dangerous. A child or
others could be seriously or fatally injured. Children could operate the
power windows, other controls, or set
the vehicle in motion. NEVER leave the
keys in a vehicle.
CAUTION!
An unlocked car is an invitation to
thieves. Always remove the key from
the ignition and lock all doors when
leaving the vehicle unattended.
Key-In-Ignition Reminder
Opening the driver’s door when the
key is in the ignition will sound a signal to remind you to remove the key.
NOTE:
If any door is open or the key is
in the ignition, this will prevent the operation of the power door locks and Remote Keyless Entry.
Locking Doors With The Key
There are two external door locks,
which are located on the driver’s and
front passenger’s doors. You can insert
the key with either side up. To lock the
door, turn the key counter-clockwise;
to unlock the door, turn the key
clockwise.
Replacement Keys
Duplication of keys consists of programming a blank key to the vehicle
electronics. A blank key is one which
has never been programmed. See
your authorized Chery dealer if you require replacement or additional keys
for your vehicle.
Chery Automobile Co., Ltd.
18 – BEFORE OPERATING YOUR VEHICLE
CAUTION!
Always remove the key from the vehicle
and lock all doors when leaving the vehicle unattended.
Remote Keyless Entry
This system allows you to lock or unlock all doors and the trunk remotely.
Vehicle Key
To Lock the Doors
Press and release the LOCK button on
the transmitter to lock all doors.
To Open the Trunk
Press the trunk button on the transmitter to unlock and open the trunk.
NOTE:
Transmitter and receivers must
be certified to conform to specific regulations in each individual country. Operation is subject to the following two conditions:
•
The device cannot cause harmful interference.
•
The device must accept any interference received, including interference
that may cause undesired operation.
If your remote lock control fails to operate from a normal distance, check for
these two conditions:
•
Weak batteries in the transmitter (the
expected life of the transmitter battery
is a minimum of three years).
•
Radio transmitter interference, such
as a radio station tower, airport transmitter, and some mobile or CB radios.
Transmitter Battery Replacement
The recommended replacement battery is CR2032.
• With the transmitter buttons facing
down, use a flat object to pry the two
halves of the transmitter apart. Make
sure not to damage the seal.
Separating Transmitter Halves
• Remove and replace the batteries.
Avoid touching the new batteries with
your fingers. Skin oils may cause battery deterioration. If you touch a battery, clean it with rubbing alcohol.
• To reassemble the transmitter case,
snap the two halves together.
Chery Automobile Co., Ltd.
BEFORE OPERATING YOUR VEHICLE – 19
Anti-Theft Security Protection
Vehicle Alarm
When the vehicle is armed, and an unauthorized person attempts to unlock
any door or trunk lid, the vehicle alarm
will trigger. When triggered, the vehicle alarm will cause all directional
signals to flash and the horn to sound
continuously for 28 seconds.
Security Lamp
The security lamp is located on the
left front door panel, near the door
lock plunger. The security lamp will
flash continuously when the vehicle is
armed.
WARNING!
Only when all the doors and trunk lid
are fully closed, can the vehicle be
armed. When the vehicle is in the antitheft mode, the following will occur:
•
All four doors and trunk lid are
locked
•
The anti-theft indicator lamp on the
left front door panel will continuously flash
Electronic Key Identification
Electronic Key Identification utilizes
engine ⬙no-start⬙ technology to greatly
enhance the entire vehicle safety and
vehicle theft prevention system.
The chip, built into each key, integrates the key, electronic anti-theft
equipment and engine computer into
an active theft prevention system. If a
key is duplicated without the authorization of the owner, and the key has
no chip containing the electronic information required for the anti-theft
equipment and engine computer, the
engine will not start using the duplicated key, thus decreasing the probability of vehicle theft.
In the event that you have lost your
vehicle key, you should go to an authorized Chery dealer to obtain a replacement key. The dealer can make a
new key for your vehicle and deactivate your lost key.
Chery Automobile Co., Ltd.
20 – BEFORE OPERATING YOUR VEHICLE
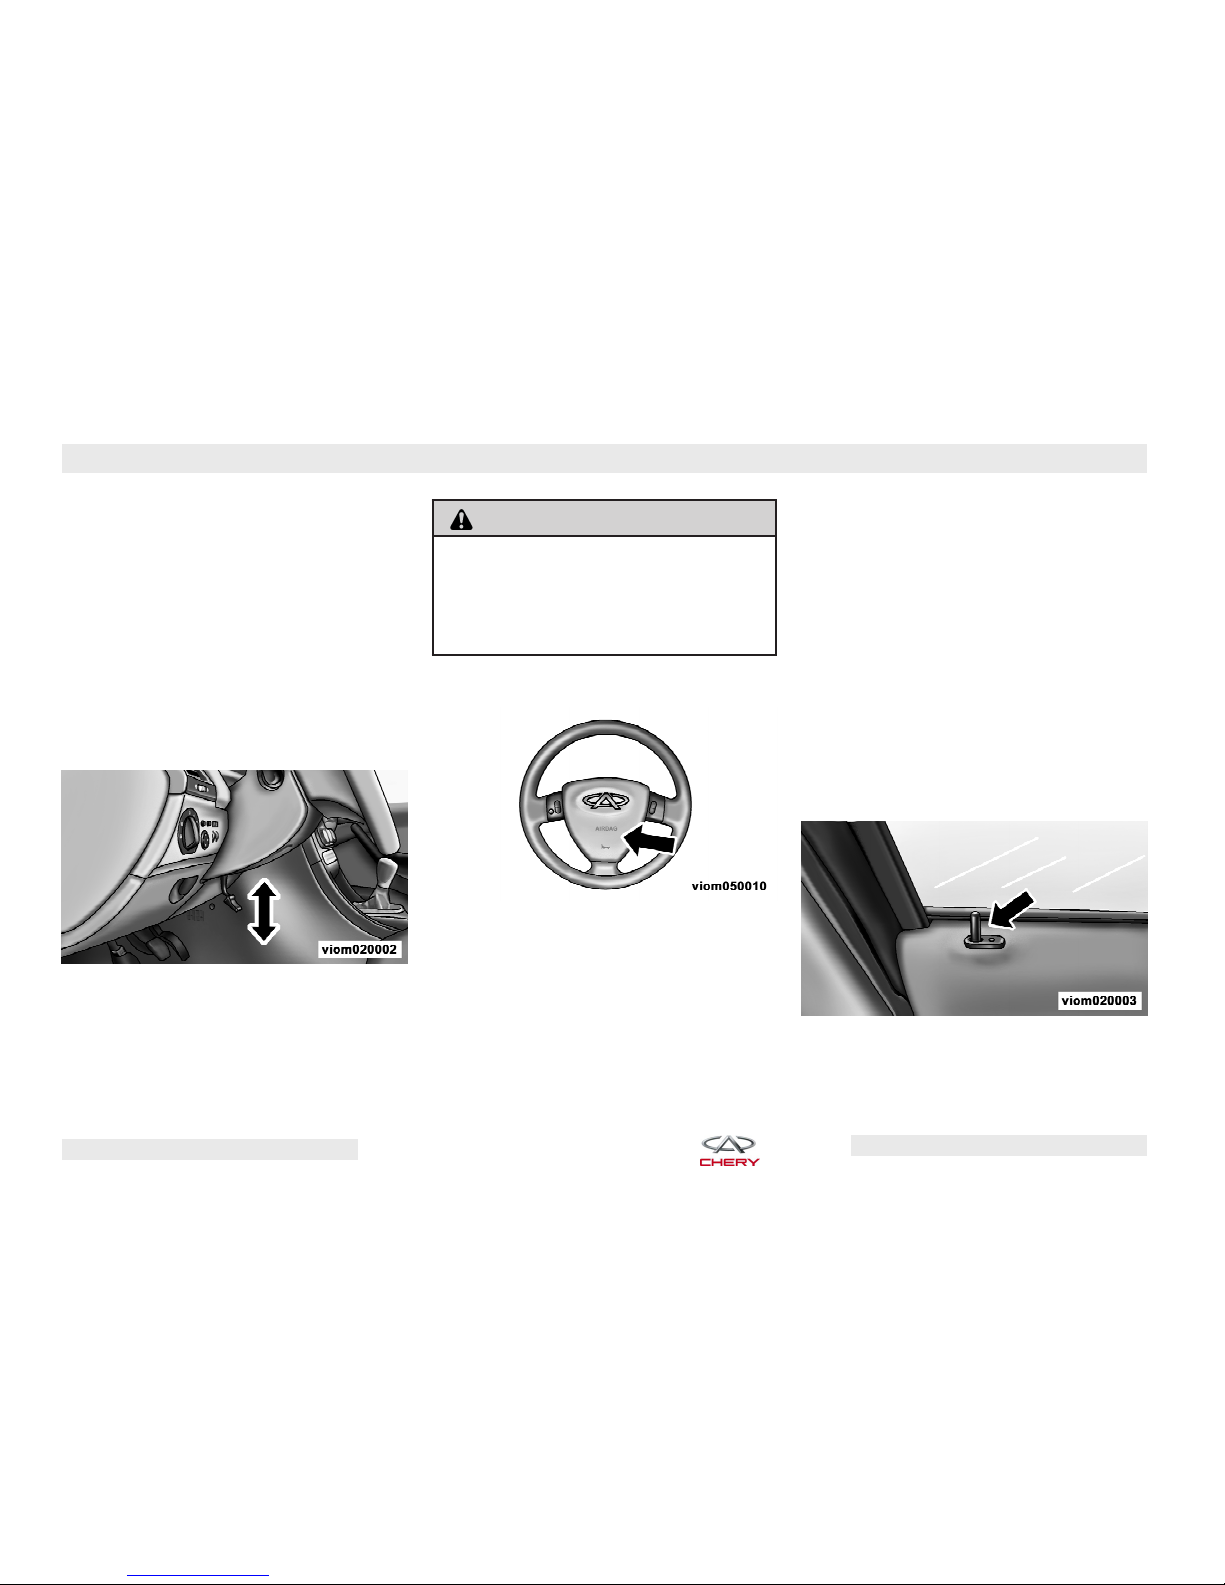
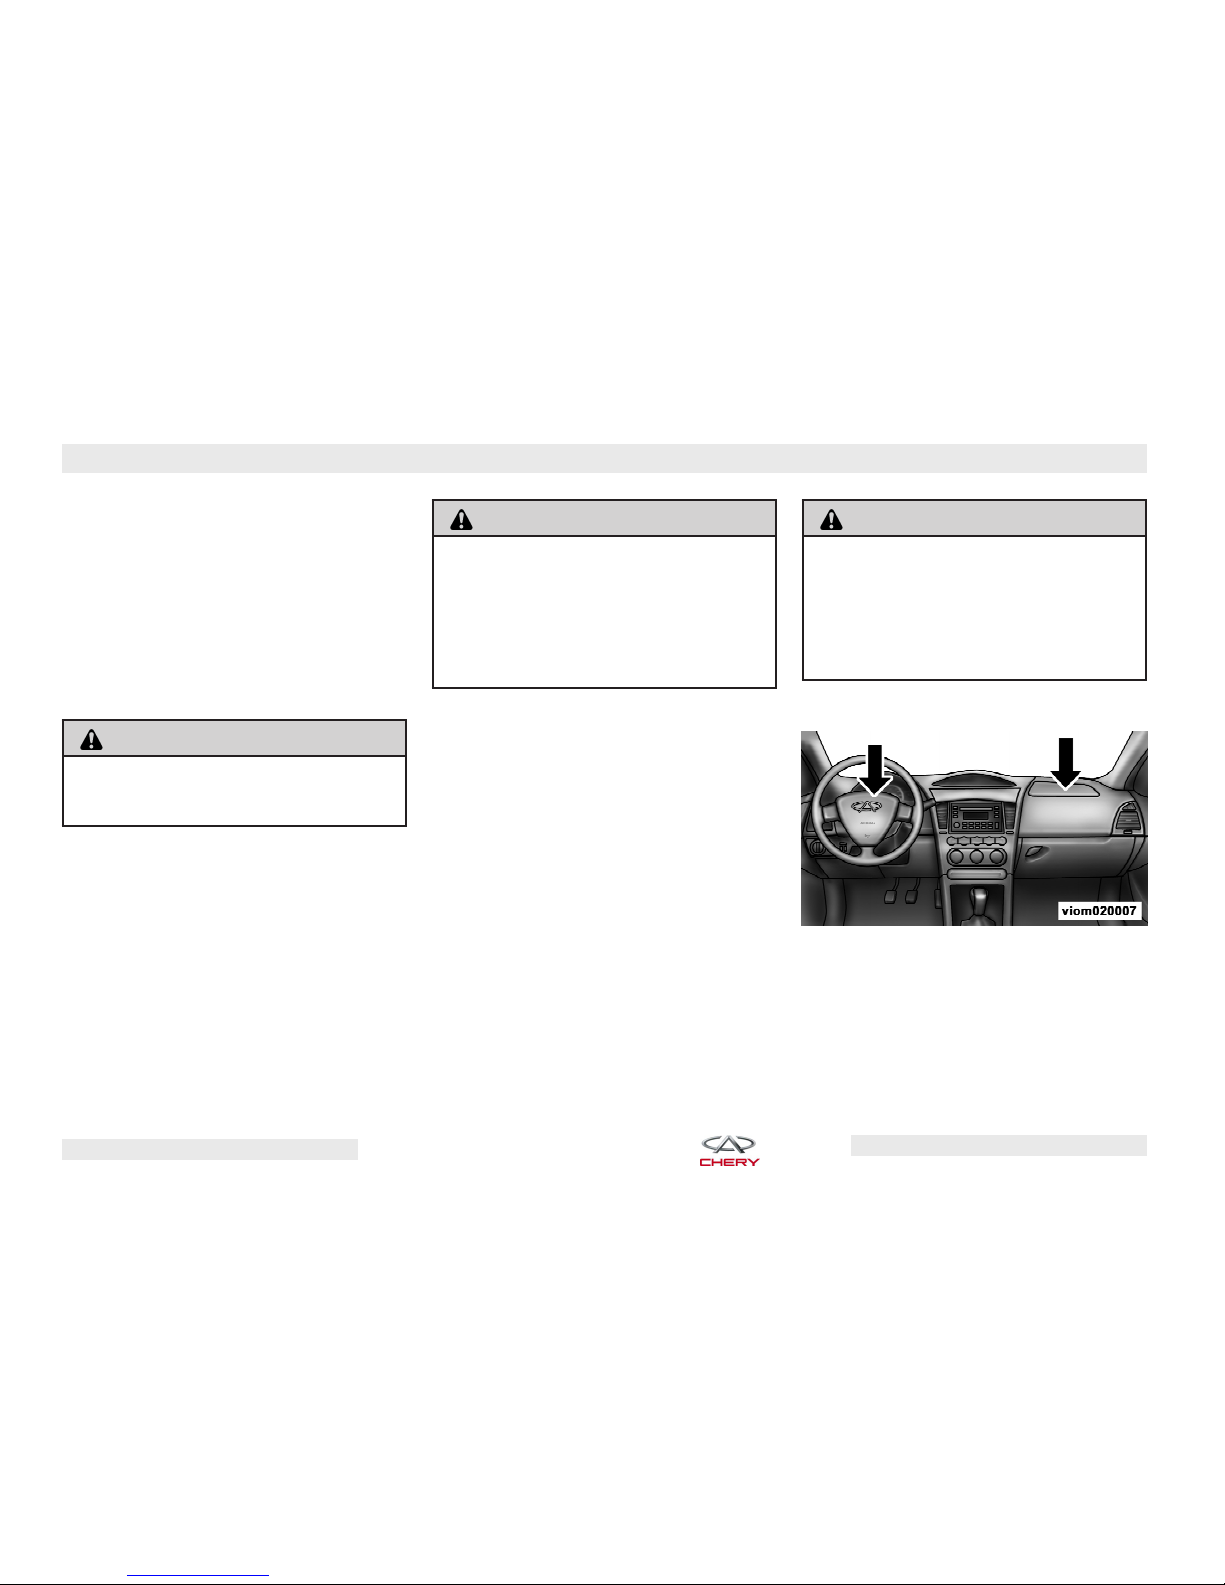
Steering Wheel
Adjusting Steering Wheel
The steering wheel can be adjusted to
make drivers more comfortable. Pull
down the locking lever to move the
steering wheel upward and downward.
After the proper adjustment, pull the
locking lever back to its original position to secure the steering wheel in
place.
Adjustable Steering Wheel
WARNING!
Do not adjust the steering wheel while
driving. Adjusting the steering wheel
while driving could cause the driver to
lose control of the vehicle.
Horn
Horn Position
Press the center push pad on the
steering wheel to operate the horn.
The horn will still work with the ignition switch in the OFF position.
Door Locks
Manual Door Locks
The front doors can be locked/
unlocked by turning the key in the
door lock cylinder. Use the manual
door lock switch on the door panel to
unlock the doors from inside of the vehicle. If the rear door switch is in the
locked position when the door is
closed, the door will lock. It is recommended to use the Remote Keyless
Entry to lock the doors.
Manual Lock Switch
Chery Automobile Co., Ltd.
WARNING!
For personal security and safety in the
event of an accident, lock the vehicle
doors when you drive as well as when
you park and leave the vehicle. When
leaving the vehicle, always remove the
key from the ignition lock, and lock
your vehicle. Do not leave children unattended in the vehicle, or with access
to an unlocked vehicle. Unsupervised
use of vehicle equipment may cause
severe personal injuries or death.
Power Door Locks
A door lock switch is located on the
driver’s door panel. Press this switch
to lock or unlock the doors.
BEFORE OPERATING YOUR VEHICLE – 21
Power Door Lock Switch Child Lock Control
To prevent you from locking your key
in the vehicle, the power door lock
switch will not operate while the key is
in the ignition and any door is open.
An audible chime will sound as a reminder to remove the key from the ignition switch.
“Child-Protection” Door Lock
System (Rear Doors)
The Rear Door Child-Protection Locks
are located inside the rear door. Turn
the child lock control upward or downward to the lock or unlock position (as
shown by the icons).
WARNING!
•
To avoid trapping passengers in the
vehicle during a collision, remember that the rear doors can only be
opened from the outside when the
child protection locks are engaged.
(Continued)
Chery Automobile Co., Ltd.
22 – BEFORE OPERATING YOUR VEHICLE
WARNING! (Continued)
•
In hot weather, the temperature inside the vehicle can rise very quickly
after the engine is turned off. Do not
leave animals or children inside
parked vehicles in hot weather; interior heat buildup may cause serious injury or death. If even left
there for a short time, it is likely that
serious injury or death could occur.
NOTE:
For emergency exit with the
child protection locks engaged, pull the
lock plunger up to the unlocked position,
roll down the window, and open the door
with the outside door handle.
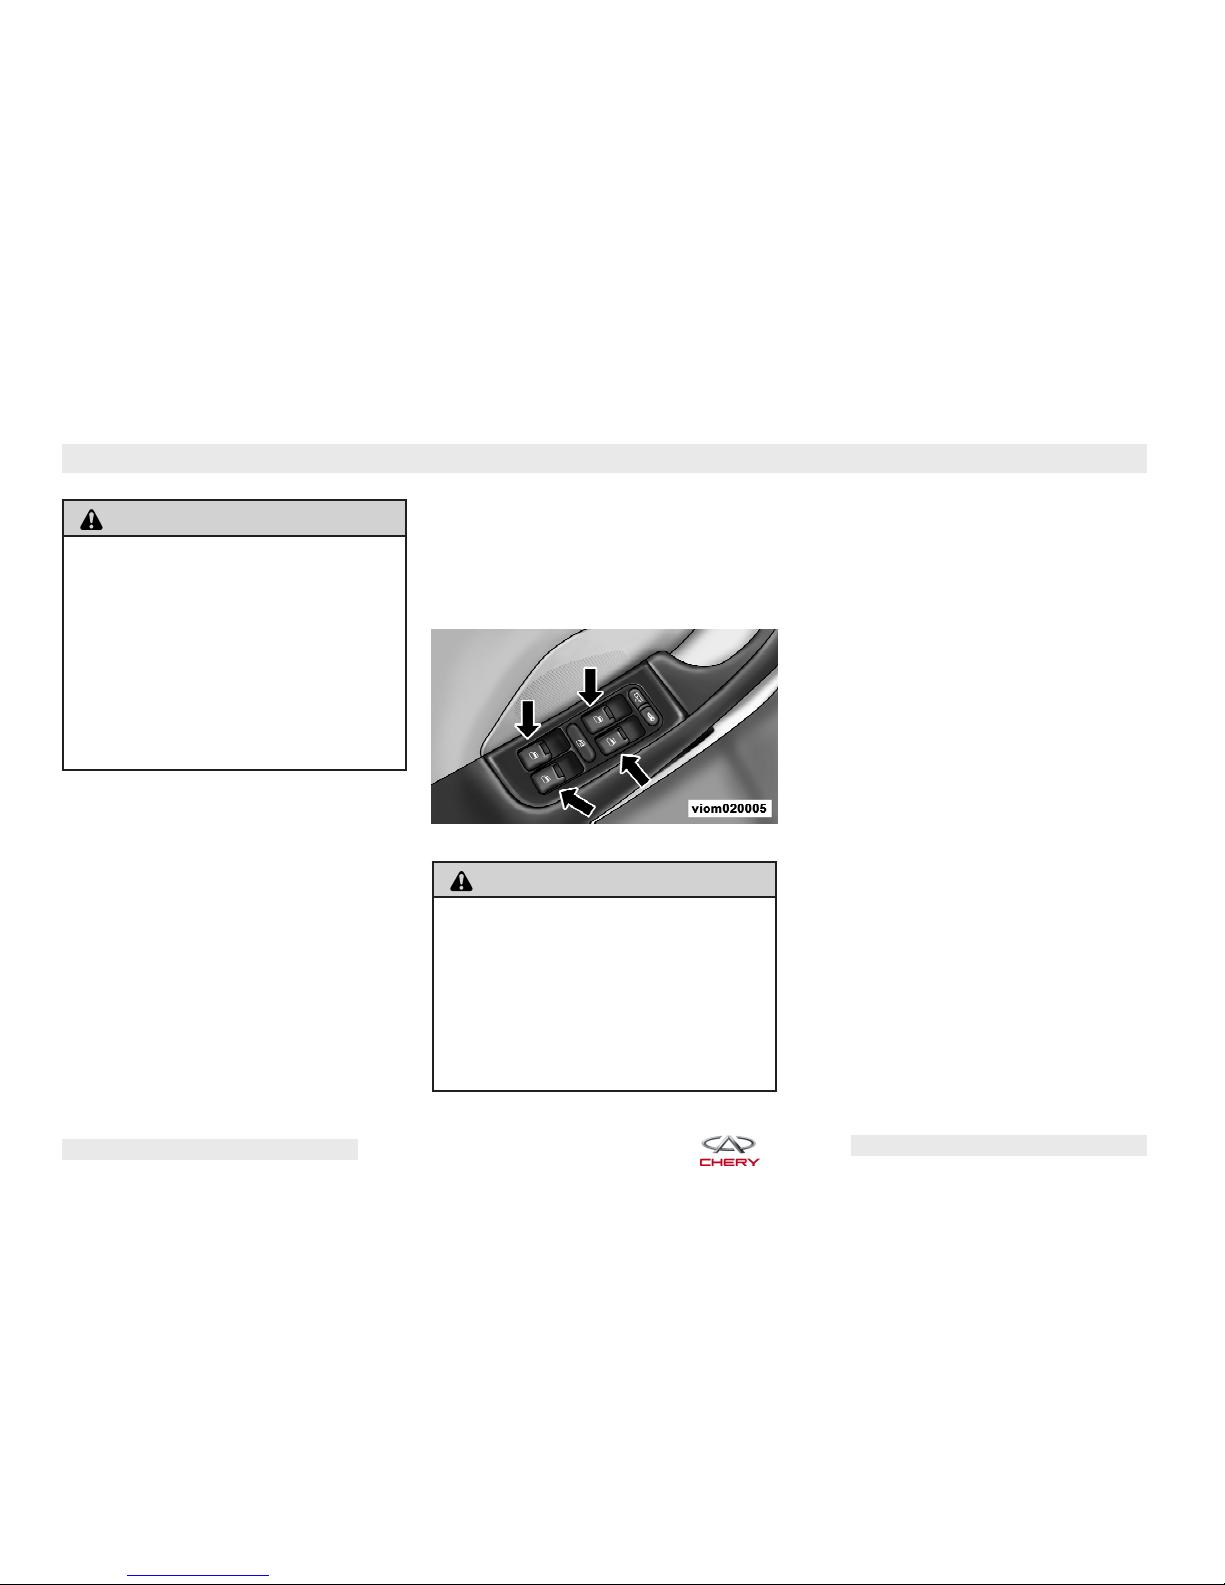
Power Windows
Power Window Switches
The driver’s door trim panel has
switches that operate all four power
windows. There are single window
controls on each passenger door trim
panel that operate each respective
passenger door window. The windows
will operate only when the ignition
switch is turned to the ON position
and will remain active for 60 seconds
after the ignition key is removed.
Power Window Switches
WARNING!
Never leave children in a vehicle with
the key in the ignition switch. Occupants, particularly unattended children
can become trapped by the windows
while operating the power window
switches which may result in serious
injury or death.
Auto-Down Feature
All four power window switches have
the Auto-Down feature. Press and hold
the window switch for one second, release, and the window will go down
automatically.
NOTE:
If any power windows are open, the
•
power windows can be closed by using the key fob transmitter, you must
press and hold the LOCK button until
all windows are closed completely.
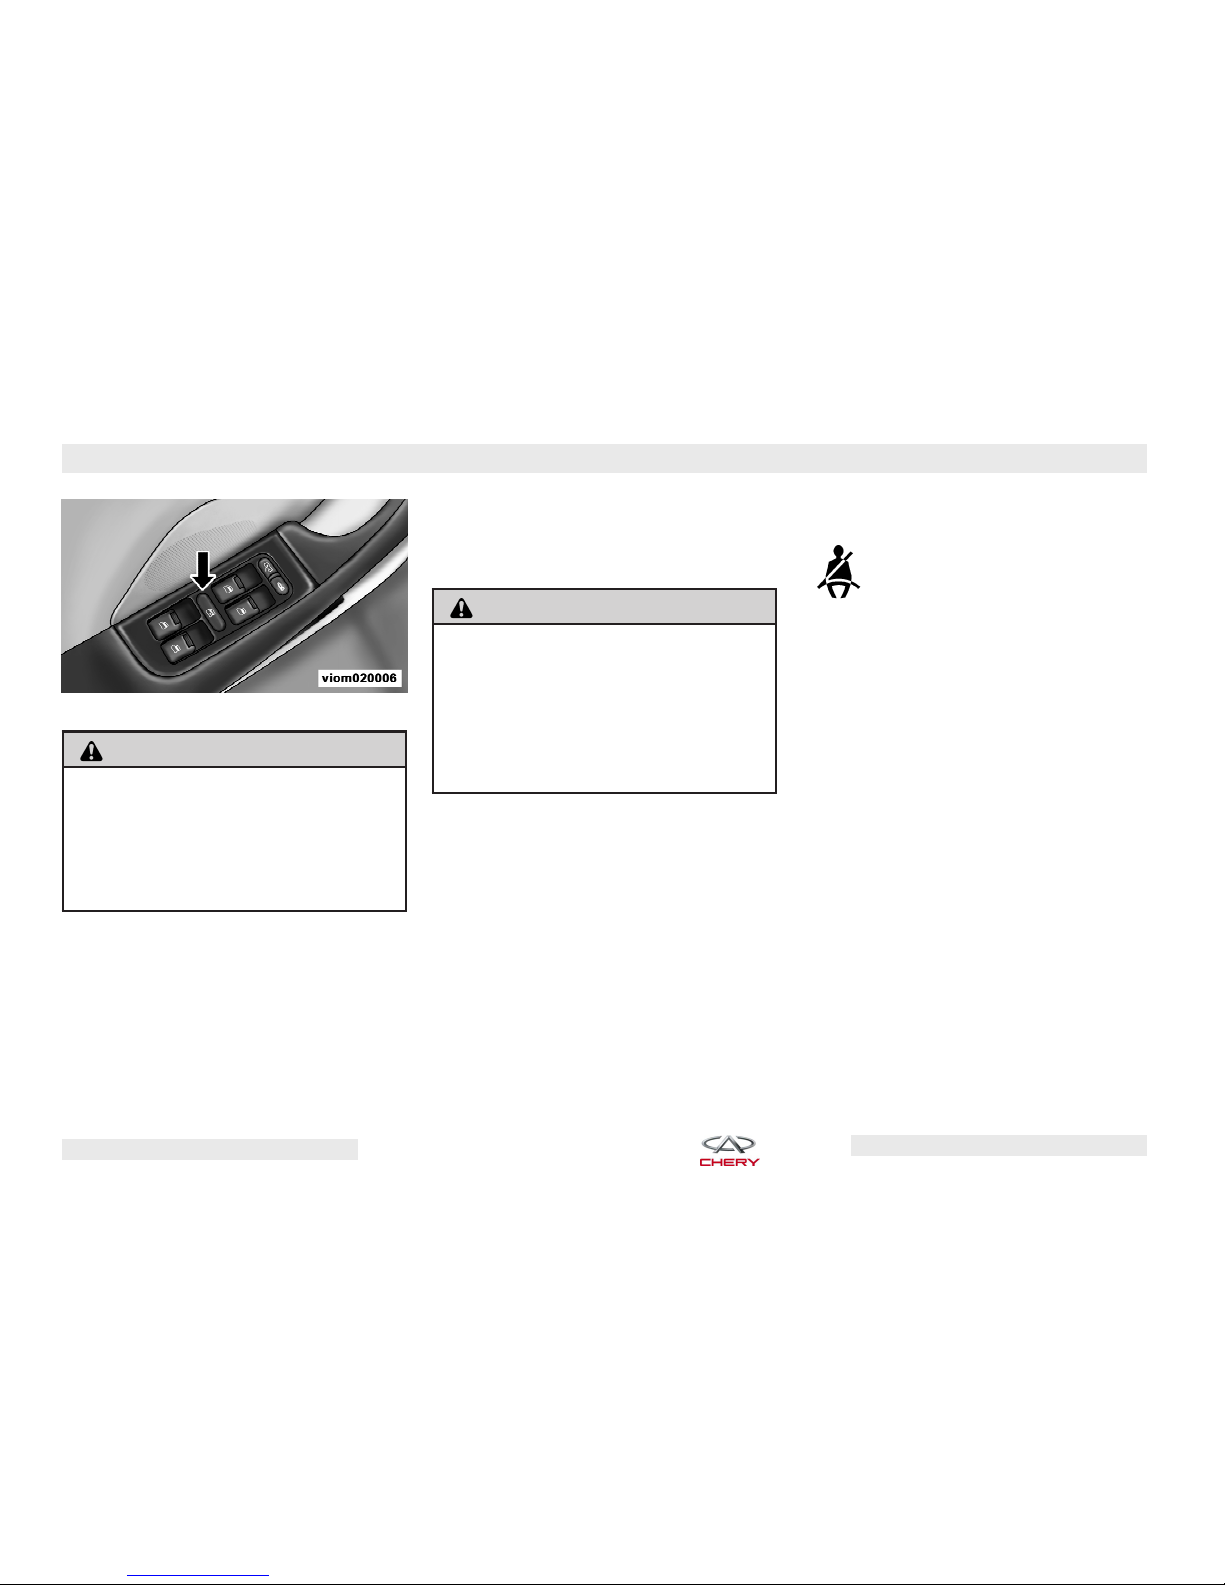
Rear Window Safety Switch
There is a safety switch on the driver
door trim panel. Press the rear window
safety switch to lock both rear passenger power windows. Cancel this feature by pressing the rear window
safety switch again. This feature is recommended if there are children in
your vehicle.
Chery Automobile Co., Ltd.
BEFORE OPERATING YOUR VEHICLE – 23
Rear Window Safety Switch
WARNING!
There is no anti-pinch protection when
the window is closing. To avoid personal injury, be sure to clear all arms,
hands, fingers and all objects away
from the window path before closing.
Occupant Restraints
Lap/Shoulder Belts
Be sure everyone in your vehicle is in
a seat and properly using a seat belt.
Never use a lap/shoulder belt or lap
belt for more than one person. Make
sure that the seat belt is properly fastened without looseness, twists, or obstruction.
WARNING!
A lap belt worn too high can increase
the risk of internal injury in a collision.
The belt forces won’t be at the strong
hip and pelvic bones, but across your
abdomen. Always wear the lap belt as
low and snug as possible.
In a collision, an unrestrained child,
even a tiny baby, can be propelled inside the vehicle if not properly restrained. The force required to hold
even an infant on your lap could become so great that you could not hold
the child, no matter how strong you
are. The child and others can be badly
injured. Any child riding in the vehicle
should be in an appropriate restraint
for the child’s size.
Lap/Shoulder Belt Warning Light
With the ignition switch ON,
this light is illuminated. It
will not turn off until the
driver properly attaches the
seat belt.
Lap/Shoulder Belt Operating
Instructions
The seat belt latch plate is above the
back of the front seat, next to your
shoulder. Grasp the latch plate and
pull out the belt. While pulling out the
belt, slide the latch plate up the webbing as far as necessary to allow the
belt to go around your lap. When the
belt is long enough to fit, insert the
latch plate into the buckle until you
hear a ⬙click⬙.
Chery Automobile Co., Ltd.
24 – BEFORE OPERATING YOUR VEHICLE
WARNING!
A belt that is fastened into the wrong
buckle will not protect you properly.
Always buckle your belt into the nearest buckle.
To release the belt, push the red button on the buckle. The belt will automatically retract to its stowed position. If necessary, slide the latch plate
down the webbing to allow the belt to
retract fully.
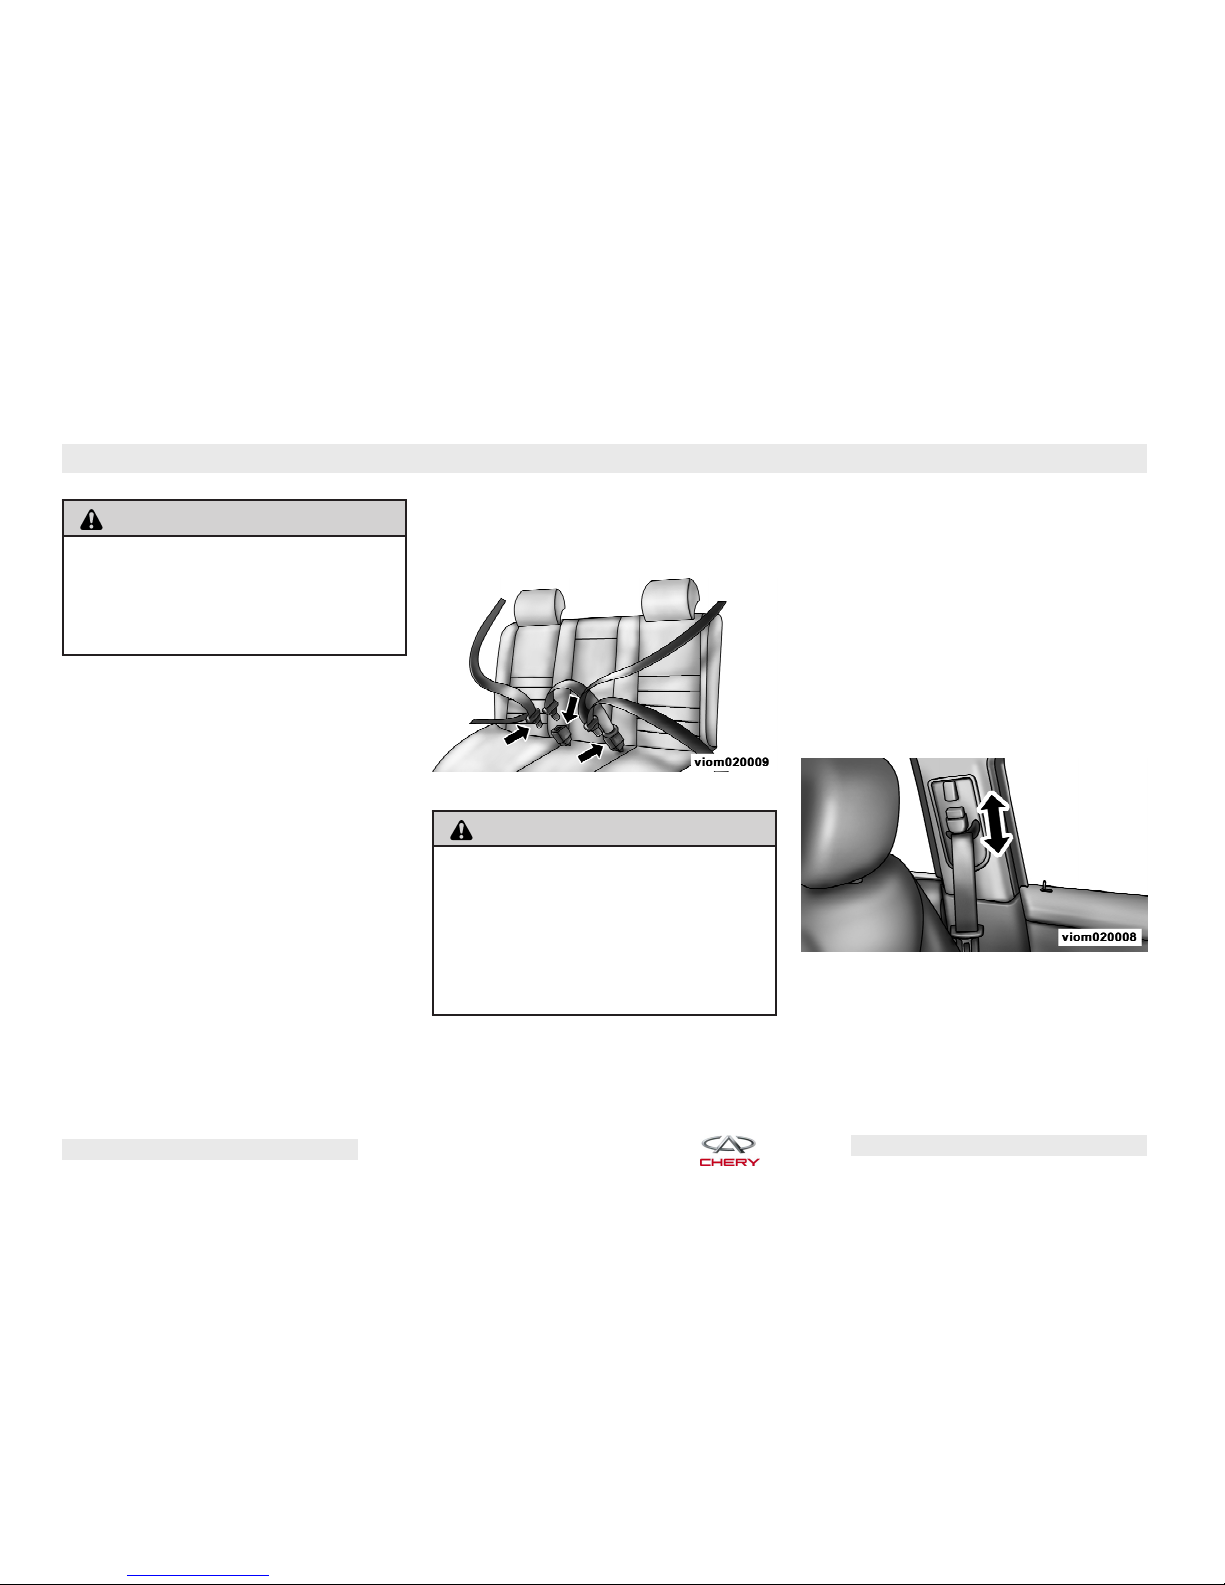
Central Two-Point Seat Belt For
Rear Seat
This seat belt length cannot be adjusted to length automatically. The
seat belt is adjusted by an adjustable
buckle that slides along its length to
provide the proper fit for the passenger. When the belt has been adjusted
to fit the passenger, insert the latch
plate into the buckle until you hear a
⬙click⬙, and then adjust the length of
seat belt manually across your abdomen.
Rear Central Two-Point Seat Belt
WARNING!
A twisted belt cannot perform properly.
In a collision, it could even cut into its
passenger . Be sure the belt is straight.
If you cannot straighten a belt in your
vehicle, take it to an authorized Chery
dealer and have it repaired.
Adjustable Upper Shoulder Belt
Anchorage
In the driver’s seat and front passenger’s seat, the shoulder belt can be
adjusted upward or downward to position the belt away from the driver’s or
passenger’s neck. Push and fully depress the button to release the anchorage, and move it up or down to
the position that fits you best.
Adjustable Upper Shoulder Belt
Anchorage
Chery Automobile Co., Ltd.
BEFORE OPERATING YOUR VEHICLE – 25
Maintenance For Seat Belt
Inspection Of Seat Belt
The seat belt should be inspected
regularly for damage or frays. Damaged parts must be replaced immediately. Seat belt assemblies must be
replaced after a collision if they have
been damaged.
WARNING!
Do not disassemble or modify the seat
belt.
Washing Seat Belt
The seat belt should be washed with
vehicle detergent or warm water and
allowed to dry naturally.
WARNING!
Never use chemical detergents, boiled
water, bleach or dye to wash the seat
belt.
Never allow water to enter the belt retractor.
Airbag
The airbags work with the seat belts to
properly restrain the driver and frontseat passenger in the event of a collision.
NOTE:
see some smoke-like particles. The particles are a normal by-product of the process that generates the nontoxic gas
used for airbag inflation.
The front occupants must be sitting as
upright as possible in order to be effectively protected.
As the airbags deflate you may
WARNING!
Always properly position your seat belt
to maintain the proper distance from
the steering wheel. Only then can the
airbag provide optimal protection during a collision.
Front Airbags
Front Airbags
The seat and backrest must be positioned correctly for the airbag to provide optimal protection during a collision. The vertical sitting posture is
best when the lower back is in contact
Chery Automobile Co., Ltd.
26 – BEFORE OPERATING YOUR VEHICLE
with the seat backrest as much as possible and the inclination of the seat
backrest is not over 30 degrees. Never
position the front seat too close to the
instrument panel. While driving, the
steering wheel should be held with
the arms slightly flexed. This is an
ideal driving posture, which helps to
decrease the risk of the driver being
injured in a collision in which the airbag does not deploy.
The front airbag will deploy in a moderate to severe frontal collision or
within the scope of left or right 30 degree collisions. When it touches the
occupant, it instantly deflates to cushion the forward movement of the occupant. An airbag is designed to deploy
in moderate to severe frontal or nearfrontal crash. The airbag will deploy
only if the impact speed is above the
system’s designated threshold level.
WARNING!
Do not put anything on or around the
front airbag covers or attempt to
manually open them. Take your vehicle
to an authorized Chery dealer for steering wheel, steering column and airbag
system service or you could be injured
because of accidental airbag deployment.
Airbag Warning Light
When the ignition switch is in the ON
position, the warning light in the instrument panel will be turned on and
remain on for 3-4 seconds. If the light
does not come on, remains illuminated after you start the vehicle, or if it
comes on as you drive, take your vehicle to an authorized Chery dealer for
inspection. It is suggested by the airbag manufacturer that the airbag
should be replaced after 10 years of
service because the efficiencies of the
inflating agent and airbag deteriorate.
If you are not clear about the service
life of your vehicle/airbag, your authorized Chery dealer can answer any
questions or address any concerns
you may have. Take your vehicle only
to an authorized Chery dealer for
service.
Child Restraint
Please follow the manufacturer’s directions exactly when installing an infant
or child restraint.
Chery Automobile Co., Ltd.

BEFORE OPERATING YOUR VEHICLE – 27
WARNING!
In a collision, an unrestrained child,
even a tiny baby, can be propelled inside the vehicle if not properly restrained. The force required to hold
even an infant on your lap could become so great that you could not hold
the child, no matter how strong you
are. The child and others can be badly
injured. Any child riding in the vehicle
should be in an appropriate restraint
for the child’s size.
NEVER use a backward-facing child
restraint seat on a passenger seat protected by an airbag. A backwardfacing child restraint should only be
used in a rear seat. A backward-facing
child restraint in the front seat may be
struck by a deploying passenger airbag which may cause severe or fatal
injury to the infant.
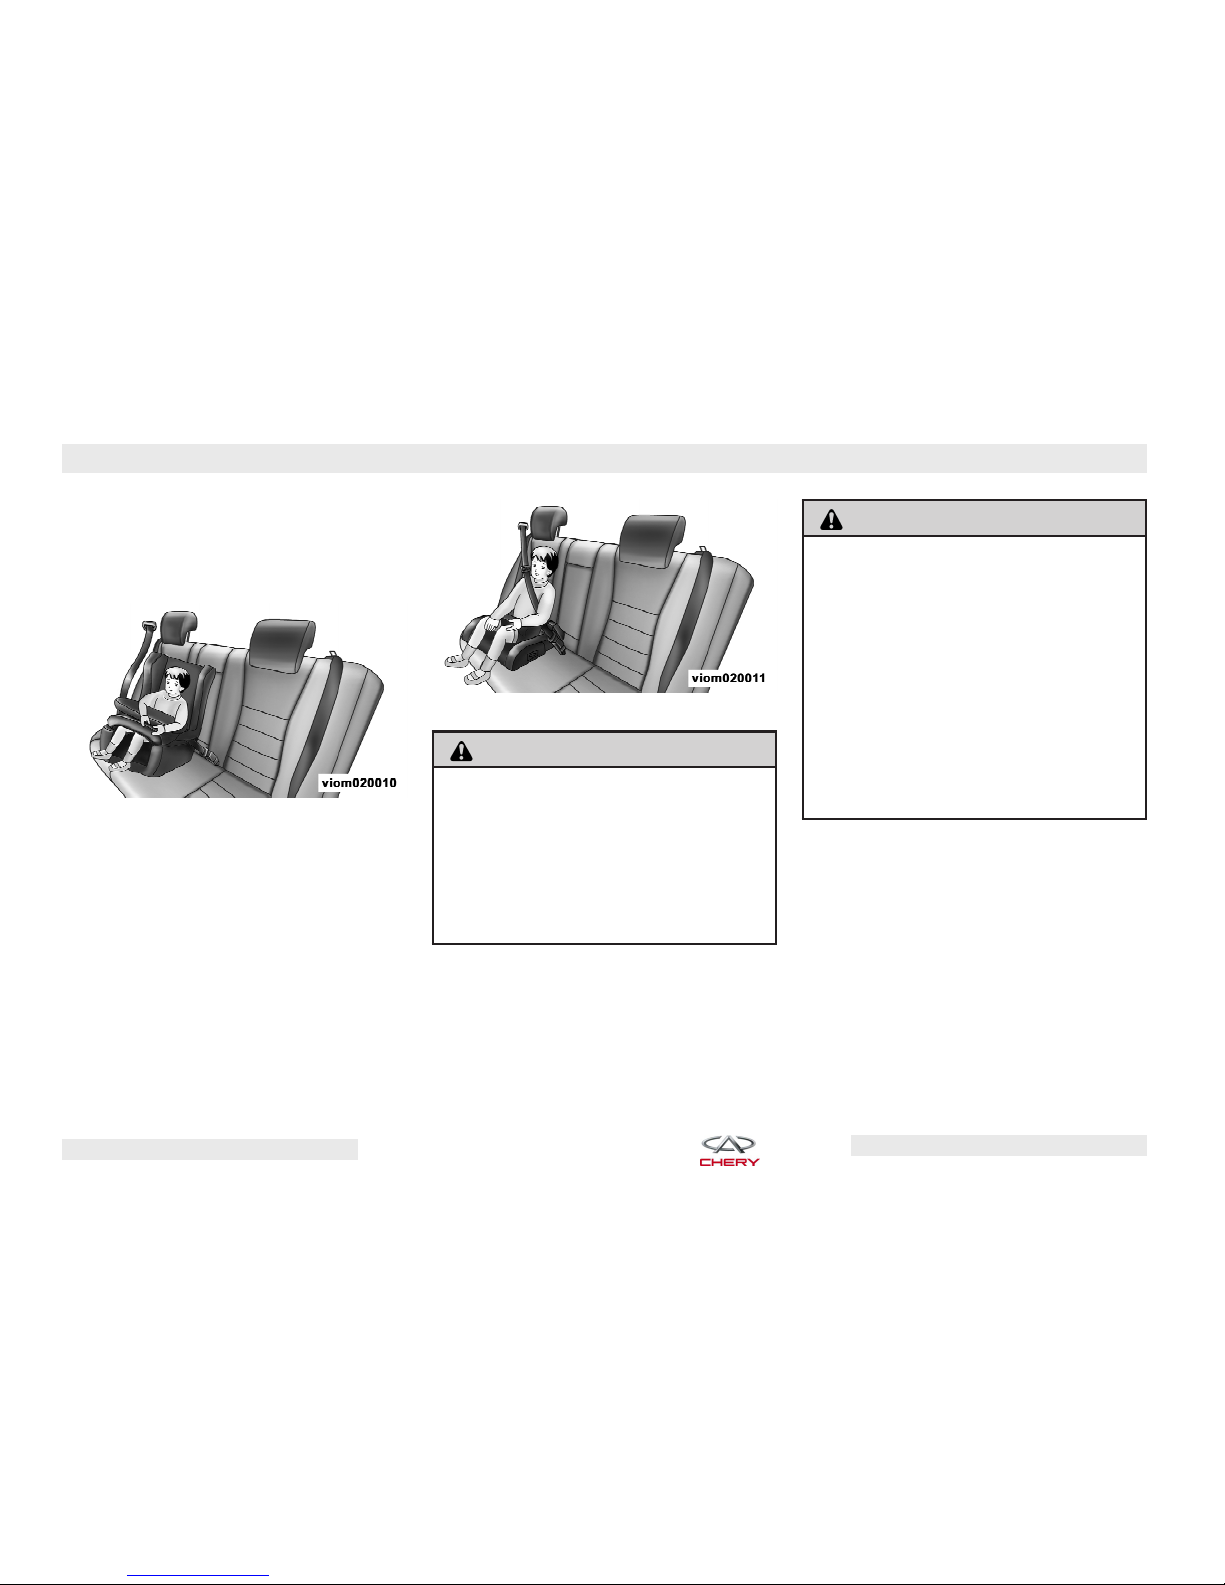
For children under 12 years old or
shorter than 150 cm, the special child
restraint must be used properly with an
infant restraint, child restraint, or with
the heightened seat cushion. The child
restraint must be applicable and government-authorized. Maximum child
safety can be obtained when the safety
seat works together with the seat belt.
Children who weigh less than 10 kg or
are less than 1 year old should be
placed in a baby carrier on the rear
seat with the child lying flat and the
baby carrier restrained. For infants,
use the backward-facing child restraint.
Backward Facing Child Seat
Chery Automobile Co., Ltd.
28 – BEFORE OPERATING YOUR VEHICLE
Children who weigh between 10 kg to
18 kg or are less than 4 years old
should use child restraints on the rear
seat.
Child Restraint Seat
Children who weigh between 18 kg
and 36 kg or are between 4 and 12
years old should sit on the heightened
seat cushion on the rear seat. The adjustable auxiliary seat belt attached to
the heightened seat cushion can ensure a child uses the seat belt properly. The heightened seat cushion positions the belt away from the child’s
neck and the lap belt should fit across
the child’s abdomen.
Heightened Seat Cushion
WARNING!
Each child restraint is intended for one
child only.
According to local traffic laws, children
are forbidden to sit in the front seat
and should use the applicable child restraints.
Operating Safety Tips
Transporting Passengers
NEVER TRANSPORT PASSENGERS IN
THE CARGO AREA.
WARNING!
It is extremely dangerous to ride in a
cargo area, inside or outside of a vehicle. In a collision, people riding in
these areas are more likely to be seriously injured or killed.
Do not allow people to ride in any area
of your vehicle that is not equipped
with seats and seat belts.
Be sure everyone in your vehicle is in
a seat and using a seat belt properly.
Locking Your Vehicle
Always remove the key from the ignition switch and lock all doors when
leaving the vehicle unattended, even
in your own driveway or garage. Try to
park your vehicle in a well-lit area and
avoid leaving articles of value exposed.
Chery Automobile Co., Ltd.
BEFORE OPERATING YOUR VEHICLE – 29
Exhaust Gas
WARNING!
Exhaust gases can injure or kill. They
contain carbon monoxide (CO), which
is colorless and odorless. Breathing it
can make you unconscious and can
eventually poison you and lead to
death.
Do not run the engine in a closed garage or in confined areas any longer
than needed to move your vehicle in
or out of the area.
If it is necessary to sit in a parked vehicle with the engine running, adjust
your heating or cooling controls to
force outside air into the vehicle. Set
the blower at high speed.
If you are required to drive with the
trunk open, make sure that all windows are closed and the climate control BLOWER switch is set at high
speed. DO NOT use the recirculation
mode.
The best protection against carbon
monoxide entry into the vehicle passenger compartment is a properly
maintained engine exhaust system.
Interior Vehicle Safety Inspection
Seat Belts
Inspect the belt system periodically,
checking for cuts, frays, and loose
parts. Damaged parts must be replaced immediately. Do not disassemble or modify the system.
Front seat belt assemblies must be replaced after a collision. Rear seat belt
assemblies must be replaced after a
collision if they have been damaged
(e.g., bent retractor, torn webbing,
etc.). If there is any question regarding
belt or retractor condition, replace the
belt.
Airbag Warning Light
The airbag warning light should come
on and remain on for 3-4 seconds as a
bulb check when the ignition switch is
first turned ON. If the light is not lit
during starting, see your authorized
Chery dealer. If the light stays on, flickers, or comes on while driving, have
the system checked by an authorized
Chery dealer.
Chery Automobile Co., Ltd.
 Loading...