

Chef's Choice Chef'sChoice Diamond Hone 110 Instructions Manual
MODEL 110
InstructIOns
Diamond Hone® Sharpener
Read these instructions before use.
It is essential that you follow these
instructions to achieve optimum results.
© 2016 EdgeCraft Corp.
EIFGB

2
IMPORTANT SAFEGUARDS
When using electrical appliances, basic safety precautions should always be
followed including the following:
1. Read all instructions.
2. To protect against electrical hazards, do not immerse the Chef’sChoice
®
in water or
other liquid.
3. Make sure only clean knife blades are inserted in the Chef’sChoice
®
.
4. Disconnect the appliance from its power source when not in use, before cleaning,
during service and when replacing parts.
5. Avoid contacting moving parts.
6. Do not operate any appliance with a damaged cord or plug or after the appliance
malfunctions, or is dropped or damaged in any manner.
U.S. customers: You may return your sharpener to EdgeCraft’s factory for service where
the cost of repair or electrical or mechanical adjustment can be estimated. If the
electrical cord on this appliance is damaged, it must be replaced by the Chef’sChoice
distributor or other qualified service to avoid the danger of electrical shock.
Outside U.S.: Please return your sharpener to your local distributor where the cost of
repair or electrical or mechanical adjustment can be estimated. If the supply cord
of this appliance is damaged, it must be replaced by a repair facility appointed by
the manufacturer because special tools are required. Please consult your
Chef’sChoice distributor.
7. CAUTION! This appliance may be fitted with a polarized plug (one blade is wider than
the other). To reduce the risk of electric shock, this plug will fit in a polarized outlet only
one way. If the plug does not fit fully in the outlet, reverse the plug. If it still does not fit,
contact a qualified electrician. Do not modify the plug in anyway.
8. The use of attachments not recommended or sold by EdgeCraft Corporation may cause
fire, electric shock or injury.
9. The Chef’sChoice
®
Model 110 is designed to sharpen kitchen knives, pocket knives and
most sport knives. Do not attempt to sharpen scissors, parrot beak knives, ax blades or
any blade that does not fit freely in the slots.
10. Do not let the cord hang over edge of table or counter or touch hot surfaces.
11. When in the “ON” position (Red color on switch is exposed when “on”), the
Chef’sChoice
®
should always be on a stable countertop or table.
12. WARNING: KNIVES PROPERLY SHARPENED ON YOUR CHEF’SCHOICE
®
WILL BE
SHARPER THAN YOU EXPECT. TO AVOID INJURY, USE AND HANDLE THEM WITH
EXTREME CARE. DO NOT CUT TOWARD ANY PART OF YOUR FINGERS, HAND OR BODY.
DO NOT RUN FINGER ALONG EDGE. STORE IN A SAFE MANNER.
13. Do not use outdoors.
14. Appliance is not intended to be used or cleaned by children or persons with reduced
physical, sensory or mental capabilities or lack of experience and knowledge of the
hazards involved.
15. Do not use honing oils, water or any other lubricant with the Chef’sChoice
®
.
16. For household use only.
17.
SAVE THESE INSTRUCTIONS.

3
YOU MADE
A GOOD
CHOICE
Congratulations on your selection of the Chef’sChoice® Diamond
Hone
®
Sharpener Professional 110. With the Professional 110 you can
produce the incredibly sharp triple bevel Trizor
®
edges on your favorite
kitchen, sporting or pocket knife.
Although the Chef’sChoice
®
Diamond Hone® Sharpener is easy to
use, it is important that you read through this instruction booklet
thoroughly before you use the sharpener in order to optimize your
sharpening results.
Gourmet cooks world-wide acknowledge the value of a fine cutting
edge for elegant food preparation. As an owner of the Chef’sChoice
®
Professional 110 you have the finest and easiest system
presently known to man to place incredibly sharp and better than
professional edges on your knives. For the first time it will be a joy
to sharpen your knives. Remember, a sharp knife is a safe knife
because you expect it to be sharp and respect it. But remember, it is
incredibly sharp! The Chef’sChoice
®
sharpener will sharpen safely
knives of any steel, carbon, stainless or alloy of any hardness.
You can sharpen the entire cutting edge of your favorite knives, from the
tip to the handle or bolster. Professionals agree that with Chef’sChoice
®
you can obtain consistently sharper and longer
lasting edges than with the older hand methods
in only a fraction of the time.
The highly precise Trizor
®
edge will reward
you with years of superior knife performance.
Whether you are cutting, slicing or chopping, it
will be a pleasure.
4
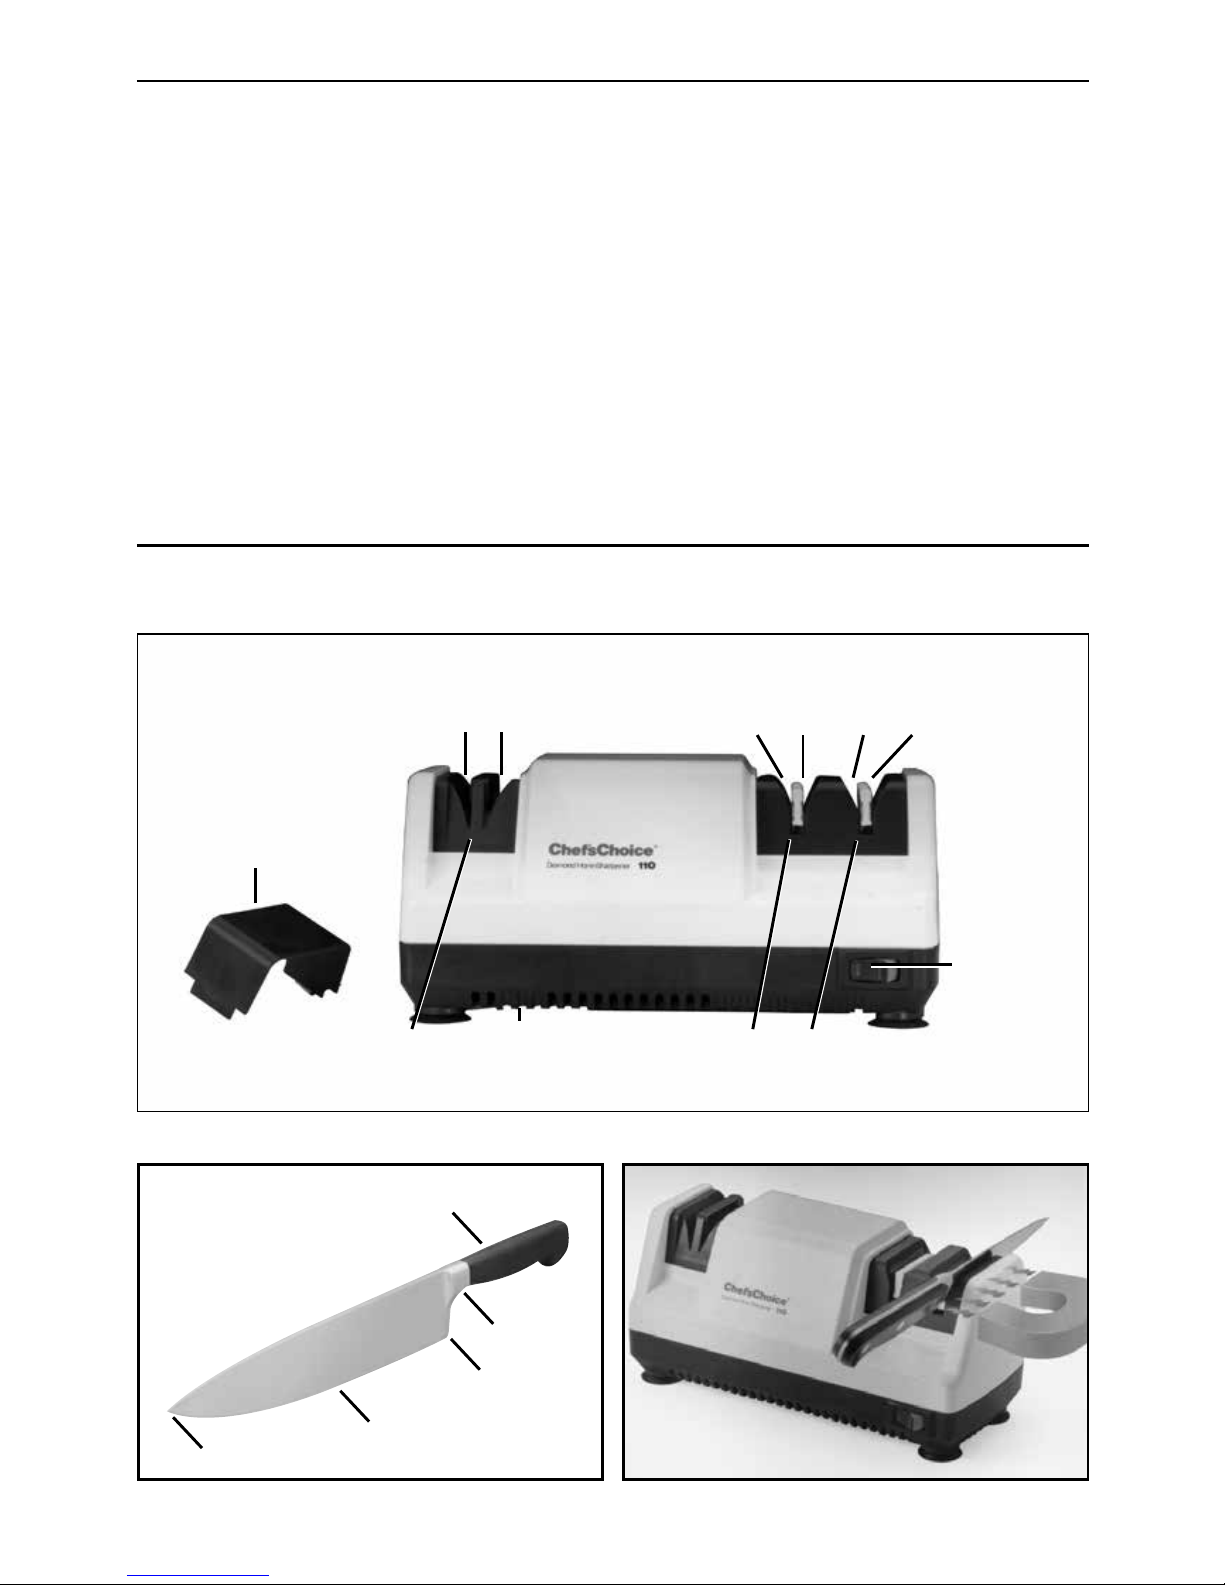
GETTING TO KNOW YOUR SHARPENER
Before using your sharpener you may wish to become familiar with its features. Do not plug the
sharpener cord into the an outlet. (Refer to Figures 1 and 2).
1. Place the heel area of a knife blade in one of the sharpening slots of Stage 2 or 3 (Figure
3). Loosen your grip. You will notice that the knife will be pulled to the side of the slot and
down into the slot by a magnet. Feel the pull of the magnet.
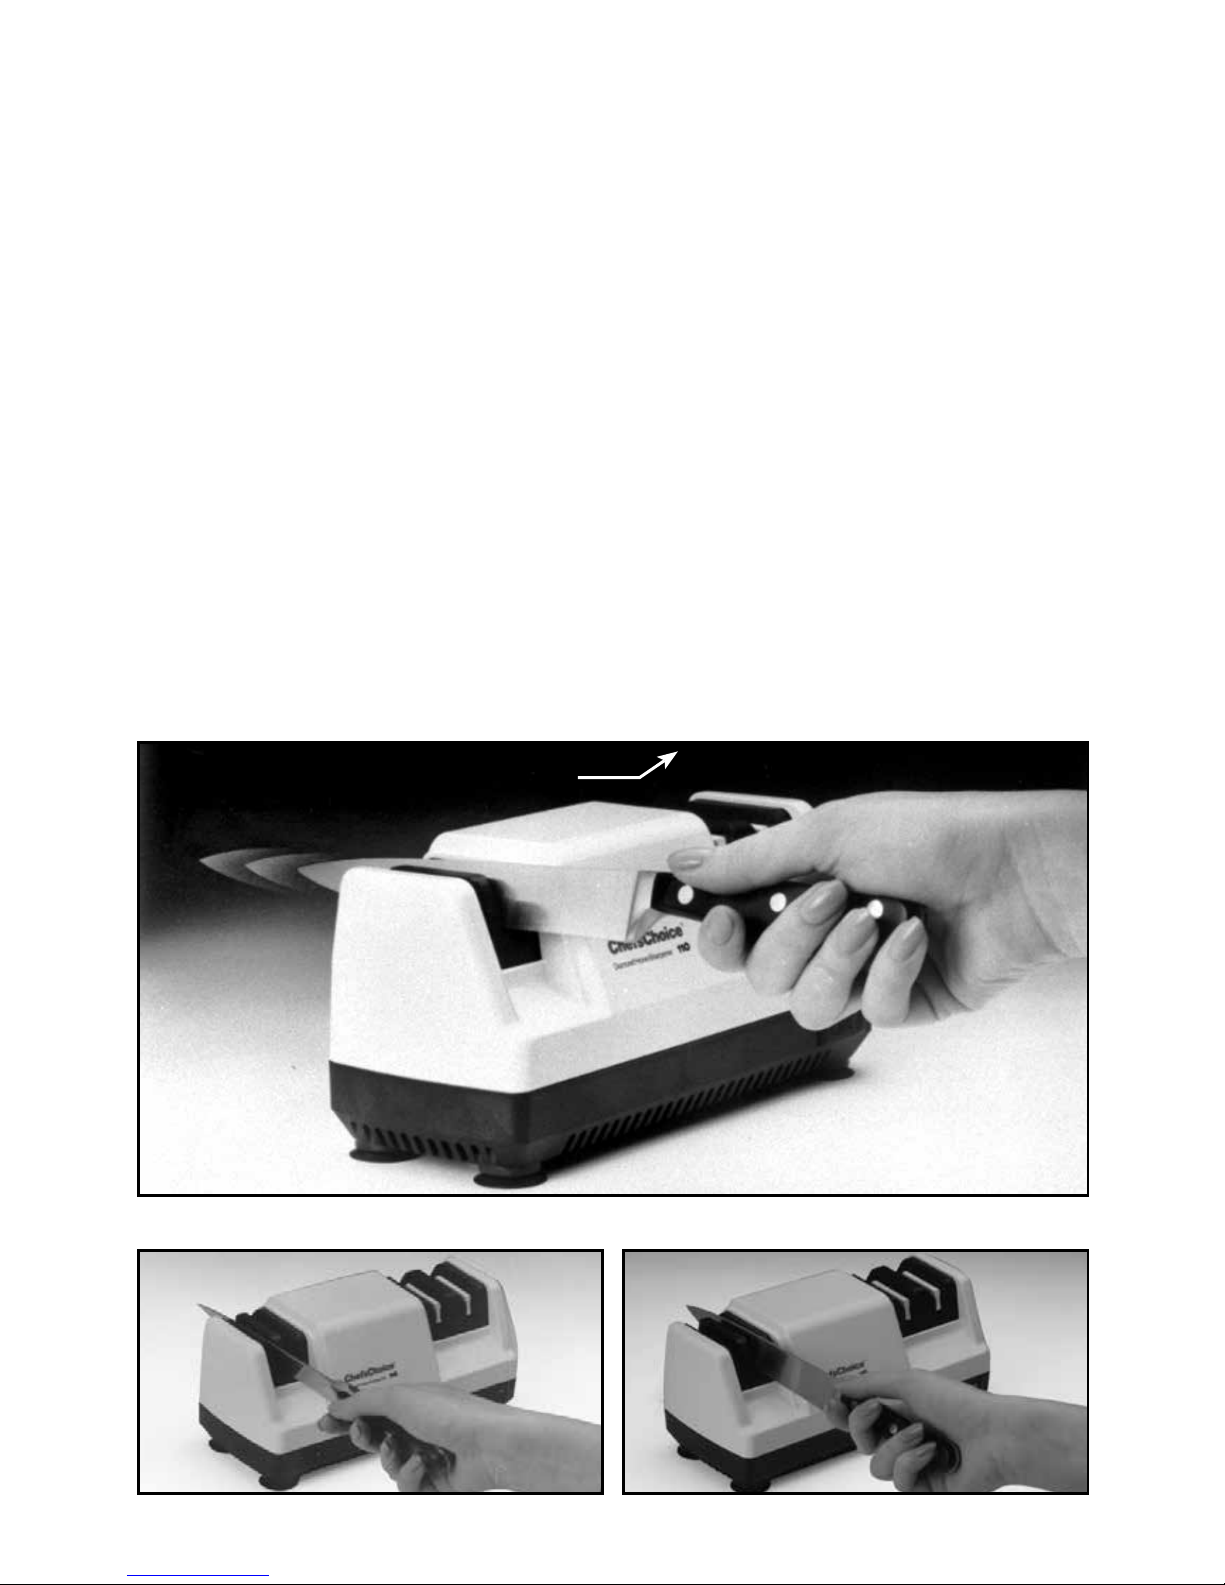
2. Now, while holding the knife with a secure yet relatively loose grip as shown in Figure 4,
pull the knife towards you while allowing the knife blade to be pulled against the magnet.
Let the magnet establish the blade angle. Except when sharpening the tip, keep the knife
blade level with the table. Grip as shown in Figure 4. You now have a feel for how the
magnets operate and are ready to proceed to the following instructions.
Place the Chef’sChoice
®
on a stable surface. Plug the sharpener cord into an appropriate electri-
cal outlet. (Voltage rating is indicated on label.) Press the switch to “ON.”
TO SHARPEN A KNIFE FOR THE FIRST TIME
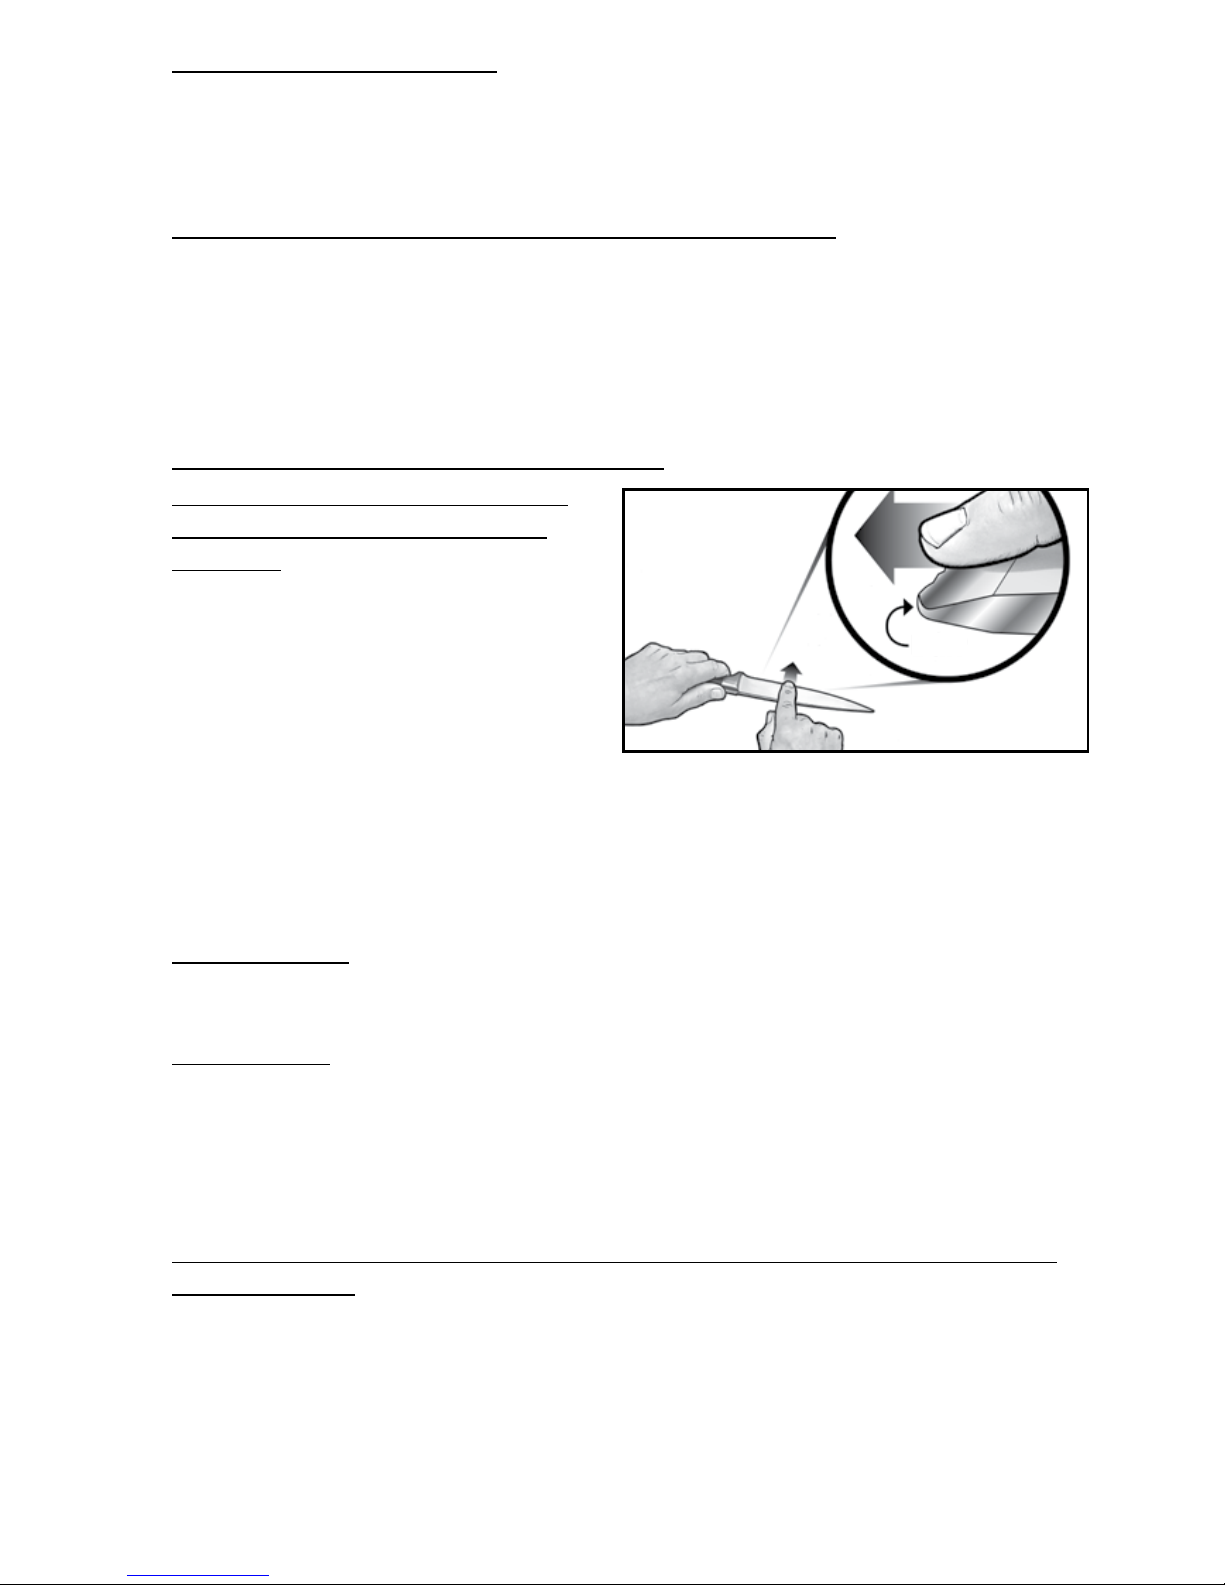
Stage 1: Hold knife with the illustrated grip below (Figure 4). Place the heel area of the knife
blade in the left PRE-SHARPENING slot, Stage 1. Let the knife rest against the magnet on the
Figure 3. Magnets control the blade angle.Figure 2. Typical kitchen knife.
Heel
Bolster
Handle
Edge
Tip
Figure 1. Chef’sChoice® Professional Model 110.
Stage 1 Pre-sharpening
(Diamond disk)
Pre-sharpening slots
Left
Left Left
Right
Right Right
Sharpening slots Honing slots
On/Off
Switch
Stage 2 Sharpening
(Orbiting Diamonds®)
Clean out
plug
Cover for
pre-sharpening
slots
Stage 3 Honing
(Orbiting Diamonds®)
5
left side of the slot. Pull the knife towards you allowing the magnet to position the blade at the
proper sharpening angle. Keep a secure yet relatively loose grip. Your grip should be just loose
enough that the magnets totally control the blade angle. DO NOT apply downward pressure on
the knife blade. Keep the edge level. NEVER PUT THE TIP OF THE BLADE INTO THE SLOT FIRST
AND PUSH THROUGH. After one pull through the left PRE-SHARPENING slot place the knife in
the right PRE-SHARPENING slot and pull through in the same manner. Repeat these two steps
three (3) or more times,* alternating left and right slots. You should take approximately three (3)
seconds for each pass to pull a 6” knife through the sharpening slots. A longer blade will require
more time; for example five (5) seconds for a 10” blade. To sharpen the tip area of the blade
lift the handle slightly as the curved portion of the blade moves through the sharpening area.
IMPORTANT after two pulls in each slot check the blade edge to see if a burr has developed (See
page 7 Suggestion 4). Continue sharpening until a burr is present along entire edge–bolster to
tip. Complete PRE-SHARPENING with one (1) fast pull (about one (1) second) in each of the left
and right PRE-SHARPENING slots.
*It is most important that a knife be sharpened sufficiently in the PRE-SHARPENING stage. For most knives
three (3) passes are adequate. With soft steel knives, pocket, serrated or thin blades only two (2) passes may
be needed. Thick, hard or very dull knives will require more than three (3) passes. See “Suggestions” section
for details. Do not proceed to Stage 2 until a burr is formed in Stage 1 as described on page 7.
Stage 2: The next operation is the SHARPENING, Stage 2. Repeat the technique as in Stage 1
but using the SHARPENING slots. Lay the knife in one slot with a very loose and relaxed grip.
This will allow the magnet to set the blade angle. Then grip loosely and pull knife through the
Figure 4. You will find it easier to use a loose grip.
Stage 1— Three (3) or more* slow passes through each slot, (left and right PRE-SHARPENING slot). Alternate each pass.
1… 2… 3 seconds, keep knife level
Proper speed,
correct sharpening grip

6
slot. Again, take about three (3) seconds per pass for a 6” blade. As before, alternate each pull
from left to right SHARPENING slots. You should pull the blade slowly through both SHARPENING
slots four (4) times. Complete SHARPENING with one (1) fast pull in each of the left and right
SHARPENING slots.
Stage 3: To develop the finest and sharpest edge possible, proceed to the HONING, Stage 3. Pull
knife eight times or more rapidly (about one (1) second for a 6” blade) through each HONING
slot, alternating left and right slots with each pass. Continue to use a loose grip. Check edge
for sharpness. If you wish to increase sharpness, make additional fast pulls in Stage 3, always
alternating left and right slots. This last step hones and polishes with ultra fine diamonds immediately adjacent to the edge leaving it incredibly sharp.
If your knife still is not razor sharp, repeat Stages 1 through 3. See “Suggestions.”
RESHARPENING
After normal use you can resharpen your knife many times keeping it razor sharp merely by
repeating Stages 2 and 3 (SHARPENING and HONING only). Stages 2 and 3 resharpen by removing
only micro amounts of steel immediately adjacent to the edge – a unique feature of ChefChoice
®
that allows you to resharpen often without any concern for the life of your knife. DO NOT USE
PRE-SHARPENING STAGE (Stage 1) FOR RESHARPENING until Stages 2 and 3 alone no longer
give you a razor sharp edge.
SUGGESTIONS
Chef’sChoice® Professional Model 110 is designed to produce incredibly sharp knife edges in a
fast and easy manner. To ensure you obtain razor sharp edges we suggest:
Stage 2— Four (4) to eight (8) slow passes through each slot (left and right SHARPENING slot). Alternate each pass.
Stage 3— Eight (8) fast passes through each slot (left and right HONING slot). Alternate each pass.
7
1. Loosen Your Grip on the Knife. Let the magnets take total control of the knife position
and sharpening angle. Allow the lower portion of the knife face to be pulled by the magnets
flat against the guide plane of the magnets. Do not resist the pull of the magnets. The
magnets will also automatically pull the knife down against the moving diamonds and
apply the correct sharpening pressure. Do not apply any downward pressure on the knife.
2. Pull the Knife Through the Sharpening Slots at Correct Speed. In Stages 1 and 2 each
slow pull should take one (1) second for each two (2) inches of blade length. In Stage 3
each pull should be fast – about one (1) second total for a 6” blade. Fast pulls should not
be so fast that knife chatters. The fast pulls in Stage 3 remove any microburrs and polish
the edge to achieve an incredibly sharp knife. Do not hesitate to make additional fast pulls
in Stage 3. If your knife still is not razor sharp, repeat the entire sharpening procedure
starting with Presharping.
3. Be Certain in All Stages to Alternate Each Pull from right to left side of blade.
4. There is a Relatively Easy Method to
Determine When Presharpening is
Complete. With most knives, you can veri-
fy there has been sufficient Presharpening
by moving your finger carefully across
and away from the edge to feel for a burr.
A burr can be felt as a roughness running
along one side of the edge. Sharpening in
the right slot will form a burr on the right
side of the edge and conversely with the left slot. When a burr is detected on successive
pulls, Presharpening is complete. With harder steel knives, the burr will not be as evident
using this technique. With most knives, you will find it necessary to pull the blade through
Presharp only three (3) times on each side. However, only with unusually hard or dull steel
knives will it be necessary to pass through Presharp ten (10) or more times on each side.
5. Serrated Knives. While this Chef’sChoice
®
sharpener is designed primarily for non-serrated knives, it will improve the performance of serrated knives by sharpening the tips of the
serrations. Do NOT use Stage 1. Follow sharpening instructions for Stages 2 and 3.
6. Pocket Knives. With thin blades, two (2) pulls through Presharpening may prove sufficient
before proceeding to Stages 2 and 3. With thicker pocket knife blades, more pulls through
Presharpening may be required. For very narrow, short or thin pocket knife blades you can,
if you prefer, bypass Presharpening and begin by sharpening in Stage 2; it will, however,
take more pulls in Stage 2. When the knife-edge becomes very sharp in Stage 2, complete
by sharpening in Stage 3.
7. The Knife Edge Should be Maintained in a Level Position Relative to the Top of the
Counter or Table. To sharpen near the tip of the blade, lift the handle up slightly so the
edge near the tip can be maintained “level.”
By giving careful attention to these suggestions, your knives will be razor sharp. Because of
the perfection of the Trizor
®
edge, there is no need or advantage to using a sharpening steel.
Consider resharpening with a manual Chef’sChoice
®
sharpener if you are using knives at a remote
location away from electrical power. Keep your Model 110 readily accessible and resharpen
often, as described in the prior Resharpening section.
Burr

8
CHEF’S KNIVES AND PARING KNIVES
The blade of a well designed chef’s knife is curved continuously from the blade tip to the end
near the handle so that, with a rocking action on a cutting surface, the entire blade length will
cut cleanly. Chef’sChoice
®
will sharpen the entire blade uniformly, avoiding a swale common to
other sharpening methods. If your chef’s knife has a heavy bolster near the handle extending
to the edge, a commercial grinder can modify or remove the lower portion of the bolster so the
bolster will not interfere with proper cutting action of the knife.
Chef’sChoice
®
Professional Model 110 will sharpen the entire cutting edge from tip to bolster
or handle. For this reason, when using paring knives, it is essential to exercise extreme care to
keep fingers away from the incredibly sharp edge near the handle.
SPORTING AND POCKET KNIVES
The Professional 110 is the ideal sharpener for your favorite sporting and pocket knives. It will
put the same incredibly sharp Trizor
®
edges on the entire length of these blades from the tip to
the bolster. See “Suggestions” section.
NORMAL MAINTENANCE
No lubrication is required for any moving parts, motor, bearing surfaces or sharpening surfaces.
Your sharpener may be cleaned by carefully wiping with a damp cloth. Do not use detergents
or abrasives.
To clean metal dust that may accumulate in the PRE-SHARPENING section, simply remove the
circular plastic plug that is located on the underneath side of the sharpener. Shake out the metal
dust and replace plug. You may wish to do this once every eighteen months with normal usage
or more often with heavy use.
SERVICE
In the event post-warranty service is needed, return your sharpener to the EdgeCraft factory where
the cost of repair can be estimated before the repair is undertaken. Please include your return
address, daytime telephone number and a brief description of the problem or damage on a
separate sheet inside the box. Retain a shipping receipt as evidence of shipment and as your
protection against loss in shipment. Outside the USA, contact your retailer or national distributor.
Assembled in the U.S.A. www.chefchoice.com
This product may be covered by one or more EdgeCraft patents and/or patents pending as marked on the product.
Chef’sChoice
®
, EdgeCraft®, Trizor®, Diamond Hone® and the overall design of this product are registered
trademarks of EdgeCraft Corporation, Avondale, PA.
Conforms to UL Std. 982 Certified to CAN/CSA Std. C22.2 No. 64
Certified to EN 60335-1, EN 60335-2, EN 55014-1+A1, EN 61000-3-2, EN 61000-3-3
© EdgeCraft Corporation 2016
F16 C1182Z2
®
EdgeCraft Corporation
825 Southwood Road, Avondale, PA 19311 U.S.A.
Customer Service (800) 342-3255 or 610-268-0500
MODELE 110
MODE D’EMPLOI
Diamond Hone® Affûteuse
Prière de lire le mode d’emploi avant usage.
Il est essential de suivre ces instructions
pour obtenir le TRANCHANT TRIZOR.
© 2016 EdgeCraft Corp.
F

2
MISES EN GARDE IMPORTANTES
Lorsque vous utilisez des appareils électriques, vous devez toujours respecter des
mesures de sécurité fondamentales, dont celles-ci:
1. Lisez les instructions au complet.
2. Pour prévenir les risques d’électrocution, n’immergez pas le Chef’sChoice
®
.
3. Avertissement: Cet appareil n’est pas conçu pour les enfants.
4. Débranchez l’appareil lorsqu’il n’est pas utilisé, avant de mettre ou d’enlever des
pièces mobiles.
5. Evitez de toucher des pièces en mouvement.
6. Ne pas fonctionner d’appareil avec une corde ou un bouchon endommagée ou après les
mauvaises fonctionnements d’appareil, ou est tombé ou est endommagé dans la manière.
Clients américains : Vous pouvez retourner votre aiguiseur à l’usine de EdgeCraft pour le
service où le coût de réparation ou l’ajustement électrique ou mécanique peut être estimé.
Quand la corde électrique sur cet appareil est endommagée, il doit être remplacé par le
distributeur ou l’autre service qualifié pour éviter le danger de choc électrique.
Etats-Unis d’extérieur : S’il vous plaît retourner votre aiguiseur à votre distributeur local où
le coût de réparation ou l’ajustement électrique ou mécanique peut être estimé. Si la corde
de provision de cet appareil est endommagée, il doit être remplacé par une facilité de
réparation fixée par le fabricant parce que les outils spéciaux sont exigés. S’il vous plaît
consulter votre distributeur.
7. L’utilisation d’accessoires qui ne sont pas recommandés ou vendus par le distributeur peut
être la cause d’incendie, d’électrocution ou de blessures.
8. N’utilisez pas l’appareil à l’extérieur.
9. Ne laissez pas le cordon pendre le long d’une table ou d’un comptoir ni toucher à des
surfaces chaudes.
10. A la position “MARCHE” (ON), placez toujours le Chef’sChoice
®
sur un comptoir ou sur une
table d’aplomb et stable.
11. ATTENTION: LES COUTEAUX BIEN AIGUISES A L’AIDE DU CHEF’SCHOICE® DEVIENNENT PLUS
TRANCHANTS QU’A L’ORDINAIRE. POUR PREVENIR LES BLESSURES, MANIEZ-LES AVEC
BEAUCOUP DE PRUDENCE. NE COUPEZ PAS EN DIRECTION DE VOS DOIGTS, DE VOTRE
MAIN OU DE VOTRE CORPS. NE PASSEZ PAS VOS DOIGTS SUR LE TRANCHANT DE LA LAME.
RANGEZ-LES DANS UN ENDROIT SUR.
12. Le modèle 110 Chef’sChoice
®
est conçu pour aiguiser des couteaux de cuisine, de poche et
à découper la viande. Il améliorera la capacité de coupe d’une lame à dents de scie
émoussée en aiguisant juste les bouts du bord à dents de scie.
13. Ne pas essayer d’aiguiser des ciseaux, un fer de hâche ou n’importe quelle lame qui ne
passe pas librement dans les fentes.
14. Prenez soin de nettoyer la lame du couteau avant de l’introduire dans le Chef’sChoice
®
.
15. N’utilisez pas d’huile, ni d’eau ou autre lubrifiant dans le Chef’sChoice
®
.
16. Pour usage domestique seulement.
17.
CONSERVEZ LES PRESENTES DIRECTIVES.

3
VOUS AVEZ
FAIT UN
BON CHOIX
Féliciatations d’avoir choisi l’aiguiseur Diamond Hone® Professionnel 110,
notre aiguiseur le meilleur et le plus polyvalent. Avec le Professionnel 110,
vour pouvez obtenir un tranchant à triple biseaux Trizor
®
aiguisé de façon
incroyable sur votre couteau de cuisine, de sport ou de poche favoris.
Bein que l’aiguiseur Diamond Hone Chef’sChoice
®
soit facile à utiliser, il
est important de lire à fond cette brochure d’instructions avant d’utiliser
l’aiguiseur afin d’optimiser vos résultats d’aiguisage.
Les cuisiniers gourmets dans le monde entier reconnaissent la valeur
d’un bon tranchant pour effectuer une préparation élégante des aliments.
En votre qualité de propriétaire d’un Professionnel 110 Chef’sChoice vous
disposez du meilleur appareil et du plus facile à utiliser qui existe actuellement
pour donner à vos couteaux un tranchant incroyablement affilé et meilleur
qu’un professionnel. Pour la première fois ce sera un plaisir d’aiguiser vos
couteaux. Souvenez-vous, un couteau tranchant est un couteau sûr parce
que vous vous attendez à ce qu’il soit tranchant et vous le respectez. Mais
souvenez-vous, il est incroyablement affilé!
L’aiguiseur Chef’sChoice aiguisera sans danger des couteaux de n’importe
quel acier au carbone, inoxydable ou en alliage de n’importe quelle dureté.
Vous pouvez aiguiser le tranchant tout entier de vos couteaux favoris, depuis
le bout jusqu’à la poignée ou la mitre. Les professionnels reconnaissent
qu’avec le Chef’sChoice vous pouvez obtenir des tranchants plus affilés
et qui durent plus longtemps de manière réqulière
qu’avec les anciennes méthodes manuelles dans
une fraction seulement du temps.
Le tranchant de haute précision Trizor vous
récompensera par des années de performance
supérieure de votre couteau. Que vous coupiez,
tranchiez ou hachiez, ce sera un plaisir.
 Loading...