

Chef's Choice 607 Instructions Manual

FOOD SLICER
607
SLICER
READ THESE INSTRUCTIONS BEFORE USE.
IT IS ESSENTIAL THAT YOU FOLLOW THESE
INSTRUCTIONS TO ACHIEVE OPTIMUM RESULTS.
© 2019 EdgeCraft Corp.

IMPORTANT SAFEGUARDS
When using electrical appliances, basic safety precautions should
always be followed, including the following:
1. Read all instructions carefully before using slicer, to maximize
results and to avoid injury.
2. To protect against risk of electrical shock, do not immerse power
unit in water or other liquid or operate in wet areas.
3. When blade is powered, place hands only on recommended
push surfaces. Fingers, hand or body contact with the
moving blade can result in serious injury. When power is o,
touch blade only to remove and clean according to instructions.
Do not touch the blade’s edge.
4. Never operate any motorized appliance when consuming
alcohol or taking medication. Close supervision is necessary
when any appliance is used by or near children, handicapped
and infirm.
5. Unplug power cord from outlet when not in use, before putting
on or taking o parts, and before cleaning.
6. Avoid contacting moving parts. Never feed food by hand. Always
use completely assembled slicer with food tray and food pusher.
7. Do not operate any appliance with a damaged cord or plug or
after the appliance malfunctions, or is dropped or damaged in
any manner. Return slicer if damaged to the nearest authorized
service facility or to EdgeCraft for examination, repair or
electrical or mechanical adjustment.
English — 2

8. The use of attachments not recommended or sold by the
appliance manufacturer may cause fire, electric shock or injury.
9. Do not use outdoors.
10. Do not let cord hang over edge of table or counter or touch
hot surfaces.
11. Blade is very sharp. Handle carefully when cleaning. Avoid
contact with cutting edge.
12. Do not attempt to cut frozen foods or foods with bones.
13. Follow instructions when lifting or moving the slicer.
14. FOR HOUSEHOLD USE ONLY.
15. Plug cord only into 120V two prong polarized AC outlet. This
appliance will be equipped with a two pronged polarized plug
(one prong is wider than the other). To reduce the risk of
electrical shock, the two pronged plug will fit a polarized outlet
only one way. If the two pronged plug does not fit fully into the
outlet, reverse the plug. If it still does not fit, contact a qualified
electrician. Do not modify the plug in any way. Do not use a
2 to 3 prong adapter.
SAVE THESE INSTRUCTIONS
ATTENTION!
If blade stops or slows while slicing,
immediately pull food back and turn
slicer off, then on again.
English — 3
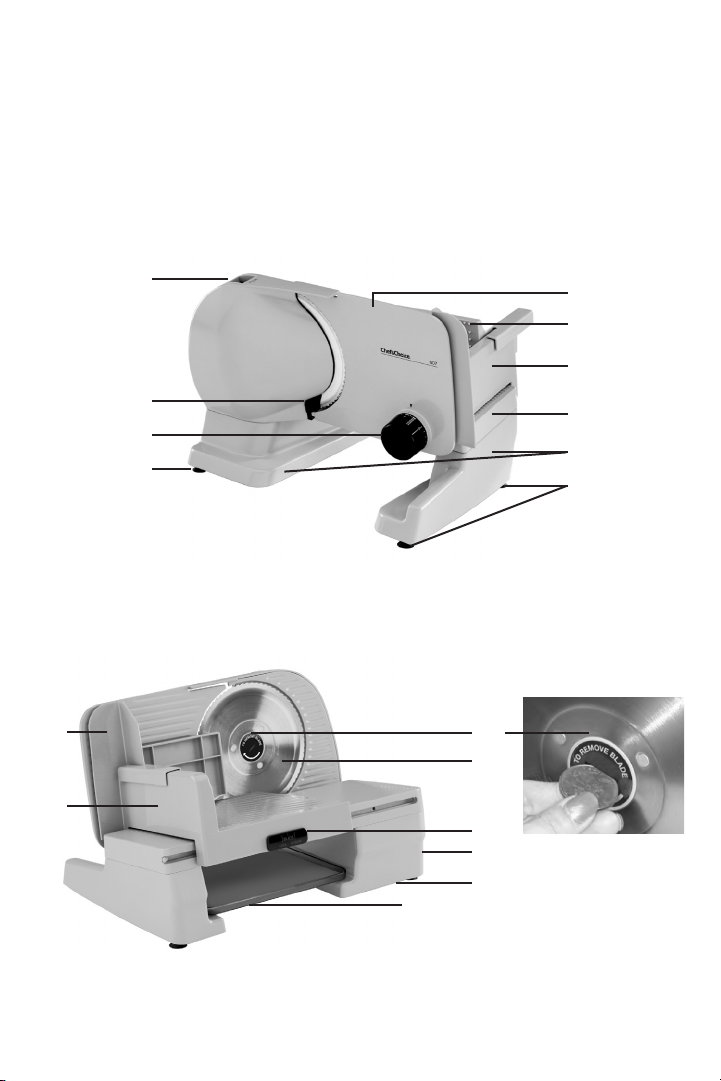
PARTS LIST*
1. On/O Power Switch
2. Thickness guide plate
3. Food pusher
4. Food carriage
4a. Thumb guard plate
5. Carriage track
6. Rubber feet
7. Thickness control knob
8. Base
9. Slice deflector
10. Carriage “Lock/Remove” control
11. Blade retaining screw
12. Blade
13. Cord storage compartment (see Figure 3)
14. Fuse (under bottom, see Figure 10)
4a
1
9
7
6
11
12
4
10
13
14
*Tray included
2
3
4
5
8
6
Blade retaining screw
—for slicer blade.
English — 4
For your safety, the food carriage (4) contains a thumb guard plate (4a) that can be moved in
SECURING THE BLADE GUARD
front of the blade’s cutting edge and locked in place when the slicer is not in use. This protects
you and children from inadvertent contact with the blade edge.
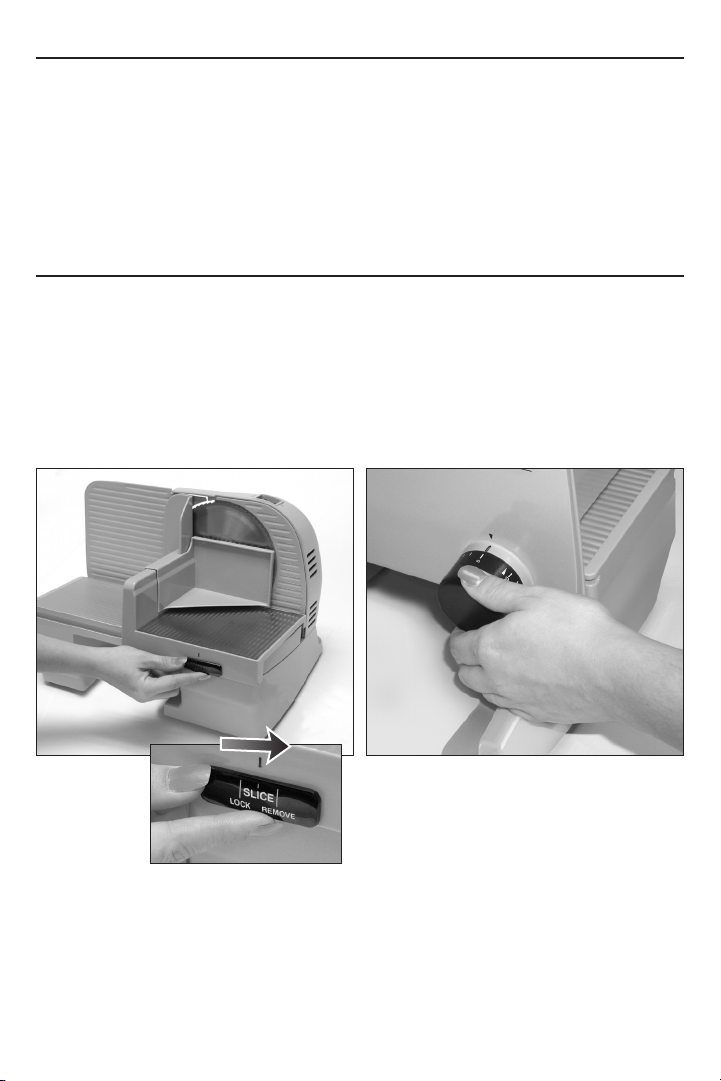
Using the thickness control knob (7), set the slice thickness to 0. Slide the carriage (4) forward to
the right end stop (Fig. 1) so that the carriage thumb protector (4a) covers the blade edge.
The carriage can then be locked in place by sliding the control button (10) to the right into the
“Lock” position. Always secure the carriage in the “Lock” position whenever it is not in use or
when the slicer is being moved or stored. To release the carriage for normal slicing, slide the
button to the middle “Slice” position. To remove the carriage from the slicer, slide the control
button all the way to the left (Fig. 1) to the “Remove” position.
1. Place slicer on a clean, dry, smooth surface. Position the slicer so the carriage is to your right
BEFORE YOU SLICE
and the thickness control knob is to your left. Be sure the blade is properly secured.
2. Unlock the carriage by sliding the carriage control button (10) to the “Slice” position (Fig. 1)
and pull the carriage toward you, away from the blade. The carriage should move smoothly in
its track. Place food on the carriage. Extra large foods such as slab bacon or brisket may have
to be cut to fit on carriage.
Caution: Always use the food pusher when operating the slicer. Not using it can result in
serious personal injury (see Fig. 4). Never feed the food by hand.
3. Set the thickness knob (Fig. 2) to the desired slice thickness.
4. Place a food tray or platter under the cutting edge of the blade to receive the food slices.
Figure 1. Securing
the blade guard.
Figure 2. Thickness control knob.
English — 5
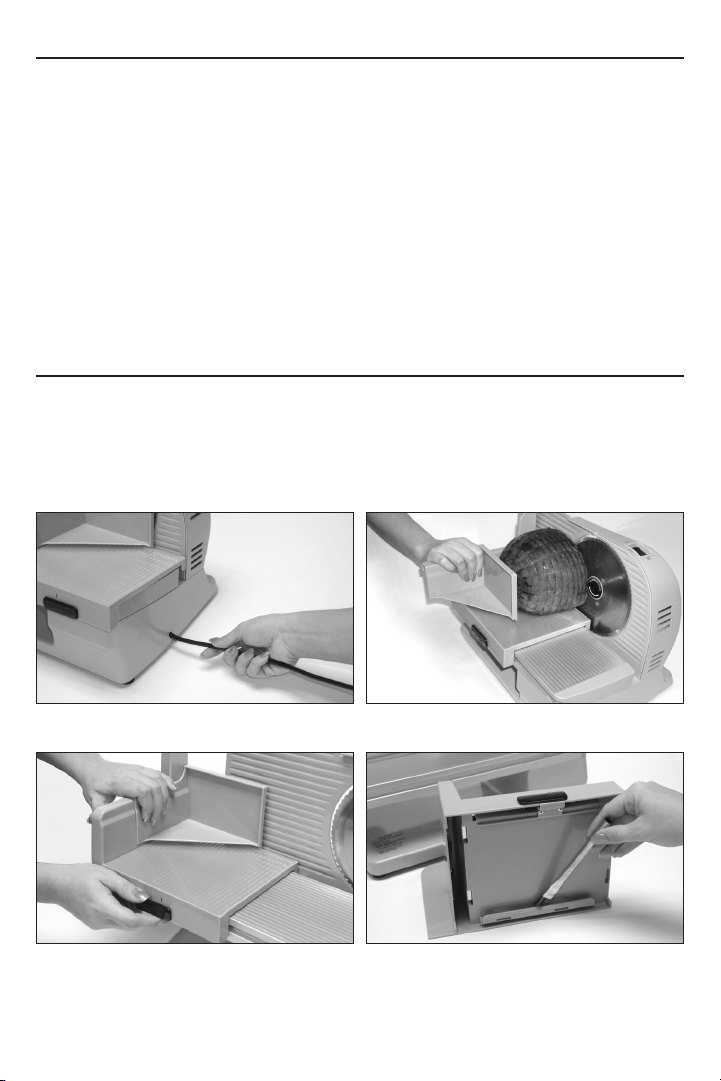
1. Plug cord into polarized two pronged two wire 120V, AC outlet. Push excess cord into the
cord storage compartment (Fig. 3).
Cord Safety: A short power cord is provided with this appliance to reduce the possibility of
someone becoming entangled in it or tripping over it. While EdgeCraft does not recommend
it, extension cords may be used. Use only 2-wire extension cords with two prong polarized
plugs. Extension cords should have an electrical rating not less than the rating on the
electrical appliance.
Do not use damaged extension cords. Keep cord away from heat, sharp edges and water.
2. Place food in the corner of the carriage and pull the carriage toward you. Hold food pusher
with your right hand, keeping thumb protected behind thumb guard (Fig. 4).
3. Press the “ON” side of the switch down for slicing.
4. To slice, slide the carriage toward the blade. Move the carriage back and forth steadily. Using
the food pusher, keep food pressed against the thickness guide plate for even slices. For best
results, do not apply excess pressure on thickness guide plate during slicing. When finished
slicing, turn o motor, unplug slicer, set the slice thickness to “0” (not below “0”) and secure
the carriage in the “Lock” position (Fig. 1).
CLEANING
UNPLUG THE SLICER CORD FROM OUTLET
Slicer parts in contact with food can be removed for thorough cleaning. Wash with a soft cloth or
sponge and a mild soap or spray cleaner. Rinse and dry.
Never use steel wool or scouring powder on any part of slicer.
DO NOT IMMERSE SLICER IN WATER. DO NOT WASH ANY PART OF THE SLICER
IN DISHWASHER.
TO SLICE
Figure 3. Push excess cord into the cord
storage compartment.
Figure 5. Removing the food carriage.
Figure 4. Hand on food pusher, slicing.
Figure 6. Lubricating food carriage guides.
English — 6
FOOD CARRIAGE
To remove the carriage, set the thickness control knob to 0, slide the carriage control button to
the “Remove” position (Fig. 5). Slide carriage away from blade until it comes o its track. Clean
carriage guide and lubricate lightly with a few drops of acid-free light household oil such as
sewing machine oil (Fig. 6).
STAINLESS STEEL BLADE
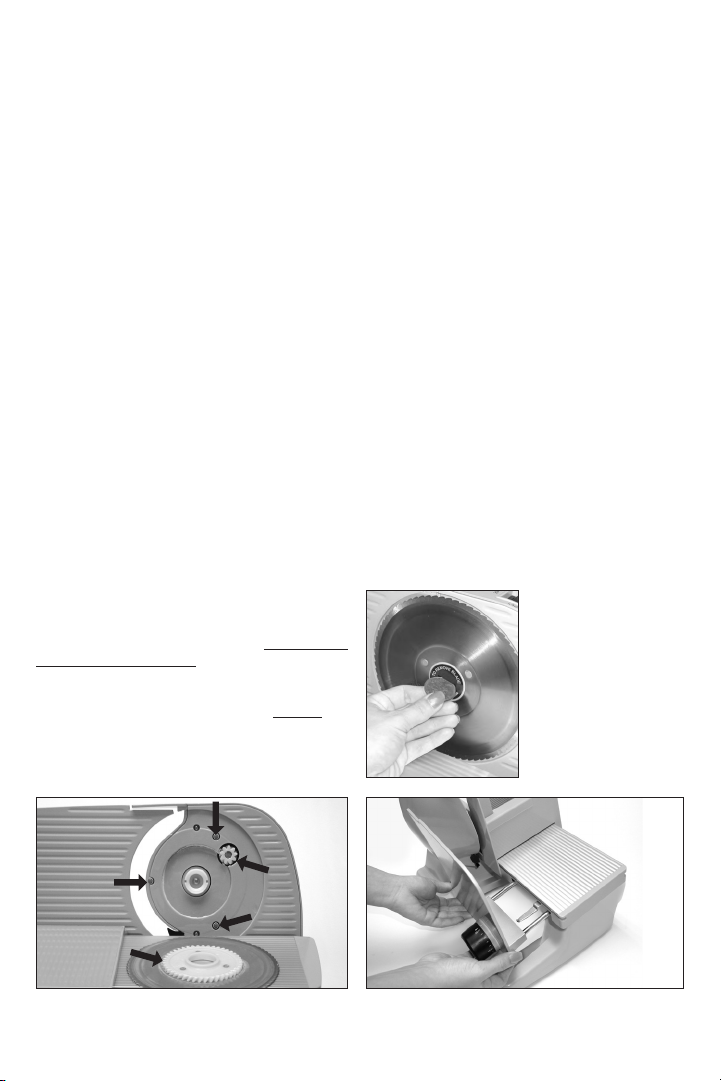
To remove the cutting blade, insert a coin in the slot of the blade fastening screw (11) and turn
the screw clockwise until the blade retaining screw is fully removed (Fig. 7). Carefully lift the
blade o. Do not touch the blade edge. Clean the cutting blade and the motor housing behind
it with a clean damp cloth. To sanitize the blade transfer it carefully to a sink and scrub with a
brush and antibacterial soap or equivalent. Lubricate the blade support posts and the drive gear
shown in Figure 8 with Vaseline. To replace, carefully align the blade on its hub so the blade and
drive gears fully engage. Turn blade fastening screw counterclockwise to tighten. (Do not
over-tighten). CAREFUL! SHARP BLADE!
THICKNESS GUIDE PLATE
You can, if you wish, remove the thickness guide plate for cleaning.
Note: To reduce the risk of injury, always remove the blade before removing the thickness
guide plate.
To remove the thickness guide plate, turn the thickness control knob counterclockwise, past “0”
to the “PLATE RELEASE” position. Pull the thickness guide plate o the slice (Fig. 9). After
cleaning this plate, lightly lubricate the two steel rods with Vaseline.
To reattach the thickness guide plate, insert the two steel rods into the holes provided on the
carriage track. Make sure the thickness control knob is aligned with the “PLATE RELEASE”
position. Now push the guide plate fully into its position and turn the knob counterclockwise to
the “0” position.
RUBBER FEET
Clean with grease-removing cleaner, mild detergent in water or alcohol.
SLICE DEFLECTOR
The Model 607E is equipped with a detachable
slice deflector (item #9, see page 4) to ensure
smooth deflection of each slice onto the tray.
This can be removed for cleaning. Always first
remove the slicer blade and thickness control
plate as shown in Figures 8 and 9. Grasp the
blade deflector with thumb and forefinger and
pull it out. It should snap out easily. Always
reinstall before installing the blade or thickness
control plate.
Figure 7. Turn the
screw clockwise for
blade removal.
Figure 8. Key areas to lubricate.
Figure 9. Removing the thickness guide plate
English — 7

This Electric Food Slicer has been equipped with a protective
fuse to prevent the motor from overheating. In the unlikely event
that the fuse fails, a spare fuse has been supplied with your
slicer. To remove the old fuse, make certain that the Power
Switch is in OFF position, that the power cord has been
unplugged, that the thickness plate is in the “0” position and the
food carriage is locked in place. Turn the slicer over with the
motor cover resting on the table as shown (Fig. 10). The fuse
holder will be accessible. Unscrew the fuse holder, pull out the
old fuse and replace it with an approved new one. Reinsert the
holder with the new fuse into its proper location, press and
rotate to lock. Satisfactory replacement fuses are available from
Hollyland 51S, Schurter FST or Bussman GDCS505. All are
Slo-Blo type, rated at 1.25A and 250V.
Figure 10. Replacing the
fuse located underneath
motor housing.
HINTS FOR BEST RESULTS:
• To slice meats wafer thin, chill thoroughly before slicing.
• Meats should be boneless, fruits should be free of seeds.
• Foods with an uneven texture, like fish or steaks, are often dicult to slice. Partially freeze
before slicing.
• At canning time, use the slicer to quickly slice cucumbers and onions for attractive pickles…
apples for pies… vegetables for the freezer.
•
For food dehydrators: produces thick or thin slices of uniform thickness for even dehydrating.
• Handy for slicing homemade or bakery bread: a great companion for your bread machine.
NOTICE:
This appliance is for household use only. No user-serviceable parts are inside. In the event service
SERVICE
is needed, you may return your food slicer to EdgeCraft Corp., where the cost of repair or
electrical or mechanical adjustment can be estimated before the repair is undertaken. Please
include your return address and a brief description of the problem or damage to the slicer on a
separate sheet inside the box.
Send your slicer, insured and postage prepaid to:
EdgeCraft Corporation
825 Southwood Road, Avondale, PA 19311 U.S.A.
Retain evidence of shipping for your protection.
Limited Warranty: Used with normal care, this EdgeCraft product is guaranteed against defective material and
workmanship for a period of one (1) year from the date of original purchase (“Warranty Period”). We will repair
or replace, at our option, any product or part that is defective in material or workmanship without charge if
the product is returned to us postage prepaid with dated proof of purchase within the Warranty Period. This
warranty does not apply to commercial use or any product abuse. ALL IMPLIED WARRANTIES, INCLUDING
IMPLIED WARRANTIES OF MERCHANTABILITY AND FITNESS FOR A PARTICULAR PURPOSE, ARE LIMITED
TO THE WARRANTY PERIOD. EDGECRAFT CORPORATION SHALL NOT BE LIABLE FOR ANY INCIDENTAL
OR CONSEQUENTIAL DAMAGES. Some states do not allow limitations on how long an implied warranty lasts
and some states do not allow exclusions or limitation of incidental or consequential damages, so the above
limitations or exclusions may not apply to you. This Limited Warranty gives you specific legal rights, and you may
also have other rights which vary from state to state.
This product may be covered by one or more EdgeCraft patents and/or patents pending as marked on the product.
Conforms to UL Std. 982 Certified to CAN/CSA Std. C22.2 No. 1335.2.14
© EdgeCraft Corporation 2019 Printed in China.
C19 E/F/S chefschoice.com S607200
Consumer Support 1-800-342-3255
English — 8
 Loading...