

Page 1
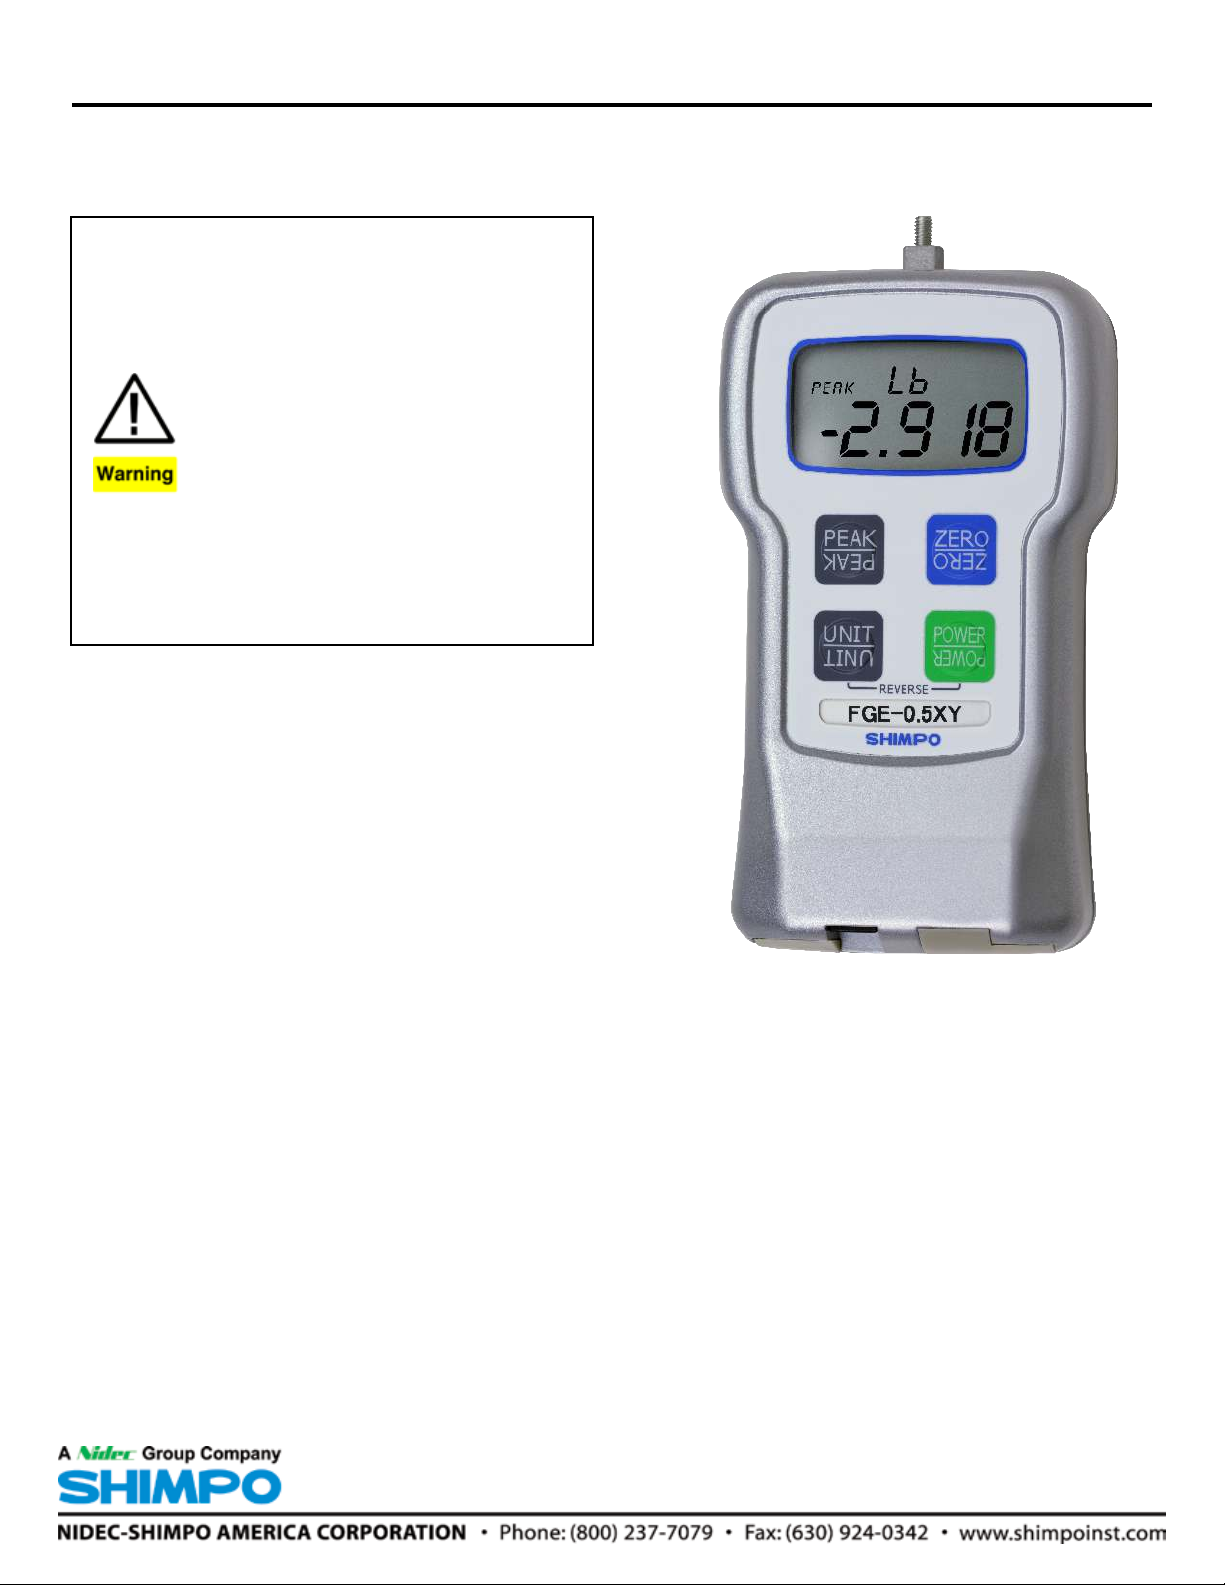
Series FGE-XY Force Gauges
Operation Manual
Do not operate or store instrument in the following
locations:
Explosive areas, near water, oil, dust or chemicals; areas where the temperatures can exceed 104°F
(40° C)
Take precaution to not drop the force gauge. Damage
to the sensor may occur.
Do not modify, disassemble or attempt to repair the
unit. Send to the factory for proper repair.
If upon delivery damage to the unit is detected, do not
operate the unit. Notify the shipping carrier immediately to obtain damage claim instructions.
Only measure forces that are in line with the measuring shaft. Do not attempt to take any measurements
(tension or compression) at any angle. Failure to keep
measurements in line will damage the instrument.
NIDEC-SHIMPO INSTRUMENTS
The Series FGE-XY Digital Force Gauges combine a rugged, ergonomic and compact design with exceptional accuracy to provide
a solid force testing instrument. These instruments are utilized in
a variety of applications such as, incoming quality inspection, finished goods testing, R&D or almost any portable or force stand
testing requirement.
Simple one button adjustment alters units, while pressing the
peak button quickly produces the highest recorded value during
the test. The 180° reversible display combined with the adjustable
excel in both compression and tension applications in any direction. Models are available from 0.5 lb to 200 lbs ranges providing
a large offering for various testing requirements.
Typical applications include wallboard, wire pull, wire crimps, trigger pull, brake pedal, aerospace ceramic, springs, food ripeness,
corrugated paper strength, blister pack, medical component,
muscle strength, ergonomic testing, adhesives, syringe plunger,
needle sharpness and many more.
ot YX-EGF eht elbane dapyek delebal laud dna noitcerid ecrof
Page 2
E
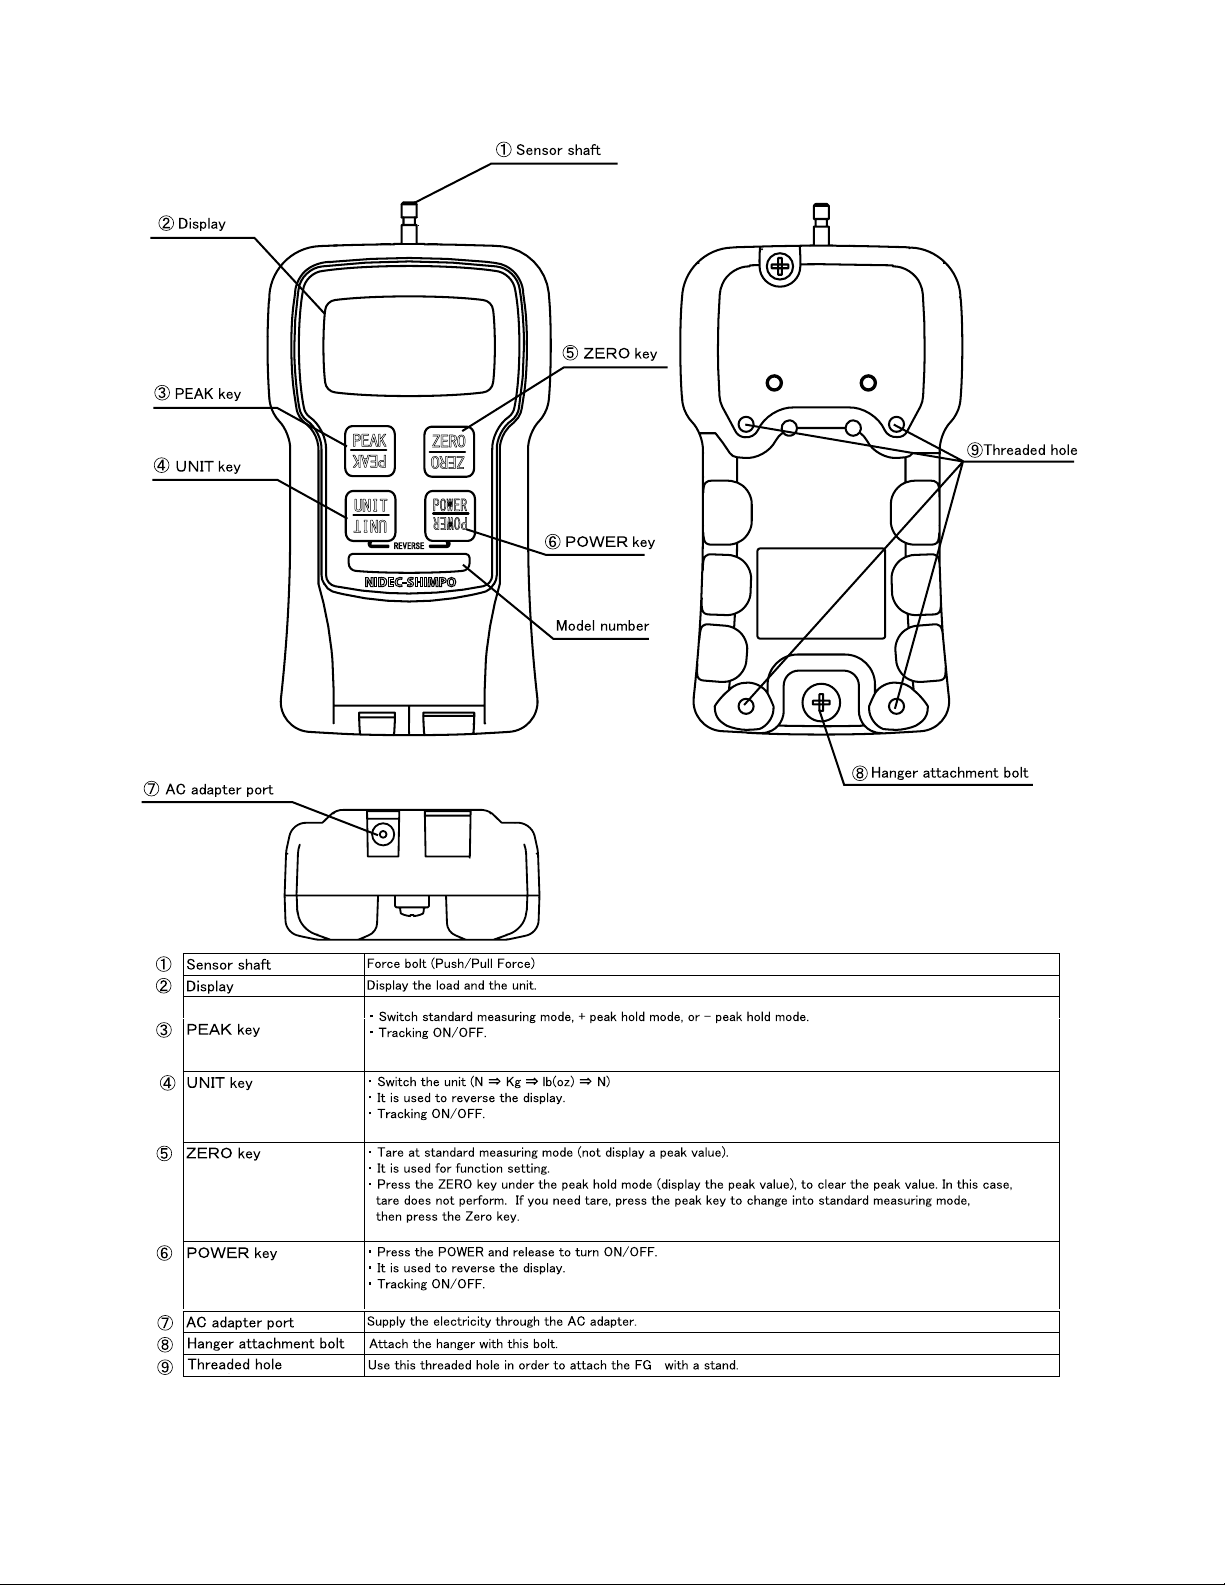
PRODUCT DIAGRAM
2
Page 3

SPECIFICATIONS
FGE-XY Model
Capacity
Resolution
Accuracy ±0.2% F.S.
Display 4-Digit LCD, 0.5” (12 mm) high, Units 0.29” (7 mm). Reversible by the push of a button. Minus sign for tension
Display Update 0.05, 0.1, 0.2, 0.3, 0.5, 1 sec
Sampling Rate 1000 Hz
Overload 200% of F.S. (200 lb.: 150% F.S.)
Power Rechargeable Ni-MH battery or AC adapter/charger
Auto Power Shut-Off Yes (not active if adapter/charge is in use)
Battery Charge 10 hours (when fully charged)
Recharge Time Approximately 17 hours when fully discharged
Temperature Range 32 - 104°F (0 - 40°C)
Dimensions 5.8 x 3 x 1.5” (147 x 75 x 38 mm)
Product Weight Approx. 1 lb (450 g); FGE-200XY Approx. 1.1 lb (500 g)
Package Weight Approx. 2.25 lb ( 1.02 kg) for 0.5 lb and 1 lb ranges; 2.4 lb (1.09 kg) for 2 to 100 lb ranges; 2.75 lb (1.25 kg) for 200 lb range.
Certification CE, RoHs
Included
Accessories
FGE-0.5XY FGE-1XY FGE-2XY FGE-5XY FGE-10XY FGE-20XY FGE-50XY FGE-100XY FGE-200XY
8 oz
0.5 lb
200.0 g
2.000 N
0.01 oz
0.001 lb
0.1 g
0.001 N
16 oz
1 lb
500.0 g
5.000 N
0.01 oz
0.001 lb
0.1 g
0.001 N
32 oz
2 lb
1,000 g
10.00 N
0.01 oz
0.001 lb
1 g
0.01 N
5 lb
2.000 Kg
20.00 N
0.001 lb
0.001 Kg
0.01 N
10 lb
5.000 Kg
50.00 N
0.01 lb
0.001 Kg
0.01 N
20 lb
10.00 Kg
100.0 N
0.01 lb
0.01 Kg
0.1 N
50 lb
20.00 Kg
200.0 N
0.01 lb
0.01 Kg
0.1 N
100 lb
50.00 Kg
500.0 N
0.1 lb
0.01 Kg
0.1 N
200 lb
100 Kg
1000N
0.1 Kg
AC adapter/charger, carrying case, hook, chisel, flat head, notched head, hanger, cone head, thread Adapter, extension rod
0.1 lb
1N
OPERATION
To Begin:
1. Charge the batteries for approximately 17 hours before using
the gauge. The batteries come discharged from the factory.
2. Hand-tighten appropriate attachment to units measuring
shaft. Do not use wrench or any other device or tool to
tighten the attachments to the shaft.
3. Press Power and release. The unit will display model name in
the upper display and the capacity in the main display.
Change Display Units
To change the display units, simply press UNIT and the units will
change with each subsequent press of the button.
Reverse the Display
If the gauge is used with the included hanger or mounted on a test
stand, the display must be reversed.
1. Press POWER and hold. The display will go blank.
2. Press and hold UNIT.
3. Release POWER while still continuing to hold down UNIT. Display will still remain blank.
4. Press POWER once more and release it while still holding UNIT.
At this point the display will appear and be reversed.
5. Release UNIT; the display stays now in the reverse mode.
To return to the normal mode, repeat steps 1-5.
Select Average or Peak
The unit can display the live Averaged reading or the Peak reading. Standard is Average.
If you want to measure the Peak force, follow this procedure:
1. Press PEAK; the word PEAK will appear in the upper left corner
of the display. If you wish to have a minus sign on the Peak, press
PEAK again.
2. The display will freeze and show only the peak force on any
given test.
3. To reset the Peak reading, press ZERO to clear the current
Peak reading and start over.
If you wish to go back to Average reading mode, press PEAK
again. The PEAK icon will disappear from the display.
3
Page 4

Taking a Measurement
After the appropriate attachment has been hand-tightened on the
instrument, tare the unit by pressing ZERO.
Tension Measurement
To measure tensile forces, use the hook attachment provided.
The display will show the force measured with a minus sign (-) to
the left of the digits.
Note: To eliminate the minus (-) sign during tensile operation, this
may be changed. Review the “Function Setting” section.
Compression Measurement
To measure compression forces, use the flat head attachment
provided. The display will not show any sign for compression.
Note: To display a minus sign (-) for compression forces, consult
the “Function Settings” section for making the change.
Low Battery
When the battery charge is low, LO BAT will appear indicating
the batteries need to be charged. To completely charge fully depleted batteries requires approximately 17 hours of charging time
with the unit off. The units possess a smart charging system that
shuts off the charging circuit once the batteries are fully charged.
Note: The unit may operate with the charging adapter while the
batteries are being charged. This will however lengthen charging
time.
Note: To modify the auto power off function, consult the “Function
Setting” section.
Tracking Function
The tracking function accounts and compensates for temperature
drift. It is advised to keep this function running for optimal performance. However, when measuring very minute forces (a few
ounces or grams) at a very slow rate, it may be advisable to disable this function.
To turn the tracking function off, follow these steps:
1. Turn POWER off
2. Press PEAK and UNIT switches simultaneously and hold. Then
press and release POWER. If the tracking function was on, the
display will show TRK OFF momentarily to confirm successful disable.
3. Release PEAK and UNIT
The tracking function is now off. Repeat these steps to activate
the tracking function. The gauge displays TRK SET when reactivated.
FUNCTION SETTING
To change the default parameters of the gauge, follow the procedure to access the settings:
1. Press and hold the ZERO button.
Auto Power Off
If the gauge is on and there is no activity for 10 minutes, the unit
automatically powers off to conserve the batteries. At 9 minutes
without activity, PWR appears to notify that there is 1 minute before
auto power-off. If the charging adapter is powering the gauge, the
auto off function is inactive.
Power OFF;
Press and hold ZERO button. Press and release the POWER button.
Plus or Minus
Sign
PEAK
Display Update
Time
PEAK
Auto Power
Off
ZERO;
Save and Exit
F01
0001
F02
F03
UNIT
MINUS
UNIT
3
UNIT
10
UNIT UNIT
F01
-0001
UNIT UNIT UNIT
F02
5
UNIT UNIT
F03
OFF
F01
0001
PLUS
F02
10
F03
10
2. Press and release the POWER button
3. Each time the PEAK button is pressed, the unit will scroll
through each of the functions.
4. Press the ZERO button to exit.
F02
UNIT
20
F02
1
UNIT UNIT
F02
2
F02
3
4
Page 5

CALIBRATION REqUIREMENTS
1. Secure and mount force gauge to a calibration stand and mount
the gauge upside down.
2. Obtain the appropriate full scale Metric range calibration weight
of your unit.
12. If calibration was unsuccessful, the display will show ERR. Remove the calibration weight, then press UNIT. Repeat the procedure to attempt for a correct calibration.
Err
3. Turn POWER OFF
4. Attach the fixture on the shaft of the force gauge. Thread and
tighten onto shaft by hand only.
5. Press and hold the UNIT, PEAK and ZERO switches.
6. Press and release the POWER switch while still holding the
other 3 switches. Continue holding the 3 switches until the display
reads CAL, now release the three switches.
CAL
-00-
7. Press the UNIT switch. The display will blink SCN for 10 seconds then show ZER. The force gauge is now ready for zero point
calibration.
“SCN”
-00-
8. Press ZERO to zero calibrate. Wait approximately 18 seconds.
The display will blink SCN then PEK. Do not press any other
switches or move the sensing shaft during calibration.
ZER
88888
88888
TROUBLESHOOTING
The following are general checkpoints. Please call Shimpo or your
dealer for further assistance.
Force Gauges does not turn on: Check that power adapter is connected properly to unit and outlet.
Error codes are displayed: Turn unit off, then back on to reset. If
error codes continue, see table below
Small Display Condition Action
OVR
ERR
3
ERR
4
The load exceeds
120% of its capacity
EEPROM reading
error
EEPROM writing error
Remove excessive
load.
Turn off, then turn on
again, if the display
does not return to
normal operation
send unit in for repair.
9. Hang the calibration weight on the hook and stabilize. The process values will change. The gauge is now ready for full-scale
calibration.
10. Press the PEAK switch to begin full scale calibration. Display
blinks SCN. Do not press any keys or touch the unit or weight
during calibration. After approximately 18 seconds, the display
blinks END. After an additional 5 seconds, the display blinks OK
if successful.
“SCN”
88888
11. Press the UNIT button, the unit automatically powers off.
“End”
88888
“oK”
88888
5
Page 6

DIMENSIONS
 Loading...