Page 1

2 YEAR WARRANTY (RESTRICTIONS APPLY)
Imada, Inc. warrants its products to the original purchaser to be free from defects
in workmanship and material under normal use and proper maintenance for two
years (one year for adapters, attachments and cables) from original purchase.This
warranty shall not be effective if the product has been subject to overload, shock
load, misuse, negligence, accident or repairs attempted by others than Imada, Inc.
During the warranty period, we will, at our option, either repair or replace
defective products. Please call our customer service department for a return
authorization number and return the defective product to us with freight prepaid.
The foregoing warranty constitutes the SOLE AND EXCLUSIVE WARRANTY, and we
hereby disclaim all other warranties, express, statutory or implied, applicable to the
products and/or software, including but not limited to all implied warranties of
merchantability, fitness, non-infringement, results, accuracy, security and freedom
from computer virus. In no event shall Imada, Inc.and/or its affiliated companies be
liable for any incidental, consequential or punitive damages in connection with the
use of its products and/or software.
Digital Force Gauge
Complete color
catalog available.
Call 800-373-9989
or E-mail us.
3100 Dundee Rd., Suite 707, Northbrook, IL 60062 USA
Telephone: (847) 562-0834 Fax: (847) 562-0839
www.imada.com E-mail: imada@imada.com
ISO 9001 & ISO/IEC 17025 Accredited
04/07
Specifications subject to change without notice.
Model: DS2
INSTRUCTION MANUAL
Page 2

INTRODUCTION
DS2 Series are state-of-the-art basic performance, easy-to-use
digital force gauges which feature giant, easy-to-read LCD displays
and provide RS-232, Digimatic and analog output. The Real time
measuring mode displays force transients and the Peak measuring
mode captures the peak force achieved during a test. Selectable
lbf(ozf), kgf(gf), and N measuring units.
IMPORTANT
Make sure to read this manual before operating.
1. WARNING!! Test samples and fixtures can break or shatter,
wear eye and body protection to avoid injury.
2. WARNING!! REGARDLESS of whether the unit is ON or OFF,
DO NOT exceed the capacity of the gauge.At 110% of the rated
capacity, the display flashes to warn. NEVER exceed 200% of the
rated capacity, or the load cell will be damaged.Avoid shock
load.
3. The gauge can be used between 30 – 100°F (0 – 40°C)
For the most accurate results, use the gauge at temperatures
close to ones on the certificate of calibration.
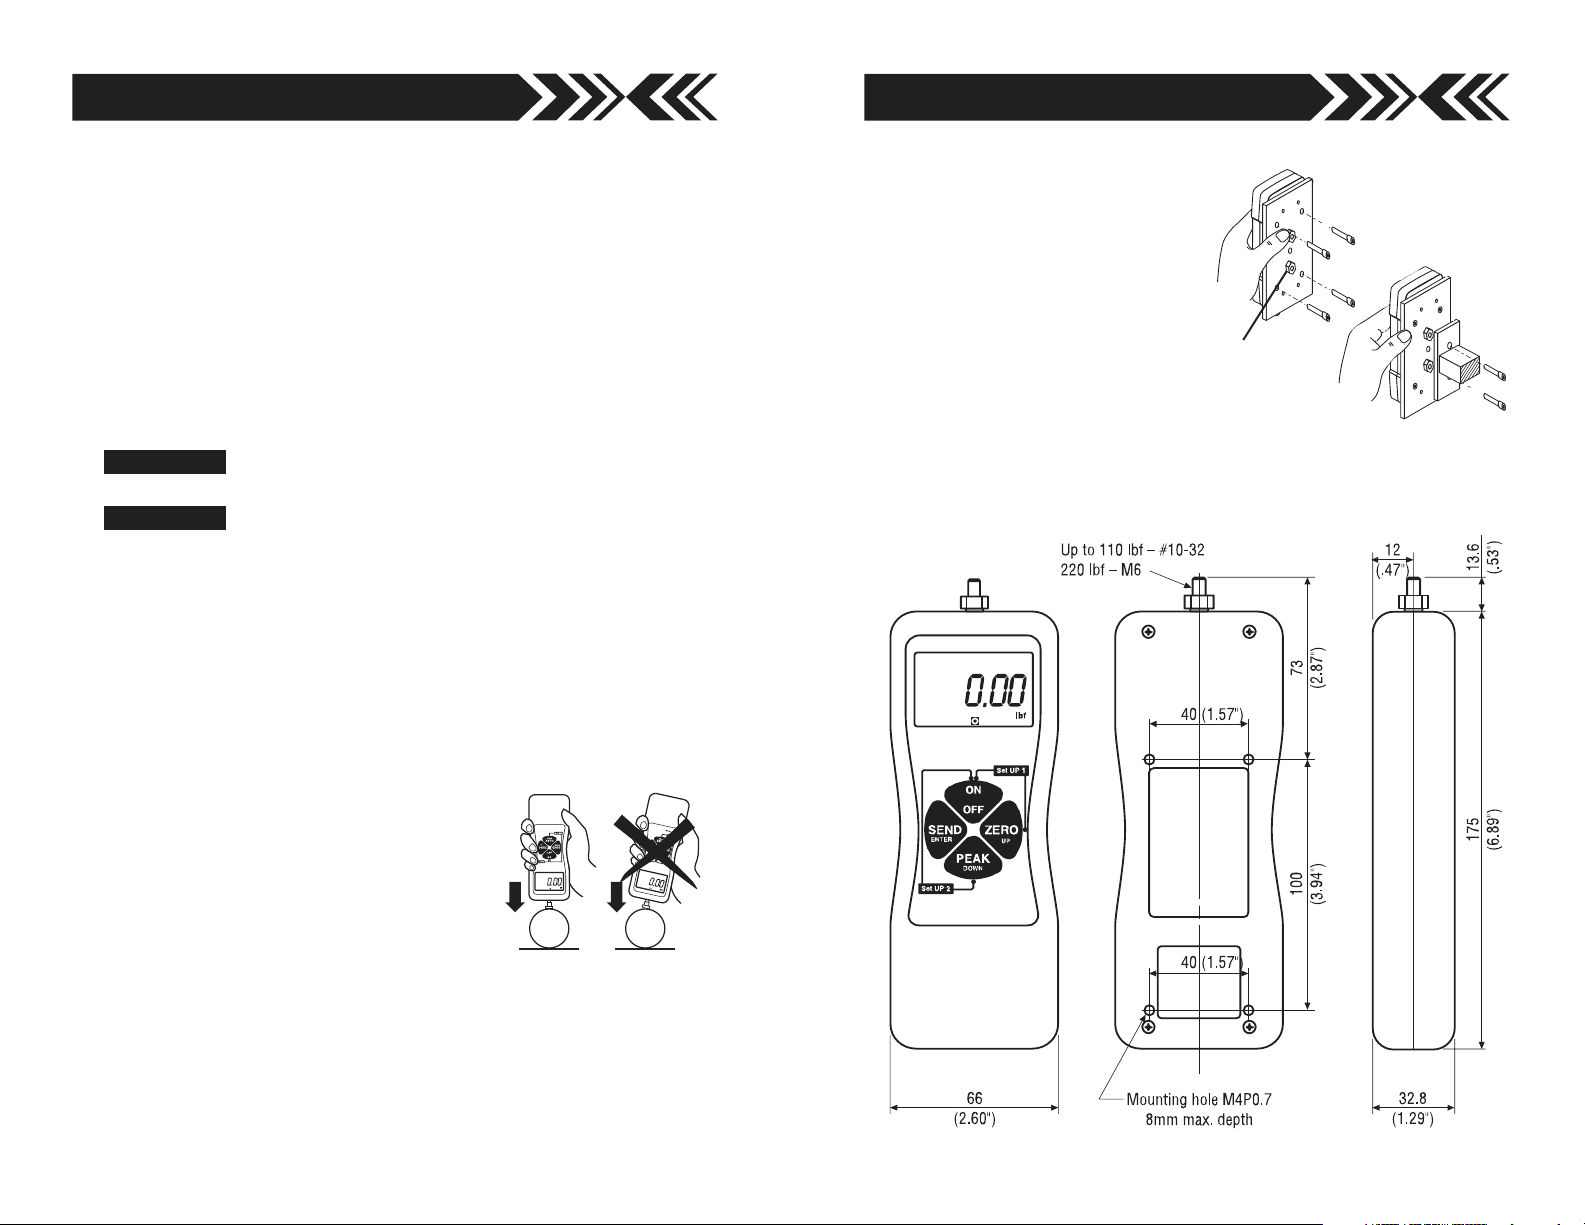
4. When mounting DS2 Series, use M4 mounting screws with a
maximum insertion depth of 8 mm into the gauge.
5. Measure in line tension and compression
forces only. DO NOT attempt to measure forces at an angle to the measuring
shaft – damage to load cell and/or shaft
may result.
6. Hand tighten attachments. DO NOT use
tools.
7. Make sure this gauge and all peripherals are powered down
before attaching any cables.
8. DO NOT disassemble the gauge. Disassembly voids warranty.
9. Use only Imada AD120 (or AD230) charger/adapter.
Optional Adapter Plate
AP-001 Adapter Plate mounts
DS2 gauges to most other
brands of test stands.
Use the 4 screws (included) to
mount the DS2 gauge to the AP001 adapter plate.Then use the
2 PEM nuts on the AP-001
adapter plate to mount to other
brands of test stand.
DS2 DIMENSIONS
AP-001
PEM NUTS
IMADA GAUGE
GAUGE MOUNTING
SCREWS (4)
OTHER BRAND TEST STAND
2 MOUNTING PLATE BOLTS
page 11page 2
Page 3

RECHARGING NI-MH BATTERY
1. To maximize the life of the battery, power is shut off after 10
minutes of non-use. Automatic shut off is bypassed when used
with the AC adapter/charger.
2. Battery icon will flash when the gauge needs to be recharged.
3. Turn off power. Only use the IMADA AC adapter/charger pro-
vided, AD120 for 115VAC, AD230 for 230VAC. Plug into the
correct AC output. It takes 10 hours to charge fully.
4. When the gauge is turned off, make sure the AC adapter/charger
is disconnected to avoid overcharging.
ACCESSORIES
Optional Handle
The OH-1 optional handle fits DS2 gauges.
Constructed of high quality steel for rugged use,
the handle facilitates measurements of heavy
loads. Complete with mounting screws.
Optional SW-1 Data Acquisition Software
Use SW-1software to capture and analyze peak data from DS-2 force
gauges.A running log of all the data is displayed along with a chart.
Calculate max/min, average, and standard deviation.
Optional Cables
CB-101 Analog cable (10')
CB-203 RS-232C cable
(10', 9 pin female)
CB-301 Digimatic Cable (10')
page 10
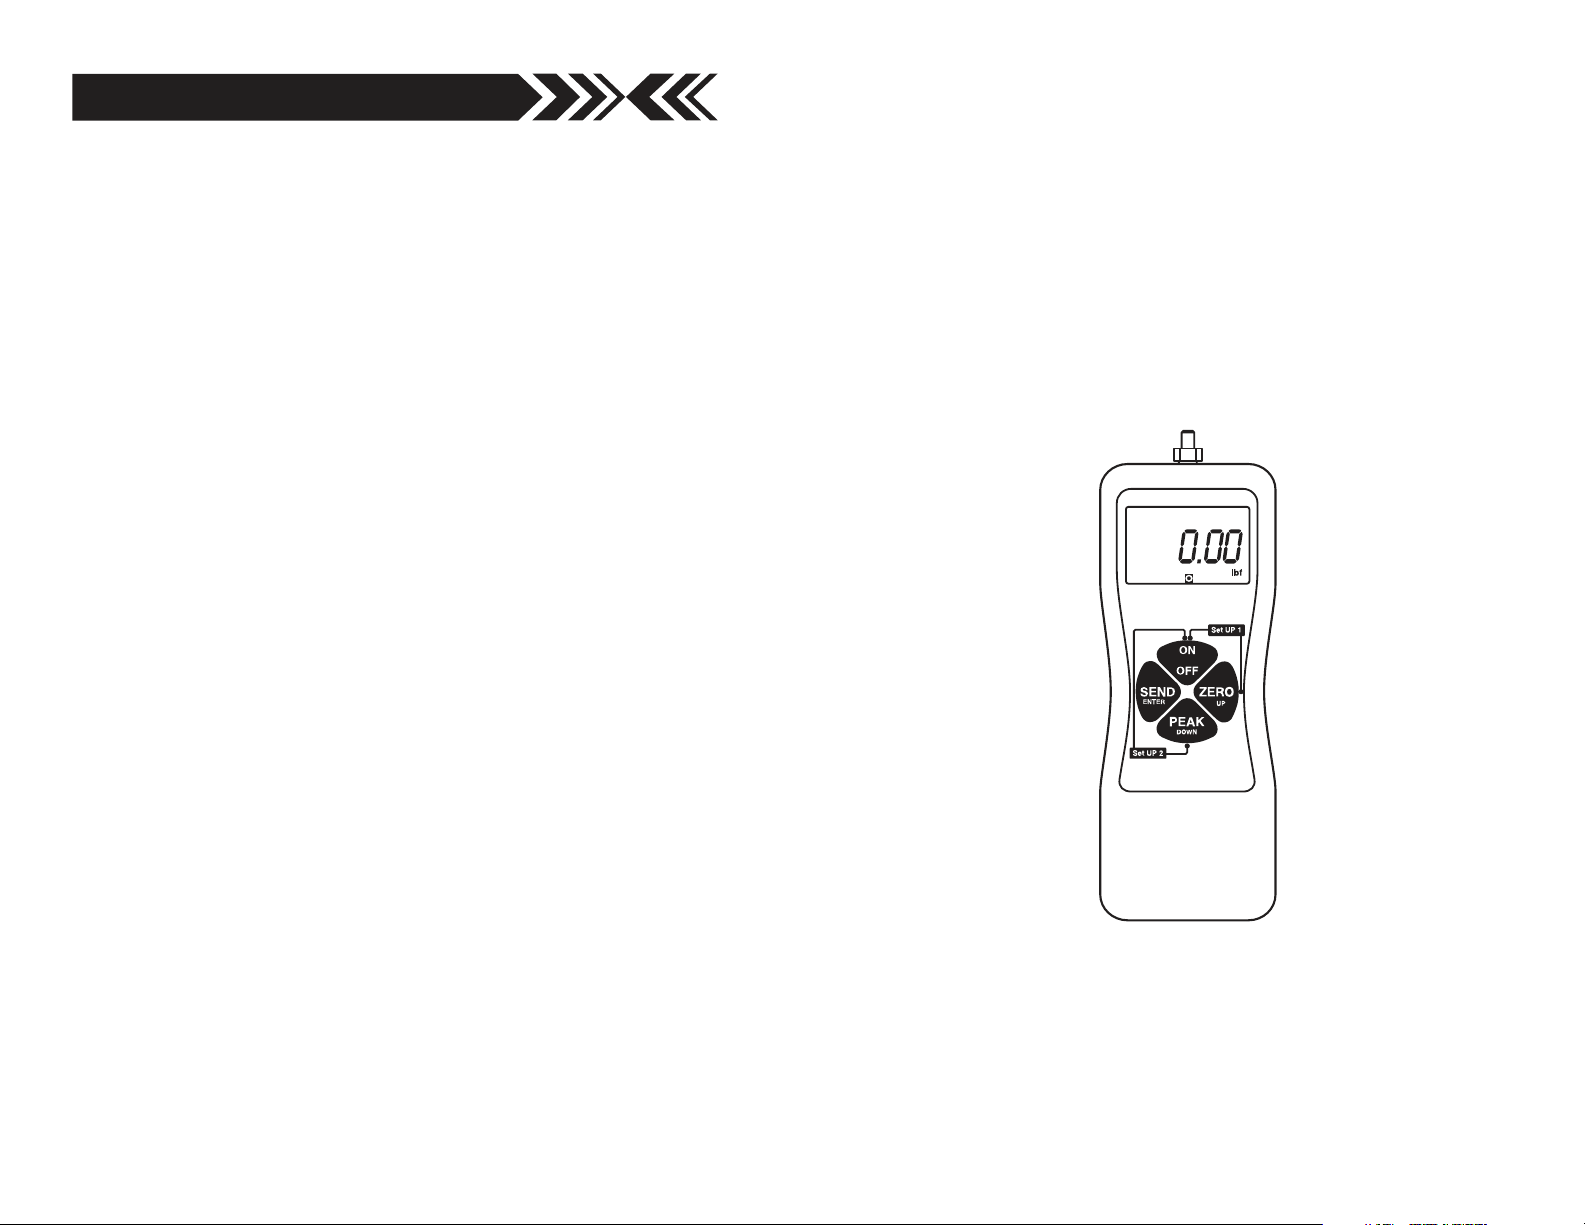
Measuring Shaft
Attach any of the included
standard attachments or
optional special attachments to measure tension
or compression forces.
up to 110 lbf– #10-32
220 lbf– M6
Send
Transmit display value
Charger Port
Recharge the internal
NiMH ba
Imada AD120 or AD230
adapters only.
t
t
tery or use the
LCD DISPLAY
1
Compression icon
Indicates compression measurement
2
Tension icon
Indicates tension measurement
3
Units indicator
Displays selected measuring unit. (ozf,
lbf, kgf or N).
4
Battery icon
Flashes when gauge needs to be
recharged
5
GO/NG Indicator
under low setpoint
–
between low and high setpoints
O
over high setpoint
+
6
Negative sign
Displayed when measuring tension
7
Peak icon
Displays continuously when peak
mode is active
On/Off
Power ON, capacity is displayed.After 10 minutes, unit
powers down if no key is
pressed.
Zero
Tares weight of attachment
and resets peak value
Peak
Press to activate Peak mode
RS-232 Port
See page 8 for pin assignments
6
7
1 2
page 3
345
Page 4

GENERAL OPERATION
Selecting Units
Selecting Units
2. Mitutoyo Digimatic
Connect the CB-301 cable to the communications port and the
device receiving the data. Set up parameters as instructed from the
Mitutoyo processor manual.
Press to turn on the gauge.The display briefly shows the gauge
capacity, then zero with a measuring unit.To change to other units:
1. Turn off the gauge.
2. Hold and press once. Press to cycle units (ozf or
lbf, gf or kgf, and N), then press to select. The LCD display
briefly shows the gauge capacity, then zero with the newly
selected measuring unit, which is retained as a default.
Reversing the Display
Reversing the Display
Press and the LCD display briefly shows the
gauge capacity and then zero. To reverse the display:
1. Turn off the gauge.
STANDARD
DISPLAY
REVERSE
DISPLAY
2. Hold and press once. Press to cycle between
standard and reverse display, then press to select. The
LCD display briefly shows gauge capacity and then zero with
3. ±1 VDC Analog Signal
Connect the CB-101 analog cable to the communications port and
the device receiving the data.
DS2 Ranges (Resolution) Accuracy: ±0.2% F.S. ±1 LSD
Model Capacity (Resolution)
Ounces (ozf)/ Grams (gf)/ Newtons
Pounds (lbf) Kilograms (kgf)
DS2-0.4 7.00 (0.01 ozf) 200.0 (0.1 gf) 2.000 (0.001 N)
DS2-1 18.00 (0.01 ozf) 500.0 (0.1 gf) 5.000 (0.001 N)
DS2-4 4.400 (0.001 lbf) 2.000 (0.001 kgf) 20.00 (0.01 N)
DS2-11 11.00 (0.01 lbf) 5.000 (0.001 kgf) 50.00 (0.01 N)
DS2-44 44.00 (0.01 lbf) 20.00 (0.01 kgf) 200.0 (0.1 N)
DS2-110 110.0 (0.1 lbf) 50.00 (0.01 kgf) 500.0 (0.1 N)
DS2-220 220.0 (0.1 lbf) 100.0 (0.1 kgf) 1000 (1 N)
DS2 Specifications
Accuracy ± 0.2% F.S., ± 1 LSD
Selectable Units lbf(ozf), kgf(gf) or Newtons
Overload Capacity 200% of F.S. (Overload indicator flashes beyond 110% of F.S.)
Data processing speed 1,000 data/second (30 data/second rate selectable)
Display Update 10 times/second
Power Rechargeable NI-MH battery pack or AC adapter
Battery Indicator Display flashes battery icon when battery is low
CPU 8-bit CMOS
Setpoints Programmable high/low setpoints with LCD indicators
Outputs RS-232C, Digimatic and ±1 VDC analog output
Operating Temp. 32° to 100°F (0° to 40°C)
Accessories included AC adapter/charger, hook, flat tip, conical tip, chisel tip,
notched tip, extension shaft
the newly selected display, which is retained as a default.
page 9page 4
Page 5

COMMUNICATIONS PORT
Port Pin Assignments
Pin# Definition
1 RS-232C and Digimatic Ground
2 RS-232C Transmit Data
3 Analog Output ±1VDC
4 Digimatic Data Request
5 RS-232C Receive Data
6 Analog Ground
7 Digimatic Clock
8 Digimatic Transmit Data
1. RS-232C Bi-directional Interface Functions
Connect the gauge and device receiving data with a CB-203 cable.
All gauge functions can be duplicated from a remote location by
using the RS-232C interface.All commands must be sent in uppercase ASCII character format followed by a carriage return (CR).
Signal level: RS-232C, 8 data bits, 1 stop bit, no parity bit
Baud rate: 19200 bps
Hand Tighten Attachments
Hand Tighten Attachments
Do not use tools to tighten attachments to the measuring shaft.
Selecting Peak or Real time Measuring Mode
Selecting Peak or Real Time Measuring Mode
Press to turn on the gauge and enter real time mode. For peak
measurement press . ‘Peak’ appears on the display. Peak read-
ings will not change until a higher value is measured.Press
again to return to real time mode.
Tare
Tare
If necessary, press to tare the weight of the attachment and
shaft. Pressing also clears the peak reading.
RS-232C Interface Functions (Upper case ASCII format)
Command Function Response*
K[CR] Select “kgf/gf” units
N[CR] Select “N” units
O
[CR]
P[CR] Select peak mode
T[CR] Select real time mode
Z[CR] Tare Display
Q[CR] Turn off power
EHHHHLLLL[CR]** Set high/low setpoints(4 digit)
E[CR]** Read high/low setpoints EHHHHLLLL[CR]**
D[CR] Transmit display data [value][units][mode][CR]
*E[CR] response if the command is not accepted.
**Ignore decimal point for high low setpoints
Select “lbf/ozf” units
R[CR] executed
E[CR] error*
HHHH=High, LLLL=Low
setpoint values (4 digit)
HHHH=High, LLLL=Low
Apply Force and Measure
Apply Force and Measure
Make sure to apply force in line with the
gauge measuring shaft.
Collecting Data
Collecting Data
Connect the gauge and PC with a CB203 cable. Measure and press
to transmit data to the PC. Use optional SW-1 (see page 10) or
other software to collect and display data.
page 5page 8
Page 6

OPTIONAL SETTINGS
The following steps are not necessary for most test applications and
may be skipped entirely.
Selecting Test Type (continued from step 2)
Select rapid data processing for Destructive Testing.
Selecting High and Low Setpoints
Program High and Low setpoints to enable GO/NG testing.
1. Turn off the gauge.
2. Hold and press once. The LCD display will
briefly show HI, then the High setpoint value with flashing
HI. Press to increase and to decrease the High
value, then press to select. The LCD display briefly
shows Lo and then Low setpoint value with flashing L.
Press to increase and to decrease the Low value,
then press to select.
3. After is pressed in step 2, the display briefly shows
F-AdC and then FA with flashing F.
4. Press or to cycle between FA (for Destructive
Testing) or SL (for Non-destructive Testing: Factory default),
then press to select.The LCD display briefly shows
the gauge capacity and then zero.
SL: Non-destructive Testing
(for most testing, 30 data/second)
FA: Destructive Testing
(for very rapid force changes, 1,000 data/second)
For example, 5 lbf is set as Low setpoint and 10 lbf as the
High setpoint, the GO/NG indicator on the LCD display
shows for measurements less than 5 lbf (Low setpoint).
O
10 lbf (High setpoint).
–
for measurements between 5–10 lbf and for over
+
page 7page 6
 Loading...