

Page 1

NOTE
TABLE OF CONTENTS
1.0 Design of the device ……………………………………………… 2
2.0 Measuring procedure ………………………………………………… 3
2.1 Information of the measurement of sawdust
3.0 Calibration curves ……………………………………………….. 6
4.0 Determination of the material reference moisture ……………….. 6
5.0 Menu level overview ………………………………………………..… 7
6.0 Changing batteries ………………………….……………………..… 8
7.0 Transfer saved data to the PC …………….……………………….. 9
8.0 Print saved data ……………………………………….………….… 10
9.0 Online print and online send ……………………………….…………….. 10
10.0 Device maintenance instructions …………………………………… 11
11.0 Exemption from liability …………………….……………………….. 11
12.0 Technical data ……………………………………….…………….…. 12
13.0 Most common reasons for miss readings …………………………. 13
14.0 Warranty ……………..………………….……………………………... 14
Checkline-Europe
-16-
Checkline-Europe
-1-
Page 2
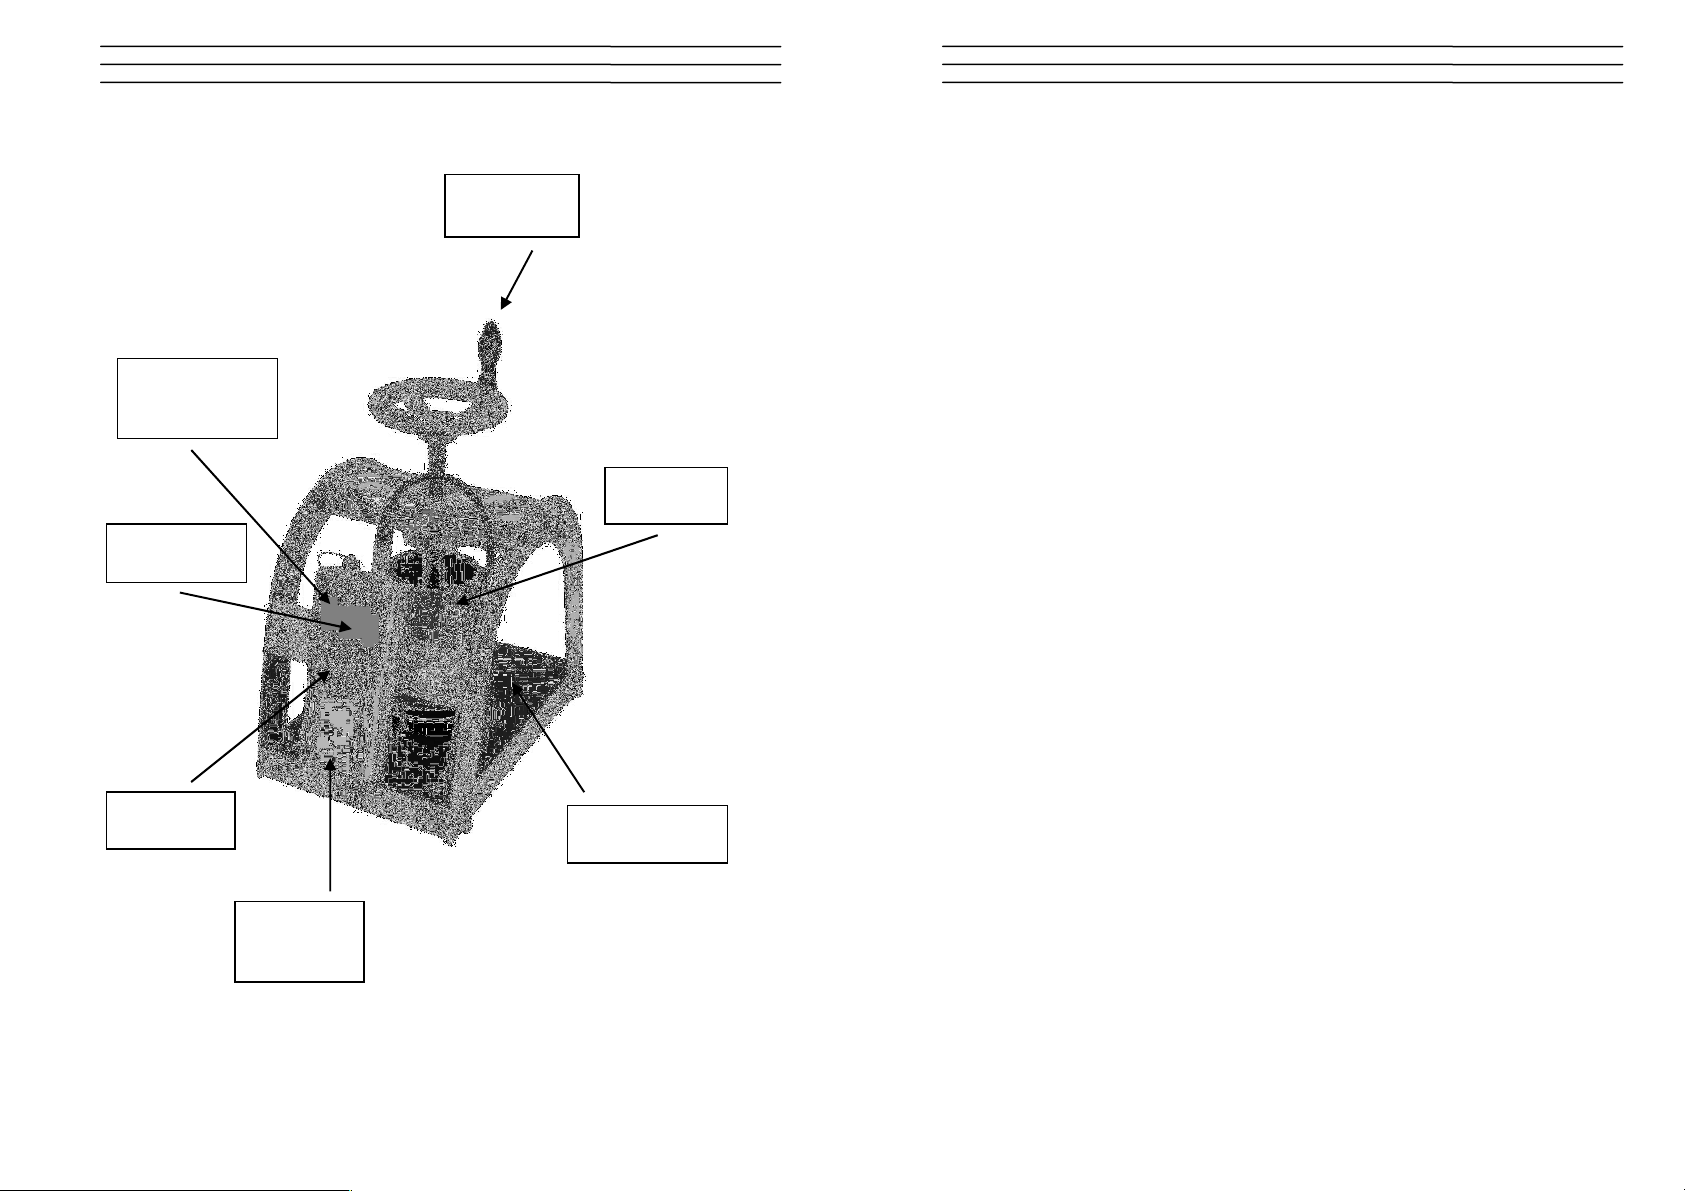
1.0 DESIGN OF THE DEVICE
chamber
button
Name of the
calibration
curve
Water
content
NOTE
Hand wheel
Measuring
Power
Batteries
slot
(flipside)
Checkline-Europe
-2-
LED (green /
orange)
Checkline-Europe
-15-
Page 3
14.0 WARRANTY
Electromatic Equipment Co., Inc. (Electromatic) warrants to the original purchaser
that this product is of merchantable quality and confirms in kind and quality with the
descriptions and specifications thereof. Product failure or malfunction arising out of
any defect in workmanship or material in the product existing at the time of delivery
thereof which manifests itself within one year from the sale of such product, shall be
remedied by repair or replacement of such product, at Electromatic’s option, except
where unauthorized repair, disassembly, tampering, abuse or misapplication has
taken place, as determined by Electromatic. All returns for warranty or non-warranty
repairs and/or replacement must be authorized by Electromatic, in advance, with all
repacking and shipping expenses to the address below to be borne by the
purchaser.
THE FOREGOING WARRANTY’S IN LIEU OF ALL OTHER WARRANTIES,
EXPRESSED OR IMPLIED, INCLUDING BUT NOT LIMITED TO, THE
WARRANTY OF MERCHANTABILITY AND FITNESS FOR ANY PARTICULAR
PURPOSE OR APPLICATION. ELECTROMATIC SHALL NOT BE RESPONSIBLE
NOR LIABLE FOR ANY CONSEQUENTIAL DAMAGE, OF ANY KIND OR
NATURE, RESULTING FROM THE USE OF SUPPLIED EQUIPMENT, WHETHER
SUCH DAMAGE OCCURS OR IS DISCOVERED BEFORE, UPON OR AFTER
REPLACEMENT OR REPAIR, AND WHETHER OR NOT SUCH DAMAGE IS
CAUSED BY MANUFACTURER’S OR SUPPLIER’S NEGLIGENCE WITHIN ONE
YEAR FROM INVOICE DATE.
Some State jurisdictions or States do not allow the exclusion or limitation of
incidental or consequential damages, so the above limitation may not apply to you.
The duration of any implied warranty, including, without limitation, fitness for any
particular purpose and merchantability with respect to this product, is limited to the
duration of the foregoing warranty. Some states do not allow limitations on how long
an implied warranty lasts but, not withstanding, this warranty, in the absence of such
limitations, shall extend for one year from the date of invoice.
Electromatic Equipment Co., Inc.
600 Oakland Ave. Cedarhurst, NY 11516 - USA
Tel: 1-800-645-7330 / Tel: 516-295-4300 / Fax: 516-295-4399
Every precaution has been taken in the preparation of this manual. Electromatic assumes no
responsibility for errors or omissions. Neither is any liability assumed for damages resulting
from the use of information contained herein. Any brand or product names mentioned herein
are used for identification purposes only, and are trademarks or registered trademarks of their
respective holders.
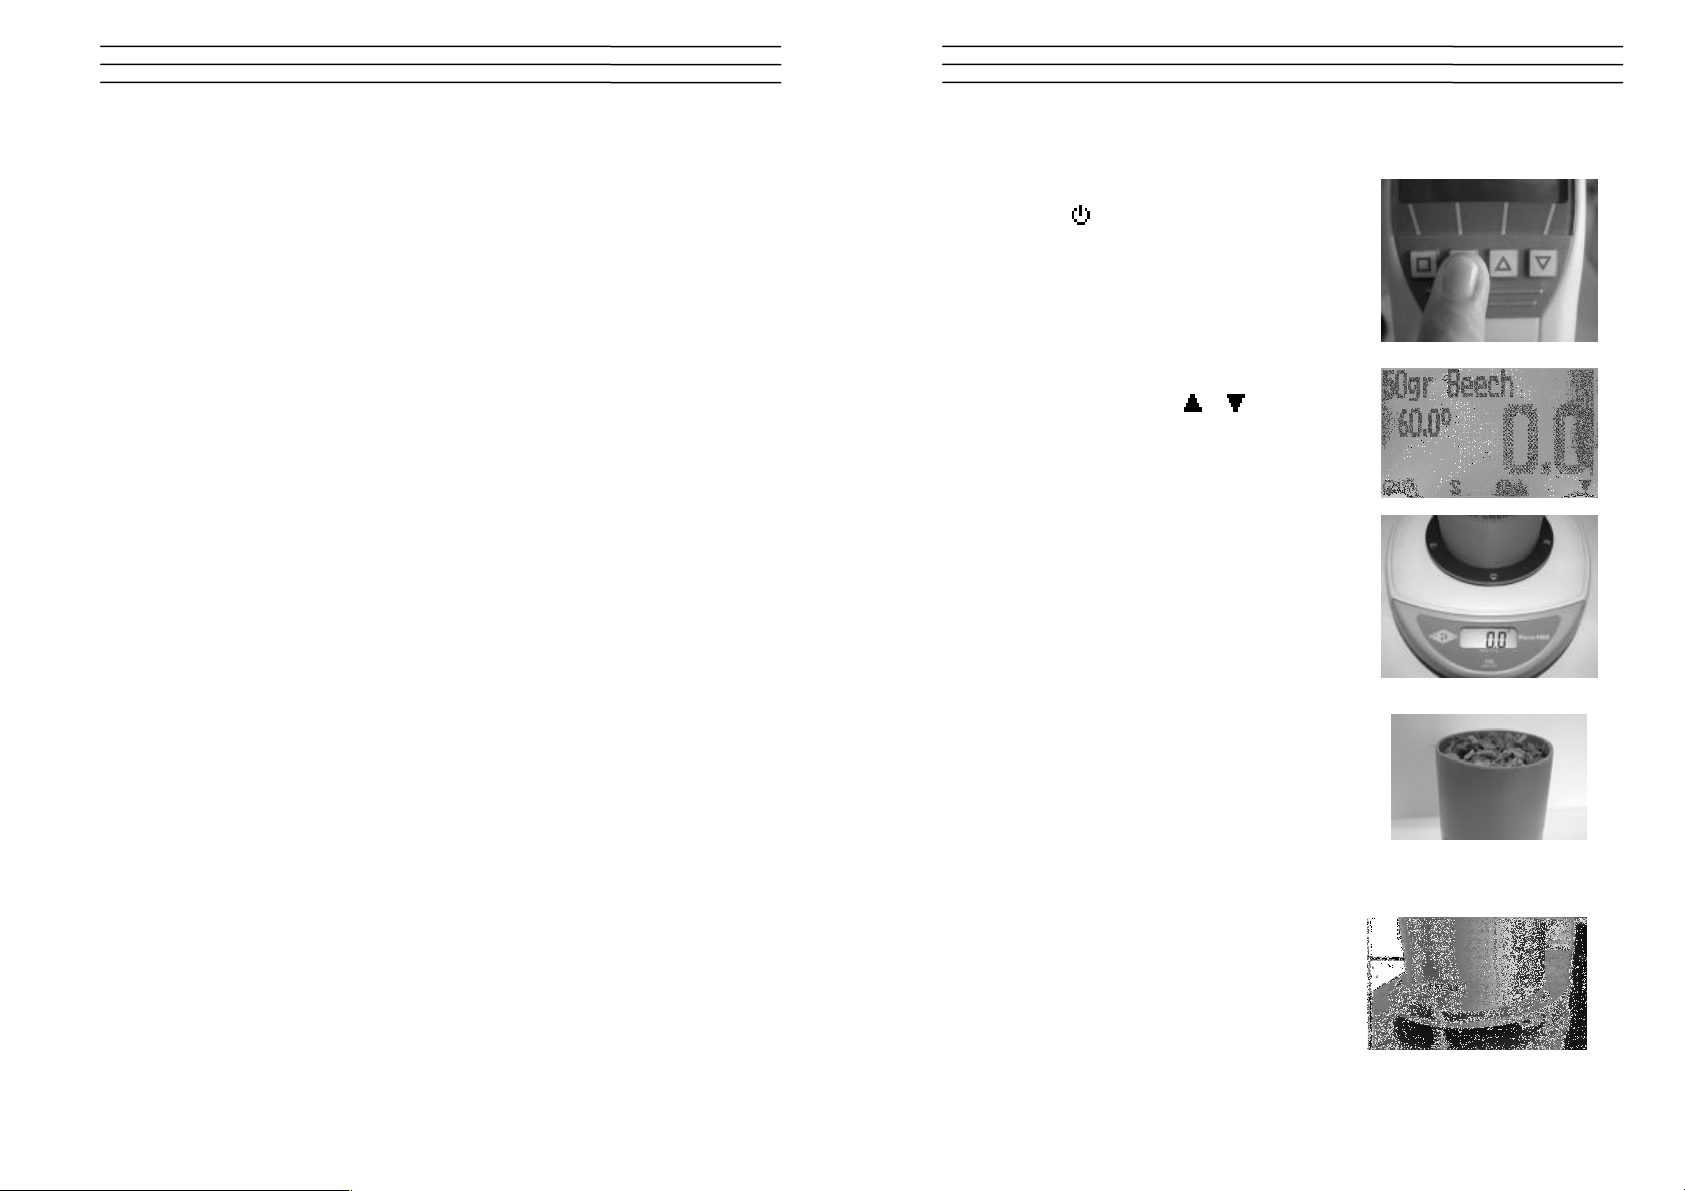
2.0 MEASURING PROCEDURE
1. Switch on the humimeter BLH by pressing the
power button (
2. Select the right calibration curve for your material
under test using the buttons
3. Place the scale on an even surface. Place the
humimeter BLH in the centre of the scale. Zero the
scale to show 0.0g.
4. Fill the measuring chamber with the appropriate
amount of wood shavings. The cup must be filled
either 50g or 100g material. During filling the cup,
the material must not be compressed too much. If
you have no place in the cup for 100g, the cup must
be emptied again and 50g wood chips have to be
filled into the cup.
CAUTION: Excessive force may be destroyed: the cup!
5. Put the measuring chamber into the device. The
sticker has to be facing the electronics housing.
)for 3 sec.
or .
Checkline-Europe
-14-
Checkline-Europe
-3-
Page 4

6. Compress the material in the measuring chamber now by turning the hand
LED off
LED
green
LED
orange
wheel (1 turn per second) until the LED turns green. Now slowly (0.5 turns per
second) must be rotated until the LED flashes orange once.
7. Then immediately press the start button on the
device
8. After a few seconds, the display shows stable
water content.
9. The water content of the sample is now visible on
the display.
10. If the measure value is blinking, the valid
measuring range is exceeded (limits see list on
page 5). In this case the accuracy will be
decreasing.
11. To save the results in the save menu press the
(
button). The storage
was successful when the number in front of the
symbol
reach the store menu please press (
increased. To
) until the
appears.
12. To name the saved results press the
button.
13. Empty the humimeter BLH and ensure that no
material rests are accumulated in the measuring
chamber.
13.0 MOST COMMON REASONS FOR MISS READINGS
• Product temperature out of application range
Material below 0°C resp. above +40°C (32 to 104 °F) may cause faulty
measurements. The storage of cold material in a warm storage area usually
creates condensed water which may lead to major measuring errors.
• Not adjusted material under test
Please ensure that the device and the material under test are being stored at the
same temperature (+/-3°C) before measuring. A very high temperature
difference has a negative effect on the stability of the measurement results.
• Wrong calibration curve
Before you measure your sample, double check the correct selection of the
calibration curve.
• Wrong filling quantity
Fill in exactly the right weight of wood chips in the measuring chamber.
• Wet or moldy material
• Frozen measuring material
• The steel plate which is mounted on the spindle part has to be cleaned at
regular intervals. As well as the pressure pin on the base plate (use a dry cloth
or something like that). Specifically, after measurement of wet material can be
located on the disk. This material can interfere with the following measurements!
• Compression function has to be done smoothly
To compress the hand wheel approximately one turn per second should be
rotated. When the green LED is on, the hand wheel has to be turned a half turn
further per second until the LED is orange is on.
Checkline-Europe
-4-
Checkline-Europe
-13-
Page 5

12.0 TECHNICAL DATA
Resolution of the display 0.5% water content
0.5°C temperature
Measuring range 15 up to 65% depending on the material
Operation temperature 0°C up to +40°C
Storage temperature -20°C to +60°C
Temperature compensation Automatically
Power supply 4 pcs. 1.5 Volt AA Alkaline batteries (900
Auto Switch OFF After app. 6 minutes (adjustable)
Current consumption 60mA (with light)
Display 128 x 64 matrix display, lighted
Dimensions 275 x 180 x 290 mm
Weight ca. 2,9 kg (including batteries)
Degree of protection IP 40
measurements)
Scope of supply Device including measuring cup
4x1.5 Volt AA Alkaline batteries
Software LogMemorizer
USB interface for PC transfer
USB cable
2.1 Information of the measurement of sawdust
Enclosed you will find instructions for measuring sawdust. If you are not sure what
type of wood you use, we recommend a one-time measurement compared with the
drying method according CEN / TS 14774.
The calibration curves using 100g filling quantity only be used in very wet material.
In general, the sample size of 50gr has to be used. If at the 50gr curve to less
pressure is in the measuring cup (LED don´t lights up orange!), than the 100gr
calibration curve must be used.
Material less than 15% water content cannot be measured.
Information: It is possible that other calibration curves (e.g., other types of wood,
defined mixtures, etc.) are calibrated by the Schaller GmbH in the humimeter
device.
Checkline-Europe
-12-
Checkline-Europe
-5-
Page 6

3.0 CALIBRATION CURVES
Type of wood
Filling quantity
Measuring range
Beech
Beech
Birch
Birch
Oak
Oak
Spruce
Spruce
Poplar
Poplar
Reference
−
Mn
50 g 15 % to 45%
100 g 40 % to 60 %
50 g 15 % to 45%
100 g 35 % to 55%
50 g 15% to 45%
100 g 40% to 55%
50 g 15% to 60%
100 g 50% to 65%
50 g 15% to 60%
100 g 50% to 60%
------ ------
To verify the calibration curve only the standardized drying method is permissible
because many other methods used are doubtful and can lead to incorrect
comparison values. If no existing curve fit, then a calibration by the company
Schaller is required.
4.0 DETERMINATION OF THE MATERIAL REFERENCE MOISTURE
The principle is a comparison measurement with the dehydration method according
to CEN/TS 14961:2005. Take the measured sample and weigh it. Dry it out in an
oven and weigh it again.
F
=
MtMn
100% ×
Mn: Mass with average moisture content
: Mass of the dried sample
M
t
%F: Calculated moisture content
10.0 DEVICE MAINTENANCE INSTRUCTIONS
To provide a long life of your device please does not expose it to strong mechanical
loads or heat e.g. dropping it or direct sunlight exposure. Clean your device using a
dry cloth. Any kind of wet cleaning damages the device.
It is not allowed to load the measuring head incorrect (stress, bending), otherwise it
can be broken. Plug and remove the insertion probe of your BLH straight into the
wood chips.
The instrument is not rainproof. Keep it in dry areas. When the device isn’t used for
a longer period (2 months) or when the batteries are empty, they should be removed
to prevent a leakage of the battery acid.
11.0 EXEMPTION FROM LIABILITY
For miss readings and wrong measurements and of this resulting damage we refuse
any liability. This is a device for quick determination of moisture. The moisture
depends on multiple conditions and multiple materials. Therefore we recommend a
plausibility check of the measuring results. Each device includes a serial number
and the guarantee stamp. If those are broken, no claims for guarantee can be
made. In case of a faulty device, please contact Checkline Europe (www.checklineeurope.eu) or our dealer.
Checkline-Europe
-6-
Checkline-Europe
-11-
Page 7
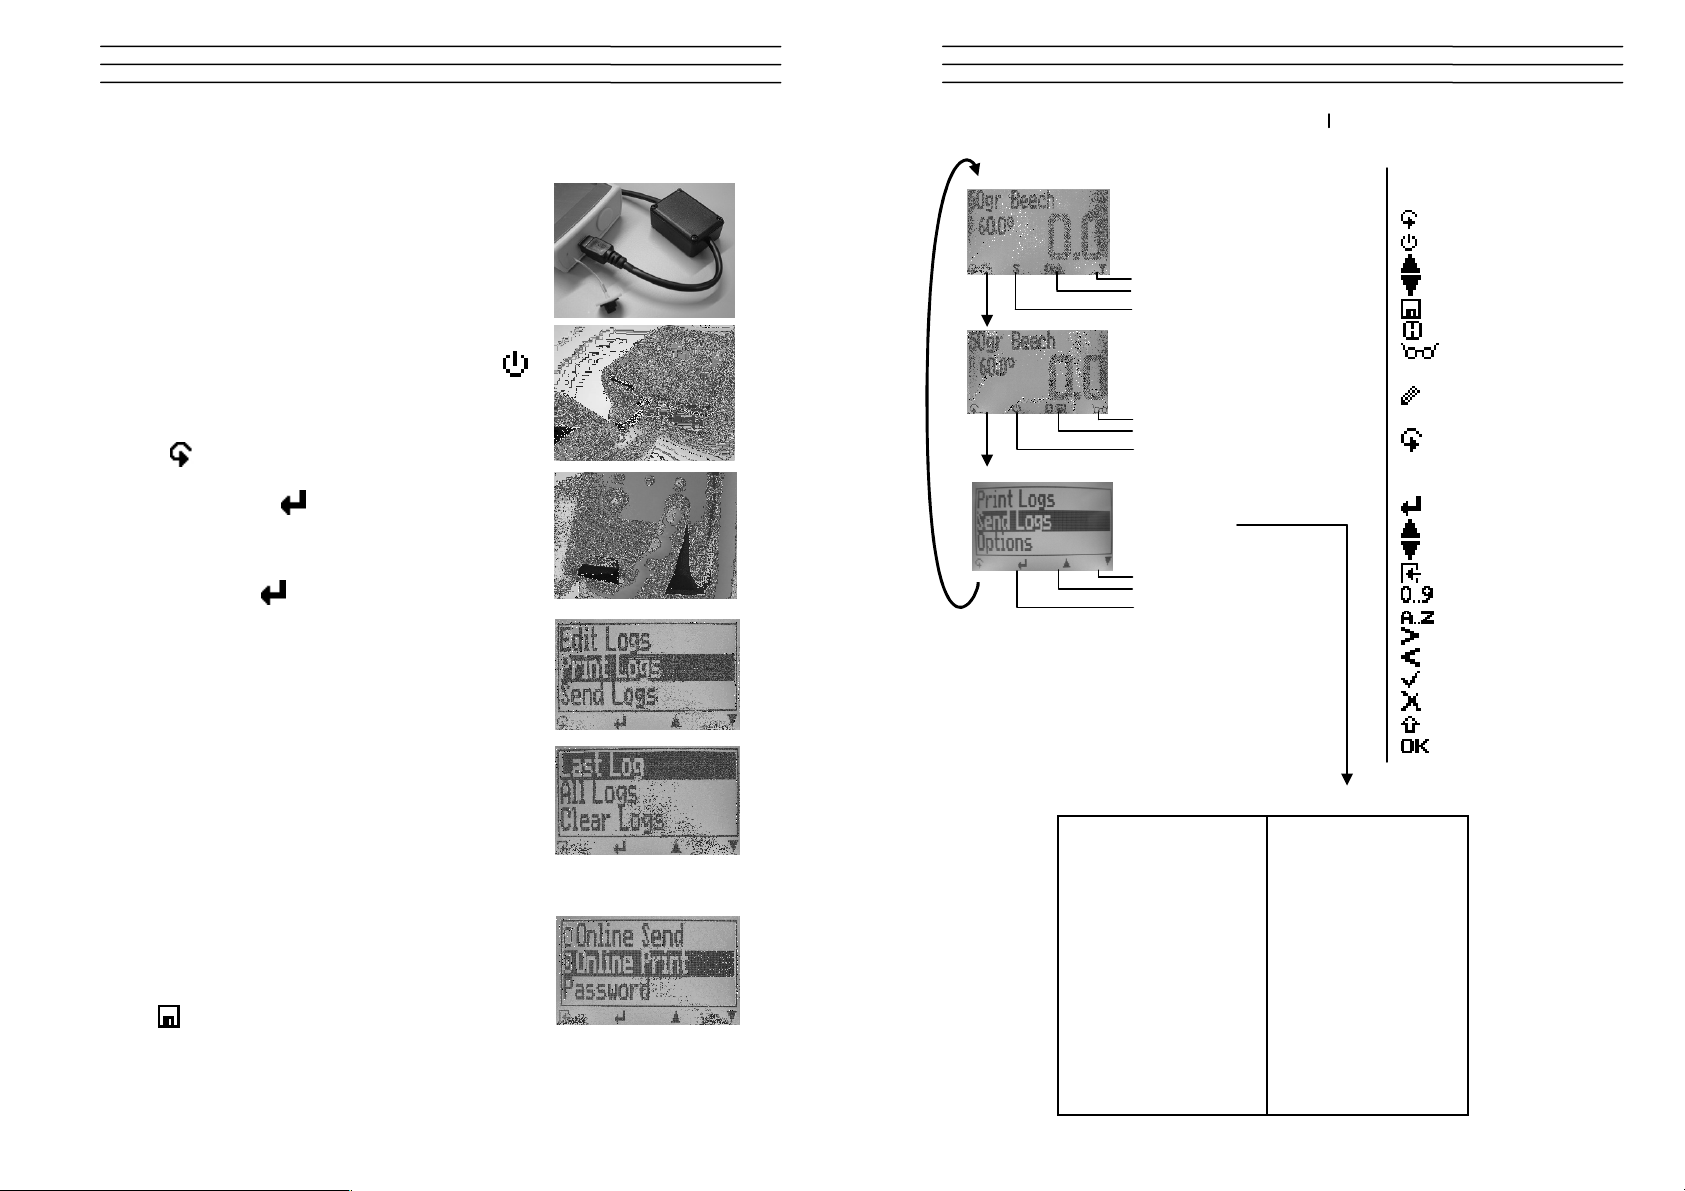
8.0 PRINT SAVED DATA
Keypad symbols
To print your saved data, connect the device to the
printer using the printer cable that was delivered with
your device. Carefully loose the protection cap on the
humimeter BLH. At first plug in the side of the connector
with the close plastic casing at the humimeter BLH.
Then switch on the device.
Not till then the other side of the cable has to be plugged
in at the printer. Switch on the printer by pressing
Now the green LED is blinking. If it does not blink,
please change the batteries and try again.
Press the
the menu (see image on the right). Choose „Print Logs“
and confirm by pressing
Now you can select if you want to print the last saved
measuring series or all saved measuring series (logs).
Confirm by pressing
printed out now.
To save paper, please think of clearing the data storage
regularly.
9.0 ONLINE PRINT AND ONLINE SEND
Your device supports the function “Online Print” and
“Online Send”, this can be activated in the menu
„Options“. If an option is active, every newly recorded log
will immediately be printed or transferred to the PC after
pressing
button at your humimeter until you reach
.
again. The selected logs are
key.
Checkline-Europe
-10-
5.0 MENU LEVEL OVERVIEW
Type selection menu
Next calibration curve
Previous calibration curve
Start measurement
.
Store menu
Watch the saved data (logs)
Save new value (log)
Power off (3 sec.)
Main menu
Switch upper
Switch lower
Open this menu / Enter
Measuring window:
Rolling Menu
Power ON / OFF
Switch upper
Switch lower
Save
Hold
Watch the
saved data
Suppliers data
can be added
Rotate display
Menu:
Enter
Switch upper
Switch lower
Exit
Enter numbers
Enter letters
Next or right
Left
Yes
No
Shift
OK
Edit Logs
Manual Logs
Clear Logs
Print Logs
Last Log
All Logs
Clear Logs
Send Logs
Manual Logs
Clear Logs
Options
Status
Overview main menu
Checkline-Europe
Options
Date / Time
Log Time
Language
Unlock
°C / °F
o Userlevel
BL On Time
Auto Off Time
Materialcalib.
o Online Send
o Online Print
Password
Reset
-7-
Page 8

6.0 CHANGING BATTERIES
Please find enclosed the manual for changing of
batteries:
1. Press with your finger onto the arrow of the battery
cap and pull it back.
2. Remove the empty batteries.
3. Put four new batteries in the device. Make sure
that the position of the battery poles is correct.
4. Press down the batteries and close the cap.
If the battery symbol appears in the measuring window
resp. if a critical charge of battery is shown in the
status, the batteries have to be changed
IMMEDIATELY. If you do not use your humimeter
device for a longer period, remove the batteries. For
eventual resulting damages we cannot provide any
warranty.
7.0 TRANSFER SAVED DATA TO THE PC
To send your saved logs to the PC, connect the
humimeter device to your PC using the USB cable that
was delivered with your device. Carefully loose the
protection cap on your humimeter and plug in the USB
mini B connector. The bigger connector has to be
connected to a USB slot on your PC.
Start the LogMemorizer software on your PC and
switch on your humimeter BLH.
The data transfer can be started on your humimeter or
on the software.
Starting the data transfer on the humimeter:
Press the key until you reach the menu (see
image on the right). Then choose „Send Logs“ and
confirm by pressing the
„Manual Logs“ and confirm with
logs will be sent to your PC.
Starting the data transfer on your PC:
Press the button „remote control“ in the
LogMemorizer software. A drop-down menu with
several options opens (see image below).
For transferring the data you can select „Import last
manual log“ (the last saved measuring series is
transferred) or „Import all manual logs“ (all saved
logs are transferred).
If you click on one of these menu items, the transfer
starts immediately.
For the basic adjustments of the software please look
through the instructions on the LogMemorizer CD.
key. Now choose
again. All saved
Checkline-Europe
-8-
Checkline-Europe
-9-
Page 9

WOOD SHAVINGS MOISTURE METER
BLH
OPERATING INSTRUCTIONS
 Loading...