

Page 1

User Manual
Page 2

Edition
Notes
The Rogue R2X Spot User Manual Edition Rev. 3 covers the description, s afety precautions,
as of this edition
Trademarks
CHAUVET, the Chauvet logo and Rogue R2X Spot are registered trad emarks or trademarks of
Chauvet & Sons, LLC (d/b/a Chauvet and Chauvet Lighting) in the United States and other
countries. Other com pany and product names and lo gos referred to her ein may be tradem arks
of their respective companies.
Copyright Notice
Chauvet owns the content of this User Manual in its entirety, including but not limited to
Electronically published by Chauvet in the United States of America.
Manual Use
Chauvet authorizes it s c us tomers to download and pr i nt th is manual for profess ional inf or mation
sage, copy, stora ge, distributio n, modification,
or printing of this manual or its content for any other purpose without written consent from
Chauvet.
Document
Printing
For better results, pr int this docum ent in c olor, on lett er size pap er (8.5 x 11 i n), double-sided. If
Intended
Any person in charge of ins talling, operatin g, and/or m aintaining this product s hould com pletely
d with the product, as well as this manual, before installin g,
operating, or maintaining this product.
Disclaimer
Chauvet believes that the information contained in this manual is accurate in all respects.
y errors or omissions in this document.
a revision of this manual or a new edition to incorporate such changes.
Edition Notes
installation, program m ing, operat ion, an d m aintenanc e of the Rogue R 2X Spot
release.
pictures, logos, trademarks, and resources.
© Copyright 2018 Chauvet. All rights reserved.
purposes only. Chauvet expr essly prohibits th e u
using A4 paper (210 x 297 mm), configure your printer to scale the content accordingly.
Audience
read through the guide tha t shippe
However, Chauvet assumes no responsibility for an
Chauvet reser ves the r ight to revise a nd m ak e change s to the c onte nt of this doc um ent witho ut
obligation that Chauvet notif y any person or company of such revision or changes. This does
not in any way constitute a commitment by Chauvet to make such changes. Chauvet may issue
Rogue R2X Spot User Manual Rev. 3
Page 3

Table of Contents
Table of Contents
1. Before You Begin ...................................................................................................................................... 1
What Is Included ........................................................................................................................................................... 1
Claims .......................................................................................................................................................................................... 1
Manual Conventions .................................................................................................................................................................... 1
Symbols ....................................................................................................................................................................................... 1
Product At A Glance ..................................................................................................................................................... 2
Safety Notes ................................................................................................................................................................. 2
Personal Safety ............................................................................................................................................................................ 2
Mounting And Rigging .................................................................................................................................................................. 2
Power And Wiring ........................................................................................................................................................................ 2
Operation ..................................................................................................................................................................................... 2
2. Introduction ............................................................................................................................................... 3
Description .................................................................................................................................................................... 3
Features ........................................................................................................................................................................ 3
Overview ....................................................................................................................................................................... 4
Dimensions ................................................................................................................................................................... 5
3. Setup .......................................................................................................................................................... 6
AC Power ...................................................................................................................................................................... 6
AC Plug ........................................................................................................................................................................................ 6
Fuse Replacement ....................................................................................................................................................................... 6
Power Linking ............................................................................................................................................................... 6
DMX Linking.................................................................................................................................................................. 6
DMX Personalities ........................................................................................................................................................................ 7
RDM (Remote Device Management) ........................................................................................................................... 7
Gobo Wheel .................................................................................................................................................................. 8
Gobo Replacement ...................................................................................................................................................................... 9
Color Wheel ................................................................................................................................................................ 11
Mounting ..................................................................................................................................................................... 12
Orientation ................................................................................................................................................................................. 12
Rigging ....................................................................................................................................................................................... 12
Procedure .................................................................................................................................................................................. 12
4. Operation ................................................................................................................................................. 13
Control Panel Description ........................................................................................................................................... 13
Control Options .......................................................................................................................................................................... 13
Programming.............................................................................................................................................................................. 13
Menu Map ................................................................................................................................................................... 14
Menu Map (Cont.) ....................................................................................................................................................... 15
Address ....................................................................................................................................................................... 16
Set the DMX Address ................................................................................................................................................................ 16
Run Mode ................................................................................................................................................................... 16
DMX Personality ........................................................................................................................................................................ 16
Auto Test .................................................................................................................................................................................... 16
Manual Test ............................................................................................................................................................................... 16
Setup ........................................................................................................................................................................... 17
Pan Reverse .............................................................................................................................................................................. 17
Tilt Reverse ................................................................................................................................................................................ 17
Screen Reverse ......................................................................................................................................................................... 17
Pan Angle .................................................................................................................................................................................. 17
Tilt Angle .................................................................................................................................................................................... 17
Pan and Tilt Movement BlackOut ............................................................................................................................................... 17
Color Movement BlackOut ......................................................................................................................................................... 17
Gobo Movement BlackOut ......................................................................................................................................................... 17
LED Frequency .......................................................................................................................................................................... 17
Rogue R2X Spot User Manual Rev. 3 -i-
Page 4

Table of Contents
LED Power ................................................................................................................................................................................. 17
Reset Function ........................................................................................................................................................................... 18
Factory Reset Function .............................................................................................................................................................. 18
System Information ..................................................................................................................................................... 19
RDM ........................................................................................................................................................................................... 19
Offset Mode ................................................................................................................................................................ 19
Pan ............................................................................................................................................................................................. 19
Tilt .............................................................................................................................................................................................. 19
Gobo .......................................................................................................................................................................................... 19
Gobo Rotate ............................................................................................................................................................................... 19
Gobo 2 ....................................................................................................................................................................................... 19
Color 1 ....................................................................................................................................................................................... 19
Color 2 ....................................................................................................................................................................................... 19
Prism .......................................................................................................................................................................................... 19
Focus ......................................................................................................................................................................................... 19
Iris .............................................................................................................................................................................................. 19
Frost ........................................................................................................................................................................................... 19
Dimmer ...................................................................................................................................................................................... 19
FO. Yellow Edge ........................................................................................................................................................................ 19
DMX Values ................................................................................................................................................................ 20
DMX Values (Cont.) .................................................................................................................................................... 21
DMX Values (Cont.) .................................................................................................................................................... 22
DMX Values (Cont.) .................................................................................................................................................... 23
DMX Values (Cont.) .................................................................................................................................................... 24
DMX Values (Cont.) .................................................................................................................................................... 25
5. Technical Information ............................................................................................................................. 26
Product Maintenance .................................................................................................................................................. 26
6. Technical Specifications ......................................................................................................................... 27
Photometrics Chart ..................................................................................................................................................... 28
Returns ....................................................................................................................................................................... 29
Contact Us ................................................................................................................................................... 30
-ii- Rogue R2X Spot User Manual Rev. 3
Page 5
1. BEFORE YOU BEGIN
What Is
• Rogue R2X Spot
• Quick Reference Guide
Claims
Carefully unpack the pr oduct immediately and check the box to make sure all the parts are in
If the box or the contents (the product and included accessories) appear damaged from
. Failure to
report damage to the c arrier immediately may inval idate your claim. In addition, keep the box
For other issues, such as missing components or parts, damage not related to shipping, or
concealed damage, file a claim with Chauvet within 7 days of delivery.
Manual
Convention
Meaning
1–512
A range of values in the text
50/60
A set of mutually exclusive values in the text
<SET>
A button on the product’s control panel
Settings
A product function or a menu option
MENU>Settings
A sequence of menu options
1–10
A range of menu values from which to choose in a menu
Yes/No
A set of two mutually exclusive menu options in a menu
ON
A unique value to be entered or selected in a menu
Symbols
Symbols
Meaning
Critical installation, configuration, or operation information. Failure to
damage third-party equipment, or cause harm to the operator.
The term “DMX” used throughout this manual refers to the USITT DMX512-A digital data
transmission protocol.
Before You Begin
Included
Conventions
• Neutrik® powerCON® power cord
• 2 Omega brackets with mounting hardware
• Warranty Card
the package and are in good condition.
shipping or show signs of mishandling, notif y the carrier immediately, not Chauvet
and contents for inspection.
comply with this information may cause the product not to work,
Important installation or configuration information. Failure to comply
with this information may keep the product from working.
Useful information.
Rogue R2X Spot User Manual Rev. 3 -1-
Page 6
Product At A
x
x
x
Auto-Ranging Power
Supply
P
x
P
P
x
x
Safety Notes
Read all the following Safety Notes before working with this product. These notes include
important information about the installation, usage, and maintenance of this product.
This product contains no user-serviceable parts. Any reference to servicing in this
open the housing or attempt any repairs.
Personal Safety
• Avoid direct eye exposure to the light source while the product is on.
• Do not touch this product’s housing during operation because it may be very hot.
Mounting And
• This product is for indoor use only! To prevent risk of fire or shock, do not expose this
• When hanging this product, always secure to a fastening device using a safety cable.
Power And
• Always make sure you are connecting this product to the proper voltage in accordance
• Never disconnect this product by pulling or tugging on the power cable.
Operation
• Do not operate this product if you see damage to the housing, lenses, or cables. Have the
• In case of a serious operating problem, stop using this product immediately!
In the unlikely event that your Chauvet product may require service, contact Chauvet
Technical Support.
Before You Begin
Use on Dimmer
Glance
Rigging
Outdoor Use
Sound-Activated
DMX
Master/Slave
User Manual will only apply to properly trained Chauvet certified technicians. Do not
All applicable local codes and regulations apply to proper installation of this product.
• Always disconnect this product from its power source before servicing.
• Always connect this product to a grounded circuit to avoid the risk of electrocution.
product to rain or moisture. (IP20)
• CAUTION: When transferring product from extreme temperature environments, (e.g. cold
truck to warm humid ballroom) condensation may form on the internal electronics of the
product. To avoid causing a failure, allow product to fully acclimate to the surrounding
environment before connecting it to power.
• Mount this product in a location with adequate ventilation, at least 20 in (50 cm) from
adjacent surfaces.
• This product weighs 47.8 lb (21.7 kg). Always ask for help when mounting this product to
avoid personal injuries or damage to the product.
• Make sure there are no flammable materials close to this product while it is operating.
• Always carry this product by the handles. Do not carry from the head.
Auto Programs
Replaceable Fuse
User-Serviceable
Wiring
with the specifications in this manual or on the product’s specification label.
• Never connect this product to a dimmer pack or rheostat.
damaged parts replaced by an authorized technician at once.
• To eliminate unnecessary wear and improve its lifespan, during periods of non-use
completely disconnect the product from power via breaker or by unplugging it.
• Do not cover the ventilation slots when operating to avoid internal overheating.
• Do not aim this product toward the Sun. The lenses could concentrate the solar energy
and cause internal overheating.
• The maximum ambient temperature is 113 °F (45 °C). Do not operate this product at a
higher temperature.
-2- Rogue R2X Spot User Manual Rev. 3
Page 7

2. INTRODUCTION
Description
The Rogue R2X Spot is a c ompact, electronic, moving yoke prod uct equipped with a 300-watt
and 2 gobo wheels for gobo
morphing. It also includes a rotating 3-facet prism, remote focus, frost and iris.
Features
Compact, moving yoke fixture with a prism and motorized focus
Simple and complex DMX channel profiles for programming versatility
LED. It includes 2 color wheels, each with 7 colors plus white
•
• Precision-designed optics for hard-edged effects
• Extremely quiet for operation in any situation
• Color wheel 1:
• 7 colors + Open (white)
• Split/linear colors
• Rainbow color spin at variable speed
• Color wheel 2:
• 7 colors + Open (white)
• Split/linear colors
• Rainbow color spin at variable speed
• Gobo wheel 1:
• 7 slot-n-lock gobos + Open
• Indexed, rotating gobo wheel with gobo shake
• Interchangable
• Gobo wheel spin at variable speed
• Gobo wheel 2:
• 8 gobos + Open
• Gobo wheel spin at variable speed
• Variable frost
• 3-facet rotating prism
• DMX channels: 18 or 21
• Pan: 540°
• Tilt: 250°
• Reset over DMX
• Electronic power supply
• RDM enabled for remote addressing and trouble shooting
• 3- and 5-pin DMX input and output connectors
• Selectable LED maximum output to match legacy Rogue R2 Spots
• Selectable PWM settings to maintain flicker free operation on camera
•
Introduction
Rogue R2X Spot User Manual Rev. 3 -3-
Page 8
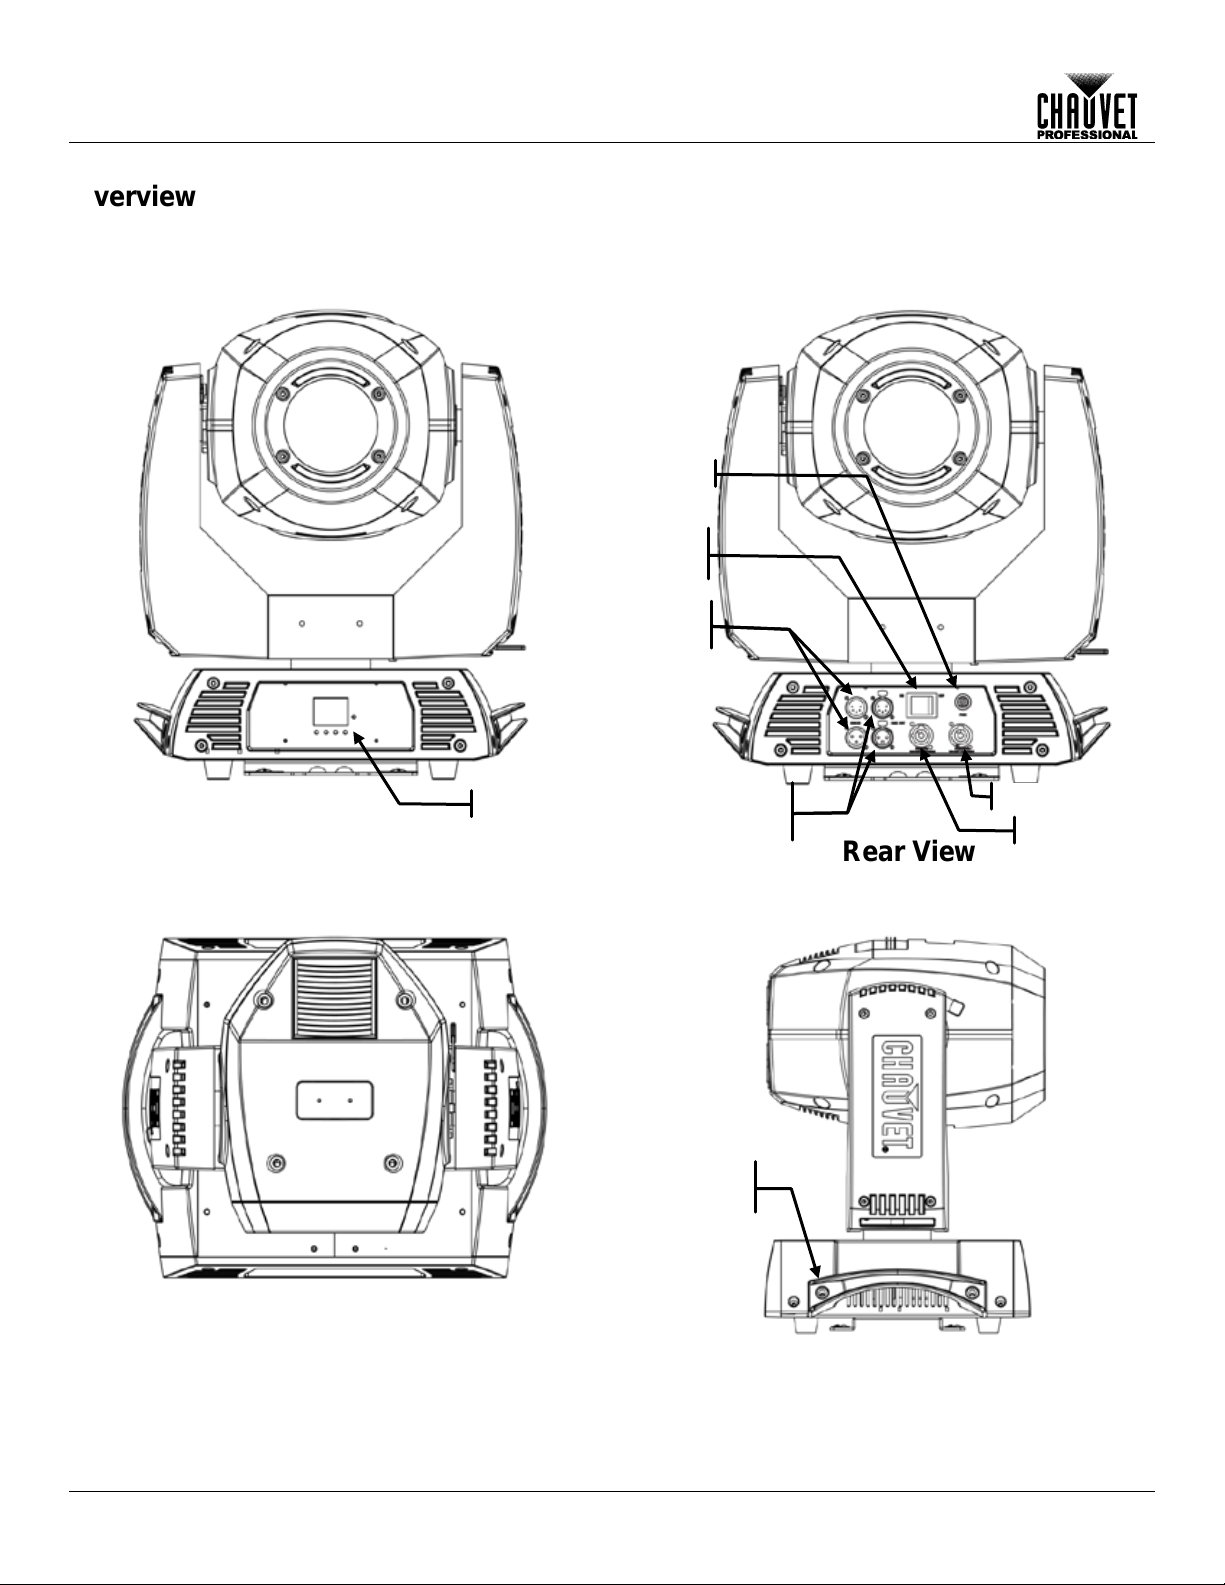
Power Out
Front View
Rear View
Power
Switch
Fuse
Control Panel
Handle
Top View
Side View
Power In
3- and 5-pin
DMX In
3- and 5-pin
DMX In
pin
DMX Out
pin
DMX Out
Introduction
Overview
3- and 5-
3- and 5-
-4- Rogue R2X Spot User Manual Rev. 3
Page 9
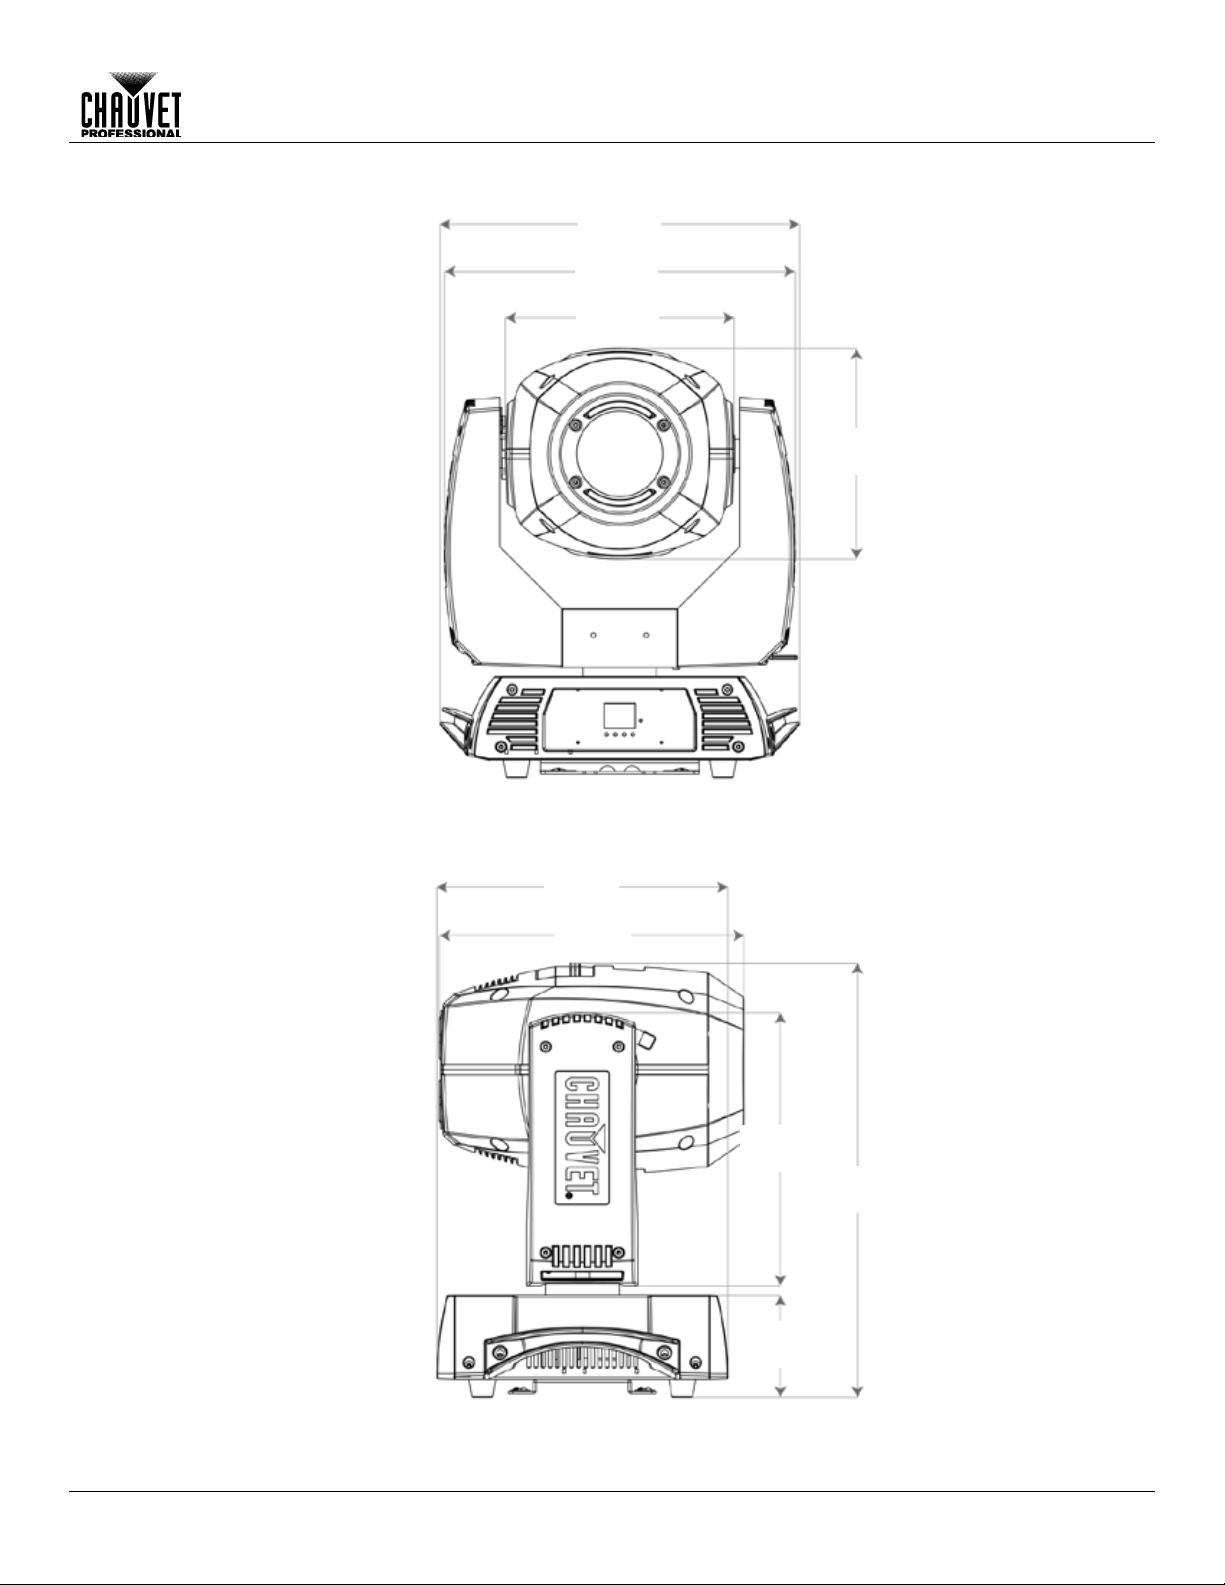
Dimensions
9.45 in
240 mm
10.28 in
261 mm
14.09 in
358 mm
16.10 in
409 mm
13.50 in
343 mm
12.87 in
327 mm
12.13 in
308 mm
4.53 in
115 mm
19.25 in
489 mm
Introduction
Rogue R2X Spot User Manual Rev. 3 -5-
Page 10
AC Power
Each Rogue R2X Spot has an auto-ranging power supply that works with an input voltage range
,
chart
r more
:
www.chauvetlighting.com/download/pro.
• Always connect this product to a protected circuit with an appropriate electrical
completely disconnect the product from power via breaker or by unplugging it.
Never connect this product to a rheostat (variable resistor) or dimmer circuit, even if the
rheostat or dimmer channel serves only as a 0 to 100% switch.
AC Plug
The Rogu e R2X Spot comes with a power input cord term inated with a Neutrik po werCON A
connector on one end and an Edison plug on the other end (U.S. mark et). If the power input
cord that came with your product has no plug, or if you nee d to c h ang e th e Edison plug, use the
table below to wire the new plug.
AC Live
Black
Brown
Yellow or Brass
AC Neutral
White
Blue
Silver
AC Ground
Green/Yellow
Green/Yellow
Green
Fuse
1. Disconnect this product from the power outlet.
4. Screw the fuse holder cap back in place and reconnect power.
Make sure to disconnect the product’s power cord before replacing a blown fuse. Always
replace the blown fuse with another of the sa me type an d ra ting.
Power Linking
The Rogue R2X Spot supports power link ing. You can power link up to 3 products at 120 V; up
for purchase.
DMX Linking
You can link the Rogue R 2X Spot to a D MX controller using a 3- or 5-pin DMX connectio n. If
, you can control each
individually with a single DMX controller.
Setup
3. SETUP
of 100 to 240 VAC, 50/60 H z. To determ ine the po wer requirem ents f or each Rogue R 2X Spot
refer to the label affixed to the pr oduct. You can also r efer to the T echnical Specif ications
in this manual.
The listed current r ati ng in d icat es t he maximum cur rent dr a w dur i ng normal operation. Fo
information, you may download Sizing Circuit Breakers from the Chauvet website
ground to avoid the risk of electrocution or fire.
• To eliminate unnecessary wear and improve its lifespan, during periods of non-use
Connection Wire (U.S.) Wire (Europe) Screw Color
Replacement
2. Using a flat-head screwdriver, unscrew the fuse holder cap from the housing.
3. Remove the blown fuse and replace with another fuse of the same type and rating
(F 7 A, 250 V).
to 6 at 208 V; or up to 7 at 230 V.
This product com es with a power input cord. Power link ing cables are available fr om Chauvet
using other DMX-compatible products with the Rogue R2X Spot
-6- Rogue R2X Spot User Manual Rev. 3
Page 11

Setup
DMX
The Rogue R 2X Spot us es a 3- or 5-pin DMX da ta connec tion for the 18- and 21-c hannel DMX
personalities.
RDM (Remote
Device
Remote Device Management, or RDM, is a standard for allowing DMX-enabled devices to
heck the DMX controller’s User
X
Spot supports RDM protocol that allows feedback to make changes to menu map options.
Download the User Manual from www.chauvetprofessional.com for more details.
If you are not familiar with or need more information about DMX standards, Master/Slave
connectivity, or the DMX cables needed to link this product to a DMX controller,
download the DMX Primer from the Chauvet website:
www.chauvetlighting.com/download/pro.
Personalities
personalities.
• Refer to the Introduction chapter for a brief description of each DMX personality.
• Refer to the Operation chapter to learn how to configure the Rogue R2X Spot to work in
these personalities.
• The DMX Values section provides you with detailed information regarding the DMX
communicate bi-directionally along existing DMX cabling. C
Manual or with the manufacturer as not all DMX controllers have this capability. The Rogue R2
Management)
Rogue R2X Spot User Manual Rev. 3 -7-
Page 12

Gobo Wheel
The Rogue R2X Spot includes two go bo wheels: 7 rot ating gobos plus open on whee l 1 and 8
fixed gobos plus open on wheel 2. The diagram shows the gobo number on the wheel, as
numbered in the DMX Values tables.
Gobo holders 5 and 6 on gobo wheel 1 are slightly smaller to accommodate glass gobos.
1
2
3
4
5
6
7
Open
Gobo Wheel 1
28.8 mm
23.8 mm
Metal Gobo Dimensions
Positions 1, 2, 3, 4, and 7
27 mm
24 mm
Glass Gobo Dimensions
Gobo Wheel 1
Setup
Gobo Wheel 1
Positions 5 and 6
-8- Rogue R2X Spot User Manual Rev. 3
Page 13

Gobo
Replacement
The gobos in the Rogu e R2X Spot gobo whee l 1 are removable from their gobo holders. This
operation is quite simple, although it requires the technician to be careful and to follow the
recommended procedure.
• Make sure to disconnect the product’s power cord before replacing a gobo
• All custom gobos in the Rogue R2X Spot gobo wheel 1 must be aluminu m or glass.
Procedure
1. Turn the product off and disconnect it from the power outlet.
correctly installed, the gobo holder should easily slide itself into the gobo whee l slot.
Gobo Replacement
Gobo Holder
Glare Shield
Gobo
Retaining Spring
Gobo Holder
Gobo Wheel 1
5
6
Setup
• Always replace a gobo with a gobo of the same dimensions.
• When inserting a glass gobo, always make sure that the shiny side of the gobo
(glass base) faces the lamp. This provides a layer of protection against the high
temperature from the lamp.
2. Open the head cover by loosening the 4 Phillips-head ¼-turn screws on the sides of the top
cover.
3. Separate the gobo holder away from the gobo wheel by pushing it toward the front of the
moving head (directi on 1 in the diagram). Be careful not to push the gobo out of the gobo
holder.
4. Extract the gobo holder by pulling it outward (direct ion 2 in the diagram).
5. On a flat surface, remove the expansion ring that holds the gobo in place and remove the
gobo from the gobo holder.
6. Insert a new gobo and hold it in place with the expansion ring.
7. Slide the tip of the gobo holder under the pressure plate near the center of the gobo wheel.
8. Push the gobo holder inwards. DO NOT force the gobo holder into the gobo wheel slot. If
Diagrams
Rogue R2X Spot User Manual Rev. 3 -9-
Page 14

The gobos on gobo wheel 2 are not removable.
8 1 2 3 4
5
6 7 Gobo Wheel 2
Setup
-10- Rogue R2X Spot User Manual Rev. 3
Page 15

Setup
Color Wheel
The Rogue R2X Spot includes 2 color wheels with 7 fixed colors plus open (white) in each
in the
DMX Values tables.
Open
Open
1
2
3
4 7 6 5 1 2 3 4 5 6 7
Color Wheel 1
Color Wheel 2
wheel, as indicated belo w. The diagram shows the color name on the wheel, a s shown
(White)
(White)
Rogue R2X Spot User Manual Rev. 3 -11-
Page 16

Mounting
Before mounting this product, read and follow the Safety Notes. For our Chauvet line of
mounting clamps, go to http://trusst.com/products/.
Orientation
Always mount this product in a safe position and make sure there is adequate room for
Rigging
Chauvet recommends using the following general guidelines when mounting this product.
• When selecting an installation location, consider easy access to this product for operation,
as CH-05 from Chauvet).
Procedure
The Rogue R2X Spot comes with a preinstalled mou nting surface to which you will be able to
)
Use two mounting points p er product. In
addition, use a safety cable to link the product to the structure.
Floor Mounting
Overhead Mounting
Omega Brackets
Safety Cable
Mounting Clamp
Mounting
Surface
Setup
ventilation, configuration, and maintenance.
programming adjustments, and routine maintenance.
• Make sure to mount this product away from any flammable material as indicated in the
Safety Notes
.
• Never mount in places where rain, high humidity, extreme temperature changes, or
restricted ventilation may affect the product.
• If hanging this product, make sure that the mounting location can support the product’s
weight. See the T ec hnical Specif ic at io ns
for the weight-bearing requirements of this
product.
• When hanging this product, always secure to a fastening device using a safety cable (such
attach the 2 included om ega brackets. Make sur e the clamps (such as CLP-15 from Chauvet
are capable of supportin g the weight of this product.
Mounting Diagram
-12- Rogue R2X Spot User Manual Rev. 3
Page 17

4. OPERATION
Control Panel
Button
Function
<MENU>
Exits from the current menu or function
<ENTER>
Enables the currently displayed menu or sets the currently
selected value in to the current function
<UP>
Navigates upward through the menu list or increases the numeric
value when in a function
<DOWN>
Navigates downward through the menu list or decreases the
numeric value when in a function
Control Options
You can set the Rogue R2X Spot starting address in the 001–512 DMX range. This
enables control of up to 24 products in the 21-channel 21CH personality.
Programming
Refer to the Menu Map to unders tand the m enu optio ns. The m enu m ap shows the m ain
screen will automatically revert to the opening screen.
Description
Operation
level and a variable number of programming levels for each option.
• To enter programming mode, press any key on the control panel to wake the opening
screen. Press <MENU> until you see one of the main level options.
• To highlight a menu option or to change a setting, press <UP> or <DOWN>.
• To change menu levels as shown in the Menu Map
This is equivalent to moving right and left of the Menu Map, respectively.
• To accept the current or new value, press <ENTER>.
• To return to the previous menu without making changes, press <MENU>.
• To exit programming mode, press <MENU> until you see one of the main level
options, the opening screen, or do not press any button for 30 seconds and the
, press <ENTER> or <MENU>.
Rogue R2X Spot User Manual Rev. 3 -13-
Page 18

Address
001–512
Sets the DMX starting address
18CH
21CH
Auto Test
Runs the product’s test sequence
Pan
Pan Fine
Tilt
Tilt Fine
P/T Speed
Dimmer
Dimmer Fine
Shutter
Color
Color2
Gobo
Gobo Rot
Gobo2
Focus
Prism
R-Prism
Iris
Frost
P/T Macro
P/T
Ma.Speed
Special
Function
YES
Reverse pan operation
NO
Normal pan operation
YES
Reverse tilt operation
NO
Normal tilt operation
Operation
Menu Map
Main Level Programming Levels Description
Run Mode
DMX
Manual Test
000–255
Selects the DMX mode
Allows manual control of all settings from the
control panel
Setup
-14- Rogue R2X Spot User Manual Rev. 3
Pan Reverse
Tilt Reverse
Page 19

Menu Map (Cont.)
YES
Rotates control screen view 180°
NO
Normal control screen view
540
Selects the 540° pan angle range
360
Selects the 360° pan angle range
180
Selects the 180° pan angle range
270
Selects the 270° tilt angle range
180
Selects the 180° tilt angle range
90
Selects the 90° tilt angle range
YES
NO
YES
NO
YES
NO
600Hz
1200Hz
6000Hz
15KHz
Auto
ECO
Legacy Mode-sets the LED level to the original
R1 Spot intensity
YES
NO
Prism
YES
NO
YES
NO
YES
NO
Zoom/Frost/
Focus
YES
Resets the zoom, frost, and focus functions to
the home position
NO
YES
NO
YES
NO
Ver:
Displays the software version
Running Mode:
Displays the current running mode
Dmx Address:
Displays the current DMX address
Temperature:
Displays the product’s temperature in Celsius
UID:
Displays the products UID number
Main Level Programming Levels Description
Screen Reverse
Pan Angle
Tilt Angle
Operation
Setup
BL.O.P/T Move
BL.O.ColorMove
BL.O.GoboMove
PWM Option
Fans
LED Power 50-100
Pan/Tilt
Shutter/
Color
Reset
Function
Gobo
Defines the pan/tilt move-in-black delay
Defines the color change move-in-black delay
Defines the gobo change move-in-black delay
Selects the PWM output frequency
Change the fan speed mode
Resets pan/tilt functions to the home position
Resets all shutter/prism functions to the home
position
Resets all color functions to the home position
Resets all gobo functions to the home position
Factory Settings
Sys Info
Rogue R2X Spot User Manual Rev. 3 -15-
All
Resets all functions to the home position
Reverts the product back to the original factory
settings
Page 20

Address
This programming level sets the DMX starting address.
• Starting from the Main Level screen, select Address, press <ENTER>.
Set the
In this mode, each product will respond to a unique starting address from the DMX
option
• Change the starting address (001–512), press <ENTER>.
Run Mode
This programming level sets the DMX personality and controls the different test modes.
• Starting from the Main Level screen, select Run Mode, press <ENTER>.
DMX Personality
This option selects which DMX Personality the product uses.
2. Select the DMX personality 18CH or 21CH, press <ENTER>.
• See the DMX Values section for the highest starting address you can select for
due to the new personality setting.
Auto Test
This option runs every attribute individually through 1 cycle.
• Highlight Auto Test, press <ENTER>.
The Auto Test will end after 1 full cycle. You can stop the test by pressing <MENU>
at any time.
Manual Test
This option allows you to run each attribute individually or as a group.
3. Repeat step 2 for the other attributes.
When exiting the M anual Test level, the values of all tested channels w ill go back
to zero.
Operation
DMX Address
controller. All products with the sam e starting address will respond in unis on. This
sets the products DMX address.
1. Highlight DMX, press <ENTER>.
each personality.
• Make sure that the starting addresses on the various products do not overlap
1. Highlight Manual Test, press <ENTER>.
2. Highlight the desired attribute listed on the control panel screen, press <ENTER>.
• Set the attribute value (000–255), press <ENTER>.
-16- Rogue R2X Spot User Manual Rev. 3
Page 21

Setup
This programm ing level controls the product’s head movement, lamp adjustments, and
maintenance timer.
• Starting from the Main Level screen, select Setup, press <ENTER>.
Pan Reverse
Reverses the operation of the pan attribute.
5. Select YES or NO, press <ENTER>.
Tilt Reverse
Reverses the operation of the tilt attribute.
2. Select YES or NO, press <ENTER>.
Screen Reverse
To invert the control panel screen:
2. Select YES or NO, press <ENTER>.
Pan Angle
This option assigns pan range.
2. Select 540, 360, or 180, press <ENTER>.
Tilt Angle
This option assigns tilt range.
2. Select 90, 180, or 270, press <ENTER>.
Pan and Tilt
This option engag es t h e sh ut ter t o block all light out put whenever the pro duc t’s head is in
2. Select YES or NO, press <ENTER>.
Color Movement
This option engages the shutter to block all light output whenever the product’s color
2. Select YES or NO, press <ENTER>.
Gobo Movement
This option engages the shutter to block all light output whenever the product’s gobo
2. Select YES or NO, press <ENTER>.
LED Frequency
This option changes the Pulse Width Modulation (P WM) frequency of the LEDs on the
2. Choose an output frequency. (600Hz, 1200Hz, 6000Hz, or 15KHz).
LED Power
This option enables the product to match the light intensity of the original Rogue R2 Spot.
2. Choose the LED intensity (50-100).
4. Highlight Pan Reverse, press <ENTER>.
1. Highlight Tilt Reverse, press <ENTER>.
1. Highlight Screen Reverse, press <ENTER>.
1. Highlight Pan Angle, press <ENTER>.
1. Highlight Tilt Angle, press <ENTER>.
Operation
Movement BlackOut
BlackOut
BlackOut
motion.
1. Highlight BL.O.P/T Move, press <ENTER>.
wheel is in motion.
1. Highlight BL.O.ColorMove, press <ENTER>.
wheel is in motion.
1. Highlight BL.O.GoboMove, press <ENTER>.
Rogue R2X Spot.
1. Go to the PWM Option main level.
1. Go to the LED POWER main level
Rogue R2X Spot User Manual Rev. 3 -17-
Page 22

Reset Function
This programming level allows the user to reset individual functions to the home position.
• Starting from the Setup screen level, select Reset Function, press <ENTER>.
Pan/Tilt Reset
This option resets the Pan/Tilt functions to the home position.
2. Select YES or NO, press <ENTER>.
Prism Reset
This option resets the Prism functions to the home position.
2. Select YES or NO, press <ENTER>.
Color/Frost Reset
This option resets the Color/Frost functions to the home position.
2. Select YES or NO, press <ENTER>.
Gobo&R/Gobo2
This option resets the Gobo&R/Gobo 2 functions to the home position.
2. Select YES or NO, press <ENTER>.
Focus/Iris
This option resets the Focus/Iris functions to the home position.
2. Select YES or NO, press <ENTER>.
All Reset
This option resets the all the functions to the home position.
2. Select YES or NO, press <ENTER>.
Factory Reset
This reverts the product back to its original factory settings.
2. Select YES or NO, press <ENTER>.
Operation
1. Highlight Pan/Tilt, press <ENTER>.
1. Highlight Shutter/Prism, press <ENTER>.
1. Highlight Color/Frost, press <ENTER>.
Reset
Reset
Function
1. Highlight Gobo&R/Gobo2, press <ENTER>.
1. Highlight Focus/Iris, press <ENTER>.
1. Highlight All, press <ENTER>.
1. Starting from the Setup screen level, select Factory Settings, press <ENTER>.
-18- Rogue R2X Spot User Manual Rev. 3
Page 23

Operation
System
Information
This programming level shows standard information regarding the product’s operating status.
• Temperature: The current product temperature is displayed on the screen.
RDM
This option shows the product’s UID #. The UID # is used when using the RDM functionality of
Use DMX configurations to operate the product with a DMX controller.
Offset Mode
The Offset mode pro vides fine adj ustments for the home position of all the m oving parts in the
the
enter 2323, press <ENTER>. This brings you into the Zero Adjust menu screen.
Pan
1. Highlight PAN, press <ENTER>.
2. Select 000–255, press <ENTER>.
Tilt
1. Highlight TILT, press <ENTER>.
2. Select 000–255, press <ENTER>.
Gobo
1. Highlight GOBO, press <ENTER>.
2. Select 000–255, press <ENTER>.
Gobo Rotate
1. Highlight GOBO ROT, press <ENTER>.
2. Select 000–255, press <ENTER>.
Gobo 2
1. Highlight GOBO2, press <ENTER>.
2. Select 000–255, press <ENTER>.
Color 1
1. Highlight COLOR1, press <ENTER>.
2. Select 000–255, press <ENTER>.
Color 2
1. Highlight COLOR2, press <ENTER>.
2. Select 000–255, press <ENTER>.
Prism
1. Highlight PRISM, press <ENTER>.
2. Select 000–255, press <ENTER>.
Focus
1. Highlight FOCUS, press <ENTER>.
2. Select 000–255, press <ENTER>.
Iris
1. Highlight IRIS, press <ENTER>.
2. Select 000–255, press <ENTER>.
Frost
1. Highlight FROST, press <ENTER>.
2. Select 000–255, press <ENTER>.
Dimmer
1. Highlight DIMMER, press <ENTER>.
2. Select 000–255, press <ENTER>.
FO. Yellow Edge
Reserved for future use.
• Starting from the Main Level screen, select Sys Info, press <ENTER>.
• Ver: The current software version is displayed on the screen.
• Running Mode: The current Running mode is displayed on the screen.
• DMX Address: The current DMX address is displayed on the screen.
the product.
1. Go to the Information main level.
2. Select UID: and the number will show on the screen.
optical path as well as the pan and tilt m ovements. This wa y, when in their home pos ition,
moving parts do not show any border or reduce the light output.
1. Starting from the Main Level screen, Press and hold <MENU> until the passcode screen
appears.
2. Using <UP> to increase the number value and <DOWN> to move to the next column,
Rogue R2X Spot User Manual Rev. 3 -19-
Page 24

21CH
1
Pan
000ó255
0–100%
2
Fine Pan
000ó255
0–100%
3
Tilt
000ó255
0–100%
4
Fine Tilt
000ó255
0–100%
5
Pan/Tilt Speed
000ó255
0–100%
6
Dimmer
000ó255
0–100%
7
Fine Dimmer
000ó255
0–100%
000ó003
216ó255
Closed
Open
000ó007
192ó255
Open
Counter-clockwise color scroll, slow to fast
000ó007
192ó255
Open
Counter-clockwise color scroll, slow to fast
Operation
DMX Values
Channel Function Value Percent/Setting
8 Shutter
9 Color Wheel 2
10 Color Wheel 1
004ó007
008ó076
077ó145
146ó215
008ó015
016ó023
024ó031
032ó039
040ó047
048ó055
056ó063
064ó127
128ó191
008ó015
016ó023
024ó031
032ó039
040ó047
048ó055
056ó063
064ó127
128ó191
Open
Slow to fast
Pulse effect from slow to fast
Random effect from slow to fast
Yellow
Light blue
Green
Red
Magenta
Dark blue
Orange
Split colors
Clockwise color scroll, slow to fast
CTO 3200 K
CTO 5600 K
Green
UV
Orange
Pink
Light blue
Split colors
Clockwise color scroll, slow to fast
-20- Rogue R2X Spot User Manual Rev. 3
Page 25

DMX Values (Cont.)
21CH
000ó007
192ó255
Open
Counter-clockwise gobo scroll, slow to fast
000ó063
232ó255
Gobo index
Boomerang effect, slow to fast
000ó006
192ó255
Open
Counter-clockwise gobo scroll, slow to fast
14
Focus
000ó255
0–100%
000ó004
005ó255
No function
Prism insert
000ó127
194ó255
Prism index
Clockwise rotation, slow to fast
000ó063
192ó255
Wide to narrow
Iris effect, out slow, in fast
000ó007
008ó255
No function
Frost effect
Channel Function Value Percent/Setting
(Cont.)
11 Gobo Wheel 1
12 Gobo Wheel 1 Rotate
008ó015
016ó023
024ó031
032ó039
040ó047
048ó055
056ó063
064ó119
120ó127
128ó191
064ó147
148ó231
Operation
Gobo 1
Gobo 2
Gobo 3
Gobo 4
Gobo 5
Gobo 6
Gobo 7
Gobo shake 1–7, slow to fast
Open
Clockwise gobo scroll, slow to fast
Clockwise rotation, slow to fast
Counter-clockwise rotation, slow to fast
13 Gobo Wheel 2
15 Prism
16 Prism Rotate
17 Iris
18 Frost
007ó013
014ó020
021ó027
028ó034
035ó041
042ó048
049ó055
056ó063
064ó120
121ó127
128ó191
128ó189
190ó193
064ó127
128ó191
Gobo 1
Gobo 2
Gobo 3
Gobo 4
Gobo 5
Gobo 6
Gobo 7
Gobo 8
Gobo shake 1–8, slow to fast
Open
Clockwise gobo scroll, slow to fast
Counter-clockwise rotation, fast to slow
Stop
Iris effect, slow to fast
Iris effect, in slow, out fast
Rogue R2X Spot User Manual Rev. 3 -21-
Page 26

21CH
000ó007
248ó255
No function
Effect 31
Operation
DMX Values (Cont.)
(Cont.)
Channel Function Value Percent/Setting
19 Movement Macros
008ó015
016ó023
024ó031
032ó039
040ó047
048ó055
056ó063
064ó071
072ó079
080ó087
088ó095
096ó103
104ó111
112ó119
120ó127
128ó135
136ó143
144ó151
152ó159
160ó167
168ó175
176ó183
184ó191
192ó199
200ó207
208ó215
216ó223
224ó231
232ó239
240ó247
Effect 1
Effect 2
Effect 3
Effect 4
Effect 5
Effect 6
Effect 7
Effect 8
Effect 9
Effect 10
Effect 11
Effect 12
Effect 13
Effect 14
Effect 15
Effect 16
Effect 17
Effect 18
Effect 19
Effect 20
Effect 21
Effect 22
Effect 23
Effect 24
Effect 25
Effect 26
Effect 27
Effect 28
Effect 29
Effect 30
-22- Rogue R2X Spot User Manual Rev. 3
Page 27

DMX Val u es (Cont.)
21CH
Movement Macro
Speed
000ó007
248ó255
No function
Pan/Tilt movement ramp speed, increase off
18CH
Channel
Function
Value
Percent/Setting
1
Pan
000ó255
0–100%
2
Fine Pan
000ó255
0–100%
3
Tilt
000ó255
0–100%
4
Fine Tilt
000ó255
0–100%
5
Pan/Tilt Speed
000ó255
0–100%
6
Dimmer
000ó255
0–100%
000ó003
216ó255
Closed
Open
Channel Function Value Percent/Setting
(Cont.)
20
Operation
000ó255 0–100%
008ó015
016ó023
024ó031
032ó039
040ó047
048ó055
056ó095
096ó103
21 Control
104ó111
112ó119
120ó127
128ó135
136ó143
144ó151
152ó159
160ó167
168ó239
240ó247
Blackout during pan/tilt (3 sec hold)
Blackout while color wheel moving (3 sec hold)
Blackout while gobo wheels moving (3 sec hold)
Disable pan/tilt blackout (3 sec hold)
Disable color wheel blackout (3 sec hold)
Disable gobo wheel blackout (3 sec hold)
No function
Pan reset
Tilt reset
Color wheel reset
Gobo wheel reset
Gobo rotation reset
Prism reset
Focus reset
All reset
Iris reset
No function
Pan/Tilt movement ramp speed, increase on
7 Shutter
Rogue R2X Spot User Manual Rev. 3 -23-
004ó007
008ó076
077ó145
146ó215
Open
Slow to fast
Pulse effect from slow to fast
Random effect from slow to fast
Page 28

18CH
000ó007
192ó255
Open
Counter-clockwise color scroll, slow to fast
000ó007
192ó255
Open
Counter-clockwise color scroll, slow to fast
000ó007
192ó255
Open
Counter-clockwise gobo scroll, slow to fast
000ó063
232ó255
Gobo index
Boomerang effect, slow to fast
Operation
DMX Values (Cont.)
Channel Function Value Percent/Setting
(Cont.)
8 Color Wheel 2
008ó015
016ó023
024ó031
032ó039
040ó047
048ó055
056ó063
064ó127
128ó191
Yellow
Light blue
Green
Red
Magenta
Dark blue
Orange
Split colors
Clockwise color scroll, slow to fast
008ó015
016ó023
024ó031
032ó039
9 Color Wheel 1
10 Gobo Wheel 1
11 Gobo Wheel 1 Rotate
040ó047
048ó055
056ó063
064ó127
128ó191
008ó015
016ó023
024ó031
032ó039
040ó047
048ó055
056ó063
064ó119
120ó127
128ó191
064ó147
148ó231
CTO 3200 K
CTO 5600 K
Green
UV
Orange
Pink
Light blue
Split colors
Clockwise color scroll, slow to fast
Gobo 1
Gobo 2
Gobo 3
Gobo 4
Gobo 5
Gobo 6
Gobo 7
Gobo shake 1–7, slow to fast
Open
Clockwise gobo scroll, slow to fast
Clockwise rotation, slow to fast
Counter-clockwise rotation, slow to fast
-24- Rogue R2X Spot User Manual Rev. 3
Page 29

DMX Values (Cont.)
18CH
000ó006
192ó255
Open
Counter-clockwise gobo scroll, slow to fast
13
Focus
000ó255
0–100%
000ó004
005ó255
No function
Prism insert
000ó127
194ó255
Prism index
Clockwise rotation, slow to fast
000ó063
192ó255
Wide to narrow
Iris effect, out slow, in fast
000ó007
008ó255
No function
Frost effect
000ó007
248ó255
No function
Pan/Tilt movement ramp speed, increase off
Channel Function Value Percent/Setting
(Cont.)
12 Gobo Wheel 2
14 Prism
007ó013
014ó020
021ó027
028ó034
035ó041
042ó048
049ó055
056ó063
064ó120
121ó127
128ó191
Operation
Gobo 1
Gobo 2
Gobo 3
Gobo 4
Gobo 5
Gobo 6
Gobo 7
Gobo 8
Gobo shake 1–8, slow to fast
Open
Clockwise gobo scroll, slow to fast
15 Prism Rotate
16 Iris
17 Frost
18 Control
128ó189
190ó193
064ó127
128ó191
008ó015
016ó023
024ó031
032ó039
040ó047
048ó055
056ó095
096ó103
104ó111
112ó119
120ó127
128ó135
136ó143
144ó151
152ó159
160ó167
168ó239
240ó247
Counter-clockwise rotation, fast to slow
Stop
Iris effect, slow to fast
Iris effect, in slow, out fast
Blackout during pan/tilt (3 sec hold)
Blackout while color wheel moving (3 sec hold)
Blackout while gobo wheels moving (3 sec hold)
Disable pan/tilt blackout (3 sec hold)
Disable color wheel blackout (3 sec hold)
Disable gobo wheel blackout (3 sec hold)
No function
Pan reset
Tilt reset
Color wheel reset
Gobo wheel reset
Gobo rotation reset
Prism reset
Focus reset
All reset
Iris reset
No function
Pan/Tilt movement ramp speed, increase on
Rogue R2X Spot User Manual Rev. 3 -25-
Page 30

Product
To maintain optimum performance and minimize wear, you should clean this product
frequently. Usage an d environment are contributing f actors in determining the cleaning
light output
performance and can c ause overheating. This can lead to reduced light source life and
7. Gently polish the lens surfaces until they are free of haze and lint.
Technical Information
5. TECHNICAL INFORMATION
Maintenance
frequency.
As a rule, clean th is product at least twice a m onth. Dust build-up reduces
increased mechanical wear.
To clean your product:
1. Unplug the product from power.
2. Wait until the product is at room temperature.
3. Use a vacuum (or dry compressed air) and a soft brush to remove dust collected on
the external vents.
4. Clean all external surfaces with a mild solution of non-ammonia glass cleaner or
isopropyl alcohol.
5. Apply the solution directly to a soft, lint-free cotton cloth or a lens cleaning tissue.
6. Wipe any dirt or grime to the outside edges of the lens surface.
Always dry the external surfaces thoroughly and carefully after cleaning them.
Do not allow the cooling fans to spin while blowing compressed air into the fixture.
-26- Rogue R2X Spot User Manual Rev. 3
Page 31

Dimensions and
16.1 in (409 mm)
13.5 in (343 mm)
19.25 in (489 mm)
47.8 lb (21.7 kg)
Note: Dimensions in inches rounded to the nearest hundredth.
Power
Power Supply Type
Range
Voltage Selection
Switching (internal)
100–240 VAC, 50/60 Hz
Auto-ranging
Consumption
517 W
437 W
Current
4.31 A
1.9 A
Power linking current
(products)
13.6 A (6 products)
13.6 A (7 products)
Fuse
F 7 A, 250 V
F 7 A, 250 V
Power I/O
U.S./Canada
Worldwide
Power input connector
Neutrik powerCON A
Neutrik powerCON A
Power cord plug
Edison (U.S.)
Local plug
Light Source
Type
Power
Lifespan
LED
300 W
50,000 hours
Photometrics
Parameter
Standard Optics
Illuminance @ 5 m
9,030 lux
Beam angle
16.5°
Gobo Dimensions
Outside Diameter
Diameter
Thickness
28.8 mm (Aluminum)
23.8 mm (Aluminum)
0.5 mm (Aluminum)
27 mm (Glass)
24 mm (Glass)
1.1–3 mm (Glass)
Thermal
Max. External Temperature
Cooling System
113 °F (45 °C)
Fan-Cooled
DMX
I/O Connectors
Connector Type
Channel Range
3- and 5-pin XLR
Sockets
18 or 21
Ordering
ROGUE2XSPOT
08011397
781462217457
6. TECHNICAL SPECIFICATIONS
User Manual
Weight
Length Width Height Weight
Parameter 120 VAC, 60 Hz 230 VAC, 50 Hz
Gobo Wheel 1
Product Name Item Code UPC Number
Image
Max.
Rogue R2X Spot User Manual Rev. 3 -27-
Page 32

Photometrics
User Manual
Chart
-28- Rogue R2X Spot User Manual Rev. 3
Page 33

Returns
You must send the product prepaid, in the original box, and with the original packing and
and request a Return Merchandise Authorization (RMA) number before
rovide the model number, serial number, and a
will refuse any product
returned without an RMA number.
DO NOT write the RMA number directly on the box. Instead, write it on a properly
affixed label.
Once you have received th e RMA number, include th e following inform ation on a piece
Be sure to pack the pr oduct properly. Any shippi ng damage resulting from inad equate
recommended.
Chauvet reserves the right to use its own discretion to repair or replace returned
product(s).
User Manual
accessories. Chauvet will not issue call tags.
Call Chauvet
shipping the product. Be prepared to p
brief description of the cause(s) for the return.
Clearly label the package with an RMA number. Chauvet
of paper inside the box:
• Your name
• Your address
• Your phone number
• The RMA number
• A brief description of the problem(s)
packaging will be the customer’s responsibility. FedEx packing or double-boxing is
Rogue R2X Spot User Manual Rev. 3 -29-
Page 34

C
WORLD HEADQUARTERS - Chauvet
General Information
Technical Support
www.chauvetlighting.com
EUROPE - Chauvet Europe Ltd.
General Information
Fax: +44 (0)1773 511110
Technical Support
General Information
Voice: +32 9 388 93 97
Technical Support
MEXICO - Chauvet Mexico
General Information
Voice: +52 (728) 690-2010
Technical Support
Outside the U.S., U nited Kingdom, Ireland, Mexico, o r Benelux contact the dealer of rec ord.
details.
User Manual
ONTACT
US
Address: 5200 NW 108th Avenue
Sunrise, FL 33351
Voice: (954) 577-4455
Fax: (954) 929-5560
Toll free: (800) 762-1084
Address: Unit 1C
Brookhill Road Industrial Estate
Pinxton, Nottingham, UK
NG16 6NT
Voice: +44 (0)1773 511115
Address: Stokstraat 18
9770 Kruishoutem
Belgium
Address: Av. de las Parti das 34 – 3B,
(Entrance by Calle 2)
Zona Industrial Lerm a
Lerma Edo. de, Mexico, C.P. 52000
Voice: (844) 393-7575
Fax: (954) 756-8015
Email:
chauvetcs@chauvetlighting.com
World Wide Web
Email: uktech@chauvetlighting.com
World Wide Web
www.chauvetlighting.co.uk
Email: Eutech@chauvetlighting.eu
World Wide Web www.chauvetlighting.eu
Email: servicio@chauvet.com.mx
World Wide Web www.chauvet.com.mx
-30- Rogue R2X Spot User Manual Rev. 3
Follow their instruc tions to reques t support or to return a pr oduct. Visit our website for c ontact
 Loading...