

Quick Reference Guide
QUICK REFERENCE GUIDE
EN
About This Guide
The Vivid Drive 28N Quick Reference Guide (QRG) has basic product information such as mounting and menu options.
Download the User Manual from www.chauvetdj.com
Disclaimer
The information and specifications contained in this QRG are subject to change without notice.
LIMITED WARRANTY
FOR WARRANTY REGISTRATION AND COMPLETE TERMS AND CONDITIONS PLEASE VISIT OUR WEBSITE.
For Customers in the United States and Mexico: www.chauvetlighting.com/warranty-registration
For Customers in the United Kingdom, Republic of Ireland, Belgium, the Netherlands, Luxembourg, France, and
Germany: www.chauvetlighting.eu/warranty-registration
Chauvet warrants that this product shall be free from defects in material and workmanship under normal use, for the
period specified in, and subject to the exclusions and limitations set forth in the full limited warranty on our website. This
warranty extends only to the original purchaser of the product and is not transferable. To exercise rights under this
warranty, you must provide proof of purchase in the form of an original sales receipt from an authorized dealer that shows
the product name and date of purchase. THERE ARE NO OTHER EXPRESS OR IMPLIED WARRANTIES. This
warranty gives you specific legal rights. You may also have other rights that vary from state to state and country to
country. This warranty is valid only in the United States, United Kingdom, Republic of Ireland, Belgium, the Netherlands,
Luxembourg, France, Germany and Mexico. For warranty terms in other countries, please consult your local distributor.
Safety Notes
These Safety Notes include important information about installation, use, and maintenance.
• ONLY connect this product to a grounded and protected circuit.
• DISCONNECT from power before cleaning.
• Make sure the power cord is not crimped or damaged.
• Never disconnect this product from power by pulling on the cord.
• DO NOT allow flammable materials close to the product when it is operating.
• DO NOT touch the product’s housing when it is on because it will be hot.
for more details.
.
.
• The voltage of the outlet to which you are connecting this product must be within the range stated on the
decal or rear panel of the product.
• This product is for indoor use only! (IP20) To prevent risk of fire or shock, do not expose this product to rain
or moisture.
• Always mount this product in a location with adequate ventilation, at least 20 in (50 cm) from adjacent
surfaces.
• Be sure that no ventilation slots on the unit’s housing are blocked.
• Never connect this product to a dimmer or rheostat.
• Never carry the product by the power cord.
• The maximum ambient temperature is 104 °F (40 °C). Do not operate this product at higher temperatures.
• In the event of a serious operating problem, stop using immediately.
• DO NOT open this product. It contains no user-serviceable parts.
• To eliminate unnecessary wear and improve its lifespan, during periods of non-use completely disconnect
the product from power via breaker or by unplugging it.
Contact
Outside the U.S., United Kingdom, Ireland, Benelux, France, Germany, or Mexico, contact your distributor to request
support or return a product. Refer to Contact Us at the end of this QRG for contact information.
What is Included
• Vivid Drive 28N
• Power Cord
•DVI Cable
•VGA Cable
•DP Cable
• HDMI Cable
• RJ45 Cable
• DP to HDMI Adaptor
• USB Cable
• Quick Reference Guide
To Begin
Unpack your Vivid Drive 28N and make sure you have received all parts in good condition. If the box or contents appear
damaged, notify the carrier immediately, not Chauvet.
AC Power
This product has an auto-ranging power supply that works with an input voltage range of 100 to 240 VAC, 50/60 Hz.
To eliminate wear and improve its lifespan, during periods of non-use completely disconnect the
product from power via breaker or by unplugging it.
1
Vivid Drive 28N QRG Rev. 1
QUICK REFERENCE GUIDE
1
2
34
5 6 11 12 13 14
78910 15 17
16 18
LCD Display
Mounting
The Vivid Drive 28N fits on a standard 19” rack, or it can be placed on its feet on a flat level surface.
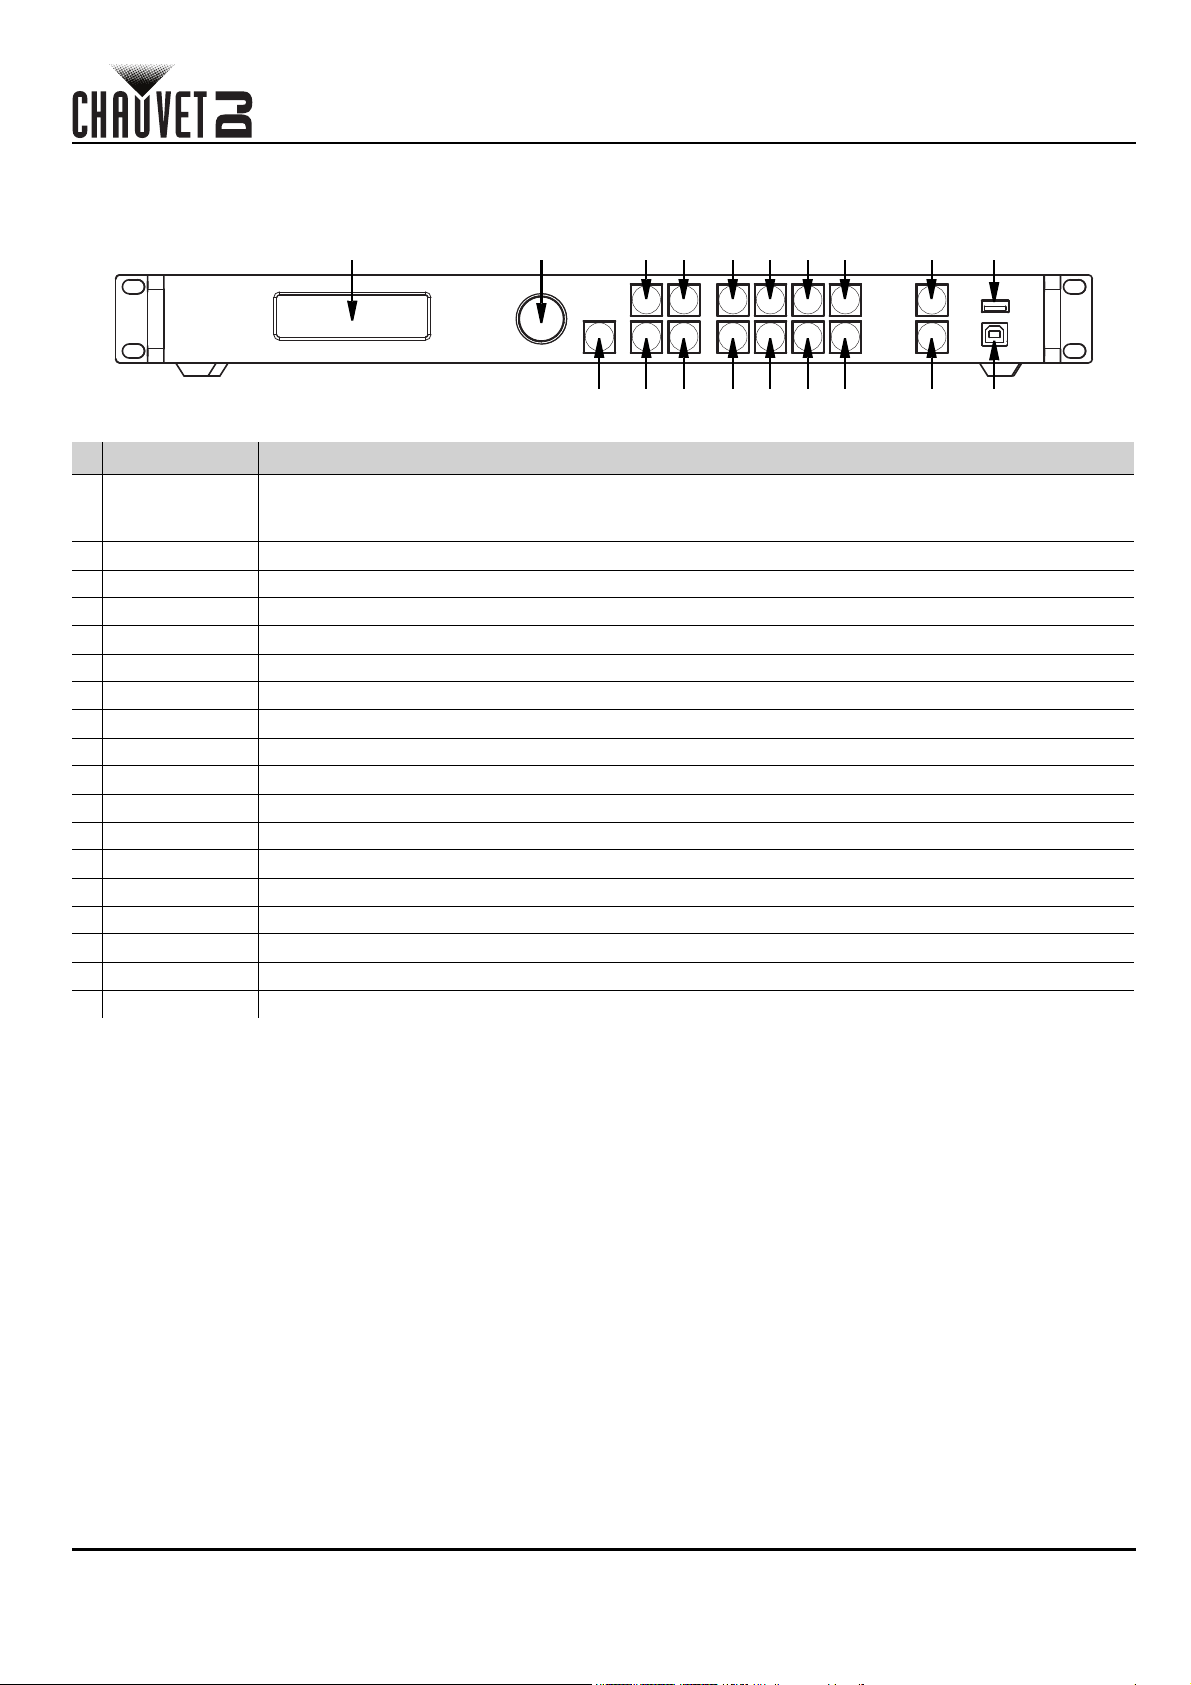
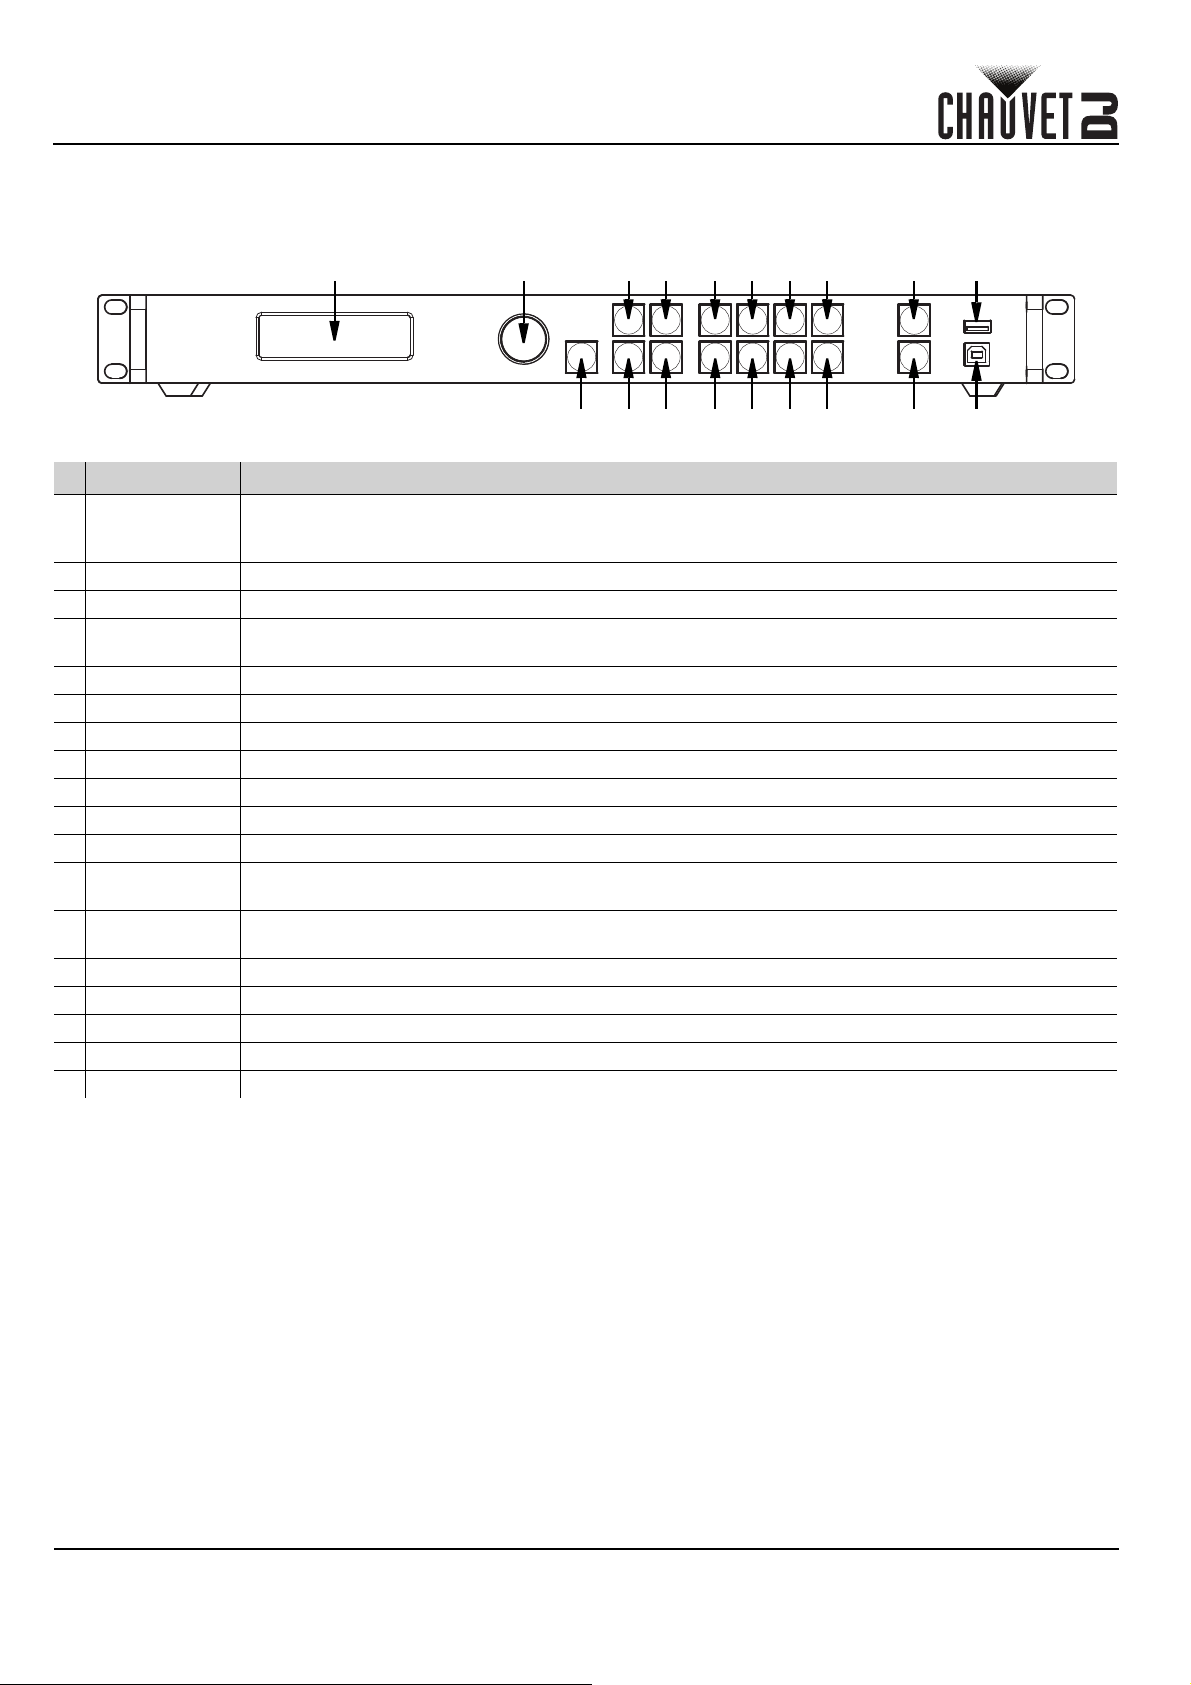
Product Front Overview
Control Panel Description
# Name Function
Rotate to navigate upwards or downwards through the menu list, and increase or decrease a
1 <MENU> Knob
2 <ESC> Exits the current menu or function
3 <SCREEN> Navigates to the Screen Settings menu
4<INPUT/1>Navigates to the Input Settings menu, or enters the number 1 when editing a number value
5<FREEZE>Freezes the video output
6<TEST/6>Navigates to the Test Pattern menu, or enters the number 6 when editing a number value
7 <HDMI/2> Selects HDMI input source, or enters the number 2 when editing a number value
8<DVI/3>Selects DVI input source, or enters the number 3 when editing a number value
9<VGA1/4>Selects VGA1 input source, or enters the number 4 when editing a number value
10 <VGA2/5> Selects VGA2 input source, or enters the number 5 when editing a number value
11 <VGA3/7> Selects VGA3 input source, or enters the number 7 when editing a number value
12 <CVBS1/8> Selects CVBS1 input source, or enters the number 8 when editing a number value
13 <CVBS2/9> Selects CVBS2 input source, or enters the number 9 when editing a number value
14 <DP/0> Selects DP input source, or enters the number 0 when editing a number value
15 <TAKE> Enables/disables PIP
16 <BLACK> Blacks out the video output
17 USB (A) Cascades to other Vivid Drive 28N products
18 USB (B) USB B port for firmware updates, connecting to NovaLCTMars or SmartLCT
selected numeric value. Push to enable the currently displayed menu option or set the currently
selected value into the selected function.
EN
Vivid Drive 28N QRG Rev. 1
2
QUICK REFERENCE GUIDE
12
333
45 6
7
7
8
91010 Power In
EN
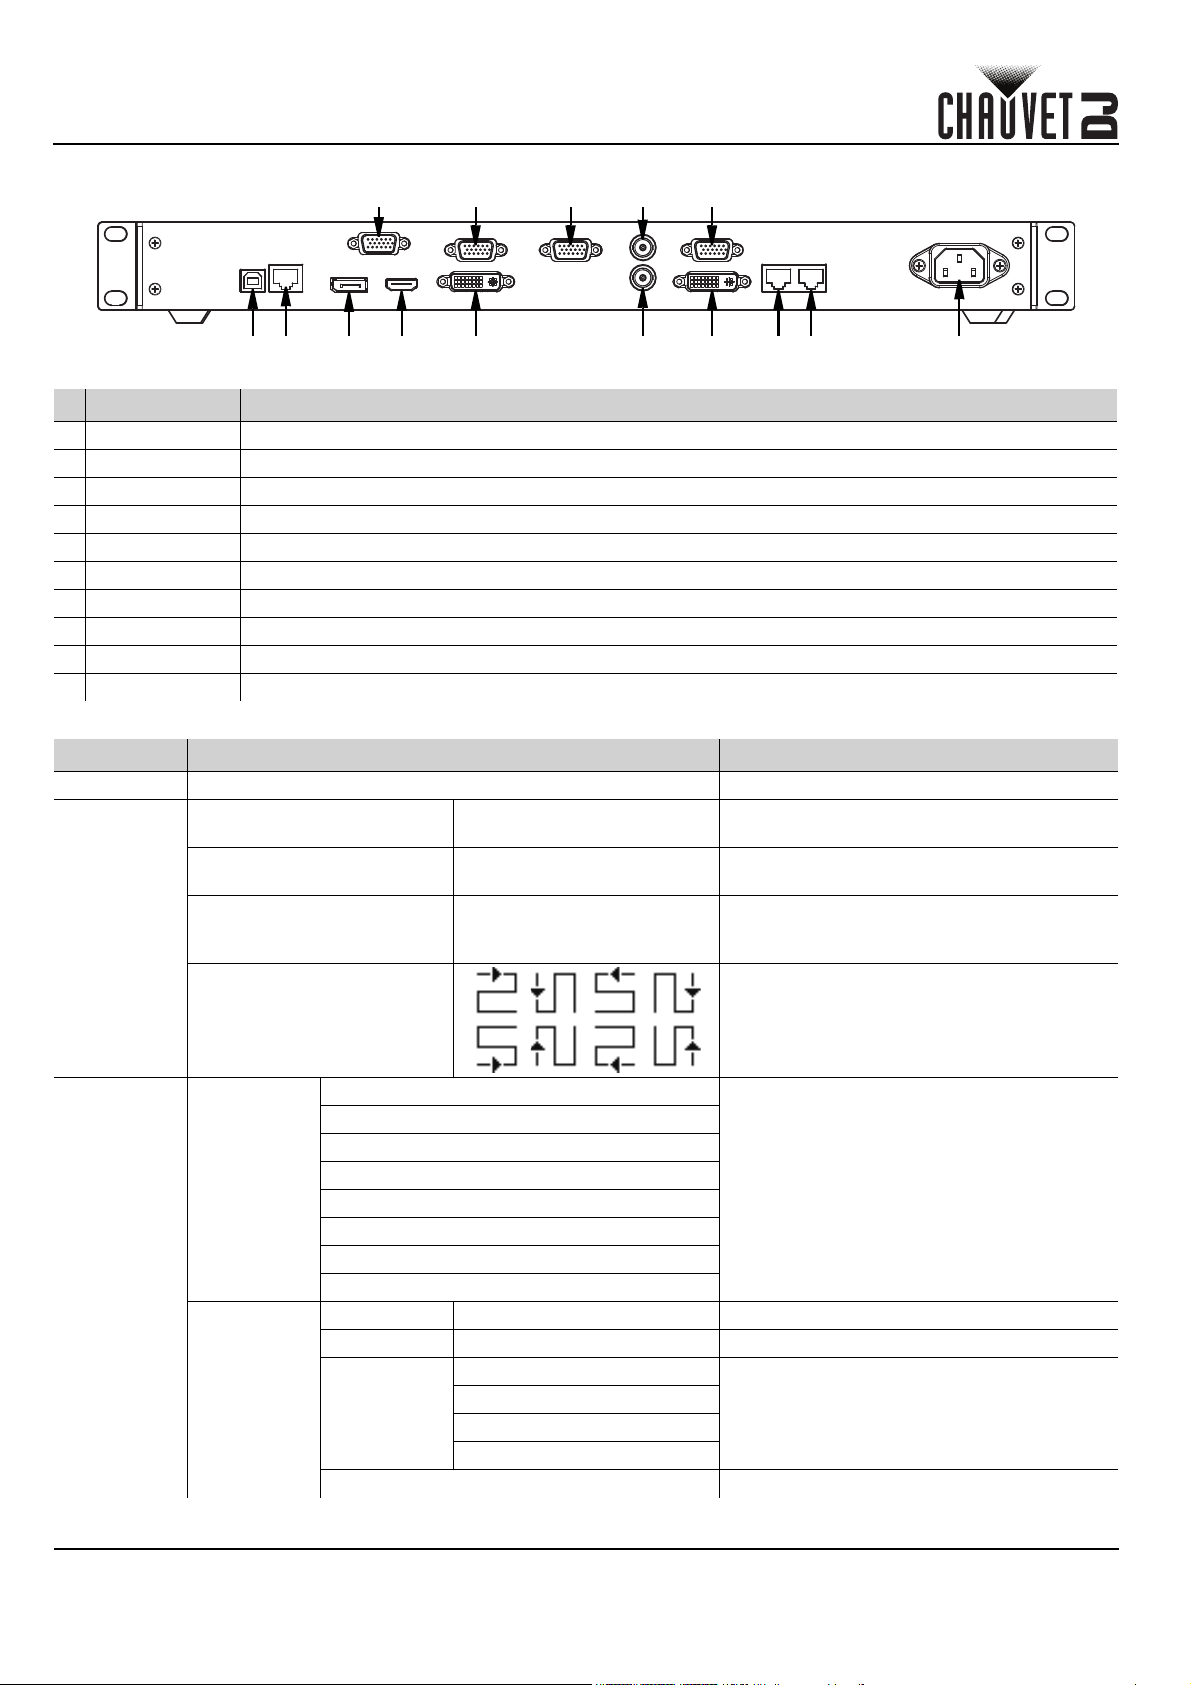
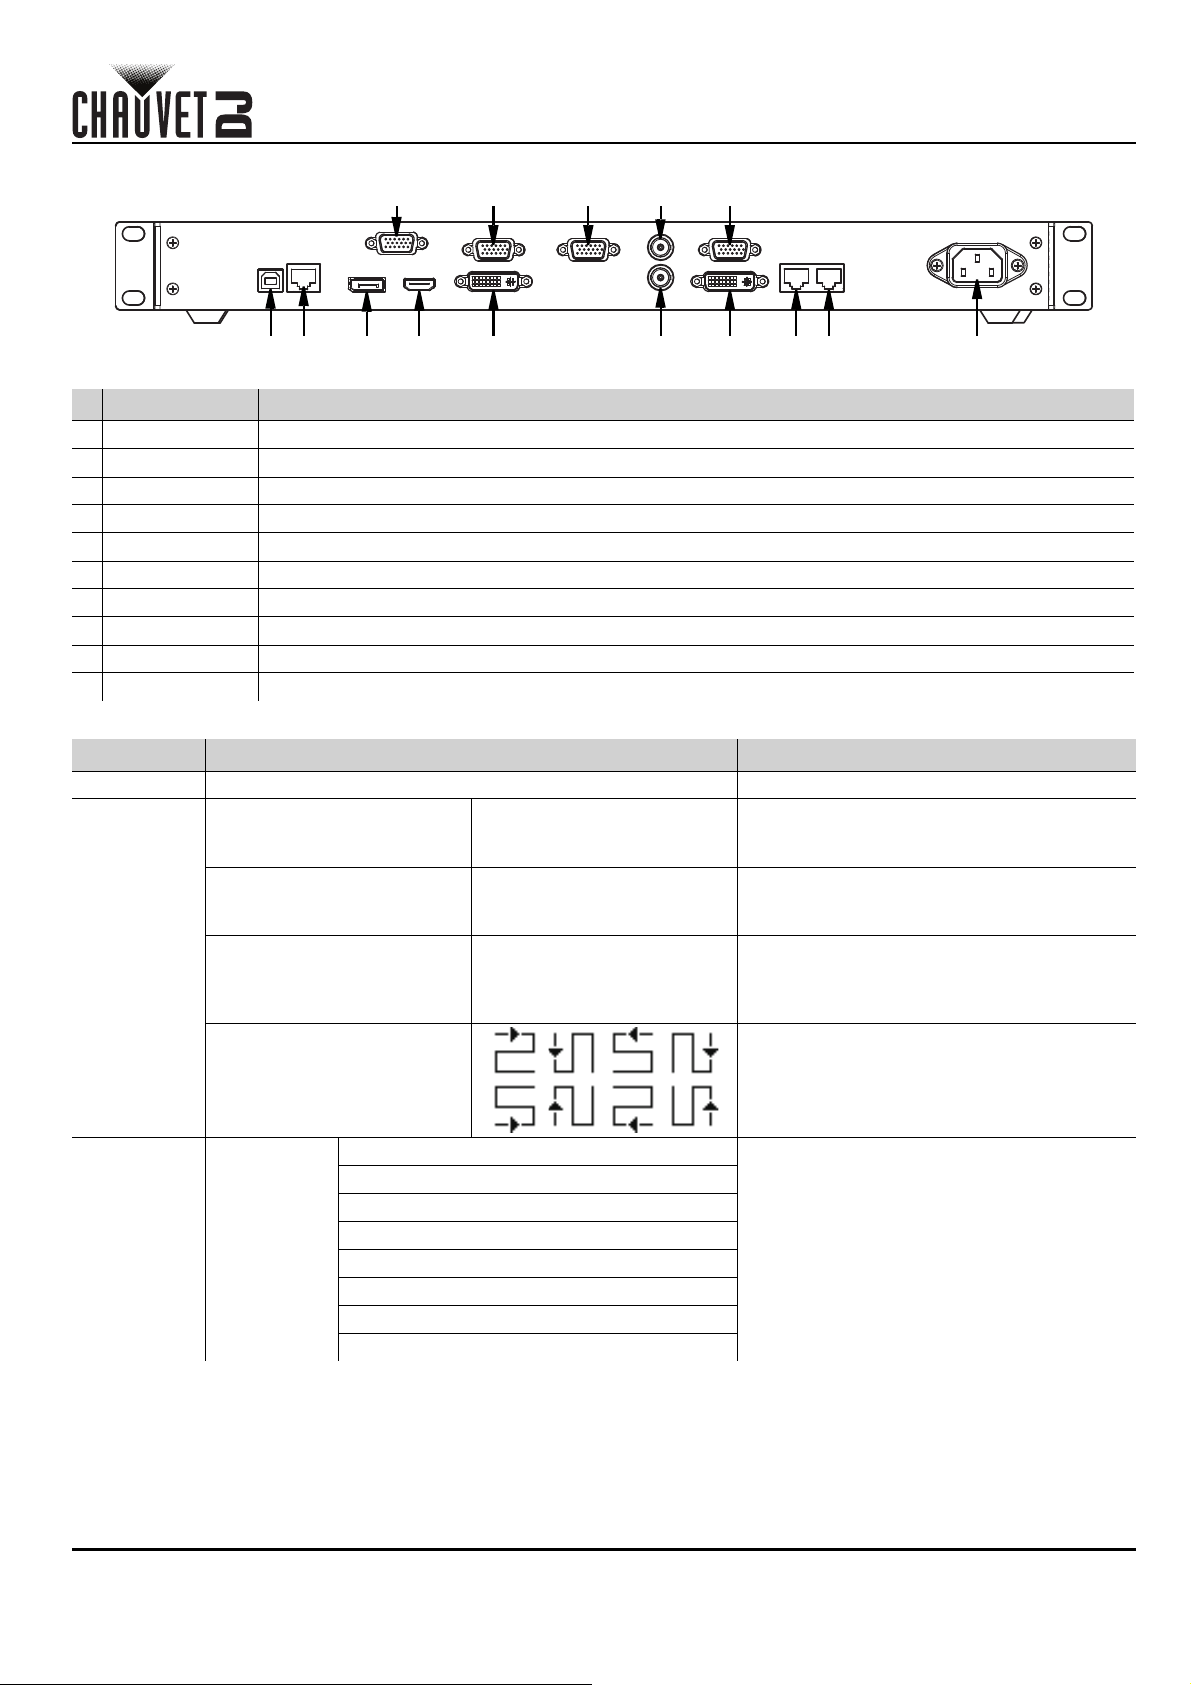
Product Rear Overview
Real Panel Description
# Name Function
1USBUSB B port for firmware updates, connecting to NovaLCTMars or SmartLCT
2RJ45RJ45 port for remote control system connection
3VGA1–3DE-15 connector for video input from a VGA source (numbered from left to right)
4DPDisplayPort input port
5HDMIHDMI input port
6DVIDVI input port
7CVBS1–2BNC connector for CVBS input (bottom is 1, top is 2)
8VGA OUTDE-15 connector for VGA output
9 DVI OUT DVI output port
10 LED OUT 1–2 Ethernet ports for sending video signal to video panels (left is 1, right is 2)
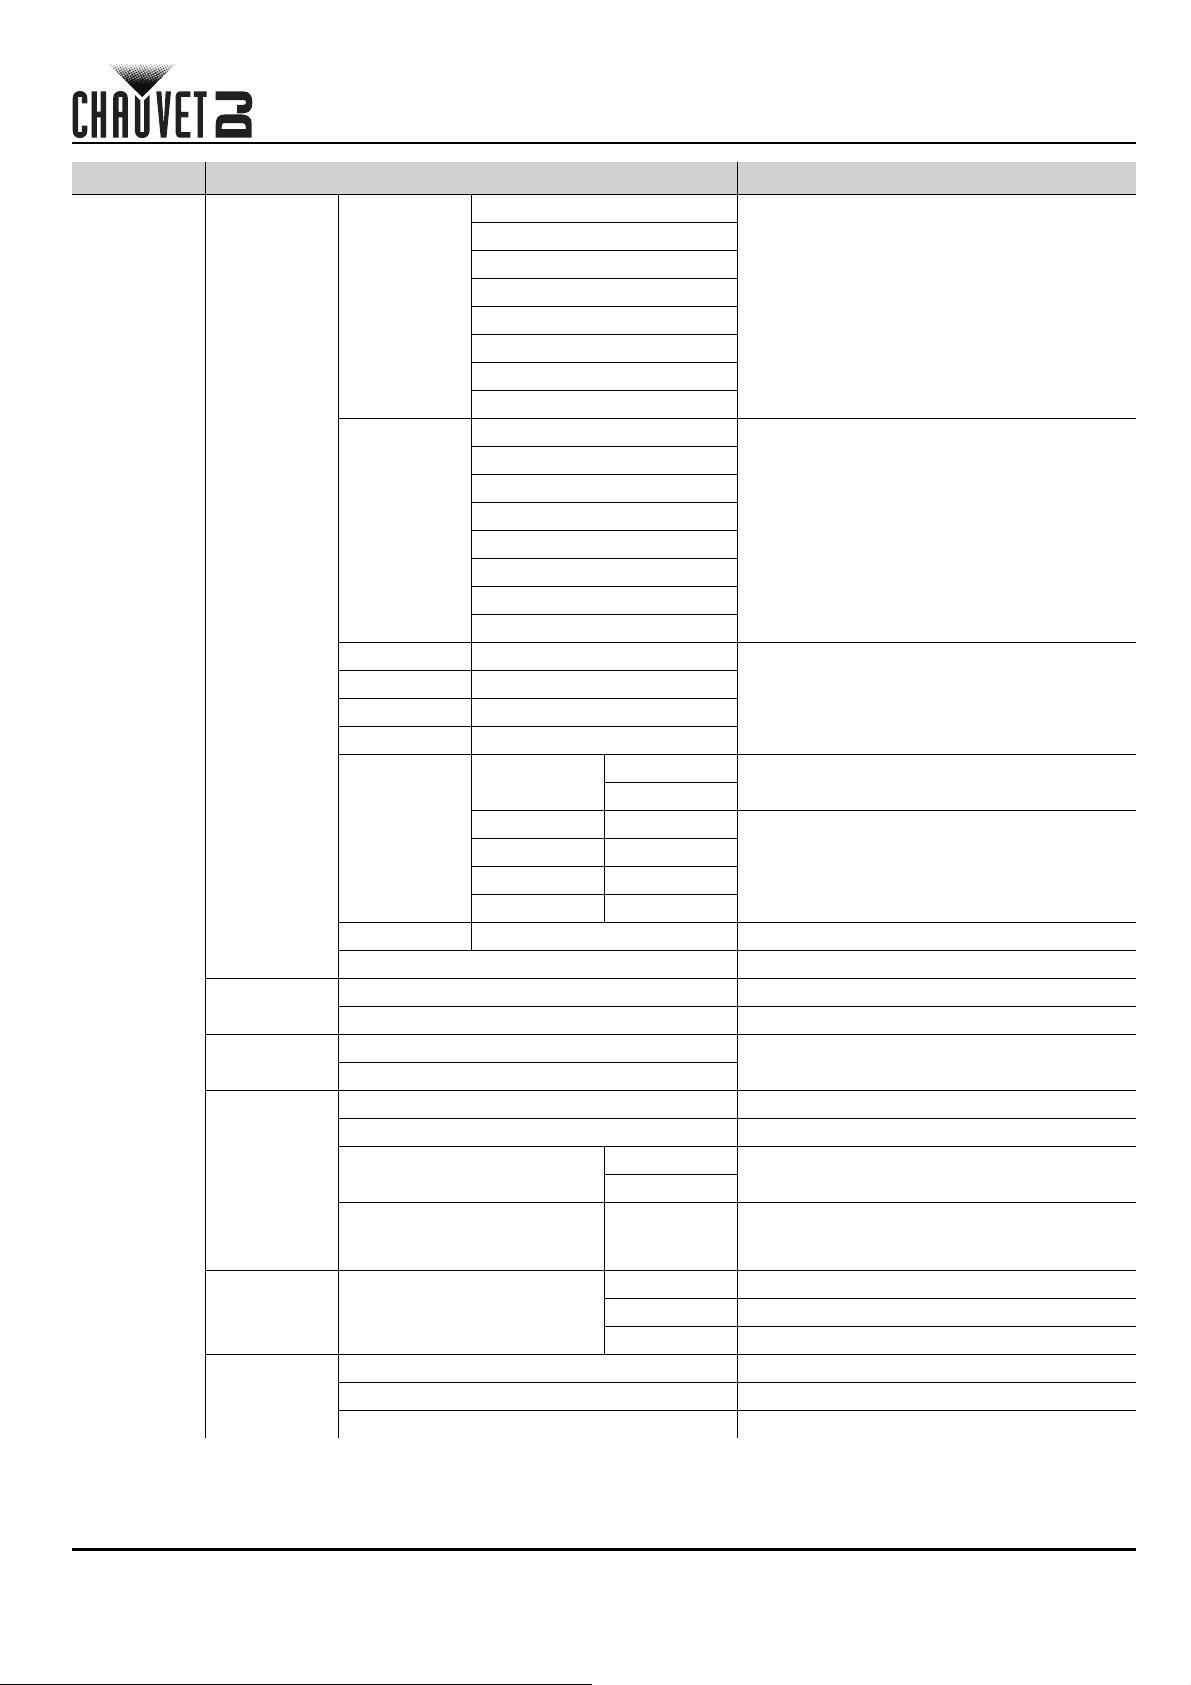
Menu Map
Main Level Programming Levels Description
Brightness 0–100% Controls total output level
Sets number of rows in video assembly. *Range
determined by Column Qty and panels.
Sets number of columns in video assembly.
*Range determined by Row Qty and panels.
Sets number of video panels connected to
Output Port 1. *Range affected by Row Qty,
Column Qty, and panels.
Sets start point and path for data flow in
video panel assembly
Selects a preset resolution
Sets custom refresh rate
Screen
Settings
Input
Settings
Cabinet Row Qty 1–15*
Cabinet Column Qty 1–30*
Port1 Cabinet Qty 1–40*
Data Flow(Front View)’Inp
1024x768
1280x1024
1366x768
Preset
Resolution
Custom
Resolution
Width (H) 800–3840 Sets custom pixel width
Height (V) 600–1920 Sets custom pixel height
Custom
Refresh Rate
1440x900
1600x1200
1920x1080
1920x1200
2048x640
Apply Applies custom resolution values
60Hz
59.94Hz
50Hz
30Hz
3
Vivid Drive 28N QRG Rev. 1
QUICK REFERENCE GUIDE
Main Level Programming Levels Description
Disable
Enable
Disable
Enable
Input Source _ _ _ _ Shows the input source
Width (H) 64–_ _ _ _*
Height (V) 48–_ _ _ _*
Start X 0–_ _ _ _**
Start Y 0–_ _ _ _**
Width (H) 64–_ _ _ _*
Height (V) 64*–_ _ _ _*
Start X 0–_ _ _ _**
Start Y 0–_ _ _ _**
Units
Scaling
Mode
Disable
Enable
Disable
Enable
CUSTOM Custom layout
L+T Left and top layout
L+B Left and bottom layout
R+T Right and top layout
R+B Right and bottom layout
CENT Center layout
T+B Top and bottom layout
HDMI
DVI
VGA2
VGA3
CVBS1
CVBS2
VGA1
HDMI
DVI
VGA2
VGA3
CVBS1
CVBS2
VGA1
Pixel Sets Output Window units to pixels
Percentage Sets Output Window units to percentage
Custom Scaling may not maintain original ratio
Equal Ratio Scaling maintains original ratio
DP
DP
Enables or disables scaling options
Enables or disables auto fit
Sets what part of the input to output.
*Dimension ranges determined by Input
Settings Resolution.
**Offset ranges determined by dimensions.
Sets the dimensions and offset of the output.
*Dimension ranges determined by screen
settings. **Offset ranges determined by
dimensions.
Sets the image offset. *Ranges determined
by screen settings.
Enables or disables Apply to all
Enables or disables Picture In Picture
Selects main input source (Disabled when
PIP enabled).
Selects PIP input source (main and PIP
input sources cannot both be digital or
analog. One must be digital [HDMI, DVI, or
DP], the other analog [VGA or CVBS].)
Output
Settings
Advanced
Settings
Scaling
Auto Fit
Custom
Scaling
Image Offset
Apply to all
PIP
Input
Capture
Output
Window
Start X -_ _ _ _*–_ _ _ _*
Start Y -_ _ _ _*–_ _ _ _*
PIP
LAYOUT
Main Source
PIP Source
EN
Vivid Drive 28N QRG Rev. 1
4
QUICK REFERENCE GUIDE
EN
Main Level Programming Levels Description
Advanced
Settings
(cont.)
Width (H) 64–_ _ _ _*
Height (V) 64–_ _ _ _*
Start: X 0–_ _ _ _**
Start: Y 0–_ _ _ _**
PIP Crop
PIP
(cont.)
Redundancy
Mapping
Advanced
Attr
Presettings Presetting 1–10
PIP Crop
Settings
Transparency
Video Sync.
Go Homepage (s) 30–3600
Width (H) 64–_ _ _ _* Sets the crop dimensions and offset of the
Height (V) 48–_ _ _ _*
Start X 0–_ _ _ _**
Start Y 0–_ _ _ _**
Window Swap Swaps Main and PIP sources
Primary Sets this Vivid Drive 28N as primary
Backup Sets this Vivid Drive 28N as backup
Disable
Enable
VGA Auto ADJ Auto-adjusts VGA input
ADC Calibration Calibrates ADC
Normal Video output
Black out Blacks out the output
Freeze Freezes the output on a single frame
Disable
Enable
0–15 Sets the PIP transparency
Disable
Enable
Save Saves the current settings
Load Loads the selected saved settings
Delete Deletes the selected saved settings
Sets dimensions and offset of the PIP.
*Dimension ranges determined by screen
size.
**Offset ranges determined by dimensions.
Enables or disables PIP cropping
PIP.
*Dimension ranges determined by Input
Settings.
**Offset ranges determined by crop
dimensions.
Enables or disables Mapping
Enables or disables video synchronization
Sets number of seconds display is inactive
before returning to the Home Screen
Test Pattern Selects a test pattern
Contrast 0–100% Adjusts the contrast of the output
Display
Control
Image
quality
5
Saturation 0–100% Adjusts the saturation of the output
Sharpness 0–24 Adjusts the sharpness of the output
Hue -180–180 Adjusts the hue of the output
Color
Tem perature
Red 0–255 Adjusts the red level of the output
Green 0–255 Adjusts the green level of the output
Blue 0–255 Adjusts the blue level of the output
Gamma 1.0–4.0 Adjusts the gamma of the output
Reset
Custom Signifies a custom color temperature
4000–9500K Selects a preset color temperature
No Keep current settings
Yes Reset image quality settings
Vivid Drive 28N QRG Rev. 1
QUICK REFERENCE GUIDE
Main Level Programming Levels Description
Off No switching effect
Cut Cut effect
Fade Fade effect
Shrink Center First video source shrinks to center
Shrink Left Top First video source shrinks to top left
Zoom Center Second video source zooms from center
Zoom Left Top Second video source zooms from top left
Disable
Enable
DVI
VGA3
CVBS2
DP
VGA1
NULL
DVI
VGA3
CVBS2
DP
VGA1
NULL
DVI
VGA3
CVBS2
DP
VGA1
NULL
NULL
1024x768
1280x1024
1366x768
1440x900
1920x1080
1920x1200
2048x640
24–60Hz Sets custom refresh rate
Apply Applies custom resolution
Enable or disable video source backups
Sets backup video source to HDMI
Sets backup video source to VGA2
Sets backup video source to CVBS1
Sets video source to be backed up, then the
backup video source
Selects a preset resolution
Advanced
Settings
(cont.)
Display
Control
(cont.)
Inputs
Backup
Output
Resolution
Switching
Effect
Fade Time(s) 0–3 Sets the fade time
Backup
Backup 1 HDMI
Backup 2 VGA2
Backup 3 CVBS1
DVI DVI*
VGA3 VGA3*
Custom
Backup
Preset
Resolution
Custom
Resolution
CVBS2 CVBS2*
DP DP*
VGA1 VGA1*
Width (H) 800–3840 Sets custom pixel width
Height (V) 600–1920 Sets custom pixel height
Custom
Refresh Rate
EN
Vivid Drive 28N QRG Rev. 1
6

QUICK REFERENCE GUIDE
EN
Main Level Programming Levels Description
_ _ _ _ _ _ _ _ _ _ _ _ _ _ _
_ _ _ _ _ _ _ _ _ _ _ _ _ _ _
No
Yes
No
Yes
USB Preferred USB connection takes priority
LAN Preferred Ethernet connection takes priority
Manually Set IP address manually
Auto IP address will be assigned
No
Yes
中文
English Sets display language to English
Русский Sets display language to Russian
Deutsch Sets display language to German
Sends selected pre-loaded file to the
connected panels
Permanently saves uploaded firmware to
connected panels
Resets the product to factory settings
Resets network settings
Sets display language to Chinese
Advanced
Settings
(cont.)
Factory
Reset
Communi-
cation
Settings’Co
Language
Load RCFG
Cabinet
Settings
OLED Brightness 6–15 Sets display brightness
HW Version V_._._._ Displays current firmware version
Communication Mode
Network
Settings
Files
Save to RV
Card
Config IPV4
IP Address 1–223.0–255.0–255.0–255 Sets IP address
Subnet Mask 0–255.0–255.0–255.0–255 Sets Subnet Mask
Reset
Phās ʹā thịy Sets display language to Thai
7
Vivid Drive 28N QRG Rev. 1
GUIA DE REFERENCIA RÁPIDA
ES
Acerca de esta guía
La Guía de referencia rápida (GRR) del Vivid Drive 28N contiene información básica sobre el producto, como montaje y
opciones de menú. Descargue el manual de usuario de www.chauvetdj.com
Exención de responsabilidad
La información y especificaciones contenidas en esta GRR están sujetas a cambio sin previo aviso.
GARANTÍA LIMITADA
PARA VER EL REGISTRO DE GARANTÍA Y LOS TÉRMINOS Y CONDICIONES COMPLETOS, VISITE NUESTRO SITIO WEB.
Para clientes en los Estados Unidos y México: www.chauvetlighting.com/warranty-registration.
Para clientes en Reino Unido, República de Irlanda, Bélgica, Países Bajos, Luxemburgo, Francia y Alemania:
www.chauvetlighting.eu/warranty-registration
Chauvet garantiza que este producto estará libre de defectos de material y mano de obra en condiciones de uso
normales, durante el periodo especificado, sujeto siempre a las exclusiones y limitaciones establecidas en la garantía
limitada completa de nuestro sitio web. Esta garantía se concede únicamente al comprador original del producto y no es
transferible. Para ejercer los derechos que otorga esta garantía, usted debe proporcionar una prueba de compra en
forma de un recibo de compra original, expedido por un distribuidor autorizado, donde figure el nombre del producto y la
fecha de compra. NO EXISTEN OTRAS GARANTÍAS EXPRESAS NI IMPLÍCITAS. Esta garantía le otorga derechos
legales específicos. Es posible que a usted le asistan otros derechos, que variarán dependiendo del estado o del país.
Esta garantía solamente es válida en los Estados Unidos, Reino Unido, República de Irlanda, Bélgica, Países Bajos,
Luxemburgo, Francia, Alemania y México. Para conocer los términos de garantía en otros países, consulte a su
distribuidor local.
.
Notas de seguridad
Estas notas de seguridad incluyen información importante sobre el montaje, uso y mantenimiento.
• Conecte este producto SOLO a un circuito con toma de tierra y protegido.
• Desconecte siempre de la alimentación antes de la limpieza.
• Asegúrese de que el cable de alimentación no está retorcido ni estropeado.
• Nunca desconecte este producto de la alimentación tirando del cable.
• NO permita la presencia de materiales inflamables cerca de la unidad cuando esté en funcionamiento.
• NO toque este producto cuando esté en funcionamiento, pues podría estar caliente.
para una información más detallada.
• La tensión del enchufe al que conecte este producto ha de estar en el rango establecido en el grabado o
en el panel posterior del producto.
• ¡Este producto es para uso en interiores solamente! (IP20) Para evitar riesgos de incendio o descarga, no
exponga este producto a la lluvia o la humedad.
• Monte siempre este producto en una ubicación con ventilación adecuada, al menos a 20 in (50 cm) de
superficies adyacentes.
• Asegúrese de que ninguna ranura de ventilación en la carcasa de la unidad queda bloqueada.
• Nunca conecte este producto a un atenuador o reostato.
• Nunca lleve este producto por el cable de alimentación.
• La temperatura ambiente máxima es de 104 °F (40 °C). No haga funcionar este producto a temperaturas más altas.
• En caso de un problema grave de funcionamiento, deje de usarlo inmediatamente.
• NO abra este producto. No contiene piezas reparables por el usuario.
• Para evitar un desgaste innecesario y alargar su vida útil, desconecte completamente el producto mediante
el interruptor o desenchufándolo durante periodos en que no se use.
Contacto
Fuera de EE. UU., Reino Unido, Irlanda, Benelux, Francia, Alemania o México póngase en contacto con su distribuidor
para solicitar asistencia o devolver un producto. Consulte Contact Us
al final de este GRR para información de contacto.
Qué va incluido
• Vivid Drive 28N
• Cable de alimentación
•Cable DVI
•Cable VGA
•Cable DP
• Cable HDMI
• Cable RJ45
• Adaptador DP a HDMI
•Cable USB
• Guía de referencia rápida
Para empezar
Desembale su Vivid Drive 28N y asegúrese de que ha recibido todas las partes en buen estado. Si la caja o los
componentes parecen dañados, notifíqueselo inmediatamente al transportista, no a Chauvet.
Corriente alterna
Este producto tiene una fuente de alimentación con detección automática que puede funcionar con un rango de tensión
de entrada de 100–240 VCA, 50/60 Hz.
Para evitar un desgaste innecesario y alargar su vida útil, desconecte completamente el producto
mediante el interruptor o desenchufándolo durante periodos en que no se use.
Vivid Drive 28N GRR Rev. 1
8
GUIA DE REFERENCIA RÁPIDA
1
2
34
5 6 11 12 13 14
78910 15 17
16 18
Pantalla LCD
ES
Montaje
El Vivid Drive 28N cabe en un rack estándar de 19'', pero también se puede colocar sobre sus patas en una superficie
plana y nivelada.
Vista general frontal del producto
Descripción del panel de control
# Nombre Función
Botón de
1
<MENU>
2 <ESC> Sale del menú o función actual
3 <SCREEN> Se desplaza al menú Configuración de pantalla
4<INPUT/1>
5 <FREEZE> Congela la salida de vídeo
6<TEST/6>Se desplaza al menú Patrón de prueba o introduce el número 6 cuando se edita un valor numérico
7 <HDMI/2> Selecciona la fuente de entrada HDMI o introduce el número 2 cuando se edita un valor numérico
8<DVI/3>Selecciona la fuente de entrada DVI o introduce el número 3 cuando se edita un valor numérico
9<VGA1/4>Selecciona la fuente de entrada VGA1 o introduce el número 4 cuando se edita un valor numérico
10 <VGA2/5> Selecciona la fuente de entrada VGA2 o introduce el número 5 cuando se edita un valor numérico
11 <VGA3/7> Selecciona la fuente de entrada VGA3 o introduce el número 7 cuando se edita un valor numérico
12 <CVBS1/8>
13 <CVBS2/9>
14 <DP/0> Selecciona la fuente de entrada DP o introduce el número 0 cuando se edita un valor numérico
15 <TAKE> Habilita o deshabilita el PIP
16 <BLACK> Apaga la salida de vídeo
17 USB (A) Va en cascada a otros productos Vivid Drive 28N
18 USB (B) Puerto USB B para actualizaciones de firmware, conectando a NovaLCTMars o SmartLCT
Gire para desplazarse hacia adelante o hacia atrás por la lista de menú, y aumente o disminuya un
valor numérico seleccionado. Pulse para habilitar la opción de menú actualmente visualizada o
configurar el valor seleccionado actualmente dentro de la función seleccionada.
Se desplaza al menú Configuración de entrada o introduce el número 1 cuando se edita un valor
numérico
Selecciona la fuente de entrada CVBS1 o introduce el número 8 cuando se edita un valor
numérico
Selecciona la fuente de entrada CVBS2 o introduce el número 9 cuando se edita un valor
numérico
9
Vivid Drive 28N GRR Rev. 1
GUIA DE REFERENCIA RÁPIDA
12
333
45 6
7
7
8
9 10 10 Entrada de alimentación
ES
Vista general trasera del producto
Descripción del panel posterior
# Nombre Función
1USBPuerto USB B para actualizaciones de firmware, conectando a NovaLCTMars o SmartLCT
2RJ45Puerto RJ45 para la conexión del sistema de control remoto
3VGA1–3Conector DE-15 para entrada de vídeo desde una fuente VGA (numerado de izquierda a derecha)
4DPPuerto de entrada DisplayPort
5HDMIPuerto de entrada HDMI
6DVIPuerto de entrada DVI
7 CVBS1–2 Conector BNC para entrada CVBS (el inferior es 1, el superior es 2)
8VGA OUTConector DE-15 para salida VGA
9 DVI OUT Puerto de salida DVI
10 LED OUT 1–2 Puertos Ethernet para enviar señal de vídeo a los paneles de vídeo (izquierdo es 1, derecho es 2)
Mapa de menú
Nivel principal
Brightness 0–100% Controla el nivel de salida total
Cabinet Row Qty 1–15*
Cabinet Column Qty 1–30*
Screen
Settings
Input
Settings
Port1 Cabinet Qty 1–40*
Data Flow(Front View)’Inp
Preset
Resolution
Niveles de programación Descripción
Establece el número de filas en el montaje
de vídeo. *Rango determinado por la
cantidad de columnas y los paneles.
Establece el número de columnas en el
montaje de vídeo. *Rango determinado por
la cantidad de columnas y los paneles.
Establece el número de paneles de vídeo
conectados al Puerto de salida 1 *Rango en
el que influyen la cantidad de columnas, la
cantidad de filas y los paneles.
Establece un punto de inicio y una ruta para
el flujo de datos en el conjunto de paneles
de vídeo
1024x768
1280x1024
1366x768
1440x900
1600x1200
1920x1080
1920x1200
2048x640
Selecciona una resolución preprogramada
Vivid Drive 28N GRR Rev. 1
10

ES
GUIA DE REFERENCIA RÁPIDA
Nivel principal
Input
Settings
(cont.)
Output
Settings
Advanced
Settings
Custom
Resolution
Scaling
Auto Fit
Custom
Scaling
Custom
Scaling
(cont.)
Image Offset
Apply to all
PIP
Niveles de programación Descripción
Width (H) 800–3840
Height (V) 600–1920 Configura la altura de píxeles personalizada
60Hz
Custom
Refresh Rate
Disable
Enable
Disable
Enable
Input Source _ _ _ _ Muestra la fuente de entrada
Input
Capture
Output
Window
Output
Window
(cont.)
Start X -_ _ _ _*–_ _ _ _* Establece la compensación de la imagen.
Start Y -_ _ _ _*–_ _ _ _*
PIP
LAYOUT
Width (H) 64–_ _ _ _*
Height (V) 48–_ _ _ _*
Start X 0–_ _ _ _**
Start Y 0–_ _ _ _**
Width (H) 64–_ _ _ _*
Height (V) 64*–_ _ _ _*
Start X 0–_ _ _ _**
Start Y 0–_ _ _ _**
Scaling
Disable
Enable
59.94Hz
50Hz
30Hz
Apply Aplica valores de resolución personalizados
Pixel
Units
Percentage
Custom
Mode
Equal Ratio
Disable
Enable
CUSTOM Disposición personalizada
L+T Disposición izquierda y superior
L+B Disposición izquierda e inferior
R+T Disposición derecha y superior
R+B Disposición derecha e inferior
CENT Disposición centrada
T+B Disposición superior e inferior
Configura la anchura de píxeles
personalizada
Configura la tasa de refresco
Habilita o deshabilita las opciones de
escalado
Habilita o deshabilita el ajuste automático
Configura qué parte de la entrada va a la salida.
*Rangos de dimensión determinados por la
resolución de la configuración de entrada.
**Rangos de ajustes de compensación
determinados por las dimensiones.
Configura las dimensiones y compensación
de la salida *Rangos de dimensión determinados
por la configuración de pantalla. **Rangos
de ajustes de compensación determinados
por las dimensiones.
Configura las unidades de la ventana de
salida a píxeles
Configura las unidades de la ventana de
salida a porcentaje
Puede que el cambio de escala no
mantenga la proporción original
El cambio de escala mantiene la proporción
original
*Rangos determinados por la configuración
de pantalla.
Habilita o deshabilita Aplicar a todo
Habilita o deshabilita Picture In Picture
11
Vivid Drive 28N GRR Rev. 1
GUIA DE REFERENCIA RÁPIDA
ES
Nivel principal
Advanced
Settings
(cont.)
Niveles de programación Descripción
Main Source
PIP Source
PIP
(cont.)
Width (H) 64–_ _ _ _*
Height (V) 64–_ _ _ _*
Start: X 0–_ _ _ _**
Start: Y 0–_ _ _ _**
PIP Crop
PIP Crop
Settings
Transparency
Redundancy
Mapping
Advanced
Attr
Presettings Presetting 1–10
Display
Control
Video Sync.
Go Homepage (s) 30–3600
Width (H) 64–_ _ _ _*
Height (V) 48–_ _ _ _*
Start X 0–_ _ _ _**
Start Y 0–_ _ _ _**
Window Swap Alterna entre las fuentes Principal y PIP
Primary
Backup
Disable
Enable
VGA Auto ADJ Ajusta automáticamente la entrada VGA
ADC Calibration Calibra el CAD
Normal Salida de vídeo
Black out Apaga la salida
Freeze Congela la salida en un solo fotograma
HDMI
DVI
VGA2
VGA3
CVBS1
CVBS2
DP
VGA1
HDMI
DVI
VGA2
VGA3
CVBS1
CVBS2
DP
VGA1
Disable
Enable
0–15 Configura la transparencia de PIP
Disable
Enable
Save Guarda la configuración actual
Load Carga los ajustes guardados seleccionados
Delete
Selecciona la fuente de entrada principal
(deshabilitado con PIP habilitado).
Selecciona la fuente de entrada PIP (las
fuentes de entrada principal y PIP no
pueden ser ambas digitales o ambas
analógicas; una debe ser digital [HDMI, DVI
o DP] y la otra analógica [VGA o CVBS]).
Configura las dimensiones y compensación
de PIP. *Rangos de dimensión
determinados por el tamaño de la pantalla.
**Rangos de ajustes de compensación
determinados por las dimensiones.
Habilita o deshabilita el recorte de PIP
Configura las dimensiones de recorte y
compensación de PIP. *Rangos de dimensión
determinados por la configuración de entrada.
**Rangos de ajustes de compensación
determinados por las dimensiones de recorte.
Establece este Vivid Drive 28N como primario
Establece este Vivid Drive 28N como respaldo
Habilita o deshabilita el mapeado
Habilita o deshabilita la sincronización de
vídeo
Establece el número de segundos que la
pantalla está inactiva antes de volver a la
pantalla de inicio
Elimina los ajustes guardados seleccionados
Vivid Drive 28N GRR Rev. 1
12

ES
GUIA DE REFERENCIA RÁPIDA
Nivel principal
Advanced
Settings
(cont.)
Display
Control
(cont.)
Inputs
Backup
Niveles de programación Descripción
Test Pattern Selecciona un patrón de prueba
Contrast 0–100% Ajusta el contraste de la salida
Saturation 0–100% Ajusta la saturación de la salida
Sharpness 0–24 Ajusta la nitidez de la salida
Hue -180–180 Ajusta el tono de la salida
Color
Image
quality
Switching
Effect
Fade Time(s) 0–3 Configura el tiempo de fade
Backup
Backup 1 HDMI
Backup 2 VGA2
Backup 3 CVBS1
Tem perature
Red 0–255 Ajusta el nivel de rojo de la salida
Green 0–255 Ajusta el nivel de verde de la salida
Blue 0–255 Ajusta el nivel de azul de la salida
Gamma 1.0–4.0 Ajusta la gamma de la salida
Reset
Shrink Center
Shrink Left Top
Zoom Center
Zoom Left Top
Disable
Enable
Custom
4000–9500K
No Mantener la configuración actual
Yes
Off Sin efecto de transición
Cut Efecto de corte
Fade Efecto de fade
DVI
VGA3
CVBS2
DP
VGA1
NULL
DVI
VGA3
CVBS2
DP
VGA1
NULL
DVI
VGA3
CVBS2
DP
VGA1
NULL
Indica una temperatura de color personalizada
Selecciona una temperatura de color
preconfigurada
Restablecer la configuración de calidad de
imagen
La primera fuente de vídeo se encoje al centro
La primera fuente de vídeo se encoje a la
parte superior izquierda
La segunda fuente de vídeo se amplía
desde el centro
La segunda fuente de vídeo se amplía
desde la parte superior izquierda
Habilita o deshabilita los respaldos de fuente
de vídeo
Configura la fuente de vídeo de respaldo
como HDMI
Configura la fuente de vídeo de respaldo
como VGA2
Configura la fuente de vídeo de respaldo
como CVBS1
13
Vivid Drive 28N GRR Rev. 1

GUIA DE REFERENCIA RÁPIDA
ES
Nivel principal
Advanced
Settings
(cont.)
Factory
Reset
Communi-
cation
Settings’Co
Language
Niveles de programación Descripción
DVI DVI*
VGA3 VGA3*
Inputs
Backup
(cont.)
Output
Resolution
Cabinet
Settings
OLED Brightness 6–15 Configura el brillo de la pantalla
HW Version V_._._._ Muestra la versión actual de firmware
Communication Mode
Network
Settings
Custom
Backup
Preset
Resolution
Custom
Resolution
Load RCFG
Files
Save to RV
Card
Config IPV4
IP Address 1–223.0–255.0–255.0–255 Configura la dirección IP
Subnet Mask 0–255.0–255.0–255.0–255 Configura la máscara de subred
Reset
Phās ʹā thịy Cambia el idioma de la pantalla a tailandés
Русский Cambia el idioma de la pantalla a ruso
Deutsch Cambia el idioma de la pantalla a alemán
CVBS2 CVBS2*
DP DP*
VGA1 VGA1*
NULL
1024x768
1280x1024
1366x768
1440x900
1920x1080
1920x1200
2048x640
Width (H) 800–3840
Height (V) 600–1920 Configura la altura de píxeles personalizada
Custom
Refresh Rate
_ _ _ _ _ _ _ _ _ _ _ _ _ _ _
_ _ _ _ _ _ _ _ _ _ _ _ _ _ _
No
Yes
USB Preferred La conexión USB tiene prioridad
LAN Preferred La conexión Ethernet tiene prioridad
Manually Establece la dirección IP manualmente
中文
English Cambia el idioma de la pantalla a inglés
24–60Hz Configura la tasa de refresco
Apply Aplica la resolución personalizada
No
Yes
Auto Se asignará la dirección IP
No
Yes
Configura la fuente de vídeo que se va a
respaldar, luego la fuente de vídeo de
respaldo
Selecciona una resolución preprogramada
Configura la anchura de píxeles
personalizada
Envía el archivo precargado seleccionado a
los paneles conectados
Guarda permanentemente el firmware
cargado para los paneles conectados
Restablece el producto a los valores de
fábrica
Restablece la configuración de red
Cambia el idioma de la pantalla a chino
Vivid Drive 28N GRR Rev. 1
14

MANUEL DE RÉFÉRENCE
FR
A propos de ce manuel
Le Manuel de Référence (MdR) du Vivid Drive 28N reprend des informations de base sur cet appareil notamment en matière de
montage et d'options de menu. Veuillez télécharger le manuel d'utilisation à partir du site internet www.chauvetdj.com
pour plus de détails.
Clause de non Responsabilité
Les informations et caractéristiques contenues dans ce MdR sont sujettes à modification sans préavis.
GARANTIE LIMITÉE
VEUILLEZ VISITER NOTRE SITE INTERNET POUR CONSULTER LES MODALITÉES D'ENREGISTREMENT DE LA
GARANTIE ET LES CONDITIONS GÉNÉRALES COMPLÈTES.
Pour les clients aux États-Unis et au Mexique: www.chauvetlighting.com/warranty-registration
Pour les clients du Royaume-Uni, de la République d'Irlande, de la Belgique, des Pays-Bas, du Luxembourg, de
la France et de l'Allemagne: www.chauvetlighting.eu/warranty-registration
Chauvet garantit que cet appareil est exempt de défauts de matériaux et de fabrication dans des conditions normales
d'utilisation, pendant la période spécifiée dans la garantie limitée complète consultable sur notre site Internet et sous
réserve des exclusions et limitations qui y sont énoncées. Cette garantie ne s'applique qu'à l'acheteur initial du produit et
n'est pas transférable. Pour exercer les droits prévus par cette garantie, vous devez fournir une preuve d'achat sous la
forme d'un reçu de vente original d'un revendeur autorisé qui indique le nom du produit et la date d'achat. IL N'EXISTE
AUCUNE AUTRE GARANTIE EXPRESSE OU IMPLICITE. Cette garantie vous confère des droits légaux spécifique.
Vous pouvez également bénéficier d'autres droits qui varient selon les états et les pays. Cette garantie n'est valable
qu'aux États-Unis, au Royaume-Uni, en République d'Irlande, en Belgique, aux Pays-Bas, au Luxembourg, en France,
en Allemagne et au Mexique. Pour connaître les conditions de garantie dans d'autres pays, veuillez consulter votre
revendeur local.
.
.
Consignes de Sécurité
Ces consignes de sécurité contiennent des informations importantes en matière d'installation, d'utilisation et d'entretien.
• Cet appareil DOIT être relié à un circuit mis à la terre et protégé.
• Toujours débrancher l'appareil de la source d'alimentation avant de le nettoyer.
• Veillez à ce que le cordon d'alimentation ne soit jamais pincé ou endommagé.
• Ne débranchez jamais cet appareil en tirant sur le cordon d'alimentation.
• NE PAS laisser de produit inflammable à proximité de l'appareil lorsque celui-ci fonctionne.
• NE PAS toucher au boîtier de l'appareil lorsqu'il est en fonctionnement, celui-ci pouvant être très chaud.
• La tension de la source d'énergie à laquelle est connecté cet appareil doit être dans la plage indiquée sur
l'étiquette ou sur le panneau arrière de l'appareil.
• Cet appareil doit uniquement être utilisé en intérieur! (IP20) Afin d'éviter tout risque d'incendie ou de
décharge électrique, veillez à n'exposer cet appareil ni à la pluie ni à l'humidité.
• Installez toujours cet appareil dans un endroit bien ventilé à au moins 50 cm (20 po) des surfaces adjacentes.
• Assurez-vous qu'aucune fente de ventilation de l'appareil n'est obstruée.
• Ne connectez jamais cet appareil à un variateur ou un rhéostat.
• Ne transportez jamais ce produit par le cordon d'alimentation.
• La température ambiante maximale est de 40 °C (104 °F). Ne faites pas fonctionner cet appareil à des
températures plus élevées.
• En cas de sérieux problèmes de fonctionnement, arrêtez l'appareil immédiatement.
• NE PAS ouvrir cet appareil. Il ne contient aucune pièce réparable par l'utilisateur.
• Durant les périodes de non-utilisation, pour éviter tout usure inutile et pour prolonger la durée de vie,
éteignez complètement l'appareil en le débranchant ou en coupant le disjoncteur.
En dehors des États-Unis, du Royaume-Uni, de l'Irlande, du Benelux, de la France, de l’Allemagne, ou du Mexique,
contactez votre fournisseur si vous avez besoin d'assistance ou pour retourner un appareil. Référez-vous à Contact Us
la fin de ce MdR pour obtenir des informations pour nous contacter.
à
Contenu
• Vivid Drive 28N
• Cordon d'alimentation
•Câble DVI
•Câble VGA
•Câble DP
• Câble HDMI
• Câble RJ45
• Adaptateur DP vers HDMI
•Câble USB
• Manuel de Référence
Préalable
Déballez votre Vivid Drive 28N et assurez-vous que vous avez reçu toutes les pièces en bon état. Si la boîte et/ou son
contenu semble endommagés, contactez immédiatement le transporteur, et non pas Chauvet.
Alimentation CA
Cet appareil est doté d'une alimentation universelle qui peut prendre en charge toute tension d'entrée comprise entre 100
et 240 VCA, 50/60 Hz.
15
Durant les périodes de non-utilisation, pour éviter toute usure inutile et pour prolonger la durée de vie,
éteignez complètement l'appareil en le débranchant ou en coupant le disjoncteur.
Vivid Drive 28N MdR Rév. 1

MANUEL DE RÉFÉRENCE
1
2
34
5 6 11 12 13 14
78910 15 17
16 18
Ecran LCD
FR
Montage
Le Vivid Drive 28N s'installe sur un rack 19" standard. Il peut également être installé sur ses pieds sur une surface plane.
Vue d'ensemble de la façade avant de l'appareil
Description du panneau de commande
# Nom Fonction
Bouton de
1
<MENU>
2 <ESC> Permet de sortir du menu ou de la fonction en cours
3 <SCREEN> Accède au menu Screen Settings
4<INPUT/1>Accède au menu Input Settings ou entre le chiffre 1 lors de la modification d'une valeur numérique.
5<FREEZE>Gèle la sortie vidéo
6<TEST/6>
7 <HDMI/2>
8<DVI/3>
9<VGA1/4>
10 <VGA2/5>
11 <VGA3/7>
12 <CVBS1/8>
13 <CVBS2/9>
14 <DP/0>
15 <TAKE> Active / désactive l'incrustation d'image (PIP)
16 <BLACK> Permet de couper la sortie vidéo
17 USB (A) Connexion en cascades vers d'autres appareils Vivid Drive 28N
18 USB (B) Port USB B pour les mises à jour du microprogramme, connexion à NovaLCTMars ou SmartLCT
Tourner pour naviguer vers le haut ou vers le bas dans la liste du menu et augmenter ou diminuer
une valeur numérique sélectionnée. Appuyer pour activer l'élément de menu actuellement affiché
ou pour confirmer la valeur actuellement sélectionnée pour la fonction sélectionnée.
Permet d'accéder au menu Test Pattern ou de saisir le chiffre 6 lors de l'édition d'une valeur
numérique.
Permet de sélectionner la source d'entrée HDMI ou de saisir le chiffre 2 lors de l'édition d'une
valeur numérique
Permet de sélectionner la source d'entrée DVI ou de saisir le chiffre 3 lors de la modification d'une
valeur numérique.
Permet de sélectionner la source d'entrée VGA1 ou de saisir le chiffre 4 lors de la modification
d'une valeur numérique.
Permet de sélectionner la source d'entrée VGA2 ou de saisir le chiffre 5 lors de la modification
d'une valeur numérique.
Permet de sélectionner la source d'entrée VGA3 ou de saisir le chiffre 7 lors de la modification
d'une valeur numérique.
Permet de sélectionner la source d'entrée CVBS1 ou de saisir le chiffre 8 lors de la modification
d'une valeur numérique.
Permet de sélectionner la source d'entrée CVBS2 ou de saisir le chiffre 9 lors de la modification
d'une valeur numérique.
Permet de sélectionner la source d'entrée DP ou de saisir le chiffre 0 lors de la modification d'une
valeur numérique.
Vivid Drive 28N MdR Rév. 1
16

MANUEL DE RÉFÉRENCE
12
333
45 6
7
7
8
9 10 10 Entrée d'alimentation
FR
Vue d'ensemble de la façade arrière de l'appareil
Description du panneau arrière
# Nom Fonction
1USBPort USB B pour les mises à jour du microprogramme, connexion à NovaLCTMars ou SmartLCT
2RJ45Port RJ45 pour la connexion au système de contrôle à distance
3VGA1–3Connecteur DE-15 pour l'entrée vidéo d'une source VGA (numéroté de gauche à droite)
4DPPort d'entrée DisplayPort
5HDMIPort d'entrée HDMI
6DVIPort d'entrée DVI
7CVBS1–2Connecteur BNC pour entrée CVBS (1 en bas, 2 en haut)
8VGA OUTConnecteur DE-15 pour sortie VGA
9 DVI OUT Port de sortie DVI
10 LED OUT 1–2 Ports Ethernet pour l'envoi de signaux vidéo vers des panneaux vidéo (gauche 1, droite 2)
Menu carte
Menu principal
Brightness 0–100% Contrôle le niveau de sortie total
Cabinet Row Qty 1–15*
Cabinet Column Qty 1–30*
Screen
Settings
Input
Settings
Port1 Cabinet Qty 1–40*
Data Flow(Front View)’Inp
Preset
Resolution
Niveaux de programmation Description
Définit le nombre de lignes de l'assemblage vidéo.
*Plage déterminée par la valeur de Column
Qty (quantité de colonnes) et les panneaux.
Définit le nombre de colonnes de l'assemblage
vidéo. *Plage déterminée par la valeur de Row
Qty (quantité de lignes) et par les panneaux.
Définit le nombre de panneaux vidéo
connectés au port de sortie 1. *Plage
dépendante des valeurs de Row Qty et
Column Qty et des panneaux.
Définit le point de départ et le chemin du flux
de données dans l'assemblage du panneau
vidéo
1024x768
1280x1024
1366x768
1440x900
1600x1200
1920x1080
1920x1200
2048x640
Sélectionne une résolution prédéfinie
17
Vivid Drive 28N MdR Rév. 1

MANUEL DE RÉFÉRENCE
FR
Menu principal
Input
Settings
(suite)
Output
Settings
Advanced
Settings
Custom
Resolution
Scaling
Auto Fit
Custom
Scaling
Image Offset
Apply to all
PIP
Niveaux de programmation Description
Width (H) 800–3840 Définit une largeur de pixels personnalisée
Height (V) 600–1920 Définit une hauteur de pixels personnalisée
60Hz
Custom
Refresh Rate
Disable
Enable
Disable
Enable
Input Source _ _ _ _ Affiche la source en entrée
Width (H) 64–_ _ _ _*
Input Capture
Output
Window
Start X -_ _ _ _*–_ _ _ _*
Start Y -_ _ _ _*–_ _ _ _*
PIP
LAYOUT
Main Source
Height (V) 48–_ _ _ _*
Start X 0–_ _ _ _**
Start Y 0–_ _ _ _**
Width (H) 64–_ _ _ _*
Height (V) 64*–_ _ _ _*
Start X 0–_ _ _ _**
Start Y 0–_ _ _ _**
Scaling Mode
Disable
Enable
59.94Hz
50Hz
30Hz
Apply
Pixel
Units
Percentage
Custom
Equal Ratio
Disable
Enable
CUSTOM Disposition personnalisée
L+T Disposition à gauche et en haut
L+B Disposition à gauche et en bas
R+T Disposition à droite et en haut
R+B Disposition à droite et en bas
CENT Disposition au centre
T+B Disposition en haut et en bas
HDMI
DVI
VGA2
VGA3
CVBS1
CVBS2
DP
VGA1
Définit un taux de rafraichissement
personnalisé
Applique des valeurs de résolution personnalisées
Active ou désactive les options de mise à
l'échelle
Active ou désactive l'ajustement
automatique
Définit la partie de l'entrée à sélectionner
pour la sortie. *Plages de dimension
déterminées par le paramétrage de
résolution en entrée. **Plages de décalage
déterminées par les dimensions.
Définit les dimensions et le décalage de la
sortie. *Plages de dimension déterminées
par le paramétrage de l'écran. **Plages de
décalage déterminées par les dimensions.
Règle les unités de la fenêtre de sortie en pixels
Règle les unités de la fenêtre de sortie en
pourcentage
La mise à l'échelle peut ne pas conserver le
rapport d'origine
La mise à l'échelle maintient le rapport d'origine
Paramètre le décalage de l'image. *Plages
déterminées par le paramétrage de l'écran.
Active ou désactive l'option Apply to all
(appliquer à tous)
Active ou désactive l'incrustation d'image
Sélectionne la source d'entrée principale
(désactivée lorsque le PIP est activé).
Vivid Drive 28N MdR Rév. 1
18

FR
MANUEL DE RÉFÉRENCE
Menu principal
Advanced
Settings
(suite)
Niveaux de programmation Description
PIP Source
Width (H) 64–_ _ _ _*
PIP
(cont.)
Redundancy
Mapping
Advanced
Attr
Presettings Presetting 1–10
Display
Control
Height (V) 64–_ _ _ _*
Start: X 0–_ _ _ _**
Start: Y 0–_ _ _ _**
PIP Crop
PIP Crop
Settings
Transparency 0–15 Définit la transparence du PIP
Video Sync.
Go Homepage (s) 30–3600
Width (H) 64–_ _ _ _*
Height (V) 48–_ _ _ _*
Start X 0–_ _ _ _**
Start Y 0–_ _ _ _**
Window Swap Intervertit les sources principales et PIP
Primary
Backup
Disable
Enable
VGA Auto ADJ Ajustement automatique de l'entrée VGA
ADC Calibration Calibrage de l'ADC
Normal Sortie vidéo
Black out Permet de couper la sortie
Freeze
HDMI
DVI
VGA2
VGA3
CVBS1
CVBS2
DP
VGA1
Sélectionne la source d'entrée PIP (Les
sources d'entrée principale et PIP ne
peuvent pas être à la fois numériques ou
analogiques. L'une doit être numérique
[HDMI, DVI, ou DP] et l'autre analogique
[VGA ou CVBS].)
Définit les dimensions et le décalage de
l'incrustation d'image. *Les plages de
dimensions sont déterminées par la taille de
l'écran. **Plages de décalage déterminées
par les dimensions.
Disable
Enable
Disable
Enable
Save Enregistre les paramètres actuels
Load
Delete
Active ou désactive le recadrage de
l'incrustation d'image
Définit les dimensions et le décalage du recadrage
de l'incrustation d'image. *Plages de
dimension déterminées par le paramétrage
d'entrée. **Plages de décalage déterminées
par les dimensions de recadrage.
Définit ce Vivid Drive 28N en tant que primaire
Définit ce Vivid Drive 28N en tant que backup
Active ou désactive le mappage
Active ou désactive la synchronisation vidéo
Définit le nombre de seconde pendant lequel
l'affichage peut rester inactif avant de revenir
à l'écran d'accueil.
Charge les paramètres sauvegardés
sélectionnés
Supprime les paramètres sauvegardés
sélectionnés
Permet de geler la sortie vidéo sur une
image
19
Test Pattern Permet de sélectionner un motif de test
Vivid Drive 28N MdR Rév. 1

MANUEL DE RÉFÉRENCE
FR
Menu principal
Advanced
Settings
(suite)
Display
Control
(suite)
Inputs
Backup
Niveaux de programmation Description
Contrast 0–100% Permet de régler le contraste de la sortie
Saturation 0–100% Permet de régler la saturation de la sortie
Sharpness 0–24 Permet de régler la netteté de la sortie
Hue -180–180 Permet de régler la teinte de la sortie
Color
Tem perature
Image quality
Switching
Effect
Fade Time(s) 0–3 Définit le délai de fondu
Backup
Backup 1 HDMI
Backup 2 VGA2
Backup 3 CVBS1
Red 0–255
Green 0–255
Blue 0–255
Gamma 1.0–4.0
Reset
Shrink Center
Shrink Left Top
Zoom Center
Zoom Left Top
Disable
Enable
Custom
4000–9500K
No Conserver les paramètres actuels
Yes
Off Pas d'effet de transition
Cut Effet coupé
Fade Effet de fondu
DVI
VGA3
CVBS2
DP
VGA1
NULL
DVI
VGA3
CVBS2
DP
VGA1
NULL
DVI
VGA3
CVBS2
DP
VGA1
NULL
Signifie une température de couleur
personnalisée
Sélectionne une température de couleur préréglée
Permet de régler le niveau de sortie rouge de
la sortie
Permet de régler le niveau de sortie vert de
la sortie
Permet de régler le niveau de sortie bleu de
la sortie
Permet de régler le paramètre gamma de la
sortie
Réinitialiser les paramètres de qualité
d'image
La première source vidéo se rétrécit vers le
centre
La première source vidéo se rétrécit vers le
coin en haut à gauche
La deuxième source vidéo effectue un zoom
depuis le centre
La deuxième source vidéo effectue un zoom
depuis le coin en haut à gauche
Active ou désactive les sources vidéo de
sauvegarde
Règle la source vidéo de sauvegarde sur
HDMI
Règle la source vidéo de sauvegarde sur
VGA2
Règle la source vidéo de sauvegarde sur
CVBS1
Vivid Drive 28N MdR Rév. 1
20

FR
MANUEL DE RÉFÉRENCE
Menu principal
Advanced
Settings
(suite)
Factory
Reset
Communi-
cation
Settings’Co
Language
Niveaux de programmation Description
DVI DVI*
VGA3 VGA3*
Inputs
Backup
(suite)
Output
Resolution
Cabinet
Settings
OLED Brightness 6–15 Définit la luminosité de l'affichage
HW Version V_._._._
Communication Mode
Network
Settings
Custom
Backup
Preset
Resolution
Custom
Resolution
Load RCFG
Files
Save to RV
Card
Config IPV4
IP Address 1–223.0–255.0–255.0–255 Définit l'adresse IP
Subnet Mask 0–255.0–255.0–255.0–255 Définit le masque de sous-réseau
Reset
Phās ʹā thịy
Русский Paramètre la langue d'affichage en russe
Deutsch Paramètre la langue d'affichage en allemand
CVBS2 CVBS2*
DP DP*
VGA1 VGA1*
NULL
1024x768
1280x1024
1366x768
1440x900
1920x1080
1920x1200
2048x640
Width (H) 800–3840 Définit une largeur de pixels personnalisée
Height (V) 600–1920 Définit une hauteur de pixels personnalisée
Custom
Refresh Rate
_ _ _ _ _ _ _ _ _ _ _ _ _ _ _
_ _ _ _ _ _ _ _ _ _ _ _ _ _ _
No
Yes
USB Preferred La connexion USB est prioritaire
LAN Preferred La connexion Ethernet est prioritaire
Manually Définition manuelle de l'adresse IP
中文
English Paramètre la langue d'affichage en anglais
24–60Hz
Apply Applique une résolution personnalisée
No
Yes
Auto L'adresse IP va être affectée
No
Yes
Définit la source vidéo à sauvegarder, puis la
source vidéo de sauvegarde
Sélectionne une résolution prédéfinie
Définit un taux de rafraichissement
personnalisé
Envoie le fichier sélectionné préchargé aux
panneaux connectés
Sauvegarde en permanence le micrologiciel
téléchargé sur les panneaux connectés.
Affiche la version actuelle du
microprogramme
Réinitialise l'appareil aux réglages d'usine
Réinitialise les paramètres réseau
Paramètre la langue d'affichage en chinois
Paramètre la langue d'affichage en thaïlandais
21
Vivid Drive 28N MdR Rév. 1

SCHNELLANLEITUNG
DE
Über diese Schnellanleitung
In der Schnellanleitung des Vivid Drive 28N finden Sie die wesentlichen Produktinformationen, wie etwa über die Montage und
Menüoptionen des Geräts. Laden Sie für weiterführende Informationen unter www.chauvetdj.com das Benutzerhandbuch herunter.
Haftungsausschluss
Die in dieser Anleitung aufgeführten Informationen und Spezifikationen können ohne vorherige Ankündigung geändert werden.
EINGESCHRÄNKTE GARANTIE
ZUR REGISTRIERUNG FÜR GARANTIEANSPRÜCHE UND ZUR EINSICHT IN DIE VOLLSTÄNDIGEN
GESCHÄFTSBEDINGUNGEN BESUCHEN SIE BITTE UNSERE WEBSITE.
Für Kunden in den USA und in Mexiko: www.chauvetlighting.com/warranty-registration
Für Kunden im Vereinigten Königreich, in Irland, Belgien, den Niederlanden, Luxemburg, Frankreich und
Deutschland: www.chauvetlighting.eu/warranty-registration
Chauvet garantiert für die in der auf unserer Website veröffentlichten vollständigen eingeschränkten Garantie genannten Dauer und
unter Vorbehalt der darin genannten Haftungsausschlüsse und -beschränkungen, dass dieses Produkt bei normalen Gebrauch frei
von Material- und Verarbeitungsfehlern ist. Diese Garantie erstreckt sich nur auf den Erstkäufer des Produkts und ist nicht
übertragbar. Zur Ausübung der unter dieser Garantie gewährten Rechte ist der Kaufbeleg in Form der Originalrechnung von einem
autorisierten Händler vorzulegen, in der die Produktbezeichnung und das Kaufdatum vermerkt sein müssen. ES BESTEHEN
KEINE WEITEREN AUSDRÜCKLICHEN ODER STILLSCHWEIGENDEN GARANTIEN. Diese Garantie gibt Ihnen besondere
gesetzliche Rechte. Und Sie haben möglicherweise weitere Rechte, die von Land zu Land unterschiedlich sein können. Diese
Garantie ist nur in den USA, im Vereinigten Königreich, in Irland, Belgien, den Niederlanden, Luxemburg, Frankreich, Deutschland
und Mexiko gültig. Bezüglich der Garantiebestimmungen in anderen Ländern wenden Sie sich bitte an Ihren lokalen Händler.
.
Sicherheitshinweise
Diese Sicherheitshinweise enthalten wichtige Informationen über die Montage, Verwendung und Wartung des Geräts.
• Schließen Sie dieses Produkt NUR an einen mit der Erde verbundenen und geschützten Stromkreis an.
• Trennen Sie das Gerät von der Stromquelle, bevor Sie es reinigen.
• Stellen Sie sicher, dass das Netzkabel nicht gequetscht oder beschädigt ist.
• Ziehen Sie beim Trennen des Geräts von der Stromversorgung nie am Kabel.
• KEINE entflammbaren Materialien während des Betriebs in der Nähe des Geräts lagern.
• NIEMALS während des Betriebs das Gehäuse berühren, da dies sehr heiß wird.
•
Die Spannung der Schukosteckdose, an die Sie das Gerät anschließen, muss sich innerhalb des Spannungsbereiches
befinden, der auf dem Hinweisschild oder dem rückwärtigen Bedienfeld des Geräts angegeben ist.
• Dieses Gerät darf nur im Innenbereich verwendet werden. (IP20) Um das Risiko von Bränden oder
elektrischen Schlägen zu vermeiden, dürfen Sie das Gerät nicht Regen oder Feuchtigkeit aussetzen.
• Installieren Sie das Gerät an einem Ort mit ausreichender Belüftung und mit einem Abstand von 50 cm zu
den angrenzenden Flächen.
• Stellen Sie sicher, dass die Lüftungsöffnungen im Gehäuse des Geräts nicht verschlossen sind.
• Schließen Sie dieses Gerät niemals an einen Dimmer oder Regelwiderstand an.
• Tragen Sie dieses Gerät niemals am Netzkabel.
• Die maximal zulässige Umgebungstemperatur beträgt 40 °C. Nehmen Sie das Gerät nicht bei höheren
Temperaturen in Betrieb.
• Bei ernsthaften Betriebsproblemen stoppen Sie umgehend die Verwendung des Geräts.
• Dieses Gerät NICHT öffnen. Die eingebauten Komponenten sind für den Kunden wartungsfrei.
• Um unnötigen Verschleiß zu vermeiden und die Lebensdauer des Geräts zu verlängern, trennen Sie
während längerer Perioden des Nichtgebrauchs das Gerät vom Stromnetz – entweder per Trennschalter
oder durch Herausziehen des Steckers aus der Steckdose.
Kontakt
Kunden außerhalb der USA, GB, Irland, Benelux, Frankreich, Deutschland oder Mexiko wenden sich an ihren
Lieferanten, um den Kundensupport in Anspruch zu nehmen oder ein Produkt zurückzuschicken. Kontaktinformationen
finden Sie im Contact Us
am Ende dieses QRG.
Packungsinhalt
• Vivid Drive 28N
• Netzkabel
• DVI-Kabel
• VGA-Kabel
• DP-Kabel
•HDMI-Kabel
• RJ45-Kabel
• Adapter für DP auf HDMI
• USB-Kabel
Start
Packen Sie Ihren Vivid Drive 28N aus und überprüfen Sie, ob Sie alle Teile unbeschädigt erhalten haben. Wenn die
Verpackung beschädigt ist, benachrichtigen Sie umgehend das Transportunternehmen, nicht jedoch Chauvet.
Wechselstrom
Dieses Gerät verfügt über ein Vorschaltgerät, das automatisch die anliegende Spannung erkennt, sobald der Netzstecker
in die Schukosteckdose gesteckt wird, und kann mit einer Eingangsspannung von 100~240 V AC, 50/60 Hz arbeiten.
Um unnötigen Verschleiß zu vermeiden und die Lebensdauer des Geräts zu verlängern, trennen Sie
während längerer Perioden des Nichtgebrauchs das Gerät vom Stromnetz – entweder per
Trennschalter oder durch Herausziehen des Steckers aus der Steckdose.
.
• Schnellanleitung
Vivid Drive 28N SAL Rev. 1
22

SCHNELLANLEITUNG
1
2
34
5 6 11 12 13 14
78910 15 17
16 18
LCD-Anzeige
DE
Montage
Der Vivid Drive 28N eignet sich für den Aufbau auf einem standardmäßigen 19-Zoll-Rack, kann alternativ aber auch mit
seinen Füßen auf einem flachen Untergrund aufgestellt werden.
Produktübersicht, Vorderseite
Beschreibung des Bedienfeldes
# Name Funktion
Drehen Sie diesen Knopf, um nach oben oder unten durch die Menüliste zu scrollen und um einen
1 <MENU>-Knopf
2 <ESC> Damit verlassen Sie das aktuelle Menü oder die Funktion
3 <SCREEN> Damit navigieren Sie zum Menü “Einstellungen”
4<INPUT/1>
5 <FREEZE> Damit wird die Video-Ausgabe eingefroren
6<TEST/6>
7 <HDMI/2>
8<DVI/3>
9<VGA1/4>
10 <VGA2/5>
11 <VGA3/7>
12 <CVBS1/8>
13 <CVBS2/9>
14 <DP/0>
15 <TAKE> Damit aktivieren oder deaktivieren Sie PIP
16 <BLACK> Damit wird die Video-Ausgabe verdunkelt
17 USB (A) Kaskaden zu anderen Vivid Drive 28N-Geräten
18 USB (B) USB B-Anschluss für Firmware-Updates und die Verbindung mit NovaLCTMars oder SmartLCT
ausgewählten numerischen Wert zu erhöhen oder zu verringern. Drücken Sie diese Taste, um die
aktuell angezeigte Menüoption zu aktivieren oder den aktuell ausgewählte Wert in einer Funktion
einzustellen.
Damit navigieren Sie direkt zum Menü “Einstellungen eingeben” oder es wird die Nummer 1
eingegeben, wenn ein numerischer Wert bearbeitet wird
Damit navigieren Sie direkt zum Menü “Testmuster” oder es wird die Nummer 6 eingegeben, wenn
ein numerischer Wert bearbeitet wird
Damit wird die HDMI-Eingangsquelle ausgewählt oder die Nummer 2 eingegeben, wenn ein
numerischer Wert bearbeitet wird
Damit wird die DVI-Eingangsquelle ausgewählt oder die Nummer 3 eingegeben, wenn ein
numerischer Wert bearbeitet wird
Damit wird die VGA1-Eingangsquelle ausgewählt oder die Nummer 4 eingegeben, wenn ein
numerischer Wert bearbeitet wird
Damit wird die VGA2-Eingangsquelle ausgewählt oder die Nummer 5 eingegeben, wenn ein
numerischer Wert bearbeitet wird
Damit wird die VGA3-Eingangsquelle ausgewählt oder die Nummer 7 eingegeben, wenn ein
numerischer Wert bearbeitet wird
Damit wird die CVBS1-Eingangsquelle ausgewählt oder die Nummer 8 eingegeben, wenn ein
numerischer Wert bearbeitet wird
Damit wird die CVBS2-Eingangsquelle ausgewählt oder die Nummer 9 eingegeben, wenn ein
numerischer Wert bearbeitet wird
Damit wird die DP-Eingangsquelle ausgewählt oder die Nummer 0 eingegeben, wenn ein
numerischer Wert bearbeitet wird
23
Vivid Drive 28N SAL Rev. 1

SCHNELLANLEITUNG
12
333
45 6
7
7
8
9 10 10 Stromeingang
Produktübersicht, Rückseite
Beschreibung des Bedienfeldes auf der Rückseite
# Name Funktion
1USBUSB B-Anschluss für Firmware-Updates und die Verbindung mit NovaLCTMars oder SmartLCT
2RJ45RJ45-Anschluss für den Anschluss einer Fernbedienung
3VGA1–3DE-15-Steckverbinder für Videoeingang von einer VGA-Quelle (nummeriert von links nach rechts)
4DPDisplayPort-Eingangsbuchse
5HDMIHDMI-Eingangsbuchse
6DVIDVI-Eingangsbuchse
7 CVBS1–2 BNC-Steckverbinder für CVBS-Eingang (unten ist 1, oben ist 2)
8VGA OUTDE-15-Steckverbinder für VGA-Ausgang
9 DVI OUT DVI-Ausgangsbuchse
10 LED OUT 1–2
Ethernet-Anschlüsse für das Senden von Videosignalen an die Videobildschirme (links ist 1, rechts ist 2)
DE
Menükarte
Hauptlevel Programmierebenen Beschreibung
Brightness 0–100% Zur Steuerung aller Ausgangspegel
Damit legen Sie die Anzahl der Zeilen in der
Screen
Settings
Input
Settings
Cabinet Row Qty 1–15*
Cabinet Column Qty 1–30*
Port1 Cabinet Qty 1–40*
Data Flow(Front View)’Inp
1024x768
1280x1024
1366x768
Preset
Resolution
1440x900
1600x1200
1920x1080
1920x1200
2048x640
Video-Baugruppe fest. *Bereich ist durch Spalte
“Menge” und die Bildschirme bestimmt.
Damit legen Sie die Anzahl der Spalten in
der Video-Baugruppe fest. *Bereich ist durch
Zeile “Menge” und die Bildschirme bestimmt.
Damit legen Sie die Anzahl der mit Ausgang
1 verbundenen Videobildschirme fest.
*Bereich ist durch Zeile “Menge”, Spalte
“Menge” und die Bildschirme bestimmt.
Damit legen Sie den Startpunkt und den
Pfad für den Datenstrom in der
Videobildschirm-Baugruppe fest
Damit wählen Sie eine voreingestellte
Auflösung aus
Vivid Drive 28N SAL Rev. 1
24

SCHNELLANLEITUNG
DE
Hauptlevel Programmierebenen Beschreibung
Damit legen Sie eine benutzerdefinierte
Pixelbreite fest
Damit legen Sie eine benutzerdefinierte
Pixelhöhe fest
Damit legen Sie eine benutzerdefinierte
Wiederholrate fest
Damit wenden Sie eine benutzerdefinierte
Auflösung an
Damit aktivieren oder deaktivieren Sie
Skalierungsoptionen
Damit aktivieren oder deaktivieren Sie die
automatische Anpassung
Eingangs an den Ausgang geht.
*Abmessungsbereiche werden durch die
Auflösung der Eingangseinstellungen
bestimmt. **Offset-Bereiche werden durch
die Abmessungen bestimmt.
Offset des Ausgangs ein. *Abmessungsbereiche
werden durch die Bildschirmeinstellungen
bestimmt. **Offset-Bereiche werden durch
die Abmessungen bestimmt.
Damit legen Sie die Einheiten des
Ausgangsfensters zu den Pixeln fest
Damit legen Sie die Einheiten des
Ausgangsfensters zu den Prozentsätzen fest
Bei der Skalierung kann das ursprüngliche
Verhältnis u. U. nicht beibehalten werden.
Bei der Skalierung wird das ursprüngliche
Verhältnis beibehalten.
*Bereiche werden durch die
Bildschirmeinstellungen bestimmt.
Damit aktivieren oder deaktivieren Sie “Auf
alle anwenden”
Damit aktivieren oder deaktivieren Sie “Bildin-Bild”
Damit wählen Sie die Eingangsquelle aus
(deaktiviert, wenn PIP aktiviert ist).
Input
Settings
(Fortsetzung)
Output
Settings
Advanced
Settings
Custom
Resolution
Scaling
Auto Fit
Custom
Scaling
Image Offset
Apply to all
PIP
Width (H) 800–3840
Height (V) 600–1920
60Hz
Custom
Refresh Rate
Disable
Enable
Disable
Enable
Input Source _ _ _ _ Damit wird die Eingangsquelle angezeigt
Width (H) 64–_ _ _ _* Damit stellen Sie ein, welcher Teil des
Input
Capture
Output
Window
Start X -_ _ _ _*–_ _ _ _* Damit legen Sie den Bild-Offset fest.
Start Y -_ _ _ _*–_ _ _ _*
PIP
LAYOUT
Main Source
Height (V) 48–_ _ _ _*
Start X 0–_ _ _ _**
Start Y 0–_ _ _ _**
Width (H) 64–_ _ _ _* Damit stellen Sie die Abmessungen und den
Height (V) 64*–_ _ _ _*
Start X 0–_ _ _ _**
Start Y 0–_ _ _ _**
Scaling
Disable
Enable
59.94Hz
50Hz
30Hz
Apply
Pixel
Units
Percentage
Custom
Mode
Equal Ratio
Disable
Enable
CUSTOM Benutzerdefiniertes Layout
L+T Linkes und oberes Layout
L+B Linkes und unteres Layout
R+T Rechtes und oberes Layout
R+B Rechtes und unteres Layout
CENT Mittleres Layout
T+B Oberes und unteres Layout
HDMI
DVI
VGA2
VGA3
CVBS1
CVBS2
DP
VGA1
25
Vivid Drive 28N SAL Rev. 1

SCHNELLANLEITUNG
Hauptlevel Programmierebenen Beschreibung
HDMI
DVI
Damit wählen Sie die PIP-Eingangsquelle
aus (Netz und PIP-Eingangsquellen können
nicht gleichzeitig beide digital oder analog
sein. Eine muss digital [HDMI, DVI oder DP],
die andere analog [VGA oder CVBS] sein.)
Offset des PIP ein. *Abmessungsbereiche
werden durch die Bildschirmgröße
bestimmt. **Offset-Bereiche werden durch
die Abmessungen bestimmt.
Damit aktivieren oder deaktivieren Sie das
PIP-Cropping.
und den Offset des PIP ein. *Abmessungsbereiche
werden durch die Eingabeeinstellungen
bestimmt. **Offset-Bereiche werden durch
die Crop-Abmessungen bestimmt.
Damit wechseln Sie zwischen den Quellen
Netz und PIP hin und her
Damit legen Sie diesen Vivid Drive 28N als
Primärgerät fest
Damit legen Sie diesen Vivid Drive 28N als
Backup-Gerät fest
Damit aktivieren oder deaktivieren Sie die
Zuordnung
Damit wird der VGA-Eingang automatisch
angepasst
Damit aktivieren oder deaktivieren Sie die
Video-Synchronisation
Damit stellen Sie ein, wie viele Sekunden
das Display inaktiv ist, bevor es zum
Startbildschirm zurückkehrt
Damit speichern Sie die aktuellen Einstellungen
Damit laden Sie die ausgewählten
gespeicherten Einstellungen
Damit löschen Sie die ausgewählten
gespeicherten Einstellungen
Damit wird die Ausgabe auf ein Einzelbild
eingefroren
Advanced
Settings
(Fortsetzung)
PIP Source
Width (H) 64–_ _ _ _* Damit stellen Sie die Abmessungen und den
Height (V) 64–_ _ _ _*
PIP
(Fortsetzung)
Redundancy
Mapping
Advanced
Attr
Presettings Presetting 1–10
Display
Control
Start: X 0–_ _ _ _**
Start: Y 0–_ _ _ _**
PIP Crop
PIP Crop
Settings
Transparency
Video Sync.
Go Homepage (s) 30–3600
Width (H) 64–_ _ _ _* Damit stellen Sie die Crop-Abmessungen
Height (V) 48–_ _ _ _*
Start X 0–_ _ _ _**
Start Y 0–_ _ _ _**
Window Swap
Primary
Backup
Disable
Enable
VGA Auto ADJ
ADC Calibration Damit wird ADC kalibriert
Normal Videoausgang
Black out Damit wird die Ausgabe verdunkelt
Freeze
VGA2
VGA3
CVBS1
CVBS2
DP
VGA1
Disable
Enable
0–15 Damit stellen Sie die PIP-Transparenz ein
Disable
Enable
Save
Load
Delete
DE
Vivid Drive 28N SAL Rev. 1
Tes t Pattern Damit wählen Sie ein Testmuster aus
26

SCHNELLANLEITUNG
DE
Hauptlevel Programmierebenen Beschreibung
Advanced
Settings
(Fortsetzung)
Display
Control
(Fortsetzung)
Inputs
Backup
Contrast 0–100%
Saturation 0–100%
Sharpness 0–24
Hue -180–180
Color
Tem perature
Image
quality
Switching
Effect
Fade Time(s) 0–3 Damit stellen Sie die Fade-Zeit ein
Backup
Backup 1 HDMI
Backup 2 VGA2
Backup 3 CVBS1
Custom
Backup
Red 0–255
Green 0–255
Blue 0–255
Gamma 1.0–4.0
Reset
Shrink Center
Shrink Left Top
Zoom Center
Zoom Left Top
Disable
Enable
DVI DVI*
VGA3 VGA3*
CVBS2 CVBS2*
DP DP*
VGA1 VGA1*
Custom
4000–9500K
No
Yes
Off Kein Umschalteffekt
Cut Schneideffekt
Fade Fade-Effekt
DVI
VGA3
CVBS2
DP
VGA1
NULL
DVI
VGA3
CVBS2
DP
VGA1
NULL
DVI
VGA3
CVBS2
DP
VGA1
NULL
NULL
Damit stellen Sie den Kontrast der Ausgabe ein
Damit stellen Sie die Sättigung der Ausgabe ein
Damit stellen Sie die Schärfe der Ausgabe ein
Damit stellen Sie den Farbton der Ausgabe ein
Kennzeichnet eine benutzerdefinierte
Farbtemperatur
Damit wählen Sie eine voreingestellte
Farbtemperatur aus
Damit stellen Sie den Rot-Ton der Ausgabe ein
Damit stellen Sie den Grün-Ton der
Ausgabe ein
Damit stellen Sie den Blau-Ton der Ausgabe
ein
Damit stellen Sie den Gammawert der
Ausgabe ein
Damit speichern Sie die aktuellen
Einstellungen
Damit stellen Sie die Einstellungen zur
Bildqualität zurück
Erste Videoquelle wird zur Mitte
zusammengeklappt
Erste Videoquelle wird nach oben links
zusammengeklappt
Zweite Videoquelle wird aus der Mitte
vergrößert
Zweite Videoquelle wird von oben links
vergrößert
Damit aktivieren oder deaktivieren Sie die
Backups der Videoquelle
Damit stellen Sie den Backup der
Videoquelle auf HDMI ein
Damit stellen Sie den Backup der
Videoquelle auf VGA2 ein
Damit stellen Sie den Backup der
Videoquelle auf CVBS1 ein
Damit stellen Sie ein, dass ein Backup der
Videoquelle erstellt werden muss und führen
dieses dann durch
27
Vivid Drive 28N SAL Rev. 1

SCHNELLANLEITUNG
Hauptlevel Programmierebenen Beschreibung
1024x768
1280x1024
1366x768
1440x900
1920x1080
1920x1200
2048x640
Custom
USB Preferred USB-Anschluss hat Vorrang
LAN Preferred Ethernet-Anschluss hat Vorrang
Manually IP-Adresse manuell einstellen
24–60Hz
Apply
No Damit speichern Sie permanent
Yes
Auto IP-Adresse wird zugewiesen
No
Yes
Damit wählen Sie eine voreingestellte
Auflösung aus
Damit legen Sie eine benutzerdefinierte
Pixelbreite fest
Damit legen Sie eine benutzerdefinierte
Pixelhöhe fest
Damit legen Sie eine benutzerdefinierte
Wiederholrate fest
Damit wenden Sie eine benutzerdefinierte
Auflösung an
Damit senden Sie eine vorgeladene Datei
an die angeschlossenen Bildschirme
hochgeladene Firmware an die
angeschlossenen Bildschirme
Damit stellen Sie die Helligkeit des Display
ein
Damit stellen Sie das Gerät auf die
Werkseinstellungen zurück
Damit setzen Sie die Netzwerkeinstellungen
zurück
Damit legen Sie die Sprache des Displays
auf Chinesisch fest
Damit legen Sie die Sprache des Displays
auf Englisch fest
Damit legen Sie die Sprache des Displays
auf Thailändisch fest
Damit legen Sie die Sprache des Displays
auf Russisch fest
Damit legen Sie die Sprache des Displays
auf Deutsch fest
Advanced
Settings
(Fortsetzung)
Factory
Reset
Communi-
cation
Settings’Co
Language
Preset
Resolution
Output
Resolution
Custom
Resolution
Load RCFG
Cabinet
Settings
OLED Brightness 6–15
HW Version V_._._._ Zeigt die aktuelle Firmware-Version an
Communication Mode
Network
Settings
Files
Save to RV
Card
Config IPV4
IP Address 1–223.0–255.0–255.0–255 Damit stellen Sie die IP-Adresse ein
Subnet Mask 0–255.0–255.0–255.0–255 Damit stellen Sie die Subnetzmaske ein
Reset
Phās ʹā thịy
Русский
Deutsch
Width (H) 800–3840
Height (V) 600–1920
Refresh Rate
_ _ _ _ _ _ _ _ _ _ _ _ _ _ _
_ _ _ _ _ _ _ _ _ _ _ _ _ _ _
No
Yes
中文
English
DE
Vivid Drive 28N SAL Rev. 1
28

GUIDA RAPIDA
IT
Informazioni sulla Guida
La Guida Rapida Vivid Drive 28N contiene informazioni di base sul prodotto quali montaggio e opzioni menù. Per
maggiori dettagli, scaricare il Manuale Utente dal sito www.chauvetdj.com
Esclusione di responsabilità
Le informazioni e le specifiche contenute in questa guida possono essere modificate senza preavviso.
GARANZIA LIMITATA
PER LA REGISTRAZIONE DELLA GARANZIA ED I TERMINI E CONDIZIONI COMPLETI VISITARE IL NOSTRO SITO WEB.
Per clienti di Stati Uniti e Messico consultare: www.chauvetlighting.com/warranty-registration.
Per clienti di Regno Unito, Repubblica di Irlanda, Belgio, Paesi Bassi, Lussemburgo, Francia e Germania:
www.chauvetlighting.eu/warranty-registration
Chauvet garantisce che i propri prodotti, in condizioni di utilizzo normale, sono esenti da difetti di materiali e manodopera,
per il periodo specificato e con le esclusioni e limitazioni riportate nella garanzia integrale limitata sul proprio sito Web.
Tale garanzia si applica soltanto all'acquirente originario del prodotto e non può essere trasferita. Per esercitare i propri
diritti secondo i termini della presente garanzia è necessario fornire prova dell'acquisto sotto forma di ricevuta o fattura
originale di un distributore autorizzato che riporti chiaramente il nome del prodotto e la data di acquisto. NON SONO
PREVISTE ALTRE GARANZIE ESPRESSE O IMPLICITE. Questa garanzia prevede diritti legali specifici. È comunque
possibile avere altri diritti che variano da stato a stato e da paese a paese. Questa garanzia si applica soltanto negli Stati
Uniti, Regno Unito, epubblica di Irlanda, Belgio, Paesi Bassi, Lussemburgo, Francia, Germania e Messico. Per i termini di
garanzia vigenti in altri paesi si prega di consultare il distributore locale.
.
Note di Sicurezza
Le Note di Sicurezza includono informazioni importanti circa il montaggio, l'uso e la manutenzione.
• Collegare questa unità SOLTANTO ad un circuito dotato di messa a terra e protetto.
• Prima di effettuare la pulizia, scollegare sempre l'unità dall'alimentazione elettrica.
• Assicurarsi che il cavo di alimentazione non sia piegato o danneggiato.
• Non scollegare mai questa apparecchiatura dall'alimentazione elettrica tirando il cavo.
• NON collocare materiale infiammabile vicino all'unità mentre è in funzione.
• NON toccare l'unità durante il funzionamento perché potrebbe essere molto calda.
.
• La tensione della presa a muro cui si collega l'apparecchiatura deve trovarsi entro il campo specificato
sull'etichetta o sul pannello posteriore.
• Questa apparecchiatura deve essere utilizzata soltanto in interni (IP20)! Per evitare il rischio di incendio o
di folgorazione non esporre l'apparecchiatura alla pioggia o all'umidità.
• Montare sempre l'unità in posizione ben ventilata, ad almeno 50 cm. (20") da qualsiasi superficie.
• Assicurarsi che nessuna apertura di ventilazione dell'unità sia ostruita.
• Non collegare mai ad un dimmer o ad un reostato.
• Non trasportare mai questo prodotto con il cavo di alimentazione.
• Massima temperatura ambiente ammessa: 40 °C (104 °F). Non utilizzare l'unità a temperature superiori.
• In caso di gravi problemi di funzionamento sospendere immediatamente l'utilizzo.
• NON aprire l'unità. Non contiene parti riparabili dall'utente.
• Per evitare un consumo inutile ed aumentare la durata, durante i periodi di non utilizzo disconnettere
completamente il prodotto dall'alimentazione con l'interruttore o scollegando il cavo.
Contatti
Per richiedere assistenza o restituire l'apparecchiatura, al di fuori di Stati Uniti, Regno Unito, Irlanda, Benelux, Francia,
Germania, o Messico contattare il distributore locale. Per informazioni sui contatti, fare riferimento a Contact Us
di questo GR.
sul retro
Che cosa è incluso
• Vivid Drive 28N
• Cavo di alimentazione
• Cavo DVI
• Cavo VGA
• Cavo DP
• Cavo HDMI
• Cavo RJ45
• Adattatore DP-HDMI
• Cavo USB
• Guida Rapida
Per iniziare
Disimballare Vivid Drive 28N ed accertarsi di aver ricevuto tutti i componenti integri. Se l'imballo appare danneggiato,
farlo immediatamente presente al trasportatore e non a Chauvet.
Alimentazione CA
Questa unità è dotata di alimentatore a commutazione automatica con tensione in ingresso di 100–240 V CA, 50/60 Hz.
29
Per evitarne l'eccessiva usura e migliorarne la durata nel tempo, scollegare l'unità dalla presa elettrica
o disattivare l'alimentazione tramite l'apposito interruttore, se inutilizzata per lunghi periodi.
Vivid Drive 28N GR Rev. 1

GUIDA RAPIDA
1
2
34
5 6 11 12 13 14
78910 15 17
16 18
Display LCD
IT
Montaggio
È possibile montare Vivid Drive 28N su un rack standard da 19" oppure posizionarlo sui relativi piedini su una superficie
piana.
Vista frontale
Descrizione del pannello di controllo
# Nome Funzione
Manopola de
1
<MENU>
2 <ESC> Consente di uscire dal menù o dalla funzione corrente
3 <SCREEN> Consente di spostarsi sul menù Screen Settings (Impostazioni schermo)
4<INPUT/1>
5<FREEZE>Blocca l'uscita video
6<TEST/6>
7 <HDMI/2> Seleziona l'ingresso HDMI o inserisce il numero 2 quando si modifica un valore numerico
8<DVI/3>Seleziona l'ingresso DVI o inserisce il numero 3 quando si modifica un valore numerico
9<VGA1/4>Seleziona l'ingresso VGA1 o inserisce il numero 4 quando si modifica un valore numerico
10 <VGA2/5> Seleziona l'ingresso VGA2 o inserisce il numero 5 quando si modifica un valore numerico
11 <VGA3/7> Seleziona l'ingresso VGA3 o inserisce il numero 7 quando si modifica un valore numerico
12 <CVBS1/8> Seleziona l'ingresso CVBS1 o inserisce il numero 8 quando si modifica un valore numerico
13 <CVBS2/9> Seleziona l'ingresso CVBS2 o inserisce il numero 9 quando si modifica un valore numerico
14 <DP/0> Seleziona l'ingresso DP o inserisce il numero 0 quando si modifica un valore numerico
15 <TAKE> Attiva o disattiva il PIP
16 <BLACK> Disattiva l'uscita video
17 USB (A) Collega in cascata altre unità Vivid Drive 28N
18 USB (B) Porta USB B per aggiornamenti firmware, collegamento a NovaLCTMars o SmartLCTMars
Ruotare per spostarsi verso l'alto o verso il basso nell'elenco menù ed aumentare o diminuire un
valore numerico selezionato. Premere per attivare l'opzione di menù visualizzata o impostare il
valore selezionato nella funzione selezionata.
Consente di spostarsi direttamente sul menù Input Settings (Impostazioni ingresso) o inserisce il
numero 1 quando si modifica un valore numerico
Consente di spostarsi direttamente sul menù Test Pattern (Schema di test) o inserisce il numero 6
quando si modifica un valore numerico
Vivid Drive 28N GR Rev. 1
30

GUIDA RAPIDA
12
333
45 6
7
7
8
9 10 10 Ingresso alimentazione
IT
Vista posteriore
Descrizione del pannello di posteriore
# Nome Funzione
1USBPorta USB B per aggiornamenti firmware, collegamento a NovaLCTMars o SmartLCTMars
2RJ45Porta RJ45 per collegamento telecomando
3VGA1–3Connettore DE-15 per ingresso video da una sorgente VGA (numerato da sinistra a destra)
4DPPorta di ingresso DisplayPort
5HDMIPorta ingresso HDMI
6DVIPorta ingresso DVI
7CVBS1–2Connettore BNC per ingresso CVBS (in basso 1, in alto 2)
8VGA OUTConnettore DE-15 per uscita VGA
9 DVI OUT Porta uscita DVI
10 LED OUT 1–2 Porte Ethernet per invio segnale video ai pannelli video (sinistra 1, destra 2)
Mappa menu
Menu principale
Brightness 0–100% Controlla il livello di uscita totale
Cabinet Row Qty 1–15*
Cabinet Column Qty 1–30*
Screen
Settings
Input
Settings
Port1 Cabinet Qty 1–40*
Data Flow(Front View)’Inp
Preset
Resolution
Livelli di programmazione Descrizione
Imposta il numero di righe nel gruppo video.
*Gamma determinata da Column Qty
(quantità colonna) e dai pannelli.
Imposta il numero di colonne nel gruppo
video. *Gamma determinata da Row Qty
(Quantità riga) e dai pannelli.
Imposta il numero di pannelli video collegati
alla porta di uscita 1. *La gamma è influenzata
da Row Qty, Column Qty e dai pannelli.
Imposta il punto di partenza e il percorso del
flusso dati nel gruppo pannelli video
1024x768
1280x1024
1366x768
1440x900
1600x1200
1920x1080
1920x1200
2048x640
Seleziona una risoluzione preimpostata
31
Vivid Drive 28N GR Rev. 1

GUIDA RAPIDA
IT
Menu principale
Input
Settings
(cont.)
Output
Settings
Advanced
Settings
Custom
Resolution
Scaling
Auto Fit
Custom
Scaling
Image Offset
Apply to all
PIP
Livelli di programmazione Descrizione
Width (H) 800–3840 Imposta la larghezza pixel personalizzata
Height (V) 600–1920 Imposta l'altezza pixel personalizzata
60Hz
Custom
Refresh Rate
Disable
Enable
Disable
Enable
Input Source _ _ _ _ Mostra la sorgente di ingresso
Width (H) 64–_ _ _ _*
Input Capture
Output
Window
Start X -_ _ _ _*–_ _ _ _*
Start Y -_ _ _ _*–_ _ _ _*
PIP
LAYOUT
Main Source
Height (V) 48–_ _ _ _*
Start X 0–_ _ _ _**
Start Y 0–_ _ _ _**
Width (H) 64–_ _ _ _*
Height (V) 64*–_ _ _ _*
Start X 0–_ _ _ _**
Start Y 0–_ _ _ _**
Scaling Mode
Disable
Enable
59.94Hz
50Hz
30Hz
Apply Applica valori di risoluzione personalizzati
Units
Disable
Enable
CUSTOM Disposizione personalizzata
L+T Disposizione a sinistra e in alto
L+B Disposizione a sinistra e in basso
R+T Disposizione a destra e in alto
R+B Disposizione a destra e in basso
CENT Disposizione centrale
T+B Disposizione in alto e in basso
HDMI
DVI
VGA2
VGA3
CVBS1
CVBS2
VGA1
Pixel
Percentage
Custom
Equal Ratio
DP
Imposta la frequenza di aggiornamento
personalizzata
Attiva o disattiva le opzioni di
dimensionamento
Attiva o disattiva l'adattamento automatico
Imposta quale parte del segnale in ingresso
inviare. *Gamma dimensionale determinata
dalla risoluzione delle impostazioni di
ingresso. **Gamma di compensazione
determinata dalle dimensioni.
Imposta le dimensioni e la compensazione di
uscita. *Gamma dimensionale determinata
dalle impostazioni dello schermo. **Gamma
di compensazione determinata dalle
dimensioni.
Imposta le unità della finestra di uscita in pixel
Imposta le unità della finestra di uscita in percentuale
Il ridimensionamento potrebbe non
mantenere il rapporto originale
Il ridimensionamento mantiene il rapporto originale
Imposta l'offset dell'immagine. *Gamma
determinata dalle impostazioni dello schermo.
Attiva o disattiva Apply to all (applica a tutti)
Attiva o disattiva Picture In Picture
(immagine nell'immagine)
Seleziona la sorgente di ingresso principale
(disabilitato quando il PIP è abilitato).
Vivid Drive 28N GR Rev. 1
32

IT
GUIDA RAPIDA
Menu principale
Advanced
Settings
(cont.)
Livelli di programmazione Descrizione
PIP Source
Width (H) 64–_ _ _ _*
PIP
(cont.)
Redundancy
Mapping
Advanced
Attr
Presettings Presetting 1–10
Display
Control
Height (V) 64–_ _ _ _*
Start: X 0–_ _ _ _**
Start: Y 0–_ _ _ _**
PIP Crop
PIP Crop
Settings
Transparency 0–15 Imposta la trasparenza PIP
Video Sync.
Go Homepage (s) 30–3600
Test Pattern Seleziona uno schema di test
Width (H) 64–_ _ _ _*
Height (V) 48–_ _ _ _*
Start X 0–_ _ _ _**
Start Y 0–_ _ _ _**
Window Swap Scambia le sorgenti Main e PIP
Primary
Backup
Disable
Enable
VGA Auto ADJ Regola automaticamente l'ingresso VGA
ADC Calibration Calibra ADC
Normal Uscita video
Black out Disattiva l'uscita
Freeze Blocca l'uscita su un singolo frame
HDMI
DVI
VGA2
VGA3
CVBS1
CVBS2
DP
VGA1
Seleziona la sorgente di ingresso PIP (le
sorgenti di ingresso principale e PIP non
possono essere sia digitali che analogiche.
Una deve essere digitale [HDMI, DVI o DP],
l'altra analogica [VGA o CVBS]).
Imposta le dimensioni e la compensazione
PIP. *Gamma dimensionale determinata
dalle dimensioni dello schermo. **Gamma di
compensazione determinata dalle
dimensioni.
Disable
Enable
Disable
Enable
Save Salva le impostazioni correnti
Load Carica le impostazioni selezionate salvate
Delete Cancella le impostazioni selezionate salvate
Attiva o disattiva il riquadro PIP
Imposta le dimensioni del riquadro e la
compensazione PIP. *Gamma dimensionale
determinata delle impostazioni di ingresso.
**Gamma di compensazione determinata
dalle dimensioni del riquadro.
Imposta questo Vivid Drive 28N come principale
Imposta questo Vivid Drive 28N come backup
Attiva o disattiva la Mappatura
Attiva o disattiva la sincronizzazione video
Imposta i secondi di inattività del display
prima di tornare alla schermata principale
33
Vivid Drive 28N GR Rev. 1

GUIDA RAPIDA
IT
Menu principale
Advanced
Settings
(cont.)
Display
Control
(cont.)
Inputs
Backup
Livelli di programmazione Descrizione
Contrast 0–100% Regola il contrasto dell'uscita
Saturation 0–100% Regola la saturazione dell'uscita
Sharpness 0–24 Regola la nitidezza dell'uscita
Hue -180–180 Regola la tonalità dell'uscita
Color
Image quality
Switching
Effect
Fade Time(s) 0–3 Imposta il tempo di dissolvenza
Backup
Backup 1 HDMI
Backup 2 VGA2
Backup 3 CVBS1
Custom
Backup
Tem perature
Red 0–255 Regola il livello di rosso dell'uscita
Green 0–255 Regola il livello di verde dell'uscita
Blue 0–255 Regola il livello di blu dell'uscita
Gamma 1.0–4.0 Regola la gamma di uscita
Reset
Shrink Center La prima sorgente video si restringe al centro
Shrink Left Top
Zoom Center La seconda sorgente video zuma al centro
Zoom Left Top
Disable
Enable
DVI DVI*
VGA3 VGA3*
CVBS2 CVBS2*
DP DP*
VGA1 VGA1*
Custom
4000–9500K
No Mantiene le impostazioni correnti
Yes
Off Nessun effetto commutazione
Cut Effetto taglio
Fade Effetto dissolvenza
DVI
VGA3
CVBS2
DP
VGA1
NULL
DVI
VGA3
CVBS2
DP
VGA1
NULL
DVI
VGA3
CVBS2
DP
VGA1
NULL
NULL
Indica una temperatura colore personalizzata
Seleziona una temperatura colore preimpostata
Ripristina le impostazioni di qualità dell'immagine
La prima sorgente video si restringe in alto a sinistra
La seconda sorgente video zuma in alto a sinistra
Attiva o disattiva i backup della sorgente
video
Imposta la sorgente video di backup su
HDMI
Imposta la sorgente video di backup su
VGA2
Imposta la sorgente video di backup su
CVBS1
Imposta la sorgente video di cui eseguire il
backup e la sorgente video di backup
Vivid Drive 28N GR Rev. 1
34

IT
GUIDA RAPIDA
Menu principale
Advanced
Settings
(cont.)
Factory
Reset
Communi-
cation
Settings’Co
Language
Livelli di programmazione Descrizione
1024x768
1280x1024
Preset
Resolution
Output
Resolution
Width (H) 800–3840 Imposta la larghezza pixel personalizzata
Custom
Resolution
Load RCFG
Cabinet
Settings
OLED Brightness 6–15 Imposta la luminosità del display
HW Version V_._._._ Visualizza la versione corrente del firmware
Communication Mode
Network
Settings
Files
Save to RV
Card
Config IPV4
IP Address 1–223.0–255.0–255.0–255 Imposta l'indirizzo IP
Subnet Mask 0–255.0–255.0–255.0–255 Imposta la maschera di sottorete
Reset
Phās ʹā thịy Imposta la visualizzazione in tailandese
Height (V) 600–1920 Imposta l'altezza pixel personalizzata
Refresh Rate
_ _ _ _ _ _ _ _ _ _ _ _ _ _ _
_ _ _ _ _ _ _ _ _ _ _ _ _ _ _
No
Yes
中文
English Imposta la visualizzazione in inglese
Русский Imposta la visualizzazione in russo
Deutsch Imposta la visualizzazione in tedesco
1366x768
1440x900
1920x1080
1920x1200
2048x640
Custom
USB Preferred La connessione USB ha la priorità
LAN Preferred La connessione Ethernet ha la priorità
Manually Imposta manualmente l'indirizzo IP
24–60Hz
Apply Applica la risoluzione personalizzata
No
Yes
Auto L'indirizzo IP sarà assegnato
No
Yes
Seleziona una risoluzione preimpostata
Imposta la frequenza di aggiornamento
personalizzata
Invia il file precaricato selezionato ai pannelli
collegati
Salva permanentemente il firmware caricato
nei pannelli collegati
Ripristina le impostazioni originarie dell'unità
Ripristina le impostazioni di rete
Imposta la visualizzazione in Cinese
35
Vivid Drive 28N GR Rev. 1

BEKNOPTE HANDLEIDING
NL
Over deze handleiding
De Vivid Drive 28N Beknopte Handleiding (BH) bevat basisinformatie over het product, zoals montage en menu-opties.
Download de gebruikershandleiding op www.chauvetdj.com
Disclaimer
De informatie en specificaties in deze BH kunnen zonder voorafgaande kennisgeving worden gewijzigd.
BEPERKTE GARANTIE
GA NAAR ONZE WEBSITE VOOR REGISTRATIE VAN DE GARANTIE EN DE VOLLEDIGE ALGEMENE VOORWAARDEN.
Voor klanten in de Verenigde Staten en Mexico: www.chauvetlighting.com/warranty-registration.
Voor klanten in het Verenigd Koninkrijk, Ierland, België, Nederland, Luxemburg, Frankrijk en Duitsland:
www.chauvetlighting.eu/warranty-registration
Chauvet garandeert dat dit product bij normaal gebruik vrij zal blijven van defecten in materiaal en vakmanschap, voor de
opgegeven periode en onder voorbehoud van de uitzonderingen en beperkingen die zijn uiteengezet in de volledige
beperkte garantie op onze website. Deze garantie geldt uitsluitend voor de oorspronkelijke koper van het product en is
niet overdraagbaar. Om onder deze garantie rechten uit te oefenen, moet u een aankoopbewijs overleggen in de vorm
van een origineel verkoopbewijs van een geautoriseerde dealer, waarop de naam van het product en de aankoopdatum
zichtbaar zijn. ER ZIJN GEEN ANDERE EXPLICIETE OF IMPLICIETE GARANTIES. Deze garantie geeft u specifieke
wettelijke rechten. Mogelijk heeft u ook andere rechten die van staat tot staat en van land tot land verschillen. Deze
garantie is uitsluitend geldig in de Verenigde Staten, het Verenigd Koninkrijk, Ierland, België, Nederland, Luxemburg,
Frankrijk, Duitsland en Mexico. Neem contact op met uw lokale verkoper voor garantievoorwaarden in andere landen.
.
Veiligheidsinstructies
Deze veiligheidsinstructies bevatten belangrijke informatie over de installatie, het gebruik en het onderhoud.
• Sluit dit product UITSLUITEND op een geaard en beveiligd stroomcircuit.
• Haal de stekker altijd uit het stopcontact voordat u hem schoonmaakt.
• Zorg ervoor dat het stroomsnoer niet knikt of beschadigd.
• Koppel dit product nooit los van het stopcontact door aan het snoer te trekken.
• GEEN brandbare materialen in de buurt van de unit tijdens gebruik.
• RAAK het product NIET AAN wanneer het in werking omdat het dan heet zijn.
voor meer informatie.
• De spanning van het stopcontact waarop u dit product aansluit moet binnen het vermelde bereik op de
sticker of achterkant van het product zijn.
• Het product is alleen voor gebruik binnenshuis! (IP20) Om risico op brand of elektrische schokken te
voorkomen, mag dit product niet aan regen of vocht worden blootgesteld.
• Monteer dit product altijd op een plek met voldoende ventilatie, minstens 20 inch (50 cm) van de
aangrenzende oppervlakken.
• Zorg ervoor dat er geen ventilatie-openingen van de behuizing van het product worden geblokkeerd.
• Sluit dit product nooit aan op een dimmer of een regelweerstand.
• Draag het product nooit aan het netsnoer.
• De maximale omgevingstemperatuur bedraagt 40 °C. Gebruik dit product niet bij hogere temperaturen.
• Stop in het geval van ernstige operationele problemen onmiddellijk met het gebruik.
• Open het product NIET. Het bevat geen te onderhouden onderdelen.
•
Om onnodige slijtage te elimineren en zijn levensduur te verlengen, gedurende perioden wanneer het product niet
wordt gebruikt, moet u het product afsluiten door een aardlekschakelaar om te zetten of door het te ontkoppelen.
Van buiten de VS, Verenigd Koninkrijk, Ierland, Benelux, Frankrijk, Duitsland of Mexico kunt u contact opnemen met de
distributeur of om ondersteuning vragen dan wel het product retourneren. Raadpleeg Contact Us
BH voor contactinformatie.
aan het einde van deze
Wat is inbegrepen
• Vivid Drive 28N
• Stroomsnoer
• DVI-kabel
• VGA-kabel
• DP-kabel
• HDMI-kabel
• RJ45-kabel
• DP naar HDMI-adapter
• USB-kabel
• Beknopte handleiding
Om te beginnen
Pak uw Vivid Drive 28N uit en zorg ervoor dat u alle onderdelen in goede staat hebt ontvangen. Als de doos of inhoud
beschadigd lijkt, stel dan de vervoerder onmiddellijk op de hoogte, niet Chauvet.
AC-stroom
Dit product heeft een voeding met automatisch bereik die werkt met een ingangsspanning van 100–240 VAC, 50/60 Hz.
Om onnodige slijtage te elimineren en zijn levensduur te verlengen, gedurende perioden wanneer het
product niet wordt gebruikt, moet u het product afsluiten door een aardlekschakelaar om te zetten of
door het te ontkoppelen.
Vivid Drive 28N BH Rev. 1
36

BEKNOPTE HANDLEIDING
1
2
34
5 6 11 12 13 14
78910 15 17
16 18
LCD-display
NL
Montage
De Vivid Drive 28N past goed op een standaard 19" rek, of het kan op zijn voetjes op een vlakke ondergrond worden
geplaatst.
Overzicht voorzijde product
Beschrijving bedieningspaneel
# Naam Functie
1<MENU>-knop
2 <ESC> Sluit het huidige menu of functie af
3 <SCREEN> Navigeert naar het menu Scherminstellingen
4<INPUT/1>
5 <FREEZE> Bevriest de video-uitvoer
6<TEST/6>Navigeert naar het menu Testpatroon, of vult het cijfer 6 in bij het bewerken van een cijferwaarde
7 <HDMI/2> Selecteert HDMI-ingangsbron, of vult het cijfer 2 in bij het bewerken van een cijferwaarde
8<DVI/3>Selecteert DVI-ingangsbron, of vult het cijfer 3 in bij het bewerken van een cijferwaarde
9<VGA1/4>Selecteert VGA1-ingangsbron, of vult het cijfer 4 in bij het bewerken van een cijferwaarde
10 <VGA2/5> Selecteert VGA2-ingangsbron, of vult het cijfer 5 in bij het bewerken van een cijferwaarde
11 <VGA3/7> Selecteert VGA3-ingangsbron, of vult het cijfer 7 in bij het bewerken van een cijferwaarde
12 <CVBS1/8> Selecteert CVBS1-ingangsbron, of vult het cijfer 8 in bij het bewerken van een cijferwaarde
13 <CVBS2/9> Selecteert CVBS2-ingangsbron, of vult het cijfer 9 in bij het bewerken van een cijferwaarde
14 <DP/0> Selecteert DP-ingangsbron, of vult het cijfer 0 in bij het bewerken van een cijferwaarde
15 <TAKE> Schakelt PIP in/uit
16 <BLACK> Verduistert de video-uitvoer
17 USB (A) Stapelt naar andere Vivid Drive 28N-producten
18 USB (B) USB B-poort voor firmware-updates, verbinding met NovaLCTMars of SmartLCT
Draaien om omhoog of omlaag door de menulijst te navigeren en een geselecteerde numerieke
waarde te te verhogen of te verlagen. Drukken om het huidige getoonde menu in te drukken of de
huidige geselecteerde waarde in de geselecteerde functie te plaatsen.
Navigeert naar het menu Ingangsinstellingen, of vult het cijfer 1 in bij het bewerken van een
cijferwaarde
37
Vivid Drive 28N BH Rev. 1
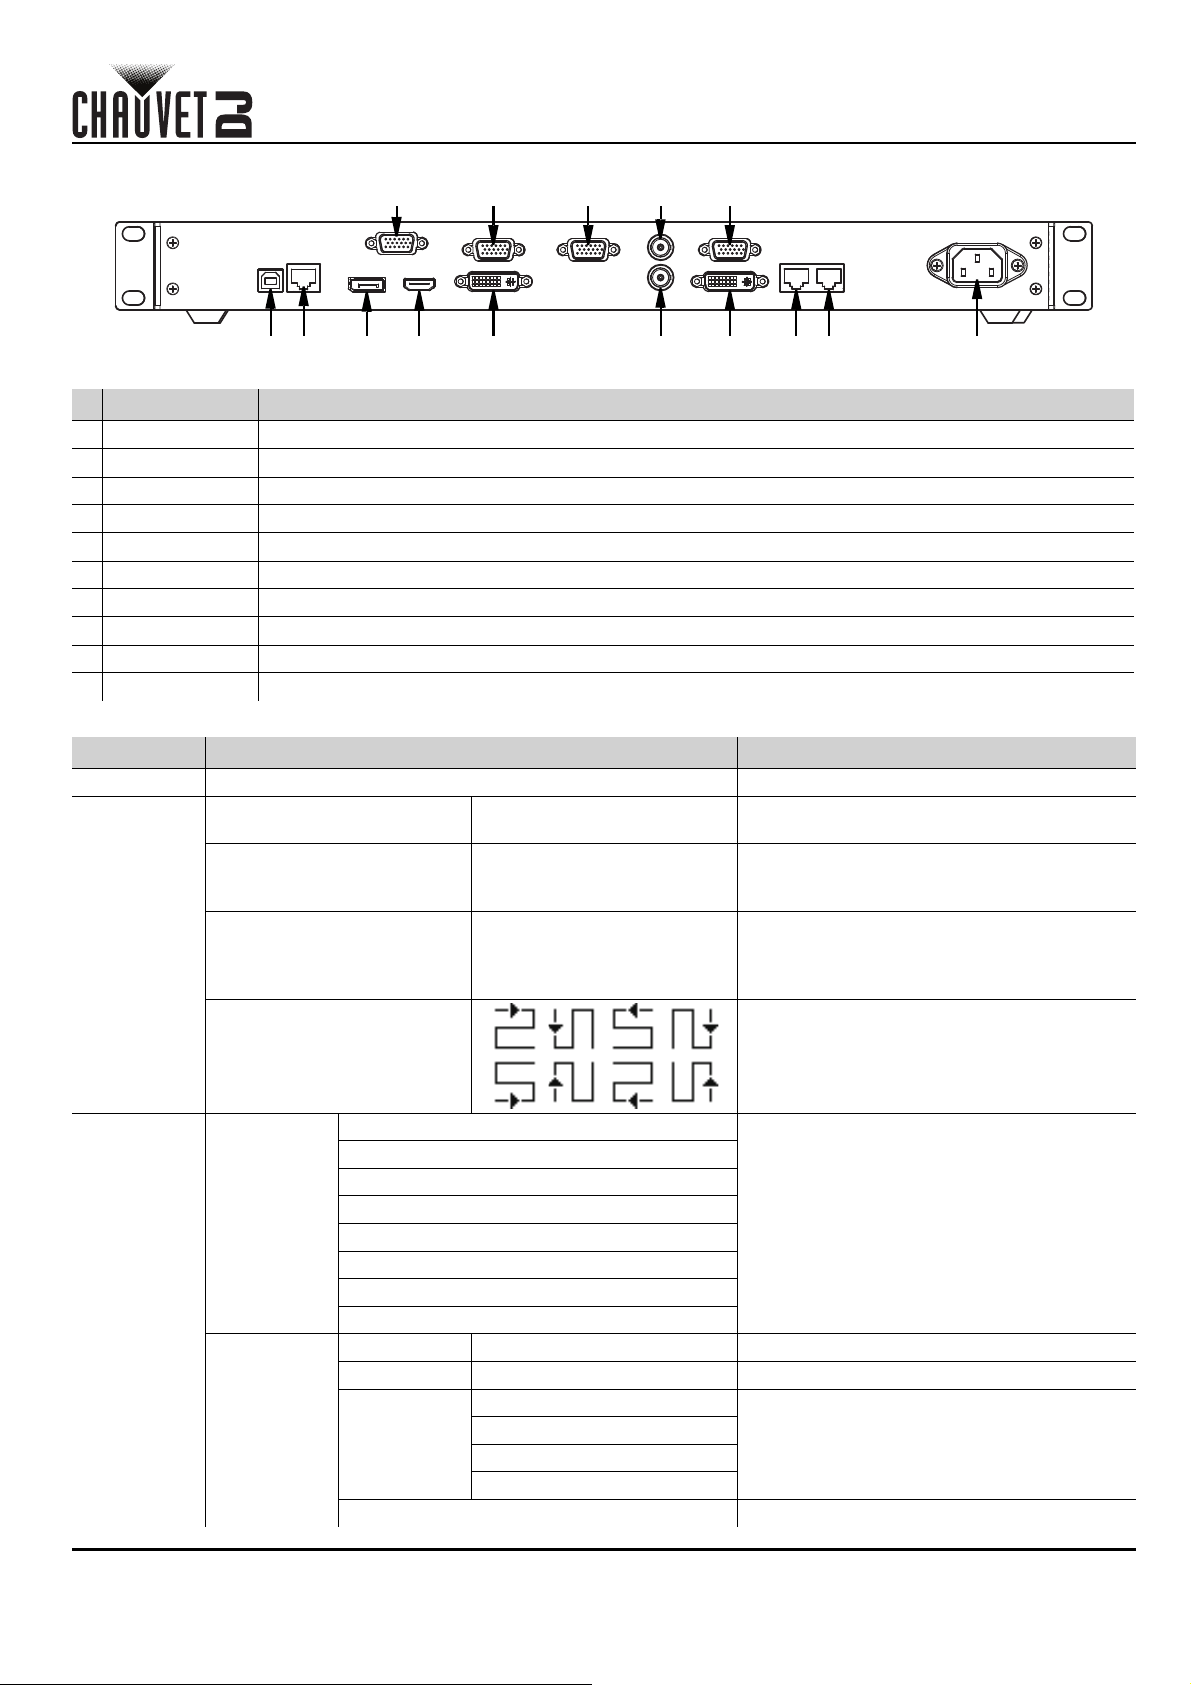
BEKNOPTE HANDLEIDING
12
333
45 6
7
7
8
9 10 10 Stroomingang
Overzicht achterzijde product
Beschrijving achterpaneel
# Naam Functie
1USBUSB B-poort voor firmware-updates, verbinding met NovaLCTMars of SmartLCT
2RJ45RJ45-poort voor verbinding met afstandsbedieningssysteem
3VGA1–3DE-15-connector voor video-invoer van een VGA-bron (genummerd van links naar rechts)
4DPDisplayPort-ingangspoort
5HDMIHDMI-ingangspoort
6DVIDVI-ingangspoort
7 CVBS1–2 BNC-connector voor CVBS-invoer (onderzijde 1, bovenzijde is 2)
8VGA OUTDE-15-connector voor VGA-uitvoer
9 DVI OUT DVI-uitgangspoort
10 LED OUT 1–2 Ethernet-poorten voor het verzenden van videosignalen naar videopanelen (links is 1, rechts is 2)
NL
Menukaart
Hoofdniveau Programmeerniveaus Beschrijving
Brightness 0–100% Regelt het totale uitgangsniveau
Stelt het aantal rijen in de videomontage in. *Bereik
vastgesteld door Kolomaantal en panelen.
Stelt het aantal kolommen in de
videomontage in. *Bereik vastgesteld door
Rijaantal en panelen.
Stelt het aantal videopanelen in dat is
aangesloten op Uitgangspoort 1. *Bereik
beïnvloed door Rijaantal, Kolomaantal en
panelen.
Stelt het startpunt en het pad in voor de
gegevensstroom in de videopaneelmontage
Selecteert een vooraf ingestelde resolutie
Stelt de aangepaste verversingssnelheid in
Screen
Settings
Input
Settings
Cabinet Row Qty 1–15*
Cabinet Column Qty 1–30*
Port1 Cabinet Qty 1–40*
Data Flow(Front View)’Inp
1024x768
1280x1024
1366x768
Preset
Resolution
Custom
Resolution
Width (H) 800–3840 Stelt de aangepaste pixelbreedte in
Height (V) 600–1920 Stelt de aangepaste pixelhoogte in
Custom
Refresh Rate
1440x900
1600x1200
1920x1080
1920x1200
2048x640
Apply Past aangepaste resolutiewaarden toe
60Hz
59.94Hz
50Hz
30Hz
Vivid Drive 28N BH Rev. 1
38

BEKNOPTE HANDLEIDING
NL
Hoofdniveau Programmeerniveaus Beschrijving
Disable
Enable
Disable
Enable
Input Source _ _ _ _ Toont de ingangsbron
Width (H) 64–_ _ _ _*
Height (V) 48–_ _ _ _*
Start X 0–_ _ _ _**
Start Y 0–_ _ _ _**
Width (H) 64–_ _ _ _*
Height (V) 64*–_ _ _ _*
Start X 0–_ _ _ _**
Start Y 0–_ _ _ _**
Pixel
Units
Scaling
Mode
Disable
Enable
Percentage
Custom
Equal Ratio
Disable
Enable
CUSTOM Aangepaste indeling
L+T Indeling links en boven
L+B Indeling links en onder
R+T Indeling boven en rechts
R+B Indeling rechts en onder
CENT Indeling midden
T+B Indeling onder en boven
HDMI
DVI
VGA2
VGA3
CVBS1
CVBS2
DP
VGA1
HDMI
DVI
VGA2
VGA3
CVBS1
CVBS2
DP
VGA1
Schakelt scaling-opties in of uit
Schakelt auto fit in of uit
Stelt in welk deel van de ingang uitgang
wordt.
*Afmetingsbereiken bepaald door resolutie
van de ingangsinstellingen.
**Offset-bereiken bepaald door afmetingen.
Stelt de afmetingen en offset van de uitgang in.
*Afmetingsbereiken bepaald door
scherminstellingen.
**Offset-bereiken bepaald door afmetingen.
Stelt eenheden van jet uitvoervenster in naar pixels
Stelt eenheden van jet uitvoervenster in naar
percentage
Schaling kan oorspronkelijke verhouding
niet handhaven
Schaling handhaaft oorspronkelijke
verhouding
Bepaalt de offset van de afbeelding.
*Bereiken bepaald door scherminstellingen.
Schakelt Op alles toepassen in of uit
Schakelt Picture In Picture in of uit
Selecteert hoofdingangsbron (Uitgeschakeld
wanneer PIP ingeschakeld is).
Selecteert PIP-ingangsbron (hoofd- en PIPingangsbronnen kunnen niet beide digitaal
of analoog zijn. De ene moet digitaal zijn
[HDMI, DVI of DP], de andere analoog [VGA
of CVBS].)
Output
Settings
Advanced
Settings
Scaling
Auto Fit
Custom
Scaling
Image Offset
Apply to all
PIP
Input
Capture
Output
Window
Start X -_ _ _ _*–_ _ _ _*
Start Y -_ _ _ _*–_ _ _ _*
PIP
LAYOUT
Main Source
PIP Source
39
Vivid Drive 28N BH Rev. 1

BEKNOPTE HANDLEIDING
Hoofdniveau Programmeerniveaus Beschrijving
Advanced
Settings
(vervolg)
Width (H) 64–_ _ _ _*
Height (V) 64–_ _ _ _*
Start: X 0–_ _ _ _**
Start: Y 0–_ _ _ _**
PIP
(vervolg)
Redundancy
Mapping
Advanced
Attr
Presettings Presetting 1–10
PIP Crop
Settings
Transparency
Video Sync.
Go Homepage (s) 30–3600
PIP Crop
Width (H) 64–_ _ _ _*
Height (V) 48–_ _ _ _*
Start X 0–_ _ _ _**
Start Y 0–_ _ _ _**
Window Swap Wisselt hoofd- en PIP-bronnen
Primary Stelt deze Vivid Drive 28N in als primair
Backup Stelt deze Vivid Drive 28N in als backup
Disable
Enable
VGA Auto ADJ Past de VGA-ingang automatisch aan
ADC Calibration Kalibreert ADC
Normal Video-uitgang
Black out Verduistert de uitvoer
Freeze Bevriest de uitvoer op een enkel frame
Disable
Enable
0–15 Stelt de PIP-transparantie in
Disable
Enable
Save Slaat de huidige instellingen op
Load
Delete
Stelt afmetingen en offset van de PIP in.
*Afmetingsbereiken bepaald door
schermformaat.
**Offset-bereiken bepaald door afmetingen.
Schakelt PIP-cropping in of uit
Stelt de cropafmetingen en offset van het
PIP in.
*Afmetingsbereiken bepaald door
ingangsinstellingen.
**Offset-bereiken bepaald door cropafmetingen.
Schakelt Mapping in of uit
Schakelt videosynchronisatie in of uit
Stelt aantal seconden in waarop het scherm
inactief is alvorens wordt teruggekeerd naar
het Startscherm
Laadt de geselecteerde opgeslagen instellingen
Verwijdert de geselecteerde opgeslagen
instellingen
NL
Display
Control
Vivid Drive 28N BH Rev. 1
Tes t Pattern Kiest een testpatroon
Contrast 0–100% Past het contrast van de uitvoer aan
Saturation 0–100% Past de verzadiging van de uitvoer aan
Sharpness 0–24 Past de scherpte van de uitvoer aan
Hue -180–180 Past de kleurtoon van de uitvoer aan
Custom Geeft een aangepaste kleurtemperatuur aan
4000–9500K
No Behoudt de huidige instellingen
Yes Beeldkwaliteitsinstellingen herstellen
Selecteert een vooraf ingestelde
kleurtemperatuur
Image
quality
Color
Tem perature
Red 0–255 Past het roodniveau van de uitvoer aan
Green 0–255 Past het groenniveau van de uitvoer aan
Blue 0–255 Past het blauwniveau van de uitvoer aan
Gamma 1.0–4.0 Past het gamma van de uitvoer aan
Reset
40

BEKNOPTE HANDLEIDING
NL
Hoofdniveau Programmeerniveaus Beschrijving
Off Geen schakeleffect
Cut Knipeffect
Fade Vervagingseffect
Shrink Center Eerste videobron krimpt naar het midden
Shrink Left Top Eerste videobron krimpt naar linksboven
Zoom Center Tweede videobron zoomt vanuit het midden
Zoom Left Top Tweede videobron zoomt vanuit linksboven
Disable
Enable
DVI
VGA3
CVBS2
DP
VGA1
NULL
DVI
VGA3
CVBS2
DP
VGA1
NULL
DVI
VGA3
CVBS2
DP
VGA1
NULL
NULL
1024x768
1280x1024
1366x768
1440x900
1920x1080
1920x1200
2048x640
24–60Hz
Apply Past aangepaste resolutie toe
Videobronbackups inschakelen of
uitschakelen
Stelt de backupvideobron in naar HDMI
Stelt de backupvideobron in naar VGA2
Stelt de backupvideobron in naar CVBS1
Stelt de videobron waarvan een backup
moet worden gemaakt en vervolgens de
backupvideobron
Selecteert een vooraf ingestelde resolutie
Stelt de aangepaste verversingssnelheid in
Advanced
Settings
(vervolg)
Display
Control
(vervolg)
Inputs
Backup
Output
Resolution
Switching
Effect
Fade Time(s) 0–3 Stelt de vervagingstijd in
Backup
Backup 1 HDMI
Backup 2 VGA2
Backup 3 CVBS1
DVI DVI*
VGA3 VGA3*
Custom
Backup
Preset
Resolution
Custom
Resolution
CVBS2 CVBS2*
DP DP*
VGA1 VGA1*
Width (H) 800–3840 Stelt de aangepaste pixelbreedte in
Height (V) 600–1920 Stelt de aangepaste pixelhoogte in
Custom
Refresh Rate
41
Vivid Drive 28N BH Rev. 1

BEKNOPTE HANDLEIDING
Hoofdniveau Programmeerniveaus Beschrijving
_ _ _ _ _ _ _ _ _ _ _ _ _ _ _
_ _ _ _ _ _ _ _ _ _ _ _ _ _ _
No
Yes
No
Yes
USB Preferred USB-verbinding heeft prioriteit
LAN Preferred Ethernetverbinding heeft prioriteit
Manually Stelt het IP-adres handmatig in
Auto IP-adres wordt toegewezen
No
Yes
中文
English Stelt de schermtaal in naar Engels
Русский Stelt de schermtaal in naar Russisch
Deutsch Stelt de schermtaal in naar Duits
Verstuurt geselecteerd vooraf geladen
bestand naar de verbonden panelen
Slaat geüploade firmware permanent op
naar aangesloten panelen
Herstelt het product naar de
fabrieksinstellingen
Herstelt netwerkinstellingen
Stelt de schermtaal in naar Chinees
Advanced
Settings
(vervolg)
Factory
Reset
Communi-
cation
Settings’Co
Language
Load RCFG
Cabinet
Settings
OLED Brightness 6–15 Stelt de helderheid van het beeldscherm in
HW Version V_._._._ Toont de huidige firmwareversie
Communication Mode
Network
Settings
Files
Save to RV
Card
Config IPV4
IP Address 1–223.0–255.0–255.0–255 Stelt het IP-adres in
Subnet Mask 0–255.0–255.0–255.0–255 Stelt het Subnet Mask in
Reset
Phās ʹā thịy Stelt de schermtaal in naar Thais
NL
Vivid Drive 28N BH Rev. 1
42

Multi-Language
Vivid Drive 28N QRG Rev. 1 ML6
© Copyright 2019 Chauvet
All rights reserved
Printed in the P.R.C.
Contact Us
Chauvet World Headquarters
Chauvet Europe Ltd
Chauvet Europe BVBA
Chauvet France
Chauvet Germany
Chauvet Mexico
QUICK REFERENCE GUIDE
General Information Technical Support
Address: 5200 NW 108th Ave. Voice: (844) 393-7575
Sunrise, FL 33351 Fax: (954) 756-8015
Voice: (954) 577-4455 Email: chauvetcs@chauvetlighting.com
Fax: (954) 929-5560
Toll Free: (800) 762-1084 Website: www.chauvetdj.com
Address: Unit 1C Email: UKtech@chauvetlighting.eu
Brookhill Road Industrial Estate
Pinxton, Nottingham, UK Website: www.chauvetdj.eu
NG16 6NT
Voice: +44 (0) 1773 511115
Fax : +44 (0) 17 73 511110
Address: Stokstraat 18 Email: BNLtech@chauvetlighting.eu
9770 Kruishoutem
Belgium Website: www.chauvetdj.eu
Voice: +32 9 388 93 97
Address: 3, Rue Ampère
91380 Chilly-Mazarin
France Website: www.chauvetdj.eu
Voice: +33 1 78 85 33 59
Address: Bruno-Bürgel-Str. 11
28759 Bremen
Germany Website: www.chauvetdj.eu
Voice: +49 421 62 60 20
Address: Av. de las Partidas 34 - 3B
(Entrance by Calle 2)
Zona Industrial Lerma Website: www.chauvetdj.mx
Lerma, Edo. de México, CP 52000
Voice: +52 (728) 690-2010
Email: FRtech@chauvetlighting.fr
Email: DEtech@chauvetlighting.de
Email: servicio@chauvet.com.mx
Outside the U.S., United Kingdom, Ireland, Benelux, France, Germany, or Mexico, contact the dealer of record. Follow
the instructions to request support or to return a product. Visit our website for contact details.
43
Vivid Drive 28N QRG Rev. 1
 Loading...