

Page 1

Quick Reference Guide
Page 2
COLORstrip/COLORstrip Mini QRG EN
2
About This
Guide
The COLORstrip/COLORstrip M ini Quick Reference Guide
(QRG) has basic
product information such as mounting, menu options, and DMX values
.
Download the User Manual from www.chauvetlighting.com for more details.
Disclaimer
The information and specifications contained in this QRG are subject to
change without notice.
Safety Notes
These Safety Notes include important information about installation, use, and
maintenance.
• This product is not intended for permanent installation.
• ONLY connect this product to a grounded and protected circuit.
• Always disconnect from power before cleaning or replacing the fuse.
• DO NOT look at the light source when the product is on.
• Make sure the power cord is not crimped or damaged.
• Never disconnect this product from power by pulling on the cord.
• When mounting this product overhead, use a safety cable.
• DO NOT allow flammable mater ials close to the uni t while operating.
• DO NOT touch this product when it is operating because it may be hot.
• The voltage of the outlet to which you are connecting this product must be
within the range stated on the decal or rear panel of the product.
•
This product is for indoor use only! (IP20) To prevent risk of fire or shock,
do not expose this product to rain or moisture.
• Always mount this product in a location with adequate ventilation, at least
20 in (50 cm) from adjacent surfaces.
• Be sure that no ventilation slots on the unit’s housing are blocked.
• Never connect th is product to a dimmer or rheostat.
• Replace the fuse with the same type and rating.
• ONLY use the hanging/mounting bracket or the handles to carry this
product.
• The maximum a mbi ent temperature is 104 °F (40 °C). Do not operate this
product at high er temperatures.
• In the event of a serious operating problem, stop using immediately.
• DO NOT open this product. It cont a i ns no us e r -serviceable parts.
• To eliminate unnecessary wear and improve its lifespan, during periods of
non-use completely disconnect the product from the power via breaker or
by unplugging it.
Contact
Outside the U.S., United Kingdom, Ireland, Mexico, or Benelux contact your
distributor to request support or return a product. Visit
www.chauvetlighting.com for contact information.
What Is
I
ncluded
• COLORstrip
or
• COLORstrip Mini
• Power Cord
• L-Brackets with Mounting
Hardware
• Warranty Card
• Quick Reference Gui de
Page 3
COLORstrip/COLORstrip Mini QRG EN
3
To Begin
Unpack your COLORstrip/COLORstrip Mini
and make sure you have
received all parts in good condition. If the box or contents appear damaged,
notify the carrier immediately, not Chauvet.
Product
Description
The COLORstrip /COLORstrip Mini is a compact, multicolor strip light for
use in indoor mobi
le entertainment applications. The
COLORstrip/COLORstrip Mini
is perfect as a wash light or effect light
when paired with other COLORstrip products. Built-
in infrared technology
offers wireless control with the optional Infrared Remote Control (IRC-6)
from CHAUVET DJ.
Product
Overview
AC Power
This product has an auto-ranging power supply that can work with an input
voltage range of 100–240 VAC, 50/60 Hz.
To eliminate wear and improve its lifespan, during periods of non-
use
completely disco nn ect from power via brea ker or by unplugging it.
Power Linking
For the maximum number of COLORstrip/COLORstrip Mini that can be
power linked at 120 V or at 240 V, see the User Manual or the
label on the
product.
Fuse Replacement
1. Disconnect the product from power.
2. Wedge the tip of a flat-head screwdriver into the slot of the fuse holder.
3. Pry the safety cap out of the housing.
4. Remove the blown fuse from the clip on the front of the safety cap and
replace with a fuse of the exact same type and r ating.
5. Re-insert the fuse holder and reconnect power.
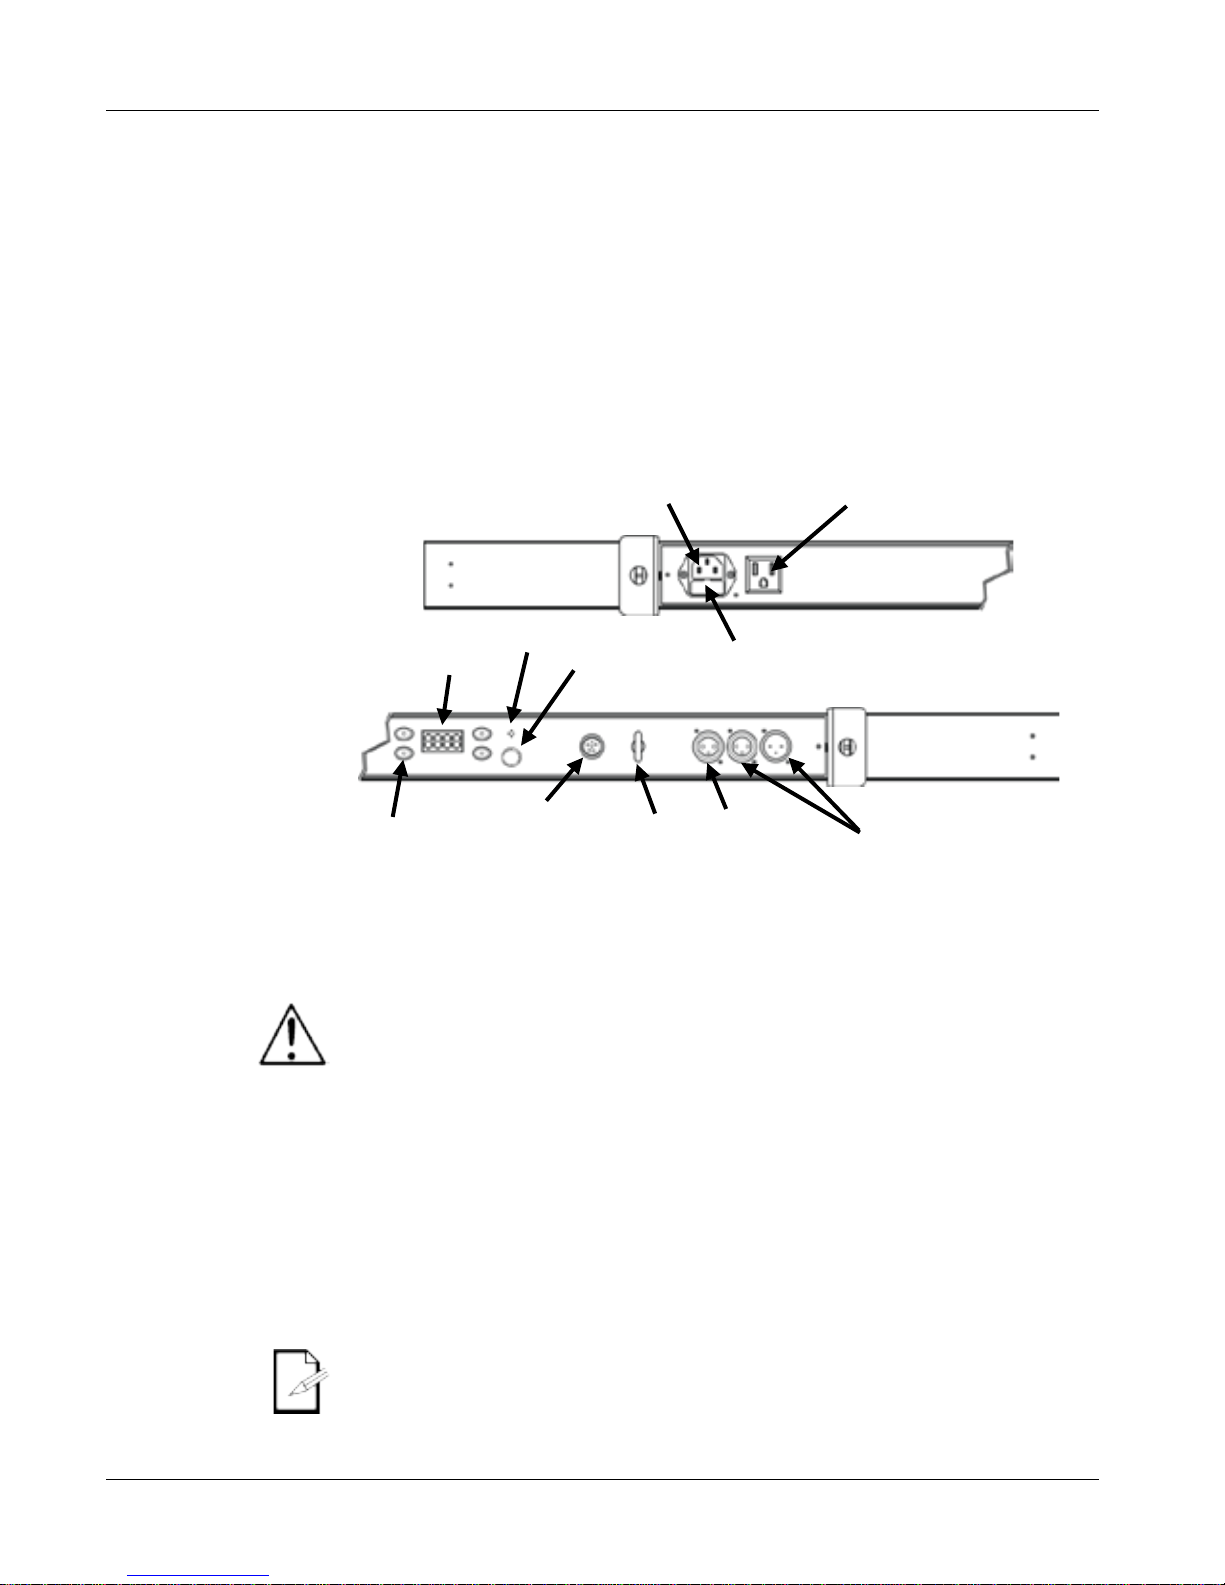
Upon plugging in the product, allow up to 30 seconds st a r t-up time.
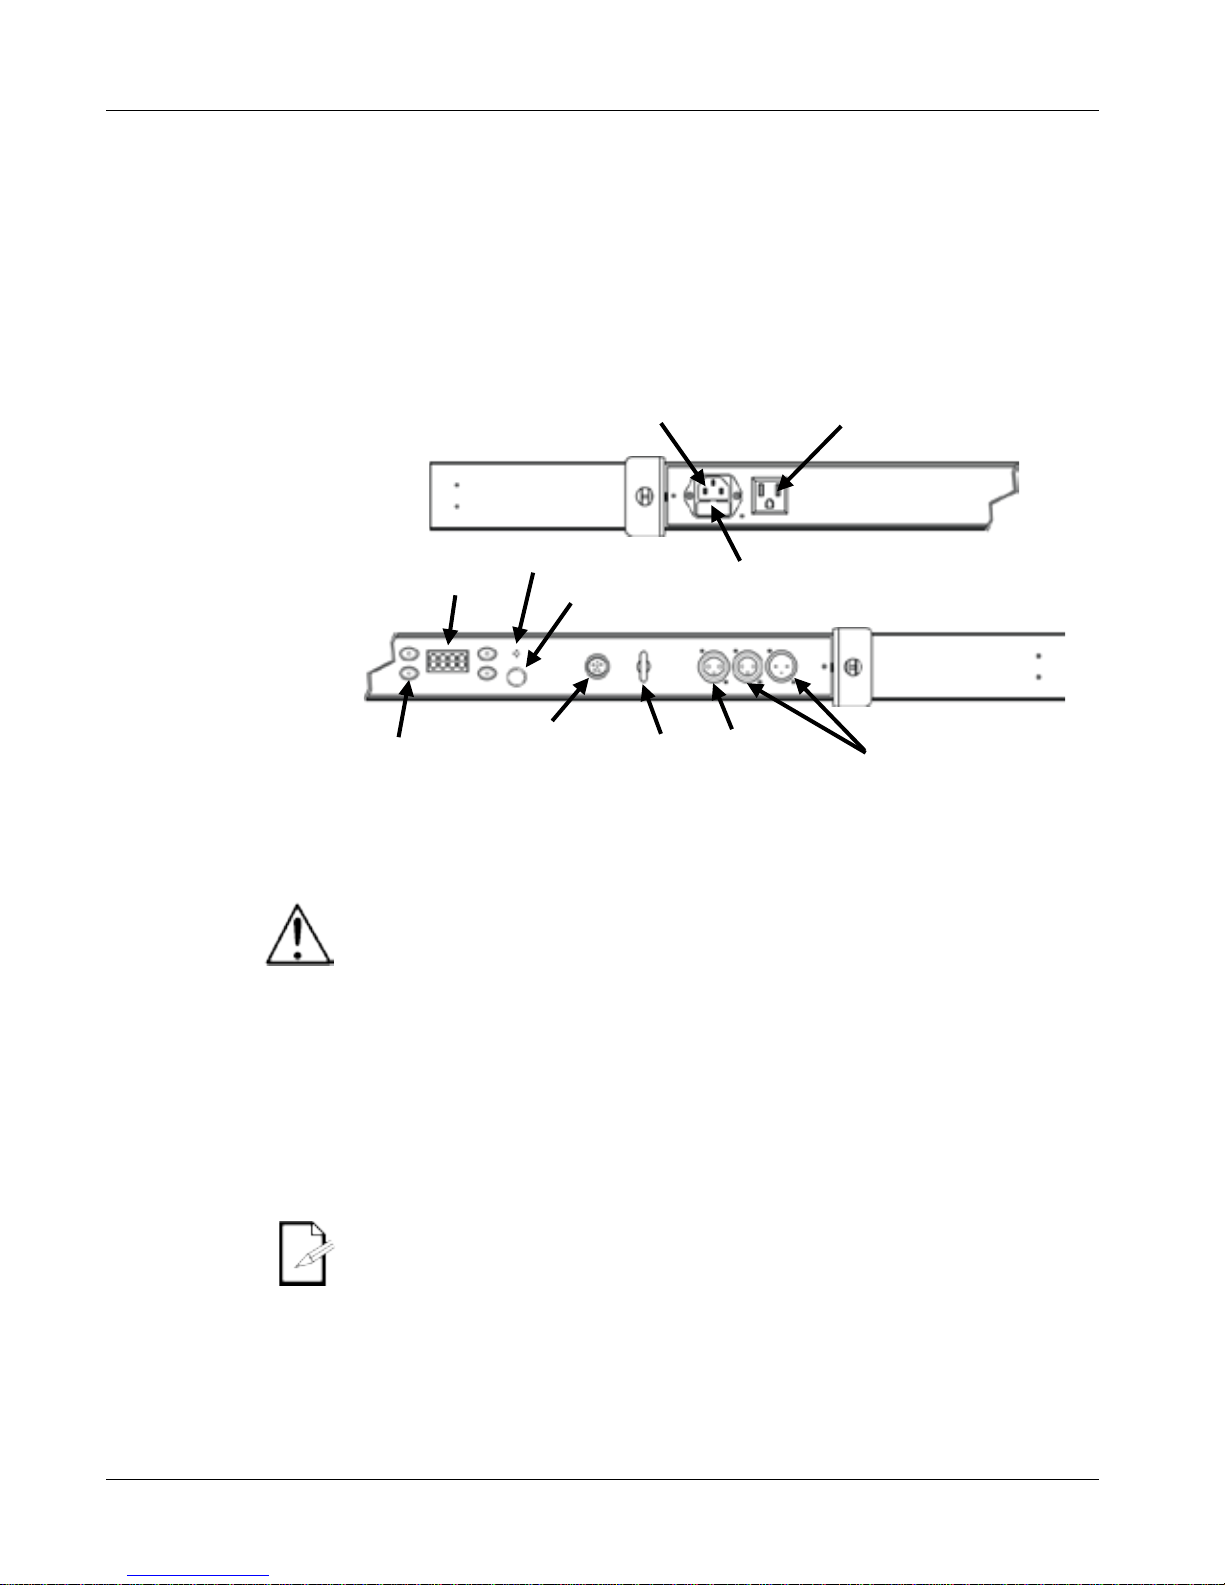
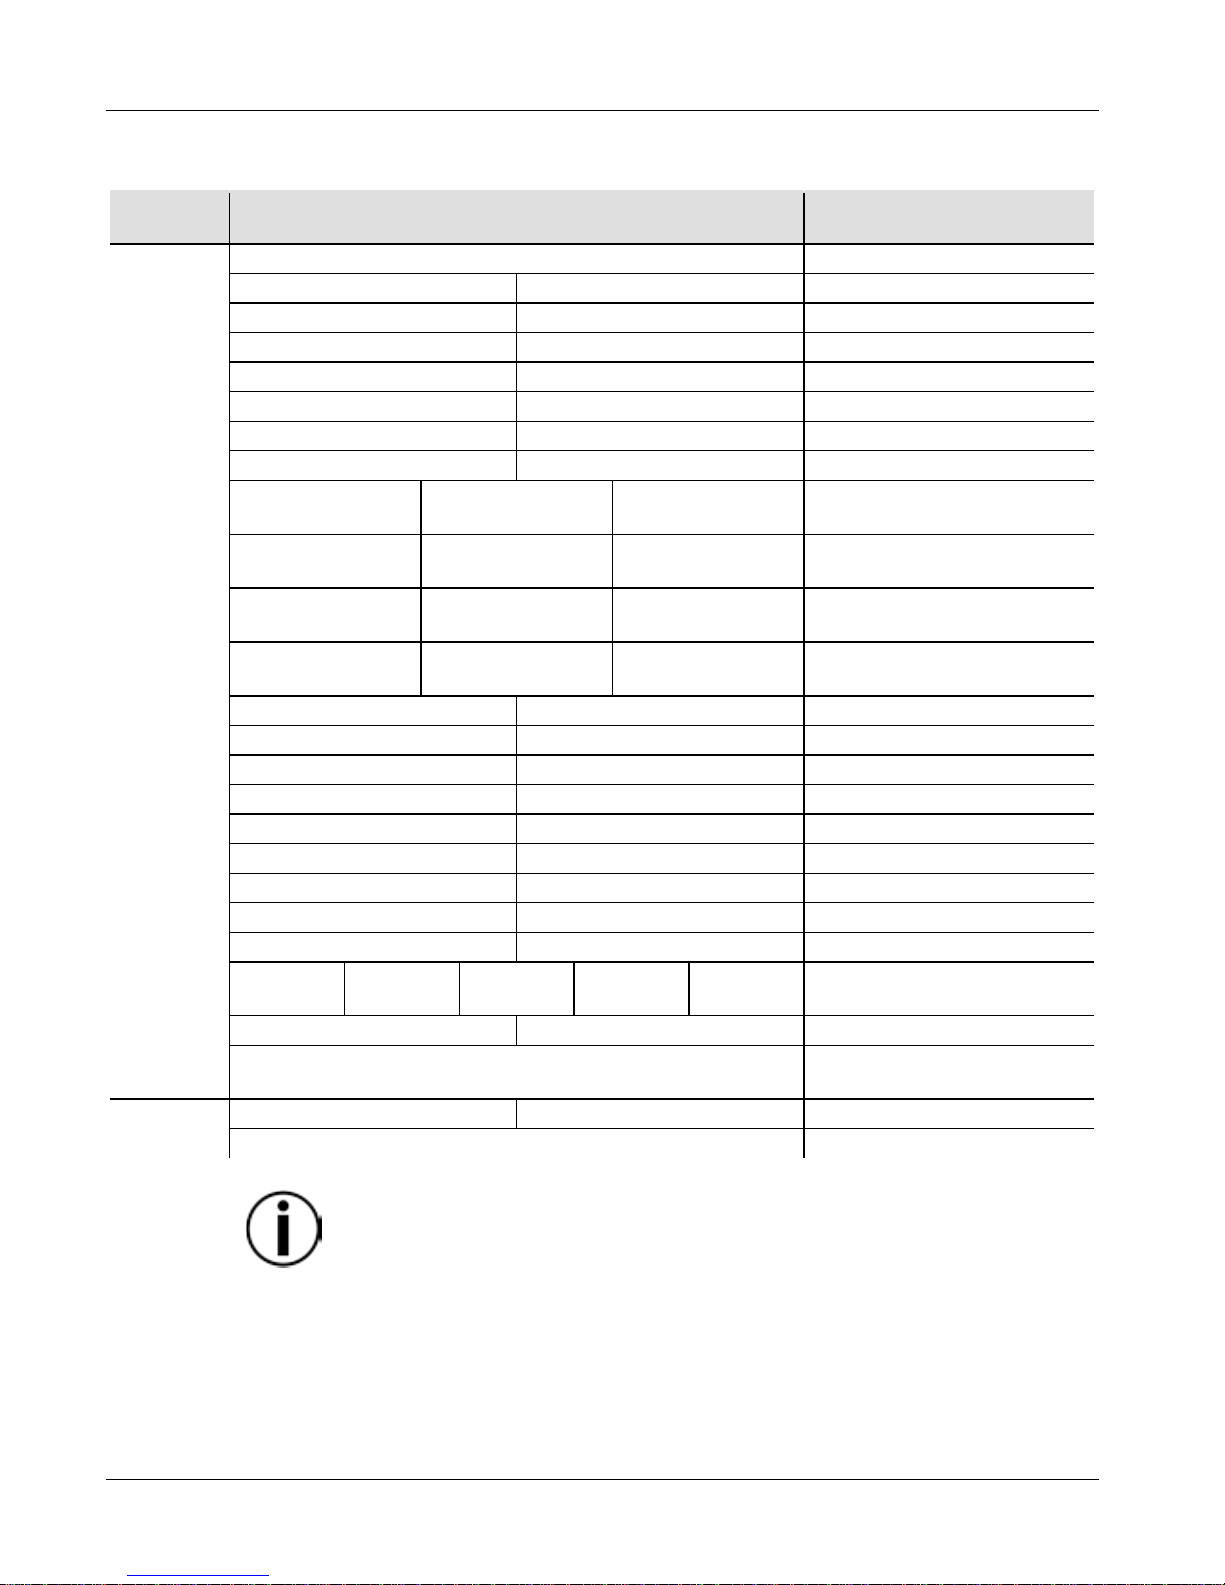
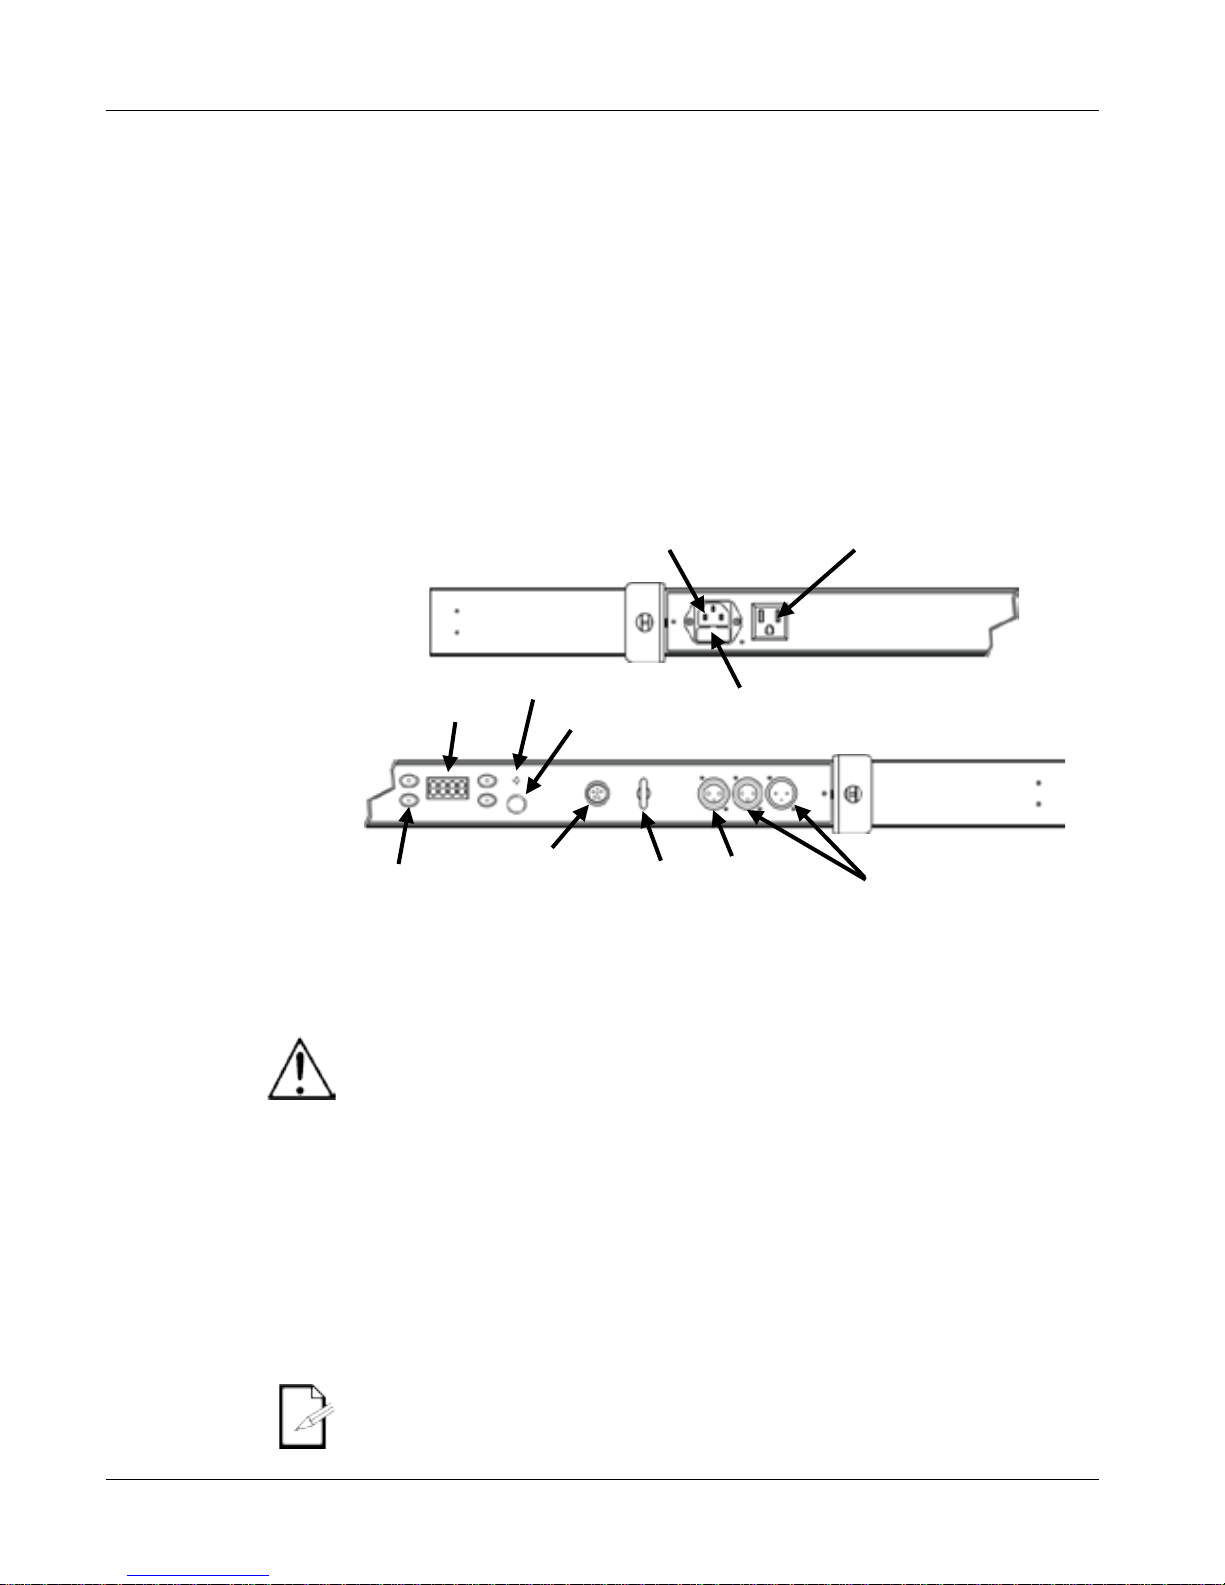
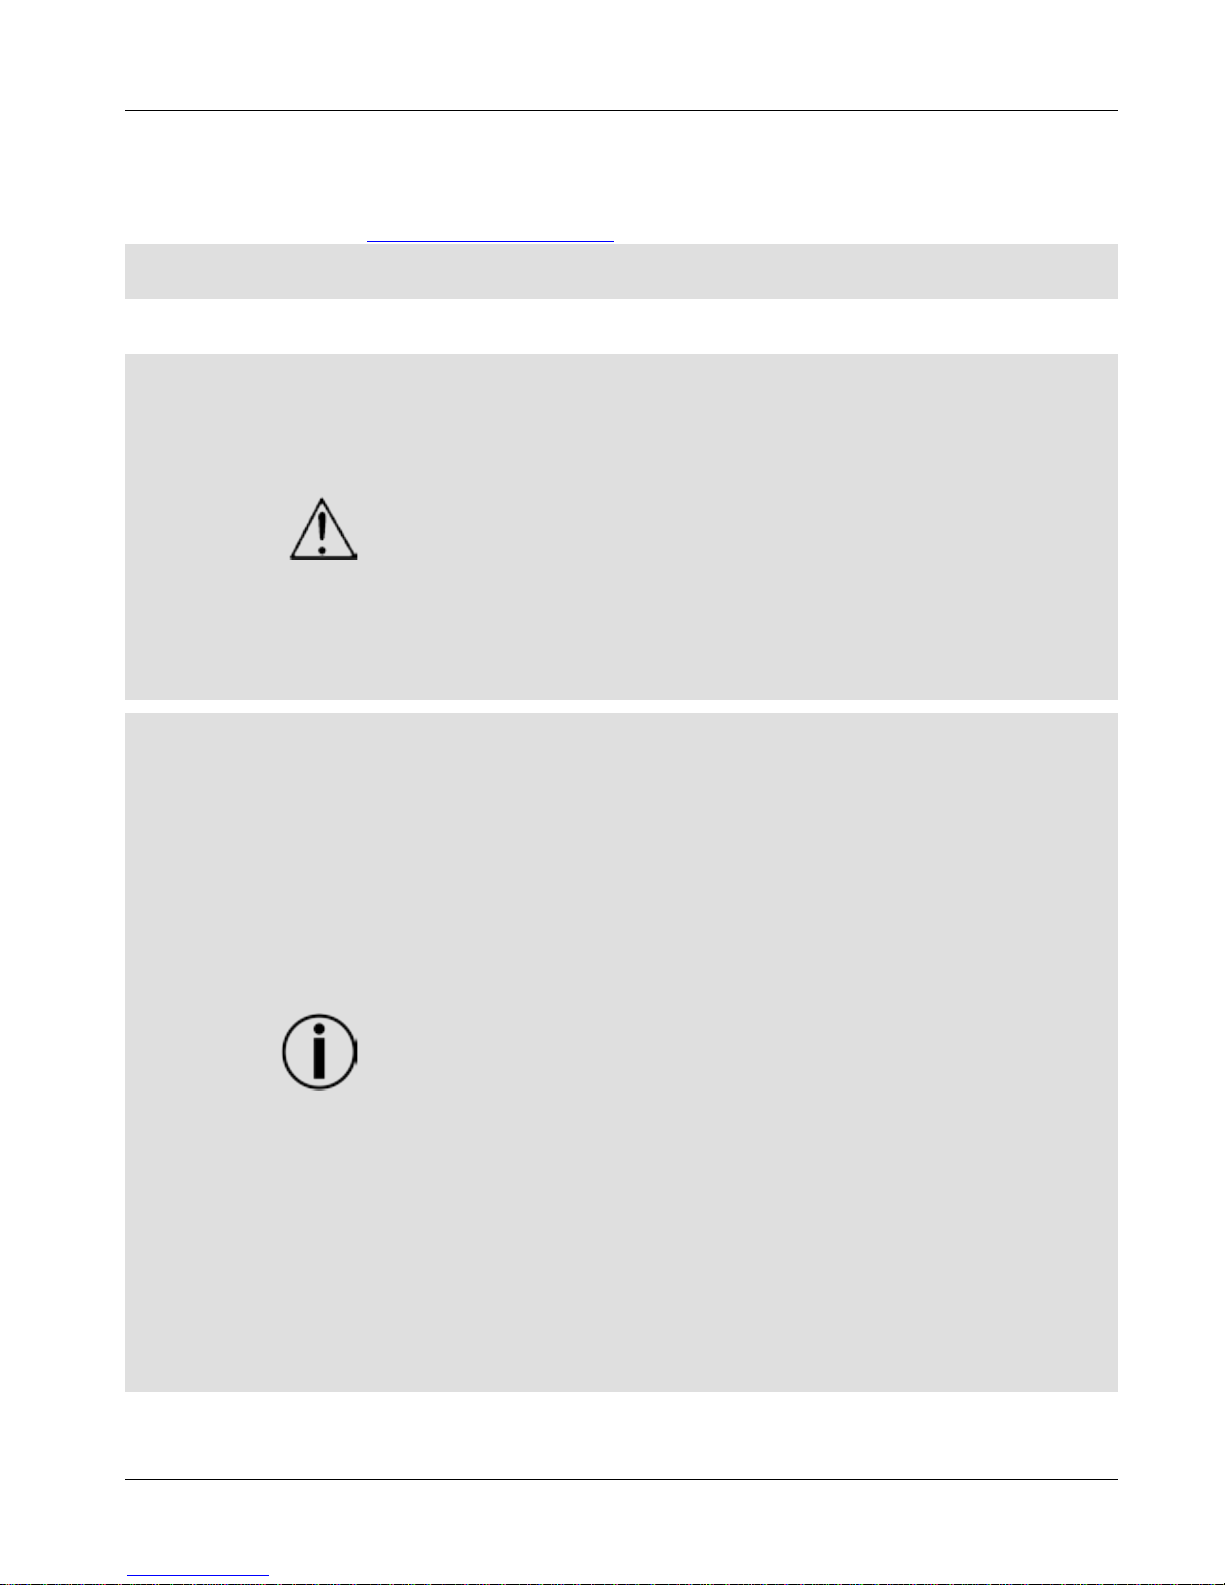
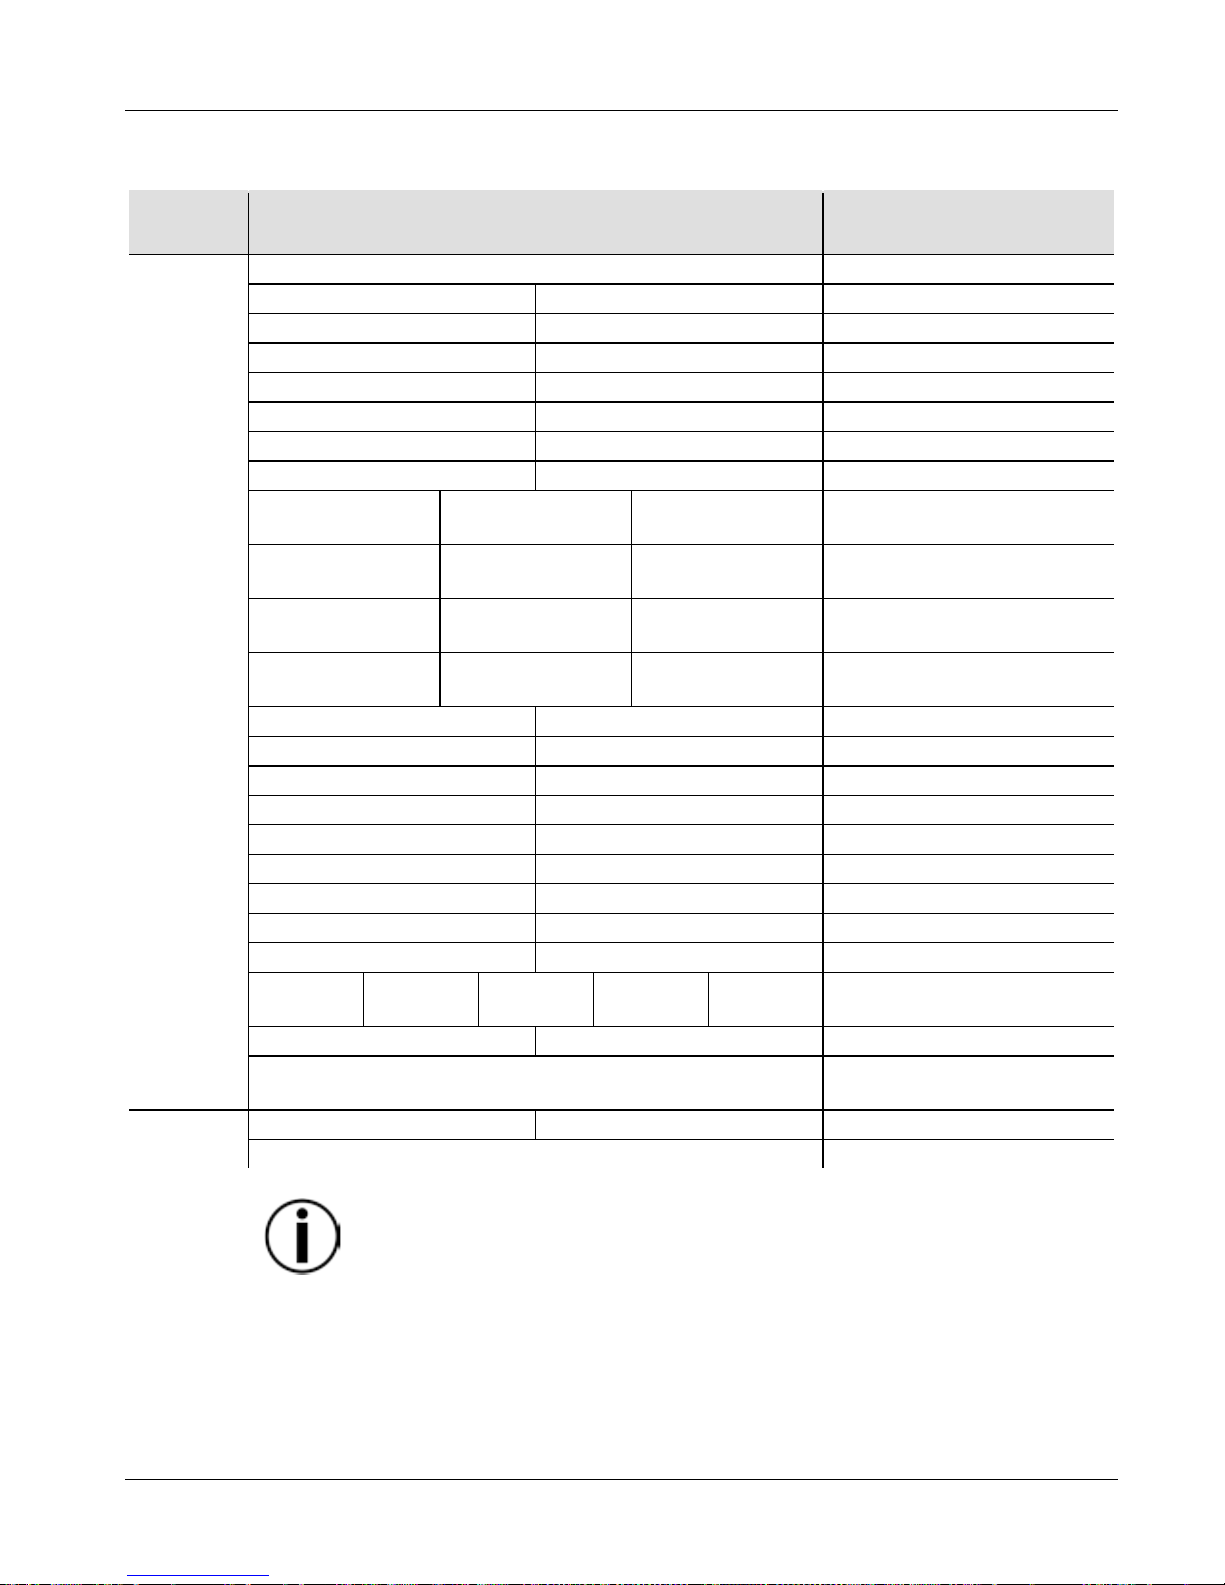
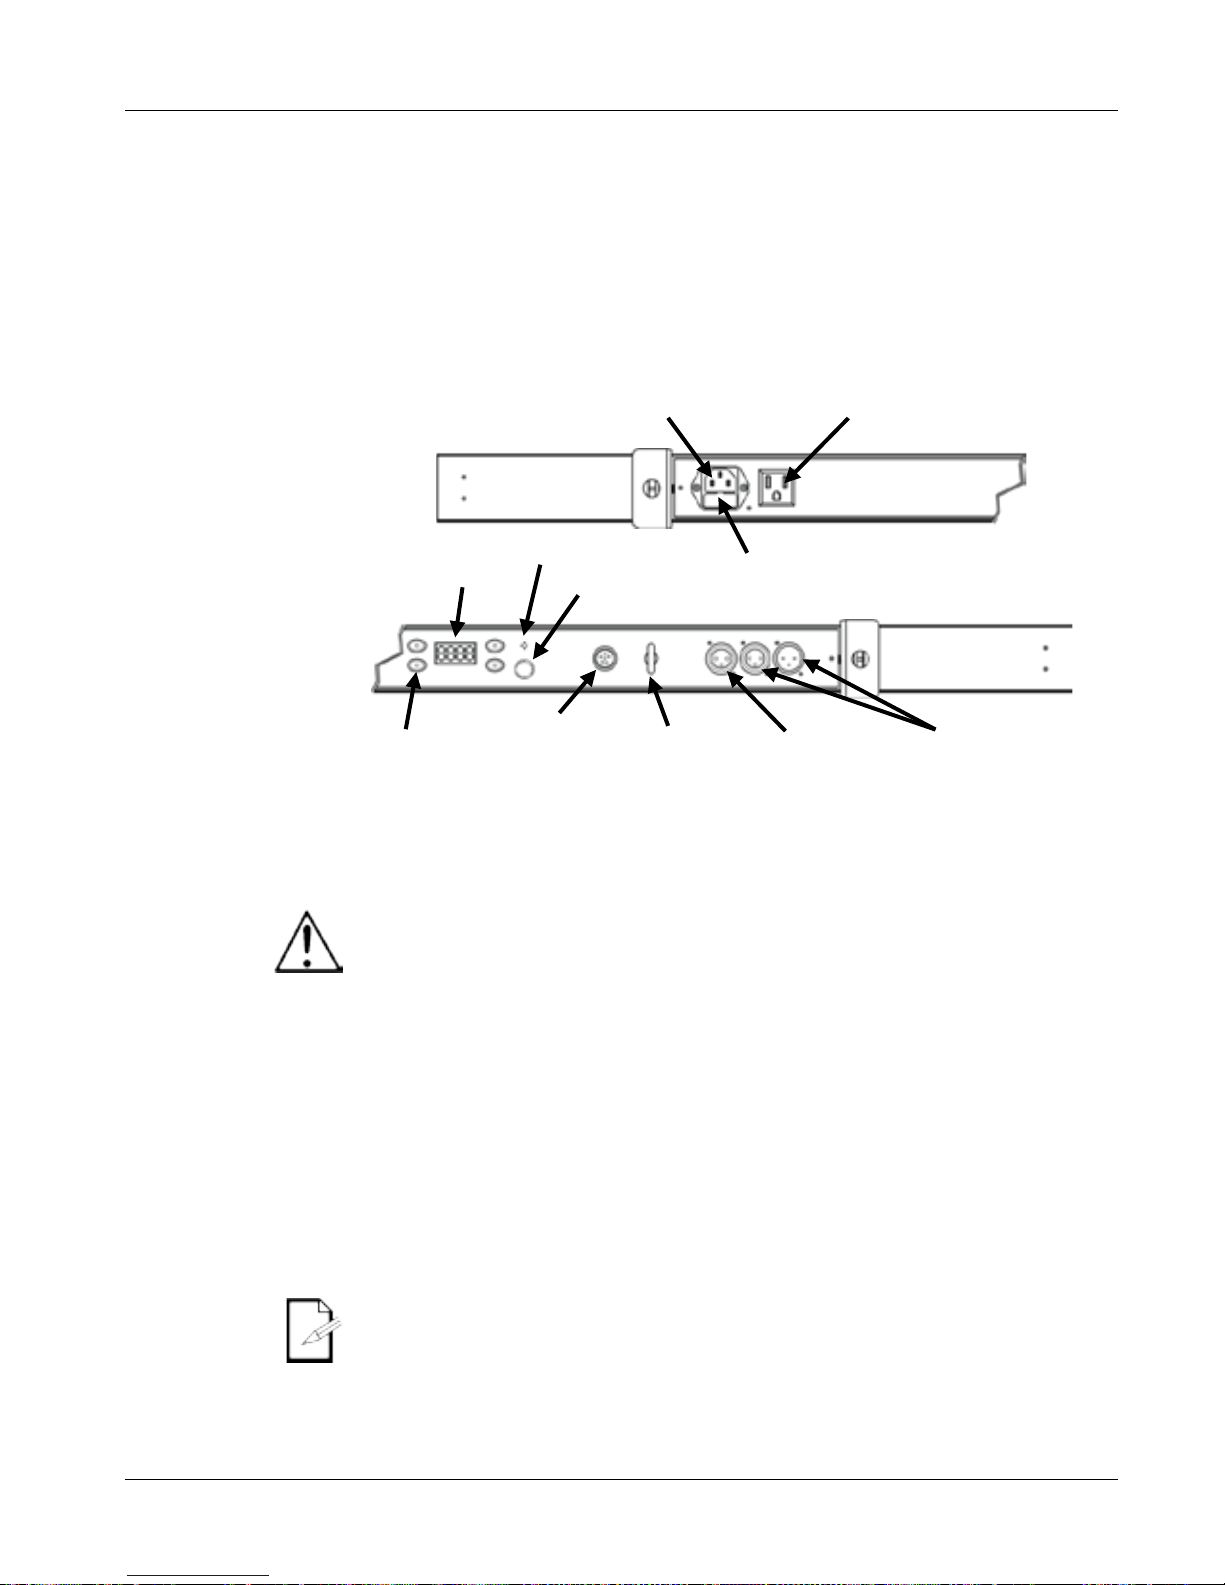
Power Out
DMX In/Out
LED Display
Fuse holder
Power In
EXT
Controller
Port
Safety
Loop
Microphone
Menu
Buttons
Sensitivity
Knob
Master
/Slave
Output
Page 4
COLORstrip/COLORstrip Mini QRG EN
4
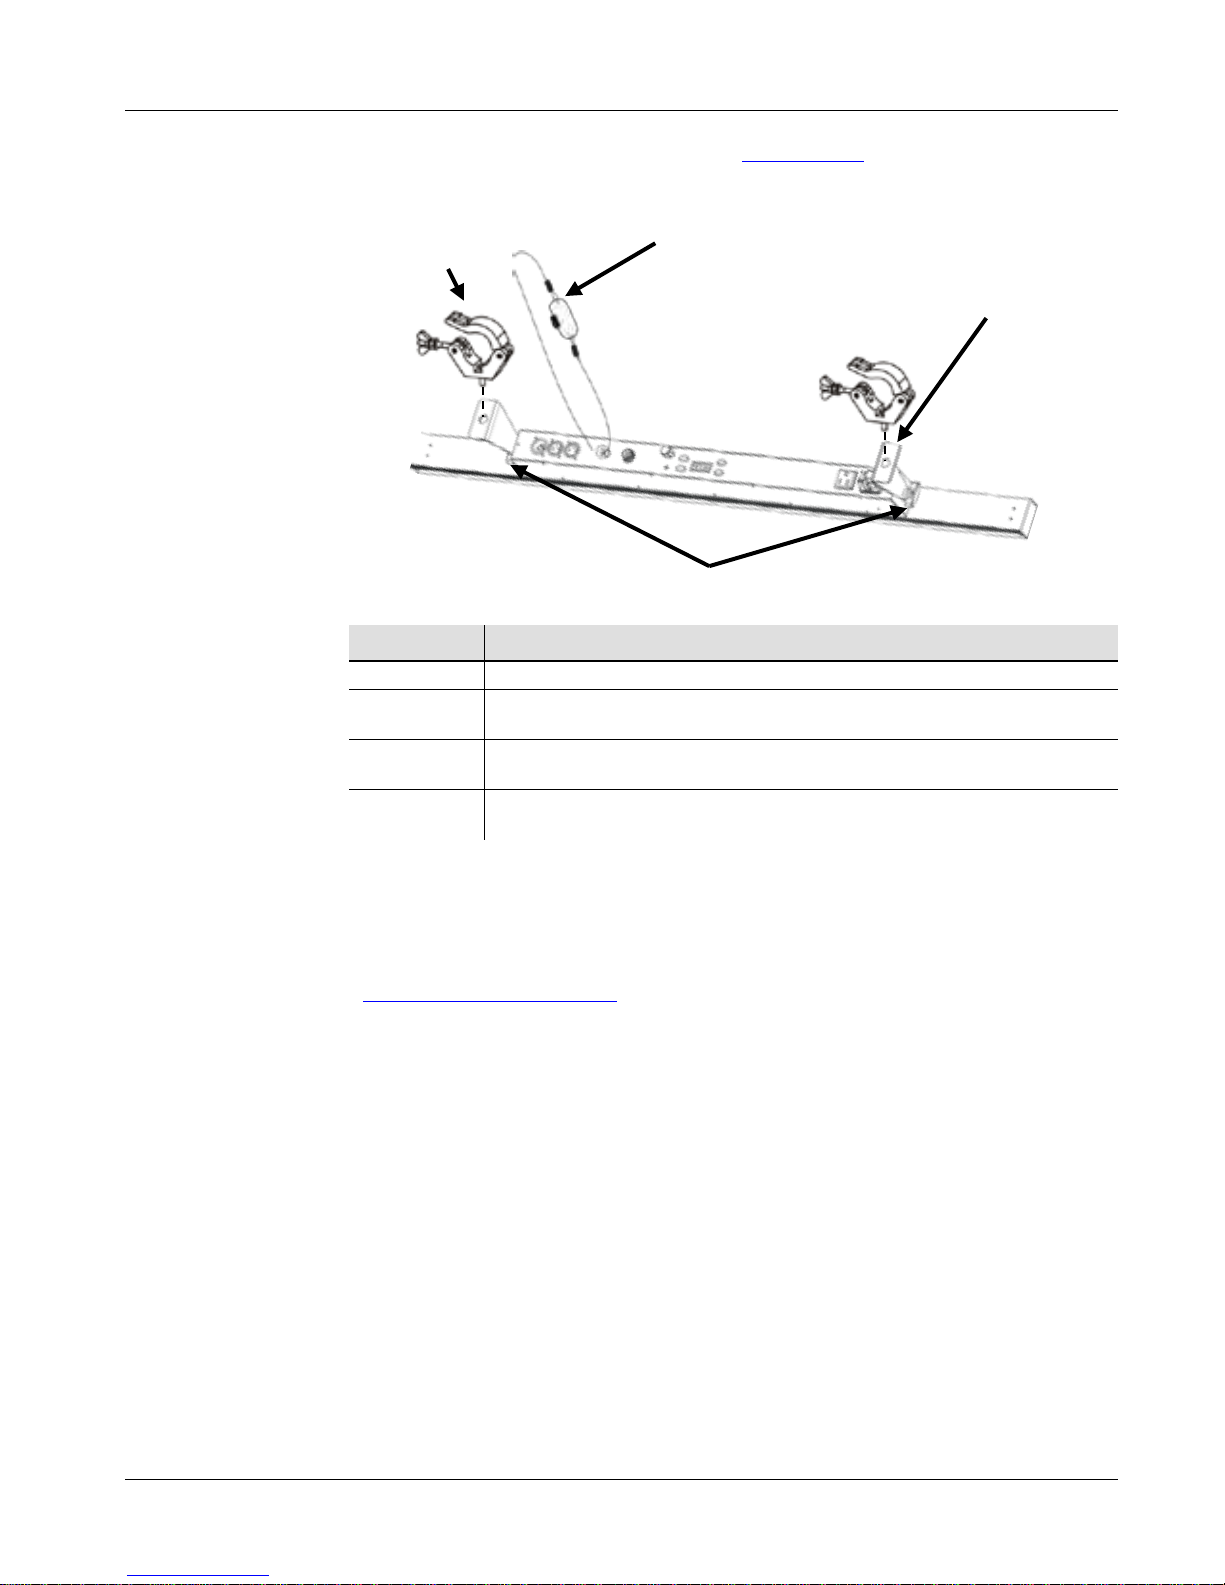
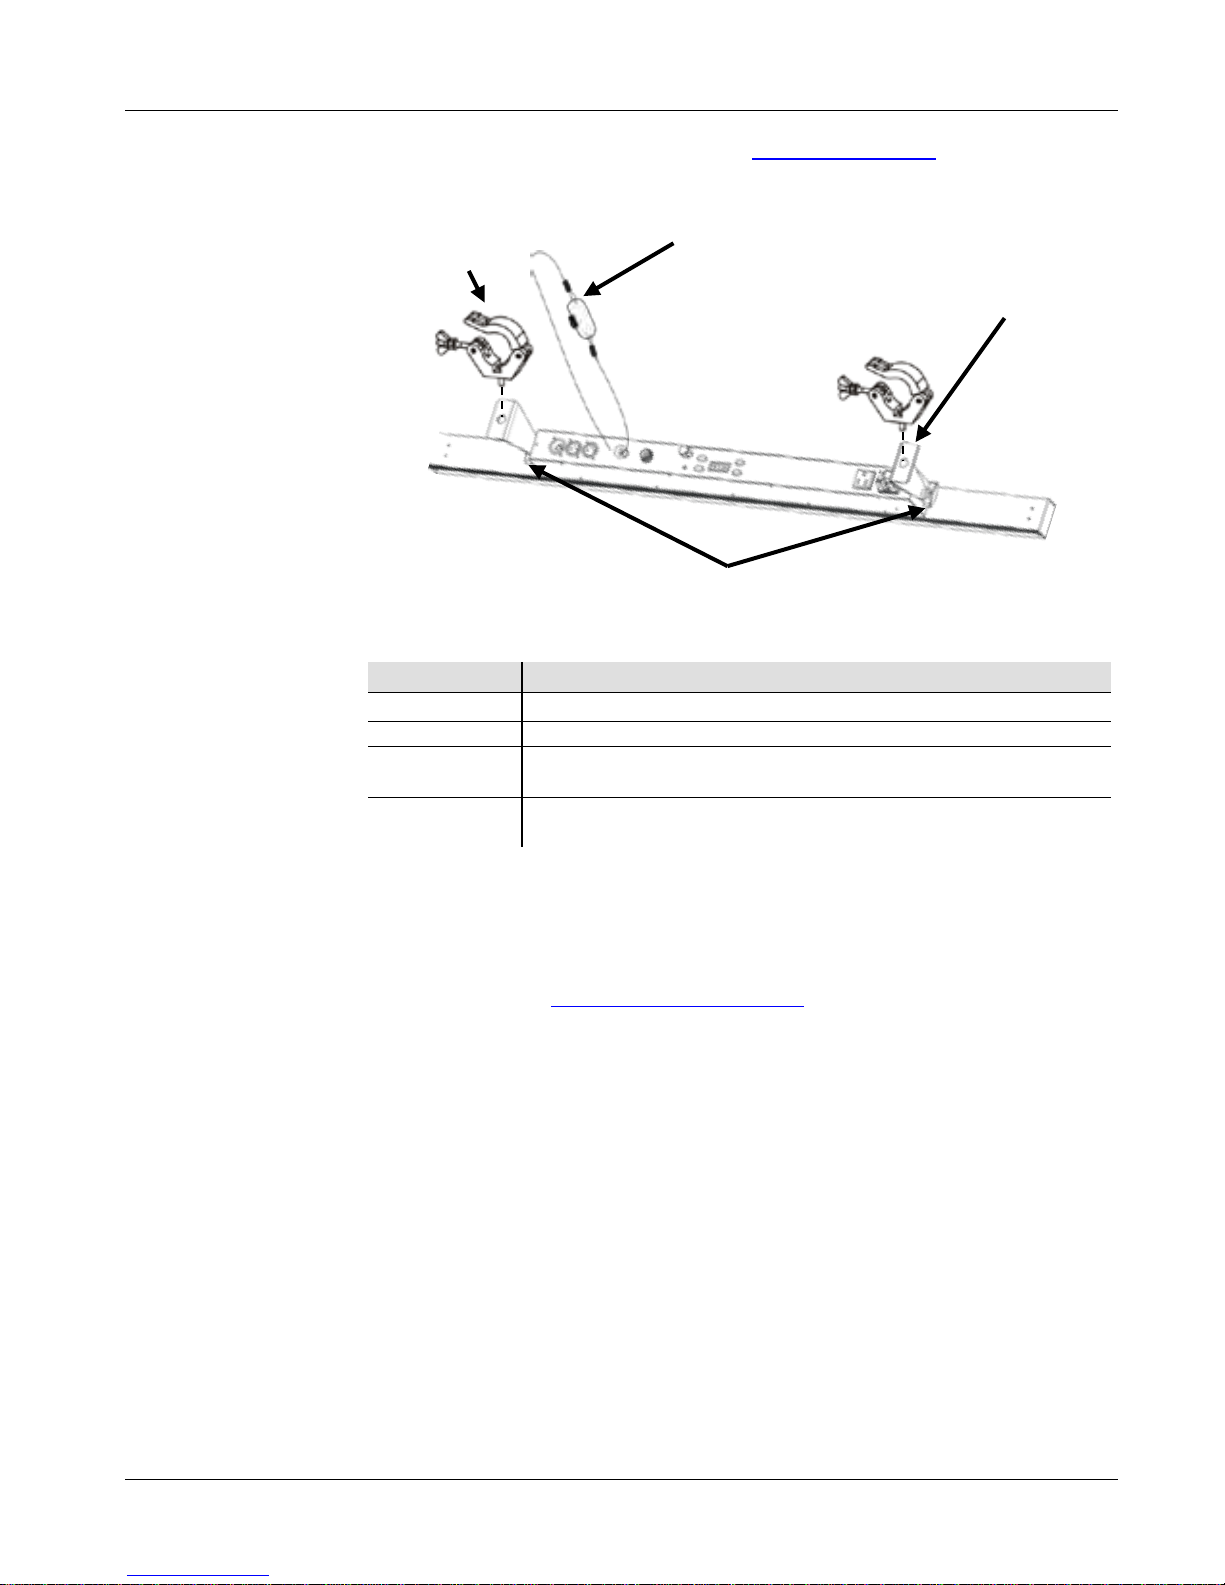
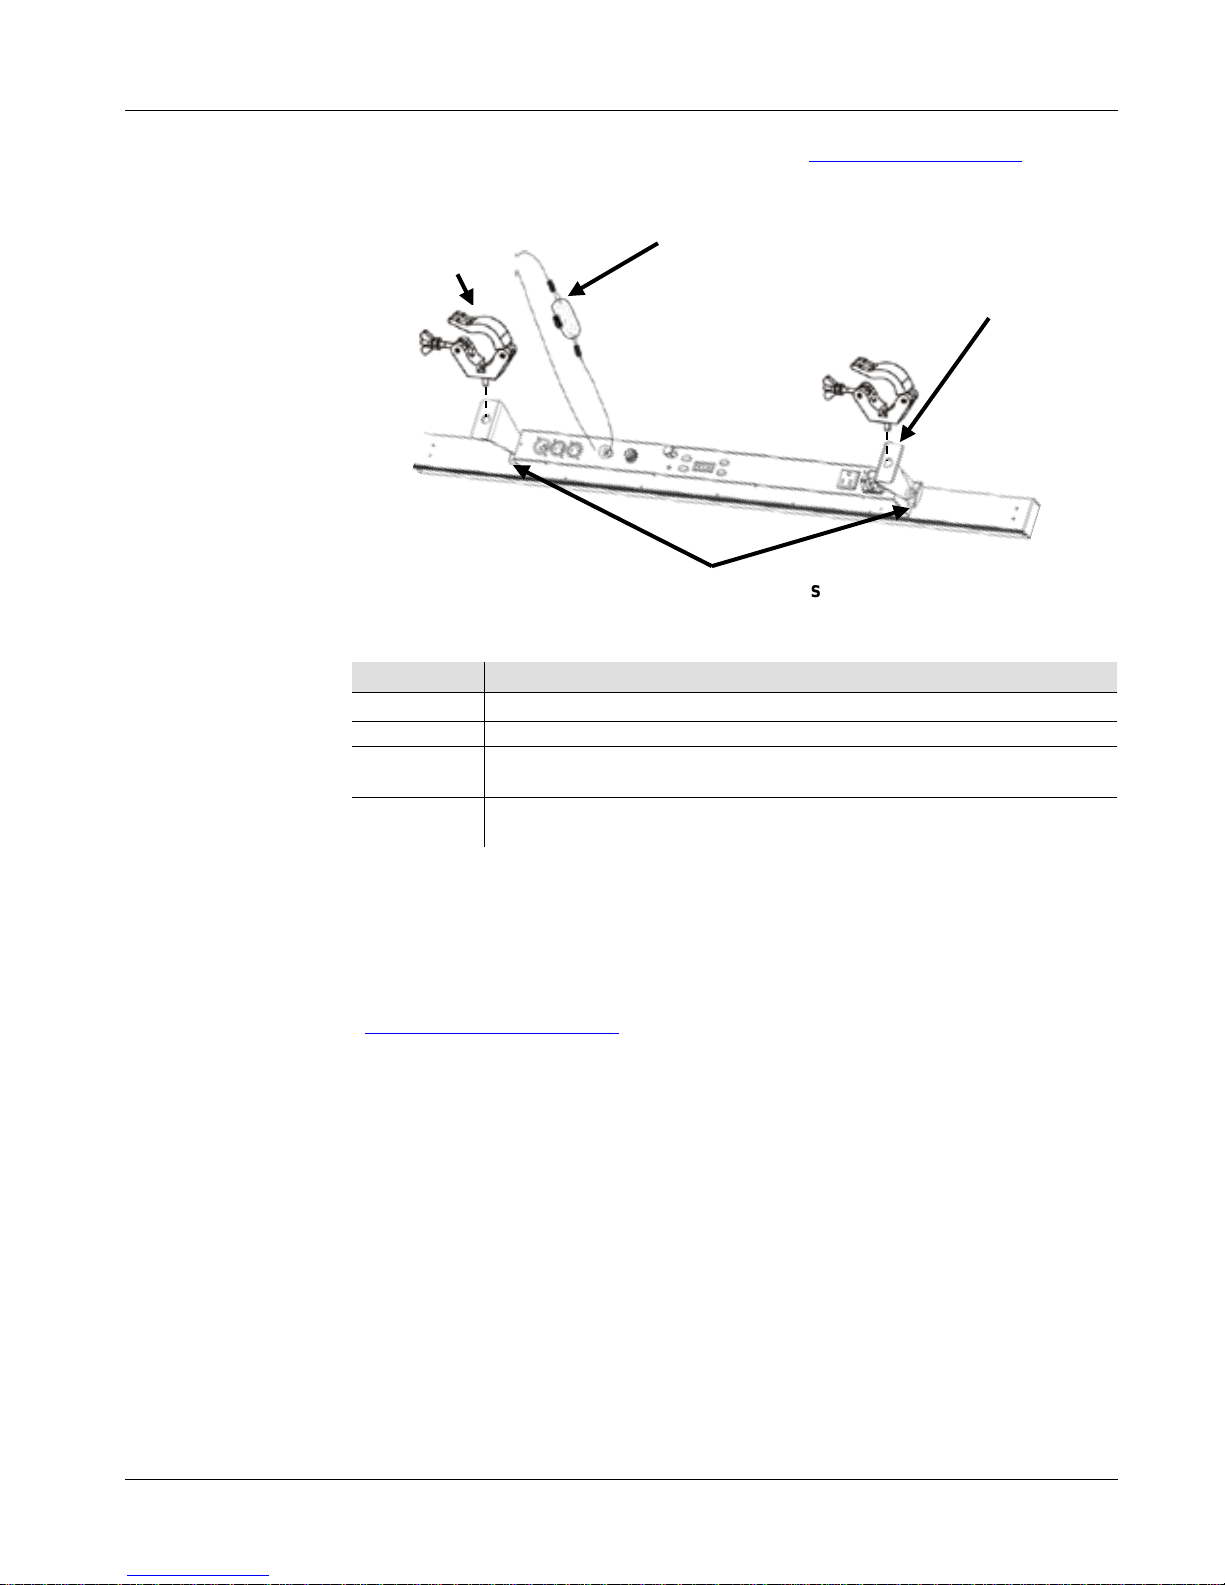
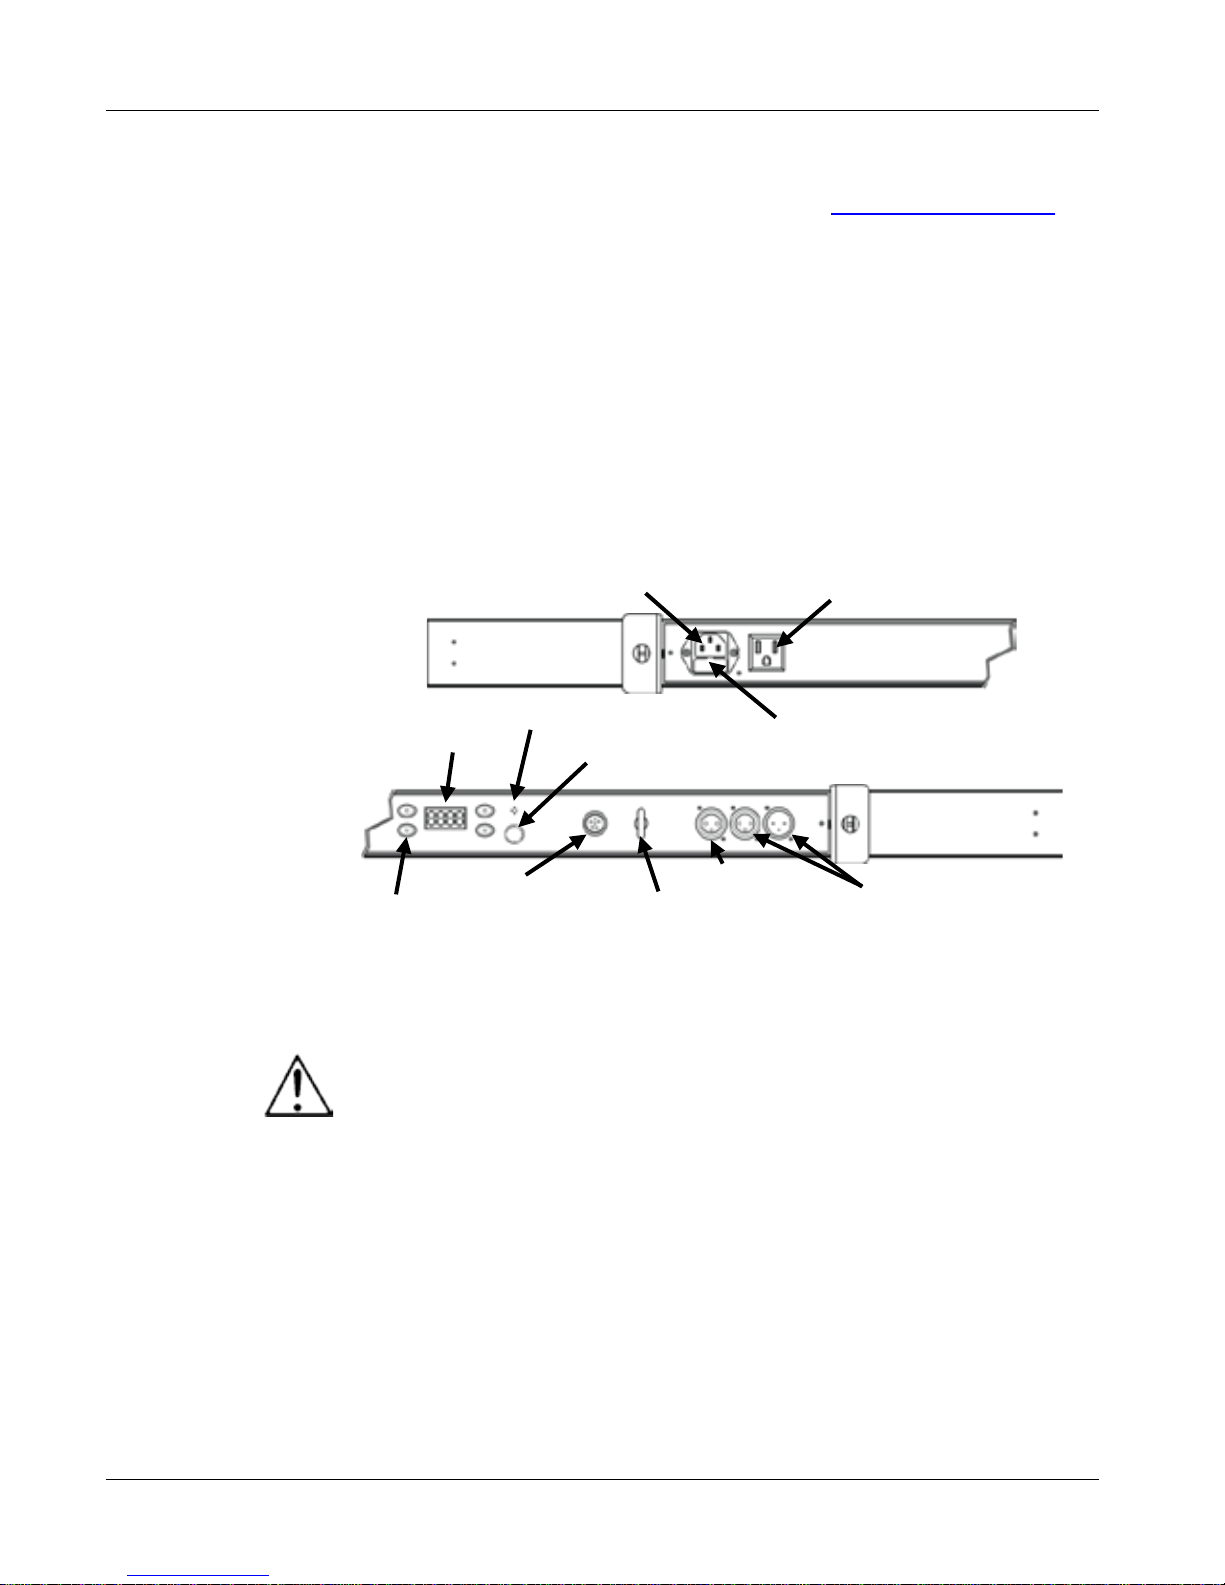
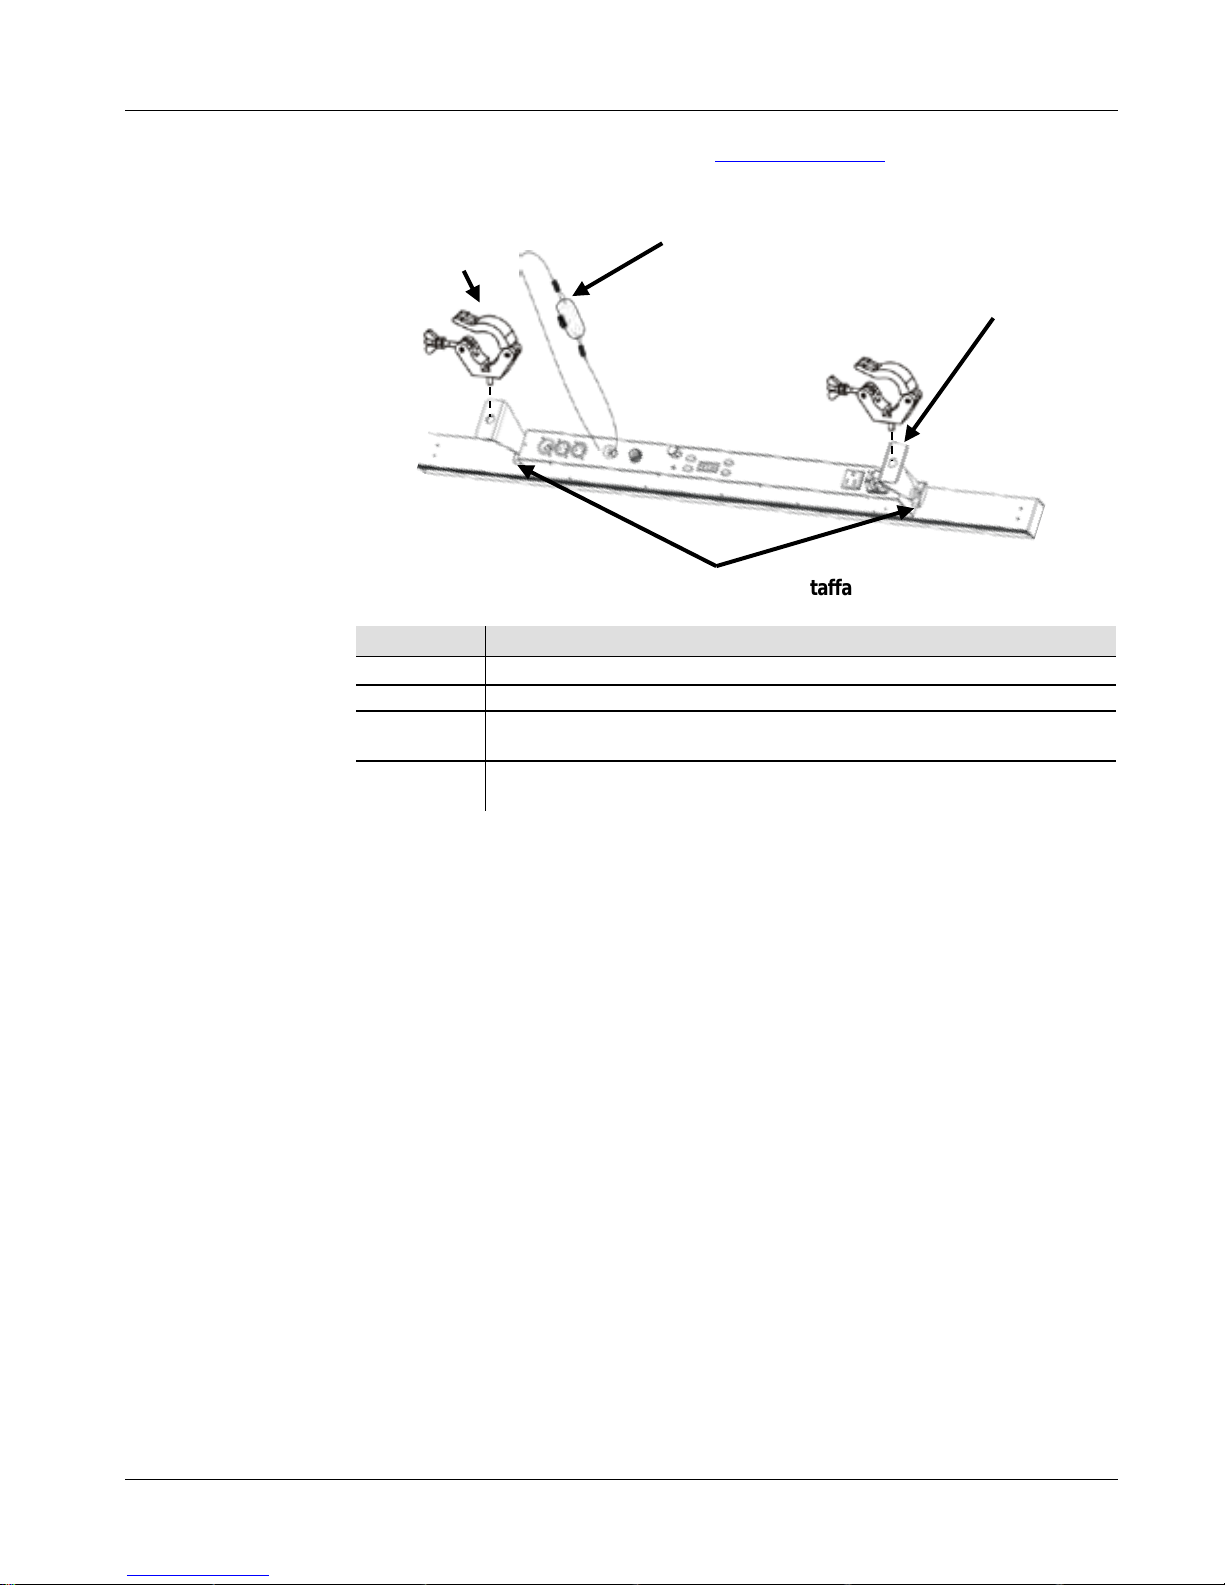
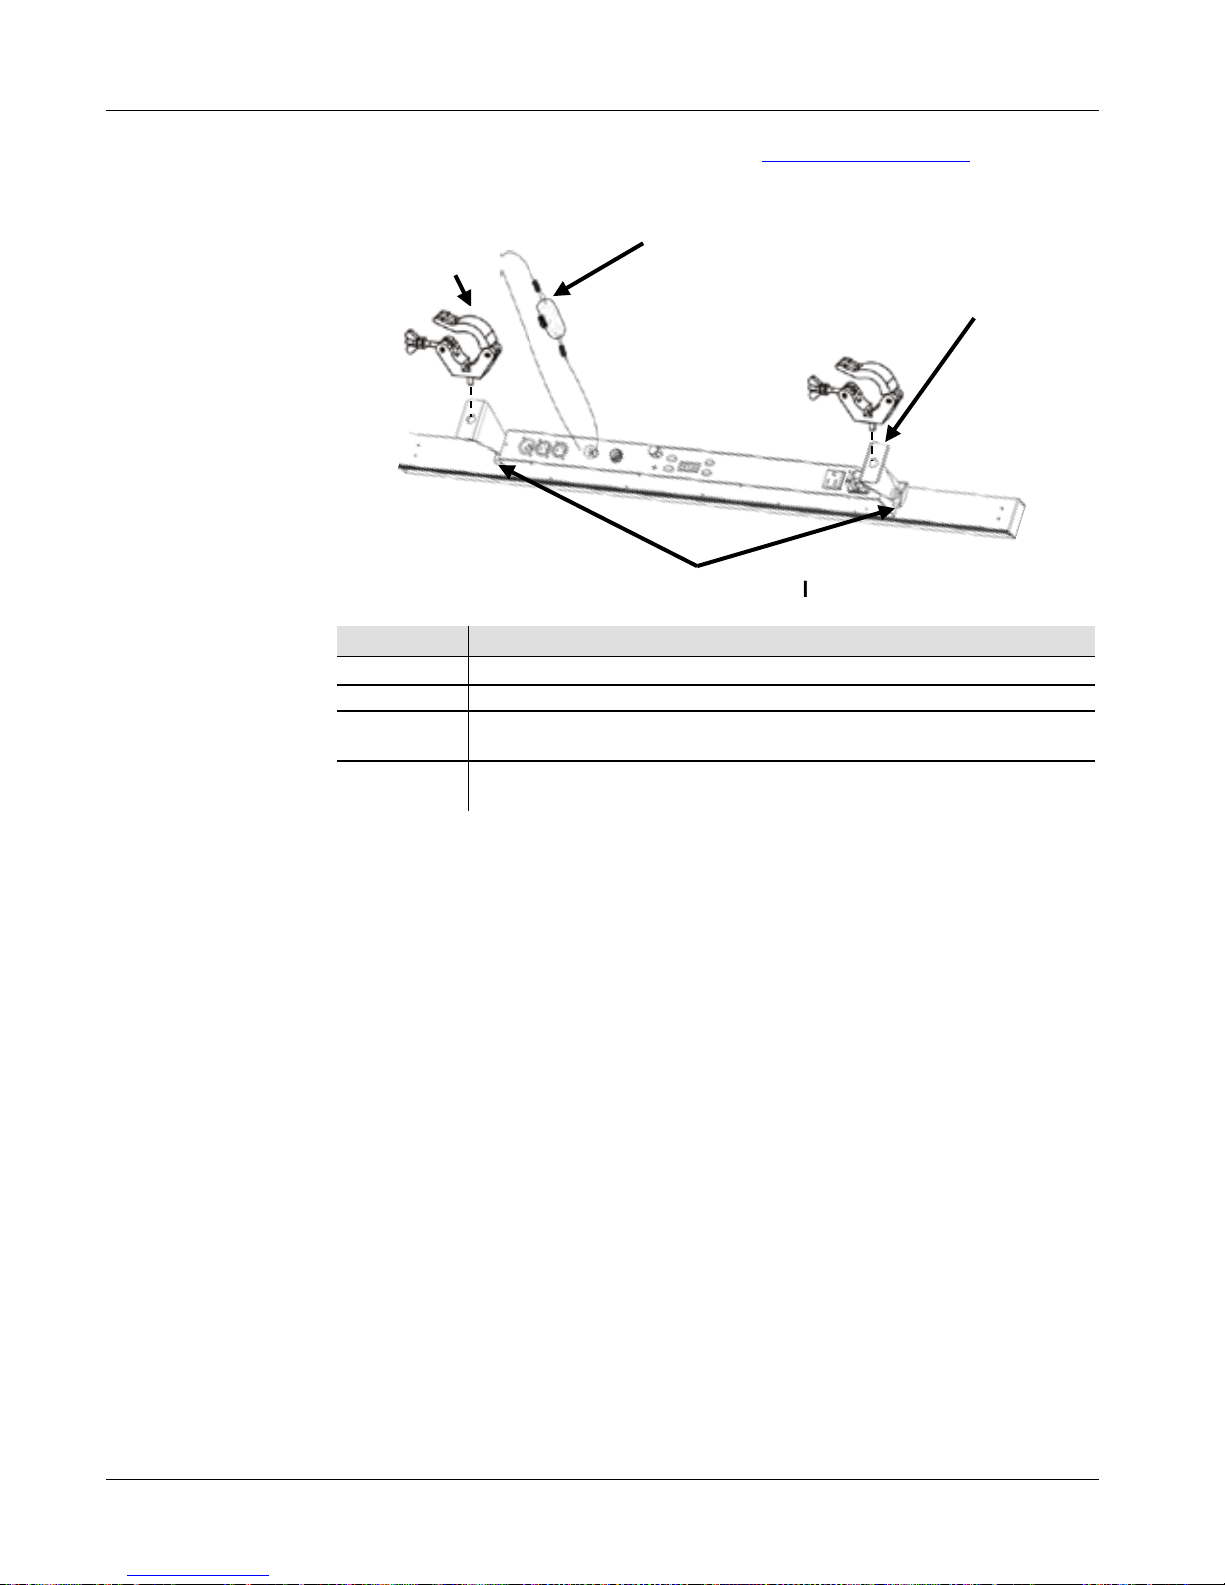
Mounting
Before mounting this product, read the Safety Notes.
Mounting
Diagram
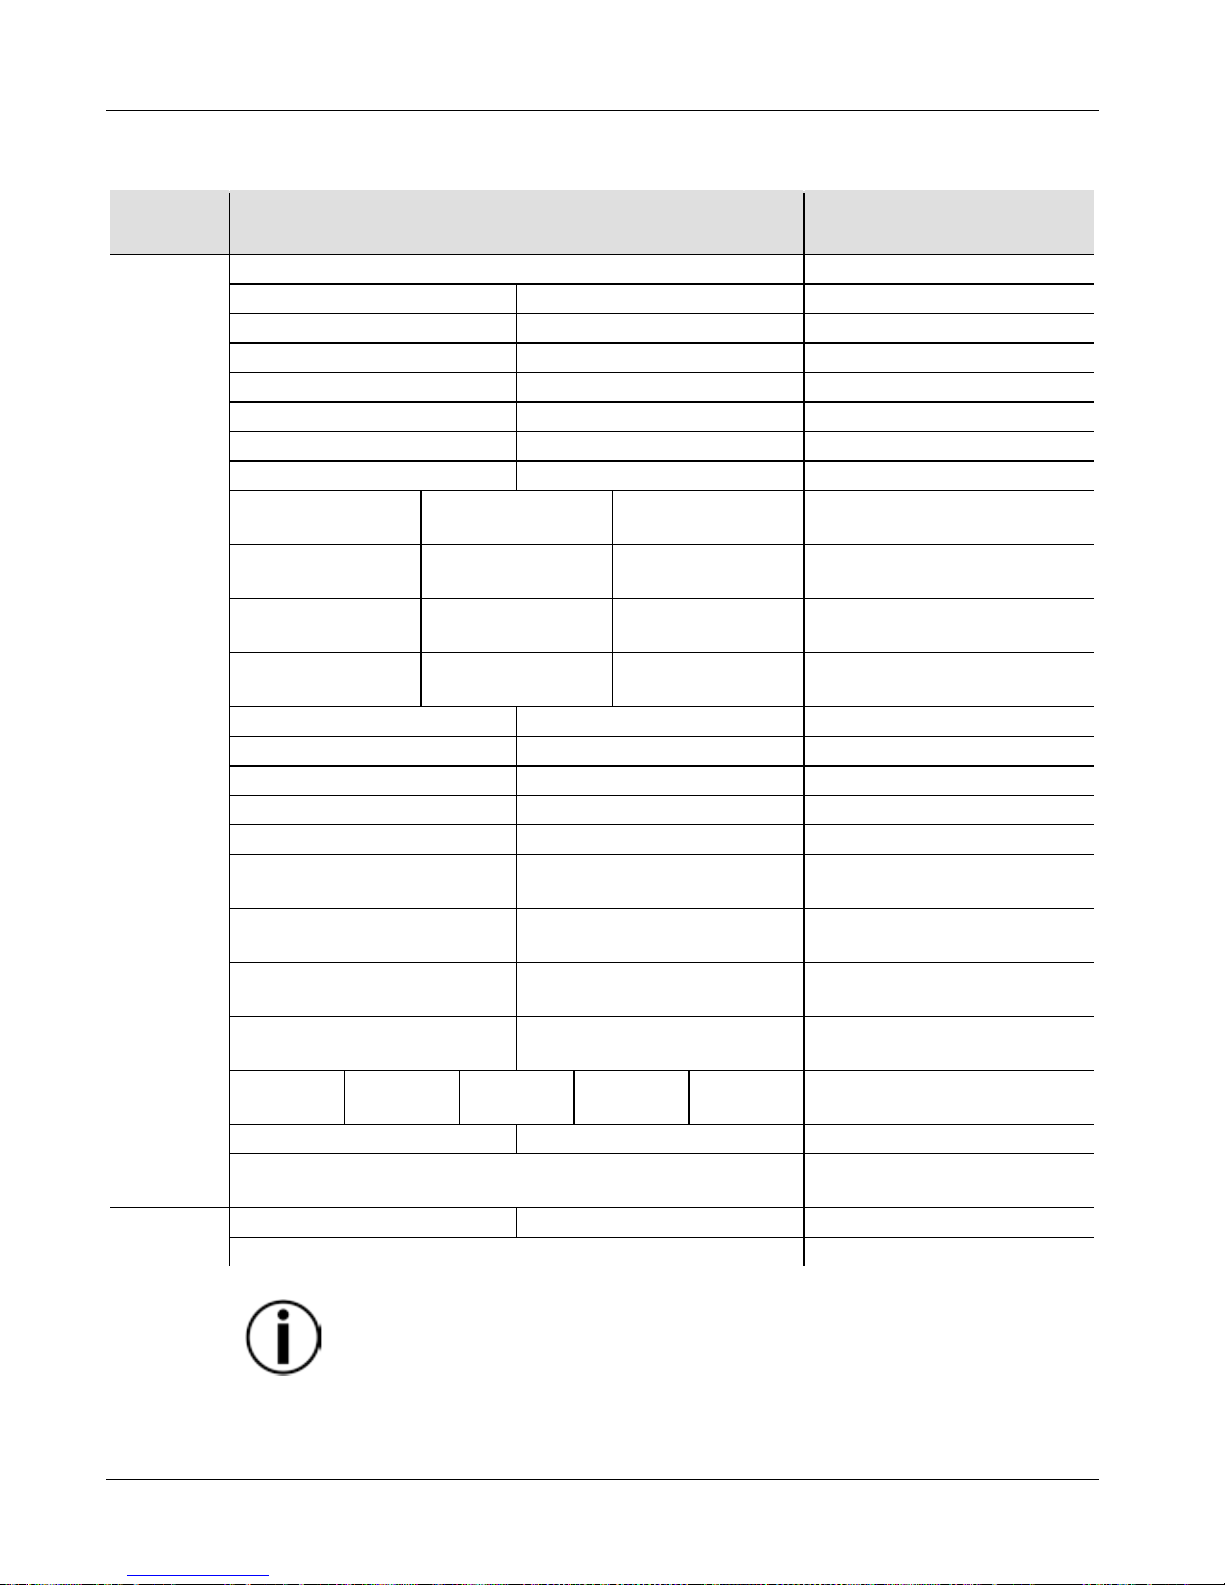
Control Panel
Description
Button
Function
<MODE>
Exits from the current menu or function
<ENTER>
Enables the currently displayed menu or sets the currently
selected value into the selected function
<UP>
Navigates upwards through the menu list and increases the
numeric value when in a function
<DOWN>
Navigates downwards through the menu list and decreases the
numeric value when in a function
DMX Linking
The COLORstrip/COLORstrip Mini can work with a DMX controller when
linked by DMX serial connections. Instructions for connecting and
configuring this product for DMX operation are in the User Manual. If you
are not familiar with DMX, download the DMX Primer from
www.chauvetlighting.com.
Starting Address
To ensure full access to all channels in each DMX mode, the highest
recommended DM X address is 509.
After setting the starting DMX address, press <MODE>, then <ENTER>
to
save the address to the product’s memory.
Master/Slave
Connection
The COLORstrip/COLORstrip Mini uses th e DMX data connection for its
Master/Slave mode. Instructions for connecting and configuring this product
for Master/Slave operation are in the User Manual.
Master/Slave
Runway Mode
The COLORstrip/COLORstrip Mini uses the Master/Slave output for its
Runway mode. Instructions for connecting and configuring this product for
Runway mode operation are in the User Manual.
Bracket Adjustment Knobs
Mounting Bracket
Clamp
(such as the CLP-
15N from
Chauvet)
Safety Cable
(such as CH-05
from Chauvet)
Page 5
COLORstrip/COLORstrip Mini QRG EN
5
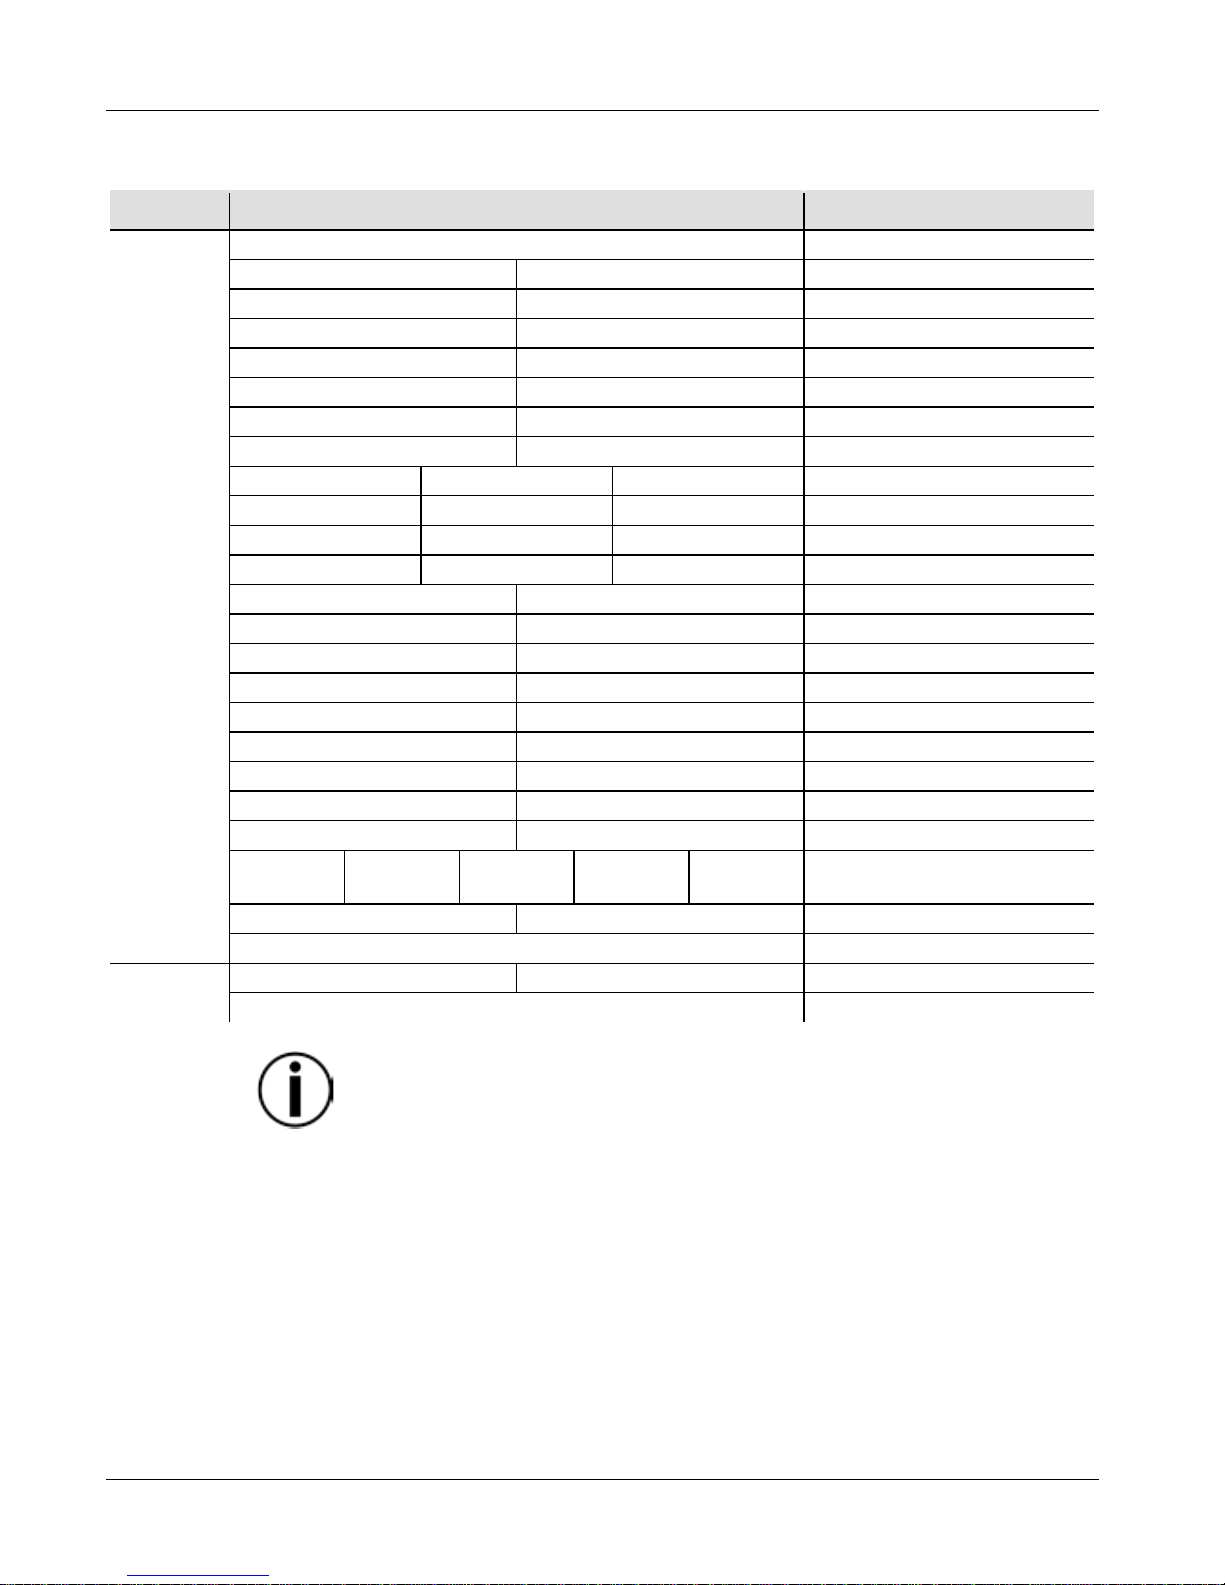
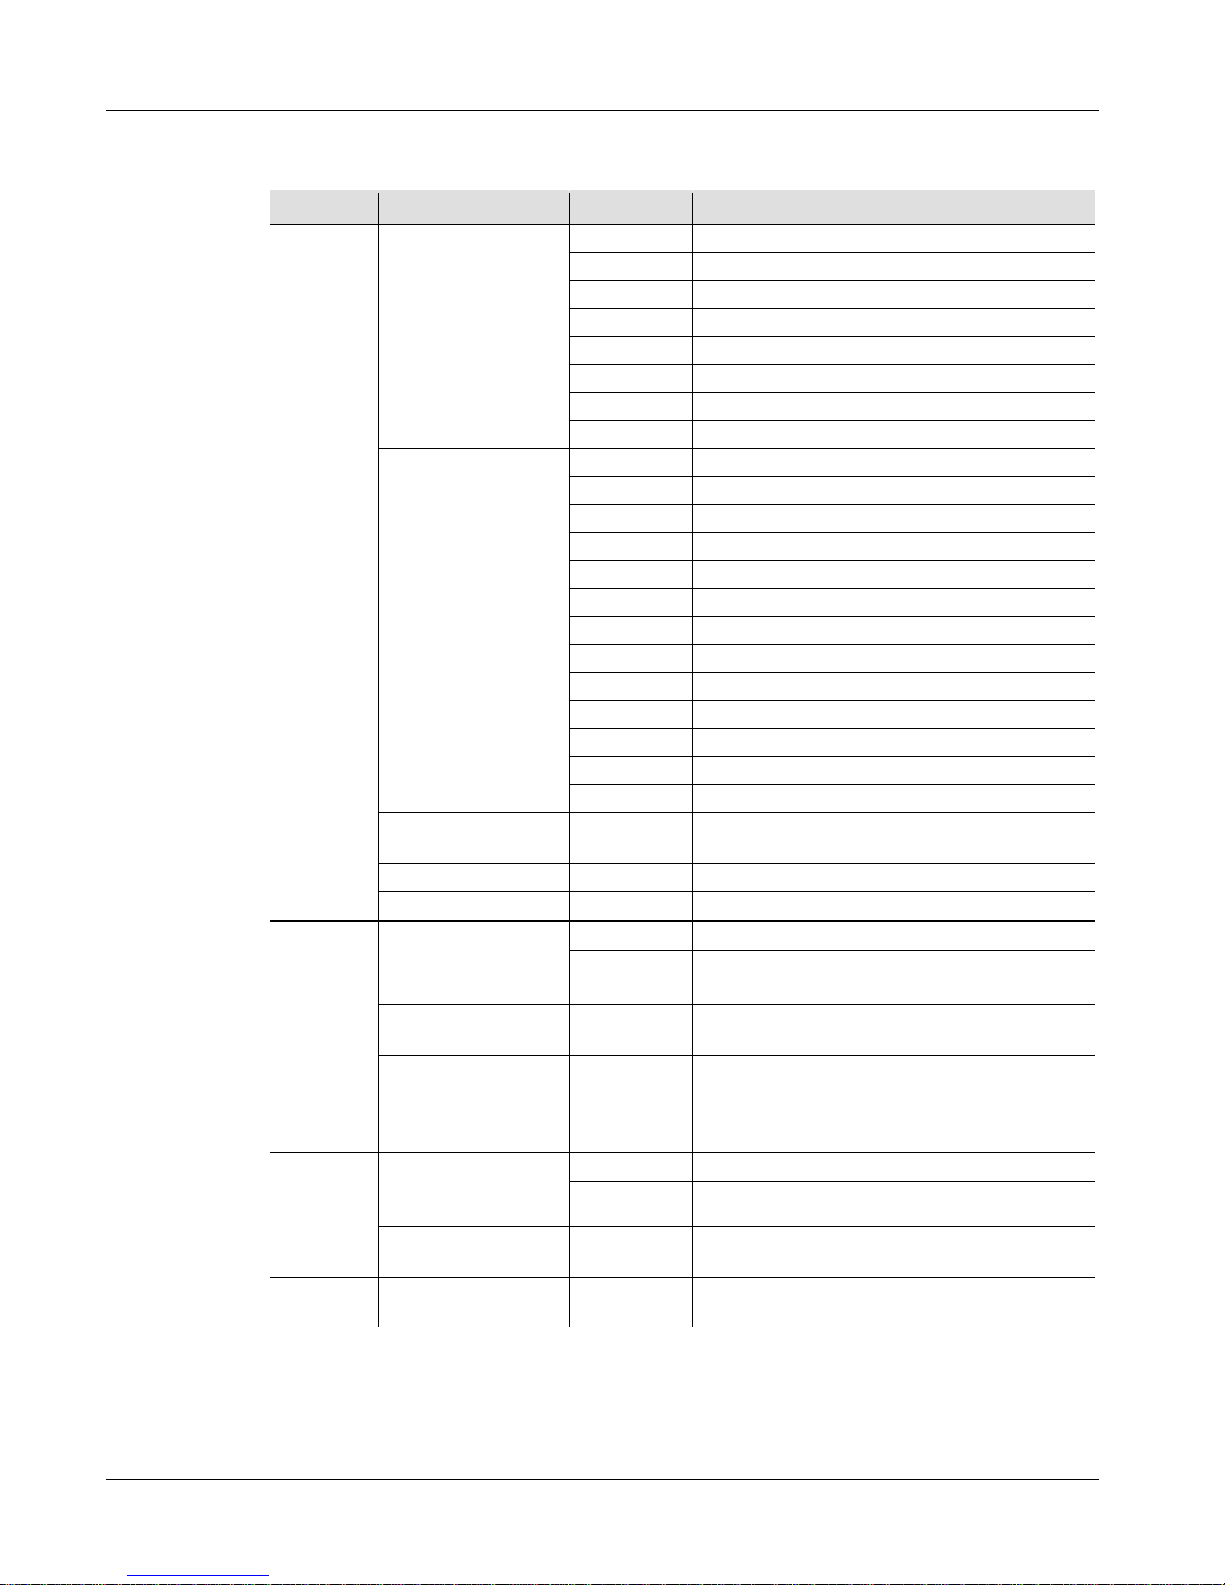
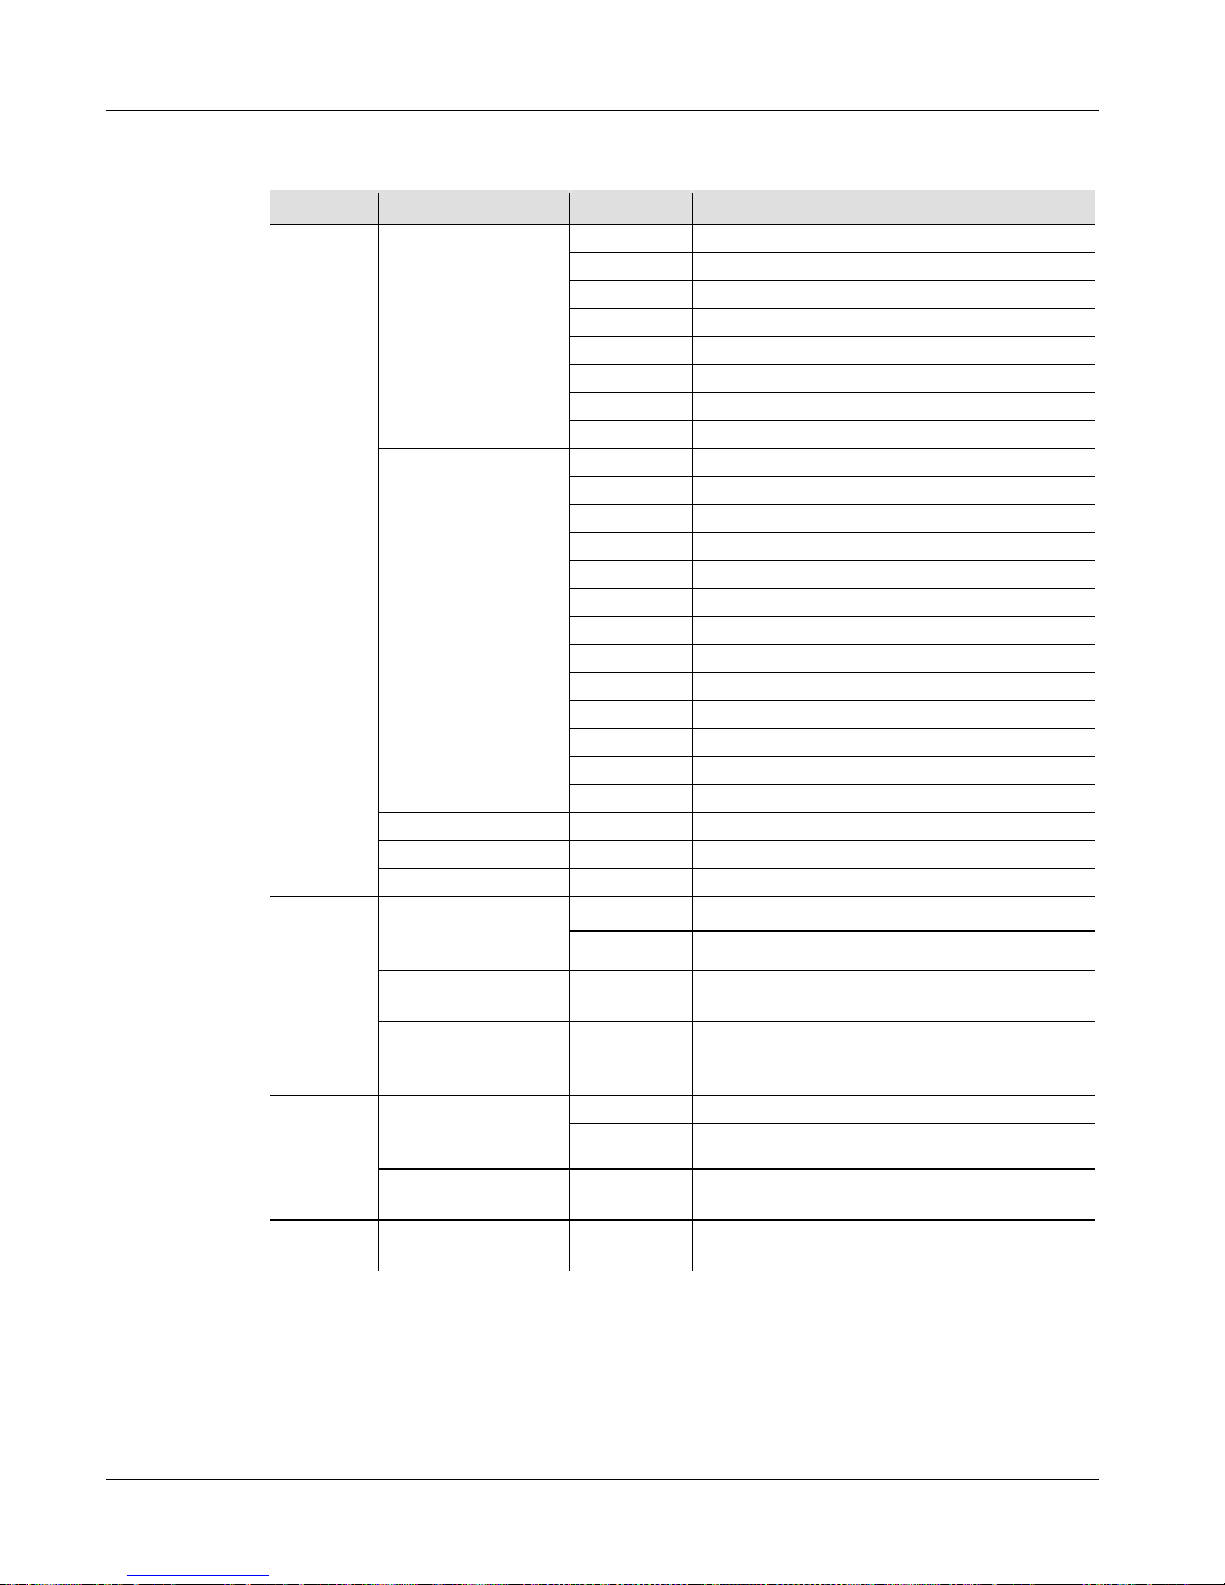
Menu Options
Main Level
Programming Levels Description
Act
A000
Blackout
A001
F000–F100
Red (strobe)
A002
F000–F100
Green (strobe)
A003
F000–F100
Blue (strobe)
A004
F000–F100
Yellow (strobe)
A005
F000–F100
Purple (strobe)
A006
F000–F100
Cyan (strobe)
A007
F000–F100
White (strobe)
A008
P000–P100
F000–F100
Color Chase 1 (speed, strobe)
A009
P000–P100
F000–F100
Color Chase 2 (speed, strobe)
A010
P000–P100
F000–F100
Color Chase 3 (speed, strobe)
A011
P000–P100
F000–F100
Color Chase 4 (speed, strobe)
A012
P000–P100
Color Chase 5 (speed)
A013
P000–P100
Color Chase 6 (speed)
A014
P000–P100
Color Chase 7 (speed)
A015
P000–P100
Color Chase 8 (speed)
A016
P000–P100
Color Chase 9 (speed)
A017
P000–P100
Color Chase 10 (speed)
A018
P000–P100
Color Chase 11 (speed)
A019
P000–P100
Color Chase 12 (speed)
A020
P000–P100
Color Chase 13 (speed)
A021 r000–r100
G000–
G100
b000–
b100
F000–
F100
Color Mix (red, green, blue,
strobe)
A022
P000–P100
Color fade (speed)
A023
All Color Chases 1–13 (speed)
SYS
SdAd
001– 509
DMX Address
SAAd
Reset
To save the current mode to the product’
s memory, press <MODE>,
then <ENTER>. The saved mode will be active upon start-up.
Page 6
COLORstrip/COLORstrip Mini QRG EN
6
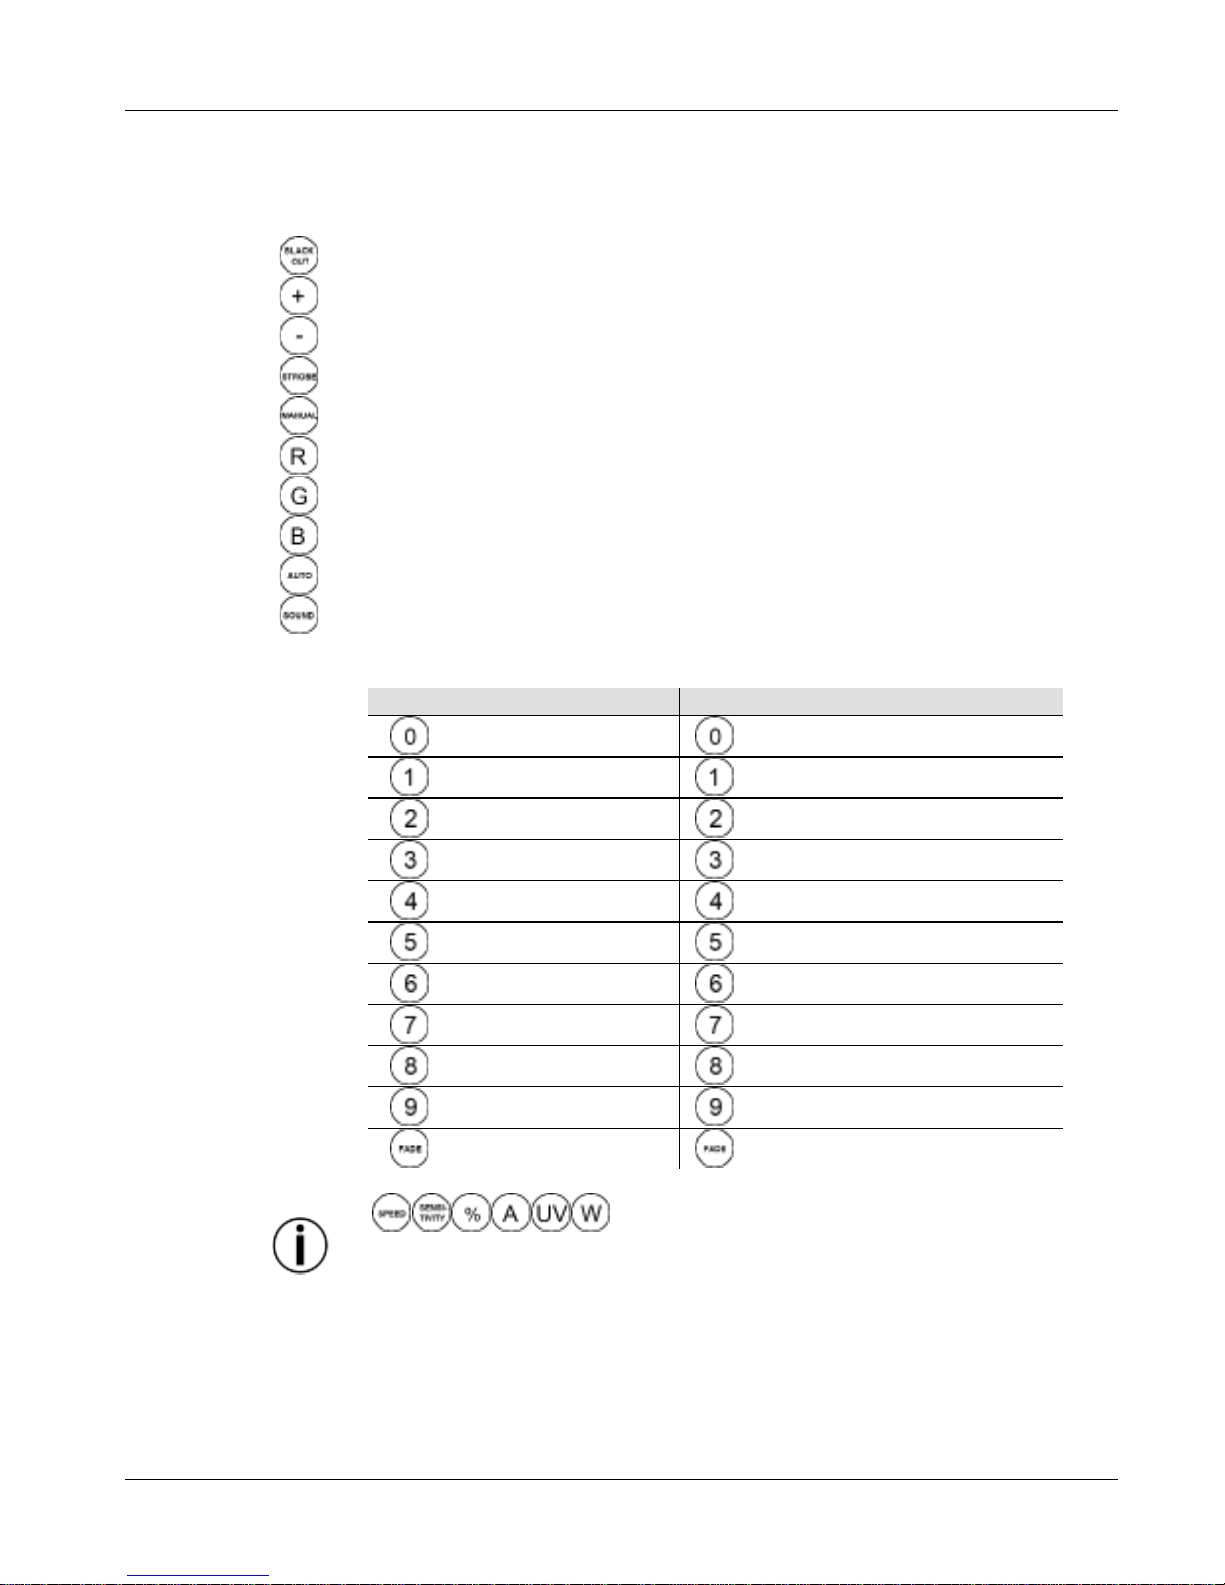
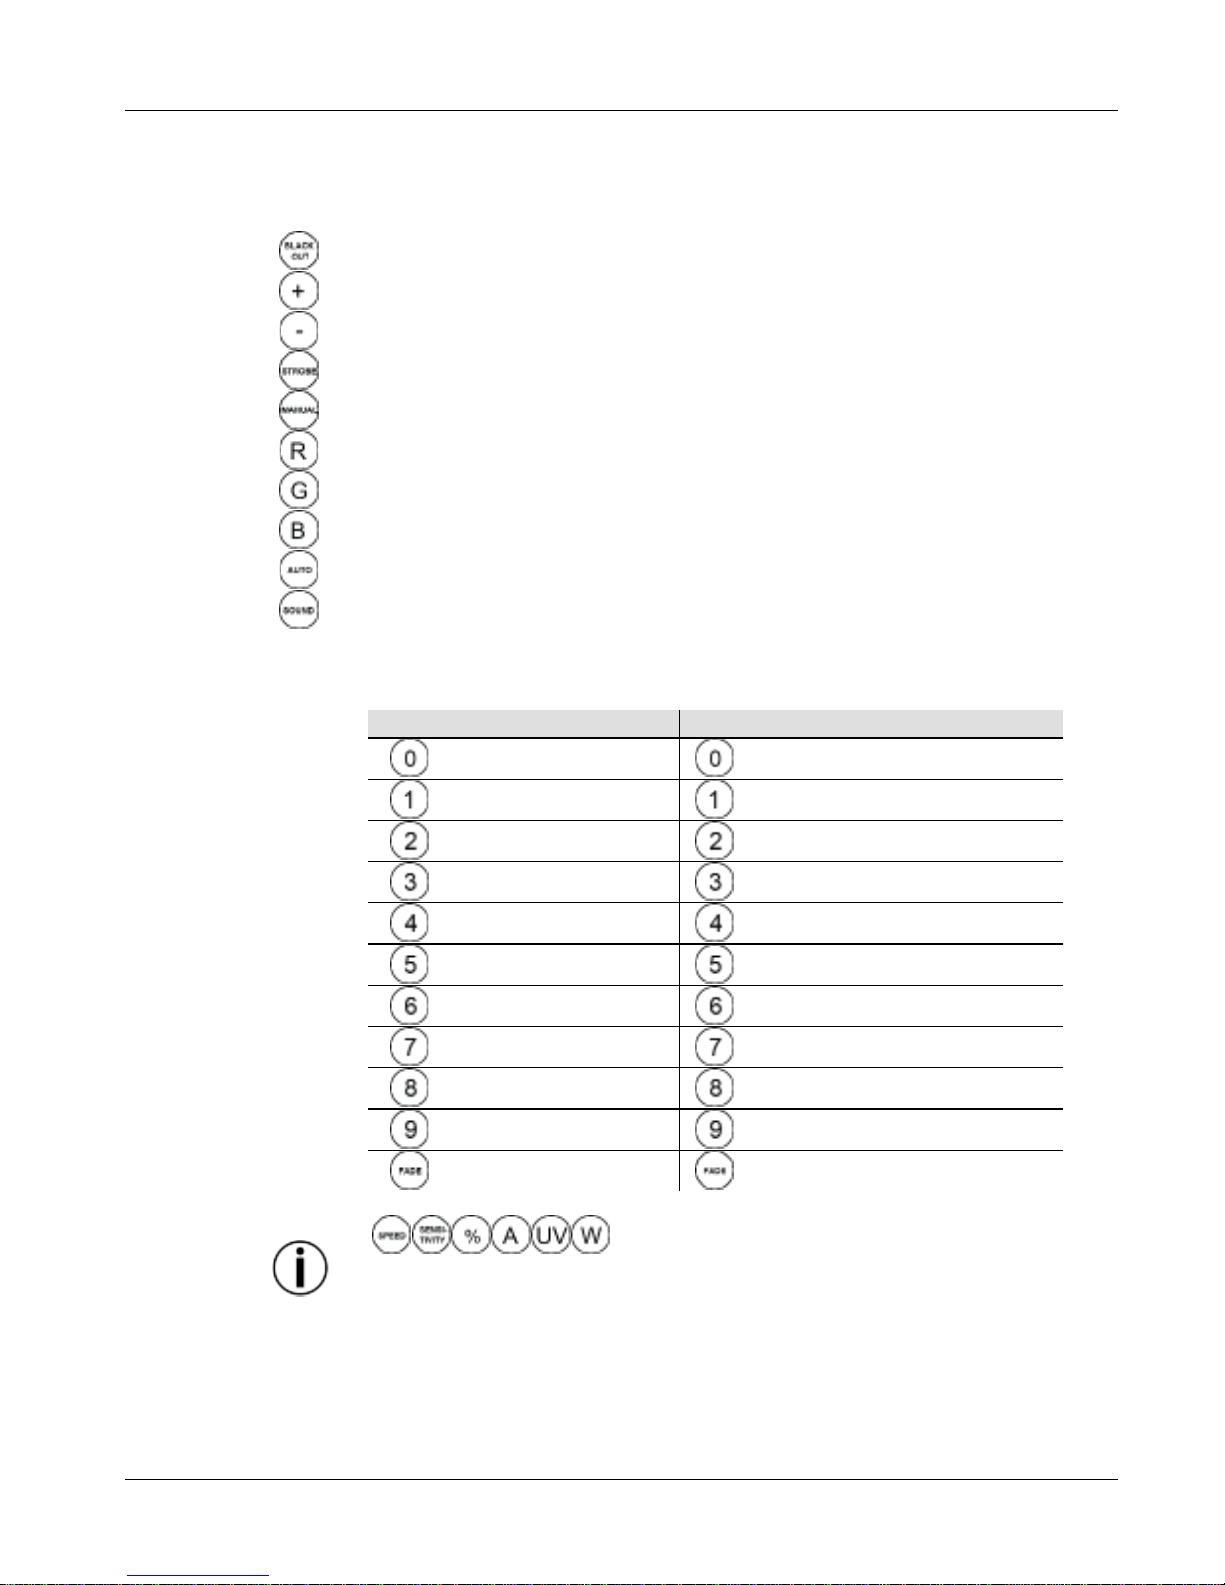
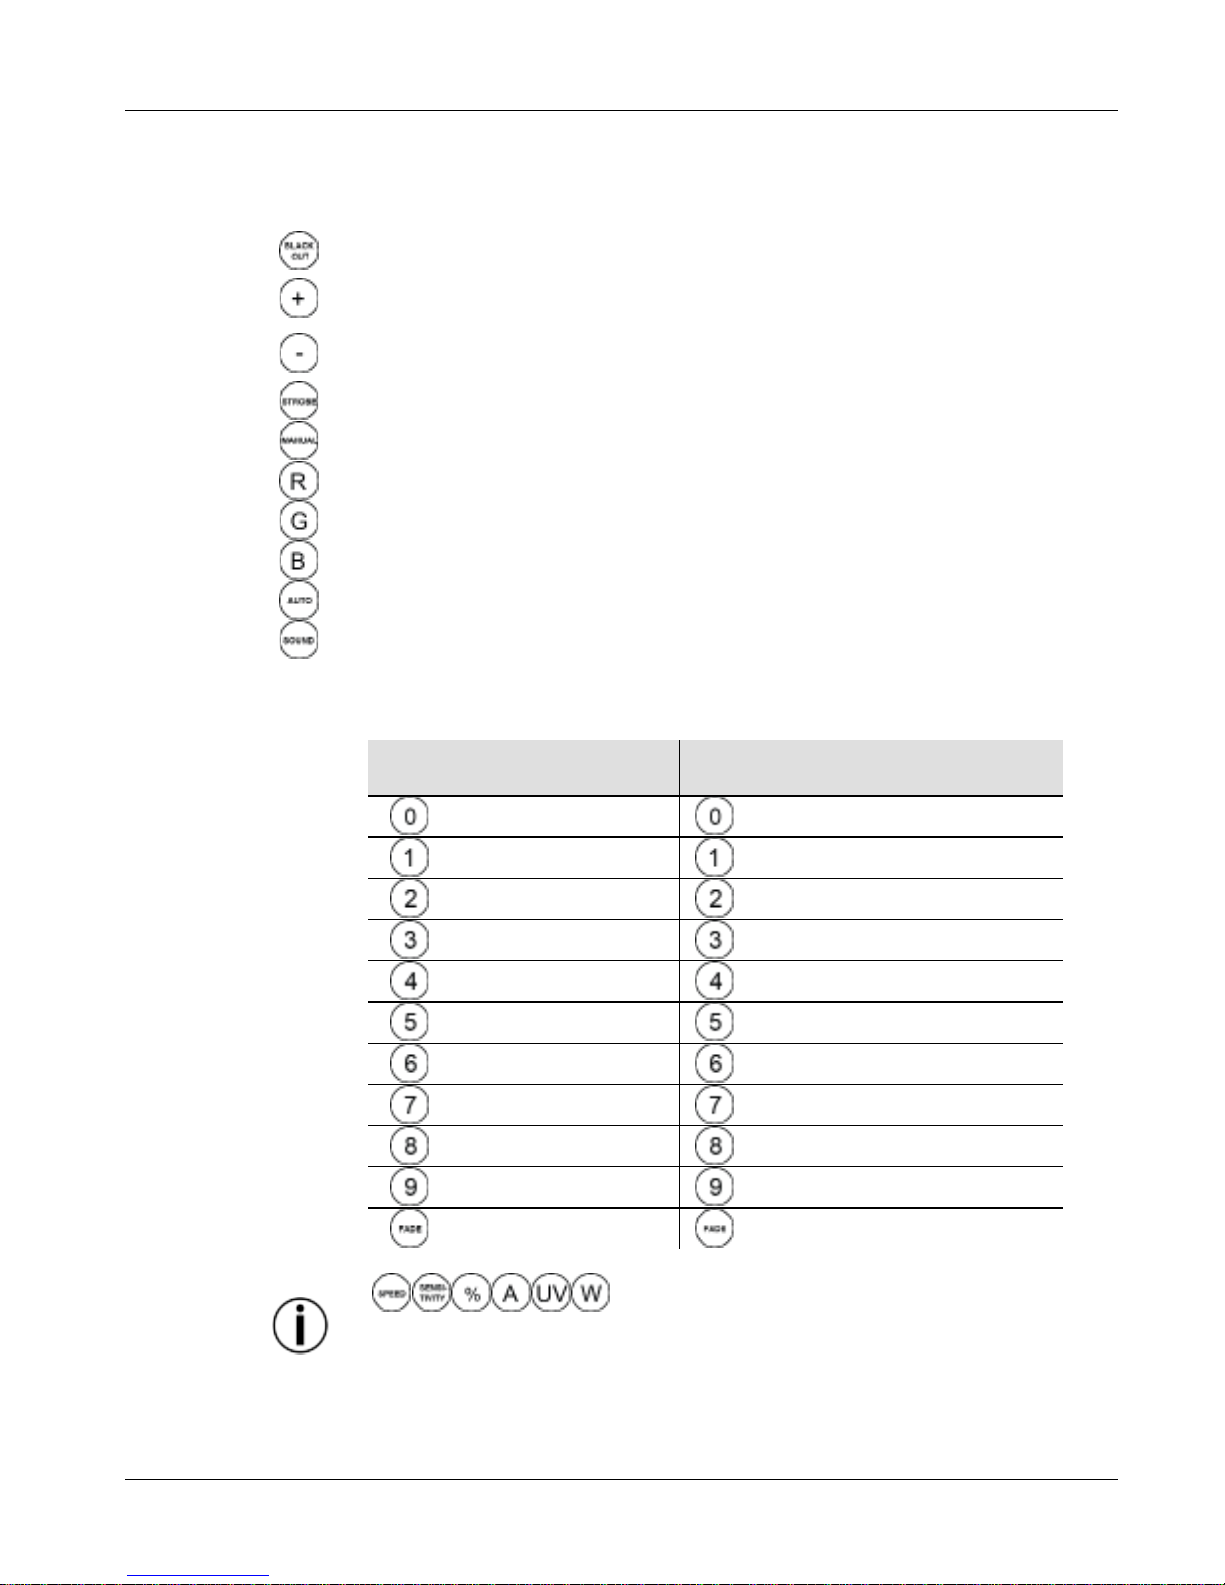
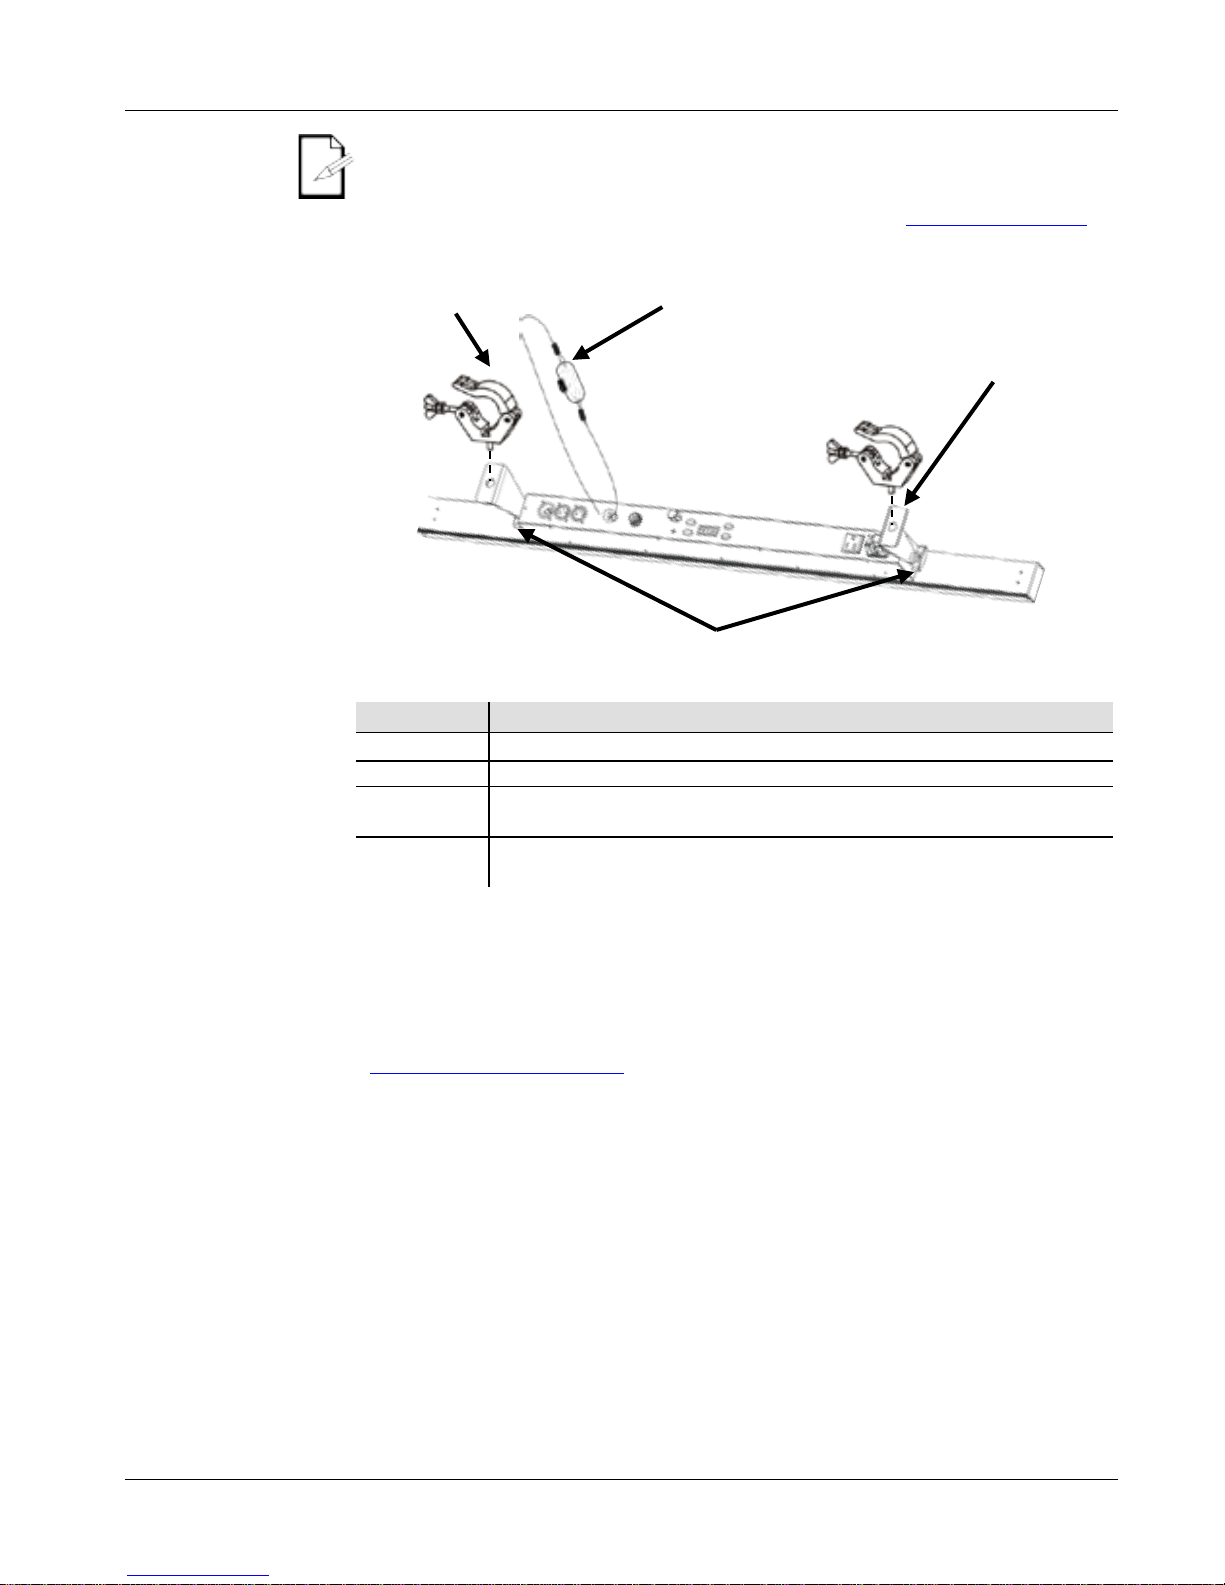
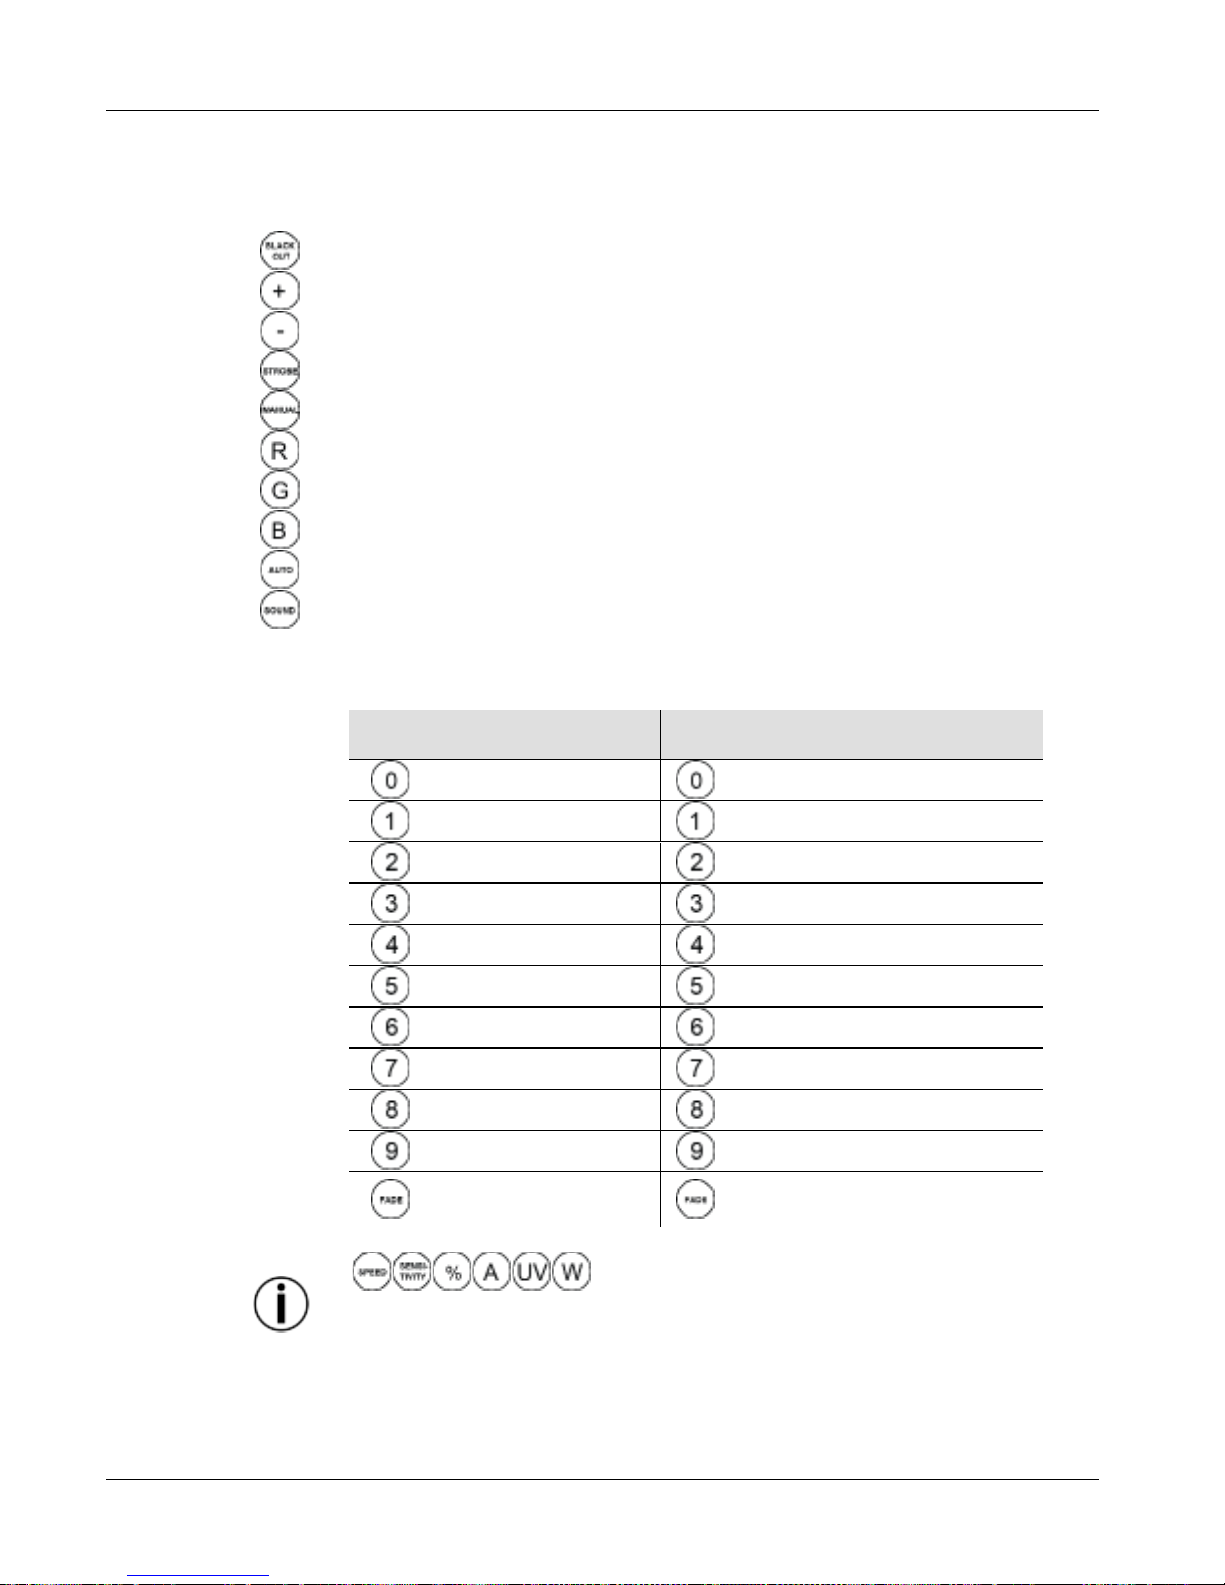
IRC-6 Remote (Infrared Remote Control)
The COLORstrip/COLORstrip Mini is compatible with the IRC-6 remote from Chauvet.
The following IRC-6 buttons are used with the COLORstrip/COLORstrip Mini:
Turns LEDs on/off
Increases Speed (of Program or Strobe) or color value
Decreases Speed ( of Program or Strob e) or col or value
Enables Strobe setting
Enables Color Mi x i ng
Sets Red color value
Sets Green color value
Sets Blue color val ue
Turns on Auto/Sound mode, or turns off Auto/Sound mode
Turns on Auto/Sound mode, or turns off Auto/Sound mode
NOTE – If Auto/Sound mode is off, Static Color mode is on.
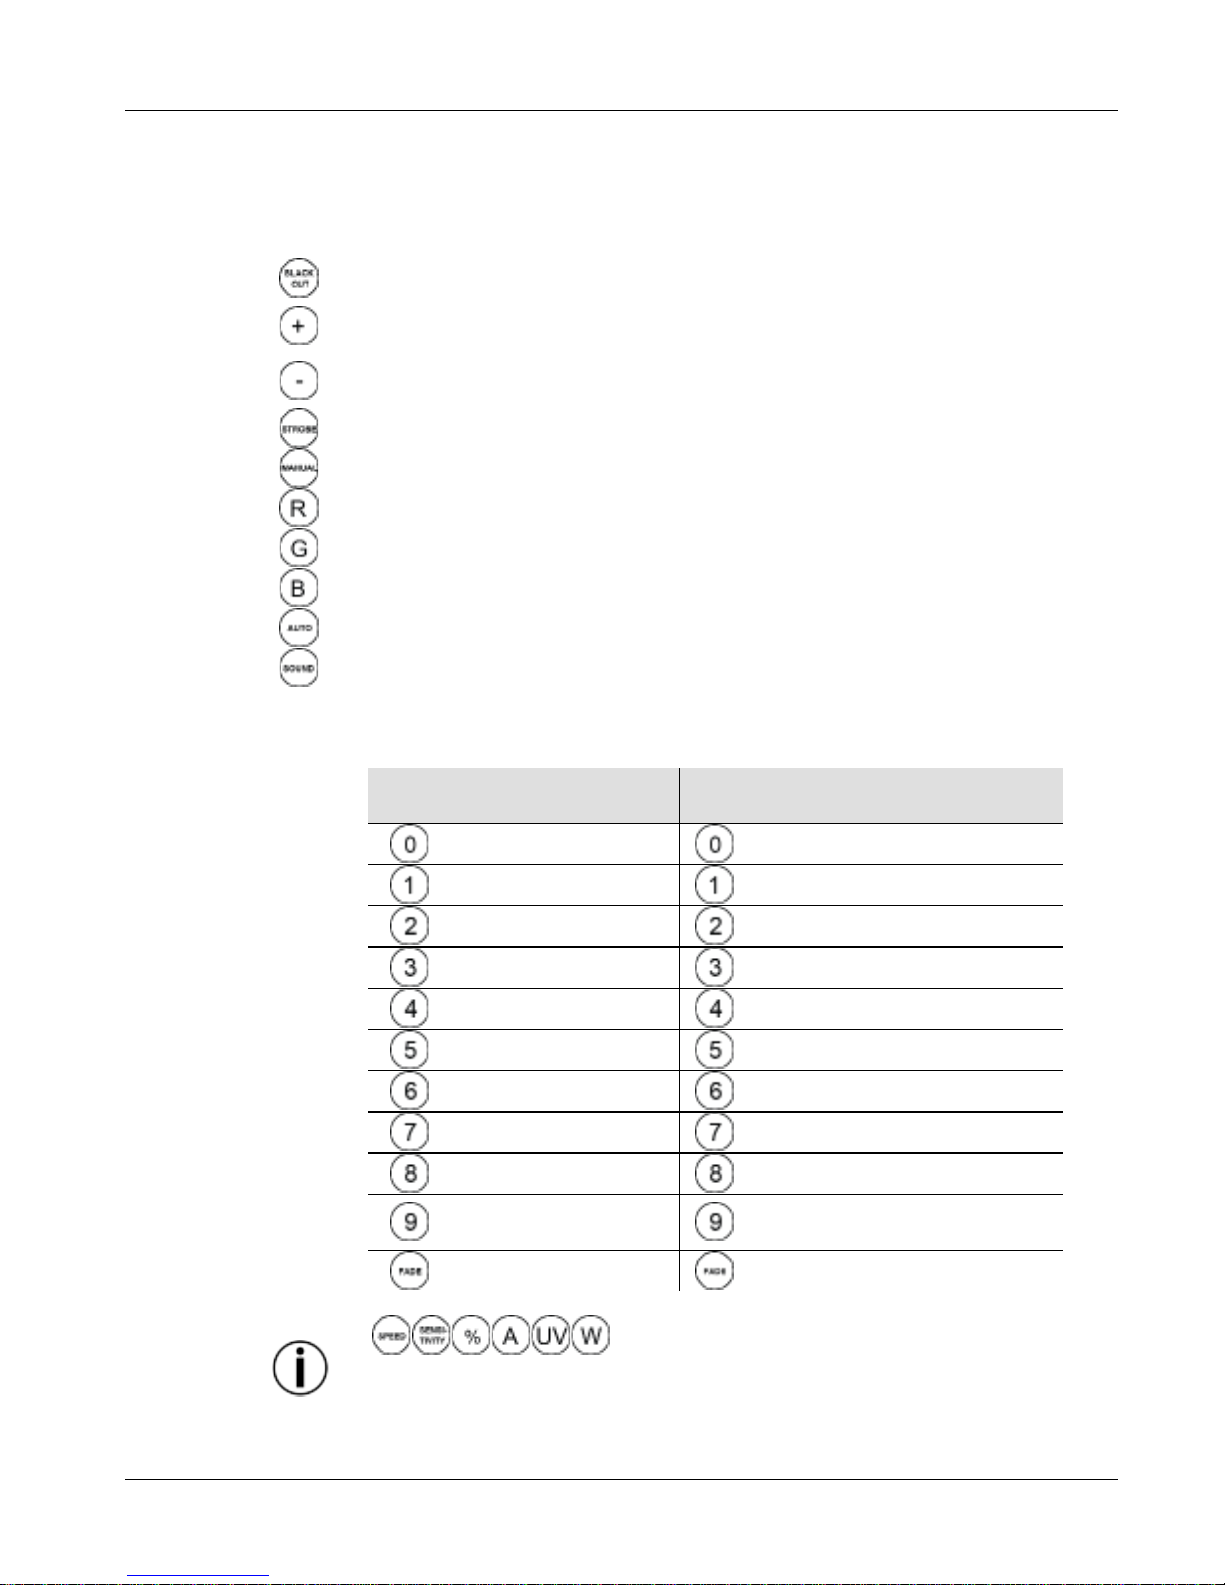
Static-Color Mode
Auto/So und Mode
A007 (White)
A008
A001 (Red)
A009
A021 (Amber)
A010
A004 (Yellow)
A011
A002 (Green)
A012
A006 (Cyan)
A013
A003 (Blue)
A014
A005 (Purple)
A015
A021 (Pink)
A017
A021 (Sunflower)
A023
No function
A022 (No response to sound)
•
- No function with this product
•
The default for Static Color mode is
A007
(white).
•
The default for Auto/Sound mode is A008.
Page 7
COLORstrip/COLORstrip Mini QRG EN
7
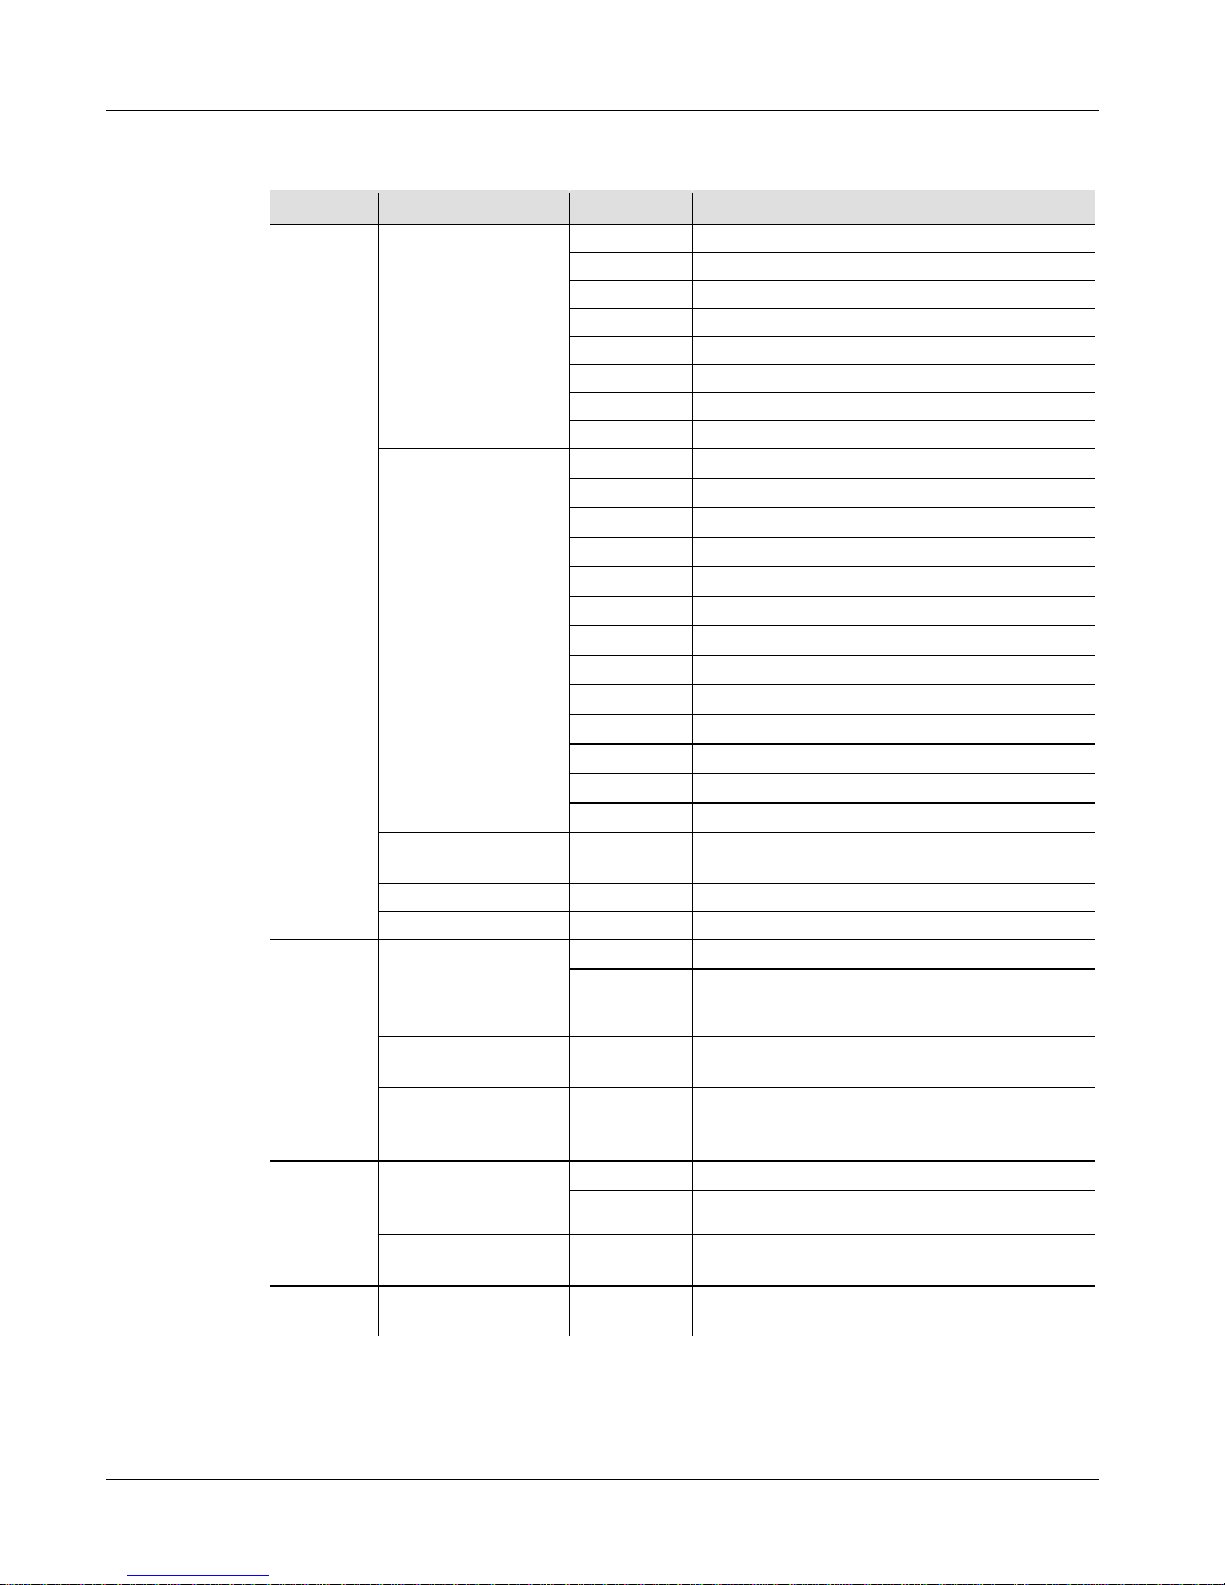
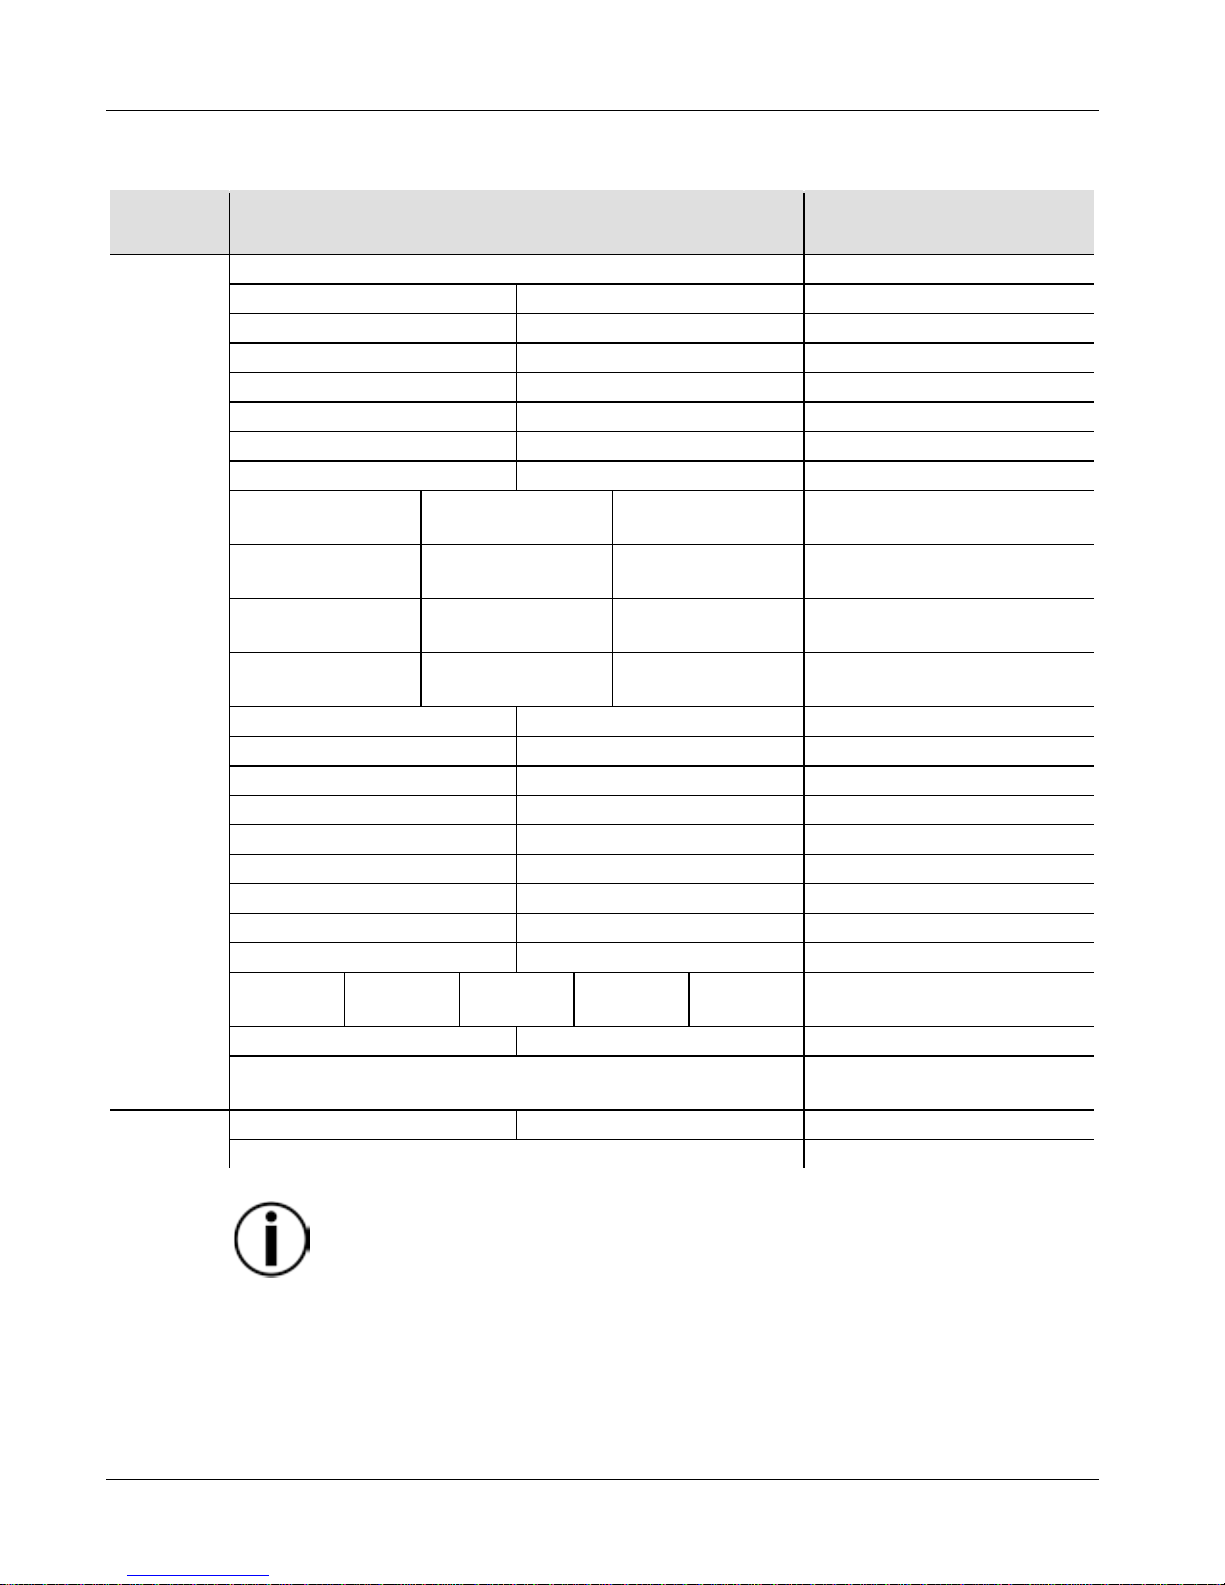
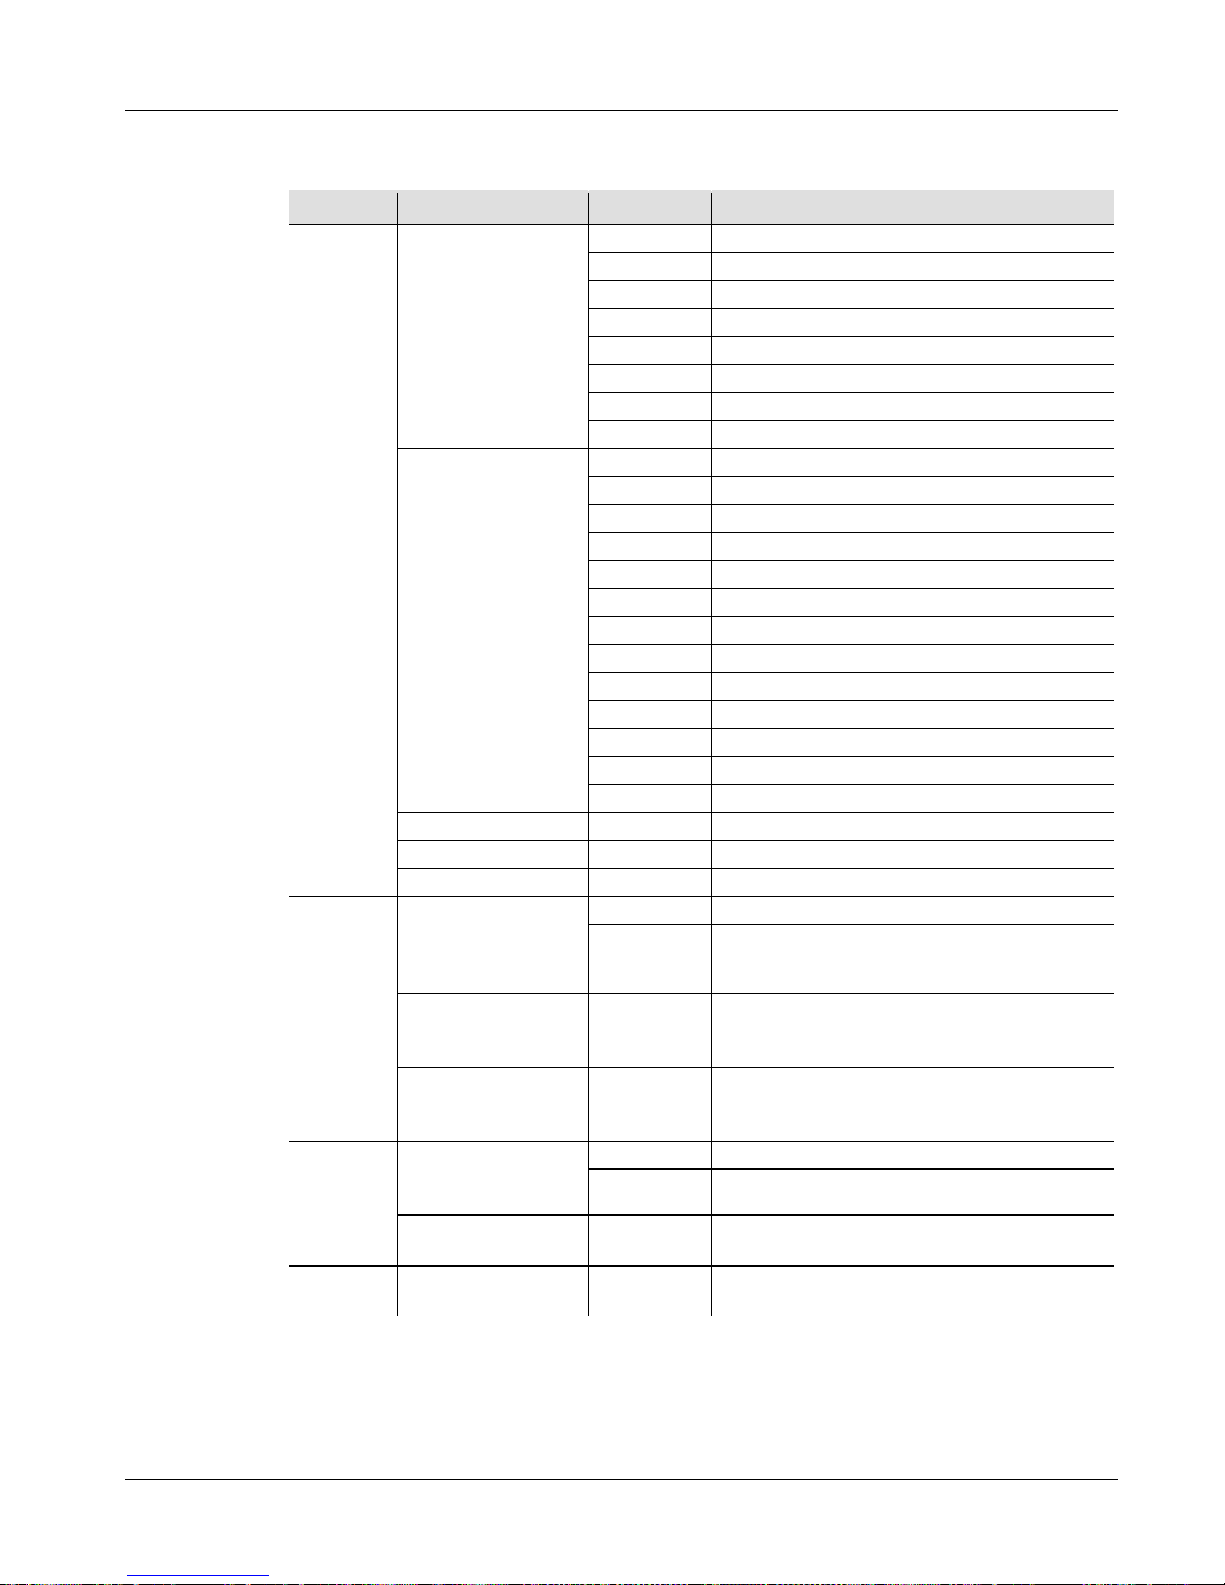
DMX Values
4 Channels
Channel Function Value Percent/Setting
1
Static Colors
000 ó 009
No function
010 ó 119
Red 0–100%
020 ó 029
Green 0–100%
030 ó039
Blue 0–100%
040 ó 049
Yellow 0–100%
050 ó 059
Magenta 0–100%
060 ó 069
Cyan 0–100%
070 ó 079
White 0–100%
Color Chases
080 ó 089
Color Chase 1
090 ó 099
Color Chase 2
100 ó 109
Color Chase 3
110 ó 119
Color Chase 4
120 ó 129
Color Chase 5
130 ó 139
Color Chase 6
140 ó 149
Color Chase 7
150 ó 159
Color Chase 8
160 ó 169
Color Chase 9
170 ó 179
Color Chase 10
180 ó 189
Color Chase 11
190 ó 199
Color Chase 12
200 ó 209
Color Chase 13
RGB Color Mixing
210 ó 219
Channels 2–4
Color Fade
220 ó 229
Color Fade
Sound-Active
230 ó 255
Sound-Active
2
Run Speed (when
Ch. 1 is
080–209
)
000 ó 127
Slow to fast
128 ó 255
Sound-Active
Red (when Ch. 1 is
210–219)
000 ó 255 0–100%
Fade Speed (when
Ch. 1 is 220–229)
000 ó 255 Slow to fast
3
Strobe (when Ch. 1
is 010–119)
000 ó 249
Slow to fast
250 ó 255
Sound-Active
Green (when Ch. 1
is 210–219)
000 ó 255 0–100%
4
Blue (when Ch. 1 is
210–219)
000 ó 255 0–100%
Page 8
COLORstrip/COLORstrip Mini GRR ES
8
Acerca de esta
guía
La Guía de referencia rápida (GRR) del COLORstrip/COLORstrip Mini
contiene información básica sobre el producto, como montaje, opciones de
menú y valores DMX. Descargue el manual de usuario de
www.chauvetlighting.com para una información más detallada.
Exención de
responsabilidad
La información y especificaciones contenidas en esta GRR están sujetas a
cambio sin previo aviso.
Notas de
seguridad
Estas notas de seguridad incluyen información importante sobre el montaje,
uso y mantenimiento.
• Este producto no e s tá concebido para una instalación permanente.
• Conecte este pr oduc to SO LO a un circuito c on tom a de t ie r ra y pr oteg i do.
•
Desconecte siempre de la alimentación antes de la limpieza o sustitución del
fusible.
• NO mire a la fuente de luz cuando el producto esté encendido.
• Asegúrese de que el cable de alimentación no está retorcido ni estropeado.
• Nunca desconecte este producto de l a a lime nt ac ión t ir a ndo de l c a bl e .
• Cuando monte e ste produc t o e n a lt o, us e un c a ble de s eg ur ida d.
• NO permita la presencia de materiales inflamables cerca de la unidad
cuando esté e n f unc ionamiento.
• NO toque este pr oduc t o c ua ndo e st é e n f unc ionamiento, pues podría e s t a r
caliente.
• La tensión del e nc hufe a l que c onec te es te pr oduc to ha de e s t a r en e l ra ng o
establecido en el grabado o en el panel posterior de l pr oduc to.
• ¡Este producto e s pa r a us o e n int e riore s s olam e nt e! ( IP20) Para e vitar
riesgos de inc e ndi o o de s c a rga , no e x pong a es te pr oduc to a l a ll uv ia o la
humedad.
• Monte siempr e est e produc t o e n una ubic a c i ón c on v e nt il a c ión a decuada,
al
menos a 20 in (50 cm) de superficies adyacentes.
• Asegúrese de que ninguna ranura de ve nt ilac i ón e n la c arc as a de la uni da d
queda bloqueada .
• Nunca conec te e s te pr oduc to a un atenuador o 8eóstato.
• Sustituya e l f us ible con uno del mism o tipo y categoría.
• Use SOLAMENTE los soportes de colgar/montar o las asas para mover
este producto.
• La temperat ura am bi e nte máx ima es de 104 °F (40 °C). No haga func i ona r
este producto a temperaturas más altas.
• En caso de un proble ma grave de funciona miento, deje de usarlo
inmediatamente.
• NO abra este pr oduc to. N o c ontie ne piezas repara bles por e l us ua ri o.
• Para evitar un desgaste innecesario y alargar su vida útil, desconecte
completame nte el pr oduc to mediante el inte rr uptor o de s e nc hufá ndol o
durante periodos en que no se use.
Contacto
Fuera de EE. UU., Reino Unido, Irlanda, México o Benelux póngase en
contacto con su distribuidor para solicitar asistencia o devolver un producto.
Visite www.chauvetlighting.com para información de contacto.
Page 9

COLORstrip/COLORstrip Mini GRR ES
9
Qué va
incluido
• COLORstrip
o
• COLORstrip Mini
•
Cable de alimentación
• Soportes en L con Material de
Montaje
• Tarjeta de garantía
•
Guía de referencia rápida
Para empezar
Desembale su COLORstrip/COLOR strip Min i y asegúrese de qu e ha r ecibi do
todas las partes en buen estado. Si la caja o los componentes parecen dañados,
notifíqueselo inmediatamente al transportista, no a Chauvet.
Descripción
del producto
El COLORstrip/COLORstrip Mini es una banda de luz multicolor para
utilizarse en aplicaciones móviles de espectáculos en interiores. El
COLORstrip/COLORstrip Mini
es perfecto como baño de luz o luz de efecto
en combinación con otro COLORstrip productos
. La tecnología de
infrarrojos integrada le ofrece control sin cables con el mando a distancia por
infrarrojos (IRC-6) opcional de CHAUVET DJ.
Vista general
Corriente
alterna
Este producto t ien e una fuente d e alimentació n con detecció n automática q u e
puede funcionar con un rango de tensión de entrada de 100–
240 VCA,
50/60 Hz.
Para evitar un desgaste innecesario y alargar su vida útil, desconecte
completamente el producto
mediante el interruptor o desenchufándolo
durante periodos e n q ue no se use.
Alimentación en
cadena
Para ver el máximo número de productos COLORstrip/COLORstrip Mini
que se pueden alimentar en cadena, consulte el Manual de usuario o la
pegatina del producto.
Sustitución del
fusible
1. Desconecte el producto de la alimentació n.
2. Haga cuña con la punta de un destornillador plano en la ranura del
portafusibles.
3. Saque la tap a de seguridad de la carcasa.
4. Quite el fusible fundido de la sujeción en l a parte frontal de la tapa de
seguridad y sustituya el fusible con otro del mismo tipo y categoría.
5. Vuelva a inser tar el portafusibles y con ecte de nuevo la alimentación.
Una vez
conectado el prod ucto, el ti empo de puest a en marcha puede ser
de hasta 30 segundos.
Salida de alimentación
Entrada/Salida
DMX
Pantalla LED
Portafusible
Entrada de alimentación
Puerto
controlador
EXT
Lazo de
seguridad
Micrófono
Botones
de
menú
Mando de
sensibilidad
Salida
Maestro/
Esclavo
Page 10
COLORstrip/COLORstrip Mini GRR ES
10
Montaje
Antes de montar est e producto, lea las Notas de seguridad.
Diagrama
de
montaje
Descripción
del panel de
control
Botón
Función
<MODE>
Sale del menú o función actual
<ENTER>
Activa una opción de menú o valor seleccionado
<UP>
Se desplaza hacia arriba por la lista de menú o aumenta el
valor numérico cuando está en una función
<DOWN>
Se desplaza hacia abajo por la lista de menú o disminuye el
valor numérico cuando está en una función
Enlace DMX
El COLORstrip/COLORstrip Mini puede funcionar con un controlador
DMX cuando s e enlaza por conexion es serie DMX. Las instr ucciones p ara
conectar y configurar este producto para funcionamiento DMX están en el
Manual de usuario. Si no está familiarizado c
on DMX, descargue el
Manual DMX de www.chauvetlighting.com.
Dirección de inicio
Para asegurarse acceso total a todos los canales en cada modo DMX, la
dirección DMX más recomendable es 509.
Después de configurar la dirección DMX de inicio, pulse <MODE>
y
luego <ENTER> para guardar la dirección en la memoria del producto.
Conexión
Maestro/Esclavo
El COLORstrip/COLORstrip Min i usa la conexión de datos DMX para su
modo Maestro/Esclavo. Las instrucciones para conectar y con figurar este
producto para funcionamiento Maestro/Esclavo están en el Manual de
usuario.
Modo Runway
Maestro/Esclavo
El COLORstrip/COLORstrip Mini utiliza la sal ida Maestro/Esclavo para
su modo Runway. Las instrucciones para conectar y configurar este
producto para el modo Runway están en el Manual de usuario.
Mando de aju ste del
soporte
Soporte de montaje
Abrazadera de
Montaje
(como CLP-15N
de Chauvet)
Cable de Seguridad
(como CH-05 de
Chauvet)
Page 11
COLORstrip/COLORstrip Mini GRR ES
11
Menu Opciones
Nivel
Principal
Niveles de Programación Descripción
ACt
A000
Blackout
A001
F000–F100
Rojo (estroboscopio)
A002
F000–F100
Verde (estroboscopio)
A003
F000–F100
Azul (estroboscopio)
A004
F000–F100
Amarillo (estroboscopio)
A005
F000–F100
Morado (estroboscopio)
A006
F000–F100
Cian (estroboscopio)
A007
F000–F100
Blanco estroboscopio)
A008 P000–P100 F000–F100
Secuencia de color 1
(velocidad, estroboscopio)
A009 P000–P100 F000–F100
Secuencia de color 2
(velocidad, estroboscopio)
A010 P000–P100 F000–F100
Secuencia de color 3
(velocidad, estroboscopio)
A011 P000–P100 F000–F100
Secuencia de color 4
(velocidad, estroboscopio)
A012
P000–P100
Secuencia de color 5 (velocidad)
A013
P000–P100
Secuencia de color 6 (velocidad)
A014
P000–P100
Secuencia de color 7 (velocidad)
A015
P000–P100
Secuencia de color 8 (velocidad)
A016
P000–P100
Secuencia de color 9 (velocidad)
A017
P000–P100
Secuencia de color 10 (velocidad)
A018
P000–P100
Secuencia de color 11 (velocidad)
A019
P000–P100
Secuencia de color 12 (velocidad)
A020
P000–P100
Secuencia de color 13 (velocidad)
A021 r000–r100
G000–
G100
b000–
b100
F000–
F100
Mezcla de color (rojo, verde,
azul, estroboscopio)
A022
P000–P100
Fade de color (velocidad)
A023
Todas las secuencias de
color 1–13 (velocidad)
SYS
SdAd
001– 509
Dirección DMX
SAAd
Reinicio
Para guardar el modo actual en la memoria del producto, pulse
<MODE> y luego <ENTER>. El modo guardado se activará con la
puesta en marcha.
Page 12
COLORstrip/COLORstrip Mini GRR ES
12
Mando a distancia IRC-6 (control remoto por infrarr ojos)
El COLORstrip/COLORstrip Mini es compatible con el mando a distancia IRC-6 de Chauvet.
Los siguientes botones del IRC-6 se usan con el COLORstrip/COLORstrip Mini:
Apaga/enciende los LED
Aumenta la velocidad (del programa o estroboscopio) o el valor del color
Disminuye la velocidad (del programa o estroboscopio) o el valor del color
Activa la configuración del estroboscopio
Activa la mezcla de co lor
Establece el valor del rojo
Establece el valor del verde
Establece el valor del azul
Enciende el modo Automático/Sonido o apaga el modo Automático/Sonido
Enciende el modo Automático/Sonido o apaga el modo Automático/Sonido
NOTA: si el modo Automático/Sonido está apagado, el modo Color estático
está encendid o.
Modo Color estático
Modo Automático/Sonido
A007 (Blanco)
A008
A001 (Rojo)
A009
A021 (Ámbar)
A010
A004 (Amarillo)
A011
A002 (Verde)
A012
A006 (Cian)
A013
A003 (Azul)
A014
A005 (Morado)
A015
A021 (Rosa)
A017
A021 (Girasol)
A023
Sin función
A022 (sin respuesta al sonido)
•
- Sin función con este producto
•
Para el modo Color es tático el valor predeterminado es A007 (blanco).
•
Para el modo Automático/Sonido el valor predeterminado es A008.
Page 13
COLORstrip/COLORstrip Mini GRR ES
13
Valores DMX
4 Canales
Canal
Función
Valor
Porcentaje/Configuración
1
Colores estáticos
000 ó 009
Sin función
010 ó 019
Rojo 0–100%
020 ó 029
Verde 0–100%
030 ó 039
Azul 0–100%
040 ó 049
Amarillo 0–100%
050 ó 059
Magenta 0–100%
060 ó 069
Cian 0–100%
070 ó 079
Blanco 0–100%
Secuencias de
color
080 ó 089
Secuencia de color 1
090 ó 099
Secuencia de color 2
100 ó 109
Secuencia de color 3
110 ó 119
Secuencia de color 4
120 ó 129
Secuencia de color 5
130 ó 139
Secuencia de color 6
140 ó 149
Secuencia de color 7
150 ó 159
Secuencia de color 8
160 ó 169
Secuencia de color 9
170 ó 179
Secuencia de color 10
180 ó 189
Secuencia de color 11
190 ó 199
Secuencia de color 12
200 ó 209
Secuencia de color 13
Mezcla de c olor
RGB
210 ó 219
Canales 2–4
Fade de color
220 ó 229
Fade de color
Activo por sonido
230 ó 255
Activo por sonido
2
Velocidad de
ejecución (cuando
el C. 1 está entre
080–209)
000 ó 127
Lento a rápido
128 ó 255
Activo por sonido (y lento a rápido)
Rojo (cuando el C. 1
está entre 210–219)
000 ó 255 0–100%
Velocidad de fade
(cuan do el C. 1 está
entre 220–229)
000 ó 255
Lento a rápido
3
Estroboscopio
(cuan do el C. 1 está
entre 010–119)
000 ó 249
Lento a rápido
250 ó 255 Activo por sonido
Verde (cuando el C. 1
está entre 210–219)
000 ó 255 0–100%
4
Azul (cuando el C. 1
está entre 210–219)
000 ó 255 0–100%
Page 14
COLORstrip/COLORstrip Mini MR FR
14
A propos de ce
manuel
Le Manuel de Référence (MR) du COLORstrip/COLORstrip Mini reprend des
informations de base sur cet appareil notamment en matière de montage, d'options
de menu et d e valeurs DM X. Veui llez télécha rger le manu el d'util isation à p artir
du site internet www.chauvetlighting.com pour plus de déta ils.
Clause de non
Responsabilité
Les informations et caractéristiques contenues dans ce MR sont sujettes à
modifica t ion sa ns pr é a v i s .
Consignes de
Sécurité
Ces consignes de sécurité contiennent des informations importantes en
matière d'installation, d'utilisation et d'entretien.
• Cet appare il n'est pa s adapté pour une instal la t ion pe rmanente.
• Cet appareil DOIT être relié à un circuit mis à la terre et protégé.
• Toujours débra nc he r l'a ppa r e il de la s our c e d'a lime nt a ti on a va nt de le
nettoyer ou de remplacer son fus ible.
• NE PAS exposer directement les yeux à la source de lumière lorsque le
produit est allumé.
• Veillez à ce que le cordon d'a lime ntation ne soit jama is pincé ou endommagé .
• Ne débranchez jamais cet appareil en tirant sur le cordon d'alime nt a tion.
• En cas de mont ag e de l'a ppa re il e n haute ur, v e il lez à touj ours ut il is e r un
câble de sécurité.
• NE PAS laisse r de pr odui t inflammable à pr oxim ité de l'a ppa r e il lorsque
celui-ci fonctionne.
• NE PAS toucher au boîtier de l'appareil lorsqu'il est en fonctionneme nt ,
celui-ci pouvant être t rès c ha ud.
• La tension de la source d'énergie à laquelle est connecté cet appareil doit être
dans la plage indiquée sur l' étiquet te ou sur le panne au arrière de l'appare il.
• Cet appareil doit uniquement être utilisé en intérieur ! (IP20) A fin d'éviter
tout risque d'incendie ou de décharge électrique, veillez à n'exposer cet
appareil ni à la pluie ni à l'humidité.
• Installez toujour s c e t a ppa r e il da ns un endr oi t bi e n v e nt ilé à a u moins
50 cm (20 po) des surfaces adjacentes.
• Assurez-vous qu'aucune fe nte de venti la t ion de l ' a ppa r e il n'es t obs t rué e .
• Ne connectez jamais cet appareil à un variateur ou un rhéostat.
• Lors du remplacement du fus ible, utilise z le mêm e type et le mêm e ampérage.
• Utilisez EXCL U SI VEME NT le support de s us pe ns ion/fixation pour
soulever cet appareil.
• La température ambiante maximale est de 40 °C (104 °F). Ne faites pas
fonctionner cet appareil à des températures plus élevées.
• En cas de sérieux problèmes de fonc tionnement, arrêtez l'appareil immédiatement.
• NE PAS ouv rir ce t a ppareil. Il ne co ntient a ucune pièce répar able par l'utilis ateur.
• Durant les pé r iode s de non-utilisation, pour éviter tout usure inutile et pour
prolonger la durée de vie, éteignez complètement l'appareil en le
débranchant ou e n c oupa nt le di sj o nc t e ur.
Nous
contacter
En dehors des États-Unis, du Royaume-Uni, de l'Irlande, du Mexique ou du
Benelux, contactez votre fournisseur si vous avez besoin d'assistance ou pour
retourner un appareil.
Veuillez consulter le site internet
www.chauvetlighting.com pour obtenir de s i nformations pour nous cont a c te r .
Page 15
COLORstrip/COLORstrip Mini MR FR
15
Contenu
• COLORstrip
ou
• COLORstrip Mini
•
Cordon d'alime nta t ion
• Supports en L avec Matériel de
Montage
• Fiche de garantie
•
Manuel de référence
Préalable
Déballez votre COLORstrip/COLORstrip Mini et assurez-vous que vous avez
reçu toutes les pièces en bon état. Si la boîte et/ou son contenu semble
endommagés, contactez immédiatement le transporteur, et non pas Chauvet.
Description
de l'appareil
Le COLORstrip/COLORstrip Mini est une barre de lumières multicolores
conçue pour les applications itinérantes de divertissement en intérieur. Le
COLORstrip/COLORstrip Mini
est parfait en tant que projecteur de type
wash ou projecteur à effets couplé avec d'autres appareils COLORstrip
. La
technologie infrarouge intégrée permet un contrôle sans fil avec la
télécommande infrarouge (IRC-
6) disponible en option auprès de
CHAUVET DJ.
Vue d'ensemble
Alimentation
CA
Cet appareil est doté d'une alimentation universelle qui peut prendre en
charge toute tension d'entrée comprise entre 100 et 240 VCA, 50/60 Hz.
Durant les périodes de non-utilisation, pour éviter t out usure inutile et
pour prolonger la durée de vie, éteignez complètement l'appareil en le
débranchant ou en coupant le disjoncteur.
Chaînage
électrique
Pour savoir combien d'appareils COLORstrip/COLORstrip Mini USB
peuvent être chainés au maximum selon le voltage
, veuillez consulter le
manuel de l'ut ilisateur ou l'autocollant apposé sur l'appar eil.
Remplacement
des fusibles
1. Débranchez l 'appareil
2. Calez la pointe d'un tournevis à tête plate dans la fente du porte-fusible.
3. Soulevez le capuc h on de sécurité hors du boîtier.
4. Enlevez le fusible grillé logé dans le clip sur le devant du capuchon de
sécurité et remplacez-le par un fusible de même type et de même
ampérage.
5. Remettez le po rte-fusible en place puis rebranchez.
Laissez l 'apparei l démarrer pendant au moins
30 secondes ap rès l'avoir
branché.
Sortie d'alimentation
Entrée/sortie
DMX
Écran LED
Porte-fusible
Entrée d'alimentation
Port
contrôleur
EXT
Anneau
de
sécurité
Microphone
Boutons
du menu
Molette de
sensibilité
Sortie
maître/
esclave
Page 16
COLORstrip/COLORstrip Mini MR FR
16
Montage
Avant de monter cet appareil, veuillez li r e les Consignes de Séc ur ité.
Schéma de
montage
Description du
panneau de
commande
Bouton
Fonction
<MODE>
Permet de sortir du menu ou de la fonction en cours
<ENTER>
Permet d'activer une option de menu ou une valeur sélectionnée
<UP>
Permet de naviguer vers le haut dans la liste du menu ou
d'incrémenter une valeur numérique dans une fonction
<DOWN>
Permet de naviguer vers le bas dans la liste du menu ou de
décrémenter une valeur numérique dans une fonction
Chaînage DMX
Le COLORstrip/COLORstrip Mini peut fonctionner avec un contrôleur DMX
lorsqu'il est relié par des connexions séries DMX. Les instructions pour la
connexion et la configuration de cet appareil pour le fonctionnement en DMX
sont indiquées dans le manuel d'utilisation. Si vous n'êtes pas
familier avec le
protocole DMX, vous pouvez télécharger l'introduction au DMX à l'adresse
www.chauvetlighting.com.
Adresse de départ
Pour permettre un accès à l'ensemble des canaux de chaque mode DMX,
l'adresse DMX maximale recommandée est 509.
Après avoir paramét ré l'adresse DMX de d épart, appuyez su r <MODE>
puis
<ENTER> pour sauvegarder l'adresse dans la mémoire d e l'appareil.
Connexion
maître/esclave
Le COLORstrip/COLORstrip Mini utilise une connexion de données DMX
pour le fonctionnement de son mode maître/esclave. Les instructions pour la
connexion et la configuration de cet appareil pour le fonctionnement en
maître/esclave sont indiquées dans le manuel d'utilisation.
Mode piste
maître/esclave
Le COLORstrip/COLORstrip Mini u tilise la sortie maître/esclave pour son
mode piste. Les instructions pour la connexion et la configuration de cet
appareil pour le fonctionnement en mode piste maître/esclave sont indiquées
dans le manuel d'utilisation.
Poignées de réglage des
supports de montage
Lyre de suspension
Fixation de
Montage
(par exemple
CLP-15N de
Câble de Sécurité
(par exemple CH-05
de Chauvet)
Page 17
COLORstrip/COLORstrip Mini MR FR
17
Options du Menu
Niveau
Principal
Niveaux de programmation Description
ACt
A000
Noir général
A001
F000–F100
Rouge (stroboscope)
A002
F000–F100
Vert (stroboscope)
A003
F000–F100
Bleu (stroboscope)
A004
F000–F100
Jaune (stroboscope)
A005
F000–F100
Violet (stroboscope)
A006
F000–F100
Cyan (stroboscope)
A007
F000–F100
Blanc (stroboscope)
A008 P000–P100 F000–F100
Chenillard de couleur 1
(vitesse, stroboscope)
A009 P000–P100 F000–F100
Chenillard de couleur 2
(vitesse, stroboscope)
A010 P000–P100 F000–F100
Chenillard de couleur 3
(vitesse, stroboscope)
A011 P000–P100 F000–F100
Chenillard de couleur 4
(vitesse, stroboscope)
A012
P000–P100
Chenillard de couleur 5 (vitesse)
A013
P000–P100
Chenillard de couleur 6 (vitesse)
A014
P000–P100
Chenillard de couleur 7 (vitesse)
A015
P000–P100
Chenillard de couleur 8 (vitesse)
A016
P000–P100
Chenillard de couleur 9 (vitesse)
A017
P000–P100
Chenillard de coul eur 10 (vitesse)
A018
P000–P100
Chenillard de coul eur 11 (vitesse)
A019
P000–P100
Chenillard de coul eur 12 (vitesse)
A020
P000–P100
Chenillard de coul eur 13 (vitesse)
A021 r000–r100
G000–
G100
b000–
b100
F000–
F100
Mélange de couleur (rouge,
vert, bleu, stroboscope)
A022
P000–P100
Fondu de couleur (vitesse)
A023
Tous les chenillards de
couleur 1–13 (vitesse)
SYS
SdAd
001– 509
Adresse DMX
SAAd
Réinitialisation
Pour enregistrer le mode courant dans la mémoire de l'appareil,
appuyez sur <MODE> puis <ENTER>. Le mode sauvegardé sera activé
lors du démarrage.
Page 18
COLORstrip/COLORstrip Mini MR FR
18
Télécommande IRC-6 (Télécommande par infrarouge)
Le COLORstrip/COLORstrip Mini est compatible avec la télécommande IRC-6 de Chauvet.
Les boutons suivants de l'IRC 6 sont utilisés avec le COLORstrip/COLORstrip Mini.
Activer ou désactiver les LEDs
Augmente la vitesse (du programme ou du stroboscope) ou la valeur de
couleur
Diminue la vitesse (du programme ou du stroboscope) ou la valeur de
couleur
Active le paramétrage de stroboscope
Active le mélange de couleur
Permet de définir la valeur de couleur rouge
Permet de définir la valeur de couleur vert
Permet de définir la valeur de couleur bl eu
Permet de bascul er le mode Auto/Activation par le son
Permet de bascul er le mode Auto/Activation par le son
REMARQUE - Si le mode Auto /Activation par le son est désactivé, le
mode couleur st atique est activé.
Mode couleur
statique
Mode auto/activation par le
son
A007 (blanc)
A008
A001 (rouge)
A009
A021 (ambre)
A010
A004 (jaune)
A011
A002 (vert)
A012
A006 (cyan)
A013
A003 (bleu)
A014
A005 (violet)
A015
A021 (rose)
A017
A021 (tournesol)
A023
Aucune fonction
A022 (aucune ré ponse a u son)
•
- Aucune fonction pour cet appareil
•
Le réglage par défaut pour le mode couleur statique est A007 (blanc).
•
Le réglage par défaut pour le mode auto/activation par le son est A008.
Page 19

COLORstrip/COLORstrip Mini MR FR
19
Valeurs DMX
4 Canaux
Canal
Fonction
Valeur
Pourcentage/Paramétrage
1
Couleurs statique s
000 ó 009
Aucune fonction
010 ó 019
Rouge 0–100%
020 ó 029
Vert 0–100%
030 ó 039
Bleu 0–100%
040 ó 049
Jaune 0–100%
050 ó 059
Magenta 0–100%
060 ó 069
Cyan 0–100%
070 ó 079
Blanc 0–100%
Chenillards de
couleur
080 ó 089
Chenillard de couleur 1
090 ó 099
Chenillard de couleur 2
100 ó 109
Chenillard de couleur 3
110 ó 119
Chenillard de couleur 4
120 ó 129
Chenillard de couleur 5
130 ó 139
Chenillard de couleur 6
140 ó 149
Chenillard de couleur 7
150 ó 159
Chenillard de couleur 8
160 ó 169
Chenillard de couleur 9
170 ó 179
Chenillard de couleur 10
180 ó 189
Chenillard de couleur 11
190 ó 199
Chenillard de couleur 12
200 ó 209
Chenillard de couleur 13
Mélange de couleur
RGB
210 ó 219 Canaux 2 à 4
Fondu de couleur
220 ó 229
Fondu de couleur
Activation par le son
230 ó 255
Activation par le son
2
Vitesse d'exécution
(lorsque le canal 1
est dans l'intervalle
080–209)
000 ó 127
Lent à rapide
128 ó 255
Activation par le son (et lent à rapide)
Rouge (lorsque le
canal 1 est dans
l'intervalle 210–219)
000 ó 255 0–100%
Vitesse de fondu
(lorsque le canal 1
est dans l'intervalle
220–229)
000 ó 255
Lent à rapide
3
Stroboscope
(lorsque le canal 1
est dans l'intervalle
010–119)
000 ó 249
Lent à rapide
250 ó 255
Activation par le son
Vert (lorsque le canal
1 est dans l'intervalle
210–219)
000 ó 255 0–100%
4
Bleu (lorsque le canal
1 est dans l'intervalle
210–219)
000 ó 255 0–100%
Page 20
COLORstrip/COLORstrip Mini SAL DE
20
Über diese
Schnell
-
anleitung
In der Schnellanleitung des COLORstrip/COLORstrip Mini finden Sie die
wesentlichen Produktinformationen, wie etwa über die Montage, Menüoptionen
und DMX-
Werte des Gerät s. Lad en S ie für weit er führend e In formati on en un ter
www.chauvetlighting.com das Benutzerha ndbuc h he r unte r .
Haftungsausschluss
Die in dieser Anleitung aufgeführten Informationen und Spezifikationen
können ohne vorherige Ankündigung geändert werden.
Sicherheitshinweise
Diese Sicherheitshinweise enthalten wichtige Informationen über die
Montage, Verwendung und Wartung des Geräts.
• Dieses Produkt eignet sich nicht für eine permanente Installation.
• Schließen Sie die s es Produk t N U R a n e i ne n m it de r E rde v e r bunde ne n und
geschützten Stromkreis an.
• Trennen Sie da s Ger ä t von de r Str omquelle, bevor S ie es re i nige n ode r die
Sicherung auswechseln.
• NIEMALS in die Lichtquelle schauen, während das Gerät eingeschaltet ist.
• Stellen Sie sicher, dass das Netzkabel nicht gequetscht oder be s c hä digt i s t.
• Ziehen Sie beim Trennen des Geräts von der Stromversorgung nie am Kabel.
• Bei Montage über Kopf immer ein Sicherungsseil verwenden.
• KEINE entflammbaren Materialien während des Betriebs in der Nähe des
Geräts lagern.
• NIEMALS während des Betriebs das Gehäuse berühren, da dies sehr heiß wird.
• Die Spannung de r S c huk os te ck dose , a n di e Sie da s Ge rä t ansc hl ieße n, muss
sich innerhal b de s Spa nnung s be r e iche s bef i nde n, de r a uf dem
Hinweisschil d ode r dem rückwärtigen B e die nfe ld des Geräts angegeben ist.
• Dieses Gerät darf nur im Innenbereich verwendet werden. (IP20) Um das
Risiko von B rände n ode r e le k tri sche n Sc hl ä g e n z u ve rm e ide n, dür f en Sie
das Gerät nicht Regen oder Feuchtigkeit aussetzen.
• Installieren Sie das Gerät an einem Or
t mit ausreic he nde r Belüf tung und mit
einem Abstand von 50 cm zu den ang r e nze nde n Flä c he n.
•
Stellen Sie sicher, dass die Lüftungsöffnungen im Gehäuse des Geräts nicht
verschlossen s i nd.
• Schließen Sie diese s Gerät niemals an einen Dimmer ode r Regelwiders tand an.
• Achten Sie beim Auswechseln der Sicherung darauf, den gleichen Typ mit
den gleiche n W erte n z u ve rw e nden.
• Das Gerät NUR an den Hänge-/Befestigungsbügel n ode r G r iffe n tr age n.
• Die maximal zulässige Umgebungstemperatur beträgt 40 °C. Nehmen Sie
das Gerät nicht bei höheren Temperaturen in Be t rieb.
• Bei ernsthaften Betriebsproblemen stoppen Sie um ge he nd die Verwendung
des Geräts.
• Dieses Gerä t NIC HT öff ne n. D ie einge ba ut e n K om pone nte n s ind für den
Kunden war tungsf r e i .
• Um unnötigen Ve rs c hl e iß z u ve rme i de n und die Lebensdauer des Geräts zu
verlängern, tr e nne n Si e w ä hre nd l äng e rer Peri ode n de s Ni c htgebrauchs das
Gerät vom Stromnetz – entweder per T re nns c ha lter ode r dur c h
Herausziehen des Steckers aus der Steckdose.
Page 21
COLORstrip/COLORstrip Mini SAL DE
21
Kontakt
Kunden außerhalb der USA, GB, Irland, Mexiko oder der Benelux-Staaten wenden sich
an ihren Lieferanten, um den Kundensupport in Anspruch zu nehmen oder ein Produkt
zurückzuschicken. Kontakti nformation en finden Sie unter www.chauvetlighting.com.
Packungsinhalt
• COLORstrip
oder
• COLORstrip Mini
• Netzkabel
• L-Winkel mit Befestigungmaterial
• Garantiekarte
• Schnellanleitung
Start
Packen Sie Ih ren COLORstrip/COLORstrip Mini aus und überprüfen Sie, ob Sie
alle Teile unbeschädigt erhalten haben. Wenn die Verpackung beschädigt ist,
benachrichtigen Sie umge hend das T ransportunte rnehmen, nic ht jedoch Chauve t.
Produkt-
beschreibung
Die COLORstrip/COLORstrip Mini ist eine kompakte, für den Innenbereich
konzipierte, mehrfarbige Leistenleuchte für mobile Anwendungen im
Unterhaltungsbereich. Die COLORstrip/COLORstrip Mini
ist perfekt geeignet als
Wash- oder Effektleuchte, wenn sie mit anderen COLORstrip-
Produkten kombin iert
wird. Die integrierte Infrarot-Technologie ermöglicht eine drahtlose Steu e rung mit der
optiona len I R-Fernbedienung (IRC-6) von CHAUVET DJ.
Übersicht
Wechselstrom
Dieses Gerät verfügt über ein Vorschaltgerät, das automatisch die anliegende
Spannung erkennt, sobald der Netzstecker in die Schukosteckdose gesteckt wird,
und kann mit einer Einga ngsspannung von 100~240 V A C, 50/ 60 Hz arbe iten.
Um un nötig en Vers chlei ß zu ve rmei den un d die Le bens dauer des Gerät s
zu verlängern, trennen Sie während längerer Perioden des
Nichtgebrauchs d as Gerät vom Stro mnetz –
entweder per Trennschalter
oder durch Herausziehen des Steckers aus der Steckdose.
Serienschaltung
der Geräte
Informationen zur maximalen Anzah l der COLORp alette-Geräte, d ie in Ser ie
geschaltet werden können, finden Sie in der Bedienungsanleitung oder auf
dem Typenschild am Gerät.
Auswechseln der
Sicherung
1. Trennen Sie d as Gerät vom Stromnetz.
2. Klemmen Sie die Spitze eines Flachkopfsch r aubendrehers in den Schlitz
des Sicherungshalters.
3. Hebeln Sie die S icherheitsabdeckung vom Gehäuse ab.
4. Entfernen Si e di e durchgebrannte Sicherung von der Klemme am
Vorderteil der Sicherheitsabdecku ng, und ersetzen Sie d iese durch eine
Sicherung des glei chen Typs und mit den gleichen Werten.
5. Stecken Sie den Sicherungshalter wieder zurück, und schl ießen Sie das
Gerät an das Stromnetz an.
Stromausgang
DMX-Eingang/-Ausgang
LED-Anzeige
Sicherungshalter
Stromzufuhr
EXT
Controller
-Anschluss
Sicherheitsöse
Mikrofon
Menütasten
Einstellknopf für
Musikempfindlich
Master/
Slave-
Ausgang
Page 22
COLORstrip/COLORstrip Mini SAL DE
22
Warten Sie nach dem Anstecken des Geräts 30 Sekunden, damit es
vollständig hochfahre n kan n.
Montage
Lesen Sie vor der Montage dieses Geräts in jedem Fall die Sicherheitshinweise.
Montageansicht
Beschreibung
des
Bedienfeldes
Taste
Funktion
<MODE>
Damit verlassen Sie das aktuelle Menü oder die Funktion
<ENTER>
Aktiviert eine Menüoption oder einen ausgewählten Wert
<UP>
Damit navigieren Sie durch die Menüpunkte nach oben und
erhöhen den numerischen Wert der entsprechenden Funktionen
<DOWN>
Damit navigieren Sie durch die Menüpunkte nach unten und
verringern den numerischen Wert der entsprechenden Funktionen
DMX-
Verbindung
Der COLORstrip/COLORstrip Mini kann mit einem DMX-Controller
betrieben werden, wenn eine DMX-
Serienschaltung zum Einsatz kommt.
Anweisungen zum Zusammenschluss und der Konfiguration dieses Geräts
für den Betrieb im DMX-Modus finden Sie im Be
nutzerhandbuch. Wenn Sie
mit DMX nicht vertraut sind, laden Sie "DMX -
Eine Einführung" unter
www.chauvetlighting.com herunter.
Startadresse
Um einen vollständigen Zugang zu allen Kanälen in jedem DMX-Modus zu
gewährleisten, beträgt die höchste empfohlene DMX -Adresse 509.
Drücken Sie nach der Einstellung der Start-DMX-Adresse auf <MODE>
und dann auf <ENTER>, um die Adresse im Gerät zu speichern.
Master/Slave-
Schaltung
Der COLORstrip/COLORstrip Mini verwendet für seinen Master/Slave-
Modus eine DMX-Datenverbindung. Anweisungen zum Zusammenschluss
und der Konfiguration dieses Geräts für den Betrieb im Master/Slave-
Modus finden Sie im Benutzerhandbuch.
Master/Slave
Pistenfeuer-
Modus
Die COLORstrip/COLORstrip Mini verwendet für ihren Master/Slave-
Ausgang einen Pistenfeuer-Modus. Anweisungen zum Zusammenschluss
und der Konfiguration dieses Geräts für den Betrieb im Pistenfeuer-Modus
finden Sie im Benutzerhandbuch.
Bügeleinstellknopf
Befestigungsbügel
Befestigungsschelle
(wie die CLP-15N
von Chauvet)
Sicherheitskabel
(wie die CH-05 von
Chauvet)
Page 23

COLORstrip/COLORstrip Mini SAL DE
23
Menüoptionen
Haupt-
funktion
Programmierebenen Beschreibung
ACt
A000
Verdunkelung
A001
F000–F100
Rot (Strobe)
A002
F000–F100
Grün (Strobe)
A003
F000–F100
Blau (Strobe)
A004
F000–F100
Gelb (Strobe)
A005
F000–F100
Lila (Strobe)
A006
F000–F100
Kobaltblau (Strobe)
A007
F000–F100
Weiß (Strobe)
A008 P000–P100 F000–F100
Farb-Chase 1
(Geschwindigkeit, Strobe)
A009 P000–P100 F000–F100
Farb-Chase 2
(Geschwindigkeit, Strobe)
A010 P000–P100 F000–F100
Farb-Chase 3
(Geschwindigkeit, Strobe)
A011 P000–P100 F000–F100
Farb-Chase 4
(Geschwindigkeit, Strobe)
A012
P000–P100
Farb-Chase 5 (Geschwindigkeit)
A013
P000–P100
Farb-Chase 6 (Geschwindigkeit)
A014
P000–P100
Farb-Chase 7 Geschwindigkeit)
A015
P000–P100
Farb-Chase 8 (Geschwindigkeit)
A016
P000–P100
Farb-Chase 9 (Geschwindigkeit)
A017
P000–P100
Farb-Cha se 10 (Geschwindigkeit)
A018
P000–P100
Farb-Cha se 11 (Geschwindigkeit)
A019
P000–P100
Farb-Cha se 12 (Geschwindigkeit)
A020
P000–P100
Farb-Cha se 13 (Geschwindigkeit)
A021 r000–r100
G000–
G100
b000–
b100
F000–
F100
Farbmischung (rot, grün,
blau, Strobe)
A022
P000–P100
Farb-Fade (Geschwindigkeit)
A023
Alle Farb-Chases 1–13
(Geschwindigkeit)
SYS
SdAd
001– 509
DMX-Adresse
SAAd
Zurücksetzen
Um den aktuellen Modus im Gerät zu speichern, drücken Sie auf
<MODE> und dann auf <ENTER>. Der gespeicherte Modus ist beim
Starten des Geräts aktiv.
Page 24
COLORstrip/COLORstrip Mini SAL DE
24
IRC-6-Fernbedienung (Infrarot-Fernbedienung)
Der COLORstrip/COLORstrip Mini ist kompatibel mit der Infrarot-Fernbedienung
(IRC-6) von Chauvet. Die folgenden Tasten der Fernbedienung IRC-6 werden für den
COLORstrip/COLORstrip Mini verwendet:
Schaltet LEDs ein /aus
Erhöht die Geschwindigkeit (des Programms oder Strobe-Effekts) oder den
Farbwert
Verringert die Geschwindigkeit (des P r ogramms oder Strobe-Effekts) oder
den Farbwert
Aktiviert Strobe-Einstellung
Aktiviert Farbmischung
Stellt den Farbwert Rot ein
Stellt den Farbwert Grün ein
Stellt den Farbwert Blau ein
Schaltet Auto-/Musiksteuerungs-Modus ein oder aus
Schaltet Auto-/Musiksteuerungs-Modus ein oder aus
HINWEIS – Wenn der Auto-/Musiksteuerungs-Modus ausgeschaltet ist, ist
der statische Farb-Modus eingeschaltet.
Statische r Farb-
Modus
Auto-/Musiksteuerungs-
Modus
A007 (weiß)
A008
A001 (rot)
A009
A021 (bernsteinfarben)
A010
A004 (gelb)
A011
A002 (grün)
A012
A006 (kobaltblau)
A013
A003 (blau)
A014
A005 (lila)
A015
A021 (rosa)
A017
A021
(sonnenblumenfarben)
A023
Keine Funktion
A022 (keine Reaktion a uf Musik)
•
- Keine Funktion mit diesem Produkt
•
Die Standar de ins tell ung f ür de n s t a ti schen Farb-Modus is t A007 (weiß).
•
Die Standardeinstellung f ür den Auto-/Musiksteuerungs-Modus ist A008.
Page 25
COLORstrip/COLORstrip Mini SAL DE
25
DMX-Werte
4 Kanäle
Kanal
Funktion
Wert
Prozent/Einstellung
1
Statischer Farben
000 ó 009
Keine Funktion
010 ó 019
Rot 0–100%
020 ó 029
Grün 0–100%
030 ó 039
Blau 0–100%
040 ó 049
Gelb 0–100%
050 ó 059
Magenta 0–100%
060 ó 069
Kobaltblau 0–100%
070 ó 079
Weiß 0–100%
Farb-Chases
080 ó 089
Farb-Chas e 1
090 ó 099
Farb-Chas e 2
100 ó 109
Farb-Chas e 3
110 ó 119
Farb-Chas e 4
120 ó 129
Farb-Chas e 5
130 ó 139
Farb-Chas e 6
140 ó 149
Farb-Chas e 7
150 ó 159
Farb-Chas e 8
160 ó 169
Farb-Chas e 9
170 ó 179
Farb-Chas e 10
180 ó 189
Farb-Chas e 11
190 ó 199
Farb-Chas e 12
200 ó 209
Farb-Chas e 13
RGBFarbmischung
210 ó 219 Kanäle 2–4
Farb-Fade
220 ó 229
Farb-Fade
Musiksteuerung
230 ó 255
Musiksteuerung
2
Ablaufgeschwindig
keit (wenn Kanal 1
von 080–209 reicht)
000 ó 127
Langsam nach schnell
128 ó 255
Musiksteuerung
(und von langsam nach schnell)
Rot (wenn Kanal 1
von 210–219 reicht)
000 ó 255 0–100%
Fade-
Geschwindigkeit
(wenn Kanal 1 von
220–229 reicht)
000 ó 255
Langsam nach schnell
3
Strobe (wenn Kanal
1 von 010–119
reicht)
000 ó 249
Langsam nach schnell
250 ó 255
Musiksteuerung
Grün (wenn Kanal 1
von 210–219 reicht)
000 ó 255 0–100%
4
Blau (wenn Kanal 1
von 210–219 reicht)
000 ó 255 0–100%
Page 26
COLORstrip/COLORstrip Mini GR IT
26
Informazioni
sulla Guida
La Guida Rapida COLORstrip/COLORstrip Mini contiene informazioni di
base sul prodotto quali montaggio, opzioni menù e valori DMX. Per maggiori
dettagli, scaricar e il Manuale Utente dal sito www.chauvetlighting.com
Esclusione di
responsabilità
Le informazioni e le specifiche contenute in questa guida possono essere
modificate senza pr eavviso.
Note di
Sicurezza
Le Note di Sicurezza includono informazioni importanti circa il montaggio,
l'uso e la manutenzione.
• Questa apparecchiatura non è progettata per installazione permanente.
• Collegare questa unità SOLTANTO ad un circuito dotato di messa a terra e
protetto.
• Prima di effettuare la pulizia
o sostituire il fusibile, scollegare sempre l'unità
dall'alimentazione elettrica.
• NON guardare l a s orge nt e lum i nosa qua ndo l ' unit à è in funzione.
• Assicurars i che il ca v o di a l ime ntaz i one non si a pie gato o danneggia to.
• Non scollegare mai questa apparecchiatura dall'alimentazione elettrica
tirando il cavo.
• Per il montaggio in alto dell'unità utilizzare SEMPRE un cavo di sicurezza.
•
NON collocare materiale infiammabile vicino all'unità mentre è in funzione.
• NON toccare l'unità durante il funz i onamento perché po
trebbe essere molto
calda.
• La tensione della presa a muro cui si collega l'apparecchiatura deve trovarsi
entro il cam po s pe c ific a t o sul l'e t ichetta o s ul pa nne ll o pos te r ior e .
• Questa apparecchiatura deve essere utilizzata soltanto in interni (IP20)! Per
evitare il r isc hio di inc e ndi o o di folgorazione non e s por re l 'a ppa rec chia t ura
alla pioggia o all'umidità.
• Montare sem pre l' uni tà i n posi z ione be n ventilata, ad a lme no 50 cm. (20")
da qualsiasi superficie.
• Assicurarsi che nessuna apertura di ventilazione dell'unità sia ostruita.
• Non collega re ma i a d un dim m e r o ad un re os tato
• Sostituire il fusibile con un altro dello stesso tipo e classe.
• Prendere e trasportare l'unità SOLTANTO dalla staffa per il montaggio
sospeso o dalle maniglie.
• Massima temperatura ambiente ammessa: 40 ° C (104 °F). Non utilizz are
l'unità a temperature superiori.
• In caso di gr av i pr oblemi di funzionam e nto s os pe nde re im m e diatam ente
l'utilizzo.
• NON aprire l'unità. Non contiene parti riparabili dall'utente.
• Per evitare un c ons umo inutile ed aumentare la durata, durante i periodi di
non utilizzo disc onne t te r e c om ple tam e nte il pr odot to da l l' alimentazione con
l'interrutt ore o s c ol lega ndo il c a v o.
Contatti
Per richiedere assistenza o restituire l'apparecchiatura, al di fuori di Stati
Uniti, Regno Unito, Irlanda, Messico o Benelux contattare il distributore
locale. Per informazioni sui contatti, visitare il sito Web
www.chauvetlighting.com.
Page 27
COLORstrip/COLORstrip Mini GR IT
27
Che cosa è
incluso
• COLORstrip
o
• COLORstrip Mini
•
Cavo di aliment az ione
• L-Staffa con Relativi Acces sori
• Scheda di garanzia
• Guida Rapida
Per iniziare
Disimballare COLORstrip/COLORstrip Mini ed accertarsi di aver ricevuto
tutti i componenti integri. Se l'imballo appare danneggiato, farlo
immediatamente pr es ente al trasport atore e non a Chauvet.
Descrizione
del prodotto
COLORstrip/COLORstrip Min i è u na luce a strisci a multicolo re per intern i e
intrattenimento mobile. COLORstrip/COLORstrip Mini
è perfetta come luce
wash o effetto luminoso quando abbinata con altri COLORstrip unità
. La
tecnologia a infrarossi di cui è dotata offre la possibilità di controllo wireless
con il telecomando a infrarossi (IRC-6) di CHAUVET DJ.
Vista d'insieme
Alimentazione
CA
Questa unità è dotata di alimentatore a commutazione automatica con
tensione in ingresso di 100–240 V CA, 50/60 Hz.
Per evitarne l'eccessiva usura e migliorarne la durata nel tempo,
scollegare l'unità dalla presa elettrica o disattivare l'alimentazione
tramite l'apposito interruttore, se inutilizzata per lunghi periodi.
Collegamento
Per il numero massimo di apparecchiature che è possibile collegare su
ciascuna presa elettrica
fare riferimento alle note riportate sull'etichetta
apposta sul prodotto o al Manuale Utente.
Sostituzione
fusibile
1. Scollegare l'alimentazione elettrica dall'unità.
2. Inserire la punta di un giravite a testa piatt a nella fessura
dell'alloggiamento del fusibile.
3. Rimuovere dall'alloggiamento il cappellotto di sicur ezza.
4. Rimuovere il fusibile bruciato dalla clip sulla parte anteriore del
cappellotto di sicurezza e sostituirlo con uno identico.
5. Reinserire il port afus ibile e ricollegare l' alimentazione elet trica.
Dopo aver collegato il prodotto, attendere fino a 30 secondi per l'avvio.
Uscita alimentazione
Ingresso/uscita
DMX
LED Display
Portafusibile
Ingresso alimentazione
Porta
telecomando
esterno
Anello di
sicurezza
Microfono
Pulsanti
menù
Manopola
sensibilità
Uscita
Master/
Slave
Page 28
COLORstrip/COLORstrip Mini GR IT
28
Montaggio
Prima di montare l 'unità, leggere le Note di Sicurezza.
Schema di
montaggio
Descrizione
del pannello di
controllo
Pulsante
Funzione
<MODE>
Consente di uscire dal menù o dalla funzione corrente
<ENTER>
Consente di attivare un'opzione di menù o un valore selezionato
<UP>
Consente di spostarsi verso l'alto nell'elenco menù o di aumentare
il valore numerico all'interno di una funzione
<DOWN>
Consente di spostarsi verso il basso nell'elenco menù o di
diminuire il valore numerico all'interno di una funzione
Manopola di regolazione staffa
Staffa di Montaggio
Morsetto di
Montaggio
(come il CLP-15N
di Chauvet)
Cavo di
Sicurezza
(come il CH-05
di
Chauvet)
Page 29

COLORstrip/COLORstrip Mini GR IT
29
Collegamento
DMX
COLORstrip/COLORstrip Mini può funzionare con un controller DMX
quando collegato tramite connessioni seriali DMX. Le istruzioni per il
collegamento e la co n
figurazione di questa unità sono contenute nel Manuale
Utente. Se non si ha familiarità con il DMX, scaricare DMX Primer
all'indirizzo www.chauvetlighting.com.
Indirizzo iniziale
Per assicurare i l completo accesso a tut ti i canali in ciascun a modalità DM X,
l'indirizzo maggiormente raccomand ato è 509.
Dopo aver impostato l'indirizzo DMX, premere <MODE>
seguito da
<ENTER> per salvarlo nella memoria dell'unità.
Collegamento
Master/Slave
In modalità Master/Slave, COLORstrip/COLORstrip Mini utilizza il
collegamento dati DMX. Le istruzioni per il collegamento e la
configurazione di questa unità per il funzionamento Master/Slave sono
contenute nel Manuale Utente.
Modalità
Movimento
(Runway)
Master/Slave
Per la modalità Movimento, COLORstrip/COLORstrip Mini utilizza l'uscita
Master/Slave. Le istruzioni per il collegamento e la configurazione di
questa unità in modalità Movimento sono contenute nel Manuale Utente.
Page 30
COLORstrip/COLORstrip Mini GR IT
30
Opzioni del menu
Livello
Principale
Livelli di programmazione Descrizione
ACt
A000
Blackout
A001
F000–F100
Rosso (strobo)
A002
F000–F100
Verde (strobo)
A003
F000–F100
Blu (strobo)
A004
F000–F100
Giallo (strobo)
A005
F000–F100
Viola (strobo)
A006
F000–F100
Ciano (strobo)
A007
F000–F100
Bianco (strobo)
A008 P000–P100 F000–F100
Chase colore 1 (velocità,
strobo)
A009 P000–P100 F000–F100
Chase colore 2 (velocità,
strobo)
A010 P000–P100 F000–F100
Chase colore 3 (velocità,
strobo)
A011 P000–P100 F000–F100
Chase colore 4 (velocità,
strobo)
A012
P000–P100
Chase colore 5 (velocità)
A013
P000–P100
Chase colore 6 (velocità)
A014
P000–P100
Chase colore 7 (velocità)
A015
P000–P100
Chase colore 8 (velocità)
A016
P000–P100
Chase colore 9 (velocità)
A017
P000–P100
Chase colore 10 (velocità)
A018
P000–P100
Chase colore 11 (velocità)
A019
P000–P100
Chase colore 12 (velocità)
A020
P000–P100
Chase colore 13 (velocità)
A021 r000–r100
G000–
G100
b000–
b100
F000–
F100
Mixaggio colore (Rosso,
Verde, Blu, strobo)
A022
P000–P100
Fade dei colori (velocità)
A023
Chase per tutti i colori 1–13
(velocità)
SYS
SdAd
001– 509
Indirizzo DMX
SAAd
Reimpostazione
Per salvare la modalità corrente nella memoria dell'unità premere
<MODE> seguito da <ENTER>. La modali tà salvata si attiverà al l'avvio.
Page 31
COLORstrip/COLORstrip Mini GR IT
31
Telecomando IRC-6 (a infrarossi)
COLORstrip/COLORstrip Mini è compatibile con il t elecomando IRC-6 di Chauvet.
Con COLORstrip/COLORstrip Mini vengono utilizzati i seguenti pulsanti del telecomando:
Attiva/disattiva i LED
Aumenta la velocità (del programma strobo) o il valore del colore
Diminuisce la velocità (del programma strobo) o il valore del colore
Abilita l'impostazione strobo
Abilita il mixaggio colore
Imposta il valore del colore Rosso
Imposta il valore del colore Verde
Imposta il valore del colore Blu
Attiva o disattiva la modalità Auto/Sonora
Attiva o disattiva la modalità Auto/Sonora
NOTA - Se la modalità Auto/Sonora non è attiva, è attiva la modalità Colore
statico.
Modalitá Colore
statico
Modalitá automatic /
attivazione sonora
A007 (Bianco)
A008
A001 (Rosso)
A009
A021 (Ambra)
A010
A004 (Giallo)
A011
A002 (Verde)
A012
A006 (Ciano)
A013
A003 (Blu)
A014
A005 (Viola)
A015
A021 (Rosa)
A017
A021 (Girasole)
A023
Nessuna funzione
A022 (Nessuna risposta al
suono)
•
- Nessuna funzione con questo prodotto
•
L'impostazione predefi nita per la modalità Colore statico è A007 (Bianco).
•
L'impostazione predefinita per la modalità Auto/Sonora è A008.
Page 32
COLORstrip/COLORstrip Mini GR IT
32
Valori DMX
4 Canali
Canale
Funzione
Valore
Percentuale/Impostazione
1
Colori statici
000 ó 009
Nessuna funzione
010 ó 019
Rosso 0–100%
020 ó 029
Verde 0–100%
030 ó 039
Blu 0–100%
040 ó 049
Giallo 0–100%
050 ó 059
Magenta 0–100%
060 ó 069
Ciano 0–100%
070 ó 079
Bianco 0–100%
Chase Colori
080 ó 089
Chase Colori 1
090 ó 099
Chase Colori 2
100 ó 109
Chase Colori 3
110 ó 119
Chase Colori 4
120 ó 129
Chase Colori 5
130 ó 139
Chase Colori 6
140 ó 149
Chase Colori 7
150 ó 159
Chase Colori 8
160 ó 169
Chase Colori 9
170 ó 179
Chase Colori 10
180 ó 189
Chase Colori 11
190 ó 199
Chase Colori 12
200 ó 209
Chase Colori 13
Mixaggio colore RGB
210 ó 219
Canali 2–4
Fade dei colori
220 ó 229
Fade dei colori
Attivazione sonora
230 ó 255
Attivazione sonora
2
Velocità di
esecuzione
(quando
il can. 1 è tra
080–209)
000 ó 127
Lento-veloce
128 ó 255
Attivazione sonora (lento
-veloce)
Rosso (quando il
can. 1 è tra
210–219)
000 ó 255 0–100%
Velocità Fade
(quando il can. 1 è
tra 220–229)
000 ó 255 Lento-veloce
3
Strobo (quando il
can. 1 è tra
010–119)
000 ó 249
Lento-veloce
250 ó 255
Attivazione sonora
Verde (quando il can.
1 è tra 210–219)
000 ó 255 0–100%
4
Blu (quando il can. 1
è tra 210–219)
000 ó 255 0–100%
Page 33
COLORstrip/COLORstrip Mini BH NL
33
Over deze
handleiding
De COLORstrip/COLORstrip Mini Beknopte Handleiding (BH) bevat basisinformatie
over het product, zoals montage, menu-opties en DMX-
waarden. Download de
gebruike rshandle iding o p www.chauvetlighting.com voor meer informatie.
Disclaimer
De informatie en specificaties in deze BH kunnen zonder voorafgaande
kennisgeving worden gewijzigd.
Veiligheidsinstructies
Deze veiligheidsinstructies bevatten belangrijke informatie over de installatie,
het gebruik en het onderhoud.
• Dit product is niet bedoeld v oor permanente ins tal la t ie.
• Sluit dit product U ITSLUITEND op een ge aa r d e n be ve il igd s tr oom c ir c uit .
• Haal voor het vervangen van de zek e r ing a l tij d de s tekk e r va n he t pr oduct
uit het stopcontact.
• KIJK NIET in de l ic ht bron wanneer het a ppa raa t i s inge sc ha ke ld.
• Zorg ervoor dat he t s t room s noe r nie t k ni k t of besc ha di g d.
• Koppel dit product nooit l os van het stopc ontact door aan het snoe r te trekken.
• Gebruik een v e i ligheidskabel wanneer he t produc t bov e n li c ha am s hoog te
wordt gemont eer d.
• GEEN brandbare ma t e rial e n in de buurt v a n de uni t t ij de ns gebruik.
•
RAAK het product NIET AAN wanneer het in werking omdat het dan heet zijn.
• De spanning va n he t s topc ont a c t wa a rop u di t pr od uc t a a ns luit m oe t bi nne n
het vermelde bereik op de sticker of achterkant van het product z i jn.
• Het product is a ll een voor gebruik binnens huis ! (IP20) Om ris ico op brand
of elektrisc he sc hokk e n t e voorkomen, mag dit product nie t a a n reg en of
vocht worden bl ootg e s t e ld.
• Monteer dit produc t a l ti jd o p e e n plek met voldoende v e ntilatie, minstens
20 inch (50 cm) van de aangrenzende oppe r v l a kk e n.
• Zorg ervoor dat e r ge e n ve nti la tie-ope ni ng e n v a n de be hui z ing van het
product worde n g e bl okk ee rd.
• Sluit dit product no oit a a n op e e n di m m e r of ee n r eg e lwe ers ta nd.
• Vervang de zekering met een van hetzelfde type en met dezelfde waarde.
• Gebruik UIT SLUIT E ND de ophang -/montagebeugel of de hendels om dit
product te drag e n.
• De maximale omg ev i ng s tem pera tuur be dr a a g t 40 °C. Gebruik dit product
niet bij hogere temperaturen.
• Stop in het geval van ernstige operatio nele problem en onmiddel lijk met het gebruik .
• Open het product N I ET. Het bevat gee n te onde r houde n onde r de le n.
• Om onnodige slijtage te elim ineren en z ijn levensduur t e verlengen, gedurende
perioden wanneer het product niet wordt gebruikt, moet u het product afsluiten
door een aardlekschakelaar om te zetten of door het te ontkoppelen.
Contact
Van buiten de VS, Verenigd Koninkrijk, Ierland, Mexico of Benelux kunt u
contact opnemen met de distributeur of om ondersteuning vragen dan wel het
product retourne re n. G a naar www.chauvetlighting.com voor contactinformatie.
Wat is
inbegrepen
• COLORstrip
of
• COLORstrip Mini
• Stroomsnoer
• L-Haken met bevestigingsapparatuur
• Garantiekaart
• Beknopte handl e idi ng
Page 34
COLORstrip/COLORstrip Mini BH NL
34
Om te
beginnen
Pak uw COLORstrip/COLORstrip Mini uit en zorg ervoor dat u alle
onderdelen in goede staat hebt ontvangen. Als de doos of inhoud beschadigd
lijkt, stel dan de vervoerder onmiddellijk op de hoogte, niet Chauvet.
Product-
beschrijving
De COLORstrip/COLORstrip Mini is een compacte, meerkleurige
strooklamp voor gebruik in mobiele amusementstoepassingen binnenshuis.
De COLORstrip/COLORstrip Mini is perfect als een washlamp of effectlamp
wanneer deze wordt gekoppeld met andere COLORstrip-producten.
Ingebouwde infrarood
technologie biedt draadloze bediening met de
optionele infrarood afstandsbediening (IRC-6) van CHAUVET DJ.
Overzicht
AC-stroom
Dit product heeft een voeding met automatisch bereik die werkt met een
ingangss pa nni ng va n 100–240 VAC, 50/60 Hz.
Om onnodige slijtage te elimineren en zijn levensduur te verlengen,
gedure nde pe ri o de n wanneer h et pr o du ct nie t wordt ge br uikt, moet u het
product afslui ten do or een aardleks chakel aar o m te zett en of door het te
ontkoppelen.
Power Linking
Voor het maximale aantal COLORstrip/COLORstrip Mini-producten die via
power link kunnen worden gekoppeld bij elke spanning, ziet u de
gebruikershandleiding of de sticker op het product.
Vervangen van
de zekering
1. Ontkoppel het apparaat van de stroom.
2. Wig de punt van een pl atte schroevendraaier i n de sleuf van de
zekeringhouder.
3. Druk de beveiligingskap uit de behuizing.
4. Verwijder de doorgebrande zekering vanaf de clip aan de voor kant van de
veiligheidsafde kking en vervang deze door een zekering van exa ct
hetzelfde type.
5. Plaats de zekerin ghouder terug en steek de stekker er weer in.
Bij het aansl uite n v an het pr oduct , g eef h et tot 30 seco nden de tij d om o p
te starten.
Vermogensuitgang
DMX
Ingang/Uitgang
LED-Display
Zekeringhouder
Stroomingang
EXT
regelaarpoort
Veiligheidslus
Microfoon
Menutoetsen
Gevoeligheid
Instelknop
Master/
Slave-
uitgang
Page 35
COLORstrip/COLORstrip Mini BH NL
35
Montage
Lees alvorens dit product te monteren all e Veiligheidsinstructies.
Montagediagram
Configuratie-
scherm
Beschrijving
Toets
Functie
<MODE>
Sluit het huidige menu of functie af
<ENTER>
Activeert een menu-optie of de geselect eerde waarde
<UP>
Navigeert omhoog via het menu of verhoogt de numerieke waarde
wanneer in een functie
<DOWN>
Navigeert omlaag via het menu of verlaagt de numerieke waarde
wanneer in een functie
Instelknop va n de beugel
Hangbeugel
Bevestigingsklem
(zoals CLP-15N
van Chauvet)
Veiligheidskabel
(zoals CH-05 van
Chauvet)
Page 36

COLORstrip/COLORstrip Mini BH NL
36
DMX-
koppeling
De COLORstrip/COLORstrip Mini kan met een DMX-regelaar werken,
indien gekoppeld door seriële DMX-
verbindingen. Instructies voor het
aansluiten en configureren van dit product voor DMX-bediening staa
n in de
gebruikershandleiding. Als u niet bekend bent met DMX, download dan de
DMX-primer op www.chauvetlighting.com.
Startadres
Om volledige toegan g tot alle kanalen in elke DMX-modus te garanderen is
het sterk aanbevolen DMX-adres voor dit product 509.
Na het instellen van het startende DMX adres, drukt u op <MODE>
en
<ENTER> om het adres op het geheugen van het product op te slaan.
Master/slave-
verbinding
De COLORstrip/COLORstrip Mini maakt gebruik van de DMX-
gegevensverbinding voor haar Master-/Slave-modus. Instructies voor het
aansluiten en configureren van dit product voor DMX-bediening staan in de
gebruikershandleiding.
Master/Slave
landingsbaan-
modus
De COLORstrip/COLOR strip Mini gebruikt de Master/Slave-uitgang voor
zijn landingsbaan-modus. Instructies voor het aansluiten en configureren
van dit product voor landingsbaan-
modus bediening staan in de
gebruikershandleiding.
Page 37
COLORstrip/COLORstrip Mini BH NL
37
Menu Opties
Hoofdfunctie
Programmeerniveaus Beschrijving
ACt
A000
Verduistering
A001
F000–F100
Rood (stroboscoop)
A002
F000–F100
Groen (stroboscoop)
A003
F000–F100
Blauw (stroboscoop)
A004
F000–F100
Geel (stroboscoop)
A005
F000–F100
Paars (stroboscoop)
A006
F000–F100
Cyaan (stroboscoop)
A007
F000–F100
Wit (stroboscoop)
A008 P000–P100 F000–F100
Kleurenachtervolging 1
(snelheid, stroboscoop)
A009 P000–P100 F000–F100
Kleurenachtervolging 2
(snelheid, stroboscoop)
A010 P000–P100 F000–F100
Kleurenachtervolging 3
(snelheid, stroboscoop)
A011 P000–P100 F000–F100
Kleurenachtervolging 4
(snelheid, stroboscoop)
A012
P000–P100
Kleurenachtervolging 5 (snelhei d)
A013
P000–P100
Kleurenachtervolging 6 (snelhei d)
A014
P000–P100
Kleurenachtervolging 7 (snelhei d)
A015
P000–P100
Kleurenachtervolging 8 (snelhei d)
A016
P000–P100
Kleurenachtervolging 9 (snelhei d)
A017 P000–P100
Kleurenachtervolging 10
(snelheid)
A018 P000–P100
Kleurenachtervolging 11
(snelheid)
A019 P000–P100
Kleurenachtervolging 12
(snelheid)
A020 P000–P100
Kleurenachtervolging 13
(snelheid)
A021 r000–r100
G000–
G100
b000–
b100
F000–
F100
Kleurenmix (rood, groen,
blauw, stroboscoop)
A022
P000–P100
Kleurenfade (snelheid)
A023
Alle kleurachtervolgingen
1–13 (snelheid)
SYS
SdAd
001– 509
DMX-adres
SAAd
Reset
Om de huidi ge op te slaan op het geheugen v an het product, dr ukt u op
<MODE> en <ENTER >. De opgeslag en modus z al gea ctiveerd worden bij
het opstarten.
Page 38

COLORstrip/COLORstrip Mini BH NL
38
IRC-6-Afstandsbediening (Infrarood Afstandsbediening)
De COLORstrip/COLORstrip Mini is compatibel met de IRC-6 afstandsbediening van
Chauvet.
De volgende IRC-6 toetsen worden gebruikt met de COLORstrip/COLORstrip Mini:
Schakelt LED-lampjes aan/uit
Verhoogt de snelheid (van programma of stroboscoop) of kleurwaarde
Verlaagt de snelheid (van programma of stroboscoop) of kleurwaarde
Schakelt de stroboscoopinstelling in
Schakelt kleuren menging in
Stelt de rode kleurwaarde in
Stelt de groene kleurwaarde in
Stelt de blauwe kleur w aar de in
Schakelt automatische/geluidsmodus in, of schakelt
automatische/geluidsmodus uit
Schakelt automatische/geluidsmodus in, of schakelt
automatische/geluidsmodus uit
LET OP - Als de automatische/geluidsmodus uit is, is de statische
kleurenmodus aan.
Statisch-
Kleurenmodus
Automatische/geluidsmodus
A007 (Wit)
A008
A001 (Rood)
A009
A021 (Amber)
A010
A004 (Geel)
A011
A002 (Groen)
A012
A006 (Cyaan)
A013
A003 (Blauw)
A014
A005 (Paars)
A015
A021 (Roze)
A017
A021 (Zonnebloem)
A023
Geen functie
A022 (G ee n react ie op geluid)
•
- Geen functie met dit product
•
De standaard voor statische kleurenmodus is A007 (wit).
•
De standaard voor automatische/geluidsmodus is A008.
Page 39
COLORstrip/COLORstrip Mini BH NL
39
DMX-waarden
4 Kanalen
Kanaal
Functie
Waarde
Percentage/instelling
1
Statischkleuren
000 ó 009
Geen fu nctie
010 ó 019
Rood 0–100%
020 ó 029
Groen 0–100%
030 ó 039
Blauw 0–100%
040 ó 049
Geel 0–100%
050 ó 059
Magenta 0–100%
060 ó 069
Cyaan 0–100%
070 ó 079
Wit 0–100%
Kleurachtervolgingen
080 ó 089
Kleurenachtervolging 1
090 ó 099
Kleurenachtervolging 2
100 ó 109
Kleurenachtervolging 3
110 ó 119
Kleurenachtervolging 4
120 ó 129
Kleurenachtervolging 5
130 ó 139
Kleurenachtervolging 6
140 ó 149
Kleurenachtervolging 7
150 ó 159
Kleurenachtervolging 8
160 ó 169
Kleurenachtervolging 9
170 ó 179
Kleurenachtervolging 10
180 ó 189
Kleurenachtervolging 11
190 ó 199
Kleurenachtervolging 12
200 ó 209
Kleurenachtervolging 13
RGB-kleurenmenging
210 ó 219
Kanalen 2–4
Kleurenfade
220 ó 229
Kleurenfade
Geluidsactief
230 ó 255
Geluidsactief
2
Loopsnelheid
(wanneer K. 1 is
080–209)
000 ó 127
Langzaam tot snel
128 ó 255 Geluidsactief (en langzaam tot snel)
Rood (wanneer K. 1
is 210–219)
000 ó 255 0–100%
Fadesnelheid
(wanneer K. 1 is
220–229)
000 ó 255 Langzaam tot snel
3
Stroboscoop
(wanneer K. 1 is
010–119)
000 ó 249
Langzaam tot snel
250 ó 255 Geluidsactief
Groen (wanneer
K. 1 is 210–219)
000 ó 255 0–100%
4
Blauw (wanneer
K. 1 is 210–219)
000 ó 255 0–100%
Page 40
SlimBANK T18 USB QRG Multi-Language
40
Contact
Us
USA WORLD HEADQUARTERS
General Information
Address: 5200 NW 108th Avenue
Sunrise, FL 33351
Voice: (954) 577-4455
Fax: (954) 929-5560
Toll free:(800) 762-1084
Technical Support
Voice: (954) 577-4455 (Press 4)
Fax: (954) 756-8015
Email: tech@chauvetlighting.com
World Wide Web
www.chauvetlighting.com
EUROPE.
General Information
Address: Stokstraat 18
9770 Kruishoutem
Belgium
Voice: +32 9 388 93 97
Technical Support
Email: Eutech@chauvetlighting.eu
World Wide Web www.chauvetlighting.eu
General Information
Address: Unit 1C
Brook hill Road Indust rial Estate
Pinxton, Nottingham, UK
NG16 6NT
Voice: +44 (0)1773 511115
Fax: +44 (0)1773 511110
Technical Support
Email: uktech@chauvetlighting.com
World Wide Web
www.chauvetlighting.co.uk
MEXICO
General Information
Address: Av. Santa Ana 30
Parque Industrial Lerma
Lerma, Mexico C.P. 52000
Voice: +52 (728) 285-5000
Technical Support
Email: servicio@chauvet.com.mx
World Wide Web www.chauvet.com.mx
Outside the U.S., United Kingdom, Ireland, Mexico, or Benelux, contact the dealer of
record. Follow their instructions to request support or to return a product. Visit our
website for contact details.
COLORstrip/COLORstrip Mini QRG Rev. 2 ML6
© Copyright 2016 Chauvet
All rights reserved.
Printed in the P. R. C.
 Loading...