

Page 1
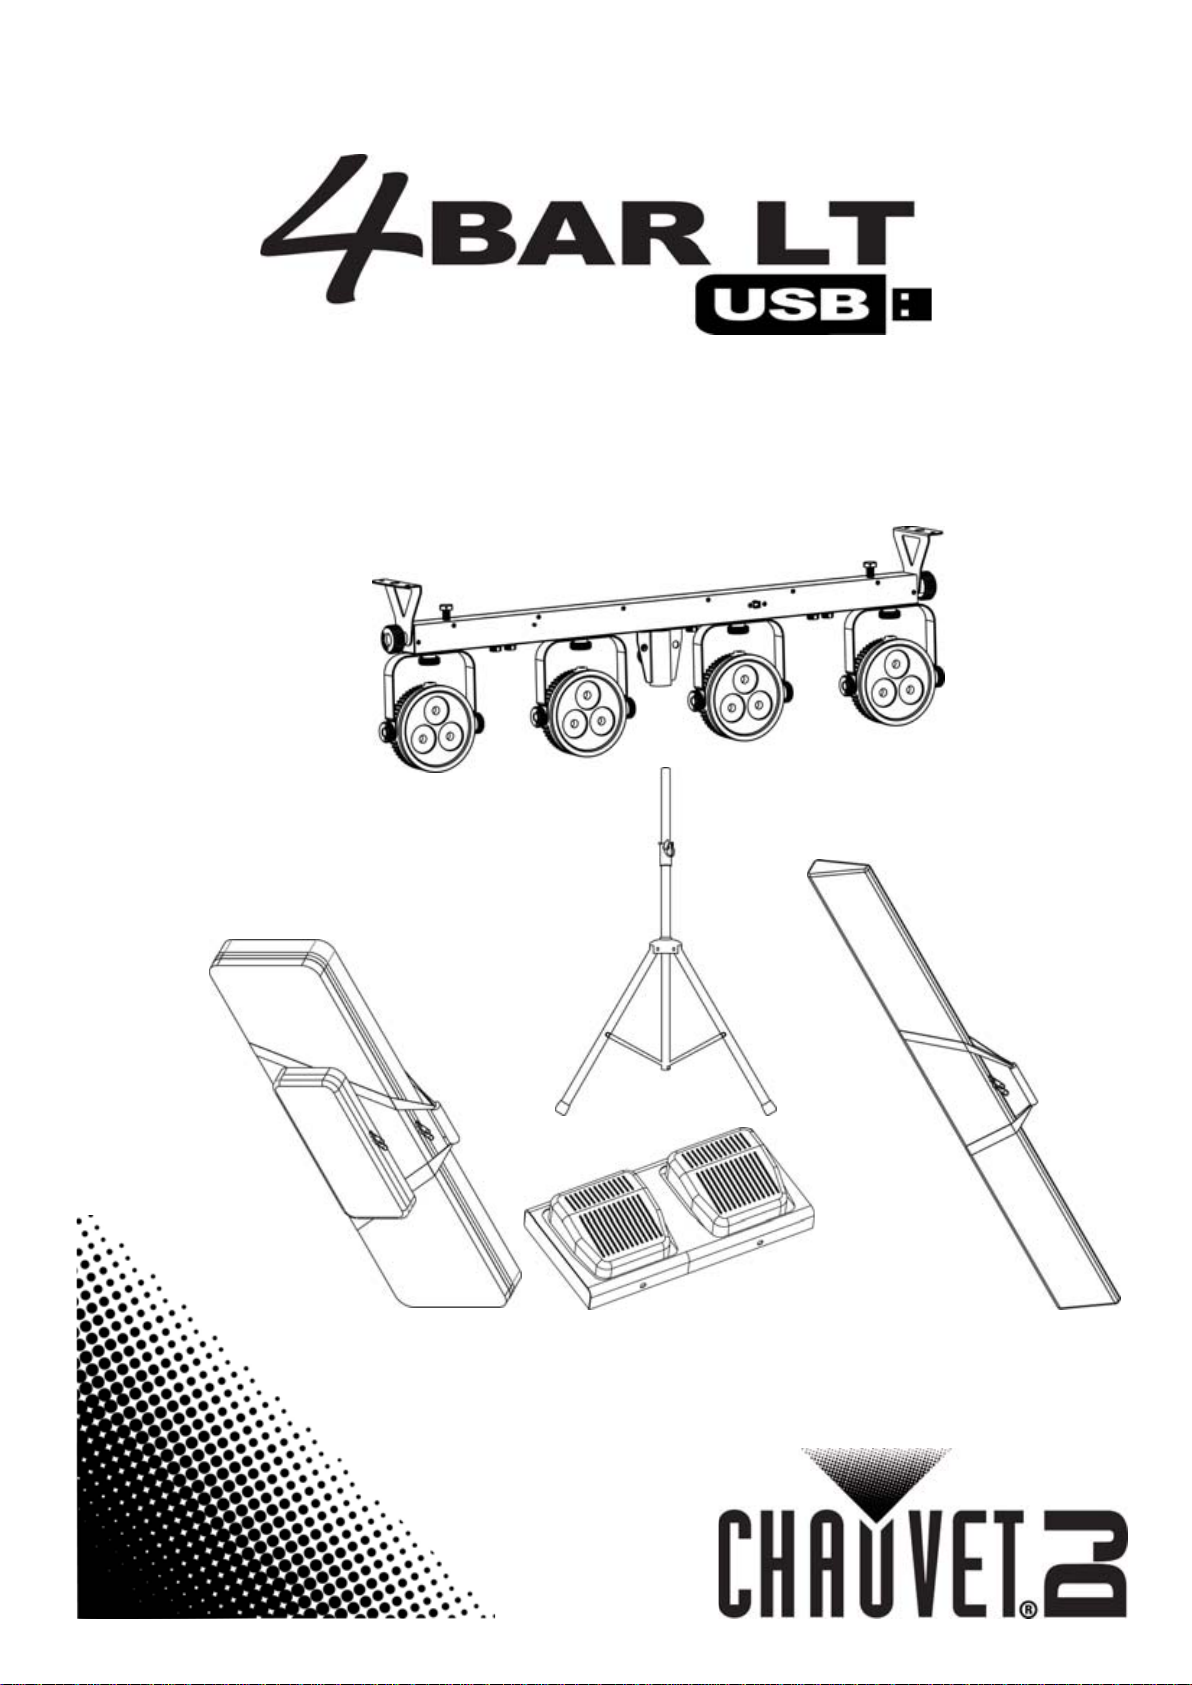
Quick Reference Guide
Page 2

QUICK REFERENCE GUIDE
EN
About This Guide
The 4Bar LT USB Quick Reference Guide (QRG) has basic product information such as mounting, menu options, and
DMX values. Download the User Manual from
Disclaimer
The information and specifications contained in this QRG are subject to change without notice.
Safety Notes
These Safety Notes include important information about installation, use, and maintenance.
• This product is not intended for permanent installation.
• ONLY connect this product to a grounded and protected circuit.
• Always disconnect from power before cleaning or replacing the fuse.
• Make sure the power cord is not crimped or damaged.
• Never disconnect this product from power by pulling on the cord.
• DO NOT touch this product when it is operating because it may be hot.
• When mounting this product overhead, use a safety cable.
• DO NOT allow flammable materials close to the product while operating.
• The voltage of the outlet to which you are connecting this product must be within the range stated
on the decal or rear panel of the product.
• This product is for indoor use only! (IP20) To prevent risk of fire or shock, do not expose this
product to rain or moisture.
• Always mount this product in a location with adequate ventilation, at least 20 in (50 cm) from
adjacent surfaces.
• Be sure that no ventilation slots on the unit’s housing are blocked.
• Never connect this product to a dimmer or rheostat.
• Replace the fuse with one of the same type and rating.
• ONLY use the carry handle or hanging/mounting bracket to carry this product.
• The maximum ambient temperature is 104 °F (40 °C). Do not operate this product at higher
temperatures.
• In the event of a serious operating problem, stop using immediately.
• DO NOT open this product. It contains no user-serviceable parts.
• To eliminate unnecessary wear and improve its lifespan, during periods of non-use completely
disconnect the product from power via the breaker or by unplugging it.
www.chauvetdj.com for more details.
Contact
Outside the U.S., United Kingdom, Ireland, Mexico, or Benelux, contact your distributor to request support or return a
product. Visit www.chauvetdj.com for contact information.
What is Included
• 4Bar LT USB
• Power cord
• Carrying bags
• Tripod
• Wired Footswitch
• Warranty Card
• Quick Reference Guide
To Begin
Unpack your 4Bar LT USB and make sure you have received all parts in good condition. If the box or contents appear
damaged, notify the carrier immediately, not Chauvet.
1
4BAR LT USB QRG Rev. 2
Page 3
QUICK REFERENCE GUIDE
EN
Product Description
The 4Bar LT USB is a pack and go, complete wash lighting solution designed for mobile entertainers. Featuring wireless
DMX control with the convenient built-in D-Fi USB port (D-Fi USB sold separately), IRC compatibility, and additional
features allow for Master/Slave and auto/sound active modes. Each pod on the 4Bar LT USB has 3 high power, tricolored LEDs, which can be positioned independently to ensure total room or stage coverage. The tri-colored LEDs are
perfect for front lighting as they nearly eliminate multicolored shadows. Easily set up and tear down in minutes using the
included tripod, foot switch and carrying cases.
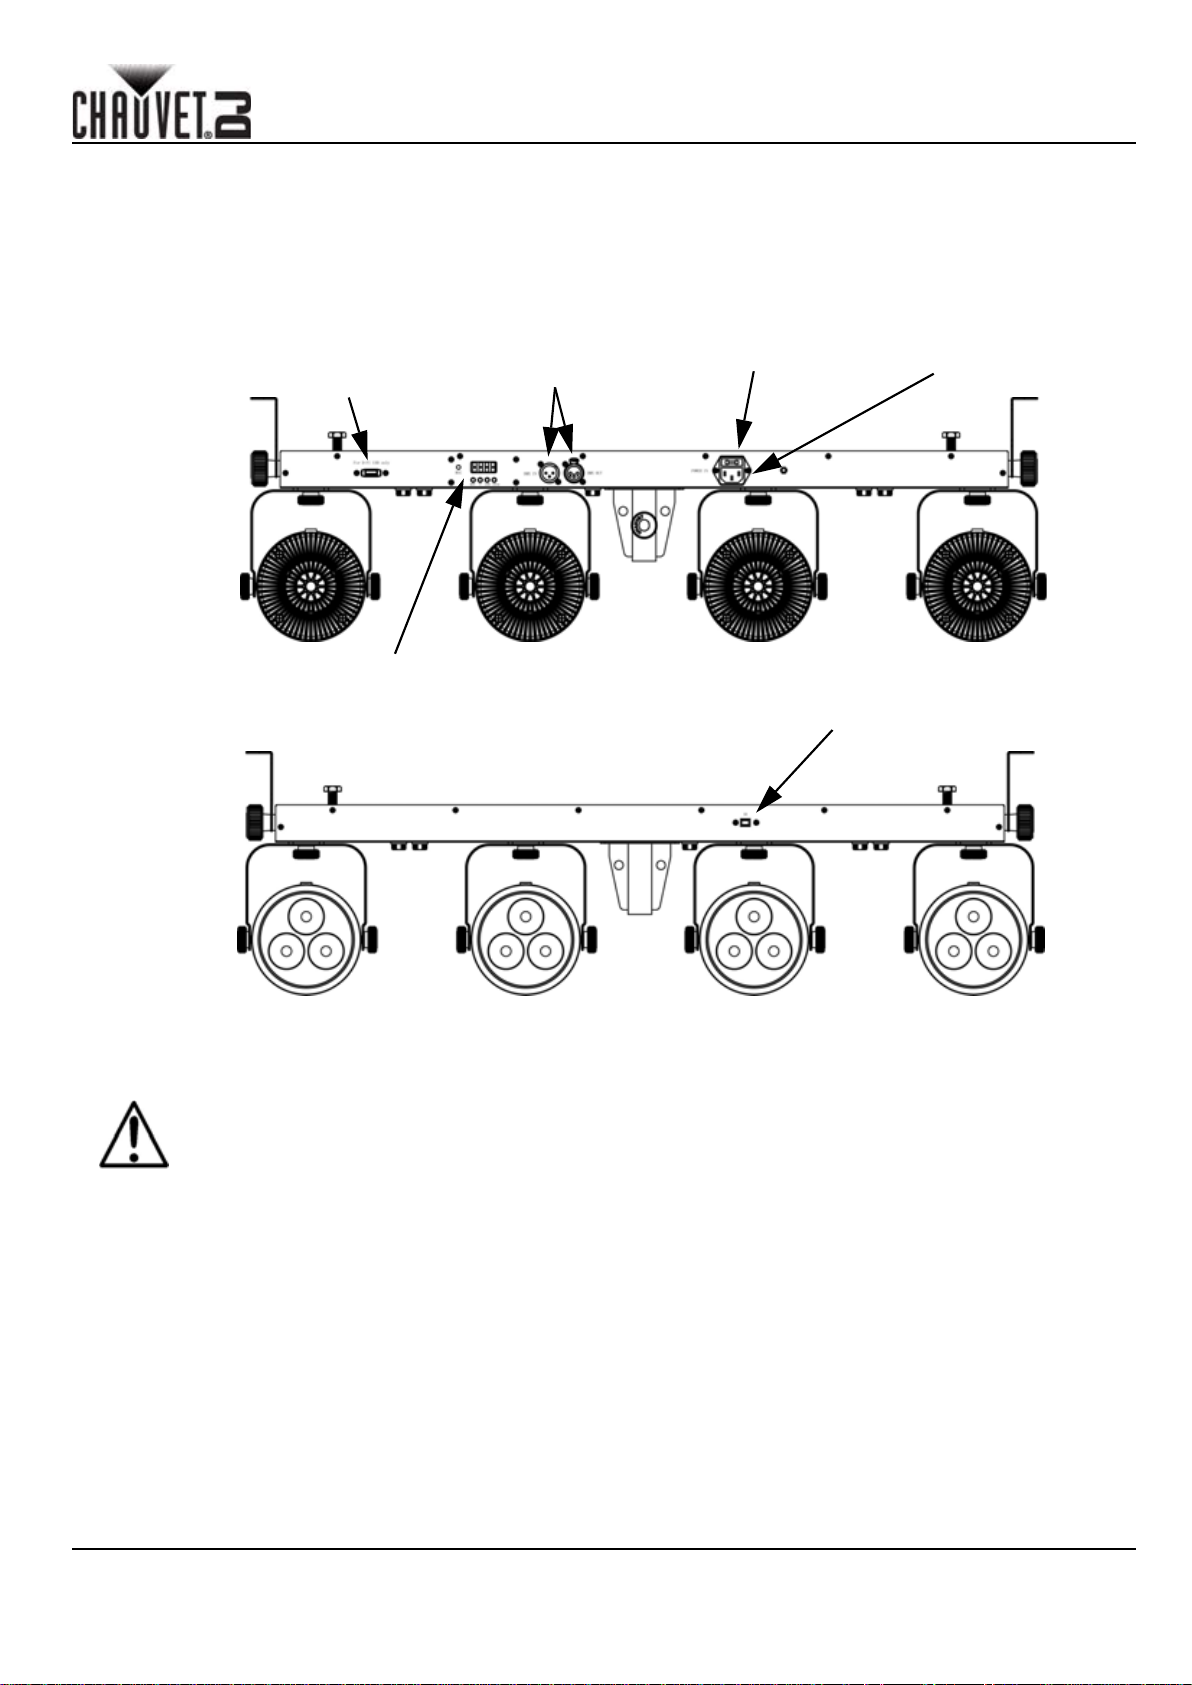
Overview
D-Fi USB
Port
DMX In/Out
Fuse Holder
Power In
Control Panel
IR Sensor
AC Power
This product has an auto-ranging power supply that can work with an input voltage range of 100-240 VAC, 50/60 Hz.
To eliminate wear and improve its lifespan, during periods of disuse completely disconnect the
product from power via breaker or by unplugging it.
Power Linking
For the maximum number of 4Bar LT USB that can be linked at 120 V or at 230 V, see the User Manual or the Label on
this product.
Fuse Replacement
1. Disconnect the product from power.
2. Wedge the tip of a flat-head screwdriver into the slot of the fuse holder.
3. Pry the safety cap out of the housing.
4. Remove the blown fuse from the clip on the front of the safety cap and replace with a fuse of the exact same
type and rating.
5. Re-insert the fuse holder and reconnect power.
4BAR LT USB QRG Rev. 2
2
Page 4
QUICK REFERENCE GUIDE
EN
Mounting
Before mounting this product, read the Safety Notes.
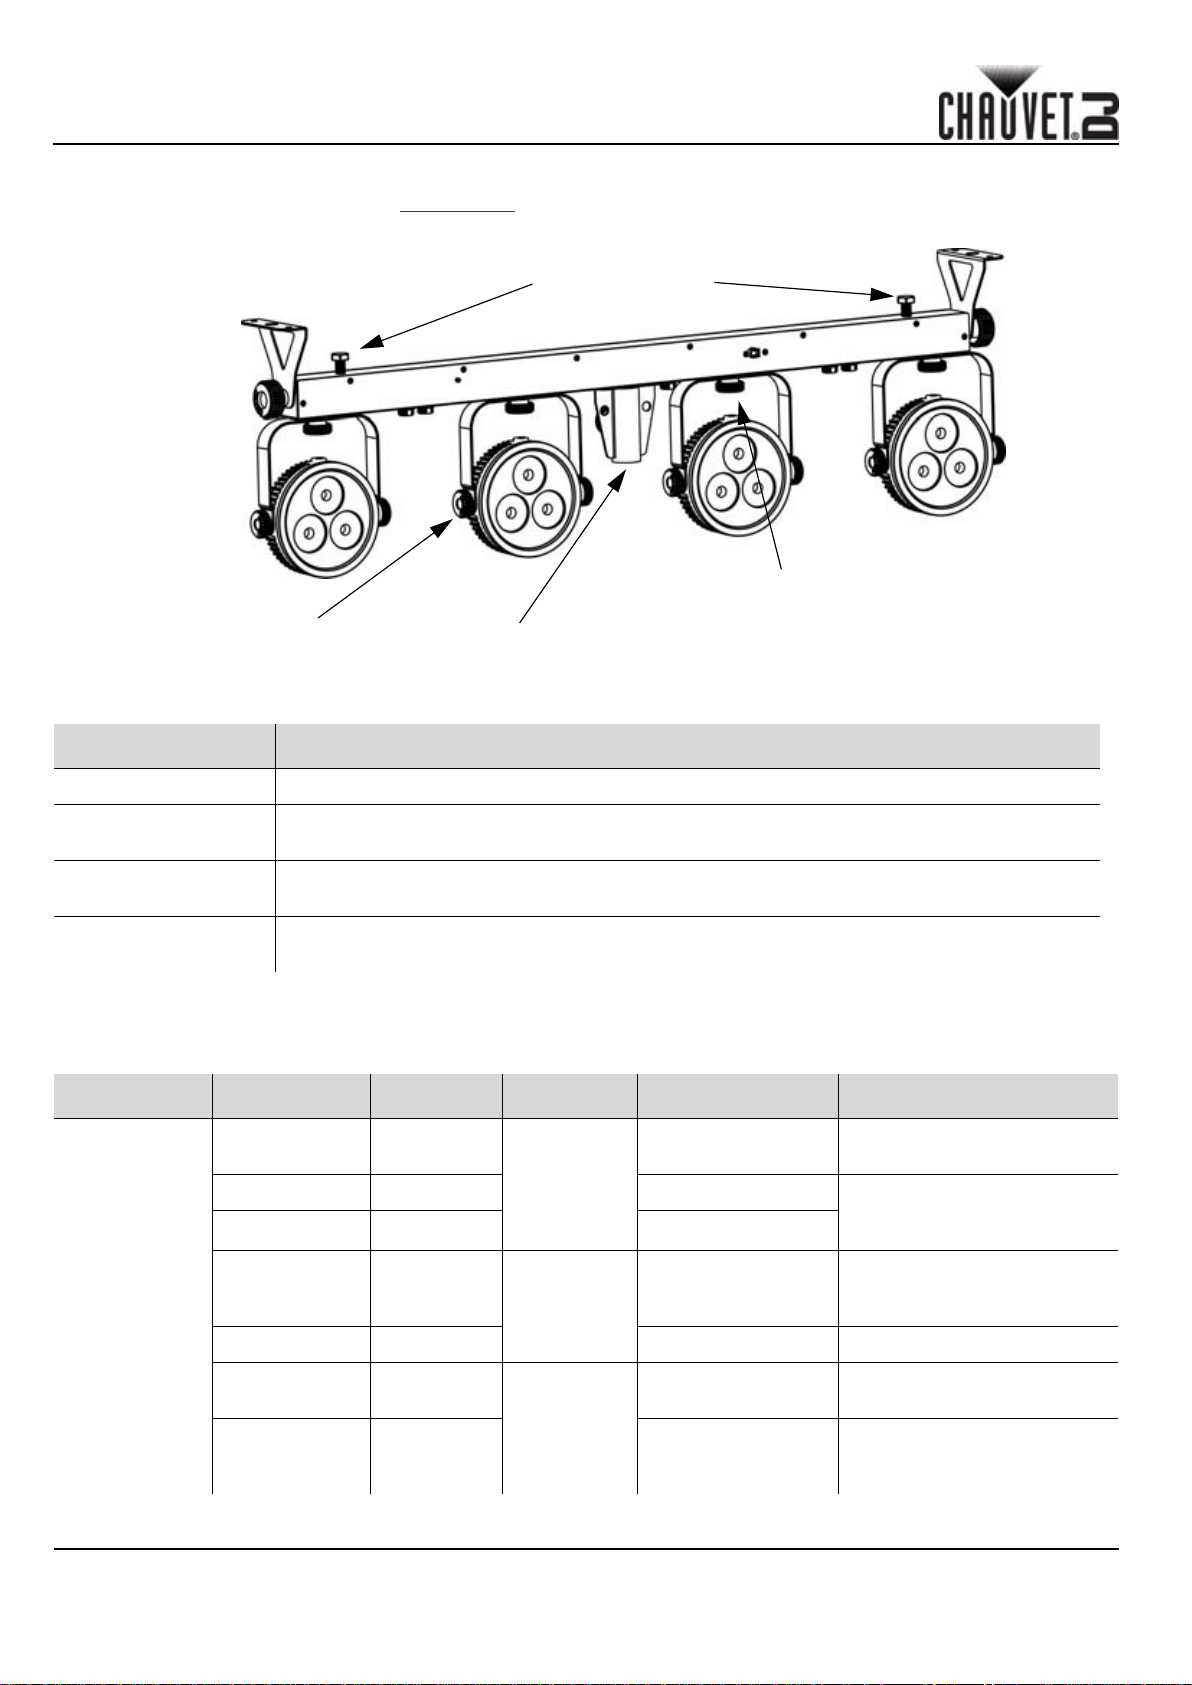
Mounting Diagram
Pod Tilt
Adjustment Knob
Tripod
Insertion Point
M10 Clamp
Hanging Bolts
Pod Pan
Adjustment Knob
Control Panel Description
BUTTON FUNCTION
<MENU> Exits from the current menu or function
<UP>
<DOWN>
<ENTER>
Foot-switch Connection
The 4Bar LT USB can also be operated using the foot-switch.
PEDAL SUB-OPTION FUNCTION PEDAL SUB-OPTION FUNCTION
Right
(preset)
Navigates upwards through the menu list and increases the numeric value when in a
function
Navigates downwards through the menu list and decreases the numeric value when in a
function
Enables the currently displayed menu or sets the currently selected value into the selected
function
1 x press White
2 x press Red 9 x press Color change every three
3 x press Green Press and hold
4 x press Blue
5 x press Yellow Press and hold Fades LEDs in/out slowly
Right
(preset)
Left
(Blackout)
8 x press
1 x press
Color change every second
in a continuous loop
seconds in a continuous
loop
All LEDs off; press pedal 1 or
pedals 1 & 2 to re-enter
active modes
6 x press Magenta
7 x press Cyan
Both
(Sound
Active)
3
Press both pedals
simultaneously
Press and hold both
pedals simultane-
ously
Sound-active mode
Strobe
4BAR LT USB QRG Rev. 2
Page 5
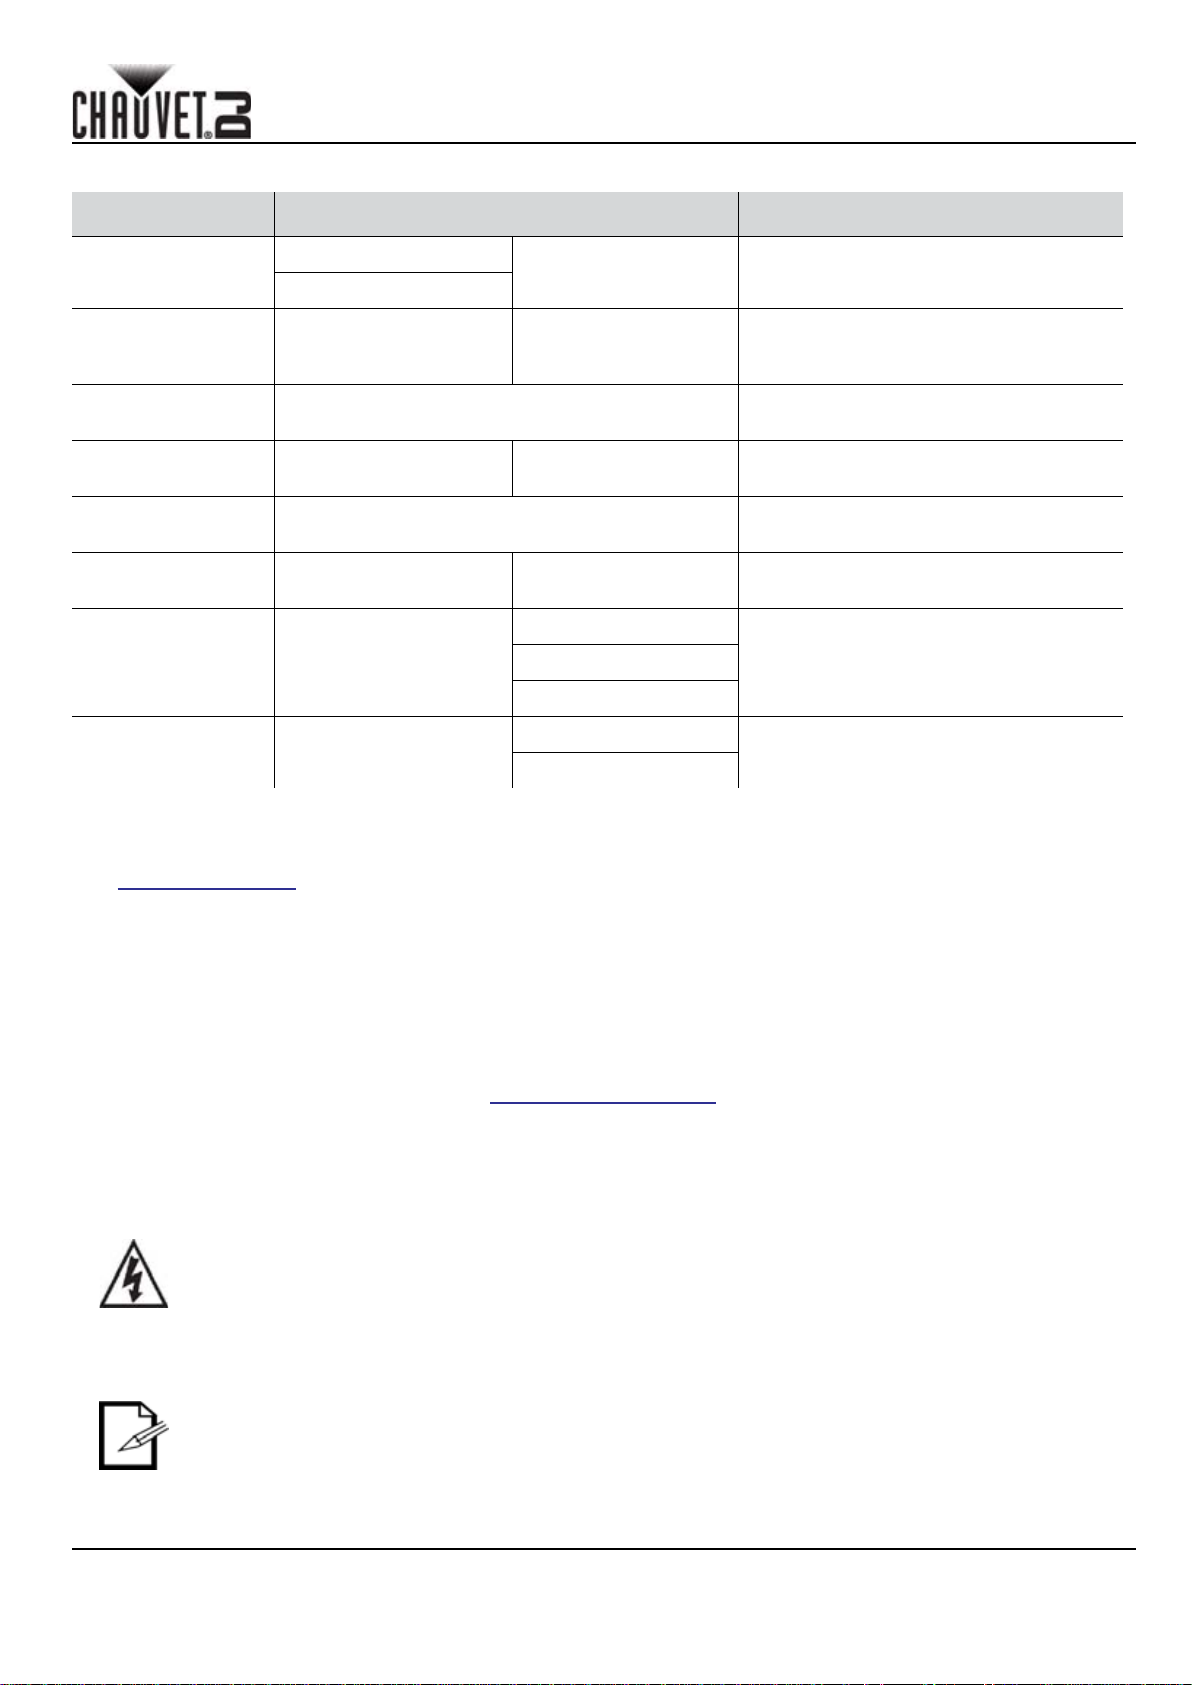
Menu Map
MODE PROGRAMMING LEVELS DESCRIPTION
QUICK REFERENCE GUIDE
EN
Dmx Mode
Preset Colors C-- C 1-C 7
Automatic Pro-
grams
Speed S-- S 1-S100
Sound-Active Snd
Sound Sensitivity Sens u 1-u100
RGB Color Mixing U--
Infrared Mode Set
3-CH
15CH
d1-d512 Set the DMX starting address
Selects one of the preset colors (red,
green, blue, cyan, magenta, yellow, or
white)
Auto Turns on Auto mode
Adjusts the speed of the automatic
programs (fast to slow)
The internal program runs to the beat of
the music
Turns on and adjusts the sensitivity of
the Sound active mode (low to high)
r 0-r100
g 0-g100
b 0-b100
ON
OFF
Adjust the red, green, and blue levels to
create a custom color
Turns on Infrared mode for IRC-6 remote
use
DMX Linking
The 4Bar LT USB can work with a DMX controller. Instructions for connecting and configuring this product for DMX
operation are in the User Manual. If you are not familiar with DMX or dip switch configuration, download the DMX Primer
from www.chauvetdj.com.
Starting Address
To ensure full access to all channels available in DMX mode, the highest recommended DMX address is 512.
Master/Slave Connection
The 4Bar LT USB uses the DMX data connection for its Master/Slave made. Instructions for connecting and configuring
this product for Master/Slave operation are in the User Manual.
IRC-6 (Infrared Remote Control)
The 4Bar L T USB is fully compatible with the Infrared Remote Control (IRC-6) from CHAUVET® DJ For more information
on the IRC-6 or to download instructions, go to www.chauvetlighting.com.
D-Fi USB Connectivity
The 4Bar L T USB is able to become a D-Fi wireless receiver/transmitter with the use of the D-Fi USB from CHAUVET DJ.
Simply set the DIP switch D-Fi receiving/transmitting channel, plug it into the USB port then set the product's DMX
Personality and DMX Address. Further instructions for connecting and configuring this product for D-Fi USB operation
are in the User Manual.
WARNING! DO NOT plug anything other than a D-Fi USB into the USB port. Doing so may cause
damage to the product.
Once plugged in, the D-Fi USB will take over the product. Wired DMX, manual display control/
menu buttons and IRC-6 will be unavailable until you unplug the D-Fi USB. The priority levels are:
1. D-Fi USB
2. Wired DMX
3. IRC-6 Remote Control
4. Manual Digital Display/Menu Buttons
4BAR LT USB QRG Rev. 2
4
Page 6
QUICK REFERENCE GUIDE
EN
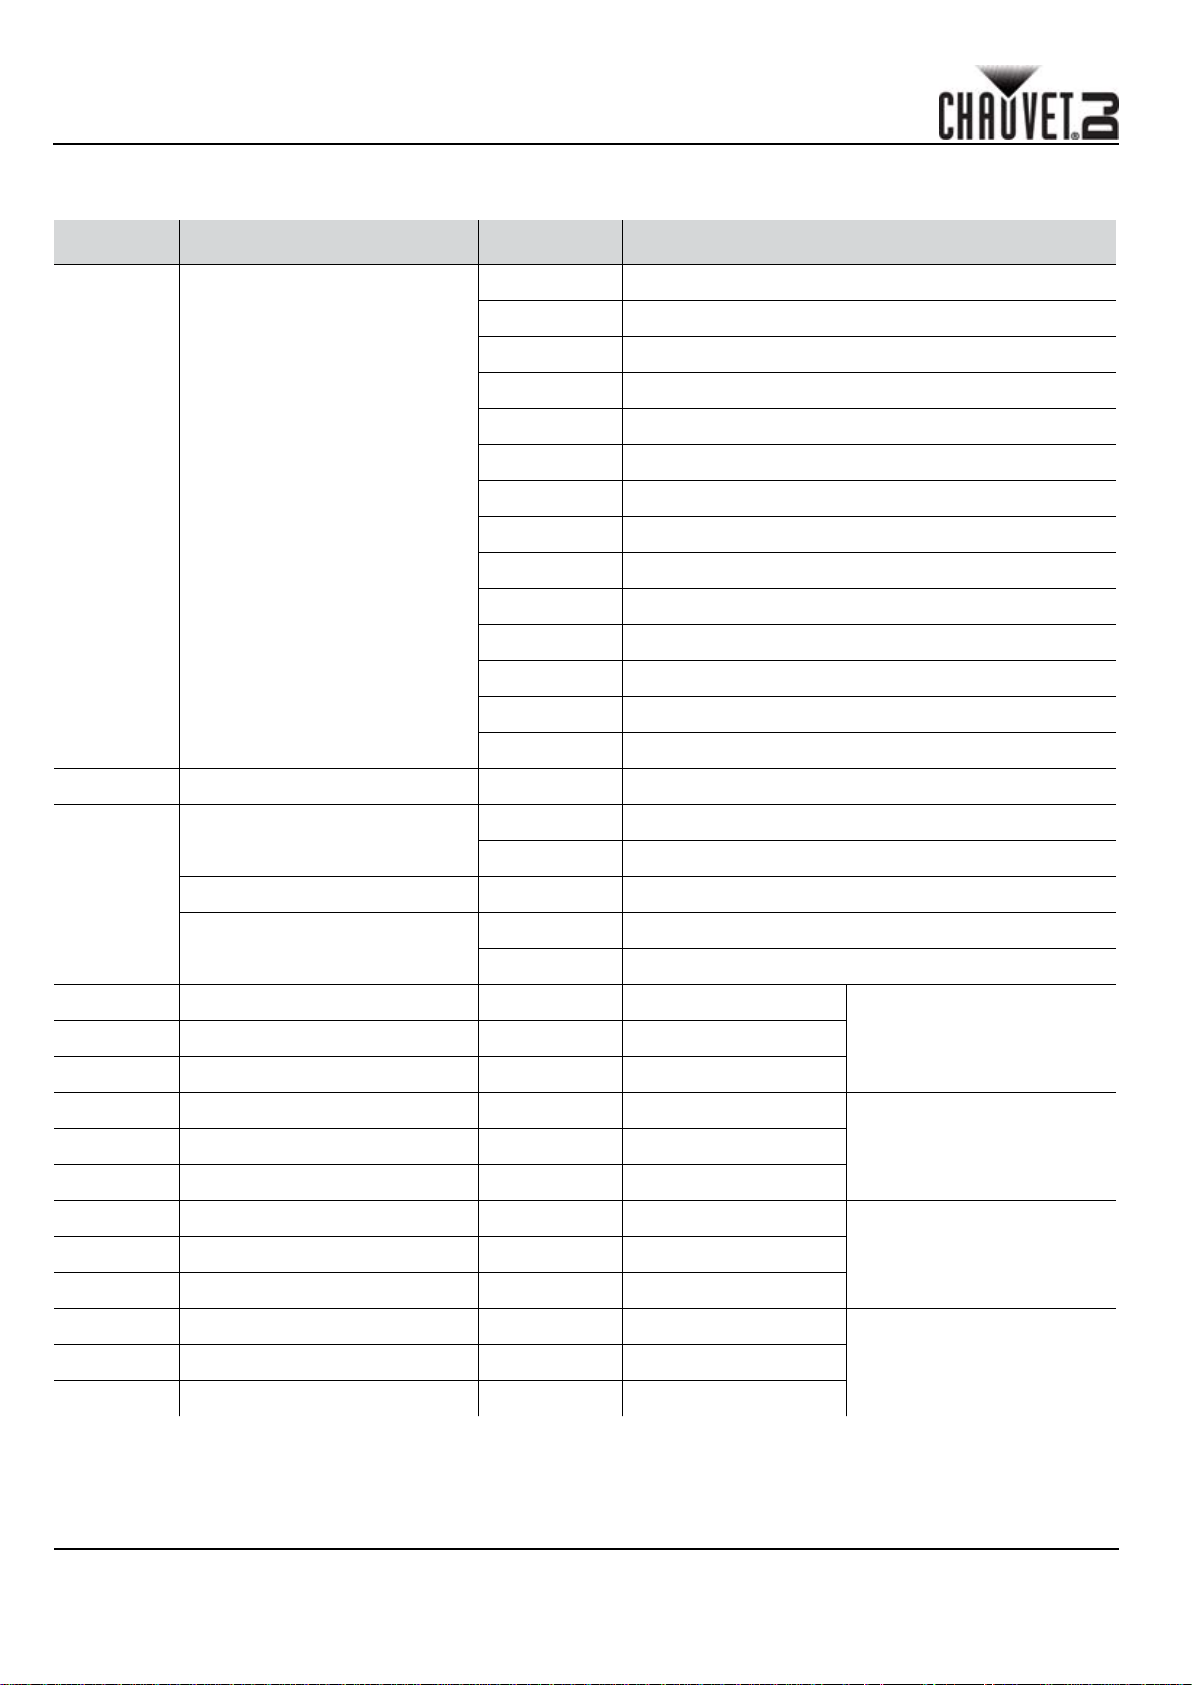
DMX Values
15CH
CHANNEL FUNCTION VALUE PERCENT/SETTING
000
009 RGB Color Mixing
010 029 Auto Program 1
049 Auto Program 2
030
050 069 Auto Program 3
070
089 Auto Program 4
090 109 Auto Program 5
1 Control Operating Mode
110 129 Auto Program 6
149 Auto Program 7
130
150 169 Auto Program 8
170 189 Auto Program 9
190 209 Auto Program 10
210
229 Auto Program 11
230 249 Auto Program 12
250 255 Sound-Active Mode
2 Dimmer 000 255 0-100%
000 009 No Function
Strobe
010 255 Slow to Fast
3
Auto Speed 000 255 Auto Speed (slow to fast)
000 010 Sound Sensitivity OFF
Sound Sensitivity
011 255 Adjust Sensitivity
4 Red 000 255 0-100%
6 Blue 000 255 0-100%
RGB Color Mixing (Pod 1)5 Green 000 255 0-100%
7 Red 000 255 0-100%
9 Blue 000 255 0-100%
10 Red 000 255 0-100%
12 Blue 000 255 0-100%
13 Red 000 255 0-100%
15 Blue 000 255 0-100%
5
RGB Color Mixing (Pod 2)8 Green 000 255 0-100%
RGB Color Mixing (Pod 3)11 Green 000 255 0-100%
RGB Color Mixing (Pod 4)14 Green 000 255 0-100%
4BAR LT USB QRG Rev. 2
Page 7
QUICK REFERENCE GUIDE
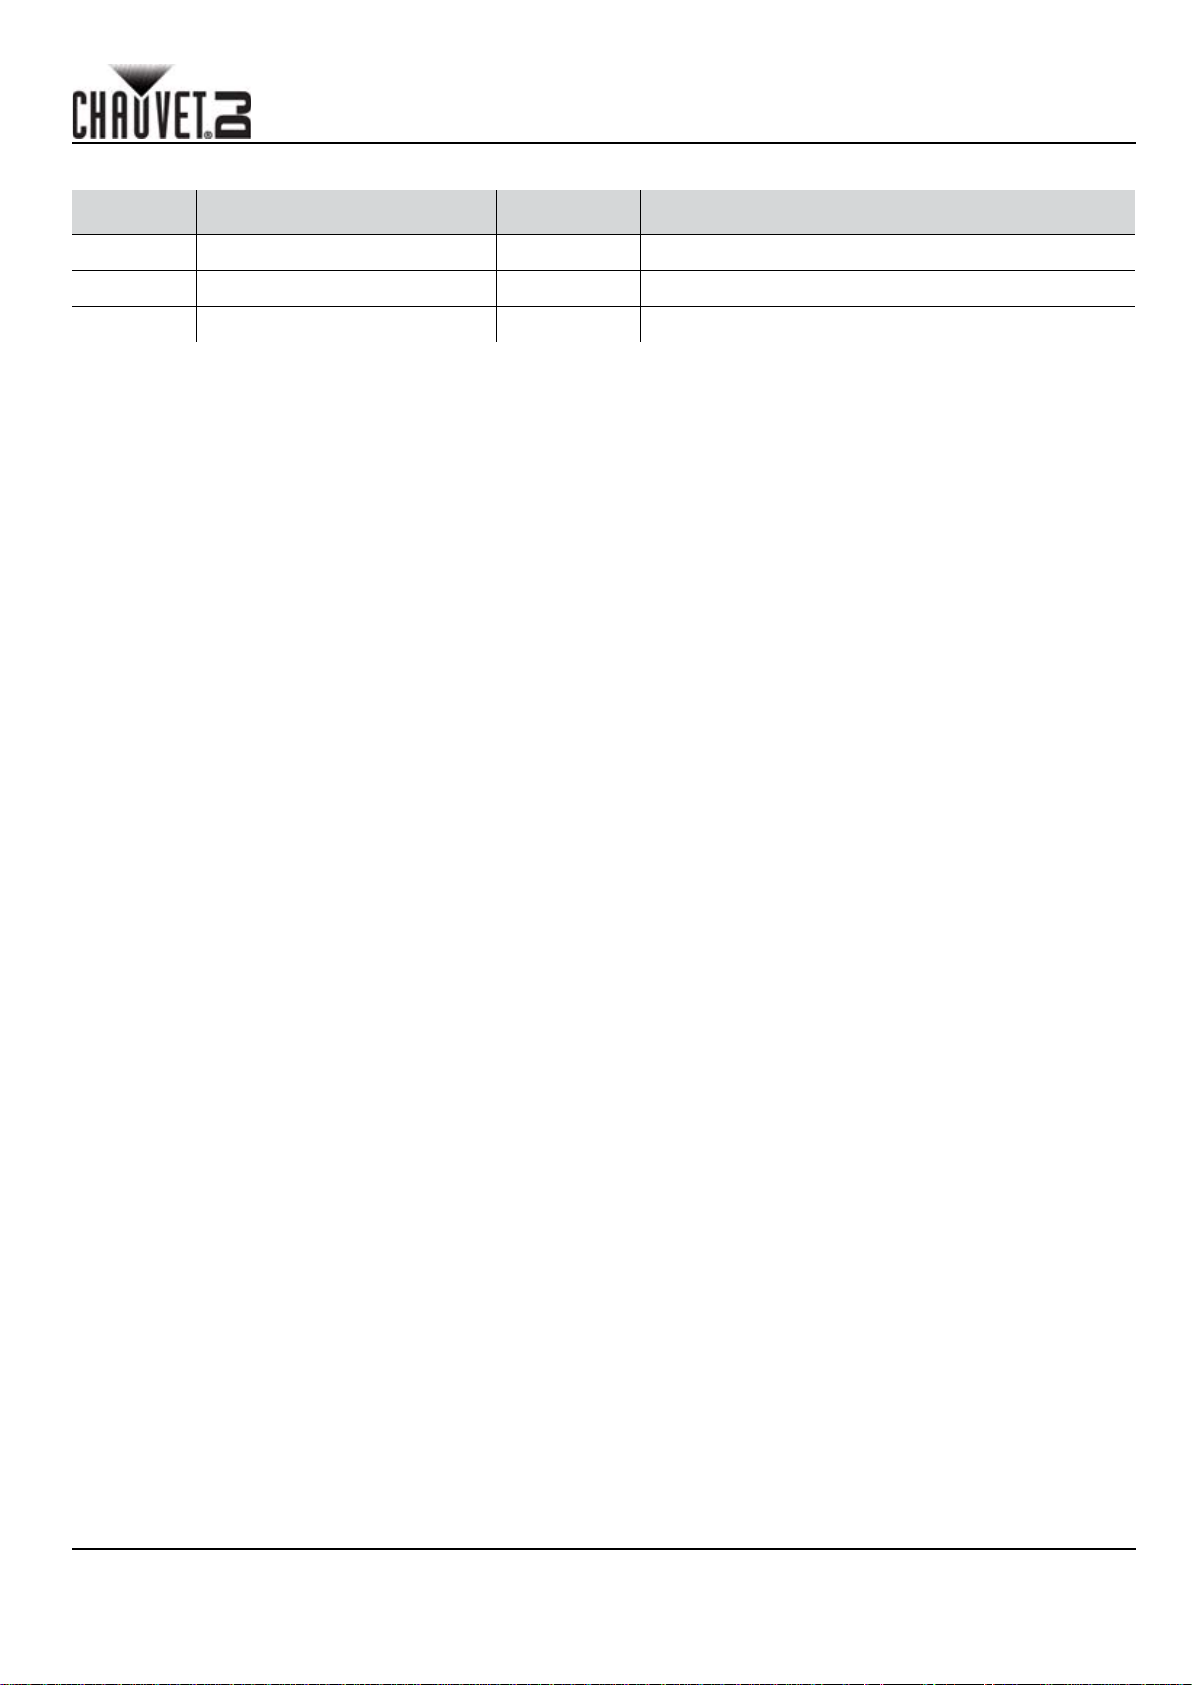
3-CH
CHANNEL FUNCTION VALUE PERCENT/SETTING
1 Red 000 255 0-100%
EN
2 Green 000
3 Blue 000 255 0-100%
255 0-100%
4BAR LT USB QRG Rev. 2
6
Page 8

GUÍA DE REFERENCIA RÁPIDA
ES
Acerca de Esta Guía
La Guía de Referencia Rápida (GRR) del 4Bar LT USB contiene información básica sobre el producto, como montaje,
opciones de menú y valores DMX. Descargue el Manual de Usuario de
detallada.
Exención de Responsabilidad
La información y especificaciones contenidas en esta GRR están sujetas a cambio sin previo aviso.
Notas de Seguridad
Estas notas de seguridad incluyen información importante sobre el montaje, uso y mantenimiento.
• Este producto no está cocebido para una instalación permanente.
• Conecte este producto SOLO a un circuito con toma de tierra y protegido.
• Desconecte siempre de la alimentación antes de la limpieza o sustitución del fusible.
• Asegúrese de que el cable de alimentación no está retorcido ni estropeado
• Nunca desconecte este producto del cable de alimentación agarrando o tirando del cable.
• NO toque este producto cuando esté en funcionamiento, pues podría estar caliente
• Cuando monte este producto en alto, use un cable de seguridad.
• NO permita la presencia de materiales inflamables cerca de la unidad cuando esté en
funcionamiento.
www.chauvetlighting.com para información más
• La tensión del enchufe al que conecte este producto ha de estar en el rango establecido en el
grabado o en el panel posterior de producto.
• ¡Este producto es para uso en interiores solamente! (IP20) Para evitar riesgos de incendio o
descarga, no exponga este producto a la lluvia o la humedad.
• Monte siempre este producto en una ubicación con ventilación adecuada, al menos a 20'' (50 cm)
de superficies adyacentes.
• Asegúrese de que ninguna ranura de ventilación en la carcasa de la unidad queda bloqueada.
• Nunca conecte este producto a un atenuador o reostato.
• Sustituya el fusible con uno del mismo tipo y categoría.
• Use SOLAMENTE los soportes de colgar/montar para mover este producto.
• La máxima temperatura ambiente es de 104 °F (40 °C). No haga funcionar este producto a
temperaturas más altas.
• En caso de un problema grave de funcionamiento, deje de usarlo inmediatamente.
• NO abra este producto. No contiene piezas reparables por el usuario.
• Para evitar un desgaste innecesario y alargar su vida útil, desconecte complemente el producto
de la alimentación, mediante el interruptor o desenchufándolo, durante los periodos en los que no
se use.
Contacto
Fuera de EE.UU, Reino Unido, Irlanda, México o Benelux, póngase en contacto con su distribuidor para solicitar
asistencia o devolver el producto. Visite www.chauvetdj.com para información de contacto.
Qué va Incluido
• 4Bar LT USB
• Cable de Alimentación
• Cajas de transporte
• Tripode
• Pedal Con Cable
• Warranty Card
• Quick Reference Guide
Para Empezar
Desembale su 4Bar LT USB y asegúrese de que ha recibido todas las partes en buen estado. Si la caja o los
componentes parecen dañados, notifíqueselo al transportista inmediatamente, no a Chauvet.
7
4BAR LT USB GRR Rev. 2
Page 9
GUÍA DE REFERENCIA RÁPIDA
ES
Descripción
El 4Bar LT USB es una solución de baño de luz portátil completa, diseñada para artistas móviles. Va equipado con
control DMX inalámbrico, con el práctico puerto D-Fi USB (se vende por separado) integrado, es compatible con IRC y
sus características adicionales permiten el funcionamiento Maestro/Esclavo y los modos automático/activo por sonido.
Cada unidad del 4Bar LT USB dispone de 3 LED tricolor de alta potencia, que se pueden colocar independientemente
para garantizar una cobertura total de la sala o del escenario. Los LED tricolor son perfectos para iluminación frontal, ya
que prácticamente eliminan la sombra multicolor. Instale y desmonte fácilmente en minutos usando el trípode, pedal y
bolsas de transporte incluidos.
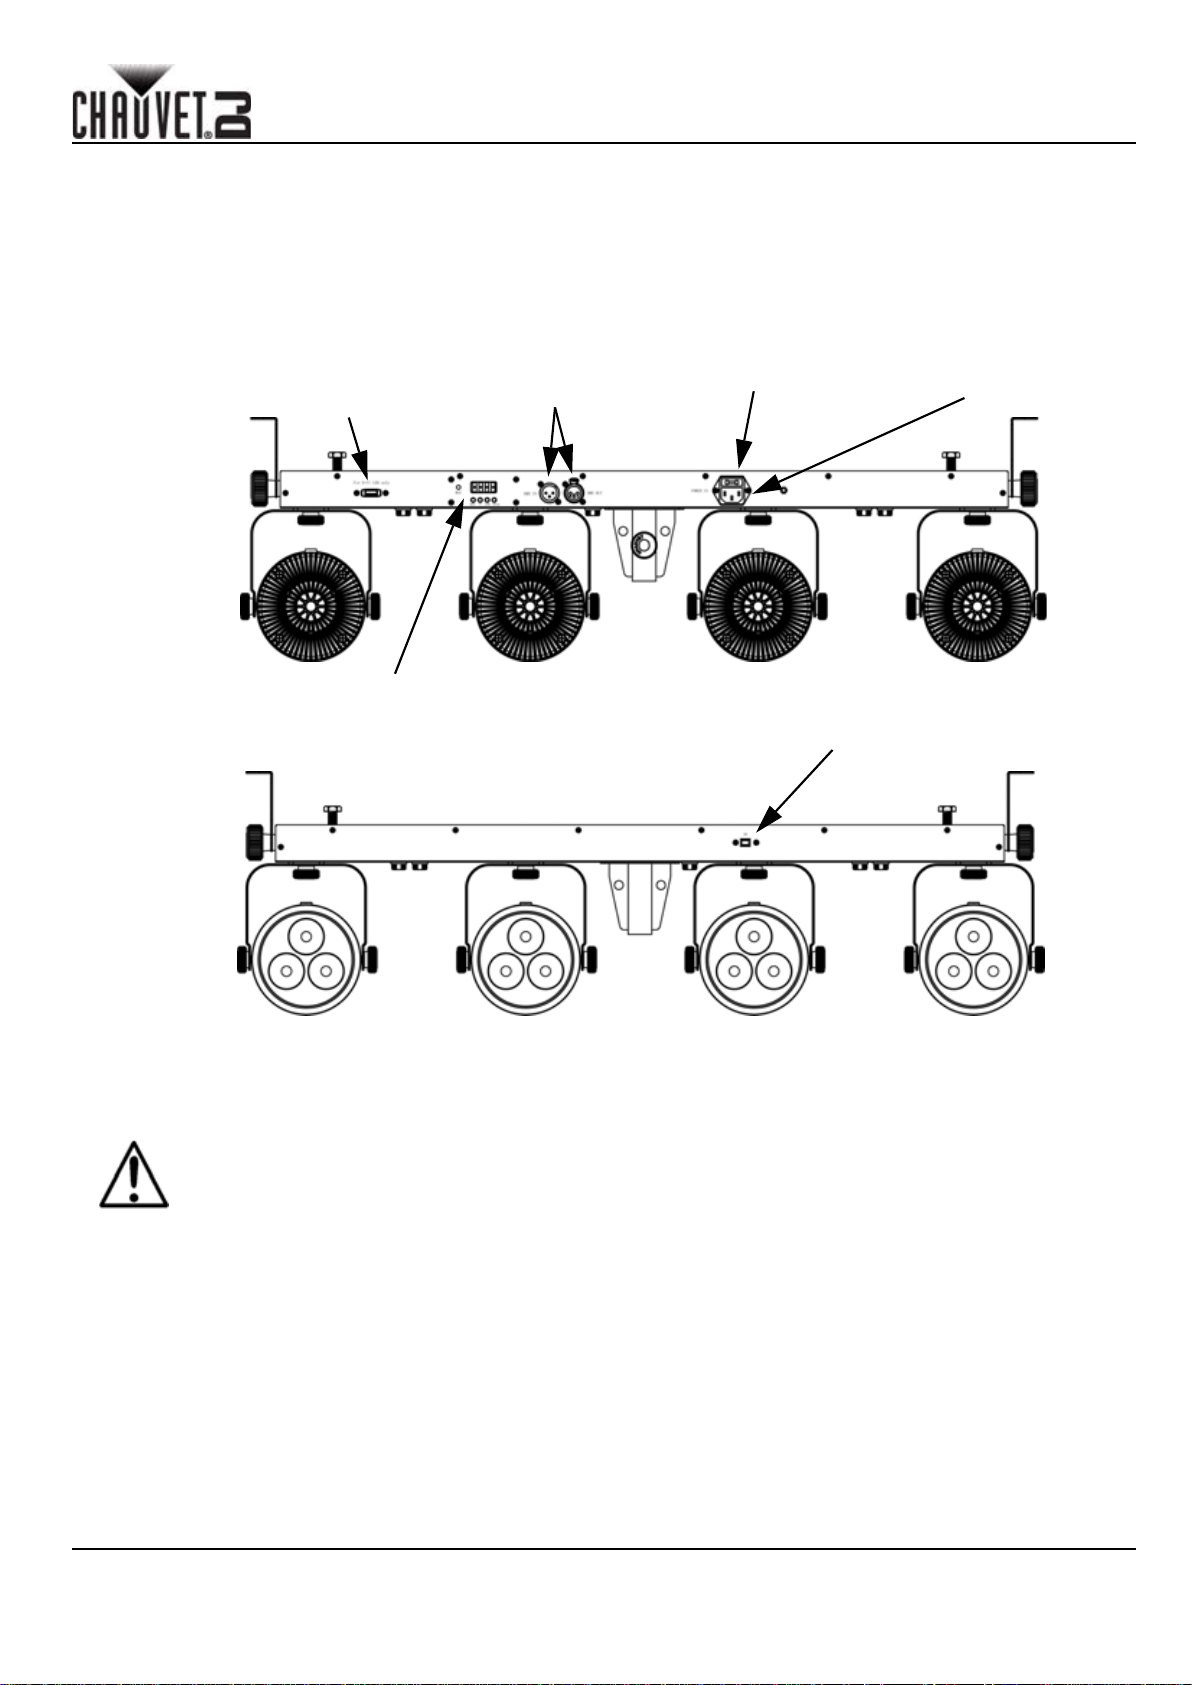
Vista General
D Puerto USB D-Fi
Entrada/
Salida DMX
Portafusibles
Entrada de alimentación
Pantalla LED
a Todo
Sensor IR
Corriente Alterna
Este producto tiene una fuente de alimentación con detección automática que puede funcionar con un rango de tensión
de entrada de 100–240 VCA, 50/60 Hz.
Para evitar un desgaste innecesario y alargar su vida útil, desconecte complemente el producto
de la alimentación, mediante el interruptor o desenchufándolo, durante los periodos en los que
no se use.
Alimentación en cadena
Para ver el máximo número de productos 4Bar LT USB que se pueden alimentar en cadena, consulte el Manual de
usuario o la pegatina del producto
Sustitución del Fusible
1. Desconecte el producto de la alimentación.
2. Con ayuda de un destornillador de cabeza plana, afloje el portafusibles y extráigalo directamente.
3. Quite el fusible fundido del portafusibles y sustituya el fusible con otro del mismo tipo y categoría.
4. Vuelva a insertar el portafusibles y conecte de nuevo la alimentación.
4BAR LT USB GRR Rev. 2
8
Page 10
GUÍA DE REFERENCIA RÁPIDA
ES
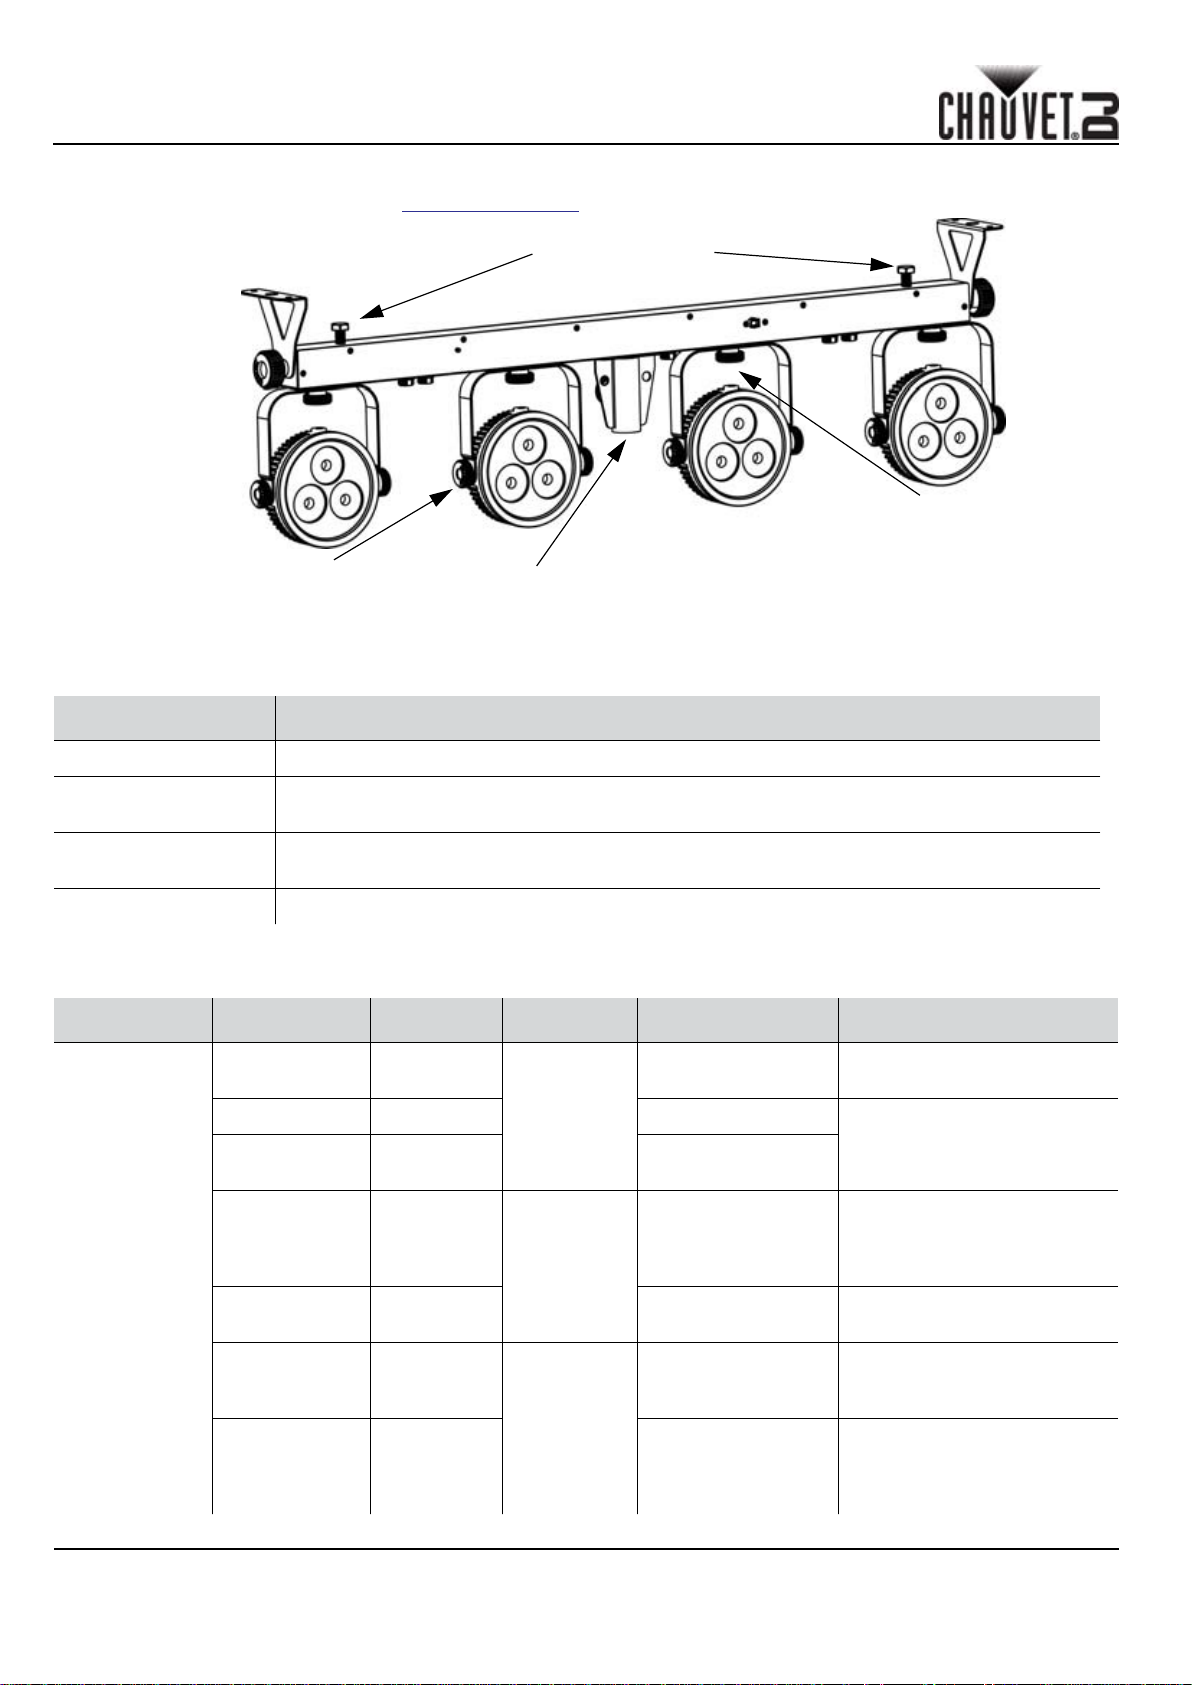
Montaje
Antes de montar este producto, lea las Notas de Seguridad y consulte el Manual del Usuario.
M10 Pernos de la
abrazadera para
colgar
Mando de ajuste
panorámico de la
Mando de ajuste
de inclinación de
la unidad
Punto de
inserción del
trípode
unidad
Descripción del Panel de Control
BOTÓN FUNCIÓN
<MENU> Selecciona un modo de funcionamiento o sale de la opción de menú actual
<UP>
<DOWN>
<ENTER> Activa una opción de menú o valor seleccionado
Conexión del pedal
El 4Bar LT USB se puede manejar también con el pedal.
PEDAL SUBOPCIÓN FUNCIÓN PEDAL SUBOPCIÓN FUNCTION
derecha
(preset)
Se desplaza hacia arriba por la lista de menú o aumenta el valor numérico cuando está en
una función
Se desplaza hacia abajo por la lista de menú o disminuye el valor numérico cuando está
en una función
1 x presión Blanco
2 x presión Rojo 9 x presión
3 x presión Verde
4 x presión Azul
5 x presión Cián
derecha
(preset)
izquierda
(Blackout)
8 x presión
Presione y man-
tenga
1 x presión
Presione y man-
tenga
Cambio de color cada
segundo en bucle continuo
Cambio de color cada tres
segundos en bucle continuo
Todos los LED apagados;
presione el pedal 1 o los
pedales 1 y 2 para volver a
entrar en los modos activos
Desvanece LEDs de entrada
/ salida lentamente
Presionar ambos
6 x presión Magenta
7 x presión Amarillo
derecha &
izquierda
(Sound
Active)
9
pedales simultán-
eamente
Al pulsar y man-
tener simultánea-
mente los dos
pedales
Sensibilidad al sonido
Estroboscopio
4BAR LT USB GRR Rev. 2
Page 11
GUÍA DE REFERENCIA RÁPIDA
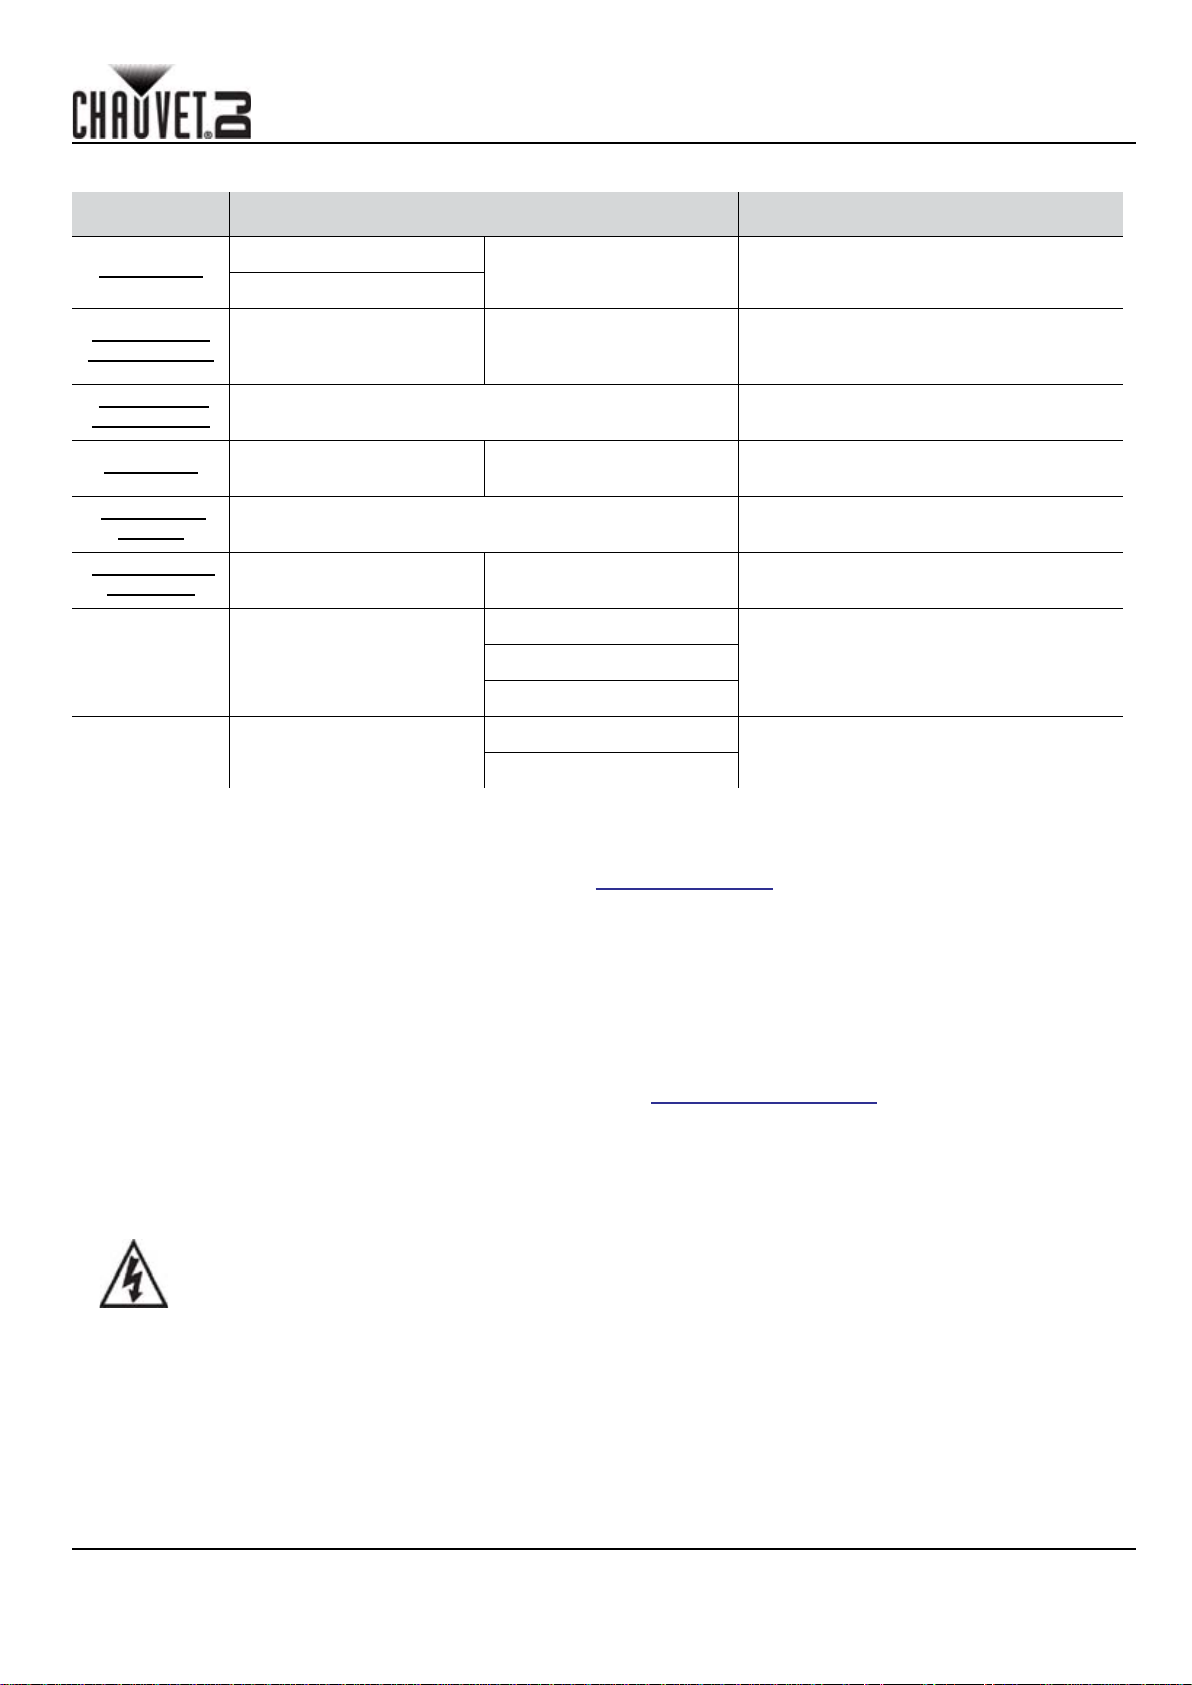
Mapa de Menú
MODO NIVELES DE PROGRAMACIÓN DESCRIPCIÓN
ES
Modo DMX
Colores pre-
configurados
Programas
automáticos
Velocidad S-- S 1-S100
Activo por
sonido
Sensibilidad
al sonido
Mezcla de
color RGB
Modo Infrar-
rojos
3-CH
15CH
C-- C 1-C 7
Auto Activa el modo Automático
Snd
Sens u 1-u100
U--
Set
d1-d512 Configura la dirección inicial DMX
r 0-r100
g 0-g100
b 0-b100
ON
OFF
Selecciona uno de los colores
preconfigurados (rojo, verde, azul, cián,
magenta, amarillo o blanco)
Ajusta la velocidad de los programas
automáticos (rápido a lento)
El programa interno se ejecuta al ritmo
de la música
Ajusta la sensibilidad del modo Sonido
(baja a alta)
Enciende el modo Infrarrojos para el
mando a distancia IRC-6
Activa o desactivar el uso de control de
pie inalámbrico y establece canal
Enlace DMX
El 4Bar LT USB puede funcionar con un controlador DMX cuando se enlaza por conexiones serie DMX. Las
instrucciones para conectar y configurar este producto para funcionamiento DMX están en el Manual de Usuario. Si no
está familiarizado con DMX, descargue el Manual DMX de www.chauvetdj.com.
Dirección de Inicio
Para asegurarse acceso total a todos los canales en cada modo DMX, la dirección DMX más recomendable es 510.
Conexión Maestro/Esclavo
El 4Bar LT USB usa la conexión de datos DMX para su modo Maestro/Esclavo. Las instrucciones para conectar y
configurar este producto para funcionamiento Maestro/Esclavo están en el Manual de Usuario.
IRC-6 (Control Remoto por Infrarrojos)
El 4Bar LT USB es totalmetne compatible con el control remoto por infrarrojos (IRC-6) de CHAUVET® DJ. Para más
información sobre el IRC-6 o para descargar instrucciones, visite www.chauvetlighting.com .
Conectividad D-Fi USB
El 4Bar LT USB tiene la capacidad de convertirse en un receptor/transmisor D-Fi inalámbrico utilizando el D-Fi USB de
CHAUVET® DJ. Simplemente configure el conmutador DIP para el canal de recepción/transmisión del D-Fi, enchúfelo
en el puerto USB y luego configure la personalidad DMX del producto y la dirección DMX. Consulte las demás
instrucciones para conectar y configurar este producto para funcionamiento del D-Fi USB en el Manual de usuario.
¡ADVERTENCIA! NO enchufe nada que no sea un D-Fi USB en el puerto USB. Si lo hace, podría
producir daños al producto.
4BAR LT USB GRR Rev. 2
10
Page 12

ES
GUÍA DE REFERENCIA RÁPIDA
Una vez conectado, el D-Fi USB tomará el control del producto. El DMX por cable, el control de
pantalla manual/botones de menú y el IRC-6 no estarán disponibles hasta que desconecte el D-Fi
USB. Los niveles de prioridad son:
1. D-Fi USB
2. DMX por cable
3. Mando a distancia IRC-6
4. Control de pantalla manual/botones de menú
11
4BAR LT USB GRR Rev. 2
Page 13
GUÍA DE REFERENCIA RÁPIDA
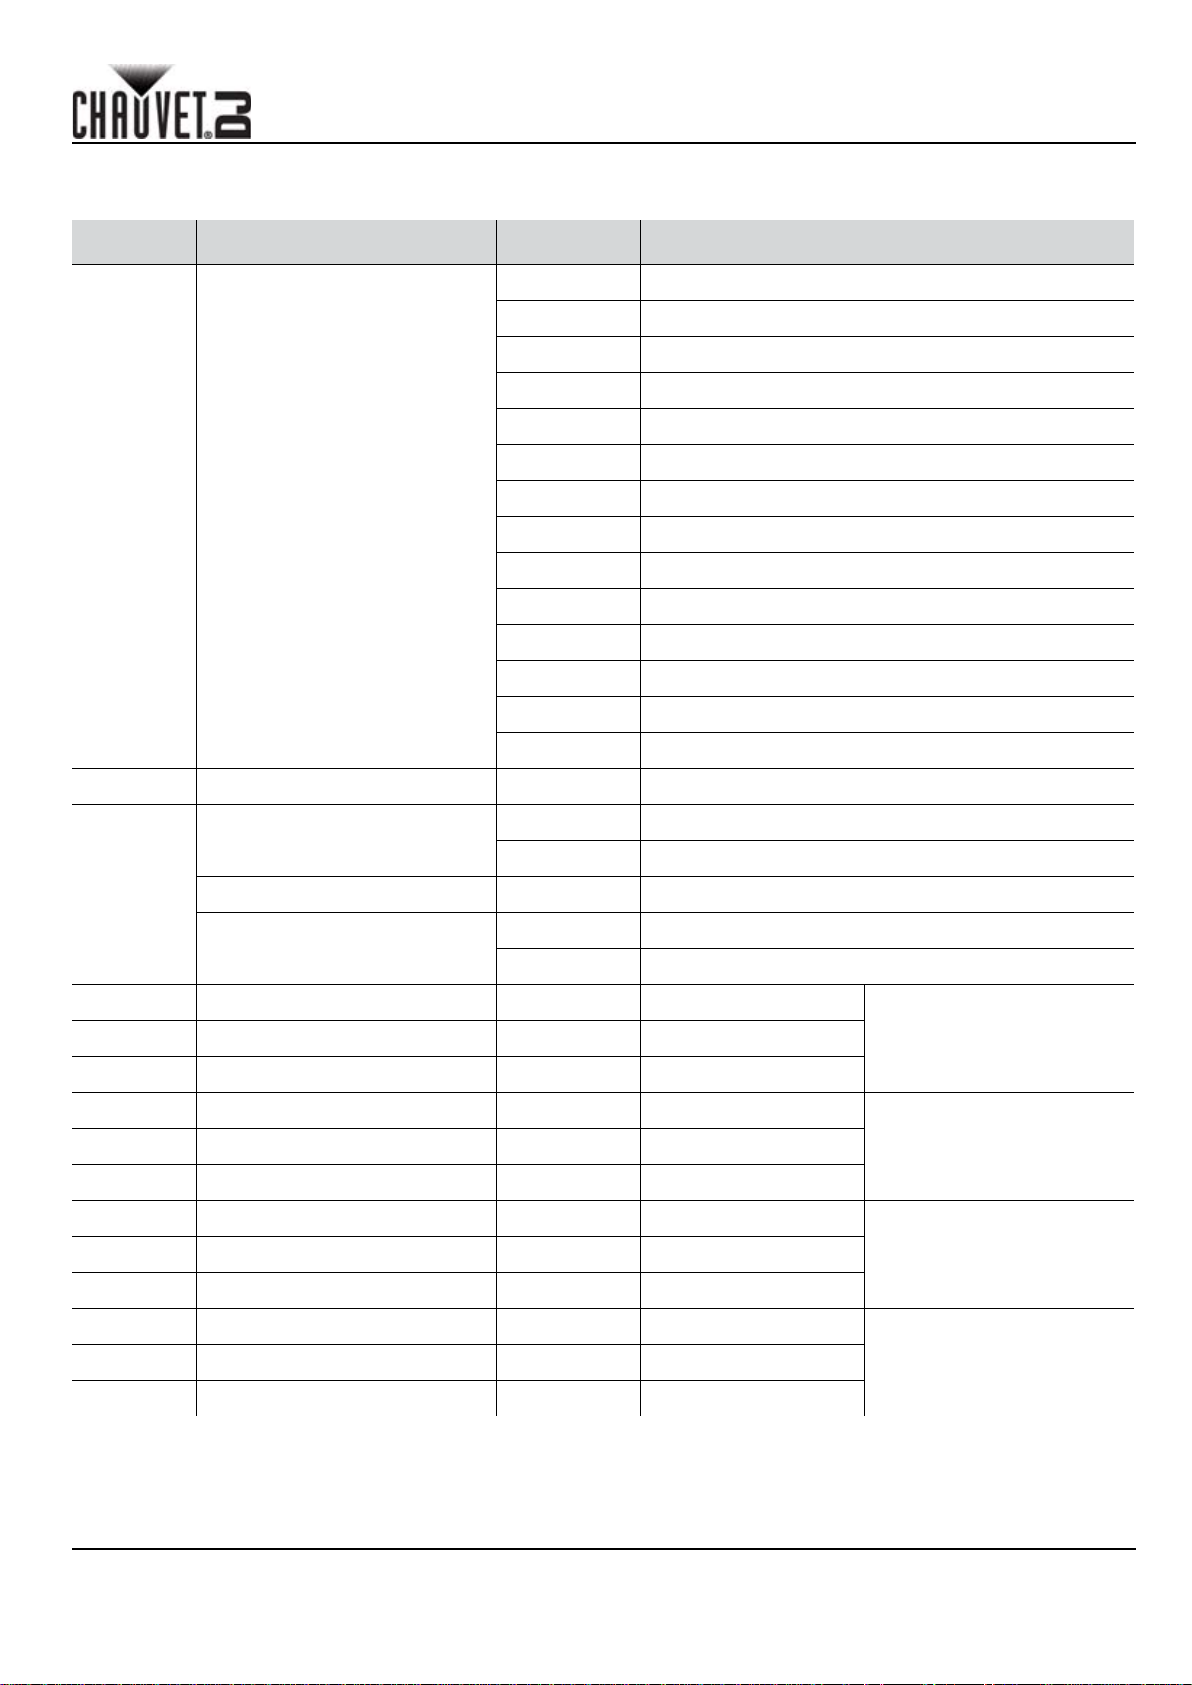
Valores DMX
15CH
CANAL FUNCIÓN VALOR PORCENTAJE/CONFIGURACIÓN
000
009 Mezcla de color RGB
010 029 Programa automático 1
049 Programa automático 2
030
050 069 Programa automático 3
070 089 Programa automático 4
090 109 Programa automático 5
ES
1
2 Atenuador 000 255 0-100%
3
4 Rojo 000 255 0-100%
5 Verde 000 255 0-100%
6 Azul 000 255 0-100%
Control/Modo de
funcionamiento
Estroboscopio
Velocidad de programa 000 255 Velocidad de lenta a rápida
Sensibilidad al sonido
110 129 Programa automático 6
130 149 Programa automático7
150 169 Programa automático 8
170 189 Programa automático 9
190 209 Programa automático 10
210 229 Programa automático 11
230 249 Programa automático 12
250 255 Modo activo por sonido
000 009 Sin función
010 255 Lento a rápido
000 010 Sin función
011 255 Sensibilidad baja a alta
Mezcla de color RGB
(Unidad 1)
7 Rojo 000 255 0-100%
8 Verde 000 255 0-100%
9 Azul 000 255 0-100%
10 Rojo 000 255 0-100%
11 Verde 000 255 0-100%
12 Azul 000 255 0-100%
13 Rojo 000 255 0-100%
14 Verde 000 255 0-100%
15 Azul 000 255 0-100%
4BAR LT USB GRR Rev. 2
Mezcla de color RGB
(Unidad 2)
Mezcla de color RGB
(Unidad 3)
Mezcla de color RGB
(Unidad 4)
12
Page 14

GUÍA DE REFERENCIA RÁPIDA
ES
3-CH
CANAL FUNCIÓN VALOR PORCENTAJE/CONFIGURACIÓN
1 Rojo 000
2 Verde 000 255 0-100%
3 Azul 000 255 0-100%
255 0-100%
13
4BAR LT USB GRR Rev. 2
Page 15

MANUEL DE RÉFÉRENCE
FR
À Propos de ce Manuel
Le Manuel de Référence du 4Bar LT USB reprend des informations de base sur cet appareil notamment en matière de
montage, d'options de menu et de valeurs DMX. Téléchargez le Manuel d'Utilisation sur www.chauvetdj.com pour de
plus amples informations.
Clause de Non-Responsabilité
Les informations et caractéristiques contenues dans ce manuel sont sujettes à changement sans préavis.
Consignes de Sécurité
Ces consignes concernant la sécurité reprennent d'importantes informations en matière d'installation, d'utilisation et de
maintenance.
• Cet appareil n'est pas conçu pour être utilisé dans une installation permanente.
• Connectez UNIQUEMENT ce produit à un circuit protégé et relié à la terre.
• Débranchez toujours cet appareil avant de procéder à son nettoyage ou au remplacement de son
fusible.
• Assurez-vous que le cordon d'alimentation n'est ni tordu ni endommagé.
• Ne débranchez jamais cet appareil en tirant sur le cordon.
• Utilisez TOUJOURS un câble de sécurité lorsque vous montez cet appareil en hauteur.
• Veillez à ce qu'AUCUNE source inflammable ne se trouve à proximité de l'unité lors de son
fonctionnement.
• Ne touchez PAS cet appareil lors de son fonctionnement car il pourrait s'avérer brûlant.
• La tension de la prise à laquelle vous connectez ce cet appareil doit être comprise dans la plage
de tensions reprise sur l'étiquette de l'appareil ou à l'arrière de ce dernier.
• Cet appareil doit être utilisé en intérieur uniquement. (IP20). Afin d'éviter tout risque d'incendie ou
décharge électrique, veillez à n'exposer cet appareil ni à la pluie ni à l'humidité.
• Montez toujours cet appareil dans en endroit bien ventilé, à au moins,
• 20 pouces (50 cm) des surfaces adjacentes.
• Assurez-vous qu'aucune fente de ventilation sur le boîtier ne soit obstruée.
• Ne connectez JAMAIS cet appareil ni à un gradateur ni à un rhéostat.
• Remplacez le fusible avec un de même type et même ampérage.
• Transportez/Suspendez cet appareil UNIQUEMENT au moyen du support dont il est doté.
• La température ambiante maximale supportée par ce produit est de
• 104 °F (40 °C). Ne le faites pas fonctionner à des températures plus élevées.
• En cas de sérieux problèmes de fonctionnement, arrêtez le système immédiatement.
• N’ouvrez P AS ce produit. Il ne contient aucun composant susceptible d’être réparé par l’utilisateur .
• Durant les périodes de non-utilisation, pour éviter tout usure inutile et pour prolonger la durée de
vie, déconnectez-entièrement l'appareil en le débranchant de l'alimentation électrique ou en
coupant le disjoncteur.
Contact
En dehors des États-Unis, du Royaume-Uni, de l’Irlande, du Mexique et de Benelux, contactez votre fournisseur si vous
avez besoin d'assistance ou de retourner votre produit. Consultez le site www.chauvetdj.com pour trouver nos
coordonnées.
Ce Qui est Inclus
• 4Bar LT USB
• Un Cordon d'Alimentation
• Mallettes de transport
• Trépied
• Pédale Wired
• Une Fiche de Garantie
• Un Manuel de Référence
4BAR LT USB MR Rev. 2
14
Page 16
MANUEL DE RÉFÉRENCE
E
FR
Débuter
Déballez votre 4Bar LT USB et assurez-vous d'avoir tout reçu et en bon état. Si l'emballage ou le contenu semblait être
endommagé, indiquez-le immédiatement au transporteur et non à Chauvet.
Description
Le 4Bar LT USB est une solution complète d'éclairage de type wash facile à transporter spécialement conçue pour les
artistes itinérants. Il dispose d'un contrôle DMX sans fil grâce au port D-FI USB (vendu séparément) intégré, d'une
compatibilité IRC et de fonctionnalités supplémentaires permettant un fonctionnement en maître/esclave et en mode
automatique ou activation par le son. Chaque module du 4Bar LT USB est équipé de 3 LED tricolores haute puissance
qui peuvent être positionnées de manière indépendante et ainsi permettre une couverture totale de la salle ou de la
scène. Les LEDs tricolores sont parfaites pour l'éclairage frontal du fait qu'elles éliminent quasiment les ombres
multicolores. Installation et démontage simples ne nécessitant que quelques minutes avec le trépied, la pédale et les
sacs de transport fournis
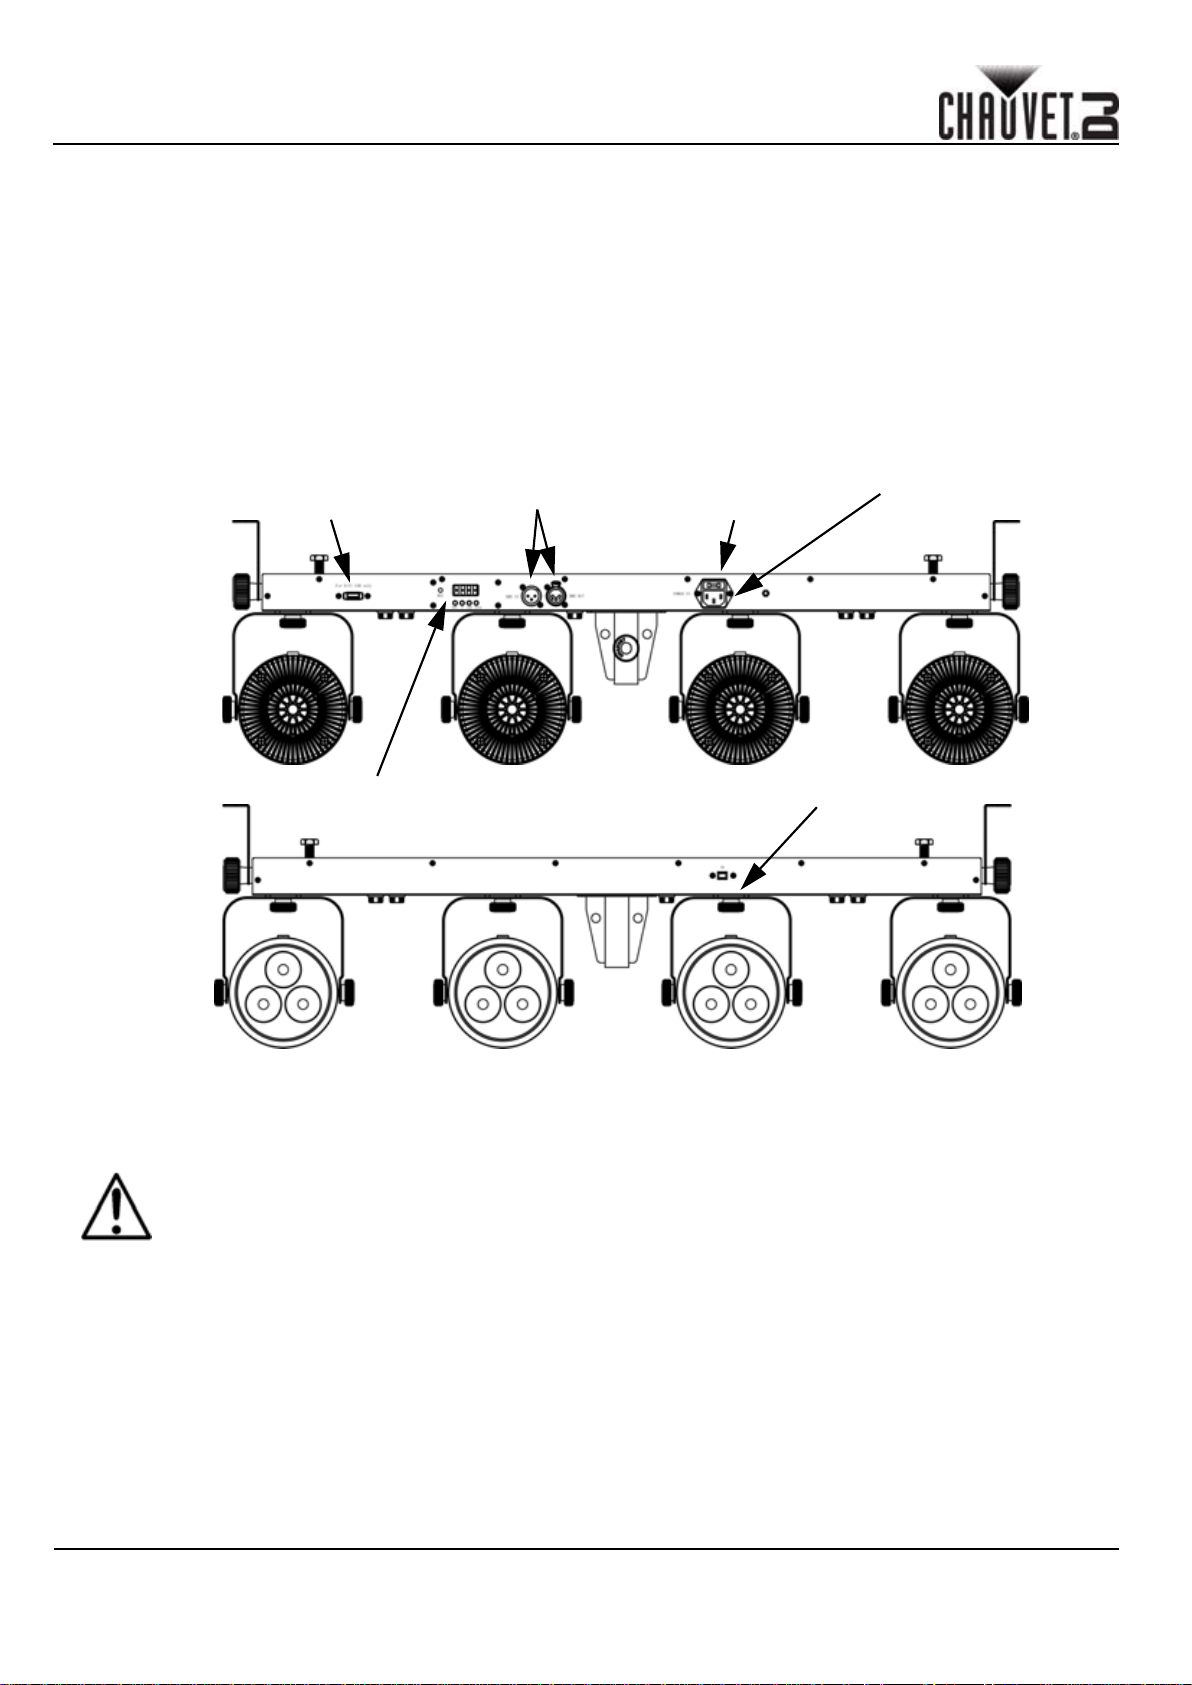
Aperçu
Port USB D-
Fi
ntrée/
sortie DMX
Porte-
fusible
Entrée
d'alimentation
Affichage LED
Alimentation CA
Cet appareil est doté d'une alimentation universelle qui peut prendre en charge toute tension d'entrée comprise entre 100
et 240 VCA, 50/60 Hz.
Durant les périodes de non-utilisation, pour éviter tout usure inutile et pour prolonger la durée de
vie, déconnectez-entièrement l'appareil en le débranchant de l'alimentation électrique ou en
coupant le disjoncteur.
Capteur Infrarouge
Chaînage électrique
Pour savoir combien d'appareils 4Bar LT USB peuvent être chainés au maximum selon le voltage, veuillez consulter le
manuel de l'utilisateur ou l'autocollant apposé sur l'appareil.
Remplacement du Fusible
1. Débranchez l'appareil de l'alimentation.
2. À l'aide d'un tournevis à tête plate, délogez le porte-fusible de son emplacement et sortez-le.
3. Retirez le fusible obsolète du porte-fusible et remplacez-le par un fusible équivalent.
4. Insérez à nouveau le porte-fusible puis rebranchez l'appareil.Re-insert the fuse holder and reconnect power.
15
4BAR LT USB MR Rev. 2
Page 17
MANUEL DE RÉFÉRENCE
Installation
Avant de monter cet appareil, lisez et assimilez les Consignes de Sécurité et se référer à le Manuel d'Utilisateur.
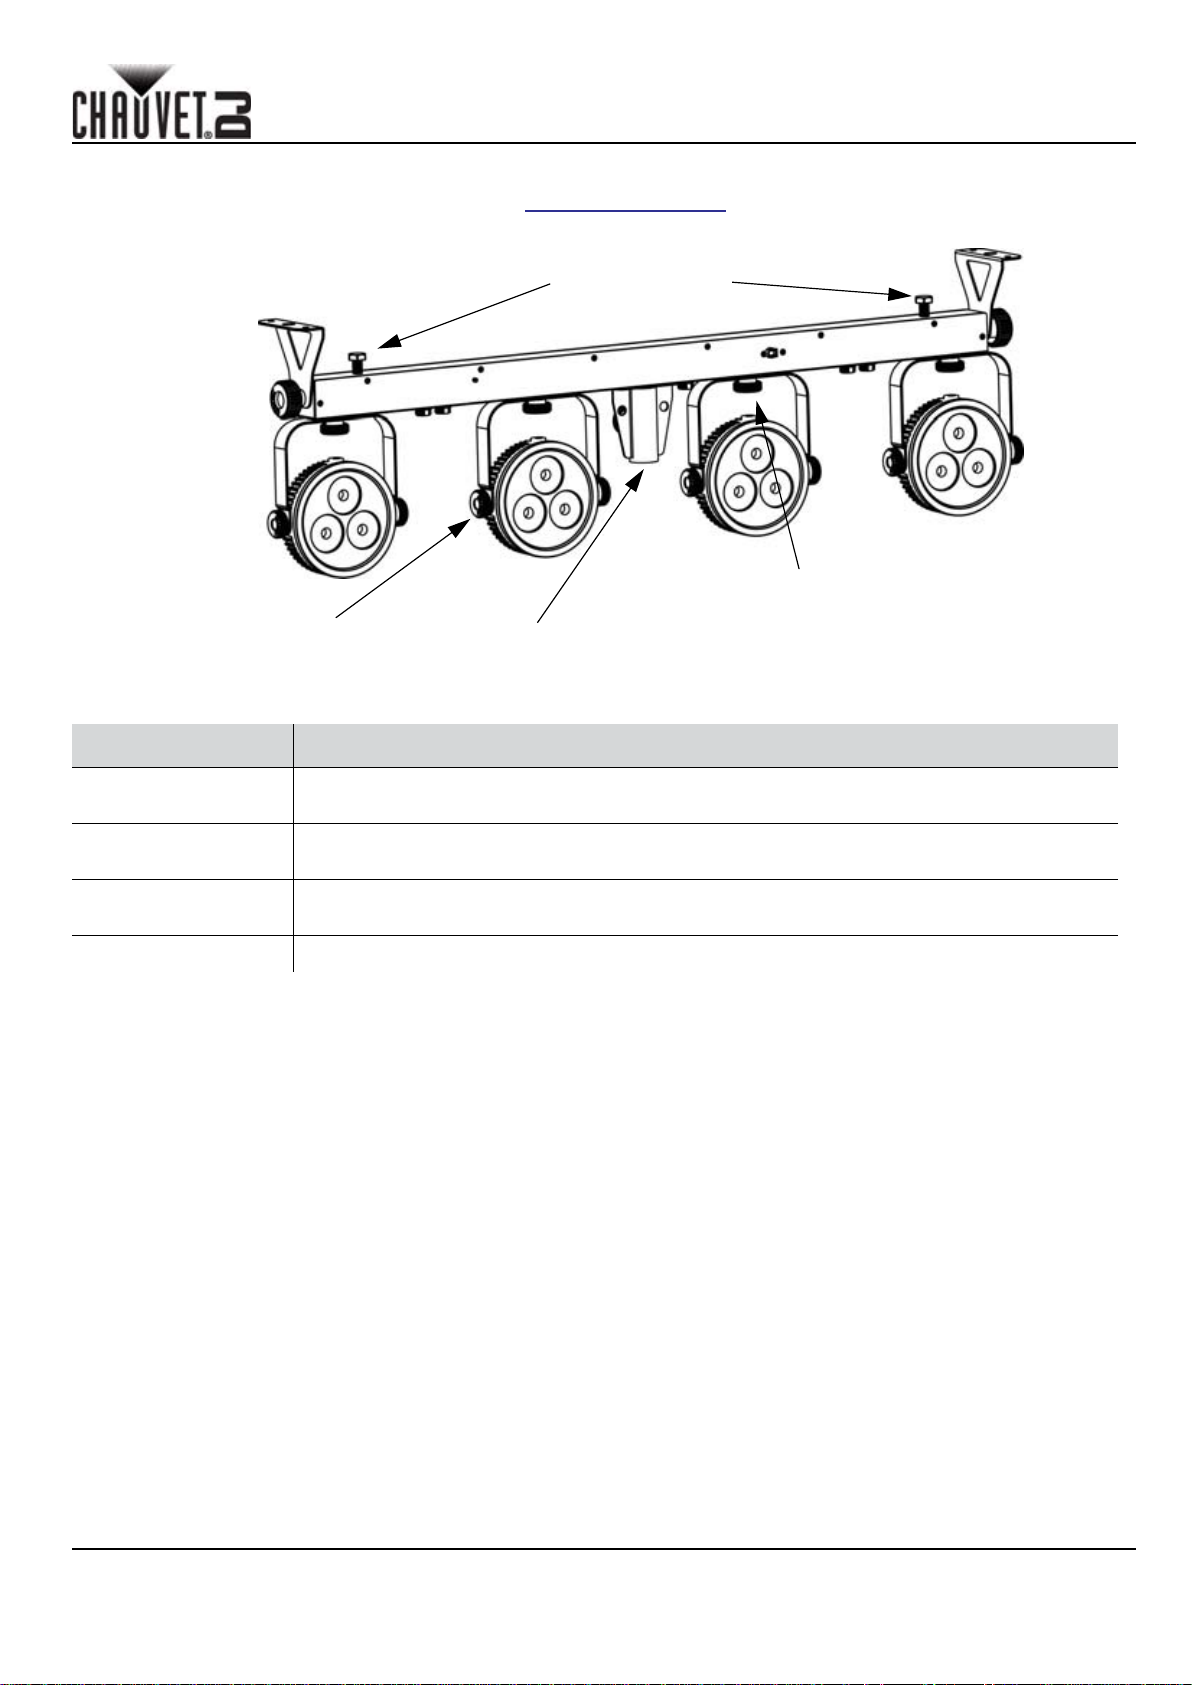
Schéma de Montage
Boulons des
pinces de
suspension
Point d'insertion du
trépied
Bouton de réglage
d'inclinaison du
module
Bouton de réglage
panoramique du
module
Description du Tableau de Commandes
FR
BOUTON FONCTION
<MENU>
<UP>
<DOWN>
<ENTER> Permet d'activer une option de menu ou une valeur sélectionnée
Permet de sélectionner un mode de fonctionnement ou de sortir de l'option de menu
courante
Permet de naviguer vers le haut dans la liste du menu ou d'incrémenter une valeur
numérique dans une fonction
Permet de naviguer vers le bas dans la liste du menu ou de décrémenter une valeur
numérique dans une fonction
4BAR LT USB MR Rev. 2
16
Page 18
MANUEL DE RÉFÉRENCE
FR
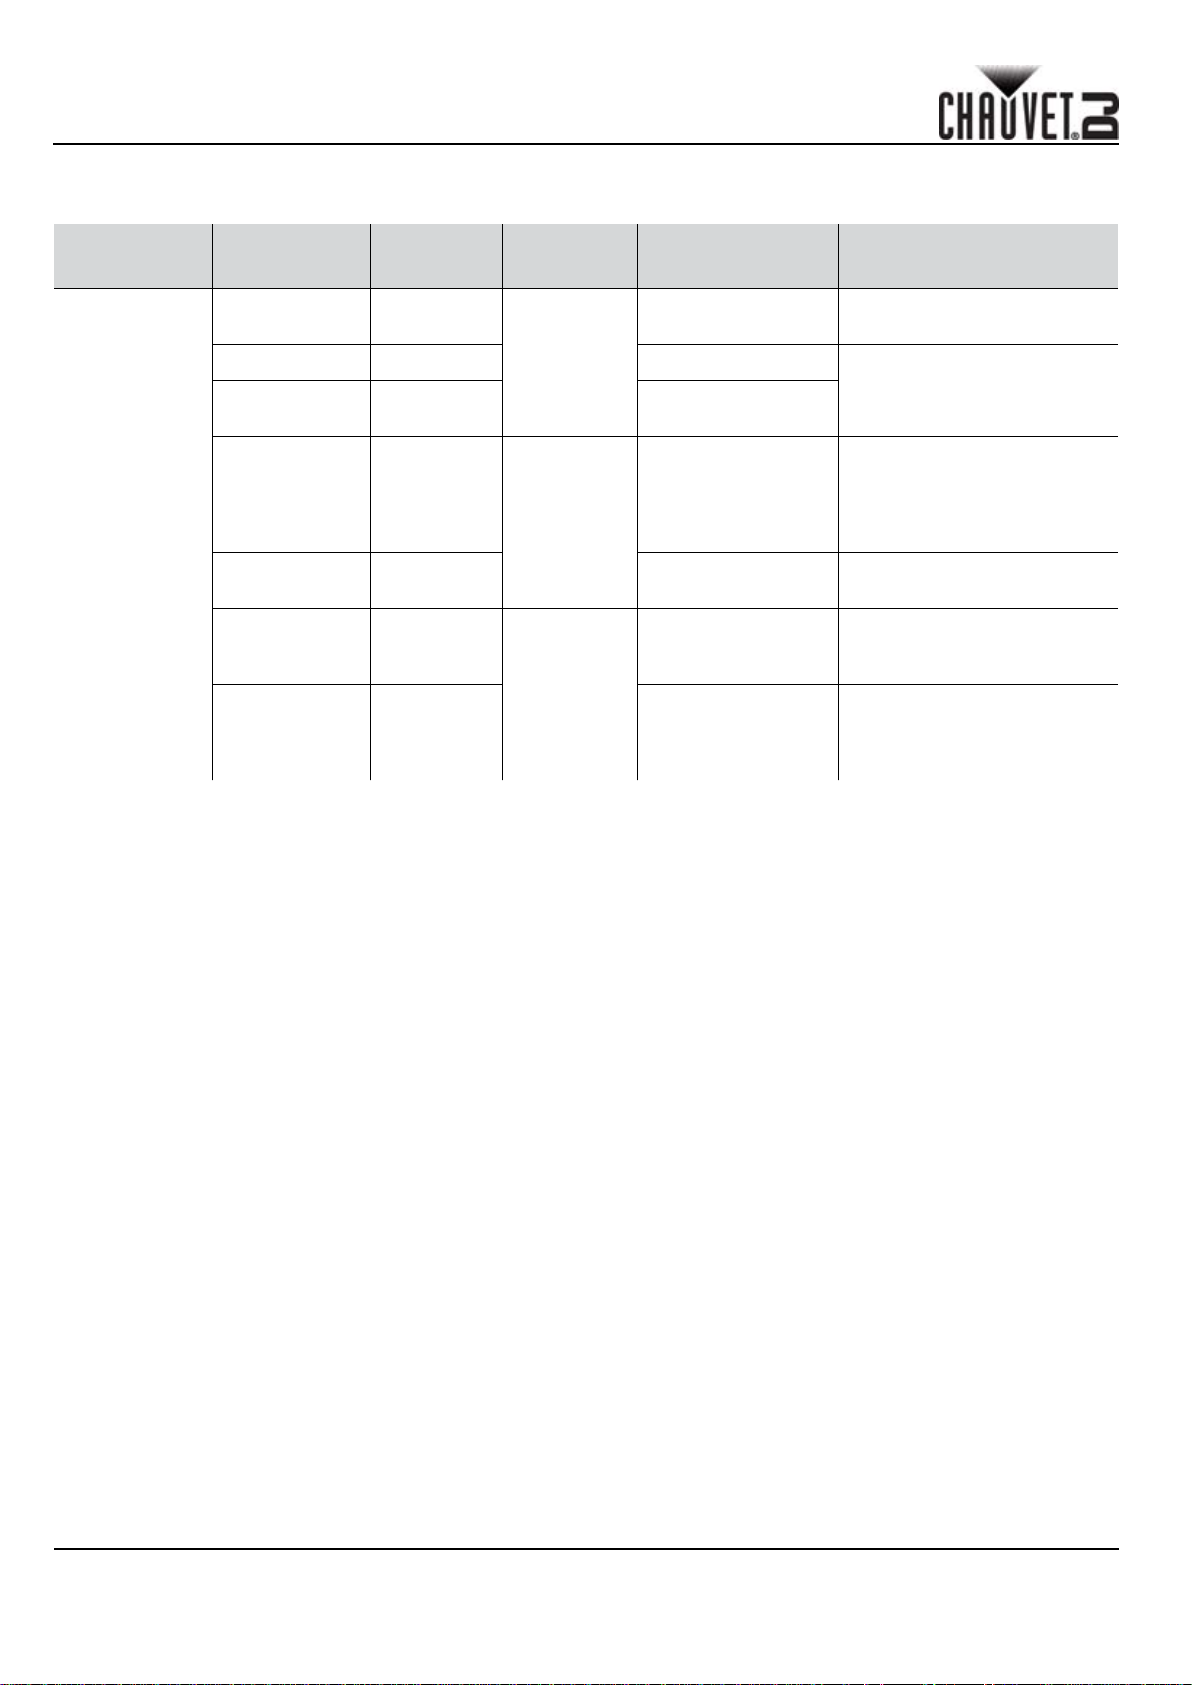
Connexion de la pédale
Le 4Bar LT USB peut également être utilisé avec la pédale.
PEDAAL
Gauche
(preset)
SOUS-
OPTION
1 x appui Blanc
2 x appui Rouge 9 x appui
3 x appui Vert
4 x appui Bleu
5 x appui Cyan
6 x appui Violet
7 x appui Jaune
Functie PEDAAL SOUS-OPTION Functie
8 x appui
Gauche
(preset)
Appuyez et main-
tenez
Droite
(Blackout)
Gauche &
Droite
(Sound
Active)
1 x appui
Appuyez et main-
tenez
Appuyez sur les
deux pédales simul-
tanément
Appuyez et main-
tenez simultané-
ment les deux
pédales
La couleur change chaque
seconde en boucle continue
La couleur change toutes les
trois secondes en boucle
continue
Lorsque toutes les LED sont
éteintes, appuyez sur la
pédale 1 ou les pédales 1 et
2 pour retourner aux modes
actifs
Fades LEDs in / out
lentement
Activation par le son
Stroboscope
17
4BAR LT USB MR Rev. 2
Page 19
MANUEL DE RÉFÉRENCE
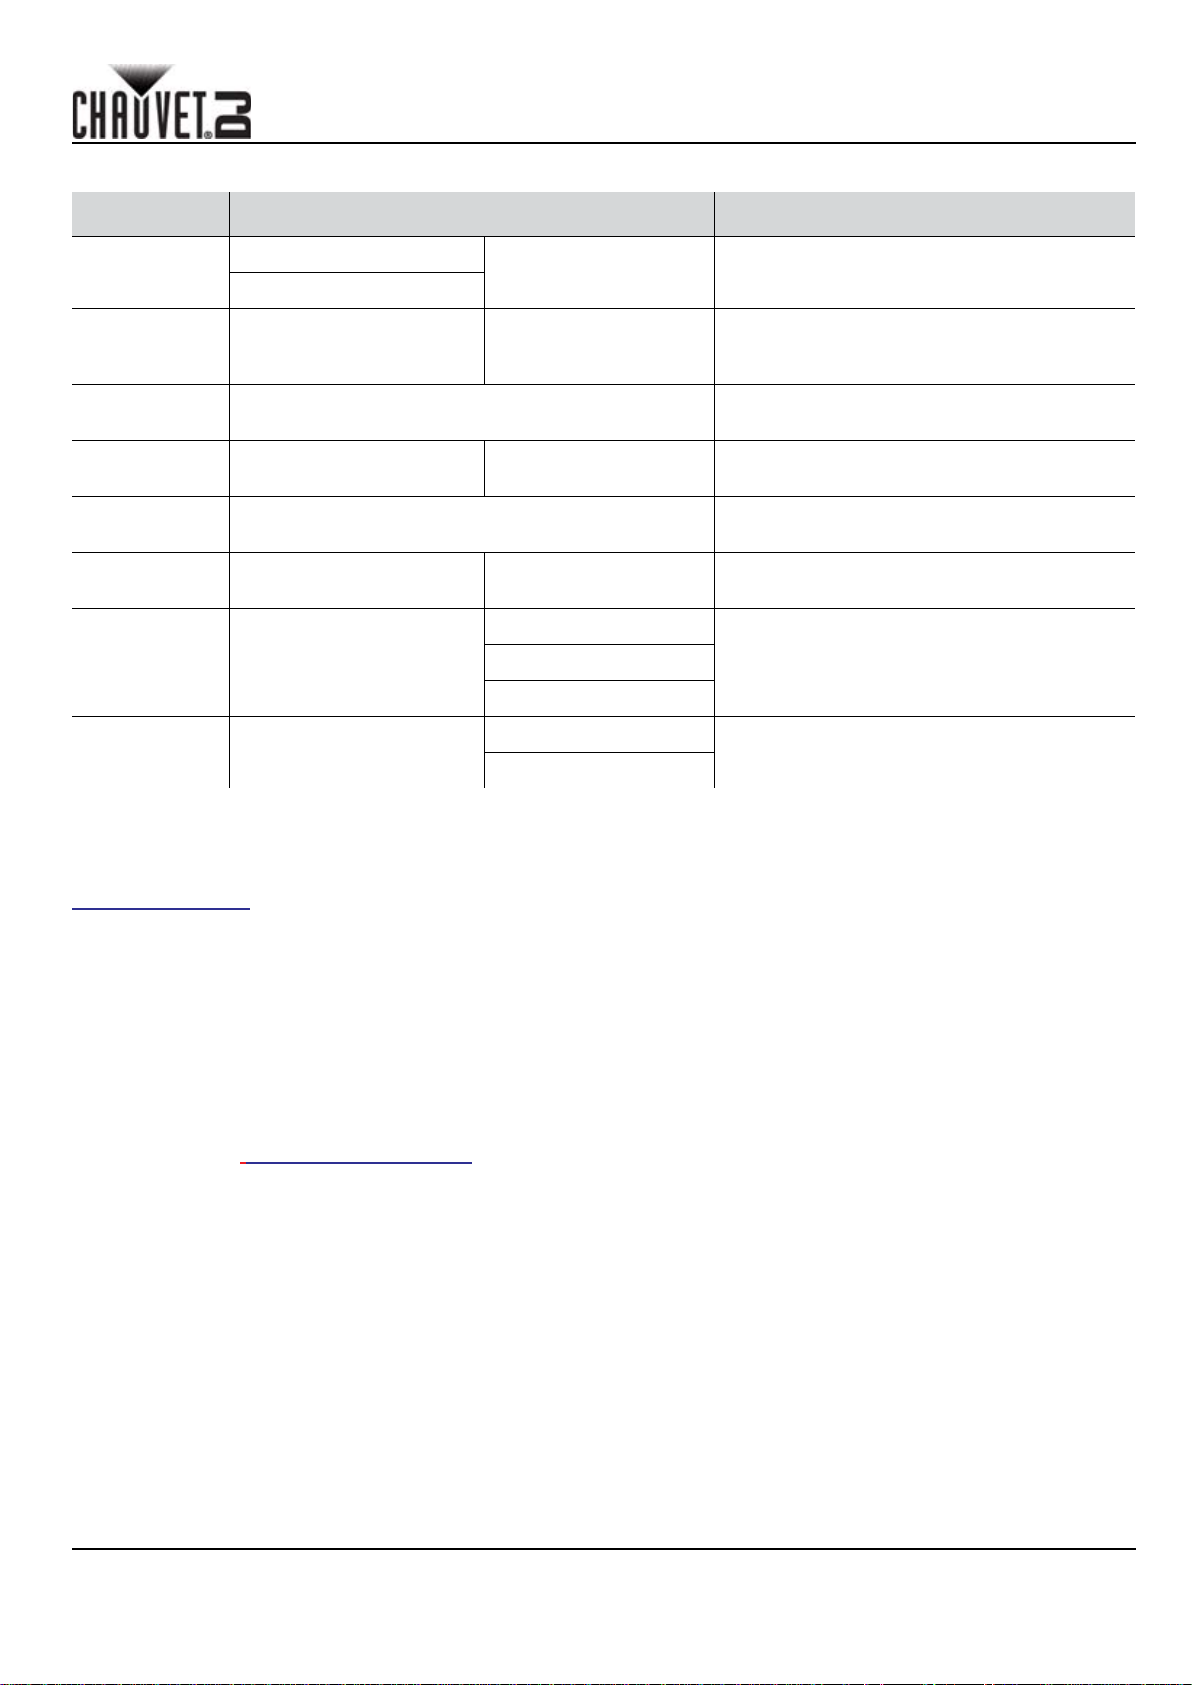
Schéma de Menu
MODE NIVEAUX DE PROGRAMMATION DESCRIPTION
FR
mode DMX
couleurs
prédéfinies
programmes
automatiques
vitesse S-- S 1-S100
activation par
le son
activation par
le son
mélange de
couleur RGB
Mode infra-
rouge
3-CH
15CH
C-- C 1-C 7
Auto Active le mode automatique
Snd
Sens u 1-u100
U--
Set
d1-d512 Permet de définir l'adresse DMX de départ
r 0-r100
g 0-g100
b 0-b100
ON
OFF
Permet de sélectionner l'une des couleurs
prédéfinies (rouge, vert, bleu, cyan, violet,
jaune ou blanc)
Permet de régler la vitesse des programmes
automatiques (de rapide à lent)
Le programme interne suit le rythme de la
musique
Permet de régler la sensibilité du mode
d'activation par le son (basse à élevée)
Permet de régler les niveaux de rouge, vert
et bleu pour la création d'une couleur
personnalisée
Permet d'activer le mode infrarouge pour
l'utilisation de la télécommande IRC-6
Raccordement DMX
Le LED 4Bar LT USB peut fonctionner avec un jeu d'orgues DMX quand raccordé par des connexions DMX en série.
Vous trouverez les instructions de connexion et configuration de cet appareil pour un bon fonctionnement en DMX dans
le manuel d'utilisation. Si vous n'êtes pas familier avec le DMX, vous pouvez télécharger l'introduction au DMX sur
www.chauvetdj.com.
Adresse de Départ
Afin d'assurer un accès à tous les canaux dans chaque mode DMX, l'adresse DMX la plus élevée recommandée est 510.
Connexion Maître/Esclave
Le LED 4Bar LT USB utilise une connexion de données DMX pour son mode maître/esclave. Vous trouverez les
instructions de connexion et configuration de cet appareil pour un bon fonctionnement en maître/esclave dans le manuel
d'utilisation.
Télécommande infra-rouge
Le 4Bar L T USB est entièrement compatible avec la télécommande infrarouge IRC-6 de chez CHAUVET® DJ. Pour plus
d'informations sur cette télécommande IRC-6, ou pour le téléchargement d'instructions, veuillez vous rendre sur le site
internet à l'adresse www.chauvetlighting.com.
4BAR LT USB MR Rev. 2
18
Page 20
MANUEL DE RÉFÉRENCE
FR
Connectivité USB D-Fi
Le 4Bar LT USB peut se transformer en récepteur/émetteur D-Fi sans fil avec l'utilisation du module D-Fi USB de
CHAUVET® DJ. Il suffit de régler l'interrupteur DIP sur le canal réception/émission, de brancher le module sur le port
USB et de paramétrer la personnalité et l'adresse DMX de l'appareil. Vous trouverez davantage d'instructions pour la
connexion et la configuration de cet appareil pour le fonctionnement en DMX dans le manuel d'utilisation.
ATTENTION ! NE branchez QUE des appareils D-Fi USB sur le port USB. Le non respect de cette
consigne peut endommager l'appareil.
Une fois branché, le module D-Fi USB prendra le contact de l'appareil. Le DMX filaire, le contrôle
manuel de l'affichage, les boutons du menu et l'IRC-6 seront indisponibles jusqu'à ce que vous
débranchiez le module D-Fi USB. Les niveaux de priorité sont comme suit:
1. Module D-Fi USB
2. DMX filaire
3. Télécommande sans-fil IRC-6
4. Affichage digitale manuel / boutons du menu
19
4BAR LT USB MR Rev. 2
Page 21
MANUEL DE RÉFÉRENCE
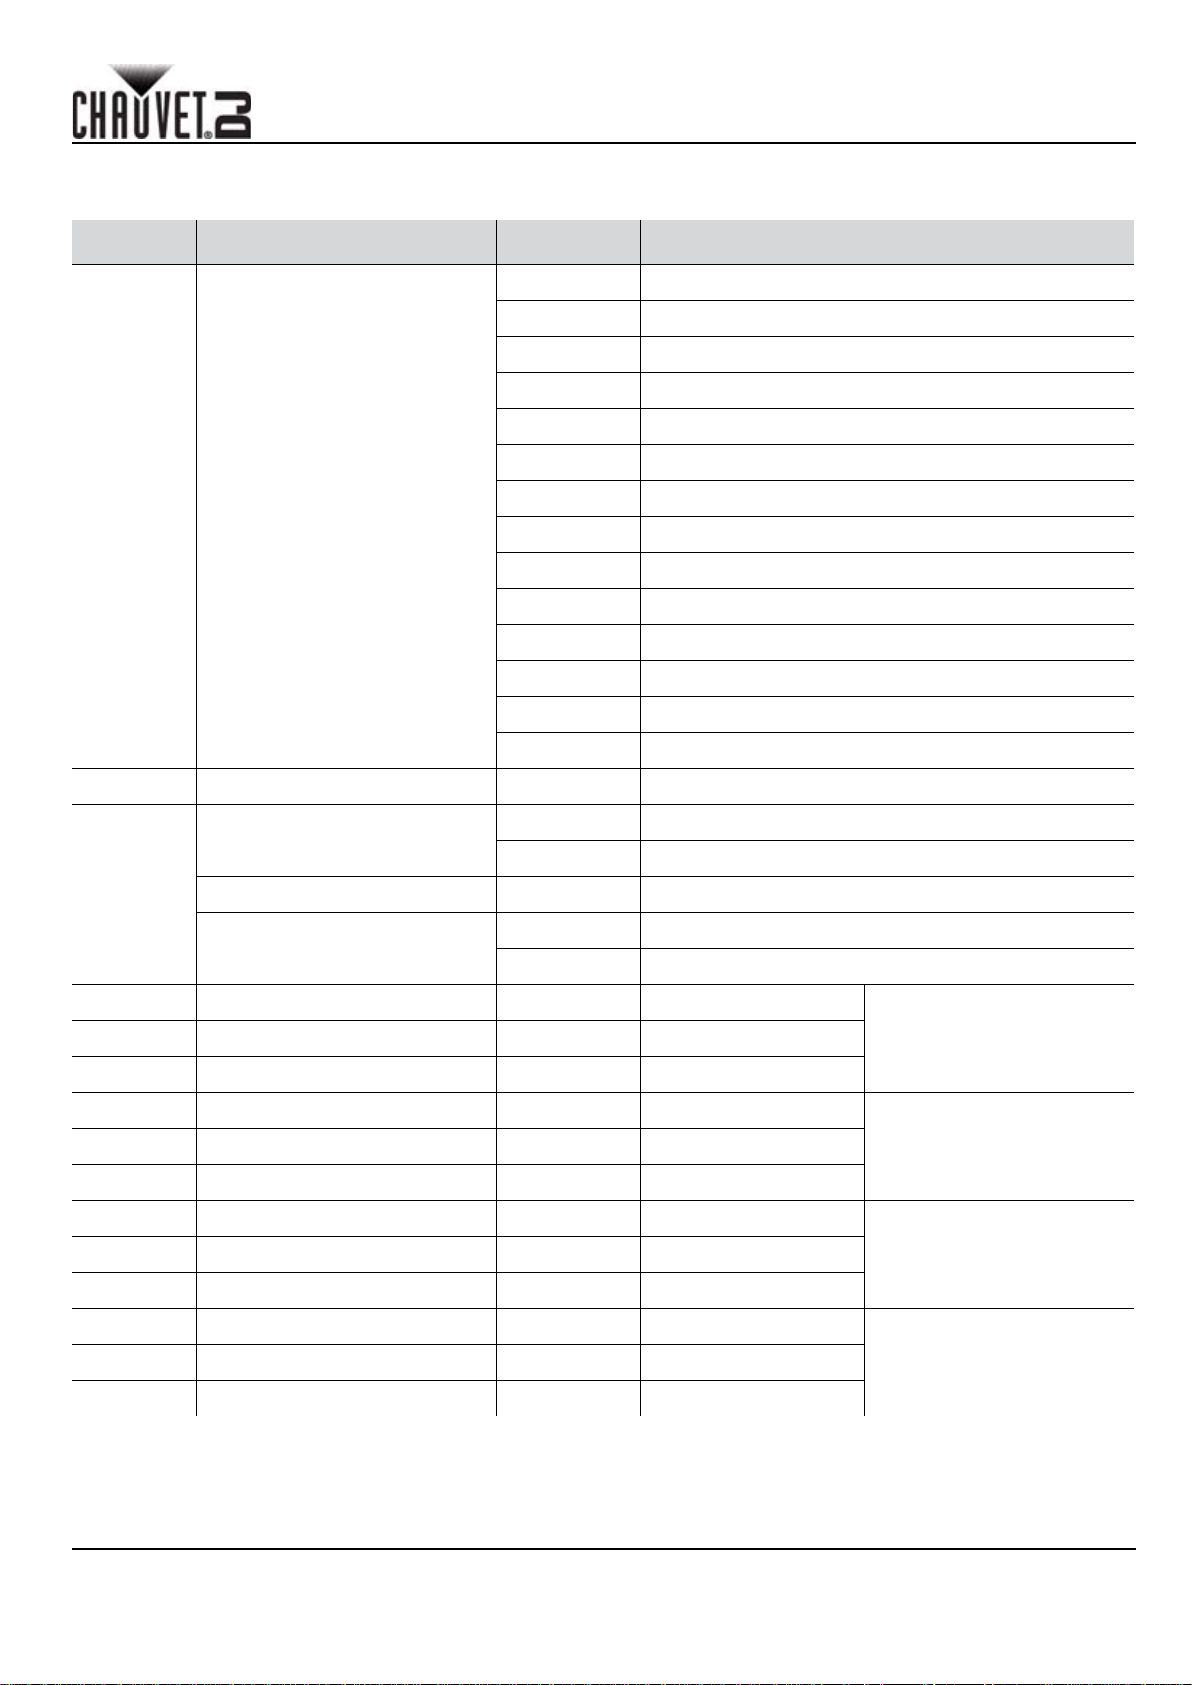
Valeurs DMX
15CH
CANAL FONCTION VALEUR POURCENTAGE/CONFIGURATION
000
009 Mélange de couleur RGB
010 029 Programme automatique 1
049 Programme automatique 2
030
050 069 Programme automatique 3
070 089 Programme automatique 4
090 109 Programme automatique 5
FR
1
2 Gradateur 000 255 0-100%
3
4 Rouge 000 255 0-100%
5 Vert 000 255 0-100%
6 Bleu 000 255 0-100%
Contrôle/Mode de
Fonctionnement
Stroboscope
Vitesse du programme 000 255 Vitesse lente à rapide
Sensibilité au son
110 129 Programme automatique 6
130 149 Programme automatique 7
150 169 Programme automatique 8
170 189 Programme automatique 9
190 209 Programme automatique 10
210 229 Programme automatique 11
230 249 Programme automatique 12
250 255 Mode d'activation par le son
000 009 Aucune fonction
010 255 Lent à rapide
000 010 Aucune fonction
011 255 Sensibilité basse à élevée
Mélange de couleur RGB
(Module 1)
7 Rouge 000 255 0-100%
8 Vert 000 255 0-100%
9 Bleu 000 255 0-100%
10 Rouge 000 255 0-100%
11 Vert 000 255 0-100%
12 Bleu 000 255 0-100%
13 Rouge 000 255 0-100%
14 Vert 000 255 0-100%
15 Bleu 000 255 0-100%
4BAR LT USB MR Rev. 2
Mélange de couleur RGB
(Module 2)
Mélange de couleur RGB
(Module 3)
Mélange de couleur RGB
(Module 4)
20
Page 22

MANUEL DE RÉFÉRENCE
FR
3-CH
CANAL FONCTION VALEUR POURCENTAGE/CONFIGURATION
1 Rouge 000
2 Vert 000 255 0-100%
3 Bleu 000 255 0-100%
255 0-100%
21
4BAR LT USB MR Rev. 2
Page 23

SCHNELLANLEITUNG
DE
Über diese Schnell-anleitung
In der Schnellanleitung des 4Bar L T USB finden Sie die wesentlichen Produktinformationen, wie etwa über die Montage,
Menüoptionen und DMX-Werte des Geräts. Laden Sie für weiterführende Informationen unter www.chauvetdj.com das
Benutzerhandbuch herunter.
Haftungsausschluss
Die Informationen und Spezifikationen dieser Anleitung können ohne vorherige Ankündigung geändert werden.
Sicherheitshinweise
Diese Sicherheitshinweise enthalten wichtige Informationen über die Montage, Verwendung und Wartung des Geräts.
• Dieses Produkt eignet sich nicht für eine permanente Installation.
• SCHLIESSEN Sie dieses Produkt nur an einen mit der Masse verbundenen und abgesicherten
Stromkreislauf an.
• Trennen Sie das Gerät von der Stromquelle, bevor Sie es reinigen oder die Sicherung
auswechseln.
• Stellen Sie sicher, dass das Netzkabel nicht gequetscht oder beschädigt ist.
• Ziehen Sie beim Trennen des Geräts von der Stromversorgung nie am Kabel.
• Bei Montage über Kopf immer ein Sicherungsseil verwenden.
• KEINE entflammbaren Materialien während des Betriebs in der Nähe des Geräts lagern.
• NIEMALS während des Betriebs das Gehäuse berühren, da dies sehr heiß wird.
• Die Spannung der Schukosteckdose, an die Sie das Gerät anschließen, muss sich innerhalb des
Spannungsbereiches befinden, der auf dem Hinweisschild oder dem rückwärtigen Bedienfeld des
Geräts angegeben ist.
• Dieses Gerät darf nur im Innenbereich verwendet werden. (IP20) Um das Risiko von Bränden oder
elektrischen Schlägen zu vermeiden, dürfen Sie das Gerät nicht Regen oder Feuchtigkeit
aussetzen.
• Installieren Sie das Gerät an einem Ort mit ausreichender Belüftung und mit einem Abstand von
50 cm zu den angrenzenden Flächen.
• Stellen Sie sicher, dass die Lüftungsöffnungen im Gehäuse des Geräts nicht verschlossen sind.
• Schließen Sie dieses Gerät niemals an einen Dimmer oder Regelwiderstand an.
• Achten Sie beim Auswechseln der Sicherung darauf, den gleichen Typ mit den gleichen Werten
zu verwenden.
• Das Gerät NUR an den Hänge-/Befestigungsbügeln tragen.
• Die maximal zulässige Umgebungstemperatur beträgt 40 °C. Nehmen Sie das Gerät nicht bei
höheren Temperaturen in Betrieb.
• Bei ernsthaften Betriebsproblemen stoppen Sie umgehend die Verwendung des Geräts.
• Dieses Gerät NICHT öffnen. Die eingebauten Komponenten sind für den Kunden wartungsfrei.
• Um unnötigen Verschleiß zu vermeiden und die Lebensdauer des Geräts zu verlängern, trennen
Sie während längerer Perioden des Nichtgebrauchs das Gerät vom Stromnetz – entweder per
Trennschalter oder durch Herausziehen des Steckers aus der Steckdose.
Kontakt
Kunden außerhalb der USA, GB, Irland, Mexiko oder Benelux wenden sich an ihren Lieferanten, um den Kundendienst in
Anspruch zu nehmen oder ein Gerät zurückzuschicken. Kontaktinformationen finden Sie unter www.chauvetdj.com f
Packungsinhalt
• 4Bar LT USB
• Netzkabel
• Tragekoffern
• Stativ
• Wired Fußschalters
• Garantiekarte
• Schnellanleitung
4BAR LT USB SAL Rev. 2
22
Page 24
SCHNELLANLEITUNG
DE
Start
Packen Sie Ihr 4Bar LT USB aus und überprüfen Sie, ob Sie alle Teile unbeschädigt erhalten haben. Wenn die
Verpackung beschädigt ist, benachrichtigen Sie umgehend das Transportunternehmen, nicht jedoch Chauvet
Beschreibung
Der 4Bar LT USB bietet als sofort einsatzbereites Gerät eine vollständige Wash-Effekt-Beleuchtung für mobile
Entertainer. Mit drahtloser DMX-Steuerung über den bequemen, integrierten D-Fi USB-Anschluss ausgestattet (separat
erhältlich), ist das Gerät mit der IRC kompatibel und verfügt über weitere Funktionen für die Master/Slave- und
Musiksteuerungs-Modi. Jeder Scheinwerferkopf am 4Bar LT USB verfügt über 3 leistungsstarke, dreifarbige LEDs, die
unabhängig voneinander positioniert werden können, um ein vollständiges Ausleuchten des Raumes oder
Bühnenbereichs zu erhalten. Die dreifarbigen LEDs eignen sich hervorragend für die Frontbeleuchtung, da sie die
unerwünschten mehrfarbigen Schatten nahezu eliminieren. Einfacher Auf- und Abbau innerhalb weniger Minuten mit
beiliegendem Stativ, Fußschalter und Tragekoffern.
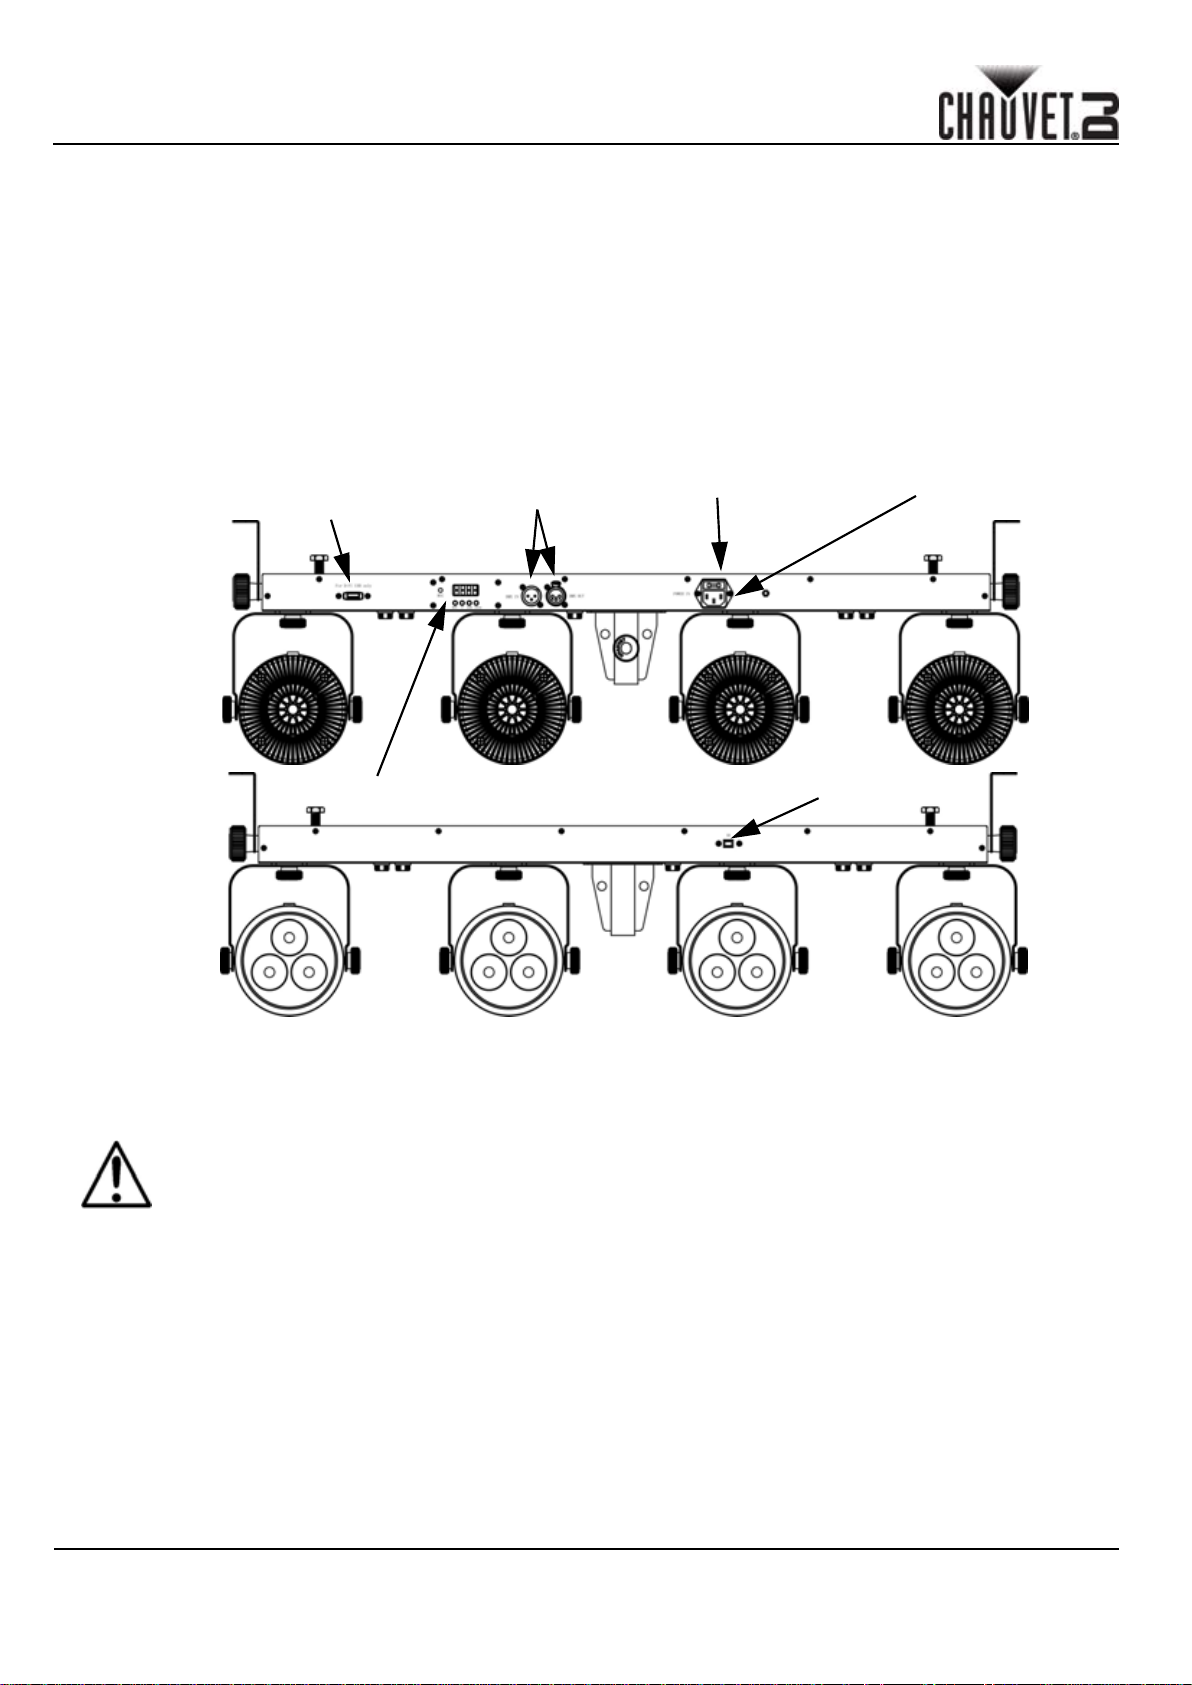
Überblick
D-Fi USB Anschluss
DMX-Eingang/
-Ausgang
Sicherungshalter
Stromausgang
LED-Anzeige
IR-Sensor
Wechselstrom
Dieses Gerät verfügt über ein Vorschaltgerät, das automatisch die anliegende Spannung erkennt, sobald der
Netzstecker in die Schukosteckdose gesteckt wird, und kann mit einer Eingangsspannung von 100~240 V AC, 50/60 Hz
arbeiten.
Um unnötigen Verschleiß zu vermeiden und die Lebensdauer des Geräts zu verlängern, trennen
Sie während längerer Perioden des Nichtgebrauchs das Gerät vom Stromnetz – entweder per
Trennschalter oder durch Herausziehen des Steckers aus der Steckdose.
Serienschaltung der Geräte
Informationen zur maximalen Anzahl der 4Bar LT USB-Geräte, die in Serie geschaltet werden können, finden Sie in der
Bedienungsanleitung oder auf dem Typenschild am Gerät..
Auswechseln der Sicherung
1. Trennen Sie das Gerät vom Stromnetz.
2. Mithilfe eines Flachkopfschraubendrehers lockern Sie den Sicherungshalter und ziehen ihn gerade heraus.
3. Entfernen Sie die durchgebrannte Sicherung von der Klemme, und ersetzen Sie diese durch eine Sicherung des
gleichen Typs und mit den gleichen Werten.
4. Stecken Sie den Sicherungshalter wieder zurück, und schließen Sie das Gerät an das Stromnetz an.
23
4BAR LT USB SAL Rev. 2
Page 25
SCHNELLANLEITUNG
Montage
Lesen Sie vor der Montage dieses Geräts die Sicherheitshinweise durch und in der Bedienungsanleitung entnehmen
Sicherheitshinweise.
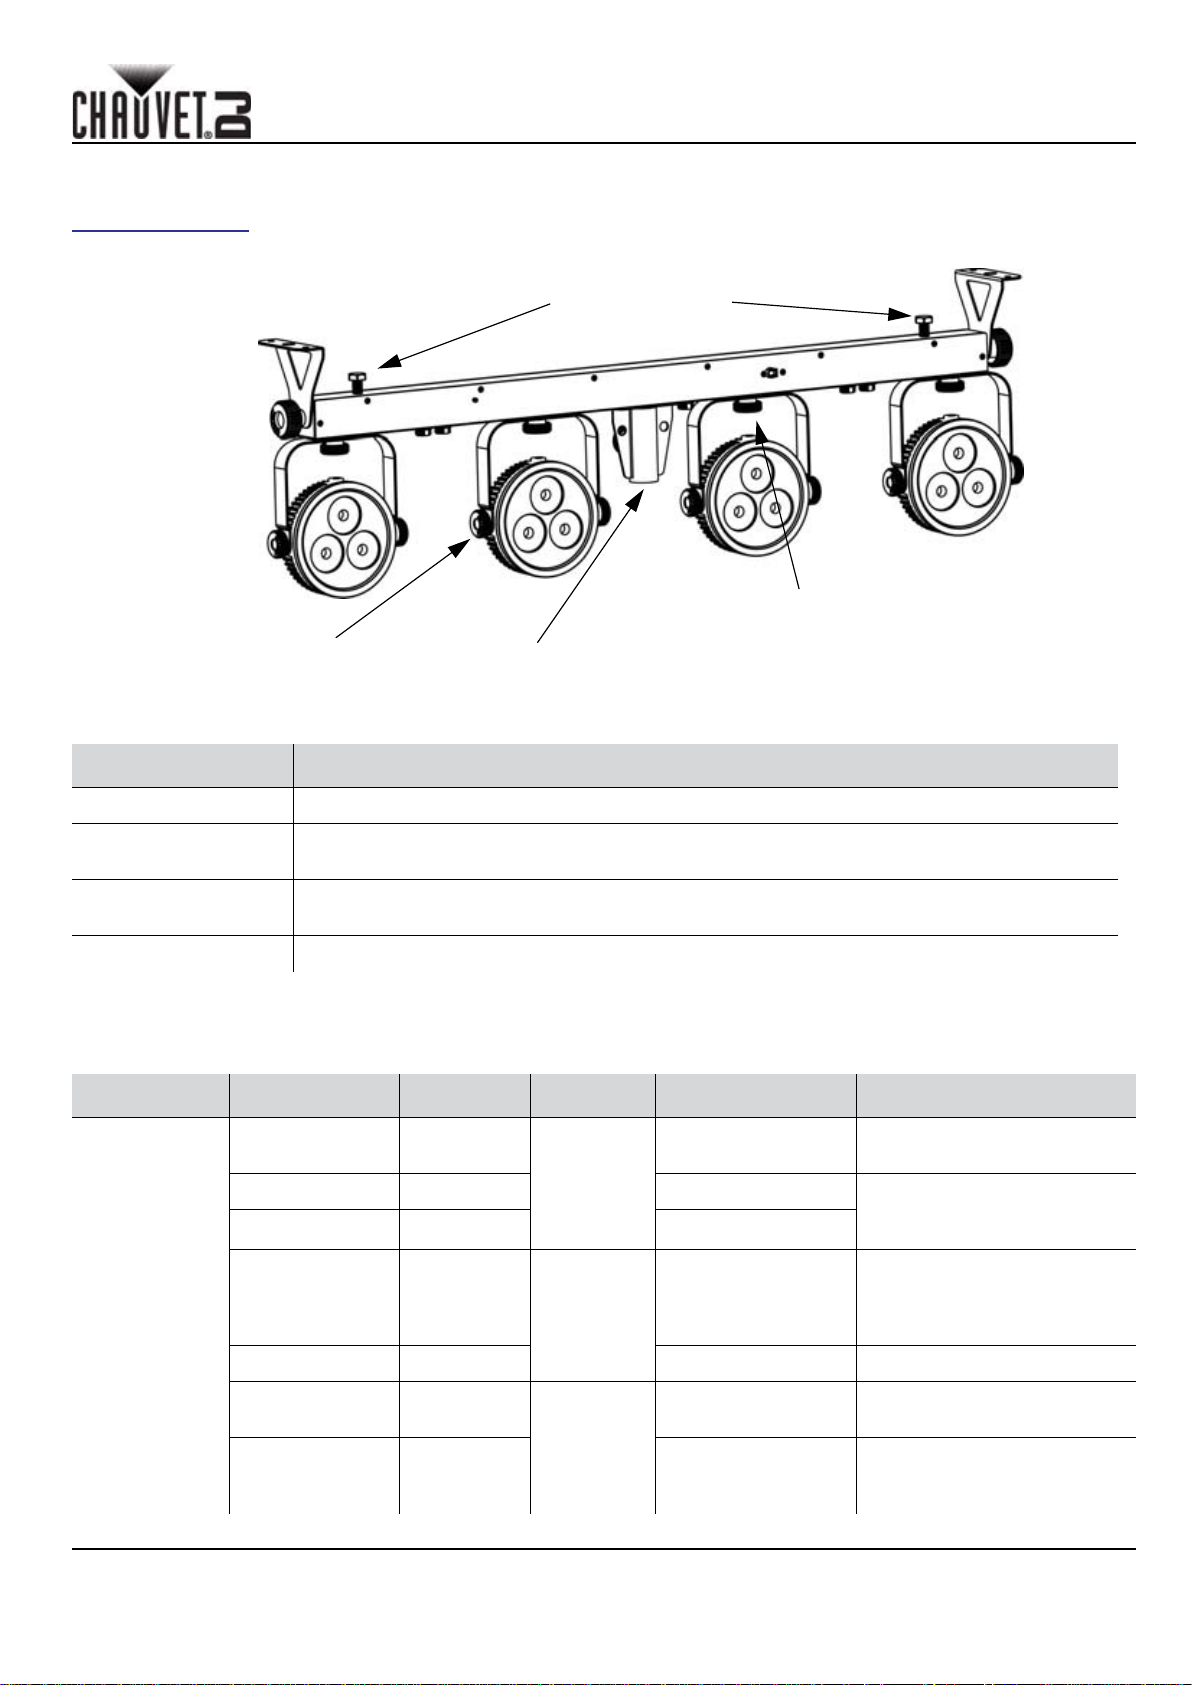
Montageansicht
Schrauben für
Aufhängung an
Schellen
Einstellknopf für
die
Einstellknopf für
die Kopfneigung
Einsetzpunkt der
Stativbefestigung
Kopfschwenkung
DE
Beschreibung des Bedienfeldes Lesen
TASTE FUNKTION
<MENU> Wählt einen Betriebsmodus oder verlässt die aktuelle Menüoption
<UP>
<DOWN>
<ENTER> Aktiviert eine Menüoption oder einen ausgewählten Wert
Fußschalteranschluss
Der 4Bar LT USB kann auch über den Fußschalter angesteuert werden.
PEDAL UNTEROPTION FUNKTION PEDAL UNTEROPTION FUNKTION
Stroboskop
(preset)
Damit navigieren Sie durch die Menüpunkte nach oben und erhöhen den numerischen
Wert der entsprechenden Funktionen
Damit navigieren Sie durch die Menüpunkte nach unten und verringern den numerischen
Wert der entsprechenden Funktionen
1 x drücken weiß
2 x drücken rot 9 x drücken Farbwechsel alle drei
3 x drücken grün
4 x drücken blau
Stro-
boskop
(preset)
Links
(Blackout)
8 x drücken Farbwechsel jede Sekunde
in einer Endlosschleife
drücken und halten
1 x drücken Alle LEDs aus; zum
Sekunden in einer
Endlosschleife
erneuten Aktivieren der Modi
Pedal 1 oder die Pedale 1
und 2 drücken
5 x drücken kobaltblau drücken und halten Fades LEDs in / out langsam
7 x drücken
4BAR LT USB SAL Rev. 2
gelb
Stro-
boskop &
Links
(Sound
Active)
Beide Pedale gle-
ichzeitig drücken
Drücken und halten
Sie beide Pedale
gleichzeitig
Musikempfindlichkeit6 x drücken magentarot
Stroboskop
24
Page 26
SCHNELLANLEITUNG
DE
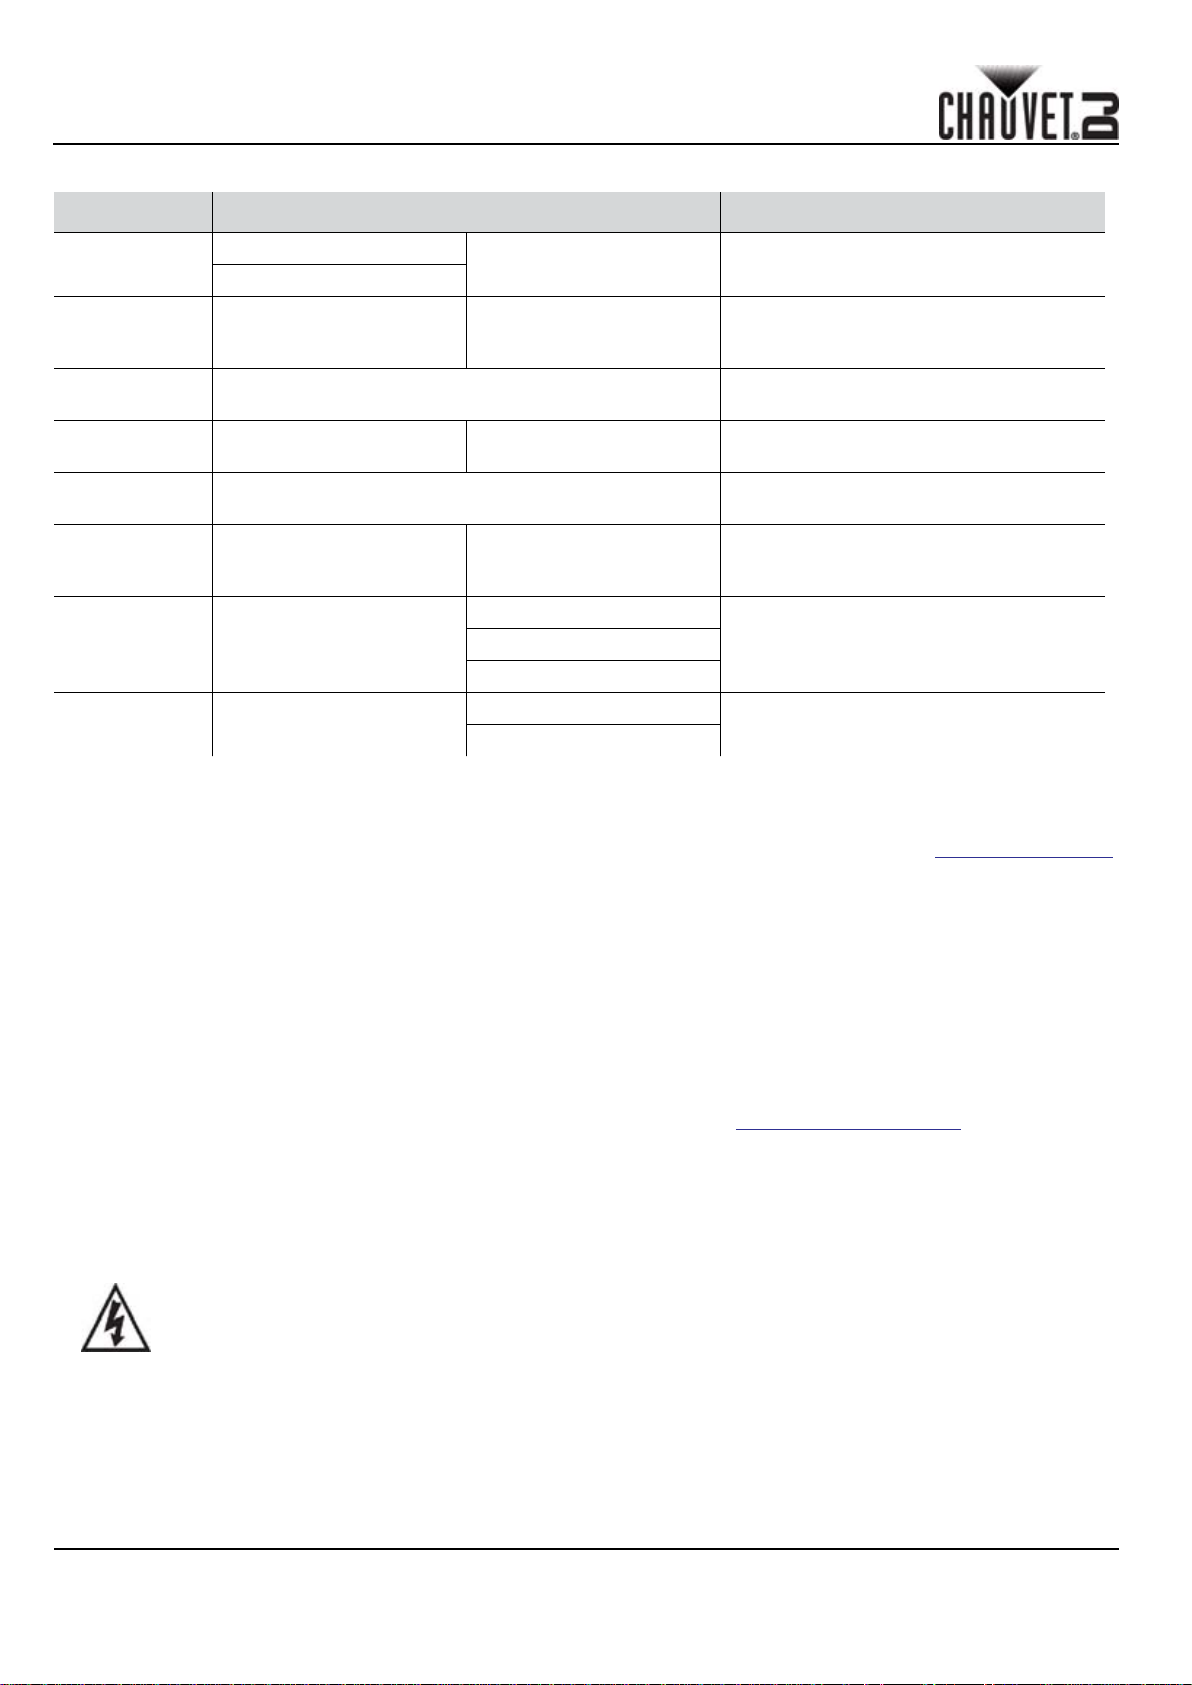
Menüstruktur
Modus Programmierebenen Beschreibung
DMX-Modus
Vorein-
gestellte Far-
ben
Auto-Pro-
gramme
Geschwind-
igkeit
Musiksteuer-
ung
Musikempfindlichkeit
RGB-Farbmi-
schung
Infrarot-
Modus
3-CH
15CH
C-- C 1-C 7
Auto Schaltet Auto-Modus ein
S-- S 1-S100
Snd
Sens u 1-u100
U--
Set
d1-d512 Stellt die DMX-Startadresse ein
r 0-r100
g 0-g100
b 0-b100
ON
OFF
Wählt eine der voreingestellten Farben
aus (rot, grün, blau, kobaltblau,
magentarot, gelb oder weiß)
Stellt die Geschwindigkeit des AutoProgramms ein (schnell bis langsam)
Die internen Programme laufen zum
Takt der Musik ab
Stellt die Musikempfindlichkeit des
Musiksteuerungs-Modus ein
(von gering bis hoch)
Stellt die rodten, grünen und blauen
Ebenen ein, um individuelle Farben zu
erzeugen
Schaltet den Infrarot-Modus der
Fernbedienung IRC-6 ein
DMX-Verbindung
4Bar LT USB kann mit einem DMX-Controller betrieben werden, wenn eine DMX-Serienschaltung zum Einsatz kommt.
Anweisungen zum Zusammenschluss und der Konfiguration dieses Geräts für den Betrieb im DMX-Modus finden Sie im
Benutzerhandbuch. Wenn Sie mit DMX nicht vertraut sind, laden Sie "DMX - Eine Einführung" unter www.chauvetdj.com
herunter.
Startadresse
Um einen vollständigen Zugang zu allen Kanälen in jedem DMX-Modus zu gewährleisten, beträgt die höchste
empfohlene DMX-Adresse 512.
Master/Slave-Schaltung
4Bar LT USB verwendet für seinen Master/Slave-Modus eine DMX-Datenverbindung. Anweisungen zum
Zusammenschluss und der Konfiguration dieses Geräts für den Betrieb im Master/Slave-Modus finden Sie im
Benutzerhandbuch.
Infrarot-Fernbedienung
Der 4Bar LT USB ist vollständig kompatibel mit der Infrarot-Fernbedienung (IRC-6) von CHAUVET® DJ. Weitere
Informationen zur IRC-6 oder herunterladbare Anweisungen finden Sie unter www.chauvetlighting.com.
D-Fi USB Connectivity
Der 4Bar LT USB kann mit einem D-Fi USB von CHAUVET® DJ in einen drahtlosen D-Fi Transceiver umgewandelt
werden. Stellen Sie dazu einfach den DIP-Schalter auf den Kanal des D-Fi Transceivers ein, stecken Sie das Gerät in
den USB-Anschluss ein und stellen Sie anschließend die DMX-Eigenschaften sowie die DMX-Adresse ein. Weitere
Anweisungen zum Zusammenschluss und der Konfiguration dieses Geräts für den Betrieb mit D-Fi USB finden Sie im
Benutzerhandbuch.
25
ACHTUNG! KEIN anderes Gerät als einen D-Fi USB in den USB-Anschluss einstecken. Dies
könnte zu Beschädigungen des Produkts führen
4BAR LT USB SAL Rev. 2
Page 27

SCHNELLANLEITUNG
DE
Nach dem Einstecken übernimmt der D-Fi USB die Steuerung des Geräts. Drahtgebundenes
DMX, manuelle Bedienelemente und Menüschaltflächen sowie IR-Fernbedienung sind deaktiviert,
bis Sie den D-Fi USB wieder ausstecken. Die Prioritätenebenen sind wie folgt verteilt:
1. D-Fi USB
2. Drahtgebundenes DMX
3. Fernbedienung IRC-6
4. Manuelle Bedienelemente und Menüschaltflächen
4BAR LT USB SAL Rev. 2
26
Page 28
SCHNELLANLEITUNG
DE
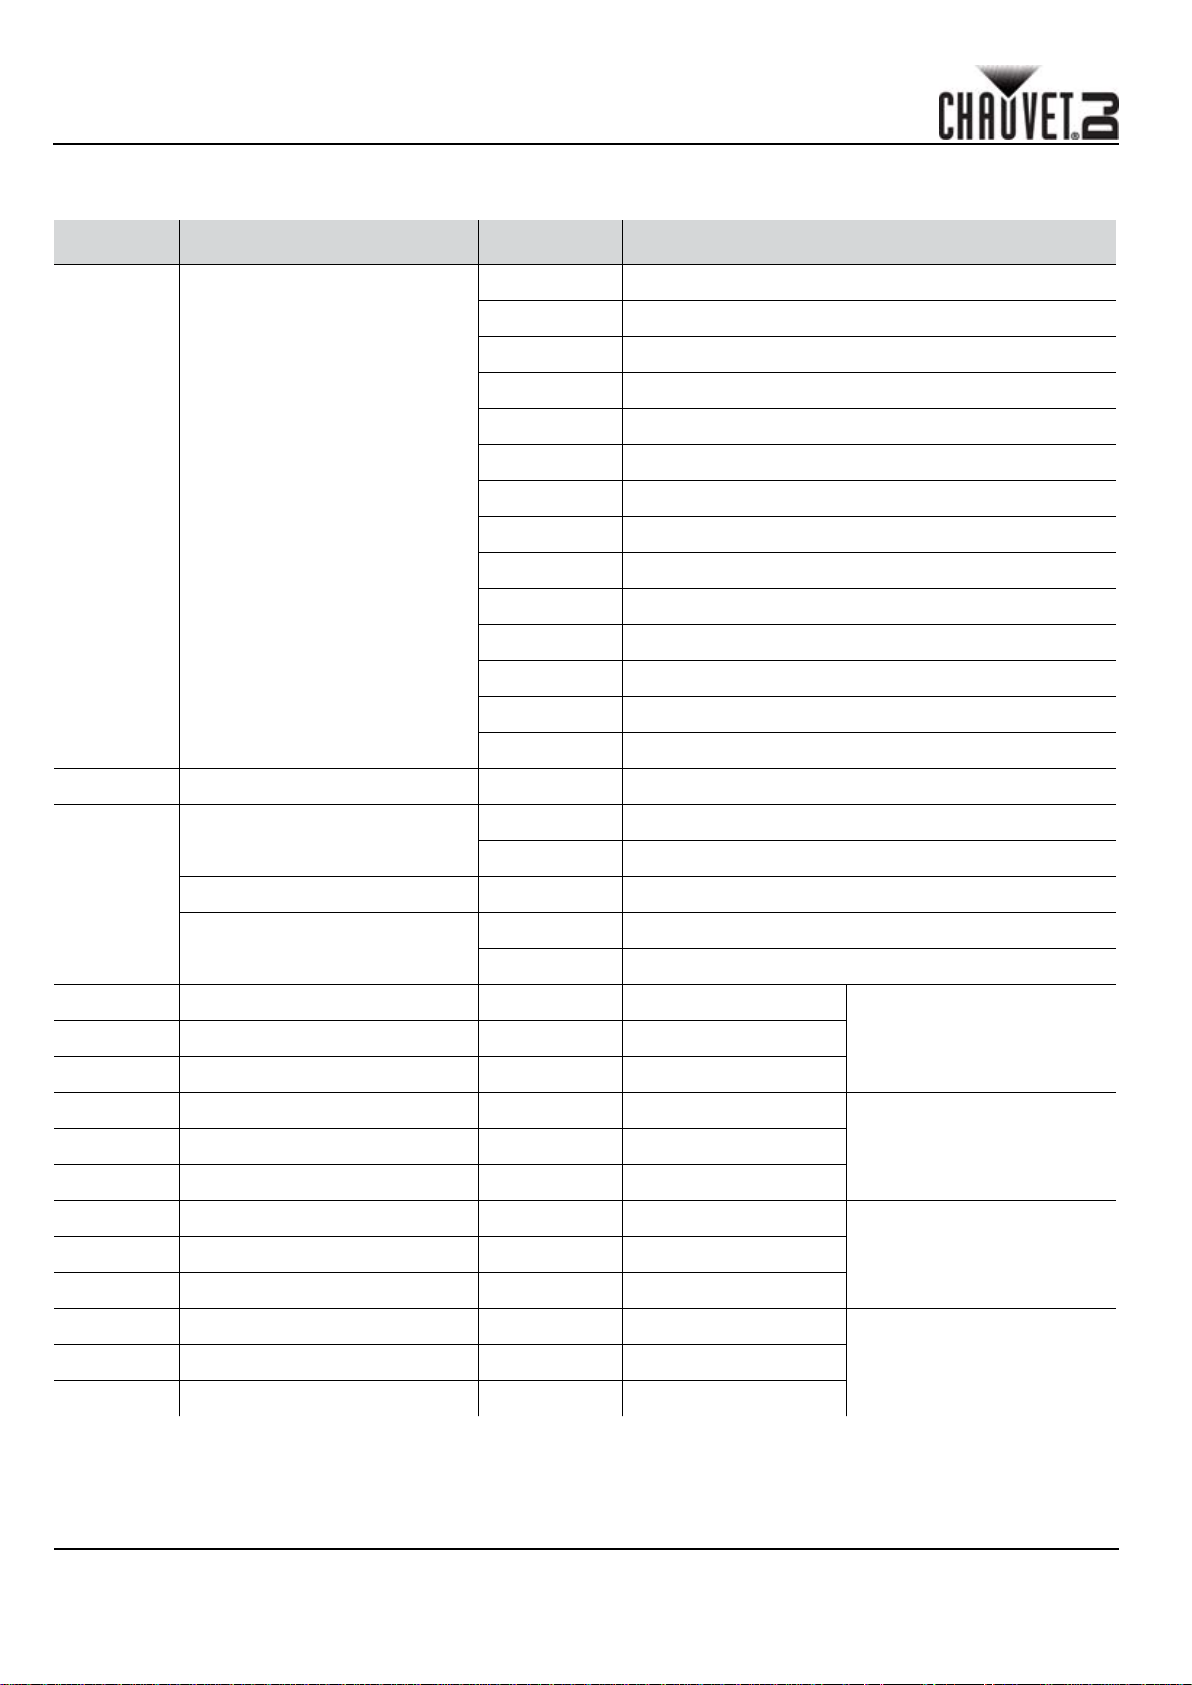
DMX-Werte
15CH
KANAL FUNKTION WERT PROZENT/EINSTELLUNG
000
009 RGB-Farbmischung
010 029 Auto Program 1
049 Auto Program 2
030
050 069 Auto Program 3
070
089 Auto Program 4
090 109 Auto Program 5
1 Steuerungs-/Betriebsmodus
110 129 Auto Program 6
149 Auto Program 7
130
150 169 Auto Program 8
170 189 Auto Program 9
190 209 Auto Program 10
210
229 Auto Program 11
230 249 Auto Program 12
250 255 Musiksteuerungs-Modus
2 Dimmer 000 255 0-100%
000 009 Keine Funktion
Stroboskop
010 255 Langsam bis schnell
3
Programm-geschwindigkeit 000 255 Geschwindigkeit, langsam bis schnell
000 010 Keine Funktion
Musikempfindlich-keit
011 255 Empfindlichkeit, niedrig bis hoch
4 Rot 000 255 0-100%
5 Grün 000 255 0-100%
6 Blau 000 255 0-100%
RGB-Farbmischung
(Ständer 1)
7 Rot 000 255 0-100%
8 Grün 000 255 0-100%
9 Blau 000 255 0-100%
10 Rot 000 255 0-100%
11 Grün 000 255 0-100%
12 Blau 000 255 0-100%
13 Rot 000 255 0-100%
14 Grün 000 255 0-100%
15 Blau 000 255 0-100%
27
RGB-Farbmischung
(Ständer 2)
RGB-Farbmischung
(Ständer 3)
RGB-Farbmischung
(Ständer 4)
4BAR LT USB SAL Rev. 2
Page 29
SCHNELLANLEITUNG
3-CH
KANAL FUNKTION WERT PROZENT/EINSTELLUNG
1 Rot 000 255 0-100%
DE
2 Grün 000
3 Blau 000 255 0-100%
255 0-100%
4BAR LT USB SAL Rev. 2
28
Page 30

GUIDA RAPIDA
IT
Informazioni sulla Guida
La Guida Rapida di 4Bar L T USB contiene informazioni di base sul prodotto quali montaggio, opzioni menù e valori DMX.
Per maggiori dettagli, scaricare il Manuale Utente dal sito
Esclusione di Responsabilità
Le informazioni e le specifiche contenute in questa guida possono essere modificate senza preavviso.
Note di Sicurezza
Le Note di Sicurezza includono informazioni importanti circa il montaggio, l'uso e la manutenzione.
• Questa apparecchiatura non è progettata per installazione permanente.
• Collegare questa unità SOLTANTO ad un circuito dotato di messa a terra e protetto.
• Prima di effettuare la pulizia o sostituire il fusibile, scollegare sempre l'unità dall'alimentazione
elettrica.
• Assicurarsi che il cavo di alimentazione non sia piegato o danneggiato.
• Non scollegare mai questa apparecchiatura dall'alimentazione elettrica tirando o strattonando il
cavo.
• Per il montaggio in alto dell'unità utilizzare SEMPRE un cavo di sicurezza.
• NON collocare materiale infiammabile vicino all'unità mentre è in funzione.
• NON toccare l'unità durante il funzionamento perché potrebbe essere molto calda.
www.chauvetdj.com.
• La tensione della presa a muro cui si collega l'apparecchiatura deve trovarsi entro il campo
specificato sull'etichetta o sul pannello posteriore.
• Questa apparecchiatura deve essere utilizzata soltanto in interni (IP20)! Per evitare il rischio di
incendio o di folgorazione non esporre l'apparecchiatura alla pioggia o all'umidità.
• Montare sempre l'unità in posizione ben ventilata, ad almeno 50 cm. (20") da qualsiasi superficie.
• Assicurarsi che nessuna apertura di ventilazione dell'unità sia ostruita.
• Non collegare mai ad un dimmer o ad un reostato.
• Sostituire il fusibile con un altro dello stesso tipo e classe.
• Prendere e trasportare l'unità SOLTANTO dalla staffa per il montaggio sospeso.
• Massima temperatura ambiente ammessa: 40 °C (104 °F). Non utilizzare l'apparecchiatura a
temperature superiori.
• In caso di gravi problemi di funzionamento sospendere immediatamente l'utilizzo.
• NON aprire l'unità. Non contiene parti riparabili dall'utente.
• Per evitare un consumo inutile ed aumentare la durata, durante i periodi di non utilizzo
disconnettere completamente il prodotto dall'alimentazione con l'interruttore o scollegando il cavo.
Contatti
Per richiedere assistenza o restituire l'apparecchiatura, al di fuori di Stati Uniti, Regno Unito, Irlanda, Messico o Benelux,
contattare il distributore locale. Per informazioni sui contatti, visitare il sito Web www.chauvetdj.com.
Che Cosa è Incluso
• 4Bar LT USB
• Cavo di alimentazione
• Borse per trasporto
• Treppiede
• Pedale Wired
• Scheda di Garanzia
• Guida Rapida
Per Iniziare
Disimballare 4Bar LT USB ed accertarsi di aver ricevuto tutti i componenti integri. Se l'imballo appare danneggiato, farlo
immediatamente presente al trasportatore e non a Chauvet.
29
4BAR LT USB GR Rev. 2
Page 31
GUIDA RAPIDA
IT
Descrizione
4Bar L T USB è una soluzione completa di luci wash progettata per intrattenitori itineranti. Il controllo DMX wireless con la
pratica porta D-Fi USB integrata (vendu séparémentinte), la compatibilità IRC e ad altre funzionalità consentono l'utilizzo
in modalità Master/Slave ed Attivazione sonora. Ogni unità sul 4Bar LT USB dispone di 3 LED tri-color ad alta potenza,
posizionabili singolarmente per una copertura totale dell'ambiente o del palcoscenico . I LED tri-color sono perfetti per
illuminazione frontale perché eliminano praticamente le ombre multicolore. Facilmente installabile e smontabile in pochi
minuti utilizzando il treppiede, l'interruttore a pedale e le borse da trasporto inclusi.
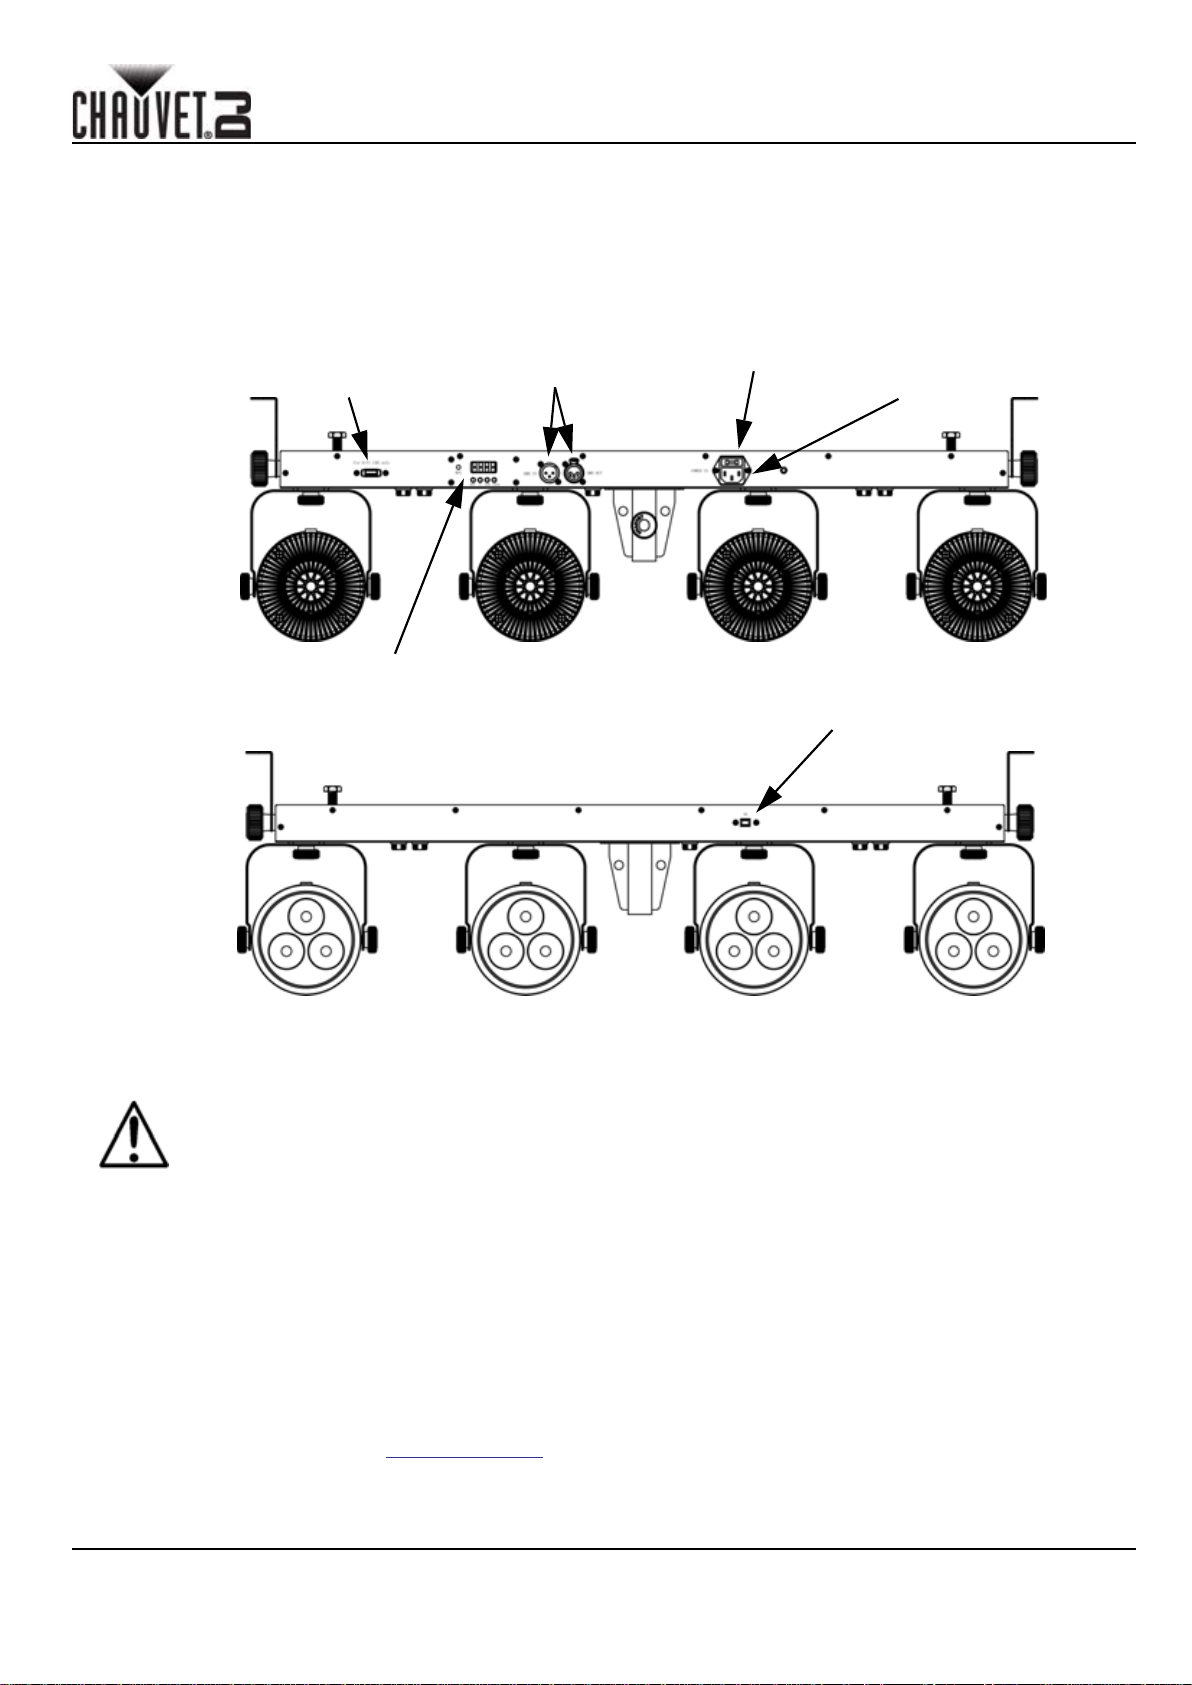
Vista d'Insieme
Porta USB D-Fi
Ingresso/uscita
DMX
Portafusibile
Ingresso
alimentazione
Display a LED
Sensore IR
Alimentazione CA
Questa unità è dotata di alimentatore a commutazione automatica con tensione in ingresso di 100–240 V CA, 50/60 Hz.
Per evitare un consumo inutile ed aumentare la durata, durante i periodi di non utilizzo
disconnettere completamente il prodotto dall'alimentazione con l'interruttore o scollegando il
cavo.
Collegamento
Per il numero massimo di apparecchiature che è possibile collegare su ciascuna presa elettrica fare riferimento alle note
riportate sull'etichetta apposta sul prodotto o al Manuale Utente.
Sostituzione Fusibile
1. Scollegare l'unità dall'alimentazione elettrica.
2. Utilizzando un giravite a testa piatta, allentare il portafusibile e tirarlo verso l'esterno.
3. Rimuovere il fusibile bruciato e sostituirlo con uno identico.
4. Reinserire il portafusibile e ricollegare l'alimentazione elettrica.
Montaggio
Prima di montare l'unità, leggere le Note di Sicurezza e fare riferimento al Manuale Utente.
4BAR LT USB GR Rev. 2
30
Page 32
IT
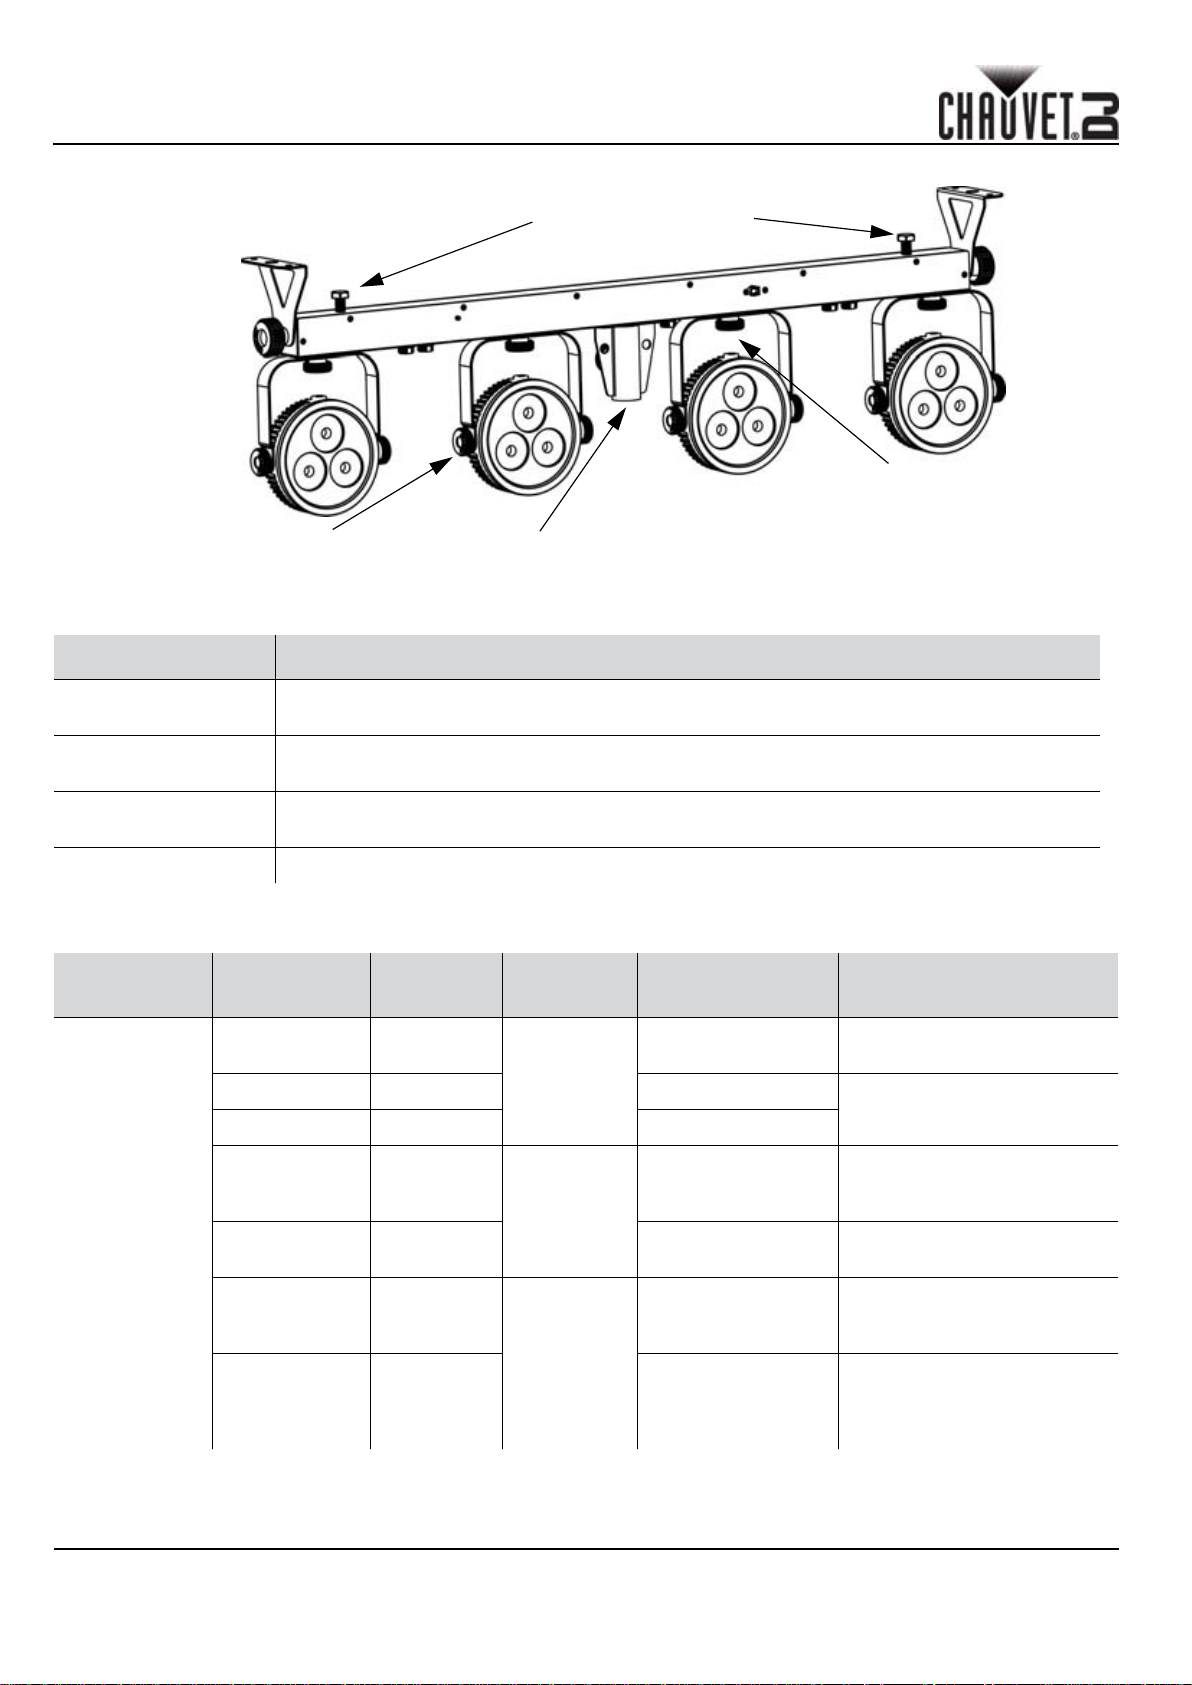
Schema di Montaggio
Manopola di
regolazione
inclinazione pod
Descrizione del Pannello di Controllo
PULSANTE FUNZIONE
Punto di attacco
GUIDA RAPIDA
Bulloni morsetti per
montaggio sospeso
Manopola di
regolazione
rotazione pod
treppiede
<MENU>
<UP>
<DOWN>
<ENTER> Consente di attivare un'opzione di menù o un valore selezionato
Consente di selezionare una modalità di funzionamento o di uscire dall'opzione di menù
corrente
Consente di spostarsi verso l'alto nell'elenco menù o di aumentare il valore numerico
all'interno di una funzione
Consente di spostarsi verso il basso nell'elenco menù o di diminuire il valore numerico
all'interno di una funzione
Collegamento interruttore a pedale
4Bar LT USB può anche essere utilizzato con l'interruttore a pedale.
PEDALE
Sinistra
(preset)
SOTTO-
OPZIONI
1 x pressione Bianco
2 x pressione Rosso 9 x pressione
3 x pressione Verde tieni premuto
4 x pressione Blu
5 x pressione Giallo tieni premuto
FUNZIONE PEDAL SOTTO-OPZIONI FUNZIONE
Sinistra
(preset)
Destra
(Blackout)
8 x pressione
1 x pressione
Il colore cambia ogni
secondo a ciclo continuo
Il colore cambia ogni tre
secondi a ciclo continuo
Tutti i LED spenti: premere il
pedale 1 oppure 1 e 2 per
tornare in modalità attiva
Fades LED in / out
lentamente
31
6 x pressione Magenta
7 x pressione Ciano
Sinistra &
Destra
(Sound
Active)
Preme contempora-
neamente entrambi
i pedali
Premere e tenere
premuto contempo-
raneamente
entrambi i pedali
Attivazione sonora
Stroboscopio
4BAR LT USB GR Rev. 2
Page 33
GUIDA RAPIDA
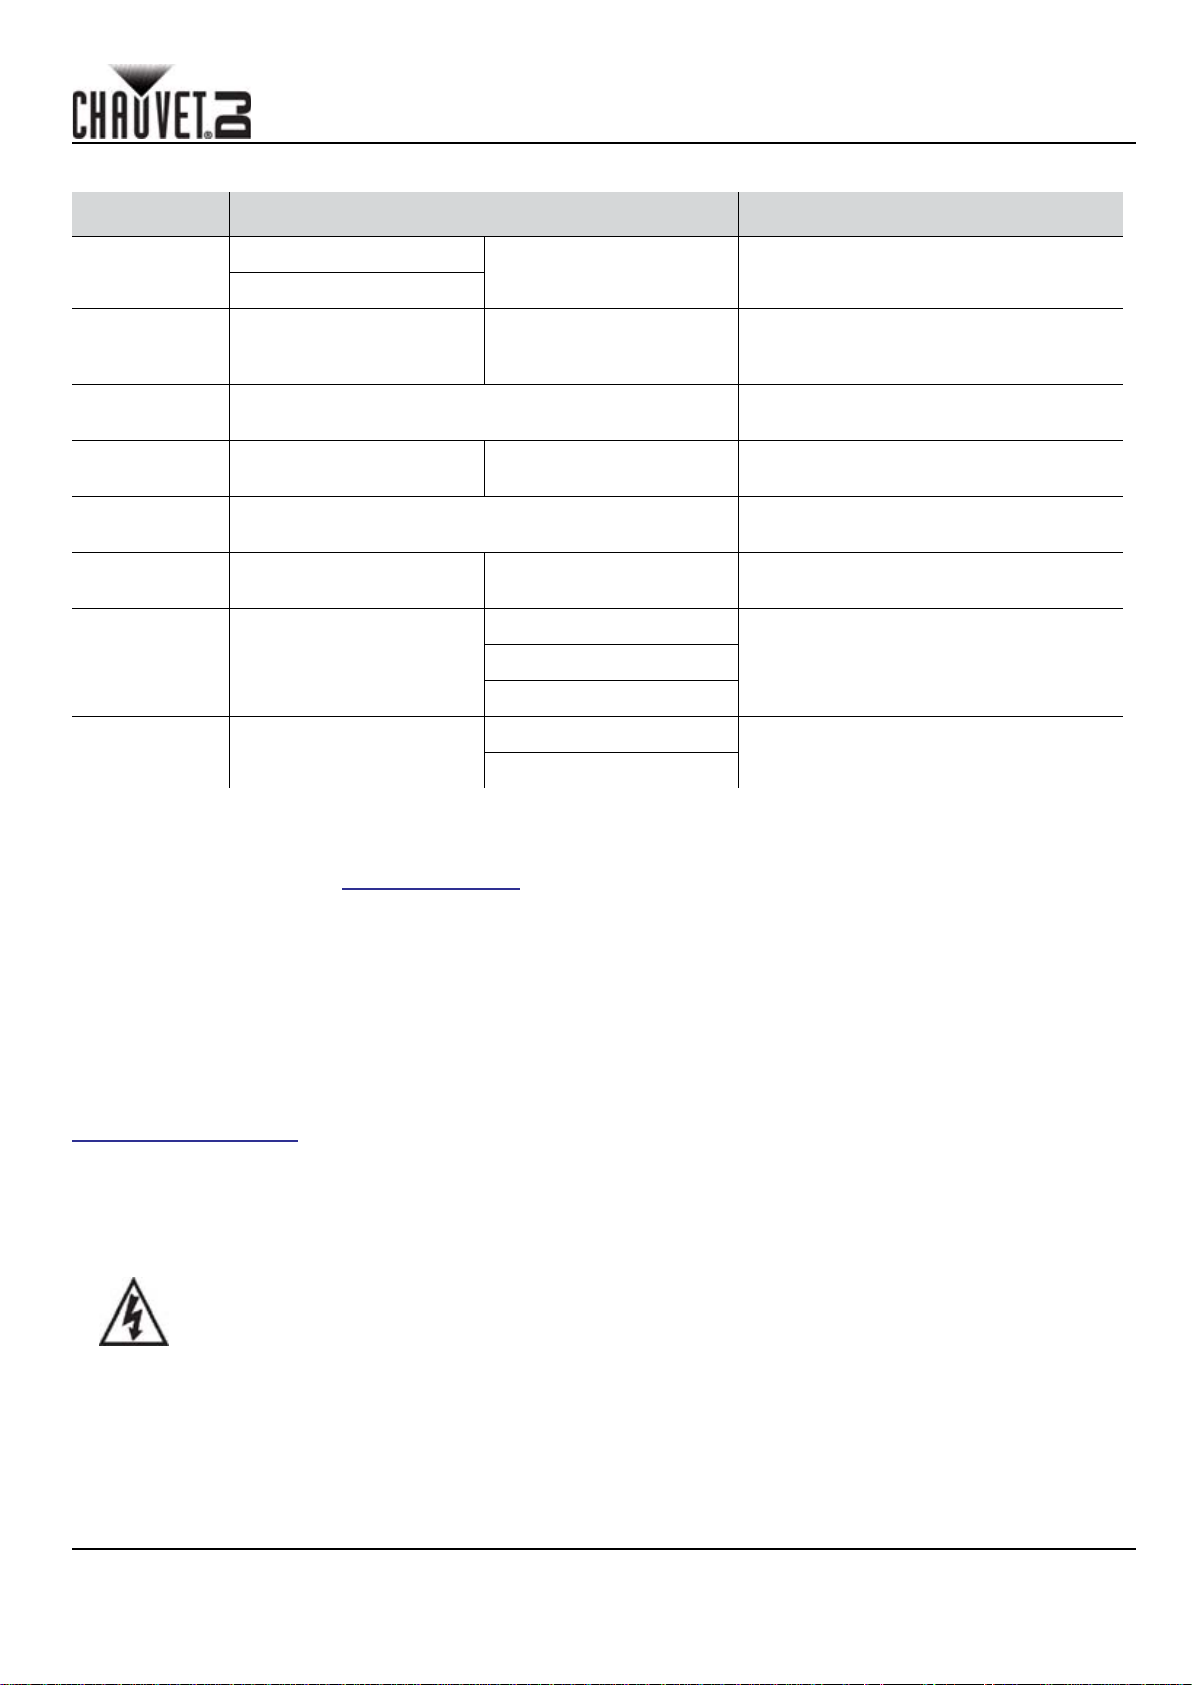
Mappa del Menù
MODALITÀ LIVELLI DI PROGRAMMAZIONE DESCRIZIONE
IT
Modalità DMX
Colori preim-
postati
Programmi
automatici
Velocità S-- S 1-S100
Attivazione
sonora
Sensibilità
sonora
Mixaggio
colore RGB
Modalità
infrarosso
3-CH
15CH
C-- C 1-C 7
Auto Attiva la modalità automatica
Snd
Sens u 1-u100
U--
Set
d1-d512 Imposta l'indirizzo DMX iniziale
r 0-r100
g 0-g100
b 0-b100
ON
OFF
Seleziona uno dei colori preimpostati
(Rosso, Verde, Blu, Ciano, Magenta,
Giallo o Bianco)
Regola la velocità dei programmi
automatici (da veloce a lenta)
Il programma interno si attiva a tempo di
musica
Regola la sensibilità della Modalità
sonota (da bassa a alta)
Regola i livelli di Rosso, Verde e Blu per
creare colori personalizzati
Attiva la Modalità infrarossi per utilizzo
telecomando IRC-6
Collegamento DMX
4Bar L T USB può funzionare con un controller DMX quando collegato tramite connessioni seriali DMX. Le istruzioni per il
collegamento e la configurazione di questa unità sono contenute nel Manuale Utente. Se non si ha familiarità con il DMX,
scaricare DMX Primer dal sito www.chauvetdj.com.
Indirizzo Iniziale
Per assicurare il completo accesso a tutti i canali in ciascuna modalità DMX, l'indirizzo maggiormente raccomandato è
510.
Collegamento Master/Slave
In modalità Master/Slave, 4Bar LT USB utilizza il collegamento dati DMX. Le istruzioni per il collegamento e la
configurazione di questa unità per il funzionamento Master/Slave sono contenute nel Manuale Utente.
IRC-6 (Telecomando a infrarossi)
4Bar LT USB è totalmente compatibile con il telecomando a infrarossi (IRC-6) di CHAUVET® DJ. Per maggiori
informazioni sul telecomando a infrarossi, o per scaricarne le relative istruzioni, visitare il sito Web
www.chauvetlighting.com.
Connettività D-Fi USB
4Bar LT USB può diventare un ricetrasmettitore wireless D-Fi utilizzando il D-Fi USB di CHAUVET® DJ. È sufficiente
impostare il DIP switch del canale di ricezione/trasmissione dell'unità, collegarla alla porta USB e poi impostare funzione
e indirizzo DMX. Le istruzioni complete per il collegamento e la configurazione di questa unità per il funzionamento D-Fi
USB sono contenute nel Manuale Utente..
ATTENZIONE! Nella porta USB collegare SOLO un D-Fi USB. In caso contrario l'unità potrebbe
danneggiarsi.
4BAR LT USB GR Rev. 2
32
Page 34

IT
GUIDA RAPIDA
Dopo il collegamento, D-Fi USB prende il controllo del prodotto. DMX cablato, controllo manuale
del display / pulsanti del menù ed IRC-6 non saranno disponibili fino a quando D-Fi USB non
verrà scollegato. I livelli di priorità sono:
1. D-Fi USB
2. DMX cablato
3. Telecomando IRC-6
4. Display digitale manuale / Pulsanti del menù
33
4BAR LT USB GR Rev. 2
Page 35
GUIDA RAPIDA
Valori DMX
15CH
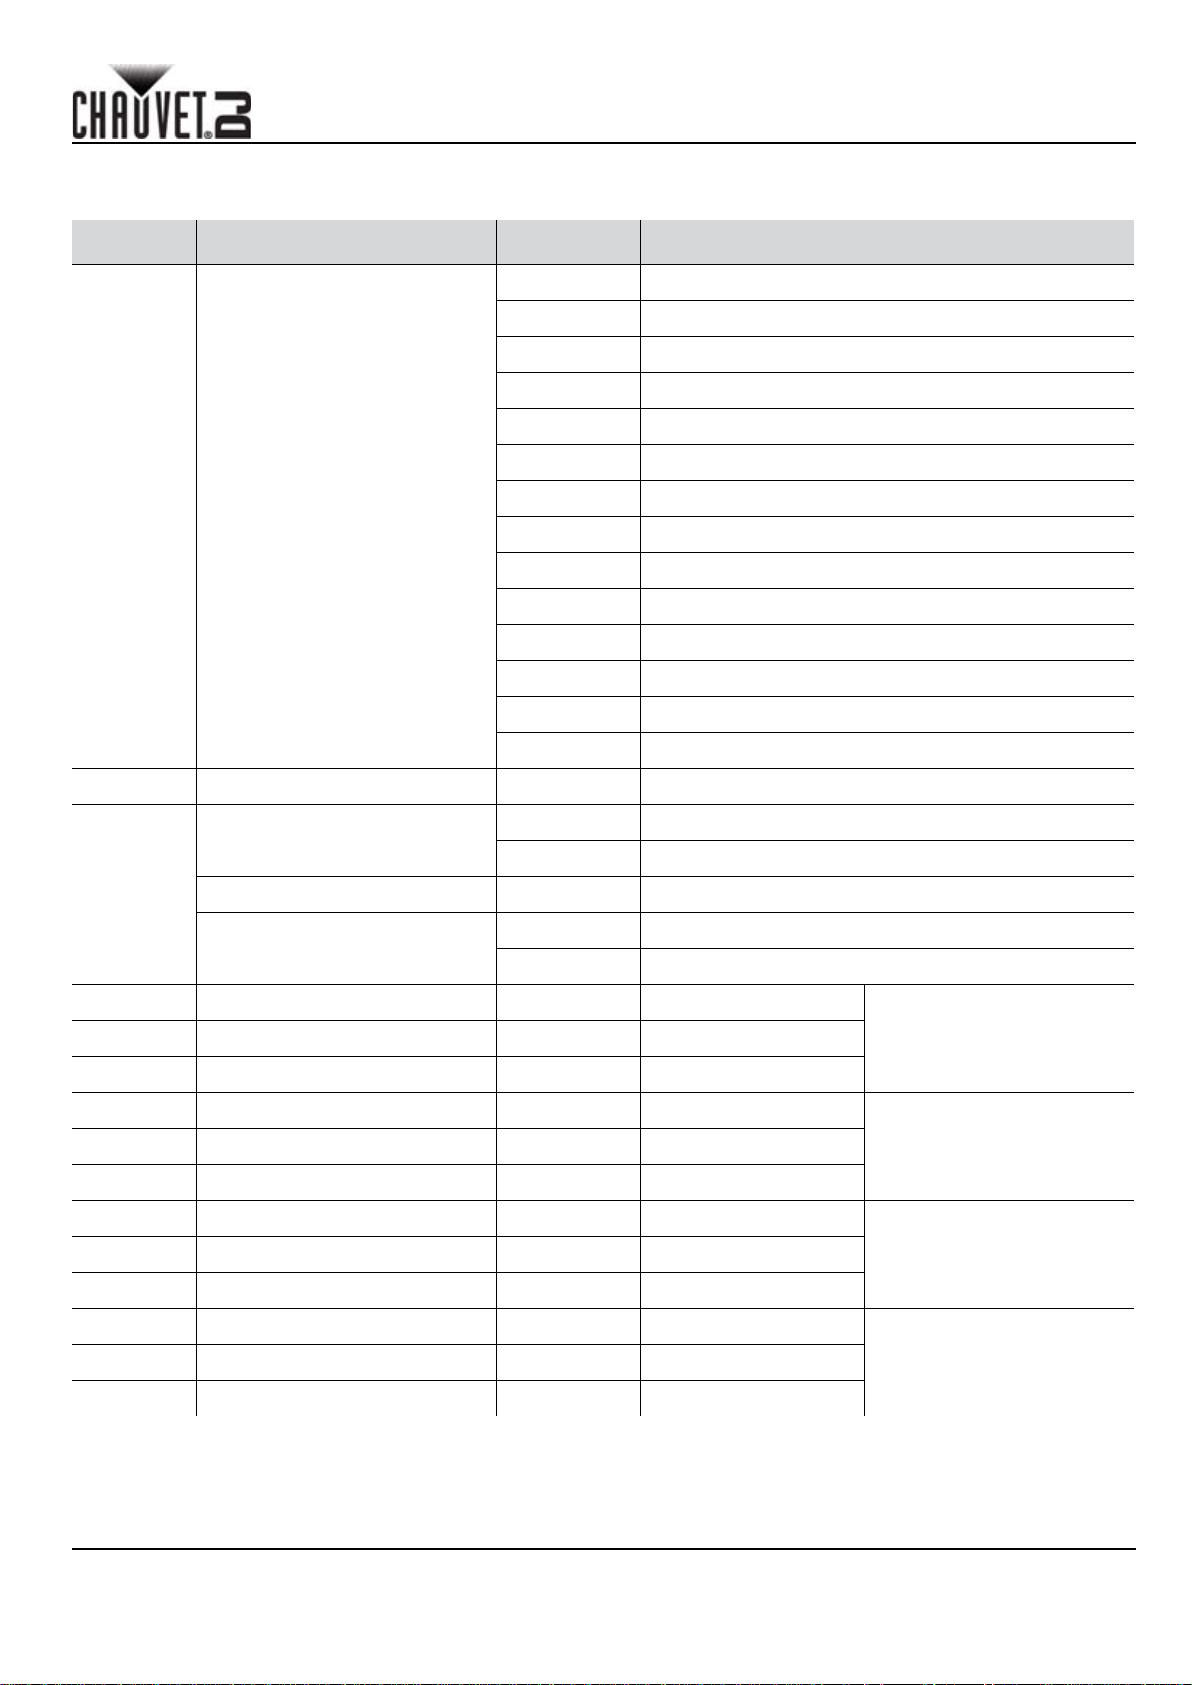
CANALE FUNZIONE VALORE PERCENTUALE/IMPOSTAZIONE
000
009 Mixaggio colore RGB
010 029 Programma automatico 1
049 Programma automatico 2
030
050 069 Programma automatico 3
070 089 Programma automatico 4
090 109 Programma automatico 5
IT
1
2 Dimmer 000 255 0-100%
3
4 Rosso 000 255 0-100%
5 Verde 000 255 0-100%
6 Blu 000 255 0-100%
Controllo/Modalità di
funzionamento
Stroboscopio
Velocità programma 000 255 Lento a veloce
Sensibilità sonora
110 129 Programma automatico 6
130 149 Programma automatico 7
150 169 Programma automatico 8
170 189 Programma automatico 9
190 209 Programma automatico 10
210 229 Programma automatico 11
230 249 Programma automatico 12
250 255 Modalità Attivazione sonora
000 009 Nessuna funzione
010 255 Stroboscopio Da lento a veloce
000 010 Nessuna funzione
011 255 Sensibilità minima-massima
Mixaggio colore RGB
(Pod 1)
7 Rosso 000 255 0-100%
8 Verde 000 255 0-100%
9 Blu 000 255 0-100%
10 Rosso 000 255 0-100%
11 Verde 000 255 0-100%
12 Blu 000 255 0-100%
13 Rosso 000 255 0-100%
14 Verde 000 255 0-100%
15 Blu 000 255 0-100%
4BAR LT USB GR Rev. 2
Mixaggio colore RGB
(Pod 2)
Mixaggio colore RGB
(Pod 3)
Mixaggio colore RGB
(Pod 4)
34
Page 36

GUIDA RAPIDA
IT
3-CH
CANALE FUNZIONE VALORE PERCENTUALE/IMPOSTAZIONE
1 Rosso 000
2 Verde 000 255 0-100%
3 Blu 000 255 0-100%
255 0-100%
35
4BAR LT USB GR Rev. 2
Page 37

BEKNOPTE HANDLEIDING
Over deze handleiding
De Beknopte Handleiding (BH) van de 4Bar LT USB bevat basisinformatie over het product, zoals montage, menuopties, en de DMX waarden. Download de gebruikershandleiding op www.chauvetdj.com voor meer informatie.
Disclaimer
De informatie en specificaties in deze BH kunnen zonder voorafgaande kennisgeving worden gewijzigd.
Veiligheids-instructies
Deze veiligheidsinstructies bevatten belangrijke informatie over de installatie, het gebruik en het onderhoud.
• Dit product is niet bedoeld voor permanente installatie.
• Sluit dit product UITSLUITEND op een geaard en beveiligd stroomcircuit.
• Haal voor het vervangen van de zekering altijd de stekker van het product uit het stopcontact.
• KIJK NIET in de lichtbron wanneer het apparaat is ingeschakeld.
• Zorg ervoor dat het stroomsnoer niet knikt of beschadigd.
• Koppel dit product nooit los van het stopcontact door aan het snoer te trekken.
• Gebruik een veiligheidskabel wanneer het product boven lichaamshoogte wordt gemonteerd.
• GEEN brandbare materialen in de buurt van de unit tijdens gebruik.
• RAAK het product NIET AAN wanneer het in werking omdat het dan heet zijn.
• TDe spanning van het stopcontact waarop u dit product aansluit moet binnen het vermelde bereik
op de sticker of achterkant van het product zijn.
• Het product is alleen voor gebruik binnenshuis! (IP20) Om risico op brand of elektrische schokken
te voorkomen, mag dit product niet aan regen of vocht worden blootgesteld.
• Monteer dit product altijd op een plek met voldoende ventilatie, minstens 20 inch (50 cm) van de
aangrenzende oppervlakken.
• Zorg ervoor dat er geen ventilatie-openingen van de behuizing van het product worden
geblokkeerd.
• Sluit dit product nooit aan op een dimmer of een regelweerstand.
• Vervang de zekering met een andere zekering van hetzelfde type en met dezelfde waarde.
• Gebruik UITSLUITEND de ophang-/montagebeugel om dit product te dragen.
• De maximale omgevingstemperatuur bedraagt 40 °C. Gebruik dit product niet bij hogere
temperaturen.
• Stop in het geval van ernstige operationele problemen onmiddellijk met het gebruik.
• Open het product NIET. Het bevat geen te onderhouden onderdelen.
• Sluit om onnodige slijtage te verhinderen en de levensduur te verlengen tijdens periodes van nietgebruik het product via stroomonderbreker of de stekker volledig van stroom af.
NL
Contact
Van buiten de VS, Verenigd Koninkrijk, Ierland, Mexico of Benelux kunt u contact opnemen met de distributeur of om
ondersteuning vragen dan wel het product retourneren. Ga naar www.chauvetdj.com voor contactinformatie.
Wat is inbegrepen
• 4Bar LT USB
• Stroomsnoer
• Draagtassen
• Driepoot
• Wired voetschakelaar
• Garantiekaart
• Beknopte handleiding
Om te beginnen
Pak uw 4Bar LT USB uit en zorg ervoor dat u alle onderdelen in goede staat hebt ontvangen. Als de doos of inhoud
beschadigd lijkt, stel dan de vervoerder onmiddellijk op de hoogte, niet Chauvet.
4BAR LT USB BH Rev. 2
36
Page 38
BEKNOPTE HANDLEIDING
NL
Beschrijving
De 4Bar LT USB is eenvoudig mee te nemen, volledig wash-verlichtingsoplossing die is ontworpen voor mobiele
entertainers. Met draadloze DMX-regeling met de handige ingebouwde D-Fi USB-poort (afzonderlijk verkrijgbare), IRCcompatibiliteit, en extra functies die modi master/slave en auto/geluid actief, mogelijk maken. Elke pod op de 4Bar LT
USB heeft 3 krachtige, driekleurige LED-lampjes, die onafhankelijk kunnen worden geplaatst om te zorgen voor volledige
dekking van de ruimte of het podium. De driekleurige LED-lampen szijn ideaal voor frontverlichting, aangezien ze
meerkleurige schaduwen vrijwel elimineren. Eenvoudig in enkele minuten op te zetten en af te breken met het
meegeleverde driepootstatief, voetschakelaar en draagtassen
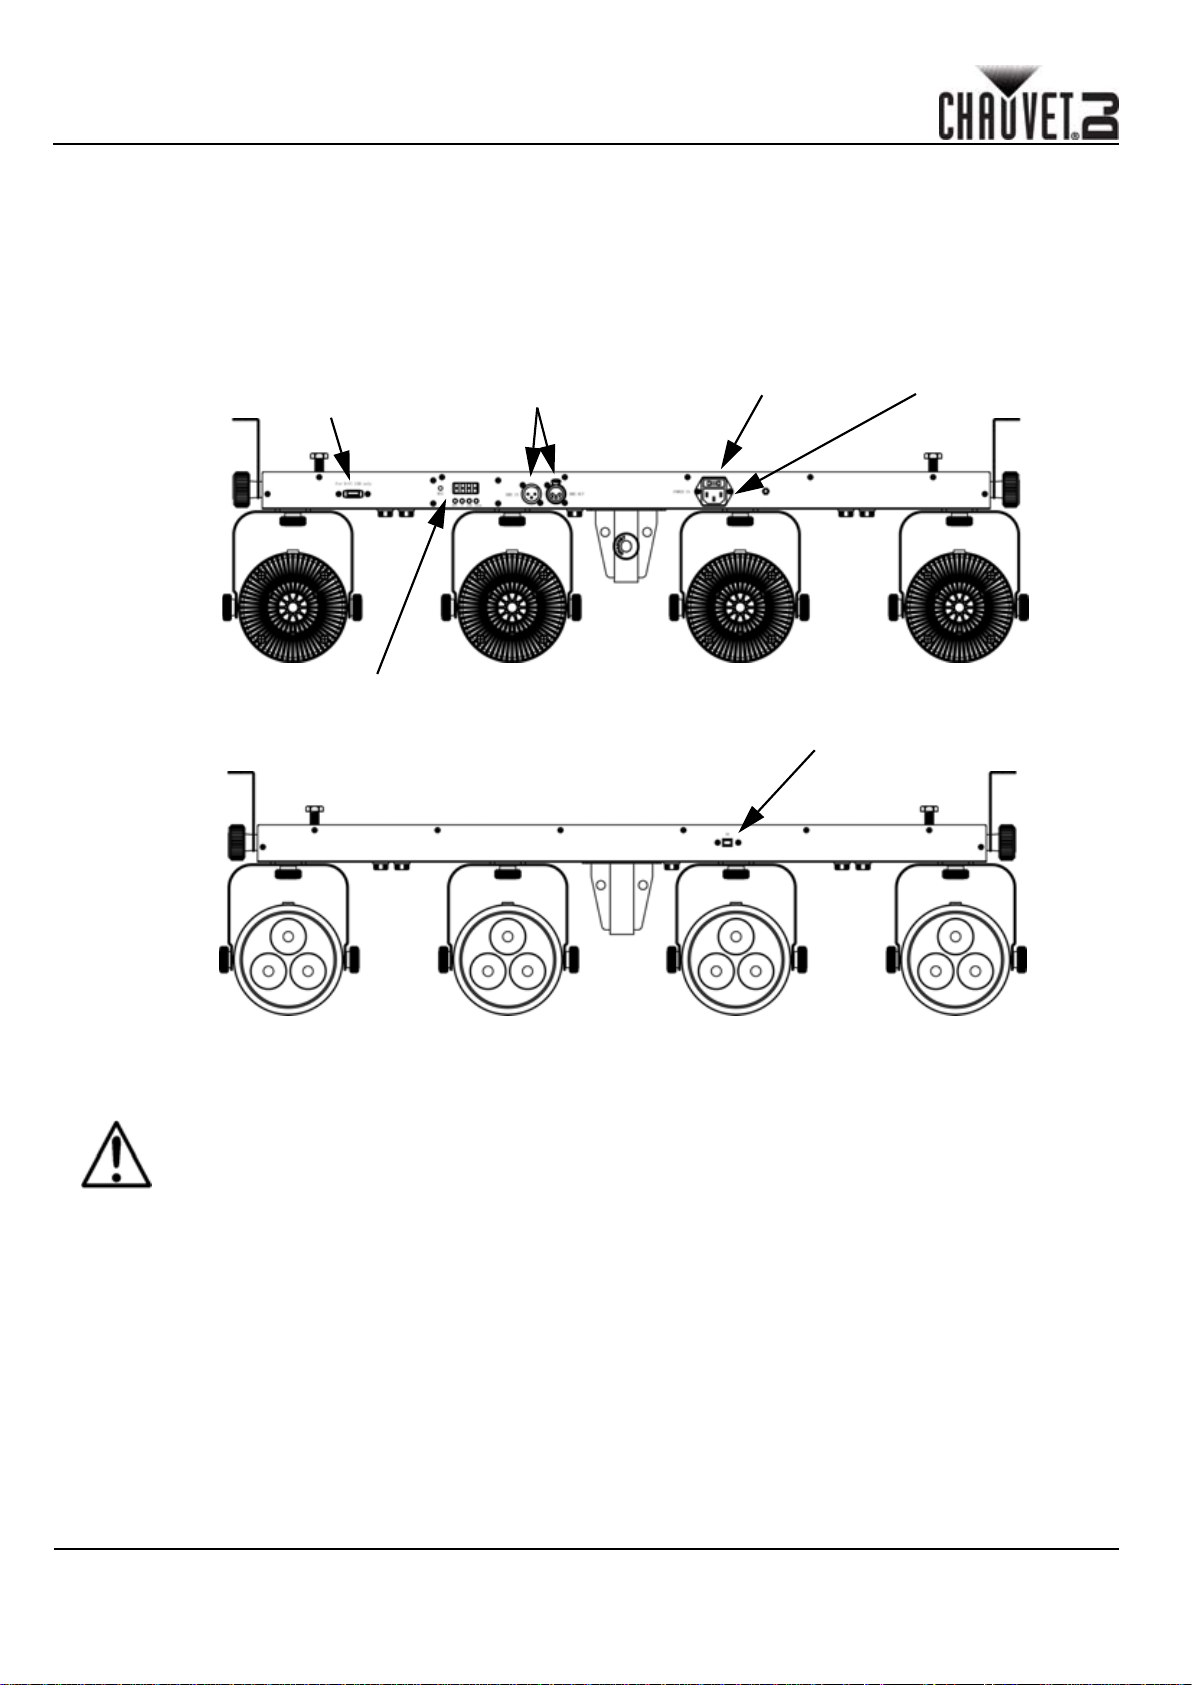
Overzicht
D-Fi USB
Poort
DMX-ingang/ uitgang
Zekeringhouder
Stroomingang
LED-display
IR-Sensor
AC Power
Dit product heeft een voeding met automatisch bereik die werkt met een ingangsspanning van 100–240 VAC, 50/60 Hz.
Sluit om onnodige slijtage te verhinderen en de levensduur te verlengen tijdens periodes van
niet-gebruik het product via stroomonderbreker of de stekker volledig van stroom af.
Power Linking
Voor het maximale aantal 4Bar LT USB-producten die via power link kunnen worden gekoppeld bij elke spanning, ziet u
de gebruikershandleiding of de sticker op het product.
Vervangen van de zekering
1. Ontkoppel het apparaat van de stroom.
2. Gebruik een schroevendraaier met platte kop, maak de zekeringshouder los en trek hem er recht uit.
3. Verwijder de doorgebrande zekering uit de houder en vervang deze door een zekering van exact hetzelfde type
en vermogen.
4. Plaats de zekeringhouder terug en steek de stekker er weer in.
37
4BAR LT USB BH Rev. 2
Page 39
BEKNOPTE HANDLEIDING
Montage
Lees alvorens dit product te monteren alle Veiligheids-instructies en raadpleeg de gebruikershandleiding .
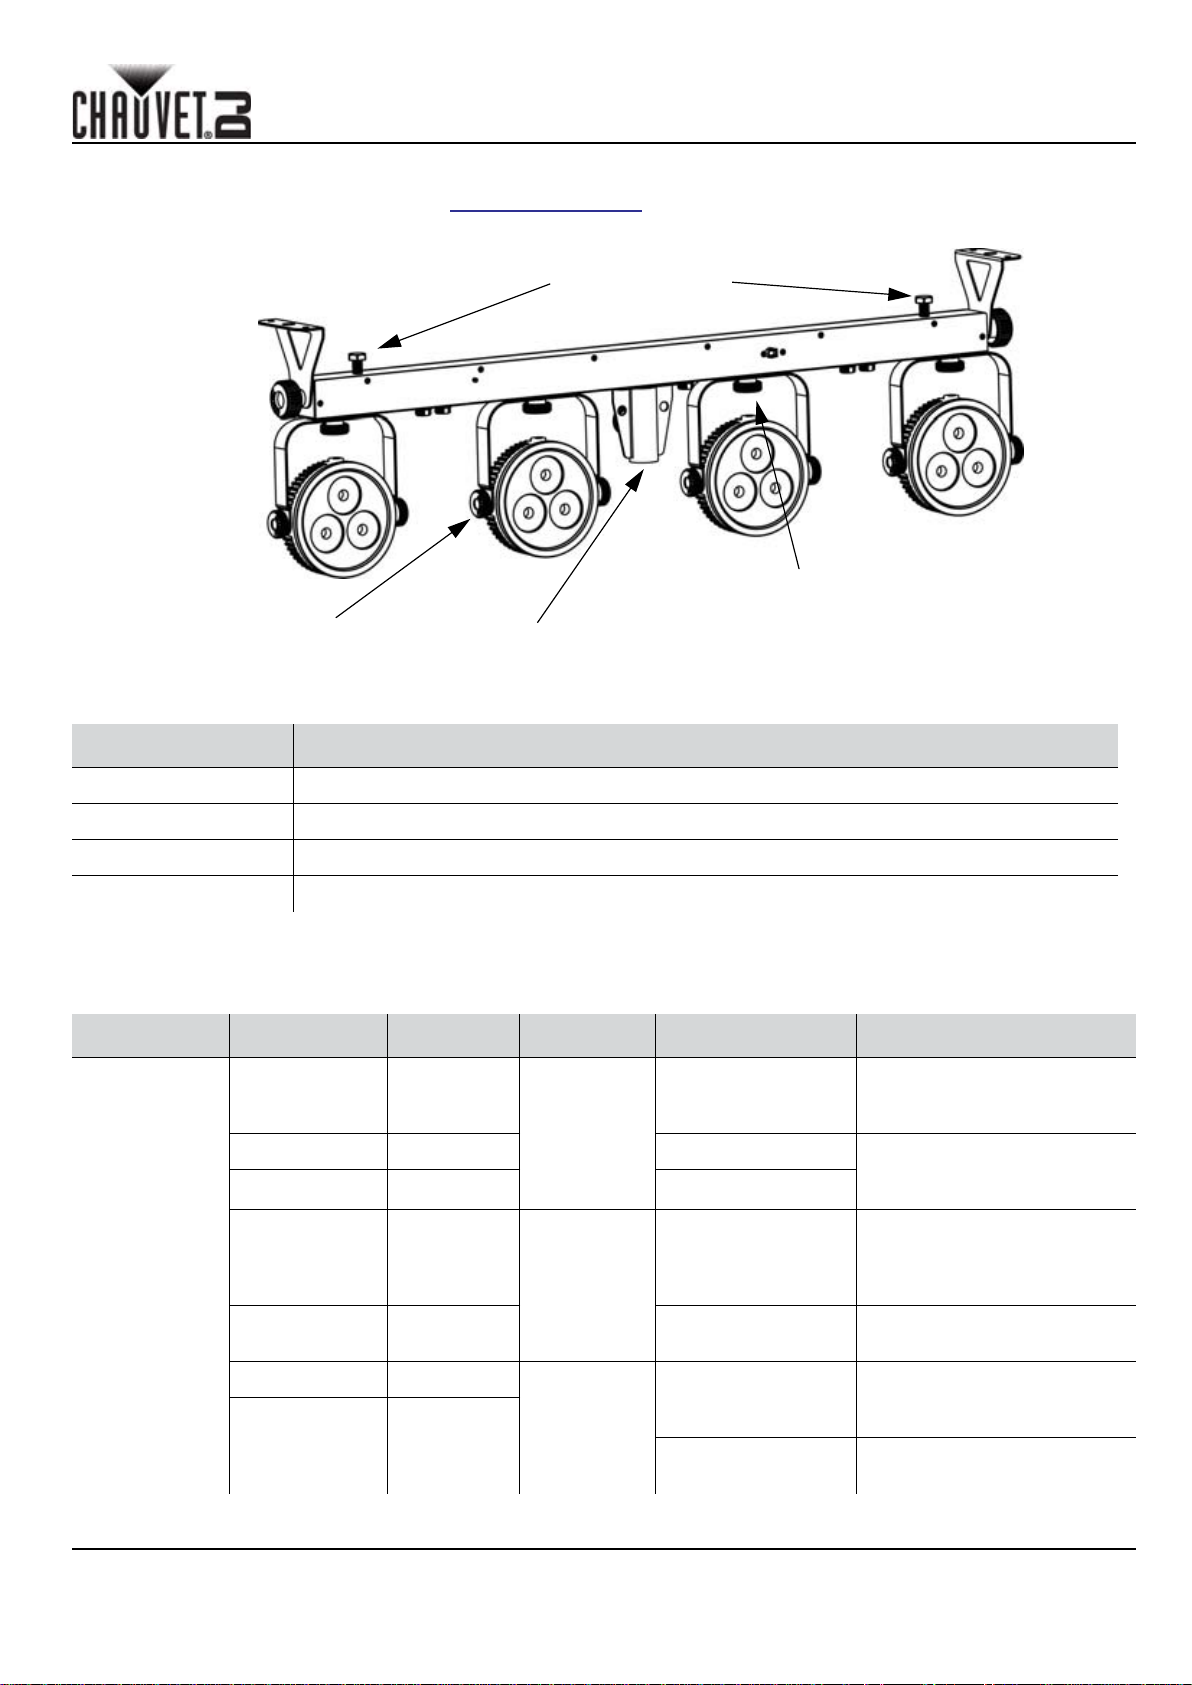
Montagediagram
Klemhangbouten
Instelknop voor de
zwenking van de pod
Instelknop voor de
kanteling van de pod
TDriepootinsert
iepunt
NL
Beschrijving bedienings-paneel
TOETS FUNCTIE
<MENU> Selecteert een bedieningsmodus of verlaat huidige menu-optie
<UP> Navigeert omhoog via het menu of verhoogt de numerieke waarde wanneer in een functie
<DOWN> Navigeert omlaag via het menu of verlaagt de numerieke waarde wanneer in een functie
<ENTER> Activeert een menu-optie of de geselecteerde waarde
Verbinding voetschakelaar
De 4Bar LT USB kan ook met de voetschakelaar bediend worden.
PEDAAL SUBOPTIE FUNCTIE PEDAAL SUBOPTIE FUNCTIE
Elke seconde in een
Rechts
(preset)
1 x drukken Wit
Rechts
2 x drukken Rood 9 x drukken Elke drie seconden in een
3 x drukken Groen Houd
4 x drukken Blauw
5 x drukken Cyaan Houd
(preset)
Links
(Blackout)
8 x drukken
1 x drukken
voortdurende lus van kleur
veranderen
voortdurende lus van kleur
veranderen
Alle LED-lampen uit; druk op
pedaal 1 of pedalen 1 en 2
om opnieuw naar de actieve
modi te gaan
Vervaagt LEDs in / out
langzaam
6 x drukken Magenta
7 x drukken Geel
4BAR LT USB BH Rev. 2
Rechts &
Links
(Sound
Active)
Beide pedalen
tegelijkertijd indruk-
ken
Houd beide ped-
alen gelijktijdig
Geluidsactief
Stroboscoop
38
Page 40
BEKNOPTE HANDLEIDING
NL
Menu Map
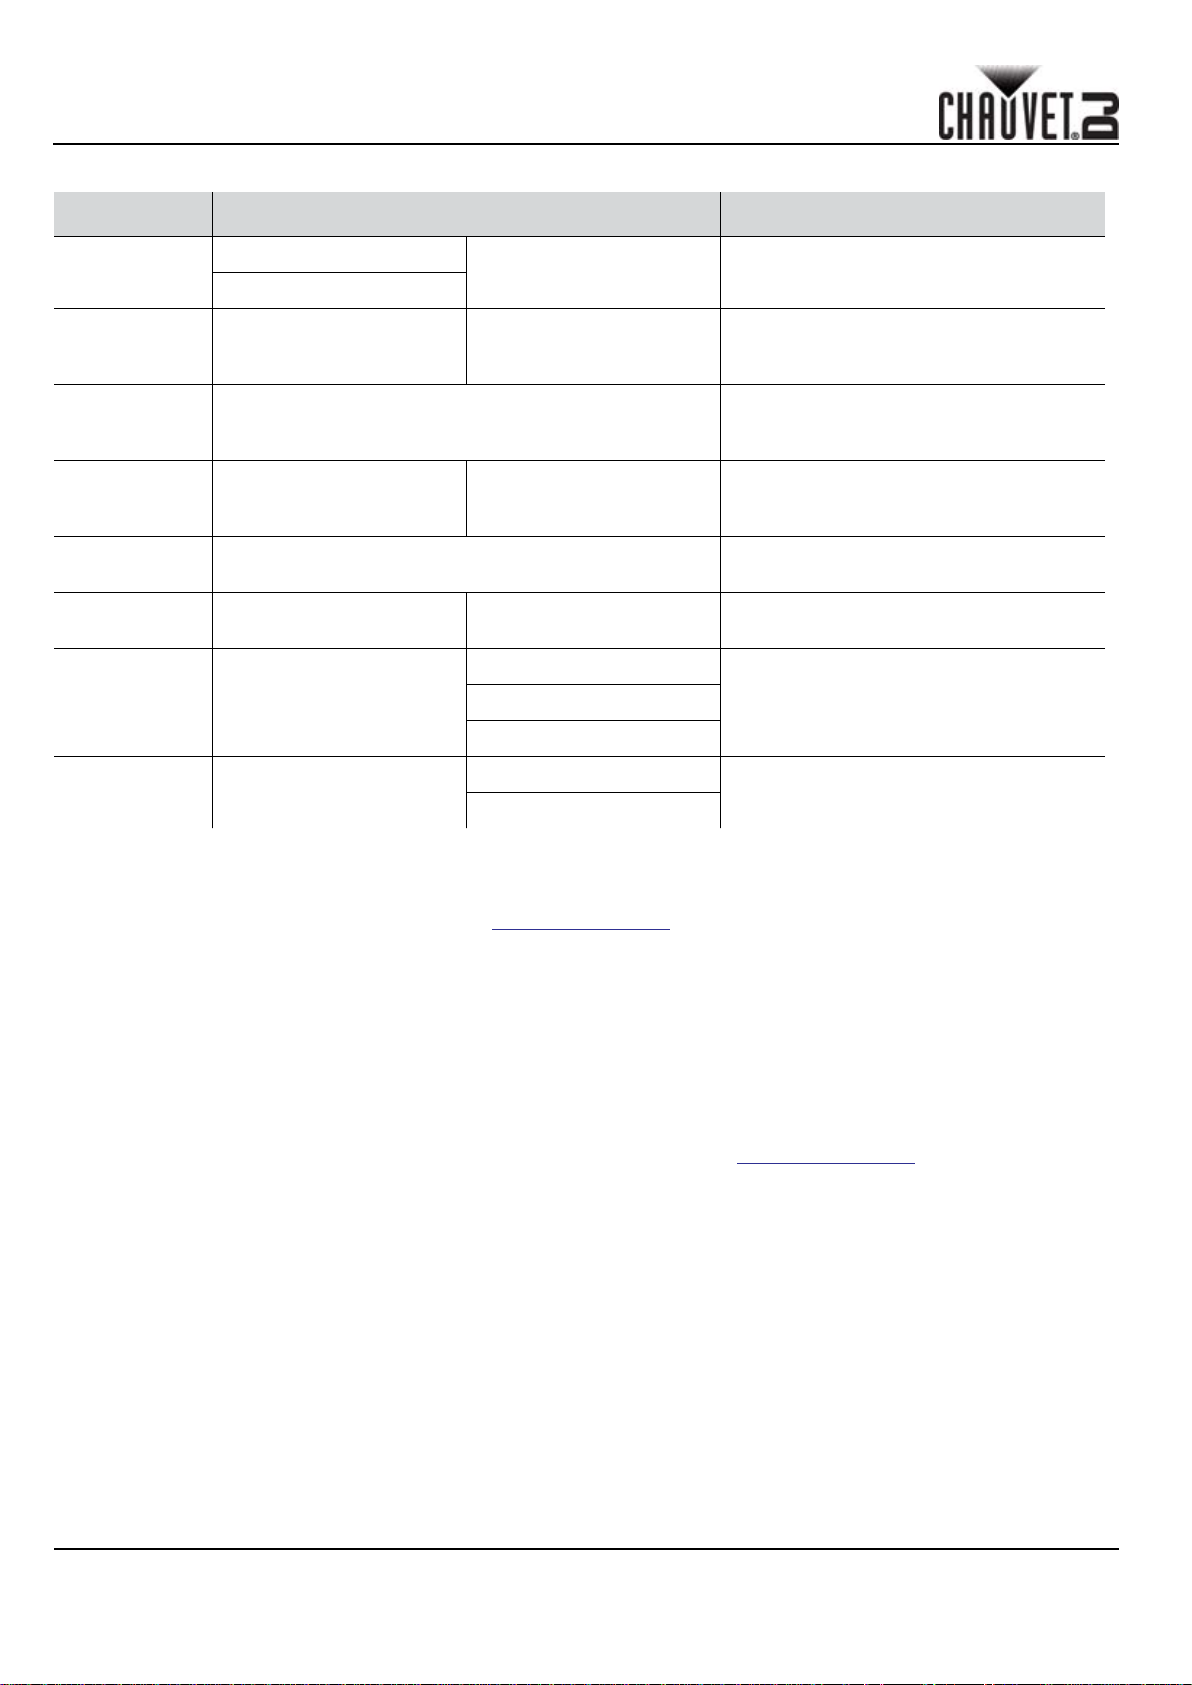
MODUS PROGRAMMEERNIVEAUS BESCHRIJVING
DMX-Modus
Vooringesteld
e kleuren
Automa-
tische pro-
gramma's
Snelheid S-- S 1-S100
Geluidsactief Snd
Geluidsactief Sens u 1-u100
RGB-kleuren-
menging
Infrarood
modus
3-CH
15CH
C-- C 1-C 7
Auto Schakelt de automatische modus in
U--
Set
d1-d512 Stelt het DMX-startadres in
r 0-r100
g 0-g100
b 0-b100
ON
OFF
Selecteert een van de vooringestelde
kleuren (rood, groen, blauw, cyaan,
magenta, geel of wit)
Stelt de snelheid in van het
automatische programma (snel tot
langzaam)
Het interne programma loopt op de beat
van de muziek
Stelt de gevoeligheid in van de
geluidsmodus (laag tot hoog)
Stelt de rode, groene en blauwe niveaus
in om aangepaste kleuren te creëren
Schakel de infrarood-modus is voor
gebruik van de IRC-6 afstandsbediening
DMX-koppeling
De 4Bar LT USB kan met een DMX-controller werken indien gekoppeld door DMX seriële verbindingen. Instructies voor
het aansluiten en configureren van dit product voor DMX-bediening staan in de gebruikershandleiding. Als u niet bekend
bent met DMX, download dan de DMX-primer op www.chauvetdj.com.
Startadres
Om volledige toegang tot alle kanalen in elke DMX-modus te garanderen is het hoogste aanbevolen DMX-adres voor dit
product 510.
Master/slave-verbinding
De 4Bar LT USB maakt gebruik van de DMX-dataverbinding voor haar Master-/Slave-modus. Instructies voor het
aansluiten en configureren van dit product voor DMX-bediening staan in de gebruikershandleiding.
Infrarood afstandsbediening (IRC-6)
De 4Bar LT USB is volledig compatibel met de infrarood afstandsbediening (IRC-6) van CHAUVET® DJ. Voor meer
informatie over de IRC-6 of voor het downloaden van instructies, gaat u naar www.chauvetdj.com.
39
4BAR LT USB BH Rev. 2
Page 41
BEKNOPTE HANDLEIDING
NL
D-Fi USB-connectiviteit
Der 4Bar LT USB kan door middel van de D-Fi USB van CHAUVET® DJ een draadloze D-Fi zender/ontvanger worden.
Stel simpelweg de DIP-schakelaar van het D-Fi zend-/ontvangstkanaal in, plaats het in de USB-poort en stel de DMXpersoonlijkheid en het DMX-adres van het product in. Verdere instructies voor het aansluiten en configureren van dit
product voor D-Fi USB-bediening staan in de gebruikershandleiding.
Waarschuwing! NIETS anders dan een D-Fi-USB in de USB-poort plaatsen. Dit kan het product
namelijk beschadigen.
Nadat het is aangesloten zal de D-Fi USB het product overnemen. Bedrade DMX, handmatige
DMX-bediening/menuknoppen en IRC-6 zijn niet beschikbaar totdat u de D-Fi USB afkoppelt. De
prioriteitsniveaus zijn:
1. D-Fi USB
2. Bedrade DMX
3. IRC-6 afstandsbediening
4. Handmatige digitale display/menuknoppen
4BAR LT USB BH Rev. 2
40
Page 42
BEKNOPTE HANDLEIDING
NL
DMX-waarden
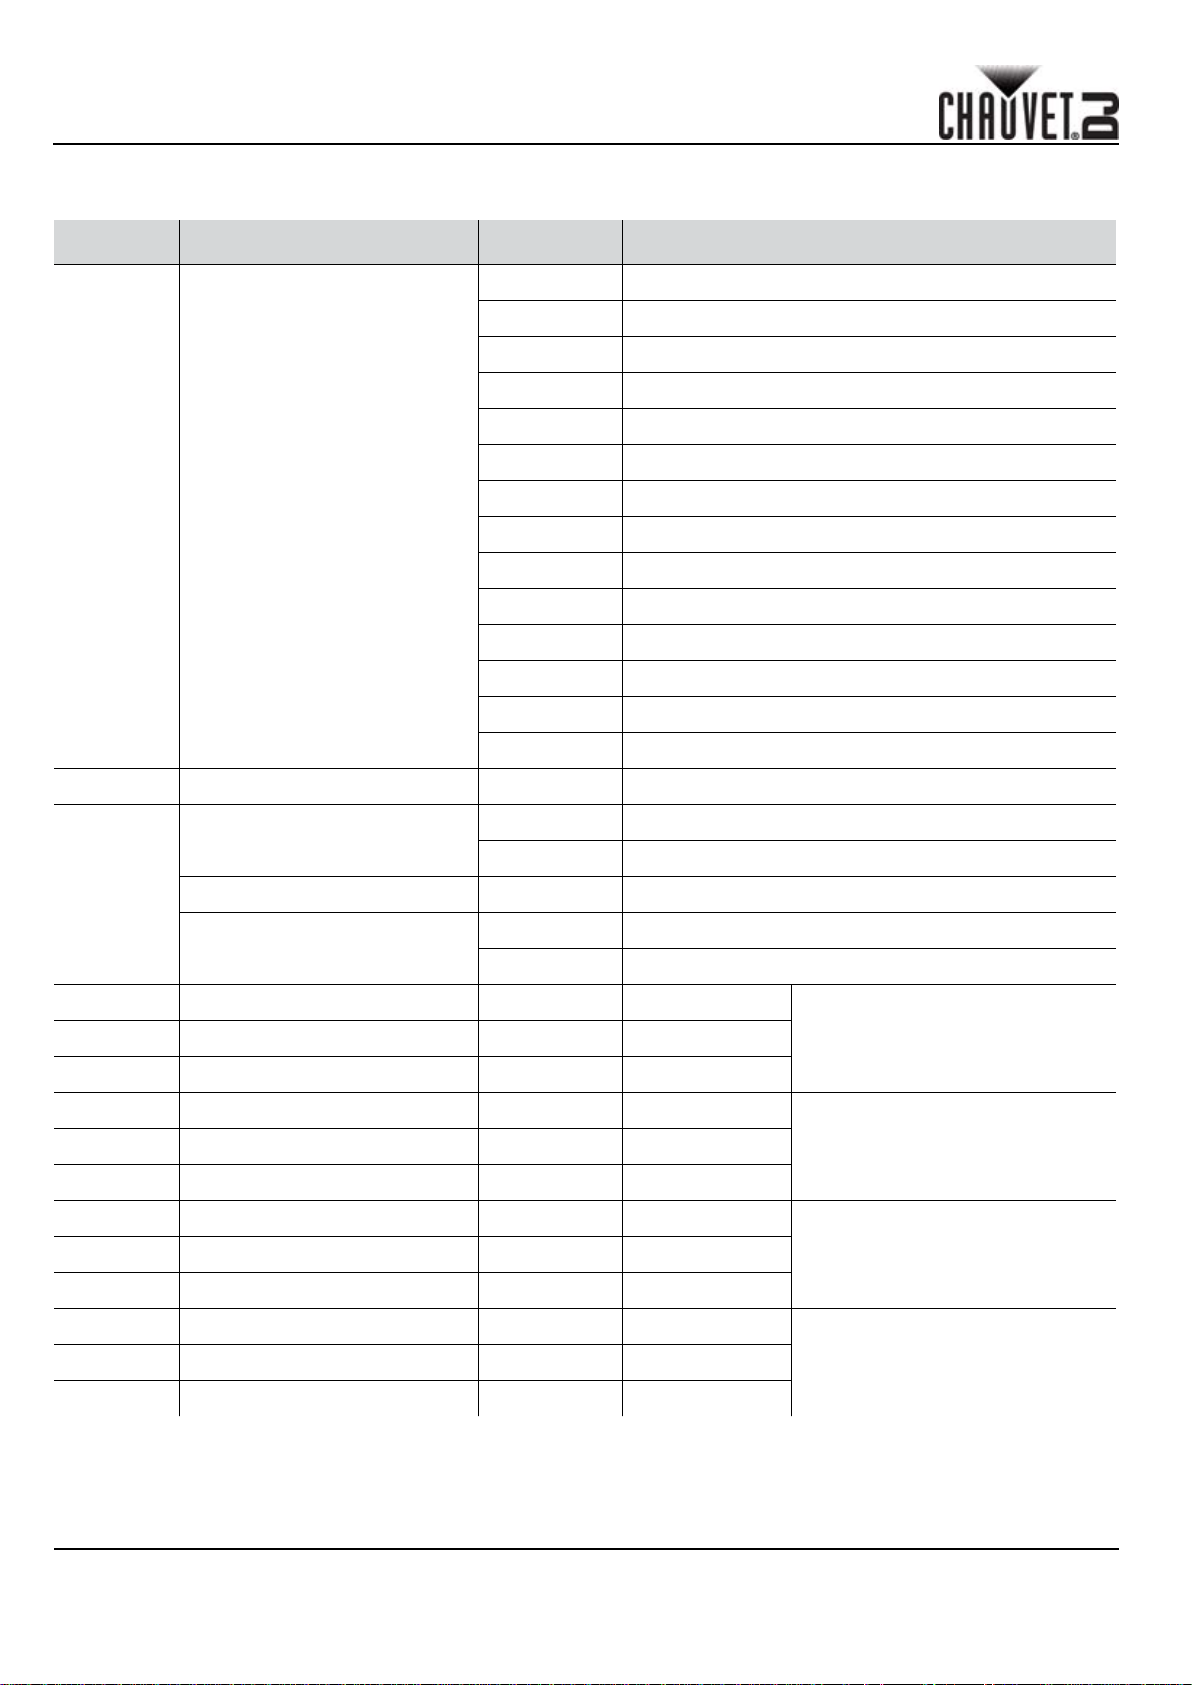
15CH
KANAAL FUNCTIE WAARDE PERCENTAGE/INSTELLING
000
009 RGB-kleurenmenging
010 029 Automatisch programma 1
049 Automatisch programma 2
030
050 069 Automatisch programma 3
070
089 Automatisch programma 4
090 109 Automatisch programma 5
1 Bediening/bedrijfsmodus
110 129 Automatisch programma 6
149 Automatisch programma 7
130
150 169 Automatisch programma 8
170 189 Automatisch programma 9
190 209 Automatisch programma 10
210
229 Automatisch programma 11
230 249 Automatisch programma 12
250 255 Geluidsactieve modus
2 Dimmer 000 255 0-100%
000 009 Geen functie
Stroboscoop
010 255 Langzaam tot snel
3
Programmasnelheid 000 255 Lage tot hoge snelheid
000 010 Geen functie
Geluidsgevoelig-heid
011 255 Lage tot hoge gevoeligheid
4 Rood 000 255 0-100%
6 Blauw 000 255 0-100%
RGB-kleurenmenging (Pod 1)5 Groen 000 255 0-100%
7 Rood 000 255 0-100%
9 Blauw 000 255 0-100%
10 Rood 000 255 0-100%
12 Blauw 000 255 0-100%
13 Rood 000 255 0-100%
15 Blauw 000 255 0-100%
41
RGB-kleurenmenging (Pod 2)8 Groen 000 255 0-100%
RGB-kleurenmenging (Pod 3)11 Groen 000 255 0-100%
RGB-kleurenmenging (Pod 4)14 Groen 000 255 0-100%
4BAR LT USB BH Rev. 2
Page 43
BEKNOPTE HANDLEIDING
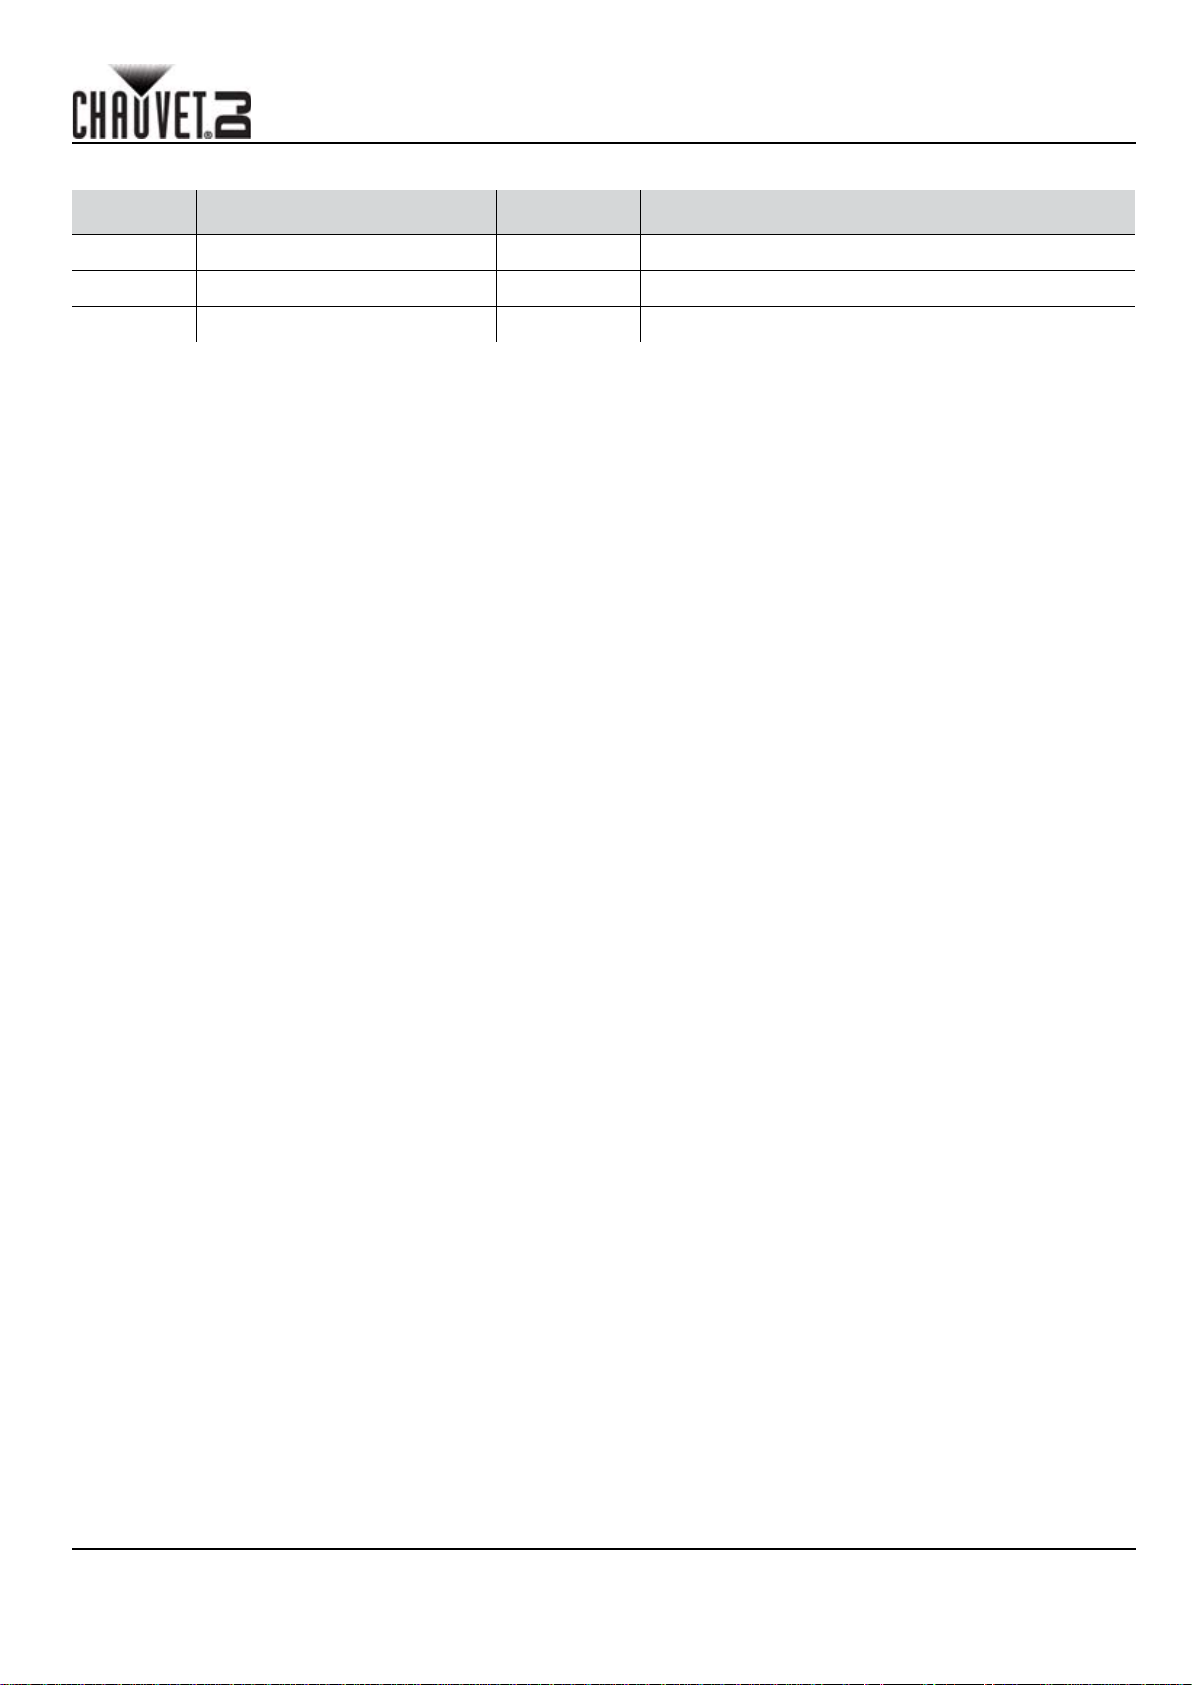
3-CH
Kanaal Functie Waarde Percentage/instelling
1 Rood 000 255 0-100%
NL
2 Groen 000
3 Blauw 000 255 0-100%
255 0-100%
4BAR LT USB BH Rev. 2
42
Page 44
Multi-Language
Contact Us
World Headquarters
EUROPE
MEXICO
QUICK REFERENCE GUIDE
General Information Technical Support
Address: 5200 NW 108th Ave. Voice: (954) 577-4455 (Press 4)
Sunrise, FL 33351 Fax: (954) 756-8015
Voice: (954) 577-4455 Email:
Fax: (954) 929-5560
Toll Free: (800) 762-1084 www.chauvetlighting.com
General Information Technical Support
Address: Stokstraat 18 Email: [email protected]
9770 Kruishoutem
Belgium www.chauvetlighting.eu
Voice: +32 9 388 93 97
General Information Technical Support
Address: Unit 1C Email: [email protected]
Brookhill Road Industrial Estate
Pinxton, Nottingham, UK
NG16 6NT www.chauvetlighting.co.uk
Voice: +44 (0) 1773 511115
Fax: +44 (0) 1773 511110
General Information Technical Support
Address: Av. Santa Ana 30 Email: [email protected]
Lerma, Mexico C.P. 52000
Voice: +52 (728) 285-5000 www.chauvet.com.mx
Website
Website
Website
Website
Outside the U.S., United Kingdom, Ireland, Mexico or Benelux, contact the dealer of record. Follow the instructions to
request support or to return a product. Visit our website for contact details.
4BAR_LT_USB QRG Rev. 2 ML6
© Copyright 2016 Chauvet
All rights reserved
Printed in the P.R.C.
43
4BAR LT USB QRG Rev. 2
 Loading...