


OPERATION MANUAL
FIGHTER COMMAND
ALARM CHRONOGRAPH
© Copyright 2006 CHASE-DURER LTD all rights reserved.

Table of Contents
®Display and Screw Down Crown/Pushbuttons |
1 |
®LCD Digital Displays |
2 |
®Setting Time and Date |
3 |
®Setting Date/Time and Alarm |
4 |
®Setting Time Zones/Leap Year |
5 |
®Resetting Chronograph Hands to Zero |
6 |
®Timing Mode • Simple Chronograph Function |
7 |
®Timing Mode • Split-Time or Intermediate Times Function |
8 |
®Timing Mode • Lap-Time Function |
9 |
®Tachymetre |
10 |
®Tachymetre |
11 |
®Navigation |
12 |
®Miscellaneous |
13 |
®Specifications |
14 |
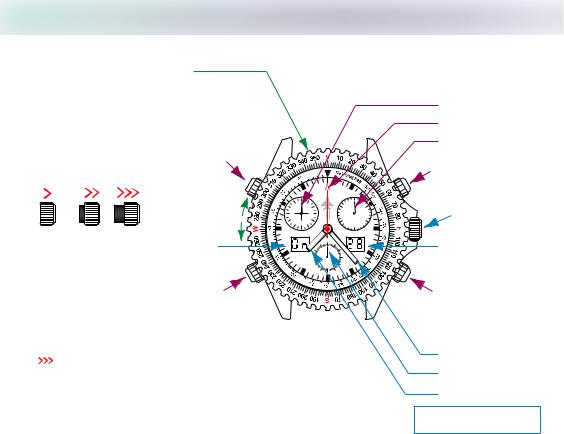
DISPLAY and Screw Down Crown/Pushbuttons |
1. |
Bezel with 360° |
|
CHRONOGRAPH HANDS |
Compass Markings |
|
|
|
|
|
|
|
|
Pushbutton D
1 |
2 |
3 |
|
CHASE-DURER |
|
|
|
|
|
GENEVE |
|
|
|
|
12 |
|
30 |
|
|
|
9 |
3 |
|
|
|
|
6 |
|
15 |
Screwed |
Setting |
|
330 FEET |
FIGHTER 1/100 SEC |
|
|
*Left LCD |
COMMAND |
|||
Down |
Positions |
|
60 |
||
|
|
|
ALARM |
45 |
DATE |
|
|
|
|
15 |
|
Screw Down Crown |
30 |
|
1  Push crown in and turn clockwise until
tight to lock down.
Pushbutton C
12 hour counter
60 second counter
30 minute counter
Pushbutton A
Setting Crown
*Right LCD
Date Indicator/ 1/100 second counter
Pushbutton B
Turn crown
counterclockwise until you no longer feel the threads gripping; crown can now be pulled out to positions 2 & 3.
2  Date, Time Zone, and LCD adjustment, Chronograph hands reset position.
Minute hand
3 Stops second hand, setting minute and hour hands position.
* LCD digital display functions are explained in detail on the following pages.
WARNING: Crown must be locked down in position 1 at all times, use positions 2 & 3 for adjustments only. Pushbuttons do not screw down;
Do not operate pushbuttons under water!
NOTE - Failure to screw down Crown to resist moisture will void your warranty
Second hand
Hour hand
WATCH HANDS
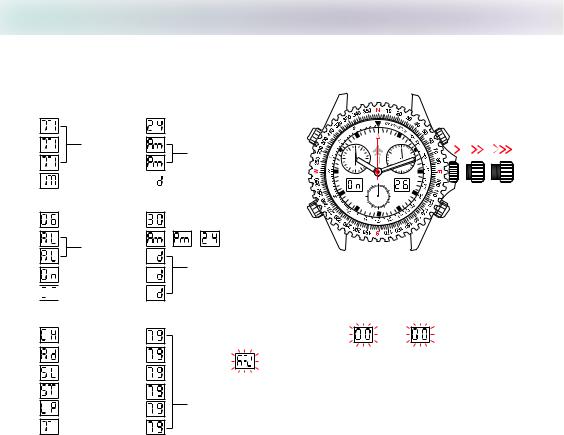
LCD Digital Displays |
2. |
Information Displayed on LCD Panels
Left LCD |
Right LCD |
Time Setting
D
24 Hour Time
Time Mode
12 Hour Time
|
CHASE-DURER |
|
GENEVE |
12 |
30 |
9  3
3
6 |
15 |
A |
|
|
1 |
2 |
3 |
Month |
|
Date |
330 FEET |
FIGHTER 1/100 SEC |
|
COMMAND |
|
60 |
ALARM |
DATE |
45 |
15 |
Alarm Indicators |
|
|
|
30 |
Alarm Hour |
Alarm Minutes |
|
||
Setting |
Setting |
C |
B |
|
|
/ |
/ |
||
|
12/24 Hour Time |
|
||
Alarm Mode |
mode indicators |
|
||
Alarm ON |
|
Date |
|
|
|
|
|
|
|


 Alarm OFF
Note - When the displays are flashing while watch is in setting
Chronograph Indicators |
|
|
Chronograph |
|
|
Add Function |
|
|
Split Time Function |
|
|
Last Elapsed Time |
Chronograph |
|
Lap Time Function |
||
1/100 second |
Total Time
mode, it indicates the watch is waiting for input.
Blinking or partial displays when watch is in normal operating mode (not setting mode) indicates a low battery condition.

Setting Time and Date |
3. |
Note - It is very important that the following steps 1 - 6 are performed in sequence when setting the Time and Date. Failure to do so can prevent accurate display of time and correct Alarm function!
1. Pull setting crown out to position 2 and preset the hour hand to the correct hour with the crown.
2. Pull setting crown out to position 3 
 when the small second hand reaches “60” to stop the second hand for exact time setting. The following steps 3 - 6 will be made with the crown in this position.
Setting AM/PM or 24 hour Time Mode
3. Make sure the setting crown is still in position 3 

and press button A to display |
+ |
/ |
/ |
|||
(time). If |
|
+ |
(date) appears, press |
D |
||
button A once more. During the 2 seconds that |
||||||
+ |
/ |
/ |
displays, press button |
|
||
D to change the right LCD between standard
AM/PM or 24 hour military time.
Your new Time Mode selection will appear for
2 seconds in the LCD’s, after which, it becomes
the default time mode with the hours and
C
minutes displayed as flashing numbers.
Set crown in position
2 to adjust only the hour hand
A
|
CHASE-DURER |
1 |
2 |
3 |
|
|
GENEVE |
||||
12 |
|
30 |
|
|
|
9 |
3 |
|
|
|
|
6 |
|
15 |
|
|
|
330 FEET |
FIGHTER 1/100 SEC |
|
|
|
|
|
COMMAND |
|
|
|
|
|
|
60 |
|
|
|
ALARM |
45 |
DATE |
|
|
|
|
15 |
|
|
|
|
|
|
30 |
|
|
|
|
|
|
B |
Set crown in |
|
|
|
|
|
|
|
|
|
|
position 3 to Stop |
||
|
|
|
the Second Hand |
||
|
|
|
and adjust both hour |
||
|
|
|
and minute hands |
||
4. Set the hour in the left LCD to match the hour hand
setting in step 1 with button C, set the minutes in the right LCD several minutes ahead of actual time using button B. Pressing B or C for longer than 1 second will advance the hours and minutes rapidly.
Setting the Date
5. Make sure the setting crown is still in position 3 |
and press button A to display |
|
+ |
|
(date). |
||||||||
|
|
+ |
|
/ |
|
/ |
|
|
|
|
|
will |
|
If |
|
|
|
|
appears, press button A once more. After 2 seconds, the two displays |
||||||||
show flashing numbers for the month in the left LCD, and the date in the right LCD. |
|
|
|
||||||||||
(continued)
Setting Date/Time and Alarm |
4. |
Set the date with button B and the month with button C. Pressing buttons B or C for longer than 1 second will advance the date and month rapidly.
6. For the final time setting step, turn the crown and adjust the minute hand to MATCH the minutes set in the right LCD with button B in previous step 4. Set the current time by pushing in the crown to position 1  while using an accurate time signal. Screw down the setting crown to finish the setting procedure.
Setting the Alarm
1. Make sure the setting crown is in position 1  .
.
2. Press button D momentarily and the left LCD will display |
|
for 2 seconds and then change to one |
|||||||||
of the following: |
|
/ |
|
|
with the date in the right LCD, |
or |
hours and |
||||
|
|
|
|
|
|
|
/ |
|
are displayed in the left LCD, press |
||
minutes in both LCD’s. If |
|
|
|
||||||||
D again to display hours and minutes currently set for the alarm time.
3. Press either button B or C; the LCD’s will flash indicating you are in alarm setting mode. Set the minutes by pushing button B, and hours with button C.
Note - While adjusting the left LCD (hour) setting, the right LCD
(minutes) will display 


 /
/


 if digital time is set to standard time mode. If digital time is in 24 hour military time mode, the right LCD will display minutes. Pressing buttons B or C for longer than 1 second will advance the hours and minutes rapidly.
D |
|
|
A |
|
CHASE-DURER |
1 |
|
|
GENEVE |
||
12 |
|
30 |
|
9 |
3 |
|
|
6 |
|
15 |
|
330 FEET |
FIGHTER 1/100 SEC |
|
|
|
COMMAND |
|
|
|
|
60 |
|
ALARM |
45 |
DATE |
|
|
15 |
|
|
|
|
30 |
|
C |
|
|
B |
4. When finished setting hours and minutes, press button D; the left LCD will display 


 for 2 seconds followed by


 or
or 


 indicating the alarm’s mode and the right LCD will display the date.
5. To set alarm state, press and hold button C until the left LCD changes from 


 to
to 


 or
or 


 to
to 


Note - To test the alarm, press and hold D; the alarm should produce a beeping tone.
 Loading...