

Page 1
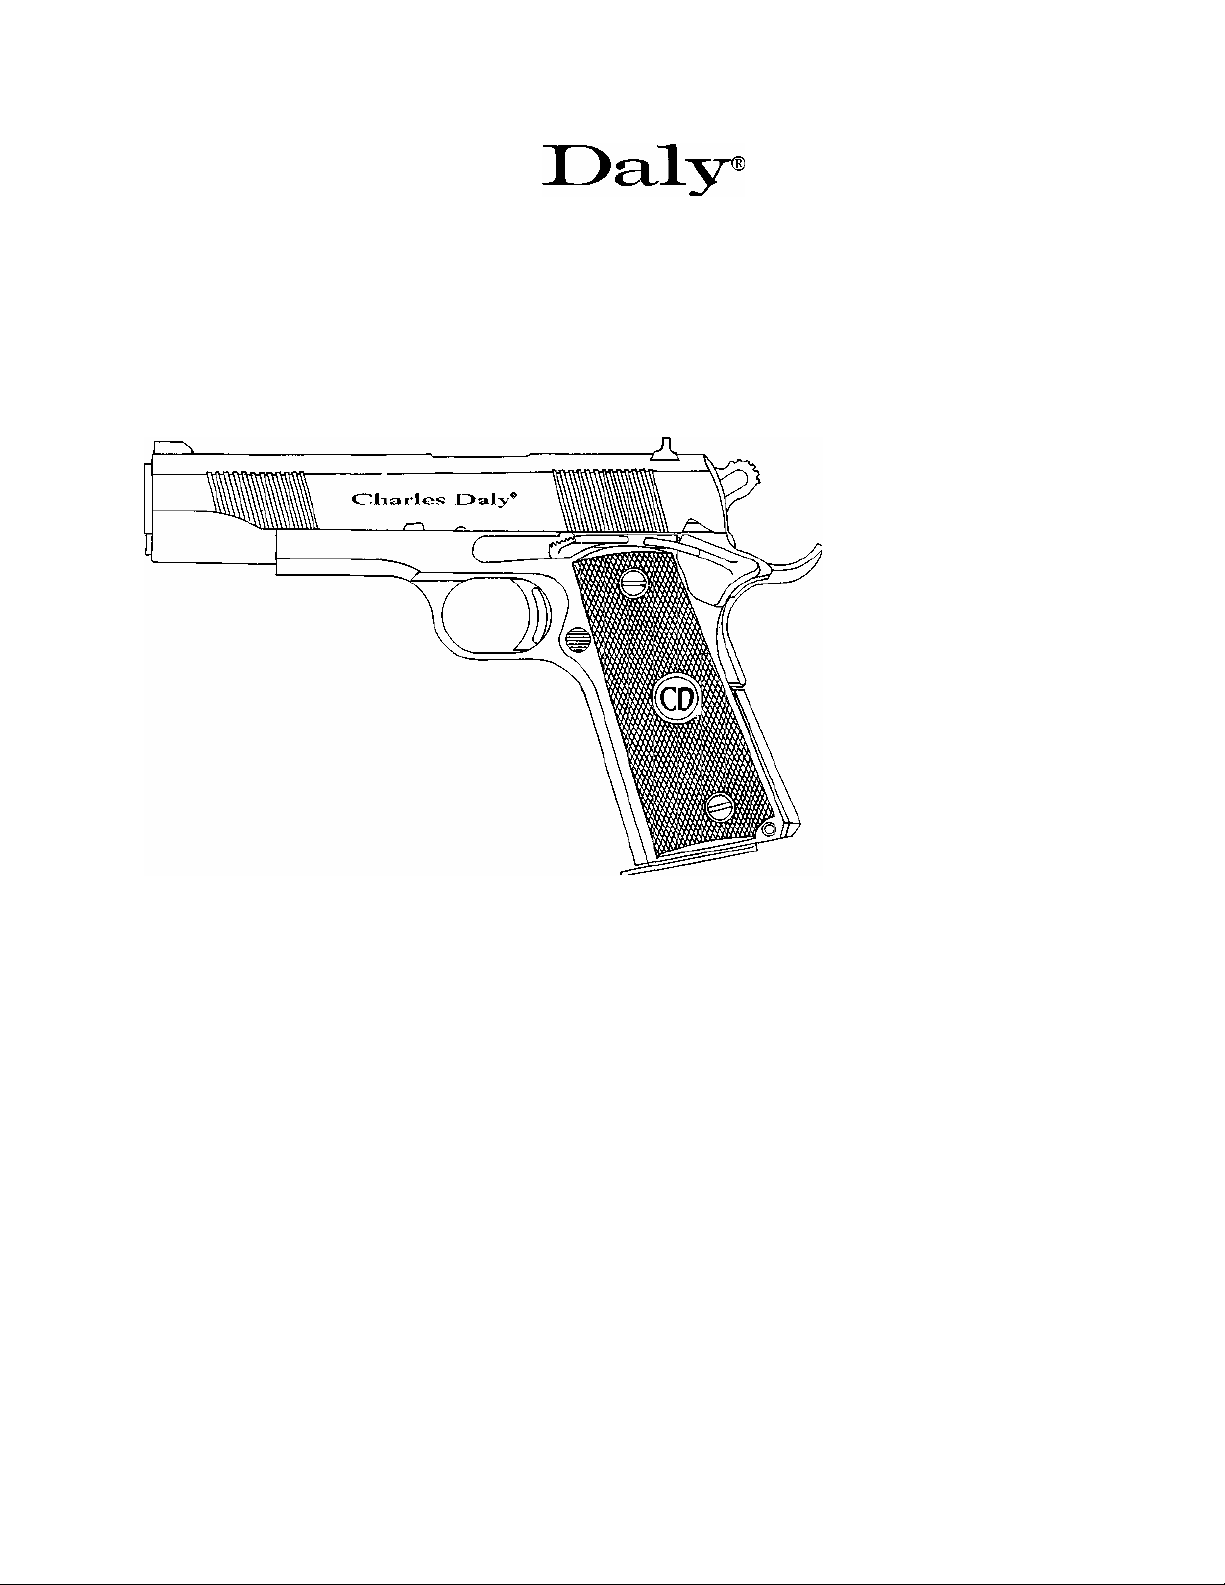
1911-Al
PISTOL CAL .
45 ACP
USER'S MANUAL
WARNING: READ THE INSTRUCTIONS and SAFETY PRECAUTIONS IN THIS
MANUAL CAREFULLY BEFORE USING THIS FIREARM.
Page 2

TABLE OF CONTENTS
Introduction..................................................................................... 2
G e n e ra l I nf or ma ti on ............... ................................. ......................... 2
Ba s i c M o d e l Description....................................................:............... 3
Specification.................................................................................... 3
S a f e t y F eat ure s. ............................................................................... 4
Special Features............................................................................... 5
Am mu n i t i o n to Use.......................................................................... 5
Operating Instructions
» Loading.......................................................................... 6
» Firing............................................................................. 6
» Unloading...................................................................... 7
Basic Disassembly Maintenance
» Disassembly..................................................................... 7
» Reassembly...................................................................... 9
Care and Maintenance..................................................................... 10
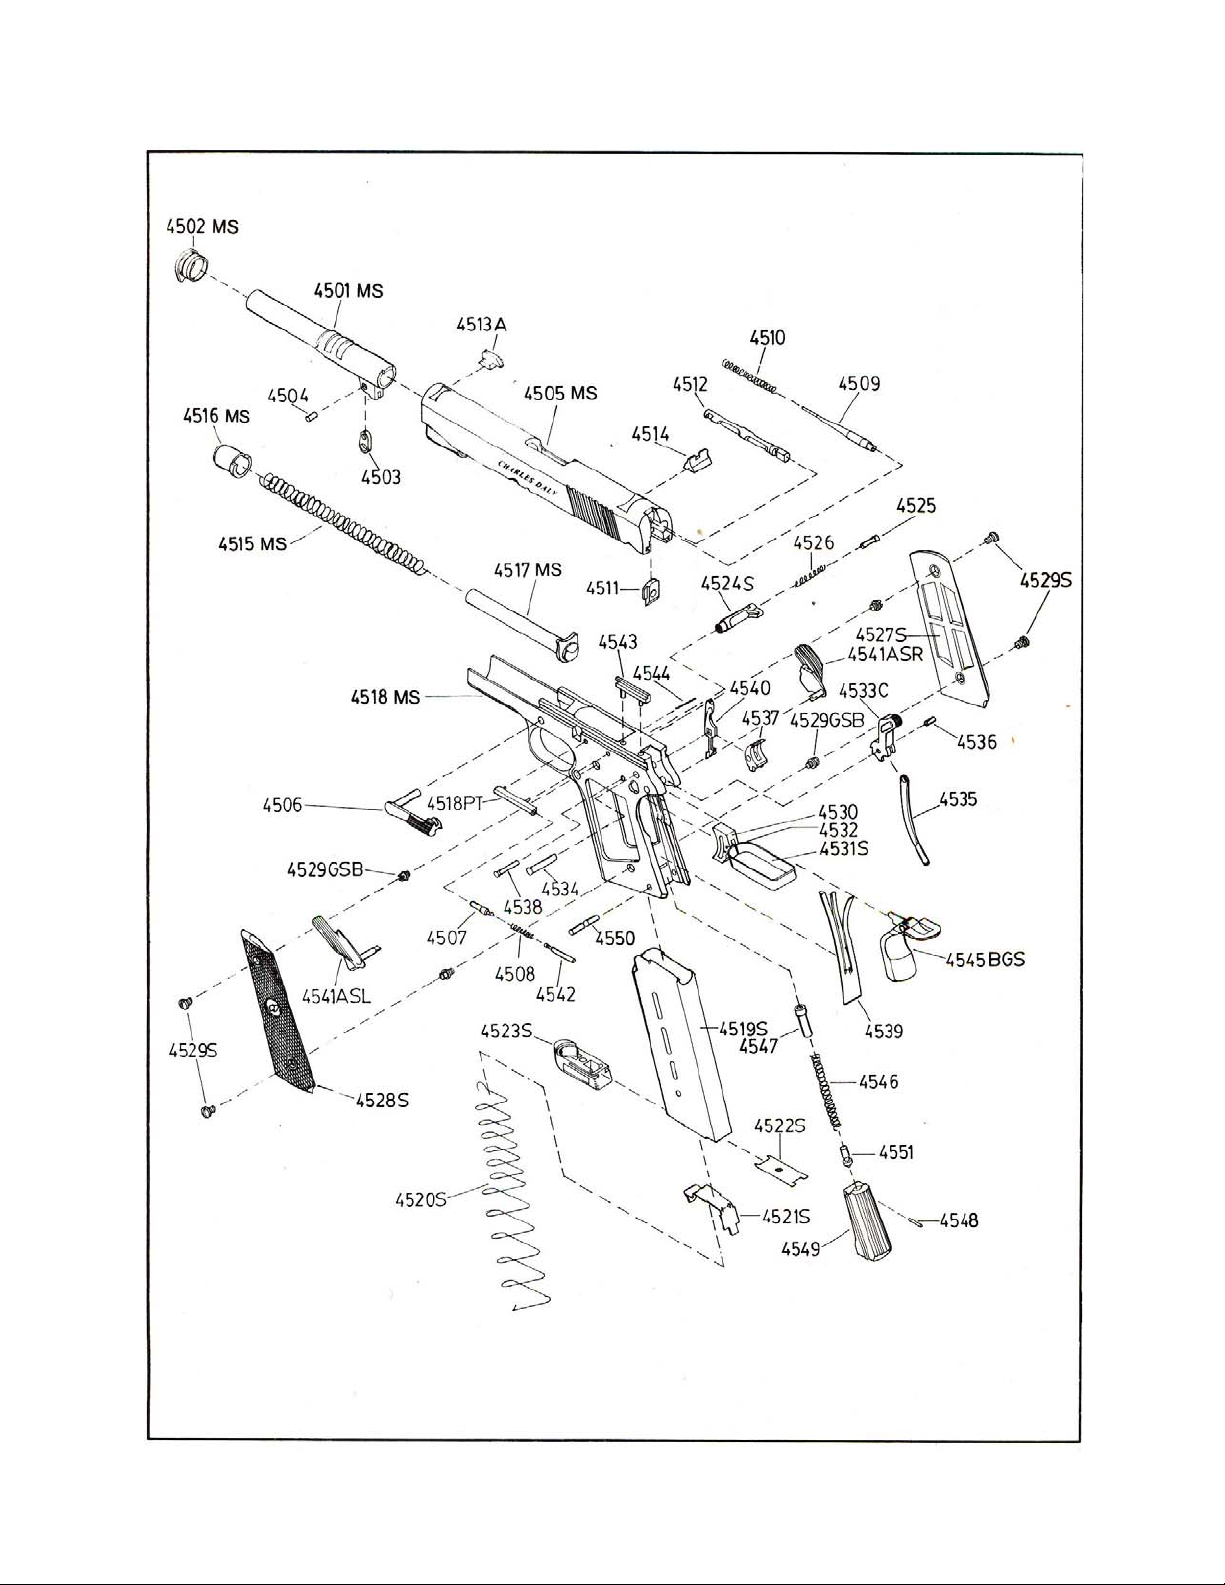
Pa r t s List.......................................................................................... 10
The Basic Rules of Safe Firearms Handing........................................... 12
Warranty Information........................................................................ 13
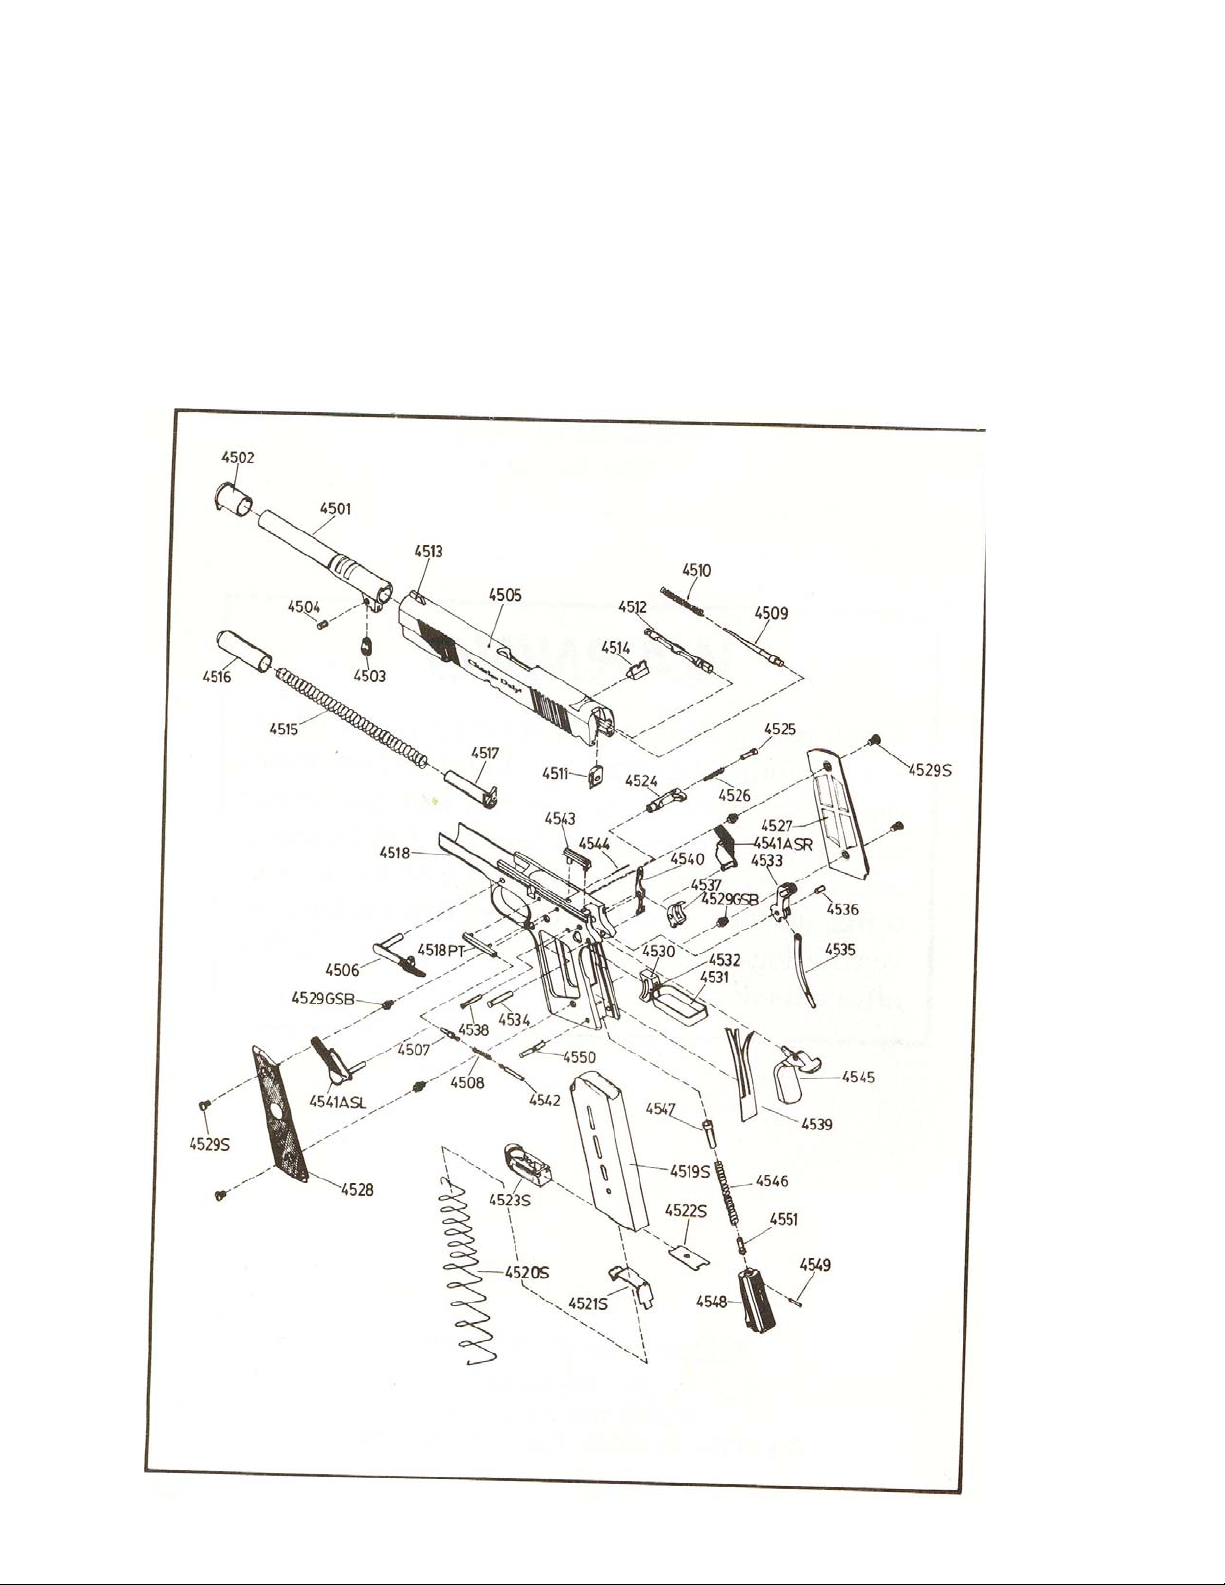
Exploded Drawing.......................................................................... 14
Page 3

Introduction
As a responsible firearms owner, yo u must read this USER'S MANUAL thoroughly and become familiar with if before you handle your new CHARLES
DALY PISTOL.
This USER'S MANUAL is designed to assist you in learning the proper use and
care of your handgun. After reading this manual, examine your handgun
carefully and make sure you under stand all of the basic features associated
with it. This includes knowing its basic parts, how the safety features operate,
how to open and close the action a nd how to safety load and unload ammunition. Remember that improper use and handling of this handgun is dangerous,
may void the warranty and could cause severe injury or death to you
personally or those around you.
The CHARLES DALY PISTOL is as well made as modern technology allows
and will give you a lifetime of reliable service, security and pride of ownership.
You, the owner, must use it properly and take good care of it, as per the
instruction given in this USER'S MANUAL and must not hesitate to ask per tinent questions from the m anufa cture r or f rom com petent gunsm iths .
This USER'S MANUAL should always be kept a vailable for reference and should
accompany the firearm if transferees to another party.
GENERAL INFORMATION
The Colt Government Model 1911-AI semi-automatic pistol, designed by John M.
Browning, has been one of the world's most popular side arms. It is a tried and
proven design which outlasted its contemporaries and is still the top
firearm choice for military, police and competition shooters throughout the
world. Because of its practical design, safety features and ru gged construct ion,
it has been considered by many military experts as the best close range
defense weapon ever designed.
Page 4

BASIC MODEL DESCRIPTION
The CHARL ES DALY PISTOL in Cal. 45 ACP, is designed for both combat and
competition, combines the be st ac cept ed pri nciple s of stren gth, safe ty, accura cy,
mechanical reliability and ease of handing-all to meet the most exacting
standards of law enforcement, military, self defense and competition shoot
ing.
All parts are made of high grade ordnance steel and heat treated for strength
and durability. The lug contact areas being the locking elements of the frame,
slide and barrel, are precisely machined and heat treated, providing accuracy,
toughness and rigidity in the locked firing position.
The frame, slide and other action parts are made by precision investment
casting and CNC-machined to equally consistent dimensions to ensure mechanical efficiency; long life and complete parts interchangeability.
Model
Caliber
Action
Magazine Cap
Effective Range
Overall Width
Overall Length
Overall Height
Weight, Empty
Weight, Loaded
Trigger Pull
Barrel Length
Sights, Front
Rear
SPECIFICATIONS
1911-A1 .45 ACP
Semi-Auto, Recoil
Operated
8 Rounds
50 Meters
33 Mm.
213 Mm.
138 Mm.
1.11 Kg.
1.29 Kg.
1.81 to 2.95 Kg.
125 Mm. Fixed
Driven in
Dovetail Cut
Page 5

Rifling
Twist Right hand. One
No. of Grooves 6
Finish Blued
Turn / 400 Mm.
NOTE:
WARNING: THE USER SHOULD NEVER DEPEND ON SAFETY MECHANISM OR ANY
2. Grip Safety:
3. Disconnector Safety:
Specifications subject to change without prior notice.
SAFETY FEATURES
OTHER MECHANICAL DEVICE TO JUSTIFY CARELESS AND IM P RO P ER
HANDLING.
1. Safety Lock:
position, blocks the sear and hammer to prevent the gun from being fired.
the gun is gripped for firing.
enable it to fire only when it is fully locked and the trigger is released after each
shot.
The pistol is fitted with a safety lock which when applied at the cocked
The pistol cannot be fired un til the grip safety is pres sed in, whe n
The pistol is designed with an automatic disconnector w hi c h
4. Half-cocked Position: The hammer is provided with a half cock notch which
allows it to be locked in the half-cocked position in cases of unintentional hammer
release or follow through caused by sear bounce.
5. Inertia Firing Pin: The firing pin is designed to operate on the principle of inertia,
with its length shorter than the overall length of the breech block. It requires a blow
from the fully cocked hammer to strike and percus s the ca rtrid ge pr im er.
Page 6

SPECIAL FEATURES
• Double slide serrations cut for optimal grip and cocking ease.
• Lowered side ejection port for a more efficient and reliable ejection of Spent
shells.
• Skeletonized combat hammer with serrated non-slip thumb surface and matching
large oval opening for light weight and reduced lock time.
• Beavertail grip safety which protects the hand from non-slip thumb surface and
matching large oval opening for light weight and reduced lock time.
• Extended slide stop that gives better leverage for lighter and faster slide relea se.
• Extended ejector the flips fired cases clear of the slide to help prevent "smoke
stacking" and jams.
• Wide extended ambidextrous safety designed for the natural sweeping motion of
the thumb for fast, reliable and comfortable operation. It is ideal for the "thumb
high" hold for both right-handed and left-handed shooters.
• Non-slip serrated and skeletonized trigger.
• Specially designed checkered high-impact phenolic grip.
• Plastic carrying guncase with eggcrate-type poly-foam for ultimate gun
protection.
• Two (2) magazin es p er gun.
Note: Specifications and features subject to change without prior notice.
AMMUNITION TO USE
The CHARLES DALY PISTOL is chambered for cat. 45 ACP cartridge in the round
nose configuration (Note: Use of wadcutter may re quire extra a djust ment of the barrel
feed ramp by a competent gunsmith), manufactured in the accordance with industry
standard. Non-standard or improperly loaded cartridges affect accuracy and cause
mechanical feeding problem. Always check for the following possible defects before
loading the ammunition into your pistol.
a. poorly seated primers.
b. incorrect seating length
c. lead deformation on the front and
shoulder
d. over expanded case mouth
e. improper crimping
f. damaged case rims
CAUTION: NEVER USE CARTRIDGES OF UNKNOWN CALIBER, ORIGINAL AND LOAD. IT
IS EXTREME1Y DANGEROUS TO USE A CARTRIDGE WHOSE PRESSURE IS
GREATER THAN INDUSTRY STANDARDS, AS THE FIREARM MAYBE DAMAGED,
AND DEAT H OR SERI OUS INJU RY T O THE SHOOTER OR OTHER PERSONS
MAY RESULT.
Page 7

OPERATING INSTRUCTION
WARNING: ALWAYS KEEP THE PISTOL POINTED IN A SAFE DIRECTION WHEN LOADING
AND UNLOADING. INSPECT THE CHAMBER AND BORE OF THE BARREL
FOR AN Y OBSTRUC TION, EX CESSIVE OIL OR GREASE. FAILURE TO DO
SO MAY RESULT IN GUN DAMAGE AND/ OR INJURY TO THE SHOOTER OR
THOSE NEARBY.
LOADING
To load the magazine, place the first cartridge in the front end of the magazine
follower and push it down until it can be slid in under the feed lips of the magazine.
Place the second cartridge on the to p of the first and force it down in the same way as
the first one. Repeat this procedure until the magazine contains the number of
cartridges you intend t o l oad. The m agazin e c an take as m a ny as e igh t ( 8) r oun d s .
To load the pistol, insert the loaded magazi ne into the grip (han dle} and push i t u p u nti l
the magazine release engages in its slot locking in place. Hold the pistol firmly with
your firing hand. Grasp the slide at its serrated section with your other hand and pull
it to the rear as far as it will go. (Note: the hammer can be cocked first to make the
slide easier to pull). Then, release the slide smartly. A cartridge is now loaded in the
chamber and the pistol is ready to fire. Push the safety lock upwards into the "SAFE"
position and leave it there until ready to shoot.
FIRING
To fire the pistol, press the safety lock down to the "FIRE" position. Obtain the correct
sight alignment and sight picture and squeeze the trigger. To fire successive s ho ts, t he
trigger must be released and squeezed repeat edly. When the last cartridge from the
magazine has been fired, the slide remain s to the rear. If you intend not to shoot or
cease firing, remember you have a loaded gun in your hand. First keep the gun
pointed in a safe direction and keep your finger off the trigger. Then, unload the gun
by following the unloading procedure below.
UNLOADING
To unload, press the magazine release and remove the magazine. If the slide is in the
forward position, pull it to the rear and retain by pushi ng the slide st op up. Inspect
the cham ber to mak e sure th at the pist ol is cle ar and unloaded. If the chamber is
empty, press the slide stop down while squeezing the tr igger, al lowing t he slide to
go forwar d. If th ere is a shell or unfir ed cartridge in the chamber, manually remove
it before pre ssing the slide st o p down. Your gun is now unloaded.
BASIC DISASSEMBLY AND REASSEMBLY
Disassembly
Barrel and Slide Assembly:
1. Press the magazine release and withdraw the magazine. Pull the slide
backwards and check the chamber to ensure that the pistol is unloaded and s afe.
Page 8

2. Press the recoil spring with your thumb and rotate the barrel bushing clockwise.
3. Gently allow the plug and recoil spring set to move forward. Do not remove the set
as this will keep the recoil spring guide in place.
4. Pull the slide backwards until the smallest slot on its left aligns with the top rear of
the slide stop. Remove the slide stop by pressing its pivot stud on the right side of the
frame.
5. Pull the slide directly forward of its guide rails in the frame. The barrel, barrel
bushing, recoil spring, recoil spring guide and recoil spring plug will come out w i t h
it.
6. Remove the recoil spring, guide and plu g from the s lide.
7. Rotate the barrel bushing to the left as far as it will go and withdraw it to the front.
8. Tilt the barrel link forward to withdraw the barrel through the front of the slide .
9. Remove the firing pin by pressing it with & pin while simultaneously pushing th e
firing pin stop downwards and out of the slide.
10. Using a pin (or the firing pin itself), p ry the extracto r by its groove out of the sl id e.
B. FRAME ASSEMBLY
1. Remove the pair of grip panels by unscrewing the grip screws with a screw driver
of the correct size.
2. Cock the hammer. Hold the thumbpiece of the safety firmly with your thumb and
index finger and exert a steady pressure to pull it outward while twisting it back
and forth. The safety lock will thus come out of the frame.
3. Lower the hammer by gripping the frame as if for sh ooting, to compress the g rip
safety and press the trigger: while ho/ding onto the hammer to ease it down.
4. With the pivot stud of the safety lock, force the hammer pin out of the frame.
This will permit the hammer and the hammer stru t attache d to it to be lifted out.
5. With the end of the hammer strut or a suitable punch, push the main spring
housing pin out of the right side of the frame.
6. Withdraw the main spring housing assembly straight down out of its grooves in
the frame.
7. Remove the grip safety and the three-leafted sear spring rearward from the
frame.
8. Again, using the hammer stru t, pus h the s ea r pin f rom rig ht to le ft rem oving it out of
the frame. This will permit the sear and the disconnector, which are both
mounted on this pin, to be withdraw, out of the frame.
9. Partly push the magazine release in on the left side of the frame by as much as
.075 in., and rotate the magazine release lock a quarter turn form right to left
with a small screw driver. This enables the magazine release assembly to be
removed out of the frame as a unit.
10. Remove the trigger assembly out of its recess cuts in the f rame.
Page 9

/ /. Push the combination slide and safety lock plungers and the spring between
them out to the rear of plunger tube.
12. Drift the ejector pin and lift the ejector out of its seat in the rear of the
frame.
13. To dismantle the main spring housi ng assembly, force the main spring cap d ow n
with a punch and push the main spring cap pin put of its hole in the main
spring housing. This will permit the main spring cap, the main spring, and the
spring housing pin retainer to be withdrawn from the housing.
REASSEMBLY
While reassembly of the dismantled pistol is done in the reverse ord er of disassembly, the
following special instruction will be of assistance:
1. When the barrel and slide assembly is to be mounted on the frame, hold bot h t he
slide and the frame bottom side up. Make sure that the barrel link is tilted to the
front as far as it will go and that the barrel link pi is flush in its seat. Th e n sl ide t he
frame forward into the slide rails.
2. The disconnector and sear are ass embled together and it is important that they be
in proper position. To do this, first mount the sear over the disconnector
(curved section inward, lugs pointing downward}. Put the parts together into the
frame by inserting the rounded head of the disconnector in its hole in the frame
so that t he f la t f a ce o f i t s l o w er e n d rests a gainst the trigger stirrup. Slightly press
the trigger so that the holes of the two parts will line up with that of the frame.
Holdin g them t his way, insert the sear pin from the left side of the frame making
sure that it pass es through both the disconnector and the sear.
3. In replacing the sear, make sure that its lower end is caught in the slot located
at the bottom rear of the frame handle. The upper end of the left-hand leaf must
rest against the sear. While retaining in this position, slide the main spring
housing up in its grooves until its end is projecting only about one-eight of an
inch below the edge of the bottom of the frame.
4. Cock the hammer to replace the safety lock.
5. Having replace the hammer, the grip safety and the safety lock, cock the
hammer. Make sure that the hammer struts rests on the main spring cap. Then,
push the main spring housing up into the frame to its final position and r etai n th e
assembly by driving in the main spring housing pin.
CARE AND MAINTENANCE
With proper care, your
dependable service. It should be inspected, cleaned and oiled periodi cally to
ensure that it remains in good condition and functions safety and reliability.
Doing the job requires no total disassembly of the mechanical parts in the
frame assembly. Under normal cleaning purposes, field stripping or dismounting
of the slide and barrel assembly is sufficient.
To clean the pistol after firing, first dismount the slide and barrel assembly.
Scrub the barrel bore and chamber with a bore brush dipped in a gun cleaning
solvent to remove lead residues and foreign matters left inside. Using an old
toothbrush dipped in solvent, clean the areas around the slide's breech face
CHARLES DALY PISTOL
will provide you with years of
Page 10

to remove powder and primer residues. Other parts and areas to be
cleaned are the slide and barrel locking lugs, the frame and slide rails, firing
pin, extractor claw and other adjacent areas. After cleaning, wipe all surfaces
with a clean dry cloth to remove all traces of the solvent and apply a light film of
oil immediately thereafter.
To clean the pistol thoroughly, disassemble all parts to the extent described
above, taking care not to ruin or lose any part. Clean and inspect all parts then
dry and lubricate very lightly. Reassemble the pistol, dry the barrel chamber
and bore and check the gun for proper functioning before loading live ammunition.
When storing the gun for a prolonged period of time, it is necessary to oil it
heavily with an acid-free lubricant. The external must be coated with an antirust oil or grease to prevent moisture from settling on the metals and sipping
into the internal mechanism causing the parts to rust and malfunction. Before
usage, the pistol must be cleaned and wiped dry again as discussed above.
CAUTION: THE GUN SHOULD BE STORED IN ROOMS W ITH DRY ATMOSPHERE
AND WITH THE LEAST HUMIDITY. IT SHOULD NOT BE S TORED ENCASED IN LEATHER OR ANYTHING THAT WILL ATTRACT AND HOLD
MOISTURE, CAUSING THE METAL PARTS TO RUST.
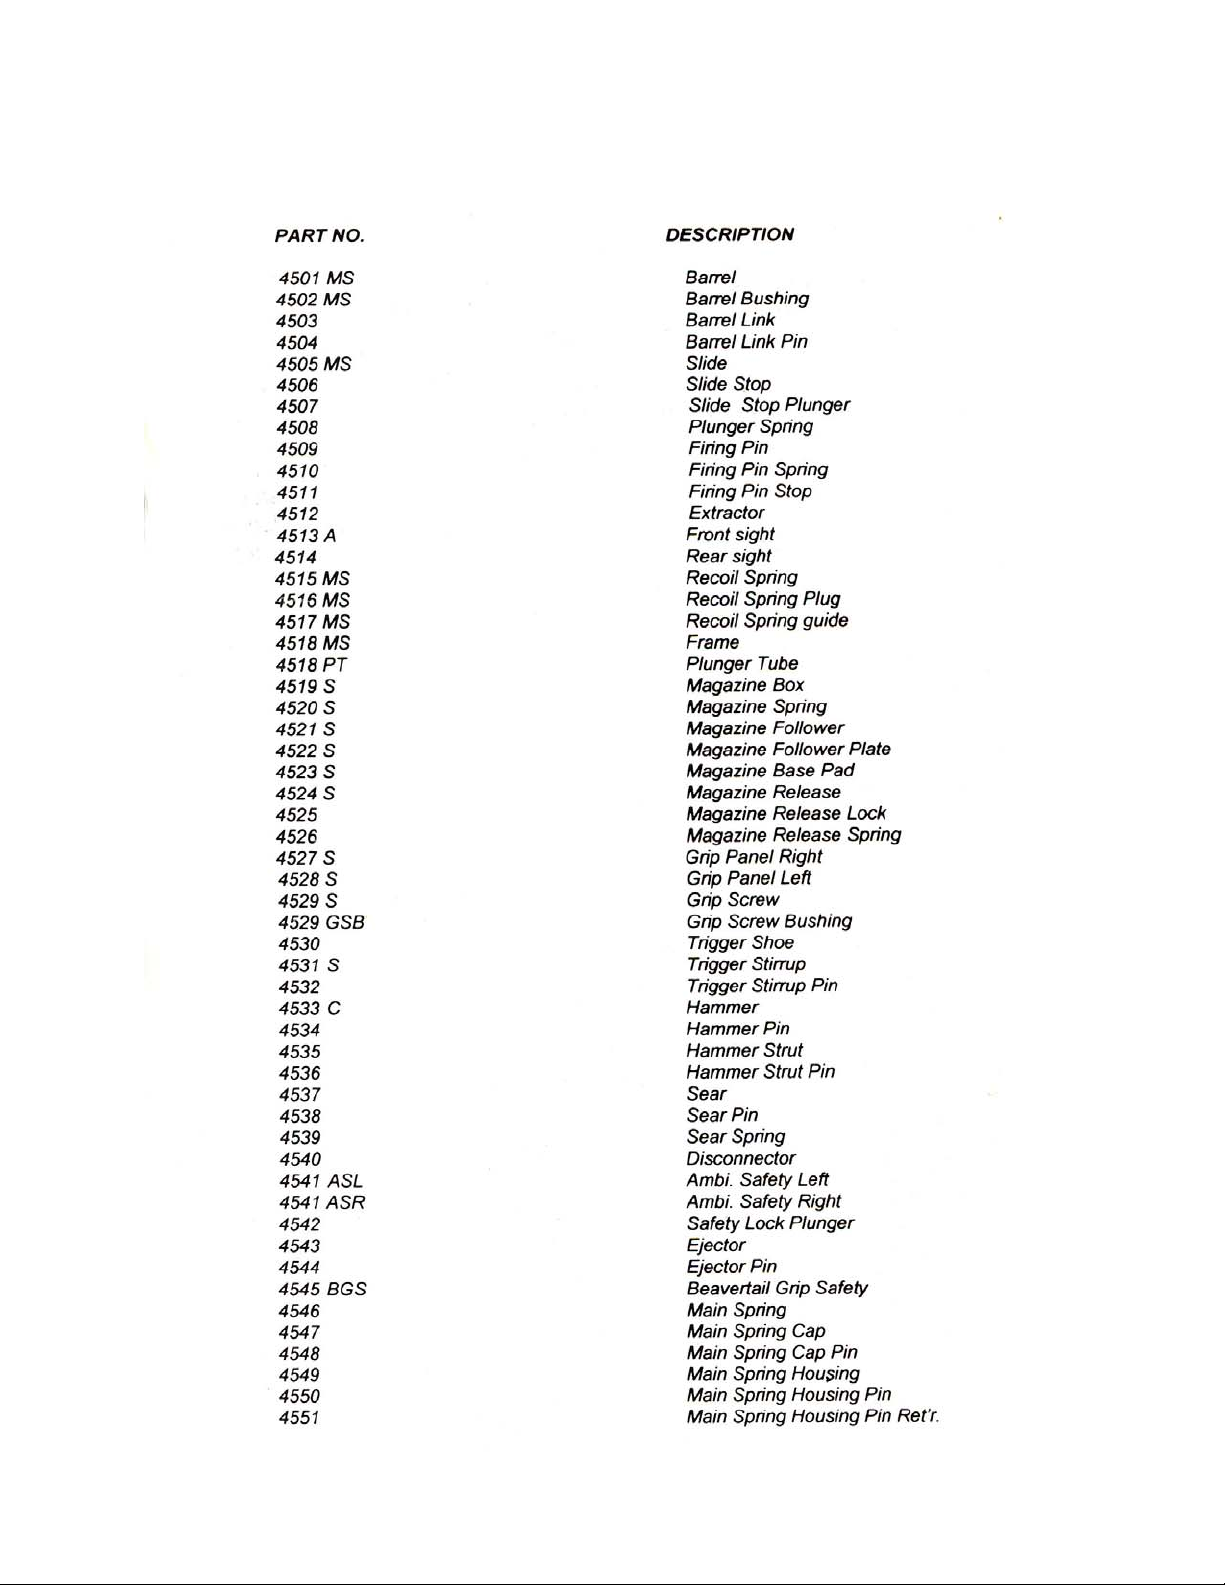
Parts List
(Note: With Reference to the Exploded, Drawing on page 14)
Part No. Description
4501 Barrel
4502 Barrel Bushing
4503 Barrel Link
4504 Barrel Link Pin
4505 Slide
4506 Slide Stop
Page 11

4507 Slide Stop Plunger
4508 Plunger Spring
4509 Firing Pin
4510 Firing Pin Spring
4511 Firing Pin Stop
4512 Extractor
4513 Front Sight
4514 Rear Sight
4515 Recoil Spring
4516 Recoil Spring Plug
4517 Recoil Spring Guide
4518 Frame
4518PT Plunger Tube
4519S Magazine Box
4520S Magazine Spring
4521S Magazine Follower
4522S Magazine Spring Plate
4523S Magazine Base Pad
4524 Magazine Release
4525 Magazine Release
Lock
4526 Magazine Release
Spring
4527 Grip Panel Right
4528 Grip Panel Left
4529S Grip Screw
4529GSP Grip Screw Bushing
4530 Trigger Shoe
4531 Trigger Stirrup
4532 Trigger Stirrup Pin
4533 Hammer
4534 Hammer Pin
4535 Hammer Strut
4536 Hammer Strut Pin
4537 Sear
4538 Sear Pin
4539 Sear Spring
4540 Disconnector
4541ASL Ambi Safety Left
4541ASL Ambi Safety Right
4542 Safety Lock Plunger
4543 Ejector
Page 12

4544 Ejector Pin
4545 Grip Safety
4546 Main Spring
4547 Main Spring Cap
4548 Main Spring Cap Pin
4549 Main Spring Housing
4550 Main Spring Housing
Pin
4551 Main Spring Housing
pin Retainer
BASIC RULES OF SAFE FIREARMS HANDLING
Safety must be the first and constant consideration of every person who handles
firearms and ammunition. A person with a gun in his possession has an important
responsibility. He must know how to use his firearm in a way which w ill e nsur e his own
safety and that of others.
Firearms do not cause accidents! Firearms accidents are almost a/ways found to have
been the result of carelessness, or ignorance on the basic rules of safe gun handling on
the part of the users.
The following rules must be strictly observed by gun users at all times:
1. Always keep the gun holstered except when drawn for a definite purpose.
2. A/ways check the gun for live ammunition when picked-up, drawn from the
holster, handed to or received from another person.
3. Never point the gun at anything you don't intend to shoot.
4. Never load and lock the gun unless you are ready to shoot. Do not even insert
your finger in the trigger guard until you a re ready to sh oot.
5. Avoid dry-firing even with dummy cartridges, unless same is performed on a regular
target range or at a known inanimate target.
6. When holding the gun that is ready to fire, be absolutely certain that it is not
pointed at any pan of your body nor at any person within your immediate vicinity.
7. Beware of obstruction in the barrel. If, when firing, a weak or peculiar report is
heard, cease firing, unload the pistol and inspect the barrel for an obs tru cti on. A
struck bullet or any other object on the barrel should be removed immediately.
Not doing so may result in a bulged or burst barrel which may cause injury to the
shooter or bystanders.
8. When a misfire is experienced, keep the gun pointed at the target for at least ten
seconds before inspecting it ; a delay ed firing ma y occur.
9. As much as possible, wear shooting glasses and hearin g protectors when firi ng.
10. Do not shoot at a hard surface or water for the bullet can glance off and travel in
unpredictable directions with considerable velocity.
/ /. Avoid drinking alcoholic beverages and/or taking prohibited drugs when handling
the firearm.
Page 13

STATEMENT OF LIABILITY
The CHARLES DALY PISTOL is classified as a firearm of dangerous weapon. It is
expressly understood that the manufacturer of CHARLES DALY assumes no liability for
its resale or unsafe handling under lo cal laws and regulations: and for physical injury
or property damage resulting from either intentional or accidental discharge, or for the
function of the gun subjected to influence beyond the manufacturer's control.
CHARLES DALY will honor no claims which may result from careless handling
unauthorized adjustment, defective or improper ammunition, corrosion or neglect.
WARRANTY
CHARLES DALY will adjust or repair, to its commercial standards, the firearms or an y
part thereof found to be defective in material or workmanship. Such services shall be
made free of charge within one (1) year from date of registered purc hase.
Page 14
Page 15
Charles Daly
MODEL MS
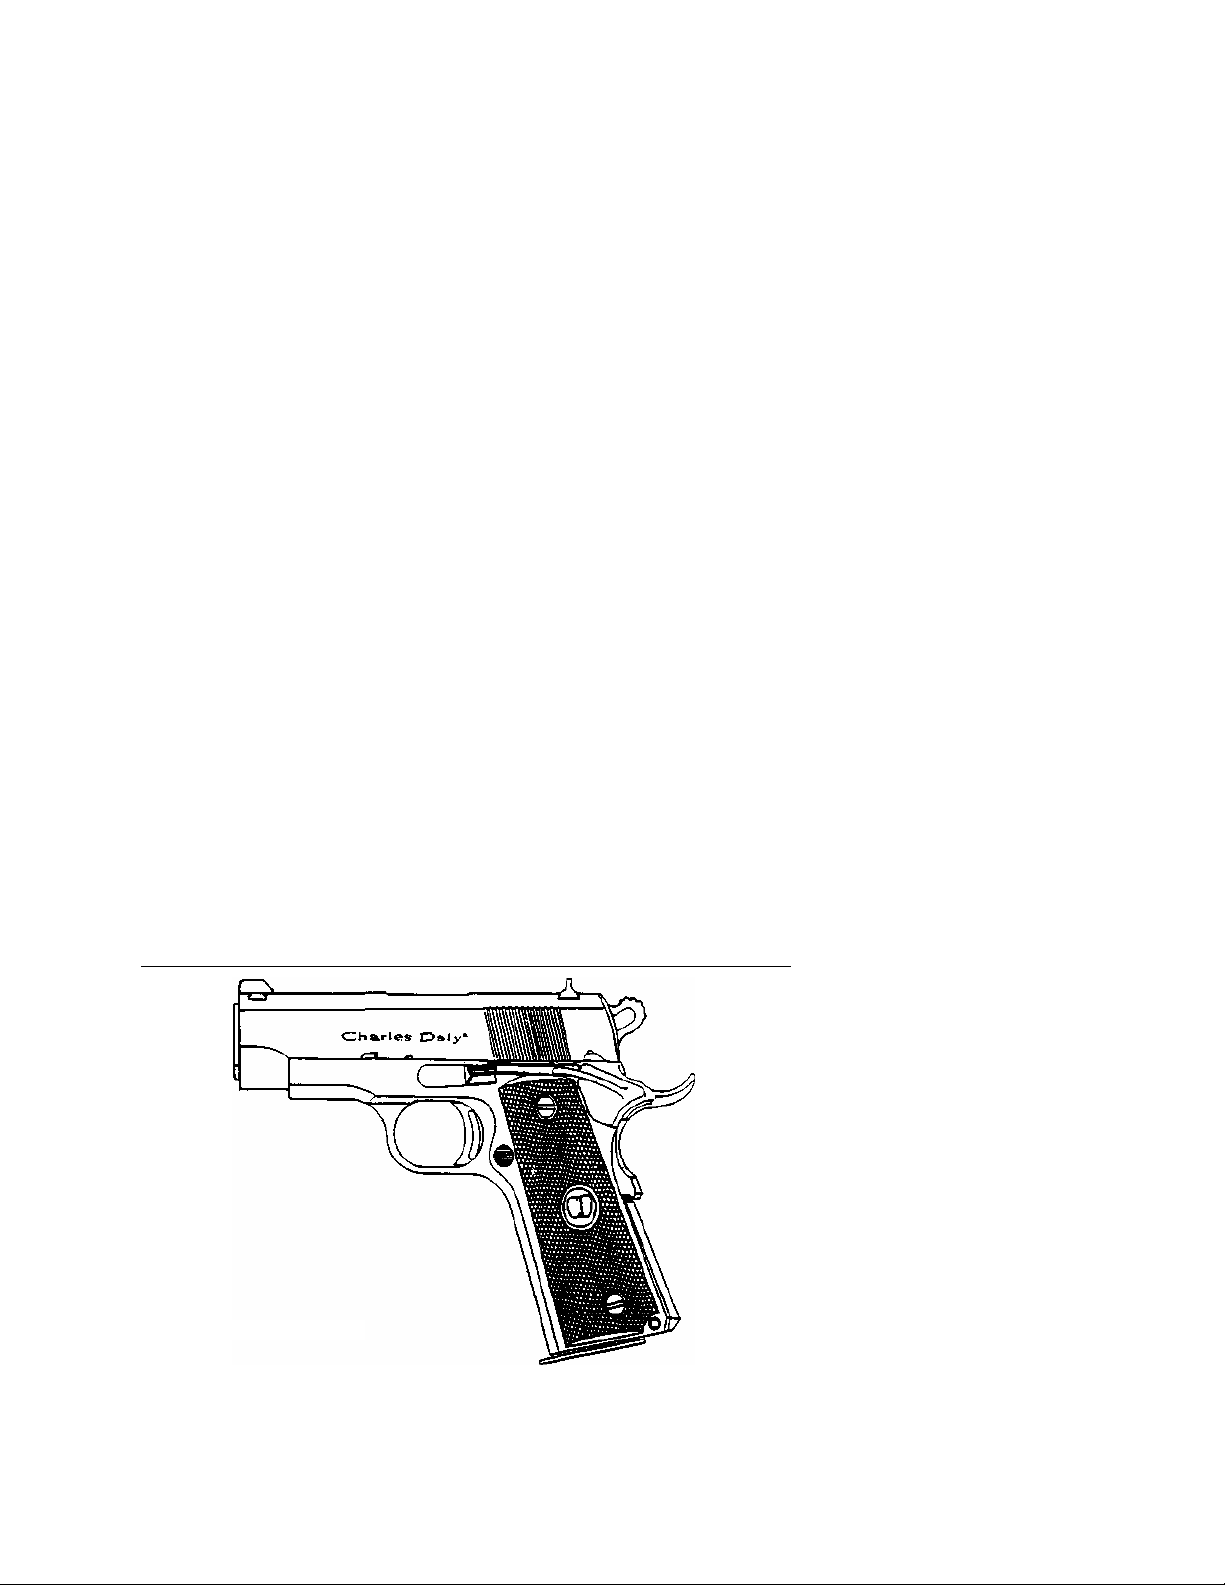
Charles Daly now introduces the new downsized Model MS 1911-A1
pistol in caliber 45 ACP. It is basically a shortened version of the
original full-size (Model FS) Charles Daly M1911-A1.
The overall length of the MS pistol is one inch shorter but with the
same grip length giving the same firepower and good handling
characteristics as with the full size parent. Most features present in
the standard version are available in this new model including the
ambidextrous safety, skeletonized trigger and combat hammer,
beavertail grip safety, squared slide serration lowered ejection por t
and beveled magazine well. Added features include the extended
ejector, use of a reverse recoil spring plug and a full leng th recoi l
spring guide which acts as a stabilizer. Dovetail fro n t a n d r e a r s i g ht s
are standard on all Charles Daly 1911- A1 pistols .
The MS uses the same internal parts of the full size model except
for a shortened barrel bushing and standard slide stop.
Disassembly of the MS pistol is done by first removing the slide stop
and separating the slide-barrel-recoil spring assembly from the
frame. Th e recoil spring guide is then pushed for ward compressing
the recoil spring until the small hole on it comes out of the reverse
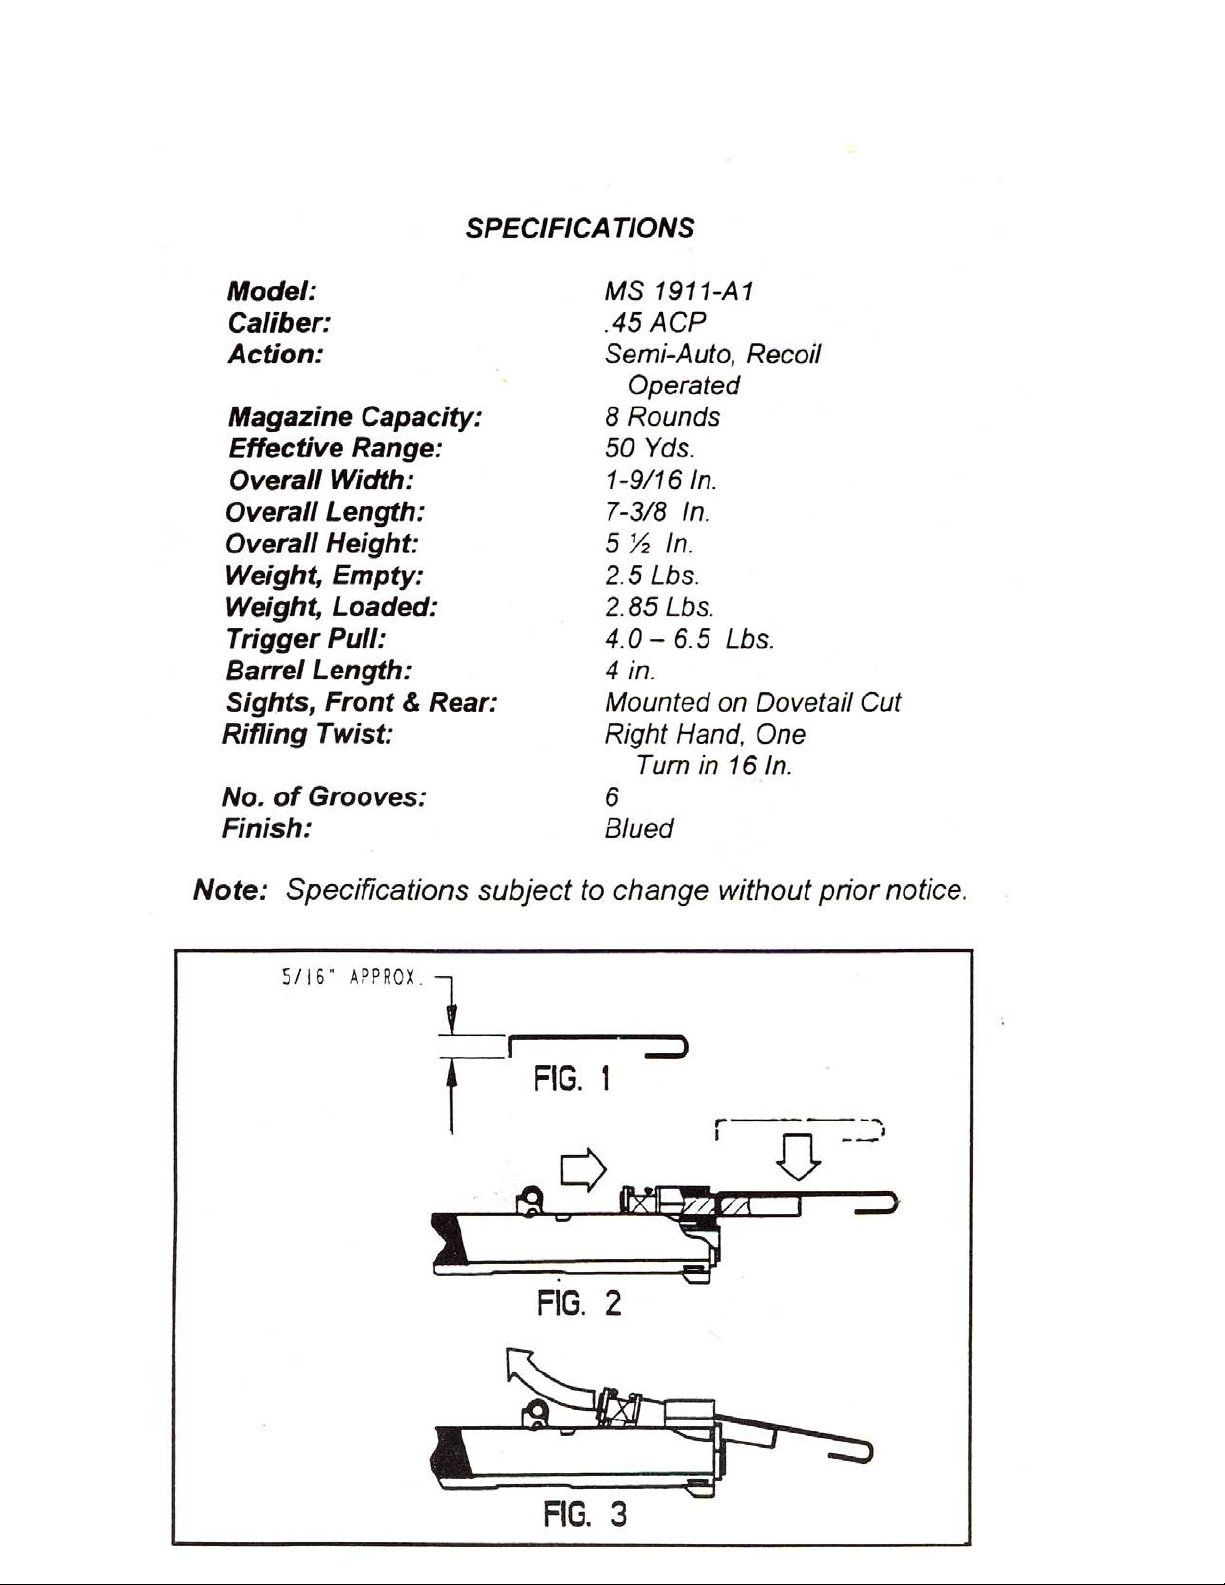
recoil spring plug. A paper clip with 5/16 inch of its end bent at 90
degree angle (Fig.1 on back page) is inserted into the hole
trapping +he spring assembly (Fig.2). At this point, the recoil s prin g
guide assembly can now be pulled out rearward of the spring
tu nn el (F ig .3 ). No fu rt he r d is as se mb l y is recommended for routine
cleaning and maintenance purposes.
MODEL MS 1911-Al
Page 16
Page 17
Page 18
Page 19
 Loading...