

Char-Broil 19952085 Product Manual
2 BURNER GAS GRIDDLE
PRODUCT GUIDE
GUIDES DES PRODUITS
GUíA DEL PRODUCTO
MODEL
MODÈLE
MODELO
SERIAL NUMBER
NUMÉRO D E SÉRI E
NÚMERO DE SERIE
• See rating label on grill for serial number.
• Ce numéro se trouve sur l´étiquette
signalétique sur i´appareil.
• El número de serie se encuentra en la etiqueta
deespecificaciones de la parrilla.
19952085
FOR OUTDOOR USE ONLY
POUR USAGE EN MILIEU EXTÉRIEUR UNIQUEMENT
ESTE JUEGO SÓLO SE PUEDE USAR EXTERIORS
DATE PURCHASED
DATE D’CHAT
FECHA DE COMPRA
TOOLS REQUIRED FOR ASSEMBLY:
• NONE
HERRAMIENTAS NECESARIAS PARA EL MONTAJE:
• NINGUNA
OUTILS REQUIS POUR L’ASSEMBLAGE:
• AUCUN
If you have questions or need assistance during assembly, please call 1-800-241-7545
Si vous avez des questions ou besoin d´aide pendant l’assemblage, S’il vous plaît appelez 1-800-241-7545
Si tiene alguna pregunta o si Necesita ayuda durante el Ensamblado, llámenos Al 1-800-241-7545
10/03/18 • 42805320
©
2018 Char-Broil, LLC. Columbus, GA, 31904. Printed in China. Imprimé en Chine. Impreso en China.
CONTENTS
IMPORTANT SAFETY
INFORMATION
IMPORTANT SAFETY INFORMATION ............................................ 2
FOR YOUR SAFETY - BEFORE USING YOUR GRIDDLE
LP GAS SAFETY AND CYLINDER CARE
LEAK CHECKING YOUR GRILL
FOR YOUR SAFETY - OPERATING YOUR GRIDDLE
CARE AND MAINTENANCE OF YOUR GRIDDLE
ASSEMBLY / ASSEMBLAGE / ASAMBLEA
REPLACEMENT PARTS DIAGRAM
REPLACEMENT PARTS LIST
TROUBLESHOOTING
LIMITED WARRANTY
................................................................... 28
.................................................................. 34
...................................................... 5
....................................................... 25
......................................... 4
............................ 7
.................................. 23
.............................................. 24
................. 3
....................... 6
SAFETY SYMBOLS
DANGER, WARNING, and CAUTION statements are used throughout
this Owner’s Manual to emphasize critical and important information.
Read and follow these statements to help ensure safety and prevent
property damage.
The statements are defined below.
CAUTION
CAUTION: Indicates a potentially hazardous situation or unsafe
practice which, if not avoided, may result in minor or moderate
injury.
WARNING
WARNING: Indicates a potentially hazardous situation which, if
not avoided, could result in death or serious injury.
DANGER
DANGER: Indicates an imminently hazardous situation which, if
not avoided, will result in death or serious injury.
PRODUCT REGISTRATION
THIS GRIDDLE IS FOR OUTDOOR USE ONLY
.......................................................... 39
DANGER
If you smell gas:
1. Shut off gas to the appliance (Remove LP Canister)
2. Extinguish any open flame.
3. If odor continues, keep away from the appliance and
immdiately call your gas supplier or your fire department.
WARNING
1. Do not store or use gasoline or other flammable liquids or
vapors in the vicinity of this or any other appliance.
2. An LP cylinder not connected for use shall not be stored in
the vicinity of this or any other appliance.
• This instruction manual contains important information
necessary for the proper assembly and safe use of the
appliance.
• Read and follow all w
assembling and using the appliance.
• Follow all warnings and instructions when using the
appliance.
• Keep this manual for future reference.
arnings and instructions before
CHARBROIL.COMPage 2

FOR YOUR SAFETY - BEFORE USING YOUR GRIDDLE
WARNING CAUTION
Do not attempt to repair or alter the regulator/
valve for any “assumed” defect. Any modification to this assembly will void your warranty and
create the risk of a gas leak and fire. Use only
authorized replacement parts supplied by manufacturer.
For Safe Use of Your Griddle and to Avoid
Serious Injury:
• Do not let children operate or play near
griddle.
• Keep griddle area clear and free from materials that burn (i.e. gasoline, propane, or any
other flammable liquid or gas).
• Do not block holes in bottom or back of
griddle.
• Check burner flames regularly.
• Never use regulator from this griddle with any
other LP appliance.
• When cooking, the appliance must be on a
level surface in an area clear of combustible
material.
• Use griddle only in well-ventilated space.
NEVER use in enclosed space such as carport,
garage, porch, covered patio, or under an
overhead structure of any kind.
• Do not use charcoal or ceramic briquets in a
gas griddle.(Unless briquets are supplied with
your griddle.)
• This appliance is not intended for and should
never be used as a heater.
• Use griddle at least 2 ft. from any wall or
surface. Maintain 10 ft. clearance to objects
that can catch fire or sources of ignition such
as pilot lights on water heaters, live electrical
appliances, etc..
• Apartment Dwellers: Check with management to learn the requirements and fire codes
for using an LP gas griddle in your apartment
complex. If allowed, use outside on the ground
floor with a two (2) foot clearance from walls
or rails. Do not use on or under balconies.
DANGER
• Never operate this appliance unattended.
• Never operate this appliance within 10ft (3m)
of any structure, combustible material or
other gas cylinder.
• Never operate this appliance within 25 ft (7.5
m) of any flammable liquid.
• If a fire should occur, keep away from the
appliance and immediately call your fire
department. Do not attempt to extinguish an
oil or grease fire with water.
Failure to follow these instructions could result in
fire, explosion or burn hazard, which could cause
property damage, personal injury or death.
• For residential use only. Do not use for
commercial cooking
• Do not leave appliance unattended. Keep
children and pets away from appliance at all
times.
• Do not use water on a grease fire. Personal
injury may result. If a grease fire develops,
turn knobs OFF and remove LP cylinder.
• Do not leave griddle unattended while
preheating or burning off food residue on HI.
If griddle has not been regularly cleaned, a
grease fire can occur that may damage the
product.
Installation Safety Precautions
• Use griddle, as purchased, only with LP
(propane) gas and the regulator/valve
assembly supplied.
• Griddle installation must conform with local
codes, or in their absence of local codes,
with either the National Fuel Gas Code, ANSI
Z223.1/ NFPA 54. Storage and handling of
liquefied petroleum gasses must conform to
LP Gas Code ANSI / NFPA 58. Griddle is not
for use in or on recreational vehicles and/
or boats.
• This griddle is safety certified for use in the
United States only. Do not modify for use in
any other location. Modification will result in
a safety hazard.
• Do not leave appliance unattended. Keep
children and pets away from appliance at all
times.
CHARBROIL.COMPage 3

LP GAS SAFETY AND CYLINDER CARE
LP (Liquefied Petroleum Gas
• Is nontoxic, odorless and colorless when produced. For Your Safety ,
LP gas has been given an odor (similar to rotten cabbage) so that it
can be smelled.
• Lp gas is highly flammable and may ignite unexpectedly when mixed
with air.
)
Propane Cylinder Use (1 lb. Disposable)
• Use only cylinder marked “Propane Fuel”.
• Cylinder must be constructed and marked in accordance with the
specifications for LP-gas cylinders of the U.S. Department of Transportation (DOT) or the National Standard of Canada, CAN/CSA-B339,
Cylinders, Spheres and Tubes for the Transportation of Dangerous
Goods.
• Save cylinder cap and reinstall when not in use.
• Cylinder supply system must be arranged for vapor withdrawal. Gas
cylinder must be upright in use.
Propane Gas Cylinders
• Your griddle is designed to operate with one 16.4 oz. disposable
cylinder (Dot 39 Cylinder) that is 7 3/8” high (not included). Do not
attempt to refill any 16.4 oz. disposable fuel cylinders.
• The cylinder must be installed, transported and stored in an upright
position and should not be dropped or handled roughly.
• When the appliance is to be stored indoors, the propane gas cylinder
must be disconnected from the appliance.
• When the propane gas cylinder is not disconnected from the
appliance, the appliance and cylinder must be stored outdoors in a
well-ventilated space.
• The cylinder should never be transported or stored where temperature can reach 125 °F (51 °C).
• Cylinders must be stored outdoors out of the reach of children.
• A disconnected LP cylinder in storage or being transported must
have a safety cap installed. Failure to use safety cap as directed may
result in serious personal injury and/or property damage.
• Do not store an LP cylinder in enclosed spaces such as a carport,
garage, porch, covered patio or other building.
4. Be sure griddle control valves are in the OFF position.
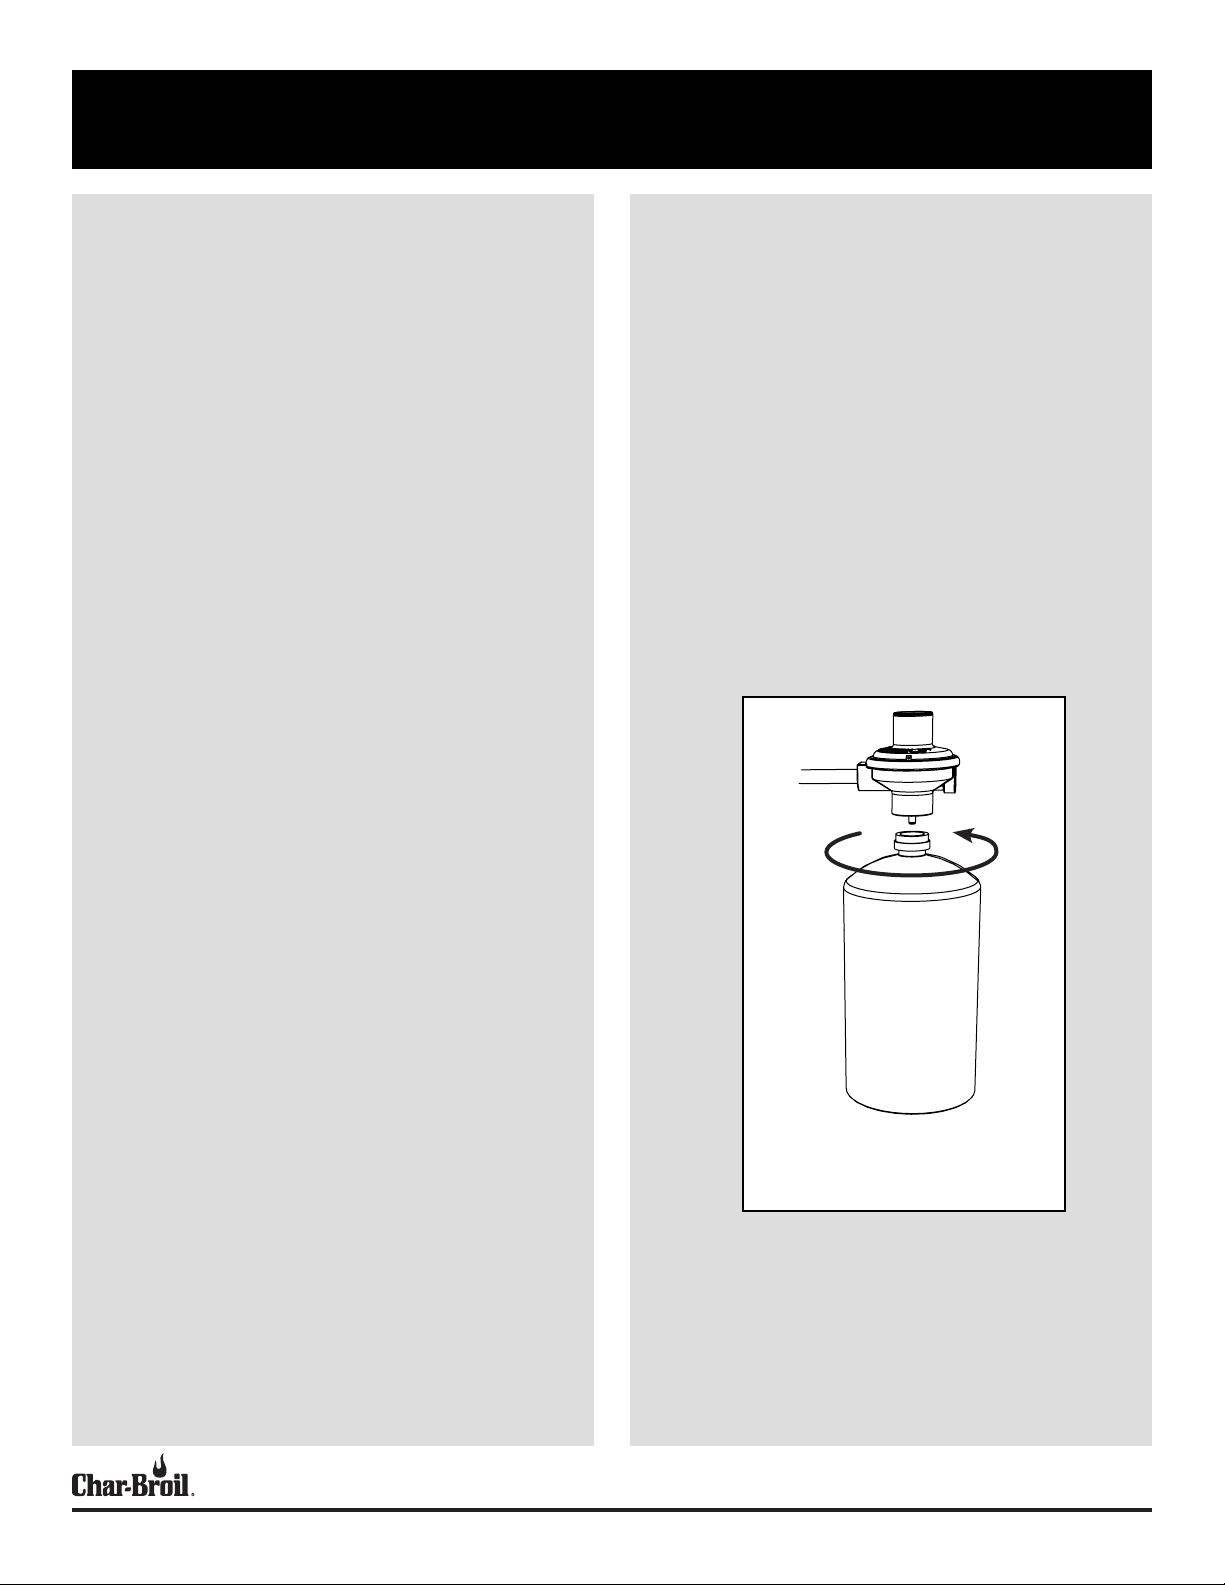
5. Insert threaded end of Propane Cylinder into Regulator/Valve and
hand-tighten turning cylinder clockwise as shown below. DO NOT
USE TOOLS! Over tightening can damage threads on Regulator/
Valve.
6. Perform a leak test.
Propane Cylinder Removal:
7. Turn control valves OFF.
8. Allow Griddle to cool.
9. Remove the propane cylinder by turning counter-clockwise until
disengaged from the Regulator/Valve.
10. Install cap on cylinder. Cap should be kept on cylinder when not in
use to prevent dirt and debris from entering Regulator/Valve.
Carefully insert cylinder into regulator and
tighten securely by hand.
DO NOT use tools.
Propane Cylinder Installation/Removal
Propane Cylinder Installation:
1. Remove cap from end of Propane cylinder (sold separately)
2. Cap should be kept on cylinder when not in use to prevent dirt and
debris from entering Regulator/Valve.
3. Check end of cylinder attachment for dirt and debris. Clean out if
necessary.
CHARBROIL.COMPage 4
LEAK CHECKING YOUR GRIDDLE
Leak Testing (1 lb. Disposable)
• During leak test, keep griddle away from open flames or sparks and do
not smoke. Griddle must be leak tested outdoors in a well ventilated
area.
• Leak test must be repeated each time gas cylinder is replaced or after
storage.
Materials needed include clean paint brush and 50/50 soap and water solution. Use mild soap and water. Do not use household cleaning agents. Damage to components can result.
PROCEDURE
1. Be sure control knobs on griddle to the “OFF” position.
2. Brush soapy solution onto connection between gas cylinder and regulator at (A).
If growing bubbles appear, there is a leak. Retighten connections and repeat
steps 1 and 2.
If you cannot stop a leak, remove gas cylinder from regulator
and check for damaged threads, dirt and debris on regulator
and gas cylinder. Also check to see if anything is obstructing
flow of gas at regulator and gas cylinder openings. Remove any
obstruction that may be found and repeat leak test. If threads
are damaged on either regulator or gas cylinder, replace. Order
new parts by giving the serial, model number and name of
items needed to the Griddle Service Center at 1-800-241-7545.
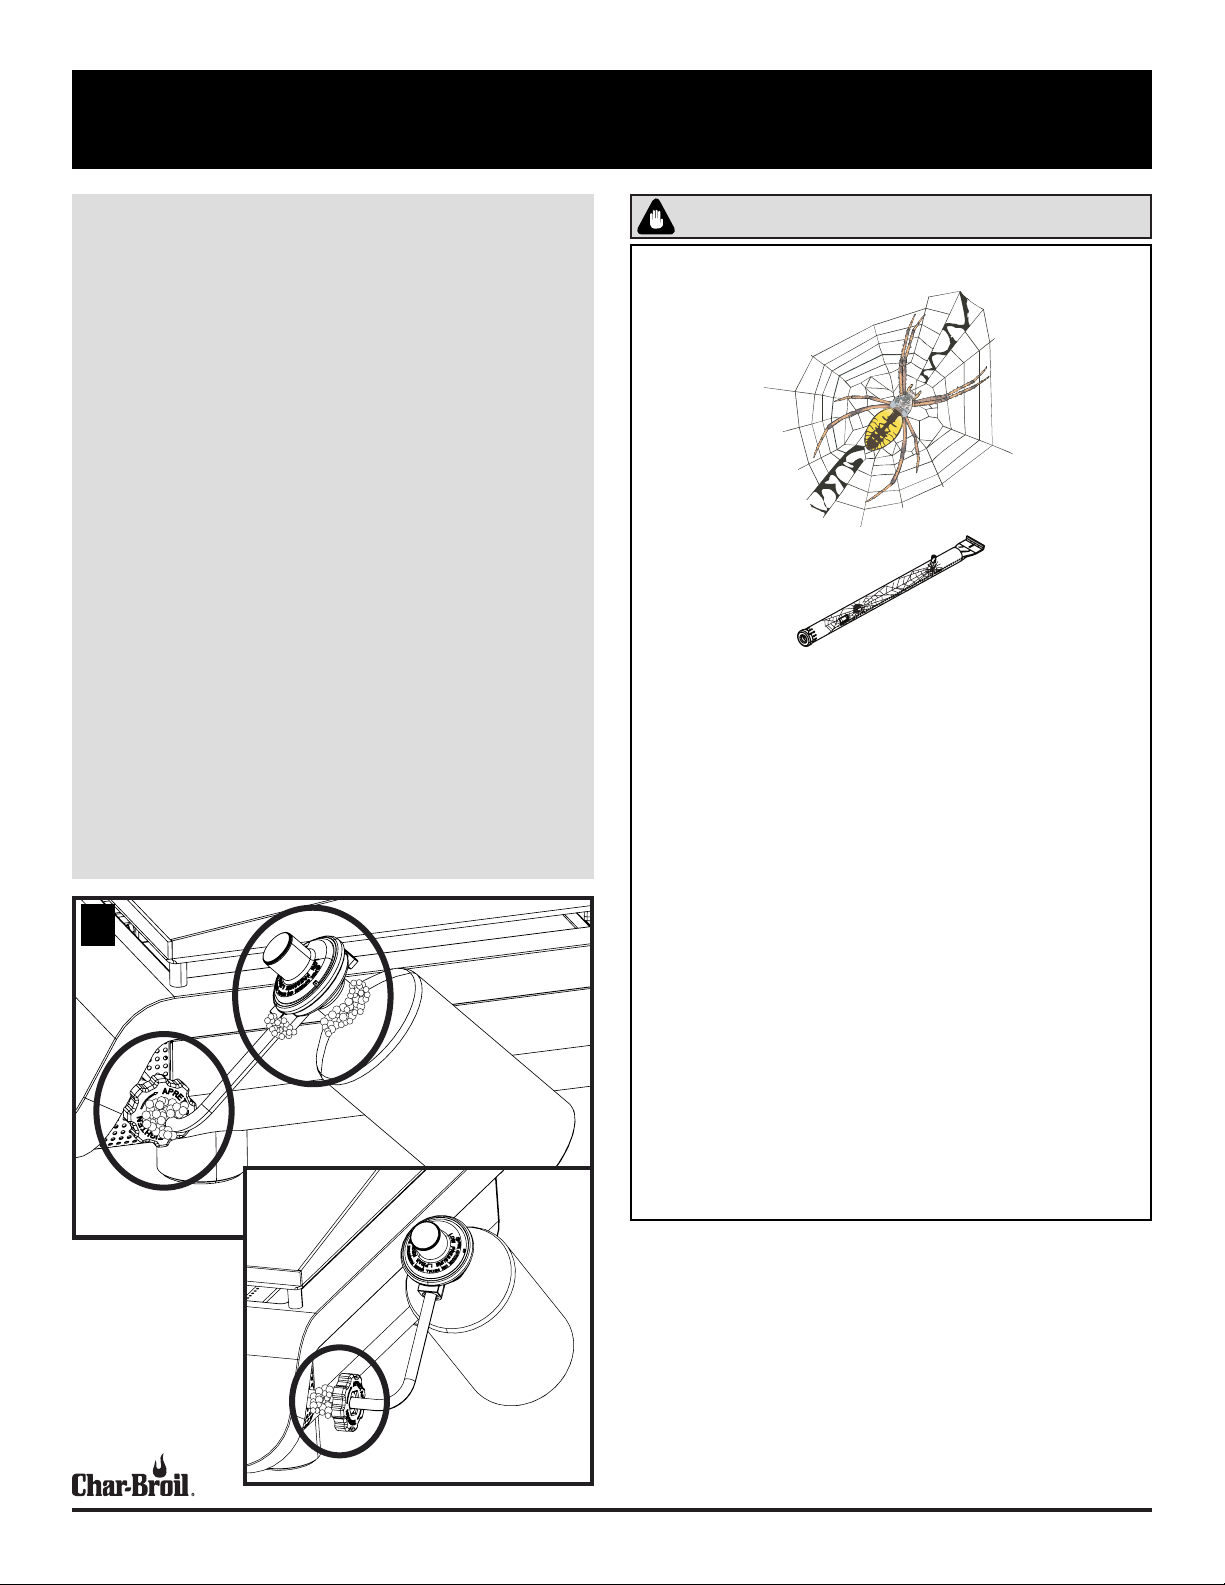
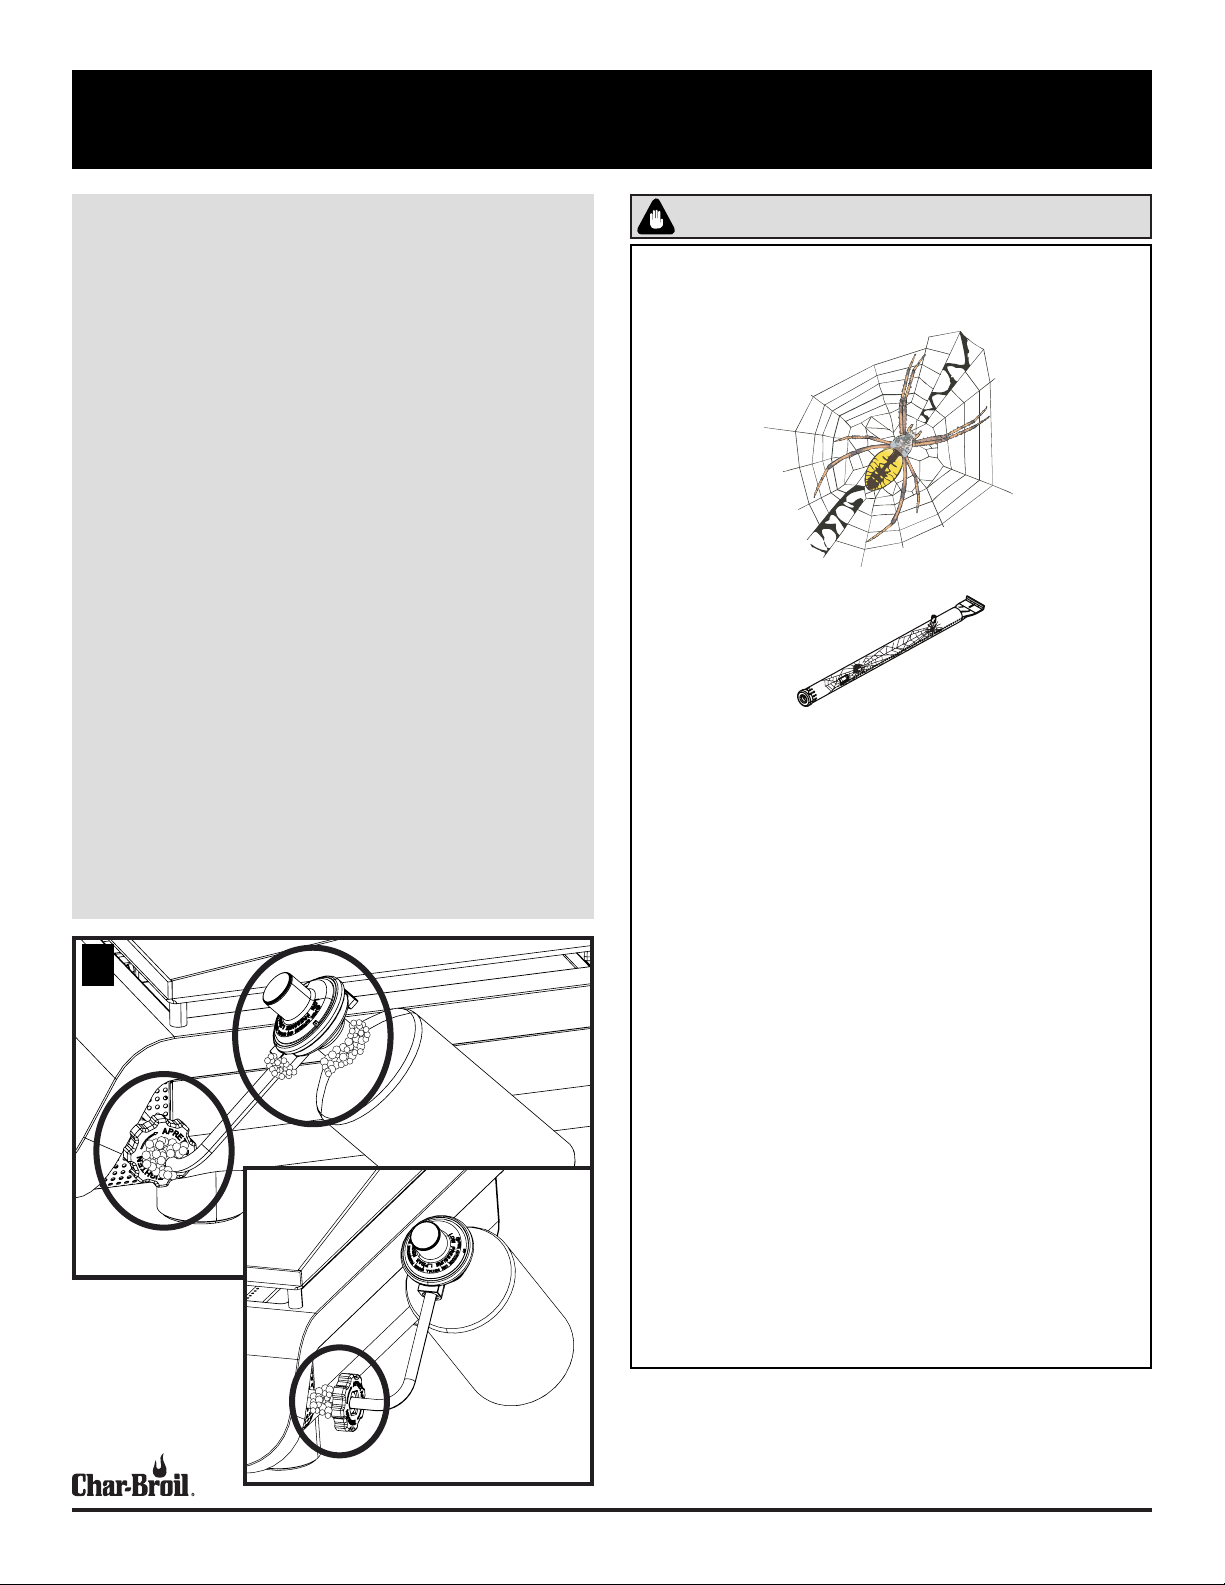
CAUTION
SPIDER ALERT!
.
If you notice that your griddle is getting hard to light or that
the flame isn’t as strong as it should be, take the time to
check and clean the burner.
In some areas of the country, spiders or small insects have been known to
create “flashback” problems. The spiders spin webs, build nests and lay
eggs in the griddle’s burner tube obstructing the flow of gas to the burner.
The backed-up gas can ignite in the burner tube. This is known as a flashback and it can damage your griddle and even cause injury.
To prevent flashbacks and ensure good performance the burner and burner
A
tube should be removed from the griddle and cleaned before use whenever
the griddle has been idle for an extended period.
IF YOU EXPERIENCE THE FOLLOWING:
1. Smell gas.
2. Burner will not light.
3. A small yellow flame from burner (should be blue).
4. Fire coming from around or behind control knob.
STOP!
IMMEDIATELY TURN OFF GAS AT LP CONTROL KNOBS!
1. Wait for griddle to cool.
2. Use a 12” pipe cleaner to clean out the burner tube.
CHARBROIL.COMPage 5
FOR YOUR SAFETY - OPERATING YOUR GRIDDLE
Ignitor Lighting
Do not lean over griddle while lighting.
1. To ignite, push and turn burner control knob slowly (2-3 seconds) to . You should hear
the ignitor click.
2. If ignition does NOT occur in 5 seconds, turn the burner control knob to OFF, wait 5
minutes and repeat the lighting procedure.
3. If ignitor does not work, follow match lighting instructions.
WARNING
Turn controls OFF and disconnect LP cylinder when not in use.
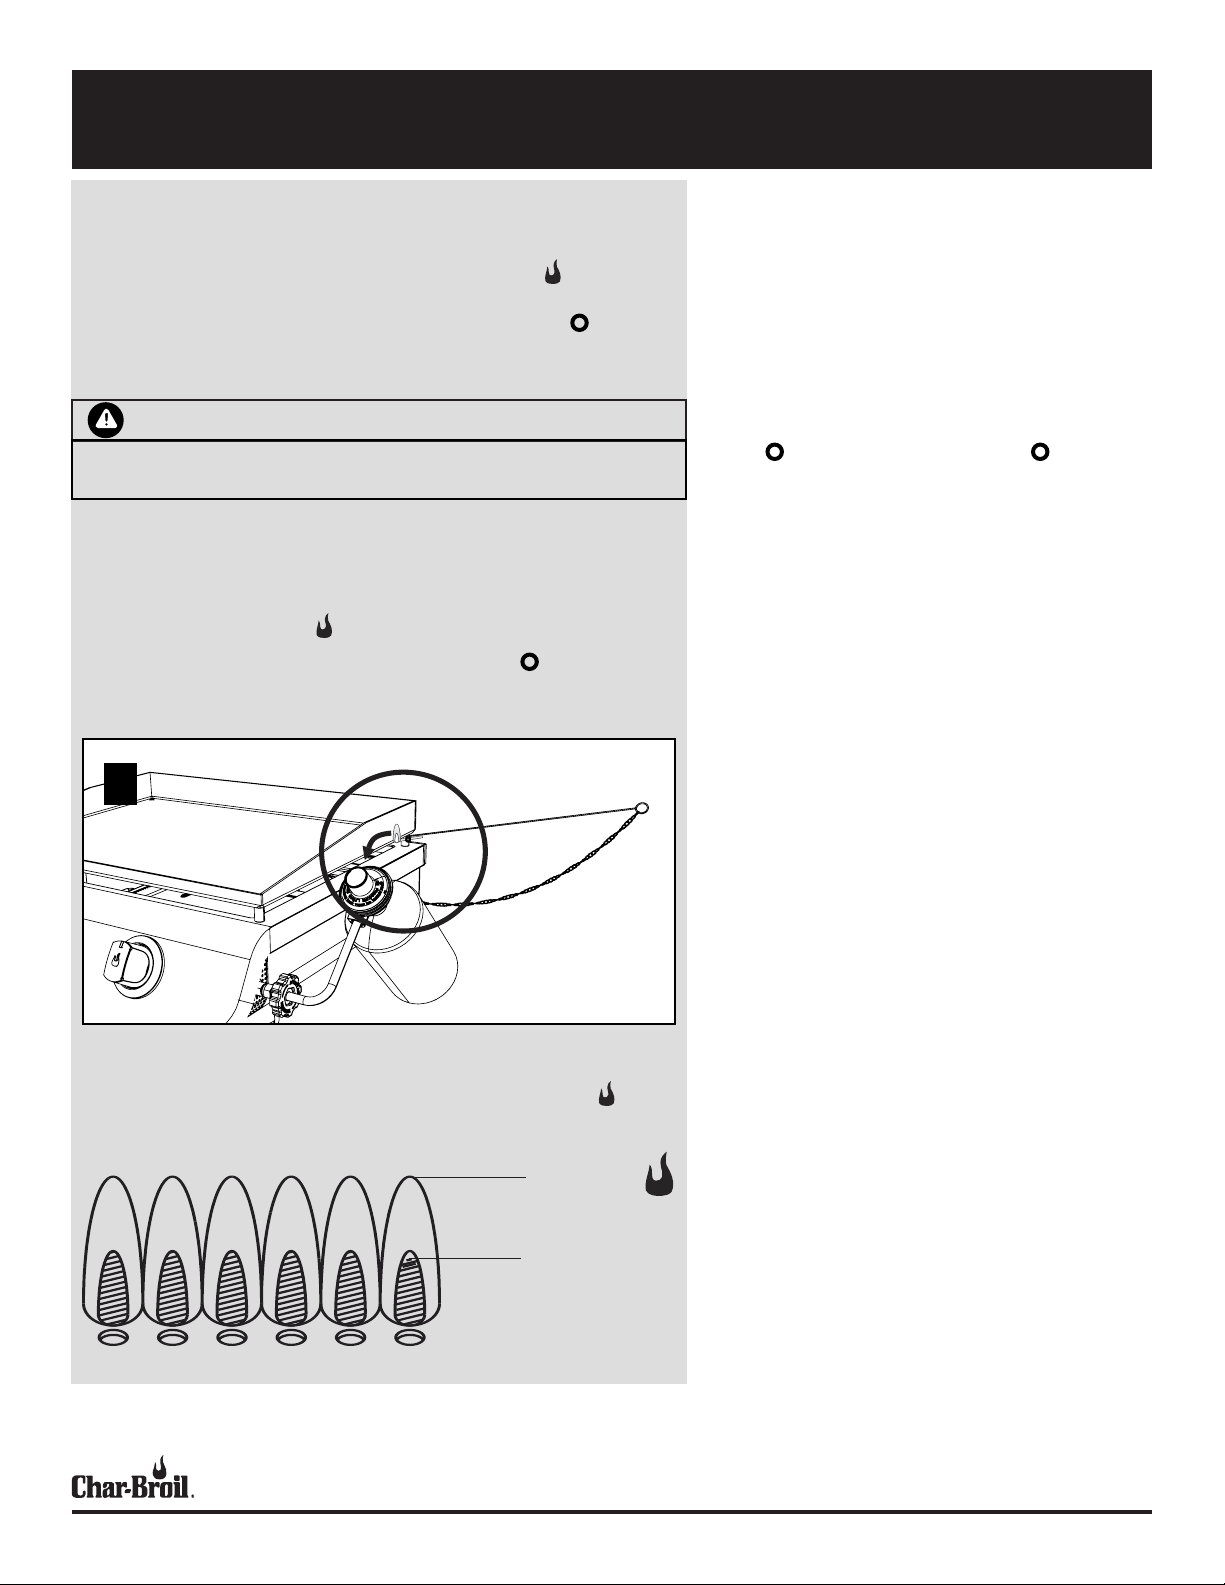
Match Lighting
1. Insert lit match into the gap between the griddle plate and the firebox, see Fig. A below.
2. Turn the burner control knob to setting.
3. If ignition does NOT occur in 5 seconds, turn the control knob to OFF, wait 5 minutes
and repeat the lighting procedure.
A
Before Cooking For The First Time
• Remove Proposition 65 Label from Right side of Griddle.
• Leak test your griddle. Operate griddle for 15 minutes with
the griddle controls on HIGH. This will heat-clean internal
components and eliminate odor from paint finish of griddle.
• Season your griddle cooking surface.
Turning Griddle Off
• After cooking, turn the griddle off by rotating the control knob
to OFF. Control knob should pop up in the OFF position.
If control knob does not pop up, disconnect cylinder to turn
griddle off and replace the Valve/Manifold assembly.
• Allow griddle to cool completely before storing.
Storing Your Griddle
• Allow griddle to cool completely.
• Remove LP Cylinder and install protective cap over outlet
threads.
• Remove Regulator/Valve from griddle to help keep dirt out of
the propane cylinder probe.
• Store Regulator/Valve in a heavy plastic bag and place inside.
• Be sure the griddle cooking surface is coated with vegetable
oil.
MATCH LIGHTING
Burner Flame Check
Light burner. Make sure burner stays lit while rotating the burner control knob from to LOW.
Always check flame prior to each use.
HIGH
LOW
CHARBROIL.COMPage 6
CARE AND MAINTENANCE OF YOUR GRIDDLE
Cleaning the Burner Assembly
Follow these instructions to clean and/or replace parts of burner assembly or if you
have trouble igniting griddle.
1. Turn gas off at control knobs and remove LP cylinder.
2. Remove griddle plate.
3. Remove hardware securing burners.
4. Detach electrode from burner.
5. Carefully lift each burner up and away from valve openings.
We suggest three ways to clean the burner tubes. Use the one easiest for you.
• Bend a stiff wire (a light weight coat hanger works well) into a small
hook. Run the hook through each burner tube several times.
• Use a narrow bottle brush with a flexible handle (do not use a brass wire
brush). Run the brush through each burner tube several times.
• Wear eye protection: Use an air hose to force air into the burner tube
and out the burner ports. Check each port to make sure air comes out
each hole.
6. Wire brush entire outer surface of burner to remove food residue and dirt.
7. Clean any blocked ports with a stiff wire such as an open paper clip.
8. Check burner for damage due to normal wear and corrosion, some holes may
become enlarged. If any large cracks or holes are found, replace burner.
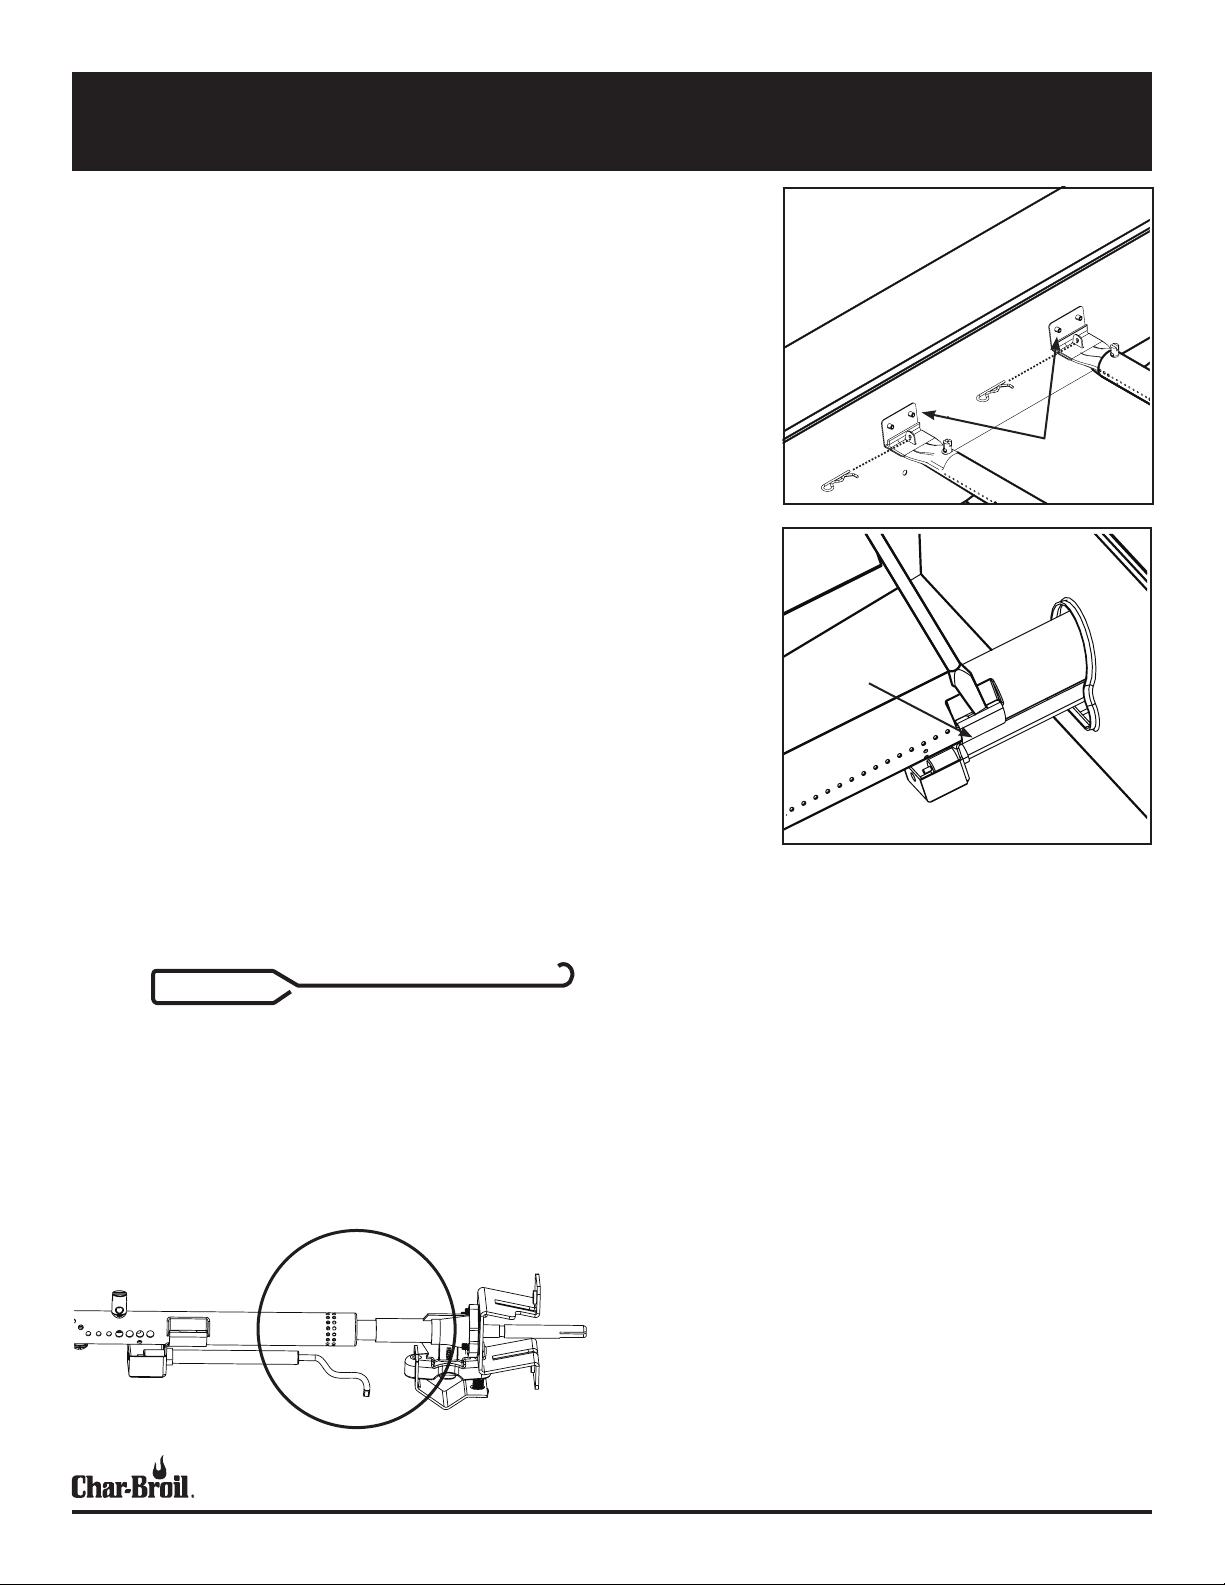
VERY IMPORTANT: Burner tubes must re-engage valve openings. See illustration below.
9. Attach electrode to burner.
10. Carefully replace burners.
11. Attach burners to brackets on firebox.
12. Reposition griddle plate.
13. Before cooking again on griddle, perform a “Leak Test” and “Burner Flame
Check”.
FIREBOX
Electrode
FIREBOX BURNER
SUPPORT
Pry off electode with a
flat blade screwdriver.
STEP 5: Example of a bent, stiff
wire for cleaning your burner.
STEP 10: CORRECT BURNER
TO VALVE ENGAGEMENT
CHARBROIL.COMPage 7

CARE AND MAINTENANCE OF YOUR GRIDDLE
SEASONING
WHAT IS SEASONING?
Seasoning is a process by which oil is baked onto metal to
create a stick resistant surface and protect against oxidization. Your Char-Broil® Griddle comes with a thin layer
of vegetable oil to protect against rust during shipping.
This may leave some blemishes and discoloration on your
griddle top. This is normal and will all even out during
your seasoning process.
WHAT OIL SHOULD I USE?
Some oils are better than others for seasoning. Flax seed
oil is a good oil for your initial seasoning since it creates a very durable bond. Flax oil has the highest level of
Omega-3 fatty acids and has a very low smoke point. It is
also a naturally hardening oil. This type of oil is good for
your initial seasoning but it is more expensive than other
options. Since it can also get brittle and flake over time, it
is good for the initial seasoning but not for many cooking
sessions. Just like cast iron, the more you cook on your
Char-Broil® Griddle the better your seasoning layer will
be. Any of the following oils can be used for your initial
seasoning.
• Canola Oil (Rapeseed Oil)
• Coconut Oil
• Flax Seed Oil
• Olive Oil
• Vegetable Shortening (Crisco)
• Vegetable Oil
INITIAL GRIDDLE SEASONING
The idea behind your initial seasoning is to coat your griddle top with oil and heat the oil above its smoke point to
polymerize the oil and create a bond with the griddle top.
The result is a darkened, stick resistant surface.
1. Apply small amount of oil (about 2-3 Tablespoons) to
the surface of the griddle top and spread it around
with a paper towel or a lint-free cloth
2. Turn all burners of your griddle on to medium-high
heat.
3. Heat the oil until it starts smoking and let it continue
to heat on the griddle top until it stops smoking. Your
griddle top will start to become darker in color. This is
good.
4. When the oil stops smoking (this should take approximately 25-30 minutes), turn your griddle off and let it
cool down.
5. Repeat steps 1 through 4 a few times until you have a
nice dark surface on your griddle.
6. After you have completed your initial seasoning, wipe
down your griddle top with cooking oil for storing.
MAINTENANCE
There are some simple cleaning and seasoning steps for
optimal performance of your Char-Broil® 2 Burner Griddle.
We recommend covering your griddle after use if it will
be left outside to protect it from the elements, especially
in the winter months. The Char-Broil® 2 Burner Griddle
Cover is available on Charbroil.com.
GRIDDLE SURFACE- CLEANING
FIRST TIME
After assembling your griddle, you want to clean the
griddle surface off with soap and hot water. Be sure you
have the time to season your griddle before you start the
cleaning process as they need to be completed at the same
time. This will be the ONLY TIME you use soap and water
to clean your griddle surface. Rinse and dry completely
with paper towels. After this initial cleaning, proceed to
the steps for Initial Griddle Seasoning.
:
AFTER EACH USE:
Clean the griddle surface after each use by scraping with
a metal spatula or scraper and wiping down the griddle
surface with a cloth or paper towel. For tough food residue, pour water onto the hot griddle surface and let the
residue boil off. DO NOT USE SOAP to clean the griddle
surface, as that will break down the seasoning you have
created on the surface. Treat your griddle top much like
you would cast iron skillets and Dutch ovens. Store your
griddle in a cool, dry place, preferably with a cover
GREASE CUP
The Grease Cup has a capacity of 16 ounces (2 cups) and
should be emptied after each cook session. Depending
on the foods you are cooking, this grease cup can fill up
quickly. Care should be taken when emptying the cup, it is
preferred to empty the grease once it is cooled down, as
both the grease cup and the grease will be very hot during
and immediately following your cook session. If you find
that the grease cup is getting full mid-cooking, you should
use a heat proof glove to carefully remove and empty the
cup. The grease cup can be washed with warm, soapy
water but should not go into the dishwasher.
CHARBROIL.COMPage 8
CONTENIDO
INFORMACIÓN IMPORTANTE DE SEGURIDAD .........................................9
INFORMACIÓN
IMPORTANTE DE
SEGURIDAD
PARA SU SEGURIDAD, ANTES DE UTILIZAR SU PLANCHA
CUIDADO DE LA SEGURIDAD DEL GAS LP Y DEL CILINDRO
CONTROLAR LAS FUGAS DE SU PARRILLA
PARA SU SEGURIDAD, OPERAR SU PLANCHA
CUIDADO Y MANTENIMIENTO DE SU PLANCHA
ASSEMBLY / ASSEMBLAGE / MONSTAJE
DIAGRAMA DE PIEZAS DE REPUESTO
LISTA DE PIEZAS DE REPUESTO
SOLUCIÓN DE PROBLEMAS
GARANTÍA LIMITADA
REGISTRO DEL PRODUCTO
.............................................................................. 36
............................................................ 26
................................................................... 30
.................................................................... 39
............................................ 12
....................................... 13
....................................14
.............................................. 23
................................................... 24
....................10
.................11
SÍMBOLOS DE SEGURIDAD
Las indicaciones de PELIGRO, ADVERTENCIA y PRECAUCIÓN se utilizan a lo
largo de este Manual del propietario para enfatizar información crítica e importante. Lea y siga estas indicaciones para ayudar a garantizar la seguridad
y evitar daños a la propiedad.
Las indicaciones se definen a continuación.
PRECAUCIÓN
PRECAUCIÓN: Indica una situación potencialmente peligrosa o práctica insegura
que, si no se evita, puede dar como resultado una lesión menor
o moderada.
ADVERTENCIA
ADVERTENCIA: Indica una situación potencialmente peligrosa que, si
no se evita, podría provocar la muerte o lesiones graves.
PELIGRO
PELIGRO: Indica una situación inminentemente peligrosa que, de no
evitarse, ocasionará la muerte o lesiones graves.
ESTA PLANCHA ES SOLO PARA USO EN EXTERIORES
PELIGRO
Si huele a gas:
1. Cierre el suministro de gas al aparato (retire el recipiente de LP)
2. Extinga cualquier llama abierta.
3. Si el olor continúa, manténgase alejado del aparato y
llame inmediatamente a su proveedor de gas o a su departamento
de bomberos.
ADVERTENCIA
1. No almacene ni use gasolina u otros líquidos o vapores inflamables
cerca de este o cualquier otro aparato.
2. Un cilindro de LP no conectado para su uso no debe almacenarse
cerca de este ni de ningún otro aparato.
• Este manual de instr
importante necesaria para el montaje correcto y el uso
seguro del artefacto.
• Lea y siga todas las advertencias e instrucciones antes
de ensamblar y usar el aparato.
• Siga todas las advertencias e instrucciones cuando use
el aparato.
• Guarde este manual para referencia futura.
ucciones contiene información
CHARBROIL.COMPágina 9
PARA SU SEGURIDAD, ANTES DE UTILIZAR SU PLANCHA
ADVERTENCIA PRECAUCIÓN
No intente reparar o alterar el regulador/válvula por
ningún defecto "asumido". Cualquier modificación a
este montaje anulará su garantía y creará un riesgo de
fuga de gas e incendio. Use solo repuestos autorizados
suministrados por el fabricante.
Para un uso seguro de su plancha y para
evitar lesiones graves:
• No permita que los niños operen o jueguen cerca
de la plancha.
• Mantenga el área de la plancha despejada y libre
de materiales combustibles (es decir, gasolina,
propano o cualquier otro líquido o gas inflamable).
• No bloquee los agujeros en la parte inferior o
trasera de la plancha.
• Compruebe las llamas del quemador regularmente.
• Nunca use el regulador de esta plancha con ningún
otro aparato de gas LP.
• Al cocinar, el aparato debe estar en una superficie
nivelada en un área libre de material combustible.
• Use la plancha solo en espacios bien ventilados.
NUNCA lo use en espacios cerrados tales como
garaje, garaje, porche, patio cubierto o debajo de
una estructura aérea de ningún tipo.
• No use briquetas de carbón o cerámica en una
plancha de gas (a menos que se suministren
briquetas con su plancha).
• Este aparato no está diseñado ni debe usarse
nunca como un calentador.
• Use la plancha al menos a 2 pies de cualquier
pared o superficie. Mantenga un espacio libre de
10 pies sobre los objetos que puedan incendiarse o
sobre las fuentes de ignición, como luces piloto en
los calentadores de agua, electrodomésticos, etc.
• Para quienes viven en apartamento: Consulte
con la administración para conocer los requisitos
y códigos de incendios para usar una plancha de
gas LP en su complejo de apartamentos. Si está
permitido, úsela afuera en la planta baja con una
separación de dos (2) pies de las paredes o rieles.
No lo use sobre o debajo de los balcones.
PELIGRO
• Nunca opere este artefacto sin supervisión.
• Nunca opere este artefacto a menos de 10 pies (3
m) de cualquier estructura, material combustible u
otro cilindro de gas.
• Nunca opere este artefacto a menos de 25 pies (7.5
m) de cualquier líquido inflamable.
• Si se produce un fuego, manténgase alejado del
aparato y llame inmediatamente a su departamento de bomberos. No intente extinguir un fuego
de aceite o grasa con agua.
El incumplimiento de estas instrucciones puede ocasionar incendios, explosiones o peligro de quemaduras,
que pueden causar daños a la propiedad, lesiones
personales o la muerte.
• Solo para uso residencial. No usar para cocinar
comercial
• No deje el aparato desatendido. Mantenga a los
niños y las mascotas alejados del aparato en todo
momento.
• No use agua en caso de un incendio de grasa.
Podrían producirse lesiones personales. Si se
produce un incendio de grasa, apague las perillas
y retire el cilindro de LP.
• No deje desatendida la plancha mientras precalienta o quema los residuos de comida en HI
(alto). Si la plancha no se ha limpiado regularmente, puede producirse un incendio por grasa
que puede dañar el producto.
Precauciones de seguridad de instalación
• Use la plancha, tal como se compró, solo con gas
LP (propano) y el conjunto de regulador/válvula
suministrado.
• La instalación de la plancha debe cumplir con los
códigos locales, o en ausencia de códigos locales,
con el Código Nacional de Gas Combustible, ANSI
Z223.1/NFPA 54. El almacenamiento y la manipulación de los gases de petróleo licuados deben
cumplir con el Código de Gas LP ANSI/NFPA 58.
La plancha no es para usarse dentro o sobre vehículos recreativos y/o botes.
• Esta plancha cuenta con un certificado de seguridad solo para su uso en los Estados Unidos. No
la modifique para usarla en ninguna otra ubicación. La modificación dará lugar a un riesgo de
seguridad.
• No deje el aparato desatendido. Mantenga a los
niños y las mascotas alejados del aparato en todo
momento.
CHARBROIL.COMPágina 10
CUIDADO DE LA SEGURIDAD DEL GAS LP Y DEL CILINDRO
LP (Gas Licuado de Petróleo)
• No es tóxico, es inodoro e incoloro cuando se produce. Para su seguridad, al
gas LP se le ha dado un olor (similar al repollo podrido) para que pueda olerse.
• El gas de LP es altamente inflamable y puede encenderse inesperadamente al
mezclarse con el aire.
4. Asegúrese de que las válvulas de control de la plancha estén en la posición
de OFF (APAGADO).
5. Inserte el extremo roscado del Cilindro de Propano en el Regulador/Válvula
y apriete a mano el cilindro giratorio en el sentido de las agujas del reloj
como se muestra a continuación. ¡NO UTILICE HERRAMIENTAS! Apretar
demasiado puede dañar las roscas en el Regulador/Válvula.
6. Realice una prueba de fugas.
Uso del cilindro de propano (1 lb. desechable)
• Use solo un cilindro marcado como "combustible de propano".
• El cilindro debe construirse y marcarse de acuerdo con las especificaciones
para cilindros de gas LP del Departamento de Transporte de los Estados
Unidos (DOT) o del Estándar Nacional de Canadá, CAN/CSA-B339, Cilindros,
Esferas y Tubos para el Transporte de Mercancías Peligrosas.
• Guarde la tapa del cilindro y vuelva a instalarla cuando no esté en uso.
• El sistema de suministro del cilindro debe estar dispuesto para la extracción
de vapor. El cilindro de gas debe estar en posición vertical durante el uso.
Extracción del cilindro de propano:
7. Coloque las válvulas de control en la posición de OFF (APAGADO).
8. Permita que la plancha se enfríe.
9. Retire el cilindro de propano girándolo en sentido contrario a las agujas del
reloj hasta que se desenganche del Regulador/Válvula.
10. Instale la tapa en el cilindro. La tapa debe mantenerse en el cilindro cuando
no se usa para evitar que la suciedad y los residuos entren en el Regulador/
Válvula.
Cilindros de gas propano
• Su plancha está diseñada para operar con un cilindro desechable de 16.4 oz.
(Cilindro Dot 39) que mide 7 3/8" de alto (no incluido). No intente rellenar los
cilindros de combustible desechables de 16.4 oz.
• El cilindro debe instalarse, transportarse y almacenarse en una posición
vertical y no debe caerse ni manipularse bruscamente.
• Cuando el aparato deba almacenarse en interiores, el cilindro de gas propano
debe estar desconectado del artefacto.
• Cuando el cilindro de gas propano no está desconectado del aparato, ambos
deben almacenarse al aire libre en un espacio bien ventilado.
• El cilindro nunca se debe transportar ni almacenar donde la temperatura
pueda alcanzar los 125 °F (51 °C).
• Los cilindros deben almacenarse al aire libre fuera del alcance de los niños.
• Un cilindro de LP desconectado en el almacenamiento o el transporte debe
tener una tapa de seguridad instalada. El incumplimiento de todas las
instrucciones del fabricante podría ocasionar lesiones personales graves y/o
daños a la propiedad.
• NUNCA lo use en espacios cerrados tales como garaje, porche, patio cubierto
o debajo de una estructura aérea de ningún tipo.
Inserte con cuidado el cilindro en el regulador
Instalación/extracción del cilindro de propano
y apriételo con seguridad a mano.
NO utilice herramientas.
Instalación del cilindro de propano:
1. Retire la tapa del extremo del cilindro de propano (se vende por separado)
2. La tapa debe mantenerse en el cilindro cuando no se usa para evitar que la
suciedad y los residuos entren en el Regulador/Válvula.
3. Verifique que el extremo del accesorio del cilindro no tenga suciedad ni
residuos. Limpie si es necesario.
CHARBROIL.COMPágina 11
CONTROLAR LAS FUGAS DE SU PLANCHA
Prueba de fugas (1 lb. desechable)
• Durante la prueba de fugas, mantenga la plancha alejada de llamas o chispas
abiertas y no fume. La plancha debe ser probada contra fugas al aire libre en
un área bien ventilada.
• La prueba de fugas debe repetirse cada vez que se reemplaza el cilindro de gas
o después del almacenamiento.
Los materiales necesarios incluyen una brocha limpia y una solución de 50/50 de
agua y jabón. Use agua y jabón suave. No use productos de limpieza para el hogar.
odría ocurrir un daño a los componentes.
P
PROCEDIMIENTO
1. Asegúrese de que las perillas de control de la plancha estén en la posición de
"OFF" (apagado).
2. Cepille la solución jabonosa sobre la conexión entre el cilindro de gas y el
regulador en (A).
aparecen burbujas crecientes, hay una fuga. Vuelva a apretar las conexiones y
Si
repita los pasos 1 y 2.
Si no puede detener una fuga, retire el cilindro de gas del regulador y
verifique si hay roscas dañadas, suciedad y residuos en el regulador y
el cilindro de gas. También verifique si algo está obstruyendo el flujo
de gas en el regulador y las aberturas del cilindro de gas. Elimine
cualquier obstrucción que pueda encontrarse y repita la prueba de
fugas. Si las roscas están dañadas en el regulador o en el cilindro de
gas, reemplácelos. Solicite piezas nuevas al número de serie, modelo
y nombre de los artículos necesarios para el Centro de servicio al
cliente de Griddle al 1-800-241-7545.
PRECAUCIÓN
¡ALERTA DE ARAÑAS!
.
Si nota que su plancha se está volviendo difícil de encender o que
la llama no es tan fuerte como debería ser, tómese el tiempo para
revisar y limpiar el quemador.
En algunas áreas del país, se sabe que arañas o pequeños insectos crean problemas
de "retroceso de la llama". Las arañas tejen telas, construyen nidos y ponen huevos
en el tubo del quemador de la plancha, obstruyendo el flujo de gas al quemador.
El gas retenido puede encenderse en el tubo del quemador. Esto se conoce como
retroceso de la llama y puede dañar su plancha e incluso causar lesiones.
A
Para evitar los retrocesos de la llama y garantizar un buen rendimiento, el quemador
y el tubo del quemador deben retirarse de la plancha y limpiarse antes de su uso
cuando la plancha ha estado inactiva durante un período prolongado.
SI EXPERIMENTA LO SIGUIENTE:
1. Huele a gas.
2. El quemador no se enciende.
3. Una pequeña llama amarilla aparece en el quemador (debe ser azul).
4. Fuego sale de alrededor o detrás de la perilla de control.
¡DETÉNGASE!
¡APAGUE INMEDIATAMENTE EL GAS EN LAS PERILLAS DE CONTROL LP!
1. Permita que la plancha se enfríe.
2. Use un limpiador de tuberías de 12" para limpiar el tubo del quemador.
CHARBROIL.COMPágina 12
 Loading...