

Char-Broil 14202002, 14202004, 14202005 Product Manual
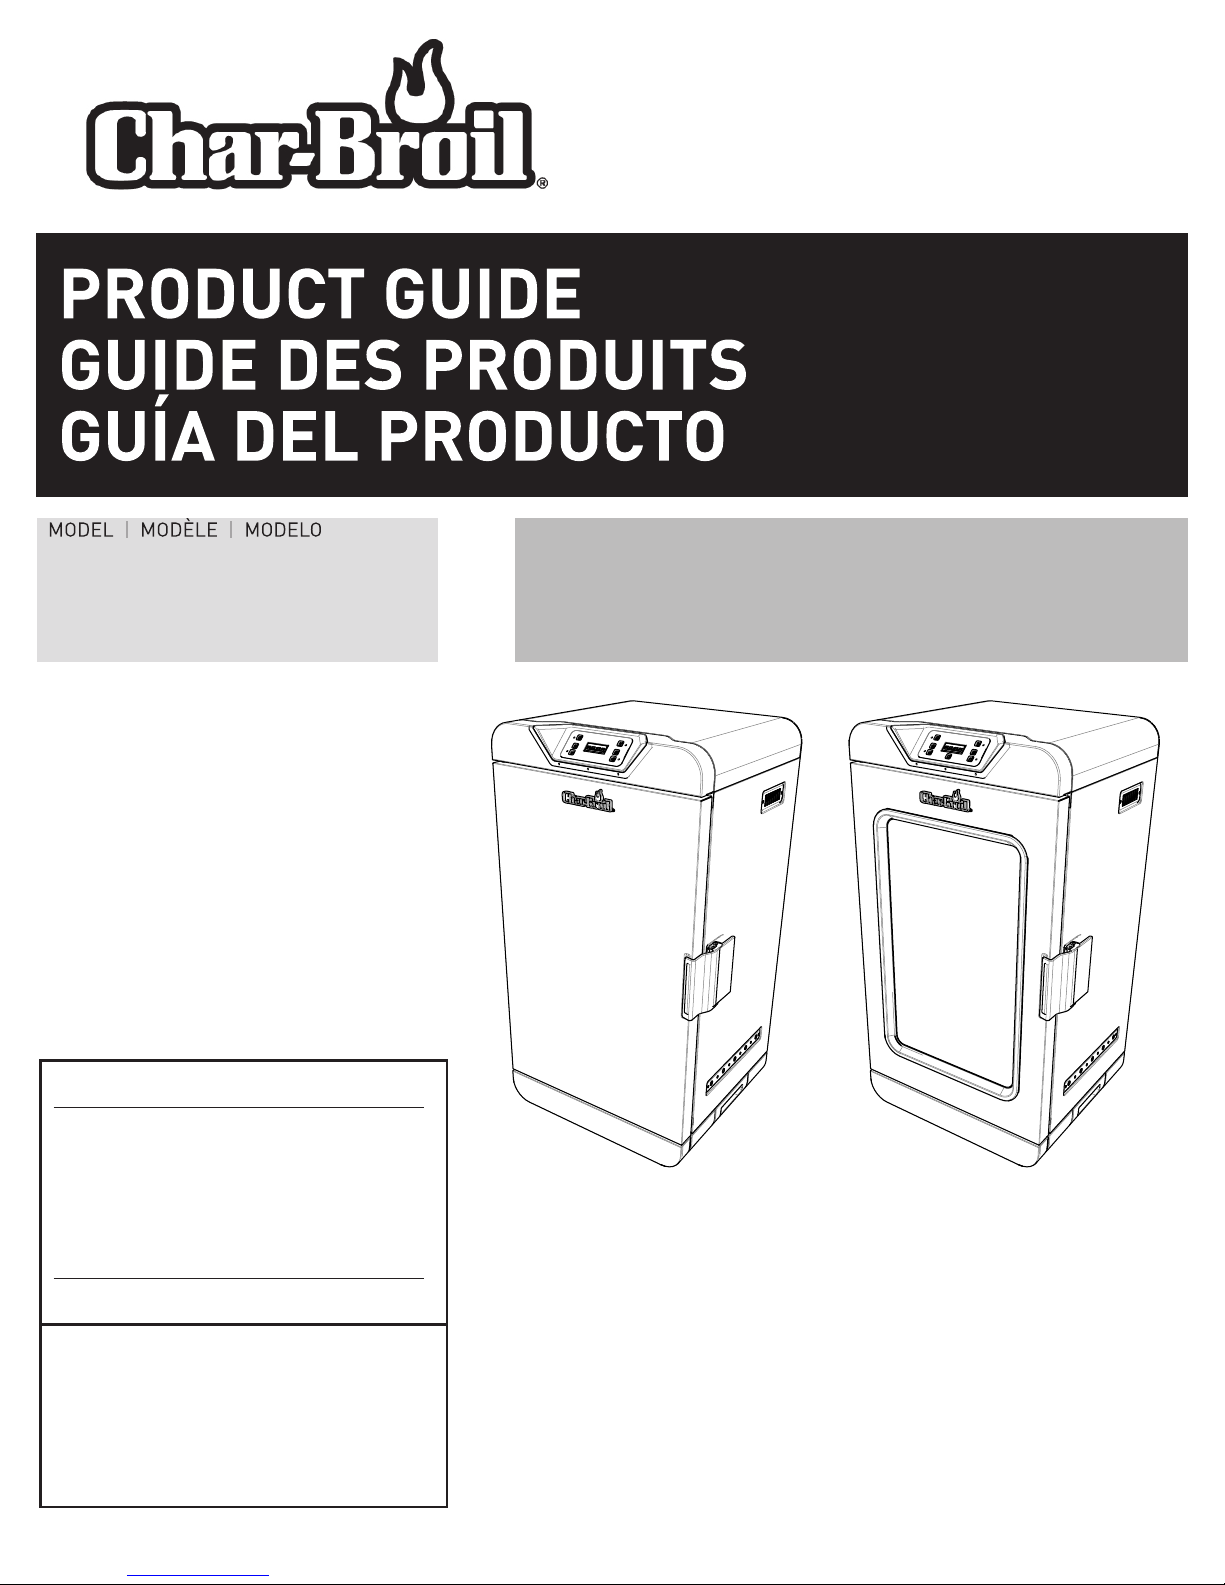
DIGITAL ELECTRIC VERTICAL SMOKER 725
®
14202002
14202004
Serial number | Numéro de série | Número de serie
See rating Label on grill for serial number.
Ce numéro se trouve sur l´étiquette signalétique sur
i´appareil.
El número de serie se encuentra en la etiqueta de
especificaciones de la parrilla.
FUMOIR ÉLECTRIQUE NUMÉRIQUE VERTICAL 725
®
®
AHUMADOR DIGITAL ELÉCTRICO VERTICAL 725
14202002 14202004
Date purchased | Date d’chat | Fecha de compra
If you have questions or need assistance
during assembly, please call 1-888-430-7870.
Si vous avez des questions ou besoin d´aide
pendant l’assemblage, S’il vous plaît appelez
1-888-430-7870
Si tiene alguna pregunta o si Necesita
ayuda durante el Ensamblado, llámenos Al
1-888-430-7870
04/23/15 • 42805248
FOR OUTDOOR USE ONLY
POUR USAGE EN MILIEU EXTÉRIEUR UNIQUEMENT
ESTE JUEGO SÓLO SE PUEDE USAR EXTERIORS
Use only with GFI (Ground Fault Interrupter) protected circuit.
Use sólo con GFI (interruptor de fallo de tierra) del circuito protegido.
Utiliser uniquement avec GFI (Interruptor de défaut de tierra) circuit protégé.
TABLE OF CONTENTS
Product Record Information . . . . . . . . . . . . . . . . . . . . . . . . . . . . 1
Important Safeguards . . . . . . . . . . . . . . . . . . . . . . . . . . . . . . . . . 2
Safety Symbols. . . . . . . . . . . . . . . . . . . . . . . . . . . . . . . . . . . . . . 2
General Safety . . . . . . . . . . . . . . . . . . . . . . . . . . . . . . . . . . . . . . 3
Use and Care . . . . . . . . . . . . . . . . . . . . . . . . . . . . . . . . . . . . . . . 3
Food Safety . . . . . . . . . . . . . . . . . . . . . . . . . . . . . . . . . . . . . . . . 5
Controller Operating Instructions. . . . . . . . . . . . . . . . . . . . . . . 5-7
Remote Control Instructions/Pairing . . . . . . . . . . . . . . . . . . . . 7-8
What’s in the Box 14202002. . . . . . . . . . . . . . . . . . . . . . . . . . . . 9
What’s in the Box 14202004. . . . . . . . . . . . . . . . . . . . . . . . . . . 10
Assembly. . . . . . . . . . . . . . . . . . . . . . . . . . . . . . . . . . . . . . . . . . 11
Troubleshooting . . . . . . . . . . . . . . . . . . . . . . . . . . . . . . . . . . . . 12
Limited Warranty. . . . . . . . . . . . . . . . . . . . . . . . . . . . . . . . . . . . 13
Parts List. . . . . . . . . . . . . . . . . . . . . . . . . . . . . . . . . . . . . . . . . . 14
Parts Diagram. . . . . . . . . . . . . . . . . . . . . . . . . . . . . . . . . . . . . . 15
INSTALLER/ASSEMBLER:
Leave this manual with consumer.
CONSUMER:
Keep this manual for future reference.
This instruction manual contains important
information necessary for the safe use of
the appliance.
Follow all warnings and instructions when
using the appliance.
Safety Symbols
The symbols and boxes shown below explain what
each heading means. Read and follow all of the
messages found throughout the manual.
DANGER
DANGER: Indicates an imminently hazardous situation
which, if not avoided, will result in death or serious injury.
WARNING
WARNING: Indicates an potentially hazardous situation
which, if not avoided, could result in death or serious
injury.
CAUTION
IMPORTANT SAFEGUARDS
When using electrical appliances, basic safety
precautions should always be followed including the
following:
READ ALL INSTRUCTIONS
• Do not touch hot surfaces. Use handles or knobs.
• To protect against electrical shock, do not immerse cord,
plugs, controller or heating element in water or any other
liquid.
• Close supervision is necessary when any appliance is used
by or near children.
• Unplug from outlet when not in use and before cleaning. Allow
to cool before putting on or taking off parts.
• Do not operate any appliance with a damaged cord or plug or
after the appliance malfunctions or has been damaged in any
manner.
• The use of accessory attachments not recommended by the
appliance manufacturer may cause injuries.
• Do not let cord hang over edge of table or counter, or touch
hot surfaces.
• Do not place on or near a hot gas or electric burner, or in a
heated oven.
• Extreme caution must be used when moving an appliance
containing hot oil or other hot liquids.
• Do not use appliance for other than intended use.
• Use only with GFI (Ground Fault Interrupter) protected circuit.
• To prevent smoker from being splashed or falling into water, do
not use smoker within 10 feet of a pool, pond or other body of
water.
• Keep smoker and electric controller dry and out of rain at all
times.
• Unplug smoker when not in use and before moving.
• Never remove grounding plug or use with an adapter to two
prongs.
• Keep electric plugs off ground and dry.
• Do not use water or other liquid spray to clean product without
first unplugging electric controller and removing heating
element.
• Fuel, such as charcoal briquettes, is not to be used with
appliance.
Use only on properly grounded outlet.
•
Do not use the appliance during an electrical storm.
•
Keep a fire extinguisher accessible during operation.
•
CAUTION: Indicates a potentially hazardous situation or
unsafe practice which, if not avoided, may result in minor
or moderate injury.
SAVE THESE INSTRUCTIONS
CAUTION
For residential use only. Do not use for commercial
cooking.
2
General Safety
1. Do not touch hot surfaces with unprotected hands. Use
rear handle provided for transportation. NOTE: Rear handle
is not to be used for lifting the appliance.
2. Never leave smoker unattended when ON.
3. Keep children away from smoker both when hot and cold.
4. Use long barbeque utensils for cooking.
5. Allow smoker to cool before moving, cleaning or storing.
6. Do not cook under a roof.
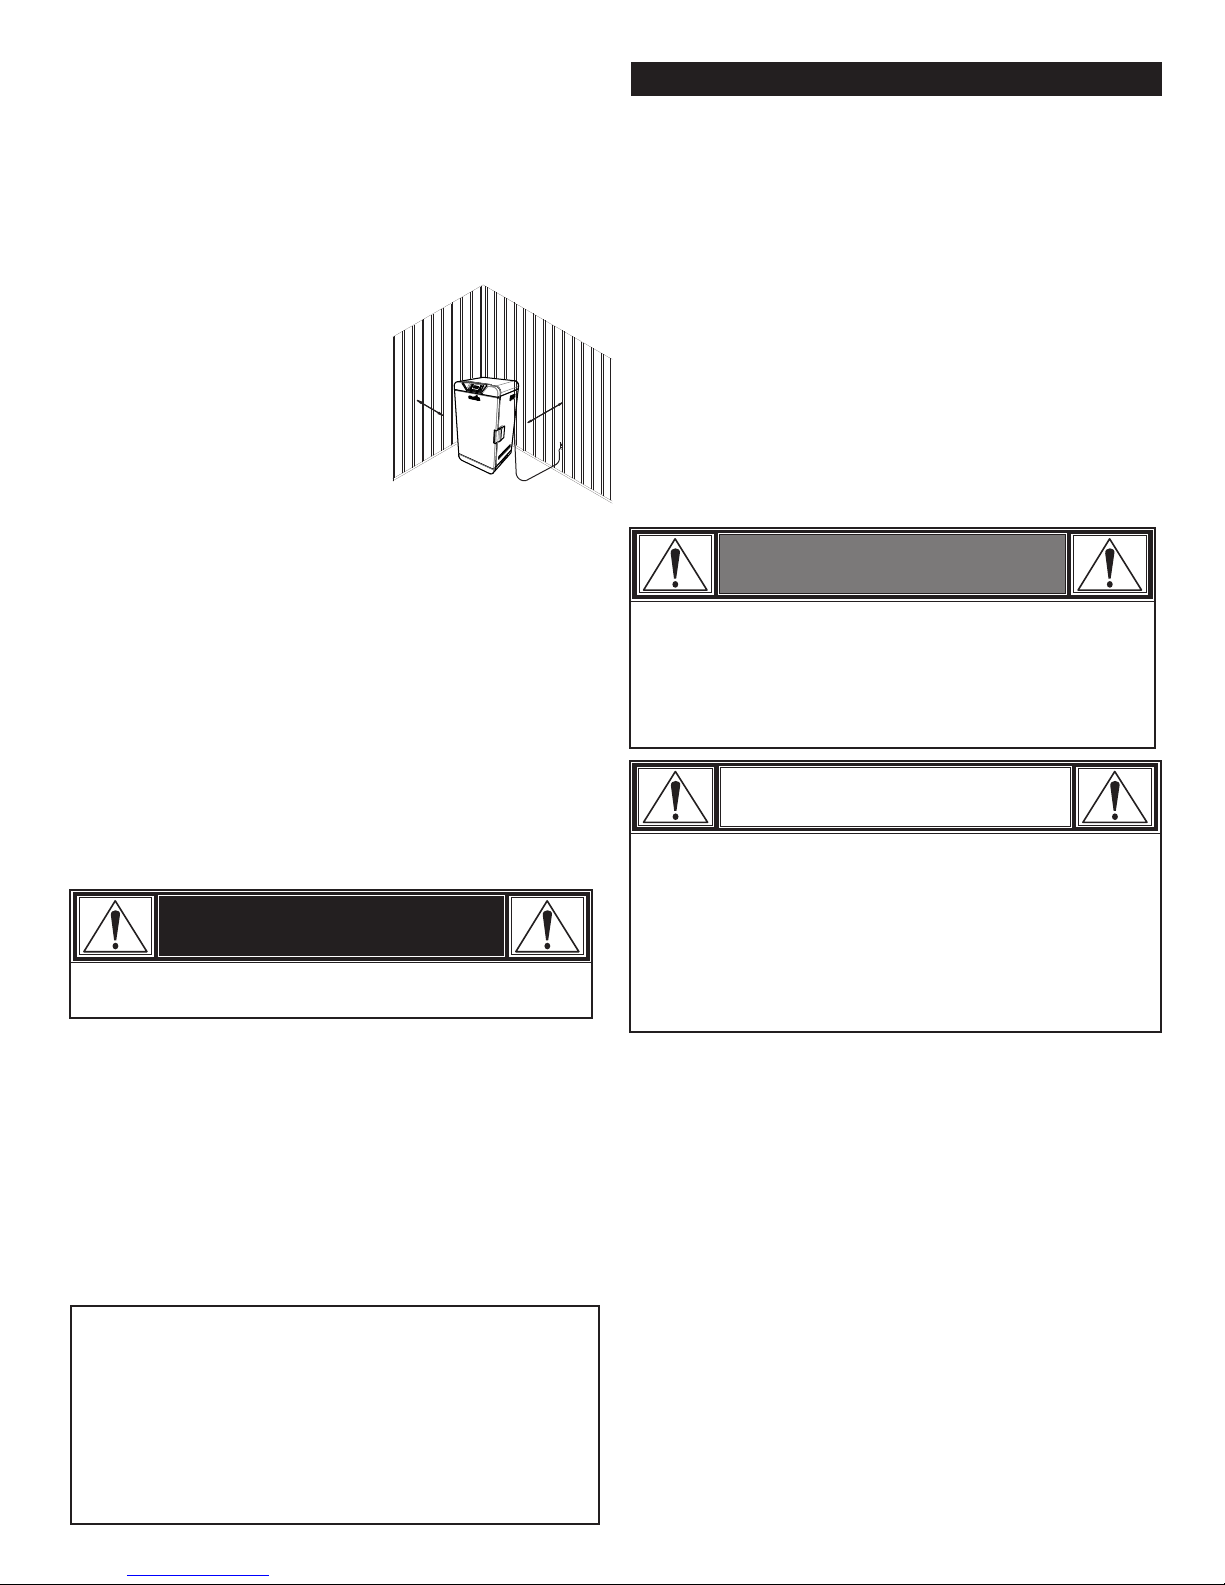
7. Keep smoker 36" (36 po) away from
walls and rails.
8. For outdoor household use
only. Do not use indoors or
for commercial cooking.
9. Do not use or store gasoline,
36 in
36 po
kerosene or other flammable
liquids within 20 feet of this
smoker when in use.
10. Store smoker in weather protected area
or use a cover when not in use.
11. Use only accessory attachments recommended by
manufacturer.
12. It is the responsibility of the assembler/owner to assemble,
install and maintain smoker.
13. Do not cover cooking rack with metal foil. This could lead to
overheating and damage to the appliance.
14. Use the drip tray only as instructed. Do not place it on the
cooking racks during operation.
15. Smoker box MUST be used at all times.
16. DO NOT leave old wood ashes in the smoker box. Empty
smoker box after each use.
17. Dispose of cold ashes by placing them in a metal foil wrapper,
soaking them in water overnight and discarding in a noncombustible container.
WARNING
Do not use 16 or 18 gauge extension cords.
Damage to household wiring and/or fire could result.
Extension Cord Use and Safety
For best smoker performance use of extension cord is not
recommended.
If you must use an extension cord for your safety:
• Use only outdoor type with 3 prong grounding plug, rated for 15
amperes or more, approved by UL, marked with a W-A and a
tag stating “Suitable for Use with Outdoor Appliance”.
• Use the shortest length extension cord required. Do not connect
2 or more extension cords together. A 12 or 14 gauge extension
cord of 50 ft. or less is acceptable.
• Keep connections dry and off ground.
• Do not let cord hang over edge of table top or other items where
it can be pulled by children or tripped over.
Ground Fault Interrupter
•Since 1971 the National Electric Code (NEC) has required
Ground Fault Interrupter devices on all outdoor circuits.
•If your residence was built before 1971, check with a qualified
electrician to determine if a Ground Fault Interrupter protector
exists.
•Do not use this appliance if the circuit does not have GFI
protection.
•Do not plug this appliance into an indoor circuit.
Use and Care of Your Smoker
Before first use of smoker:
• Remove all packaging and sale labels from the smoker. Do not
use sharp tools to remove stickers.
• Wash cooking grates with warm soapy water, rinse and dry
throughly.
Before each use of smoker:
• Use smoker only on a firm and level surface to prevent tipping
over. DO NOT move appliance across uneven surfaces.
• To prevent household circuit breakers from tripping, keep
electric controller dry and do not use other electrical products
on the same circuit.
• Check grease tray to make sure it is empty and is mounted
properly prior to each use.
• For stick-free cooking, apply a thorough coating of vegetable
oil or vegetable oil based spray to the cooking grate.
• DO NOT cover the cooking grates with metal foil.
WARNING
•Failure to follow all manufacturer’s instructions could result
in serious personal injury and/or property damage.
•Use care when operating your smoker.
•Read and follow all the information and safeguards in this
product guide before attempting to assemble or operating
this smoker.
CAUTION
Do not use sharp or pointed tools to clean smoker.
Do not use abrasive oven cleaners, steel wool or metal brushes
to clean porcelain grates or smoker body. They will damage the
finish.
Replace damaged part(s) only with Char-Broil certified
replacement parts. Do not attempt to repair damaged parts.
Safety Tips
Ÿ If you have an appliance problem see the "Troubleshooting
Section".
Ÿ Clean smoker often, preferably after each cookout. If a bristle
brush is used to clean any of the smoker cooking surfaces,
ensure no loose bristles remain on cooking surfaces prior to
cooking. It is not recommended to clean cooking surfaces while
smoker is hot.
Ÿ DO NOT open the smoker door during operation, unless
necessary. Opening the door will allow heat to escape, and slow
the cooking time.
Ÿ DO NOT USE CHARCOAL. A charcoal fire will result and
the smoker is not designed for charcoal. The fire will
create an unsafe condition and damage the smoker.
Wood chips must be used to create a smoked flavor.
3
DANGER
WARNING
In case of fire, unplug smoker from outlet and allow fire to burn
out. Do not use water to put out a fire in this or another
electrical appliance.
To avoid electrical shock disconnect electric cord before
cleaning smoker. Never immerse electric controller or heating
element in any liquid.
Cleaning your smoker:
Excess build up of burned grease and food particles will reduce
the smoker’s cooking performance. To obtain optimum
performance:
• Clean the interior and exterior at least once a season,
more often with heavy use.
• Best results are obtained by brushing particle buildup
downward toward the bottom of smoker.
• Using a mild detergent or hot soapy water, moderately scrub
interior surfaces of the smoker with a plastic or bristle brush.
Clean cooking grates, water pan, meat probe, and drip pan
•
regularly with warm soapy water or a baking soda and water
solution. Use non-abrasive scouring powder for stubborn
stains. If a bristle brush is used to clean any of the smoker
cooking surfaces, ensure no loose bristles remain on cooking
surfaces prior to cooking. It is not recommended to clean
cooking surfaces while smoker is hot.
Clean the smoker with a non-abrasive cleaner.
•
Clean cooking grates, water pan, meat probe, and drip pan
•
regularly with warm soapy water or a baking soda and water
solution. Use non-abrasive scouring powder for stubborn
stains. If a bristle brush is used to clean any of the smoker
cooking surfaces, ensure no loose bristles remain on cooking
surfaces prior to cooking. It is not recommended to clean
cooking surfaces while smoker is hot.
Clean the surface of the thermostats after each use. There
•
are two thermostats located on the rear inside wall of the
smoker.
If your smoker is equipped with a window, do not use abrasive
•
cleaners on the window. Use a cleaner approved for use on
ceramic glass cooktops. Window is tempered and will not
break under normal use.
For smoker box, clean frequently to remove ash build up,
•
residue and dust.
Dispose of cold ashes by placing them in a metal foil wrapper,
•
soaking them in water overnight and discarding in a noncombustible container.
The door seal MUST be cleaned with a damp cloth after each
•
use in order to keep the seal in proper working condition.
For Safe Use of Your appliance and to Avoid Serious
Injury:
• The use of alcohol, prescription or non-prescription
drugs may impair the consumer's ability to properly
assemble or safely operate the appliance.
• When cooking, the appliance must be on a level, stable
surface in an area clear of combustible material.
• Do not leave appliance unattended. Keep children and
pets away from the appliance at all times.
• Do not move the appliance when in use.
• This appliance is not intended for and should never be
used as a heater.
• This appliance will be hot during and after use. Use
insulated oven mitts or gloves and long-handled
barbecue utensils for protection from hot surfaces or
splatter from cooking liquids.
• Keep appliance area clear and free from materials that
burn.
• Keep appliance area clear and free from combustible
materials, gasoline and other flammable vapors and
liquids.
• Use only in well-ventilated space.appliance
WARNING
CALIFORNIA PROPOSITION 65
1. Combustible by-products produced when using
this product contains chemicals known to the State
of California to cause cancer, birth defects, or
other reproductive harm.
2. This product contains chemicals, including lead
and lead compounds, known to the State of
California to cause cancer, birth defects or
other reproductive harm.
Wash your hands after handling this product.
Apartment Dwellers:
Check with management to learn the requirements
and fire codes for using an electric smoker in your
apartment complex. Use only as allowed.
4
Food Safety
Food safety is a very important part of enjoying the outdoor
cooking experience. To keep food safe from harmful bacteria,
follow these four basic steps:
Clean: Wash hands, utensils, and surfaces with hot soapy water
before and after handling raw meat and poultry.
Separate: Separate raw meats and poultry from ready-to-eat
foods to avoid cross contamination. Use a clean platter and
utensils when removing cooked foods.
Cook: Cook meat and poultry thoroughly to kill bacteria. Use a
thermometer to ensure proper internal food temperatures.
Chill: Refrigerate prepared foods and leftovers promptly.
For more information call: USDA Meat and Poultry Hotline at
1-888-MPHOTLINE (888-674-6854) In Washington, DC
Or E-mail: mphotline.fsis@usda.gov
Or visit the USDA website at www.fsis.usda.gov
How To Tell If Meat Is Cooked Thoroughly
• Meat and poultry cooked in the appliance often browns very
fast on the outside. Use only thawed meat and a meat
thermometer to be sure food has reached a safe internal
temperature, and cut into food to check for visual signs of
doneness.
• We recommend food to be at least 40°F before cooking in your
appliance.
• Whole poultry should reach 165° F. Juices should run clear
and flesh should not be pink.
• Beef, veal and lamb steaks, roasts and pork chops can be
cooked to 160° F.
• NEVER partially cook meat or poultry and finish cooking later.
Cook food completely to destroy harmful bacteria.
• Use a meat thermometer to ensure proper internal food
temperatures.
USDA Recommended
Internal Cooking Temperatures
Ground Meat
Beef, Pork, Veal, Lamb......................................160°F
Turkey, Chicken.................................................165°F
Fresh Beef, Veal, Lamb
Medium Rare.......................................................145°F
(let stand 3 minutes before cutting)
Medium................................................................160°F
Well Done............................................................170°F
Poultry
Chicken & Turkey, whole.....................................165°F
Poultry Parts.......................................................165°F
Duck & Goose....................................................165°F
Fresh Pork
Medium Rare......................................................145°F
(let stand 3 minutes before cutting)
Medium..............................................................160°F
Well Done..........................................................170°F
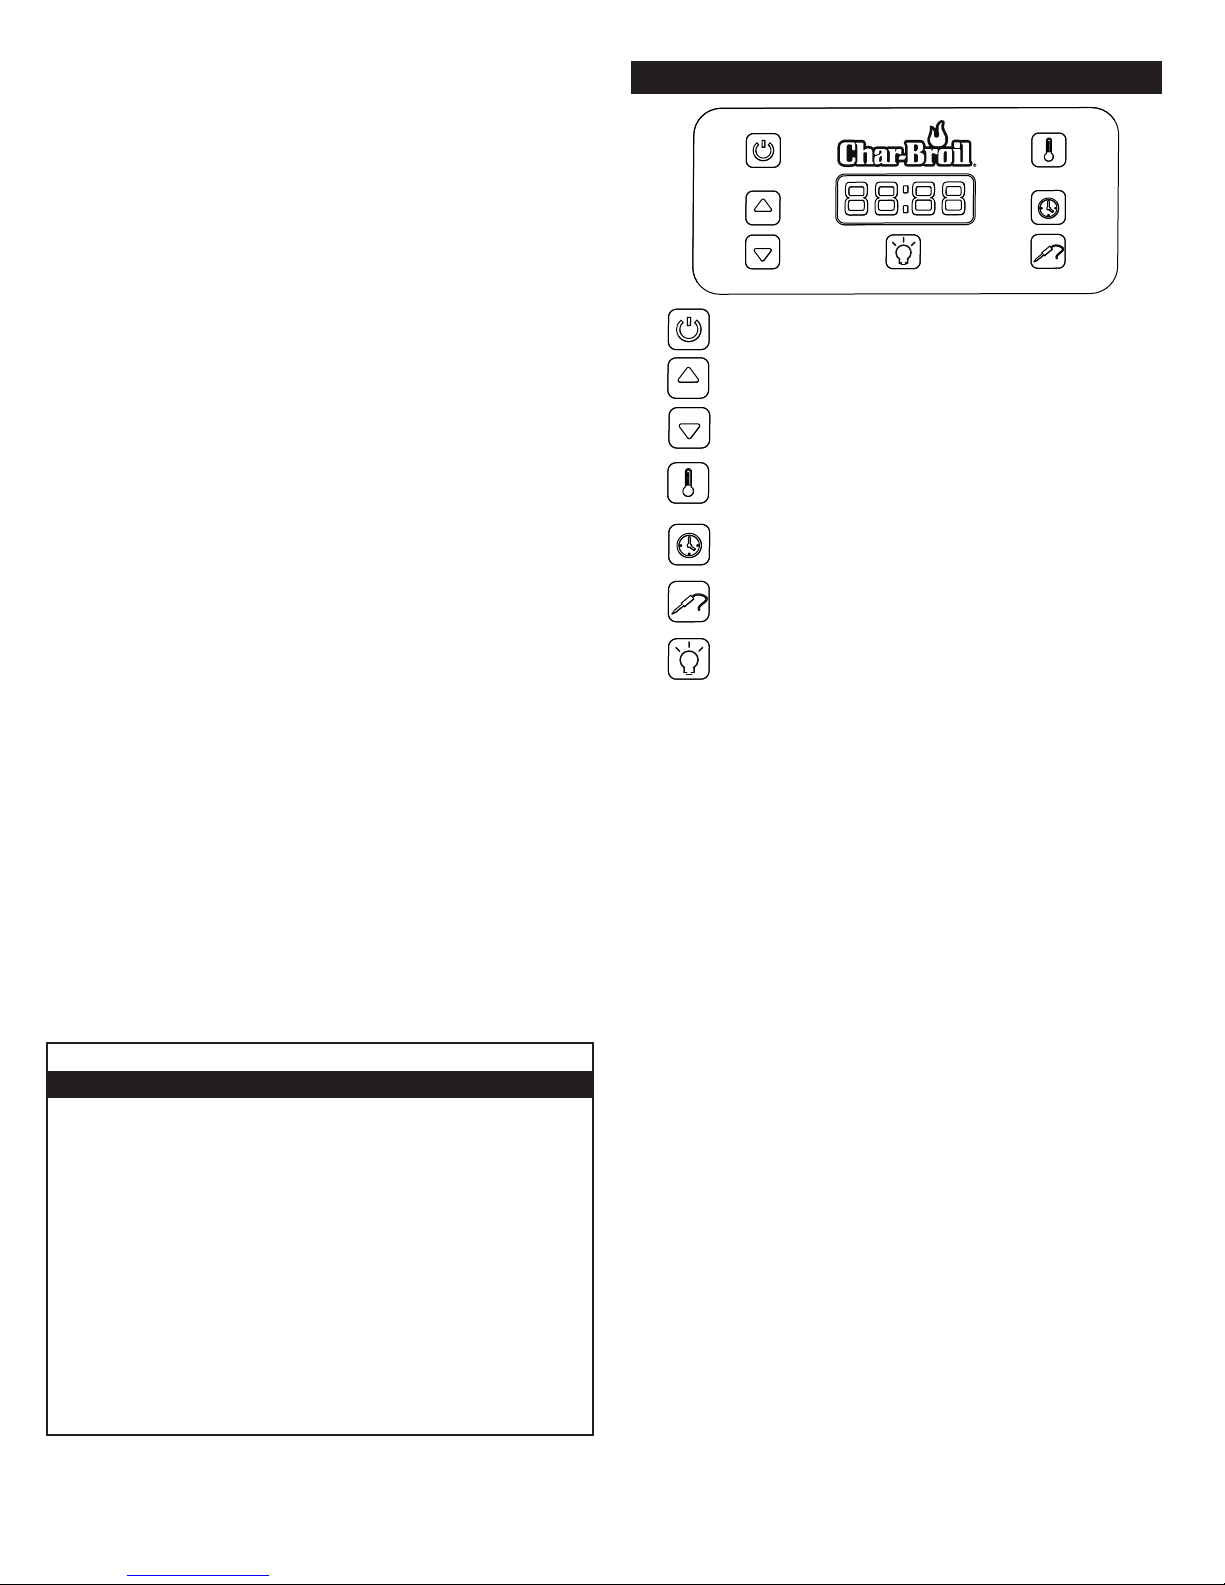
Control Panel Operating Instructions
Power Button - Turns smoker on and off
Up Button - add to time/temp value
Down Button - subtract from time/temp value
Temp Button - switches input to adjust
Cooking temp
Time Button - switches input to adjust
Cooking time
Meat Probe Button - switches input to adjust target
meat probe temp
Chamber Light - On/Off (Optional)
Ÿ The control panel temperature reading may fluctuate plus or
minus 10-15°F (5-8°C) as the appliance cycles to maintain
correct cooking temperature setting.
Ÿ Press the Power Button once, and the appliance is now ready
to receive input settings from the Temp Button, Time Button
and/or Meat Probe Button.
Ÿ If appliance is powered on and left unattended for 19 hours, the
appliance will automatically turn off.
Ÿ The controller reads and displays internal cook temperature
setting in °F, time in 00:00 (hours:minutes) and meat probe
temperature in °F. Temperature readings can be changed from
°F to °C by pressing the “UP” and “DOWN“ buttons
simultaneously for a period of 3 seconds. The temperature
readings can be changed back to °F from °C using the same
method.
Ÿ The heating element will not begin to heat up until you input the
Temp and Time or Meat Probe and Temp settings. NOTE: You
must choose to cook by either time or meat probe target temp.
These functions will not work simultaneously.
Ÿ If the meat probe is not connected to the smoker the meat probe
function is disabled.
1) Seasoning Your Smoker
NOTE: Season your smoker before first cooking. Refer to page 6
for Temp Button and Time Button functions.
a) Make sure water pan is in place with NO WATER and
smoker box is in place with no wood chips.
b) Plug in the appliance. The display will immediately
have power. A beep is sounded when the unit is
plugged in.
c) Press the Power Button once, the control unit is now
ready.
5
(Continued next page)

Control Panel Operating Instructions (Continued)
d) Press the Temp Button and set temperature to 275°F
(135°C), max. setting, using the “UP” or “DOWN”
buttons.
e) Press the Time Button and set the time to 2 hours
using the using the “UP” or “DOWN” buttons,
f) Once 2 hours has elapsed, turn off smoker and allow to
cool.
g) After the seasoning process has completed, your
smoker is now ready for use.
CAUTION: The smoker is HOT during use. Wear protective gloves
when working inside the smoker.
Using the Smoker Box:
The smoker box is what will enable you to add smoke flavor to your
foods. Simply fill the smoker box with wood chips to the desired
level and slide it into place prior to preheating the smoker. The
smoker box can be filled to varied levels to accommodate short and
long cooks. There are many wood chip types that result in different
flavors. For a chart listing estimated wood chip level to cook time
ratios and smoke flavor details, please see grilling guide.
NOTE:
Ÿ The smoker box is designed for wood chips or pellets only, do
not use wood chunks.
Ÿ Always operate smoker with smoker box in place regardless of
whether or not you use wood chips. Never remove or refill the
smoker box during cooking
Using the Water Pan:
Your appliance comes equipped with a water pan. The water pan
can be used to keep meat moist while cooking. To use, fill the water
pan with warm water (cold water can bring down the temp of the
cooker) to the Max Water mark and slide into place. Do not overfill
the water pan.
NOTE:
Ÿ Using water is not required for smoking.
Ÿ Always operate (including preheating) smoker with water pan in
place regardless of whether or not you use water. Never remove
the water pan during cooking.
Ÿ If water pan needs to be refilled during cooking, always fill
through the hole in the drip pan assembly. Care should be taken
when refilling water pan to avoid having any liquid coming in
contact with the heating element. Serious damage to the heating
element could result, including flare ups and electrical failure.
Cooking with your Smoker NOTE: Always preheat smoker with smoker box in place, including
wood chips if being used.
1) Setting the Preheat Cycle
a) Press the Temp Button.
b) Press and hold the “UP” or “DOWN“ button to raise or
lower until the letters “PH” is displayed. Release the
button. “PH” is blinking.
c) Press the Temp Button again. The display will no
longer blink indicating that the “PH” is set.
d) The display will show “PH”, no temperature will be
shown during the Preheat cycle.
e) The appliance will automatically start the Preheating
process.
Continued
f) The Preheat cycle will run for 40 minutes.
g) After the 40 minute preheat cycle ends:
Ÿ The appliance will automatically reduce the interior
temperature.
Ÿ The display will blink "00:00" (no temp will be
displayed)
Ÿ An audible beep will sound - 3 beeps initially and
then 3 beeps once every 30 seconds thereafter.
h) You can then use the Temp Button, Meat Probe
Button or Time Button to start using the smoker.
NOTE: The appliance will automatically turn off if 60 minutes has
passed after the initial 40 minute Preheat cycle has been
completed (40 minute Preheat + 1 hour = 100 total
minutes)
IMPORTANT: Always cook with both the water pan and smoker box
in place, whether or not they are filled.
2) Using the Temp Button
Display Range: 100°F - 275°F (38°C - 135°C)
a) Press the Temp Button. The default temperature
setting of 200°F (93°C) is shown.
b) Press and hold the “UP” or “DOWN“ button
respectively to raise or lower the desired cooking
temperature. (The display should automatically raise or
lower when the button is pressed and stop when the
button is released.)
c) Press the Temp Button again after the desired
temperature setting is entered. After the Temp Button
is pressed the display should no longer blink indicating
that it is set.
3) Using the Time Button
Display Range: 00:00 – 19:00 hours.
NOTE: The Meat Probe function will be disabled.
a) Press the Time Button, and a blinking “00:00” is
shown.
b) Press the “UP” or “DOWN“ button to raise or lower the
hour (“00:00”) in 1 hour increments. (The display should
still be blinking.) The display will raise or lower when the
button is pressed and stop when the button is released.
c) Press the Time Button again after the desired hour
portion of the cook time setting is entered. After the
Time Button is pressed the hour portion (“00:00”)
should no longer blink indicating that it is set.
d) The minute portion (“00:00”) will remain blinking at this
point as it has not yet been set.
e) Press the “UP” or “DOWN“ button to raise or lower the
minutes (“00:00”). The display should still be blinking.
f) Press the Time Button again after the desired minute
portion (“00:00”) of the cook time setting is entered.
After the Time Button is pressed the minute portion
(“00:00”) should no longer blink indicating that it is set.
g) After pressing the Time Button in the previous step
the time should begin to count down.
h) When using the Time function, the display should show
the Set Cooking Temperature and the actual elapsed
Time (countdown). They should alternate every
throughout the length of the cooking cycle.
6

Control Panel Operating Instructions (Continued)
i) Once the desired set time has elapsed:
Ÿ The controller will automatically reduce the appliance
temperature to 120°F (49°C).
Ÿ The display will alternate between 00:00 and 120°F
(49°C) showing the set time has elapsed.
Ÿ An audible beep will sound 3 beeps and then 3
beeps once every 30 seconds thereafter until the
Power Button is pressed, or has reached the
maximum 19 hour automatic shut-off.
4) Meat Probe Button
Display Range: 50°F to 225°F (-3.9°C to107°C)
NOTE: The Set Time function will be disabled.
a) Press the Meat Probe Button, and the default desired
meat probe temperature setting of 145°F (63°C) is
displayed and will blink.
b) Press the “UP” or “DOWN“ button to raise or lower the
desired meat probe temperature setting.
c) Press the Meat Probe Button again after the desired
meat probe temperature setting is entered.
d) After the Meat Probe Button is pressed the display
should no longer blink indicating that it is set.
e) When using the Meat Probe function, the display
should show the Chamber Temperature and the actual
Meat Probe Temperature. The display will alternate
throughout the length of the cooking cycle.
f) Once the desired meat probe temperature has been
reached:
Ÿ The controller will automatically reduce the set temp
to 120°F (49°C).
Ÿ The display will alternate between the actual Meat
Probe temperature and 120°F (49°C).
Ÿ An audible beep will sound 3 beeps and then 3
beeps once every 30 seconds thereafter until the
Power Button is pressed, or has reached the
maximum 19 hour automatic shut-off.
5) The meat probe may be unplugged or removed from the food
at any time. If the meat probe is not plugged in or does
not reach the desired meat probe temperature setting,
power to the heating element continues until the Power
Button is pressed, or has reached the maximum 19 hour
automatic shut-off.
6) Optional LED Light Button: This button turns on and off the
chamber light, if equipped.
7) Optional Remote Control: If equipped with a remote control,
please see “Remote Control Operation”.
Remote Control Battery Requirements
Batteries Required: 2 each - AAA alkaline batteries. (IEC - LR03,
ANSI - 24A 1.5V DC)
Tips for proper battery care and use
Ÿ Use the correct size and type of battery specified.
Ÿ Avoid mixed use of batteries, i.e. new, used or different types of
batteries.
Ÿ Keep battery contact surfaces and battery compartment
contacts clean.
Ÿ Remove batteries from the remote control when it is not
expected to be in use for several months.
Ÿ Make sure that you insert batteries into the remote control
properly, with the + (plus) and – (minus) terminals aligned
correctly.
Ÿ Rechargeable batteries are not recommended.
Ÿ Keep batteries out of reach of small children. Should a child
swallow a battery, consult a physician immediately.
Ÿ Always remove exhausted batteries from the remote control and
dispose of properly.
7
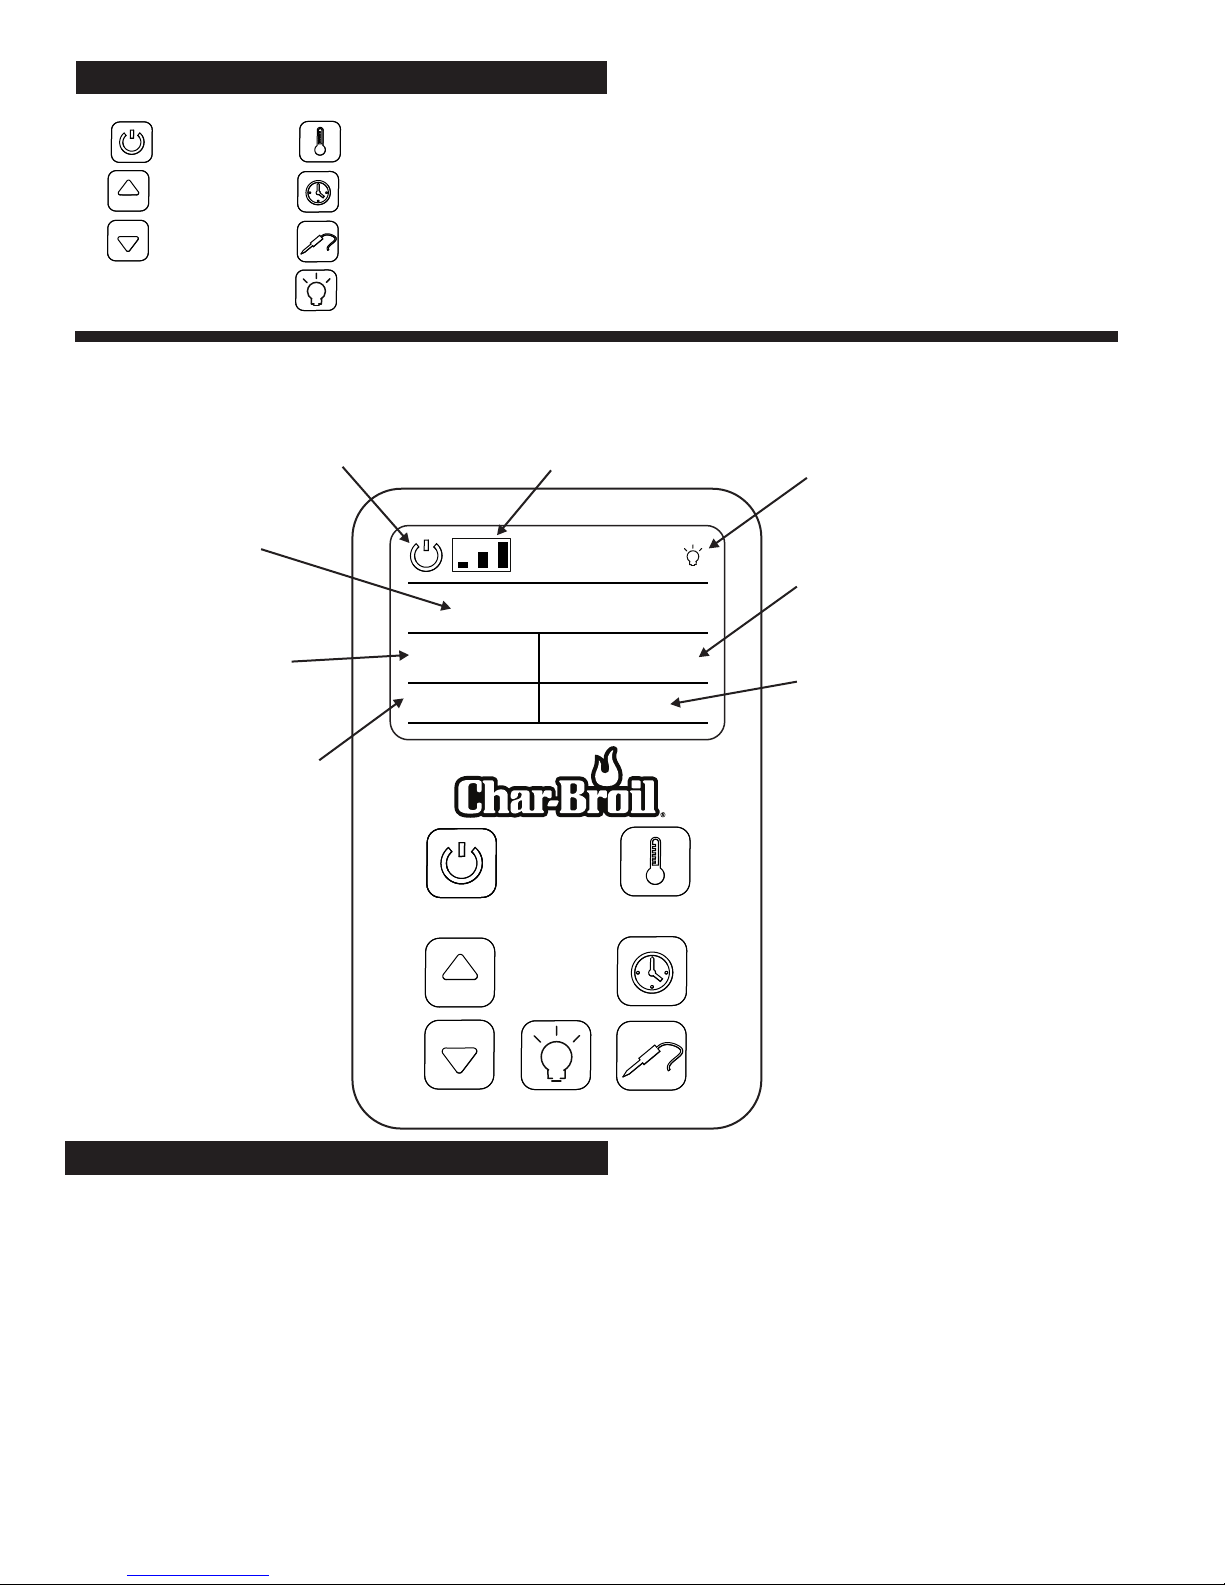
Remote Control Operating Instructions
Power Button
Up Button
Down Button
Temp Button
Time Button
Meat Probe Button
Chamber Light On/Off (Optional)
Smoker Power “On” indication:
This will show that the smoker is on.
This will display the
desired setpoint
temperature.
This will display the
amount of cook time
desired.
This will display the
Set Temperature of the
Meat Probe.
Signal Strength indication:
This will show the strength of the
connection between the remote
control and the smoker.
Set Chamber Temperature: 000°F
Set Time: 00:00
Set Meat Probe
Temp: 000°F
Remaining Time: 00:00
Meat Probe
Actual Temp: 000°F
NOTE: The buttons on the remote control will
function exactly the same as the buttons on the
smoker control panel. Refer to pages 5 & 6 for
button function and operation.
Smoker Chamber light “On” indication:
This will show that the smoker chamber
light is “On” if showing, and “Off” if not
showing.
This display will show how much
cook time is left. It will count
down from the “Set Time”
This display will show the actual
temp of the meat probe.
Remote Control Operation (If Equipped)
Insert two “AAA” batteries into your remote before beginning the Sync operation.
1) Syncing your remote with the Smoker Control Panel.
a) Press the Power button twice on the Remote. The smoker control panel will be ready to accept commands from the remote.
b) Set the smoker Preheat cycle using the remote.
NOTE: The Preheat cycle cannot be overridden by the remote. If you have engaged the preheat cycle, only the smoker control panel can
be used to make changes. The remote can used to start the Preheat cycle.
c) When the preheat cycle has completed, “PH” will blink.
d) Go to the smoker control panel, set the smoker to cook using the desired method of cooking - Time and Temp or Meat Probe
per instructions on page 5-6.
e) Your remote will now display the settings you have entered on the smoker control panel. You now have control of the smoker
using the remote. Each button on the remote will function the same as the buttons on the smoker control panel.
8
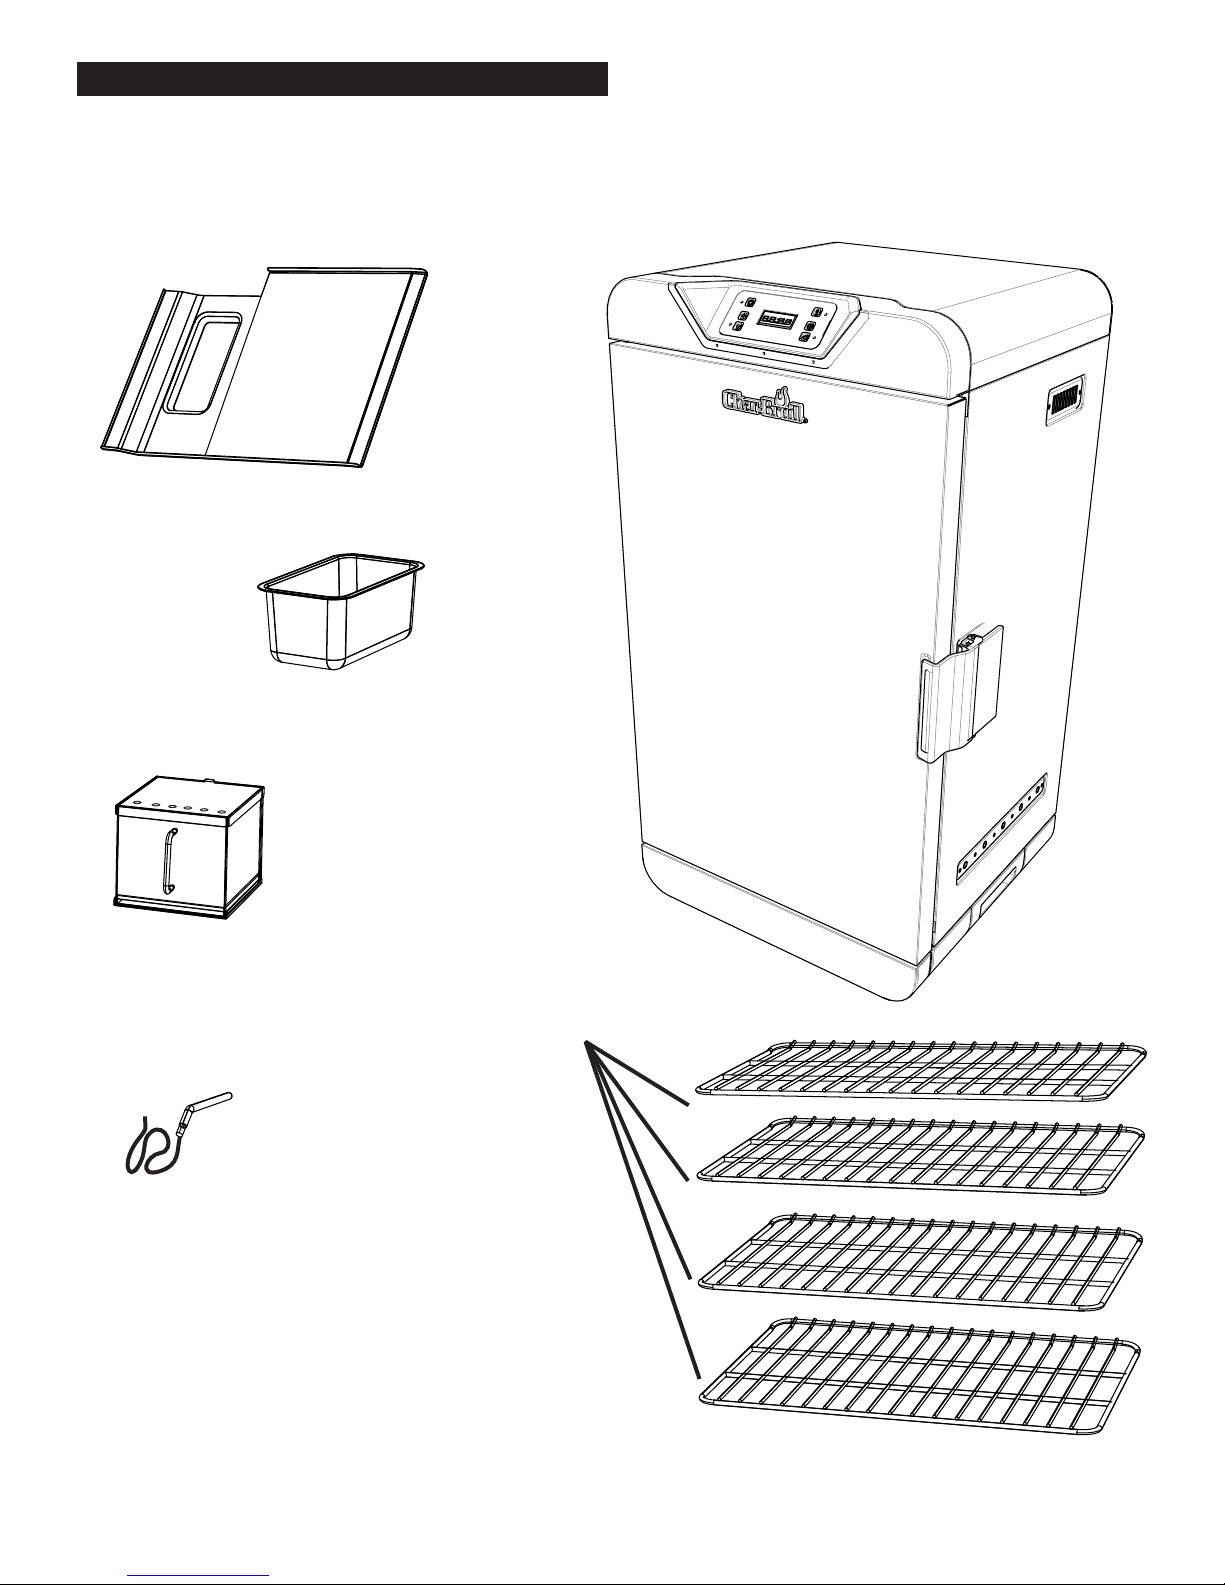
What’s in the Box - Model 14202002
B. Drip Pan
A. Smoker Assembly
C. Water Pan
D. Smoker Box
F. Meat Probe
E. Cooking Grates (4)
9
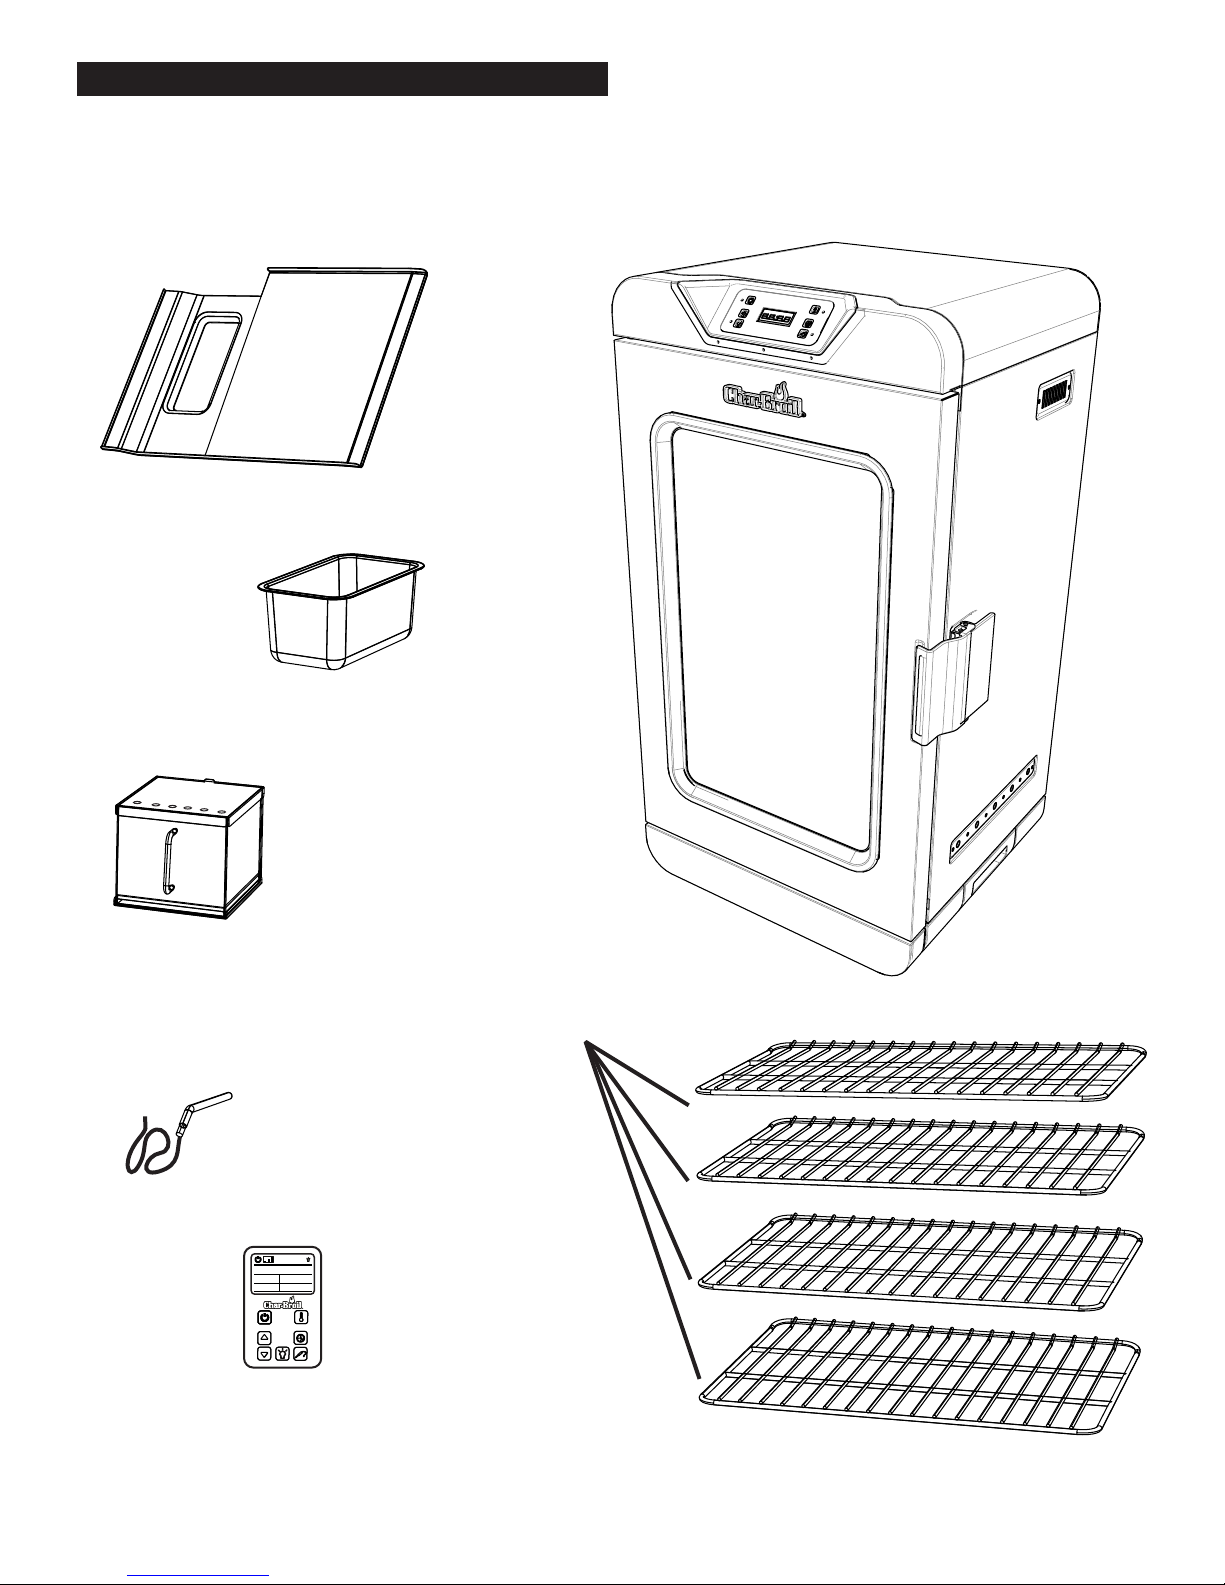
What’s in the Box - Model 14202004
B. Drip Pan
A. Smoker Assembly
C. Water Pan
D. Smoker Box
F. Meat Probe
Set Chamber Temperature: 000°F
Remaining Time: 00:00
Set Time: 00:00
Set Meat Probe
Meat Probe
Actual Temp: 000°F
Temp: 000°F
E. Cooking Grates (4)
G. Remote Control -
14202004 only.
10
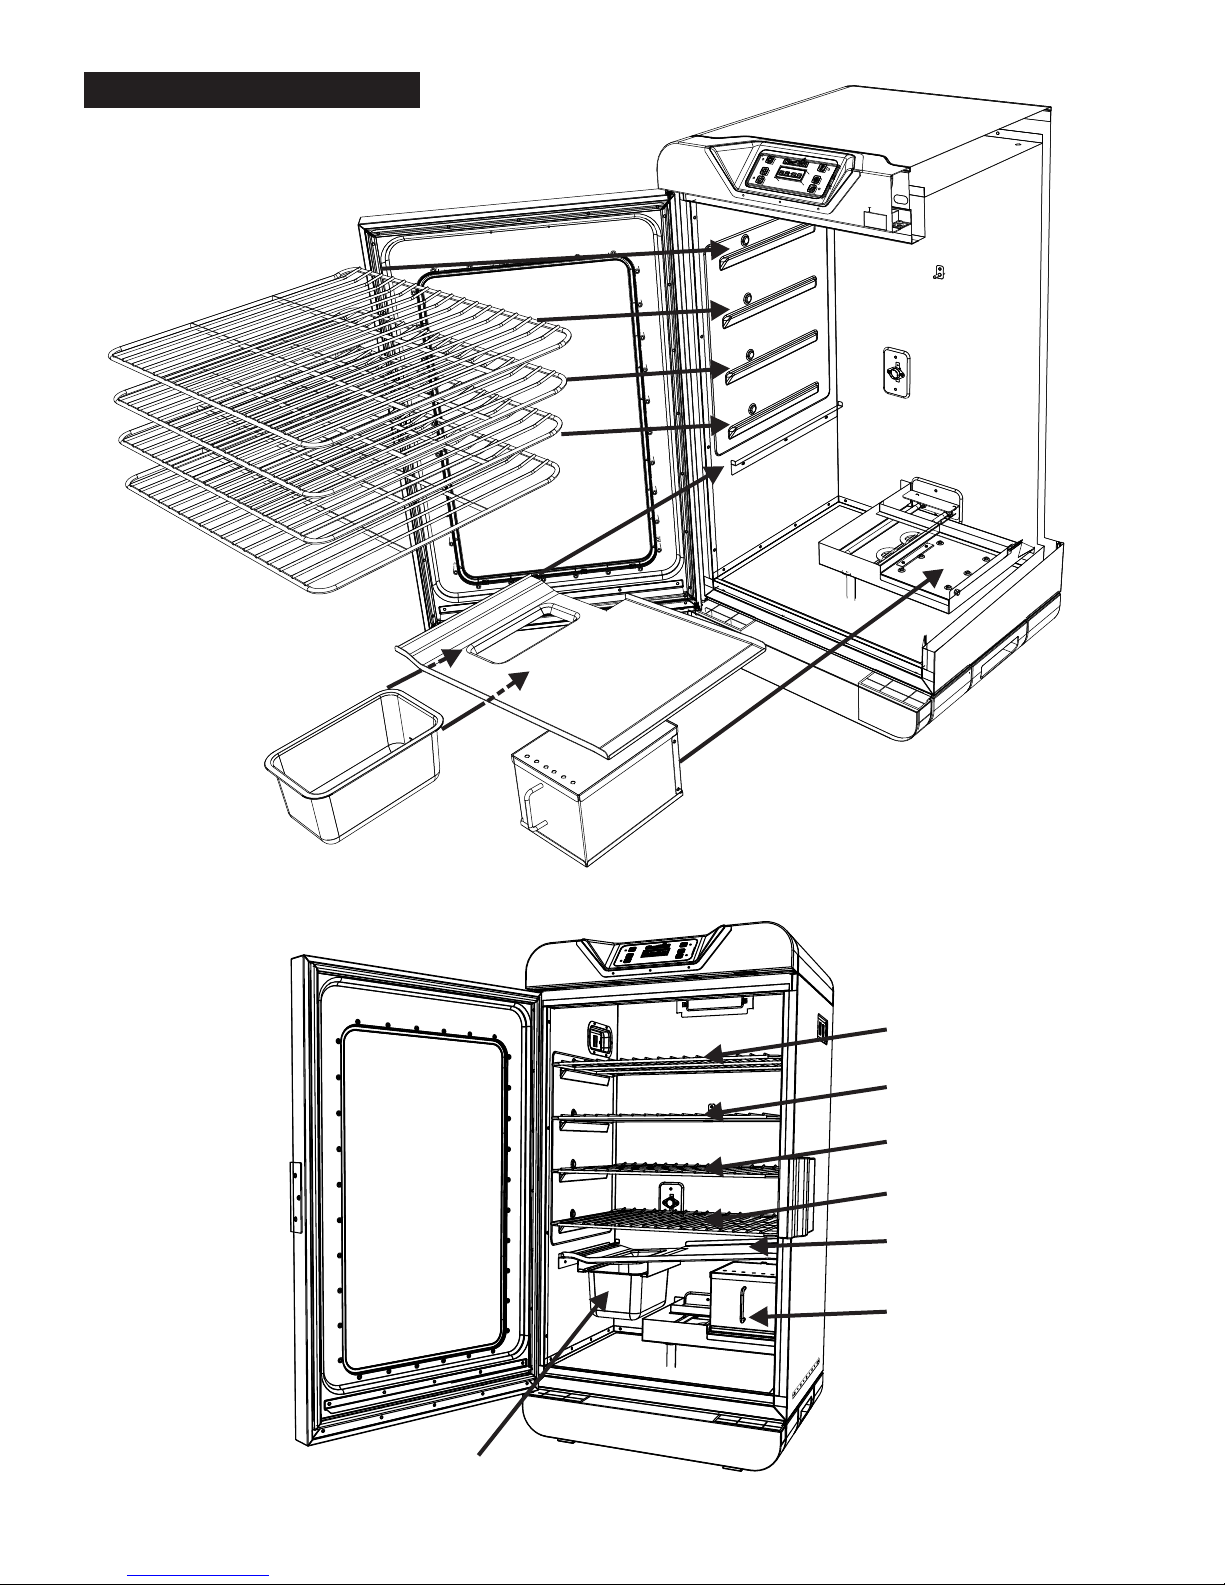
4
ASSEMBLY
E - 4 each
A
C
B
D
Side wall not
shown for clarity.
E
E
E
E
B
D
C
11

Problem
Smoker not heating
Possible Cause
Ÿ Smoker is OFF.
Ÿ No Power
Ÿ Faulty controller or heating element.
Troubleshooting
Prevention/Solution
Ÿ Turn on the Smoker
Ÿ Check for tripped household circuit breakers or GFI (Ground Fault
Interrupter). Reset or replace if necessary.
Ÿ Try a known, working appliance in the outlet.
Ÿ Try a different outlet, preferably on a different circuit.
Ÿ Replace controller or heating element.
Circuit breaker trips or
fuse blows
Smoker will not cook
properly
Flare-ups
Persistent grease fire
Remote control
is unresponsive
Ÿ Another appliance plugged into same circuit as
smoker.
Ÿ Moisture or water in controller or electrical
connections.
Ÿ Damaged cord or electrical connections.
Ÿ Door of smoker is left open.
Ÿ Insufficient preheat or temperature set too low.
Ÿ Inappropriate extension cord.
.
• Excess fat in meat.
• Excessive cooking temperature.
• Grease build up.
• Grease trapped by food build up.
Ÿ The remote control is not sync’d to the
smoker
Ÿ Do not use other electrical appliances on the same circuit.
Ÿ Keep all electrical connections dry. Do not operate unit when raining.
Ÿ Replace damaged controller or extension cord.
Ÿ Close door on smoker while cooking.
Ÿ Preheat 15-20 minutes. Increase controller setting.
Ÿ Replace with appropriately rated cord (15 amps).
• Trim fat from meat before cooking.
• Adjust (lower) temperature as needed.
• Clean smoker.
• Turn te Smoker OFF. Keep door open and let fire burn out.
After smoker cools, clean insulation bowl.
• Do not apply water to fire. Personal injury may result.
Reset the Remote Control:
Ÿ Main Control: press Temp button and hold for 3 seconds until it beeps.
Ÿ Remote Control: Press Temp button and hold for 3 seconds until it
beeps
The Remote control is now sync’d to the smoker. indicates
remote is sync’d with the smoker.
Error Codes:
ERR1 - Cabinet
Ÿ Meat Probe is not plugged in.
Temperature Sensor
ERR4 - Meat probe
Ÿ Wires damaged or chafed.
damaged
No Display
Ÿ Thermostat is damaged / Bad Ÿ Replace the Thermostat
Ÿ Plug in the Meat Probe.
Ÿ Replace the Meat Probe.
12

LIMITED WARRANTY
This warranty only applies to units purchased from an authorized retailer. Manufacturer warrants to the original consumer-purchaser only that this
product shall be free from defects in workmanship and materials after correct assembly and under normal and reasonable home use for the periods
indicated below beginning on the date of purchase*. The manufacturer reserves the right to require that defective parts be returned, postage and or
freight pre-paid by the consumer for review and examination.
SCOPE OF COVERAGE PERIOD OF COVERAGE TYPE OF FAILURE COVERAGE
All Parts
*Note: A dated sales receipt WILL be required for warranty service.
The original consumer-purchaser will be responsible for all shipping charges for parts replaced under the terms of this limited warranty.
This limited warranty is applicable in the United States and Canada only, is only available to the original owner of the product and is not transferable.
Manufacturer requires proof of your date of purchase. Therefore, you should retain your sales slip or invoice. Registering your product is not a
substitute for proof of purchase and the manufacturer is not responsible for or required to retain proof of purchase records.
This limited warranty applies to the functionality of the product ONLY and does not cover cosmetic issues such as scratches, dents, corrosions or
discoloring by heat, abrasive and chemical cleaners or any tools used in the assembly or installation of the appliance, surface rust, or the
discoloration of stainless steel surfaces. Paint is not warranted and will require touch up. RUST is not considered a manufacturing or materials defect.
This limited warranty will not reimburse you for the cost of any inconvenience, food, personal injury or property damage.
1 year from date of purchase*
ITEMS MANUFACTURER WILL NOT PAY FOR:
1. Shipping cost, standard or expedited, for warranty and replacement parts
2. Service calls to your home.
3. Repairs when your product is used for other than normal, single-family household or residential use.
4. Damage, failures, or operating difficulties resulting from accident, alteration, careless handling, misuse, abuse, fire, flood,
acts of God, improper installation or maintenance, installation not in accordance with electrical or plumbing codes, or use
of products not approved by the manufacturer.
5. Any food loss due to product failures or operating difficulties.
6. Replacement parts or repair labor costs for units operated outside the United States or Canada.
7. Pickup and delivery of your product.
8. Repairs to parts or systems resulting from unauthorized modifications made to the product.
9. The removal and/or reinstallation of your product.
DISCLAIMER OF IMPLIED WARRANTIES and LIMITATION OF REMEDIES
Repair or replacement of defective parts is your exclusive remedy under the terms of this limited warranty. In the event of parts availability issues,
the manufacturer reserves the right to substitute like or similar parts that are equally functional.
Manufacturer will not be responsible for any consequential or incidental damages arising from the breach of either this limited warranty or any
applicable implied warranty, or for failure or damage resulting from acts of God, improper care and maintenance, grease fire, accident, alteration,
replacement of parts by anyone other than Manufacturer, misuse, transportation, commercial use, abuse, hostile environments (inclement weather,
acts of nature, animal tampering), improper installation or installation not in accordance with local codes or printed manufacturer instructions.
THIS LIMITED WARRANTY IS THE SOLE EXPRESS WARRANTY GIVEN BY THE MANUFACTURER. NO PRODUCT PERFORMANCE
SPECIFICATION OR DESCRIPTION WHEREVER APPEARING IS WARRANTED BY MANUFACTURER EXCEPT TO THE EXTENT SET
FORTH IN THIS LIMITED WARRANTY. ANY IMPLIED WARRANTY PROTECTION ARISING UNDER THE LAWS OF ANY STATE,
INCLUDING IMPLIED WARRANTY OF MERCHANTABILITY OR FITNESS FOR A PARTICULAR PURPOSE OR USE, IS HEREBY
LIMITED IN DURATION TO THE DURATION OF THIS LIMITED WARRANTY.
Neither dealers nor the retail establishment selling this product has any authority to make any additional warranties or to promise remedies
in addition to or inconsistent with those stated above. Manufacturer's maximum liability, in any event, shall not exceed the purchase price of the
product paid by the original consumer.
NOTE: Some states do not allow an exclusion or limitation of incidental or consequential damages, so some of the above limitations or exclusions
may not apply to you. This limited warranty gives you specific legal rights as set foth herein. You may also have other rights which vary from state
to state. In the state of California only, if refinishing or replacement of the product is not commercially practicable, the retailer selling this product or
the Manufacturer will refund the purchase price paid for the product, less the amount directly attributable to use by the original consumer-purchaser
prior to discovery of the nonconformity. In addition, in the state of California only, you may take the product to the retail establishment selling this
product in order to obtain performance under this limited warranty.
PERFORATION, MANUFACTURING,
AND MATERIAL DEFECTS ONLY
If you wish to obtain performance of any obligation under this limited warranty, you should
Consumer returns will not be accepted unless a valid Return Authorization is first acquired. Authorized returns are clearly marked on the outside of
the package with an RA number and the package is shipped freight/postage pre-paid. Consumer returns that do not meet these standards will be
refused.
write to:
Consumer Relations
P. O. Box 1240
Columbus, GA 31902-1240
WS_1 Rev05
13

4
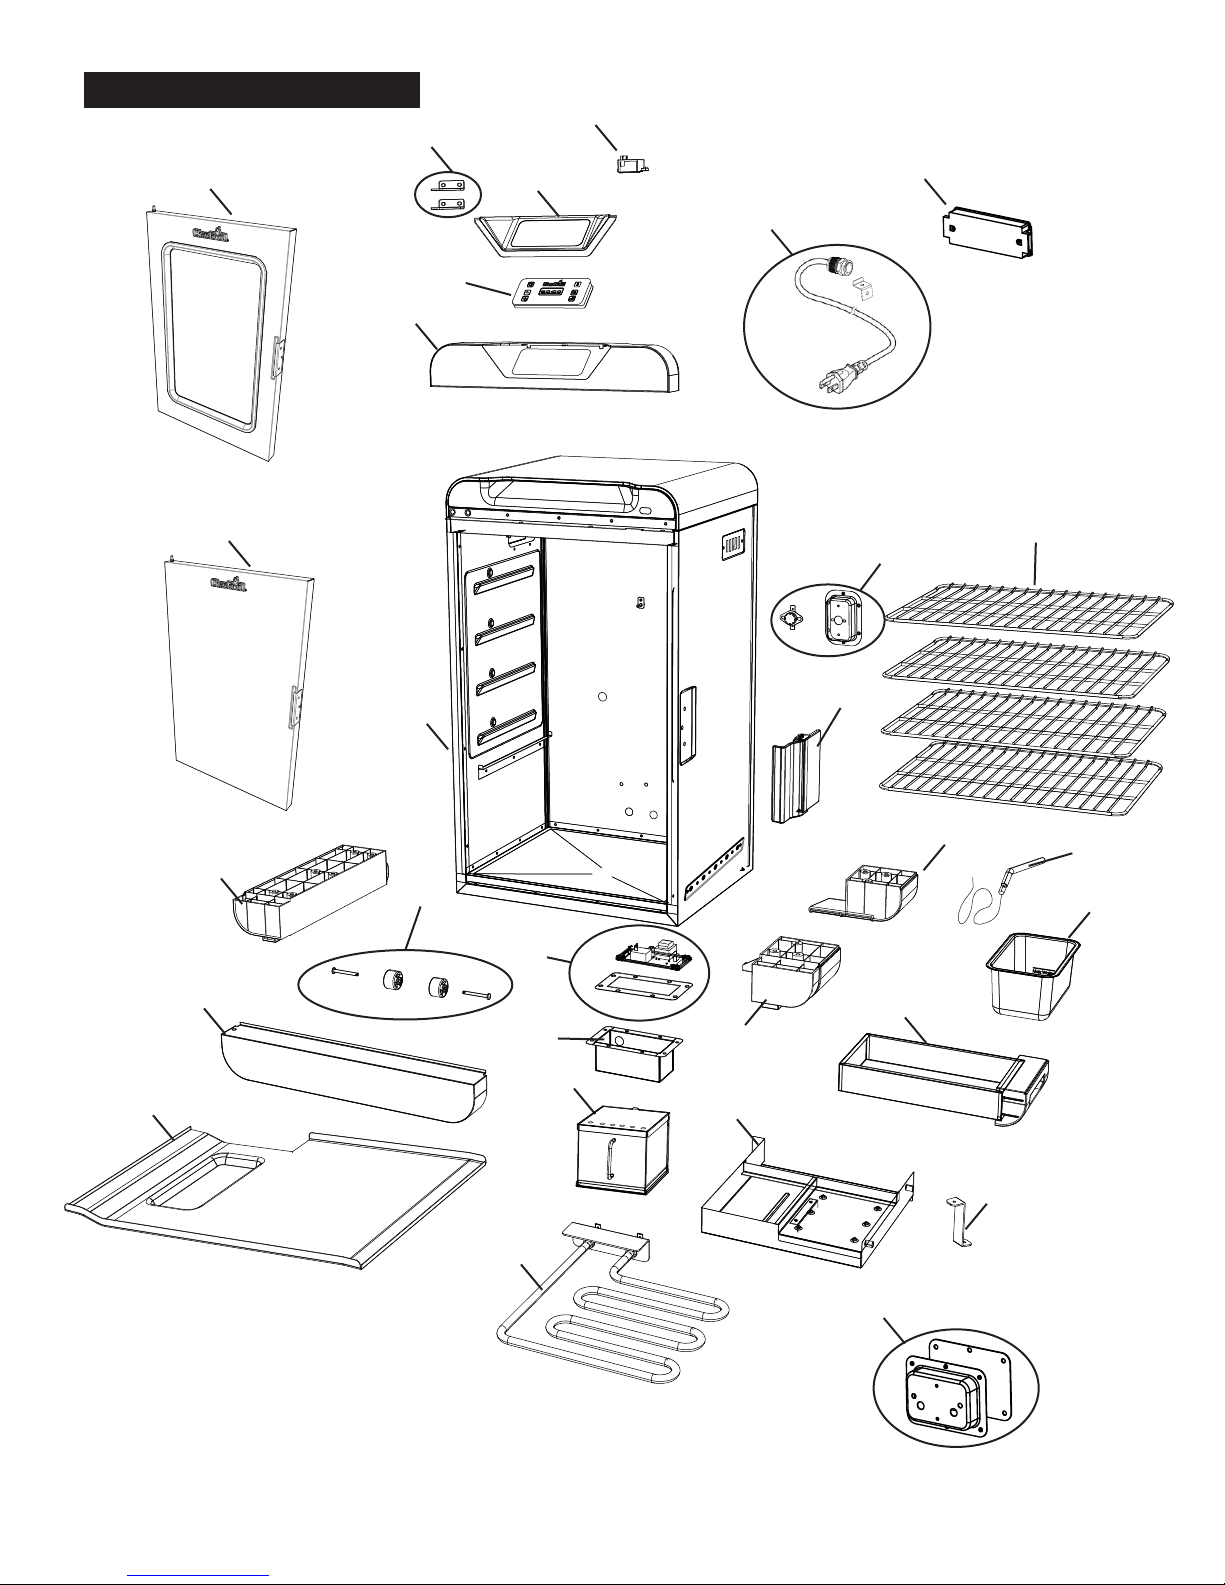
Key Qty Description
1 1 DOOR ASSEMBLY
2 1 LED LIGHT KIT (FOR MODEL 14202004 ONLY)
3 2 DOOR HINGE BRACKET KIT
4 1 MEAT PROBE HOUSING
5 1 DOOR LATCH ASSEMBLY
6 1 SMOKER BODY ASSEMBLY
7 1 LEFT LEG
8 1 GREASE TRAY ASSEMBLY
9 1 WATER PAN
10 1 SMOKER BOX
11 1 DRIP PAN ASSEMBLY
12 2 WHEEL KIT
13 4 COOKING GRATE
14 1 CONTROL PANEL DISPLAY KIT
15 1 HEATING ELEMENT REFLECTOR SUPPORT
16 1 HEATING ELEMENT
17 1 MEAT PROBE
18 1 THERMOSTAT KIT
19 1 HEATING ELEMENT BACK HOUSING KIT
20 1 FRONT FASCIA, LOWER
21 1 RIGHT LEG, FRONT
22 1 RIGHT LEG, REAR
23 1 CONTROL PANEL FASCIA KIT
24 1 HEATING ELEMENT REFLECTOR
25 1 POWER BOARD KIT
26 1 POWER BOARD HOUSING
27 1 POWER SUPPLY CORD KIT
28 1 CONTROL PANEL DISPLAY HOUSING KIT
NOT Pictured
… 1 ASSEMBLY MANUAL, ENGLISH, FRENCH, SPANISH
… 1 TROUBLESHOOT GUIDE (ONLINE ONLY)
… 1 REMOTE CONTROL (FOR MODEL 14202004 ONLY)
PARTS LIST
14
4
WARRANTY PARTS DIAGRAM
1 - 14202004 only
4
3
2 - 14202004 only
28
27
14
23
1 - 14202002 only
7
20
11
6
12
25
26
18
13
5
22
17
9
8
21
10
24
15
16
19
15
 Loading...