

Page 1
Assembly
Guide
Model Numbers:
11401587
Propane cylinder
sold separately.
Allow approximately 10 minutes for assembly.
PROPANE
(English)
42804597 • 01/07/2011
Page 2
2
ASSEMBLY GUIDE
A, B, Assembly:
CAUTION: For your safety, before operating, Read Product Guide & Outdoor Cooking Guide
provided with this grill.
*SAFETY First…..Grill components may have sharp edges. Be careful when handling grill parts
during assembly. We suggest that you wear a sturdy pair of leather gloves while handling the grill parts.
BEFORE You begin assembly of your grill….
1. Carefully remove all components from the carton.
2. Familiarize yourself with the components and hardware used for assembly.
3. Please note that hardware used for assembly may not be shown actual size..
4. After removing components from the carton, split the carton open and use it as
a scratch-free work pad to assemble your grill.
BEFORE You Grill….
1. Read Product Guide & Outdoor Cooking Guide
2. Position Grill safely away from walls & structures
3. Pre– Heat Grill—15 minutes on High to season grill.
TIPS & Tricks…...
First Take a moment to record the serial number here: _______________________________
When grilling, preheat your grill for 10 to 15 minutes with the lid down.
Go to charbroil.com to register your grill.-
After grilling the grill can be turned on High for cleaning and burning off
the grate. Use a wire brush to brush off the grate.
A light coat of oil on the grate will help prevent foods like fish and vegetables from
sticking to the grate.
TOOLS REQUIRED FOR ASSEMBLY
NONE
NOTE….
Installer: Leave instructions with the grill.
Consumer: Retain instructions for reference.
Grill must be installed in accordance with local
codes…..
Designed for outdoor use only…
Read all instructions before operating…
© 2010 Char-Broil, LLC Printed in China • Columbus, GA 31902 •
Page 3
3
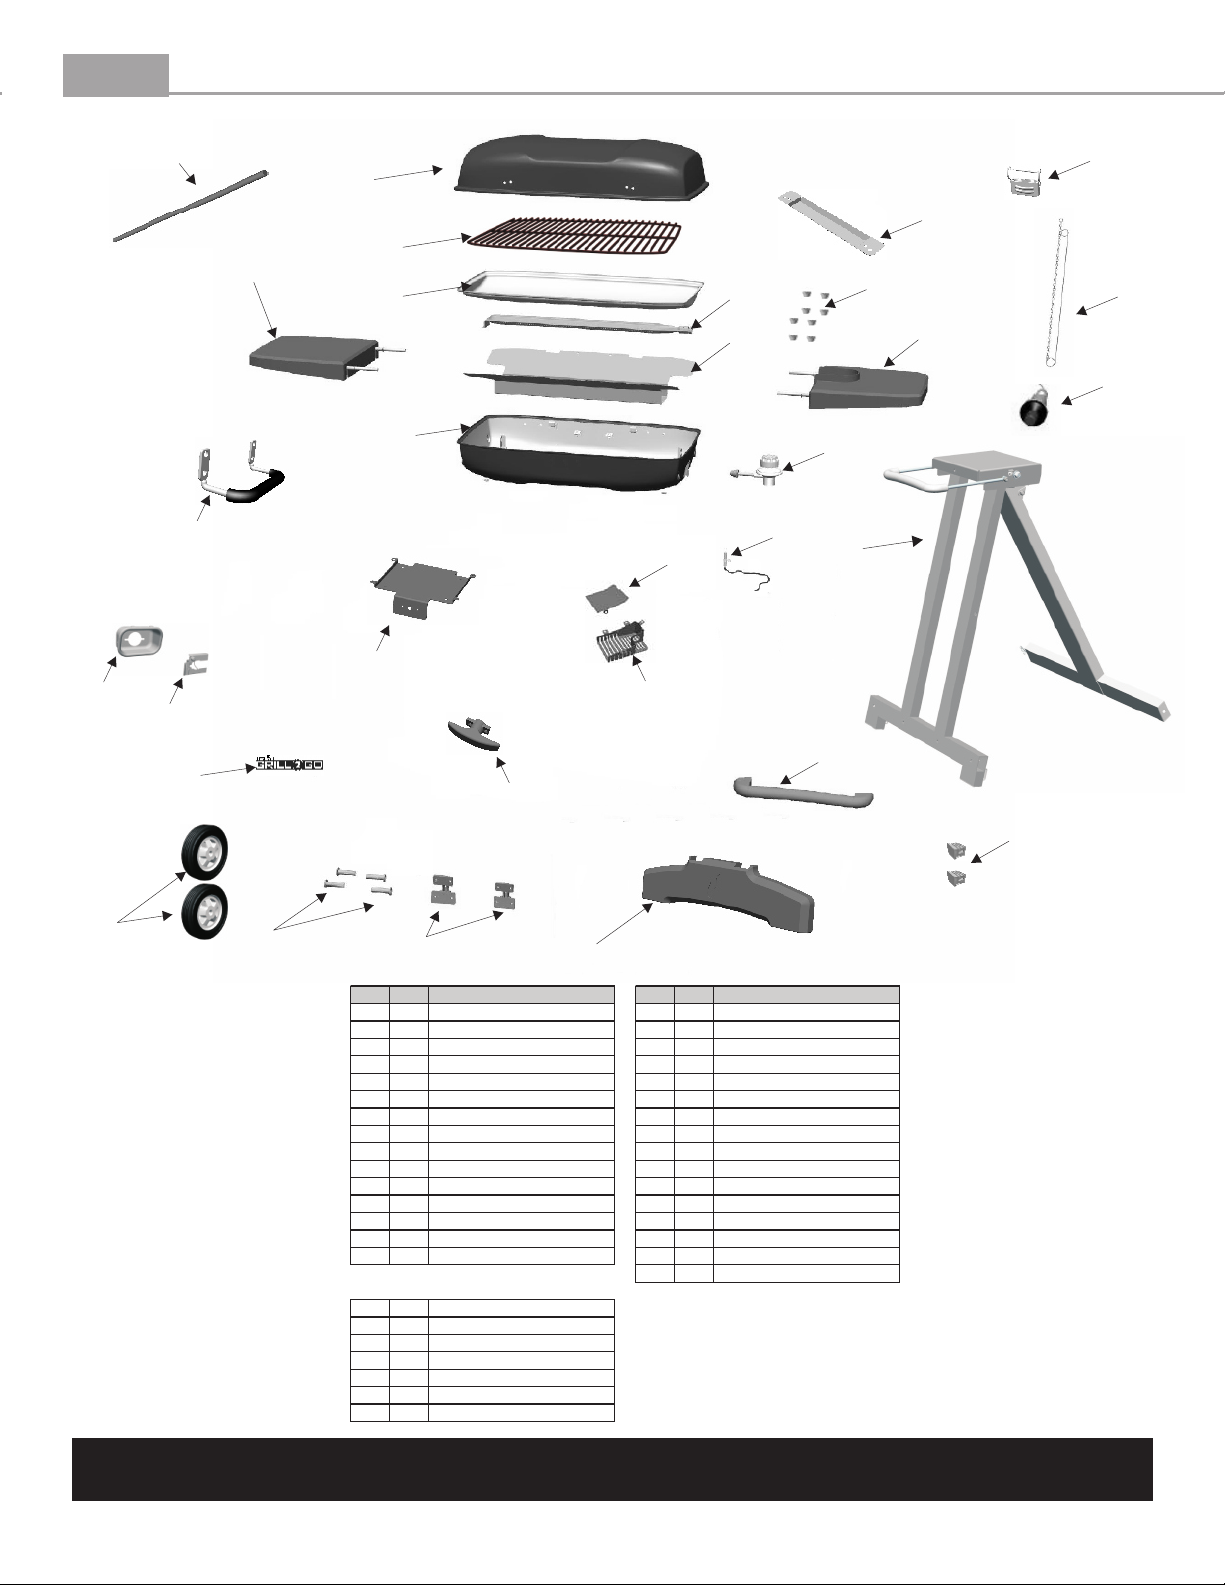
Key Qty Description Key Qty Description
A 1 GRILL LID P 1 HANDLE, F/ LID
B 1 COOKING GRATE Q 1 LOGO PLATE
C 1 TROUGH R 1 ELECTRODE W/ WIRE
D 1 BURNER S 2 SIDE SHELF BUSHINGS
E 1 INNER REFLECTOR T 1 IGNITOR MOUNTING BRACKET
F 1 FIREBOX BOTTOM U 1 IGNITOR HEAT SHIELD
G 1 GRILL STAND V 1 GRILL HEAD MOUNTING BRACKET
H 1 FASCIA, F/ GRILL STAND W 1 GRILL HEAD PULL HANDLE
I 1 MATCH HOLDER X 1 HEAT SHIELD, F/ LID HANDLE
J 1 LEFT SIDE SHELF Y 1 LID CLASP
K 1 RIGHT SIDE SHELF Z 1 VENTURI GUARD
L 1 REGULATOR CONTROL VALVE AA 1 PIEZO IGNITOR
M 2 WHEEL BB 1 REAR HANDLE, F/ FIREBOX
N 1 HINGE SET CC 2 LEG END CAP
O 1 VENTURI LATCH ASSEMBLY DD 8 RUBBER BUMPER
EE 1 AXLE, F/ WHEEL
NOT Pictured
… 1 HARDWARE PACK
… 1 ASSEMBLY MANUAL, ENGLISH
… 1 ASSEMBLY MANUAL, SPANISH
… 1 ASSEMBLY MANUAL, FRENCH
… 1 PRODUCT GUIDE, ENGLISH
… 1 PRODUCT GUIDE, SPANISH
… 1 PRODUCT GUIDE, FRENCH
ASSEMBLY GUIDE
Grill Parts Diagram
EE
Y
A
X
B
J
C
D
E
DD
I
K
AA
F
BB
U
L
R
G
V
Z
T
O
Q
M
NOTE: Some grill parts shown in the assembly steps may differ slightly in appearance from
those on your particular model. However, the method of assembly remains the same.
S
N
P
W
CC
H
Page 4

4
ASSEMBLY GUIDE
Part Qty
A1–
–
A2
Handle
Heat Sheld
1
1
GRILL Assembly
Fasteners
#10x24x5/8”
Machine Screw
(Qty. 4)
Hinge Pin
(Qty. 2)
Hitch Pin
(Qty. 2)
#8 Fiber Washer
(Qty. 4)
Step 1: Choose a location suitable for assembling your grill. Carefully cut the carton open and use it as a
pad to prevent scratching or damaging your grill. Next, verify that you have all of your parts.
Assemble the Handle and Heat Shield as shown using 4 #8 Fiber Washers and 4 #10-24x5/8" Screws.
Securely tighten the screws.
A1
Handle
A2
Heat Shield
Step 2: Install the Grill Lid to the Firebox Bottom by aligning the hinges as shown below. with the hinges
aligned and the grill lid resting on top of the fire box, install the hinge pins through the holes in the
hinges, shown (A) Then insert a hitch pin into each of the hinge pins to hold them in place, shown (B)
A
Grill Lid
Insert Hitch Pins
B
Fire Box
Page 5

5
ASSEMBLY GUIDE
Part Qty
A3
–
–
A4
– Grill Head 1
A5
– 2
A6
Grill Stand
Axle Rod
Wheels
1
1
GRILL Assembly
Fasteners
Wheel Retaining
Flat Washer
(qty 2)
Clip
(qty 2)
Step 3: Install a wheel retaining clip to one end of the axle. install one flat washer as shown below. After
the flat washer, install a wheel. Be sure to orient the wheel as shown. Now insert the axle (with wheel
installed) through the grill stand axle holes as shown below.
Next, install the remaining wheel and flat washer - then secure with the remaining wheel retaining clip.
Flat Washer
Wheel A6
Wheel
Retaining
Clip
Flat Washer
Axle
Wheel
Retaining
Clip
Axle Hole
A4
Wheel shown properly
installed.
Page 6

6
ASSEMBLY GUIDE
Step 1: Unfold the grill stand. Ensure that the locking clip engages at the rear
of the stand.
Attach the grill head to the grill stand by inserting the tab shown into the grill
stand, then allow the grill head to rotate forward while pulling the latch
handle. Ensure that the latch handle is fully engaged by pulling up on the grill
head.
Grill Head Slot
Grill Stand Locking Clip
(Shown engaged)
GRILL Head Assembly
Grill Head shown assembled to the grill stand.
Pull Handle to
engage pin in front of
the grill stand.
Engage Grill
Head Clip into
slot
Page 7

7
ASSEMBLY GUIDE
Regulator Lock
Step 2:
rear of the grill, inserting the Regulator Control Valve fully into the exposed burner tube,
and then releasing the regulator lock.
Step 3: Place the Trough and Cooking Grate in position as shown below.
Assemble the Side Shelves by inserting the side shelf mounting rods into the side shelf busing.
1. Slide to rear
Install the Regulator Control Valve by first sliding the regulator lock toward the
GRILL Head Assembly
Regulator
2. Insert Regulator fully
into burner tube.
3. Release lock.
Cooking Grate
Trough
Page 8

8
GRILL CARRY POSITION
To transport your grill, first allow the grill to cool completely.
?Remove the propane cylinder from the grill head.
?Remove and store the side shelves inside the grill head.
?Then be sure that the grill lid latch is locked down securely.
?Remove the grill head and set it aside.
?Fold up the grill stand.
?Attach the grill head to the grill stand in the carry position.
Pull handle
to engage
the grill stand
carry
position.
To release the grill stand into the Carry
position, flip the grill stand lock down and
carefully fold up the grill stand.
Insert grill
head clip into
carry position
slot.
Grill-2-Go Quickset in the carry position.
 Loading...