

Champion Pumps CPS3, CPS3VLT, CPSP3 User Manual

4
Pump operates but
delivers little or no
water
1. Plugged impeller
2. Check valve
installed backwards, or
faulty
3. Pump air locked
1. Clean out impeller
2. Reverse position of
check valve, or replace
3. Drill 1/8” hole in
discharge line between
pump and check valve
Product Warranty
Date of Manufacture and Warranty Tag is on pump cord.
LIMITED WARRANTY: We warrant to our immediate customer and to the
ultimate consumer that products of our manufacture will be free of defects
in material and workmanship under normal use and service for one year
(12 months) from the date of installation, or 18 months from the date of
manufacture, which ever comes first. We will repair or replace, at our
option, to the original purchaser any part or parts of our product found
upon our examination to be defective. Please call Champion Pump
Company, Inc. (419-281-4500) for instructions. Be prepared to provide
the model number, the date code and/or serial number and proof of the
date installed when exercising this warranty. Warranty tag (Required) is on
the pump power cord. All transportation charges on products or parts
submitted for repair or replacement must be paid by purchaser. This
limited warranty does not cover products which have been damaged as a
result of accident, abuse, misuse, neglect, improper installation, improper
maintenance, or failure to operate in accordance with Champion Pump
Company, Inc. written instructions. UNDER NO CIRCUMSTANCES WILL WE
BE RESPONSIBLE FOR ANY OTHER DIRECT OR CONSEQUENTIAL
DAMAGES, INCLUDING BUT NOT LIMITED TO LOST PROFITS, LOST
INCOME, LABOR CHARGES, DELAYS IN PRODUCTION, IDLE PRODUCTION
WHICH DAMAGES ARE CAUSED BY ANY DEFECTS IN MATERIAL AND/OR
WORKMANSHIP AND/OR DAMAGE OR DELAYS IN SHIPMENT. THIS
WARRANTY IS EXPRESSLY IN LIEU OF ANY OTHER EXPRESS OR IMPLIED
WARRANTY, INCLUDING ANY WARRANTY OF MERCHANTABILTIY OR
FITNESS FOR A PARTICULAR PURPOSE. Some states do not allow
limitations on how long an implied warranty lasts, or do not allow the
exclusions or limitations of incidental or consequential damages, so the
above limitations might not apply to you. This limited warranty gives you
legal rights, and you may also have other legal rights which vary from state
to state.
12-0010-0000 www.championpump.com
4 05/12
Installation and Operation Manual
Model CPS3
Submersible Sump/Effluent Pump
Thank you for purchasing this CHAMPION PUMP! The CPS3 is
a high quality, energy efficient, heavy duty cast iron 1/3 HP sump/effluent
pump. We back these Champion products with Champion service and a
Champion attitude. Please read, save, and follow these instructions to
ensure Champion performance.
BEFORE OPERATION – Important Product and
Safety Information – WARNINGS – Personal Injury
and/or property damage could result if not adhered to.
! Risk of Electric Shock – Fatal electric shock could occur. Always
disconnect the power source before attempting to install, service,
relocate, or check the pump. Never touch pump, pump motor,
water, or discharge piping when pump is connected to electrical
power. Never enter a wet or flooded area, basement, basin, etc.
that is in contact with the pump or electrical circuit before power
supply has been disconnected.
! Pump has not been investigated for use in swimming pool areas
or any area that might reasonably expect aquatic, animal, or
human entrance. Precautions should be taken to prevent such
entrance during use.
! Connect only to a properly grounded, grounding type receptacle.
Use of a ground fault circuit interrupter (GFCI) is required for
maximum safety.
! All wiring must be performed by qualified electrician in
accordance with all local and national electric code.
! When power source or supply is turned off (in open position) a
lock and tag out should be used to prevent accidental power
application or activation.
! Do not use extension cord or cut off grounding pin. Should be
installed on separate 15 AMP circuit breaker.
! Use only with a properly sized (input AMPS, volts, HP) motor
controller.
! Do not use to pump flammable/explosive liquids such as
gasoline, fuel oil, kerosene, and /or chemicals, salt water, etc.
! Do not use pump in an explosive atmosphere or classified as
hazardous per NEC, ANSI/NFPA 70.
! Make sure pump is on hard level bottom in sump, do not set
directly on earth, gravel, or other debris. This could cause
excessive wear or possible jamming and flooding.
! Make sure pump is secure in basin and piping is firmly supported
so that pump cannot move, not allowing liquid level switch to
interfere with basin wall or other obstacle preventing proper
operation. Flooding or overheating could occur if not prevented.
!
CHAMPION PUMP COMPANY Phone: 419-281-4500
1102 Myers Pkwy Ashland, OH 44805 Fax: 419-616-1100
1
2
! All basins or sumps must have covers and installed to meet health
and plumbing codes with proper sealing and venting. Before
opening or entering sump safety precautions per OSHA
requirements should be strictly adhered.
General Information
Model CPS3 is a manual sump pump and needs a liquid level motor control
switch, 28-0007-0010 vertical switch, 13-0001-1001 float switch to
operate properly in the basin. The control switch easily mounts to the
discharge piping and is adjustable for different basin and liquid levels.
Pump plug is plugged into back of piggyback receptacle on switch cord.
Model CPS3 is also offered with an attached vertical switch (CPS3V) or
attached float switch (CPS3A).
CPS3 --- minimum discharge pipe and fitting size – 1 ½”
Min. Basin Dia. Approx. on level Approx. off level
CPS3V 12” 7 1/8” 3”
CPS3A 14” 12 ¼” 5”
These pumps have an air bleed hole and a small stream of water during
operations maybe noticed. This is normal.
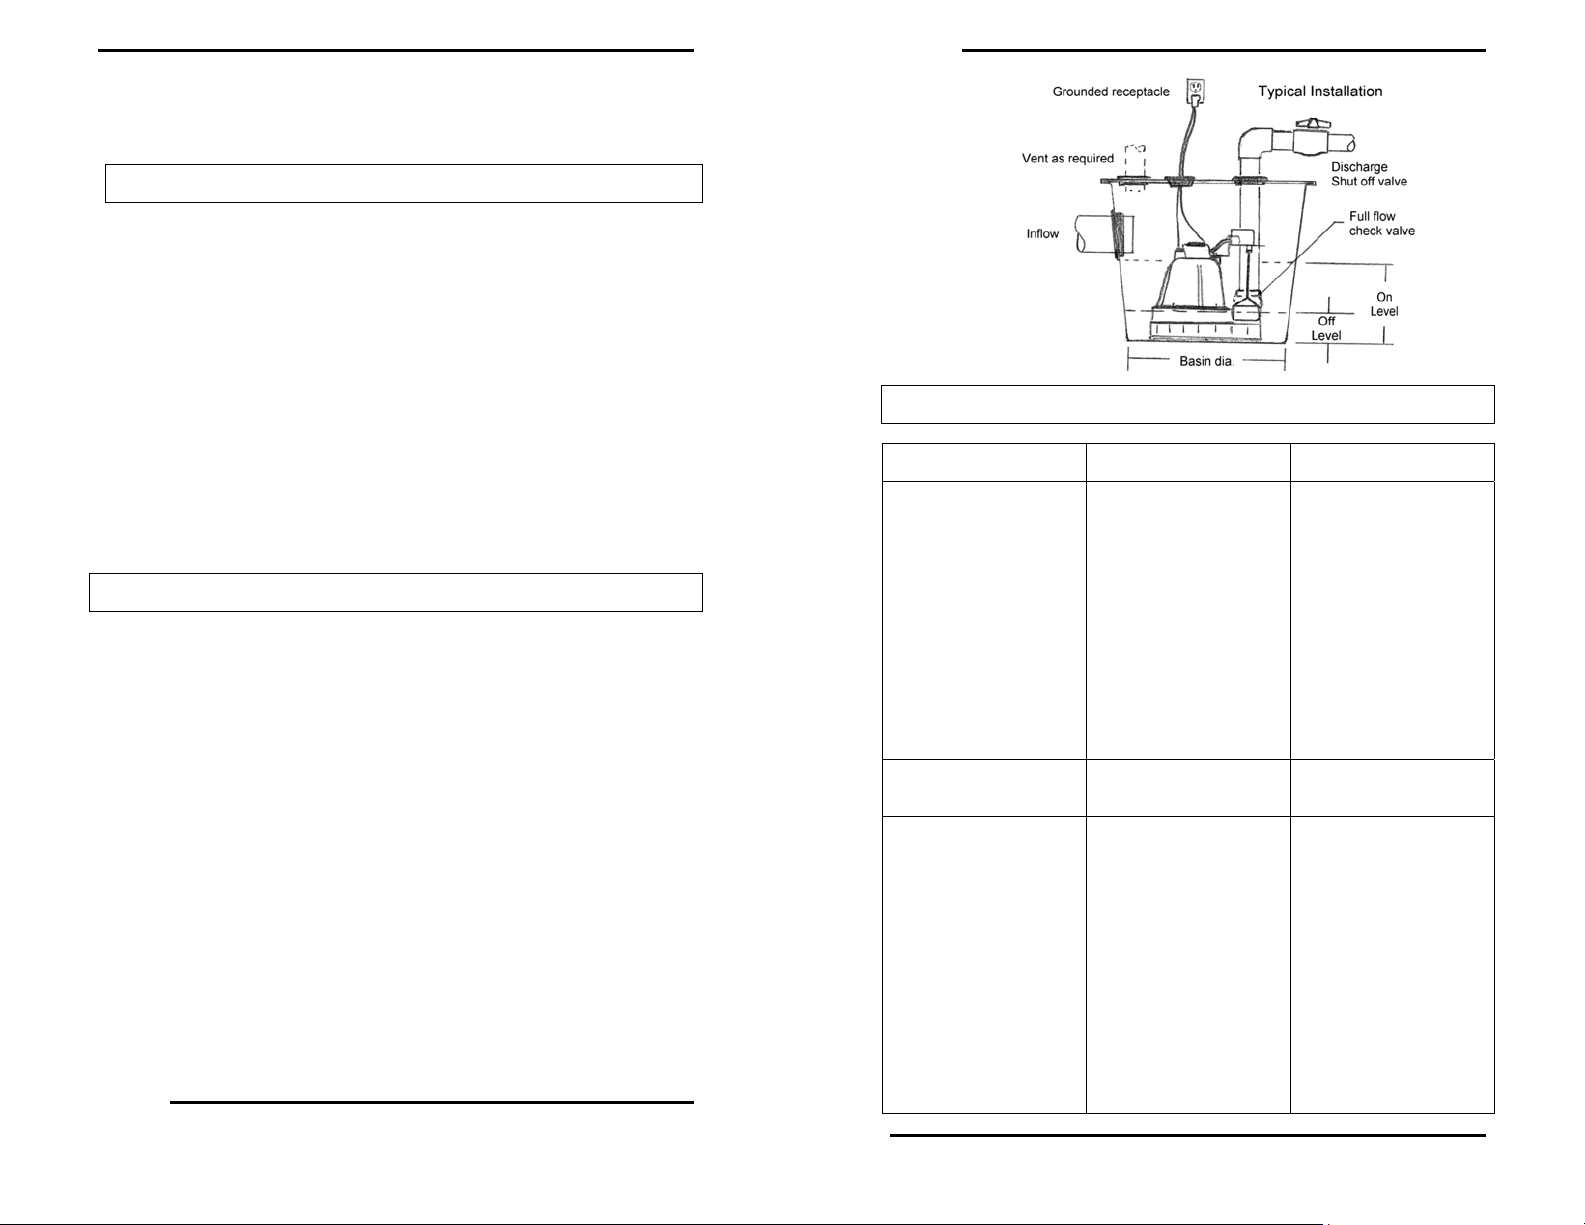
Dewatering/Sump/Effluent Installation
1. Provide proper sump basin size. A larger size is
recommended as it allows more reserve, and reduced
switching.
2. Make sure level control switch has full motion without
possible interference or hang up.
3. Make sure pump is on solid, clean, debris free base.
4. Schedule 40 PVC pipe is recommended, check local code.
Hand tighten piping into pump. Install a union or other
means of separating discharge line for easy pump removal.
5. A full flow check valve is recommended just above or in place
of the union to prevent water backflow. Connect additional
piping as needed to direct discharge to desired location.
Keep piping as short as possible with minimum number of
turns. Secure piping.
6. A ball or gate valve is recommended after the check valve to
prevent backflow when removal is necessary.
7. In effluent applications check with health and plumbing
codes for proper basin size, sealing, venting requirements.
8. An audible high water alarm, such as CP Model 1011421
should be installed for additional protection against flooding.
9. Check for proper operation once installed and power
connected by filling basin with water.
2
3
Maintenance and Troubleshooting
Symptom Possible Cause(s) Corrective Action
Pump will not start or
run
Pump starts and stops
too often
Pump will not shut off
or thermal protector
turns off
1. Blown fuse, trip
breaker
2. Low line voltage
3. Defective motor
4. Defective float
switch
5. Impeller bound
6. Float obstructed,
low water
1. Backflow of water
from piping
2. Faulty float switch
1. Defective float
switch
2. Obstacle in piping,
valve shut
3. Float obstructed
4. Low line voltage
5. Too many
appliances on circuit
3
1. If blown, replace
with proper sized fuse
or reset breaker.
2. If voltage is under
108 volts, check wiring
size.
3. Replace pump
4. Replace float switch
5. If impeller will not
turn, remove housing
and remove blockage
6. Make sure float
moves freely up and
down, check level
1. Install or replace
check valve
2. Replace float switch
1. Replace float switch
2. Remove pump and
clean pump and
piping, open valve
3. Make sure float
move freely up and
down
4. If voltage is under
108 volts, check wiring
size
5. Install pump on
dedicated circuit.
IMPORTANT: Do not
use extension cord to
power pump
 Loading...