

Page 1
Operation Manual
SUPER BEAST Multi-tool
SC-11M-10
Technical Specifications
General Safety/Operating Instructions
Attaching/Changing the Head
Using the SUPER BEAST as a Cutter
Using the SUPER BEAST as a Spreader
Maintenance Instructions
This is a detailed instruction guide specific to Champion Rescue Tools SUPER BEAST Multi-tool – please see
separate information provided for general hydraulic tool usage, warranty information, MSDS information, etc.
when every second counts
trust a CHAMPION
Page 2
Champion Rescue Tools – SUPER BEAST Multi-tool Detailed Tool Instructions
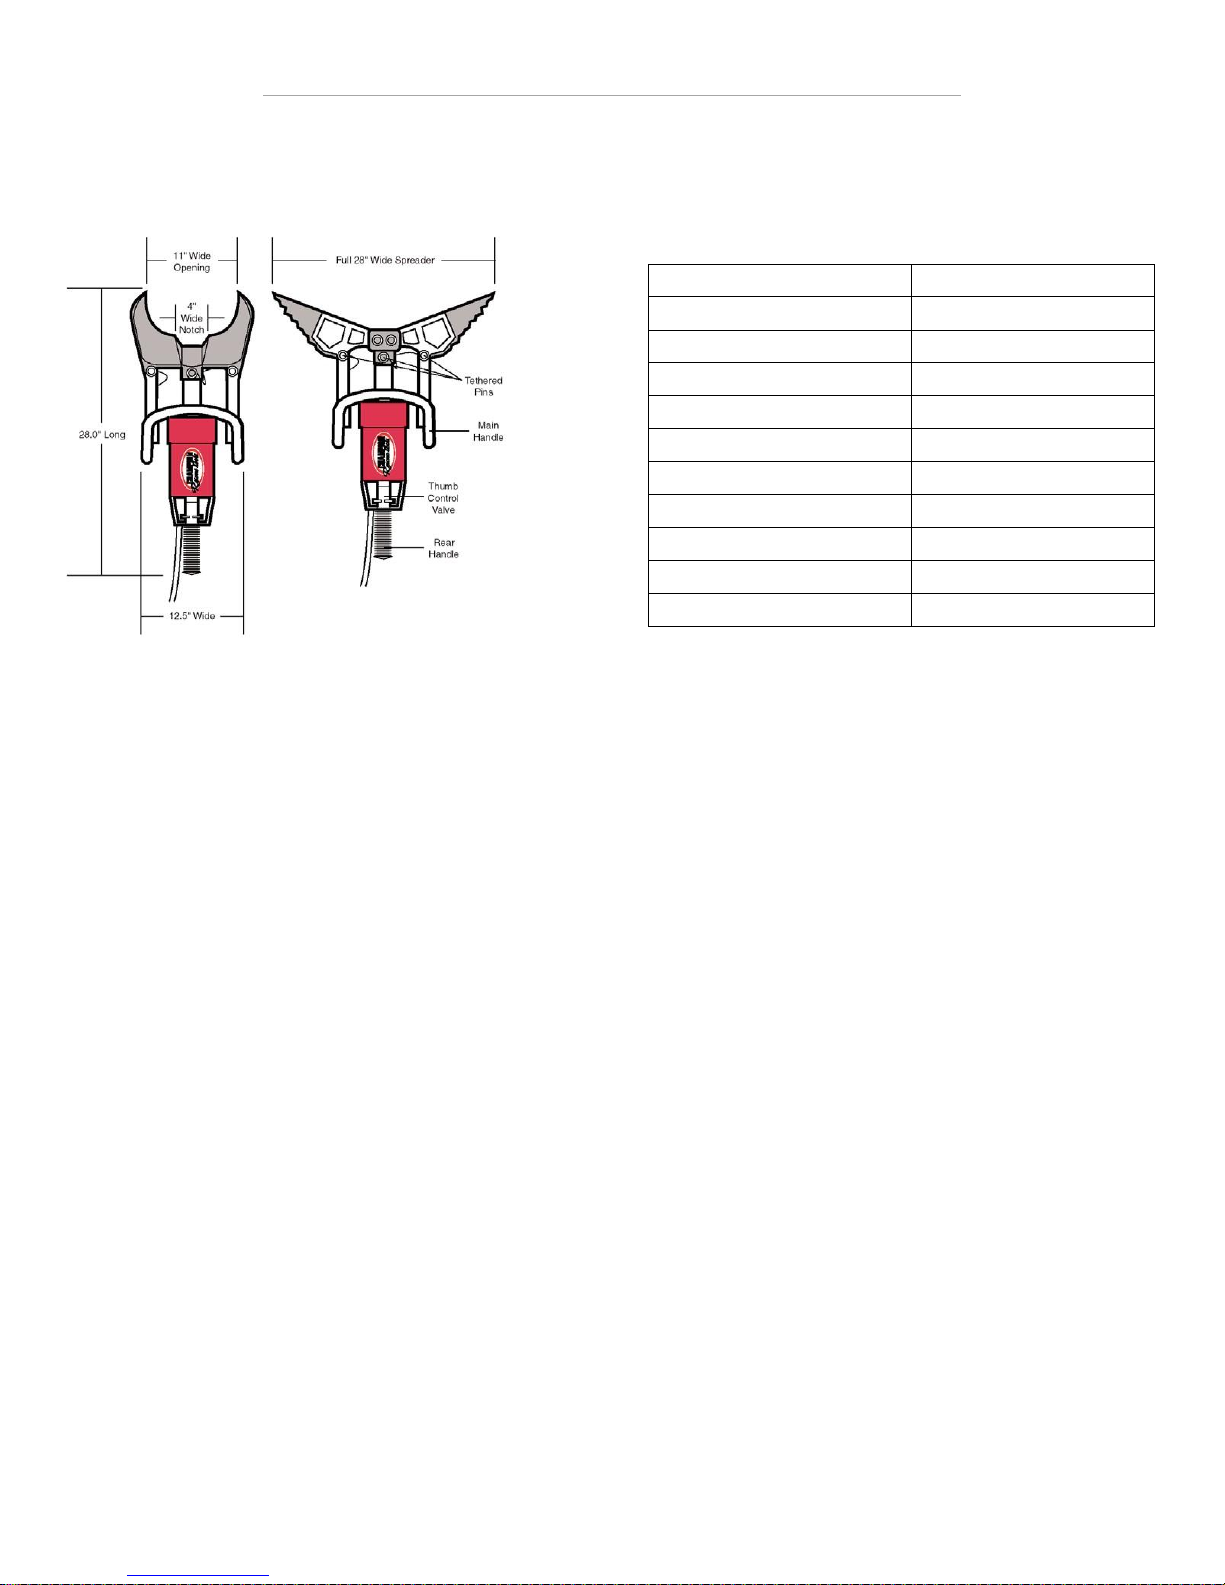
Operating Pressure
10,500 psi
Weight (Cutter)
51.9 lbs
Weight (Spreader)
45.0 lbs
Length
28 – 34 inches
Width
12.5 inches
Height
8 inches
Blade Opening
10.75 inches
Max Cutting Force
500,000 lbs
Spreader Opening
28 inches
Max Spreading Force
140,000 lbs
Hydraulic Fluid Type
Specified by Customer
Introduction
Thank you for purchasing the SUPER BEAST Multi-tool –
the safest, most powerful and functional rescue tool in
the market. For General Operating and Safety
Instructions please refer to the “General Operating
Procedures” Booklet furnished with your tool.
General Safety and Operating Instructions
1. Always turn the power unit to the “off” position and
place the control valve in the “off” position for any
service or clearing work. You should also “dump”
the valve by pushing it all the way to one side and
then the other – this releases any stored energy and
eliminates tool creep.
2. Familiarize yourself with the tool(s) and control
valve, moving the control valve back and forth until
familiar with the valve action and operation. NEVER
put any part of your body between the moving parts
of this or any other tool!
3. The SUPER BEAST will cut a broad range of
materials. Inspect the cutter blades after each use
to make sure it is in good condition. Inspection of
the blades before each use is a MUST! If blades are
suspect in any way, pull the tool out of service
immediately and replace the blades. Remember
you are cutting with many thousands of pounds of
force.
4. Worn edges can be filed, but NEVER grind them
with a hand grinder. To file the blades simply lay a
file on the inside, or ground side, of the blade being
careful to NOT just file the edge. File at least 2 to 3
inches of the blade at a time so as to keep the blade
edge flat and do not roll it over. If rolled, the blade
will be ruined. If this happens, the blade will have
to be returned to the factory for repair or
replacement. Note: Do not file the blades regularly
as maintenance – only file if the blade is damaged.
5. If your spreader tips get worn or have dings and
dents you may also file those as needed.
6. The Hydraulic Cylinder on your new tool operates
under extreme pressure and is a sealed unit. Under
normal use, it does not require service. The factory
sealed cylinder must NEVER be taken apart. Doing
so will void your warranty and could potentially
result in severe injure or even death.
7. As long as the cylinder remains sealed and is not
tampered with, any defect or malfunctions are
covered by the Champion limited lifetime warranty
(to the original purchaser). See the “Champion
Rescue Tools Statement of Lifetime warranty” for
additional information.
8. The control valve must be kept clean. Blow off sand
and dirt with an air hose. Use WD-40- on the valve
spring. Valve does not need any maintenance.
9. Make sure the tethered pins or ball detents that
hold the head clevis and arms/blades in place stay
adjusted so the pins do not work loose.
10. As with all Champion Rescue Tools, the operating
speed can be slowed down or increased by moving
the trigger accordingly. If the trigger is opened
partial the movement will be slow; If the trigger is
opened all the way movement will be faster.
Always use proper safety gear and follow all safety
instruction as outlined in this manual
© Champion Rescue Tools
Page 3

Champion Rescue Tools – SUPER BEAST Multi-tool Detailed Tool Instructions
Step 1
Step 2
Step 3
Attaching (or Changing) the Head on the SUPER BEAST
1. Remember to always the wear the appropriate
safety equipment (PPE), including gloves, as
the blades have sharp protrusions and edges.
2. Note: The tethered pins holding the
blades/arms or clevis will not come out until
cylinder is extended a minimum of 1” or 25.4
mm.
3. Turn the power unit pump control valve to the
“OFF” position.
4. Cycle the valve trigger (control) on the tool left,
then right, or right then left.
5. Place the tool on the ground or a stable surface
in a well lit area.
6. Pull the center pin by the knurled knob first.
Then remove the pins on each side of blade or
arm. Do not pull on the tethers.
7. Remove the head and place out of the work
area.
8. Make sure the head and socket are clean, with
no dirt, sand, or debris. Take the desired
head and slide over the center shaft.
9. Align center hole and insert large pin, pushing
pin all the way down.
10. Take the blades/arms and align the holes with
the link arms on the tool.
11. Insert pins as previously described.
12. Turn the “dump” valve at the power unit to
“on position”. Now the tool is ready for use.
© Champion Rescue Tools
Page 4

Champion Rescue Tools – SUPER BEAST Multi-tool Detailed Tool Instructions
Using the SUPER BEAST as a Cutter
1. Always inspect the tool prior to each use.
2. Turn the valve at the power unit to the “ON”
position
3. Be sure to follow proper general procedures (as well
as any department specific procedures) for
performing vehicle extrication – otherwise severe
injure or even death for occupants or tool operators
is possible.
4. Do a visual check before making a cut, as for every
action there is often an equal reactions. Check
twice and cut once.
5. Open the cutting blade to the distance required to
ensure you get the material to be cut into the notch
(bottom of the blades close to the blade bolt) and
6. Remember, the notch is where the tool makes its
Using the SUPER BEAST as a Spreader
1. The SUPER BEAST Spreader can be used to spread,
crush or lift. Keep in mind if you lift with this tool,
lift 1” crib 1”.
2. DO NOT use the aluminum portion of the arms for
spreading, lifting, or crushing as this may result in
damage to the arms and presents potential risk to
the operator.
3. Try and use as much spreading surface area to push,
crush, or lift on the tips so you have more contact
surface.
4. Always pick up the tool by the handles only.
5. To take the spreader off line or to change the head
6. When the tool is not in action rest the tool on a part
start your cut. If you are unable to get the material
all the way into the notch at least get it as deep as
possible. Don’t use the tip of the blades on solid or
extremely had materials. If the cut cannot be made
the first time, then reopen the blades and
reposition for another cut. Always use common
sense.
maximum power.
Champion offers a line of specialty blades designed
for specific extrication applications – contact the
Sales Department for more information.
back to the cutter head follow the head change
instructions provided in this manual.
of the vehicle or structure with a firm grip on the
handles while you are awaiting you next task.
Otherwise you can rest the tip of the tool on the
ground, in vertical position, holding the rear handle
while you are waiting. This will help reduce
operator fatigue.
Maintenance Instructions
1. Inspect both heads and the tool after every use for
wear and damage. Never use a damaged tool.
2. Remove any debris from the tool or heads.
3. Keep the tool clean and dry. Wipe with a clean
cloth if necessary. Use a mild detergent to clean the
tool and dry thoroughly.
4. Lubricate the valve spring with a light lubricant, such
as WD-40.
5. Lubricate the detents on the pins with a light
lubricant such as WD-40 or a light silicon lubricant.
Check adjustments on detents.
6. Ensure that all handles are tight. There are screws
on both rear and front handles, use blue lock-tight
to secure if necessary.
7. Inspect couplers to ensure that they operated
correctly and are free of dirt and debris. Blow out
with an air hose if needed.
8. Inspect hoses for cracks, cuts and bulges. DO NOT
operate tools with damaged hoses.
9. Inspect the spreader arms and cutting head for
wear or damage. DO NOT operate with damaged
arms or blades.
10. Keep tool free from rust and corrosion.
11. Replace handle if broken or damaged.
12. Replace Missing or damaged decals, if needed.
© Champion Rescue Tools
Page 5

Support
Should you require either technical, service, training, or any other type of support, please contact our Corporate
Offices at:
Champion Rescue Tools
814 Berry Court
Upland, California 91786 USA
Phone: (909) 982-1126 Fax: (9090 982-0050
Toll Free: (888) 396 -2426 www.championrescuetools.com
© Champion Rescue Tools
 Loading...