

Page 1
Indirect Cooler Module
Users Manual
Model
IM70
2 Stage Evaporative Cooling
The IM70 indirect cooling module (ICM) is a pre-cooler used in 2-Stage or Indirect/Direct evaporative cooling. The ICM cools
the air without adding any additional moisture. It accomplishes this by circulating water downward through a heat exchanger,
while a fan draws air upward through the heat exchanger. This air and water are cooled by evaporation and in turn cool the
walls of the heat exchanger. The removed heat is exhausted
from the unit with the moist air. Hot, dry outside air is pulled
horizontally through the cooled walls of the heat exchanger by
the attached evaporative cooler. This air is cooled and since
it does not contact water, there is no moisture added.
The dry air cooled by the ICM is then cooled more by the direct
evaporative cooler. The dry bulb temperature of the air after
going past the ICM drops as does the wet bulb or saturation
temperature. This cooled dry air from the ICM is pulled through
wet evaporative media in the direct evaporative cooler which
cools the air and adds moisture. The temperature leaving the
evaporative cooler is lower than what is possible without the
ICM, often below the ambient wet bulb temperature.
The IM70 can be mounted directly to Champion’s Ultracool 51
& 71 series evaporative cooler models for a complete 2-stage
evaporative cooling process.
Heat
Exchanger
Cool Dry
Air
Hot Dry
Air
Safety Rules
1. Read instructions carefully.
2. Electrical hook up should be done by a qualifi ed electrician, so that all electrical wiring will conform to your local stan-
dards.
3. Always Disconnect from Power Source before installing or performing any maintenance.
4. The IM70 will run on 120V A.C., single phase, 60 Hz (cycle) current only.
5. The pump and motor are equipped with an automatic thermal overload switch which will shut motor off when it overheats.
The motor may start unexpectedly after it cools down.
www.championcooler.com
5-07110521
Page 2
Installation
CAUTION: Make sure that the mounting surface is strong enough to sup-
port the operating weight of the cooler when in use. (For operating weight,
see Specifi cation Table.)
CAUTION: Never start cooler until installation is complete and unit has
been tested for rigidity.
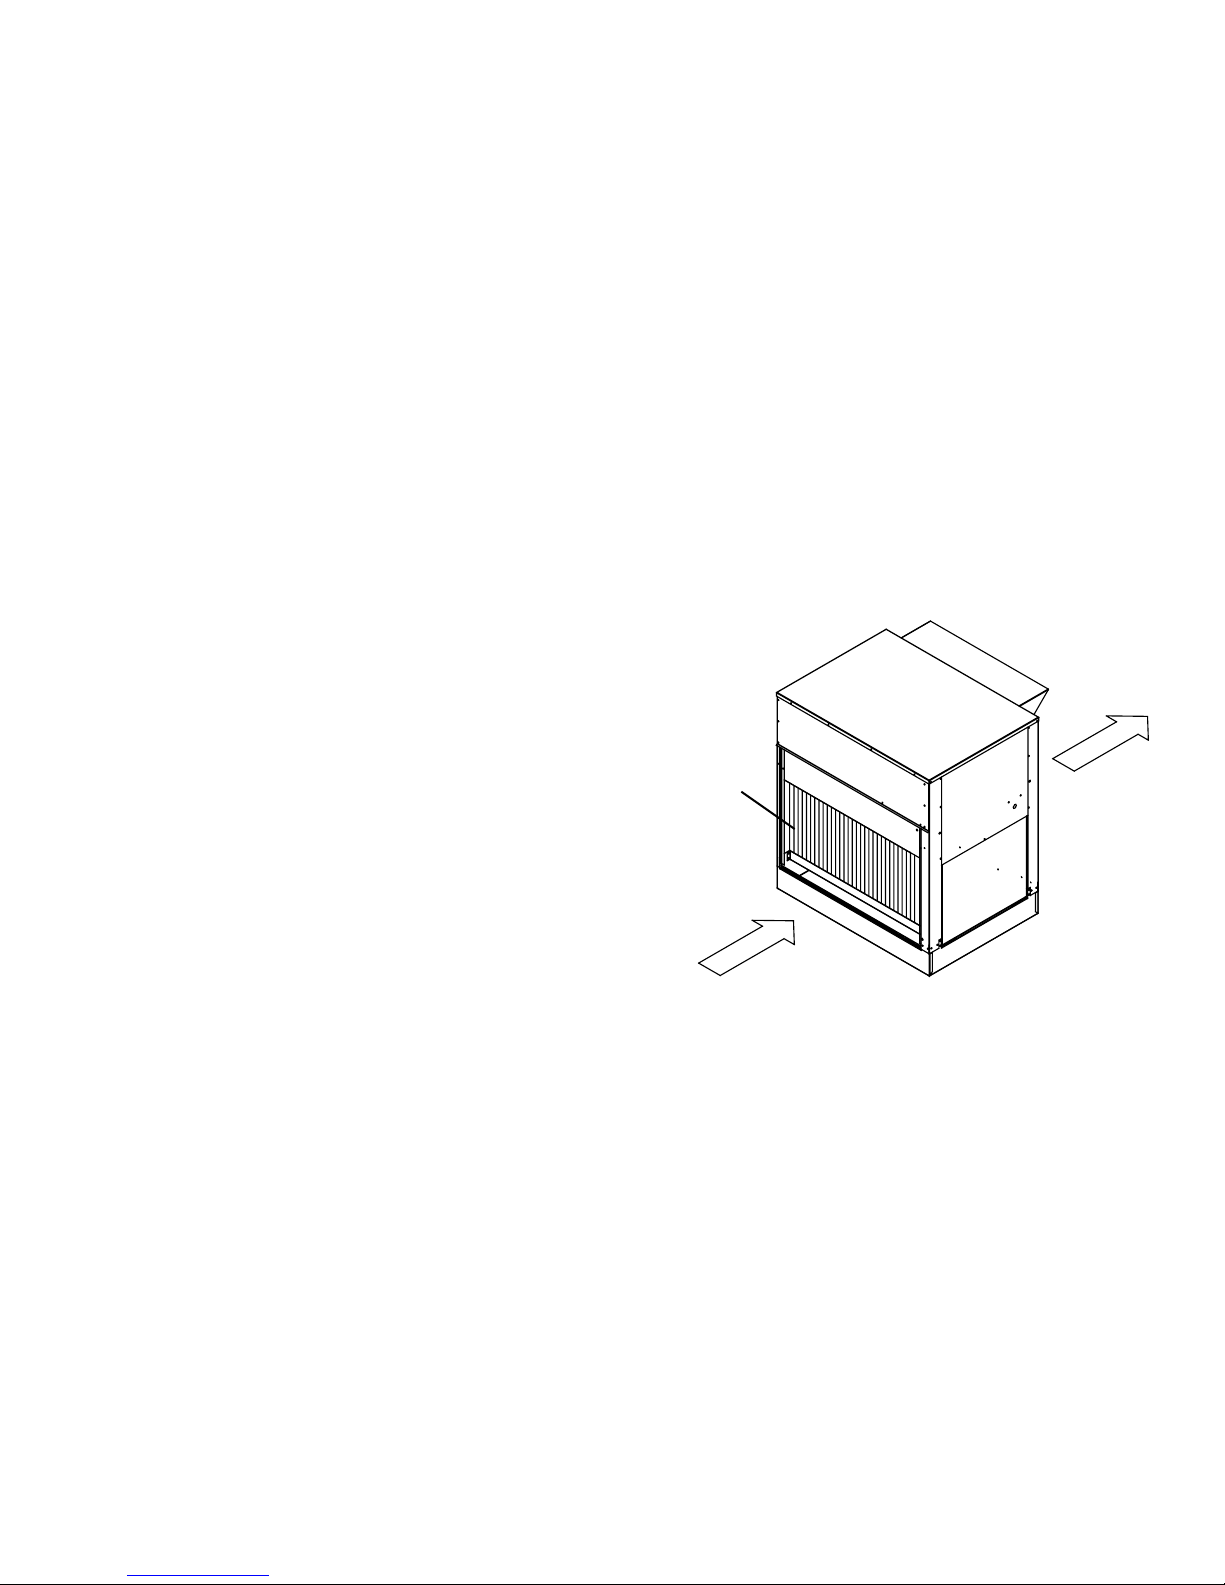
• Install rain guard. A 3 piece rain guard kit is included with the unit. Refer to
fi gure 1 for installation instructions. Place the fl ange of the top piece over the
side piece and screw together with the provided screws. Repeat for both left
and right sides. Slide the fl ange of the top section under the top pan. Screw the
sides of the rain guard into the holes in the exhaust panel.
• Mount unit to the evaporative cooler. For two stage evaporative cooling, at-
tach the IM70 to an Mastercool 51 or 71 unit (sold separately). Remove the perforated grill on
the Mastercool Attach weather stripping (not supplied) around the perimeter of the Mastercool.
Slide the IM70 next to the cooler making sure the units fi t snugly together. Using the provided
mounting brackets and self drilling screws, locate the bracket below the top of the inspection
panel on the IM70 (Fig. 2). Attach using the provided screws. Making sure that there is a
good fi t between the IM70 and the cooler, screw the self drillers into the cooler to lock it into
place. Repeat for opposite side. Install the perforated grill removed previously to the rear
of the IM70.
Note: If this unit is mounted to another unit besides an Mastercool 51 or 71 series unit, you
will need to purchase separately a 51 series perforated grill (part #222130-078).
Fig. 1
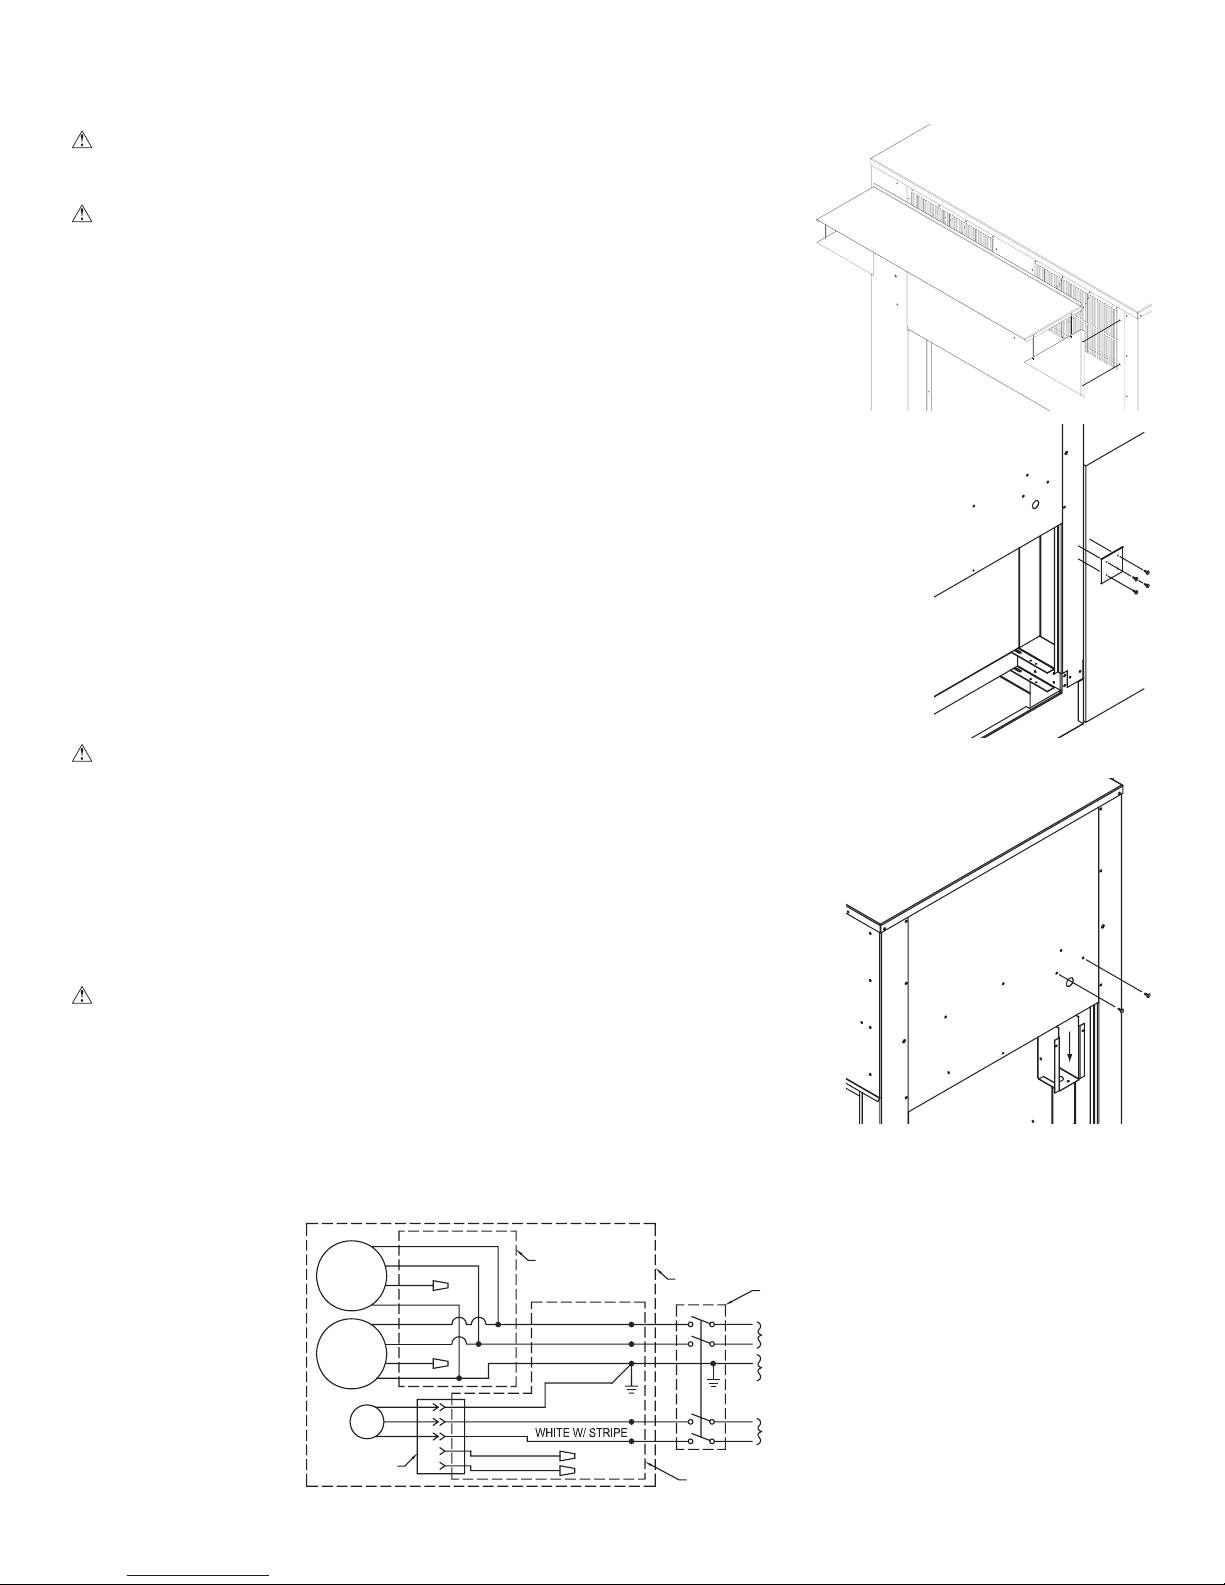
Electrical Installation
WARNING: Disconnect all electrical service that will be used for this unit before you
begin the installation.
• Remove junction box. The electrical junction box is located inside the unit above
the inspection panel door. Remove two screws and slide the junction box down to
gain access to wiring (Fig. 3).
• Hook up electrical. Electrical hook up should be done by a qualifi ed electrician,
so that all electrical wiring will conform to your local standards. This unit is suppled
with a 120V pump and fan motor. See fi gure 4 for the wiring diagram.
WARNING: Make sure the cooler cabinet is properly grounded to a suitable
ground connection for maximum safety.
Wiring Diagram
FAN
MOTOR
FAN
MOTOR
BLACK
WHITE
RED
GREEN
RED
INTERNAL
WIRING BOX
BLACK
WHITE
GREEN
GREEN
UNIT
CABINET
REQUIRED SERVICE
DISCONNECT IN SIGHT
OF UNIT
L1
120V - 60Hz - 1 PH
N
EQUIPMENT GROUND
Fig. 2
Fig. 3
PUMP
PUMP
RECEPTACLE
BROWN
ORANGE
BLUE
L1
120V - 60Hz - 1 PH
N
INSTALLATION WIRING BOX
Fig. 4
1105212
Page 3

Water Connection
• Install overfl ow assembly. Place drain nipple through the hole in the bottom pan, with the rubber
washer between the pan and the head of the drain nipple (Fig. 5). Screw on nut and draw up tight
against bottom of pan. Insert the overfl ow pipe in the nipple to retain water. The overfl ow pipe may
be removed to drain the pan when necessary . A garden hose may be screwed onto the drain nipple to
drain water away from your unit.
Overfl ow Pipe
Nipple
Rubber Washer
Bottom Pan
Nut
Fig. 5
• Connect water supply line. Find the closest supply of water. Run 1/4” tubing from the unit to the
water supply . You may use a saddle valve (Fig. 6) to connect 1/4” tubing to the cold water supply
or a Sillcock and water valve connected to an outside faucet (Fig. 7).
Place the nut and ferrule on the tubing and tighten the nut until water
tight. Insert the tubing into the fl oat hole of the corner post. Remove the
1/4” Tubing
Saddle
Valve
Faucet
Nut
Water Supply
Valve
Ferrule
perforated grill if installed to have access to the fl oat. Attach the tubing to
the fl oat using a nut and ferrule. Tighten until water tight. IMPORTANT:
Do not connect the water supply to any soft water applications. Soft
water will cause corrosion and decrease the life of the unit.
Fig. 6
Cold
Water
Pipe
Sillcock
Fig. 7
• Fill pan. Allow water to fi ll to approximately 3” in the bottom pan and
adjust the fl oat to maintain this water level. This can be accomplished by bending the fl oat rod.
Maintenance
WARNING: Before doing any maintenance be sure power is off. This is for your safety.
Spring Start-Up
• Clean heat exchanger. Clean the inlet face of the heat exchanger with a garden hose. Remove any obstruction and lightly
clean any scale buildup. To clean the top of the heat exchanger , remove the top pan. Remove the media brackets holding the
fi lters in place and remove the fi lters. Cover up the blower housings so no water comes into contact with the motors. Clean
with a hose, removing any obstruction and scale buildup.
• Clean or change fi lters. There is a 3 piece fi lter set located under the heat exchanger. Remove the inspection panel to ac-
cess these fi lters. Remove the fi lters and clean out the openings with a garden hose. Clean off the face any scale or other
obstruction to the passages. Slight scraping may be required to remove hardened scale. There are also mist eliminating
fi lters above the water distribution system. Remove the top pan to gain access to these mist eliminating fi lters. The media
brackets will need to be removed before removing the mist eliminating fi lters. If cleaning the mist eliminating fi lters while in the
unit, make sure to cover the fan blower housings so that water does not come in contact with the motors. The fi lters should
be replaced after 5 years or when necessary.
• Clean pump. Periodic cleaning of the pump will prolong the life and effi ciency
of the pump. For your safety, make certain the unit is disconnected from the
power source before servicing pump. Remove the pump from the pump mount.
Refer to fi gure 8 for disassembling the pump. DO NOT open the sealed portion
of the unit or remove housing screws. Remove the intake screen. Remove
the volute mounting screws. Lightly clean any corrosion or debris which may
clog the impeller. Use a brush and penetrating oil and lightly scrape to remove
encrusted material. Turn the impeller by hand to make sure it turns freely.
After cleaning, reinstall in reverse order. Do not forget to replace the water
delivery tube onto the pump outlet.
• Clean bottom pan of any debris.
Winter Shut-Down
• Drain water. Always drain all of the water out of the unit and water supply line when not in use for prolonged periods, and
particularly at the end of the season. Keep the water line disconnected from both the unit and water supply so that it does not
freeze.
• Unplug pump. When cooler is not used for extended periods unplug the pump from inside cooler.
• Cover unit. To protect the life of the fi nish, a cover for the unit is suggested in extended periods of non use.
110521 3
Impeller
Volute
Intake Screen
Fig 8
Page 4

Replacement Parts List
When ordering parts, please be sure to furnish the following information on all orders. Failure to do so may delay your
order.
1. Cooler model number
2. Cooler serial number
3. Description and part number
4. Date of purchase
No. Description IM70
1. Top Pan ......................................................................................................................222150-001
2. Bottom Pan .................................................................................................................322150-002
3. C-Channel Bracket (2) ................................................................................................216150-001
4. Inlet Panel ..................................................................................................................222150-006
5. Grill Insert Panel .........................................................................................................222150-013
6. Left Side Panel ...........................................................................................................222150-005
7. Right Side Panel .........................................................................................................222150-010
8. Inspection Panel .........................................................................................................222150-016
9. Outlet Panel ................................................................................................................220150-001
10. Corner Post, Outlet .....................................................................................................222150-003
11. Corner Post, Inlet .......................................................................................................222150-004
12. Side Filler Panel .........................................................................................................222150-009
13. Outlet Support Bracket ...............................................................................................220150-003
14. Inlet Support Bracket ..................................................................................................220150-004
15. Media Bracket (4) .......................................................................................................222150-007
16. Media Filler Panel .......................................................................................................222150-015
17. Water Distributor Support Bracket ..............................................................................222150-008
18. Pump Mounting Bracket .............................................................................................220150-002
19. Pump ..........................................................................................................................110437
20. Float Mounting Bracket ..............................................................................................222150-014
21. Float Valve ..................................................................................................................FL-C
22. Squaring Bracket ........................................................................................................220150-005
23. Heat Exchanger ..........................................................................................................110140
24. Filter Pad ...................................................................................................................310105-101
25. Mist Eliminator Filter Pad ...........................................................................................310105-201
26. Blower Housing (2) .....................................................................................................324102-005
27. Blower Wheel, Left (2) ................................................................................................110747
28. Blower Wheel, Right (2) .............................................................................................110748
29. Blower Motor (2) .........................................................................................................110441-C
30. Fan Motor Junction Box .............................................................................................281004-002
31. Receptacle, Pump ......................................................................................................110361
32. Electrical Junction Box ...............................................................................................322009-004
33. Rain Guard Kit ............................................................................................................322150-011
34. Water Delivery Tube ...................................................................................................310717
35. Water Distributor Assembly ........................................................................................3D-29
36. Nozzles (8) .................................................................................................................110141
37. Over Flow Assembly ...................................................................................................3OA-2
38. Connecting Bracket (2) ...............................................................................................220150-006
NOTE: Standard hardware items may be purchased from your local hardware store.
1105214
Page 5

Parts Drawing
Model Voltage Total Fan Motor
Amperage
IM70 1 15 V *8 Amps 1.5 Amps 17 Gal. 240 377
* Motor amperage is for 2 motors.
110521 5
Specifi cations
Pump
Amperage
Approx. Reservoir
Weight (Lbs.)
Capacity
Shipping Operating
Page 6

CHAMPION COOLER LP
5800 Murray St.
Little Rock, AR 72209
(800) 643-8341
www.championcooler.com
1105216
 Loading...