

Page 1
Technical Manual
Two Tank
Rack Conveyor
with/without Prewash
With (FFPR26)
Basic With (PR22) With (PR36) 26" Front Feed
Model 22" Prewash 36" Prewash Prewash
40KB 40KPRB PR36/40KB FFPR26/40KB
60KB 60KPRB PR36/60KB FFPR26/60KB
64KB 64KPRB PR36/64KB FFPR26/64KB
Machine Serial No.
June, 2005
Manual P/N 112951 Rev. I
P.O. Box 4149 2674 N. Service Road
Winston-Salem, North Carolina 27115-4149 Jordan Station, Ontario,Canada L0R 1S0
336/661-1556 Fax: 336/661-1660 905/562-4195 Fax:905/562-4618
www.championindustries.com
For machines beginning with
serial no. R1247 and above
Page 2
Complete the information below so it will be available for quick reference.
Model Number Serial Number
Voltage and Phase
Champion Service Agency Phone
Champion Parts Source Phone
Champion Service:
Champion (USA) Champion (Canada)
Phone: 1 (336) 661-1556 Phone: 1 (905) 562-4195
1 (800) 858-4477 1 (800) 263-5798
Fax: 1 (336) 661-1660 Fax: 1 (905) 562-4618
We strongly recommend that you Fax your orders.
NOTE: When calling to order parts, be sure to have the model number, serial number,
voltage and phase of your machine.
COPYRIGHT © 2004 by Champion Industries, Inc.
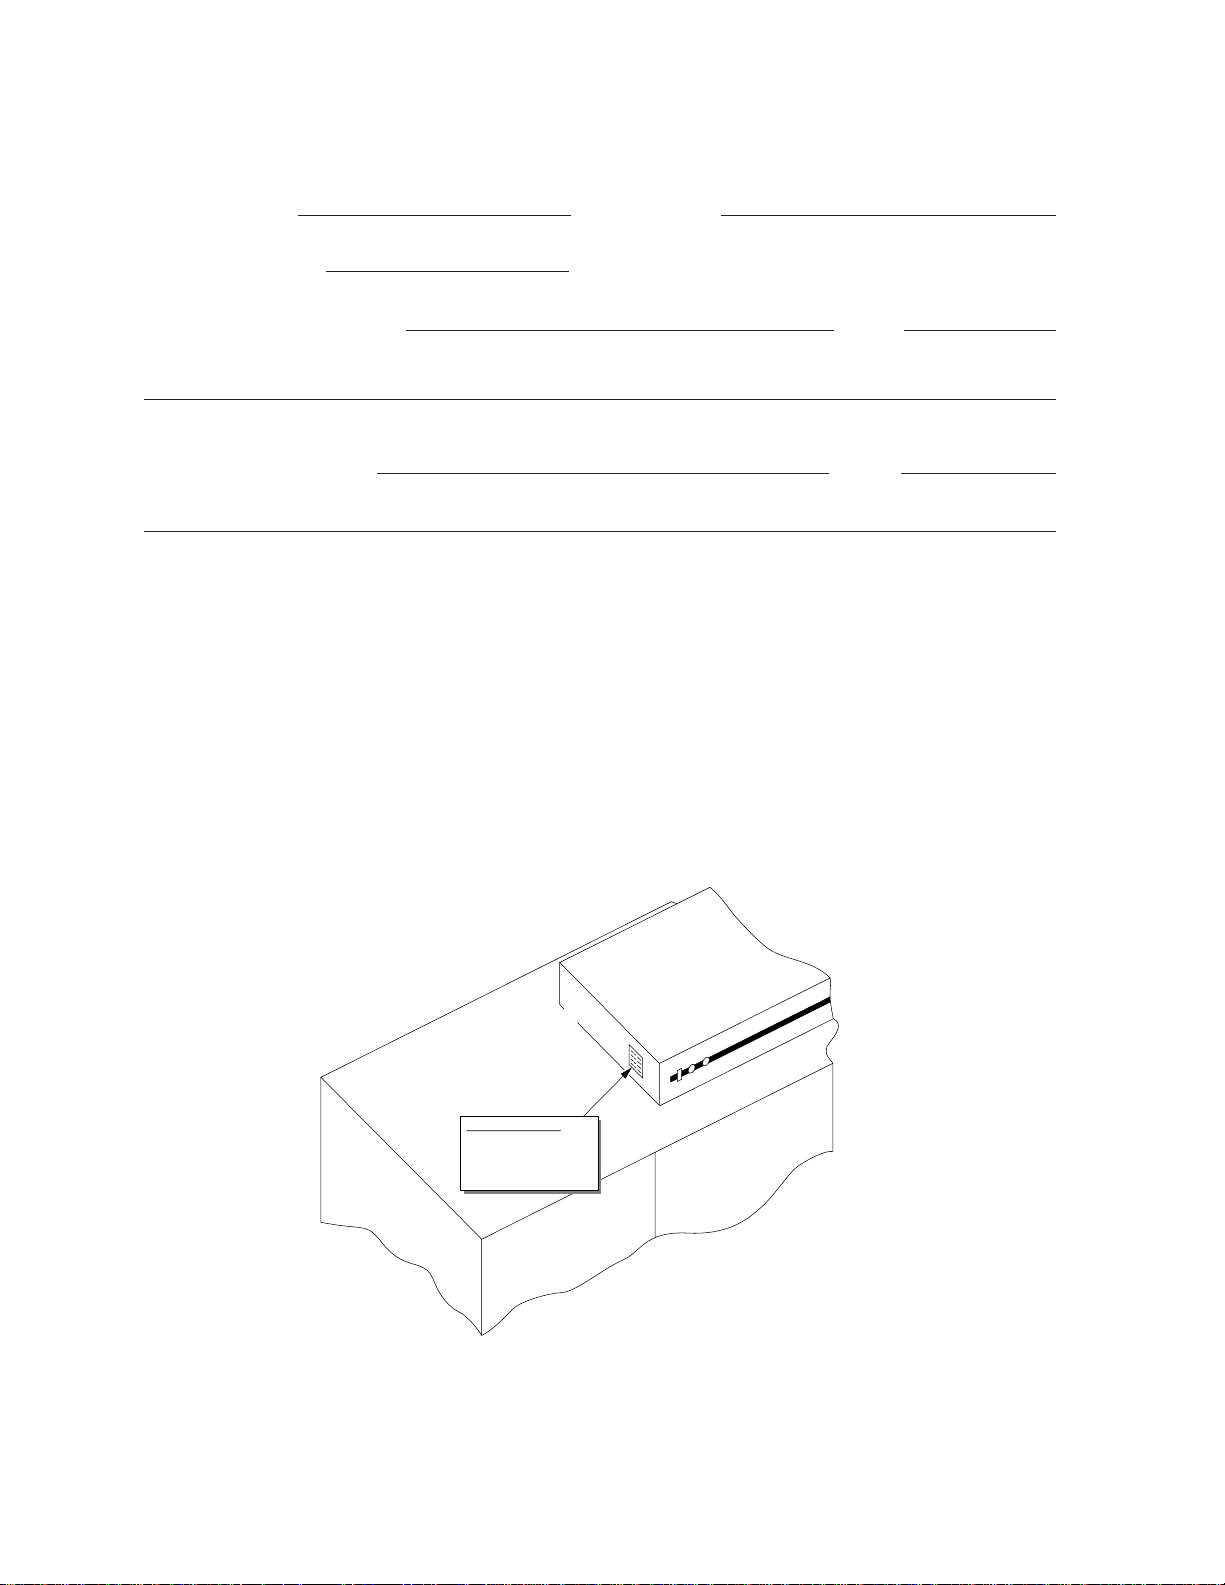
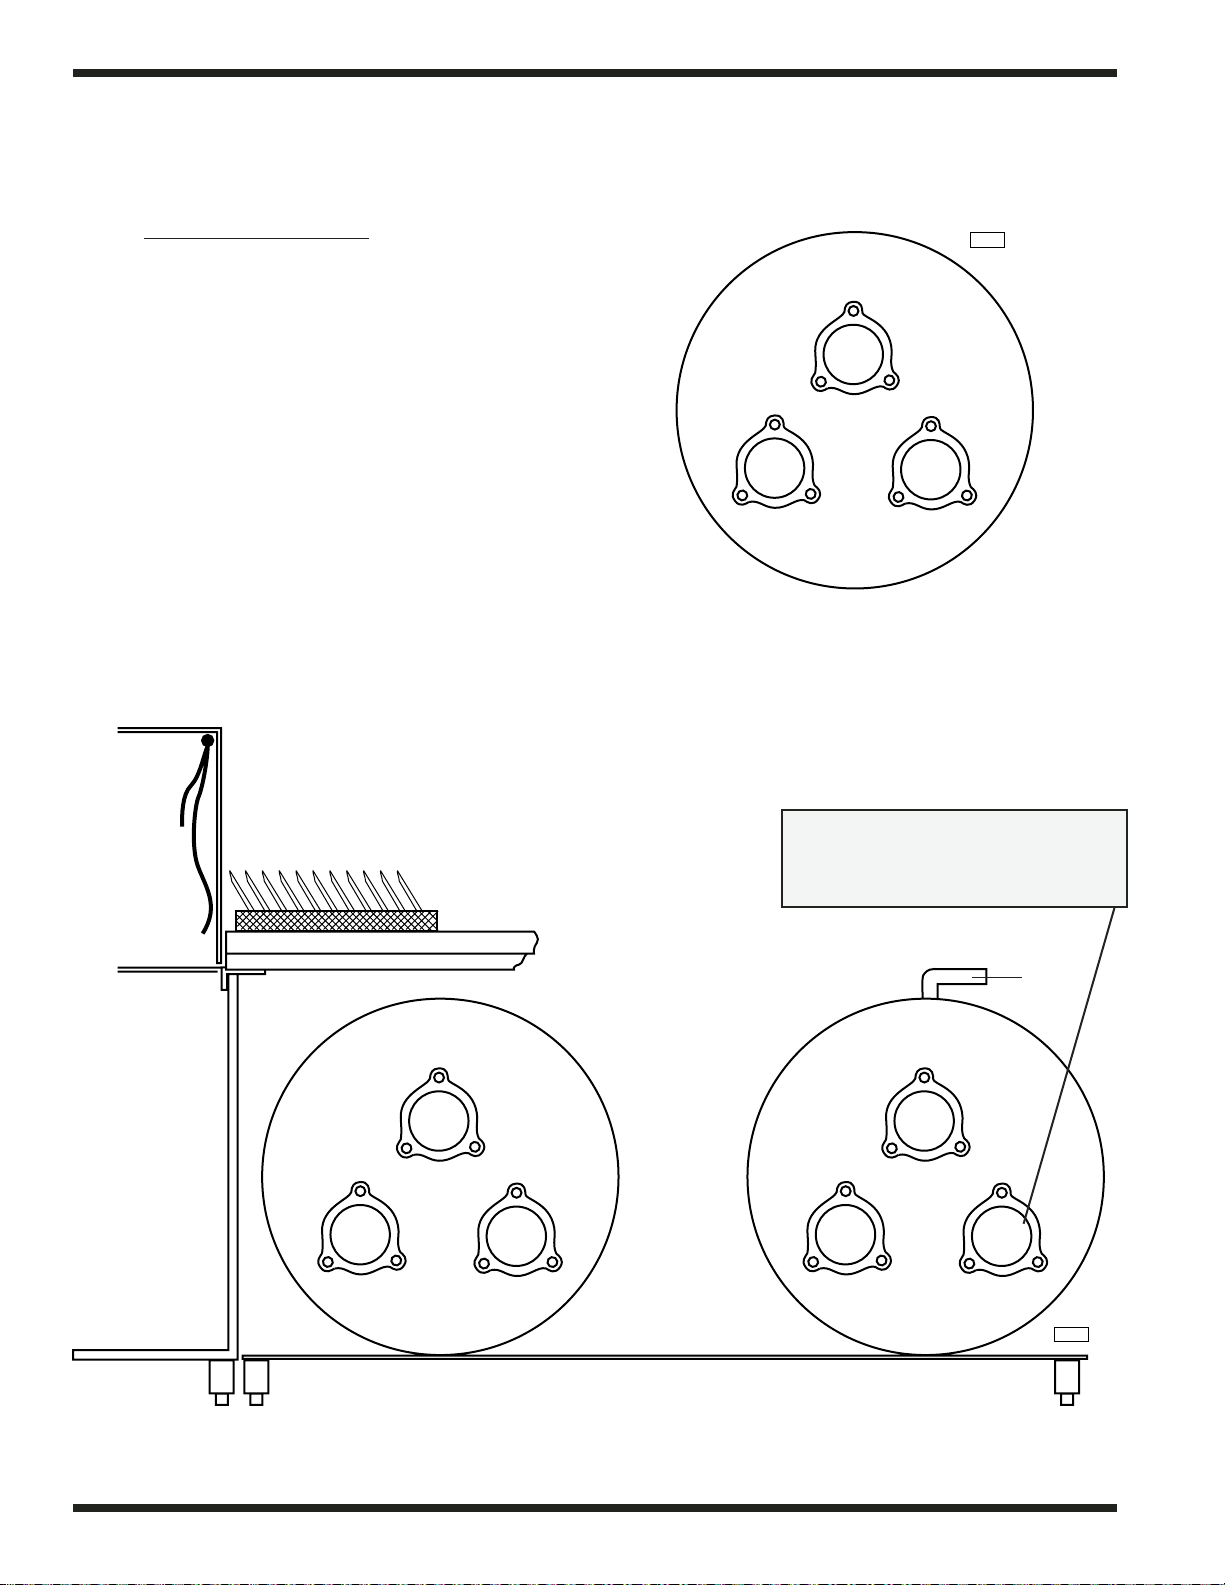
Machine Data Plate with
Model No., Serial No.,
Voltage and Phase is
located on the right or left
side of the Control Cabinet
Top of Machine
Control Cabinet
Left to Right
Model Shown
Page 3

i
Revision History
Revision Revised Serial Number Comments
Date Pages Effectivity
3/10/99 All R-1247 First Issue of Manual and service replacement parts
1/26/00 35 ––– Added cradle assy P/N's
1/26/00 90 R1666 Changed motor contactor P/N 111642 to Motor
contactor P/N 108122
1/26/00 95 ––– Added dual float switch, P/N 11019 to par ts list
5/23/00 39 R-1810 Changed pump assembly parts
10/1/00 95 ––– Corrected float switch, P/N 111019
10/10/00 35 ––– Added 40-60 KB cradle part numbers
11/01/00 54 R1529 Added new piping due to change in location of
pressure switch
11/01/00 58 All Inserted new drawing for all Serial numbers with no
booster or with Steam booster
4/3/01 89 ––– Revised machines for 12' thermometer – 109499
1/03/02 55,59 R2441 Change vacuum breaker 3/4" 1044129 to 113222
1/03/02 56,60,63,73,77 Change vacuum breaker 1/4" 107069 to 113218
1/03/02 56,59,63,73,77 R2441 Change Parker/Evans 1/4" solenoid valve 109885 to
GC solenoid valve 1/2" 113352 along with repair kit,
coils and piping changes
1/03/02 73,77 Added track stiffener 325667
5/20/02 56,60,63,73,77 Added 900836 Kit* Repair, 1/4" & 1/2" Vacuum
Breaker and 900837 Kit* Repair 3/4" Vacuum Breaker
2/5/03 39 Replaced impellers with new part numbers.
2/5/03 89 Replaced 108391 with 113622 thermometer.
2/5/03 91 Replaced Furnace (Siemens) overloads with
Telemecanique (Square D) overloads.
2/5/03 92, 115, 117 Replaced P/N 111826 with P/N 111827.
7/23/03 55, 56, 59, 60, 63, Revised plastic style vacuum breakers with
73, 74, 77, 78 bronze style.
7/23/03 89 Corrected part numbers for overlays.
3/11/04 43, 45, 67, 69 R3285 Replaced 111090 with 113721 reed switch.
71, 73
3/11/04 124 ––– Revised schematic 700935 revision H to revision I.
REVISIONS
Page 4

ii
REVISIONS
Revision History (Cont.)
Page 5

iii
CONTENTS
CONTENTS
Page
REVISION HISTORY...................................................................................................................... i
WARRANTY .................................................................................................................................. vi
KEY COMPONENTS...................................................................................................................... 1
INTRODUCTION .......................................................................................................................... 2
GENERAL........................................................................................................................................ 3
INSTALLATION ............................................................................................................................ 5
Unpacking .......................................................................................................................... 5
Electrical Connections ........................................................................................................ 5
Plumbing Connections ........................................................................................................ 6
Ventilation Connections ...................................................................................................... 6
Chemical Connections ........................................................................................................ 6
Curtain Locations ................................................................................................................ 7
Completing Installation ...................................................................................................... 7
OPERATION.................................................................................................................................... 8
MAINTENANCE ............................................................................................................................ 11
Maintenance Schedule ........................................................................................................ 11
Deliming.............................................................................................................................. 12
TROUBLESHOOTING .................................................................................................................. 13
ELECTRICAL SERVICE ................................................................................................................ 15
MECHANICAL SERVICE ..............................................................................................................23
TABLE LIMIT SWITCH INSTALLATION.................................................................................... 27
REPLACEMENT PARTS ................................................................................................................ 31
ELECTRICAL SCHEMATICS ...................................................................................................... 111
LIST OF FIGURES
Figure 1 — Fuse Blocks .............................................................................................................. 15
Figure 2 — Motor Overload ...................................................................................................... 15
Figure 3 — Pump Timer ..............................................................................................................16
Figure 4 — Dual Float Switch .................................................................................................... 17
Figure 5 — Tank Heat Ther mostats ............................................................................................ 18
Figure 6 — Booster Thermostat Locations (Electric) ................................................................ 18
Figure 7 — Booster High Limit Thermostat (Electric) .............................................................. 18
Figure 8 — Front View Typical 40°F/22°C rise Booster, One Tank 36 Kw shown .................. 22
Figure 9 — F ront View Typical 70°F/39°C rise Booster, Two Tank 57 Kw shown .................... 22
Figure 10 — Idle Pump Switch Assembly .................................................................................... 24
Page 6

iv
REVISIONS
LIST OF FIGURES (Cont.)
Figure 11 — Magnetic Switch and Magnet .................................................................................. 24
Figure 12 — Rinse-Saver Switch Mechanism .............................................................................. 24
Figure 13 — Crank Assembl y........................................................................................................ 25
Figure 14 — Conveyor Drive Assembly........................................................................................ 25
Figure 15 — View of Load End of Machine ................................................................................ 26
Figure 16 — Close-up View of Bearing Housing ........................................................................ 26
Figure 17 — Close-up View of Clutch Assembly .......................................................................... 26
Figure 18 — Conveyor Drive Assembly........................................................................................ 32
Figure 19 — Track and Cradle Assembly .................................................................................... 34
Figure 20 — Track and Cradle Assembly-PR22, PR36 ................................................................ 36
Figure 21 — Motor and Pump Assembly (Wash, Power Rinse, Prewash) .................................... 38
Figure 22 — Idle Pump Mechanism ............................................................................................ 42
Figure 23 — Idle Pump Switch (FFPR26 Only) (All S/N’s) ........................................................ 44
Figure 24 — Wash System Assembly (Wash Tank and Power Rinse Tank).................................. 46
Figure 25 — Wash System Assembly (PR22, FFPR26)................................................................ 48
Figure 26 — Wash System Assembly (PR36) .............................................................................. 50
Figure 27 — Outside Rinse Piping with Electric Booster ............................................................ 52
Figure 28 — Outside Rinse Piping with Electric Booster After R1529 ...................................... 54
Figure 29 — Fill and Outside Rinse Piping, w/No Booster and Steam w/Booster ...................... 58
Figure 30 — Cold Water Thermostat for Prewash Option .......................................................... 62
Figure 31 — Inside Rinse Piping .................................................................................................. 64
Figure 32 — Rinse Saver Mechanism (L-R) ................................................................................ 66
Figure 33 — Rinse Saver Mechanism (R-L) .............................................................................. 68
Figure 34 — Doors, Curtains, Miscellaneous................................................................................ 70
Figure 35 — Hood (PR22, PR36) ................................................................................................ 72
Figure 36 — Hood (FFPR26) ...................................................................................................... 76
Figure 37 — Tank (PR22).............................................................................................................. 80
Figure 38 — Tank (PR36) ............................................................................................................ 82
Figure 39 — Tank (FFPR26) ...................................................................................................... 84
Figure 40 — Drain Unit and Screens Wash/Power Rinse Tank .................................................... 86
Figure 41 — Control Cabinet ........................................................................................................88
Figure 42 — Control Panel............................................................................................................ 90
Figure 43 — Tank Heat (Electric, R-L Shown) ............................................................................ 94
Figure 44 — Tank Heat (Steam Coils, R-L Shown) ...................................................................... 96
Figure 45 — Tank Heat (Steam Supply Piping)............................................................................ 98
Figure 46 — Tank Heat (Condensate Piping)................................................................................ 100
Figure 47 — Tank Heat (Steam Injector, R-L Shown) .................................................................. 102
Figure 48 — Electric Booster (40°F/22°C Rise) .......................................................................... 104
Figure 49 — Electric Booster (70°F/39°C Rise) .......................................................................... 106
Figure 50 — K2 Steam Booster .................................................................................................... 108
Page 7

v
CONTENTS
Figure 51 — Thrush Steam Booster (40°F/22°C - 70°F/39°C Rise) ............................................ 110
Figure 52 — Thrush Steam Booster (80°F/44°C Rise) ................................................................ 112
Figure 53 — Control Panel, Electric Booster (70°F/39°C Rise) .................................................. 114
Figure 54 — Control Panel, Electric Booster (40°F/22°C Rise) .................................................. 116
Figure 55 — Vent Hood Assembly ................................................................................................ 118
Figure 56 — Dish Racks................................................................................................................ 120
ELECTRICAL SCHEMATICS
B700935/I — Wiring Diagram (64KB, 40KB, 60KB Steam/Electric)
B700936/G— Wiring Diagram (64KPRB, 40KPRB, 60KPRB Steam/Electric)
Page 8

vi
REVISIONS
LIMITED W ARRANTY
Champion Industries Inc. (herein referred to as Champion), P.O. Box 4149, Winston-Salem, North Carolina 27115, and P.O.
Box 301, 2674 N. Service Road, Jordan Station, Canada, L0R 1S0, warrants machines, and par ts, as set out below.
Warranty of Machines: Champion warrants all new machines of its manufacture bearing the name “Champion”
and installed within the United States and Canada to be free from defects in material and workmanship for a period of
one (1) year after the date of installation or fifteen (15) months after the date of shipment by Champion, whichever
occurs first. [See below for special provisions relating to glasswashers.] The warranty registration card must be returned
to Champion within ten (10) days after installation. If warranty card is not returned to Champion within such period, the
warranty will expire after one year from the date of shipment.
Champion will not assume any responsibility for extra costs for installation in any area where there are
jurisdictional problems with local trades or unions.
If a defect in workmanship or material is found to exist within the war ranty period, Champion, at its election, will either
repair or replace the defective machine or accept return of the machine for full credit; provided, however, as to glasswashers, Champion’s obligation with respect to labor associated with any repairs shall end (a) 120 days after shipment,
or (b) 90 days after installation, whichever occurs first. In the event that Champion elects to repair, the labor and work to
be performed in connection with the warranty shall be done during regular working hours by a Champion authorized
service technician. Defective parts become the property of Champion. Use of replacement parts not authorized by
Champion will relieve Champion of all further liability in connection with its warranty. In no event will Champion’s
warranty obligation exceed Champion’s charge for the machine. The following are not covered by Champion’s warranty:
a. Lighting of gas pilots or burners.
b. Cleaning of gas lines.
c. Replacement of fuses or resetting of overload breakers.
d. Adjustment of thermostats.
e. Adjustment of clutches.
f. Opening or closing of utility supply valves or switching of electrical supply current.
g. Cleaning of valves, strainers, screens, nozzles, or spray pipes.
h. Performance of regular maintenance and cleaning as outlined in operator’s guide.
i. Damages resulting from water conditions, accidents, alterations, improper use, abuse,
tampering, improper installation, or failure to follow maintenance and operation procedures.
j. Wear on Pulper cutter blocks, pulse vanes, and auger brush.
Examples of the defects not covered by warranty include, but are not limited to: (1) Damage to the exterior or interior
finish as a result of the above. (2) Use with utility service other than that designated on the rating plate. (3) Improper
connection to utility service. (4) Inadequate or excessive water pressure. (5) Corrosion from chemicals dispensed in
excess of recommended concentrations. (6) Failure of electrical components due to connection of chemical dispensing
equipment installed by others. (7) Leaks or damage resulting from such leaks caused by the installer, including those at
machine table connections or by connection of chemical dispensing equipment installed by others. (8) Failure to comply
with local building codes. (9) Damage caused by labor dispute.
Warranty of Parts: Champion warrants all new machine parts produced or authorized by Champion to be free
from defects in material and workmanship for a period of 90 days from date of invoice. If any defect in
material and workmanship is found to exist within the war ranty period Champion will replace the defective
part without charge.
DISCLAIMER OF
WARRANTIES AND LIMITATIONS OF LIABILITY. CHAMPION’S WARRANTY
IS ONLY TO THE EXTENT REFLECTED ABOVE. CHAMPION MAKES NO OTHER WARRANTIES, EXPRESS
OR IMPLIED, INCLUDING, BUT NOT LIMITED,TO ANY WARRANTY OF MERCHANTABILITY, OR FITNESS
OF PURPOSE. CHAMPION SHALL NOT BE LIABLE FOR INCIDENTAL OR CONSEQUENTIAL DAMAGES.
THE REMEDIES SET OUT ABOVE ARE THE EXCLUSIVE REMEDIES FOR ANY DEFECTS FOUND TO EXIST
IN CHAMPION DISHWASHING MACHINES AND CHAMPION PARTS, AND ALL OTHER REMEDIES ARE
EXCLUDED, INCLUDING ANY LIABILITY FOR INCIDENTALS OR CONSEQUENTIAL DAMAGES.
Champion does not authorize any other person, including persons who deal in Champion dishwashing machines to change
this warranty or create any other obligation in connection with Champion Dishwashing Machines.
Page 9

1
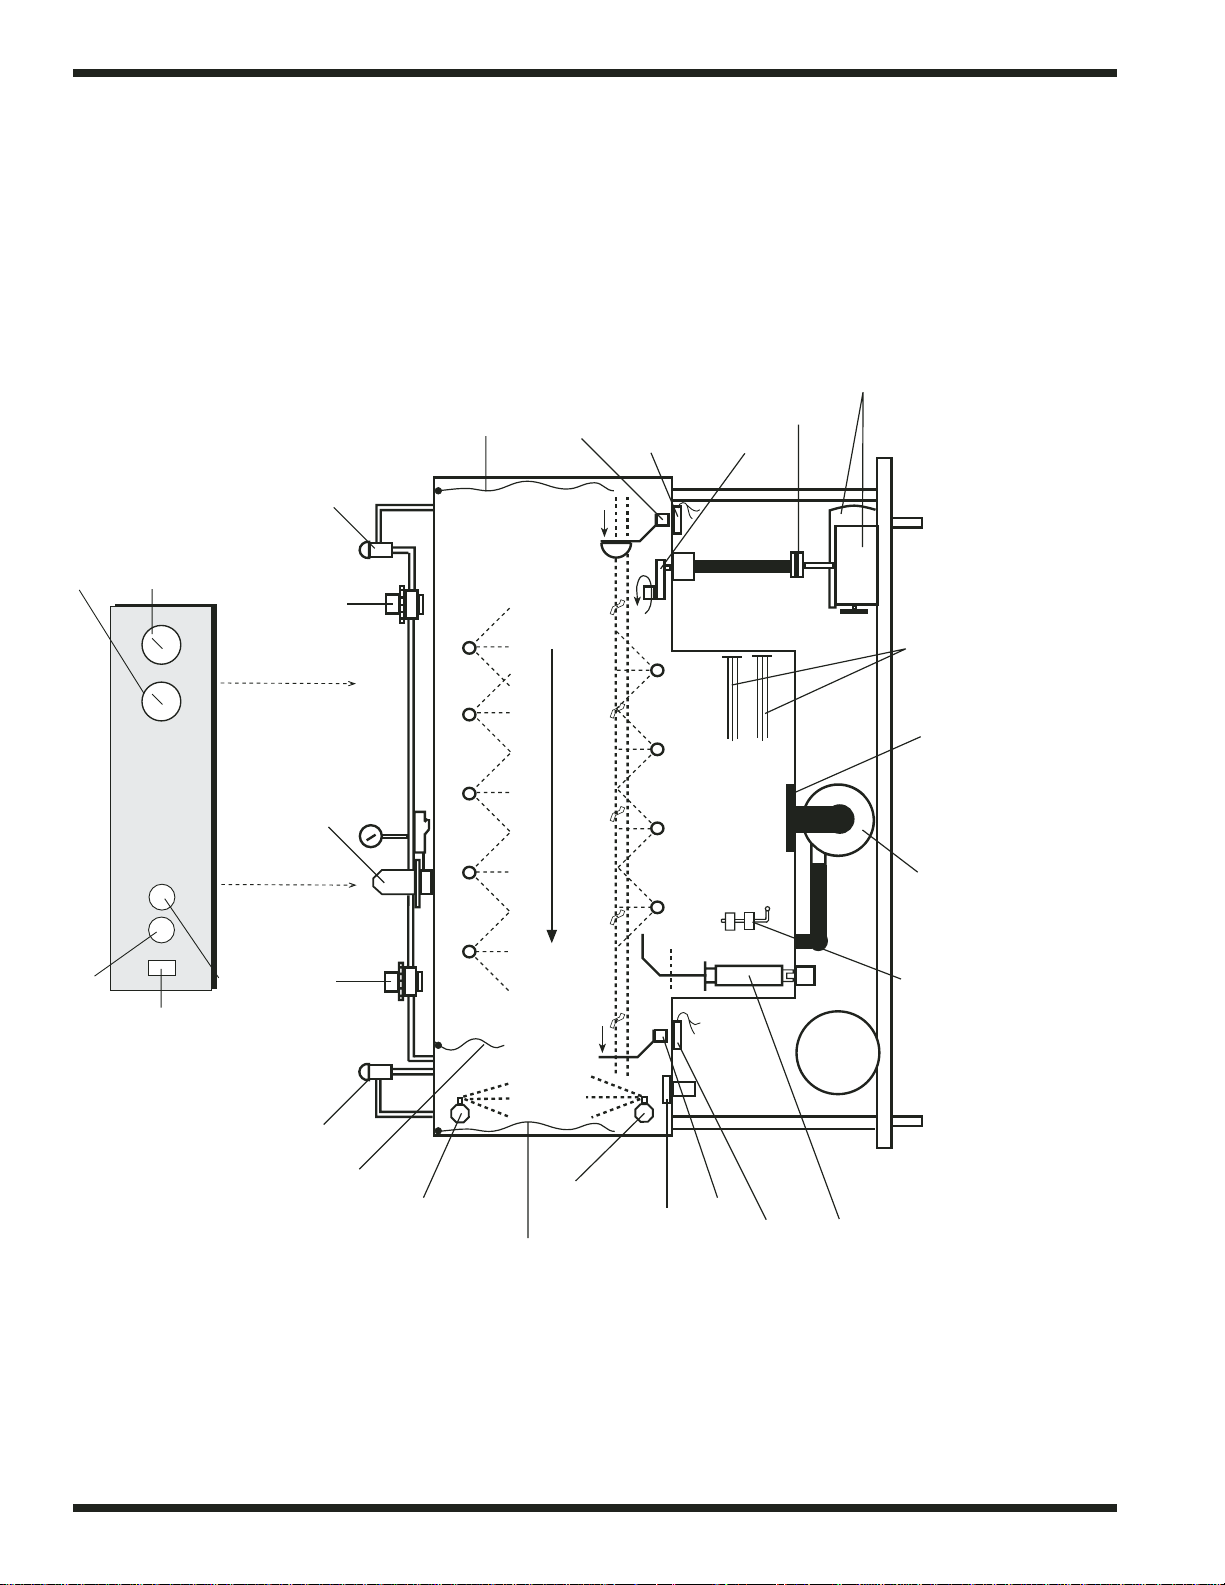
Vacuum
Breaker
Line Strainer
Power Rinse Tank
Heat Control
and High Limit
Thermostats
Power Rinse tank
Pump/Motor
Assembly
Dual Float Switch
Auto Fill/Low Water
Tank Heat Protection
Door-activated
Drain-overflow
Tube Assembly
Final Rinse-Saver
Mechanism
(Switch and Magnet)
Final Rinse
Booster Tank Assy
(Electric Only)
Power Rinse Tank
Heater Element
Final Rinse
Piping
Pushbutton Stop
Switch (Red)
Wash Spray
Arms
Pushbutton Start
Switch (Green)
Main Power Switch/
Circuit Breaker
Control
Transformer
Solenoid
Valve
Pressure Gauge
Pressure Reducing
Valve, PRV,
(Factory
installed on machines
with boosters)
Top Mounted Control Cabinet
Temperature
Gauges
Conveyor Crank
and Crosshead
Roller Assembly
Conveyor Dr ive Clutch
and Gear Reducer
Cradle Assembly
Idle Pump Mechanism
(Switch and Magnet)
Rack Conveyor Key Component Locations
(Right to Left Electrical Machine Shown)
KEY COMPONENTS
Page 10

2
INTRODUCTION
INTRODUCTION
Welcome to Champion.
...and thank you for allowing us to take care of your dishwashing needs.
This manual covers several models. Model numbers are shown on the front cover.
Your machine has been completely assembled, inspected, and thoroughly tested at our factory
before it was shipped to your installation site.
This manual contains:
• Warranty information
• Operation and cleaning instr uctions
• Maintenance instr uctions
• Troubleshooting guide
• Basic ser vice infor mation
• Replacement par ts lists
• Electrical schematics
Complete and return your warranty registration card within ten (10) days after the installation of
your machine.
All information, illustrations and specif ications contained in this manual are based upon the latest product information available at the time of publication. Champion constantly improves its
products and reserves the right to make changes at any time or to change specifications or design
without notice and without incurring obligation.
For your protection, factor y authorized par ts should always be used for repairs.
Replacement parts may be ordered from your Champion authorized service agency. When
ordering parts, please supply the model number, serial number, voltage and phase of your
machine, the part number, part description, and quantity.
Page 11

3
GENERAL
GENERAL
This manual covers the Champion two tank rack conveyor dishwashing machine. This machine is
fully automatic and is equipped with 2 H.P. wash/rinse pump motors and a 1/4 H.P. conveyor
drive motor. All models are available for right-to-left or left-to-right operation.
This series of dishwashers is modular in design. The following models and options are covered in
this manual:
Model Numbers
Two tank - Basic.................................................... 64KB, 40KB, 60KB
Two tank with 22" Prewash .................................. 64KPRB, 40KPRB, 60KPRB
Two tank with 36" Prewash .................................. PR36/64KB, PR36/40KB, PR36/60KB
Two tank with 26" Front Feed Prewash ................ FFPR26/64KB, FFPR26/40KB, FFPR26/60KB
• The 64KB basic model, along with its respective prewash option, is a high temperature
(180˚F/82°C final rinse) sanitizing model.
• The 40KB basic model, along with its respective prewash option, is a high temperature
(180˚F/82°C final rinse) sanitizing model.
• The 60KB basic model, along with its respective prewash option, is a high temperature
(180˚F/82°C final rinse) sanitizing model.
Page 12

4
THIS PAGE
INTENTIONALLY
LEFT BLANK
GENERAL
Page 13

5
INSTALLATION
Unpacking
CAUTION:
Care should be taken when lifting the machine. The piping under the base can be damaged.
Remove the dishwasher front panels if lifting from the front with a forklift.
1. Immediately after unpacking your machine, inspect for any shipping damage. If damage is
found, save the packing material and contact the carrier upon receipt of the machine.
2. Remove the dishwasher from the skids. Adjust the feet if required, then move the machine to
its permanent location. The machine should not be installed within 6 inches [153mm] of any
wall or structure.
3. Level the machine by placing a level on the top of the machine and adjusting the feet. Level
front-to-back and side-to-side.
Electrical Connections
NOTE:
Electrical and grounding connections must comply with the National Electrical Code and/or
Local Electrical Codes.
WARNING:
When working on the dishwasher, disconnect the electric service and tag it to indicate work
is being done on that circuit.
1. The electrician should compare the electrical specifications on the machine electrical connection plate (located inside the control cabinet) to the electrical power supply before connecting to the incoming service at a fused disconnect switch.
2. Motor rotation was set at the factory. Ensure proper rotation of the conveyor drive shaft (red
arrow on shaft shows direction of rotation). Reversing the motor direction is done in the control cabinet by reversing the wires Ll and L2 on the disconnect switch side of the main electrical connection terminal block (Refer to the electrical diagrams in the back of this manual).
3. A knock-out plug is provided at the rear of the control cabinet for electrical service connections.
NOTE:
Electrical and grounding connections must comply with the National Electrical Code and/or
Local Electrical Codes.
NOTE:
Electric boosters require a separate electrical connection.
A fused disconnect switch or circuit breaker (supplied by user) is required to protect each
INSTALLATION
!
!
Page 14
6
Chemical Connection
Terminal Board
INSTALLATION
Plumbing Connections
CAUTION:
Plumbing connections must comply with local sanitary and plumbing codes.
1. Connect the hot water supply at the final rinse piping connection located behind the control
cabinet at the top of the machine.
2. A “Y” line strainer is provided by Champion for machines without boosters.
A pressure reducing valve (PRV) is provided by Champion for machines with built-in boosters.
3. If the incoming hot water supply pressure exceeds 25 psi [173 kPa], a PRV must be installed
and set to 20-22 psi [138-151 kPa]. The PRV may be purchased from Champion or supplied
by others.
4. Install a manual shut-off valve in the steam and water supply lines to accommodate ser vicing
the machine. The valve should be the same size as or larger than the supply line.
5. Provide a suitable gravity drain to connect to a 1-5/8" OD drain tube.
Ventilation
1. Stainless steel watertight ducting should be installed INSIDE the 4" x 16" [102mm x 407mm]
vent stacks at the load and unload ends. A minimum of 6 air changes per hour of kitchen air
is recommended. The typical exhaust ventilation requirements for a rack machine using a
180˚F/82°C final rinse are:
• The load end requires 150 CFM @ 1/4" (SP), [71 Liters/sec] with prewash.
• The load end requires 200 CFM @ 1/4" (SP), [95 Liters/sec] without prewash.
• The unload end requires 400 CFM @ 1/4" (SP), [189 Liters/sec].
2. An adjustable damper is supplied with the vent stacks for adjusting the exhaust volume.
CAUTION:
Exhaust air should not be vented into a wall, ceiling, or concealed space of a building.
Condensation will cause damage.
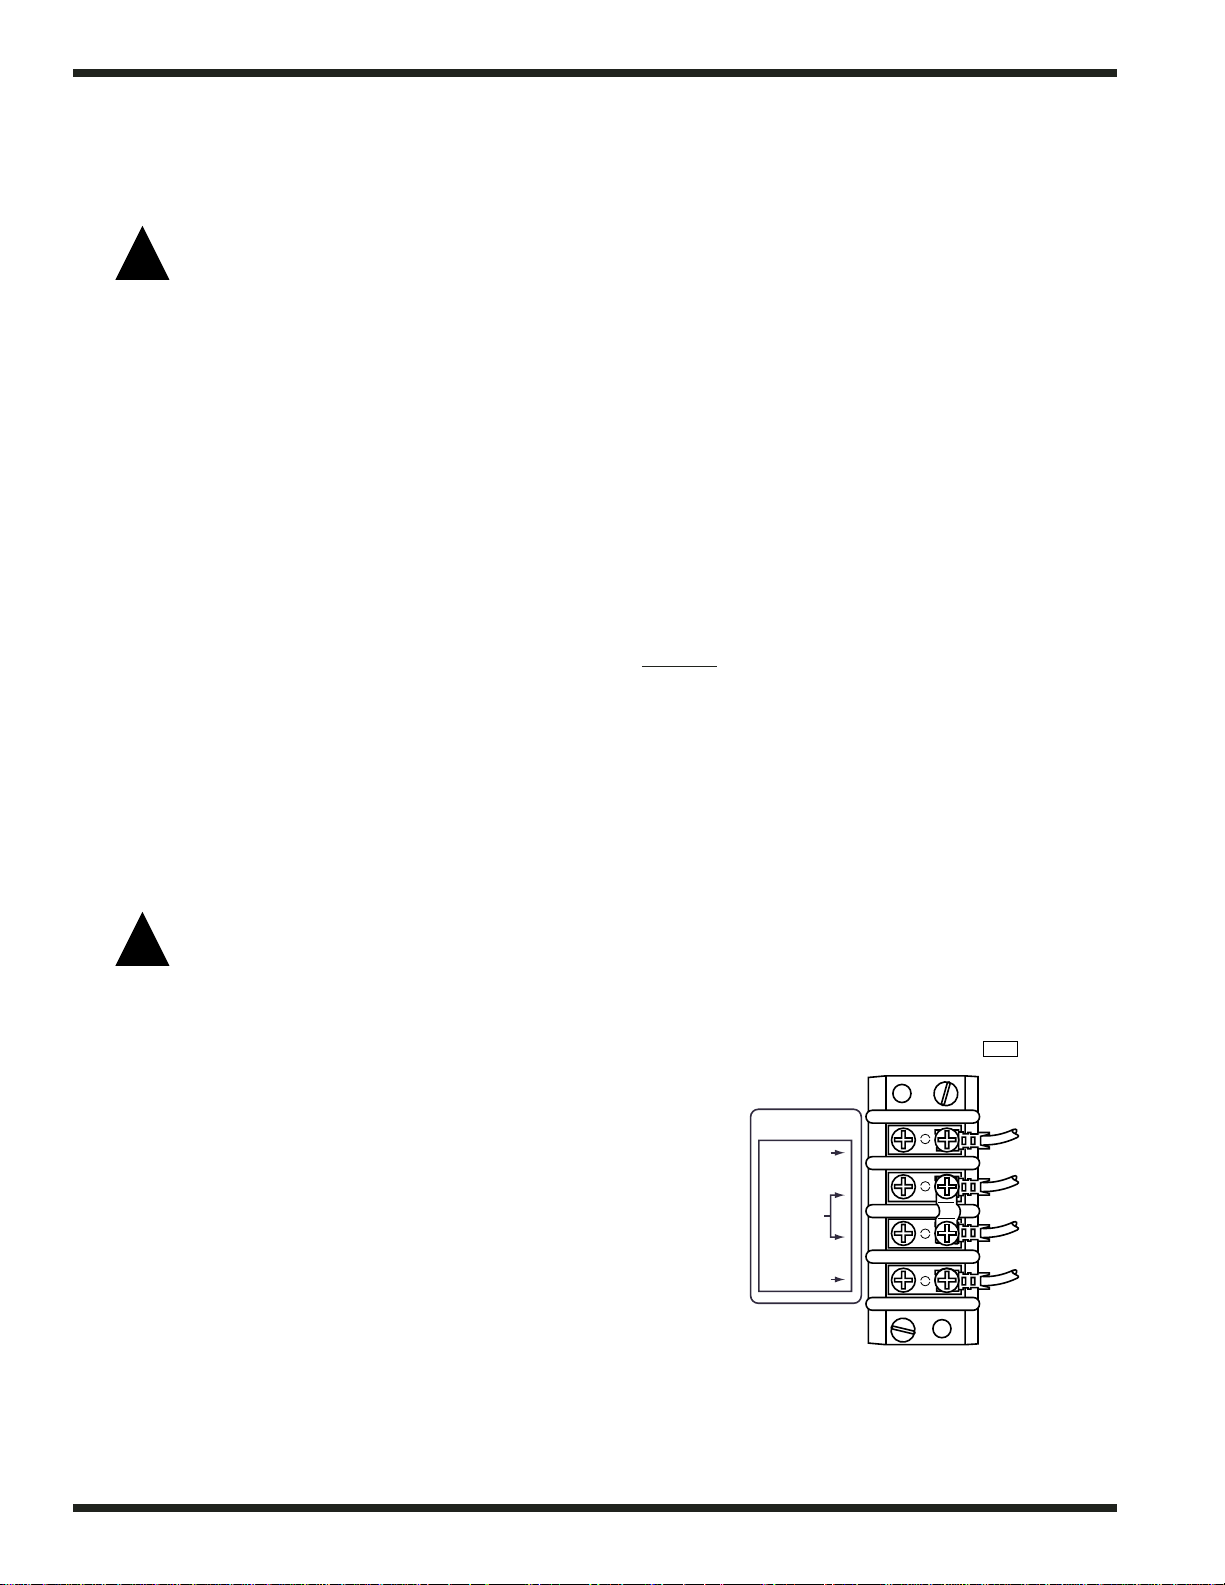
Chemical Connections
1. Use a qualified detergent/chemical supplier.
2. Labeled control circuit connection ter minals are provided
in the control cabinet for detergent and rinse agent/sanitizer
dispensing equipment (supplied by others).
3. Refer to the illustration below. The illustration shows the terminal board for current production machines.
Signal connection points include:
• Detergent signal 120VAC, 1 Amp Max amp load.
• Rinse aid/Sanitizer signal 120VAC, 1 Amp Max amp load.
4. A removable black plug is provided in the load end
side of the wash tank for installation of the
detergent conductivity cell.
!
!
SIGNAL ONLY
120V
120V
RINSE AID/
SANI
COMMON
DETERGENT
1R001
Page 15
7
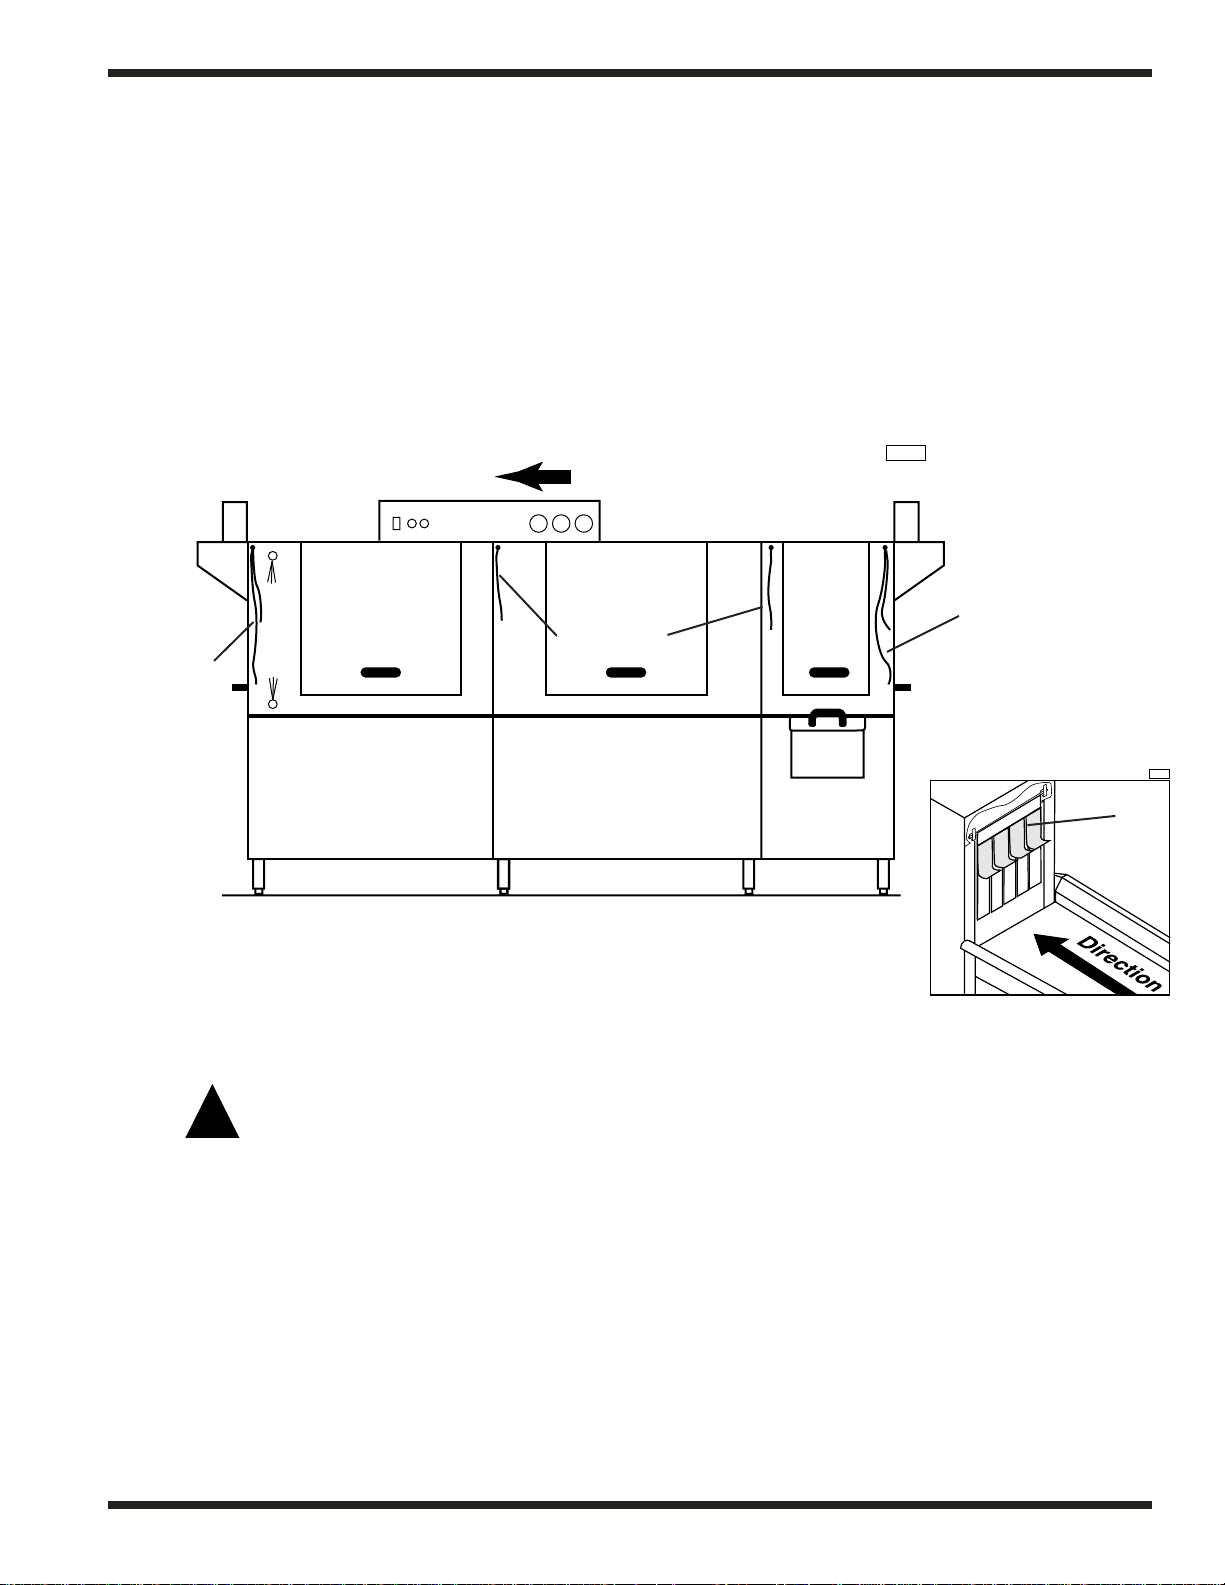
Short cur tain
Long
curtain
Load End
Curtain Locations
(Machine with prewash shown)
Long curtain
Short
flaps
Short flaps on long curtains
face the load end of dishwasher
Curtain Locations
1. Refer to the illustrations below and hang the curtains as shown.
J-hooks are located in the corners of each section to accept the curtain rods.
• Standard long curtain 24" x 20-1/4" [610mm x 515mm]
• High hood long curtain 24" x 22-3/4" [610mm x 578mm]
• Standard short curtain 24" x 13-1/4" [610mm x 337mm]
• High hood short curtain 24" x 20-1/4" [610mm x 515mm]
2. Make sure the short flaps of the long cur tains f ace the load end of the dishwasher.
The longest curtains always go on each end of the dishwasher.
INSTALLATION
Completing Installation
WARNING:
Do not insert racks into machine before tanks fill with water. Operating pumps dry will cause
pump seal damage and leakage that can result in a motor failure.
1. Remove any foreign material from inside the machine.
2. Check to insure that drains and overflow pipes are operational and sealed.
3. Position scrap screens on supports above the tanks.
4. After plumbing and electrical connections are completed, fill the tank and wait 10 minutes.
Check all plumbing connections for leaks.
5. Drain the tank and check the drain lines for leaks.
6. The for med down lip of the dishtable should be placed inside the machine. The dishtable
should be pitched toward the dishwasher for proper draining by adjusting its leveling feet.
The dishtable should be sealed to the dishwasher.
!
1R003
WASH
PRE
WASH
R-L Direction
Power Rinse
1R002a
Page 16
8
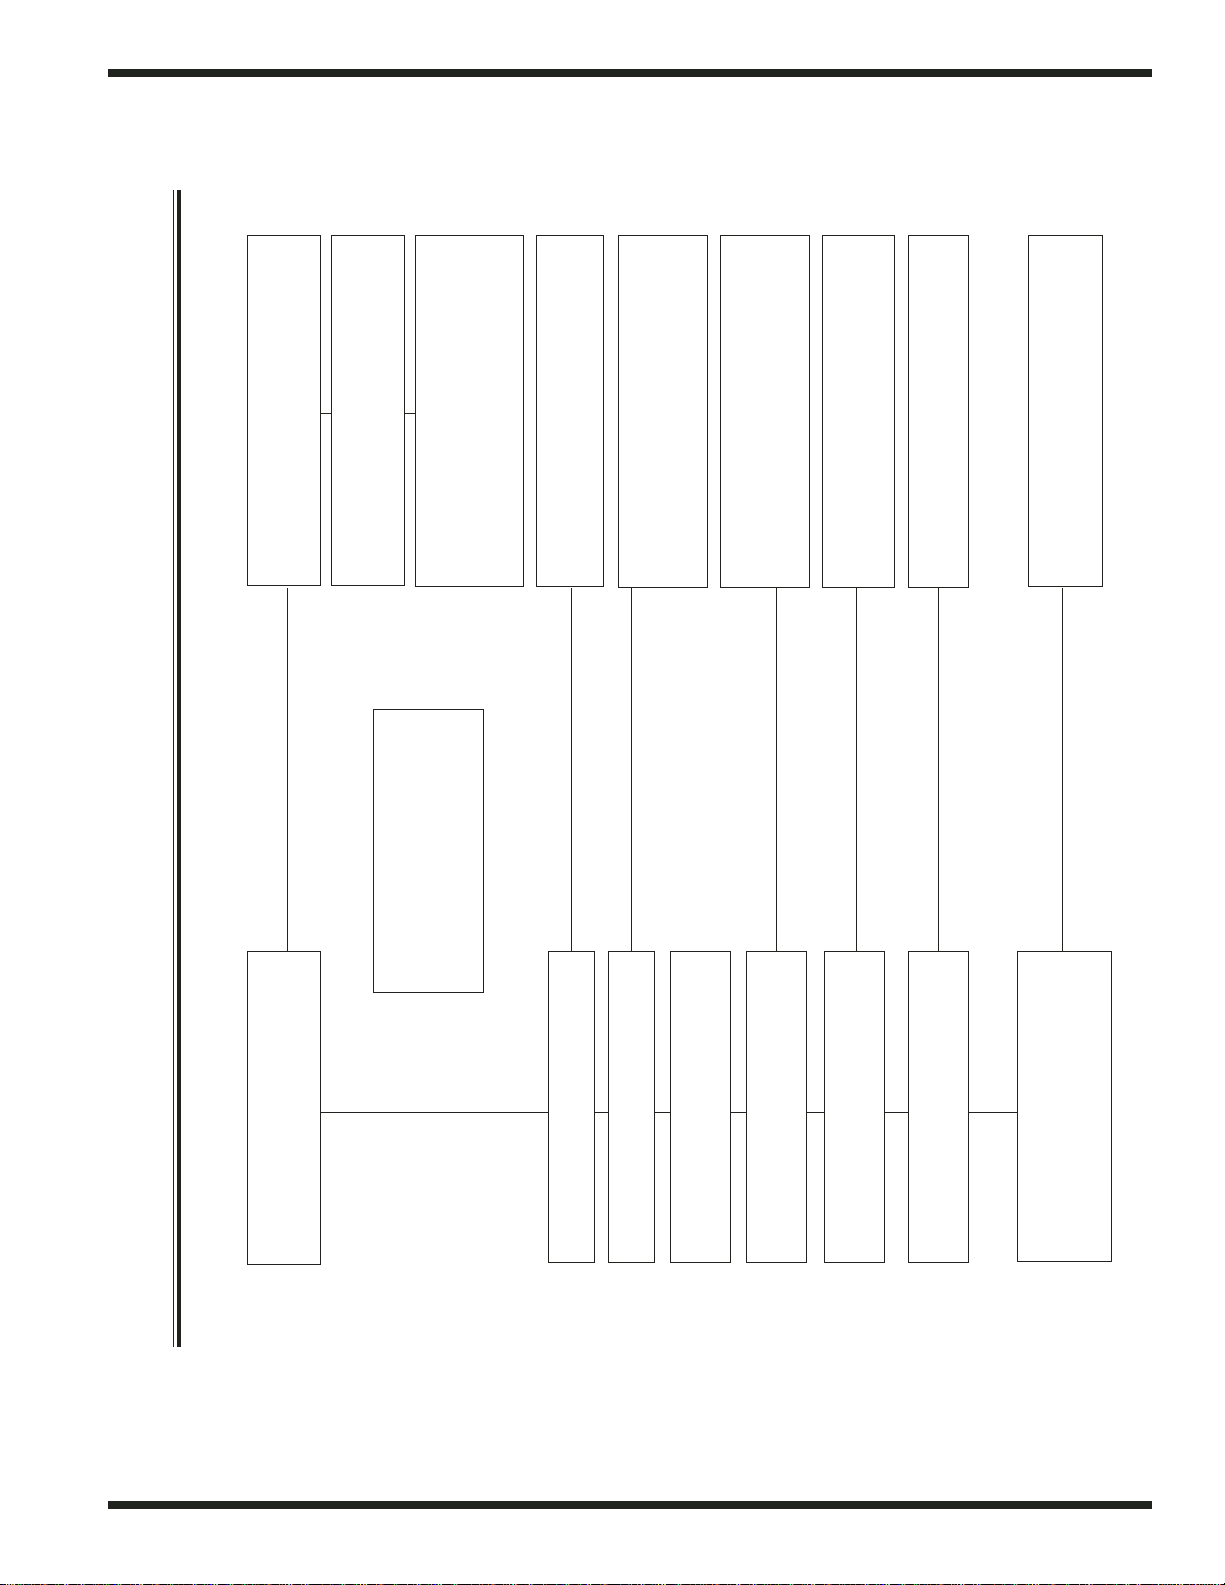
Simplified Rack Conveyor Dishwasher
Right to Left Model
OPERATION PROCEDURE
OPERATION
Final Rinse Water
Wash Water
Temperature Gauge
Temperature Gauge
Vacuum
Breaker
Long Curtain
Idle Pump
Magnet
Idle Pump
Magnetic Switch
Conveyor Crank
Conveyor Drive
Motor and Gear
Clutch
Assembly
Reducer
Control Cabinet
Green Start Button
Lighted On-Off
Rocker Switch
Pressure
Regulating
Rinse Valve
Red Stop Button
Vacuum
Breaker
Fill Valve
Valve
Wash Arm Spray Pipes
Right to Left Model
Conveyor Direction
Wash Arm Spray Pipes
Booster
E lectric Tank
Heaters
Pump
Strainer
Wash
Pump
Dual Float
Switch
Short Curtain
Rinse-Saver
Final Rinse
Drain-off
Adjustment
Magnet
Rinse-Saver
Magnetic Switch
Door Activated
Drain-overflow
Assembly
Long Curtain
Upper Final Rinse Pipe
Lower Final Rinse Pipe
Page 17
9
OPERATION
Rack Conveyor Machine
Operation Procedure
Action Result
Turn Power Switch on
Press green start button
Insert soiled rack
Rack conveys thru machine
Rack activates final rinse
Rack exits the machine
Press stop push button
Drain machine for cleaning
after each meal period
or every 2 hours of use
Lighted On-Off Rocker Switch
on control cabinet will illuminate
Float switch activated
Tank(s) fill with water
When machine is full float
switch cuts off water
and calls for heat.
(Wait for proper temperature)
Conveyor drive motor
is activated
Wash pump starts
Continuous power on wire #13
and #2 120V Detergent signal
20 psi required flow pressure
Power to wire #70 and #2 120V
Rinse/Sanitize signal
Wash pumps shut down (timer)
Conveyor continues to run
Conveyor drive will stop
Check detergent and rinse aid
supply. Replenish if necessary
Doors are closed
Door activated drains
are closed
Page 18

10
OPERATION
OPERATION
Follow the procedure below to operate your dishwasher properly.
1. Check that spray pipes, curtains, overflow drains, and scrap screens are in place and clean.
2. Turn on detergent dispenser switches and check detergent supply.
3. Turn on exhaust vent system (if applicable), and make sure it is operating.
4. Close door(s). Push the power switch to the ON position. Tanks will begin filling with water.
5. When tanks are full, check wash tank temperature gauge. Minimum wash temperatures are:
• 64KB, 40KB, 60KB Wash tank - 150°F/66°C
• 64KB, 40KB, 60KB Power rinse tank - 160°F/71°C
• Prewash tanks do not have tank heaters
6. Press the START button on the control cabinet. Only the conveyor will start. The pumps
WILL NOT OPERATE until the first rack enters the machine.
7. Scrap and pre-flush all items to be washed, and load the items into the rack.
DO NOT OVERLOAD RACKS.
Place dishes edgewise in a peg rack, cups and bowls upside down in a flat rack.
Spread silverware evenly in a single layer in a flat rack or
upright (loosely packed) in a cutlery rack.
8. Push the rack into the machine, and the pumps will star t automatically.
9. Check the rinse pressure and temperature as the racks pass through the final rinse. This rinse
pressure MUST be 20-22 psi [138-151 kPa] and the f inal rinse temperature MUST be
180°F/82°C minimum.
10. The pumps will automatically stop shortly after the last rack leaves the machine.
The conveyor will continue to run.
11. The machine may be stopped any time during the cycle by pressing the STOP button on the
control cabinet. When restarted, items inside the machine will be fully washed and rinsed.
12. CLEAN scrap screens, scrap baskets (if applicable) and REPLACE tank water every 2 hours
of operation or after each meal period. Check chemical supply.
CAUTION:
DO NOT allow racks to remain on unload dishtable. This could cause the conveyor to jam
and may damage machine. The installation of a table limit switch is highly recommended and
will reduce the risk of damage.
WARNING:
Do not leave water in tanks overnight.
!
!
Page 19

11
MAINTENANCE
MAINTENANCE
The efficiency and life of your machine is increased by regularly scheduled preventive maintenance.
A well maintained machine gives better results and ser vice. An investment of a few minutes of daily
maintenance will be worthwhile.
The best maintenance you can provide is to keep your machine clean. Components that are not
regularly cleaned and flushed will clog and become inoperative.
Intervals shown in the following schedules represent an average length of time between necessary
maintenance. Maintenance intervals should be shortened whenever your machine is f aced with
abnormal working conditions, hard water, or multiple shift operations.
Maintenance Schedule
CLEANING
• Daily-Every 2 Hours of Operation
1. Turn power switch to OFF.
2. Remove all scrap screens, scrap baskets (if applicable), and pull drain lever(s) to drain
water. Clean inside of tanks and flush with clean water. Backflush scrap screens until clean.
Do not strike screens against solid objects.
3. Remove the spray pipes by a 1/4 tur n, counterclockwise. Remove the end plug from each
spray pipe. Flush pipe and nozzles until clean. Do not strike spray pipes against solid
objects. Replace end plugs, verify that rubber seals are in place on manifolds. Reinstall
spray pipes using a 1/4 clockwise turn.
4. Remove and clean curtains. Hang them off the dishtable to dry.
5. Leave the doors open between operations to allow dr ying.
6. Verify that final rinse nozzles are clean and free of inter nal hard water deposits. Clean rinse
nozzle orifices with a small paper clip. Consult your chemical supplier for the proper use
and kind of deliming chemical.
7. Repor t any unusual conditions to your supervisor.
• As Required
1. Check temperature and pressure gauge readings.
2. Inspect machine and check pump motor for leaks around the shaft.
3. Check chemical supplies and refill as necessar y.
• Weekly
1. Inspect all water lines for leaks and tighten at joints if required.
2. Clean all detergent residue from exterior of machine.
3. Check drain/overflow tube for leaks.
4. Clean accumulated scale from heating element.
5. Remove and closely inspect each spray ar m for blockage.
Page 20

12
MAINTENANCE
• Weekly (Cont.)
6. Straighten a paper clip and use it to clear each rinse nozzle.
7. Inspect pawl bars and drive assembly for wear and freedom of travel.
8. Check float switches in tank for freedom of travel.
9. Check idle pump and final rinse levers for freedom of travel.
DELIMING
Your dishwasher should be delimed regularly as required. This will depend on the mineral content of your water.
Inspect your machine interior for lime deposits. If deliming is required, a deliming agent should
be used for best results. Consult your chemical supplier for proper type and procedures.
DANGER:
Deliming solution, rinse agents, or other acids must not come in contact with household bleach (sodium hypochlorite) or any chemicals containing chlorine, iodine,
bromine, or fluorine. Mixing may cause hazardous gases to form. Consult your
chemical supplier.
!
Page 21

13
TROUBLESHOOTING
In order to find the cause of a breakdown or abnormal operating condition in your dishwasher
please ensure that:
1. All switches are ON
2. Drain and overflow tube are in place and seated
3. Wash pipe and rinse nozzles are clean
4. Scrap screen(s) and scrap basket (if applicable) are properly positioned
5. Spray pipes are in their proper positions
6. Ther mostat(s) are at their cor rect setting
7. Sanitizer, detergent, and rinse additive dispensers are adequately filled
8. Doors are fully closed.
If a problem still exists, use the following table for troubleshooting
CONDITION CAUSE SOLUTION
Machine will not start Door not closed .................................. Make sure doors are fully closed
Door safety switch faulty .................. Contact your service agency
Start switch faulty.............................. Contact your ser vice agency
Main switch off.................................. Check disconnect
No rack inserted ................................ Place rack in unit
Overload protector tripped ................ Reset overload in control box
Low or no water Main water supply is turned off ........ Turn on house water supply
Drain/overflow tube is not
in place and seated ............................ Place and seat drain tube
Machine doors not fully closed ........ Close doors securely
Faulty fill valve.................................. Contact your service agency
Stuck or defective float...................... Check floats and clean
Clogged ‘Y’strainer .......................... Clean or replace
Continuous water filling Stuck or defective float...................... Check floats and clean
Fill valve will not close...................... Clean or replace
Drain tube not in place ...................... Look for drain tube in tank
Any motor not running Overload protector tripped ................ Reset overload in control box
Defective motor ................................ Contact your service agency
Wash tank water temperature Incoming water temperature
is low when in use at machine too low ............................ Raise temperature to: 140°F/60°C
Defective thermometer ...................... Check or replace
Defective thermostat.......................... Check for proper setting or replace
Defective heater element .................. Check or replace
Low steam pressure .......................... Check steam supply pressure
Defective steam trap.......................... Check or replace
Defective solenoid valve.................... Check or replace
TROUBLESHOOTING
Page 22

14
CONDITION CAUSE SOLUTION
Insufficient pumped spray Clogged pump intake screen.............. Clean
pressure Clogged spray pipe............................ Clean
Scrap screen full ................................ Must be kept clean and in place
Low water level in tank...................... Check drain and overflow tube
Pump motor rotation incorrect .......... Reverse connection between L1
and L2 in control cabinet (3 phase only)
Defective pump seal .......................... Contact service agent
Insufficient f inal rinse or no Faulty pressure reducing valve .......... Clean or replace
final rinse Improper setting on pressure
reducing valve.................................... Set flow pressure to 20-22 psi [138-151 kPa]
Clogged rinse nozzle and/or
pipe .................................................... Clean with paper clip/delime
Improper water line size.................... Have installer change to proper size
Clogged ‘Y’strainer .......................... Clean or replace
Low final rinse temperature Low incoming water ........................ Check the booster (KB, KPRB models)
be sure the thermostat is set to maintain
180°F/82°C temperature.
Check valve to be sure it is clean
and operating.
Defective thermometer ...................... Check for proper setting or replace
Poor washing results Detergent dispenser not
operating properly.............................. Contact detergent supplier
Insufficient detergents ...................... Contact detergent supplier
Food Soil concentration too
high in wash tank .............................. Drain tank, clean and refill every 2 hours of
operation or after each meal period.
Wash water temperature
too low .............................................. See condition “Wash Tank
W ater Temperature” above
Wash ar m clogged .............................. Clean
Improperly scraped dishes ................ Check scraping procedures
Ware improperly
placed in rack .................................... Use proper racks. Do not overload racks
Improperly cleaned
equipment .......................................... Unclog wash sprays and rinse nozzles
to maintain proper pressure and flow
conditions. Overflows must be open.
Keep wash water as clean as possible.
Electric elements or steam
coils has soil/lime buildup ................ Clean and delime
TROUBLESHOOTING
Page 23

15
1R005
1R004
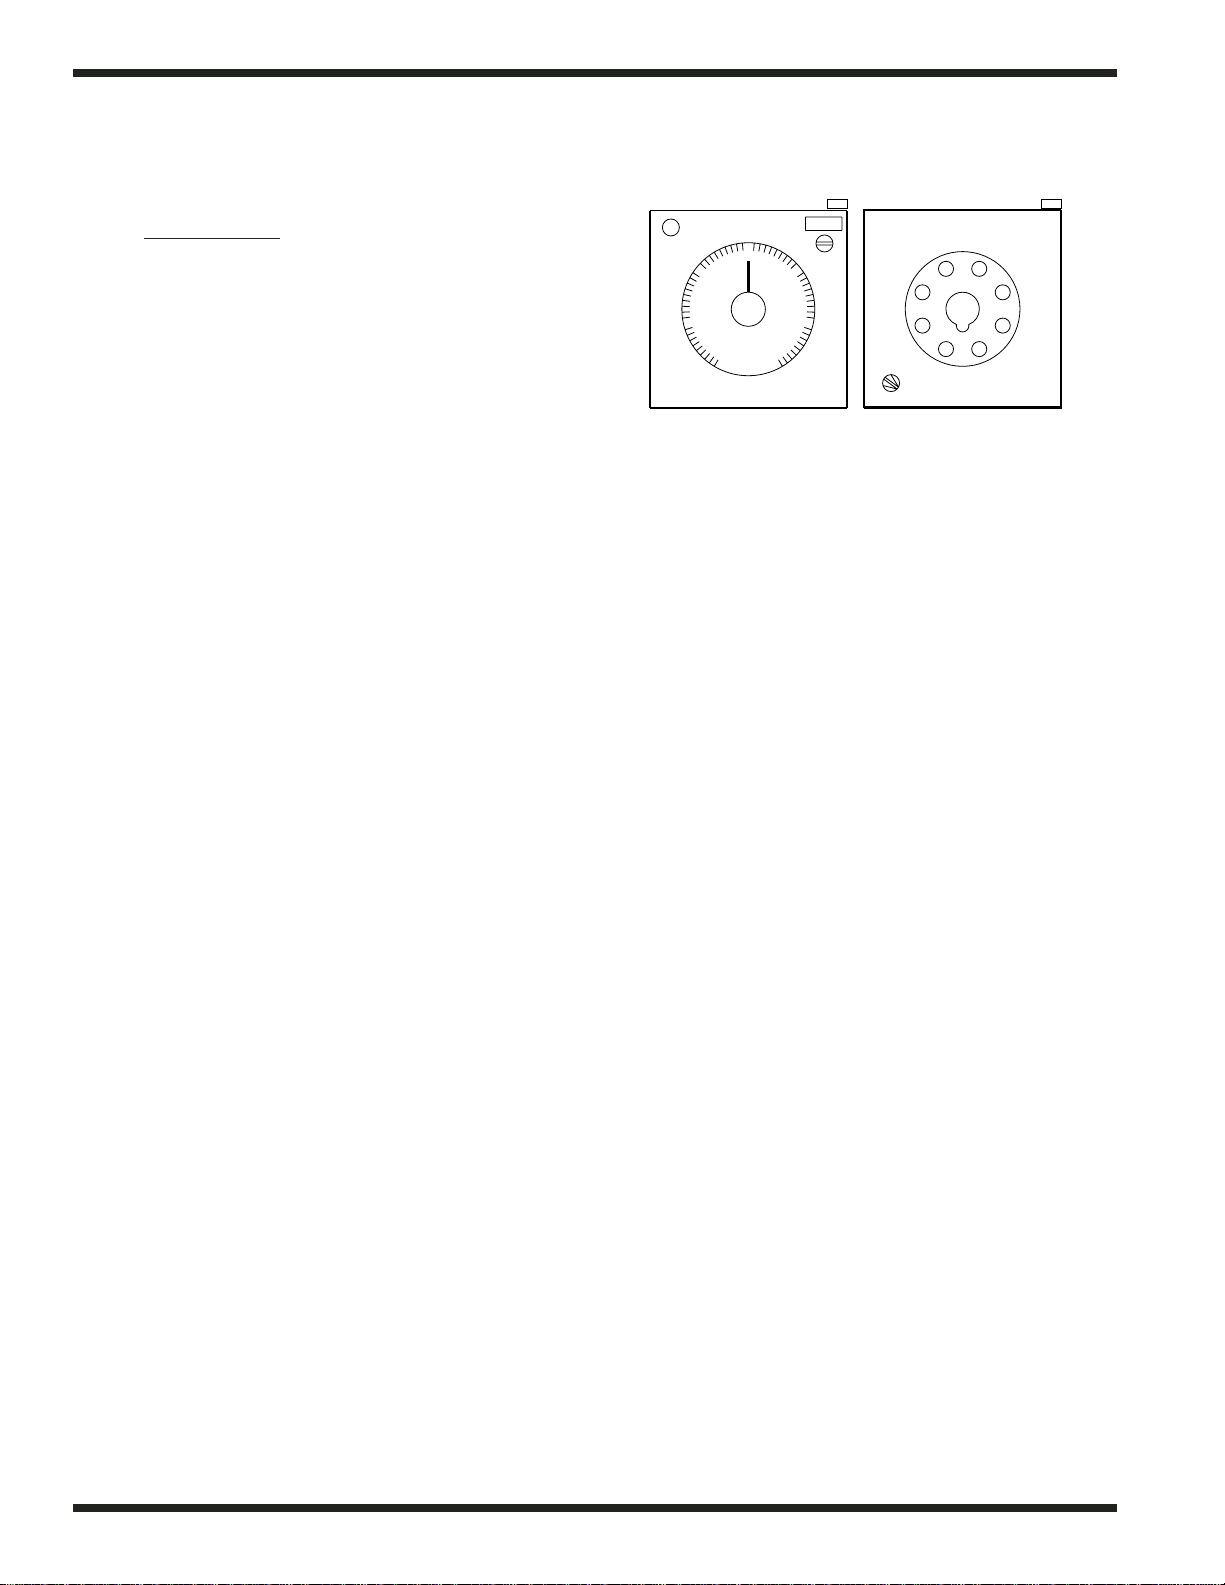
Figure 1
Fuse Blocks
Figure 2
Motor Overload
ELECTRICAL SERVICE
ELECTRICAL SERVICE
Fuse Blocks—120VAC Control Voltage
Two fuse blocks, located in the center rear of the main control cabinet
protect the main control transformer. Each fuse block holds a fuse.
The fuses are marked 1FU and 2FU on the electrical schematic.
To Replace the fuse:
• Disconnect power to the machine at the main service switch.
• Flip the tab on the top of the fuse block to open the block.
• Remove the fuse and replace it.
• Close the fuse block and turn the main power on.
• If the fuse blows again, DO NOT INCREASE THE FUSE SIZE.
• DETERMINE THE CAUSE OF THE OVERLOAD.
Fig. 1 shows the fuse block opened and the fuse exposed.
Motor Overloads
Motor overloads are located to the left of the fuse blocks inside
the control cabinet. Each motor has one overload to protect it from
line voltage electrical overloads. In addition, an auxilary set of switch
contacts is built into the overload. The switch contacts disconnect
120VAC power to the motor contactor coils in the event of an overload
condition. Refer to Fig. 2.
Note the Switch Lever on the Overload.
• If the switch lever is off with the “0” showing
then the overload has tripped on an overload.
To Reset the Motor Overload:
• Flip the star ter switch to the On position.
• Run the dishwasher and test the AMP
draw of the motor in question. If the motor
checks okay then there may be a wiring
problem or the overload may be defective.
To Replace a Motor Overload:
• Disconnect the wires to the overload.
• Release the mounting catch on the front
side of the overload, push forward and lift out.
• Snap the new overload into place and
reconnect the wires.
To adjust the overload setting:
The screwdriver in Fig. 2 is positioned
to adjust the motor overload AMP setting.
• Read the FLA motor amps that applies for the
machine voltage on the Motor Nameplate.
• Turn the setting to match nameplate FLA.
Page 24
16
BackFront
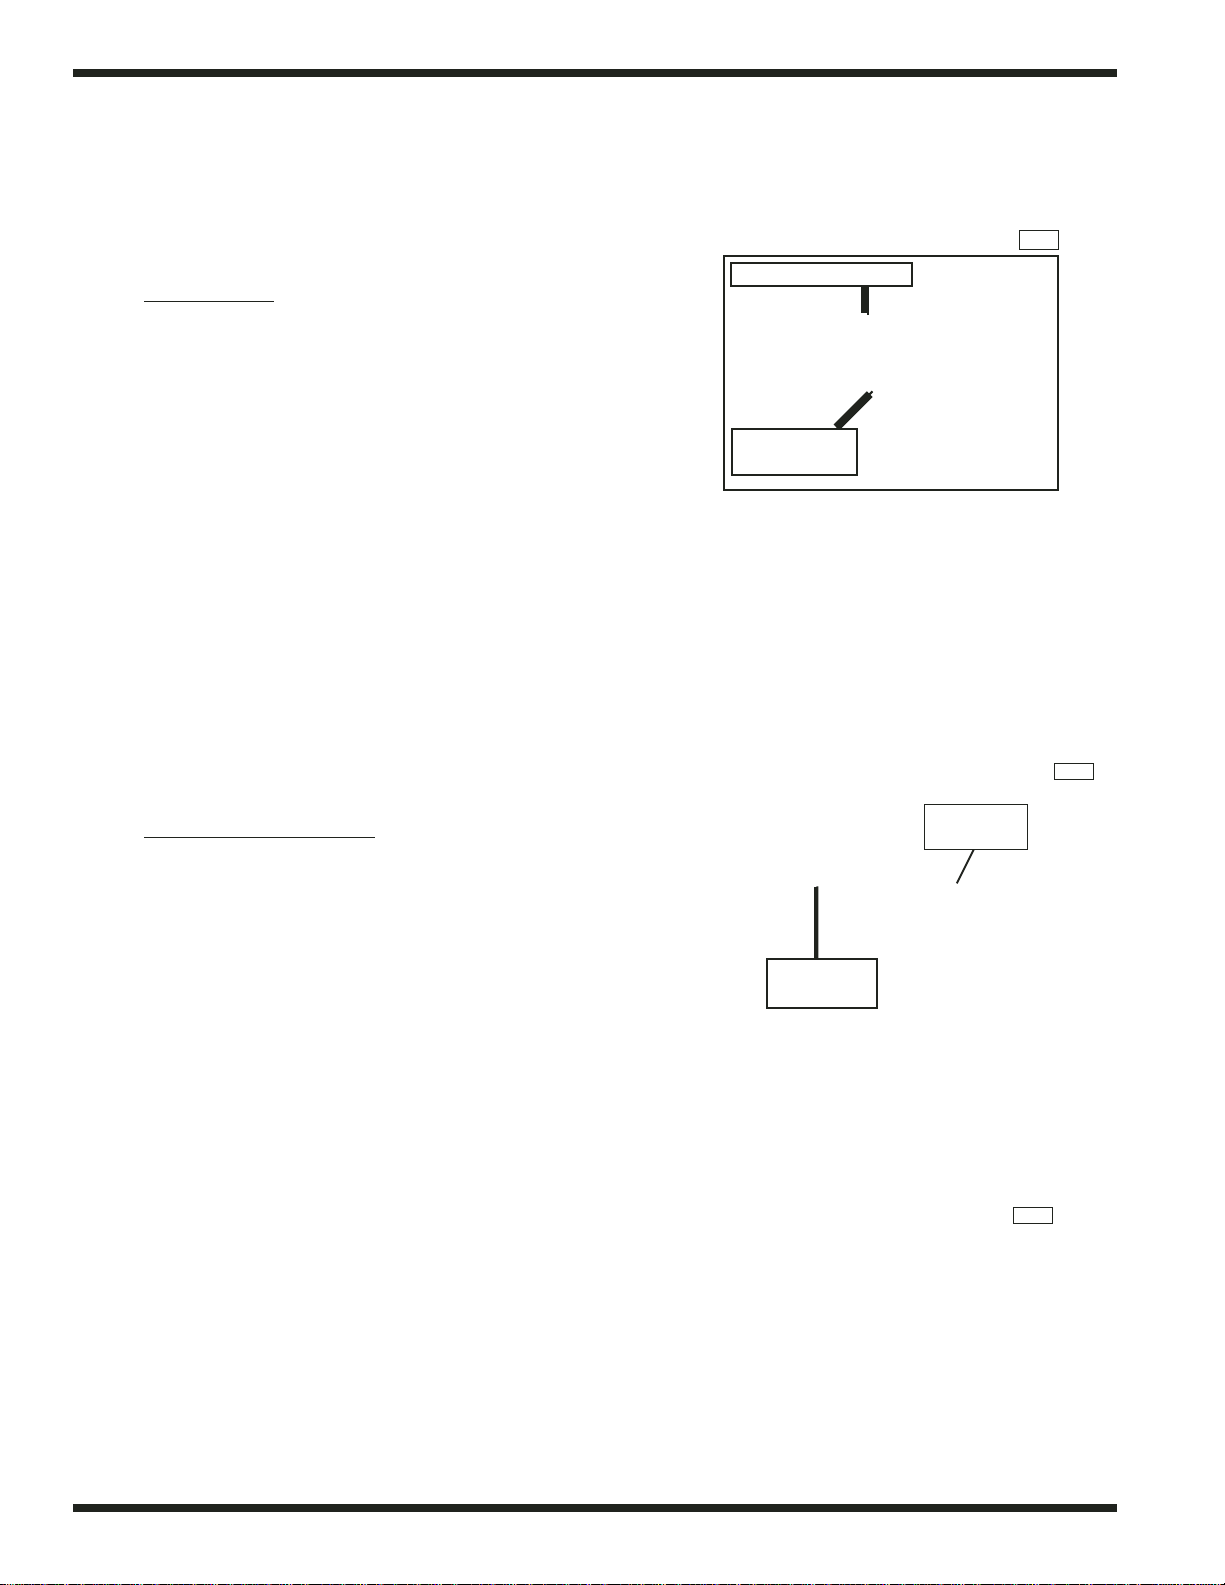
Pump Timer
Refer to Fig. 3
The automatic timer located in the left center of the
control cabinet is set at the factory.
The Pump Timer controls the amount of time that
the pumps will run before the last rack enters the
load end of the dishwasher tunnel.
The Pump Timer is an OFF DELAY timer.
Each timer is marked
with a tag noting
the time set by the factory.
The timer has the following user defined settings:
1. Adjustable timer range
2. Timer knob setting
3. Indicator light (ON when timer is counting)
4. 50 Hz or 60 Hz setting on the back of the timer
To Replace a Timer:
• Disconnect power to the machine at the main service switch.
• Remove the defective timer and install the replacement.
• Adjust the new timer setting to match the setting
of the original timer.
Operation Sequence:
• A dishrack entering the machine contacts the idle pump switch lever.
• Nor mally closed contacts of the idle pump switch open, de-energizing control relay 1CR.
• Nor mally closed contacts (1, 9) of 1CR close and apply 120VAC to reset coil of pump timer.
• Pump timer resets.
• The dishrack moves off the idle pump switch lever. The switch contacts close.
• 1CR energizes and contacts (1, 9) open removing 120VAC from the pump timer reset coil.
• The pump timer begins to time down for its preset time setting.
• The timer is reset each time the idle pump switch is activated. If the timer is reset only once it
will time out and shut the pumps off after the rack has exited the dishwasher.
To Check the Pump Timer Setting:
• Turn the power on.
• Place a rack on the conveyor.
• Press the Green star t button. The conveyor drive will start.
• When the rack enters the load end the pumps will star t.
• Wait for the rack to exit the tunnel at the unload end.
• When the pumps stop, push the red stop button.
• Measure the distance between the exit end of the tunnel and the rack.
• The rack should be about 1 foot past the end of the tunnel.
• If the distance is less than 1 foot, increase the pump timer setting. Continue to increase the
timer setting a few seconds at a time until the proper distance is reached.
• If the measured distance is g reater than 1 foot, decrease the pump timer setting. Continue to
decrease the timer setting a few seconds at a time until the proper distance is reached.
ELECTRICAL SERVICE
0
1
2
3
UP
4
5
6
Omron
H2C
6M
1R006
50
60
1
2
3
4
5
6
7
8
1R007
Figure 3
Pump Timer
Page 25

17
1R008
Figure 4
Dual Float
Switch
ELECTRICAL SERVICE (Cont.)
Automatic Fill/Low Water Heat Protection
Dual Float Switches –
Refer to F
ig. 4
Each tank contains a dual float. The device consists of
an angled stem containing two reed switches.
Two stainless steel ball floats slide over the
stem and are free to move up and down.
The floats contain magnets. When the float moves on the
stem, it opens and closes its associated reed switch inside the
stem. The reed switches control relays. The relays control the
automatic fill and heat for different parts of the machine.
Float switches and their relays operate on 24VAC.
Circuit Explanation –
The following is a general explanation of the float switch circuit.
Refer to the electrical schematic on your machine for a detailed
description of the individual floats, relays, and wiring.
Bottom Float and Reed Switch:
• The bottom float controls the heat.
• When the bottom float is down, the bottom reed switch contacts are open.
• When the bottom float is up, the bottom reed switch contacts close.
Top Float and Reed Switch:
• The top float controls a fill valve.
• When the top float is down, the top reed switch contacts are open.
• When the top float is up, the top reed switch contacts are closed.
Initial Fill –
• When the tank is completely empty, both floats are down and their reed switch contacts are open.
• The control relay for the float switch is de-energized.
• The fill valve for the tank is energized and the tank begins to fill with water.
• As the water level in the tank rises, the bottom float begins to move up.
• When the bottom float is completely up, its NO reed switch contacts close.
• This prepares the heat circuit, but the heat Does Not energize at this time.
• The tank continues to fill until the top float is completely up.
• The top float’s NO reed switch contacts close. Its control relay energizes.
• The fill valve de-energizes.
• The heat circuit energizes through the float switch and the contacts of the control relay.
During Normal Operation –
• If the water level in a tank falls below the level of the top float, the top float moves down and
its reed switch contacts open.
• When the water level falls below the level of the bottom float, the bottom float moves down
and its reed switch opens.
• The control relay de-energizes. The fill valve energizes and refills the tank.
• The heat circuit will de-energize until the water level in the tank raises the top float again.
• The bottom float keeps the heat circuit ready as long as the water level is above the level of
the bottom float.
ELECTRICAL SERVICE
Page 26
18
1R010
1R009
Figure 5
Tank Heat Thermostats
Figure 6
Booster Thermostat Locations
Figure 7
Booster – High Limit Thermostat
ELECTRICAL SERVICE
ELECTRICAL SERVICE (Cont.)
Thermostat Locations and Adjustments
Refer to Fig. 5
Electric tank heat is controlled by two ther mostats.
1. The control ther mostat which regulates the temperature.
2. The high limit ther mostat which protects from overheating.
Location:
Both thermostats are located on front of tank, inside a black
enclosure box behind the front access panel.
Adjustment:
The Control Thermostat has an adjustment screw on one side.
• The ther mostat is wired Nor mally Closed.
• Turn the adjustment screw clockwise to increase
the temperature in the tank and counterclockwise
to decrease the temperature in the tank.
The High Limit Thermostat is not adjustable.
It contains a red reset button in its center.
• The red button pops out if the temperature
in the tank exceeds 210°F/99°C.
• Press the red button in to reset the high limit.
Determine the cause of the high temperature condition.
Refer to F
ig. 6 and Fig. 7.
Electric Booster Heat is controlled by two ther mostats.
1. The control ther mostat which regulates the temperature.
2. The high limit ther mostat which protects from overheating.
3. Each tank has a control and a high limit ther mostat.
Location:
The control thermostat is enclosed in a black box mounted
on the front of the wash tank behind the front access panel.
The high limit thermostat is enclosed in a box mounted
on top of the booster tank.
Adjustment:
The control thermostat has an adjustment screw on one side.
• The ther mostat is wired Nor mally Closed.
• Turn the adjustment screw clockwise to increase the booster tank temperature
and counterclockwise to decrease the booster tank temperature.
The high limit thermostat is a bimetal snap design. It is not adjustable.
• A button with a red dot in the center pops out when
the temperature exceeds 210°F/99°C.
• Press the red reset button in to reset the high limit.
Determine the cause of the high temperature condition.
Control Thermostat
High limit
Thermostat
High Limit
Thermostat
Control
Thermostat
1R011
Page 27

19
480V/3 Phase
575V/3 Phase
Delta Connection
480V/3 Phase
575V/3 Phase
Delta Connection
480V/3 Phase
575V/3 Phase
Delta Connection
480V/3 Phase
575V/3 Phase
Delta Connection
208-240V/3 Phase
Wye Connection for
380-415V/3 Phase
208-240V/3 Phase
Wye Connection for
380-415V/3 Phase
208-240V/3 Phase
Wye Connection for
380-415V/3 Phase
208-240V/3 Phase
Wye Connection for
380-415V/3 Phase
208-240V/3 Phase
Delta Connection
208-240V/3 Phase
Delta Connection
208-240V/3 Phase
Delta Connection
208-240V/3 Phase
Delta Connection
208V/1 Phase
208V/1 Phase
208V/1 Phase
208V/1 Phase
Configuration C
Booster tank element
View of calrod coils
Terminal Connections view of element
Terminal Connections view of element
Configuration D
Wash tank element
View of calrod coils
Configuration B
Booster tank element
View of calrod coils
Configuration A
Booster tank element
View of calrod coils
Terminal Connections view of element
Terminal Connections view of element
ELECTRICAL SERVICE (Cont.)
Heater Element Wiring – Booster Tank and Wash Tank Heater Elements
Refer to the illustrations and follo
w the steps below to properly install ter minal jumpers and
to make line pow
er connections to a replacement element.
Step 1. Hold the element assembly with the calrod coils facing toward you.
Step 2. Match your element coil to Configuration A, B, C, or D.
Step 3. Rotate your element coils to match the correct conf iguration.
Step 4. Flip the element over and match your element to the cor rect ter minal configuration.
Step 5. Install terminal jumpers according to the illustration for your voltage requirement.
Step 6. Install the element and make your line connections 1L1, 1L2, or 1L3 per the illustration.
ELECTRICAL SERVICE
1L1
1L2
1L3
1L1
1L2
1L3
1L1
1L2
1L3
1L1
1L2
1L3
1L2
1L1
1L1
1L2
1L1
1L2
1L1
1L2
1L1
1L2
1L3
1L1
1L2
1L3
1L1
1L2
1L3
3
1L1
1L2
1L3
1L1
1L2
1L3
1L1
1L2
1L3
3
1L
1L
Page 28

20
Low voltage
208-230V/1PH
Only
Motors
Motor Specifications
Voltage: Standard motors are multi-voltage
Low voltage: 208-230VAC
High voltage: 460VAC or 575VAC only
Phase: Motors may be single or three phase
Wiring Connections:
Refer to the diagrams below for 3 phase motor lead wiring.
Low voltage High Voltage 575V/3PH
208-230V/3PH 460V/3PH Only
Refer to the diagram at right
for single phase motor lead wiring.
Troubleshooting:
Motor will not run:
1. Check incoming power to control cabinet.
2. Check for tripped manual motor star ter (overload) in control cabinet.
(Refer to Motor Overload service section for the proper setting)
3. Check power at motor contactor.
Motor runs hot and trips motor starter overload:
1. Check for proper voltage between L1-L2, or (L1-L2, L2-L3, L1-L3 for 3 phase).
2. Check FLA on motor leads L1, L2, (also L3 for 3 phase) using amp tester.
(Motor full load amp (FLA) ratings are stamped on motor nameplate).
Motor Replacement:
1. Disconnect the power to the machine.
2. Disconnect the wires at the motor junction box.
3. Make note of the motor connections in order to phase the replacement correctly.
4. Install the new motor and check for proper rotation.
5. Proper shaft rotation is clockwise looking at the rear of the motor.
6. Motor rotation can be reversed by switching L1 and L2 on 3 phase motors. Single phase
motor rotation cannot be reversed
7. Replacement motors are available as complete assemblies.
8. Champion cannot provide replacement bearings, stators, or rotors for motor repair parts.
ELECTRICAL SERVICE
321
LINE
654
987
321
654
987
321
LINE
2
8
J
LINE
LINE
L1
L2
4
3
Page 29

21
Dual Float Switches –
Troubleshooting:
The dual float controls fill and heat circuits.
Identifying a Dual Float Problem:
The most common trouble conditions associated with a dual float failure are:
1. The tank fills constantly.
2. The tank heat will not come on.
Inspect the Dual Float:
1. Be sure that the dual float assembly is clean and free of scale build-up.
2. Be sure that the stainless steel balls on the float assembly move up and down freely.
In addition to checking the float operation, perform the following—
System Checks:
1. All drain valves are fully closed.
2. Incoming water supply Flow Pressure is 20-22 psi [138-151 kPa].
3. Fuses in control cabinet are good (Electric Heat Only).
4. Tank Heat thermostats and/or High limit thermostats operate correctly.
5. Booster Heat ther mostats and/or High limit ther mostats operate cor rectly.
ELECTRICAL SERVICE
Dual Float Troubleshooting Diagrams:
YES
Water Shuts OFF
Machine is in
Final Rinse Mode
Not a Dual Float
Problem
System
Checks
System
Checks
YES
YES
YES
YES
YES
YES
NO
NO
NO
NO
NO
NO
NO
Wash or Prewash
Tank Fills Constantly
Is Tank Full
of Water?
Are the Float
Balls Up?
Close
Drain
Valve
Clean
Float
Assy
Is Heat ON
when called
for?
Replace
Dual
Float
Check
Solenoid
Valve
Are the Float
Balls Up?
Check
Solenoid
Valve
Is Heat ON
when called
for?
Replace
Dual
Float
Clean
Float
Assy
Close
Drain
Valve
Is Tank Full
of Water?
Check to ensure
that
Rinse-Saver Lever
is not
Operated
Water Runs Constantly
Through Final Rinse Piping
Page 30
22
Canister No.1
L-R Direction
Water
Supply
In
Canister No.1
Canister No.2
ELECTRICAL SERVICE
Figure 8
Front V ie w
Typical 40°F/22°C Rise Booster
One T ank – T otal 36Kw Shown
Figure 9
Front V ie w
Typical 70°F/39°C Rise Booster
Two-Tank – Total 57Kw Shown
12Kw
9Kw
9Kw
9Kw9Kw
9Kw
12Kw
12Kw
Dishwasher
Unload
End
12Kw
Electric Booster Heater — Element Installation
Refer to Fig. 8 and F
ig. 9
Champion built-in boosters are constructed of
stainless steel and have locations for three electric
booster heater elements.
1. The two booster conf igurations for rack
conveyor models are:
Single tank - 40°F/22°C rise booster
Two tank - 70°F/39°C rise booster
The total Kw rating of the booster assembly is
determined by the model number of the machine
and the minimum temperature of the incoming
water supply.
2. The highest rated Kw element
should always be installed in the
bottom right corner location of
booster canister No. 1.
1R013
Highest Rated Kw Element
installed in bottom right corner
of Canister No.1
1R012
Page 31

23
MECHANICAL SERVICE
Plug
Volute
Bolt
(A)
Backing Plate
Backing Plate
Mounting Nut
Seal Assy
Pump Flange
Impeller
Washer
Bolt
(B)
Gasket
Nut
MECHANICAL SERVICE
Pump Seal Replacement:
WARNING:
Disconnect all
power to the
machine at the
main power
source and
place a tag at
the disconnect
switch to show
that work is
being done
on the circuit.
1. Disconnect the power to the machine.
2. Drain the machine. Remove the plug from the lowest point on the pump volute and drain the
pump.
3. Remove the pump hoses.
4. Disconnect the wires to the motor at the motor junction box.
5. Unbolt the motor from the base of the machine and remove the motor and pump.
6. Remove all the bolts (A) on the volute and carefully remove the volute from the pump flange.
7. Lock the motor shaft holding the square end of the rear shaft with a wrench or vise g rips.
8. Remove the impeller retaining bolt (B). Remove the large retaining nut and washer.
9. Remove the impeller using a strap wrench. Turn it counterclockwise. Do not strike the
impeller with a hammer to loosen or remove it.
10. Check the impeller counterbore for shim washers. Be sure to reinstall. Not all impellers
have shims.
11. Remove the old seal and discard. Check the seal seat in the pump flange and clean thoroughly.
12. Clean the seating surface on the motor shaft with #600 emer y paper or crocus cloth.
13. Check the water slinger and replace if worn or missing. Remove the (4) backing plate mtg.
nuts to gain access to the slinger.
14. Press the rubber seal and ceramic into the pump flange. Use a water soluble lubricant. Keep
the ceramic clean.
15. Install the rotating part of the seal on the shaft with the g raphite surf ace toward the ceramic.
Use a water soluble lubricant.
16. Reinstall the impeller, washer, lock-nut, and bolt. Install a new flange gasket. Bolt the volute
to the flange.
17. Reinstall the pump and motor assembly on the base of the machine and reconnect the pump
hoses.
18. Reconnect the power and fill the tank with water. Check for leaks.
19. Bump start the pump to check the motor for correct rotation.
20. Proper shaft rotation is clockwise looking at the rear of the motor.
Water
Slinger
Page 32
24
1R016
1R014
MECHANICAL SERVICE
Figure 12
Rinse-Saver Switch Mechanism
Figure 11
Magnetic Switch and Magnet
Figure 10
Idle Pump Switch Assembly
Magnetic Switch
Magnet
MECHANICAL SERVICE (Cont.)
Idle Pump and Rinse-Saver Switch Assemblies
Idle Pump Switch Assembly –
Refer to F
ig. 10. The idle pump switch, also called the rack switch is
located on the load end of the conveyor track. It is made up of a lever
mechanism, a magnet, and a magnetic reed switch. The magnetic switch
contacts are closed when the idle pump lever is at rest as pictured in figure 10. When a rack is placed into the machine, it contacts the idle pump
lever. The magnet swings away from the magnetic switch. The closed
contacts of the switch open and power is removed from control relay
1CR. The normally closed contacts, (1, 9) of 1CR, close and apply
120VAC to the PUMP TIMER RESET COIL. The timer resets and the
wash pump(s) start. When the rack moves past the idle pump lever, the
magnet returns to its resting state. The magnetic switch contacts close.
Power is re-applied to 1CR and the 120VAC is removed from the pump
timer reset coil. The timer begins to count down. The idle pump switch
will reset the timer each time a rack contacts the lever. If only one rack
operates the idle pump switch then the timer will time out after its preset
time and the pumps will stop.
Magnetic Switch and Magnet –
Refer to F
ig. 11. The magnetic switches are located
on the underside of the tank hood. Studs are welded on
the hood and the switches are nutted securely in place.
The magnets are mounted on the ends of the idle pump
and rinse-saver levers by screws and nuts. The magnets
are enclosed in stainless steel housings.
Rinse-Saver Switch Assembly –
Refer to F
ig. 12. The rinse-saver switch assembly, also called the final
rinse switch, is located on the unload end of the conveyor track. It is
made up of a lever assembly, magnetic switch, and magnet. The contacts
of the magnetic switch are closed when the magnet is in the rest position
as pictured in f igure 12. The operation of the final rinse is controlled by
the rinse-saver switch. When a rack contacts the lever of the switch
assembly, the magnet moves away from the magnetic switch. The
contacts of the switch open and power is removed from control relay
2CR. The normally closed contacts (12, 4) of 2CR close. 120VAC power
is applied to the final rinse water solenoid valve. 180°F/82°C final rinse
water is supplied to sanitize the dishes. Power will continue to be applied
to the solenoid valve as long as a rack operates the rinse-saver assembly.
When the rack moves past the lever, the magnet returns to its rest
position. The magnetic switch closes and the final rinse tur ns off.
Magnet
1R015
Magnet
Page 33

25
1R017
1R018
MECHANICAL SERVICE
Figure 13 – Crank Assembly
Figure 14 – Conveyor Drive Assembly
Conveyor Drive Assembly
Refer to Fig. 14. The conveyor
drive assembly is made up of a
crank assembly, a clutch assembly,
gear reducer, and 1/4 HP motor.
Crank Assembly –
Refer to F
ig. 13.
The crank
assembly mounts inside the dishwasher hood and is made up of a
crank, adjustable stud, and crosshead roller. The roller engages the
conveyor cradle assembly. The
crank assembly rotates in a counterclockwise direction. The crosshead
roller should be adjusted so that
it is flush with the bottom of the
cradle assembly crosshead.
Clutch Assembly –
Refer to F
ig.14. The clutch assembly
is made up of the clutch discs, a clutch
shaft, bearing, bearing housing, and
seal assembly. The clutch assembly
couples the output shaft of the gear
reducer to the crank assembly.
Clutch Adjustment –
The clutch assembly is torqued at the
factory to 12 ft/lbs. This allows the
clutch to slip if the conveyor cradle
assembly jams.
Refer to F
ig. 17.
To adjust the clutch:
1. Loosen the two set screws
in the clutch adjusting nut.
2. Tighten the adjusting nut only
enough so that the clutch
assembly will slip when a
person of moderate build (about
180lbs./82 kg) exerts force against
the conveyor cradle assembly.
3. It is e
xtremely important that the
clutch assembly slips if the conveyor
cradle jams; so be careful not to
overtighten the clutch adjusting nut.
4. Tighten the set screws in the adjusting nut and recheck the conveyor
cradle assembly.
Crosshead Roller
Screw C
Washer
Dog Point
Set Screw
Crank
Roller Flush
Machine viewed from load end
Left to right model shown
Bearing & Seal
Housing
Clutch Shaft
Clutch
Gear
Reducer
Motor
Bolt A
Page 34

26
1R021
1R020
1R019
MECHANICAL SERVICE
Figure 17
Close-up view of Clutch Assembly
Figure 16
Close-up view of Bearing Housing
Figure 15
View of Load End of Machine
Drive Clutch Replacement –
• Turn off all power to the machine
and remove the load end curtain.
Refer to F
ig. 15.
1. Remove (Screw A), the
10-32 x 3/8" flat head bracket
retaining screw located slightly
forward of the idle pump switch
assembly.
2. Remove (Screw B), quantity (4),
1/4-20 X 1/2" truss head track
mounting screws on the load end
of the machine.
3. Lift the cradle and track assembly
so that it clears the crosshead roller.
Refer to F
ig. 13.
4. Remove (Screw C), a 10-32 x 3/8" truss head
screw and washer from the crank assembly.
5. Loosen the crank dog-point retaining set screw and
remove the crank assembly from the clutch shaft.
6. Remove the lower front and side panels to access the
clutch and gear reducer.
Refer to F
ig. 16.
7. Remove (Screw D), quantity (4), 1/4-20 x 3/8" round
head screws that hold the bearing and shaft seal in the
bearing housing.
8. Loosen (Screw E), quantity (2), bearing set screws
and slide the bearing and seal assembly down the
clutch shaft.
Refer to F
ig. 17.
9. Loosen (Screw F), quantity (2), clutch set screws on
the bottom of clutch assembly. Slide the clutch
assembly up until it clears the output shaft of the gear
reducer.
Refer to F
ig. 14.
10. Remove the V-belt from the motor and gear reducer
pulleys.
11. Remove (Bolt A), quantity (4), 5/16-18 x 3/4" hex
head bolts holding the gear reducer to the machine
base. Slide the gear reducer out.
12. Remove the clutch assembly by pulling the clutch and
clutch shaft down and out of the bearing housing.
13. Install the new clutch assembly and re-assemble in
reverse order.
Screw B
Screw B
Screw A
Lift Track and Cradle Up
Screw E
Screw D
Screw F
Adjusting Nut
Set Screws
Clutch
Adjusting Nut
Page 35

27
Screws (4)
Actuator Head
Fig. B
Fig.A
MECHANICAL SERVICE
Switch Body
Dishtable
Backsplash
TABLE LIMIT SWITCH INSTALLATION
INSTRUCTIONS KIT P/N 407400
I. Introduction
Champion Industries offers a table limit switch as an option to protect the dishwasher conveyor
system from jams caused by dishracks backing up at the unload end of the dishtables.
These instructions provide the servicer with a step-by-step method for installing and wiring the
table limit switch on a rack conveyor dishwasher.
II. Pre-installation
The minimum clearance necessary to install a table limit switch is 1-7/8" [48mm], measured
from the wall to the backside of the dishtable backsplash. (See Fig. A)
NOTE:
If you do not have 1-7/8" [48mm] clearance, you will not be able to install the switch
assembly.
A. Inspect the Installation Kit Be sure that your kit contains:
(1) Switch bracket..............................315339 (1) Table limit switch assy ....................111165
(2) 10-32 x 1/4 tr uss head screw ......100213 (1) Switch spring & rod assy ................111166
(2) 10-32 x 1/2 tr uss head screw ......100097 (1) Paper template for marking holes ..111167
(1) Instr uction sheet ..........................900721
NOTE:
Refer to Fig. B and note the orientation of the actuator head, 4 screws, and the switch body.
If the switch in your kit does not resemble Fig. B, remove the 4 screws holding the actuator
head and rotate the head to match the assembly in Fig. B. Re-install the screws.
17/8" Min.
[48mm]
Page 36

28
Fig. D
R-L Installation
MECHANICAL SERVICE
Fig. C
L-R Installation
B. Additional Materials Required for Installation (Supplied by the Installer)
(*) Ft. of flexible non-metallic liquid tight 1/2" conduit
(*) Ft. of #14 gauge wire (2 wires & a ground required)
(3) Ring terminals #6 stud size
(1) Ring terminal 1/4-20 stud size
(2) Wire nuts
(1) Straight 1/2" liquid tight conduit fitting for (R-L)
(1) 90° Ell 1/2" liquid tight conduit fitting for (R-L)
or
(2) Straight 1/2" liquid tight conduit fittings for (L-R)
* As required
C. Special T ools Required
• Variable speed drill
• 3/16" drill bit
• 5/16" drill bit (If using a Greenlee®1/2" conduit punch)
• Hole saw or knock-out punch capable of cutting stainless steel.
NOTE:
Greenlee
®
makes a knock-out punch for cutting SST. Their 1/2" conduit punch will cut the
7/8" [22mm] hole required for this installation: Greenlee
®
P/N 28154 ........Punch
P/N 28155 ........Die
These parts may be ordered through a local dealer. P/N 28451 ........Bolt
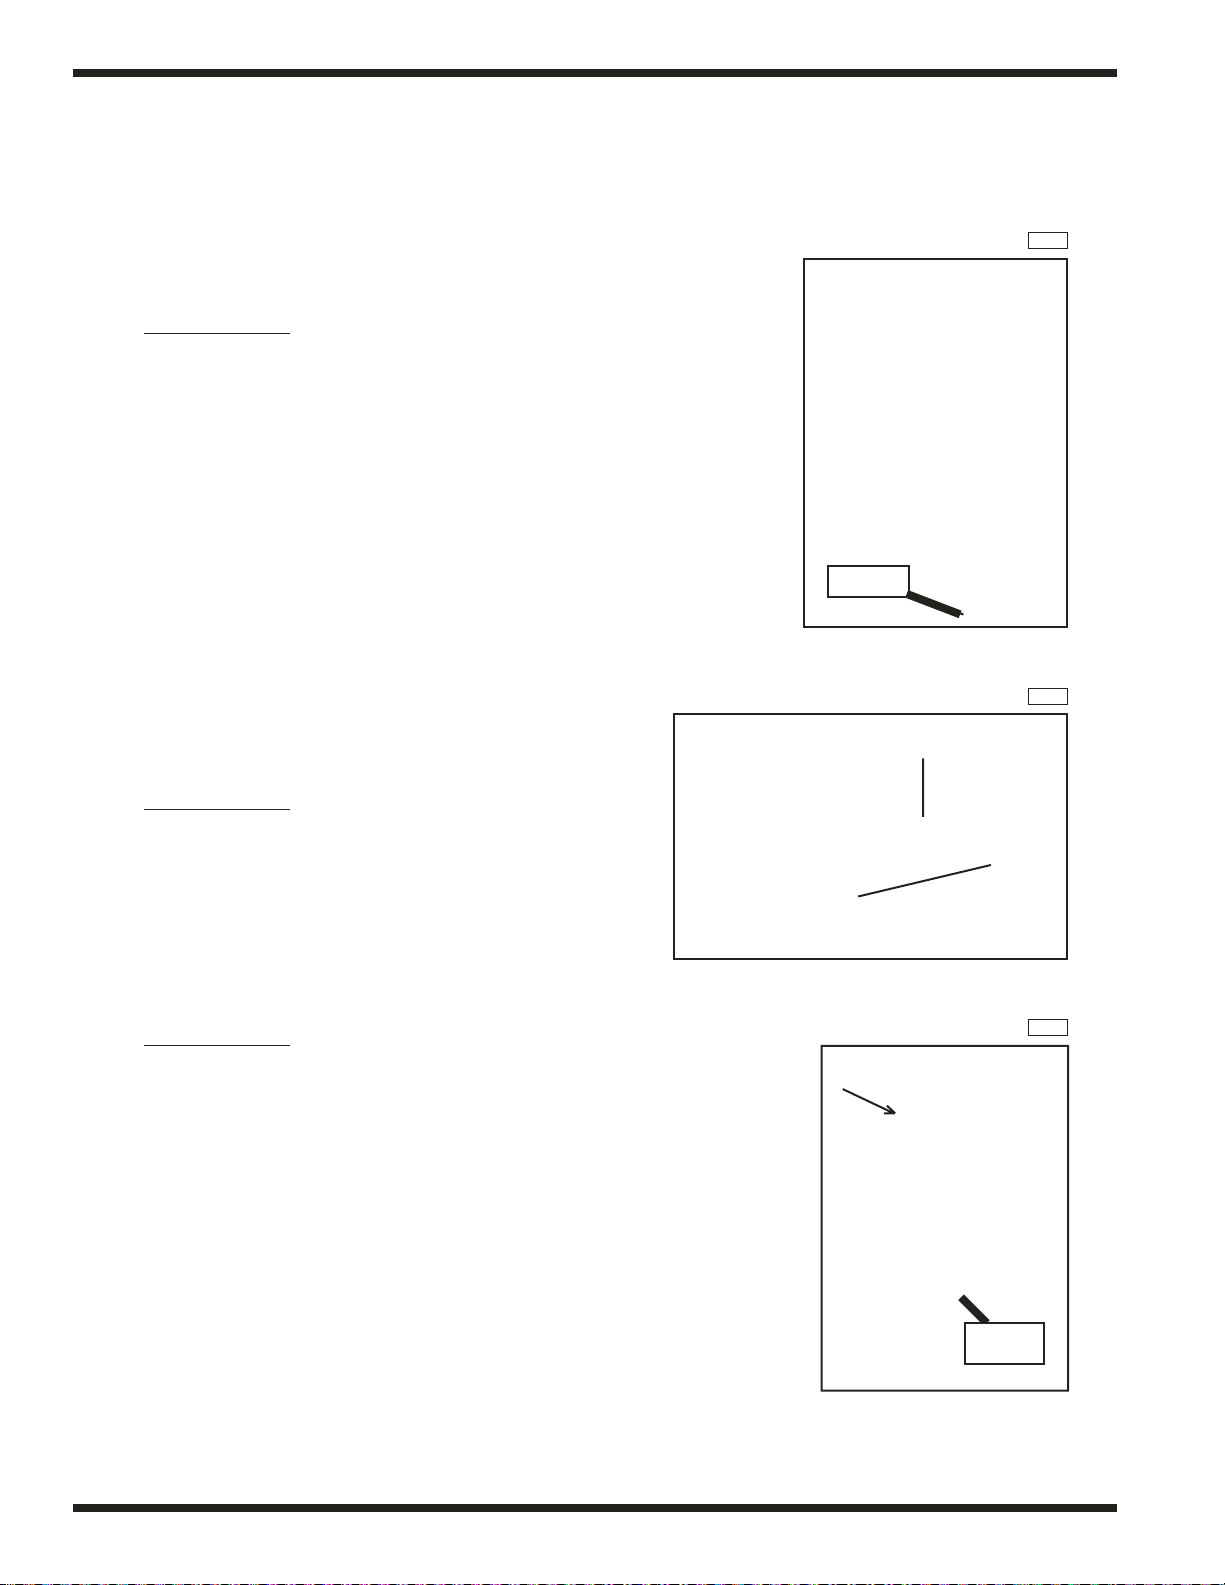
III. Installation
A. Cutting and Drilling the Dishtable
• Refer to Fig. C for L-R installation
• Refer to Fig. D for R-L installation
1. Check the paper template provided in your
installation kit.
2. Note that the template will work for both
L-R & R-L operations.
For L-R operation, the 3/16" [5mm] holes are
nearest the end of the table. For R-L operation,
the 7/8" [22mm] hole is nearest the end of
the table.
3. Using the template measurements, mark
and drill the required holes.
B. Assemble the Switch and Switch Bracket
• Refer to Fig. C and use the diagram as a guide for assembly.
1. Use (2) 10-32 x 1/4" tr uss screws to mount the switch bracket to the switch assembly. When
properly installed, the switch bracket mounting holes will be above the switch assembly and
the shaft of the actuator head will be pointing up.
6" [152mm]
6" [152mm]
Page 37

29
MECHANICAL SERVICE
C. Adjusting the Switch Spring & Rod Assembly
• Refer to Fig. C for L-R installation and Fig. D for R-L installation
1. The switch spring and rod assembly pass through the 7/8" [22mm] hole. With the switch in
an unoperated state, the rod should be angled towards the discharge end of the dishwasher.
2. The rod should touch the edge of the 7/8" [22mm] hole closest to the unload end of the
machine. This position will allow the switch rod maximum travel before it contacts the
opposite edge of the 7/8" [22mm] hole and will insure that the switch will be operated by
the dishrack.
3. This is a trial and er ror adjustment. One suggested method is to hold the switch and rod
assembly in position on the outside of the table. Estimate the rod location and lock it down
with the 5/32" socket head screw on the end of the rod assembly. Install the switch assembly
using the (2) 10-32" x 1/2" truss head screws. Check the switch rod position and adjust as
necessary.
IV. Wiring and Final Mounting of the Table Limit Switch Assembly
Note 1: Wiring should be made in accordance with local electrical codes.
Note 2:Champion recommends a ground wire from the switch to the junction box.
A. Locating and Wiring of Junction Box
1. Remove the front lower panel of the dishwasher. The junction box is located near the center
of the lower frame. (See Fig. E)
2. Open the junction box and locate two wires marked 7 and 8. the wires are wire-nutted
together.
3. Use one of the vacant knock-outs on the junction box and connect a conduit f itting.
4. Measure and cut the conduit and route the #14 gauge wires through conduit and into the
junction box.
5. Crimp the 1/4" ring ter minal to the g round wire. Locate a 1/4-20 bolt that holds the junction
box to the frame of the dishwasher. Remove the nut and put the ground wire on this bolt.
Replace the nut and tighten securely.
6. Designate one of the conduit wires as 7 and connect it to wire 7 in the junction box.
Designate the remaining conduit wire as 8 and connect it to wire 8 in the junction box. Close
the junction box and replace the front panel on the dishwasher.
Junction Box
Conduit
Table Limit Switch
Fig. E
Page 38

30
Fig. F
MECHANICAL SERVICE
7. Connect the proper conduit fitting to the table limit switch. Route the #14 gauge wires to the
switch and refer to Fig. F for the proper terminal designations.
8. Connect conduit wire 7 to the COM (Common) ter minal of the switch terminal block.
Connect conduit wire 8 to the NC (Normally Closed) terminal of the switch terminal block.
Connect the conduit ground wire to the ground screw in the switch assembly.
9. Close the switch cover.
Apply a thread locking compound to the threads of the 10-32 x 1/2" screws.
Mount the switch assembly to the dishtable.
V. Testing Table Limit Switch Operation
1. Star t the dishwasher and load enough racks to activate the limit switch while the conveyor
and pumps are running.
2. Obser ve the dishrack as it contacts the switch rod assembly. The dishwasher conveyor should
stop before the rod reaches the end of its travel.
If it does not: Re-adjust the switch rod position in the 7/8" hole to operate earlier or
re-check the wiring.
3. Check the dishwasher for correct operation.
8 7
Page 39

31
REPLACEMENT PARTS
REPLACEMENT
PARTS
Page 40

32
Figure 18 – Conveyer Drive Assembly
REPLACEMENT PARTS
LH
INPUT
1R022
TANK
35
36
34
33
32
31
30
29
28
25
37
20
15
19
41
18
43
17
26
25
24
23
6
5
4
3
2
1
39
40
38
8
9
42
27
22
21
12
11
10
16
15
13
RH
INPUT
14
12
11
10
7
Page 41

33
REPLACEMENT PARTS
CONVEYOR DRIVE ASSEMBLY
Fig. 18 Part
Item No. No. Part Description Qty.
1 100249 Motor, 1/4-HP Drive (115/208-230V-60Hz 1Ph) .................................... 1
2 107181 Motor, 1/4-HP Drive (208-240-480V-60Hz 3Ph) .................................... 1
3 180225 Motor, 1/4-HP Drive (380V-50Hz 3Ph) .................................................. 1
4 180274 Motor, 1/4-HP Drive (380V-60Hz 3Ph) .................................................. 1
5 180145 Motor, 1/4-HP Drive (415V-60Hz 3Ph) .................................................. 1
6 180240 Motor, 1/4-HP Drive (575V-60Hz 3Ph) .................................................. 1
7 100453 Sheave (AK54) 3/4" Bore ........................................................................ 1
8 100446 Sheave (AK30) 1/2" Bore ........................................................................ 1
9 100797 Belt - 4L340 (64KB, 64KPRB) .............................................................. 1
9 100794 Belt - 4L310 (40 & 60KB & KPRB) ...................................................... 1
10 100142 Nut, g rip (5/16-18) .................................................................................. 1
11 102376 Washer, flat (5/16") .................................................................................. 1
12 100739 Bolt (5/16-18 x 3/4") Hex hd .................................................................. 1
13 110300 Box, gear (L-R) ........................................................................................ 1
14 110299 Box, gear (R-L) ........................................................................................ 1
15 104916 Key (3/16" x 3/16" x 3/4") ...................................................................... 2
16 104915 Key (3/16" x 3/16" x 1 1/4") .................................................................... 1
17 100870 Slinger, water............................................................................................ 1
18 109661 Limiter, torque (Includes item 47)............................................................ 1
19 202675 Shaft, drive ................................................................................................ 1
20 109374 Shield, drip................................................................................................ 1
21 100382 Bearing...................................................................................................... 1
22 102244 Seal (5/8") (2-Piece) ................................................................................ 1
23 104923 Screw (1/4-20 x 3/8") Round hd .............................................................. 4
24 100143 Nut, g rip (3/8-16) .................................................................................... 4
25 104618 Washer, flat (3/8") .................................................................................... 8
26 B1074-1 Housing, bearing ...................................................................................... 1
27 108820 Gasket, bearing housing .......................................................................... 1
28 100153 Bolt (3/8-16 x 1") Hex hd ........................................................................ 4
29 103180 Ring, wiper .............................................................................................. 1
30 100771 Screw, set (1/4-20 x 1/4") Socket hd ........................................................ 1
31 202386 Crank ........................................................................................................ 1
32 104925 Washer, flat (1/4" x 1" O.D.).................................................................... 1
33 100007 Screw (10-32 X 3/8") Truss hd ................................................................ 1
34 100868 Stud, crosshead roller................................................................................ 4
35 202381 Roller, crosshead ...................................................................................... 4
36 100769 Screw, set (3/8-16 x 3/4") Dog Point ........................................................ 8
37 107089 Nut, jam (1/2-13)...................................................................................... 1
38 100141 Nut, g rip (1/4-20) .................................................................................... 1
39 100734 Bolt (1/4-20 x 1/2") Hex hd .................................................................... 4
40 313360 Guard, belt .............................................................................................. 1
41 110990 Label - Rotation........................................................................................ 1
42 N/A Screw, set (5/16-18 x 3/8") Dog Point...................................................... 1
43 105263 Set, clutch pad (1 pair for #250 clutch) .................................................... 1
— 900146 Clutch assy (Includes items 15, 18-20, 41).............................................. —
Page 42

34
Figure 19 – Track and Cradle Assembly (64KB)
REPLACEMENT PARTS
5
9
10
3
14
2
1
3
6
7
12
13
4
11
4
13
13
13
3
8
1R023
10
Page 43

35
REPLACEMENT PARTS
TRACK AND CRADLE ASSEMBL Y
Fig.19 Part
Item No. No. Part Description Qty.
1 312106 Track ........................................................................................................ 2
2 100007 Screw (10-32 x 3/8") Truss hd.................................................................. 2
3 111296 Screw (10-32 x 3/8") Flat hd .................................................................. 10
4 100194 Nut, g rip (10-32) ...................................................................................... 10
5 100073 Screw (1/4-20 x 1/2") Truss hd .............................................................. 12
6 100141 Nut, g rip (1/4-20) .................................................................................... 12
7 204513 Pawl........................................................................................................... 12
8 110857 Shoulder bolt .......................................................................................... 12
9 316901 Cradle (64KB) ........................................................................................ 1
9 316902 Cradle Weldment (40KB) ........................................................................ 1
9 316903 Cradle Weldment (60KB) ........................................................................ 1
10 100142 Nut, g rip (5/16-18) .................................................................................. 10
11 315278 Suppor t – Front (RH) .............................................................................. 1
12 315279 Suppor t – Front (LH) ................................................................................ 1
13 408092 Slide Assy, Cradle .................................................................................... 6
14 316214 Divertor, Cradle........................................................................................ 1
— 408140 Cradle Assy. (64KB)(includes items 6-9) ................................................ 1
— 408141 Cradle Assy. (40KB)(includes items 6-9) ................................................ 1
— 408142 Cradle Assy. (60KB)(includes items 6-9) ................................................ 1
Page 44

36
Figure 20 – Track and Cradle Assembly – PR22, PR36
(PR36 Shown)
REPLACEMENT PARTS
1R025
4
4
11
15
16
10
1
12
20
21
9
2
6
5
8
7
14
13
12
17
3
22
22
22
22
5
6
3
18
19
Page 45

37
REPLACEMENT PARTS
TRACK AND CRADLE ASSEMBLY (PR22, PR36)
(All S/N's) (PR36 Shown)
Fig. 20 Part
Item No. No. Part Description Qty.
1 311651 Track (PR22) ............................................................................................ 2
2 313117 Track (PR36) .......................................................................................... 2
3 100194 Nut, g rip (10-32) (PR22) ........................................................................ 9
4 100194 Nut, g rip (10-32) (PR36) ........................................................................ 10
5 111296 Screw (10-32 x 3/8") Flat hd (PR22) ...................................................... 9
6 111296 Screw (10-32 x 3/8") Flat hd (PR36) ...................................................... 10
7 100142 Nut, g rip (5/16-18) (PR22) ...................................................................... 4
8 100142 Nut, g rip (5/16-18) (PR36) ...................................................................... 6
9 204513 Pawl (PR22) ............................................................................................ 4
10 204513 Pawl (PR36). ............................................................................................ 6
11 100073 Screw (1/4-20 x 1/2") Truss hd .............................................................. 8
12 100141 Nut, g rip (1/4-20) .................................................................................... 6
13 110857 Shoulder bolt (PR22) ............................................................................... 8
14 110857 Shoulder bolt (PR36) .............................................................................. 10
15 312955 Cradle (PR22) .......................................................................................... 8
16 312954 Cradle (PR36) .......................................................................................... 1
17 313357 Cradle connector ...................................................................................... 1
18 315278 Suppor t, Front RH (PR22 R-L)................................................................ 1
19 315278 Suppor t, Front RH (PR36)........................................................................ 1
20 315279 Suppor t, Front LH (PR22 L-R) ................................................................ 1
21 315279 Suppor t, Front LH (PR36)........................................................................ 1
22 408092 Slide Assy, cradle...................................................................................... 4
— 405925 Cradle Assy (PR22) (includes items 7, 9, 13, 15) .................................... 1
— 405926 Cradle Assy (PR36) (includes items 8, 10, 14, 16) .................................. 1
Page 46

38
Figure 21 – Motor and Pump Assembly
(Wash, Power Rinse, Prewash)
REPLACEMENT PARTS
10
11
12
14
13
9
51
30
47
45
2
1
46
44
43
42
41
40
1
2
3
4
5
6
7
8
19
20
21
15
55
2
43
53
52
54
17
16
18
22
23
24
25
26
27
28
48
49
50
51
30
33
31
32
29
34
29
36
31
32
35
37
38
31
39
47
ORIENTATION "B"
Pump Discharge
Bottom Right
ORIENTATION "A"
Pump Discharge
Top Left
1R027
Page 47

39
REPLACEMENT PARTS
MOT OR AND PUMP ASSEMBL Y
(Wash, Power Rinse, Prewash)
Fig. 21 Part
Item No. No. Part Description Qty.
— Replacement kits are available to rebuild existing pump assemblies.
Pump Replacement Kits
— 900737 Kit, gasket (Includes Qty. 1 each of Item 24-26) (Order Qty. 2) ........................ 2
— 900738 Kit, Flange/Volute Replacement (Pump seal not included)
(Includes items 22, 24-26, 29-39) ........................................................................ 1
— 900739 Kit, Pump Assy, 1-HP (Motor not included)
(Includes items 19, 22-26, 27, 29-39) .................................................................. 1
— 900740 Kit, Pump Assy, 2-HP (Motor not included)
(Includes items 19, 22-26, 28, 29-39) .................................................................. 1
1 100739 Bolt (5/16-18 X 3/4) Hex hd ................................................................................ 8
2 102376 Washer, flat (5/16") .............................................................................................. 12
3 110421 Motor, 2-HP (208-240V/60Hz/1Ph)...................................................................... 1
4 110422 Motor, 2-HP (208-240V/460V/60Hz/3Ph)............................................................ 1
5 112221 Motor, 2-HP (380V/50Hz/3Ph) ............................................................................ 1
6 180273 Motor, 2-HP (380V/60Hz/3Ph) ............................................................................ 1
7 180246 Motor, 2-HP (415V/50Hz/3Ph) ............................................................................ 1
8 111740 Motor, 2-HP (575V/60Hz/3Ph) ............................................................................ 1
9 110419 Motor, 1-HP (115V/208-240V/60Hz/1Ph)............................................................ 1
10 110420 Motor, 1-HP (208-240V/460V/60Hz/3Ph)............................................................ 1
11 180245 Motor, 1-HP (380V/50Hz/3Ph) ............................................................................ 1
12 180272 Motor, 1-HP (380V/60Hz/3Ph) ............................................................................ 1
13 180237 Motor, 1-HP (415V/50Hz/3Ph) ............................................................................ 1
14 111739 Motor, 1-HP (575V/60Hz/3Ph) ............................................................................ 1
15 110734 Stud, motor............................................................................................................ 4
16 100754 Screw (10-32 X 1/2") Flat hd................................................................................ 3
17 109654 Slinger, water ........................................................................................................ 1
18 110270 Washer, star (countersunk) .................................................................................... 3
19 204460 Plate, backing ........................................................................................................ 1
20 106407 Washer, lock (3/8") Split ...................................................................................... 4
21 107690 Nut, jam (3/8-16) .................................................................................................. 4
22 111681 Flange, pump ........................................................................................................ 1
23 111111 Seal, mechanical (5/8") ........................................................................................ 1
24 111941 Gasket (.0085") (1 notch) ...................................................................................... 1
25 111942 Gasket (.015") (2 notches) .................................................................................... 1
26 111943 Gasket (.032") (3 notches) .................................................................................... 2
27 113118 Impeller, SST (1 HP) (2.875") (PR22, PR36)...................................................... 1
28 113119 Impeller, SST (2 HP) (3.5") (Wash, Rinse) .......................................................... 1
29 102500 Plug (1/4" NPT) Brass .......................................................................................... 2
30 112380 Volute, pump ........................................................................................................ 2
31 106482 Washer, lock (1/4")................................................................................................ 4
32 100736 Bolt (1/4-20 X 3/4") Hex hd ................................................................................ 10
33 111964 Clamp, discharge pump hose ................................................................................ 1
34 102504 Plug (1/2" NPT) Brass .......................................................................................... 1
35 112338 O-ring .................................................................................................................... 2
36 112379 Flange, suction ...................................................................................................... 1
37 110248 Washer, flat............................................................................................................1
38 110247 Nut, jam (7/16-20) Hex ........................................................................................ 1
39 100734 Bolt (1/4-20 X 1/2") Hex hd ................................................................................ 1
40 109562 Hose, intake .......................................................................................................... 1
41 104203 Clamp, hose (M52)................................................................................................ 2
42 307995 Flange, intake ........................................................................................................ 1
43 100142 Nut, grip (5/16-18) ................................................................................................ 8
44 109568 Gasket, flange intake ............................................................................................ 1
45 322550 Strainer, pump intake .......................................................................................... 1
46 107967 Nut, grip (1/4-20) w/nylon insert.......................................................................... 1
47 110858 Clamp, discharge hose .......................................................................................... 1
Page 48

40
P/N 110461
P/N 110938
P/N 110461P/N 110460
MOT OR/PUMP ASSEMBLY (Cont.)
(Wash, Power Rinse, Prewash)
Fig. 21 Part
Item No. No. Part Description Qty.
48 109578 Hose, discharge (Orientation A)............................................................................ 1
(For R-L direction FFPR26)
(For R-L & L-R direction PR36 units)
49 110459 Hose, discharge (Orientation A)............................................................................ 1
(For R-L & L-R direction PR22 units)
50 110461 Hose, discharge (Orientation A)............................................................................ 1
(For 40KB wash R-L direction), (For 40KB power rinse L-R direction)
(For 60KB wash R-L direction), (For 60KB power rinse L-R direction)
(For 64KB wash R-L direction), (For 64KB power rinse L-R direction)
51 104165 Clamp, hose (M40)................................................................................................ 1
52 110457 Hose, discharge (Orientation B) .......................................................................... 1
(For L-R direction FFPR26)
53 110938 Hose, discharge (Orientation B)............................................................................ 1
(For 40KB power rinse R-L direction), (For 64KB power rinse R-L direction)
54 110460 Hose, discharge (Orientation B)............................................................................ 1
(For 40KB wash L-R direction)
(For 60KB power rinse R-L direction) (For 60KB wash L-R direction)
(For 64KB wash L-R direction)
55 312645 Base, motor mount ................................................................................................ 1
REPLACEMENT PARTS
ORIENTATION 'A'
PUMP DISCHARGE
TOP LEFT
ORIENTATION 'B'
PUMP DISCHARGE
BOTTOM
RIGHT
AB
As viewed facing
pump end
Hose Orientation for:
(40KB, L-R)(60KB, R-L/L-R)
(64KB, L-R)
Hose Orientation for:
(40KB, R-L) (64KB, R-L)
Page 49

41
REPLACEMENT PARTS
MOT OR AND PUMP ASSEMBL Y (Cont.)
(Wash, Power Rinse, Prewash)
Fig. 21 Part
Item No. No. Part Description Qty.
Pump Assemblies – ORIENTATION “A”
— 451524 Pump Assy. lHP, 208-240V/60Hz/lPH
(Includes items 1-2, 9, 15-26, 27, 29-32, 34-39).................................................. 1
— 451523 Pump Assy . lHP, 208-240V/460v/60Hz/3PH
(Includes items 1-2, 10, 15-26, 27, 29-32, 34-39)................................................ 1
— 451637 Pump Assy . lHP, 575V/60Hz/3PH
(Includes items 1-2, 14, 15-26, 27, 29-32, 34-39)................................................ 1
— 451668 Pump Assy . lHP, 380V/50Hz/3PH
(Includes items 1-2, 11, 15-26, 27, 29-32, 34-39)................................................ 1
— 451674 Pump Assy . lHP, 380V/60Hz/3PH
(Includes items 1-2, 12, 15-26, 27, 29-32, 34-39)................................................ 1
— 451670 Pump Assy . lHP, 415V/50Hz/3PH
(Includes items 1-2, 13, 15-26, 27, 29-32, 34-39)................................................ 1
— 451526 Pump Assy . 2HP, 208-240V/60Hz/lPH
(Includes items 1-2, 3, 15-26, 28, 29-32, 34-39).................................................. 1
— 451525 Pump Assy. 2HP, 208-240V/460V/60Hz/3PH
(Includes items 1-2, 4, 15-26, 28, 29-32, 34-39).................................................. 1
— 451656 Pump Assy. 2HP, 380V/50Hz/3PH
(Includes items 1-2, 5, 15-26, 28, 29-32, 34-39).................................................. 1
— 451685 Pump Assy. 2HP, 380V/60Hz/3PH
(Includes items 1-2, 6, 15-26, 28, 29-32, 34-39).................................................. 1
— 451647 Pump Assy. 2HP, 415V/5OHz/3PH
(Includes items 1-2, 7, 15-26, 28, 29-32, 34-39).................................................. 1
— 451639 Pump Assy. 2HP, 575V-60Hz-3PH
(Includes items 1-2, 8, 15-26, 28, 29-32, 34-39).................................................. 1
Pump Assemblies – ORIENTATION “B”
— 451361 Pump Assy. lHP, 208-240V/60Hz/lPH
(Includes items 1-2, 9, 15-26, 27, 29-32, 34-39).................................................. 1
— 451615 Pump Assy . lHP, 208-240V/460V/60Hz/3PH
(Includes items 1-2, 10, 15-26, 27, 29-32, 34-39)................................................ 1
— 452383 Pump Assy . lHP, 575V/60Hz/3PH
(Includes items 1-2, 14, 15-26, 27, 29-32, 34-39)................................................ 1
— 451363 Pump Assy . 2HP, 208-240V/60Hz/lPH
(Includes items 1-2, 3, 15-26, 28, 29-32, 34-39).................................................. 1
— 451362 Pump Assy. 2HP, 208-240V/460V/60Hz/3PH
(Includes items 1-2, 4, 15-26, 28, 29-32, 34-39).................................................. 1
— 451657 Pump Assy. 2HP, 380V/50Hz/3PH
(Includes items 1-2, 5, 15-26, 28, 29-32, 34-39).................................................. 1
— 451673 Pump Assy. 2HP, 380V/60Hz/3PH
(Includes items 1-2, 6, 15-26, 28, 29-32, 34-39).................................................. 1
— 451641 Pump Assy. 2HP, 415V/50Hz/3PH
(Includes items 1-2, 7, 15-26, 28, 29-32, 34-39).................................................. 1
— 451636 Pump Assy. 2HP, 575V/60Hz/3PH
(Includes items 1-2, 8, 15-26, 28, 29-32, 34-39).................................................. 1
Page 50

42
Figure 22 – Idle Pump Mechanism
REPLACEMENT PARTS
TANK BOTTOM
9
STUD WELDED TO
TANK BOTTOM
12
2
6
5
2
8
7
3
1
3
4
11
10
1R028
Page 51

43
REPLACEMENT PARTS
IDLE PUMP MECHANISM
Fig. 22 Part
Item No. No. Part Description Qty.
1 111030 Cam, idle pump ........................................................................................ 1
2 107137 Bolt (10-32 x 7/8") Hex hd ...................................................................... 2
3 104971 Nut, g rip (6-32) ........................................................................................ 2
4 316562 Suppor t bracket, pivot arm ...................................................................... 1
5 316565 Suppor t bracket, idle pump ...................................................................... 1
6 104618 Washer, flat (3/8") .................................................................................... A/R
7 316560 Pivot arm, idle pump ................................................................................ 1
8 100194 Nut, g rip (10-32) ...................................................................................... 1
9 111026 Magnet ...................................................................................................... 1
10 111319 Screw (6-32 x 1/2") Truss hd .................................................................. 2
11 113721 Switch Reed Aleph .................................................................................. 1
12 104971 Nut, g rip (6-32) ........................................................................................ 2
— 408221 Idle Pump Mechanism Assy (R-L 64KB, 64KPRB, 60KB,
40KB, PR36) (includes items 1-10) ........................................................ 1
— 408220 Idle Pump Mechanism Assy (L-R PR22, R-L 64KB, 64KPRB,
60KB, 40KB, PR36) (includes items 1-10).............................................. 1
NOTE:
For Idle Pump Mechanism on FFPR26, refer to the next page and parts list.
Page 52

44
Figure 23 – Idle Pump Switch (FFPR26 Only)
(R-L Shown)
REPLACEMENT PARTS
4
5
3
1
TANK BOTTOM
8
9
10
STUD WELDED TO
TANK BOTTOM
7
7
6
2
1R029
Page 53

45
REPLACEMENT PARTS
IDLE PUMP SWITCH (FFPR26 Only)
(R-L Shown)
Fig. 23 Part
Item No. No. Part Description Qty.
1 111029 Cam .......................................................................................................... 1
2 107137 Bolt (10-32 x 7/8") Hex hd ...................................................................... 1
3 314093 Suppor t, pivot arm .................................................................................. 1
4 315181 Stiffener, (R-L direction machine only) .................................................. 1
5 315182 Stiffener, (L-R direction machine only) .................................................. 1
6 314106 Pivot arm .................................................................................................. 1
7 104971 Nut, g rip (6-32) ...................................................................................... 4
8 111026 Magnet .................................................................................................... 1
9 111319 Screw (6-32 x 1/2") Truss hd.................................................................... 2
10 113721 Reed Switch Aleph .................................................................................. 1
Page 54

46
Figure 24 – Wash System Assembly
(Wash Tank and Power Rinse Tank)
REPLACEMENT PARTS
8
9
4
3
2
10
11
12
4
3
14
13
11
7
5
6
2
15
16
2
18
20
21
22
23
19
17
1
REAR
OF
HOOD
TANK BOTTOM
1R036
Page 55

47
REPLACEMENT PARTS
* Note: Please consult the factory to order:
P/N 411477 Debossed spraypipe assembly (Items 21-23).
WASH SYSTEM ASSEMBLY
(Wash Tank and Power Rinse Tank)
Fig. 24 Part
Item No. No. Part Description Qty.
1 410702 Manifold Assy. ........................................................................................ 1
2 111456 Gasket Manifold ...................................................................................... 3
3 106482 Washer Lock 1/4" Split ............................................................................ 8
4 100736 Bolt 1/4-20 x 3/4 Hex Head .................................................................... 8
5 100073 Screw 1/4-20 x 1/2 Truss Head................................................................ 2
6 313212 Bracket, Standpipe.................................................................................... 1
7 100141 Nut Grip 1/4-20 SST ................................................................................ 2
8 315640 Standpipe, Weldment (Standard hood wash tank ) .................................. 1
— 316759 Standpipe, Weldment (Standard hood power rinse tank )........................ 1
9 316884 Standpipe, Weldment (High hood wash tank).......................................... 1
— 316883 Standpipe, Weldment (High hood power rinse tank)................................ 1
10 100740 Bolt 5/16-18 x 1 Hex Head ...................................................................... 4
11 102376 Washer 5/16 x 3/4 x 1/16.......................................................................... 8
12 108345 Gasket 3 x 3 x 1/8" .................................................................................. 1
13 106013 Washer Lock 5/16 Split............................................................................ 4
14 100154 Nut Plain 5/16-18 .................................................................................... 4
15 316772 Plate, Adjustable Restrictor ...................................................................... 1
16 316773 Slide, Adjustable Restrictor...................................................................... 1
17 316756 Manifold, Weld 3 Hole ............................................................................ 1
18 111454 Locking Plate, Manifold .......................................................................... 9
19 111505 O-ring Wash Arm...................................................................................... 9
20 111478 Bolt 10-32 x 1/2 Hex Head ...................................................................... 36
21 321471 Spraypipe Weldment ................................................................................ 9
22 104414 O-ring 1 Inch ............................................................................................ 9
23 112240 Plug Debossed Spraypipe ........................................................................ 9
*— 411477 Spraypipe Assy (Includes Items 21-23).................................................... —
Page 56

48
Figure 25 – Wash System Assembly (PR22, FFPR26)
REPLACEMENT PARTS
15
13
14
16
17
18
19
20
21
19
22
4
27
26
2
1
28
25
5
6
9
9
24
23
14
12
9
78
6
5
4
3
10
11
10
11
2
1
26
27
28
FFPR36 High Hood Only
(additional deflector assy
after second nozzle of
each spraypipe)
1R037
Page 57

49
REPLACEMENT PARTS
WASH SYSTEM ASSEMBLY (PR22, FFPR26)
Fig. 25 Part
Item No. No. Part Description Qty.
1 112240 Plug, Debossed Spraypipe........................................................................ 2
2 104414 O-ring 1" .................................................................................................. 2
3 321471 Spraypipe ................................................................................................ 2
4 107137 Bolt 10-32 x 7/8" HH .............................................................................. 8
5 111454 Locking Plate, Manifold .......................................................................... 2
6 111505 O-ring Wash Arm...................................................................................... 2
7 316794 Flange Weld Standpipe PR22 .................................................................. 1
8 408287 Flange Assy. PR26FF .............................................................................. 1
9 111456 Gasket, Manifold NG .............................................................................. 3
10 106486 Washer Lock #10 Split............................................................................ 8
11 100194 Nut Grip 10-32 ........................................................................................ 8
12 106028 Bolt 1/4-20 x 2 1/2"HH ............................................................................ 1
13 313212 Bracket, Standpipe.................................................................................... 1
14 100141 Nut Grip 1/4-20 ........................................................................................ 2
15 100073 Bolt 1/4-20 x 2 1/2" Truss Head .............................................................. 1
16 315625 Standpipe PR22 & PR26 .......................................................................... 1
17 316886 Standpipe PR22 & PR26 High Hood ...................................................... 1
18 100740 Bolt 5/16-18 x 1 Hex Head ...................................................................... 4
19 102376 Washer 4/16 x 3/4 x 1/16.......................................................................... 8
20 108345 Gasket 3 x 3 x 1/8 .................................................................................... 1
21 106013 Washer Lock 5/16 Split............................................................................ 4
22 100154 Nut Plain 5/16-18 .................................................................................... 4
23 316772 Plate, Adjustable Restrictor ...................................................................... 1
24 316773 Slide, Adjustable Restrictor...................................................................... 1
25 408287 Flange Assy. Lower PR22 & PR26 .......................................................... 1
**26 321904 Deflector, Spraypipe PR26 Only.............................................................. 2
**27 100754 Screw 10-32 x 1/2" Flat Head .................................................................. 2
**28 107966 Nut Grip 10-32 W/Nylon Insert .............................................................. 2
*— 411477 Spraypipe Assy (Includes Items 1-3)........................................................ —
* Note: Please consult the factory to order:
P/N 411477 Debossed spraypipe assembly, (Items 1-3).
** Note: FFPR36 High Hood units use Qty. 4 each of Items 26-28.
(See Fig. 32, pg.62)
Page 58

50
Figure 26 – Wash System Assembly (PR36)
REPLACEMENT PARTS
8
9
10
11
12
4
3
14
13
11
7
2
15
16
2
18
20
19
21
22
23
17
1
2
4
5
6
3
REAR
OF
HOOD
TANK BOTTOM
15°
1R038
Page 59

51
REPLACEMENT PARTS
WASH SYSTEM ASSEMBLY (PR36)
Fig. 26 Part
Item No. No. Part Description Qty.
1 316688 Manifold Weld 3 Hole ............................................................................ 1
2 111456 Gasket, Manifold ...................................................................................... 3
3 106482 Washer Lock 1/4" Split ............................................................................ 8
4 100736 Bolt 1/4-20 x 3/4" HH .............................................................................. 8
5 100073 Screw 1/4-20 x 1/2" Truss Head .............................................................. 1
6 313212 Standpipe Bracket .................................................................................... 1
7 100141 Nut Grip 1/4-20 ........................................................................................ 1
8 205221 Standpipe Modified PR36 ........................................................................ 1
9 316885 Standpipe PR36 High Hood .................................................................... 1
10 100740 Bolt 5/16-18 x 1 Hex Head ...................................................................... 4
11 102376 Washer 5/16 x 3/4 x 1/16.......................................................................... 8
12 108345 Gasket 3 x 3 x 1/8 .................................................................................... 1
13 106013 Washer Lock 5/16 Split............................................................................ 4
14 100154 Nut Plain 5/16-18 .................................................................................... 4
15 316772 Plate, Adjustable Restrictor ...................................................................... 1
16 316773 Slide, Adjustable Restrictor...................................................................... 1
17 316691 Manifold Weld 2 Hole .............................................................................. 1
18 111454 Locking Plate, Manifold .......................................................................... 5
19 111478 Bolt 10-32 x 1/2" W/Loctite .................................................................... 20
20 111505 O-ring Wash Arm...................................................................................... 5
21 321471 Spraypipe Assy. (includes 22 & 23) ........................................................ 5
22 104414 O-ring 1 Inch ............................................................................................ 5
23 112240 Plug, Debossed Spraypipe........................................................................ 5
*— 411477 Spraypipe Assy (Includes Items 21-23).................................................... —
* Note: Please consult the factory to order:
P/N 411477 Debossed spraypipe assembly, (Items 21-23).
Page 60

52
Figure 27 – Outside Rinse Piping With Electric Booster Prior to Serial Number R1529
REPLACEMENT PARTS
TOP OF HOOD
WATER
INLET
43
BACK OF
HOOD
42
7
10
29
7
28
30
7
7
8
7
15
16
17
7
18
7
19
20
21
25
26
27
22
24
31
32
22
33
34
35
41
40
39
36
37
38
23
TO FINAL RINSE
10
9
7
6
8
3
1
2
4
11
5
5
TO BOOSTER
BACK OF HOOD
14
13
TO BOOSTER
THERMOMETER
LEAD
10
1R039
Page 61

53
REPLACEMENT PARTS
OUTSIDE RINSE PIPING WITH ELECTRIC BOOSTER
(Prior to S/N R1529)
Fig. 27 Part
Item No. No. Part Description Qty.
1 101259 Plug, pipe (1/8 NPT) Brass .................................................................... 1
2 105976 Bushing, Reducing (3/4 NPT x 1/8 NPT) Brass ...................................... 1
3 100599 Cross (3/4 NPT) Brass.............................................................................. 1
4 102392 Bushing, Reducing (3/4 NPT x 1/2 NPT) Brass ...................................... 1
5 109879 Fitting, compression (7/8" OD x 3/4 NPT male) .................................... 2
6 108391 Ther mometer, 48" lead ............................................................................ 1
7 100184 Nipple (3/4 NPT Close) Brass.................................................................. 6
8 100571 Union (3/4 NPT) Brass ............................................................................ 2
9 102490 Nipple (3/4 NPT x 3 1/2) Brass .............................................................. 1
10 102444 Elbow, street (3/4 NPT x 90°) Brass ........................................................ 2
11 104429 Breaker, vacuum (3/4 NPT) Brass............................................................ 1
— 108351 Kit, repair 3/4" vacuum breaker .............................................................. 1
12 102654 Nipple (3/4 NPT x 4 1/4) Brass .............................................................. 1
13 102442 Elbow (3/4 NPT x 90°) Brass .................................................................. 2
14 111437 Valve, solenoid (3/4 NPT) (120V coil) .................................................... 1
— 109903 Repair kit (3/4 NPT) solenoid valve ........................................................ 1
— 111472 Replacement coil, (3/4") Solenoid valve.................................................. 1
15 102526 Tee (3/4 NPT x 3/4 NPT x 1/2 NPT) Brass ............................................ 1
16 100209 Nipple (1/2 NPT x Close) Brass .............................................................. 1
17 102412 Coupling (1/2 NPT Female) Brass .......................................................... 1
18 100599 Cross (3/4 NPT) Brass ............................................................................ 1
19 107418 Tee (3/4 NPT x 1/4 NPT) Brass .............................................................. 1
20 102403 Bushing, Reducing (3/4 NPT x 1/4 NPT) Brass .................................... 1
21 100947 Nipple (1/4 NPT x Close) Brass ............................................................ 1
22 103403 Tee (1/4 NPT) Brass ................................................................................ 1
23 102500 Plug (1/4 NPT) Brass .............................................................................. 1
24 109909 Fitting, compression (1/4 NPT x 1/2 O.D.) (PR22) ................................ 1
25 110134 Nipple (1/4 NPT x 2 1/2) Brass .............................................................. 1
26 106418 Petcock (1/4 NPT Female) Brass.............................................................. 1
27 100135 Gauge, pressure (0-60 PSI Male) ............................................................ 1
28 311694 Bracket, piping suppor t ............................................................................ 1
29 107550 Valve, pressure reducing (3/4 NPT) Brass .............................................. 1
30 110768 Strainer, line (3/4 NPT) Brass .................................................................. 1
31 107380 Tubing, copper (64KB) ............................................................................ A/R
32 107380 Tubing, copper (64KB) ............................................................................ A/R
33 109885 Valve, solenoid (1/4 NPT) (120V coil) (PR22)........................................ 1
— 111172 Repair kit, (1/4") Solenoid valve ............................................................ 1
— 111469 Replacement coil (1/4") Solenoid valve .................................................. 1
34 101262 Nipple (1/4 NPT x 1 1/2) Brass (PR22) .................................................. 1
35 102422 Elbow (1/4 NPT x 90°) Brass (PR22)...................................................... 1
36 110134 Nipple (1/4 NPT x 2 1/2) Brass (PR22) .................................................. 1
37 107069 Breaker, vacuum (1/4 NPT) Brass (PR22) .............................................. 1
— 108349 Kit, repair 1/4" vacuum breaker .............................................................. 1
38 101261 Elbow, street (1/4 NPT x 90°) Brass (PR22)............................................ 1
39 110135 Nipple (1/4 NPT x 7 1/4) Brass (PR22) .................................................. 1
40 100573 Locknut (1/4 NPT) Brass (PR22) ............................................................ 1
41 201669 Locknut (1/4 NPT) Plated (PR22)............................................................ 1
42 100073 Screw (1/4-20 x 1/3) Truss hd.................................................................. 1
43 100141 Nut, g rip (1/4-20) .................................................................................... 1
— 601076 Piping Assy Final Rinse (includes items 3,-5,7-10,) .............................. 1
— 601247 Piping Assy Wash/Rinse (includes items 7-12, 15-27) ............................ 1
— 403563 Piping Assy Fill (includes items 24, 31-41) ............................................ 1
Page 62

54
Figure 28 – Outside Rinse Piping With Electric Booster After Serial Number R1529
REPLACEMENT PARTS
TOP OF HOOD
WATER
INLET
39
BACK OF
HOOD
38
7
10
25
7
24
26
7
7
8
7
14
16
17
22
34
21
15
23
18
20
27
28
20a
29
30
31
37
36
35
32
33
34
19
TO FINAL RINSE
10
9
7
7
6
8
3
1
2
4
11
5
5
TO BOOSTER
13
12
TO BOOSTER
THERMOMETER
LEAD
DETAIL B
DETAIL A
10
1R039r02
30a
Page 63

55
REPLACEMENT PARTS
OUTSIDE RINSE PIPING WITH ELECTRIC BOOSTER
(After S/N R1529)
Fig. 28 Part
Item No. No. Part Description Qty.
1 101259 Plug, pipe (1/8 NPT) Brass ...................................................................... 1
2 105976 Bushing, Reducing (3/4 NPT x 1/8 NPT) Brass ...................................... 1
3 100599 Cross (3/4 NPT) Brass.............................................................................. 1
4 102392 Bushing, Reducing (3/4 NPT x 1/2 NPT) Brass ...................................... 1
5 109879 Fitting, compression (7/8" OD x 3/4 NPT male) .................................... 2
6 108391 Ther mometer, 48" lead ............................................................................ 1
7 100184 Nipple (3/4 NPT Close) Brass.................................................................. 6
8 100571 Union (3/4 NPT) Brass ............................................................................ 2
9 102490 Nipple (3/4 NPT x 3 1/2) Brass .............................................................. 1
10 102444 Elbow, street (3/4 NPT x 90°) Brass ........................................................ 2
11 104429 Breaker, vacuum (3/4 NPT) Brass (bronze) ............................................ 1
**— 108351 Kit, repair 3/4" vacuum breaker (bronze) ................................................ 1
**— 113223 Kit, Repair 3/4" vacuum breaker (plastic)................................................ 1
12 102442 Elbow (3/4 NPT x 90°) Brass .................................................................. 2
13 111437 Valve, solenoid (3/4 NPT) (120V coil) .................................................... 1
— 109903 Repair kit (3/4 NPT) solenoid valve ........................................................ 1
— 111472 Replacement coil, (3/4") Solenoid valve.................................................. 1
14 100599 Cross (3/4 NPT) Brass ............................................................................ 1
15 107418 Tee (3/4 NPT x 1/4 NPT) Brass .............................................................. 1
16 102403 Bushing, Reducing (3/4 NPT x 1/4 NPT) Brass .................................... 1
17 100947 Nipple (1/4 NPT x Close) Brass ............................................................ 1
18 103403 Tee (1/4 NPT) Brass ................................................................................ 1
19 102500 Plug (1/4 NPT) Brass .............................................................................. 1
20 109909 Fitting, compression (1/4 NPT x 1/2 O.D.) (PR22) ................................ 1
20a 109909 Fitting, compression (1/4" NPT x 1/2" O.D.) (Prior to S/N R2440)........ 1
20a 111250 Fitting, compression (1/2" O.D. x 1/2" MPT) (After S/N R2441) .......... 1
21 110134 Nipple (1/4 NPT x 2 1/2) Brass .............................................................. 1
22 106418 Petcock (1/4 NPT Female) Brass.............................................................. 1
23 100135 Gauge, pressure (0-60 PSI Male) ............................................................ 1
24 311694 Bracket, piping suppor t ............................................................................ 1
25 107550 Valve, pressure reducing (3/4 NPT) Brass .............................................. 1
26 110768 Strainer, line (3/4 NPT) Brass .................................................................. 1
27 107380 Tubing, copper (64KB) ............................................................................ A/R
28 107380 Tubing, copper (64KB) ............................................................................ A/R
*29 109885 Valve, solenoid (1/4 NPT) (120V coil) (PR22) (Prior to S/N R2440) .... 1
— 111172 Repair kit, (1/4") Solenoid valve ............................................................ 1
— 111469 Replacement coil (1/4") Solenoid valve .................................................. 1
29 113352 Valve Solenoid (1/2" NPT) (After S/N R2441) ...................................... 1
— 113392 Repair kit (1/2") Solenoir Valve .............................................................. 1
— 113357 Replacement Coil (120V) ........................................................................ 1
30 101262 Nipple (1/4 NPT x 1 1/2) Brass (PR22) (Prior to S/N R2440)................ 1
30 100947 Nipple, close 1/4 NPT Brass (After S/N R2441) .................................... 1
30a 102388 Bushing, Reducing 1/2 x 1/4 Brass (After S/N R2441) .......................... 1
31 102422 Elbow (1/4 NPT x 90°) Brass (PR22)...................................................... 1
32 110134 Nipple (1/4 NPT x 2 1/2) Brass (PR22) .................................................. 1
Page 64

56
OUTSIDE RINSE PIPING WITH ELECTRIC BOOSTER (cont.)
(After S/N R1529)
Fig. 28 Part
Item No. No. Part Description Qty.
33 107069 Breaker, vacuum (1/4 NPT) Brass (PR22) (Prior to S/N R2561)............ 1
— 108349 Kit, repair 1/4" vacuum breaker .............................................................. 1
33 113218 Vacuum Breaker (1/4" NPT) Brass (After S/N R2561) .......................... 1
— 113219 Kit, Repair 1/4" vacuum breaker.............................................................. 1
34 101261 Elbow, street (1/4 NPT x 90°) Brass (PR22)............................................ 1
35 110135 Nipple (1/4 NPT x 7 1/4) Brass (PR22) .................................................. 1
36 100573 Locknut (1/4 NPT) Brass (PR22) ............................................................ 1
37 201669 Locknut (1/4 NPT) Plated (PR22)............................................................ 1
38 100073 Screw (1/4-20 x 1/3) Truss hd.................................................................. 1
39 100141 Nut, g rip (1/4-20) .................................................................................... 1
Detail A 601076 Piping Assy Final Rinse (includes items 1-5, 7-11, 15, 21-23, 34) ........ 1
Detail B 601247 Piping Assy Wash/Rinse (includes items 5, 7-8, 10, 12-14, 16-20, 24).... 1
— 403563 Piping Assy Fill (includes items 24, 31-41) ............................................ 1
— 900836 Kit*Repair, 1/4" & 1/2" Vacuum Breaker
(Includes one each of 108349, 113219 and 113221)
— 900837 Kit*Repair 3/4" Vacuum Breaker (Includes one each of 108351 and 113223)
* Between serial number range R2289 and R2440 maintained 1/4" valves, switching from Parker to GC
(see Srv Bulletin #46) then converted to 1/2"valves. Contact factory for machines in this serial number
range for correct 1/4" valve.
** Kits 900836 and 900837 were created to repair either style of vacuum breaker (bronze or plastic).
Plastic style is no longer available as a complete vacuum breaker.
REPLACEMENT PARTS
Page 65

57
THIS PAGE
INTENTIONALLY
LEFT BLANK
Page 66

58
Figure 29– Fill & Outside Rinse Piping With No Booster (Electric) or With Steam Booster
REPLACEMENT PARTS
TOP OF HOOD
WATER
INLET
BACK OF
HOOD
FROM STEAM BOOSTER
WITH
STEAM
BOOSTER
21
1
2
5
3
6
7
8
9
10
11
12
6
13
6
7
6
5
6
14
18
19
15
16
17
20
25
6
9
26
24
23
27
28
22a
29
30
37
36
31
35
34
32
33
4
38
39
40
4
22
6
13
6
7
6
5
8
14
18
19
15
16
17
20
22
1R040r02
21
30a
Piping for machines with
Serial Numbers After R1529
Piping for machines with
Serial Numbers Prior to R1529
Page 67

59
REPLACEMENT PARTS
FILL & OUTSIDE RINSE PIPING,
NO BOOSTER,AND STEAM WITH BOOSTER
Fig. 29 Part
Item No. No. Part Description Qty.
1 101259 Pipe plug (1/8 NPT) Brass ...................................................................... 1
2 105976 Bushing, reducing (3/4 NPT x 1/8 NPT) ................................................ 1
3 102392 Bushing, reducing (3/4 NPT x 1/2 NPT) ................................................ 1
4 102504 Pipe plug (1/2 NPT) Brass ...................................................................... 2
5 100599 Cross (3/4 NPT) Brass ............................................................................ 1
6 100184 Nipple, close (3/4 NPT) Brass ................................................................ 5
7 100571 Union (3/4 NPT) Brass ............................................................................ 2
8 102490 Nipple (3/4 NPT x 3-1/2") Brass ............................................................ 1
9 102444 Elbow, street (3/4 NPT x 90°) Brass ........................................................ 2
10 104429 Vacuum breaker (3/4 NPT) Brass (bronze).............................................. 1
— 108351 Kit, repair 3/4" vacuum breaker (bronze) ................................................ 1
— 113223 Kit, Repair 3/4" vacuum breaker (plastic)................................................ 1
11 102654 Nipple (3/4 NPT x 4-1/4") Brass .............................................................. 1
12 102442 Elbow (3/4 NPT x 90°) Brass .................................................................. 1
13 111437 Valve, solenoid (3/4 NPT) (Water) .......................................................... 1
— 109903 Repair kit, solenoid valve (3/4 NPT) .................................................... 1
— 111472 Replacement coil, solenoid valve (3/4 NPT) (120V) .............................. 1
14 107418 Tee (3/4 NPT x 3/4 NPT x 1/4 NPT) Brass ............................................ 1
15 110134 Nipple (1/4 NPT x 2 1/2) Brass .............................................................. 1
16 106418 Petcock (1/4 NPT Female) Brass ............................................................ 1
17 100135 Gauge, pressure (0-60 PSI Male) ............................................................ 1
18 102403 Bushing, reducing (3/4 NPT x 1/4 NPT) Brass ...................................... 1
19 100947 Nipple (1/4 NPT x Close) Brass .............................................................. 1
20 103403 Tee (1/4 NPT) Brass ................................................................................ 1
21 102500 Plug, pipe (1/4 NPT) Brass ...................................................................... 1
22 109909 Fitting, compression (1/4 NPT x 1/2 O.D.) .............................................. 1
22a 109909 Fitting, compression (1/4" NPT x 1/2" O.D.) (Prior to S/N R2440)........ 1
22a 111250 Fitting, compression (1/2" O.D. x 1/2" MPT) (After S/N R2441) .......... 1
23 100141 Nut, g rip (1/4-20) .................................................................................... 1
24 100073 Screw (1/4-20 x 1/2") Truss hd .............................................................. 1
25 311694 Bracket, piping suppor t .......................................................................... 1
26 110768 Line strainer (3/4 NPT) Brass ................................................................ 1
27 107380 Tubing, copper (64KB) ............................................................................ A/R
28 107380 Tubing, copper (64KB) ............................................................................ A/R
*29 109885 Valve, solenoid (1/4 NPT) ........................................................................ 1
— 111172 Repair kit, solenoid valve (1/4 NPT) .................................................... 1
— 111469 Replacement coil, solenoid valve (1/4 NPT) (120V) .............................. 1
29 113352 Valve Solenoid (1/2" NPT) (After S/N R2441) ...................................... 1
— 113392 Repair kit (1/2") Solenoid Valve .............................................................. 1
— 113357 Replacement Coil (120V) ........................................................................ 1
30 101262 Nipple (1/4 NPT x 1-1/2") Brass ............................................................ 1
30 100947 Nipple, close 1/4 NPT Brass (After S/N R2441) .................................... 1
30a 102388 Bushing, Reducing 1/2 x 1/4 Brass (After S/N R2441) .......................... 1
31 102422 Elbow (1/4 NPT x 90°) Brass .................................................................. 1
32 110134 Nipple (1/4 NPT x 2-1/2") Brass .............................................................. 1
Page 68

60
FILL & OUTSIDE RINSE PIPING,
NO BOOSTER,AND STEAM WITH BOOSTER (cont.)
Fig. 29 Part
Item No. No. Part Description Qty.
33 107069 Vacuum breaker (1/4 NPT) Brass (Prior to S/N R2561).......................... 1
— 108349 Repair Kit, vacuum breaker (1/4 & 1/2) .................................................. 1
33 113218 Vacuum Breaker (1/4" NPT) Brass (After S/N R2562) .......................... 1
— 113219 Kit, Repair 1/4" vacuum breaker.............................................................. 1
34 101261 Elbow, street (1/4 NPT x 90°) Brass ...................................................... 1
35 110135 Nipple (1/4 NPT x 7-1/4" RTOE) Brass ................................................ 1
36 100573 Locknut (1/4 NPT) Brass ........................................................................ 1
37 201669 Locknut (1/4 NPT) Nickel-Plated .......................................................... 1
38 102525 Tee (3/4 NPT x 1/2 NPT x 3/4 NPT) Brass ............................................ 1
39 109879 Compression, fitting (3/4 NPT X 7/8" O.D.) .......................................... 1
40 107314 Tubing (7/8" O.D.) Copper ...................................................................... A/R
— 601245 Piping Assy, Wash/Rinse (includes items 1 - 23) .................................... 1
— 403563 Piping Assy, Fill (includes items 22,26,29 thru 37) ................................ 1
**— 900836 Kit*Repair, 1/4" & 1/2" Vacuum Breaker
(Includes one each of 108349, 113219 and 113221)
**— 900837 Kit*Repair 3/4" Vacuum Breaker (Includes one each of 108351 and 113223)
* Between serial number range R2289 and R2440 maintained 1/4" valves, switching from Parker to GC
(see Srv Bulletin #46) then converted to 1/2" valves. Contact factory for machines in this serial number
range for correct 1/4" valve.
** Kits 900836 and 900837 were created to repair either style of vacuum breaker (plastic or bronze).
Plastic style is no longer available as a complete vacuum breaker.
REPLACEMENT PARTS
Page 69

61
THIS PAGE
INTENTIONALLY
LEFT BLANK
Page 70

62
Figure 30 – Cold Water Thermostat for Prewash Option
REPLACEMENT PARTS
COLD
WATER
INLET
TOP OF
PREWASH
HOOD
1
2
3
6
11
7
8
10
4
5
18
12
16
17
19
20
21
23
22
24
PREWASH
TANK
9
13
14
15
Page 71

63
REPLACEMENT PARTS
COLD WATER THERMOSTAT FOR PREWASH OPTION
Fig. 30 Part
Item No. No. Part Description Qty.
1 201669 Locknut (1/4 NPT) (Nickel Plated) ........................................................ 1
2 100573 Locknut (1/4 NPT) Brass ........................................................................ 1
3 110135 Nipple (1/4 NPT x 7 1/4) Brass .............................................................. 1
4 101261 Elbow, street (1/4 NPT x 90°) Brass ...................................................... 1
5 107069 Vacuum breaker (1/4 NPT) Brass (bronze).............................................. 1
— 108349 Repair Kit, 1/4" and 1/2" vacuum breaker (bronze) ................................ 1
— 113219 Kit, Repair 1/4" vacuum breaker (plastic)................................................ 1
6 110134 Nipple (1/4 NPT x 2-1/2) Brass .............................................................. 1
7 102422 Elbow (1/4 NPT x 90°) Brass .................................................................. 1
8 101262 Nipple (1/4 NPT x 1-1/2) Brass (Prior to S/N R2440) .......................... 1
8 100947 Nipple, close 1/4 NPT Brass (After S/N R2441) .................................... 1
9 102388 Bushing, Reducing 1/2 x 1/4 Brass (After S/N R2441) .......................... 1
**10 109885 Valve, solenoid (1/4 NPT) (Prior to S/N R2440) .................................... 1
— 111172 Repair kit, solenoid valve (1/4 NPT) ...................................................... 1
— 111469 Replacement coil, solenoid valve (1/4 NPT) (120V coil) ...................... 1
10 113352 Valve Solenoid (1/2" NPT) (After S/N R2441) ...................................... 1
113392 Repair kit, valve 1/2"................................................................................ 1
113357 Replacement coil (120V).......................................................................... 1
11 100947 Nipple, Close (1/4NPT) Brass ................................................................ 1
12 319549 Bracket, piping suppor t .......................................................................... 1
*13 108265 Valve, pressure reducing (1/2 NPT) ........................................................ 1
*14 100947 Nipple, Close (1/4NPT) Brass ................................................................ 1
15 102388 Bushing, reducer (1/2 x 1/4) Brass .......................................................... 1
16 104421 Line strainer (1/2 NPT) Brass .................................................................. 1
17 102438 Elbow, street (1/2 NPT x 90°) Brass ...................................................... 1
18 100141 Nut, g rip (1/4-20) .................................................................................... 1
19 107922 Box, thermostat and cover........................................................................ 1
20 107966 Nut, g rip (10-32 w/nylon insert) .............................................................. 2
21 109069 Ther mostat w/capillar y ............................................................................ 1
22 201041 Washer ...................................................................................................... 1
23 106460 Screw (6-32 x 1/4" Truss head) ................................................................ 2
24 100547 Locknut (1/2" NPT SST).......................................................................... 1
— 403563 Piping Assy., fill (includes items 1-9) .................................................... 1
***— 900836 Kit*Repair, 1/4" & 1/2" Vacuum Breaker
(Includes one each of 108349, 113219 and 113221)
***— 900837 Kit*Repair 3/4" Vacuum Breaker (Includes one each of 108351 and 113223)
* Note: Items 13 and 14 are optional unless incoming water supply pressure exceeds 25 PSI [173kPa].
** Between serial number rante R2289 and R2440 maintained 1/4" valves, switching from Parker to GC
(see Srv Bulletin #46) then converted to 1/2" valves. Contact factory for machines in this serial number
range for correct 1/4" valve.
***Kits 900836 and 900837 were created to repair either style of vacuum breaker (plastic or bronze).
Plastic style is no longer available as a complete vacuum breaker.
Page 72

64
Figure 31 – Inside Rinse Piping
REPLACEMENT PARTS
12
13
REAR
OF HOOD
7
8
10
9
11
3
6
4
2
5
HOOD TOP
1
TANK
BOTTOM
5
6
1R046
Page 73

65
REPLACEMENT PARTS
INSIDE RINSE PIPING
Fig. 31 Part
Item No. No. Part Description Qty.
1 100156 Locknut 3/4 NPT Brass ............................................................................ 1
2 108620 Gasket Rinse Pipe .................................................................................... 1
3 311405 Manifold, Final Rinse (Standard) ............................................................ 1
4 311404 Manifold, Final Rinse (High Hood) ........................................................ 1
5 205421 Pipe Final Rinse........................................................................................ 2
6 106734 Cap 1/2" Plastic ........................................................................................ 2
7 112022 Nozzle Spray Lower, ................................................................................ 3
8 315294 Suppor t – Rinse Pipe ................................................................................ 1
9 106486 Washer, Lock 10-32 Split ........................................................................ 1
10 104985 Nut, Plain 10-32 ........................................................................................ 1
11 106530 Nozzle, Spray Upper .............................................................................. 3
12 100141 Nut Grip 1/4-20 ........................................................................................ 1
13 100778 Screw 1/4-20 x 3/8 Truss Head................................................................ 1
Page 74

66
Figure 32 – Rinse Saver Mechanism (L-R Shown)
REPLACEMENT PARTS
1
2
3
4
5
6
7
10
9
9
8
4
6
6
11
12
1R049
Page 75

67
REPLACEMENT PARTS
See next page for R-L Rinse Saver Mechanism
RINSE SAVER MECHANISM (L-R SHOWN)
Fig. 32 Part
Item No. No. Part Description Qty.
1 100754 Screw 10-32 x 1/2" Flat Head .................................................................. 4
2 100194 Nut, Grip 10-32 ........................................................................................ 4
3 319302 Bracket, Rinse Switch Mounting .............................................................. 1
4 106026 Washer 1/4 x 5/8 x 1/16 SST.................................................................... 2
5 100141 Nut, Grip 1/4-20 SST .............................................................................. 1
6 104971 Nut, Grip 6-32 .......................................................................................... 4
7 113721 Reed Switch Aleph .................................................................................. 1
8 111026 Magnet SST .............................................................................................. 1
9 106382 Screw 6-32 x 3/8 Truss Head .................................................................. 2
10 205377 Sleeve, Rinse Switch ................................................................................ 1
11 100736 Bolt 1/4-20 x 3/4 Hex Head .................................................................... 1
12 319303-2 Arm, Rinse Switch (L-R) ........................................................................ 1
— 411101 Rinse Actuator Assy. (L-R) ...................................................................... 1
(includes items 3-8 and 9-12)
Page 76

68
Figure 33 – Rinse Saver Mechanism (R-L Shown)
REPLACEMENT PARTS
1
12
11
4
10
6
9
9
6
7
8
5
4
3
2
6
1R050
Page 77

69
REPLACEMENT PARTS
See previous page for L-R Rinse Saver Mechanism
RINSE SAVER MECHANISM (R-L SHOWN)
Fig. 33 Part
Item No. No. Part Description Qty.
1 100754 Screw 10-32 x 1/2" Flat Head .................................................................. 4
2 100194 Nut, Grip 10-32 ........................................................................................ 4
3 319302 Bracket, Rinse Switch Mounting .............................................................. 1
4 106026 Washer 1/4 x 5/8 x 1/16 SST.................................................................... 2
5 100141 Nut, Grip 1/4-20 SST .............................................................................. 1
6 104971 Nut, Grip 6-32 .......................................................................................... 4
7 113721 Reed Switch Aleph .................................................................................. 1
8 111026 Magnet SST .............................................................................................. 1
9 106382 Screw 6-32 x 3/8 Truss Head .................................................................. 2
10 205377 Sleeve, Rinse Switch ................................................................................ 1
11 100736 Bolt 1/4-20 x 3/4 Hex Head .................................................................... 1
12 319303-1 Arm, Rinse Switch (R-L) ........................................................................ 1
— 411100 Rinse Actuator Assy. (R-L) ...................................................................... 1
(includes 3-6 and 8-12)
Page 78

70
Figure 34 – Doors, Curtains, Miscellaneous
REPLACEMENT PARTS
4
5
6
11
22
1R052
19
20
16
15
14
13
12
FRONT
OF HOOD
34
11
34
25
25
33
24
23
3
2
1
21
17
18
1
3
2
10
25
26
32
31
30
29
27
Champion
28
9
7
8
17
18
Page 79

71
REPLACEMENT PARTS
DOORS, CURTAINS, MISCELLANEOUS
Fig. 34 Part
Item No. No. Part Description Qty.
1 108250 Rod, curtain (End) .................................................................................... 2
2 108042 Cur tain, end (Standard) ............................................................................ 2
3 109588 Cur tain, end (High-Hood) ........................................................................ 2
4 204506 Rod, curtain (Center) ................................................................................ 1
5 108043 Cur tain, center (Standard) ........................................................................ 1
6 109589 Cur tain, center (High-Hood) .................................................................... 1
7 110691 Guide, door (Standard) ............................................................................ 2
8 110692 Guide, door (High-Hood) ........................................................................ 2
9 107970 Screw (3-32 x 1") Fillister hd .................................................................. 14
10 107965 Nut, g rip (8-32) w/nylon insert ................................................................ 14
11 100141 Nut, g rip (1/4-20) .................................................................................... 6
12 100073 Screw (1/4-20 x 1/2") Truss hd ................................................................ 2
13 317344 Hook, door catch ...................................................................................... 1
14 317345 Bracket, door catch .................................................................................. 1
15 313359 Stop, door.................................................................................................. 1
16 100141 Nut, g rip (1/4-20) .................................................................................... 1
17 113721 Switch Reed Aleph .................................................................................. 2
18 108954 Nut, g rip (6-32) w/nylon insert ................................................................ 4
19 107967 Nut, g rip (1/4-20) w/nylon insert ............................................................ 3
20 314013 Baffle ........................................................................................................ 1
21 108578 Bracket, panel .......................................................................................... 4
22 107016 Nut (4-40) w/nylon insert ........................................................................ 4
23 107015 Screw (4-40 x 1/4") Round hd.................................................................. 4
24 109158 Nameplate ‘Champion’ ............................................................................ 2
25 100073 Screw (1/4-20 x 1/2") Truss hd ................................................................ 5
26 316990 Door - 24" (High-Hood) .......................................................................... 1
27 316992 Door - 24" (Standard) .............................................................................. 1
28 108966 Handle, door ............................................................................................ 1
29 100007 Screw (1-32 x 3/8") Truss hd.................................................................... 2
30 111026 Switch, magnet reed ................................................................................ 1
31 100194 Nut, g rip (10-32) ...................................................................................... 2
32 106486 Washer, lock (10-32) split ........................................................................ 2
33 313036 Panel, end .................................................................................................. 1
34 317149 Panel, front .............................................................................................. 2
Page 80

72
Figure 35 – Hood (PR22, PR36)
REPLACEMENT PARTS
Champion
TO WASH
TANK PIPING
27
28
32
31
29
26
36
25
32
23
24
21
19
22
20
FRONT
OF HOOD
19
17
15
16
34
20
33
20
23
14
35
36
41
40
42
42
1
41
40
44
45
46
47
47
23
14
12
13
2
3
4
5
6
7
8
9
10a
10
4
11
48
28
50
49
328
29
30
1R054-B2
52
8a
Page 81

73
REPLACEMENT PARTS
HOOD (PR22, PR36)
Fig. 35 Part
Item No. No. Part Description Qty.
1 201669 Locknut (1/4 NPT) Nickel........................................................................ 1
2 100573 Locknut (1/4 NPT) Brass ........................................................................ 1
3 110135 Nipple, RTOE (1/4 NPT x 7-1/4") Brass ................................................ 1
4 101261 Elbow, street (1/4 NPT x 90) Brass ........................................................ 2
5 107069 Vacuum breaker 1/4" (bronze).................................................................. 1
— 108349 Repair Kit, 1/4" vacuum breaker (bronze) .............................................. 1
— 113219 Kit, Repair 1/4" vacuum breaker (plastic)................................................ 1
6 110134 Nipple (1/4 NPT x 2-1/2") Brass ............................................................ 1
7 102422 Elbow (1/4 NPT x 90) Brass .................................................................... 1
8 101262 Nipple (1/4 NPT x 1-1/2") Brass .............................................................. 1
8 100947 Nipple, close 1/4 NPT Brass (After S/N R2441) .................................... 1
8a 102388 Bushing, Reducing 1/2 x 1/4 Brass (After S/N R2441) .......................... 1
*9 109885 Valve, solenoid 1/4" ................................................................................ 1
— 111172 Repair kit, valve 1/4" .............................................................................. 1
— 111469 Replacement, coil solenoid valve (1/4" NPT) (120V coil)...................... 1
9 113352 Valve Solenoid (1/2" NPT) (After S/N R2441) ...................................... 1
113392 Repair kit, Valve 1/2"................................................................................ 1
113357 Replacement coil (120V).......................................................................... 1
10 109909 Fitting, compression (1/4 NPT x 1/2") .................................................... 1
10a 109909 Fitting, compression (1/4 NPT x 1/2") (Prior to S/N R2440).................. 1
10a 111250 Fitting, compression (1/2 O.D. x 1/2 MPT) Brass (After S/N R2441).... 1
11 107315 Tubing, copper (1/2" O.D.) (64KB) w/PR36 .......................................... A/R
12 108043 Cur tain, center (Standard) ...................................................................... 1
13 109589 Cur tain, center (High-Hood) .................................................................... 1
14 108250 Cur tain rod................................................................................................ 2
15 110691 Guide, door (Standard) ............................................................................ 2
16 110692 Guide, door (High-Hood) ........................................................................ 2
17 107970 Screw (8-32 x 1") Fillister hd .................................................................. 14
18 107965 Nut, g rip (8-32) w/Nylon inser t .............................................................. 14
19 317344 Hook, door catch .................................................................................... 1
20 100141 Nut, g rip (1/4-20) .................................................................................... 6
21 317345 Bracket, door catch .................................................................................. 1
22 313359 Door stop .................................................................................................. 1
23 100073 Screw (1/4-20 x 1/2") Truss hd .............................................................. 10
24 319991-2 Cover, door switch (PR36) ...................................................................... 1
25 113721 Reed Switch Aleph .................................................................................. 1
26 108954 Nut, g rip (6-32) w/Nylon inser t .............................................................. 6
27 107966 Nut, g rip (10-32) w/Nylon inser t ............................................................ 4
28 100007 Screw (10-32 x 3/8") Truss hd.................................................................. 4
29 313698 Panel, front RH (PR22, PR36) ................................................................ 1
30 311302 Panel, front RH (PR22) ............................................................................ 1
31 313967 Panel, front LH (PR36) ............................................................................ 1
32 319993 Back plate, door switch (PR36) ................................................................ 1
33 108578 Bracket, panel .......................................................................................... 2
34 317690 Table flange .............................................................................................. 1
35 108042 Cur tain, end (Standard) ............................................................................ 1
36 109588 Cur tain, end (High-Hood) ........................................................................ 1
37 110856 Nut (1/4" NPT) Plug ................................................................................ 1
38 110750 Gasket 1/4" .............................................................................................. 1
Page 82

74
HOOD (PR22, PR36) (cont.)
Fig. 35 Part
Item No. No. Part Descrption Qty.
39 107016 Nut, g rip (440) w/Nylon inser t ................................................................ 2
40 107015 Screw (440 x 1/4") Round hd .................................................................. 2
41 109158 Nameplate, “Champion” .......................................................................... 1
42 110855 Plug (1/4" NPT)........................................................................................ 1
43 316991 Door (14") Standard (PR22) .................................................................... 1
44 317009 Door (14") High-Hood (PR22) ................................................................ 1
45 316992 Door (24") Standard (PR36) .................................................................... 1
46 316990 Door (24") High-Hood (PR36) ................................................................ 1
47 108966 Door Handle ............................................................................................ 1
48 111026 Magnet, reed switch .................................................................................. 1
49 100194 Nut, g rip (10-32) ...................................................................................... 2
50 106486 Washer, lock (#10) Split .......................................................................... 2
51 111478 Bolt (10-32 x 1/2" hex) w/Loctite ............................................................ 1
52 325667 Track Stiffener.......................................................................................... 2
— 403563 Piping Assy, fill (includes items 1-10) .................................................... A/R
— 108618 Gasket, hood ............................................................................................ 1
**— 900836 Kit*Repair, 1/4" & 1/2" Vacuum Breaker
(Includes one each of 108349, 113219 and 113221)
**— 900837 Kit*Repair 3/4" Vacuum Breaker (Includes one each of 108351 and 113223)
* Between serial number range R2289 and R2440 maintained 1/4" valves, switching from Parker to GC
(see Srv Bulletin #46) then converted to 1/2" valves. Contact factory for machines in this serial number
range for correct 1/4" valve.
** Kits 900836 and 900837 were created to repair either style of vacuum breaker (plastic or bronze).
Plastic style is no longer available as a complete vacuum breaker.
REPLACEMENT PARTS
Page 83

75
THIS PAGE
INTENTIONALLY
LEFT BLANK
Page 84

76
Figure 36 — Hood (FFPR26)
REPLACEMENT PARTS
34
39
40
41
42a
43
42
36
37
38
36
35
TO WASH
TANK PIPING
2
17
18
19
STUDS WELDED
TO WASH
TANK CRADLE
2
2
17
18
2
1
26
27
28
29
30
31
EDGE OF HOOD
24
23
5
4
22
21
20
33
16
15
2
1
23
32
1
11
12
13
14
3
4
5
6
10
9
HOOD
23
7
8
2
1
9
FRONT FEED PR26 HOOD
L-R SHOWN
44
EDGE OF
HOOD
Champion
1R055B1
40a
25
45
Page 85

77
REPLACEMENT PARTS
HOOD (FFPR26)
Fig. 36 Part
Item No. No. Part Description Qty.
1 100073 Screw (1/4-20 x 1/2") Truss hd .............................................................. 11
2 100141 Nut, g rip (1/4-20) .................................................................................... 19
3 314489 Track, rear ................................................................................................ 1
4 314515 Track, front .............................................................................................. 1
5 100754 Screw (10-32 x 1/2") Flat hd .................................................................. 3
6 100736 Bolt (1/4-20 x 3/4") Hex hd .................................................................... 4
7 314762 Track, side (L R) ...................................................................................... 1
8 314512 Track, side (R-L) .................................................................................... 1
9 100194 Nut, g rip (10-32) .................................................................................... 4
10 315392 Track support .......................................................................................... 1
11 104985 Nut, plain (10-32) .. .................................................................................. 3
12 106486 Washer, lock (#10) Split . ........................................................................ 3
13 107033 Washer, flat (#10) . .................................................................................. 3
14 315122 Splash shield, vent .................................................................................. 1
15 315125 Cover, No vent (Optional) ...................................................................... 1
16 401487 Vent Stack Assy........................................................................................ 1
17 313598 Lever, pawl bar . ...................................................................................... 2
18 107999 Bolt (1/4-20 x 1-3/4") Hex hd ................................................................ 2
19 314772 Pawl bar .................................................................................................. 1
20 107016 Nut, g rip (440) w/Nylon Inser t .............................................................. 2
21 109158 Nameplate “Champion”............................................................................ 1
22 107015 Screw (440 x 1/4") Round hd .................................................................. 2
23 100097 Screw (10-32 x 1/2") Truss hd ................................................................ 2
24 314516 Rack guide ................................................................................................ 1
25 317690 Table flange ............................................................................................ 1
26 108043 Cur tain, center (Standard) ...................................................................... 1
27 109589 Cur tain, center (High-Hood) .................................................................. 1
28 108250 Cur tain rod, Center .................................................................................. 1
29 108042 Cur tain, end (Standard) .......................................................................... 1
30 109588 Cur tain, end (High-Hood) ...................................................................... 1
31 111146 Cur tain rod, End ...................................................................................... 1
32 314730 Front panel .............................................................................................. 1
33 201669 Locknut (1/4 NPT) (Nickel-Plated) ........................................................ 1
34 100573 Locknut (1/4 NPT) Brass ........................................................................ 1
35 110135 Nipple, RTOE (1/4 NPT x 7-1/4") Brass .............................................. 1
36 101261 Elbow, street (1/4 NPT x 90°) Brass ...................................................... 2
37 107069 Vacuum breaker (1/4 NPT) (bronze)........................................................ 1
— 108349 Repair Kit, vacuum breaker 1/4" & 1/2" (bronze) .................................. 1
— 113219 Kit, Repair 1/4" vacuum breaker (plastic)................................................ 1
38 110134 Nipple (1/4 NPT x 2-1/2") Brass ............................................................ 1
39 102422 Elbow (1/4 NPT x 90°) Brass .................................................................. 1
40 101262 Nipple (1/4 NPT x 1-1/2") Brass ............................................................ 1
40 100947 Nipple, close 1/4 NPT Brass (Not Shown) (After S/N R2441) .............. 1
40a 102388 Bushing, Reducing 1/2 x 1/4 Brass (After S/N R2441) .......................... 1
*41 109885 Valve, solenoid (1/4 NPT) ...................................................................... 1
Page 86

78
HOOD (FFPR26) (cont.)
Fig. 36 Part
Item No. No. Part Description Qty.
— 111172 Repair kit, solenoid valve (1/4 NPT) .................................................... 1
— 111469 Replacement coil, solenoid valve (1/4 NPT) (120V coil) ........................ 1
41 113352 Valve Solenoid (1/2" NPT) (After S/N R2441) ...................................... 1
113392 Repair kit, valve 1/2"................................................................................ 1
113357 Replacement coil (120V).......................................................................... 1
42 109909 Fitting, compression (1/4 NPT x 1/2" O.D.) .......................................... 2
42a 109909 Fitting Compression (1/4 NPT x 1/2" O.D.) (Prior to S/N R2440) ........ 1
42a 111250 Fitting Compression (1/2" O.D. x 1/2" MPT) Brass (After S/N R2441) 1
43 107315 Tubing, copper (1/2" O.D.) .................................................................... A/R
44 108578 Bracket, panel .......................................................................................... 2
45 325667 Track Stiffener.......................................................................................... 1
— 108618 Gasket, hood ............................................................................................ A/R
— 403563 Piping Assy Fill (includes items – 33 thru 42) ........................................ 1
**— 900836 Kit*Repair, 1/4" & 1/2" Vacuum Breaker
(Includes one each of 108349, 113219 and 113221)
**— 900837 Kit*Repair 3/4" Vacuum Breaker (Includes one each of 108351 and 113223)
* Between serial number range R2289 and R2440 maintained 1/4" valves, switching from Parker to GC
(see Srv Bulletin #46) then converted to 1/2" valves. Contact factory for machines in this serial number
range for correct 1/4" valve.
** Kits 900836 and 900837 were created to repair either style of vacuum breaker (plastic or bronze).
Plastic style is no longer available as a complete vacuum breaker.
REPLACEMENT PARTS
Page 87

79
THIS PAGE
INTENTIONALLY
LEFT BLANK
Page 88

80
Figure 37 – Tank (PR22)
REPLACEMENT PARTS
TO WASH
TANK
TO WASH
DRAIN
STUDS WELDED
TO TANK
SCREEN
THERMOMETER
(CALLED OUT IN
CONTROL BOX)
38
45
38
44
42
41
20
43
38
35
36
37
34
34
32
31
30
29
28
26
25
24
33
22
23
28
27
22
21
18
8
18
19
17
16
15
4
12
13
9
14
7
11
8
10
1
2
3
4
5
4
6
1R056
Page 89

81
REPLACEMENT PARTS
TANK (PR22)
Fig. 37 Part
Item No. No. Part Description Qty.
1 108875 Cotter pin (3/32" x 1/2") .......................................................................... 1
2 205121 Lift rod, overflow .................................................................................... 1
3 107967 Nut, g rip (1/4-20) w/Nylon Inser t .......................................................... 1
4 100141 Nut, g rip (1/4-20) .................................................................................... 5
5 317892 Suppor t, overflow .................................................................................... 1
6 111532 O-ring, overflow ...................................................................................... 1
7 316916 Overflow tube (5-1/2") ............................................................................ 1
8 106026 Washer, flat (1/4") .................................................................................... 5
9 106482 Washer, lock (1/4") Split.......................................................................... 2
10 108875 Cotter pin (3/32" x 1/2") .......................................................................... 1
11 317051 Lift ar m .................................................................................................... 1
12 102376 Washer, flat (5/16") .................................................................................. 1
13 111391 Spring, latch bracket ................................................................................ 1
14 316552 Latch bracket ............................................................................................ 1
15 105254 Bolt (10-32 x 1/2") Hex hd .................................................................... 1
16 106486 Washer, lock (#10) Split .......................................................................... 1
17 316554-1 Drain lever. .............................................................................................. 1
18 109034 Gasket (1/2 NPT) Plug ............................................................................ 2
19 108418 Plug (1/2 NPT) Plastic ............................................................................ 2
20 108417 Nut (1/2 NPT) Plastic .............................................................................. 2
21 106314 Bolt (3/8-16 x 1/2") Hex hd .................................................................... 1
22 104618 Washer, flat (3/8") .................................................................................... 2
23 100143 Nut, g rip (3/8-16) .................................................................................... 1
24 112257 O-ring, drain body .................................................................................... 1
25 107340 Clamp, hose (M28) .................................................................................. 2
26 111034 Drain body .............................................................................................. 1
27 111060 Tee (1-1/2 NPT x 1-1/4 NPT x 1-1/4 NPT) Galvanized ........................ 1
28 111113 Nipple, toe (1-1/4 NPT x 2") Galvanized ................................................ 2
29 204979 Hose, drain .............................................................................................. 1
30 311272 Scrap basket.............................................................................................. 1
31 108966 Handle, cover .......................................................................................... 1
32 320988 Cover, scrap basket .................................................................................. 1
33 100073 Screw (1/4-20 x 1/2") Truss hd .............................................................. 2
34 100194 Nut, g rip (10-32) .................................................................................... 4
35 104584 Nut, plain (1/2-13) .................................................................................. 1
36 104882 Washer, flat (1/2") .................................................................................... 1
37 100735 Bolt (1/4-20 x 5/8") Hex hd .................................................................... 4
38 100547 Locknut (1/2 NPT) SST .......................................................................... 5
39 311628 Screen suppor t rear .................................................................................. 1
40 100097 Screw (10-32 x 1/2") Truss hd.................................................................. 2
41 305763 Scrap screen ............................................................................................ 1
42 312649 Screen suppor t front ................................................................................ 1
43 110854 Dual Float switch...................................................................................... 1
44 110750 Gasket, float switch . ................................................................................ 1
45 204533 Nipple, crossflow (1/2 NPT x 13-1/2" SST)............................................ 1
— 408213 Drain Mechanism Assy (Includes items 10-17) ...................................... 1
Page 90

82
Figure 38 – Tank (PR36)
REPLACEMENT PARTS
TO WASH
TANK
TO WASH
DRAIN
THERMOMETER
(CALLED OUT IN
CONTROL BOX)
STUDS WELDED
TO TANK
SCREEN
39
45
39
44
43
42
37
38
20
46
39
34
35
36
34
32
31
30
29
28
26
25
24
22
23
22
47
33
27
18
21
18
19
17
16
15
40
34
41
4
12
13
9
14
7
11
8
10
1
2
3
4
5
4
6
1R057
Page 91

83
REPLACEMENT PARTS
TANK (PR36)
Fig. 38 Part
Item No. No. Part Description Qty.
1 108875 Cotter pin (3/32" x 1/2") .......................................................................... 1
2 205121 Lift rod, overflow .................................................................................... 1
3 107967 Nut, g rip (1/4-20) w/Nylon inser t .......................................................... 1
4 100141 Nut, g rip (1/4-20) .................................................................................... 5
5 317892 Suppor t, overflow .................................................................................... 1
6 111532 O-ring, overflow........................................................................................ 1
7 316916 Overflow tube (5-1/2") ............................................................................ 1
8 106026 Washer, flat (1/4") .................................................................................... 5
9 106482 Washer, lock (l/4") Split .......................................................................... 2
10 108875 Cotter pin (3/32" x 1/2") .......................................................................... 1
11 317051 Lift ar m .................................................................................................... 1
12 102376 Washer, flat (5/16") .................................................................................. 1
13 111391 Spring, latch bracket ................................................................................ 1
14 316552 Latch bracket ............................................................................................ 1
15 111478 Bolt (10-32 x 1/2") Hex hd ...................................................................... 1
16 106486 Washer, lock (#10) Split .......................................................................... 1
17 317163-1 Drain lever .............................................................................................. 1
18 109034 Gasket (1/2 NPT) Plug ............................................................................ 2
19 108418 Plug (1/2 NPT) Plastic.............................................................................. 2
20 108417 Nut (1/2 NPT) Plastic .............................................................................. 2
21 106314 Bolt (3/8-16 x 1/2") Hex hd .................................................................... 1
22 104618 Washer, flat (3/8") .................................................................................... 2
23 100143 Nut, g rip (3/8-16) .................................................................................... 1
24 112257 O-ring, drain body .................................................................................... 1
25 107340 Clamp, hose (M28) .................................................................................. 2
26 111034 Drain body .............................................................................................. 1
27 111060 Tee (1-1/2 NPT x 1-1/4 NPT x 1-1/4 NPT) Galvanized ........................ 1
28 111113 Nipple, toe (1-1/4 x 2") Galvanized........................................................ 1
29 111117 Hose, drain .............................................................................................. 1
30 311273 Scrap basket ............................................................................................ 1
31 108966 Handle, cover............................................................................................ 1
32 305720 Cover, scrap basket .................................................................................. 1
33 100073 Screw (1/4-20 x 1/2") Truss hd .............................................................. 2
34 100194 Nut, g rip (10-32) .................................................................................... 4
35 104584 Nut, plain (1/2-13) .................................................................................. 1
36 104882 Washer, flat (1/2") .................................................................................... 1
37 110750 Gasket, float switch ................................................................................ 1
38 110854 Dual Float switch...................................................................................... 1
39 100547 Locknut (1/2 NPT) SST .......................................................................... 1
40 313811 Screen suppor t, rear ................................................................................ 1
41 100097 Screw (10-32 x 1/2") Truss hd.................................................................. 1
42 306910 Screen suppor center .............................................................................. 1
43 305783 Scrap screen ............................................................................................ 1
44 313959 Screen suppor t front ................................................................................ 1
45 204539 Nipple, crossflow (1/2 NPT x 13-1/2") SST............................................ 1
46 100735 Bolt (1/4-20 X 5/8) Hex hd .................................................................... 4
47 106026 Washer, flat (1/4") .................................................................................... 1
Page 92

84
Figure 39– Tank (FFPR26)
REPLACEMENT PARTS
33
20
34
35
25
26
27
32
31
30
20
20
24
23
22
20
21
20
2
1
3
4
9
7
6
5
17
10 11
8
12
13
14
15
16
9
19
18
36
26
25
27
28
29
37
TO WASH
DRAIN
42
39
38
41
40
44
43
THERMOMETER LEAD
(CALLED OUT IN
CONTROL CABINET)
1R058
Page 93

85
REPLACEMENT PARTS
TANK (FFPR26)
Fig. 39 Part
Item No. No. Part Description Qty.
1 316554 Drain lever (L-R) .................................................................................... 1
2 316554-1 Drain lever (R-L) .................................................................................... 1
3 106486 Washer, lock (#l0) Split .......................................................................... 1
4 111478 Bolt (10-32 x 1/2") Hex hd .................................................................... 1
5 316552 Latch bracket ............................................................................................ 1
6 111391 Spring, latch bracket ................................................................................ 1
7 102376 Washer, flat (5/16") .................................................................................. 1
8 106482 Washer, lock (1/4) Split ............................................................................ 2
9 100141 Nut, g rip (1/4-20) .................................................................................... 5
10 317050 Lift ar m (L,R) .......................................................................................... 1
11 317051 Lift ar m (R-L) .......................................................................................... 1
12 106026 Washer, flat (1/4") .................................................................................... 1
13 108875 Cotter pin (3/32" x 1/2") .......................................................................... 1
14 108875 Cotter pin (3/32" x 1/2") .......................................................................... 1
15 205121 Lift rod, overflow .................................................................................... 1
16 107967 Nut, g rip (1/4-20) w/Nylon Inser t .......................................................... 1
17 316916 Overflow tube (5-1/2") ............................................................................ 1
18 111532 O-ring, overflow ...................................................................................... 1
19 314294 Suppor t, overflow .................................................................................... 1
20 100547 Locknut (1/2 NPT) SST .......................................................................... 5
21 109034 Gasket, ther mometer ................................................................................ 2
22 314771 Scrap basket ............................................................................................ 1
23 305763 Scrap screen ............................................................................................ 1
24 312649 Screen suppor t, front .............................................................................. 1
25 107033 Washer, flat (#10) . .................................................................................. 4
26 106486 Washer, lock (#10) .................................................................................. 4
27 104985 Nut, plain (10-32) .................................................................................... 4
28 110854 Float switch . ............................................................................................ 1
— 111151 C-clip (2 per float switch) ........................................................................ 2
29 110750 Gasket float switch .................................................................................. 1
30 107589 Washer, lock (1/2") .................................................................................. 1
31 104584 Nut, plain (1/2-13). .................................................................................. 1
32 201041 Washer, flat (7/8" I.D. x 1/8" Thick) ...................................................... 1
33 204981 Nipple, crossflow (1/2" NPT x 11") SST ................................................ 1
34 314763 Screen suppor t, Rear (L,R) . .................................................................... 1
35 314764 Screen suppor t, Front (R-L) .................................................................... 1
36 100735 Bolt (1/4-20 x 5/8") Hex hd .................................................................... 4
37 106026 Washer, flat (1/4") .................................................................................... 4
38 112257 O-ring, drain body .................................................................................. 1
39 111034 Drain body ............................................................................................... 1
40 111060 Tee (l-1/2 NPT x 1-1/4 NPT x 1-1/4 NPT) Galvanized........................... 1
41 111113 Nipple, toe (1-1/4 NPT x 2") Galvanized ................................................ 2
42 107340 Clamp, hose (M28) .................................................................................. 1
43 111117 Hose, drain (44KB, KL44, 44WS) .......................................................... 3 ft.
44 111117 Hose, drain (54KB) ................................................................................ 4 ft.
— 408212 Drain Mechanism Assy (L-R) (Includes Items 1,3-7,10,13) .................. 1
— 408213 Drain Mechanism Assy (R-L) (Includes Items 2-7, 11, 13) .................... 1
Page 94

86
Figure 40 – Drain Unit and Screens
W ash Tank, Power Rinse T ank
REPLACEMENT PARTS
Power
Rinse
Wash
To Prewash
26
27
29
30
31
32
33
31
30
29
28
22
23
7
19
18
13
23
24
3
15
25
2
1
3
4
5
6
8
9
7
9
11
10
12 14
16
17
20 21
12
19
1R059
Page 95

87
REPLACEMENT PARTS
DRAIN UNIT AND SCREENS
WASH TANK, POWER RINSE T ANK
Fig. 40 Part
Item No. No. Part Description Qty.
1 317164-1 Drain lever (L-R)...................................................................................... 1
2 317164-2 Drain lever (R-L)...................................................................................... 1
3 106486 Washer, lock (#10).................................................................................... 2
4 111478 Bolt (10-32 x 1/2") Hex hd .................................................................... 1
5 111391 Spring, overflow lift ................................................................................ 1
6 102376 Washer, flat (5/16") .................................................................................. 1
7 100735 Bolt (1/4-20 x 5/8") Hex hd .................................................................... 6
8 316552 Latch bracket .......................................................................................... 1
9 108875 Cotter pin (3/32" x 1/2") .......................................................................... 2
10 317050 Lift ar m, (L-R) ........................................................................................ 1
11 317051 Lift ar m, (R-L) ........................................................................................ 1
12 106026 Washer, flat (1/4") .................................................................................... 1
13 205080 Lift rod, overflow .................................................................................... 1
14 104925 Washer, lift rod ........................................................................................ 1
15 305164 Screen ...................................................................................................... 6
16 316835 Filler (RH) ................................................................................................ 1
17 317069 Filler (LH) ................................................................................................ 1
18 107967 Nut, g rip (1/4-20) w/nylon insert ............................................................ 1
19 100141 Nut, g rip (1/4-20) .................................................................................... 2
20 314463 Overflow (7") (Wash) .............................................................................. 1
21 314457 Overflow (7-1/2") (Rinse) ...................................................................... 2
22 111532 O-ring, overflow ...................................................................................... 1
23 107033 Washer, flat (#10) .................................................................................... 2
24 104985 Nut, plain (10-32) .................................................................................... 1
25 305163 Screen suppor t .......................................................................................... 1
26 112257 O-ring........................................................................................................ 1
27 111034 Drain body .............................................................................................. 1
28 100579 Pipe plug (1-1/4 NPT) Galvanized .......................................................... 1
29 111059 Tee (1-1/4" NPT x 1-1/4" NPT x 1-1/2" NPT)........................................ 2
30 204383 Nipple, toe 1" NPT x 2" galvanized ........................................................ 2
31 107340 Clamp, Hose ............................................................................................ 4
32 111117 Hose (14") ................................................................................................ 1
33 111117 Hose (27-1/4") .......................................................................................... 1
Page 96

88
Figure 41 – Control Cabinet
REPLACEMENT PARTS
19
26
27
25
13
14
22
12
15
17
8
20
7A
3
4
24
23
6
9
1
10
11
18
16
24
15
2
7B
1R063
21
5
Page 97

89
REPLACEMENT PARTS
CONTROL CABINET
Fig. 41 Part
Item No. No. Part Description Qty.
1 317186 Control box 36" ...................................................................................... 1
2 317405 Cover, control cabinet 36" ...................................................................... 1
3 111596 Decal 36" Cabinet (64/40/60KPRB) ........................................................ 1
4 111597 Decal 36" Cabinet (64/40/60KB) ............................................................ 1
5 113622 Ther mometer 4' Gas Filled - Final Rinse (Replaces 108391) .................. 1
6 107440 Ther mometer 8' - Rinse .......................................................................... 1
7A 107440 Ther mometer 8' - Wash Prewash (L-R) PR22, PR 26, PR 36.................. 1
7B 109499 Ther mometer 12' - Wash (R-L)................................................................ 1
8 107440 Ther mometer 8' - Prewash........................................................................ 1
9 900726 Kit, Stop Pushbutton (Red) .................................................................. 1
10 900725 Kit, Star t Pushbutton (Green) ................................................................ 1
11 111980 Power switch/Circuit Breaker - 5Amp
12 110920 Connector (1" x 90°) .............................................................................. 1
13 100882 Connector (1-1/4" x 90°).......................................................................... 1
14 107964 Bushing .................................................................................................... 1
15 107368 Coupling, chain end ................................................................................ 2
16 107367 Chain, bead . ............................................................................................ 1 ft.
17 110919 Connector (1") ........................................................................................ 1
18 109056 Insulation .................................................................................................. 1
19 112087 Label - Thermometer Overlay - Wash...................................................... 1
20 113663 Label - Thermometer Overlay - Rinse .................................................... 1
21 113644 Label -Ther mometer Overlay - Final Rinse .......................................... 1
22 107351 Switch, toggle DPOT (Blower, Dryer) .................................................... 1
23 111357 Pad,vibration damping.............................................................................. 2
24 100097 Screw (10-32 x 1/2") Truss hd ................................................................ 4
25 100194 Nut, g rip (10-32) ...................................................................................... 2
26 104883 Screw (6-32 X 3/8)Round hd .................................................................. 2
27 112307 Wire, retainer screw mount ...................................................................... 2
— 900725 Kit, Star t pushbutton (Green) (Kit includes: Qty. 1 each P/N 111614,
green pushbutton and P/N 111617, Contact Block N.O.)
— 900726 Kit, Stop pushbutton (Red) (Kit includes: Qty. 1 each P/N 111615,
red pushbutton and P/N 111616, Contact Block N.C.)
Page 98

90
Figure 42 – Control Panel
REPLACEMENT PARTS
CONTACTORCONTACTOR
MACHINE
ELECTRICAL
CONNECTION PLATE
POWER
CONNECTOR
FUSE
BLOCK
MOTOR OVERLOADS
BUS BAR
DRIVE
24V
TRANSFORMER
PREWASH WASH
TERMINAL
BLOCK
POWER
RINSE
CONTROL
TRANSFORMER
TANK HEAT
FUSE BLOCK
TANK HEAT
FUSE BLOCK
GROUND
TIMER
51
50
52
54
53
62
61
60
6766
57
26 27 28 29
22 23 24 25
56
58
59
58
59
3536373839
31
30
66 67
40 55
49
48
47
17
13
10
12
9
11
8
7
5
6
43
18
14 15 16
19 20
21
WASH
CONTACTOR
PREWASH
CONTRACTOR
DRIVE
CONTACTOR
33
1 221
32
2
DETERGENT
RINSE AGENT
SANITIZER
42 42 42 42 43 44 45
33
4541
46
POWER RINSE
CONTACTOR
1 2
65
64
63
1R066
Page 99

91
REPLACEMENT PARTS
CONTROL PANEL
Fig. 42 Part
Item No. No. Part Description Qty.
*1 108122 Contactor (Motor) 12 Amp, 3 Pole w/Aux Switch (40/60/64KB) .......... 2
*2 108122 Contactor (Motor) 12 Amp, 3 Pole w/Aux Switch (40/60/64KPRB) ...... 3
3 110805 Star ter Mtr OL GV2-M08 w/Aux - 1/4 HP Drive (208-240V/1PH) ...... 1
4 110803 Star ter Mtr OL GV2-M06 w/Aux - 1/4 HP Drive (208-240V/3PH) ...... 1
5 110802 Star ter Mtr OL GV2-M05 w/Aux - 1/4 HP Drive (380-415V/3PH) ...... 1
6 110802 Star ter Mtr OL GV2-M05 w/Aux - 1/4 HP Drive (440-480V/3PH) ...... 1
7 110801 Star ter Mtr OL GV2-M04 w/Aux - 1/4 HP Drive (575V/3PH) .............. 1
8 110807 Star ter Mtr OL GV2-M14 w/Aux - 1HP Prewash (208-240V//lPH) ...... 1
9 110805 Star ter Mtr OL GV2-M08 w/Aux - 1HP Prewash (208V/lPH) .............. 1
10 110805 Star ter Mtr OL GV2-M08 w/Aux - 1HP Prewash (220-240V/3PH) ...... 1
11 110804 Star ter Mtr OL GV2-M07 w/Aux - 1HP Prewash (380-415V/3PH) ...... 1
12 110804 Star ter Mtr OL GV2-M07 w/Aux - 1HP Prewash (440-480V/3PH) ...... 1
13 110803 Star ter Mtr OL GV2-M06 w/Aux - 1HP Prewash (575V/3PH) .............. 1
14 111630 Overload, Motor -2HP Wash/Power Rinse (208-240V/ lPH) .................. 1
15 112691 Overload, Motor -2HP Wash/Power Rinse (208-240V/3PH) .................. 1
16 110805 Star ter Mtr OL GV2-M08 w/Aux-2HP Wash/Power Rinse
(380-415V/3PH) ...................................................................................... 1
17 110805 Star ter Mtr OL GV2-M08 w/Aux-2HP Wash/Power Rinse
(440-480V/3PH) ...................................................................................... 1
18 112692 Overload, Motor -2HP Wash/Power Rinse (575V/3PH) .......................... 1
19 111671 Bus bar 3 Unit (64KB) ............................................................................ 1
20 111634 Bus bar 4 Unit (64KPRB) ........................................................................ 1
21 111636 Power connector, 3 pole............................................................................ 1
22 111833 Terminal block (208-240V/lPH) ............................................................ 1
23 111833 Terminal block (208-240V/lPH) .............................................................. 1
24 111833 Terminal block (208-220V/3PH) 70°Rise .............................................. 1
25 111833 Terminal block (208-240V/3PH) 40°Rise .............................................. 1
26 111833 Terminal block (208-240V/3PH) ............................................................ 1
27 111833 Terminal block (380-415V/3PH).............................................................. 1
28 111833 Terminal block (440-480V/3PH).............................................................. 1
29 111833 Terminal block (575V/3PH) .................................................................... 1
30 104873 Label, g round............................................................................................ 1
31 103309 Wire lug-ground........................................................................................ 1
*32 108130 Auxiliar y switch (Drive contactor) .......................................................... 1
33 110849 Din Rail 16-1/2" (specify length 16 1/2") ................................................ 2
34 110849 Din Rail 12" (specify length 12") ............................................................ 1
35 111153 Fuse block................................................................................................. 2
36 111823 Fuse (ATDR-6) (208-240V) .................................................................... 2
37 111822 Fuse (ATDR-5) (380-415V) .................................................................... 2
38 111821 Fuse (ATDR-3) (440-480V) .................................................................... 2
39 111821 Fuse (ATDR-3) (575V) ............................................................................ 2
40 112351 Timer 0-6 Min. Off Delay ...................................................................... 1
41 111068 Relay-120V .............................................................................................. 1
42 111067 Relay-24V (64KB) .................................................................................. 4
43 111067 Relay 24V (64KPRB) .............................................................................. 5
44 111067 Relay-24V (Table limit switch) ................................................................ l
45 111068 Relay-120V (Booster-Electric) ................................................................ 1
*When replacing a drive motor contactor, Item 1 or 2, and machine S/N is prior to S/N R1666, you
must order Item 32, P/N 108130 in addition to P/N 108122.
Page 100

92
CONTROL PANEL (cont.)
Fig. 42 Part
Item No. No. Part Description Qty.
46 111036 Socket, relay (1 Per Relay) ...................................................................... A/R
47 107091 Transformer, Control (500VA) (208-240V) ............................................ 1
48 107091 Transformer, Control (500VA) (440-480V) ............................................ 1
49 109148 Transformer, Control (500VA) (380-415V) ............................................ 1
50 111046 Transformer, Control (500VA) (575V) .................................................... 1
51 111277 Transformer, Control (120V to 24V) ...................................................... 1
52 107171 Terminal block (4 pole)............................................................................ 1
53 112279 Jumper, shorting ...................................................................................... 1
54 112296 Label, chemical connections .................................................................... 1
55 112352 Socket, timer ............................................................................................ 1
56 317185 Inner panel ................................................................................................ 1
57 108615 Data plate, machine electrical connection .............................................. 1
58 111827 Contactor (Heat-Electric) 60Amp 3 Pole (208-240V) .......................... 1
59 111827 Contactor (Heat-Electric) 60Amp 3 Pole (440-480V) (575V) .............. 1
60 111230 Fuse (OT-60)(Heat-Electric) (208-220V) ................................................ 3
61 111240 Fuse (OT-50) (Heat-Electric) (220-240V) .............................................. 3
62 108517 Fuse (ATMR-25) (Heat-Electric) (208-220V) ...................................... 3
63 100922 Fuse (ATMR-20) (Heat-Electric) (575V)(480V) .................................. 3
64 180173 Fuse (A4J40) (Heat-Electric) (208-220V) .............................................. 3
65 180176 Fuse (A4J60) (Heat-Electric) (208-220V) .............................................. 3
66 180171 Fuse Block 600V/30A (440-480V) ........................................................ 2
67 106925 Fuse Block 600V/50A (208-220V) .......................................................... 2
REPLACEMENT PARTS
 Loading...