

Page 1
Technical Manual
Gas Fired
Boiler
Model
CSS-130
Read all instructions carefully before starting the installation.
Save this manual for future reference
July, 1997
P. O. Box 4149
Winston-Salem, North Carolina 27115-4149
336/661-1556 Fax: 336/661-1660
CAUTION
Manual P/N 111995 REV. A
2674 N. Service Road
Jordan Station, Ontario, Canada LOR 1SO
905/562-4195 Fax: 905/562-4618
Champion Industries, Inc.
Page 2

Complete the information below so it will be available for quick reference.
Model Number CSS-130 Serial Number
Voltage and Phase 115/60/1
Champion Parts Distributor Phone
Champion Service Agency Phone
In the United States Call:
Champion Industries Service: 1-800-858-4477 Champion Service Fax: 1 (336) 661-1660
In Canada Call:
Champion Industries Service: 1-800-263-5798 Champion Service Fax: 1 (905) 562-4618
NOTE:When calling to order parts, be sure to have the model number, serial number,
voltage and phase of your machine.
COPYRIGHT © 1996, 1997 by Champion Industries, Inc.
Page 3
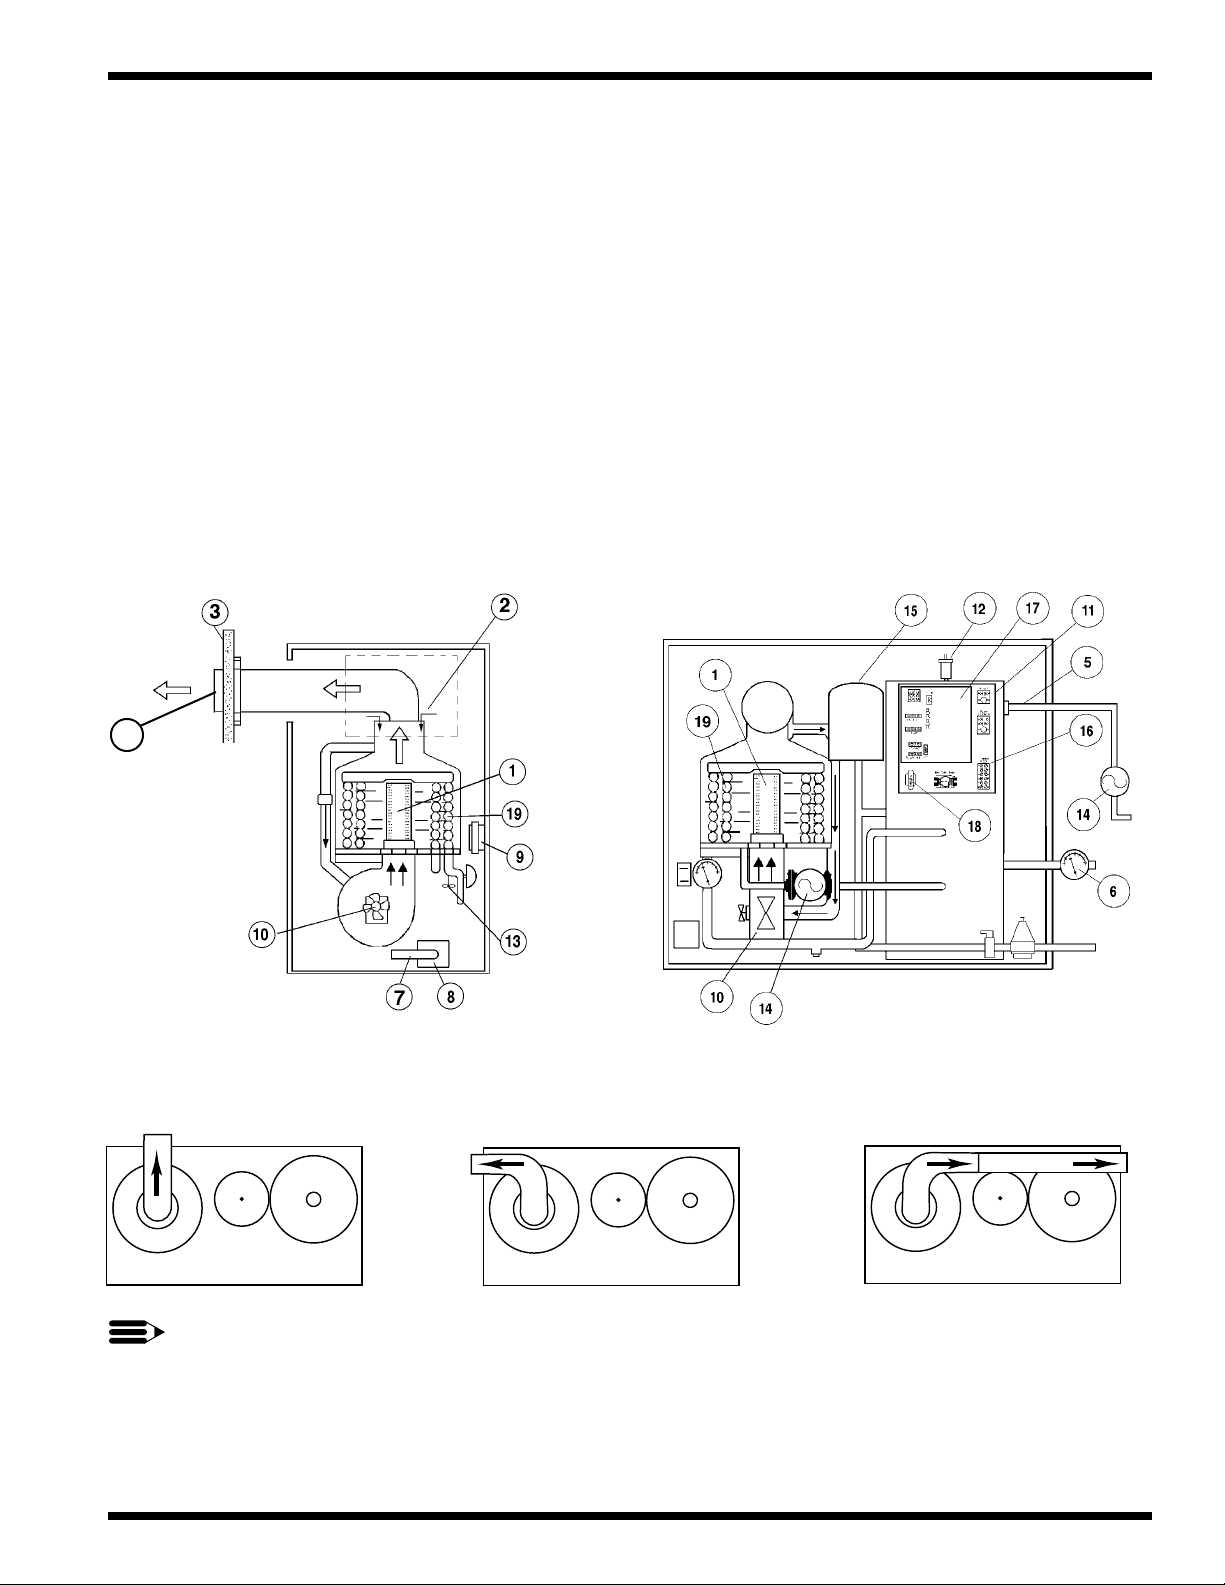
CSS-130 GAS FIRED BOILER COMPONENT LOCATOR
TO THE INST ALLER:
BEFORE YOU BEGIN
It is important for you to read all Installation and Operating sections of this manual before you begin
installation. This will avoid mistakes and confusion when installing and operating the unit.
1. Gas Burner
2. Air Intake
3. Outside Vent Wall
4. Exhaust Air
5. Dishwasher Water Supply
6. Water Return From Dishwasher
7. Gas Supply
8. Gas Valve
9. Stack Switch
10. Blower Motor and Housing
11. Control Cabinet
12. Tank Vent
13. Coil Air Bleed Off
14. Circulation Pump
15. Expansion Tank
16. Terminal Strip
17. Boiler Control
18. Transformer 24V
19. Copper Coil Heat Exchanger
4
Left Side View
Gas Flue (Rear of CSS-130)
Gas Flue (Left end of CSS-130)
Front View
Gas Flue (Right end of CSS-130)
NOTE:
The CSS-130 is available in (3) venting configurations: rear, left, or right direction.
Gas flue venting configurations are specified at the time of order.
Figure 1
Component Locator
i
Page 4

REVISIONS
Revision History
Revision Revised Serial Number Comments
Date Pages Effectivity
7/7/97 All — Reissue of manual and replacement parts lists
ii
Page 5

CONTENTS
CONTENTS
LIMITED WARRANTY ....................................................................................... 1
INTRODUCTION ................................................................................................. 2
Unpacking the Gas Fired Boiler ......................................................................................... 3
Installation Codes ............................................................................................................. 3
Locating the Gas Fired Boiler ............................................................................................ 3
Clearance to Combustibles ............................................................................................ 4
Air for Combustion and Ventilation ............................................................................... 5
INSTALLATION ................................................................................................... 6
VENT INSTALLATION .................................................................................................... 6
General........................................................................................................................... 6
Existing Boiler Removal ................................................................................................ 6
Common Venting ........................................................................................................... 7
Vertical V enting.............................................................................................................. 8
Chimney V enting............................................................................................................ 10
Horizontal Through-the-W all Venting ........................................................................... 14
Pipe Cutting and Joining Procedures......................................................................... 15
Locating the Vent Opening in the Outside Wall ........................................................ 16
Installing the Horizontal Venting and Termination.................................................... 17
GAS SUPPLY CONNECTIONS........................................................................................ 18
Gas Fuel Requirements .................................................................................................. 18
Gas Pressure Requirements............................................................................................ 18
Gas Piping Installation................................................................................................... 19
Pressure Testing the Gas Piping Installation .................................................................. 20
Field Conversion of Gas Orifice .................................................................................... 21
ELECTRICAL CONNECTIONS....................................................................................... 22
PLUMBING CONNECTIONS .......................................................................................... 24
Water and Drain Connections ........................................................................................ 24
INITIAL START-UP AND SERVICE................................................................... 25
Instructions for Setting Air Pressure in Expansion Tank.................................................... 26
Instructions for Manually Venting Air from Boiler Water System ..................................... 27
Gas Valve Operating Instructions .......................................................................................28
Check Test, and Start-up ..................................................................................................... 29
Sequence of Operation Explained ......................................................................................36
TROUBLESHOOTING FLOW CHARTS............................................................ 37
ELECTRICAL SCHEMATICS ............................................................................. 45
REPLACEMENT PAR TS LIST............................................................................ 48
iii
Page 6

CONTENTS
Figure 1 – Component Locator .................................................................................................. i
Figure 2 – Minimum Clearance to Combustibles (Top View) ................................................... 4
Figure 3 – Minimum Clearance to Combustibles (Front View) ................................................. 4
Figure 4 – Clearance Dimensions Chart .................................................................................... 4
Figure 5 – Vent Pipe Slope and Horizontal Support .................................................................. 8
Figure 6 – Vertical Through-the-Roof Vent Installation with Fire Stops ................................... 9
Figure 7 – Vertical Vent Configuration ...................................................................................... 9
Figure 8 – Type B-1 Vent Chimney Venting Detail .................................................................... 11
Figure 9 – Type B-1 Chimney Vent Connection without Elbows .............................................. 12
Figure 10 – T ype B-1 Chimney Vent Connection with Elbows ................................................... 12
Figure 11 – Horizontal Through-the W all Venting ....................................................................... 14
Figure 12 – Horizontal Vent (Exit Through Rear Wall) ............................................................... 16
Figure 13 – Horizontal T ermination Clearance............................................................................16
Figure 14 – Horizontal Vent T ermination (Window and Grade Level) ........................................ 17
Figure 15 – Horizontal Vent (Exit Through Side Wall)................................................................ 17
Figure 16 – Pipe Sizing Table ......................................................................................................19
Figure 17 – Gas Supply Piping (Drip Leg) .................................................................................. 19
Figure 18 – CSS-130 Manual Gas Shut-off Valve ....................................................................... 20
Figure 19 – CSS-130 Gas Connection Point (Side View) ............................................................ 20
Figure 20 – CSS-130 Gas Connection Point (T op View) ............................................................. 20
Figure 21 – Gas Orifice Union Location......................................................................................21
Figure 22 – Gas Orifice Union ..................................................................................................... 21
Figure 23 – LP Gas Orifice Kit P/N 111993................................................................................ 21
Figure 24 – Electrical Connections (Right side of CSS-130) ......................................................22
Figure 25 – Electrical Schematic Detail....................................................................................... 23
Figure 26 – CSS-130 Control Panel Power Connections (Inside right front side)....................... 23
Figure 27 – Plumbing Connections (Right side of CSS-130) ...................................................... 24
Figure 28 – Electrical Diagrams...................................................................................................46
Figure 29 – Parts Diagrams..........................................................................................................48
LIST OF FIGURES
iv
Page 7

WARRANTY
LIMITED WARRANTY
Champion Industries Inc. (herein referred to as Champion), P.O. Box 4149, Winston-Salem, North Carolina 27115,
and P.O. Box 301, 2674 North Service Road, Jordan Station, Ontario, Canada L0R 1S0 warrants machines, and parts,
as set out below.
Warranty of Machines: Champion warrants all new machines of its manufacture bearing the name
"Champion" and installed within the United States and Canada to be free from defects in material and workman
ship for a period of one (1) year after the date of installation or fifteen (15) months after the date of shipment by
Champion, whichever occurs first. [See below for special provisions relating to glasswashers.] The warranty
registration card must be returned to Champion within ten (10) days after installation. If warranty card is not
returned to Champion within such period, the warranty will expire after one year from the date of shipment.
Champion will not assume any responsibility for extra costs for installation in any area where there are
jurisdictional problems with local trades or unions.
If a defect in workmanship or material is found to exist within the warranty period, Champion, at its election,
will either repair or replace the defective machine or accept return of the machine for full credit; provided, how
ever, as to glasswashers, Champion's obligation with respect to labor associated with any repairs shall end
(a) 120 days after shipment, or (b) 90 days after installation, whichever occurs first. In the event that Champion
elects to repair, the labor and work to be performed in connection with the warranty shall be done during regular
working hours by a Champion authorized service technician. Defective parts become the property of Champion.
Use of replacement parts not authorized by Champion will relieve Champion of all further liability in connection
with its warranty. In no event will Champion's warranty obligation exceed Champion's charge for the machine.
The following are not covered by Champion's warranty:
a. Lighting of gas pilots or burners.
b. Cleaning of gas lines.
c. Replacement of fuses or resetting of overload breakers.
d. Adjustment of thermostats.
e. Adjustment of clutches.
f. Opening or closing of utility supply valves or switching of electrical supply current.
g. Cleaning of valves, strainers, screens, nozzles, or spray pipes.
h. Performance of regular maintenance and cleaning as outlined in operator’s guide.
i. Damages resulting from water conditions, accidents, alterations, improper use, abuse,
tampering, improper installation, or failure to follow maintenance and operation procedures.
j. Wear on Pulper cutter blocks, pulse vanes, and auger brush.
Examples of the defects not covered by warranty include, but are not limited to: (1) Damage to the exterior or
interior finish as a result of the above, (2) Use with utility service other than that designated on the rating plate,
(3) Improper connection to utility service, (4) Inadequate or excessive water pressure, (5) Corrosion from
chemicals dispensed in excess of recommended concentrations, (6) Failure of electrical components due to
connection of chemical dispensing equipment installed by others, (7) Leaks or damage resulting from such
leaks caused by the installer, including those at machine table connections or by connection of chemical
dispensing equipment installed by others, (8) Failure to comply with local building codes, (9) Damage caused by
labor dispute.
Warranty of Parts: Champion warrants all new machine parts produced or authorized by Champion to be free
from defects in material and workmanship for a period of 90 days from date of invoice. If any defect in
material and workmanship is found to exist within the warranty period Champion will replace the defective
part without charge.
DISCLAIMER OF WARRANTIES AND LIMITATIONS OF LIABILITY. CHAMPION'S WARRANTY
IS ONLY TO THE EXTENT REFLECTED ABOVE. CHAMPION MAKES NO OTHER WARRANTIES,
EXPRESS OR IMPLIED, INCLUDING, BUT NOT LIMITED, TO ANY WARRANTY OF
MERCHANTABILITY, OR FITNESS OF PURPOSE. CHAMPION SHALL NOT BE LIABLE FOR
INCIDENTAL OR CONSEQUENTIAL DAMAGES. THE REMEDIES SET OUT ABOVE ARE
THE EXCLUSIVE REMEDIES FOR ANY DEFECTS FOUND TO EXIST IN CHAMPION DISHWASHING
MACHINES AND CHAMPION PARTS, AND ALL OTHER REMEDIES ARE EXCLUDED,
INCLUDING ANY LIABILITY FOR INCIDENTALS OR CONSEQUENTIAL DAMAGES.
Champion does not authorize any other person, including persons who deal in Champion dishwashing
machines to change this warranty or create any other obligation in connection with Champion Dishwashing Machines.
1
Page 8

INTRODUCTION
INTRODUCTION
Welcome to Champion...
and thank you for allowing us to take care of your dishwashing needs.
This manual covers the Champion Single Source Gas Fired Boiler, Model CSS-130.
The CSS-130 operates in conjunction with the Champion door-type dishwasher model D-HB and
the rack conveyor dishwasher model 44-WS and 66-WS
The CSS-130 is a low pressure gas fired boiler capable of supplying hot water to the dishwasher
wash tank heating coil for wash tank heat and 180°F final rinse water for sanitizing.
Your gas fired boiler was completely assembled, inspected, and thoroughly tested at our factory
before it was shipped to your installation site.
This manual contains:
• Installation Instructions
• Operation Instructions
• Maintenance Instructions
• Service Instructions
• Replacement Parts Lists
• Electrical Schematics
All information, illustrations and specifications contained in this manual are based upon the
latest product information available at the time of publication. Champion constantly improves
its products and reserves the right to make changes at any time or to change specifications or
design without notice and without incurring any obligation.
For your protection, factory authorized parts should always be used for repairs.
Replacement parts may be ordered directly from your Champion authorized parts distributor
or authorized service agency. When ordering parts, please supply the model number, serial
number, voltage, and phase of your machine, the part number, part descriptions and quantity.
2
Page 9

INTRODUCTION
Unpacking the Gas Fired Boiler
CAUTION:
!
Care should be taken when lifting the machine to prevent damage.
1. Immediately after unpacking the machine, inspect for any shipping damage.
If damage is found, save the packing material and contact the carrier immediately.
2. Remove the gas fired boiler from the skid.
Move the boiler to its permanent location.
Installation Codes
The installation of this unit must conform to local codes or, in the absence of local code,
to the National Fuel Gas Code, ANSI Z223.1-Latest Edition. Where required by the authority
having jurisdiction, the installation also must conform to the Standards for Controls and Safety
Devices for Automatically Fired Boilers, ANSI/ASME CSD-1.
For Canada, the installation of this unit must conform to all Canadian local codes as applicable or,
in the absence of local codes, to the Canadian installation code, CAN/CGA-B149, and CSA C22.1
Canadian Electrical Code Part 1.
Locating the Gas Fired Boiler
Locate the gas fired boiler as near to the exhaust venting system as practical. Air openings on the front,
back and sides of the boiler housing should not be obstructed since they supply air to the combustion
chamber.
The location of the boiler should be chosen with regard to venting dimensions, convenient access to
piping, ventilation of operating components and accessibility for service and cleaning.
The boiler shall be installed such that the gas ignition system components are protected from water
(dripping, spraying, rain, etc.) during appliance operation and servicing procedures such as pump
replacement, burner cleaning and the like.
When the unit is located in an unconfined space of a building, air infiltration may be adequate to provide
air for combustion and ventilation. Where normal infiltration does not provide the necessary air , outside
air must be introduced.
In buildings of unusually tight construction, or when locating the unit in a confined space, additional air
must be provided. For confined spaces, two (2) permanent openings shall be provided:
One (1) opening within 12" of the ceiling and one (1) within 12" of the floor of the enclosing space.
Each opening shall be at least 1 square inch per 1,000 BTU/HR heater input of the total for all appliances
in the area, but not less than 100 square inches. These openings shall freely connect with areas having
adequate infiltration from outside.
The boiler should be placed beside the Champion dishwasher model that it serves so that all plumbing and
electrical connections between the boiler and the dishwasher can be made per Champion's specifications.
If installed in a finished area, provisions should be made for drainage of any accidental spillage or
leakage of water. The boiler pressure relief valve and back-flow preventor should be piped to a
drain to protect from the occasional discharge of water.
3
Page 10

INTRODUCTION
INTRODUCTION (CONT'D)
Locating the Gas Fired Boiler (Cont'd)
Clearance to Combustibles
The CSS-130 is certified by the American Gas Association, (AGA), and the Canadian Gas Association
(CGA), for installation on combustible flooring. The CSS-130 is rated for alcove installation.
NOTE:
DO NOT INSTALL THE GAS FIRED BOILER ON CARPETING.
Refer to Fig. 2-4 below for the minimum allowable clearances to combustible
and noncombustible materials.
BD
A
C
Dishwasher
Figure 2
Minimum Clearance
to Combustibles
CSS-130
T op View
A
(Horizontal Vent Arrangement Shown)
A
B
A
B
Dishwasher
(Horizontal Vent Arrangement Shown)
Figure 3
Minimum Clearance
to Combustibles
CSS-130
Front View
CLEARANCE TO COMBUSTIBLES
(Dimensions in Inches)
Location Item Minimum Clearance
A
B
C
D
Boiler to Top, Back, & Side Walls
Double wall Type B-1 Vent
Single Wall SST or
Galvanized Vent
Hot Water Pipes
Through Combustible Wall
1 inch
1 inch
6 inches
3 inches
2 inches
Figure 4
Clearance Dimensions Chart
(See Fig. 2-3 above)
4
Page 11

INTRODUCTION
Clearance to Combustibles (Cont'd)
The clearances listed in the Clearance Chart (See Fig. 4) are minimum clearances. Clearances for service
accessibility to the gas fired boiler must take preference over the fire protection clearances. The installer
should allow a minimum of 12" for servicing at the sides and back of the boiler if possible.
!
WARNING:
Provide a screen or other type of protective barrier around exposed vent pipe to reduce burn
hazards where inadvertent contact with hot vent surfaces by personnel can occur.
Air for Combustion and V entilation
General
An adequate supply of air for combustion and ventilation must be supplied in accordance with
Section 5.3 of the National Fuel and Gas Code, ANSI Z223.1-Latest Edition or applicable
provisions of the local building codes for gas utilization equipment installed in buildings that
require air for combustion, ventilation, and the dilution of flue gases from within the building.
For Canada, the installation of this unit must conform to all Canadian local codes as applicable or,
in the absence of local codes, to the Canadian installation code, CAN/CGA-B149.
Install the equipment in a location where the ventilation facilitates the satisfactory combustion of
gas, proper venting and maintenance of ambient temperature at safe limits under normal conditions
of use.
Equipment should be located so as not to interfere with proper air circulation.
When normal infiltration does not provide the necessary air, outside air must be introduced.
In addition to air needed for combustion, process air must be provided as required for:
cooling of equipment or material, controlling the dew point, heating, drying, oxidation or dilution, safety
exhaust, odor control, and air for compressors.
In addition to air needed for combustion, ventilation air must also be supplied, including all air required
for comfort and proper working conditions for personnel.
Unconfined Space
An unconfined space (such as an open basement) must have a minimum volume of 50 cubic feet per
1,000 BTU/HR input of the total of all appliances in the area. Adjoining rooms may be counted as one
area only if there are no doors between the rooms.
Air Contaminants
Compounds bearing contaminants such as chloride, fluoride, iodide, and bromide, when present in certain
concentrations in the air supplied for combustion to the boiler, can result in an accelerated and severe
corrosion condition in the heat exchanger and/or the venting systems. Avoid storing or using chemicals
containing these compounds in the vicinity of the boiler if at all possible.
!
CAUTION:
Combustion air must not be contaminated by corrosive chemical fumes which can damage
the heat exchanger in the boiler.
5
Page 12

INSTALLATION
INSTALLATION
!
WARNING:
Read all of the instructions included with your machine before
attempting any installation. Faulty vent installation can cause
improper operation of the gas fired boiler..
Vent Installation
General
The CSS-130 gas fired boiler is approved as a Category I Boiler when the following vent
installations are used:
1. Common vent installation
2. Vertical through-the-roof vent installation
3. Masonry chimney vent installation using Type B-1 Double-wall vent.
The CSS-130 is approved as a Category III Boiler when a horizontal through-the-wall vent
installation is used. This installation is a positive pressure venting system and requires that
all connections be sealed with an approved high temperature sealant.
Refer to the specific venting installation section for detailed instructions.
Vent installation must be in compliance with Part 7 "Venting of Equipment", of the
National Fuel Gas Code; ANSI Z223.1-Latest Edition, (In Canada, to the Canadian installation code, CAN/CGA-B149), local codes, or ordinances, these instructions, and good
trade practices.
Existing Boiler Removal
When an existing boiler is removed from a venting system serving other appliances, the
venting system is likely to be too large to properly vent the remaining attached appliances.
Perform the following steps individually with each appliance that remains connected to the
common vent system placed in operation with the other appliances remaining connected to
the common venting system but not in operation.
If improper venting is observed during any of the following tests, the common venting system
must be corrected.
1. Seal any unused openings in the common venting system.
2. Visually inspect the vent system for proper size and horizontal pitch and determine that
there is no blockage or restriction, leakage, corrosion, and other deficiencies which could
cause an unsafe condition.
3. As far as practical, close all building doors and windows plus all doors between the space
which the appliances remain connected to the common vent system are located and the
other spaces of the building.
6
Page 13

INSTALLATION
Existing Boiler Removal (Cont'd)
4. Turn on clothes dryers and any appliance NOT connected to the common vent system.
Turn on any exhaust fans, such as range hoods and bathroom exhausts so they will operate
at maximum speed. DO NOT operate a summer exhaust fan. Close fireplace dampers.
5. Follow the lighting instructions of the appliance being tested and place the appliance in
operation. Adjust the thermostat so the appliance operates continuously.
6. After five minutes of main burner operation, test for air spillage at the draft hood relief
opening. Use the flame of a match or candle, or the smoke from a cigarette, cigar, or pipe.
7. Repeat steps for each appliance connected to the common vent system.
After it has been determined that each appliance remaining connected to the common vent
system properly vents when tested as outlined above, return all doors, windows, exhaust fans,
fireplace dampers, and any other gas burning appliance to their previous conditions of use.
If necessary the common vent should be re-sized to approach the minimum size as
determined by using the appropriate tables in Appendix G in the National Fuel Gas Code,
ANSI Z223.1-Latest Edition.
For Canada, the installation of this unit must conform to all Canadian local codes as applicable or,
in the absence of local codes, to the Canadian installation code, CAN/CGA-B149.
The boiler should not be connected to a chimney flue serving a separate appliance that is designed
to burn solid fuel.
No portion of the venting system can extend into, or pass through any circulating air duct or plenum.
All vent pipe passing through floors, walls, and ceilings must be installed with the listed clearance to
combustible materials and be fire stopped according to local codes.
Common V enting
Vent connectors serving Category I appliances shall not be connected to any portion of the mechanical
draft systems operating under positive pressure such as Category III or Category IV venting systems.
When two or more vent connectors enter a common gas vent, chimney flue, or a single-wall metal pipe,
the smaller of the connectors shall enter at the highest level consistent with the available headroom or
clearance to combustible material.
Vent connectors shall be firmly attached to draft hood outlets or flue collars by sheet metal screws or
other approved means, except vent connectors of listed Type B-1 vent material (which shall be assembled
in accordance with the vent manufacturer's instructions). Fasten joints between sections of single-wall
connector piping with sheet metal screws or other approved means.
7
Page 14

INSTALLATION
INSTALLA TION (CONT'D)
Vent Installation
Common V enting (Cont'd)
Horizontal portions of the venting system must be supported at least every 5 feet with metal
straps to prevent sagging. All horizontal sections of the vent connection must slope upwards
1/4 inch per foot from the boiler to the vent termination (See Figure 5 below).
Upward slope =
1/4" minimum per foot
Vent Connector
Support horizontal sections
every 5 feet with metal straps
Figure 5
Vent Pipe Slope
and
Horizontal Support
The vent connector should be routed to the vent using the shortest route possible.
The entire length of a vent connector shall be readily accessible for inspection, cleaning,
and replacement.
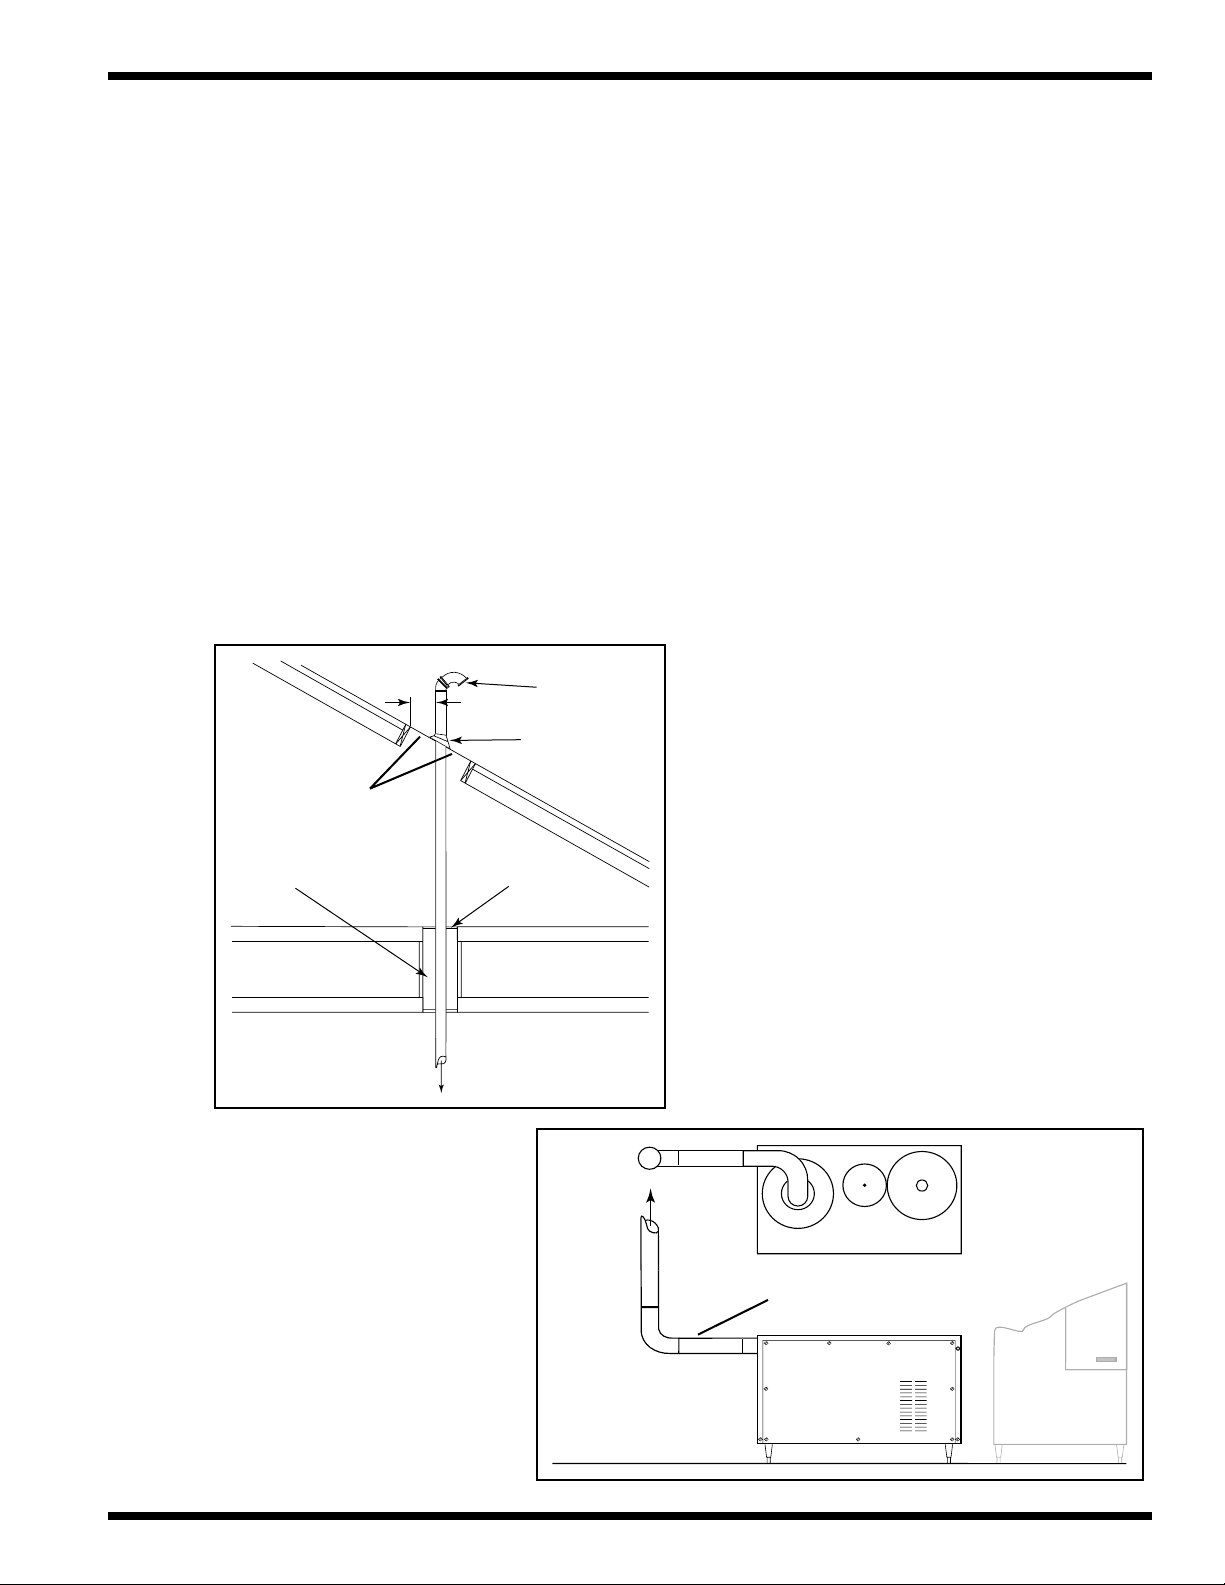
V ertical V enting
The CSS-130 is certified for use with up to 50 equivalent feet of 3" diameter pipe
for vertical vent installations. A 90° elbow equals 5 equivalent feet of pipe.
Vent pipe and fittings must be securely supported horizontal sections require supports
every 5 feet. Fire stops can support up to ten feet of vertical run.
Galvanized or stainless steel vent pipe may be used for vertical runs.
Stainless steel vent pipe must be used for horizontal runs.
®
Saf-T Vent
and is approved for use in the United States and Canada.
manufactured by Heat Fab, Inc., is constructed from AL294C stainless steel
8
Page 15
INSTALLATION
V ertical Venting (Cont'd)
Maintain six inches (6") air space to combustible around the pipe for single wall metal vent.
Maintain one inch (1") air space to combustible around pipe for Type B-1 vent.
Whenever possible , the vent should be continued straight up through the roof. If it is necessary to
make an offset in the attic, the horizontal run should slope upwards minimum of 1/4 inch per foot
and be supported by metal straps.
Vent pipe passing through floors, ceilings, or framed walls must be fire stopped at floors and ceilings.
The fire stop must close-in the area between the outside of the vent and the opening in the structure.
Fire stops and supports can be purchased from Plexco Inc., or Hart and Cooley Inc.
When the vent passes through the roof, a flashing and storm collar must be used. Seal the storm
collar to the pipe using a high temperature sealant. Terminations must be used in all installations
above the roof to ensure the proper performance of the boiler and to prevent the entrance of debris.
Type B-1 gas vents shall terminate above the roof surface with a U.L. listed cap or roof assembly.
Maintain
minimum
air space
Termination
Storm collar
and flashing
Fire stopChase
To CSS-130
Vent
To roof
Figure 6
Vertical Through-the -Roof
Vent Installation with Fire Stops
CSS-130
T op View
Figure 7
CSS-130
Vertical Vent Configuration
Slope up = 1/4" min. per foot
CSS-130
Front View
Dishwasher
9
Page 16

INSTALLATION
Vent Installation (Cont'd)
Chimney V enting
The CSS-130 is certified as a Category I Boiler and approved for venting in a masonry
chimney with Type B-1 Double-walled vent connector.
The following requirements must be met to use this type of vent installation:
1. The chimney must be internal lined or internal B vent type.
2. An external or unlined chimney may serve as a chase for the use of high temperature
plastic pipe alternative venting provided that no other equipment is vented into the
chimney . The chimney may have an approved liner installed into the flue.
3. Two (2) or more vent connectors, from either power or natural draft units, may enter a
common gas vent provided that they conform to the provisions and tables of the
National Fuel Gas Code, ANSI Z223.1/NFPA 54- Latest Edition, or applicable provisions
of local building code. For Canada, the installation of this unit must conform to all
Canadian local codes as applicable or,in the absence of local codes, to the Canadian
installation code, CAN/CGA-B149.
4. None of the vent connectors may be connected to equipment with a positive vent
pressure.
5. The unit must be located as close to the chimney as possible to provide the
shortest vent connector.
Installation
Refer to Fig. 8 on page 11, and note the dimensions (H, L, D, and A).
These dimensions are taken in to consideration when determining the vent and
vent connector requirements. Follow the procedure below to size the venting.
Determine the height of the chimney or Type B-1 vent and the length of the lateral run.
Select the proper vent connector diameter from Table 11-2, Table 11-2a or Table 11-3
shown on pages 12-13. These tables were derived from Tables 11-2 and Table 11-3 of the
National Fuel Gas Code, ANSI Z223.1/NFPA 54-Latest Edition.
Install and adaptor at the flue outlet of the boiler to step up to the diameter of the vent
connector. Install elbows for the vent connector if required. All elbows should be the full
size of the vent connector.
Caution:
!
Do Not install a three inch (3") elbow between the flue outlet on the
boiler and the adaptor.
Install the vent connector between the elbows, if used, and the chimney.
Slope the vent connector upwards toward the chimney 1/4" minimum per foot of lateral run.
Secure all joints in accordance with the vent manufacturer's instructions for
Type B-1 vent material.
10
Page 17
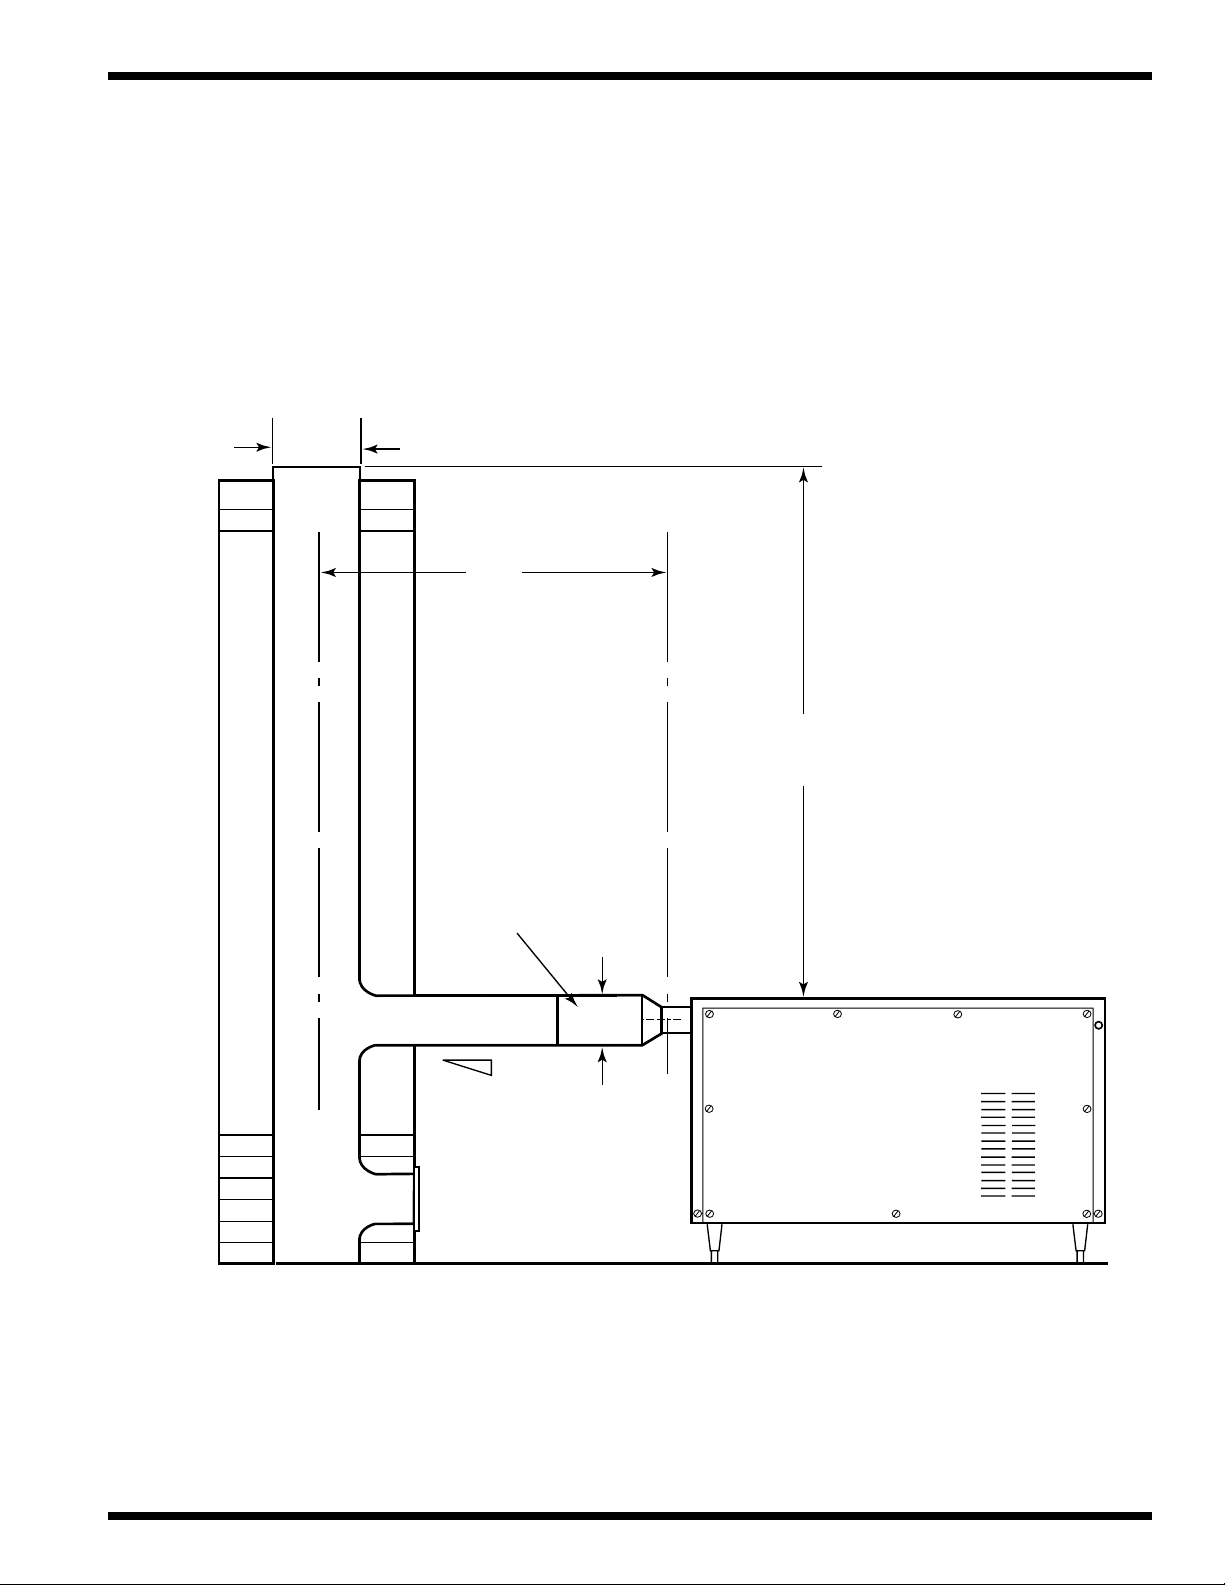
INSTALLATION
Chimney V enting
Figure X below shows the dimensions that must be taken into consideration when sizing the vent and the
vent connector.
H = Height of the chimney or Type B vent
L = Total lateral length of the vent connector
D = Required diameter of vent connector (Refer to Tables on pages X-X).
A = Minimum/maximum size limits of internal area of the chimney
A
L
Adapter
D
Slope up =
1/4" min. per foot
Figure 8
T ype B-1 Vent Chimney Venting Detail
(Vent Connection without Elbows Shown)
(Lateral slopes up 1/4" min. per foot)
H
CSS-130
Refer to V ent Tables 11-2, 11-2a, and 11-3 on the next page
for vent and vent connector diameter sizes.
11
Page 18

INSTALLATION
Vent Installation (Cont'd)
Chimney V enting (Cont'd)
Refer to Table 11-2, 11-2a or 11-3 and select the
vent and vent connector diameter that meets
the requirements for your installation.
For example:
For Type B venting into a masonry chimney, refer to
Table 11-3. If dimension (H) equals 30 feet, and the
total (L) equals 10 feet, then the required vent diameter
would be 8 inches (8") as denoted by the dot (
•) in
the 8" Diameter Pipe column of the Table.
Table 11-3
Type B-1 Chimney Venting
For CSS-130 Gas Fired Boiler
Rated 130,000 BTU/HR
Fan Assist
Total
Height
(ft)
(H)
10 2
15
20
30
50
Type B-1 Double Connector Diameter to be used
with chimney areas within the size limits at bottom
Total
Lateral
(ft)
Total (L)
2
5
10
2
5
10
2
5
10
2
5
7" Diameter
Pipe
(D)
8" Diameter
Pipe
(D)
A
L
H
Slope up =
1/4" min.
per foot
D
CSS-130
Adapter
Figure 9
Type B-1 Chimney
Vent Connection without Elbows
(Lateral slopes up 1/4" min. per foot)
A
L
D
H
Slope up =
1/4" min.
per foot
Minimum Internal
Area of Chimney
(Square Inches)
(A)
Maximum Internal
Area of Chimney
(Square Inches)
(A)
Capacity of Masonry Chimney Flue with
Type B-1 Double Wall Flue Connector
Serving a Single Category I Appliance
6350
352269
12
CSS-130
Adapter
Figure 10
Type B-1 Chimney
Vent Connection with Elbows
(Laterals slope up 1/4" min. per foot)
Page 19

INSTALLATION
Chimney V enting
Refer to Figs. 9-10 on the preceding page to determine the dimensions for your installation.
Use the appropriate Table for your installation to determine the correct diameter of vent
and vent connector.
H = Height of the chimney or Type B vent
L = Total lateral length of the vent connector
D = Required diameter of vent connector
A = Minimum/maximum size limits of internal area of the chimney
Table 11-2
with Single Wall Metal Connectors Serving a Single
Type B-1 Double-Wall Venting
Category I Appliance
For CSS-130 Gas Fired Boiler
Rated 130,000 BTU/HR
Table 11-2a
Type B-1 Double-Wall Venting
Derated for Sizing Flexible Metal Flueliners
For CSS-130 Gas Fired Boiler
Rated 130,000 BTU/HR
Fan Assist
Vent and Connector Diameter
Total
Height
(ft)
(H)
6
8
10
15
20
30
Total
Lateral
(ft)
Total (L)
0
2
4
6
0
2
5
8
0
2
5
0
2
5
10
0
2
5
10
0
2
5
10
15
4" Diameter
Pipe
(D)
5" Diameter
Pipe
(D)
6" Diameter
Pipe
(D)
Total
Height
(ft)
(H)
6
8
10
15
20
30
Total
Lateral
(ft)
Total (L)
0
2
4
6
0
2
5
8
0
2
5
0
2
5
10
0
2
5
10
0
2
5
10
15
Fan Assist
Vent and Connector Diameter
4" Diameter
Pipe
(D)
5" Diameter
Pipe
(D)
6" Diameter
Pipe
(D)
13
Page 20

INSTALLATION
INSTALLA TION (CONT'D)
Vent Installation (Cont'd)
Horizontal Through-the-Wall V enting
The CSS-130 is approved as a Category III Boiler when a horizontal through-the-wall vent
installation is used. This installation is a positive pressure venting system and requires that
all connections be sealed with an approved high temperature sealant such as Dow Corning
Silastic 736 RTV high temperature adhesive/sealant or UltraVent
Hart and Cooley Inc.
The CSS-130 is certified for use with up to 50 equivalent feet of 3" diameter stainless steel
pipe for horizontal vent installations. A 90° elbow equals 5 equivalent feet of pipe.
NOTE:
STAINLESS STEEL VENT PIPE MUST BE USED FOR HORIZONTAL RUNS.
™
sealant from
Saf-T Vent
steel and is approved for use in the United States and Canada.
Vent installation must be in compliance with Part 7 "Venting of Equipment", of the
National Fuel Gas Code; ANSI Z223.1-Latest Edition, local codes, or ordinances,
these instructions, and good trade practices.
For Canada, the installation of this unit must conform to all Canadian local codes as applicable or, in the absence of local codes, to the Canadian installation code, CAN/CGA-B149.
Vent pipe and fittings must be securely supported. Horizontal runs must be supported at
five foot intervals and at each point where an elbow is used.
To prevent condensate collection at any one point in the horizontal vent run, slope the
vent pipe down 1/4" min. per foot of horizontal run (See Fig. 11 below).
®
manufactured by Heat Fab, Inc., is constructed from AL294C stainless
Support every 5 feet
Boiler
Slope down =
Wall
1/4" min. per foot
14
CSS-130
Figure 11
Horizontal Through-the-wall Venting
( Slope down 1/4" min. per foot)
Page 21

Horizontal Through-the-Wall V enting (Cont'd)
Pipe Cutting and Joining Procedure
1. Using a sharp 24 teeth per inch hacksaw, hand cut pipe to length as square as possible.
Caution:
!
Do not use a power saw as it may cause damage to the pipe.
2. Clean pipe mating surfaces of all dirt, grease, and moisture.
INSTALLATION
3. Use Dow Corning Silastic 736 RTV high temperature adhesive/sealant, UltraVent
sealant from Hart and Cooley , Inc., or other approved adhesive/sealant.
Caution:
!
Do not use solvent cements or other adhesives to join vent piping.
4. Insert one section of pipe into another. Use a felt marker or soft lead pencil to mark the
pipe at the full insertion depth.
5. Separate the pipe sections and apply a generous bead of adhesive material around the end
of the pipe within the marked area.
6. Using a twisting motion to spread the adhesive completely between the sections of pipe.
7. When the two sections of pipe have bottomed out, inspect the joint for a complete seal.
Additional sealant may be required for a complete seal. It takes 24 hours of curing time
to develop full joint strength.
Caution:
!
Do not drill holes through pipe or fittings.
Do not use sheet metal screws or rivets.
™
15
Page 22

INSTALLATION
INSTALLA TION (CONT'D)
Vent Installation
Horizontal Through-the-W all Venting
(Cont'd)
Locating the V ent Opening in the Outside Wall
It is essential to follow the National Fuel Gas Code, ANSI. Z223.1-Latest Edition and these
instructions for proper venting and condensate disposal.
For Canada, the installation of this unit must conform to all Canadian local codes as applicable or, in the absence of local codes, to the Canadian installation code, CAN/CGA-B149.
1. The vent termination must be located at least 12" inches above grade or the normally
expected snow accumulation level. (Snow level may be higher on walls exposed to
prevailing winds.)
2. If adjacent to public walkways, the vent termination must be located 7 feet above grade.
3. Do not locate termination close to shrubbery.
4. The termination must be located at least 10 feet from any forced air inlet into the
building and at least 4 feet horizontal and in no case above or below any other building
opening, gas meter, electrical meter, service regulator, reliefs, or other equipment.
5. Do not locate termination near an alcove, over a window well, or closer than 5 feet to the
corner of joining parts of the building structure.
6. Do not locate under any kind of deck or patio.
7. If possible, the wall through which the vent will pass should not be exposed to prevailing
winds.
8. Select a point of wall penetration where the minimum 1/4" minimum per foot
downward slope can be maintained.
Slope down
away
from Boiler =
1/4" min. per foot
Front View
16
Rear Wall
T op V iew
CSS-130
Figure 12
Horizontal Vent
(Exit Through Rear Wall)
4 feet
Horizontal Vent
12 " min.
Grade
Figure 13
Horizontal T ermination Clearance
(Window and Grade Level)
Termination
Page 23

INSTALLATION
Horizontal Through-the-Wall V enting
Installing the Horizontal V enting and Termination
1. Cut a hole in a wall of the building at least 7" in diameter.
2. The hole must be located to maintain a downward slope of 1/4" minimum per foot
of horizontal run from the boiler.
3. Install an approved thimble, one sleeve each to the inside and outside walls of the building.
4. Install the horizontal run from the boiler to the wall.
5. Install the last section of vent pipe so that it extends through both wall plates and terminates
1-1/4" beyond the outside wall thimble. (See Fig. X below)
6. Install a 3 inch (3") coupling to the end of the last section and seal with high temperature
adhesive/sealant.
7. Seal all joints between the mounting plates and thimble with high temperature adhesive/sealant.
8. Install a 90° elbow to a 6-3/4" piece of 3 inch vent pipe.
9. Install a debris screen in the 90° elbow.
10. Install the assembly to the 3 inch coupling described in step 6 sealing all joints and making sure that
the discharge end of the elbow is pointing straight down.
11. After installation, the distance between the outside wall thimble and the closest edge of the
termination elbow must not be less than six inches. (See Fig. 14).
Figure 14
Horizontal Vent T ermination
Side
Wall
Vent extends 1-1/4"
90° elbow points
Debris screen
12" (min.) above
highest snow fall
Slope down
away
from Boiler =
1/4" min. per foot
down
Wall thimble
3"
6"
Seal with
adhesive
5-3/4"
hole
Wall
T op V iew
Figure 15
Horizontal Vent
(Exit Through Side Wall)
CSS-130
Front View
17
Page 24

INSTALLATION
INSTALLA TION (CONT'D)
Gas Supply Connections
NOTE:
Gas connections must be in compliance with Part 3 "Gas Piping Installation",
of the National Fuel Gas Code; ANSI Z223.1-Latest Edition, local codes, or
ordinances, these instructions, and good trade practices.
For Canada, the installation of this unit must conform to all Canadian local
codes as applicable or, in the absence of local codes, to the Canadian
installation code, CAN/CGA-B149.
!
WARNING:
Gasoline, or other flammable materials and liquids (adhesives,
solvents, etc.) and the vapors that they produce, are extremely dangerous.
DO NOT handle, use or stor e gasoline or other flammable liquids anywhere
near or in the vicinity of the gas boiler.
!
WARNING:
Inspect the vent system for proper installation BEFORE making
gas supply connections.
Failure to install proper venting as described in the venting installation
instructions of this manual (See pages 6-17) can result in unsafe operation
of the CSS-130, gas fired boiler. T o avoid the risk of fire, explosion, or
asphyxiation from carbon monoxide, never operate the CSS-130, gas fired
boiler unless it is properly vented and an adequate air supply for proper
operation is available.
Gas Fuel Requirements
The CSS-130 is designed and certified for use with Natural Gas or LP Gas.
!
CAUTION:
Check the gas fuel specified on the CSS-130 rating plate before making any
gas connection. The rating plate is located on the lower left side of the unit.
If the rating plate and the gas supply do not agree, refer to page 21,
"Field Conversion of Gas Orifice".
Gas Pressure Requirements
1. Inlet gas supply pressure must be at least 4" W.C. and no greater than 14" W.C.
for Natural and LP gas installations.
18
2. For LP Gas Only, the CSS-130 operates best with a supply pressure of 9-10" W.C.
If no other appliances are being supplied by the LP gas supply, set the low pressure
regulator to 9-10" W.C.
3. A maxitrol RV48 regulator or equivalent is recommended for regulating the
inlet gas pressure.
Page 25

INSTALLATION
Gas Supply Connections (Cont'd)
Gas Piping Installation
1. Supply piping must be sized correctly to minimize pressure drop between the meter or regulator
and the CSS-130. Refer to Fig. 16 below for pipe capacity ratings and size the pipe for your
installation to meet or exceed the 130,000 BTU/HR rating of the CSS-130.
2. Run gas supply line in accordance
with all applicable codes.
3. If the CSS-130 is installed above
the gas supply, run piping up to a
point above the vent center line
and back down to the unit.
This prevents water from entering
the gas supply line should a water
leak develop in the boiler section of
the unit.
Length of
Pipe
(Straight Length)
10 ft.
20 ft.
30 ft.
40 ft.
50 ft.
Capacity of Pipe in MBTU/HR
(.6 Specific Gravity of Gas)
1/2"
132
92
73
63
3/4"
278
190
152
130
115
1"
520
350
285
245
215
1-1/4"
1,050
730
590
500
440
4. All threaded joints in the gas piping
should be coated with piping
compound. The compound must be
resistant to the action of liquefied
petroleum gases, (LP gas), even if
your unit uses natural gas.
5. Pipe unions used in the gas line
must be the ground-joint type.
6. Install a manual shut-off valve in
accordance with state and local
requirements if required.
The CSS-130 is equipped with a
manual shut-off valve.
7. A one-eighth inch (1/8') plugged tap,
accessible for test gauge connection
must be installed immediately upstream
of the CSS-130 gas supply connection.
8. Install a trap and drip leg in the last
vertical run before entering the CSS-130.
75 ft.
100 ft.
150 ft.
Add equivalent
ft. listed at right
for each ➞➞➞
Tee or Bend
(Capacity of Pipe in MBTU/HR)
Based on .6 Specific Gravity of Gas
93
79
64
1.3 ft.
1.7 ft.
Figure 16
Pipe Sizing T able
175
150
120
2.2 ft.
360
305
250
2.7 ft.
9. Support all piping with straps or hangers.
Figure 17
Gas Supply Piping
(Drip Leg)
19
Page 26

INSTALLATION
INSTALLA TION (CONT'D)
Gas Supply Connections
Gas Piping Installation (Cont'd)
Refer to Figs. 18, 19, and 20
9. Connect the gas supply piping to the CSS-130 at the lower left
side of the unit.
10. Gas connection point is 1/2" NPT. (See A, Fig. 18)
11. The unit comes equipped with a 1/2" manual shut-off valve.
12. All threaded joints in the gas piping should be coated with piping
compound. The compound must be resistant to the action of liquefied
petroleum gases, (LP gas), even if your unit uses natural gas.
A
Pressure Testing the Gas Piping Installation
1. The CSS-130 and its manual gas shut-off valve must be disconnected
from the gas supply piping system during any pressure testing of the
system at test pressures in excess of 1/2 psig.
2. The CSS-130 must be isolated from the gas supply piping system by
closing its individual manual gas shut-off valve during any pressure testing
of the gas supply system at test pressures equal to or less than 1/2 psig.
Figure 19
Gas Connection Point
(Side View)
Figure 18
CSS-130
Manual Gas Shut-off Valve
20
Figure 20
Gas Connection Point
(T op View)
Page 27

Gas Supply Connections
Field Conversion of Gas Orifice
The CSS-130 requires a gas orifice specifically
designed for either Natural or LP gas. If the
gas fuel supply at the installation site does not match
the gas type marked on the machine data plate located
on the front panel of the gas fired boiler, you will
have to change the gas orifice.
!
WARNING:
When working on any electrical circuit,
disconnect the power at the main service
disconnect switch or breaker and place a
tag at the disconnect switch to indicate that
work is being performed on the circuit.
WARNING:
!
Close the CSS-130 manual gas shut-off
valve located on the left side of the unit
before you remove the gas orifice union.
INSTALLATION
Figure 21
Gas Orifice Union Location
Refer to Figs. 21, 22, and 23
1. The gas orifice union is located behind the gas
burner recirculation pump near the center of the
CSS-130.
2. The gas orifice is screwed into the union.
(See Fig. 22, Orifice Detail)
3. To convert the gas orifice, remove the orifice
union and unscrew the gas orifice.
4. Install the correct orifice for your gas supply.
5. An LP gas conversion kit, P/N 111993, is
available from Champion. This kit contains
a label marked "Propane Gas". Be sure to
apply this sticker to the data plate on the front
panel of the CSS-130 adjacent to the data plate.
4. Reassemble the gas union. All threaded joints in
the gas piping should be coated with piping
compound.
5. Turn the gas supply on. Test for gas leaks.
Check the CSS-130 for proper operation.
Orifice Detail
Figure 22
Gas Orifice Union
Figure 23
LP Gas Orifice Kit
P/N 111993
21
Page 28

INSTALLATION
INSTALLA TION (CONT'D)
Electrical Connections
Refer to Figs. 24-26.
1. The CSS-130 requires a single (120 v, 60 Hz, 15 amp) electrical power source.
2. Electrical fittings with conduit run through the interior of the boiler is provided to
connect the incoming power supply. Conduit to interconnect the CSS-130 to the
dishwasher is provided.
3. All electrical connections are made in the CSS-130 control cabinet which is located on
the right side front of the unit (See Fig. 25).
Wiring connections should be made as shown in the electrical schematic (See Fig. 26).
4. Control wiring for an optional dishwasher ventilation fan contactor or starter may be run
through the same conduit into the terminal strip located in the boiler control cabinet.
(Optional fans must be approved by local authority.)
5. A fused disconnect switch or circuit breaker (supplied by others) is required to protect
the power supply circuit.
NOTE:
All electrical and grounding connections must be made in accordance with
the requirements of the authority
having jurisdiction or, in the absence of
such requirements, with the National
Electrical Code, ANSI/NFPA 70.
Installation should also conform with
CSA C22.1 Canadian Electrical Code
Part I.
Incoming Power
CSS-130 to Dishwasher
Interconnect Conduit
WARNING:
!
When working on any electrical
circuit, disconnect the power at
the main service disconnect
switch or breaker and place a
tag at the disconnect switch to
indicate that work is being
performed on the circuit.
Figure 24
Electrical Connections
(Right side of CSS-130)
22
Page 29

C
C
Electrical Connections (Cont'd)
INSTALLATION
6. The schematic detail, Fig. 25 shows
the incoming power connected at
the power contactor. The contactor
is located inside the CSS-130
control cabinet.
7. The incoming power must be connected
to the power contactor as shown. Any
other connection point will prevent the
CSS-130 from operating properly.
8. The complete wiring schematic for the
CSS-130 can be found on page 44.
Figure 25
Electrical Schematic
Detail
1
B12
ER
TOR
10
INAL
K
B19
B17
32
10
2
32
33
B2
B17
CONTROL CABINET
COOLING FAN
B1
B2
L1
N
GROUND
TO DISH MACHINE
10
CONTROL CABINET
2
CIRCUIT BREAKER
LOAD SIDE
LOCATED IN
HC1
DISHMACHINE
CONTROL CABINET
33
EXHAUST FAN SIGNAL
TO TURN ON EXHAUST
FAN WHEN BOOSTER IS
VENTED INTO DISHMACHINE VENT HOOD
120V INPUT POWER
10
CONNECTION POINT
2
RACK MACHINE
CONTROL CABINET
4
CONNECTION POINT
2
D-H1 DOOR MACHINE
CONTROL CABINET
A701339/D
Connect Incoming Power
120V/60Hz/1PH
at Power Contactor
Conduit Connecting
CSS-130 to Dishwasher
Figure 26
CSS-130 Control Panel Power Connections
(Inside right front side)
23
Page 30

INSTALLATION
INSTALLA TION (CONT'D)
Plumbing Connections
WARNING:
!
Plumbing connections must comply with local sanitary and plumbing codes.
Water and Drain Connections
Refer to Fig. 27.
1. The CSS-130 requires a single 3/4" NPT hot water connection.
• Minimum incoming water supply temperature should be 140°F/60°C.
• Minimum and maximum incoming water supply pressure should be 23 PSI/159 kPa.
2. The CSS-130 is equipped with a 3/4" pressure reducing valve, PRV on the incoming
water supply line.
3. The CSS-130 is equipped with a pressure relief valve, (30 PSI/207 Kpa, 130 lbs/hr
minimum capacity) on the CSS-130 water outlet.
CAUTION:
!
The boiler pressure relief valve and back-flow preventer should be piped
separately to a floor drain to remove any water discharge from the
gas-fired boiler.
4. The CSS-130 is equipped with the piping required to interconnect it to the dishwasher.
Figure 27
Plumbing Connections
To final rinse
valve
Pressure
Relief Valve
(Pipe to Drain)
From wash tank
heater coil
(Right side of CSS-130)
24
To wash tank
heater coil
Back-Flow
Preventer
(Pipe to Drain)
To dishwasher fill
solenoid valve
Water Supply
Connection
3/4" NPT
Page 31

INITIAL START -UP AND SERVICE
INITIAL ST ART-UP
AND
SER VICE
25
Page 32

ATTENTION INST ALLER
INSTRUCTIONS FOR SETTING AIR
PRESSURE IN EXP ANSION TANK
NOTE:
Expansion tank air pressure should be set to 20 PSI for proper operation.
Note:
The best time to check the air pressure in the expansion tank is sometime before the water
and electric service are connected to the boiler.
For boiler assembly BEFORE it is filled with water
1. Make sure Dishwasher’s main power switch is
OFF.
2. Mare sure main water supply valve is OFF.
3. Check the expansion tank pressure with an
air guage.
4. Depress valve stem to allow air to escape.
5. Check pressure and repeat the above until the
tank pressure reading is 20 PSI.
6. If too much air is released, use a tire chuck and
add air until the pressure gauge reads 20 PSI.
7. Acceptable pressure range is 19-20 PSI.
For boiler assembly AFTER it is filled with water
1. Make sure Dishwasher’s main power switch is
OFF.
2. Mare sure main water supply valve is OFF.
3. Slightly open drain valve located at the bottom of
the storage tank to bleed off some water until the
dishwasher Final Rinse Gauge reads 0 PSI.
4. Close the storage tank drain valve.
5. Check the expansion tank pressure with an
air guage.
6. Check pressure and repeat the above until the
tank pressure reading is 20 PSI.
7. If too much air is released, use a tire chuck and
add air until the pressure gauge reads 20 PSI.
8. Acceptable pressur range is 19-20 PSI.
26
9. Open water supply valve.
Page 33

ATTENTION INST ALLER
INSTRUCTIONS FOR MANUALLY VENTING AIR
FROM BOILER W ATER SYSTEM
CAUTION:
Failure to follow instructions will result in permanent damage to the recirculating pumps.
NOTE: Plumbing and Electrical service connections must
be completed BEFORE performing the
following procedures.
1. Make sure Dishwasher’s main power switch is OFF.
2. Mare sure main water supply valve is OFF.
3. Check high vent knurled cap on boiler holding tank.
—If closed, turn knurled cap A CCW one
complete turn.
4. Open petcock
tank heater coil piping.
5. Remove silver air bleed plug C in center of
recirculating pump. Pump is located on right front
corner.
6. Remove silver air bleed plug
burner recirculating pump.
7. Open air bleed petcock
burner assy.
8. Turn main water supply ON
—Water fills the gas boiler and dishwasher tank
heater coil.
—Air or a mixture of air and water, then water
only should be observed coming from
petcock/vents.
on outlet side of dishwasher
B
in center of
D
on lower left front of
E
9. Observe air bleed petcock
—Make sure a steady stream of water comes from
petcock
10. When boiler holding tank is full, turn dishwasher
main power switch ON.
—Dishwasher fills automatically.
—Boiler may begin ignition cycle.
—One or both boiler recirculating pumps run.
11. Observe vent ports. Make sure a steady stream of
water comes from all ports.
12. Close petcock and reinstall recirculating
pump plugs in the following order.
—Install the plug
—Install the plug
—Close dishmachine’s petcock B located
on outlet side of wash tank heater coil.
13. Check the amp draw on the boiler recirculating pumps. The correct reading should
be between 1.2A to 1.7A.
14. If reading is less than 1.2A, repeat Steps 3-12
and recheck recirculating pump amps.
then close the petcock.
E
on burner recirculating pump.
D
on return recirculating pump.
C
.
E
E
A
C
D
B
27
Page 34

FOR YOUR SAFETY READ BEFORE OPERATING
WARNING:
If you not follow these instructions exactly, a fire
or explosion may result causing property damage,
personal injury or loss of life.
This appliance does not have a pilot.
A.
It is equipped with an ignition device
which automatically lights the burner.
DO NOT try to light the burner by hand.
BEFORE OPERATING
B.
the appliance area for gas. Be sure
to smell next to the floor because
some gas is heavier than air and will
settle on the floor.
smell all around
WHAT TO DO IF YOU SMELL GAS
* Do not try to light any appliance.
* Do not touch any electric switch;
do not use any phone in your
building.
* Immediately call your gas supplier
from a neighbor's phone. Follow
the gas supplier's instructions.
* If you cannot reach your gas
supplier, call the fire department.
C.
Use only your hand to push or turn
the gas control knob. Never use tools.
If the knob will not push in or turn by
hand, do not try to repair it, call
qualified service technician. Force or
attempted repair may result in a fire
or explosion.
D.
Do not use this appliance if any part
has been under water. Immediately call
qualified service technician to inspect
the appliance and to replace any part
of the control system and any gas
control which has been under water.
OPERATING INSTRUCTIONS
1.
STOP!
above on this label.
2.
Make sure system has been properly
filled with water and bled of air.
Turn off all electric power to the
3.
appliance.
This appliance is equipped with an
4.
ignition device which automatically
lights the burner. Do not try to light
the burner by hand.
Read the safety information
5.
Turn manual gas valve located on left
side of unit to "ON" position.
6.
Push in gas control knob slightly and
turn clockwise to "OFF". Do not force.
Wait five (5) minutes to clear out any
7.
gas. Then smell for gas, including near
the floor. If you smell gas, STOP!
Follow "B" in the saftey information
above on this label. If you do not
smell gas, go to the next step.
Turn the gas control knob
8.
counter clockwise to "ON".
Close the access door on the left side
9.
cover panel.
Turn on all electric power to the
10.
appliance.
If the appliance will not operate,follow
11.
the instructions to "Turn Off Gas
Appliance" and call your service
technician or gas supplier.
TO TURN OFF GAS TO APPLIANCE
Turn off all electric power to the
1.
appliance if service is to be performed.
Turn manual gas valve located on left
2.
side of unit to "OFF" position.
28
Push in gas control knob slightly and
3.
turn clockwise to "OFF". Do Not Force.
Page 35

INITIAL START -UP AND SERVICE
CHECK, TEST & ST ART - UP
FILLING SYSTEM
1. Open all supply and return valves.
2. Fill heating system to minimum operating pressure -20 psig.
3. Open bleed pet cock and bleed air from heater coil until a
good dream of water comes out.
4. Purge all lines by opening vents, or with flushing valves.
5. Close gas valve.
6. Turn on 120 volt power, and listen for unit circulator to
start. Unit will cycle off on lockout.
7. Open all vents again to discharge any additional air and
close off after air is eliminated.
8. System is now ready for operation.
INITIAL FIRING
1. Be sure that system has been filled properly (see above)
and does not leak.
2. Open gas cock(s). Open manual gas shut-off valve by
turning to "on" position.
3. Turn on main dishwasher power switch, and set thermostat
to call for heat. In approximately 2 seconds, blower will
come on.
NOTE: Burner may not ignite on first attempt because of air
in gas lines. In this case, blower will stop after 5 minutes.
Should this happen, turn off main switch. Wait 5 minutes and
turn on main switch again.
4. If burner fails to ignite after three attempts, refer to Troubleshooting Section 2, Service Manual or call service for
troubleshooting.
WARNING: Should any pronounced odor of gas be
detected, or if the gas burner does not appear to be
functionlng in a normal manner, close main shut-off
valve, do NOT shut off switch, and contact your
heating contractor, gas company, or factory
representative.
5. You MUST check flame monitoring control (ignition
system safety shut-off device).
a. Close gas cock with burner operating.
b. In 3 seconds, FLAME indicator light will go out and
blower will continue to run on post purge cycle. Two
additional attempts to light will follow including pre-purge,
igniter on, valve/flame on and post purge. (Ignition will not
occur-gas off).
c. Open gas cock. Switch dishwasher power switch “OFF”
and then "ON" again. Burner should start after about
45 secs. It is recommended that the unit be checked with
a standard CO
into exhaust pipe through outside vent terminal. Readings
should be:
- 8% to 8.5% (nat. gas) 9% to 9.8% (LP gas)
CO
2
0
- 7% to 6%
2
or 0 2 tester. Insert tester probe at least 6"
2
6. Check burner input (other equipment off)
a. Measure the time, in seconds, it takes to use one
cubic foot of gas.
b. Divide the number of seconds into 3,600.
c. Multiply the result by the heating value of the gas to
obtain BTU/HR input.
Example: If it takes 36 seconds to use one cubic foot of gas
and the heating value of the gas is 1,000 BTU/CU FT,
(approximate natural gas value).
INPUT = 3,600/36 x 1,000 = 100,000 BTU/HR
Input Ranges
127,400 BTU/HR to 132,600 BTU/HR
Because of the altitude and other minor variations, it is
possible the input will not fall within this range and the gas
orifice must be replaced. See chart in an orifice kit.
LIGHTING AND
SHUTDOWN INSTRUCTIONS
A. LIGHTING
1. Ensure that heater is filled with water, air is bled from
boiler coil and water pressure is at a minimum of 12 psi.
2. Open manual gas valve.
3. Open gas cock on gas valve.
4. Turn “ON” dishwasher power.
5. After 45 seconds, ignition will occur (if there is a call for
heat).
B. SHUTDOWN
1. Turn “OFF” disconnect switch to boiler and dishwasher.
2. Close manual gas valve.
3. Close gas cock on gas valve.
MAINTENANCE
OWNER CARE AND MAINTENANCE
1. Inspect venting system - Annually remove screws on
vent terminal and remove terminal. Inspect interior with
flash light. Reassemble and reseal exhaust vent air
system.
2. General Housekeeping - Keep boiler area clear and free
from combustible materials, gasoline and other flammable
vapors and liquids.
Keep boiler cabinet louvers clear for proper cooling of
internal components.
Do not obstruct boiler room ventilation screens or grills.
SERVICE MAINTENANCE
Cleaning heat exchanger to be done by qualified service
person.
CAUTION: Label all wires prior to disconnection when
servicing controls. Wiring errors can cause improper and
dangerous operation.
Verify proper operation after servicing.
29
Page 36

INITIAL START -UP AND SERVICE
This Page
Intentionally
Left Blank
30
Page 37

INITIAL START -UP AND SERVICE
ADJUSTING BURNER / INPUT
The CSS-130 burner system is a pre-mixed, forced combustion
system. Outside air is drawn through the air orifice (located in
the air induction system) and mixed with the gas drawn in
downstream of the air orifice. The gas is metered through an
orifice located in the gas orifice union. All the air required for
complete combustion comes into the unit in this manner.
Adjusting the input is limited to changing the gas orifice to
achieve the proper input. The air orifice cannot be altered and
the gas valve pressure setting cannot be changed.
Before changing the gas orifice to correct input, service
representatives should make the following checks:
1. The pressure on the inlet side of the gas valve is
between 4" and 14" water column.
2. The pressure on the outlet side (manifold) of the gas
valve and “T” above air orifice is between -0.05"
and -0.35" water column with the unit operating.
To increase the input, install larger diameter gas orifice.
Each size will change the input approximately 5 C. F. H.
Once the correct input has been achieved, the burner should
be checked with an oxygen (0
analyzer.
The unit should be in operation 5 minutes before adjusting
input or taking C0
or 02 readings. This time will allow for
2
preheating of the intake air.
Insert the probe of the 0
through the vent terminal. If C0
readings should be between 8.0 and 8.5 for natural gas and
9.0 and 9.8% for propane. If 02 is being measured, the
readings should be between 7 and 6.
Measuring C0
*
2
When operating on natural gas, readings below 8.0 generally
indicate a lean mixture (not enough gas). Readings above
9.25 generally indicate a rich mixture (too much gas). Inputs
should be increased or decreased to correct lean or rich
mixtures.
NOTE: If the mixture is very rich (not enough air for
complete combustion), it is possible to get low readings on a
C0
analyzer. This situation does not occur often but it can be
2
detected if reading continues to go lower as the input is
increased. If this condition is suspected, a CO test should be
taken at the vent outlet. Inputs must be reduced to correct high
CO reading and to bring C0
*The following numbers apply to natural gas only. The range
of operation for LP is 9.0 to 9.8 % CO2.
Measuring 0
2
Readings above 7% indicate a lean mixture (not enough gas).
Readings below 6% indicate a rich mixture. Input should be
increased or decreased to correct lean or rich mixtures.
) or carbon dioxide (C02) gas
2
or C02 tester at least 6" into the vent
2
is being measured, the
2
readings to proper levels.
2
CLEANING COMBUSTION CHAMBER COIL
1. Turn off electric and gas supplies and remove the jacket
2. Remove the vent assembly and top cover.
3. Remove the top half of the combustion chamber by
removing the 3 screws and nuts that clamp the top half to
the bottom half. Remove the clamp on the air orifice hose
and the two clear plastic lines connected to the “T” on the
air induction elbow.
4. Remove the top insulator cap by spreading the retainer.
5. Remove the igniter.
6. Clean the finned tubing with a wire brush and vacuum all
loose material from the combustion chamber.
7. Replace all parts in the reverse order in which they were
removed.
8. Restart the unit as indicated by the lighting instruction
label.
UNIT PUMP
The unit pump operates whenever there is a call for heat or
hot water.
It is a wetted-rotor type pump and should always be filled with
water when it is operating so that it will cool properly.
If a pump change is required for any reason, close gas valve
and drain water from the unit. Turn off the main disconnect
switch and unplug the pump wires, remove the pump motor.
The pump housing need not be removed. The replacement
pump motor should be installed in the reverse order from
which the old pump motor was removed. After filling the
system be sure to bleed the coil at coil bleed petcock.
NOTE: If the pump motor is not defective the pump cartridge
alone may be changed.
GAS VALVE
The gas valve is a solenoid operated, negative pressure
regulated valve. The outlet pressure is regulated at -0.2”w.c.
It is designed to operate with supply pressures
of 4-14” w.c. Within that range of supply pressures, the
regulated discharge pressure may vary from -0.05” to
-0.35” inches w.c. The regulator is not adjustable and the
effect of this variation in discharge pressure is not significant.
Because of the fixed regulator setting, gas flow must be
adjusted by changing the gas orifice.
To remove the gas valve, shut off 120 volt power and the
master gas cock in gas line, loosen the nut on the gas orifice
union and remove the orifice union plus piping to the gas valve.
Disconnect the wires from the gas valve. The valve may now
be unscrewed from the inlet piping. After the valve has been
removed, replace with a new valve in the reverse order in which
the old valve was removed. Do not over tighten the fittings into
the valve body as this may cause damage to the valve.
NOTE: When fueled by LP gas, the CSS-130 performs best
with 9-10” w.c. supply pressure. If no other appliances are
being supplied by the LP supply set the low pressure regulator
to 9-10” w.c.
31
Page 38

INITIAL START -UP AND SERVICE
SAFETY LIMIT SWITCH
The Safety Limit Switch has a fixed set point at 240°F. It will
reset automatically.
To replace the switch, shut off the 120 volt power and close
gas valve, drain water from the heater and remove the nut
which holds the safety limit bulb in the heater discharge fitting.
Remove the bulb from the fitting and remove the 2 screws which
hold the switch assembly to the electrical control box. Disconnect the 2 wires from the quick connects at switch and remove
the safety limit assembly. To replace, perform the same
operations in reverse. Push the sensing bulb as far into the
fitting as possible before tightening sealing nut. No more than
1/2" of sensing bulb should be visible after installation. Fill the
heater and be sure to bleed the coil at the coil bleed petcock.
Turn on disconnect switch and check heater operation.
OPERATING CONTROL
The Operating Control maintains boiler discharge temperature
between 180-199°F . It has a fixed set point of 210°F at the
output of the burner and a differential of 30°F. If replacement is
necessary, shut off the 120 volt power and disconnect the wires
to the sensor. Valve off and drain water from the unit and
remove sensor. Install new sensor, refill heater and bleed coil at
coil bleed petcock. Check boiler operation after installation of
new Operating Control. Its contacts open at 210°F and they
reclose at 180°F.
IGNITER
The igniter is a “glow bar” type silicon carbide unit. It is
energized whenever there is a call for heat and the red
“IGNITER” light on the heater control is lit. After the igniter is
switched off and the heater continues to run, the igniter
functions as a flame sensor for the heater control.
If the igniter fails and must be replaced, always install a new
igniter gasket with the replacement igniter.
CAUTION: Ignitor gets hot.
BLOWER
The Combustion Air Blower is a high head centrifugal blower.
It is designed to provide about 2" w.c. of suction at 30 CFM.
This performance is necessary to operate the gas valve
reliably, to overcome induction system friction losses and to
eliminate any sensitivity to wind striking the vent terminal. It is
powered by a 120 volt motor which draws about 1.3 amps at
rated load. It is powered by the integrated heater control
whenever there is a call for heat and 30 seconds thereafter. If
a blower change is required, turn off the 120 volt power and
unplug the power wires from the blower motor. Remove the
three nuts from the blower discharge flange and the four nuts
from the blower inlet flange. The blower may now be deflected
enough to permit its removal. Install the new blower using new
gaskets, in the reverse order from which the old blower was
removed. The four inlet flange nuts, however, should only be
finger tight initially and then tighten with a wrench after all
other operations have been completed. The combustion should
be checked for correct air-fuel ratio whenever the blower is
replaced (see Burner Adjustment).
HEATER CONTROL
The Integrated Heater Control Module controls the combustion
process, the gas valve, the igniter, the blower, the unit pump
and the system circulator. It provides blower pre-purge as well
as burner flame sensing. When replacing the heater control
turn off disconnect switch and press in tabs on each end of
plugs to remove from control. All plugs are color coded and it
is not possible to miswire the control.
STACK SWITCH
The Stack Switch is a normally open single pole switch which
is operated by the pressure difference across the air orifice.
It is set to close when a static pressure difference of 1” w.c. is
generated by the combustion air blower. Its function is to prove
airflow and to inhibit burner operation in the event of flue or
chimney stoppage. The switch is wired directly to the heater
control. It is located behind the front panel, and is attached to
the left-hand control cabinet support bracket.
PRESSURE SWITCH
The Differential Pressure Switch is a normally open single pole
switch which is designed to detect pump operation, water flow
and operate as a low water cut off device. To replace, turn off
electrical power & boiler feed water. Valve off and drain water
from the heater, unplug wires from the switch and remove
switch. Install new switch in reverse order. Refill heater and
bleed air from the coil bleed petcock. Turn on electrical power
and recycle system
TRANSFORMER
The control transformer accepts 120 VAC power and provides
40 VA of 24 VAC power for the heater control only.
32
STORAGE TANK
The Storage Tank contains approximately 10 gallons of
heater water. It functions as an energy storage vessel to
reduce heater cycling.
TIME DELAY RELAY (TDR)
The Time Delay Relay controls the unit pump and keeps it
operating for approximately one minute after the blower post
purge stops. Control voltage on the TDR is 24 volts from the
limit circuit. The contacts to supply pump power are 120 VAC.
They delay on open one minute after the 24 volt control voltage
is interrupted. Turn off disconnect switch before changing TDR.
Page 39

INITIAL START -UP AND SERVICE
DELAYED IGNITION
Possible Causes - Time of occurrence
a. High lockups on LP - occurs on start-up.
b. Gas valve regulation problem - occurs on start-up.
c. Defective burner (flameholder) - occurs primarily
on burner shutdown
d. Natural gas orifice in LP unit- occurs on startup
a). High lock up pressures on LP fuel systems are the most
common cause of delayed ignitions on CSS-130 heaters.
The high LP supply pressure results from improper second
stage regulator selection or a faulty regulator.
It can be detected by measuring the gas supply pressure to
the unit at the inlet pressure tap on the gas valve. Use a
water manometer or pressure gauge with a scale reading of
at least 25” w.c. Install the pressure tap in the 1/8” NPTF
plugged port located above the gas inlet port on the gas
valve. The gas supply to the heater must be shut off before
making this connection. The CSS-130 heater is designed to
operate with supply pressures of 4-14” w.c. If supply
pressure exceeds 14” w.c. with the heater not operating it is
likely that this is the cause of the delayed ignition. Lock up
pressures must be measured when the heater is not
operating and preferably immediately after heater shutdown
b). Gas valve regulation problems can also cause delayed
ignitions. To detect gas valve regulation problems it is
necessary to have an inclined manometer or a Magnehelic
pressure gauge. The normal gas valve regulator setting is
-0.2” w.c. It is measured between the 1/8" NPTF plugged
port marked PRESS TAP on the gas valve and the barbed
fitting above the air orifice coupling.
The pressure will be about -2.5” w.c. when the blower
is running (prepurge) before the gas valve opens. When
the gas valve is energized and the solenoid opens the
pressure should rise to - 0.2” w.c. This should happen
smoothly without allowing the pressure to go positive
(above 0” w.c.). If the pressure spikes positive when the
solenoid opens then the gas valve regulator is faulty and
may be the cause of the delayed ignition (assuming inlet
tested OK).
NOISY OPERATION
There are two principal sources of noisy operation:
a. Combustion - high pitched noise - whistle or hoot
b. Boiling (kettling) - lower frequency noise which
varies with temperature - moan.
a). Combustion noise occurs at any boiler discharge
temperature and is heard the loudest at the flue outlet (especially on units with side wall venting). There are two basic
causes for the noise, rich mixture and cross contamination.
To check for a rich mixture, it will be necessary to measure the
percent 0
4-1/2% or CO
10.8% (LP) will often cause combustion noise. To eliminate the
noise it will be necessary to install a smaller gas orifice so that
the 0
(natural) or 10.8% (LP).
Sometimes the readings are influenced by cross contamination
and a check for cross contamination should be done before
changing orifices if it is suspected. A strong smell from the
flue products is generally an indication. Check for cross
contamination using the procedure listed in the index. If
there is no cross contamination, reorificing should be done.
b). Boiling (kettling) may occur at heater discharge
temperatures from 170°F to 210°F. The temperature at which
it starts will vary from one installation to another. The primary
cause of the problem is poor heat transfer on the inside of the
heater coil. This may be caused by scaling from the heater
water if no antifreeze is present.
Many times it is difficult to determine if the noise is combustion
or boiling related. The best clue is when in the cycle the noise
appears and if its frequency changes with heater discharge
temperature. Combustion noises always have the same
frequency, however, their volume may change from the time
that the burner first fires to the time that it shuts off. Boiling
noises have a frequency that varies with boiler discharge
temperature and sometimes they will disappear completely at
higher temperatures just before the heater goes off on limit.
Vibration of the heater pressure gauge needle may also occur
with boiling noises.
or CO2 in the flue products. 02 readings lower than
2
readings higher than 9-1/4% (natural gas) and
2
will rise above 4-1/2% or the CO2 will drop to 9-1/4%
2
c). A defective burner (flameholder) can cause a delayed
ignition however not often. If the gas supply pressure and
the gas valve are functioning properly and the air and gas
orifices are correct the burner should be inspected. To
inspect, remove the blower and the burner will drop out of
the bottom of the chamber. There should be no perforations
other than the punched holes. When replacing the burner the
insulating pad must be on the top of it. If none was on the
burner when it was removed check to see if it fell off during
burner removal and has stayed in the combustion chamber.
Never leave an insulating pad lying in the combustion
chamber as this can cause burner overheating and
perforation.
33
Page 40

INITIAL START -UP AND SERVICE
INSUFFICIENT HOT WATER
Possible Cause:
a. Low limit failure
b. Coil contamination
a). Failure of the low limit to operate within its normal
calibration points will have the same effect as incorrect
system circulator wiring.
b). Coil scaling may occur in some areas of the country
where there are high concentrations of minerals in the
water. These minerals may cause fouling of the domestic
hot water coil over an extended period of time (lime build
up) or they may in rare instances cause a problem in less
than a year of operation. The minerals which react quickly
(mostly magnesium) in well systems cause a slime on the
inside of the coil which prevents adequate heat transfer.
These minerals must be filtered out by a special incoming
water filter or inhibited to protect the coil and also to provide
acceptable water quality. The minerals contained in public
water systems which accumulate in the coil over long
periods of time may be removed when necessary by
flushing the coil with cleaner. These products are also
effective in cleaning a coil that is fouled by magnesium.
Flush entire system thoroughly after demineralizing
process. Failure to do so will result in contaminated
rinse water and severely shorten unit life.
HIGH GAS CONSUMPTION
SEE ALSO CROSS CONTAMINATION
Improper burner operation caused by incorrect air/fuel ratio
(C0
or 02 out of the specified range) will cause high gas
2
consumption. It is most noticeable on LP fired units with low
C02 or high 02, however, units operating on LP or natural gas
with incorrect air/fuel ratios will not provide their best efficiency. If no combustion analyzing equipment (C0
available an indication of the air/fuel ratio can be gotten by
briefly sniffing the flue gases. When running properly the
CSS-130's flue gases should have little smell. If they have a
strong piercing smell the gas orifice is probably too small. Do
not attempt to do reorificing without an 0
or C02 kit.
2
or 02) is
2
SHORT CYCLING
SEE ALSO CROSS CONTAMINATION
The result of low flow is very rapid temperature rise in the
heater. Sometimes the rise is so fast that the operating
control will not operate before the safety limit operates. The
heater will lockout and can only be restarted by resetting the
manual reset button on the safety limit switch. (Where
applicable.) If the on cycles are at least 1-1/2 minutes long
then the short cycling will not be a problem .
CROSS CONTAMINATION AND COMBUSTION
RELATED SHORT CYCLING
UNITS INSTALLED WITH QUICK VENT
Heater short cycling, nuisance lockouts and objectionable
flue gas orders, may be caused by leakage of flue
products into the combustion air stream. This results from
poorly sealed joints in the inner (3") pipe. The symptom
of this problem is continual restarts without a lockout
occurring. The “VALVE/FLAME” light will be on for only a
short time (but more than 6 seconds) before the post
purge starts. This condition is generally seen on new
installations; however, it is possible that a poorly assembled flue pipe could come apart and cause the same
effect. Cross contamination can best be detected with a
C0
analyzer (Bacharach® kit for example). Remove the
2
stack switch tube from the “tee” fitting above the air
orifice and connect the sampling tube of the analyzer to
the "tee”. Run heater and check C0
measurable C02, cross contamination exists somewhere
in the flue system. If the heater will not operate long
enough to get a C0
sample it is possible to check for
2
cross contamination in another way. Loosen the top
clamp on the air duct coupling and remove the gas
balance line from the “tee fitting”. Lift up the air induction
elbow and twist it to the side so that air from the space
around the heater can be drawn into the air duct coupling
(do not disturb the air orifice in the coupling). Cover the
air induction elbow with your hand or plug it with a rag
and restart the heater. If no short cycling occurs there is
a leak in the 3" flue pipe which must be corrected. Do not
leave the heater operating in this manner. Re-assemble
the air duct after removing plug (rag) and connect the
balance line and stack switch tubes. Disassemble flue
and fix leak.
. If there is any
2
34
Page 41

LOCKOUTS
Integrated Heater Control Lockout - Possible Causes
a. Cross Contamination
b. Moisture in Combustion Chamber
c. Gas Valve Malfunction
d. Poor Combustion
e. Boiler Control Malfunction
f. Control Contact Failure
1). Stack Switch
2). Operating Control
g. Failure of Air Source
h. Igniter Failure
a.) If cross contamination is suspected see “Cross
Contamination” and check for it. One percent C0
in the air
2
duct can cause nuisance lockouts.
b.) Moisture in the combustion chamber will also cause lock-
outs by weakening the flame signal to the heater control. It
should be suspected if the heater temperature does not rise
above 160°F during long periods of operation. This condition
can be caused by an improperly wired system circulator. On
sidewall vented units moisture can get into the combustion
chamber from a flue pipe that is pitched incorrectly (back toward
the heater without a condensate trap). Quick Vented systems
should always pitch down from the heater.
c.) A defective gas valve (one that doesn't always open
properly) can cause a nuisance lockout however, occurrences
like this are rare.
d). A more common cause of nuisance lockouts is poor
combustion. If there is an odor in the flue gases, this should
be suspected. Check C0
or 02 to determine if combustion is
2
within limits. Poor combustion causes a weak flame signal to
the burner control and lockouts may result.
e). If combustion is within limits and none of the causes
mentioned above seems to be the cause of the lockout it is
possible that the heater control may be defective.
35
Page 42

SEQUENCE OF OPERATION
On a call for heat from the tank thermostat on the CSS-130, the pump operates and the boiler control is energized through the
operating control, pressure switch and the safety limit. It checks to ensure that the stack switch contacts are open and then energizes
the blower. The blower starts and the air pressure increases until the stack switch contacts close and the red “PURGE” light lights. The
pump and blower continue to run and for 15 seconds the red “PURGE” light stays on. Following that the red “PURGE” light goes out,
the red “igniter” light lights and the igniter heats for 20 seconds. At the end of the 20 seconds the red “VALVE\FLAME” light is lit and
the gas valve is energized. For 2 seconds the valve and igniter are energized and burner will ignite. Following this the igniter is deenergized and the red “IGNITER” light goes out. The pump and blower continue to run and the burner operates under the supervision of
the boiler control. If for any reason the full sequence is completed and the burner doesn't ignite, the sequence will be repeated after a
blower “on” time of 45 seconds (30 seconds post purge and 15 seconds prepurge for the next cycle). During this part of the sequence
the igniter remains on for 30 seconds and the balance of the sequence is unchanged. If no ignition occurs again a third cycle will follow
with the same sequence as the second. After the third “trial for ignition” if the burner does not ignite the system will “lockout” and reset
can only be accomplished by momentarily switching the power off. At the end of a heating cycle after the gas valve is de-energized, the
blower will continue to run for a 30 second post purge. If normal burner operation during a heating cycle is interrupted by any of the limit
controls the unit pump will continue to run and the blower will continue to operate for a 30 second post purge.
TROUBLESHOOTING (DETAILED FLOW CHARTS ON PAGES 20-26).
If the burner “lockout” for any reason the cause of failure will be displayed by the flashing of one of the lights.
CODE
GREEN “POWER” Light flashing - control failure, no light - no power.
RED “PURGE” Light flashing - blower or stack switch failure or possible flue blockage.
RED “VALVE\FLAME” Light flashing - valve, igniter or flame sense failure (combustion related problem).
NOTE: If the stack switch contacts are closed for any reason when the blower isn't operating a sequence will not occur and after 45
seconds the control will lockout and the “PURGE” light will flash. If the stack switch contacts are open and do not close during purge
period, after 5 minutes the control will lockout and the “PURGE” light will flash. If the boiler does not operate, the green “power” light
is on and no indicator lights are flashing, check for an open pressure switch, low limit switch, operating control or safety limit switch on
either series. For additional troubleshooting information refer to the troubleshooting flow charts on the pages that follow.
Power LED
*1
Aquastat/Auxiliary
Limits
Circulator
Air Proving Switch
Combustion
Air Blower
Purge LED
Igniter
Proof of Flame
Igniter LED
Gas Control
Power
On
Thermostat
call for heat
*3
Closed
45
sec
max
Open
8
min.
max.
Closed
Thermostat
call for heat
ends
16
sec
*3
20
sec
2 sec
IAP
8
sec
1 sec
30
sec
One minute
One minute
after burner
after burner
shut down
shut down
on TDR
on TDR
*2
Valve/Flame LED
*1. Power LED blinks once when 24V power is applied and when thermostat calls for heat.
*2. On as long as control is powered and operating properly.
*3. If either switch opens during the run cycle, burner will stop, followed by postpurge. Circulator will
run as long as thermostat is calling for heat. Burner ignition sequence will restart if switch closes.
36
Page 43

GENERAL TROUBLESHOOTING
Reset boiler control by interrupting
power at side of unit for 15 seconds
Green Light Flashes
Yes
Test limit
circuit
Open
OK
Check
stack
switch
Defective
Replace
Replace boiler
control
Yes
*
Green Light Comes On
No
Did boiler run through
a complete cycle as
described in sequence
of events on page__?
Pump operates
(120 V to pump)
OK
Refer to flow
chart for specific
problem
No
No
Check for voltage
(120 VAC) between
black and white
wires at back of “120
VAC” connector control
No
Replace
Yes
Check for voltage (24
VAC) between yellow
wires at back of “VAC
24 x FMR” connector
on boiler control
0 Volts
120
Volts
24 Volts
1. Is service switch on?
2. Is circuit on?
3. Are fuses or circuit
breaker OK?
Yes No
Correct and
recycle boiler
through a few
cycles.
Have qualified
electricain
repair fault in
wiring to the
boiler
Correct
After 5 minutes are any
red lights flashing?
Replace boiler
control
Yes No
Replace transformer
and run boiler
through a few
cycles
Purge Light
Check Valve/Flame
Troubleshooting
1. Limit circuit open
2. No call for heat/
hot water
*Poor switch contact on relays or thermostats can cause a flashing green light.
0 Volts
37
Page 44

TESTING LIMIT CIRCUIT
(Complete General TroubleshootingFirst)
1. Switch boiler on
2. Check for 24V at PIN #6
NOTE: Plug orientation may
differ from diagram
Yes
All limits OK.
Boiler should cycle properly
on a call for heat or hot water
24V Present
Continuity
Violet
1
2
3
Red
4
7
CN6
8
5
6
“Control”
9
Red
No - Unplug CN6 from
boiler control and test
as indicated
Check for continuity across
pressure switch contacts
(boiler pressure above 12 PSI)
No Continuity
Check for continuity across
safety limit contacts
Replace
pressure
switch
Pump operates
No
No Continuity
Continuity
Check pump
Check for continuity across
operating control limits
Replace safety limit
No Continuity
Continuity
Limit circuit appears OK Recycle boiler a few times after
Replace operating
control
plugging in “control” plug
NOTE: After completing limit circuit testing, recycle boiler a few times. If boiler does
not recycle, connect a jumper temporarily between the red wires. If boiler starts, remove
jumper and temporarily jump each safety control until the defective control is located.
NEVER leave a safety control jumped.
38
Page 45

Red Purge Light Flashing
( Complete General Troubleshooting First)
Reset boiler control by
switching power off for
15 seconds and then on again
With a call for heat/hot water
afte rtwo (2) seconds does
green power light come on?
After five (5) minutes red
“Purge” light flashes
Yes
Stack switch contacts not
closing. Check for flue
blockage (snow, leaves etc)
against vent terminal
Blockage
exists
Clear blockage and
recycle boiler
Yes
No
Cycle boiler many
times to try to create
a malfunction
No
Blockage
No
After 45 seconds red
“Purge” light flashes
Shut off power, disconnect
wires to stack switch, turn on
power - after two (2) seconds
blower starts
Yes
Reconnect stack
switch wires.
Check blower
No
Check stack switch
troubleshooting
Check stack switch
troubleshooting
39
Page 46

Checking Blower
(Complete General Troubleshooting First)
Reset boiler control by
switching power off for
15 seconds and then on again
With a call for heat/hot water, after two (2)
seconds does green power light come o
Yes
Blower starts
No
Yes
Connect manometer to “pressure tap”
on gas valve-pressure during blower operation
without gas flow (valve/flame
light not lit) is -2.5 in w.c. Natural or LP Gas
Yes
Blower OK
Check for flue
obstructions
No
No
Refer to general trouble
shooting section
Check for voltage 120 VAC
at blower wire connector
(within 5 minutes after green
light)
0 Volts
Check output
thermostat
120 VAC
Replace blower
Obstruction
Clear/remove
obstruction
40
Clear
Replace blower
OK
Replace boiler
control
Check stack switch
Check limit switch
Page 47

Checking Stack Switch
(Complete General Troubleshooting First)
1. Turn off boiler switch
2. Remove both tubes from
stack switch and disconnect
electrical wires
3. Check for continuity across
switch terminals
Reconnect stack switch
tubes and check for
continuity between
stack switch terminals
with blower operating
Continuity
(0 OHMS)
Stack switch OK
Continuity
(0 OHMS)
Replace stack
switch
Νο continuity
(
OHMS)
∞
Replace stack
switch
Yes
1. Attach tubes disconnected
from stack switch to U-tube
manometer
2. Turn on boiler to operate
blower
3. Manometer indicates 1.5" w.c.
or greater
Check for vent obstructions
Clear
Check blower
No continuity
( OHMS)
∞
No
Clear obstructions &
reconnect tubes &
electrical wires to
stack switch-start
boiler & run thriugh
a few cycles
Obstructed
NOTE: Check tubes on stack switch for proper connections
41
Page 48

“Valve/Flame” Light Flashing
Red
(Complete General Troubleshooting First)
Are gas valves and gas meter turned on?
Is there gas in the LP tank (LP units)?
Yes
Reset boiler by interrupting power for
15 seconds - when “valve/flame” lite
lights is there 24 VAC between orange
and yellow wires on gas valve and/or
does gas valve click?
Yes
Does burner ignite and
appear to run properly?
Yes
Nuisance lockout caused flashing
light - Check combustion
No
No
Check igniter igniter OK?
50 - 200 OHMS,
no cracks
No
Turn on valves, fill LP tank on LP
unit. Reset boiler by switching
power off for 15 seconds. Run
through two to three cycles
Check wires to gas valve
OK
Replace
integrated
boiler control
Faulty
Correct
wiring
Check gas and air orifice
for proper size
Incorrect
Install
correct
orifices
Check for gas flow. Is
meter moving? (Gas
pressure is OK)
Yes
Correct
Boiler cycles through three cycles after
resetting and “valve/flame” lite flashes
Replace integrated boiler control
Yes
No
No
Replace
igniter
Replace gas valve
42
Page 49

Checking Pump
Pump operates?
Yes
After five minutes are any
red lights flashing?
With a call for heat,
by switching off boiler switch for 15 seconds
and then try again.
After two seconds does
green power light come on?
Yes
reset boiler control
No
Refer to general trouble
shooting section
No
120 volts at pump plug?
No
Yes
Purge
Check Valve/Flame
Troubleshooting
No
Limit circuit open
Check Limit Circuit
Troubleshooting
Yes
Replace
pump
cartridge
Yes
120 volts at
pump motor
Check
wires to
pump
No
24 volts at control
(CN6) plug PIN#7
Yes
Replace
boiler
control
No
No call
for heat
43
Page 50

Action for
Diagnosis
1. Read voltage between black &
white wires at back of (120 VAC)
plug
2. Read voltage between yellow
wires at back of (VAC 24XFMR)
plug
3. Replace 59301A
1. Jump control wires, one control
at a time to identify open circuit
control (except stack switch)
2. Check for 120 VAC between
grey and white wires at back of
(Inducer) plug
3. Check for 120 VAC between
brown & white wire at back of
circulator plug or control
Check for 120 VAC between blue
wires at back of (Igniter) plug when
red “Igniter” light is on
Check for 24 VAC between orange
and yellow wires on gas valve when
red “Valve/Flame” light is on
See trouble shooting section under
“cross contamination” & “short
cycling” in service manual
Potential Problem
Comments
1. No 120 VAC supply
Green“Power” light on
S9301A/G856DBG CONTROLS
Quick Reference T rouble Shooter
Verified
Control Function
Integrated boiler control
2. Defective 24 VAC
transformer
(59301A)
3. Defective 59301A
1. Low limit, operating
control, safety limit, system
pressure switch
2. Defective blower
Red “Purge” light on
1. Low limit (HW only)
operating control, safety
limit, system pressure
switch, stack switch
2. Blower
3. Internal pump starts
3. Defective pump
Igniter does not heat up
Red “Igniter” light on
Red “Purge” light off
Blower continues to run
Igniter via S9301A
No gas flow
Red “Valve/Flame” light
on ignition Activation
Igniter boiler control
Unit transfer to postpurge
12-15 secs after red
“valve/ flame” light is on
Period (IAP)
Igniter monitors flame via
flame rectification to
ground
Igniter, air & gas source
and repeats sequence
44
1. Observe the Sequence 2. Failure to Complete Start Cycle
Event
A. Power switch on
B. Pre-purge (if low limit
or Thermostat calling)
(2-17 sec)
C. Igniter heats up and
remains on (17-39 sec)
D. Gas valve energized
(37-39 sec)
E. Igniter off (39 sec)
Gas valve energized
(39-43+ sec)
Page 51

LADDER DIAGRAM
STACK PRESSURE
SWITCH
B15
B12
B4
B4
PUMP
GAS BURNER
POWER LIGHT
BOOSTER CONTROL CABINET
B11
B13
1
3
CONTROL
B2
CIRCULATOR
B5
B2
BLOWER
IGNITOR
B7
B6
B8
B9
B2
XFRM
24V
THERMOSTAT
INDUCER
120 VAC
PRI
TRANSFORMER
B9
SAFETY
LIMIT
B16
CONTROL
MODULE
7
24 VAC
9
GND
B1
IGN
B2
120V
B21
B8
B9
B21 B20 B14
PRESSURE
SWITCH
B3
TIME DELAY RELAY
B3
B3
OPERATING
CONTROL
GND
B2
B12
B12
B4 B4
TANK HEAT
RECIRCULATION PUMP
B2
B10
B1
PUMP
B1
RELAY 1
B19
B16 B12
POWER
CONTACTOR
B1
B2
2
GND
TERMINAL
BLOCK
2
B10
B1
B2
SCHEMATIC
THERMOSTAT
B19
B17
10
32
10
2
32
33
B2
HC1
33
B17
CONTROL CABINET
COOLING FAN
B1
B2
L1
120V INPUT POWER
N
GROUND
TO DISH MACHINE
10
CONTROL CABINET
2
CIRCUIT BREAKER
LOAD SIDE
LOCATED IN
DISHMACHINE
CONTROL CABINET
EXHAUST FAN SIGNAL
TO TURN ON EXHAUST
FAN WHEN BOOSTER IS
VENTED INTO DISHMACHINE VENT HOOD
10
CONNECTION POINT
2
RACK MACHINE
CONTROL CABINET
4
CONNECTION POINT
2
D-H1 DOOR MACHINE
CONTROL CABINET
B12
B12
B15
GAS VALVE
Figure 28
Electrical Diagrams
45
Page 52

This Page
Intentionally
Left Blank
46
Page 53

REPLACEMENT
PARTS
47
Page 54

REPLACEMENT PARTS
1
11
2
3
4
5
Left Side View
6
10
9
8
36
38
7
Rack Conveyor
7
14
12
13
Front View
6
33
16
34
24
17
25
18
35
15
5
32
26
30
19
31
27
28
23
20
29
22
21
38
Door-type
37
Figure 29
Parts Diagram
48
Page 55

REPLACEMENT PARTS
CSS-130 PARTS LIST
(For machines built after 7/7/97)
Fig. 29 Part Part Description Qty.
Item No. No.
1 112197 Boiler assembly (Includes Item #7) .............................................. 1
2 112009 Clamp, hose................................................................................... 2
3 111950 Hose boot, air intake...................................................................... 1
4 111954 Orifice, air ..................................................................................... 1
5 111931 Blower assembly ........................................................................... 1
6 111923 Valve, gas....................................................................................... 1
— 111955 Orifice, natural gas .................................................................... 1
— 111993 Orifice, LP gas........................................................................... 1
7 111919 Ignitor (Includes gasket)................................................................ 1
8 111951 Air bleed-off assembly .................................................................. 1
9 111928 Pressure switch, stack differential ................................................. 1
10 111927 Thermostat, high limit ................................................................... 1
11 112083 Fan, control cabinet cooling .......................................................... 1
12 111930 Gauge, pressure/temperature......................................................... 1
13 111924 Thermostat, operating control ....................................................... 1
14 112064 Valve, manually operated gas ........................................................ 1
15 111853 Pump, circulation (w/differential pressure switch ports) .............. 1
16 111952 Lower inlet elbow assembly.......................................................... 1
17 111929 Pressure switch, circulation pump differential.............................. 1
18 112290 Eliminator, air................................................................................ 1
19 112429 Valve, water pressure reducing...................................................... 1
20 100853 Valve, check .................................................................................. 1
22 104682 Thermometer ................................................................................. 1
21 111746 Back flow preventer ...................................................................... 1
23 111854 Pump, circulation .......................................................................... 1
24 111277 Transformer, 24VAC ..................................................................... 1
25 111925 Relay, time delay ........................................................................... 1
26 100294 Strip, terminal................................................................................ 1
27 107369 Contactor, power ........................................................................... 1
28 109069 Thermostat, control ....................................................................... 1
29 112188 Lamp, power indicator .................................................................. 1
30 111067 Relay, control 24VAC.................................................................... 1
31 111036 Socket, relay .................................................................................. 1
32 111926 Module, (Ignition) boiler control .................................................. 1
33 111852 Vent, high ...................................................................................... 1
34 111745 Tank, expansion ............................................................................. 1
35 111953 Upper inlet elbow assembly .......................................................... 1
36 317943 Coil, heat exchanger (44-66WS rack conveyor) ........................... 1
37 317893 Coil, heat exchager (D-H1 door-type)........................................... 1
38 100123 Gauge, cock................................................................................... 1
— 112043 Valve, pressure relief (3/4", 30 PSI) (Not shown) ......................... 1
— 100135 Gauge, pressure (Not shown) ........................................................ 1
— 103309 Lug, ground (Not shown) .............................................................. 1
— 112228 Valve, angle drain 1/2" .................................................................. 1
49
 Loading...